

Page 1

Thermo shakers and Block thermostats
MKR13-MKR23-MHR13-MHR23-MHL23-TK23-TH21
Read this document before commisioning!
Rev. 4.3 August 2018
From serial number xxxxxxxx-x2 and onwards
User’s guide (Original instructions EN)
Page 2

About Hettich Benelux
Hettich Benelux is a leading manufacturer of laboratory equipment, which is tailored to your specic applications and
requirements. Expect quality, innovation and service from Hettich Benelux in everything we do. Not only is innovation
important, the maintenance of your equipment is also in good hands.
As a manufacturer Hettich Benelux is responsible for the design-to-production process; with full, extensive tests being
conducted on the end product. Our products do not only meat the current requirements, but also anticipate future
demands. We realise that standard solutions are not enough in many cases, which is why Hettich Benelux continues to
develop individual solutions for your specic situation.
Engineerd for you!
Contact
Hettich Benelux B.V.
De Aaldor 9
4191 PC Geldermalsen
The Netherlands
Quality management system
Environmental management system
Medical devices - Quality management system in accordance with
ISO 13485:2016
F-gases, regulation on uorinated
greenhouse gases and repealing
regulation (EC) No 517/2014
Certication for quality, durability
and safety
Hettich Benelux B.V. is a member of Sedex. Sedex provides member companies with a secure online platform for sharing and managing information on for key pillars: Health and Safety, Labour Standards, Business Ethics and the Environment. Being member of Sedex is a sign of the willingness of Hettich Benelux
to share information and to utilise this information to help manage and improve ethical standards within the
supply chain.
Page 3
Page 4

Table of contents
1 Description of the product ���������������������������������������������������������������������������������������������������� 5
1.1 Overview: ................................................................................................................................................................5
1.2 Explanation: ................................................................................................................................................................5
2 Intended use ������������������������������������������������������������������������������������������������������������������������� 6
3 Residual risks ������������������������������������������������������������������������������������������������������������������������� 6
4 Transport and storage �������������������������������������������������������������������������������������������������������������� 6
5 Safety instructions and warnings ����������������������������������������������������������������������������������������� 6
6 Ambient conditions in operation ����������������������������������������������������������������������������������������� 8
7 Explanation of the symbols ���������������������������������������������������������������������������������������������������� 8
7.1 Symbols used in this document: .........................................................................................................................8
7.2 Symbols used on the device: ...................................................................................................................................... 8
8 Identication plate �������������������������������������������������������������������������������������������������������������� 9
9 Installation ����������������������������������������������������������������������������������������������������������������������� 10
9.1 Unpacking ..............................................................................................................................................................10
9.2 Installation ..............................................................................................................................................................10
9.3 Changeable blocks .................................................................................................................................................10
9.4 Connecting the device to the mains .......................................................................................................................10
10 Operation ����������������������������������������������������������������������������������������������������������������������� 11
10.1 Start menu ..............................................................................................................................................................11
10.2 Setup menu .................................................................................................................................................11
10.3 10-point-calibration .................................................................................................................................................12
10.4 Temperature set value .................................................................................................................................... 13
10.5 Mix set value .................................................................................................................................................13
10.6 Duration of the process (time setting) ..........................................................................................................13
10.7 100% Short-Mix (vortexing) ....................................................................................................................................14
10.8 Select program mode ....................................................................................................................................14
10.9 Process without time setting ....................................................................................................................... 14
10.10 Process with time setting ....................................................................................................................................14
10.11 Process end .................................................................................................................................................15
11 Programming function �������������������������������������������������������������������������������������������������� 16
11.1 Program menu .................................................................................................................................................16
11.2 Setting of the individual parameter ....................................................................................................................... 16
11.3 Entry of further program steps ....................................................................................................................... 19
11.4 To change the program data entry .......................................................................................................................19
11.5 Termination of program data entry .......................................................................................................................19
11.6 Starting a program .................................................................................................................................................19
11.7 Changing parameters during the program process ............................................................................................. 19
11.8 Termination/ interuption of the program ..........................................................................................................20
12 Assembly of accessories �������������������������������������������������������������������������������������������������� 20
13 Troubleshooting ������������������������������������������������������������������������������������������������������������ 21
14 Maintenance ����������������������������������������������������������������������������������������������������������������������� 22
14.1 Cleaning .............................................................................................................................................................. 22
14.2 Disinfection .............................................................................................................................................................. 22
15 Service ���������������������������������������������������������������������������������������������������������������������������������� 22
15.1 Decontamination before shipment ....................................................................................................................... 22
16 Recycling ����������������������������������������������������������������������������������������������������������������������� 23
Appendix �������������������������������������������������������������������������������������������������������������������������������������� 24
Technical data ..............................................................................................................................................................24
Article description blocks & accessories ....................................................................................................................... 28
Accessories . ...................................................................................................................................................................28
Read the safety instructions before use!
Page 4
Page 5

1 Description of the product
1�1 Overview:
Exchangeble thermoblocks
Display Control panel
1�2 Explanation:
Control panel:
Program up to 9 complete programs with 30 program steps and temperature curves in total - exactly tailored to your application. The application variety is rounded out by the short mix function e.g. for vortexing as wel as interval shaking. The
direction of rotation is switchable by the software.
Display:
There is a constant overview of your process at any time. With the detailed information on the display
you always have an overview of the following values:
* Actual and set temperature
* Actual and set shaking frequency
* Actual and set time
* Program number, cycle, step
Exchangeble thermoblocks:
There are more than 40 exchangeble blocks. Quick and simple handling: they are simply inserted and xed on top of the
heating and cooling units. The blocks are suitable and exchangeable for all Thermo shakers and Block thermostats. Our
blocks have consistent outside dimensions of 14,5 x 10,2 cm. The usable area here is 12,5 x 8,5 cm. The height varies
with each block.
Read the safety instructions before use!
Page 5
Page 6

Temperature accuracy:
Every Hettich Benelux system is calibrated with a gauged high-precision tem-perature measuring device to temperature
accuracy and reproducibility. This calibration is performed at a room temperature of +20,0°C and with oil as a reference
liquid. Hettich Benelux reaches a very high accuracy by measuring the block temperature directly inside the block. It can,
however, not be avoided that the room temperature affects the sample temperature in case of a large temperature difference between room and block temperature. The anti-condensation plate reduces this effect. We recommend using the
anti-condensate plate BA 24 / BA 96 or the tempering tub BT 01 / BT 02. When setting a process time, please note that
the sample temperature is always reached a little later than the dis-played block temperature.
The TK 23 and the TH 21 are not be able to shake.
Sound level:
The noise that the device makes is caused by the cooling fan. The cooling fan runs faster as the device consumes more
power. If the device warms up or cools down to its set temperature, it will produce more noise than when it reaches the
set temperature.
This is designed to make the device as quiet as possible.
Page 6
Page 7

2 Intended use
The Hettich Benelux Thermo Shakers and Block Thermostats are used for tempering and mixing of solutions in closed
reaction tubes and plates. Please pay attention that the target temperature of the samples should not exceed the boiling
point of the solution, which should be heated. Please consider this when setting the target temperature via the software
of the Thermo Shaker or Block Thermostat. If there are any uncertainties regarding the liquids, which should be heated
or cooled, please contact Hettich Benelux. The Hettich Benelux devices are meant for indoor usage only. Please use only
Hettich Benelux accessories or accessories recommended by Hettich Benelux.
3 Residual risks
The device is built according to the current state of the art and the current rules relating to
safety.When used without sufcient knowledge and without sufcient capacity, risk of injury and dangerous
situations will arise. Both for the user and third parties.
The unit may only be operated as intended and by competent and adequately trained personnel. The device may only be
used in a faultless and a trouble-free condition.
4 Transport and storage
The device during transport and storage is suitable for an ambient temperature of -20 °C to + 60° C and a relative humidity up to 80%. (non-condensing)
The unit should be stored and transported in an upright position. The device should be stored in dry and closed areas.
When moving the device from a colder to a warmer environment, the device must be warmed up at least 3 hours, before
connecting the device to the mains.
5 Safety instructions and warnings
If you discover damage to the device during unpacking, contact the supplier before connecting the device to
the mains.
The device can only be used when it is installed correctly according the instructions in this user’s guide and
according to the local applicable regulations.
Do only connect the system to an earthed mains power socket of 100 – 240V AC / 47 – 63Hz.
Do not place hot blocks on inammable or not heat-resistant surfaces.
Make sure to only use containers in the block which are suitable for the desired temperature range.
If liquid gets into the system, immediately pull out the plug and contact our service department to ensure complete safety.
Do not touch or transport hot systems.
Contact with highly ammable uids must be avoided.
The ventilation of the device must not be blocked. To ensure proper ventilation at all times, take care of a minimum distance of 10 centimetres on each side of the device.
Damaged mains cable should only be replaced with equal ones.
Page 7
Read the safety instructions before use!
Page 8

This device is not intended for use by persons (including children) with reduced physical, sensory or mental
defects or persons who do not have sufcient experience and knowledge, unless they are taught by a person
responsible for their safety in the use of the machine or initially supervised.
To prevent damage by condensation, the device in the transition from a cold to a warm room should be at
least 3 hours in the warm room before the device can be connected to the mains.
The device may not be used in the open air.
The device is not suitable for use in areas where explosive atmospheres may prevail.
The device must not be moved or knocked during the operation.
Only the exchangeble thermoblocks approved or delivered by Hettich Benelux BV may be used on this device.
When a malfunction occurs: Disconnect the device from the mains, remove the plug from the outlet and / or
remove the fuse in the fuseholder. If a plug connection is mounted, unplug the power cord by grasping the
plug and not the powercord.
Repairs and other work on the appliance should only be performed by qualied personnel. You can also rely
on the support of Hettich Benelux BV.
Only original spare parts or authorised spare parts by Hettich Benelux BV may be applied for maintenance
and/or malfunction.
The device during transport and storage is suitable for an ambient temperature of -20°C to +60°C and a relative humidity up to 80%. (non-condensing)
Please note, that by heating your samples dangerous gases may be emitted. In this case, the device must be
used with an extractor hood.
If the Thermo shakers are operated with a high shaking frequency, the vibrations of the system might transmit
to the underground. There is the possibility that the thermo shaker vibrates from and off the table.
Please do consider this when placing the system.
Hot surface temperatures! The device is getting hot on the outside. Before using the device please take care
of the necessary safety-measures so that it is not possible to touch the thermo blocks during the operation.
The device may not be exposed to direct sunlight, large heat-radiating surfaces (e.g. a window) and strong air
streams (e.g. a radiator or air conditioning) at the location required.
Extra information;
Hettich Benelux BV works continuously to develop and improve our equipment� Please understand
that we reserve the right to change the shape, version, and the technology to improve the equipment�
Page 8
Read the safety instructions before use!
Page 9

6 Ambient conditions in operation
The device is designed for indoor opperation, within the ambient temperatures of 5°C up to 40°C, at a maximum relative humidity of 80% (non-condensing).
7 Explanation of the symbols
7�1 Symbols used in this document:
This symbool indicates instructions regarding to safety and pointing out potential hazards.
This symbol indicates hot surfaces danger.
This symbol indicates thas this users guide along with all its safety instructions must be read and understand.
This symbol indicates important and/or convenient and practical tips.
Symbol for the separate collection of electrical and electronic equipment in accordance with the Directive
2002/96/EG
(WEEE, waste of electrical and electronic equipment)
7�2 Symbols used on the device:
This symbol indicates electrical danger.
This symbol indicates hot surfaces danger.
Fuse
Earth conductor
Read the safety instructions before use!
Page 9
Page 10

8 Identication plate
The identication plate is attached above the electrical outlet of the device.
Explanation identication plate:
Model: Type of product
S/N: Unique serial number of the machine
Build: Year of Construction
Weight: Weight of device without blocks
100-240 V AC/ 47-63 Hz/ 380W: Electrical power supply / voltage, frequency, power consumption.
2x 6.3 AT /250 V: Type of glass fuse.
The displayed image is an example. For the correct data, look at the identication plate on the device itself.
Read the safety instructions before use!
Page 10
Page 11

9 Installation
9�1 Unpacking
If you discover damage to the device during unpacking, contact the supplier before connecting the device to
the mains.
Keep packaging materials away from children. Plastic can be a choking hazard to children. Please return the
packaging to an ofcial collection point.
9�2 Installation
The equipment can be used on a at and stable surface. Make sure the suction feet are clean and dust free before placing the device on the desired place. Test if the device is xed on the desired place by pulling it up. A clear “plop” sound
assures you that the surface is not porous.
Be ware that there are many blocks that are suited for the device. Please ensure that you adjust the mixing
speed of the device, to make sure that it remains at its place.
The device still could move because of the shaking motion. Make sure it is impossible for the device to fall
from the table.
Make sure that the ventilation openings of the device are not blocked. To ensure proper ventilation at all times,
a minimum distance of 10 centimetres on each side of the device is required.
9�3 Changeable blocks
At delivery, the changeable blocks are packed separately. Place the blocks on the tempering plates and take care of the
proper alignment of the central threaded bolt and the two small corner bolts ensuring that the block lays accurately on the
tempering plate. Then attach the block with the enclosed socket screw tightly at the bottom of the tempering plate to get
the block xed for shaking and to obtain even better temperature accuracy. Check the tight attachment of the block by
pulling it up
Never start the process without the block being tightly attached. Do always use two blocks for two-block systems, even if
only one of them is used. This ensures safety as well as a smooth shaking operation.
9�4 Connecting the device to the mains
Plug the mains cable in the IEC socket on the back of the system and connect it with the mains power 100 – 240 V AC /
47 – 63 Hz via a Schuko socket. Please make sure that you are using earthed mains power sockets.
Do only connect the system to an earthed mains power socket of 100 – 240V AC / 47 – 63Hz.
Damaged mains cable should only be replaced with equal ones.
Read the safety instructions before use!
Page 11
Page 12

10 Operation
Switch on the system with the mains switch on the back of the system. The start menu will be displayed. The green LED
turns on, on the right sight of the touch panel, as soon as a process is running.
10�1 Start menu
This menu is displayed after the power is switched on, after abortion or after the nor-mal completion of a process.
The last set values are retained even after the switch-off
of the system.
10�2 Setup menu
Select setup menu in the start menu and con-rm with
ok.
With the keys + and –, the input or the values can be
changed. If an input is conrmed with ok, the box will
highlighted ashing again. With conrming the button
Start menu, the start menu is displayed again.
The following values can be adapted:
Page 1:
Language: English, German, French, Spanish
Tempering unit: °C or °F
Block number (10-point calibration)
Conrm end:
Yes: at the process end, a signal is audible until the ok
key is pushed. Until then, the process runs with the previous data.
No: the process ends without conrmation.
Rotation direction: right, left. Not available with TK 23 and
TH 21.
Page 2:
Display colour: Normal - inverse
Read the safety instructions before use!
Page 12
Page 13

10�3 10-point-calibration
By default the standard calibration begins with the block
number “B1”. 10 temperature bases are underlying this
calibration. The calibration is optimized for all HETTICH
BENELUX standard blocks. If you are using customized
blocks you will be able to do individual calibrations in
addition. For the calibration you need a gauged high-precision temperature measuring device.
Select block number in the set up menu and conrm with
ok. Now you will get to the cali-bration menu. You are
now able to calibrate and save different individual calibrations, from standard block B1 up to B4. Therefore please
select B1 to B4. Conrm again with ok. In the rst and
third column you can see the temperature base. In the
second and fourth column you can see the variable set
values.
By pushing the + and – keys the entries and values can
be changed. The selected eld is blinking; by pushing ok
the eld is selected for changing.
Example:
You have adjusted the device for 95,0°C in the start menu
and are measuring only 85,0°C with a calibrated thermometer inside your sample. Now you have to change the
tem-perature set value in column four about 10°C.
By doing so you can calibrate every single base
individually but if there are red numbers, then
the place of the values are not correct.
Read the safety instructions before use!
Page 13
Page 14

10�4 Temperature set value
Navigate with + and – to the temperature input box and
conrm with ok. The individual numbers can be selected
with arrow left and right, their value can be changed
with +
and -. The input is conrmed with ok and the cursor
automatically jumps to the Start but-ton.
A set value change can also be made in the same way
during a running process. After conrming the input with
ok, the new set value is effective immediately. For the
hun-dreds, the following values can be selected:
0 for temperatures up to +99,9°C
1 for temperatures from +100,0°C
- for temperatures below 0,0°C
Important information
For cooling systems, the minimum tempera-ture may not
be smaller than the difference from room temperature
mentioned below.
MKR 13 / TK 23: 16°C below r.t.
MKR 23: 11°C below r.t.
The temperature adjustable range is larger then the temperature working range. For details see the appendix
of this user’s guide.
10�5 Mix set value
Navigate with + and – to the shaking fre-quency input
box and conrm with ok. The individual numbers can be
selected with
arrow left and right, its value can be changed with +
and –.
The input is conrmed with ok and the cursor automati-
cally jumps to the button Start.
The 1. Digit number cannot be selected and changed.
A set value change can also be made in the same way
during a running process. After conrming the input with
ok, the new set value is effective immediately.
The device still could move because of the shaking motion. Make sure it is impossible for the device to fall
from the table.
10�6 Duration of the process (time setting)
Navigate with + and – to the time input box and conrm
with ok. The individual numbers can be selected with
arrow left and right, its value can be changed with +
and –.
The input is conrmed with ok and the cursor automati-
cally jumps to button Start.
For an endless process, select 00:00.
Page 14
Page 15

10�7 100% Short-Mix (vortexing)
Navigate with + and – to the button 100% Short-Mix
and conrm with ok. The system shakes with maximum
mixing speed regardless of a process is started or not.
During the whole shaking process ok must be pushed
continuously.
10�8 Select program mode
Navigate with + and – to the button
Program and conrm with ok. For detailed information
on programming see page 10.
10�9 Process without time setting
Only set a set temperature and a set shaking frequency
but set the time on continuous 00:00. Now, the process
time is displayed continuously. It only starts to run if the
tem-perature set value is reached. A set value change
can also be made as described above during a running
process. Changes are re-tained also after the completion
of the proc-ess and are displayed in the start menu as
current set values. For terminating the proc-ess, push
Stop.
10�10 Process with time setting
If a process time is set, the remaining time is displayed in
the menu. The time only starts to run if the temperature
set value is reached. This does also apply for subsequent
tempera-ture changes. A set value change can also be
made as described above during a running process.
The process ends without a signal or con-tinuous with a
signal until it is terminated
manually. The relevant modus can be set in the setup
menu.
Read the safety instructions before use!
Page 15
Page 16

For changes during the process
If set value changes have been made, you
can select to save these changes and to have
them displayed in the start menu as new set
values.
Stopping the process before the expiration of the time
If the process is stopped or changed before the expiration of the time, you can select
whether the process really should be termi-nated or if it should continue. Depending on the selection, the start menu or the
selection to continue the process from the
stop (time runs from stop) or to make a restart
(time runs from zero) is displayed.
10�11 Process end
Setting in setup:
Conrm end: Yes
If a process time is preset, the expiration of
the time is indicated by a ashing LED and a
signal, the process continues. You can ter-
mi-nate the process with ok.
Conrm end: No
If a process time is preset, only the informa-tion that the process is completed will be
displayed after the expiration of the time. The
device turns off automatically.
Read the safety instructions before use!
Page 16
Page 17

11 Programming function
11�1 Program menu
Navigate with + and – to the button Programs and con-
rm with ok. A total of 30 different program steps can be
preset, distributed on max. 9 different programs.
Conrm the highlighted ashing program number if you
want to change it. Conrm the prog. no. with ok. With +
and – , the program numbers 1-9 can be selected.
If you want to edit the displayed program, select the
different adjustable parameters with + and –. For editing,
conrm with ok and change the value. For nal conrmation conrm with ok again.
11�2 Setting of the individual parameter
By selecting “Programs” in the start menu, you will have a total number of 30
different (recurrent) program steps available. These can be selected in up to 9 dif-ferent programs. You have the choice of
f. ex. either 9 programs with 3 program
runnings each or f. ex. 1 program with 30 program runnings. For normal operation the choice will be somewhere in between.
“prog-no�” is blinking and shows 1 as standard. By pressing ok any program number. between 1 and 9 can be selected
using buttons + and –. Conrm your entry by pressing ok and the next eld “cycles” will be blinking.
Cycles = Number of repetitions of the program, selection 1-9 possible without
having to conrm “Start” again.
If no changes are to be made, select the next eld by using the - (down) button.
By pressing ok you can change the number of cycles from 1 to 9 using the + and – buttons. Conrm your entry by pressing ok and the next eld “step”
will be blinking.
Step = Section within a program. Selection 1-9 possible.
If no changes are to be made, select the next eld by using the – (down) button.
Read the safety instructions before use!
Page 17
Page 18

For changing the program step displayed, press ok. A value between 1 and 30 can be selected using buttons + and –.
Conrm your entry by pressing ok and the next eld “hours” will be blinking. If in the eld “minutes” no entries are to be
made, select the next eld by using the – (down) button.
Hours = Duration of the section in hours.
If no changes at “hours” are to be made, select the next eld by using the – (down) button. For any changes press ok;
the ones column is highlighted and can be changed with buttons + and –. For changing the tens column use button for
marking and + and – for changing. Conrm your entry by pressing ok and the next eld “minutes” will be blinking.
Minutes = Duration of the section in minutes.
For entries press ok; the tens column is highlighted and can be changed by using buttons + and –� For changing the ones
column use button for marking and + and – for changing. Conrm your entry by pressing ok and the next eld “temp °C”
will be blinking.
Time “endless”
If a program step (normally the last one) shall be running without a time setting until the program will be completed manually, i.e. endless, the hours and minutes must be set to 00.
Temperature = Set temperature of the section.
The temperature set value is 37°C as standard. If no changes are to be made, select the next eld by using the – (down)
button. To change this value press ok. Every single digit can be changed. The cursor is placed at the tens column of the
set value.
This value can be changed with buttons + and –. To change another digit in this data eld, it must be marked by buttons
< and >. The highlighted value will be changed with button + or –. After setting the value it must be conrmed with ok; the
eld “rising time” will be blinking.
Rising time = Time setting for tempering the sample to set temperature. This setting is only required if the sample is to
be tempered slower than in presttings of the device. If the sample is to be tempered as fast as possible, set the value to
0.
With “rising time” the heating or cooling speed compared with the normal speed can be reduced. You have the possibility to determine a certain period (= rising time; with a max. of 99 minutes to choose) in which a set temperature shall be
reached in the actual program step, if a slower than normal tempering is desired.
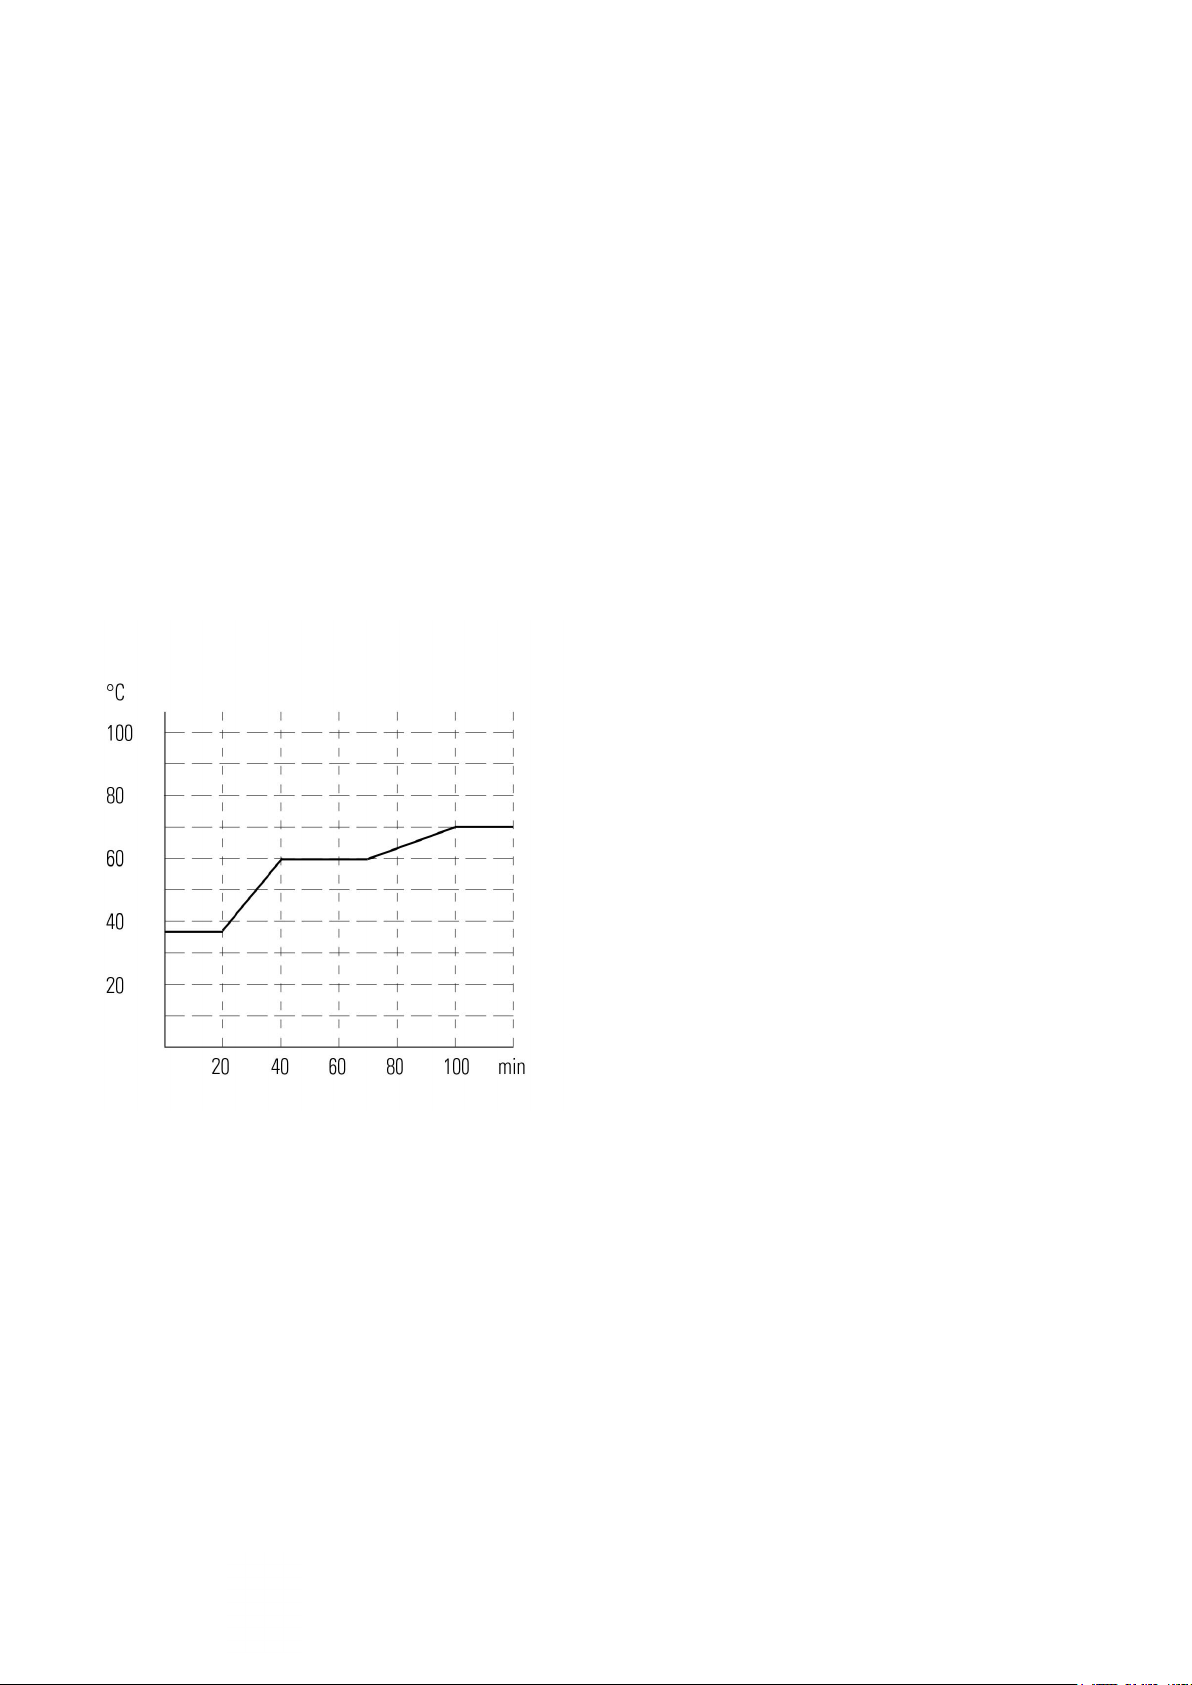
As shown in the illustration beside, a temperature of 60,0°C in step 2 shall be reached within 20 minutes, starting from a
temperature of 37,0°C in step 1. If no changes are to be made in “rising time” (fastest possible heating or cooling time),
select the next eld by using the – (down) button. For changing the standard value 0 press ok; the ones column is high-
lighted and can be changed with buttons
+ and –� For changing the tens comlumn use button for marking and + and – for
changing. Conrm your entry by pressing ok and the next eld “speed” will be blinking.
Rotational speed = Shaking frequency with which the blocks are shaken.
The last number (1. digit) can not be selected and changed.
For “speed” 0 is set as standard. If no changes are to be made (tempering without shaking), select the next eld by
using the – (down) button. To change this value press ok; every single digit can be changed. The cursor is placed at the
hundreds column of the set value. This value can be changed with buttons + and –. To change another digit in this data
eld, it must be marked by buttons < and >. The highlighted value will be changed with button + or –. The last digit (ones
column) cannot be chosen and changed. After setting the value it must be conrmed with ok; the eld “pause” is blinking.
Read the safety instructions before use!
Page 18
Page 19
Interval shaking = Interval shaking is an alternative when the probe shall not
be subject to permanent shaking. A resting time of up to 9.9 minutes can be set in “pause”. The following short shaking
time of up to 9 seconds is set in “mix sec”.
This is a reasonable choice for the last program running of a complete program with time setting “” during off working
hours.
Pause [min] = Resting time of up to 9.9 minutes. If no intervals are to be set, enter the value 0.0 here.
Duration of pause is 0.0 as standard. If no changes are to be made, select the next eld “step” by using the – (down)
button. To change this value press ok; the ones column is highlighted and can be changed by using buttons + and –. For
changing the 1/10 digit press button >; the digit is highlighted and can be changed with but-tons + and –. Conrm your
entry by pressing ok and the next eld “mix sec” will be blinking.
Mix [s] = Short shaking time up to 9 seconds after resting time.
For “mix sec” 1 is set as standard. If no changes are to be made, select the next eld “step” by using the – (down) button.
For changing the shaking time press ok and change time by using buttons + and –. Conrm your entry by pressing ok
and the next eld “step” will be blinking.
Example of a temperature program:
Step: 1
Minutes: 20
Temp. °C: 37,0
Rising time: 00
Step: 2
Minutes: 50
Temp. °C: 60,0
Rising time: 20
Step: 3
Minutes: endless
Temp. °C: 70,0
Rising time: 30
Read the safety instructions before use!
Page 19
Page 20
11�3 Entry of further program steps
If another program step shall be added to a chosen program, press ok at the blinking eld “step” and increase
the number of the last program step by 1. Further entries
as already described.
11�4 To change the program data entry
To change the chosen program, enter the program step
number to be changed.
Select the eld to be changed by using buttons + and – .
Press ok for changing. Changes are made as already
described and must be conrmed with ok. Select a cor-
responding eld by using buttons + and – or < / >.
11�5 Termination of program data entry
To complete a chosen program, mark either “Start” (to
start the program immediately) - screen 6 will appear, or
“Startmenu” (to save the program only) - screen 1 will
appear. You can also select “prog-no.” (for entry of another program). When “Delete” is selected, the complete
program with all program steps as displayed is deleted.
11�6 Starting a program
Select the relevant prog. no. and conrm the Start but-
ton in the program menu.
11�7 Changing parameters during the program
process
Change of temperature and rotational speed as well as
performing a Short-Mix are possible during a running
program.
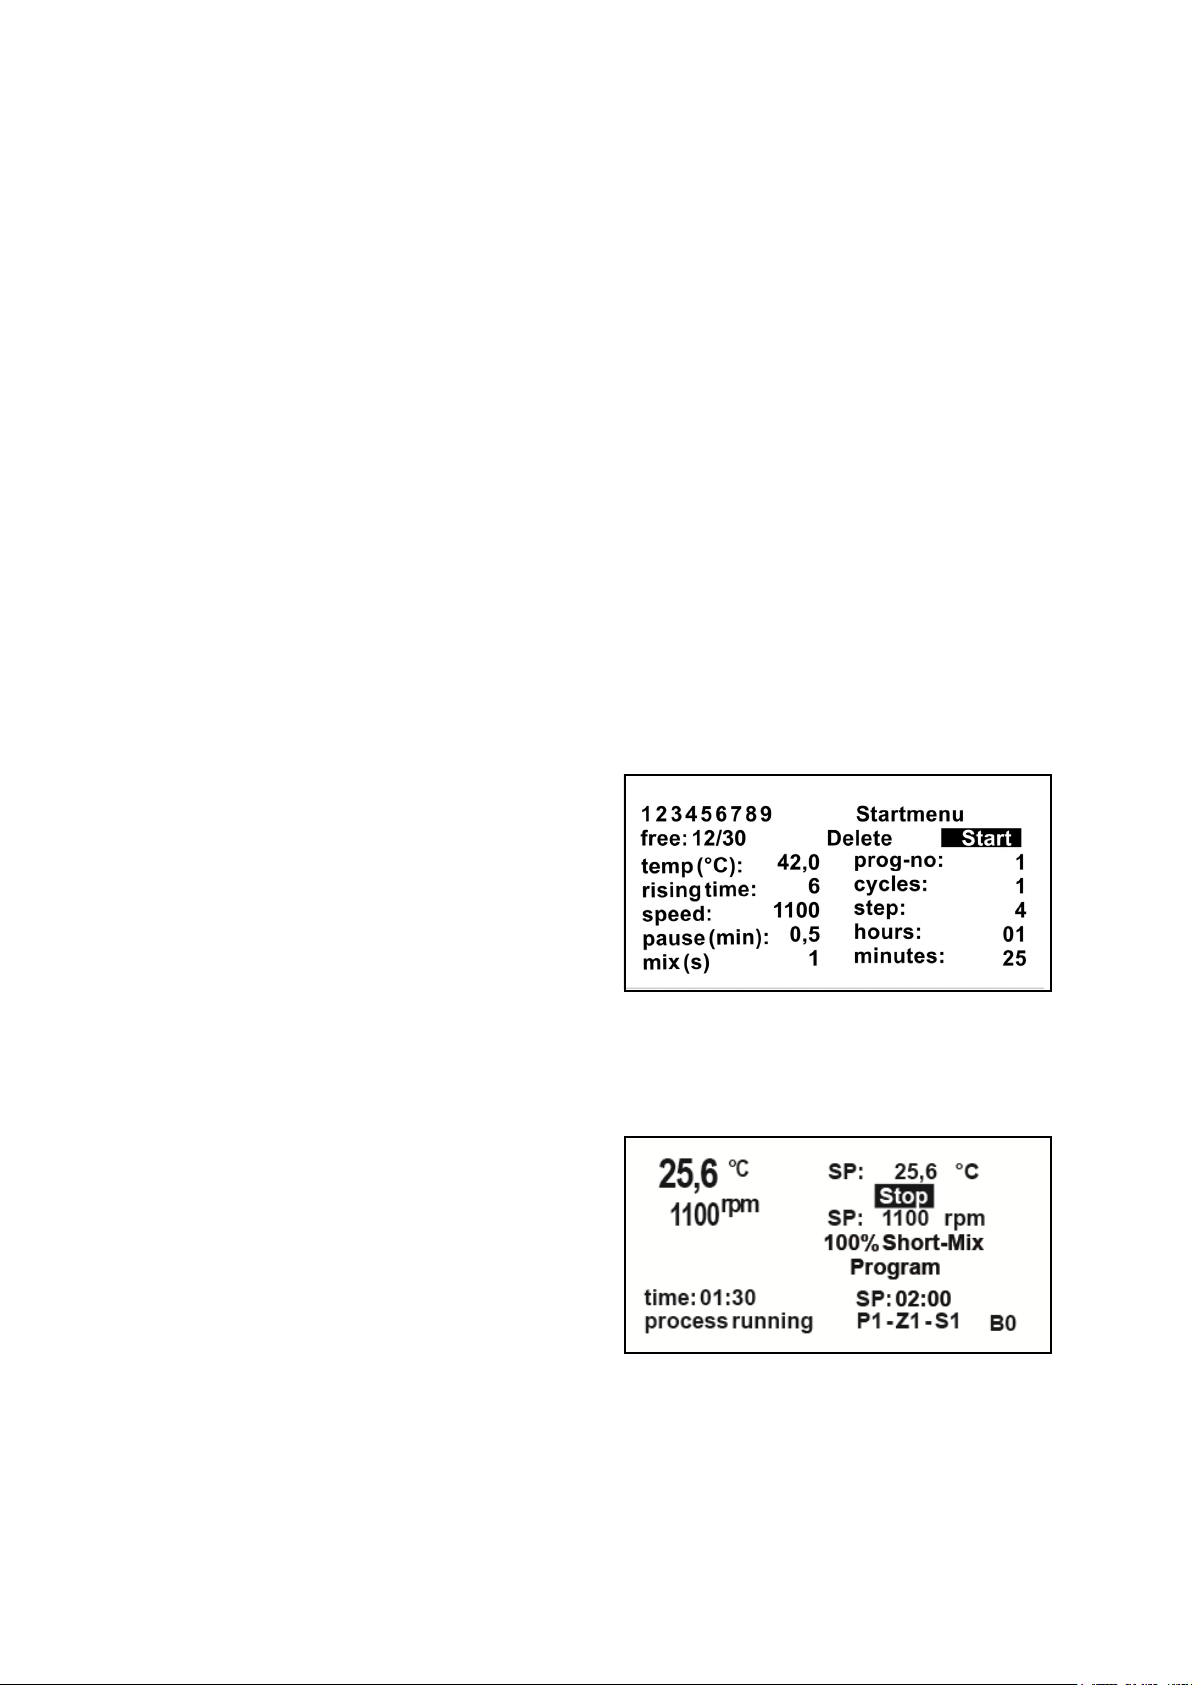
The set time is the time of the running step, the remaining
time is the time of the complete process. In the lower
right part of the display, program no., cycle and step are
indicated.
Read the safety instructions before use!
Page 20
Page 21

11�8 Termination/ interuption of the program
If you push Stop, the options stop process and continue process are displayed.
If you select stop process, the Start menu or Save
changes is displayed if parameters have been changed
during the process.
If you select Continue with process the selection Con-
tinue from stop or
Process Restart is displayed.
(program starts from cycle 1, step 1).
12 Assembly of accessories
Anti-Condensation Plate BA 24 / 96
The anti-condensation plate BA 96 (800013000) is placed on the attached block, no assembly steps are required. For
using the anti-condensation plate BA 24 (800012900), remove the socket screw in the block with the enclosed screwdriver. Screw the enclosed threaded pin with isolation knob into the anti-condensation plate. Place the anti-condensation
plate on the block and screw the threaded pin in deeper so that it takes hold of the bolt of the system and with that tightly
attaches block and anti-condensation to the system.
Read the safety instructions before use!
Page 21
Page 22

13 Troubleshooting
The display remains blank
Please check if the mains switch on the back side is switched on.
If it is switched on and voltage is present at the socket, check the micro-fuse and replace if required. (IEC 127-2/III, 250 V,
6.3 A time-lag).
This fuse and a spare fuse are located in the IEC-bushing (in which the connection cable is plugged). The fuse box can be
pulled out with a screwdriver.
The system does not cool, heat or shake as set
Check whether the display indicates the correct system type name at power-on. If not, please contact your local dealer or
the Hettich Benelux service de-partment.
There are excessive temperature uctuations
Check the seat of the changeable block by pulling it up. If it is too loose or if the block exhibits roughness, e.g. contamination, the heat / coolness is not transferred correctly.
Information on the capacitive touch display
The touch display reacts on nger pressure, even when wearing thin latex gloves, but not on stylos.
Due to its glass surface, the front panel is insensitive to dirt, chemicals and mechanical damage. Please avoid scratches in
the coating since they can cause malfunctions. Please take note of the following cleaning instructions.
Read the safety instructions before use!
Page 22
Page 23

14 Maintenance
Regularly clean the housing and the changeable blocks of the Thermo Shakers and BlockThermostates.
With long-term use at high speed or with a high weight of the interchangeable blocks there is a chance that
the parts of the thermomixer vibrate apart. Therefore, regularly check all fastening parts and tighten them
where necessary.
Precautions for avoiding electric shocks
Electronic devices can cause electric shocks in case of an operating error. Never try to repair electric parts. Never open
the housing.
Switch off the system and disconnect it from the power supply before starting with cleaning or disinfection
works.
Never let get liquids inside the housing (ventilations slit).
Do not perform spray disinfection.
Do only connect the system with the power supply if it is completely dry.
The repair may only be performed by staff authorized personnel which are trained by the manufacturer of the device. A
modication of the system is not permitted.
14�1 Cleaning
1. Please disconnect the system from the power supply before you start cleaning.
2. Please clean all outer parts of the system with a mild detergent and a lint-free cloth.
3. Please wipe off the detergent with Aqua dest..
4. Please dry all cleaned parts.
Caution when handling aggressive chemicals
Do not use aggressive chemicals like e.g. strong and weak bases, strong acids, formaldehyde, acetone, halogenated
hydrocarbons or phenol for cleaning the system and its accessories.
In case of contamination with aggressive chemicals, clean the system with a neutral detergent immediately.
Use neither corrosive detergents nor aggressive solvents or abrasive polishing agents.
The thermoblocks are not suitable for cleaning in a dishwasher.
14�2 Disinfection
1. Please disconnect the system from the power supply before you start disinfecting.
2. Let the system cool down.
3. Please clean the system as described above.
4. Please select a disinfection method compliant to the applicable local legal regulations and
directives.
5. Please wipe off all outer parts of the system with the disinfectant and a lint-free cloth.
Read the safety instructions before use!
Page 23
Page 24

15 Service
If a technical problem arises, please contact your local dealer or the Hettich Benelux service department. The Hettich
Benelux contact information can be found at www.hettichbenelux.com. If required, the system will be returned for repair.
Please take note of our service guidelines, which can be found at www.hettichbenelux.com as well.
15�1 Decontamination before shipment
If you send the system to the authorised technical service for repair or to your distributor for disposal, decontaminate
all parts you want to send. Document the decontamination in a Decontamination certicate (incl. serial number) and
include it with the shipment.
16 Recycling
Devices at the end of their life, must be discarded in a professional and appropriate manner, in accordance with local
regulations and laws.
Contact your local recycling organization and trade according to local law.
Hettich Benelux BV is a member of the Foundation for Technical Waste Recycling (RTA)
For disposal and recycling please use the return system via www.stichtingrta.nl
(Only valid in the Netherlands)
Packing material
The packaging is made of;
- Polyethylene stretch lm.
- The clip box is made of premium waterproof plywood.
- The clip box is mounted with stainless steel brackets.
Keep the packaging away from children, polyethylene stretch lm can cause suffocation.
Please return the packaging to an ofcial collection point.
Discarded appliances should be disabled: Remove the plug and cut the power cord through.
Ensure that the cooling circuit is not damaged when the device is removed.
Information about the refrigerant can be found on the nameplate.
Page 24
Page 25
Appendix
Technical data
Technical data MKR 13
Temperature-working range Amb. -16°C to +100°C
Temperature-adjustable range -10°C to +105°C
Accuracy / resolution +/- 0.1°C /0.1°C
Max. heating time 11.3°C / min.
Max. cooling time -12.0°C / min
Shaking frequency 200 - 1.500 rpm
Orbit 3mm round
Dimensions (without block) W x D x H 220x330x144mm
Block - capacity 1 changeable block
Weight (without block) 10kg
Power input 220W
Electr. supply 100 - 240V AC 47 - 63Hz
Fuse 6,3AT
Protection class IP21
Environmental conditions
Ambient air temperature
in service (non-condensing)
Relative humidity Max. 80%
5 - 40°C
Technical data MKR 23
Temperature-working range Amb. -11°C to +100°C
Temperature-adjustable range -10°C to +105°C
Accuracy / resolution +/- 0.1°C /0.1°C
Max. heating time 11.7°C / min.
Max. cooling time -9.6°C / min.
Shaking frequency 200 - 1.200 rpm
Orbit 3mm round
Dimensions (without block) W x D x H 220x330x144mm
Block - capacity 2 changeable blocks
Weight (without block) 9.5kg
Power input 400W
Electr. supply 100 - 240V AC 47 - 63Hz
Fuse 6,3AT
Protection class IP21
Environmental conditions
Ambient air temperature
in service (non-condensing)
Relative humidity Max. 80%
5 - 40°C
Read the safety instructions before use!
Page 25
Page 26
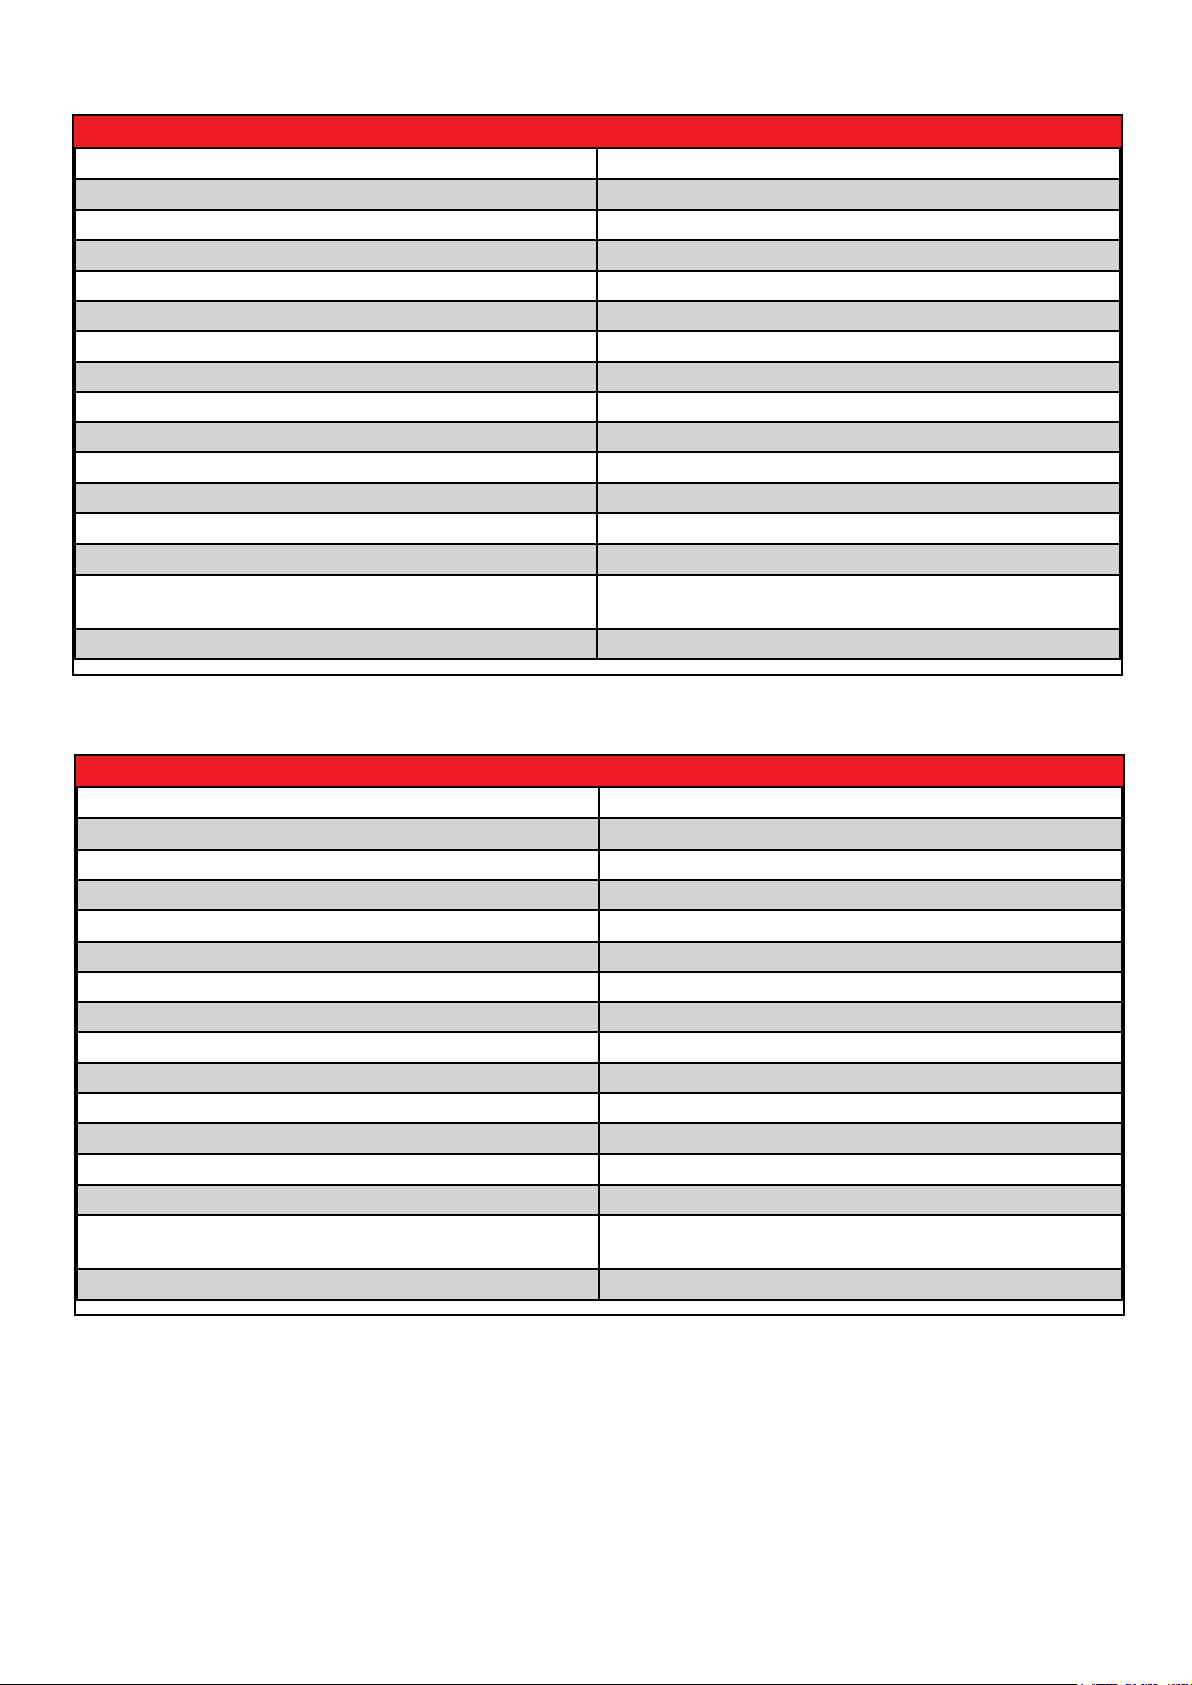
Technical data MHR 13
Temperature-working range Amb. +3°C to +130°C
Temperature-adjustable range 0°C to +137°C
Accuracy / resolution +/- 0.1°C /0.1°C
Max. heating time 11.3°C / min.
Shaking frequency 200 - 1.500 rpm
Orbit 3mm round
Dimensions (without block) W x D x H 220x330x109mm
Block - capacity 1 changeable block
Weight (without block) 8.8kg
Power input 230W
Electr. supply 100 - 240V AC 47 - 63Hz
Fuse 6,3AT
Protection class IP21
Environmental conditions
Ambient air temperature
in service (non-condensing)
Relative humidity Max. 80%
5 - 40°C
Technical data MHR 23
Temperature-working range Amb. +3°C to +130°C
Temperature-adjustable range 0°C to +137°C
Accuracy / resolution +/- 0.1°C /0.1°C
Max. heating time 8.9°C / min.
Shaking frequency 200 - 1.500 rpm
Orbit 3mm round
Dimensions (without block) W x D x H 220x330x109mm
Block - capacity 2 changeable blocks
Weight (without block) 9.2kg
Power input 380W
Electr. supply 100 - 240V AC 47 - 63Hz
Fuse 6,3AT
Protection class IP21
Environmental conditions
Ambient air temperature
in service (non-condensing)
Relative humidity Max. 80%
5 - 40°C
Read the safety instructions before use!
Page 26
Page 27
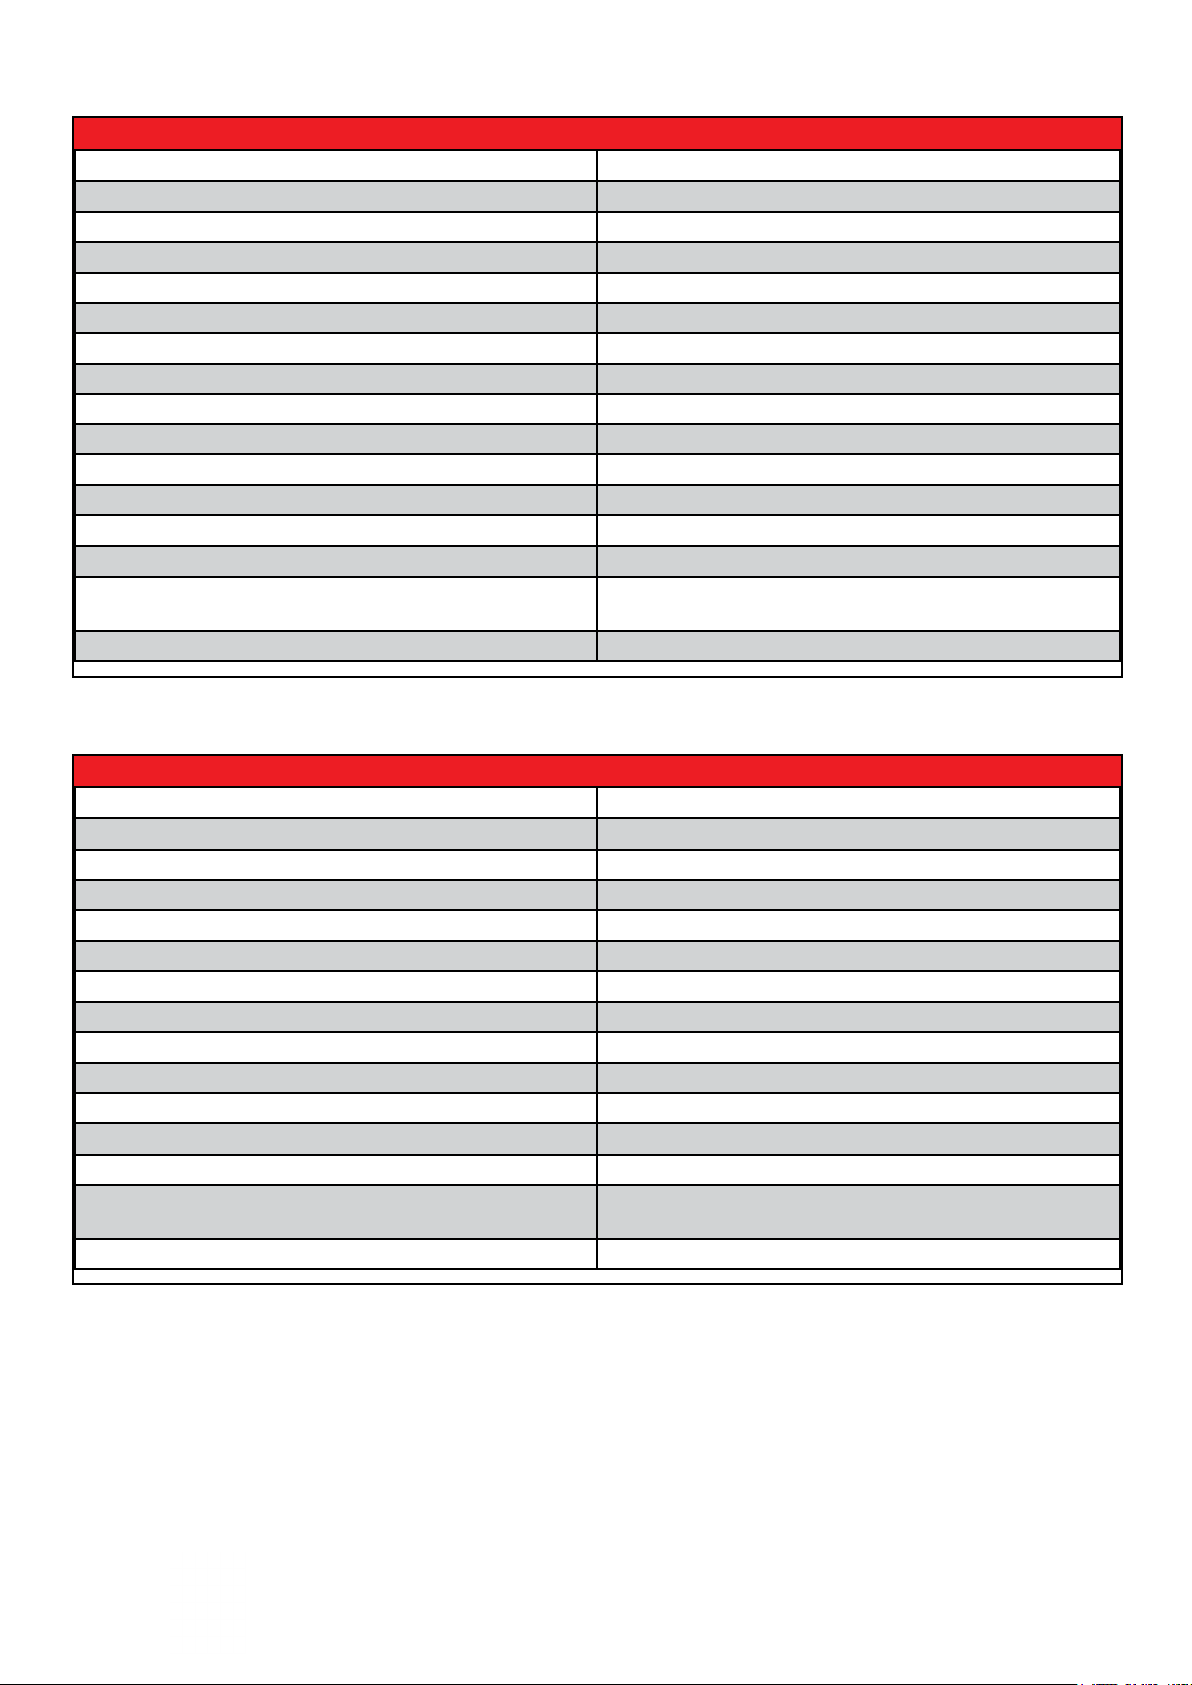
Technical data MHL 23
Temperature-working range Amb. +3°C to +130°C
Temperature-adjustable range 0°C to +137°C
Accuracy / resolution +/- 0.1°C /0.1°C
Max. heating time 8.9°C / min.
Shaking frequency 200 - 1.300 rpm
Orbit 3mm linear
Dimensions (without block) W x D x H 220x330x109mm
Block - capacity 2 changeable blocks
Weight (without block) 9.2kg
Power input 380W
Electr. supply 100 - 240V AC 47 - 63Hz
Fuse 6,3AT
Protection class IP21
Environmental conditions
Ambient air temperature
in service (non-condensing)
Relative humidity Max. 80%
5 - 40°C
Technical data TK 23
Temperature-working range Amb. -16°C to +100°C
Temperature-adjustable range -10°C to +105°C
Accuracy / resolution +/- 0.1°C /0.1°C
Max. heating time 11.7°C / min.
Max. cooling time -11.5°C / min
Dimensions (without block) W x D x H 220x330x144mm
Block - capacity 2 changeable blocks
Weight (without block) 6.2kg
Power input 360W
Electr. supply 100 - 240V AC 47 - 63Hz
Fuse 6,3AT
Protection class IP21
Environmental conditions
Ambient air temperature
in service (non-condensing)
Relative humidity Max. 80%
5 - 40°C
Read the safety instructions before use!
Page 27
Page 28
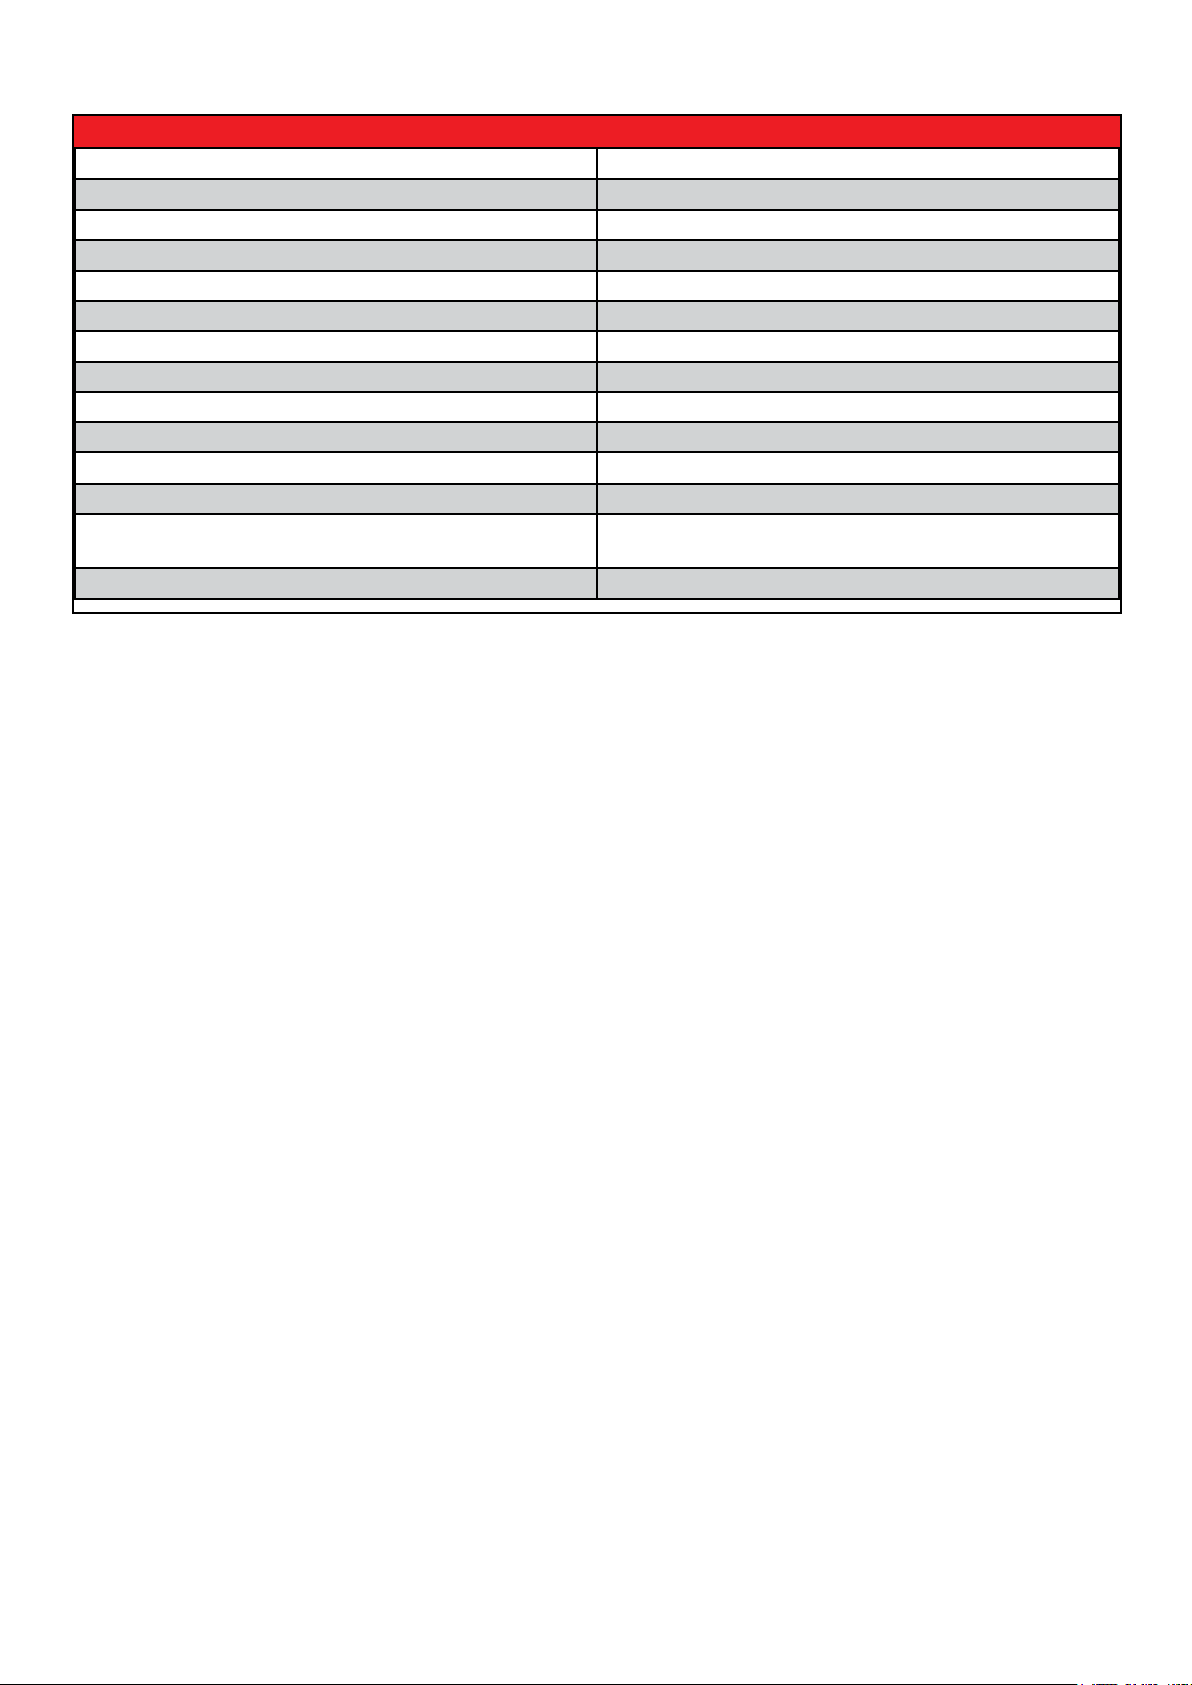
Technical data TH 21
Temperature-working range Amb. +3°C to +130°C
Temperature-adjustable range 0°C to +137°C
Accuracy / resolution +/- 0.1°C /0.1°C
Max. heating time 10.6°C / min.
Dimensions (without block) W x D x H 220x330x109mm
Block - capacity 2 changeable blocks
Weight (without block) 3.9kg
Power input 370W
Electr. supply 100 - 240V AC 47 - 63Hz
Fuse 6,3AT
Protection class IP21
Environmental conditions
Ambient air temperature
in service (non-condensing)
Relative humidity Max. 80%
5 - 40°C
Page 28
Page 29
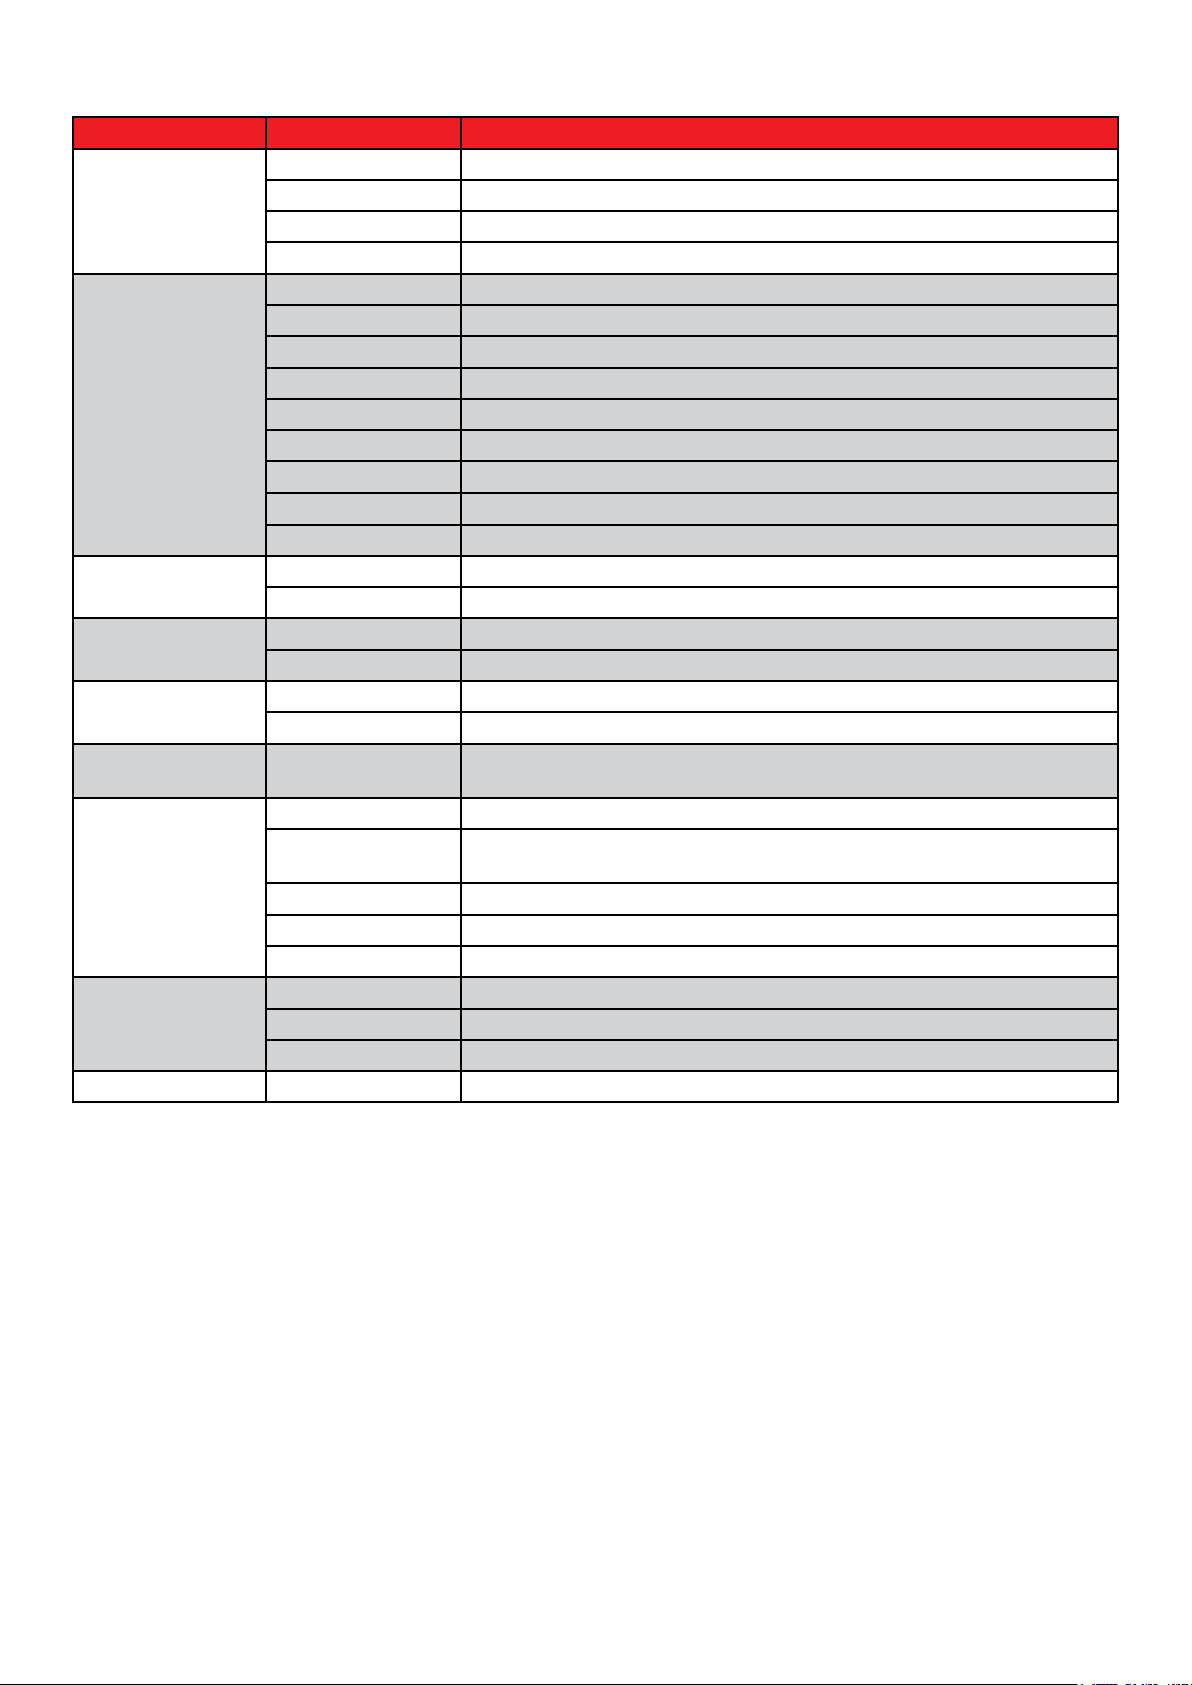
Article description blocks & accessories
Blocks Art� No� Dimensions of the containers
For micro test tubes 800010800 BM 02 for 96 x 0.2 ml conical & 8-container stripes
800010900 BM 05 for 38 x 0.5 ml conical
800011000 BM 15 for 24 x 1.5 ml conical
800011100 BM 20 for 24 x 2.0 ml cylindrical
For sample
tubes
For centrifuge tubes 800012200 BZ 15 “Falcon” tubes 14 x 15 ml, with isolation lid
For PCR
plates
For micro
plates
For deep- well
plates
For other
applications
For customized
containers
For Slides 800012400 BY 12 for 12 slides for hybridisation
800011500 BP 10 for 24 x D=10.3 mm, 46 mm deep, round bottom, lid
800011600 BP 12 for 24 x D=12 mm, 20 mm deep, at bottom
800011700 BP 15 for 24 x D=15 mm, 30 mm deep, at bottom
800011800 BP 16 for 24 x D=16.5 mm, 46 mm deep, round bottom, lid
800014200 BP 17.0 for 24 x D=17 mm, 30 mm deep, at bottom
800016100 BP 19.2 for 24 x D=18.7 mm, 25 mm deep, at bottom
800015200 BP 23.0 for 12 x D=22.5 mm, 56 mm deep, at bottom
800016000 BP 25.5 for 12 x D=23.0 mm, 56 mm deep, at bottom
800011900 BP 28 for 8 x D=28 mm, 40 mm deep, at bottom
800012300 BZ 50 for “Falcon” tubes 6 x 50 ml, with isolation lid
800010401 BC 96 for 96-well “V”-bottom
800010301 BC 84 for 384-well
800012000 BV 96 for 96 x round or “V”-bottom
800010600 BF 96 for at bottom
800010500 BD 96 for 96-deep-well-plates
800011200 BN 10 for 36 rectangular cuvettes, outer diameter 12.5 mm
800012100 BW 01 as tub for deep-well, stacked microtiter plates and other contai-
ners, incl. isolation lid and unloading device
800014100 SO 10.4 for 24 x D=10,4 mm, 180 mm deep
800012600 SO 12.0 for 24 x 12ml test tubes
800012700 SO 20.5 for 12 x 20ml test tubes
800010700 BM 00 without drilling, height 25 mm
800011300 BO 37 without drillings, height 37 mm
800011400 BO 50 without drillings, height 50 mm
Read the safety instructions before use!
Page 29
Page 30
Article description blocks & accessories
800017101 BD 96 Exchangeable thermoblock for 4titute Deep-Well plates round
800016602 BD 96-BR Exchang. thermoblock for Eppendorf Deep-Well-plates, round
800016900 BM 05/15 Block for 24x1,5+0,5 Micro tubes, conical
800016400 BM 13 exchangeable thermoblock for cryo tubes 1,5-2,0ml d=12,5
800017400 BP 13 Exchangeable thermoblock for cryo tubes 24xØ=12,5mm 40mm
800018600 BZ 15 Exchangeable block + lid for Falcontubes 14x15ml 93mm deep
800019001 BV 96 Exchangeable block for 96 well microtiter plates, round bottom
800019301 BF96 Exchangeable thermoblock for Microtiterplates, Flat bottom
800018500 BP 47 Exchangeable block Scott Draun asks 50ml 2x47mm drill. 60mm
800018900 BP71.5 Exchang. thermoblock Schott Draun asks 250ml 2x71,5mm dril.
800018701 BZ 50 exchangeable thermoblock for Falcon tubes, 95mm deep drillings
bottom
bottom
deep, round
deep
74 deep
Accessories
Art� No� Description
800012800 BI 01 Isolation lid
800013800 BT 01 Tempering tub for 1 block, transparent
800013900 BT 02 Tempering tub for 2 blocks, transparent
800012900 BA 24 Anti-condensation plate for 1 block (micro test tubes)
800013000 BA 96 Anti-condensation-plate for 1 block (PCR / test plates)
800013100 BR 05 Rack with holder f. tubes 0.5 ml
800014300 BR 15 Rack with holder f. tubes 1.5 / 2,0ml
800012501 Heating top 48V
Page 30
 Loading...