

hestan KEC, KEC 30 Use & Care Manual
INDOOR COOKING
Radiant Cooktop
KEC
Use & Care Manual
THIS INDICATES THAT DEATH OR SERIOUS INJURY MAY
OCCUR AS A RESULT OF NOT OBSERVING THIS WARNING
THIS INDICATES THAT MINOR OR MODERATE INJURY MAY
OCCUR AS A RESULT OF NOT OBSERVING THIS WARNING.
THIS INDICATES THAT DAMAGE TO THE APPLIANCE OR
PROPERTY MAY OCCUR AS A RESULT OF NOT OBSERVING
THIS WARNING.
CAUTION
NOTICE
READ THESE INSTRUCTIONS CAREFULLY AND COMPLETELY
BEFORE INSTALLING OR USING YOUR APPLIANCE TO REDUCE
THE RISK OF FIRE, BURN HAZARD, OR OTHER INJURY. KEEP
THIS MANUAL FOR FUTURE REFERENCE.
Do not store or use gasoline or other flammable vapors and liquids in the vicinity of
this or any other appliance.
Installation and service must be performed by a qualified installer or service agency.
DO NOT REPAIR, REPLACE OR REMOVE ANY PART OF THE APPLIANCE UNLESS
SPECIFICALLY RECOMMENDED IN THE MANUAL. IMPROPER INSTALLATION,
SERVICE OR MAINTENANCE CAN CAUSE INJURY OR PROPERTY DAMAGE. REFER
TO THIS MANUAL FOR GUIDANCE. ALL OTHER SERVICING SHOULD BE DONE BY A
QUALIFIED TECHNICIAN.
INSTALLER: LEAVE THIS MANUAL WITH THE OWNER OF THE APPLIANCE.
HOMEOWNER: RETAIN THIS MANUAL FOR FUTURE REFERENCE.
IF THE INFORMATION IN THIS MANUAL IS NOT FOLLOWED
EXACTLY, A FIRE OR EXPLOSION MAY RESULT CAUSING
PROPERTY DAMAGE, PERSONAL INJURY, OR DEATH.

Message from Hestan:
Hestan’s award-winning culinary innovations and purpose-built features
reinvented the restaurant kitchen and redefined culinary experience in
some of America’s most acclaimed restaurants. Hestan now takes this
performance from the back of the house and puts it front and center in
yours. Thoughtfully designed and meticulously built, Hestan will serve you
beautifully for years to come.
Hestan is the only residential brand born from the dreams and demands of
professional chefs. From ranges to refrigeration, every detail is designed
to deliver the performance and reliability expected in a restaurant – now
available for you.
We appreciate you choosing Hestan, and we promise to deliver the very best
to you.
Welcome to Hestan
©2018 Hestan Commercial Corporation
1
EN

©2018 Hestan Commercial Corporation
3
EN
When properly cared for, your Hestan appliance will provide safe, reliable service for many
years. When using this appliance, basic safety practices must be followed as outlined below.
IMPORTANT: Save these instructions for the local Utility Inspector’s use.
INSTALLER: Please leave these Installation Instructions with the owner.
OWNER: Please retain these Installation Instructions for future reference.
This appliance is NOT designed for installation in manufactured (mobile) homes or
recreational park trailers. Do NOT install this appliance outdoors.
SAFETY PRECAUTIONS - BEFORE YOU BEGIN
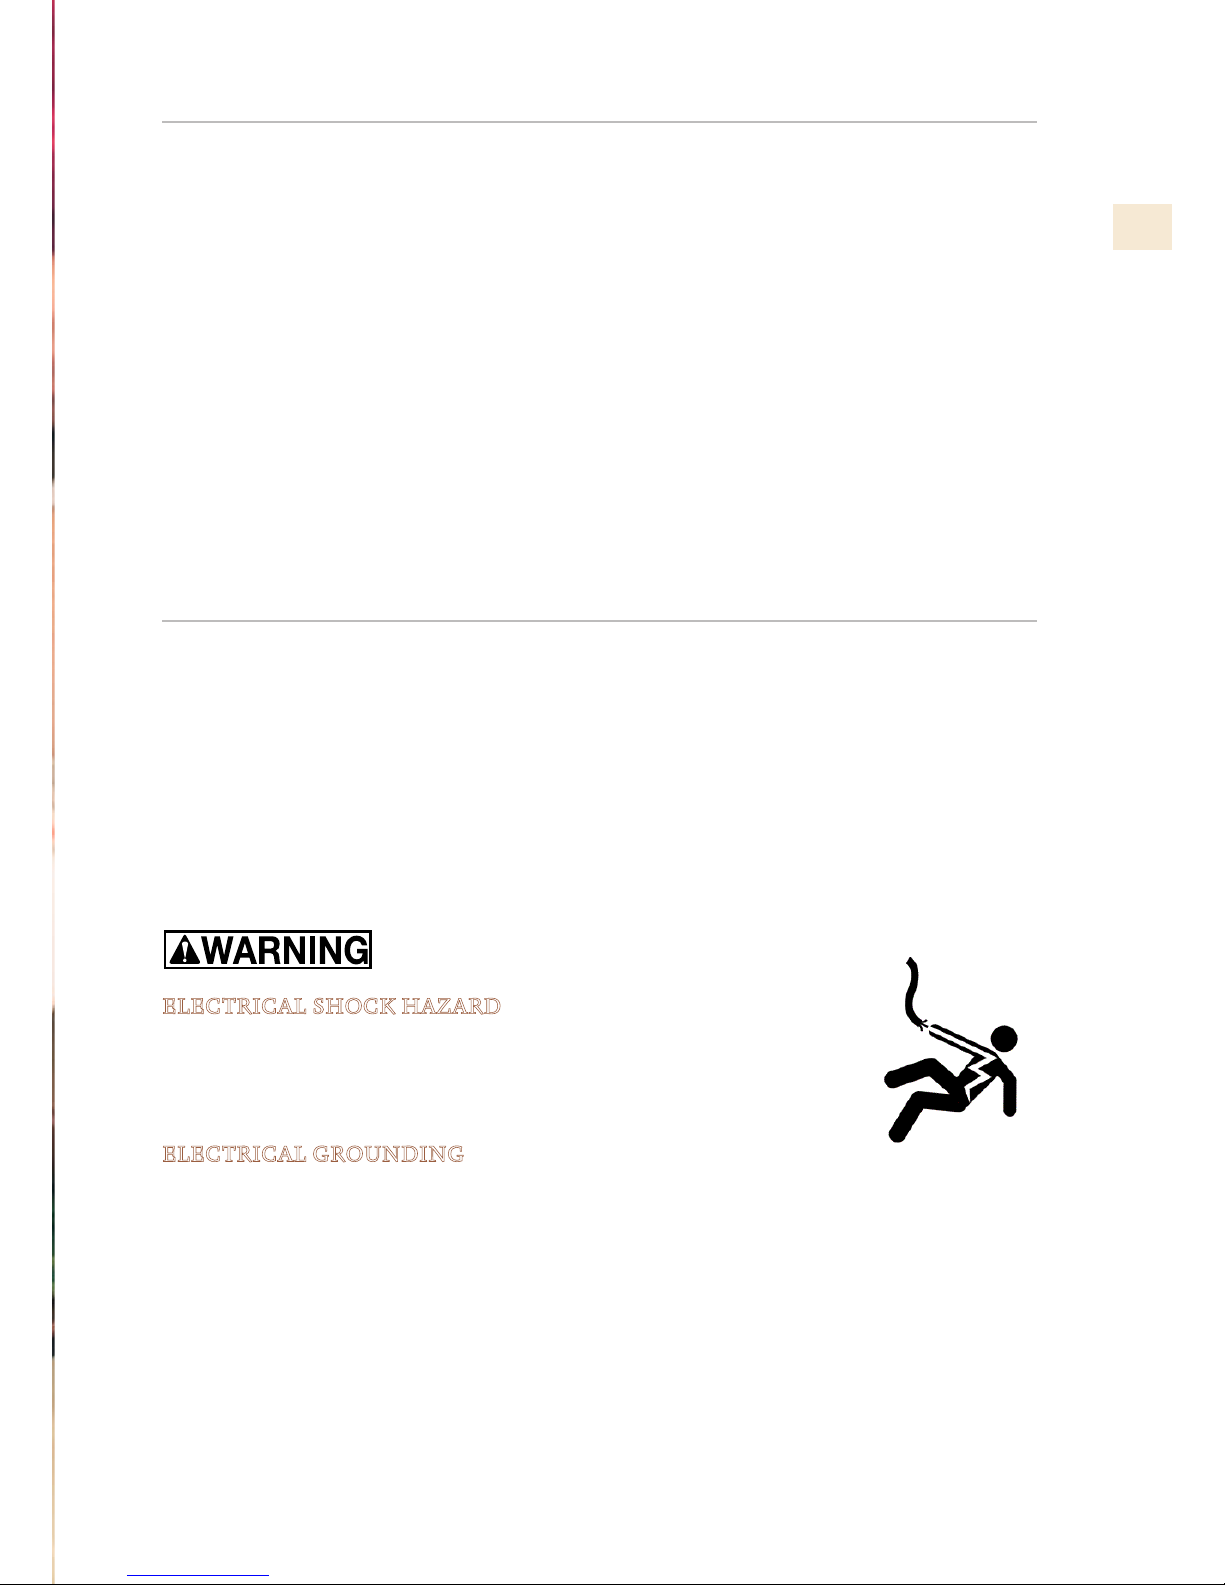
ELECTRICAL SHOCK HAZARD
Disconnect power before installing or servicing appliance. Before turning
power ON, be sure all controls are in the OFF position. Failure to do so can
result in death or electrical shock.
ELECTRICAL GROUNDING
• This appliance must be grounded. Grounding reduces the risk of electric shock in the
event of a short circuit. Read the ELECTRICAL CONNECTIONS section of this manual
for complete instructions.
• DO NOT ground to a gas pipe.
• DO NOT use an extension cord with this appliance.
• DO NOT have a fuse in the NEUTRAL or GROUNDING circuit. A fuse in the NEUTRAL
or GROUNDING circuit could result in an electrical shock.
TABLE OF CONTENTS
3 SAFETY PRECAUTIONS - BEFORE YOU BEGIN
4 RATING LABEL
4 REGULATORY / CODE REQUIREMENTS
4 MODEL NUMBERS
7 MODEL AND PART IDENTIFICATION
8 TOUCH CONTROLS
10 CONTROLS AND SETTINGS
15 COOKTOP OPERATION
17 CLEANING THE COOKTOP
19 TROUBLESHOOTING
21 PARTS LIST
21 SERVICE
21 LIMITED WARRANTY
©2018 Hestan Commercial Corporation
4
EN
MODEL NUMBERS
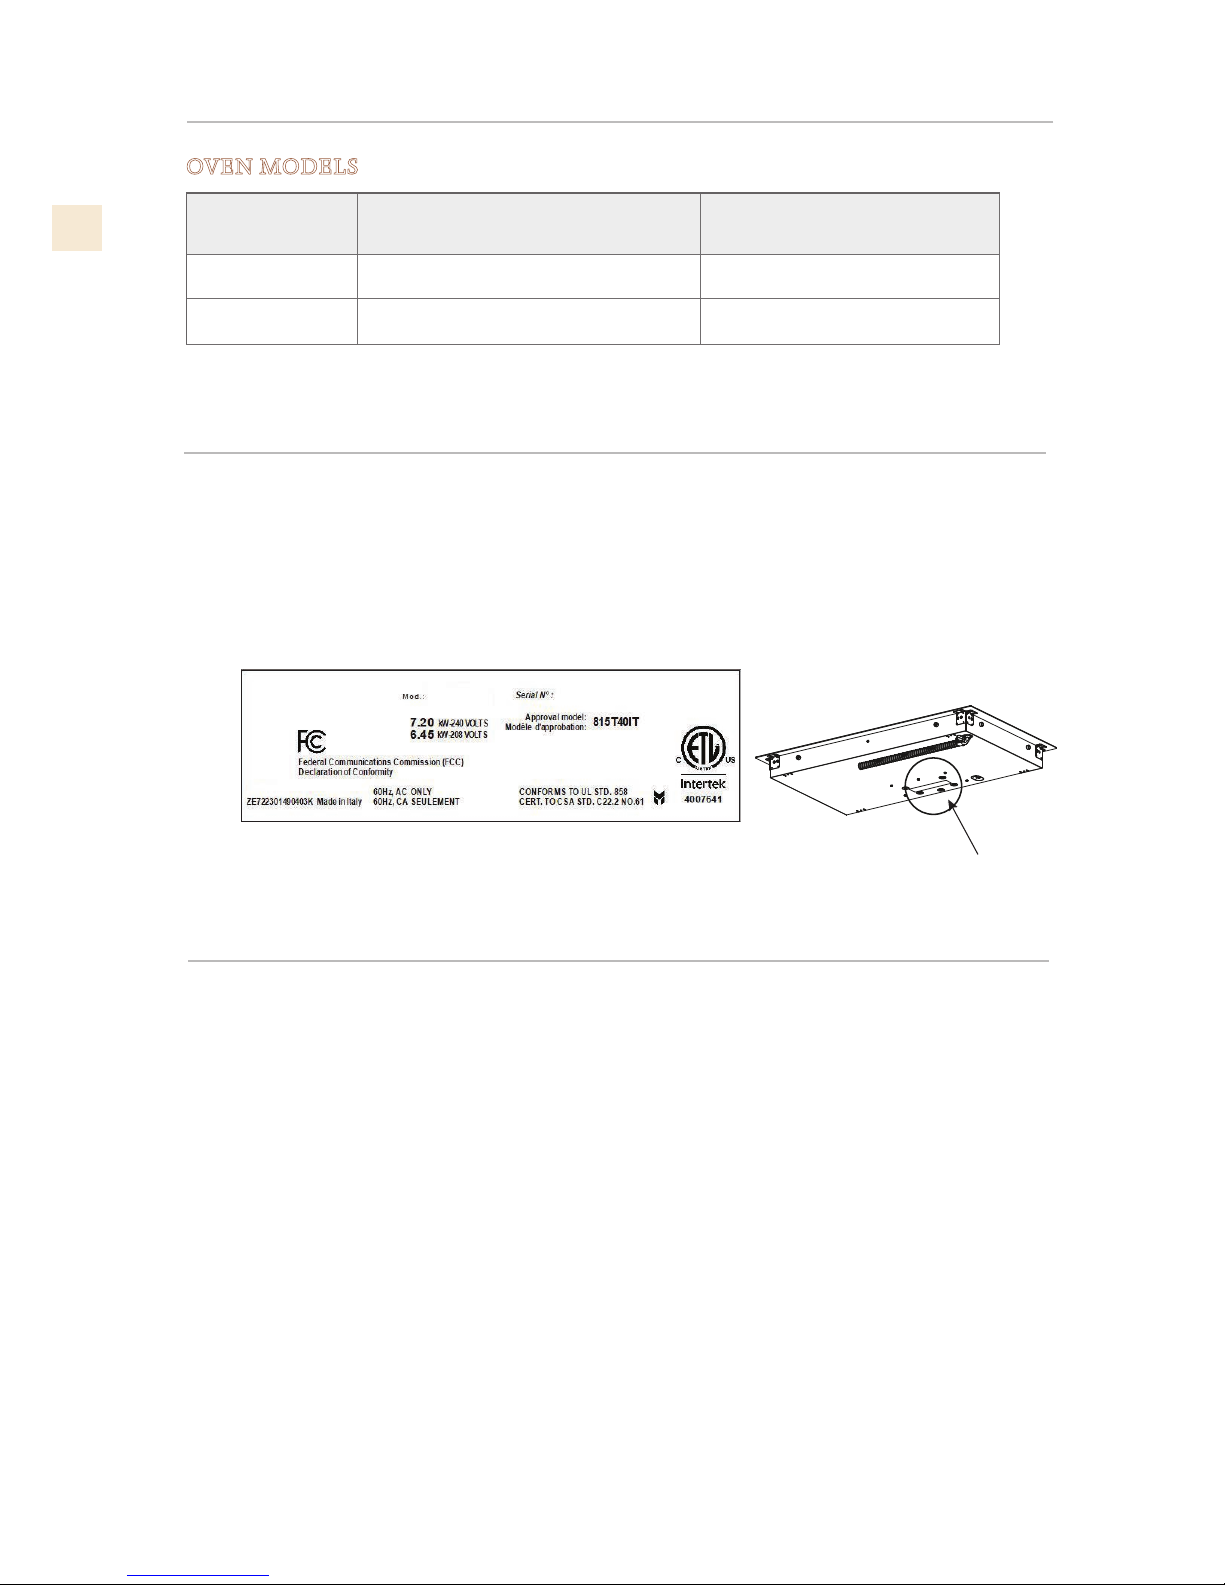
RATING LABEL
The rating label contains important information about your Hestan appliance such as the model and
serial number, electrical rating and the minimum installation clearances.
The rating label is located on the left side of the oven cavity opening near the door hinge.
If service is necessary, contact Hestan Customer Care with the model and serial number information
shown on the label.
OVEN MODELS
MODEL NO. DESCRIPTION
CIRCUIT BREAKER
REQ’D
KEC 30 30” Radiant Cooktop 40 Amp
KEC 30 30” Radiant Cooktop 50 Amp
REGULATORY / CODE REQUIREMENTS
Installation of this cooking appliance must be made in accordance with local codes. In the
absence of local codes, this unit should be installed in accordance with the National Electrical
Code and local codes.
This appliance must be electrically grounded in accordance with local codes or in the absence
of local codes with the National Electrical Code
ANSI/NFPA 70
, or Canadian Electrical code
CSA C22.1
.
RATING LABEL
SERIAL TAG
KEC30-BK
HESTAN COMMERCIAL CORP.
ANAHEIM, CA - USA
TYPICAL RATING LABEL

©2018 Hestan Commercial Corporation
5
EN
ELECTRICAL SUPPLY
This appliance must be connected to a dedicated circuit, 240 VAC, Single Phase, 60 Hz, with a
current rating as shown in the model number listing on pg. 6. Have the installer show you where
the electric circuit breaker is located so you know how to shut off the power to this appliance. It is
the responsibility of the user to have the appliance connected by a licensed electrician in accordance
with all local codes, or in the absence of local codes, in accordance with the National Electrical
Code. Read the ELECTRICAL CONNECTIONS section of the Installation Manual for complete
details.
CHILD SAFETY
IT IS THE RESPONSIBILITY OF THE PARENTS OR GUARDIANS TO ENSURE CHILDREN ARE
INSTRUCTED IN THE SAFE USE OF THIS APPLIANCE. Do not allow children to use this appliance
without adult supervision. Do not allow children to play in or around the appliance, even when not
in use. Items of interest to children should not be stored in or on the appliance, in cabinets above, or
on the backguard of the appliance. Children climbing on the appliance could be seriously injured.
BURN HAZARD - Cookware can get very hot during operation. Do not let children touch the
appliance while in operation. Failure to observe these instructions may result in severe burns or
injury.
TECHNICAL SAFETY
Installation and service on this appliance must be performed by a qualified appliance installer, or
a Hestan service technician. Do not repair or replace any part of the appliance unless specifically
instructed to do so. Defective parts must only be replaced with genuine Hestan parts. Contact
Hestan Customer Service for inquiries or to arrange a service call.
The appliance must be disconnected from the power during any service or maintenance work.
USER SAFETY
BURN HAZARD - Cookware can get very hot during operation.
Avoid wearing loose-fitting garments or long sleeves while cooking. They could ignite. For personal
safety, wear proper apparel while using the appliance. Some synthetic fabrics are highly flammable
and should not be worn while cooking.
Do not allow anyone to climb, stand, step on, lean against, or sit on any part of the appliance,
especially the oven door. This may result in damage to the appliance, or personal injury.
FIRE SAFETY
To reduce the risk of a grease fire, do not leave surface burners unattended at high settings.
Always turn on the ventilation hood when cooking. Clean vent hood grease filters frequently -
grease should not be allowed to accumulate on the fan or filters.
Use the appropriate pan size for the burner being used. For safety considerations, adjust the flame
size so they do not travel up the sides of the pan.
Keep the appliance zone clear and free from combustible materials, gasoline, and other flammable
vapors and liquids. NEVER store flammable liquids and materials in, above, or on the range, or near
cooking surfaces. Do not obstruct the flow of combustion and ventilation air of the appliance.
ALWAYS have a working smoke detector near the kitchen.
ALWAYS have an appropriate dry-chemical fire extinguisher nearby. Smother fire or flames using
the lid of the utensil (pot or pan), a cookie sheet or metal tray. Then shut off the burner. Use an
extinguisher, or baking soda if the fire is small and relatively contained. DO NOT USE WATER ON
A GREASE FIRE. Doing so may result in spreading the fire elsewhere.
NEVER pick up a flaming pan. You may spill the grease on yourself and be severely burned.
If accessible, turn off the ventilation hood during a fire, but do not reach through the flames to do
this.
In the event of personal clothing or hair catching fire, drop and roll immediately to smother the
flames. Seek medical attention if necessary.
SAFETY PRECAUTIONS - BEFORE YOU BEGIN
(CONTINUED)

©2018 Hestan Commercial Corporation
6
EN
Do not hang articles from any part of the appliance or place anything against the oven door. Some
fabrics are highly flammable and could ignite.
IF THE FLAMES DO NOT GO OUT - EVACUATE AND CALL THE FIRE DEPARTMENT.
SAFETY DURING CLEANING
Only clean the appliance as directed in the CLEANING & MAINTENANCE section of this manual.
Do not use a steam cleaner to clean the oven or any part of the range. Steam could penetrate into
electrical components and cause a short circuit and/or shock hazard.
Do not use abrasive cleaners, hard objects such as brushes or scrapers, or sharp metal tools to clean
the glass. Scratches could cause the glass to shatter.
Wait until the appliance is completely cool before using any aerosol-type cleaners. Many of these
cleaners use flammable propellants which could ignite in the presence of heat.
PROPER USAGE
Always position the handles of pot and pans so they do not extend over adjacent work zones or
over the edge of the rangetop. This is to avoid knocking over hot contents which could burn you, or
result in a fire.
SAFETY PRECAUTIONS - BEFORE YOU BEGIN
(CONTINUED)
©2018 Hestan Commercial Corporation
7
EN
MODEL AND PART IDENTIFICATION
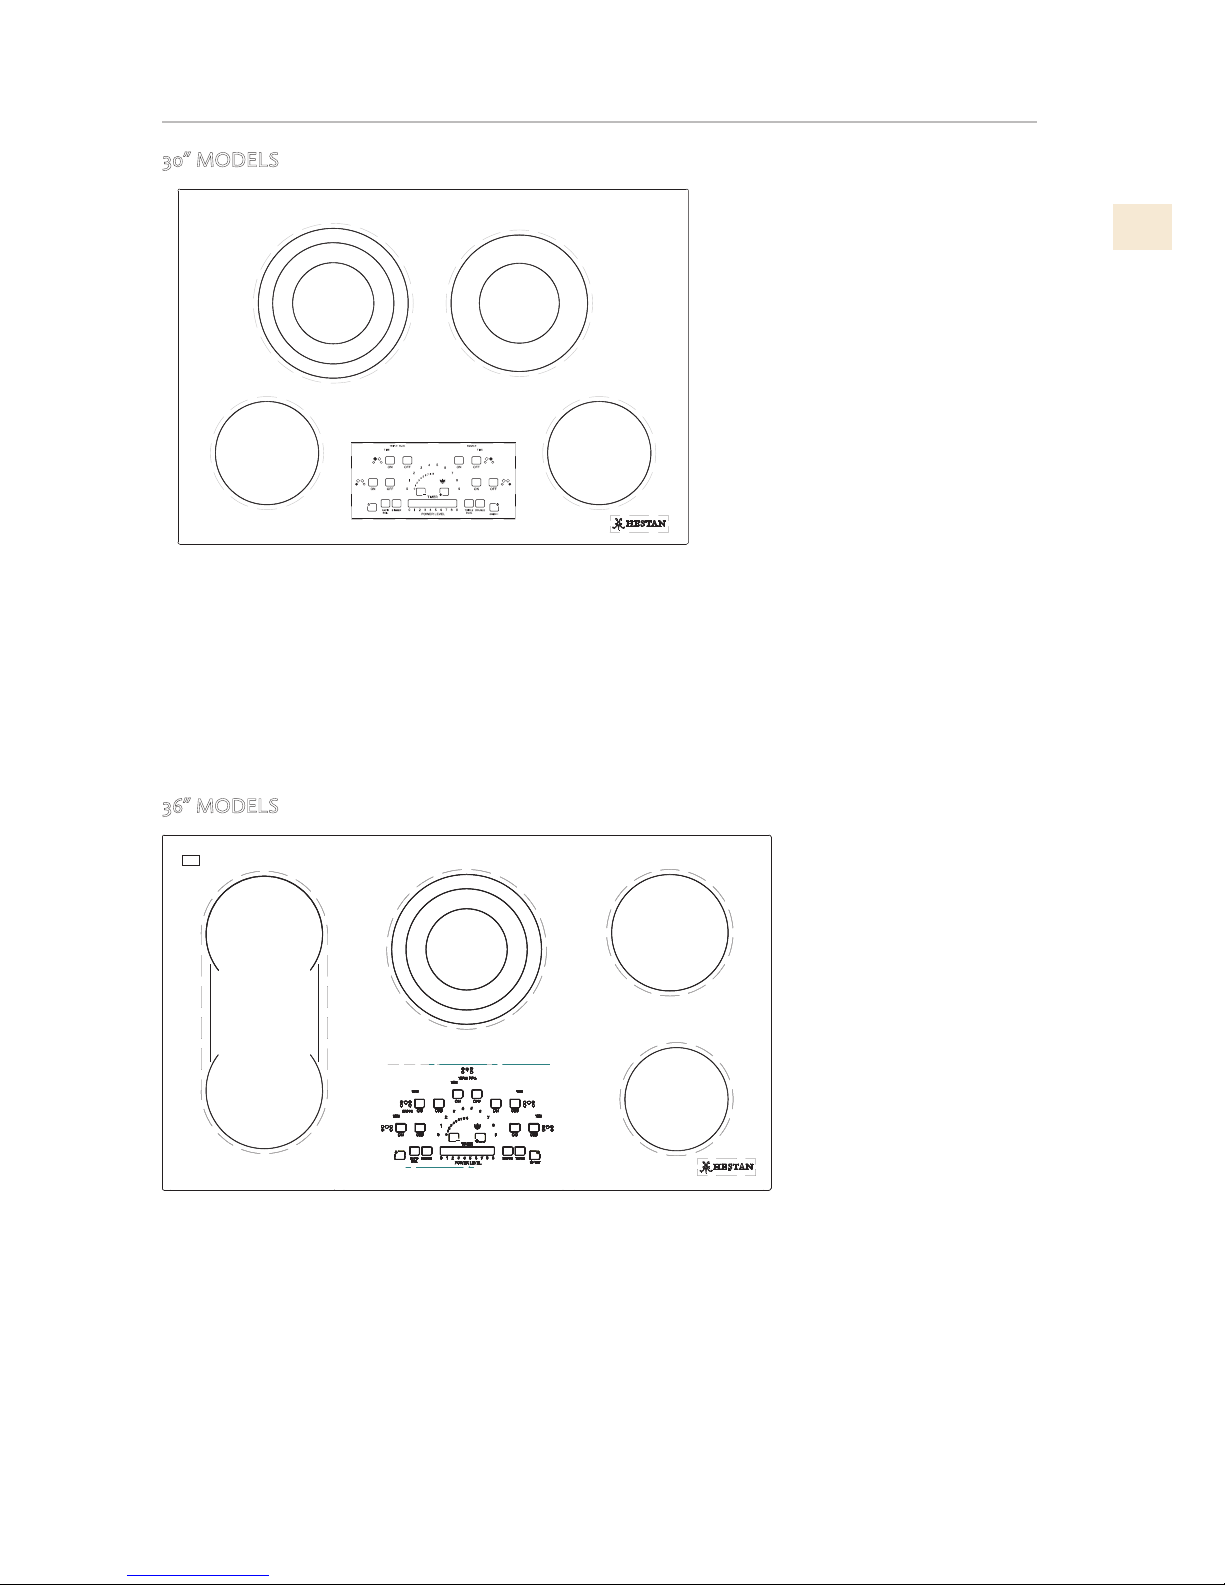
30” MODELS
3
5
1
2
4
Figure 1.
Position 1 - 1200W 6” single circuit element
Position 2 - 1200W 6” single circuit element
Position 3 - 2500W/1600W/800W 9”/7”/5” triple circuit element
Position 4 - 2200W/800W 8”/5” double circuit element
Position 5 - touch control
36” MODELS
2
3
6
5
4
1
2b
Figure 2.
Position 1 - 1200W 6” single circuit element
Position 2 - 1800W 7” single circuit element
Position 2b - 800W bridge element between 2 and 3
Position 3 - 1800W 7” single circuit element
Position 4 - 2500W/1600W/800W 9”/7”/5” triple circuit element
Position 5 - 1800W 7” single circuit element
Position 6 - touch control

©2018 Hestan Commercial Corporation
8
EN
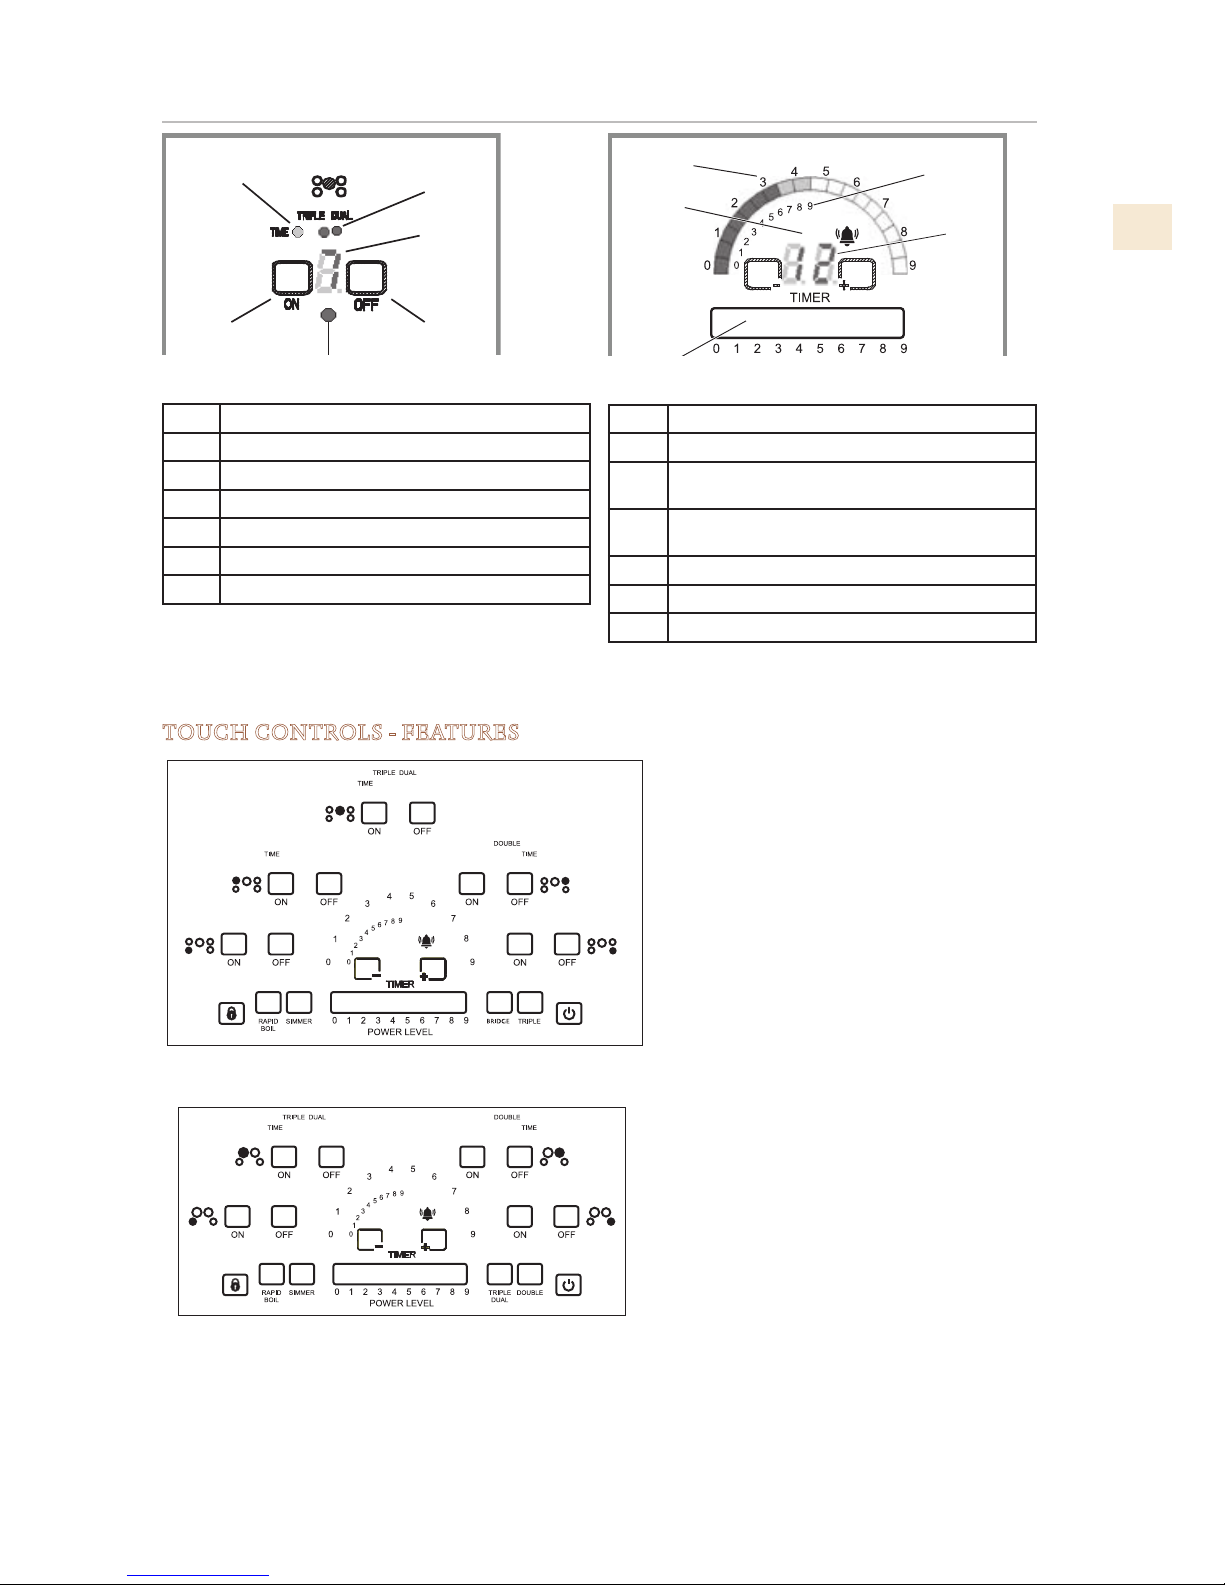
TOUCH CONTROLS
9
2
1
3
3
5
4b
4
12
6
8
1
7
10
Figure 3.
Position 1 - Main ON/OFF cooktop key.
Position 2 - Command lock key - child proof.
Position 3 - Commands lock indicator.
Position 4 - ON, OFF keys and power level display, for front left cooking zone.
Position 4b - Bridge element enabled indication.
Position 5 - ON, OFF keys and power level display, for rear left cooking zone.
Position 6 - ON, OFF keys and power level display, for central triple cooking zone.
Position 7 - ON, OFF keys and power level display, for rear right cooking zone.
Position 8 - ON, OFF keys and power level display, for front right cooking zone.
Position 9 - Special functions keys.
Position 10 - Extension keys to enable bridge or dual/triple zones.
Position 11 - “Peacock Tail” for dual range power level.
Position 12 - Timer.
Position 13 - Slide bar for power level setting.
©2018 Hestan Commercial Corporation
9
EN
TOUCH CONTROLS
(CONTINUED)
TOUCH CONTROLS - FEATURES
36” Cooktop
30” Cooktop
Slide bar for power setting
Dual power ranges - Full and Simmer
Five cooking zones
Five independant timers, one per zone
Egg timer (in addition to zone timers)
Rapid Boil function
Triple/Dual/Single cook zone
Bridge function
Main ON/OFF key and LOCK key
Slide bar for power setting
Dual power ranges - Full and Simmer
Four cooking zones
Four independant timers, one per zone
Egg timer (in addition to zone timers)
Rapid Boil function
Triple/Dual/Single cook zone
Double/Single cook zone
Main ON/OFF key and LOCK key
Figure 6.
6
5
4
1
2
Figure 4.
Item Function
1
OFF key for the zone.
2
ON/SELECTION key for the zone.
3
HOT indication (zone active or residual heat).
4
Power level display.
5
Extension enabled (dual/triple circuit, bridge).
6
Zone’s timer is active.
2
4
3
5
Figure 5.
Item Function
1
Slide Bar to set the power level.
2
Low range power scale (0 to 15%), inner
numerals.
3
Full range power scale (0 to 100%), outer
numerals.
4
Egg Timer (minute minder) active.
5
Timer display and keys.
©2018 Hestan Commercial Corporation
10
EN
This kind of electric heating elements use a ribbon wire
located under the glass surface to provide the heat for
cooking. The heating elements will cycle on and off,
depending on the power level set and displayed by the
control.
Temperature limiters
Each radiant heater has its own temperature limiter to
protect the glass cooking surface from excessive
temperatures. The limiter will operate automatically by
cycling the element.
Multiple heating elements (dual or triple) consist of
two or three radiant ribbon elements within the same
heating area. The zone small center element may be
used by itself, or the additional elements can be used as
well. This provides a cooking area as large as needed.
The 36” cooktop provides a “bridge” element between
the two left cooking zones. When BRIDGE is enabled,
the two zones and the bridge element are controlled
together, acting as a single large cooking area.
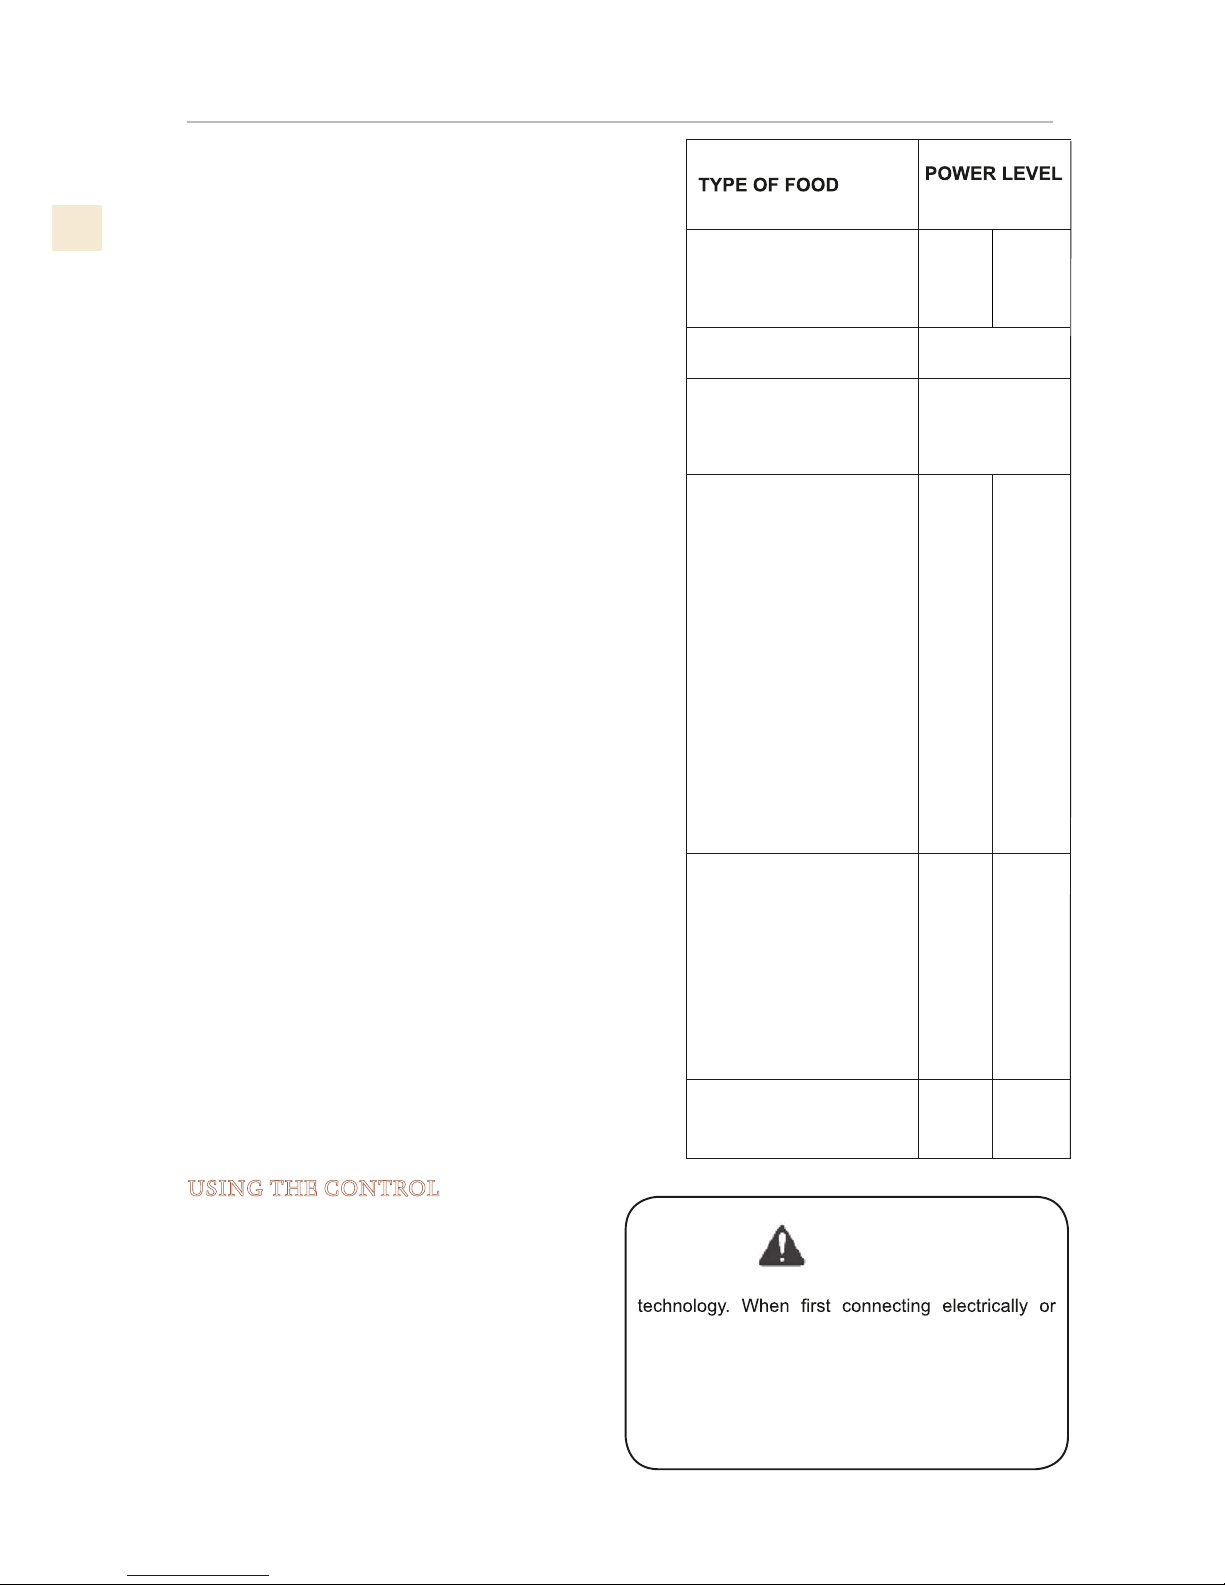
All the settings described in the following table are
recommended, provided that the element has not been
preheated before. The values in the table represent
indicative settings, given that the actual values may
depend on:
• Type and quality of the pan.
• Type, quantity and temperature of the food.
• Element used and individual preferences.
SETTING
Melting butter, chocolate
Delicate sauce, rice,
simmering sauces with
butter and egg yolk
SIMMER
Cooking vegetables,
Fish broths,
Fried or Scrambled eggs,
Finishing cereals,
pasta,
milk,
pancakes,
pudding,
Simmering meats,
Steaming vegetables,
Pop corn,
Bacon,
Stewing meet soup,
Sautéed vegetables,
Spaghetti sauces.
(5)
Braising meet,
Pan frying meet,
Fish,
Eggs,
Stir frying,
Quickly brown or sear
meats
Hold rapid boil
(7)
Boiling water for
vegetables, pasta
(9)
Radiant Elements
Bridge Radiant Element
Multiple Radiant Elements
Recommended Settings
KEC 30
KEC 36
SIMMER
(5)
(7)
(9)
CONTROLS AND SETTINGS
USING THE CONTROL
When the cooktop is connected to the electrical
voltage supply all lights and digits turn on to
indicate a proper activation. This operation will
be completed after a few seconds, the control
turns off automatically. Then the cooktop is
ready for operations.
WARNING
This touch control works using optical light sensing
after a power failure, any direct strong light over the
sensor area may affect the touch control functionality.
When powering on the unit make sure that no strong
light is shining direct over the touch control zone,
it can compromise the start-up sensor calibration
resulting in an unresponsive touch control.

©2018 Hestan Commercial Corporation
11
EN
SWITCHING THE CONTROL ON
If the commands are locked, touch the [LOCK] key for a few seconds. (See that the LOCK led is on
and turns off after a few seconds.)
Touch the main [ON/OFF] key to enable the single zones for
selection.
All the displays show power level “0”. If you don’t touch anything
else, the control shuts down again after about 10 seconds.
SELECTING AND SETTING ZONE POWER
Touch the ON key for the desired zone: the HOT SURFACE (ref.3)
indication starts flashing, waiting for user input.
Touch the slide bar to set the power level (levels 0 to 9). You can
slide your finger along the bar to select the desired value.
The display (ref.4) and the “Peacock Tail” (ref.6) shows the power
level, updated in real time.
After a 5 seconds time-out the value is accepted and the
HOT SURFACE led stops flashing.
The “Peacock Tail” disappears after some seconds more.
The following picture represents the Full Power Scale
where the control uses all the available power range from
0% up to the 100% corresponding to level 9.
Level 4 corresponds to 15% of the available power.
USING SIMMER
SIMMER is a low temperature mode, where a level of 9
in SIMMER has the same power as a level of 4 in normal
mode, 15% of full power.
Select a cooking zone, then touch the SIMMER key(ref.
8) to enable simmer mode, then set power with the slider.
In SIMMER mode, the inner numbers of the power scale
show selected power.
RETURNING TO NORMAL MODE
Select the zone and touch the SIMMER key again to
treturn to normal mode.
NOTE: The numeric power value stays the same, so
the power will increase to the normal amount for that
power level..
When a zone is turned off, the SIMMER mode is
halted for that zone as well.
TURNING A ZONE OFF
Touch the zone’s OFF key to turn an active zone off.
To turn all zones off, touch the main ON/OFF key.
6
5
4
1
2
3
Figure 7.
7
6
Figure 8.
9
8
Figure 9.
CONTROLS AND SETTINGS
(CONTINUED)
©2018 Hestan Commercial Corporation
12
EN
CONTROLS AND SETTINGS
(CONTINUED)
USING A DUAL ELEMENT ZONE
The 30” cooktop has a dual element zone (see page 7).
To use the smaller part of the zone (inner element) , touch the selector key and set a power level.
To use the entire zone, touch the DOUBLE key. The DOUBLE indicator will illuminate when both
(inner and outer) elements are selected.
USING A TRIPLE ELEMENT ZONE
The 30” and 36” cooktops have a triple element zone (see page 7).
To use the smallest part of the zone (inner element) , touch the selector key and set a power level.
To use the inner and middle elements, touch the TRIPLE key. One of the TRIPLE indicators will
illuminate when the inner and middle elements are selected.
To use the third element as well (entire zone), touch the TRIPLE key again. Two TRIPLE indicators
will illuminate when the entire zone (inner, middle, and outer) elements are selected.
USING BRIDGE MODE
The 36” cooktop can use the two left cooking zones and a special element between them all
together in “Bridge Mode”.
1. Touch the selection key for either of the left two zones.
2. Touch the BRIDGE key.
3. Set power using the slider for either of the bridged zones.
• Both of the left cooking zones and the bridge element are controlled together while bridged.
• Either zone’s selector key will turn the entire bridged zone OFF.
EXITING BRIDGE MODE
To stop “Bridge Mode”, use either zone’s selector key to turn the zones off. This will stop “Bridge
Mode”.
ZONE ACTIVE / HOT SURFACE INDICATORS
Each zone has a “Hot Surface” indicator light to show that the zone’s surface is hot.
When a zone is activated, the light turns on, and it remains until the zone is deactivated and the
surface has cooled to a “safe to touch” temperature (approximately 150˚F).
RAPID
BOIL FUNCTION
This function sets a zone to heat at full power (power level 9) for ten minutes, then it drops to the
set power. It is available for any zones, including bridged or double/triple zones.
To enable Rapid Boil: Select a zone and touch RAPID BOIL. You can set power before or after
selecting Rapid Boil.
The power indicator for the slected zone will alternate between “P” and the set power level.
KEY LOCK FUNCTION
The LOCK function disables all control functions except “Select/Zone OFF” and ON/OFF (all off).
To lock/unlock, touch the LOCK key for two seconds. The indicator light is ON when the controls
are locked.
©2018 Hestan Commercial Corporation
13
EN
TIMERS
There is one timer for each cooking zone, plus an independant timer.
NOTE: Timers are simply reminders - they do not control elements or turn them off.
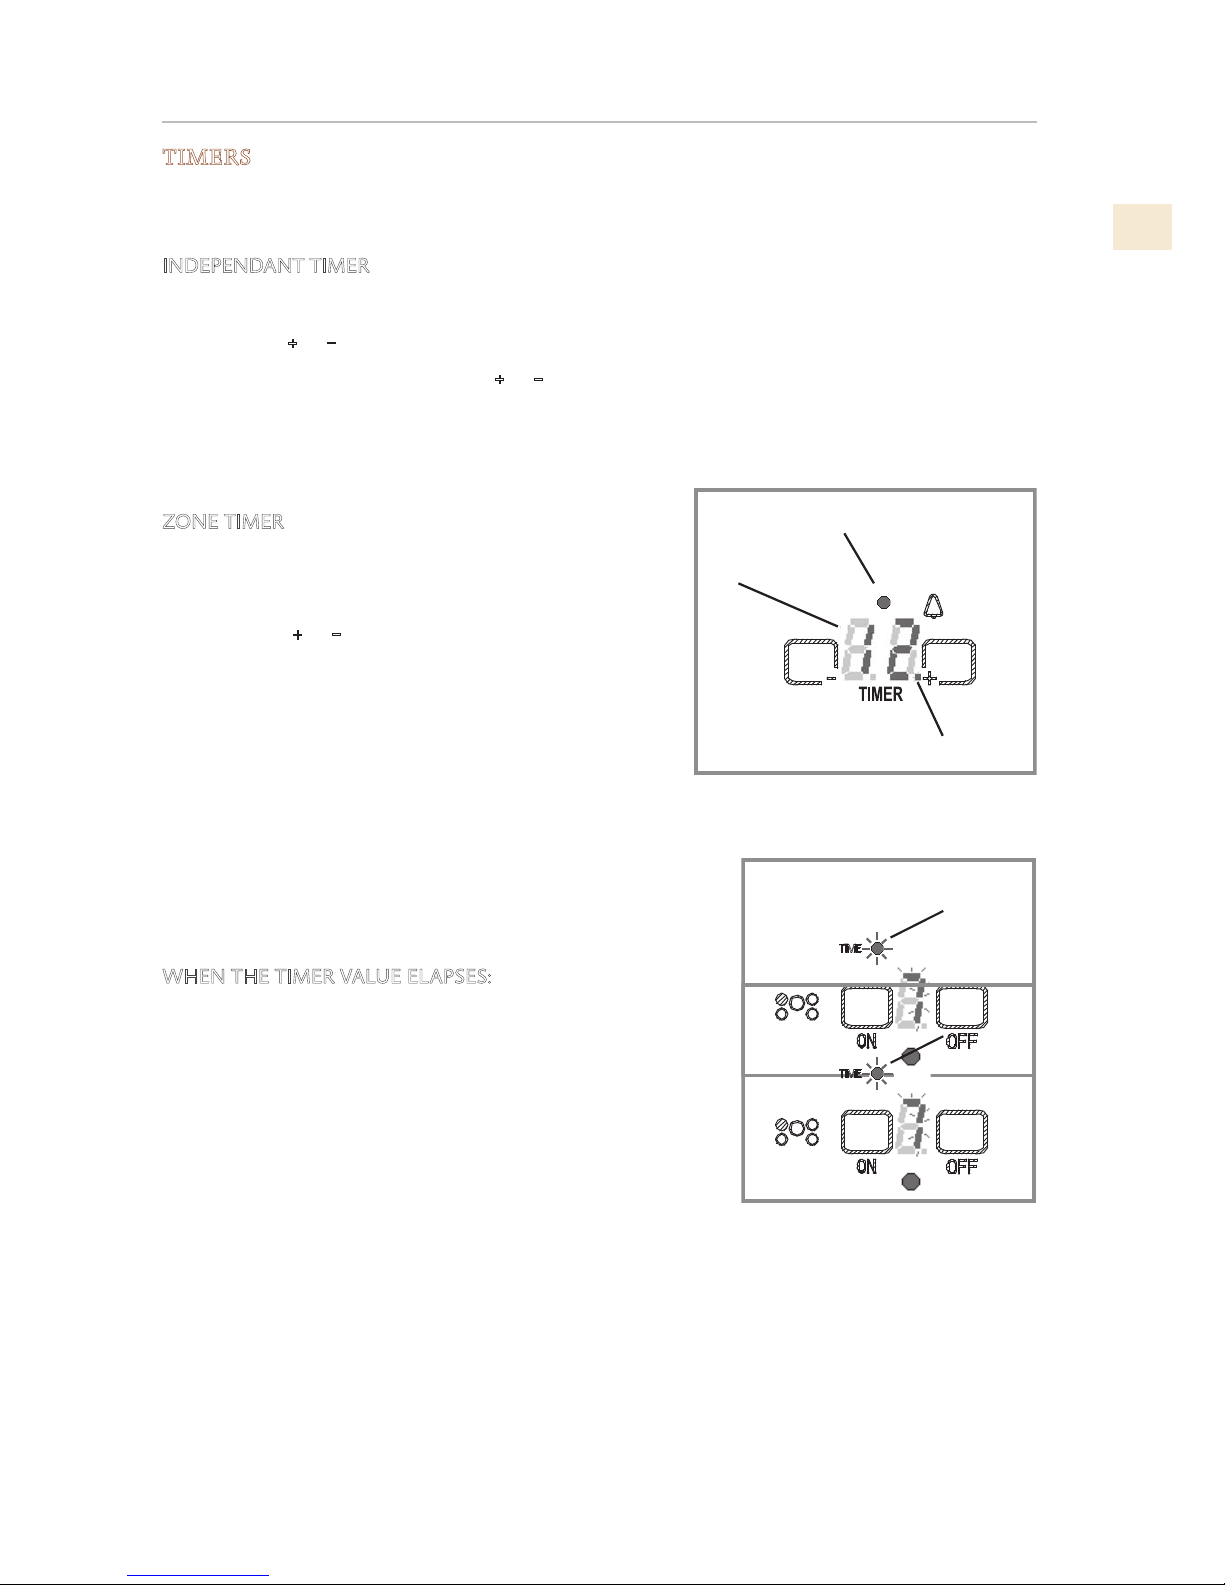
INDEPENDANT TIMER
1. Make sure no zone is flashing/waiting for input
2. Touch the + or − keys to activate the timer and set the value. The maximum value is 99.
3. To cancel the timer, either use the + or − keys to set the time to zero, or touch them both at once
to zero the timer.
To check the independent timer value when it’s not displayed with the highest priority, touch [T-] or
[T+] when no zones are selected. The timer led (ref.4) flashes and the displayed value switches to the
independent timer.
ZONE TIMER
Each zone can have its own timer set.
1. Touch the ON key for the cooking zone
2. Touch the + or − keys to activate the timer and set the
value.
3. When the indicator goes steady, the value is accepted.
• If more than one timer is set, the display shows the
lowest value, the one that will expire first. The timer led
(ref.4) related to the zone which the displayed value is
referring to, is flashing. If the displayed value refers to the
independent timer, the timer led (ref.2) flashes.
• To check the remaining time for any one of the timed zone, touch the [ON] key related to the
zone: the corresponding timer led will begin to flash and the
value on the timer display will switch for some seconds to the
new value. After a time-out, it will switch back to the shortest
one.
WHEN THE TIMER VALUE ELAPSES:
An end of activity beep sequence sounds: three short beeps
followed by a long interval are repeated for 1 minute.
The led indicator related to the elapsed timer flashes.
The timer value “00” flashes too and will continue to flash waiting
for a user confirmation.
• Touch [T-J or [T +1 to cancel the expired timer, the display
switches to the next shortest timer or gets blank if there aren’t
any other timer set.
WARNING: the timer is only intended as an acoustic advisor that recalls
the attention of the user.
Timers have no effect on the heating elements. The cooking zone must always be stopped manually
by touching the related [OFF] key.
1
2
3
Figure 10.
4
Figure 11.
4
Figure 12.
CONTROLS AND SETTINGS
(CONTINUED)
©2018 Hestan Commercial Corporation
14
EN
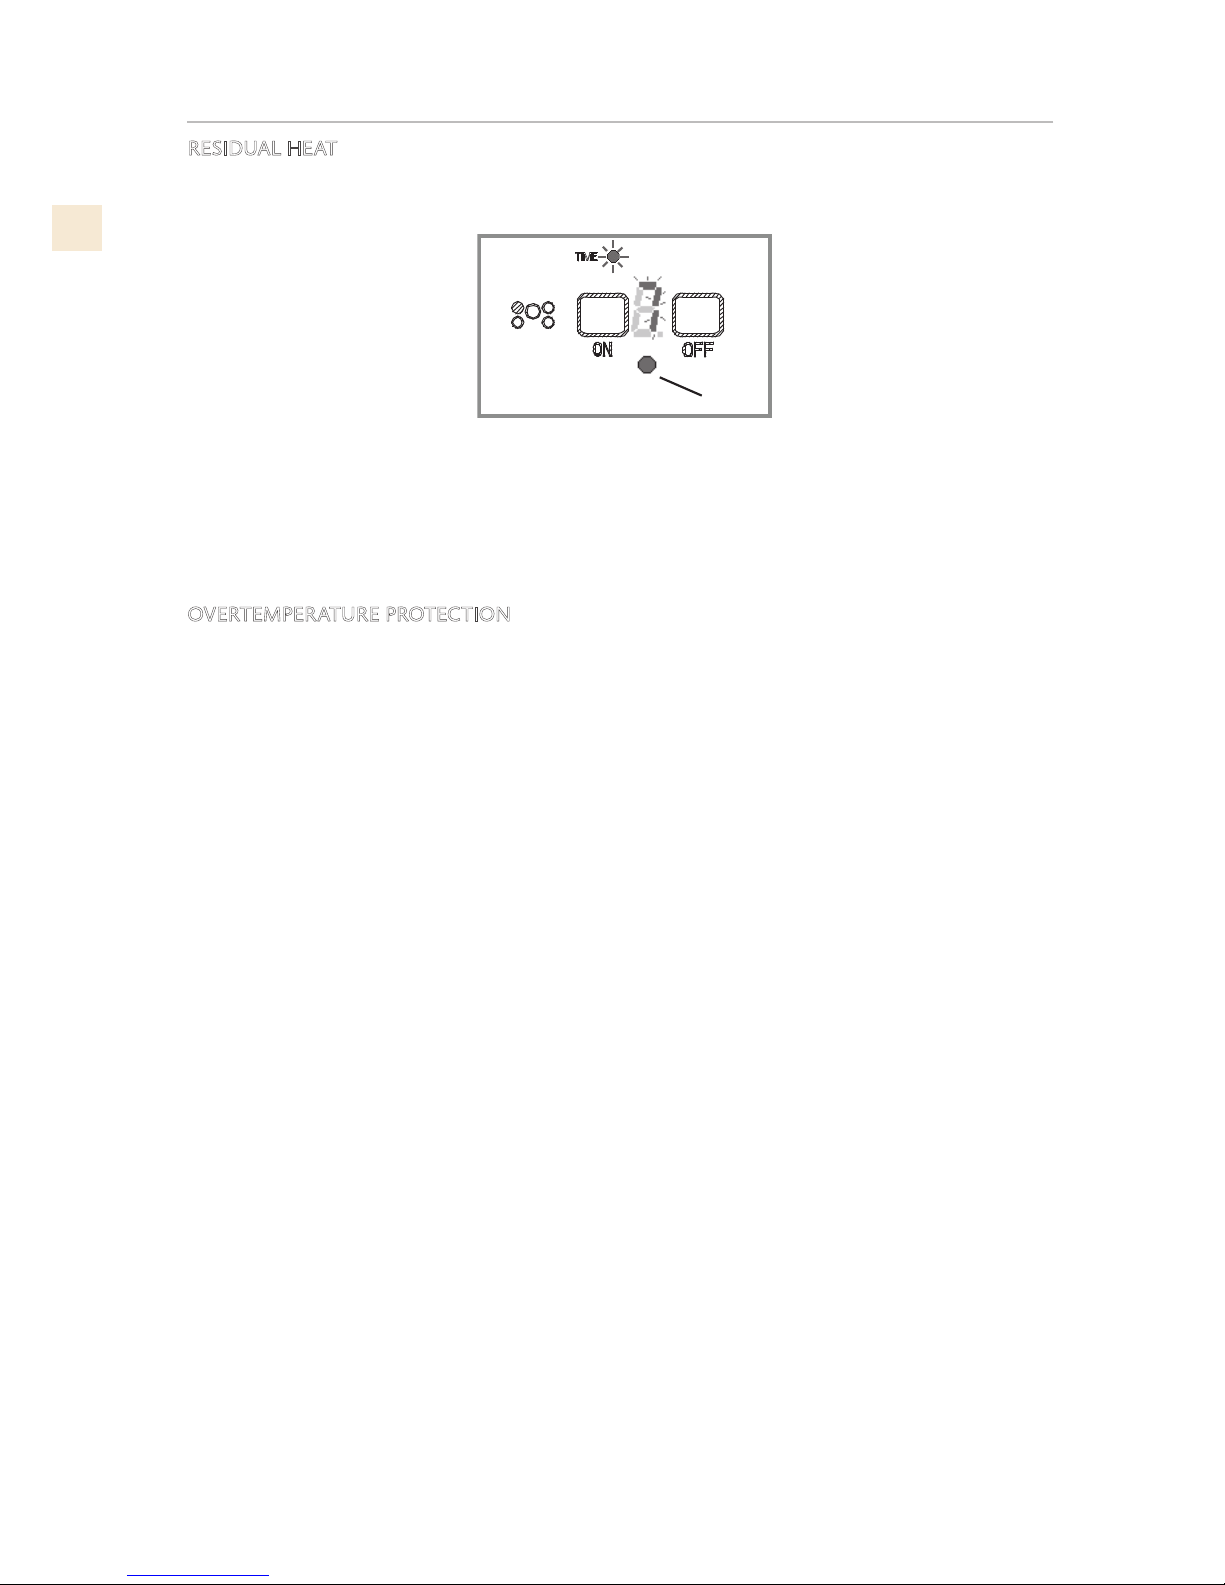
RESIDUAL HEAT
The HOT SURFACE indicators remain on even after the end of the cooking activity, just the
necessary time to let the surface cool down below a safety value.
3
Figure 13.
The residual heat time depends on the power level that was set on the cooking zone and the time
the heating element has been working for.
For example, a cooking zone that has been working for more than 5 minutes at full power will take
half an hour to cool down before the Residual Heat indication fades away. At level 1 it will take
about 10 minutes.
OVERTEMPERATURE PROTECTION
The control monitors its own internal temperature and stops any activity in case of overheating of
inner parts. Let the appliance cool down.
CONTROLS AND SETTINGS
(CONTINUED)
 Loading...