

Hestan GFDSR241, GRGR24, GRFR24 Use and Care Manual

INDOOR / OUTDOOR
UNDERCOUNTER REFRIGERATION
Refrigerators, Freezers, & Beer Dispensers
Use & Care Manual

EN
Message from Hestan:Message from Hestan:
Outdoor cooking is a perfectionist’s pursuit, and with your new investment,
you’ve now taken the ultimate step forward. We sincerely welcome you to
the Hestan Family. We’ve engineered and built our products so that your
guests will rave about your meal, but deep down, our customers know it
could’ve been just a little more tender, juicier – a pinch more salt in the rub
or a few seconds less on the flame. Yes, we’ve taken the time to know our
Hestan customer and we’re excited to be on this journey with you. Hestan
Outdoor was born from this same perfectionist passion. Our engineers
experimented, innovated, tweaked and tinkered until they created the most
powerful, versatile and reliable outdoor products available.
We pride ourselves on restless innovation, superior engineering and
purpose-built designs, but also our in-depth understanding of our target
consumer and the interests and needs of the ultimate end-users we serve
and covet. For many consumers, cooking outdoors is much more than an
act of food preparation. It’s a lifestyle activity that encompasses culinary,
leisure and social pursuits among others.
We are thankful and proud that you have chosen Hestan, and we yearn to
have you as a customer for life. We take your decision to choose Hestan
most seriously, and we promise to deliver the very best to you.
Welcome to Hestan OutdoorWelcome to Hestan Outdoor
2
©2021 Hestan Commercial Corporation
TABLE OF CONTENTS
DANGER
DANGER
NOTICE
3 SAFETY DEFINITIONS
4 MODEL NUMBERS
5 RATING LABEL
5 REGULATORY/CODE REQUIREMENTS
5 IMPORTANT CHILD SAFETY
5 PRECAUTIONS BEFORE YOU USE YOUR APPLIANCE
7 OPERATION
7 DIGITAL TEMPERATURE CONTROL
10 MAINTENANCE - OUTDOOR MODEL / WINTERIZING
10 LED REPLACEMENT
11 CLEANING
13 DISPOSAL
14 TROUBLESHOOTING
15 PARTS LIST / SERVICE
16 WARRANTY
READ THESE INSTRUCTIONS CAREFULLY AND COMPLETELY
BEFORE INSTALLING OR USING YOUR APPLIANCE TO REDUCE
THE RISK OF FIRE, SHOCK HAZARD, OR OTHER INJURY. KEEP
THIS MANUAL FOR FUTURE REFERENCE.
IMPORTANT! IMPORTANT! Read and understand all information in this manual before
attempting the installation. All plumbing and electrical work must be
performed by a qualified technician and conform to all applicable state and
local codes.
EN
INSTALLER: LEAVE THIS MANUAL WITH THE OWNER OF THE APPLIANCE.
HOMEOWNER: RETAIN THIS MANUAL FOR FUTURE REFERENCE.
SAFETY DEFINITIONS
THIS INDICATES A HAZARD THAT WILL RESULT IN SERIOUS
INJURY OR DEATH IF PRECAUTIONS ARE NOT FOLLOWED.
THIS INDICATES A HAZARD THAT MAY RESULT IN SERIOUS
INJURY OR DEATH IF PRECAUTIONS ARE NOT FOLLOWED.
THIS INDICATES A HAZARD WHERE MINOR INJURY
OR PRODUCT OR PROPERTY DAMAGE MAY OCCUR IF
PRECAUTIONS ARE NOT FOLLOWED.
THIS INDICATES THAT PRODUCT OR PROPERTY DAMAGE MAY
OCCUR IF PRECAUTIONS ARE NOT FOLLOWED.
RISK OF FIRE OR EXPLOSION - FLAMMABLE REFRIGERANT USED. Consult
repair manual/owners guide before attempting to service this product. All
safety precautions must be followed. To be repaired by trained service personnel only. Use caution
when handling, moving and using the product to avoid damaging the refrigerant tubing or increasing
the risk of a leak.
All service work shall be performed by factory authorized service personnel and
all component parts shall be replaced with like components to minimize the risk
of possible ignition due to incorrect parts or improper service.
If service is necessary, repair work must be performed by a Hestan authorized
servicer. Work done by unqualified individuals could potentially be dangerous
and will void the warranty.
©2021 Hestan Commercial Corporation
3
SAFETY DEFINITIONS
NOTICE
This product contains blown foam insulation using blowing agent R-611 (Methyl
Formate). The foam in this product does not contain HFC’s, CFC’s, or HCFC’s.
(continued)
EN
All models covered in this manual are manufactured using refrigerant R600a (Isobutane). R600a is
a hydrocarbon. This refrigerant is flammable and is only allowed for use in appliances which fulfill
the requirements of UL/IEC 60335-1 and UL/IEC 60335-2-24 (To cover potential risk originated from
the use of flammable refrigerants). Consequently, R600a is only allowed to be used in refrigerating
appliances which are designed for this refrigerant and fulfill the above-mentioned standard.
• R600a is heavier than air. The concentration will always be highest at the floor level.
• The explosion limits are as follows:
o Lower Limit: 1.8% by volume
o Upper Limit: 8.4% by volume
o Ignition Temperature: 860ºF [460°C]
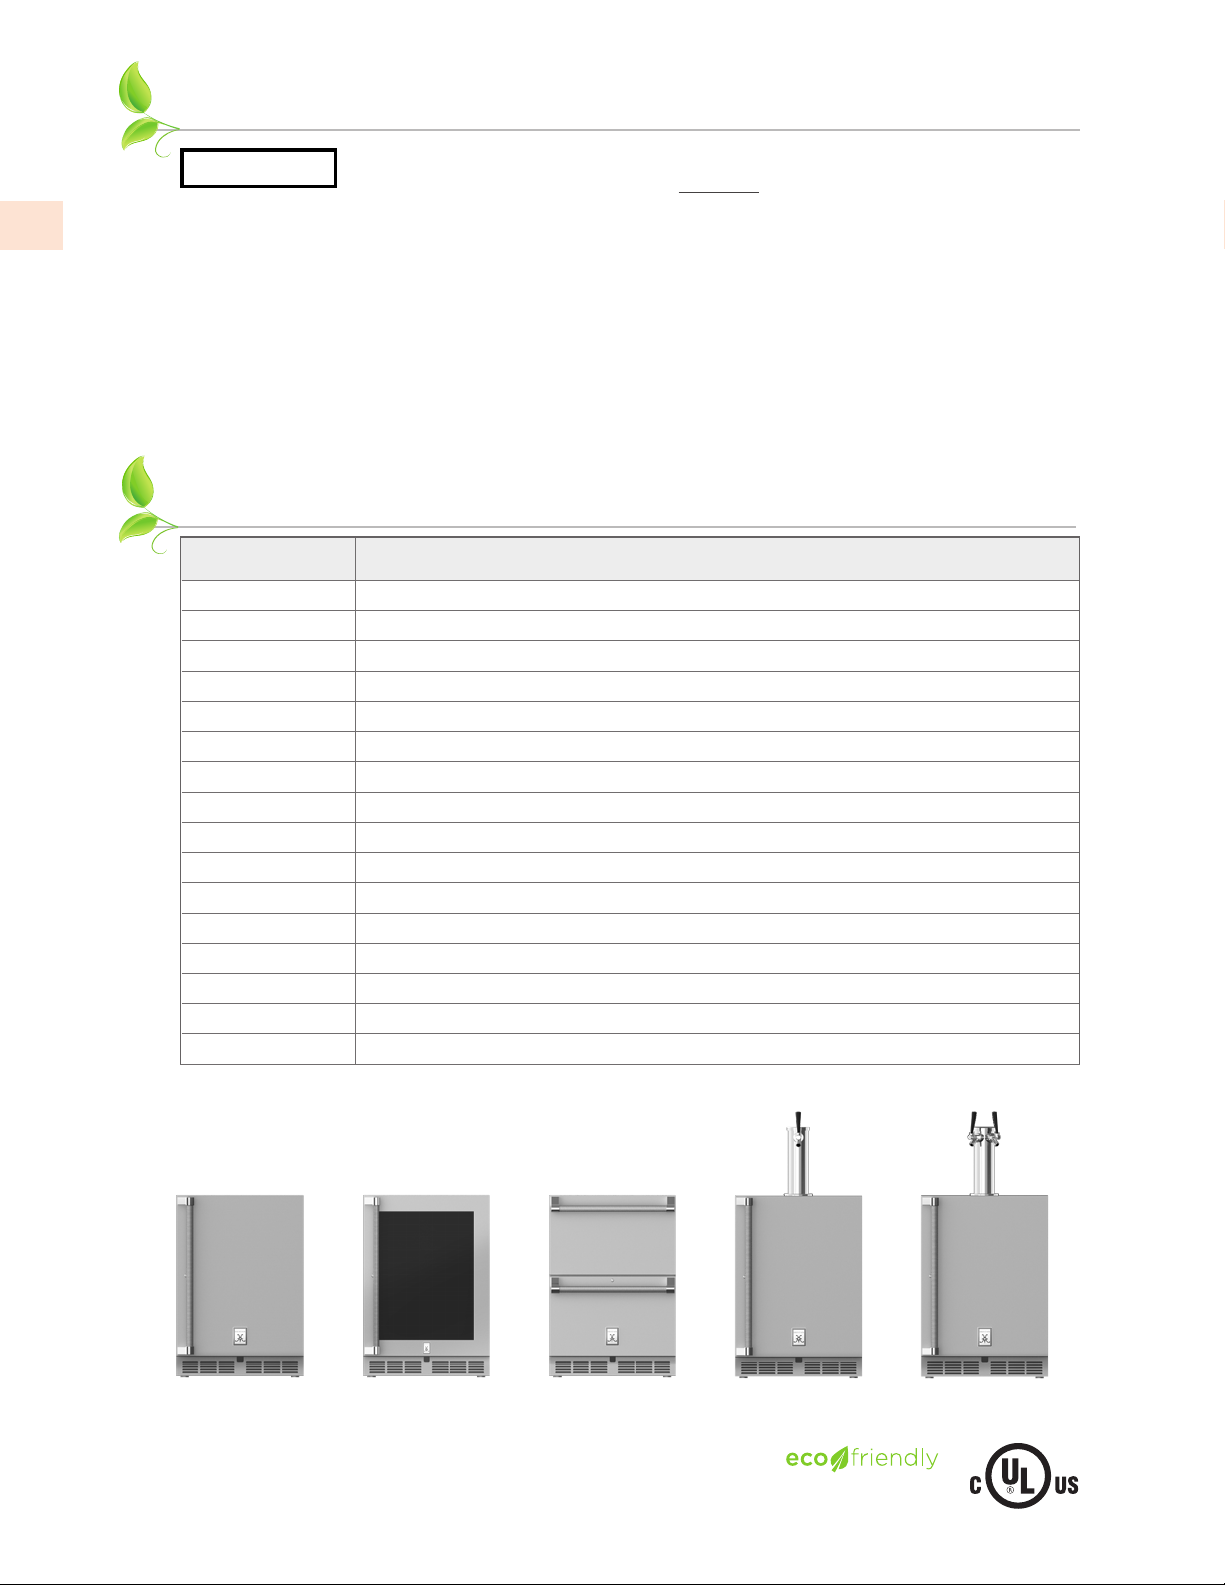
MODEL NUMBERS
Model No. Description
GRS_24 INDOOR / OUTDOOR REFRIGERATOR, SOLID DOOR, 24”
GRS_24-XX INDOOR / OUTDOOR REFRIGERATOR, SOLID DOOR, COLOR, 24”
GRG_24 INDOOR / OUTDOOR REFRIGERATOR, GLASS DOOR, 24”
GRG_24-XX INDOOR / OUTDOOR REFRIGERATOR, GLASS DOOR, COLOR, 24”
GRR24 INDOOR / OUTDOOR REFRIGERATOR DRAWERS, 24”
GRR24-XX INDOOR / OUTDOOR REFRIGERATOR DRAWERS, COLOR, 24”
GRFR24 INDOOR / OUTDOOR REFRIGERATOR DRAWER AND FREEZER DRAWER, 24”
GRFR24-XX INDOOR / OUTDOOR REFRIGERATOR DRAWER AND FREEZER DRAWER, COLOR, 24”
GRWS_24 INDOOR / OUTDOOR DUAL ZONE REFRIGERATOR WITH WINE, SOLID DOOR, 24”
GRWS_24-XX INDOOR / OUTDOOR DUAL ZONE REFRIGERATOR WITH WINE, SOLID DOOR, COLOR, 24”
GRWG_24 INDOOR / OUTDOOR DUAL ZONE REFRIGERATOR WITH WINE, GLASS DOOR, 24”
GRWG_24-XX INDOOR / OUTDOOR DUAL ZONE REFRIGERATOR WITH WINE, GLASS DOOR, COLOR, 24”
GFDS_241 INDOOR / OUTDOOR SINGLE FAUCET BEER DISPENSER, SOLID DOOR, 24”
GFDS_241-XX INDOOR / OUTDOOR SINGLE FAUCET BEER DISPENSER, SOLID DOOR, COLOR, 24”
GFDS_242 INDOOR / OUTDOOR DOUBLE FAUCET BEER DISPENSER, SOLID DOOR, 24”
GFDS_242-XX INDOOR / OUTDOOR DOUBLE FAUCET BEER DISPENSER, SOLID DOOR, COLOR, 24”
4
GRSR24 shown GRR24 shownGRWGR24
shown
©2021 Hestan Commercial Corporation
_ = Right (R) or Left (L) Hinged Model
GFDSR241
shown
R600a Refrigerant
GFDSR242
shown
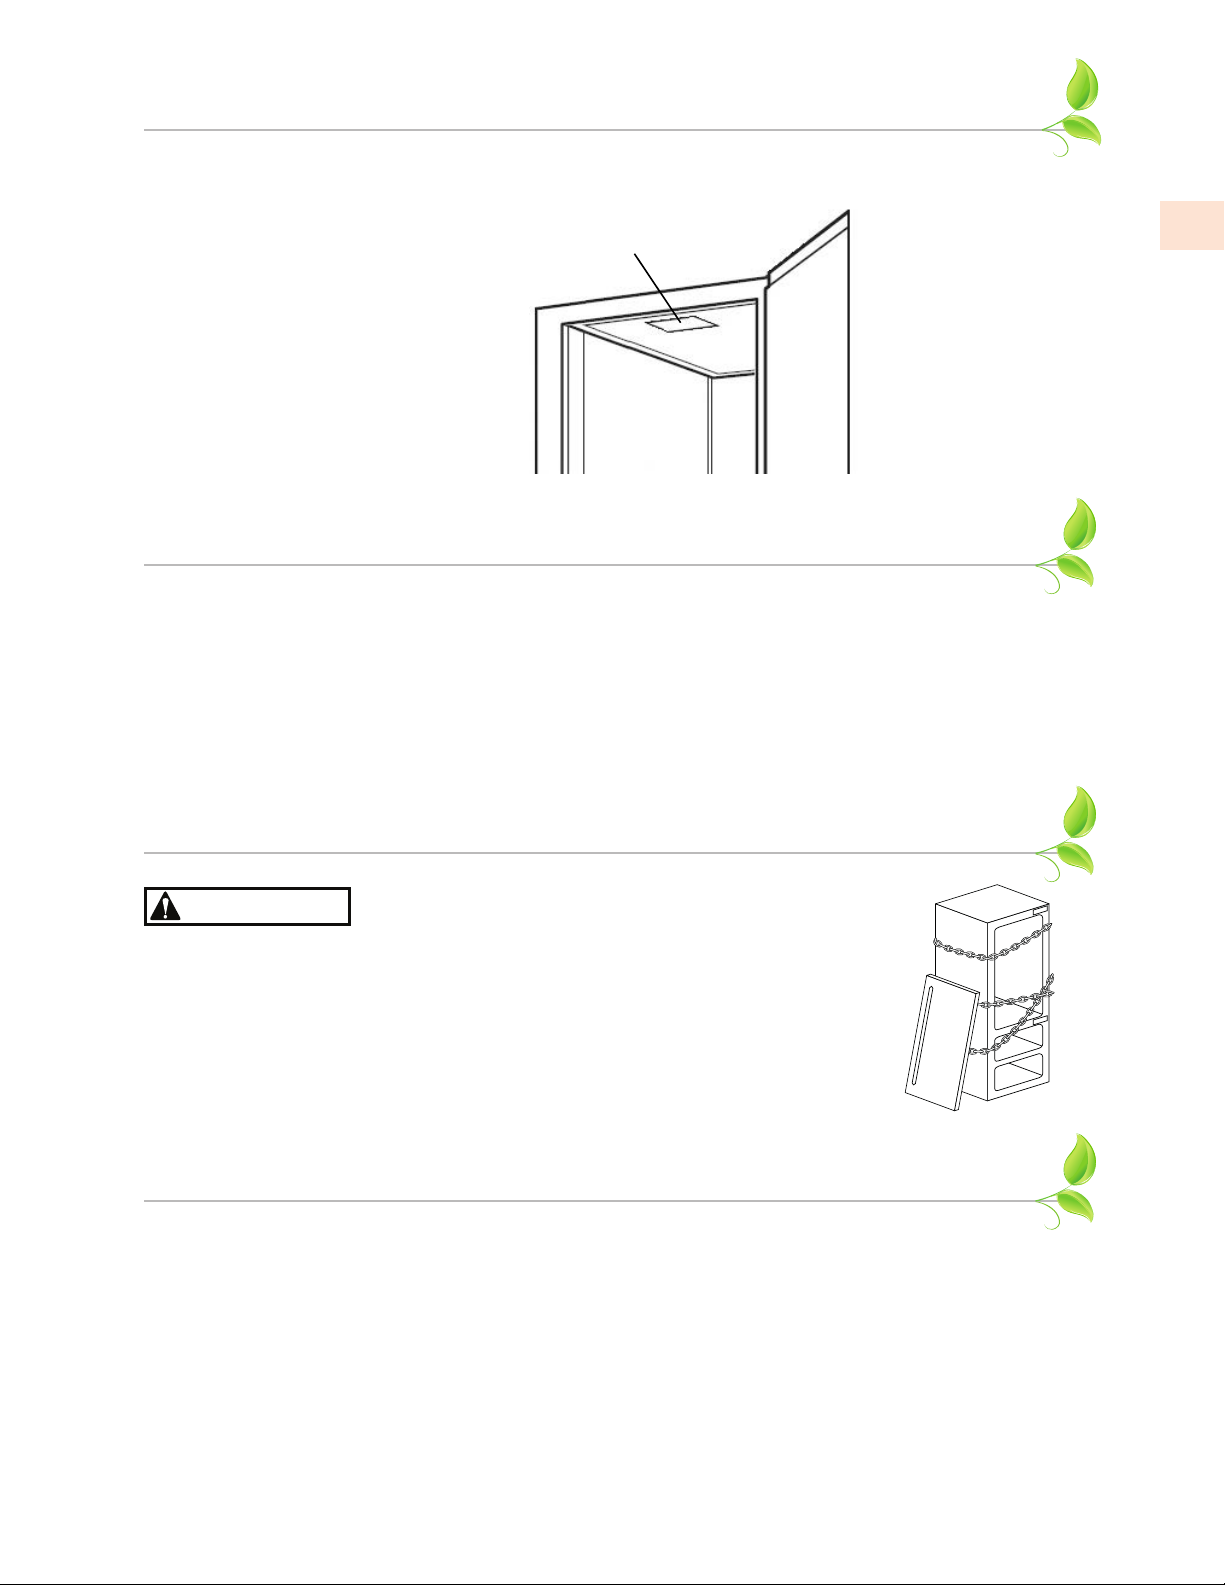
RATING LABEL
DANGER
The rating label contains important information about your Hestan appliance such as the model and
serial number, and refrigerant information if service is required.
RATING LABEL
The rating label is attached to the
inside top of the cabinet.
REGULATORY / CODE REQUIREMENTS
Installation of this appliance must be made in accordance with local codes. In the absence of
local codes, this unit should be installed in accordance with the National Electrical Code and local
codes.
This appliance must be electrically grounded in accordance with local codes or in the absence of
local codes with the National Electrical Code
C22.1
.
ANSI/NFPA 70
, or Canadian Electrical code
CSA
EN
IMPORTANT CHILD SAFETY
Risk of child entrapment. Before you throw away your old refrigerator or freezer:
• Take off the doors
• Leave the shelves in place so that children may not easily climb inside.
NEVER allow children to play inside the appliance.
PRECAUTIONS - BEFORE YOU USE YOUR APPLIANCE
When properly cared for, your Hestan undercounter refrigeration product will provide safe, reliable
service for many years. When using this appliance, basic safety practices must be followed as
outlined below.
IMPORTANT: Save these instructions for the local Utility Inspector’s use if needed.
INSTALLER: Please leave these instructions with the owner.
OWNER: Please retain these instructions for future reference.
This appliance is NOT designed for installation in manufactured (mobile) homes or recreational
park trailers.
©2021 Hestan Commercial Corporation
5

EN
DANGER
NOTICE
DANGER
DANGER
PRECAUTIONS - BEFORE YOU USE YOUR APPLIANCE
(continued)
PRIOR TO INSTALLATIONPRIOR TO INSTALLATION
PLEASE CONSULT THE INSTALLATION MANUAL PROVIDED. Carefully inspect appliance for
hidden damage. If damage is discovered, file your claim immediately with the transport company.
Hestan is not responsible for damage in transit. Remove any packaging materials before operating.
RISK OF FIRE OR EXPLOSION - FLAMMABLE REFRIGERANT USED.
Use caution when handling, moving and using the product to avoid damaging
the refrigerant tubing or increasing the risk of a leak.
When moving the unit, be sure to protect finished flooring with appropriate
material to avoid damage from moving the unit. Do not lift unit by drawer,
shelving or door handles, as damage to the unit could occur if not moved as instructed.
To prevent personal injury, a minimum of two people are required to lift the
unit. Larger units may require additional personnel.
Before moving the unit, secure the door shut with tape to prevent door from swinging open while
being moved. Carefully move unit to installation site and place in front of opening.
If unit has been laid on its back or sides, place unit upright and allow a
minimum of 24 hours before connecting power.
The unit must NOT be totally enclosed or damage may occur. Air circulation must
not be restricted. The condenser at the cabinet front must be provided with a
minimum of 2” [5 cm] air space. Be sure to provide access so the front cover can be removed to
clean the condenser.
Do not store flammable liquids (i.e. Gasoline or Lighter Fluid) or vapors near
the appliance to avoid a fire.
ELECTRICAL SHOCK HAZARDELECTRICAL SHOCK HAZARD
Disconnect power before installing or servicing appliance. Failure to
do so can result in death or electrical shock.
ELECTRICAL GROUNDINGELECTRICAL GROUNDING
• This appliance must be grounded. Grounding reduces the
risk of electric shock in the event of a short circuit. Read the
ELECTRICAL CONNECTIONS section of the Installation Manual
for complete instructions.
• DO NOT ground to a gas pipe.
• DO NOT use an extension cord with this appliance.
• DO NOT have a fuse in the NEUTRAL or GROUNDING circuit. A fuse in the NEUTRAL or
GROUNDING circuit could result in an electrical shock.
Appliances equipped with a flexible electrical supply cord are provided with a three-prong
grounding plug. It is imperative that this plug be connected to a properly grounded three-prong
receptacle. If the receptacle is not the proper grounding type, contact an electrician.
• Never remove the grounding prong from this plug.
• Never use a 2-prong adapter.
• If a 2-prong receptacle is encountered, or a longer power cord is required, contract a qualified
electrician to have it replaced in accordance with applicable electrical codes.
• The unit is designed for 115 volt AC power and must be plugged into a Ground Fault Circuit
Interrupter (GFCI) protected circuit when installed outdoors.
6
©2021 Hestan Commercial Corporation
OPERATION
Programming Button Definitions:
MASTER SWITCHMASTER SWITCH
Hestan refrigeration products come equipped with a master power switch located behind the
louvered toe kick. Remove the toe kick/grille to turn power on or off to the unit.
INTERIOR LIGHTINTERIOR LIGHT
Door units are equipped with an interior light that illuminate when the door is opened. All models
come standard with adjustable blue and white LED lighting. The cabinet also comes equipped with a
manual light switch for displaying the products through a glass door.
Always ensure that the manual light switch is in the OFF position before closing a solid wood or
stainless steel door. If manual light switch is left on for an extended period of time, it will increase
energy usage and decrease LED life.
LOADING PRODUCTLOADING PRODUCT
Before storing perishables, turn unit on and allow it to operate for a minimum of 24 hours to allow
temperatures to stabilize. When loading items into the unit, do not block internal louvers and fan
guard openings or performance will be decreased.
CHECKING PRODUCT TEMPERATURECHECKING PRODUCT TEMPERATURE
1. To accurately check the temperature of product stored in the refrigerated compartment, insert
an accurate thermometer into a plastic unbreakable bottle, partially filled with water. Tighten
bottle cap securely.
EN
2. Place the bottle in the desired area for 24 hours. Refrain from opening the unit during the testing
period. After 24 hours, check the temperature of the water. Adjust the temperature accordingly
using the following procedures:
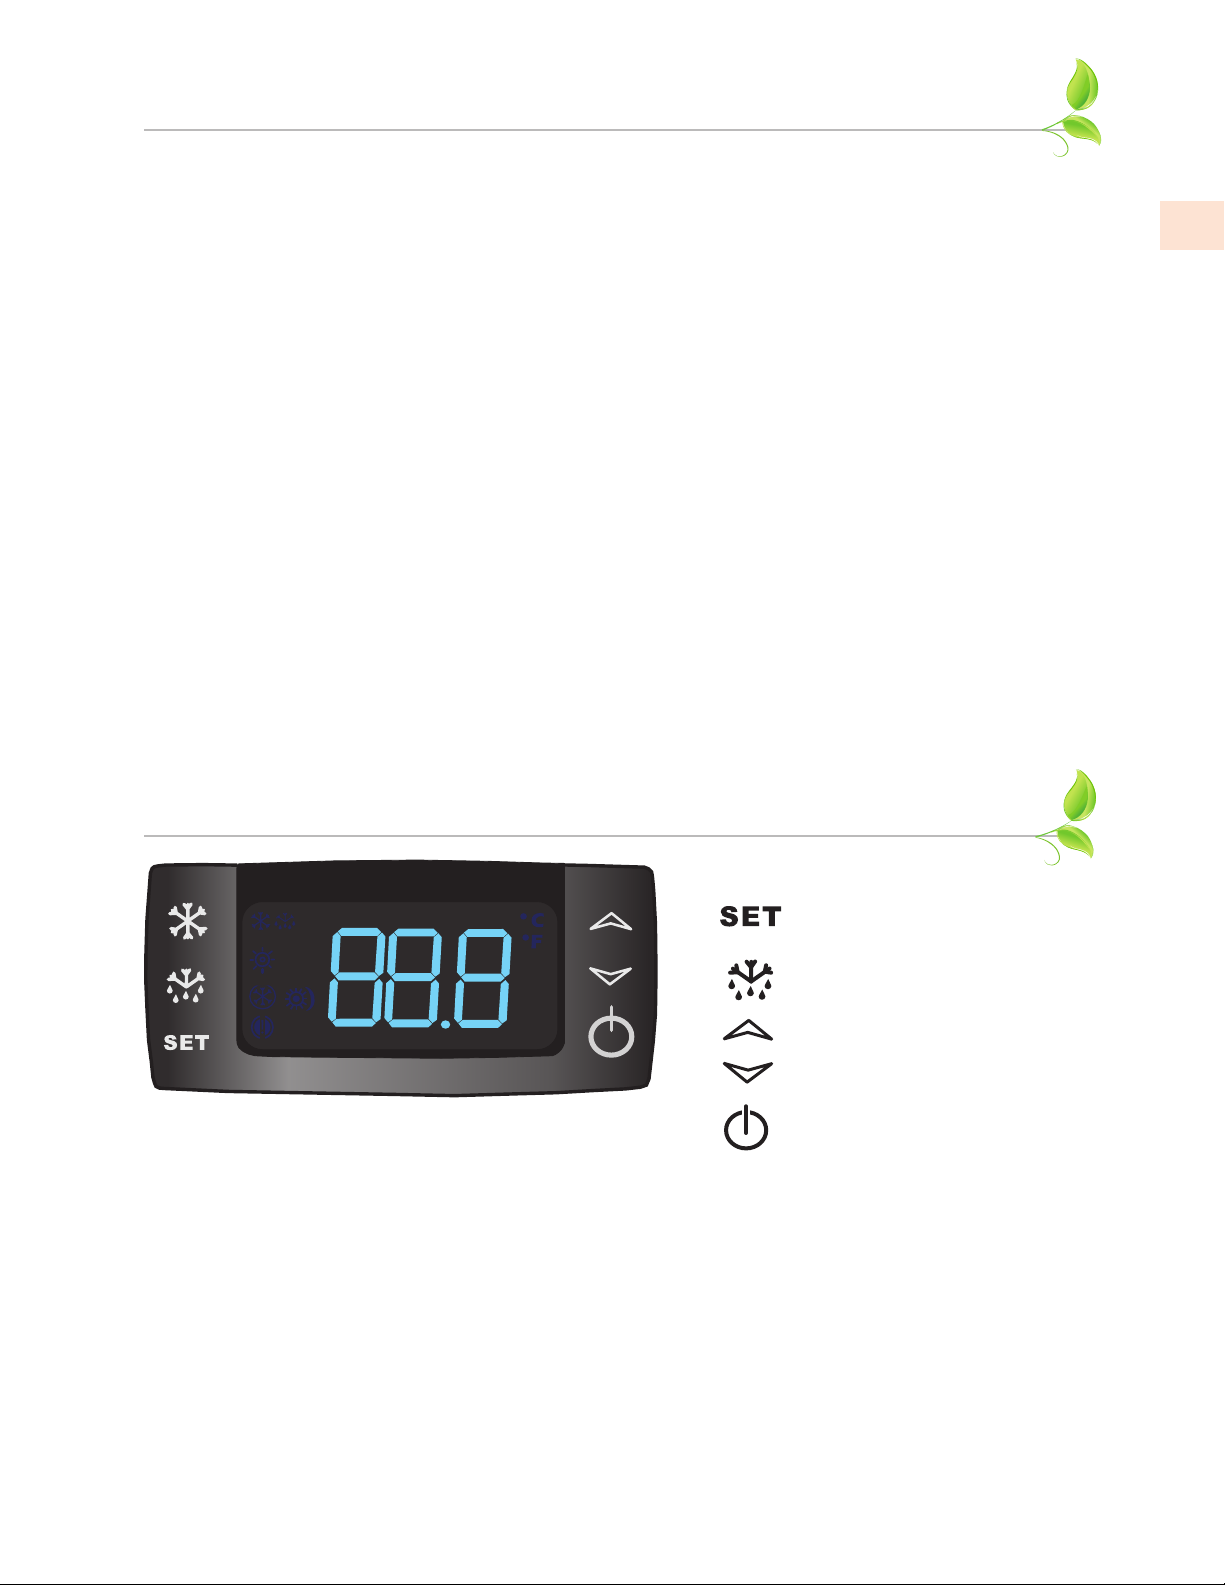
DIGITAL TEMPERATURE CONTROL
Figure 1. Digital Temperature Controller
DUAL ZONE CONTROL INSTRUCTIONSDUAL ZONE CONTROL INSTRUCTIONS
ON / OFF
Press the ON/OFF button to turn the unit on or off.
SET button
DEFROST button (melting snowflake)
UP arrow
DOWN arrow
ON/OFF button
Upper Compartment:
To view the upper compartment temperature, press and release the DEFROST button (melting
snowflake).
Lower Compartment (Must be coldest zone):
Display reading always shows the lower compartment temperature.
©2021 Hestan Commercial Corporation
7

EN
DIGITAL TEMPERATURE CONTROL
Setpoint Display:
Press and release the SET button; display will read St1. Press SET again and the LOWER
compartment setpoint will be displayed.
Press SET again; the display will read St2. Press SET again and the UPPER compartment temperature
will be displayed.
Changing the Lower Compartment Temperature:
1. Press and hold the SET button until the display shows St1 with “F” flashing.
2. Press SET again to display the lower compartment’s current temperature (“F” will continue to
flash).
3. Use the UP or DOWN arrow key to scroll to the desired temperature. The controller will
memorize the new emperature.
Changing the Upper Compartment Temperature:
1. Press and hold the SET button until the display shows St1 with “F” flashing. Press the DOWN
arrow once; the display will read St2.
2. Press SET again to display the upper compartment’s current temperature (”F” will continue to
flash).
3. Use the UP or DOWN arrow key to scroll to the desired temperature. The controller will
memorize the new temperature.
(continued)
NOTE: Dependent on the model and configuration, the controllers have been programmed to only
allow a lower compartment temperature adjustment range as specified within the chart below. The
upper compartment range is not limited, but should always be kept within the specified range shown
in the table for the upper compartment. See the chart below for the specified range allowed for your
unit.
Dual-Zone Units
MODEL TEMPERATURE RANGE
GRFR24 Upper 30°to 42°F [-1 to +6°C] / Lower -10°to 10°F [-23 to -12°C]
GRWS_24 / GRWG_24 Upper 45°to 65°F [+7 to +18°C] / Lower 30°to 42°F [-1 to +6°C]
Dual-Zone Temperature Scale
To change F to C, press and hold the down arrow for 3 seconds.
To Start A Manual Defrost (GRFR24 Only)
Press and hold the DEFROST button (melting snowflake) for 3-5 seconds. Melting snowflake will
illuminate.
SINGLESINGLE ZONE CONTROL INSTRUCTIONS ZONE CONTROL INSTRUCTIONS
ON / OFF
Press the ON/OFF button to turn the unit on or off.
To Set Target Temperature
Press and release the SET button. Display will show the current temperature setpoint.
8
©2021 Hestan Commercial Corporation

DIGITAL TEMPERATURE CONTROL
NOTICE
To Change Setpoint Temperature
1. Press and hold the SET button until the display shows the current setpoint temperature with the
“F” flashing.
2. Use the UP and DOWN arrow button to scroll to the desired temperature.
To Start A Manual Defrost (Freezer Models Only)
Press the DEFROST button (melting snowflake)
To See Maximum Stored Temperature
Press the UP arrow button to see the maximum stored temperature.
To reset the maximum stored temperature, while displayed, press and hold the SET button until ‘rst’
flashes in the display.
To See Minimum Stored Temperature
Press the DOWN arrow button to see the minimum stored temperature.
To reset the minimum stored temperature, while displayed, press and hold the SET button until ‘rst’
flashes in the display.
NOTE: Dependent on the model and configuration, the controllers have been programmed to only
allow a temperature adjustment within the specified range. See the chart below for the specified
range allowed for your unit.
(continued)
EN
Single-Zone Units
MODEL MIN. TEMP. SET MAX. TEMP. SET
GRS_24 33°F [+1°C] 42°F [+6°C]
LED Functions
The following table describes the LED functions.
LED Mode Function
ON Compressor is on
Flashing Anti-short cycle
delay is on
ON Defrost is on
ON Alarm is on
Flashing You are in the process of
Audible alarm will sound if the door is left ajar for longer than 1 minute. Fully
closing the door will clear the alarm condition. Prolonged time spent with the door
open can damage the equipment.
programming the unit
©2021 Hestan Commercial Corporation
9

MAINTENANCE
DANGER
SEASONAL MAINTENANCE FOR UL-APPROVED OUTDOOR MODELSSEASONAL MAINTENANCE FOR UL-APPROVED OUTDOOR MODELS
EN
WINTERIZINGWINTERIZING
This process should occur when the daily low temperatures is at or below the temperatures stated
below:
Refrigerator models: 38°F [+3°C] Beverage Center/Beer: 42°F [+6°C]
Freezer models: 32°F [0°C] Wine Reserve: 45°F [+7°C]
It is best to winterize your unit before the low temperatures listed above.
1. Turn the unit to OFF position by pressing the OFF button on the controller. The controller
displays the word “OFF” and turn the master switch located behind the grille off (if the power
cord is accessible, unplug the power cord. If not, turn off the circuit breaker to the electrical
receptacle the cabinet is plugged into).
2. Remove all contents from the unit.
3. Remove the front grille.
4. Clean the condenser by using a vacuum cleaner to remove loose debris (leaves, dirt, etc.) that
may have accumulated inside the grille.
5. Reinstall the front grille.
6. Clean the interior of the unit using stainless steel cleaner and polish (see page 11).
7. Clean the exterior of the unit using stainless steel cleaner and polish (see page 11).
NOTE: Do not place a cover over the unit. While not required, you may choose to remove the unit
from the outdoor location and store indoors.
Operating the unit at temperatures lower than those recommended will void the warranty.
SPRING START-UPSPRING START-UP
This process should occur after the daily low temperatures is above the temperatures stated below:
Refrigerator models: 38°F [+3°C] Beverage Center/Beer: 42°F [+6°C]
Freezer models: 32°F [0°C] Wine Reserve: 45°F [+7°C]
1. Remove the grille.
2. Check the condensing unit to ensure it is clear of loose debris, and clean as necessary with a
vacuum cleaner.
3. Reattach front grille to the unit.
4. Clean the interior of the unit using stainless steel cleaner and polish (see page 11).
5. Clean the exterior of the unit using stainless steel cleaner and polish (see page 11).
6. Plug the unit into the electrical receptacle or turn on the circuit breaker.
7. Turn on the master switch located behind the grille. Press the OFF button one time to turn the
unit on. The controller display will show the actual temperature inside the cabinet.
8. The cooling process will begin to bring the unit to the set temperature. It is recommended you
run the unit for 24 hours to stabilize the operating temperature before using.
Never attempt to repair or perform maintenance on the unit until the main electrical power has
been disconnected!
10
©2021 Hestan Commercial Corporation
LED REPLACEMENTLED REPLACEMENT
To receive parts and/or service and the name and telephone number of the nearest Hestan
authorized service representative, please contact your Hestan dealer or distributor, or Hestan’s
Customer Service Department by calling 888-905-7463 or e-mailing outdoorwarranty@hestan.com

CLEANING
STAINLESS STEEL CARESTAINLESS STEEL CARE
Stainless Steel is widely used for catering and residential kitchen equipment because of its strength,
its ability to resist corrosion, and its ease of cleaning. Unfortunately, the metal is often taken
for granted and it is assumed that no problems will arise during its usage. However, some care is
required to ensure a long service life of the appliance.
Stainless steel is a “passive” metal because it contains other metals like chromium, nickel and
manganese that stabilize the atoms. Chromium provides an invisible passive film that covers the steel
surface, acting as a shield against corrosion. As long as the film is intact and not contaminated, the
metal is passive and stainless. If the passive film of stainless steel has been broken, equipment can
start to corrode and rust.
Three materials or processes can break down stainless steel’s passive layer and allow corrosion to
occur:
• Mechanical abrasion
• Deposits and water
• Chlorides
Mechanical abrasion refers to items that will scratch a steel surface. Steel pads, wire brushes and
scrapers are prime examples.
Water comes out of the faucet in varying degrees of hardness. Hard water may leave spots. When
allowed to sit, these deposits will break down the passive chromium layer and rust stainless steel.
Other deposits from food preparation must be promptly removed with an appropriate cleaning
agent.
Chlorides are found nearly everywhere. They are in water, food and table salt. Household and
industrial cleaners are the worst offenders. Examples of products containing chlorides are bleach,
and pool chlorine. Outdoor locations near a swimming pool, or near areas where liquid fertilizers are
used can also contribute to corrosion of your Hestan products.
EN
PREVENTING STAINLESS STEEL RUSTPREVENTING STAINLESS STEEL RUST
Use non-abrasive tools to clean stainless steel products. Soft cloths and plastic scouring pads will
not harm the steel’s passive layer. Clean with polish lines. Some stainless steels have visible polishing
lines or “grain”. When visible lines are present, always scrub in a motion parallel to the lines. When
the grain cannot be seen, polish in a consistent straight pattern and not in a circular motion.
Use alkaline, alkaline-chlorinated or non-chloride containing cleaners. While many traditional
cleaners are loaded with chlorides, the industry is providing an ever-increasing choice of non-chloride
cleaners. If you are not sure of chloride content in the cleaner being used, contact your cleaner
supplier. If your present cleaner contains chlorides, ask your supplier for an alternative. Avoid
cleaners containing quaternary salt; it also can attack stainless steel and cause pitting and rusting.
Keep food equipment clean. Use alkaline, alkaline-chlorinated or non-chloride cleaners at
recommended strength. Clean frequently to avoid build-up of hard, stubborn stains. The single most
likely cause of damage is chlorides in the water. Remember, adding heat to cleaners that contain
chlorides dramatically increases their effect on stainless steel.
If chlorinated cleaners are used, immediately rinse and wipe equipment and supplies dry. The sooner
you wipe standing water, especially when it contains cleaning agents, the better. After wiping
equipment down, allow it to air dry. Oxygen helps maintain the stainless steel passive film.
CLEANING THE CABINET INTERIOR / EXTERIORCLEANING THE CABINET INTERIOR / EXTERIOR
NEVER use hydrochloric acid (muriatic acid) on stainless steel. Do not use abrasive cleansers or
cloths on any interior or exterior surfaces or removeable parts.
Glass panels may be cleaned using any standard glass cleaner available on the market.
To clean interior and exterior non-metallic surfaces and removable parts, wash with mild solution of
soap and lukewarm water with a little baking soda. Rinse and dry thoroughly. Avoid getting water
on the lights, controllers, fan motors and unfinished wood wine rack faces.
©2021 Hestan Commercial Corporation
11
 Loading...