

Page 1
LP PORTABLE TO
LP PIPED SYSTEMS KIT
AGCKLPP
APPLICABLE APPLIANCES:
GRILLS - GABR / GSBR / GMBR
SIDE BURNER - AGB
IMPORTANT - READ ALL INSTRUCTIONS BEFORE YOU BEGIN
THE INSTRUCTIONS HEREIN SHOULD BE PERFORMED BY A QUALIFIED SERVICE TECHNICIAN.
THE APPLIANCE MUST BE COMPLETELY COOL AND THE PREVIOUS GAS SOURCE MUST BE SHUT
OFF OR REMOVED BEFORE ATTEMPTING INSTALLATION.
Some parts inside your grill or side burner have sharp edges. Care must be taken when handling the
various components to avoid personal injury. Wear gloves when handling.
TOOLS REQUIRED:
Work gloves
Safety glasses
Phillips screwdriver
Pipe wrench or large slip-joint pliers
Adjustable Wrenches (2)
Thread sealant
EN
DANGER
If you smell gas:
1. Shut off gas to the appliance.
2. Extinguish any open flame.
3. Open lid.
4. If odor continues, keep away from the
appliance and immediately call your gas
supplier or your fire department.
IF THE INFORMATION IN THIS MANUAL IS NOT FOLLOWED
EXACTLY, A FIRE OR EXPLOSION MAY RESULT CAUSING
PROPERTY DAMAGE, PERSONAL INJURY, OR DEATH.
Flammable Gas - disconnect all propane or natural gas supplies to this
unit before servicing.
Electrical Parts & Components – disconnect all power supplies and
batteries before servicing.
1. Do not store or use gasoline or
other flammable liquids or vapors
in the vicinity of this or any other
appliance.
2. An LP cylinder not connected for
use shall not be stored in the vicinity
of this or any other appliance.
DANGER
READ THIS MANUAL CAREFULLY AND COMPLETELY BEFORE USING YOUR
GRILL TO REDUCE THE RISK OF FIRE, BURN HAZARD, OR OTHER INJURY.
KEEP THIS MANUAL FOR FUTURE REFERENCE.
©2016 Hestan Commercial Corporation
1
Page 2
EN
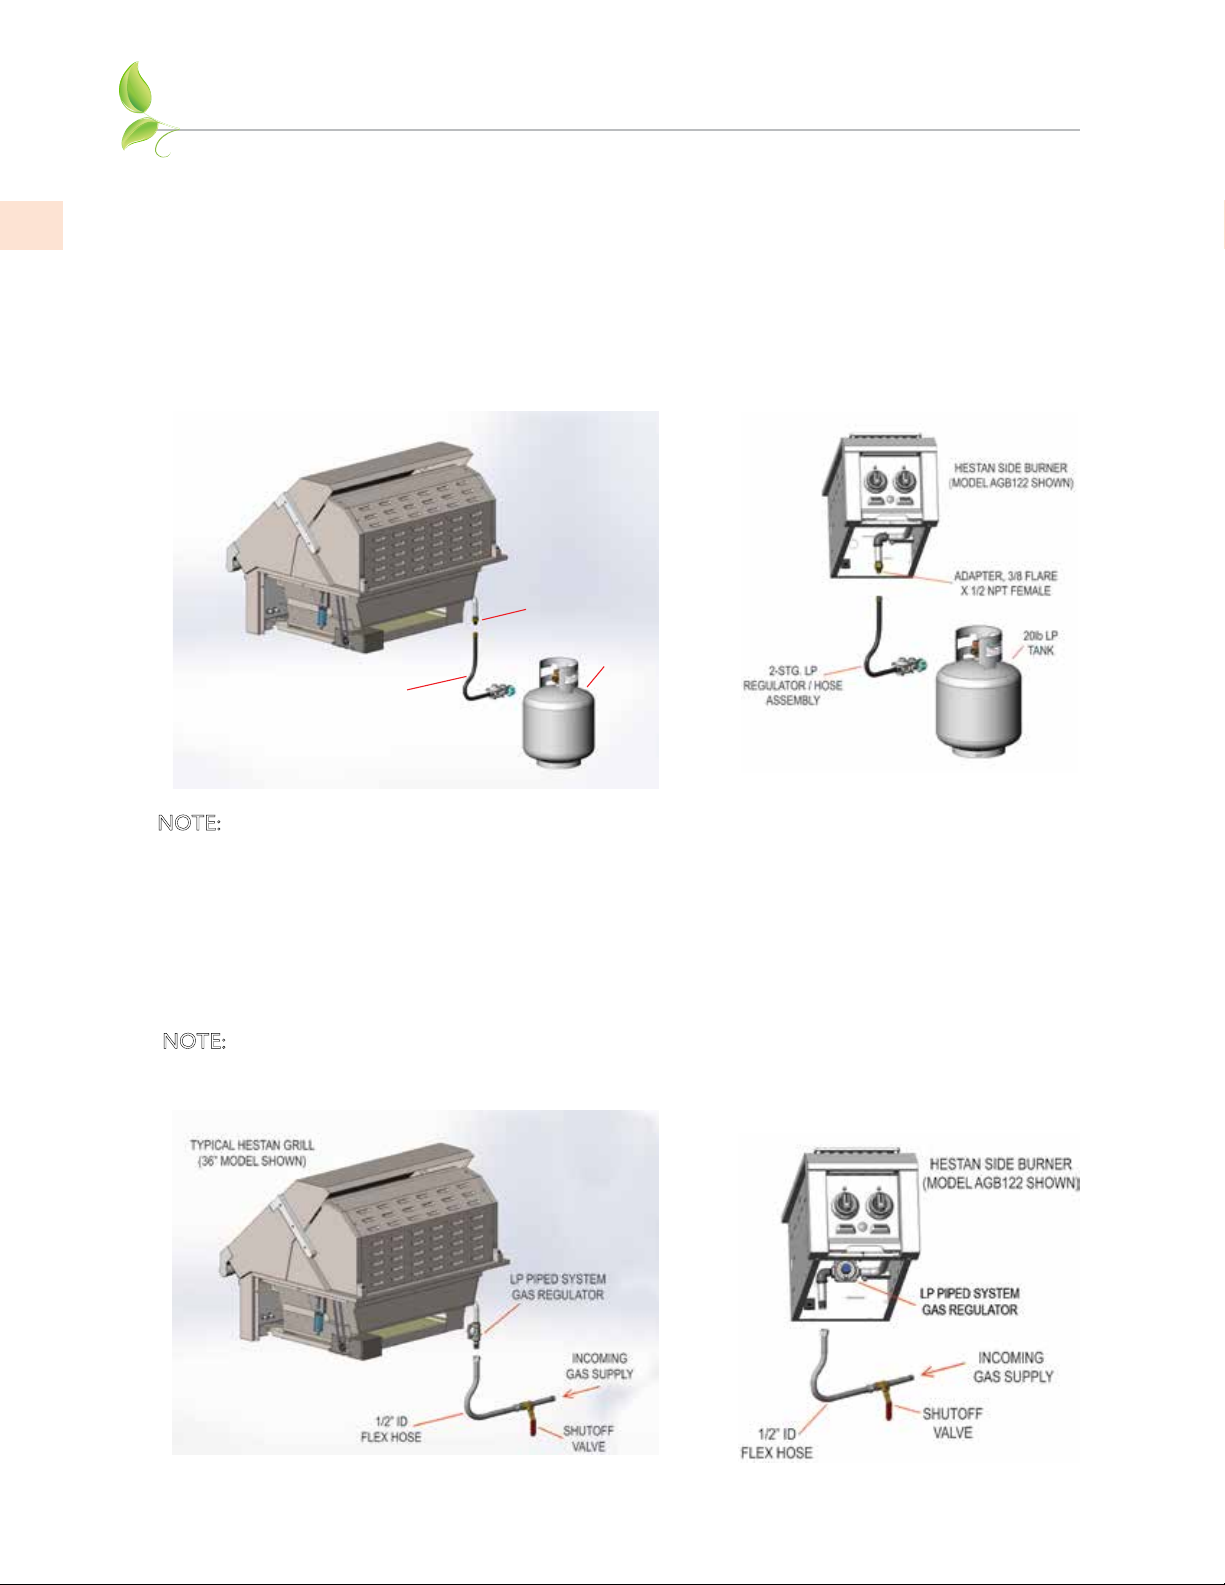
TYPICAL HESTAN GRILL
(36” MODEL SHOWN)
ADAPTER, 3/8 FLARE
X 1/2 NPT FEMALE
20lb LP
TANK
2-STG. LP
REGULATOR / HOSE
ASSEMBLY
CHANGING REGULATOR (FOR UNITS WITH PORTABLE LP TANKS)
An LP piped system is one with a large central LP tank that feeds an entire household. These systems are
normally equipped with a high pressure regulator by the large LP tank, and low pressure regulators close
to the home.
This kit is to be used if your Hestan grill or side burner was already supplied with a 2-stage LP regulator /
hose assembly. The kit includes a special regulator for use with LP Piped systems.
1. As shown below, disconnect the small LP tank, remove the hose assembly, and remove the brass
adapter fitting from the manifold pipe at the rear of the appliance.
NOTE: If you have a Hestan Side Burner inter-plumbed with a Hestan Grill, you will follow these same
instructions.
2. Install the new LP PIPED SYSTEM regulator as shown below. Connect to your LP Piped System
using a minimum 1/2” diameter flexible (semi-rigid) stainless steel gas hose. The gas line connectors
must comply with the
Homes, ANSI Z21.75 • CAS 6.27
Standard for Connectors for Outdoor Gas Appliances and Manufactured
, and suitable for outdoor installation. The connection shall be 6 feet
(1.82 m) or less.
NOTE: To ensure proper heating performance of this appliance, verify that the supply pressure is
adequate (11.0” WC supply pressure is preferred) to maintain 10.0” WC manifold pressure.
2
©2016 Hestan Commercial Corporation
Page 3
TESTING & ADJUSTMENT
LEAK TESTING
GENERAL
A complete gas tightness check must be performed of all gas-carrying components due to possible
movement during installation, or excessive pressure unknowingly being applied to parts of the unit.
BEFORE TESTING
• Do not smoke while leak testing.
• Never leak test with an open flame.
• Make a soap solution of one part liquid detergent and one part water for leak testing purposes.
• Apply the solution to the gas fittings by using a spray bottle or a brush.
• For LP units, always check with a full LP cylinder.
TO TEST
• Make sure all control valves are in the “OFF” position.
• Apply the soap solution described above to all fittings.
• Turn the gas supply on.
• Check all connections from the supply line, or LP cylinder up to and including the manifold pipe
assembly.
• Soap bubbles will appear where a leak is present. If a leak is present, immediately turn off gas supply,
tighten any leaking fittings, turn the gas supply back on, and recheck.
• If you cannot stop a gas leak, turn off the gas supply and call the dealer where you purchased your
grill.
• Do not use the grill until all connections have been checked and do not leak.
EN
IMPORTANT NOTE - ALWAYS CHECK FOR LEAKS AFTER EVERY LP CYLINDER CHANGE.
BURNER / VALVE ADJUSTMENTS
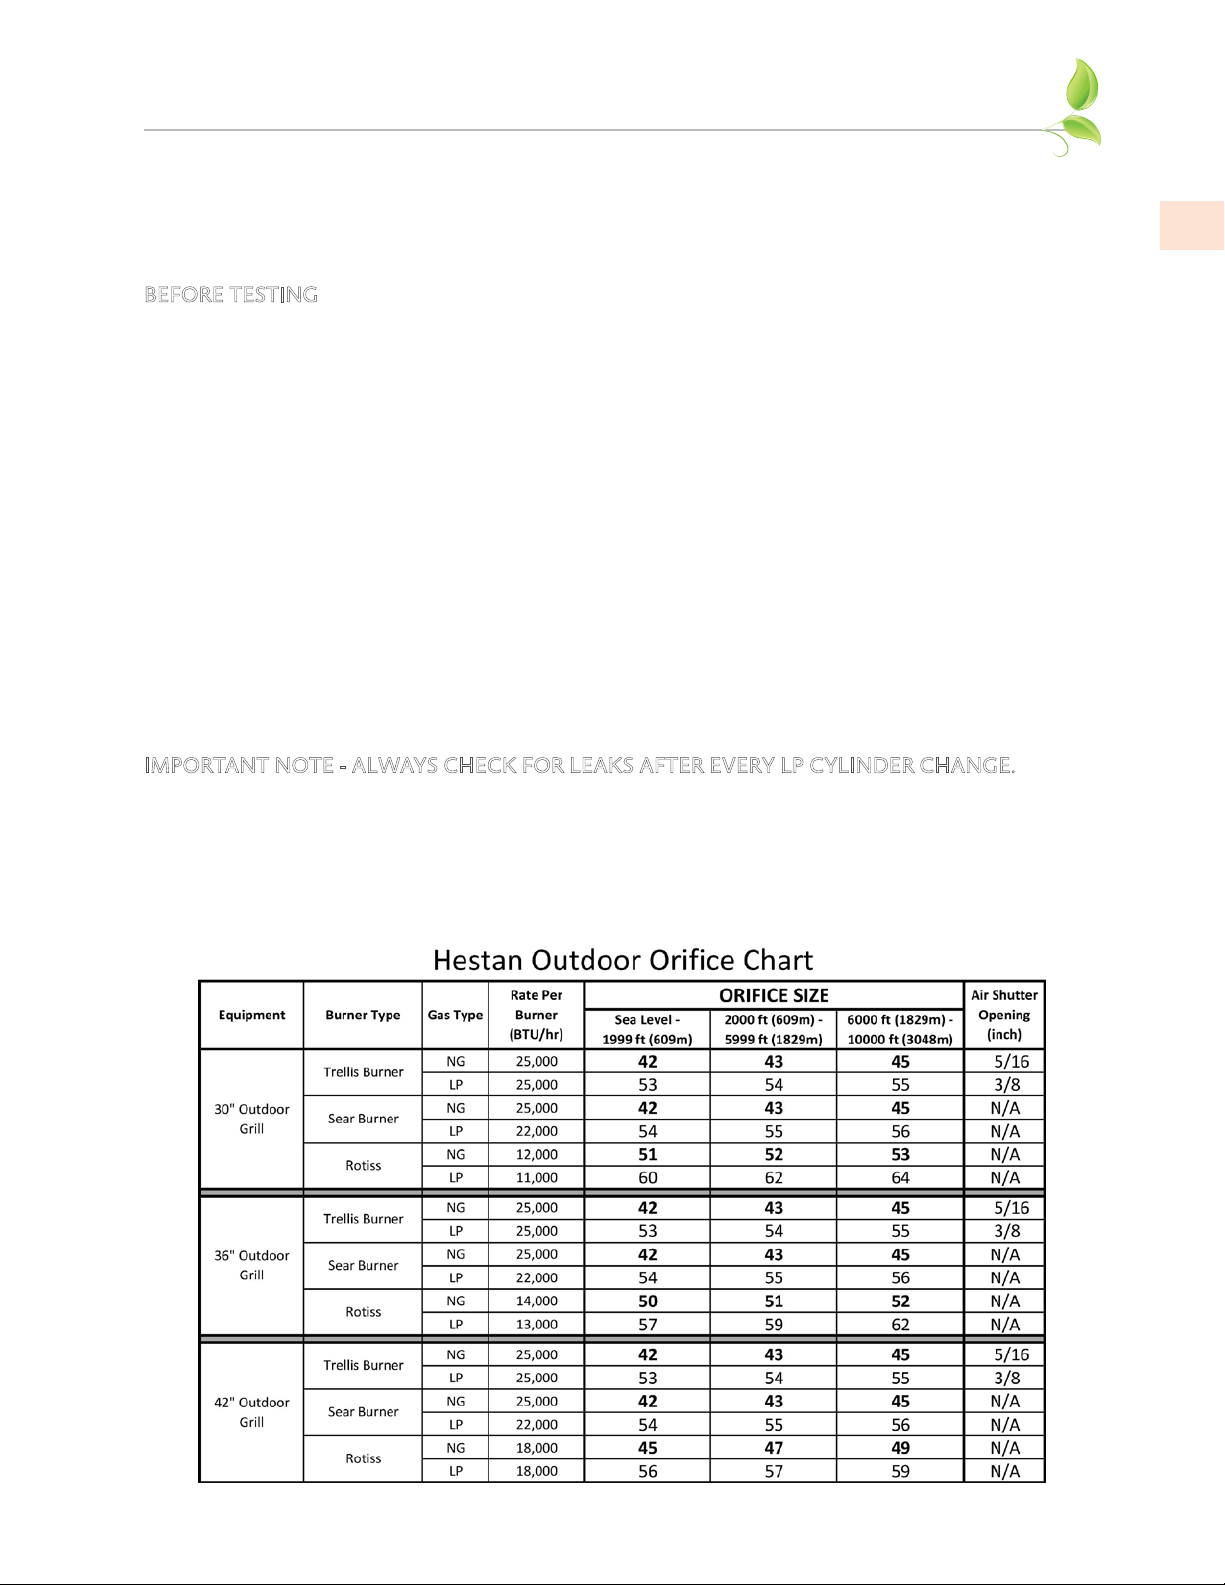
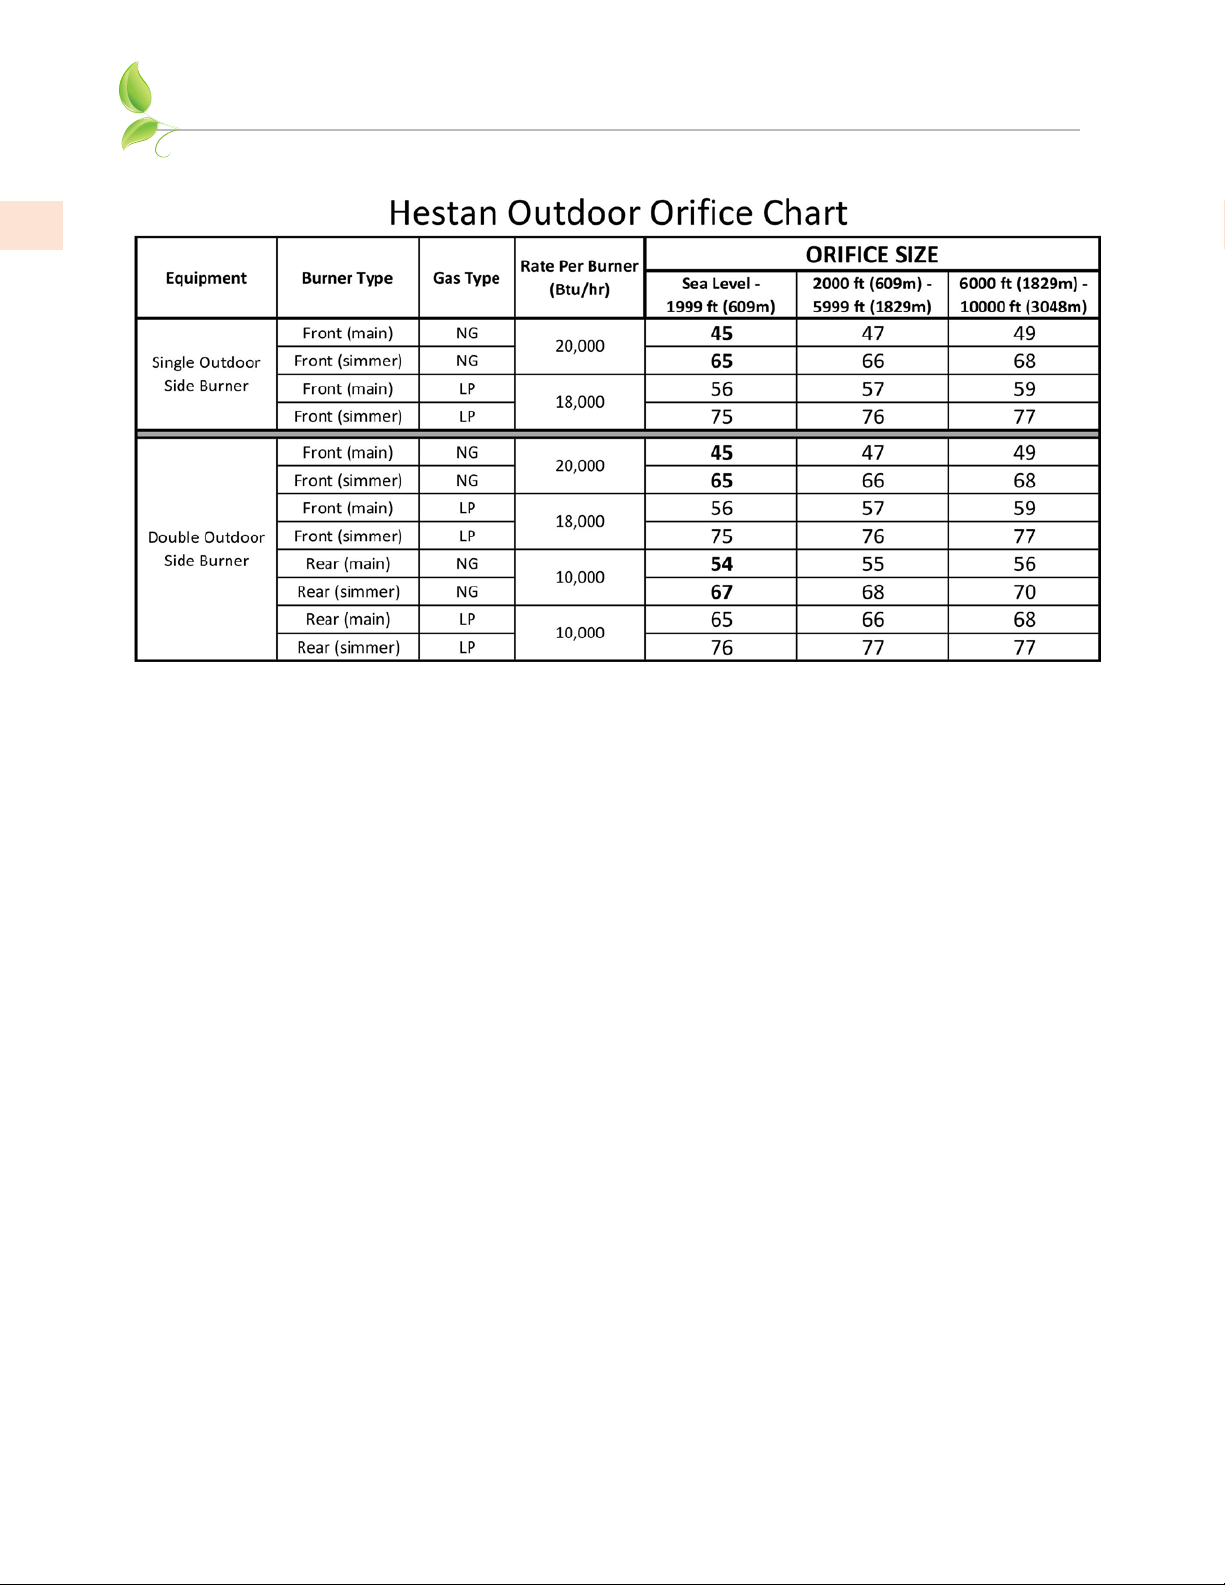
Consult the GAS CONNECTIONS section of your Hestan outdoor appliance for full instructions on
burner adjustments, flame appearance, air shutter adjustment, and valve adjustments. This step is very
important to ensure successful burner performance after conversion to a new fuel type, or changing
orifices for high altitude locations.
©2016 Hestan Commercial Corporation
3
Page 4
EN
TESTING & ADJUSTMENT
(continued)
4
©2016 Hestan Commercial Corporation
Page 5

RETAIN THIS MANUAL FOR FUTURE REFERENCE
Hestan Commercial Corporation
3375 E. La Palma Ave
Anaheim, CA 92806
(888) 905-7463
©2016 Hestan Commercial Corporation P/N 013719 REV A
 Loading...