

hestan GES08, GESB08, GES12, GESB12 Installation Instructions Manual

OUTDOOR LIVING
SUITE
(WITH CUSTOMER-PROVIDED STONE TOP)
INSTALLATION INSTRUCTIONS
GES08, GESB08, GES12, GESB12
IMPORTANT - READ ALL INSTRUCTIONS BEFORE YOU BEGIN
THE INSTALLATION HEREIN SHOULD BE PERFORMED BY A QUALIFIED SERVICE TECHNICIAN
OR PROFESSIONAL OUTDOOR EQUIPMENT INSTALLER. MANY COMPONENTS ARE HEAVY AND
REQUIRE 2 OR 3 PERSONS TO UN-PACK AND SETUP THIS SUITE. FAILURE TO DO SO MAY RESULT
IN PERSONAL INJURY.
THE ELECTRICAL COMPONENTS SUPPLIED WITH THIS SUITE MUST BE INSTALLED BY A
LICENSED ELECTRICIAN AND CONNECTED IN ACCORDANCE WITH LOCAL CODES. THE SUITE
SHOULD BE CONNECTED TO A DEDICATED CIRCUIT BREAKER. ALL OUTLETS SUPPLIED WITH
THIS SUITE ARE GROUND FAULT CIRCUIT INTERRUPTER OUTLETS AND MUST BE PROPERLY
INSTALLED AND GROUNDED BY A LICENSED ELECTRICIAN TO GUARANTEE SAFE AND RELIABLE
OPERATION.
SOME PARTS INSIDE THE SUITE HAVE SHARP EDGES. CARE MUST BE TAKEN WHEN HANDLING
THE VARIOUS COMPONENTS TO AVOID PERSONAL INJURY. WEAR GLOVES WHEN HANDLING.
EN
TOOLS REQUIRED:
Work gloves
Safety glasses
Power drill with masonry bits
Concrete / masonry anchors & hardware
Flat and Phillips screwdrivers
Socket wrench with 7/16” & 9/16” sockets and short extensions
Combination wrenches of 7/16” & 9/16” sizes
Level
AFTER INSTALLATION OF YOUR GRILL AND OTHER GAS-FIRED EQUIPMENT IN THIS
SUITE, READ THE MANUAL(S) PROVIDED WITH THOSE PRODUCTS CAREFULLY AND
COMPLETELY BEFORE USING YOUR GRILL TO REDUCE THE RISK OF FIRE, BURN
HAZARD, OR OTHER INJURY. KEEP THIS MANUAL FOR FUTURE REFERENCE.
IF THE INFORMATION IN THE GAS-FIRED APPLIANCE MANUALS
ARE NOT FOLLOWED EXACTLY, A FIRE OR EXPLOSION MAY RESULT
CAUSING PROPERTY DAMAGE, PERSONAL INJURY, OR DEATH.
Flammable Gas - disconnect all propane or natural gas supplies to this unit
before servicing.
Electrical Parts & Components – disconnect all power supplies and
batteries before servicing.
©2017 Hestan Commercial Corporation
1
EN
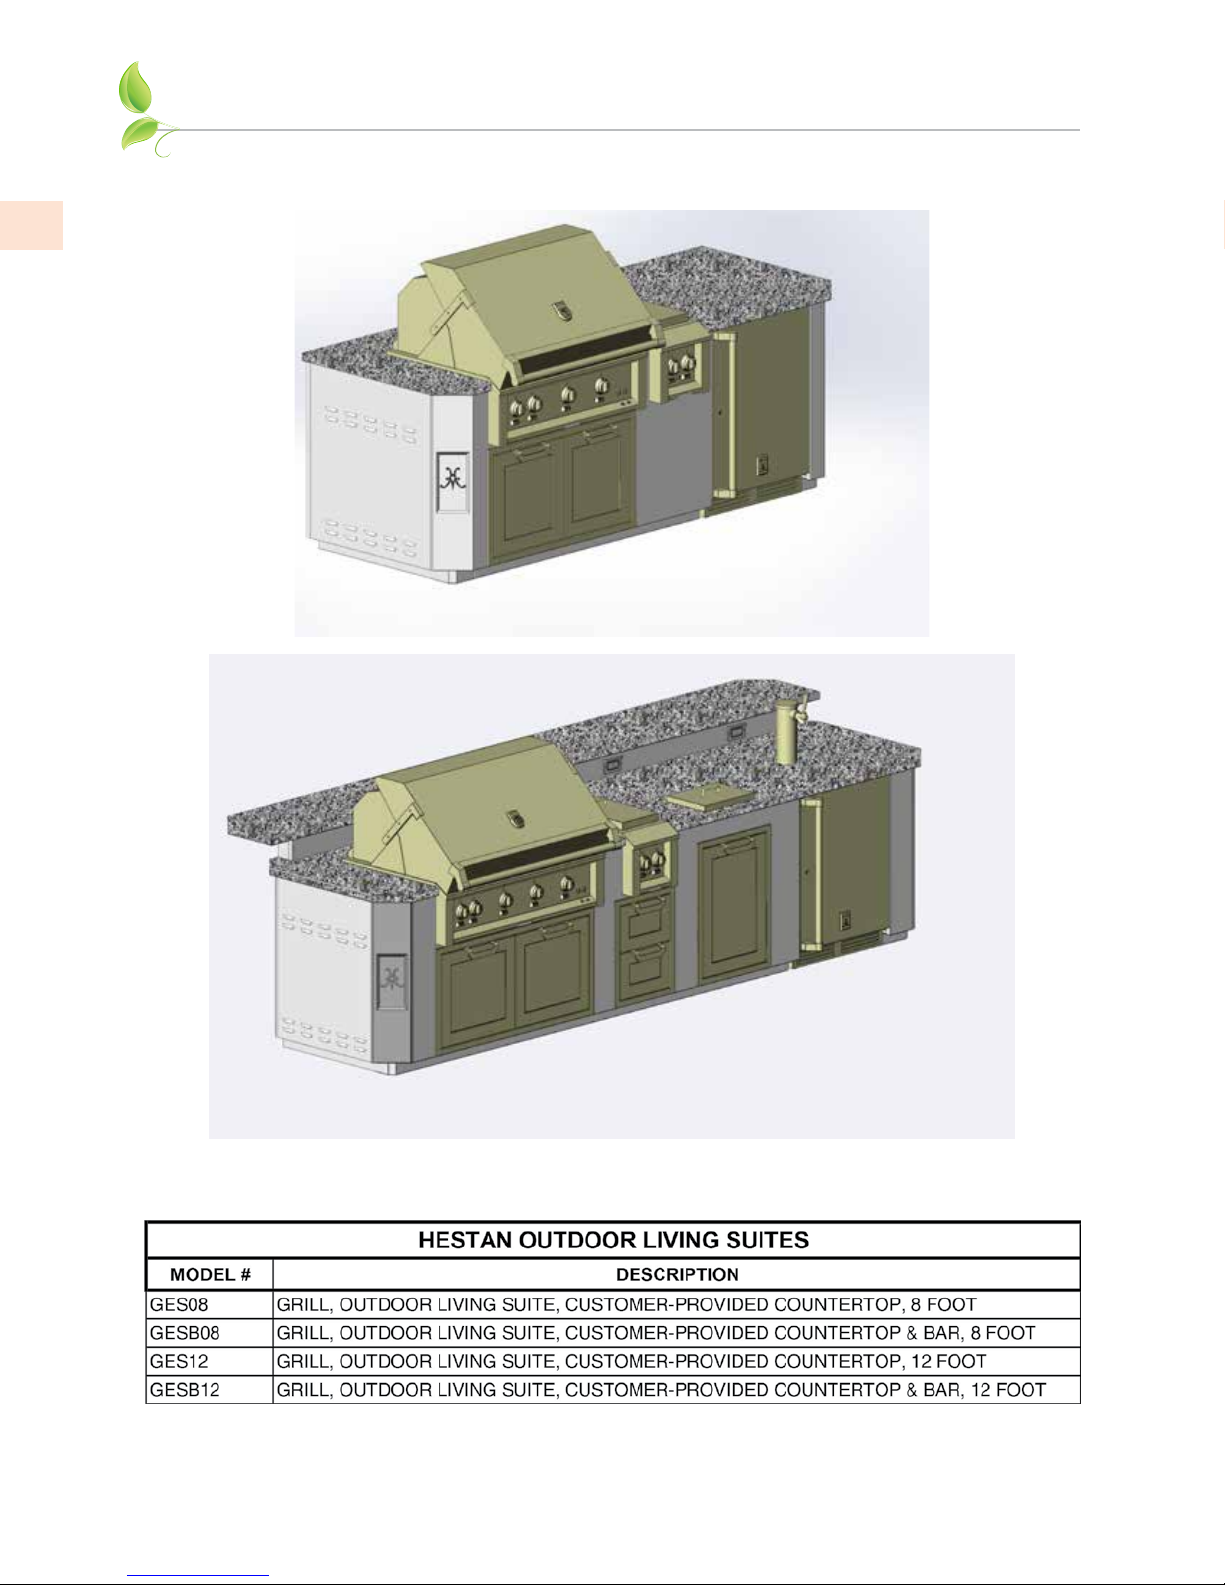
Suite GES08 shown with:
GABR36 Built-In Gas Grill
ABG122 Double Side Burner
AGAD36 Double Access Doors
GRSR24 Outdoor Fridge
ALL ITEMS PURCHASED SEPARATELY
STONE TOP NOT INCLUDED
Suite GESB12 shown with:
GABR42 Built-In Gas Grill
ABG122 Double Side Burner
AGTC Trash Chute
AGAD42 Double Access Doors
AGDR16 Double Drawers
AGTRC20 Trash & Recycling Center
GFDSR241 Outdoor Single Faucet Beer Dispenser
ALL ITEMS PURCHASED SEPARATELY
STONE TOPS NOT INCLUDED
SUITE MODELS WITH CUSTOMER-PROVIDED TOP
Below are representations of Hestan Outdoor Living Suites covered in this manual.
2
©2017 Hestan Commercial Corporation
LOCATING THE SUITE
When determining a suitable location for your suite, take into account concerns such as exposure
to wind, rain, sprinklers, proximity to traffic paths, and keeping any gas supply line runs as short
as possible.
Locate the grill only in a well-ventilated area. Never locate the grill in a building, breezeway, shed
or other such enclosed areas without an approved ventilation system. Never locate the grill over,
under, or next to unprotected combustible construction.
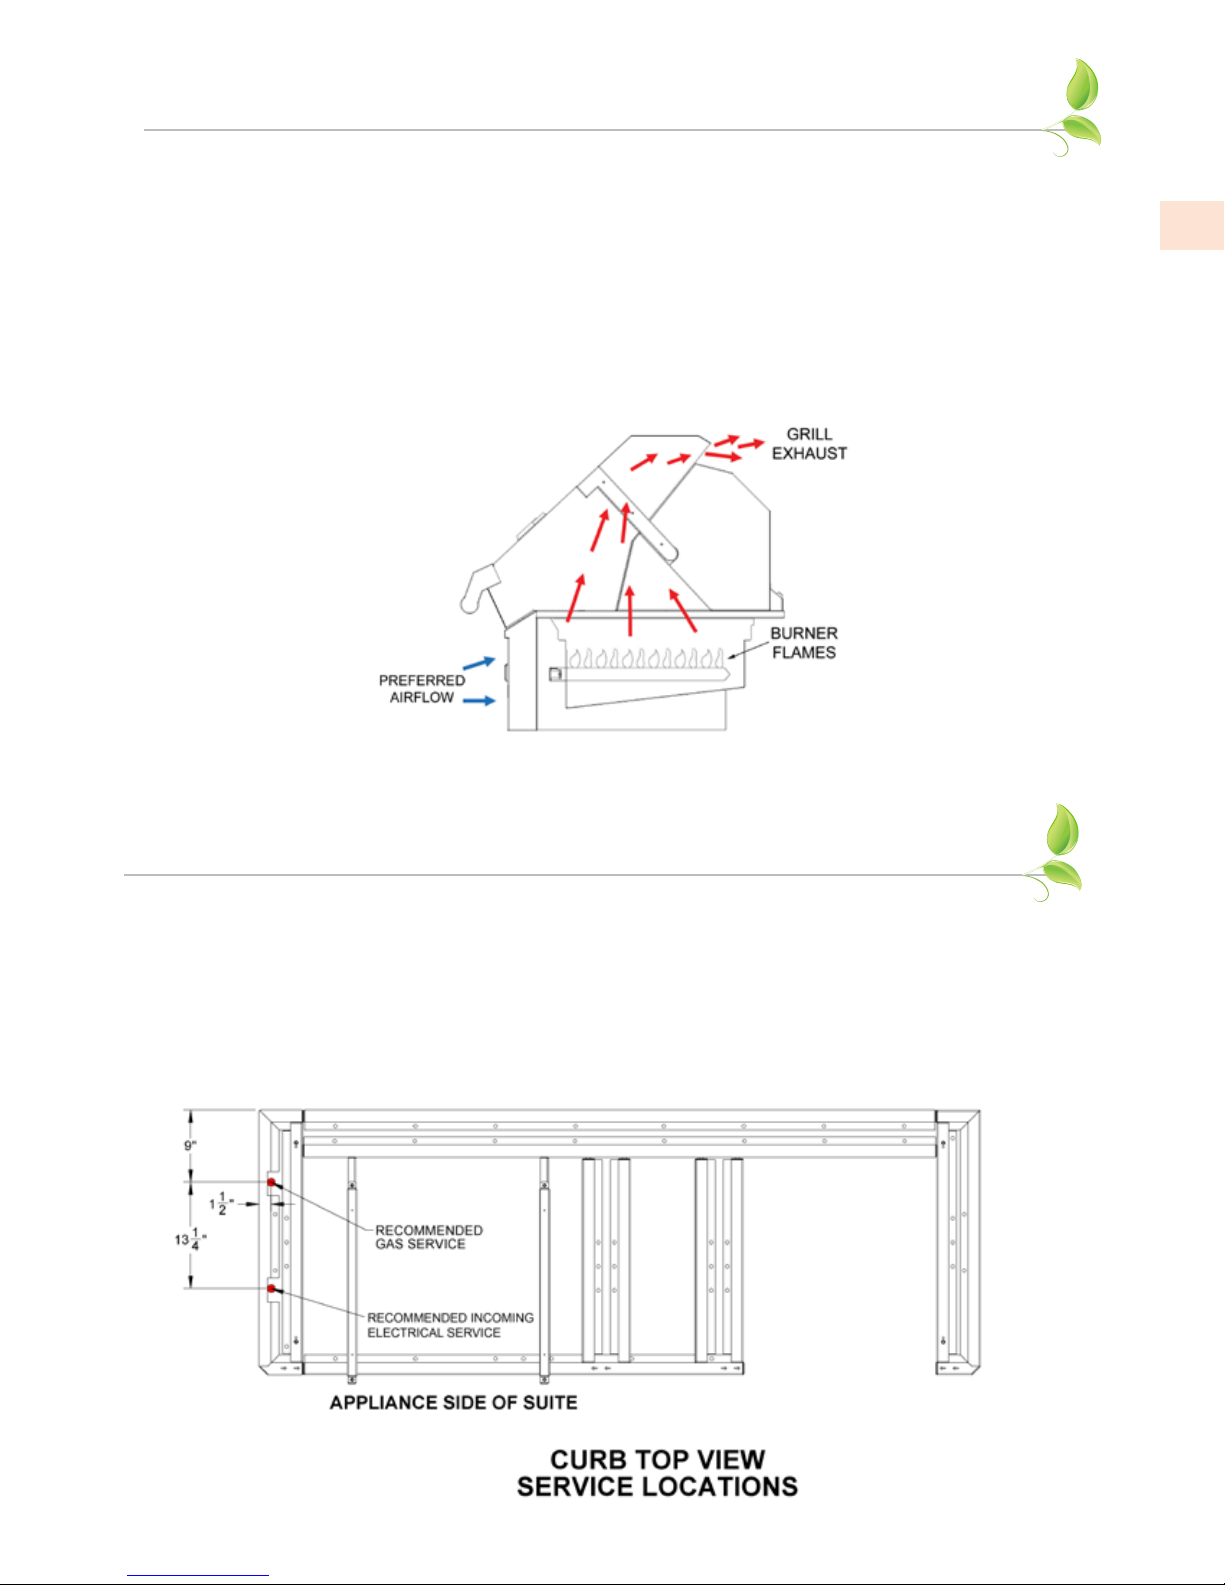
During heavy use, the grill will produce a lot of heat and smoke. The grill is designed to take in
cool air at the front control panel area, and send the combustion products and smoke out the
exhaust gap at the rear of the hood. It is important to maintain this flow at all times. Using the
grill in windy areas can disrupt this proper flow and cause damage to your grill, or result in burn
hazards to the user. See Fig. 1 for details.
EN
Figure 1
The Hestan Outdoor Living suite features ventilation openings (louvers) on each end. These
openings must be clear to avoid accumulation of gas should there be a leak. These openings are
further described later in this manual.
CURB INSTALLATION
1. The Hestan Outdoor Living Suite must be located on a level concrete or masonry patio
surface, not on direct soil. A licensed plumber and electrician should run their service
lines to the suite area prior to installation of the curb, in accordance with local codes. See
dimensions below for recommended location. See ELECTRICAL ITEMS section of this
manual for details. The gas line to the suite will require a shut-off that is easily accessible.
Local codes may also require a tracer wire be buried alongside the gas line for underground
detection. See the GAS CONNECTIONS section of this manual, and the appliance manual(s)
for more details.
©2017 Hestan Commercial Corporation
3
EN
CURB INSTALLATION
2. The curb should be as level as possible and permanently anchored to the patio surface using
stainless steel masonry anchors & bolts (not included). If you choose not to permanently anchor your
suite, be sure you have moved it to its final location. Also be aware that the suites featuring a bar
are prone to tipping over unless the curb is anchored to the floor surface. The Outdoor Living Suite
is very heavy and difficult to move once assembly is complete and all equipment has been installed.
(8 foot Outdoor Living Suite curb shown)
(continued)
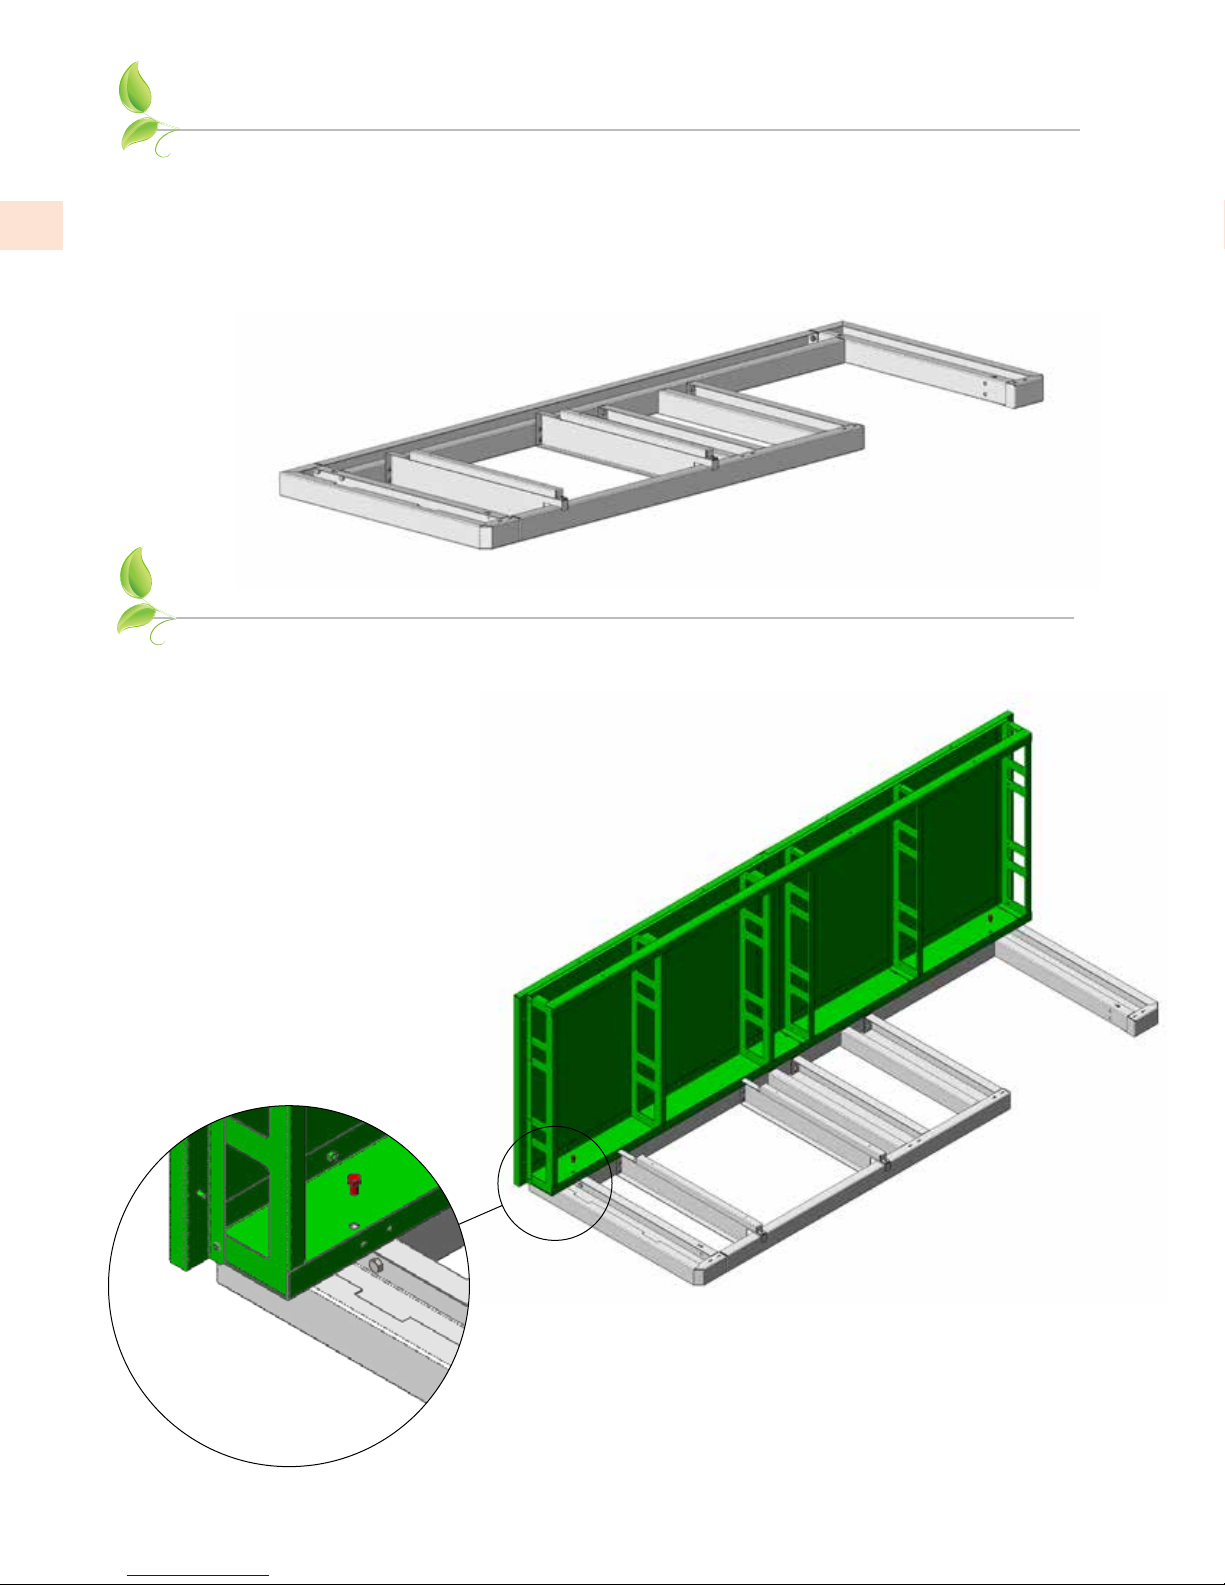
BACK AND SUPPORT WALL ASSEMBLY
3. Use 2 each 3/8-16 x 5/8” long hex bolts to align and attach the back wall to the curb. Be careful the
back wall does not tip over if the curb was not anchored down. Tighten all bolts.
4
©2017 Hestan Commercial Corporation

BACK AND SUPPORT WALL ASSEMBLY
4. Attach support wall #1 to curb assembly and back wall as shown using 6 each 1/4-20 x 1/2” hex
bolts and hex nuts where needed. Do not fully tighten bolts yet. Route the main electrical box as
described below and attach using 2 each 1/4” hex nuts.
(continued)
MAIN ELECTRICAL BOX
ROUTE THIS BOX
BETWEEN THIS SPACE
AND ATTACH TO THIS WALL
ON 2 STUDS PROVIDED
EN
1/4” BOLTS
& NUTS HERE
5. Install remaining support walls as you did in step 4. Each wall is numbered and has a corresponding
number on the curb and/or rear wall for ease of locating. (8 foot Outdoor Living Suite shown) Do
not fully tighten bolts yet.
©2017 Hestan Commercial Corporation
5
EN
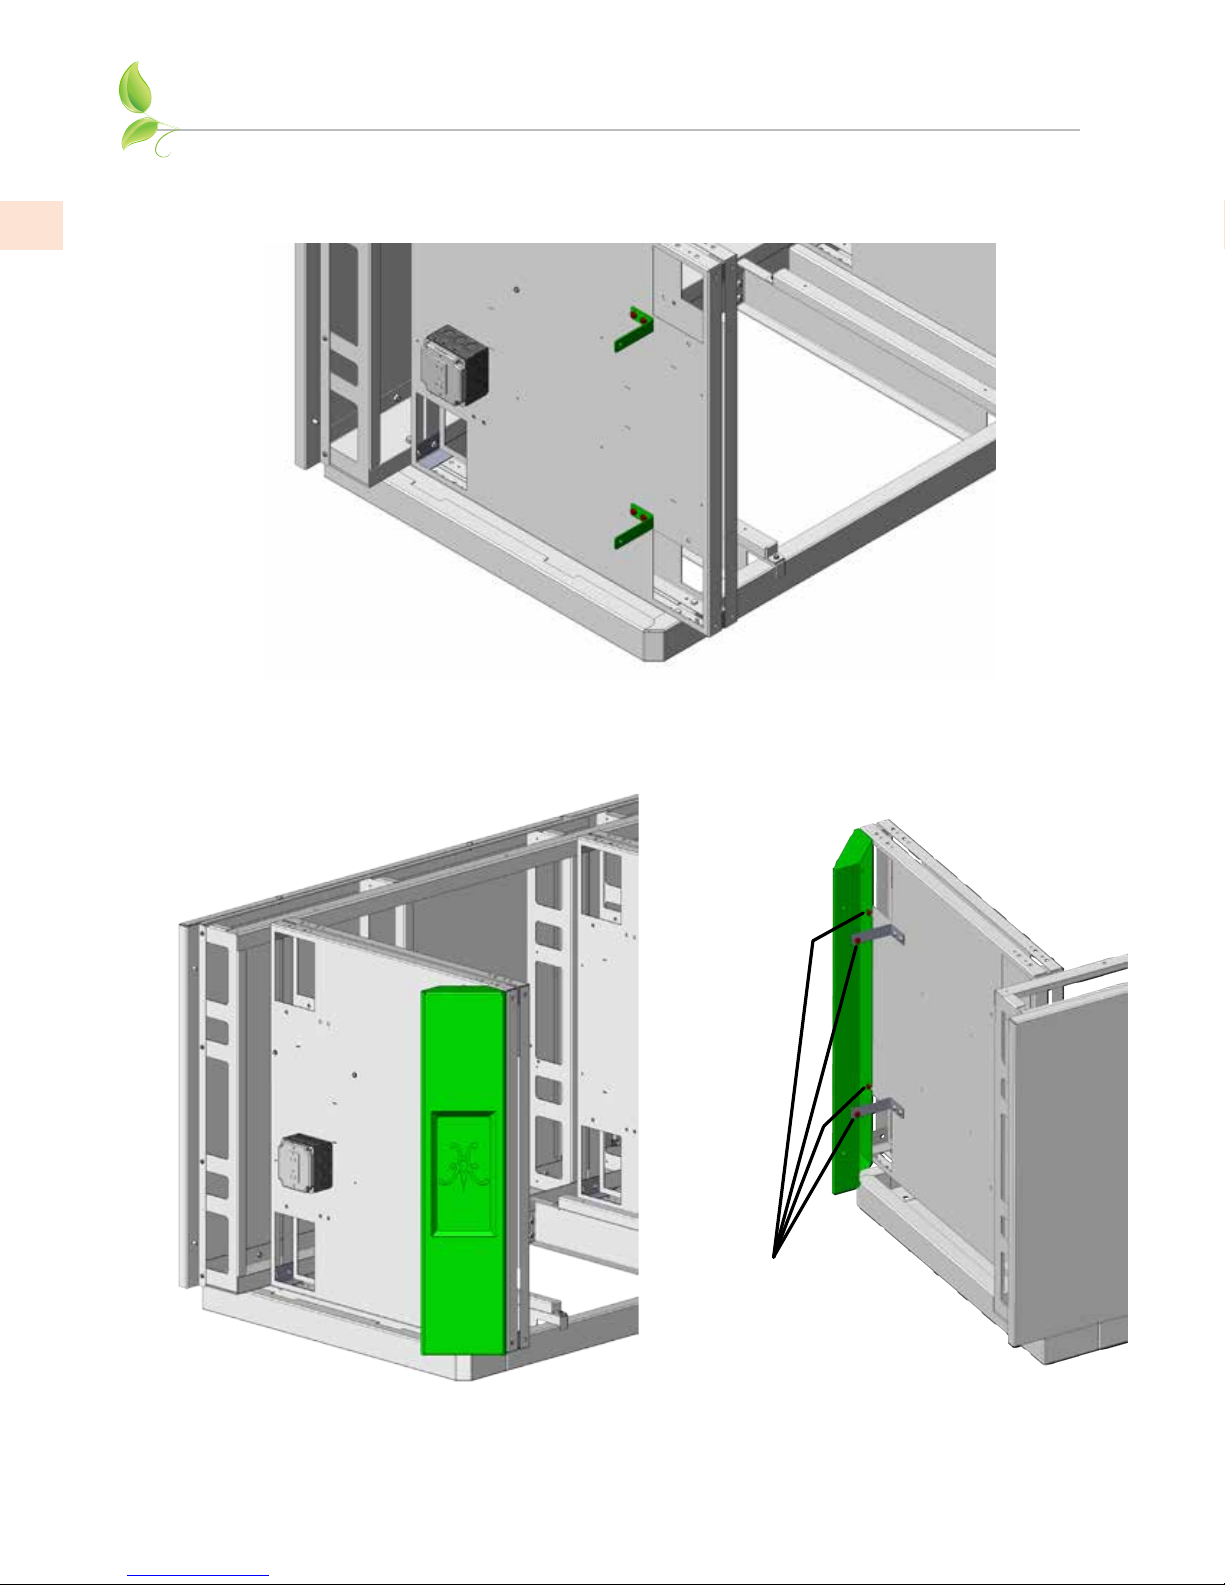
INSTALL CORNER ASSEMBLY
6. Install corner assembly brackets as shown using 1/4-20 x 1/2” long hex bolts and hex nuts where
needed. For suites with Bar Top, install 4 brackets on each side.
7. Install 2 corner assemblies (4 assemblies for suites with Bar Top). Use 1/4-20 x 1/2” long hex bolts
and hex nuts where needed. Do not tighten until lift-off panels have been checked for proper t
(see Step 13).
1/4” BOLTS
& NUTS HERE
6
©2017 Hestan Commercial Corporation

ELECTRICAL ITEMS
ELECTRICAL SUPPLY
The Hestan Outdoor Living Suite is completely pre-wired for ease of installation. The suite will
require a 20 amp supply (breaker) from the house main electrical panel. The licensed electrician
will have to run the appropriate wire size and conduit for this application. Rigid or flexible
conduit suitable for burial with water-tight connections are highly recommended from the house
main electrical panel, to the suite.
Important: The appliance(s) must be electrically grounded in accordance with local codes, or in
the absence of local codes with the National Electrical Code,
Appliances (grill, side burner, refrigerators, etc. ) are equipped with a flexible electrical supply
cord featuring a three-prong grounding plug. It is imperative that this plug be connected to a
properly grounded three-prong receptacle. If the receptacle is not the proper grounding type,
contact an electrician. Do not remove the grounding prong from this plug.
The appliances are designed for 120 volt AC power and must be plugged into a Ground Fault
Circuit Interrupter (GFCI) protected circuit. For gas-burning appliances, do not connect to
the electrical supply until after gas connections have been made and leak checks have been
performed.
KEEP ANY ELECTRICAL CORDS AND FUEL SUPPLY HOSES AWAY FROM ANY HEATED
SURFACES.
• To protect against electric shock, do not immerse cord or plugs in water or other liquid.
ANSI/NFPA 70-1990
.
EN
• Unplug from the outlet when not in use and before cleaning. Allow to cool before putting
on or taking off parts.
• Do not operate any outdoor cooking gas appliance with a damaged cord or plug, or after the
appliance malfunctions or has been damaged in any manner. Contact the manufacturer for
repair.
• Do not let the cord hang over the edge of a table or touch hot surfaces.
• Do not use an outdoor cooking gas appliance for purposes other than intended.
• Use only a Ground Fault Circuit Interrupter (GFCI) protected circuit with this outdoor
cooking gas appliance.
• Never remove the grounding prong or use with a 2-prong ground adapter.
• Use only extension cords with a 3-prong grounding plug, rated for the power of the
equipment, and approved for outdoor use with a W-A marking.
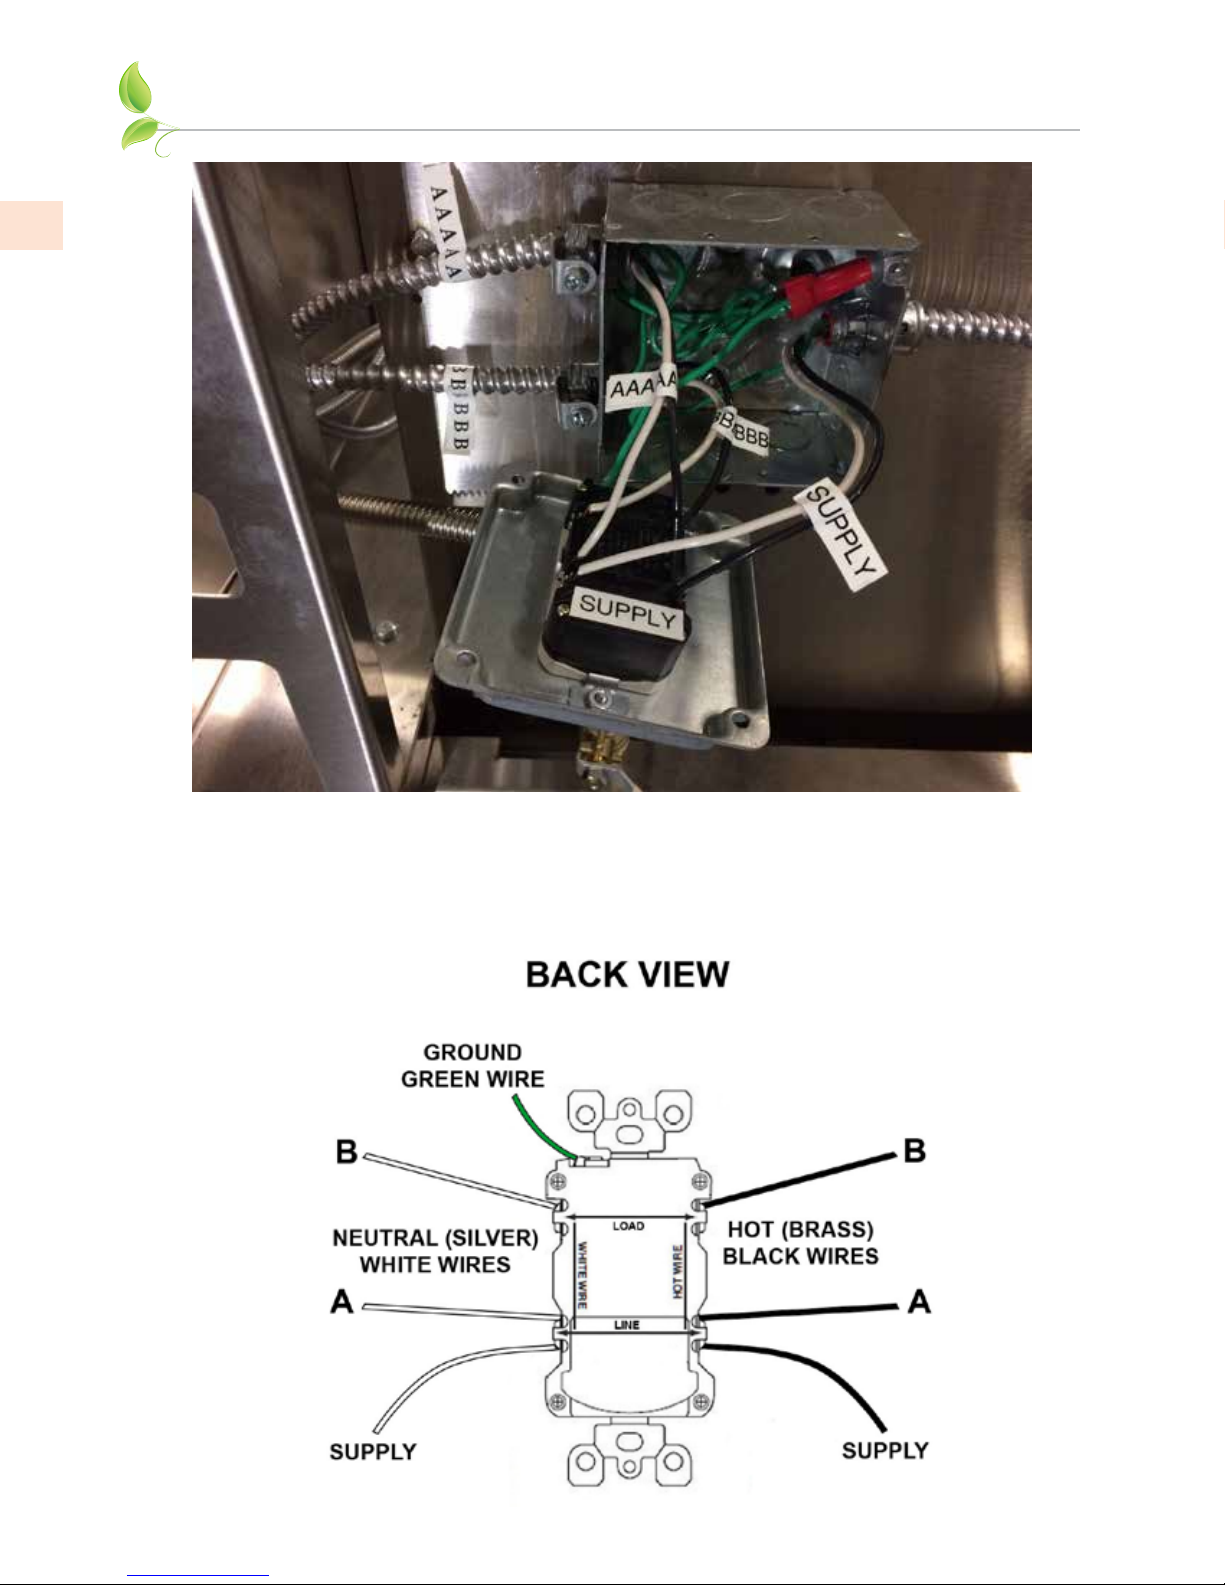
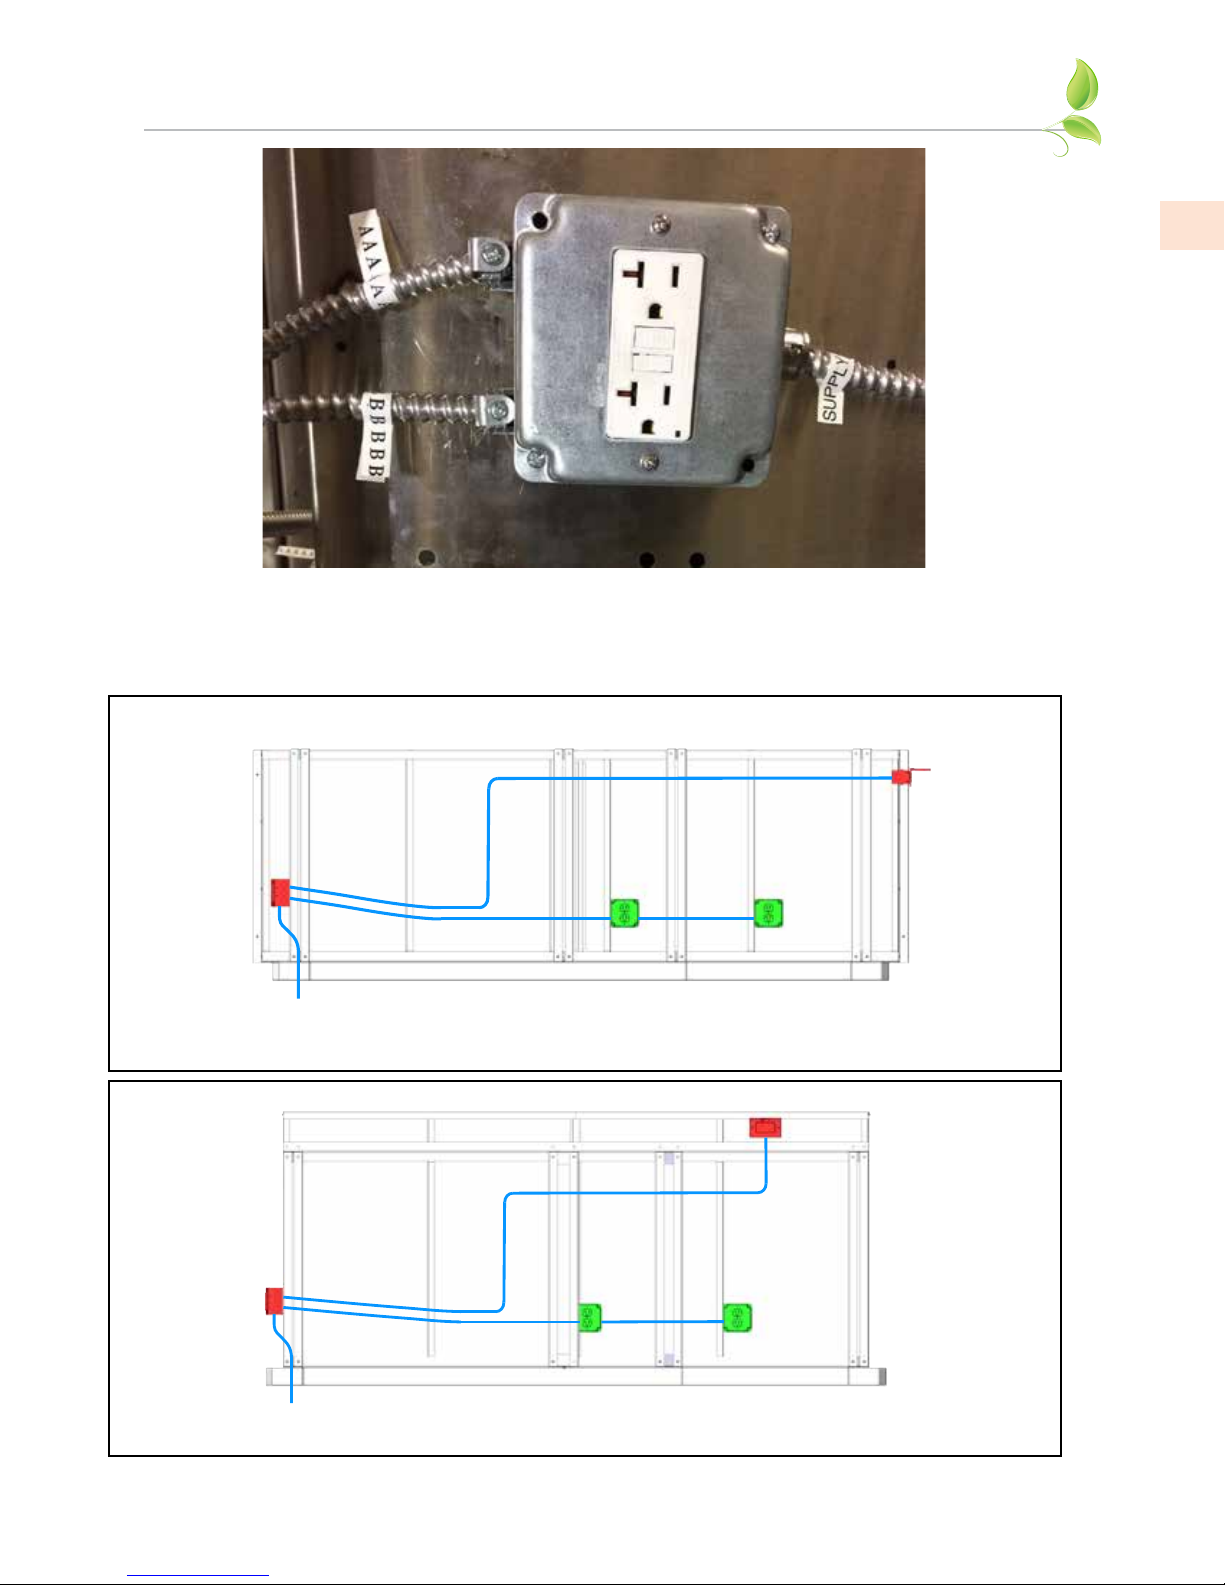
ELECTRICAL BOXES & CONDUIT
8. As mentioned in Step 1, a licensed electrician must run the electrical supply lines from the house
main electrical panel (20 amp breaker), to the recommended area below the curb base. This supply
is brought into the main electrical box as shown in the photo on the next page. The flex conduits
coming out of this box are labeled “A” or “B”. The electrician will make up the final connections as
shown in the diagrams on the following pages.
This main electrical box contains a GFCI outlet, which protects all the “B” outlets. The “A” circuit
runs to the weather-proof GFCI outlet located on the right side of the Suite, or to the outlets at the
bar (for those models featuring a raised bar). Should the GFCI trip due to a fault at the Grill, Side
Burner, or Refrigerator (“B” outlets), it must be reset, and the other “A” outlets will not be affected.
Similarly, the “A” GFCI will not affect the “B” outlets if it trips due to a fault.
©2017 Hestan Commercial Corporation
7
EN
ELECTRICAL ITEMS
(continued)
MAIN ELECTRICAL BOX SHOWING SUPPLY
LINE ENTERING ON RIGHT SIDE OF BOX.
8
©2017 Hestan Commercial Corporation
ELECTRICAL ITEMS
MAIN ELECTRICAL BOX
WITH GFCI OUTLET
GFCI
OUTLET
OUTLET
OUTLET
SERVICE
LINE IN
8 FOOT SUITE WITHOUT BAR
GESS08, GESD08, GES08
A
A
A
A
B
B
B
MAIN ELECTRICAL BOX
WITH GFCI OUTLET
SERVICE
LINE IN
A
B
GFCI
OUTLET
OUTLET
OUTLET
A
A
B
B
8 FOOT SUITE WITH BAR
GESSB08, GESDB08, GESB08
A
MAIN ELECTRICAL BOX COMPLETE
(continued)
EN
©2017 Hestan Commercial Corporation
9
 Loading...