


Hestan AEB121NGSS, AEB122NG, AEB122LPSS, AEB121LPSS Installation Manual
LP PORTABLE TANK
CONNECTION KIT
AGCKLPT
IMPORTANT - READ ALL INSTRUCTIONS BEFORE YOU BEGIN
THE INSTRUCTIONS HEREIN SHOULD BE PERFORMED BY A QUALIFIED SERVICE TECHNICIAN.
THE APPLIANCE MUST BE COMPLETELY COOL AND THE PREVIOUS GAS SOURCE MUST BE SHUT
OFF OR REMOVED BEFORE ATTEMPTING INSTALLATION.
Some parts inside your appliance have sharp edges. Care must be taken when handling the various
components to avoid personal injury. Wear gloves when handling.
TOOLS REQUIRED:
Work gloves
Safety glasses
Phillips screwdriver
Pipe wrench or large slip-joint pliers
Thread sealant
Power drill with masonry bit
SS fasteners and/or masonry anchor bolts
EN
DANGER
If you smell gas:
1. Shut off gas to the appliance.
2. Extinguish any open flame.
3. Open lid.
4. If odor continues, keep away from the
appliance and immediately call your gas
supplier or your fire department.
IF THE INFORMATION IN THIS MANUAL IS NOT FOLLOWED
EXACTLY, A FIRE OR EXPLOSION MAY RESULT CAUSING
PROPERTY DAMAGE, PERSONAL INJURY, OR DEATH.
Flammable Gas - disconnect all propane or natural gas supplies to this
unit before servicing.
Electrical Parts & Components – disconnect all power supplies and
batteries before servicing.
1. Do not store or use gasoline or
other flammable liquids or vapors
in the vicinity of this or any other
appliance.
2. An LP cylinder not connected for
use shall not be stored in the vicinity
of this or any other appliance.
DANGER
READ THIS MANUAL CAREFULLY AND COMPLETELY BEFORE USING YOUR
APPLIANCE TO REDUCE THE RISK OF FIRE, BURN HAZARD, OR OTHER
INJURY. KEEP THIS MANUAL FOR FUTURE REFERENCE.
©2017 Hestan Commercial Corporation
1
EN
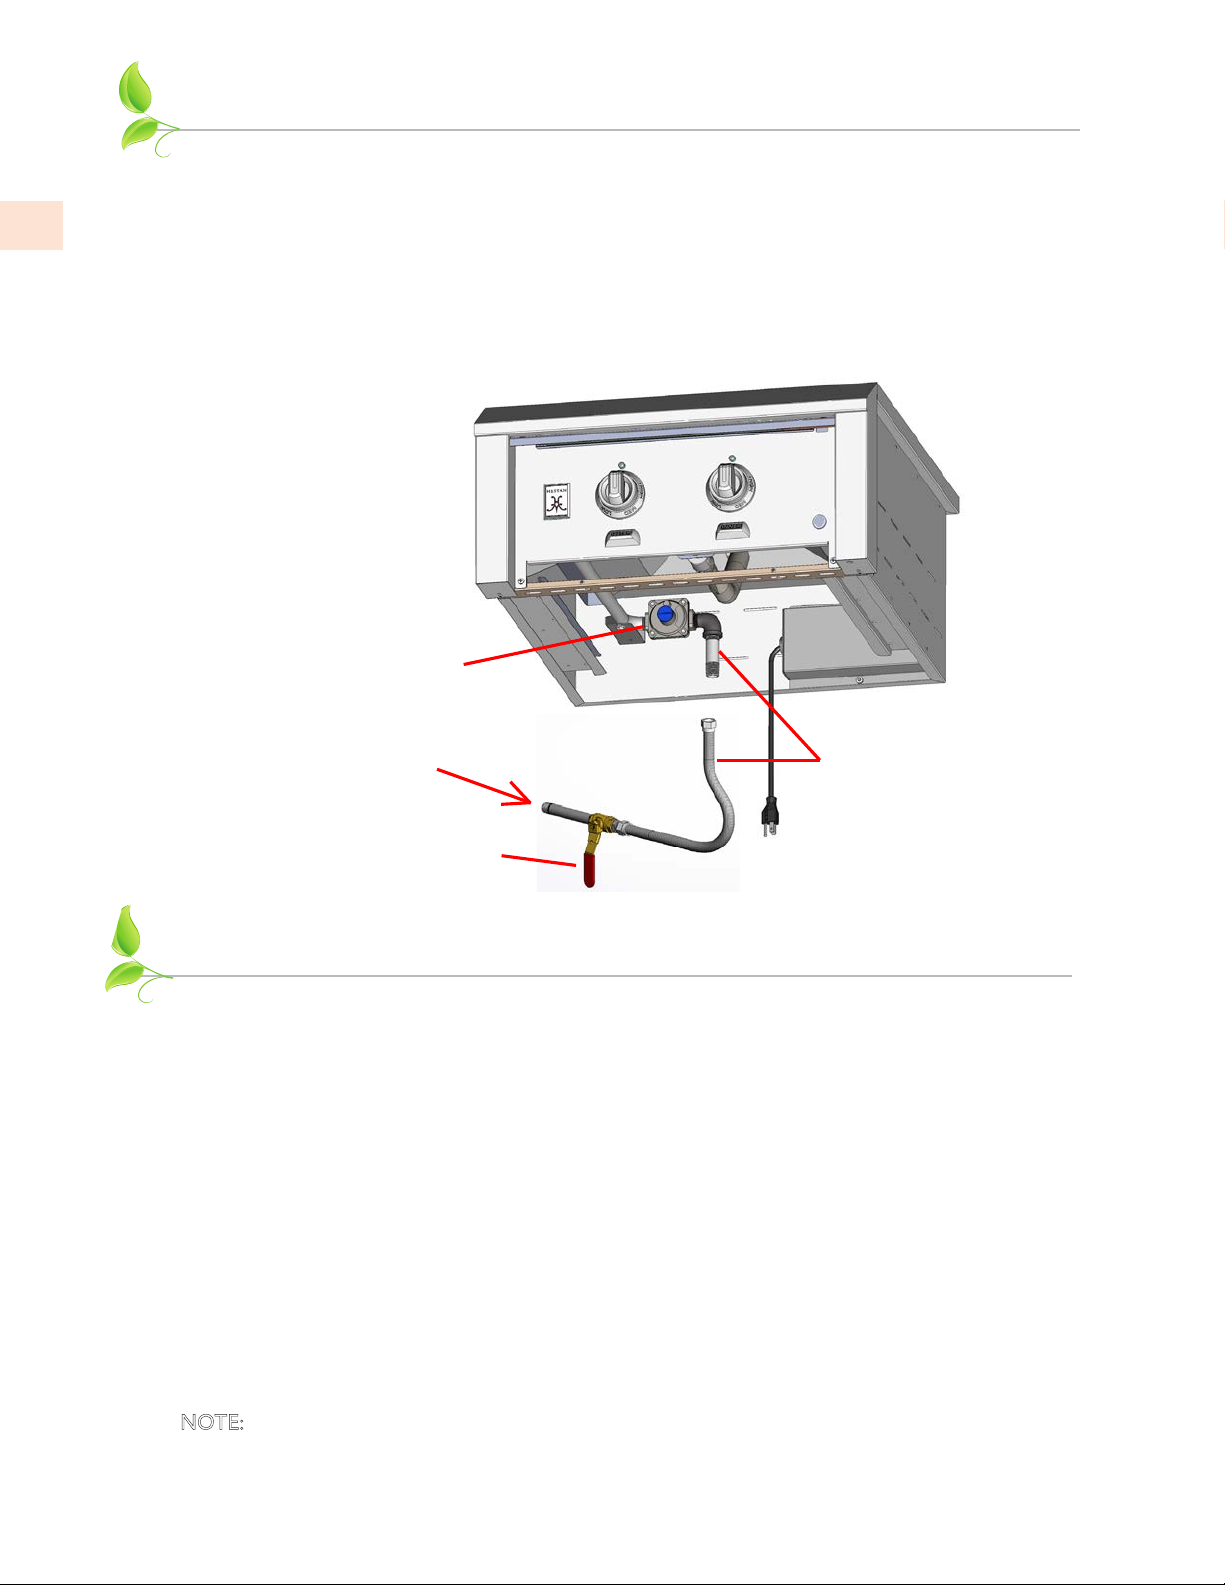
REMOVING THE OLD REGULATOR
NOTE: If you are converting your appliance from an existing regulator as seen below, it must be
removed before you can use the new regulator/hose assembly in this kit. If your existing regulator
was for a Natural Gas (NG) appliance, you will also need a Gas Conversion Kit to change all your
orifices from NG to LP. Please contact your Hestan dealer to order the appropriate kit.
HESTAN POWER BURNER
(MODEL AGPB24-LP shown)
REMOVE THIS
REGULATOR
INCOMING
LP GAS SUPPLY
SHUTOFF VALVE
(SUPPLIED BY
CUSTOMER)
1/2” ID FLEX HOSE,
ELBOW & NIPPLE
(SUPPLIED BY
CUSTOMER)
GAS CONNECTIONS
GAS SUPPLY
Gas connections should be made by a qualified plumber, or your professional outdoor appliance
installer.
Make certain new piping and connections have been made in a clean manner and have been purged
so that piping compound, chips, etc. will not clog regulators, valves, orifices, or burners. Use pipe
joint compound / thread sealant approved for natural and LP gases.
NEVER CONNECT THE APPLIANCE TO AN UNREGULATED GAS SUPPLY. Before proceeding,
ensure the appliance is fitted for Natural or Liquid Propane gas. Connecting to an improper gas type
will result in poor performance and increased risk of damage or injury. Gas type and gas consumption
(BTU per hour) for each burner type is shown on the rating label affixed to the underside of the drip
tray.
Installation of this cooking appliance must be made in accordance with local codes. In the absence of
local codes, this unit should be installed in accordance with the National Fuel Gas Code No.
NFPA 54
Code
, Natural Gas and Propane Installation code
B149.2.
CSA B149-1,
or Propane Storage and Handling
Z223.1/
NOTE: See rating label for manifold pressure for the type of gas of your appliance. To ensure proper
heating performance of this appliance, verify that the supply pressure is adequate (11.0” WC supply
pressure is preferred) to maintain 10.0” WC manifold pressure.
2
©2017 Hestan Commercial Corporation
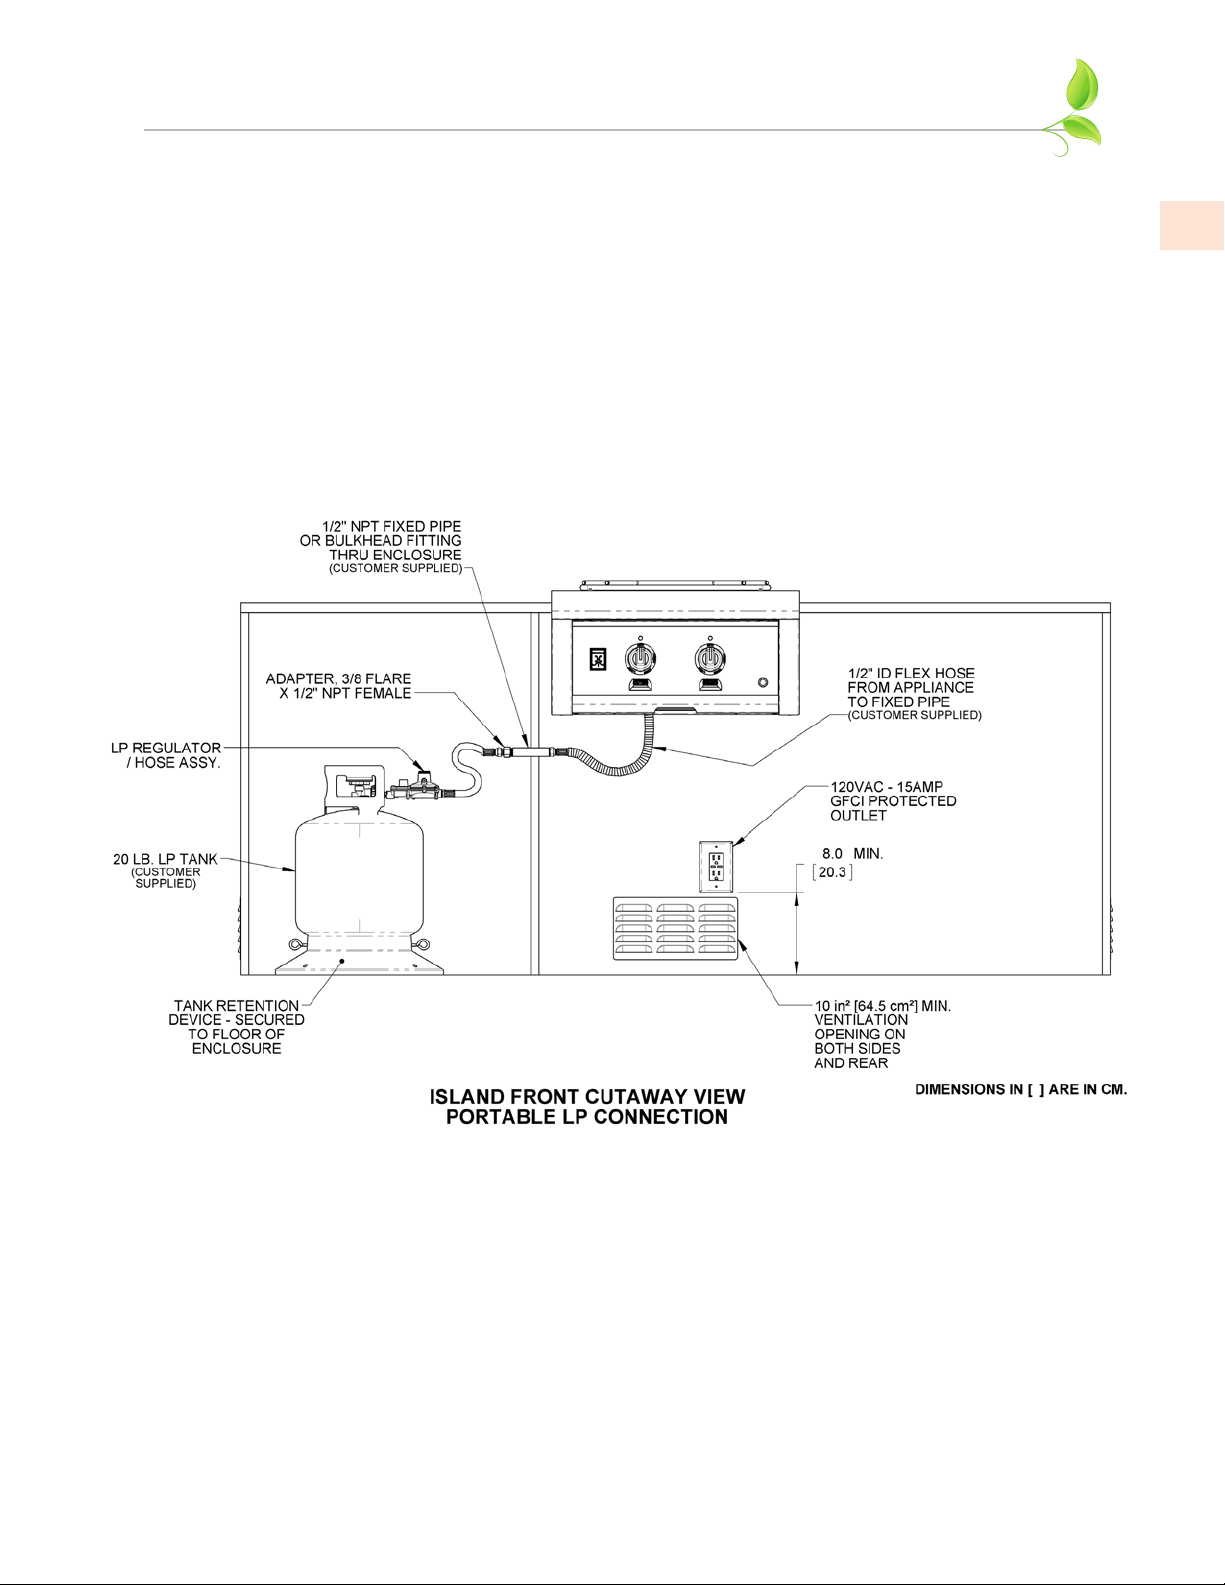
INSTALLATION OF NEW REGULATOR
1. The gas connection at the appliance must use a minimum 1/2” diameter flexible (semi-rigid)
stainless steel gas hose up to the fixed pipe / bulkhead fitting as shown below. The gas line
connectors must comply with the
Manufactured Homes, ANSI Z21.75 • CSA 6.27
stainless steel gas connection shall be 6 feet (1.82 m) or less.
2. Connect the regulator/hose assembly to the 3/8” Flare (compression flare fitting) X 1/2” NPT
female adapter as shown. Use appropriate thread sealant on all connections. The hose as well as
the connectors must comply with the
Manufactured Homes, ANSI Z21.75 • CSA 6.27
NOTE: Locate the pipe and regulator assembly in such a way that the regulator cannot touch
the floor of the enclosure when disconnected from the LP cylinder. This is important so that no
contaminants can get into the large connection end. Also be sure all hoses are away from heat
sources and away from sharp edges which may cut into the hose and cause a leak.
Standard for Connectors for Outdoor Gas Appliances and
, and suitable for outdoor installation. This
Standard for Connectors for Outdoor Gas Appliances and
, and suitable for outdoor installation.
EN
3. Place the tank retention device on the floor of your island (enclosure). Temporarily place a
standard 20 lb. LP cylinder in the retention device and connect the regulator/hose assembly to
the cylinder. DO NOT OPEN THE GAS VALVE. Move the retention device to a convenient
location which allows for easy access to the cylinder shutoff valve, and does not stretch or kink
the hose. When you believe you have the device located correctly, mark the floor around the
device, disconnect the regulator and remove the cylinder from the island.
4. Using the holes provided in the retention device, secure it to the floor with screws (not included).
Use of stainless-steel screws is highly recommended.
5. Re-install the LP cylinder in the retention device and re-connect the regulator/hose assembly.
6. Proceed to LEAK TESTING section.
©2017 Hestan Commercial Corporation
3
EN
LEAK TESTING
GENERAL
A complete gas tightness check must be performed of all gas-carrying components due to possible
movement during installation, or excessive pressure unknowingly being applied to parts of the unit.
BEFORE TESTING
• Do not smoke while leak testing.
• Never leak test with an open flame.
• Make a soap solution of one part liquid detergent and one part water for leak testing purposes.
• Apply the solution to the gas fittings by using a spray bottle or a brush.
• For LP units, always check with a full LP cylinder.
TO TEST
• Make sure all control valves are in the “OFF” position.
• Apply the soap solution described above to all fittings.
• Turn the gas supply on.
• Check all connections from the supply line, or LP cylinder up to and including the manifold pipe
assembly.
• Soap bubbles will appear where a leak is present. If a leak is present, immediately turn off gas
supply, tighten any leaking fittings, turn the gas supply back on, and recheck.
• If you cannot stop a gas leak, turn off the gas supply and call the dealer where you purchased
your appliance.
• Do not use the appliancel until all connections have been checked and do not leak.
IMPORTANT NOTE - ALWAYS CHECK FOR LEAKS AFTER EVERY LP CYLINDER CHANGE.
ADDITIONAL WARNINGS
1. The appliance shall be used only outdoors and shall not be used in buildings, garages, sheds,
breezeways, or any enclosed areas. Do not operate the appliance under unprotected,
combustible construction. Use only in well-ventilated areas. See the INSTALLATION section of
the manual that came with your appliance for more details.
2. Portable LP cylinders - Always shut off the main valve on the liquid propane (LP) cylinder after
each use. Never use a dented or rusted LP cylinder. Never attach or disconnect an LP cylinder, or
move or alter gas fittings when the appliance is in operation or is hot.
3. Inspect LP gas supply hose prior to each use of the appliance. The hose must be kept away from
heated areas of the appliance. If there is evidence of excessive abrasion or wear, or the hose is
cut, it must be replaced before using the appliance. The hose and LP regulator are supplied as a
complete assembly and must be replaced together. Do not attempt to repair or replace the hose
itself. Contact your Hestan dealer for genuine replacement P/N 014309.
4
©2017 Hestan Commercial Corporation