Hestan AEAD30BK, AEAD30BU, AEAD36, AEAD30, AEAD30RD Installation Manual
...
OUTDOOR CABINETS
Installation Instructions
AEAD / AESDR / AEDR
IMPORTANT - READ ALL INSTRUCTIONS BEFORE YOU BEGIN
INSTALLER SHOULD LEAVE THESE INSTRUCTIONS WITH THE HOMEOWNER
Some parts have sharp edges. Care must be taken when handling the various components to avoid personal injury. Wear gloves when handling.
TOOLS REQUIRED:
Work gloves Safety glasses
Electric drill with assorted bits for mounting hardware, masonry anchors, etc. where needed Phillips screwdriver
Flat-blade screwdriver Level
Tape measure
Inspect the product to verify that there is no shipping damage. If any damage is detected, call the shipper and initiate a damage claim. Hestan Commercial Corp. is not responsible for shipping damage. DO NOT discard any packing material (box, pallet, straps) until the unit has been inspected.
Remove all exterior packaging materials, banding, tape, etc. Remove all protective film from the inside of your cabinets. You may leave any exterior protective film on until after installation is complete.
CABINET DOOR INSTALLATION (AEAD, AESDR, AEDR)
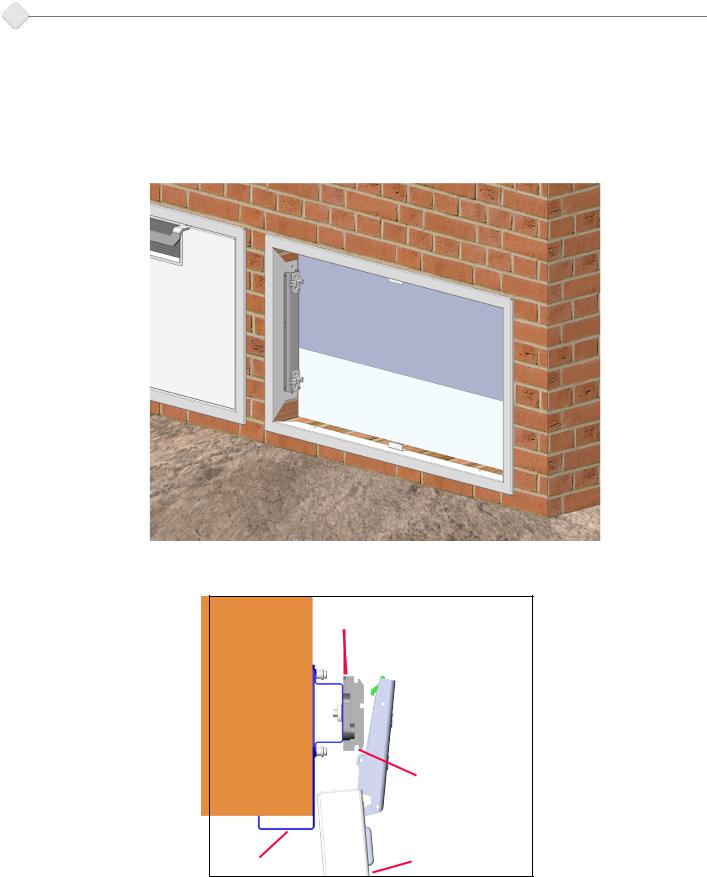
1.Your new Aspire cabinets come with doors pre-installed in their frames. It will be necessary to detach them before installing the frame in your island structure. As shown below, pinch the back of the hinge to un-clip it from the mounting base. The door may now be removed.
MOUNTING
BASE PINCH HERE
TO UN-CLIP
HINGE
STRUCTURE (DOOR JAMB)
ACCESS |
|
|
|
DOOR |
|
|
1 |
FRAME |
|
DOOR |
|
|
|
©2017 Hestan Commercial Corporation |

CABINET DOOR INSTALLATION (continued)
2.Consult the table at the end of this instruction manual to determine the appropriate cutout dimensions for the Aspire Outdoor cabinet product you are installing. The cutouts should be square at all corners for proper fitment of the cabinet. The installer will have to build up any internal structural elements or supports in the island in order to secure the cabinet in place. Stainless steel hardware (not included) is highly recommended.
3.Slide the frame into the opening and check for proper alignment. Secure the frame to the structural members of your island using the various available mounting holes in the frame. Use at least 2 screws per side.
4. To re-install the door, follow the instructions shown below.
MOUNTING
BASE
 PUSH HINGE
UNTIL REAR
CLIP ENGAGES
STRUCTURE
(DOOR JAMB) ATTACH AT THIS NOTCH FIRST
ACCESS |
|
|
DOOR |
DOOR |
|
FRAME |
||
|
2 ©2017 Hestan Commercial Corporation

CABINET DOOR INSTALLATION (continued)
5.Aspire cabinet doors feature 3-way adjustable hinges. It is recommended to do the height adjustment first. Loosen the top & bottom screw on each mounting base, then use the height adjustment screw shown below to fine-tune the vertical height of the door in the frame. Tighten the top and bottom screws when done.
HEIGHT
ADJUSTMENT
6. The side and depth adjustment of the doors are shown below.
SIDE-TO-SIDE |
DEPTH |
ADJUSTMENT |
ADJUSTMENT |
©2017 Hestan Commercial Corporation 3
 Loading...