

Page 1
www.heroninstruments.com
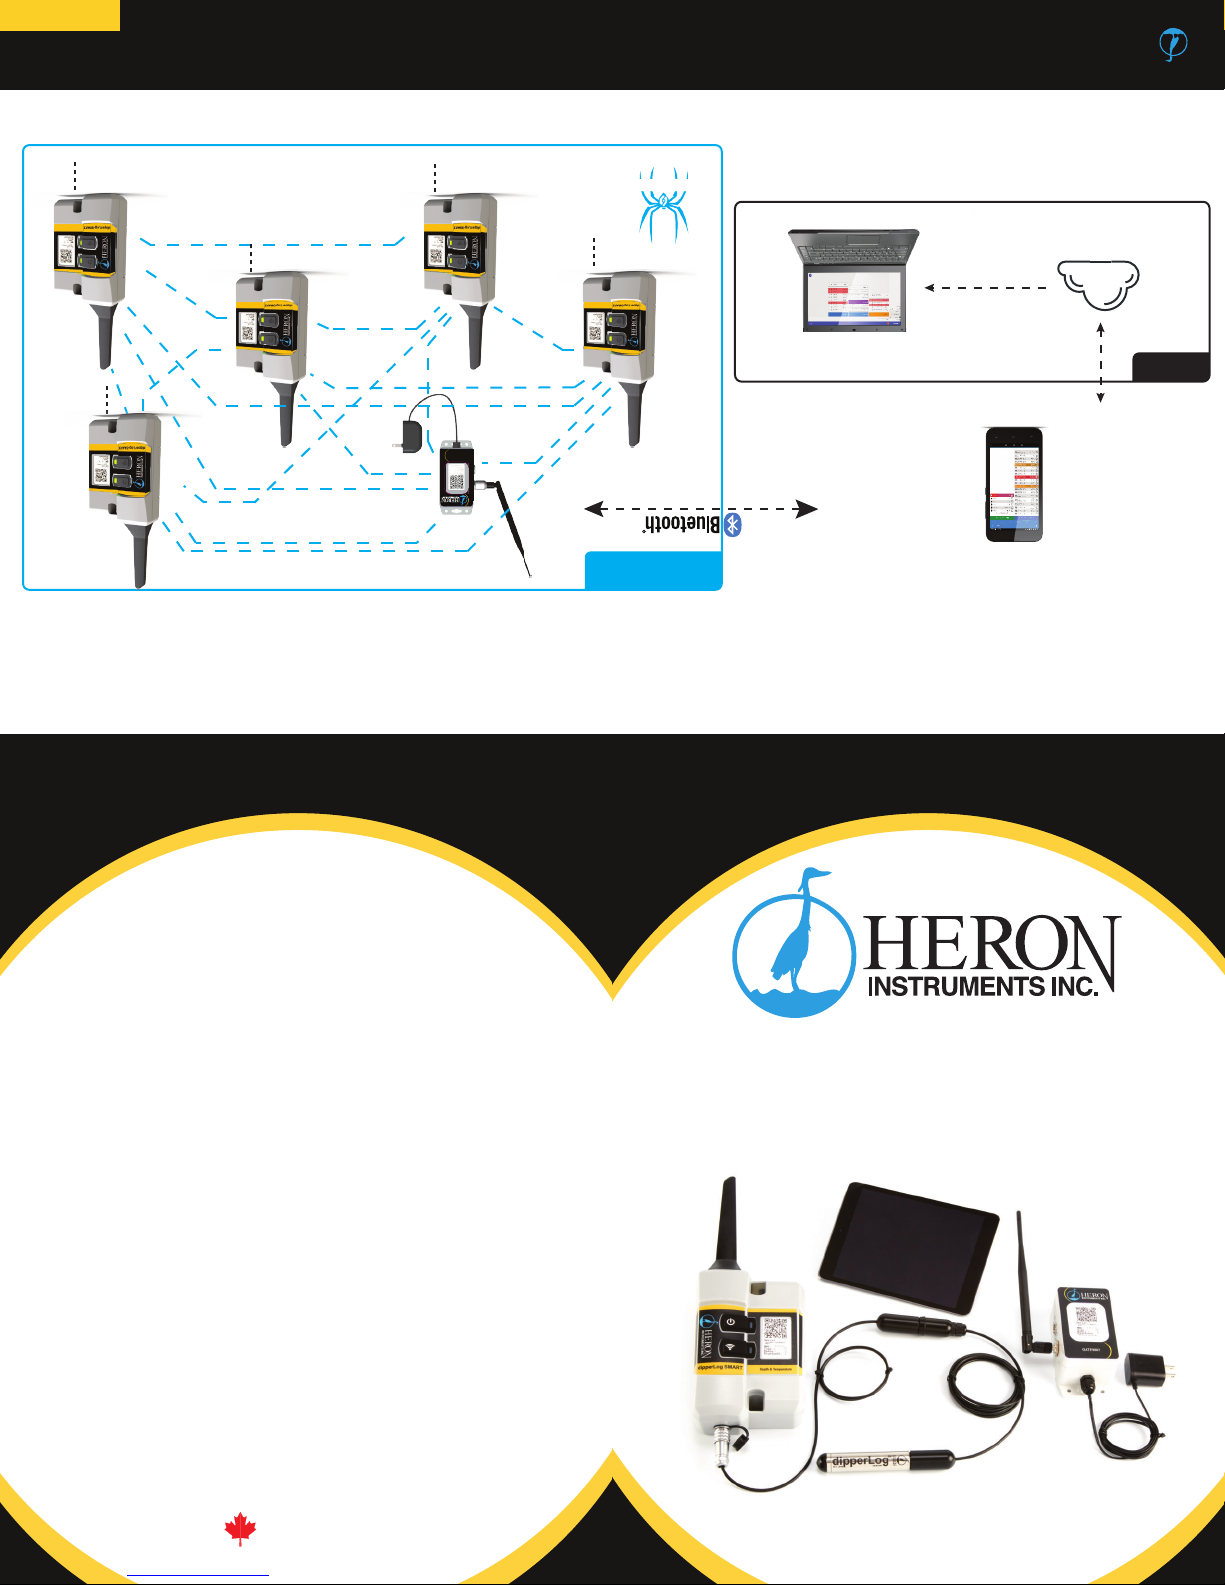
SPIDERMESH
Connect the Gateway
to a power outlet
SpiderMesh Cooperative
Mesh Network
Sensor/Probe
attach to
Node
Sensor/Probe
attach to
Node
Gateway
GATEWAYGATEWAY
Sensor/Probe
attach to
Node
Sensor/Probe
attach to
Node
Sensor/Probe
attach to
Node
Optional
Web App
Cloud
Connect to the internet to
enable remote monitoring
(optional)
Android device
Page 1
Operating and Maintenance Instructions Inside
HERON ALSO MANUFACTURES:
• Water Level Meters
• Data Loggers
• Interface Meters
• Conductivity Meters
• Temperature Meters
• Well Casing Indicators
• Well Depth Indicators
• Tag Lines
• Downhole Inspection Cameras
Figure 1: Typical System Deployment
dipperLog SMART
Remote Monitoring System
Quick Start Guide
HERON INSTRUMENTS INC.
447 Moxley Road, Dundas, ON L9H 5E2 CANADA
1-800-331-2032 or 905-628-4999
Please visit our website www.heroninstruments.com
for more information on the complete Heron product line.
Made in Canada
Page 2
Preparing the dipperLog SMART System
The dipperLog SMART is a turnkey monitoring system for viewing and recording
the remote data on any computer, tablet or smartphone from anywhere.
In the starter kit, you will nd:
1. A Sensor, either water depth & temperature or water detection connected via
a downhole cable.
2. A Node dedicated to each sensor.
3. A Gateway to collect the data.
4. An Android Tablet with the dipperLog SMART App already installed. In most
cases, the following steps can be skipped if the tablet has been previously
congured.
Installation Wizard
Starting with a fresh install of the dipperLog SMART App (not an update nor a
precongured tablet), the Installation Wizard will automatically launch when the
App starts. You can skip the Wizard anytime, except at the end, when the nish
button has already been pressed. This step will automatically be skipped if your
tablet was precongured.
If you skip the Wizard, it will automatically re-launch at the next App restart, and
will continue to do so as long as there is no Gateway registered in the App. Once
a master component is registered in the database (a Gateway), then the Wizard
can only be launched manually through the CFG tab, under Installation Wizard.
Note that you will need to be connected to an internet network for the Wizard to
congure and download your maps properly.
Installation Wizard - Step 1 - Name Device
Name your device (your Android device) so that you can recognize it easily in the
future when you have more Android devices.
Installation Wizard - Step 2 - Enter Your Address
Enter your address (the location of the system installation). For Canadian systems,
the 3 rst digits of the postal code, and for American systems it could be a zip
code. Then tap on Search Address. The address found will be used as the center
location of the maps that will be downloaded. It is important to enter the correct
location, or the maps downloaded won’t be relevant (only maps surrounding your
area will be saved to your device).
Installation Wizard - Step 3 - Remote Use
Next, you’ll be asked whether you wish to use the system locally only or locally and
remotely (i.e. use the system outside of the network, to view your system at home,
at work or anywhere in the world). If you select Yes, then the Wizard will guide
you through some extra steps to congure the remote access.
Installation Wizard - Step 4- Congure Google Account
For remote use, the Wizard will prompt you to congure a Google Account (either
choose an existing one or create a new one). Most of our services use Google
services (such as Google Drive) to store your private data.
Unboxing
Step 1: Connect the Gateway to a power outlet and turn it on by pressing the
ON/OFF button. Look at the LED ashing. The Gateway is ready
once it starts blinking at a regular pace. The dipperLog SMART System
is sending/receiving data when the LED blinks.
Step 2: Open your tablet. Look for the dipperLog SMART App icon
either on the main screen or by clicking on Applications. Open the
dipperLog SMART App.
Step 3: After the main splash screen, you will either enter into the App or be
presented with an installation Wizard. If you are not comfortable setting
up the system manually, then follow through the steps of the Wizard to get
your system operational.
dipperLog SMART Remote Monitoring System Quick Start Guide
Installation Wizard - Step 5- Congure Alarms
Next, you can customize the basic alarm settings. You can disable/enable:
- Sound alarms on errors and warnings (you will be able to set the error
limits on each sensor later on)
- Turn on Text-to-Speech to get warnings and errors even when not
looking at the system
Installation Wizard - Step 6 - Congure Units
Next, you can customize the units that will be used throughout the App. You can
choose either Metric or Imperial units or tap on Customize Units to choose the
right unit for each of your measurements.
Metric units: distance in meters, height in cm, temperature in °C, positive
pressure in bar, negative pressure or vacuum in inches Hg, volume in L, ow in
gpm (UK gallons)
Imperial units: distance in feet, height in inches, temperature in °F, positive
pressure in psi, negative pressure or vacuum in inches Hg, volume in gal (US),
ow in gpm (US gallons)
Installation Wizard - Step 7 - Choose Application
Next, you will be prompted to select the main use of the dipperLog SMART system.
Choose general application if you are unsure.
Installation Wizard - Step 8 - Reader or Writer
Then, you will be asked to choose how the App will gather data from the
dipperLog SMART system:
1) by pairing with a Gateway (choose this if this is your rst installation)
2) if you answered yes at Step #3 (you are going to use the system remotely),
by reading data from the cloud
Installation Wizard - Step 9 - Install Gateway
Now it’s time to install the device that you have chosen in Step #8. Tap on scan if
applicable to scan the barcode of your Gateway. Then, name your gateway
device. The next two steps will congure the Gateway settings (if applicable)
depending on the conguration of your network size and estimated coverage.
Installation Wizard - Step 10 - Dene System
Enter the distance of the farthest Node from the Gateway (from your main
location). In other words, what will be the radius of your dipperLog SMART
network if the center is at the Gateway.
Installation Wizard - Step 11 - Congure Performance
Choose how you would like to optimize the system:
1) Batttery Saver (low data-rate). You should choose this option if you do not
currently need very high data rate to save your battery life. When saving
battery life, the system will respond slower than with the high performance
option. You will still get frequent readings, but not once every second.
2) High performance (high data-rate). You can choose this option if you are
currently monitoring a critical operation. The system will respond very fast and
consume more battery life.
You can choose to run on the Battery Saver mode all the time. You should still have
plenty of data. Once the Wizard is over, you can still change these options
manually without having to re-run the Wizard. To do so, go to the Node tab in the
dipperLog SMART App. Tap on your activated Gateway. Change the duty cycle
from 5% (battery saving mode) to any higher value (e.g. 10%, 15%, 20%...).
Installation Wizard - Step 12 - Choose Theme
Choose the look of your App. For the best experience, select Modern theme.
Installation Wizard - Final Step - Finish
You can now commit your preferences and click on Finish, or you can cancel by
pressing Skip (no changes will be made). Wait while your preferences are applied.
The Wizard will also take care of downloading the satellite map for you. Once
completed, the App will restart and you should be ready to start adding sensors to
your network.
Page 2
Page 3
Installing Nodes in the Field
Step 1: Turn on the Node by pressing the Power Button. The Network LED
indicator will start blinking. The rst sequence of blinks represents the
Channel that the Node is currently set on (e.g. 3 blinks = Channel # 3).
After the startup sequence, the Power LED light will start blinking at the
same rate as your Gateway once it is connected (after a few seconds to a
few minutes). The Network LED will blink 3 times every 8 seconds while it
is searching for the network (It is not connected yet!)
Step 2: Install the Nodes starting from the nearest ones (from the Gateway). Go to
the exact location where the Node will be installed with your tablet.
Step 3: If the LED on the Power Button of the Node is still blinking steadily, then
you can install your dipperLog SMART Node at that location (the blinking
LED indicates a connection to the network). If the Network LED is blinking,
then you are out of the network. Install other Nodes or a Repeater
between. Since the Nodes are relaying messages to the Gateway,
installing other Nodes rst might increase the network’s coverage.
In the dipperLog SMART App (on the tablet):
1. Go to the Nodes tab, swipe left to right or right to left to view the Node
list (Gateway, Repeater, Depth & Temperature, etc.) If your tablet was
precongured, then all unused Node types might be hidden. You can unhide
them by going to the CFG. tab, tap on Select Active Nodes and check all
Node types that you wish to show.
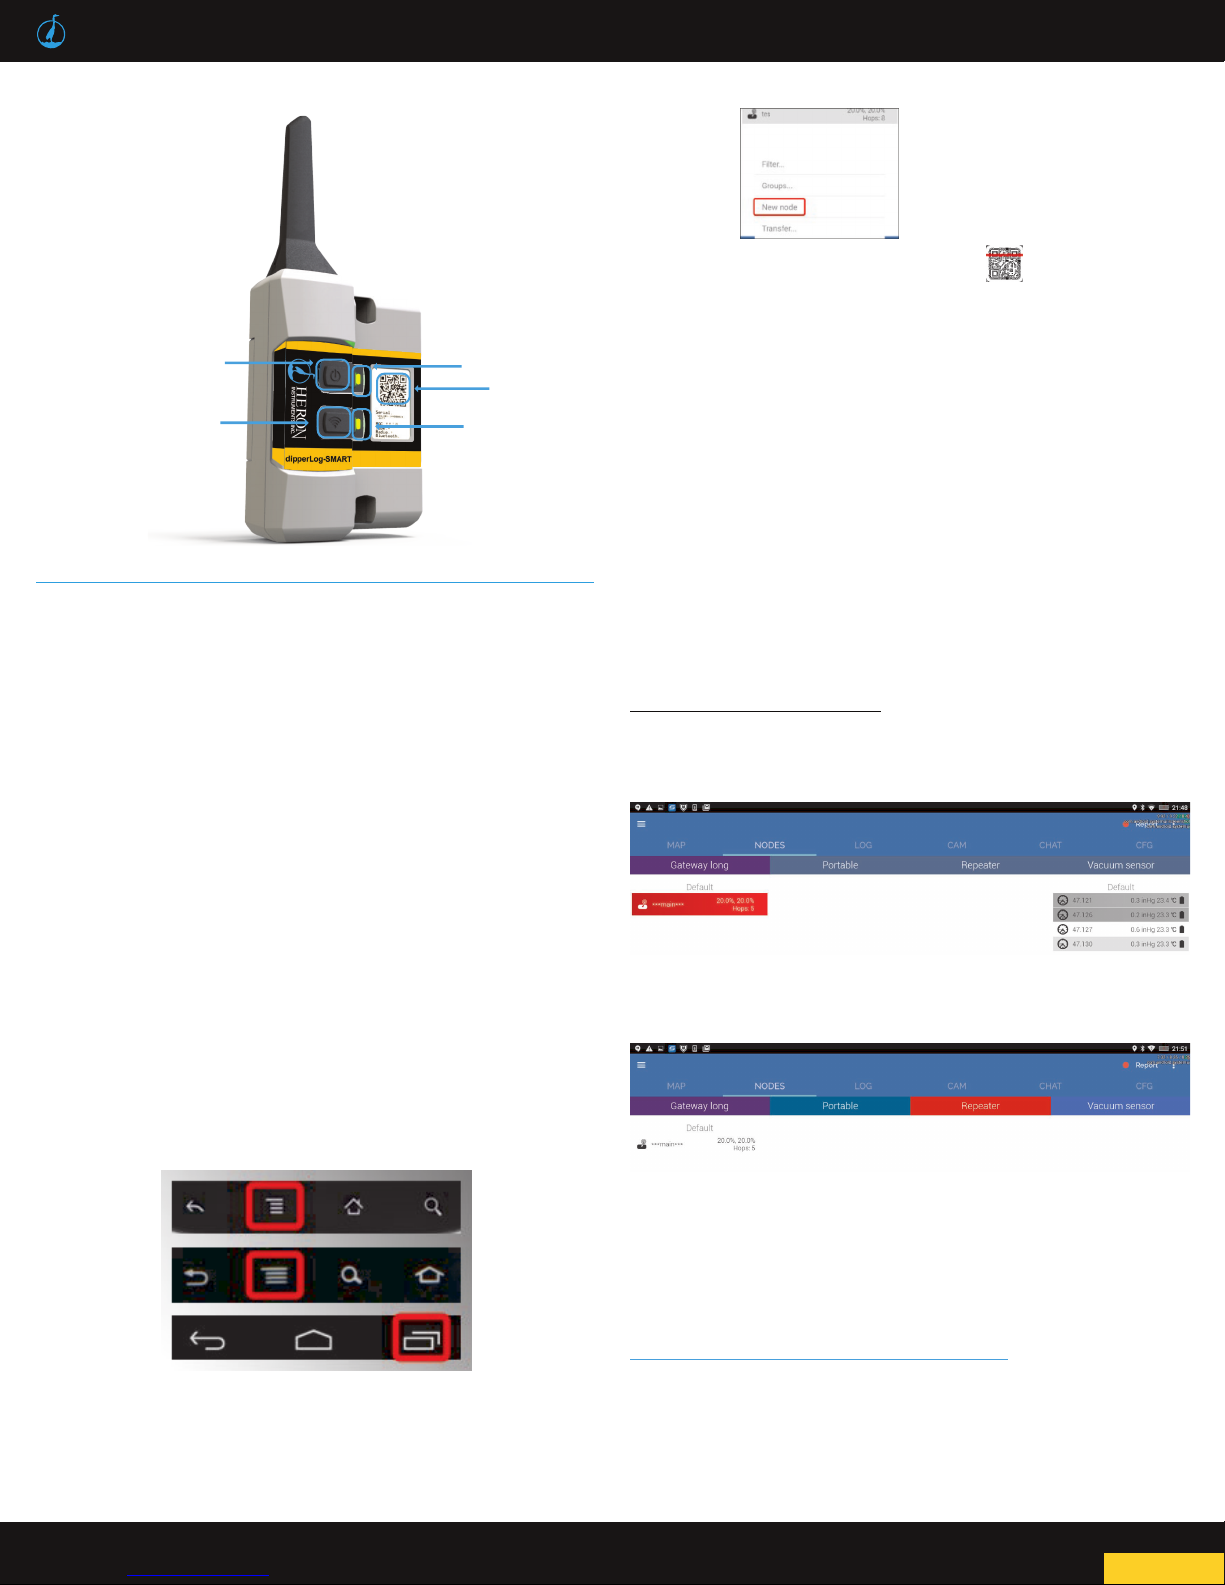
2. Tap on the Menu Button of the Android device and tap on Add Node.
The Menu Button varies depending on the Android device and can be
toggled by clicking or long clicking any of the following buttons (or any
other)
dipperLog SMART Remote Monitoring System Quick Start Guide
3. Tap on Add New Node (see picture on below)
4. In the Menu, click on the Scan Barcode button
5. Scan the barcode on the Node, turning on the ashlight if needed
6. Tap the Name eld and name the Node. Tap the Ok button.
7. The Node has now been installed and the sensor's icon should appear in the
sensors list (Nodes tab) and on the Map tab as well.
8. Repeat steps 1-7 for all Nodes to be added to the network, always using
the same Android device (tablet) to add/remove Nodes.
9. You will start getting your readings once you return to your Gateway (until
the tablet can communicate with the Gateway via a Bluetooth connection)
Your system should now be up and running. If the Node’s page headers (including
the Gateway header) are greyed out then your tablet has not been paired with the
Gateway. To pair, click and hold on the Gateway’s name. In the menu, scroll down
and tap on Activate. The App will restart, this time with a Bluetooth connection with
the Gateway. After a few seconds, the sensors lists will change color and you
will start receiving data. If the Gateway stays red, make sure the Bluetooth is
activated on the Android device and that it is in Bluetooth range of the Gateway.
See Figure 3 to Ensure Correct Setup
Barcode
Power LED
Network LED
Network Button
Power Button
Figure 2: Node Buttons & Features
Figure 3: (a) Gateway is not connected to the
Tablet and Nodes lists are greyed out
Figure 3: (b) Gateway is connected to the tablet
and Nodes lists are coloured
Data is stored locally in the Android smartphone/tablet. You can view the logged
history by tapping on the Node(s) of interest and click on the graph button.
If you have enabled remote use in the Installation Wizard, then you should see a
Google Drive Downloading message appear at the bottom of the screen from time
to time. Once the message change to Google Drive OK, then your remote access is
ready to be viewed online. Open a Chrome browser on any computer/
tablet/smartphone that has access to the internet. Then go to:
https://dipperlogsmart.com/Web24_general/#/home
Click on the user icon and log into the same Google Account as congured on the
dipperLog SMART System. In the menu, click on My Nodes - List by Type to view
your system.
Page 3
 Loading...