

HERKULES HBH 1000 Operating Instructions Manual
HBH 1000
Bedienungsanleitung
Bohrhammer
Operating Instructions
Hammer Drill
Mode d’emploi
Marteau perforateur
Manual de instrucciones
Martillo perforador
Bruksanvisning
Borrhammare
Käyttöohje
Iskuporakone
Brugsanvisning
Borehammer
Navodila za uporabo
Udarni vrtalnik
Használati utasítás
Fúrókalapács
Navodila za upora
Udarni vrtalnik
Naputak za uporabu
Bušilica s čekićem
Kullanma talimat∂
Elektro Cakma Matkabi
Art.-Nr.: 42.583.43 I.-Nr.: 01013
Anleitung HBH 1000 Herkules 30.07.2003 9:18 Uhr Seite 1

Gehörschutz tragen!
Wear ear muffs!
Porter une protection de l’ouïe !
¡Póngase cascos protectores para
los oídos!
Använd hörselskydd!
Käytä kuulosuojuksia!
Bær høreværn
Nosit ochranu sluchu!
Hordjon zajcsökkentő hangvédőt!
Na ušesih nosite protihrupno zaščito !
Nosite zaštitnik za uši.
Kulakl∂k tak∂n!
Augenschutz tragen!
Wear goggles!
Portez une protection des yeux !
¡Póngase gafas protectoras!
Använd ögonskydd!
Käytä suojalaseja!
Bær øjenværn
Nosit ochranu zraku!
Hordjon szemvédőt!
Na očeh nosite zaščito za oči !
Nosite zaštitne naočale.
Koruyucu gözlük tak∂n!
Bei Staubentwicklung Atemschutz tragen!
Wear a breathing mask!
En cas de dégagement de poussière
Si se genera polvo
Vid dammbildning
Pölyävissä töissä
Bær åndedrætsværn ved støvdannelse
Při tvorbě prachu nosit masku na ochranu
dýchacích cest!
Porképzésnél hordjon egy porvédőálarcot
Pri nastajanju prahu nosite zaščitno masko za
dihanje !
U slučaju stvaranja prašine nosite masku za
disanje!
Toz oluµan iµlerde maske kullan∂n!
Bitte Seite 2 ausklappen
Please fold out page 2
Veuillez déplier les page 2
Desdoblar página 2
Fäll ut sidorna 2
Käännä sivut 2 auki
Fold side 2 ud
Prosím nalistujte stranu 2
Kérjük a 2 - ig levő oldalakat
szétnyitni.
Prosimo odprite stran 2
Molimo da raširite stranice 2
Lütfen sayfa 2’i aç∂n
Anleitung HBH 1000 Herkules 30.07.2003 9:18 Uhr Seite 2
3
1
2 3
Anleitung HBH 1000 Herkules 30.07.2003 9:18 Uhr Seite 3

4
4
6
5
a
b
c
a
b
7
Anleitung HBH 1000 Herkules 30.07.2003 9:18 Uhr Seite 4

5
D
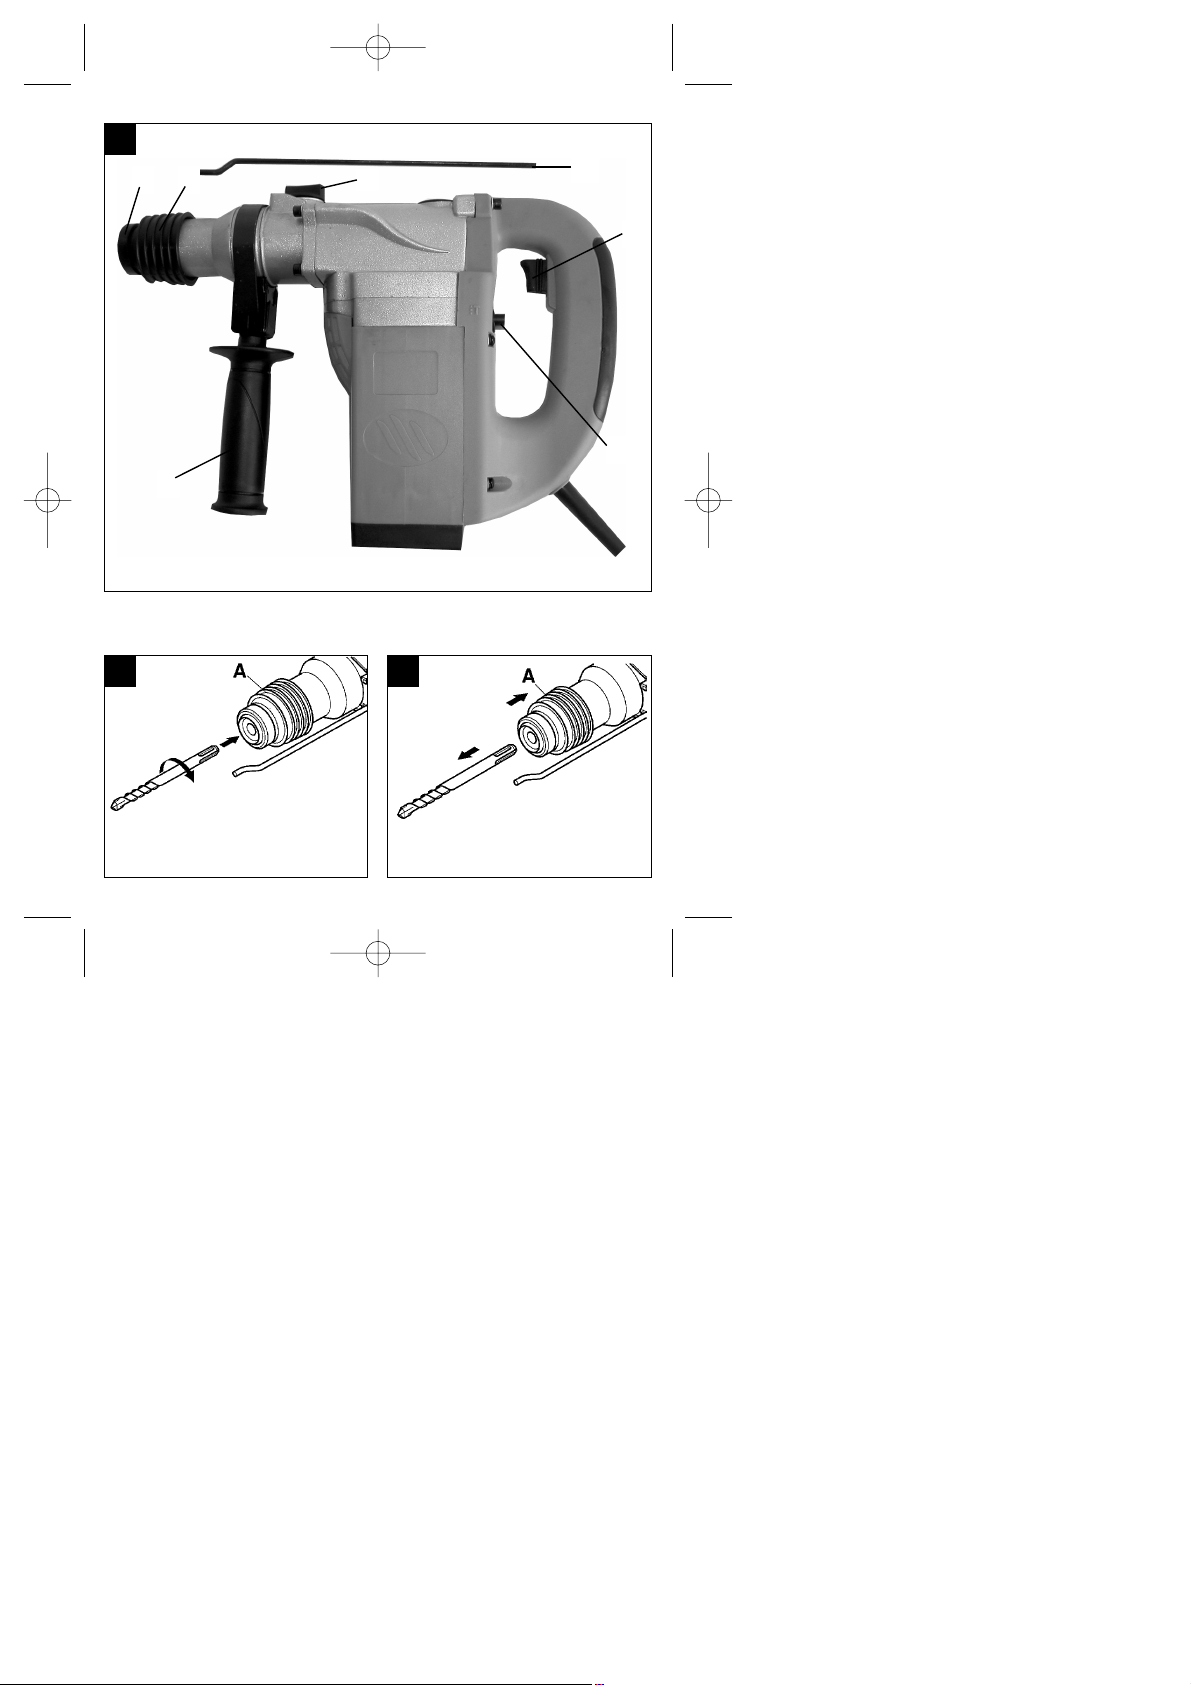
1. Gerätebeschreibung (Abb.1)
1 Staubschutz
2 Verriegelungshülse
3 Ein-Aus-Schalter
4 Zusatzgriff
5 Drehstop
6 Tiefenanschlag
7 Schlagstop
2. Technische Daten
Spannung: 230 V ~ 50 Hz
Leistungsaufnahme: 1010 Watt
Leerlaufdrehzahl: 850 min
-1
Schlagzahl: 4500 min
-1
Bohrleistung (max.): Beton/Stein 26 mm
Gewicht: 6,14 kg
Vibrationspegel: 7,4 m/s
2
Schalldruckpegel: 90,9 dB(A)
Schalleistungspegel: 103,9 dB(A)
Schutzklasse: / II
Geräusch- und Vibrationsmeßwerte ermittelt entsprechend EN 50144-2-6. Der Bohrhammer ist nicht für
die Verwendung im Freien, entsprechend Artikel 3
der Richtlinie 2000/14/EG vorgesehen.
3. Sicherheitshinweise
Achtung! Beim Gebrauch von Elektrowerkzeugen
sind zum Schutz gegen elektrischen Schlag,
Verletzungs- und Brandgefahr folgende grundsätzlichen Sicherheitsmaßnahmen zu beachten.
Lesen und beachten Sie diese Hinweise, bevor Sie
das Werkzeug benutzen.
Prüfen Sie die auf dem Typenschild angegebene
Spannung (Volt).
Bei Verwendung von Leitungsrollern, Leitung voll-
ständig abrollen. Drahtquerschnitt mind. 1,5 mm
2
.
Bei Einsatz des Elektro-Bohrhammers im Freien
ist für den Anschluß eine ordnungsgemäße
Verlängerungsleitung H07RN-F 3G1,5 mm
2
mit
spritzwassergeschützten Steckvorrichtungen zu
verwenden.
Achten Sie auf einen sicheren Stand auf Leitern
oder Gerüsten bei freihändigem Bohren.
In Wänden, wo Strom-, Wasser- oder Gas-
leitungen unsichtbar verlegt sind, zuerst die
Leitungen mit einem Leitungssuchgerät
lokalisieren. Berührung mit stromführenden Teilen
oder Leitern vermeiden.
Tragen Sie zum Schutze Ihrer Ohren einen
Gehörschutz: schleichender Gehörverlust!
Tragen Sie eine Schutzbrille und verwenden Sie
eine Staubmaske bei stauberzeugenden Arbeiten.
Nicht im Bereich von Dämpfen oder brennbaren
Flüssigkeiten verwenden.
Ziehen Sie bei allen Umbau- und Reinigungs-
arbeiten den Stecker aus der Steckdose.
Schützen Sie die Netzleitung vor Beschädi-
gungen. Öl und Säure können die Leitung
beschädigen.
Maschine nicht überlasten.
Wichtig!
Alle nationalen Sicherheitsvorschriften bezüglich
Installation, Betrieb und Wartung sind zu
befolgen.
Meißel und Bohrer können versehentlich aus dem
Werkzeug geschleudert werden und schwere
Verletzungen verursachen:
- Vor dem Arbeitseinsatz immer nachprüfen, daß
- Meißel oder Bohrer im Werkzeughalter arretiert
- sind.
- Werkzeughalter regelmäßig auf Abnutzung oder
- Beschädigung kontrollieren.
- Ein schlagendes Werkzeug nur starten, wenn
- es gegen ein Werkstück (Wand, Decke usw.)
- gedrückt wird.
- Nach beendeter Arbeit den Bohrhammer vom
- Stromnetz trennen und Meißel oder Bohrer aus
- dem Werkzeug nehmen.
- Vor dem Wechsel von Meißel oder Bohrer den
- Bohrhammer immer vom Netz trennen.
Schützen Sie Augen und Mitarbeiter vor
Teilchenflug und absplitternde Fremdkörper.
Schutzhelm tragen! Trennwände aufstellen!
Arbeitshandschuhe schützen vor Finger-
quetschungen und Hautabschürfungen.
Vibrationen können für das Hand-Arm-System
schädlich sein: die Einwirkzeit von Vibrationen ist
so gering wie möglich zu halten.
Netzkabel immer nach hinten vom Gerät weg-
führen.
Bewahren Sie das Gerät so auf, daß es für
Kinder unzugänglich ist.
Beim Arbeiten Gerät immer mit beiden Händen
halten und auf einen sicheren Stand achten.
Weitere Sicherheitshinweise für Elektrowerkzeuge finden Sie in dem beiliegenden Heftchen.
Anleitung HBH 1000 Herkules 30.07.2003 9:18 Uhr Seite 5

4. Vor Inbetriebnahme
Einsatzstelle nach verdeckt liegenden elektri-
schen Leitungen, Gas- und Wasserrohren mit
einem Leitungssuchgerät untersuchen.
Vor Anschluß an das Stromnetz darauf achten,
daß die Netzspannung mit der Angabe auf dem
Leistungsschild übereinstimmt.
4.1 Bestimmungsgemäße Verwendung
Das Gerät ist bestimmt zum Hammerbohren in Beton, Gestein und Ziegel und für Meißelarbeiten unter
Verwendung des entsprechenden Bohrers
4.2 Werkzeug einsetzen und wechseln (Abb. 2)
Werkzeug vor dem Einsetzen reinigen und mit
Maschinenfett leicht fetten.
Verriegelungshülse (A) zurückziehen und halten.
Staubfreies Werkzeug drehend in die Werkzeug-
aufnahme bis zum Anschlag einschieben. Das
Werkzeug verriegelt sich selbst.
Verriegelung durch Ziehen am Werkzeug prüfen.
4.3 Werkzeug entnehmen (Abb. 3)
Verriegelungshülse (A) zurückziehen, halten und
Werkzeug entnehmen.
5. Inbetriebnahme (Abb. 1)
5.1 Ein- Ausschalten
Einschalten: Betriebsschalter (3) drücken
Ausschalten: Betriebsschalter (3) loslassen.
5.2 Zusatzgriff (4)
Bohrhammer aus Sicherheitsgründen nur mit
dem Zustzgriff verwenden.
Eine sichere Körperhaltung beim Arbeiten erhalten
Sie durch Drehen des Zusatzgriffes. Zusatzgriff entgegen dem Uhrzeigersinn lösen und drehen.
Danach Zusatzgriff wieder festziehen.
5.3 Tiefenanschlag (6)
Zusatzgriff lösen und den geraden Teil des Tiefenanschlages in die Bohrung des Zusatzgriffes einsetzen.
Tiefenanschlag einstellen und Zusatzgriff wieder
anziehen.
5.4 Staubaufnahme-Vorrichtung (Abb. 4)
Vor Bohrhammerarbeiten senkrecht über dem Kopf,
Staubaufnahme-Vorrichtung über den Bohrer schieben.
5.5 Schlagstop (Abb. 5)
Zum sanften Anbohren ist der Bohrhammer mit
einem Schlagstop ausgestattet.
Schalthebel (7) nach rechts auf Position (b)
drehen, um das Schlagwerk auszuschalten.
Um das Schlagwerk wieder einzuschalten muß
der Schalthebel (7) wieder zurück auf Position (a)
gedreht werden.
5.6 Drehstop (Abb. 6)
Für Meißel arbeiten kann die Drehfunktion des
Bohrhammers ausgeschaltet werden.
Hierzu den Stellhebel (5) mit dem Pfeil (a) auf die
Position (c) am Maschinengehäuse drehen.
Um die Drehfunktion wieder einzuschalten muß
der Stellhebel (5) mit dem Pfeil (a) auf die Position (b) gedreht werden.
Achtung:
Zum Hammerbohren benötigen Sie nur eine geringe
Anpreßkraft. Ein zu hoher Anpreßdruck belastet unnötig den Motor. Bohrer regelmäßig prüfen.
Stumpfen Bohrer nachschleifen oder ersetzen.
6. Wartung
Vor allen Arbeiten am Gerät Netzstecker ziehen!
Halten Sie Ihr Gerät immer sauber.
Benutzen Sie zur Reinigung des Kunststoffes
keine ätzenden Mittel.
Um Staubablagerungen zu vermeiden sollten die
Lüftungsschlitze nach Arbeitsende, durch
Druckluft (max. 3 bar) gereinigt werden.
Kohlebürsten regelmäßig kontrolieren (ver-
schmutzte bzw. verschlissene Kohlebürsten
führen zu übermäßiger Funkenbildung und zu
Drehzahlstörungen).
7. Ersatzteilbestellung
Bei der Ersatzteilbestellung sollten folgende
Angaben gemacht werden:
Typ des Gerätes
Artikelnummer des Gerätes
Ident- Nummer des Gerätes
Ersatzteil- Nummer des erforderlichen Ersatzteils
Ersatzkohlen 42.583.40.02
Schalter 42.583.40.01
6
D
Anleitung HBH 1000 Herkules 30.07.2003 9:18 Uhr Seite 6

7
GB
1. Layout (Fig. 1)
1 Dust guard
2 Locking sleeve
3 On/Off switch
4 Additional handle
5 Rotation stop
6 Drilling depth stop
7 Hammer stop
2. Technical data
Mains voltage: 230 V ~ 50 Hz
Power: 1010 Watt
Idle speed: 850 min
-1
Hammer rate: 4500 min
-1
Drilling capacity (max.): Concrete/Stone 26 mm
Weight: 6,14 kg
Vibration: 7,4 m/s
2
Sound pressure level: 90,9 dB(A)
Sound power level: 103,9 dB(A)
Protection class: / II
The noise and vibrations from this tool were measured in accordance with EN 50144-2-6. This hammer
drill is not intended for use outdoors as defined in
Article 3 of the Directive 2000/14/EC.
3. Safety rules
Important! When using electric tools it is essential
that you comply with the following basic safety rules
for the prevention of electrical shock and risk of injury
or fire.
Please read these directions for use carefully before
you start to use this tool, and put all the information
into practice.
Check that your mains voltage is the same as
that marked on the rating plate.
If you use a cable reel, run all the cable off the
reel. The minimum conductor cross section used
should be 1.5 mm
2
.
If you use this electric hammer drill outdoors you
must connect it using a suitable H07RN-F 3G
1.5 mm
2
extension cable with a spray-water
protected plug.
Make sure of your footing, particularly when
working free-handed on ladders or scaffolding.
Use a detector to localize pipes and/or cables in
walls with concealed electric, water or gas lines.
Avoid any contact with conducting electrical parts
or lines.
Wear ear-muffs to protect your hearing: Risk of
progressive loss of hearing!
Wear goggles and use a breathing mask on
dusty jobs.
Never use the machine near vapors or
combustible liquids.
Always unplug the machine before cleaning it or
changing drill bits etc.
Keep the power cable safe from damage. Oil and
acids can damage cables.
Never overload the machine.
Important!
Follow all safety regulations in your country appli
cable to the installation, use and maintenance of
the machine.
Chisel bits and drill bits can be inadvertently
thrown out from the machine and cause serious
injury:
Always check that the chisel bit or drill bit is firmly
locked in the chuck before you start work.
Check the chuck for wear or damage at regular
intervals.
Do not start a hammering tool until it is pressed
against a workpiece (wall, ceiling, etc.).
Always unplug the hammer drill when you have
finished working and remove the chisel bit or drill
bit from the tool.
Always unplug the machine before changing
chisel bits or drill bits etc.
Protect eyes and assistants from small flying
parts and splinters. Wear a helmet! Erect a
screen wall!
Use workgloves to protect fingers from crushing
and skin from grazing.
Vibrations can be harmful to the hand-arm
system: Keep the impact time of vibrations to a
minimum.
Always keep the power cable away from where
you want to drill.
Keep the machine out of children’s reach.
Always hold the machine with two hands when it
is running and make sure of your footing.
You will find additional safety rules for the
use of electric tools in the enclosed booklet.
Anleitung HBH 1000 Herkules 30.07.2003 9:18 Uhr Seite 7

4. Preparations
Use a detector to localize pipes and/or cables in
walls with concealed electric, water or gas lines.
Before you plug in the machine, check that your
mains voltage is the same as that marked on the
rating plate.
4.1 Intended use
The tool is designed for drilling with hammer action
and for chiseling work in concrete, rock and brick,
always using the correct drill or chisel bit.
4.2 Fitting and changing a bit (Fig. 2)
Clean the bit and coat it with a little machine
grease before you insert it.
Pull back the locking sleeve (A) and hold in this
position.
Insert the dust-free bit with a twist as far as it
goes into the SDS-Plus chuck. The bit will
automatically be locked in place.
Pull on the bit to check that it is secure.
4.3 Removing a bit (Fig. 3)
Pull back the locking sleeve (A), hold and pull out the
bit.
5. Starting up (Fig. 1)
5.1 Switching on/off
Switching on: Press On/Off switch (3).
Switching off: Release On/Off switch (3).
5.2 Additional handle (4)
For safety reasons you should always use the
hammer drill with the additional handle.
For a secure posture during work you should turn the
additional handle. Twist the additional handle
anticlockwise and turn.
Then fix the additional handle by twisting again.
5.3 Depth stop
(6)
Loosen the handle attachment and place the straight
part of the depth stop in the hole. Adjust the depth
stop and retighten the handle attachment.
5.4 Dust collector (Fig. 4)
Before you start any hammer drilling work directly
over your head, slide the dust collector on the bit.
5.5 Hammer stop (Fig. 5)
The hammer drill comes with a hammer stop for
smooth pre-drilling.
Turn the lever switch (7) to the right to position
(b) to switch off the hammer mechanism.
To turn the hammer mechanism back on you
have to turn the lever switch (7) back to position
(a).
5.6 Rotation stop (Fig. 6)
For chiseling, the rotary function of the hammer drill
can be switched off.
Turn the lever selector (5) so that the mark C
coincides with the arrow (a) on the machine
housing.
To reactivate the rotating function you have to
turn the lever selector (5) so that the mark (b)
coincides again with the arrow (a).
Important:
You only need to apply minimal pressure for hammer
drilling. Do not apply too much pressure as this will
put unnecessary strain on the motor. Check the
hammer drill at regular intervals.
Re-sharpen or replace bits whenever blunt.
6. Maintenance
Always unplug the machine before starting any
maintenance work!
Keep your machine clean at all times.
Do not use aggressive agents to clean plastic
parts.
To prevent dust from collecting in the air vents,
clean them with compressed air (max. 3 bar)
each time you finish working with the machine.
Check the carbon brushes at regular intervals
(dirty or worn carbon brushes cause excessive
sparking and interference in speed).
7. Ordering replacement parts
Please quote the following data when ordering replacement parts:
Type of machine
Article number of the machine
Identification number of the machine
Replacement part number of the part required
Replacement carbon brushes 42.583.40.02
Switch 42.583.40.01
8
GB
Anleitung HBH 1000 Herkules 30.07.2003 9:18 Uhr Seite 8

9
F
1. Description de l’appareil (fig. 1)
1 Protection contre la poussière
2 Douille de verrouillage
3 Interrupteur Marche/Arrêt
4 Poignée supplémentaire
5 Stop de rotation
6 Butée de profondeur
7 Stop de frappe
2. Caractéristiques techniques
Tension: 230 V ~ 50 Hz
Puissance absorbée: 1010 Watt
Vitesse de rotation de marche à vide : 850 tr/min
Nombre de frappes : 4500 tr/min
Capacité de perçage (max.) : Béton/pierre 26 mm
Poids : 6,14 kg
Niveau de vibration : 7,4 m/s
2
Niveau de pression acoustique : 90,9 dB(A)
Niveau de puissance acoustique : 103,9 dB(A)
Catégorie de protection : / II
Valeurs de mesure du bruit et des vibrations
recueillies conformément à EN 50144-2-6. Ce
marteau perforateur ne convient pas à l’emploi à l’air
libre conformément à l’article 3 de la directive
2000/14/CE.
3. Consignes de sécurité
Attention! Lors de l’usage d’outils électriques, il faut
respecter les mesures de sécurité fondamentales
suivantes à des fins de protection contre les électrocutions, les blessures et les incendies.
Lisez et suivez ces indications avant d’utiliser
l’appareil.
Vérifiez la tension indiquée sur la plaque sig
nalétique (Volt).
Si vous employez des enrouleurs de câble,
déroulez complètement le câble. Section
transversale de fil min. 1,5 mm
2
.
Si vous utilisez un marteau perforateur électrique
à l’air libre, il faut employer une rallonge H07RNF 3G1,5 mm2dans le respect des règles de l’art
pour le raccordement ainsi qu’un dispositif
enfichable disposant d’une protection contre les
éclaboussures.
Veillez à bien vous tenir en équilibre sur les
échelles ou échafaudages lorsque vous percez
sans appui.
Pour les murs dans lesquels les conduites de
courant, d’eau ou de gaz ont été posées de
façon invisible, localisez-les tout d’abord à l’aide
d’un appareil de recherche de conduites. Eviter
tout contact avec des pièces conductrices de
courant ou des conducteurs.
Portez une protection de l’ouïe pour vous
protéger les oreilles : perte insidieuse de l’ouïe !
Portez des lunettes de protection et utilisez un
masque anti-poussière pendant les travaux
générateurs de poussière.
Ne pas utiliser en présence de vapeurs ni de
liquides inflammables.
Retirez la fiche de la prise de courant pour tous
les travaux de modification et de nettoyage.
Protégez la ligne secteur contre tout
endommagement. L’huile et les acides peuvent
endommager la conduite.
Ne surchargez pas la machine.
Important!
Vous devez respecter toutes les consignes de
sécurité concernant l’installation, le
fonctionnement et la maintenance.
Le trépan et le foret peuvent être catapultés par
mégarde de l’outil et causer de graves blessures:
Toujours vérifier avant de commencer le travail,
si-le trépan ou le foret est bien bloqué dans le
porte-outils.
Contrôlez régulièrement si le porte-outils n’est
pas usé ou endommagé.-
Ne faites démarrer l’outil frappant qu’après -
l’avoir appuyé contre la pièce à usiner (mur,
plafond, etc.) -
Après le travail, déconnectez le marteau
perforateur du courant du secteur et retirez le
trépan et ou foret de l’outil.
Avant de remplacer un trépan ou un foret,
déconnectez toujours le marteau perforateur du
réseau.
Protégez vos yeux et vos collègues contre les
particules en vol et les corps étrangers se
détachant par éclats. Portez un casque ! Placez
des panneaux de séparation !
Des gants vous protègeront de pincements des
doigts et de pelage des doigts.
Les vibrations peuvent être nuisibles au système
bras-main : il faut réduire le plus possible le
temps pendant lequel des vibrations sont
présentes.
Toujours faire passer le câble réseau à l’arrière
de l’appareil.
Conservez l’appareil de manière qu’il soit
inaccessible aux enfants.
Toujours maintenir l’appareil des deux mains en
travaillant et veiller à bien garder l’équilibre.
Vous trouverez d’autres consignes de sécurité
en annexe, dans le carnet.
Anleitung HBH 1000 Herkules 30.07.2003 9:18 Uhr Seite 9

4. Avant la mise en service
Vérifiez si des conduites électriques, de gaz ou
d’eau ne sont pas cachées dans l’endroit où vous
désirez travailler, en vous aidant d’un appareil de
recherche de conduites.
Avant de connecter au réseau, vérifiez si la tensi
on du secteur correspond bien à celle indiquée
sur la plaque signalétique.
4.1 Emploi conforme à l’affectation
L’appareil est conçu pour perforer à percussion et
forer à marteau le béton, la pierre et la tuile en utilisant le foret et/ou le marteau respectif.
4.2 Mise en place et changement des outils
(fig. 2)
Avant de l’employer, nettoyez l’outil et graissez-le
légèrement de graisse à machine.
Tirez la douille de verrouillage vers l’arrière (A) et
maintenez-la ainsi.
Poussez l’outil dégagé de poussière en le
tournant dans le porte-outils jusqu’à la butée.
L’outil se verrouille lui-même.
Contrôlez qu’il s’est bien verrouillé en le tirant.
4.3 Retirez l’outil (fig. 3)
Tirez la douille de verrouillage vers l’arrière (A),
maintenez-la tirée et retirez l’outil.
5. Mise en service (fig. 1)
5.1 Mise en / hors service
Mise en circuit : Appuyez sur l’interrupteur (3)
Mise hors circuit : Relâchez l’interrupteur (3).
5.2 Poignée supplémentaire (4)
Utilisez le marteau perforateur uniquement avec
sa poignée supplémentaire, pour des raisons de
sécurité.
Vous obtiendrez une tenue corporelle bien sûre en
tournant la poignée supplémentaire. Desserrez la
poignée supplémentaire en la tournant dans le sens
contraire aux aiguilles d’une montre.
Fixez ensuite à nouveau la poignée supplémentaire.
5.3 Butée de profondeur (6)
Desserrer la poignée supplémentaire et placer la
pièce droite de la butée de profondeur dans le trou
de la poignée supplémentaire. Régler la butée de
profondeur et resserrer la poignée supplémentaire.
5.4 Dispositif de logement de poussière (fig. 4)
Avant de travailler avec votre marteau perforateur
placé verticalement au-dessus de votre tête, placez
le dispositif de logement de poussière au-dessus du
foret.
5.5 Stop de frappe (fig. 5)
Pour commencer légèrement un trou, le marteau
perforateur est équipé d’un stop
de frappe.
Tournez le levier de réglage (7) à droite en
position (b) pour mettre l’outil de percussion
hors circuit.
Pour remettre l’outil de percussion en circuit, le
levier de réglage (7) doit être retourné à nouveau
sur sa position (a).
5.6 Stop rotation (fig. 6)
Pour les travaux au trépan, la fonction de rotation du
marteau perforateur peut être mise hors circuit.
Pour y arriver, tournez le levier de réglage (5)
avec la marque C sur la flèche (a) sur le boîtier
de la machine.
Pour remettre la fonction de rotation en circuit, il
faut tourner le levier de réglage (5) avec la mar
que (b) sur la flèche (a).
Attention :
Pour perforer à percussion, vous n’avez besoin que
d’une force de pression minime. Si vous appuyez
trop, le moteur est surchargé. Contrôlez régulièrement le foret. Faites réaffûter les forets épointés ou
remplacez-les.
6. Maintenance
Avant tout travail sur l’appareil, retirez la fiche de
contact de la prise !
Gardez l’appareil en bon état de propreté.
N’utilisez pas de produit corrosif pour nettoyer les
matières plastiques.
Pour éviter des dépôts de poussière, il faut net
toyer la fente d’aération à l’aide d’air comprimé
(max. 3 bars) après le travail.
Contrôlez régulièrement les balais de charbon (
des balais de charbon encrassés ou usés
entraînent une formation exagérée d’étincelles et
le disfonctionnement de la vitesse de rotation).
7. Commande de pièces de rechange
Pour les commandes de pièces de rechange, vous
devrez indiquer les références suivantes:
Type de l’appareil
No. d’article de l’appareil
No. d’identification de l’appareil
No. de pièce de rechange de la pièce requise
Charbons de rechange 42.583.40.02
Interrupteur 42.583.40.01
10
F
Anleitung HBH 1000 Herkules 30.07.2003 9:18 Uhr Seite 10
 Loading...