

Page 1

HWGADSL2P-54V2 AnnexA Hercules ADSL2/2+ Wireless G Modem Router
CONTENTS
1. YOUR HERCULES MODEM ROUTER................................................................................................4
1.1. Recommendations........................................................................................................................4
1.2. Specifications................................................................................................................................5
1.3. System requirements....................................................................................................................5
1.4. Box contents..................................................................................................................................6
1.5. Front face overview.......................................................................................................................6
1.6. Connectivity overview...................................................................................................................7
2. INSTALLING YOUR HERCULES MODEM ROUTER .........................................................................8
2.1. Launching the Hercules Modem Router Installation Assistant.....................................................8
2.2. Step 1: How to position your Modem Router................................................................................8
2.3. Step 2: How to connect your Modem Router..............................................................................10
2.3.1. Uninstalling your old modem or disabling the automatic connection to your
old modem.....................................................................................................................10
2.3.2. Getting past the Content Advisor (parental control)......................................................11
2.3.3. Installing a filter (recommended)...................................................................................12
2.3.4. Connecting the Modem Router......................................................................................13
3. WIFI MANAGER, THE VERSATILE UTILITY....................................................................................14
3.1. Opening the door to WiFi Manager.............................................................................................14
3.2. Changing the WiFi Manager password.......................................................................................15
3.3. Navigating within the WiFi Manager interface............................................................................17
3.4. Connecting the Modem Router to your Internet account............................................................17
3.4.1. Configuring your ADSL connection...............................................................................18
3.4.2. Testing your ADSL connection......................................................................................21
3.4.3. Resolving any difficulties in accessing WiFi Manager or the Internet...........................22
3.5. Mastering your WiFi network at your fingertips ..........................................................................26
3.5.1. Personalizing your private WiFi network.......................................................................26
3.5.2. Securing your WiFi network using the Assistant...........................................................27
3.5.3. Limiting access to your private WiFi network to certain WiFi computers and
devices...........................................................................................................................31
3.5.4. Disabling your private WiFi network..............................................................................33
3.5.5. Enabling/Disabling your public WiFi network ................................................................33
3.5.6. Changing the public WiFi network name.......................................................................33
3.6. The firewall: your ultimate protection against Internet attacks ...................................................34
TM
4. WELCOME TO THE WIRELESS ATTITUDE
4.1. A few important points to bear in mind before getting started....................................................35
4.2. Computers running Windows Vista: Connecting to a wireless network.....................................35
4.3. Disconnecting from a wireless network......................................................................................39
4.4. Managing your favorite networks................................................................................................40
4.5. Computers running Windows Vista: Sharing folders, a printer or an ADSL connection............41
!................................................................................35
ESPAÑOL NEDERLANDS ITALIANO ENGLISH FRANÇAIS DEUTSCH
Page 2

Hercules ADSL2/2+ Wireless G Modem Router HWGADSL2P-54V2 AnnexA
4.5.1. Enabling sharing............................................................................................................42
4.5.2. Windows Vista: Sharing public or personal folders....................................................... 45
4.5.3. Computers running Windows Vista: Accessing shared folders.................................... 47
4.5.4. Wi n d ow s V i s ta : S h a ri n g a pr i n t e r...........................................................................................47
4.5.5. Computers running Windows Vista : Accessing the shared printer.............................. 49
4.5.6. Windows Vista: Sharing an ADSL connection in an Infrastructure
type network......... 51
4.6. Computers running Windows XP: Connecting to a wireless network........................................ 53
4.7. Computers running Windows XP: Disconnecting from a wireless network...............................55
4.8. Computers running Windows XP: Managing your favorite networks......................................... 56
4.9. Computers running Windows XP: Sharing folders, a printer or an ADSL connection............... 58
4.9.1. Windows XP: Using the Network Setup Wizard in an Infrastructure network .............. 58
4.9.2. Windows XP: Sharing folders........................................................................................ 62
4.9.3. Windows XP: Accessing shared folders ....................................................................... 63
4.9.4. Windows XP: Sharing a printer..................................................................................... 63
4.9.5. Windows XP: Modifying a workgroup name.................................................................65
4.9.6. Windows XP: Manually enabling or disabling your adapter’s WiFi connection
(advanced users)........................................................................................................... 66
4.10. Computers running Windows 2000: Connecting to a wireless network..................................... 66
4.11. Computers running Windows 2000: Disconnecting from a wireless network............................ 66
4.12. Computers running Windows 2000: Sharing folders, a printer or an ADSL connection............66
4.12.1. Creating a workgroup in Windows 2000....................................................................... 67
4.12.2. Windows 2000: Sharing folders....................................................................................67
4.12.3. Windows 2000: Accessing shared folders.................................................................... 68
4.12.4. Win d o w s 2 0 0 0 : S h a r i n g a p rin t e r ...........................................................................................68
4.12.5. Win d o w s 2 0 0 0 : Modifying a workgroup name.................................................................. 70
4.12.6. Windows 2000: Sharing an ADSL connection in an Infrastructure
network.................71
4.12.7. Windows 2000: Manually enabling or disabling your adapter’s WiFi
connection (advanced users)........................................................................................72
4.13. Computers running Windows Me: Connecting to a wireless network........................................ 73
4.14. Computers running Windows Me: Disconnecting from a wireless network............................... 73
4.15. Computers running Windows Me: Sharing folders, a printer or an ADSL connection............... 73
4.15.1. Windows Me: Using the Home Networking Wizard in an Infrastructure
network......... 73
4.15.2. Windows Me: Sharing folders....................................................................................... 75
4.15.3. Windows Me: Accessing shared folders....................................................................... 76
4.15.4. Windows Me: Sharing a printer.....................................................................................76
4.15.5. Windows Me: Modifying a workgroup name................................................................. 78
4.15.6. Windows Me: Manually enabling or disabling your adapter’s WiFi connection
(advanced users)........................................................................................................... 78
4.16. Computers running Windows 98 SE: Connecting to a wireless network................................... 79
4.17. Computers running Windows 98 SE: Disconnecting from a wireless network..........................79
4.18. Computers running Windows 98 SE: Sharing folders, a printer or an ADSL connection.......... 79
4.18.1. Windows 98 SE: Creating a workgroup........................................................................ 79
4.18.2. Windows 98 SE: Sharing folders...................................................................................80
4.18.3. Windows 98 SE: Accessing shared folders..................................................................80
4.18.4. Windows 98 SE: Sharing a printer................................................................................ 80
4.18.5. Windows 98 SE: Sharing an ADSL connection in an Infrastructure
network............... 82
Page 3

HWGADSL2P-54V2 AnnexA Hercules ADSL2/2+ Wireless G Modem Router
4.18.6. Windows 98 SE: Manually enabling or disabling your adapter’s WiFi
connection (advanced users)........................................................................................83
5. MANUALL Y C ON F IG U RI N G Y OU R AD S L C ON N EC TI O N..................................................................84
5.1. Gathering your ADSL connection settings..................................................................................84
5.2. Entering your ADSL connection settings....................................................................................86
5.2.1. Testing your ADSL connection......................................................................................90
5.2.2. Reconnecting.................................................................................................................91
6. WIFI MANAGER FOR ADVANCED USERS......................................................................................92
6.1. Configuring your WiFi network’s advanced options....................................................................92
6.2. Configuring your Internet firewall................................................................................................94
6.2.1. Opening doors in your firewall for certain Internet services..........................................94
6.2.2. Limiting access of one of your network computers to Internet services .......................97
6.3. A toolbox with multiple facets....................................................................................................100
6.3.1. Restarting the Hercules Modem Router......................................................................100
6.3.2. Restarting the WiFi function........................................................................................100
6.3.3. Loading/Saving your settings......................................................................................101
6.3.4. Restoring your original settings...................................................................................102
6.3.5. Updating the Modem Router’s firmware......................................................................102
6.4. Other advanced options............................................................................................................103
6.4.1. Configuring the DHCP server......................................................................................103
6.4.2. Managing the IP addresses of local network computers ............................................104
6.4.3. Enabling/Disabling UPnP............................................................................................105
6.4.4. Controlling your Hercules Modem Router from a remote location via the Internet.....105
6.4.5. Changing the Hercules Modem Router’s password....................................................106
6.4.6. Configuring a DDNS account......................................................................................106
6.5. Product information...................................................................................................................107
7. GLOSSARY.......................................................................................................................................108
8. TECHNICAL SUPPORT....................................................................................................................111
9. WARRANTY......................................................................................................................................111
10. ENVIRONMENTAL PROTECTION RECOMMENDATION..............................................................111
ESPAÑOL NEDERLANDS ITALIANO ENGLISH FRANÇAIS DEUTSCH
Page 4

Hercules ADSL2/2+ Wireless G Modem Router HWGADSL2P-54V2 AnnexA
1. YOUR HERCULES MODEM ROUTER
Congratulations on your purchase! With your Hercules Modem Router, the doors of wireless Internet access
are open wide to you.
Your Hercules Modem Router, or Hercules HWGADSL2P-54V2, is a clever combination of two products in
one: it is a WiFi router and an ADSL modem in one convenient package.
It will allow you to discover a new way of communicating between several computers, sharing Internet access,
peripheral devices, data and more… all without the constraints of cables.
Great care has been taken in designing your product. Both simple to operate and user-friendly, it is well
suited to beginners and advanced users alike.
TM
And now, it’s time to learn about your new product and join in the Wireless Attitude
1.1. Recommendations
- Never open up your Hercules Modem Router, as you risk damaging its internal components.
- In order to avoid the risk of fire or electrical discharge, keep your router away from:
- rain or humidity, as well as all fluids (water, chemical products and any other liquids),
- sources of heat such as heaters, stoves and any other heat-producing devices (including amplifiers),
- direct sunlight.
- Do not cover your Modem Router.
- Unplug the router’s power cable if you do not plan on using it again for an extended period of time. To
unplug the power cable, take hold of and pull on the plug. Never pull on the cable itself.
- Disconnect the router before cleaning. Use a soft cloth for cleaning and avoid using aerosol cleaners.
!
4/113 – User Manual
Page 5

HWGADSL2P-54V2 AnnexA Hercules ADSL2/2+ Wireless G Modem Router
1.2. Specifications
Hercules HWGADSL2P-54V2, referred to hereafter in the manual as the Hercules Modem Router, is
equipped with 4 functionalities: (1) ADSL modem (RE-ADSL, ADSL2 and ADSL2+ compatible), (2) dual-
network WiFi
Supported ADSL standards: ANSI T1.413 Issue 2, ITU-T G.992.1 AnnexA (G.dmt ADSL), ITU-T
Supported ATM and PPP protocols: PPPoA (RFC 2364), PPPoE (RFC 2516), IPoverATM (RFC
Network protocols and supported functions:
WiFi 802.11b/g function:
Interface:
External CC power, input: 200~240V, 50/60Hz, output: 12V CC/1 A
Green LEDs on front face
802.11g wireless router, (3) 10/100 LAN switch and (4) Internet firewall.
G.992.2 (G.lite ADSL), ITU G.992.3 (G.dmt.bis ADSL2), ITU G.992.3 AnnexL (RE-ADSL2), ITU G.992.4
(G.lite.bis ADSL2), ITU G.992.5 (ADSL2+), maximum downstream rate of 24Mbps, maximum upstream
rate of 1Mbps
2225/1577), Multiple Protocols over AAL5 (RFC 2684/1483), VC-Mux and LLC encapsulation
WLAN IEEE 802.11b/g
LAN TCP/IP 10/100Mbps
DHCP server, relay and client
DNS relay
DDNS support
PortForwarding and IP Filtering
Double Firewall: SPI (Stateful Packet Inspection) and NAT (Network Translation Address)
Presets for most Internet applications (P2P, videoconferencing, games...)
UpnP remote access
DMZ function
Update via Ethernet
Up to 54Mbps with Double SSID
2.4GHz frequency
Maximum transmission power: 100mW
OFDM and DSSS modulation
Security: WEP64/128, WPA-PSK and WPA2 with configuration assistant
MAC address filtering
4 Ethernet RJ45 10/100Mbps Auto MDI/MDI-X network ports for automatic detection of crossed
cabling (one Ethernet Cat 5 cable included)
1 RJ11 ADSL port (one RJ11/RJ11 telephone cable included)
Hardware reset button
ENGLISH FRANÇAIS DEUTSCH
1.3. System requirements
To access configuration settings:
Intel Pentium III, AMD Athlon/AMD-K6
64MB RAM
RJ45 10/100 Ethernet network adapter
CD-ROM drive
Operating system: Microsoft Windows 98 SE, Me, 2000, XP, Vista
To access the Internet:
Active Internet line
Internet Explorer 6.0, Netscape Navigator 4.7 or Mozilla Firefox 1.0 or higher
ESPAÑOL NEDERLANDS ITALIANO
User Manual – 5/113
Page 6
Hercules ADSL2/2+ Wireless G Modem Router HWGADSL2P-54V2 AnnexA
1.4. Box contents
Please verify that all of the following elements are present in your Hercules Modem Router box:
Hercules HWGADSL2P-54V2 Modem Router
Base
CD-ROM containing Installation Assistant and user manual in pdf format
Ethernet cable (light gray)
Telephone cable (dark gray)
Power adapter
Quick Start Guide in English
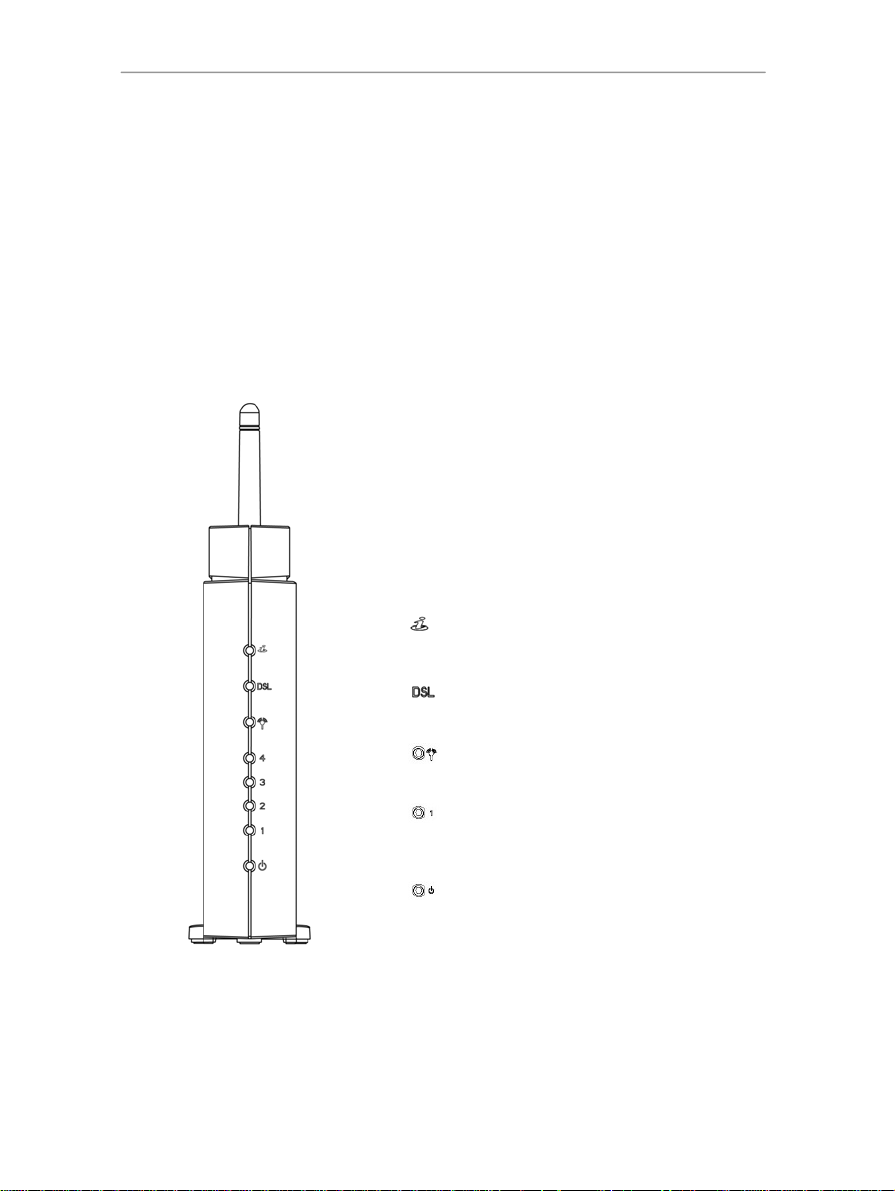
1.5. Front face overview
: Internet LED: lights up when a connection to your
Internet ADSL account is established
: DSL LED: lights up when ADSL line is active, flashes
during data transfer
: WiFi LED: lights up when WiFi connection is active,
flashes during data transfer
: 4 LEDs corresponding to the 4 Ethernet ports: each
LED lights up when a peripheral is connected to the
corresponding port, and flashes during data transfer
: Power LED
6/113 – User Manual
Page 7
HWGADSL2P-54V2 AnnexA Hercules ADSL2/2+ Wireless G Modem Router
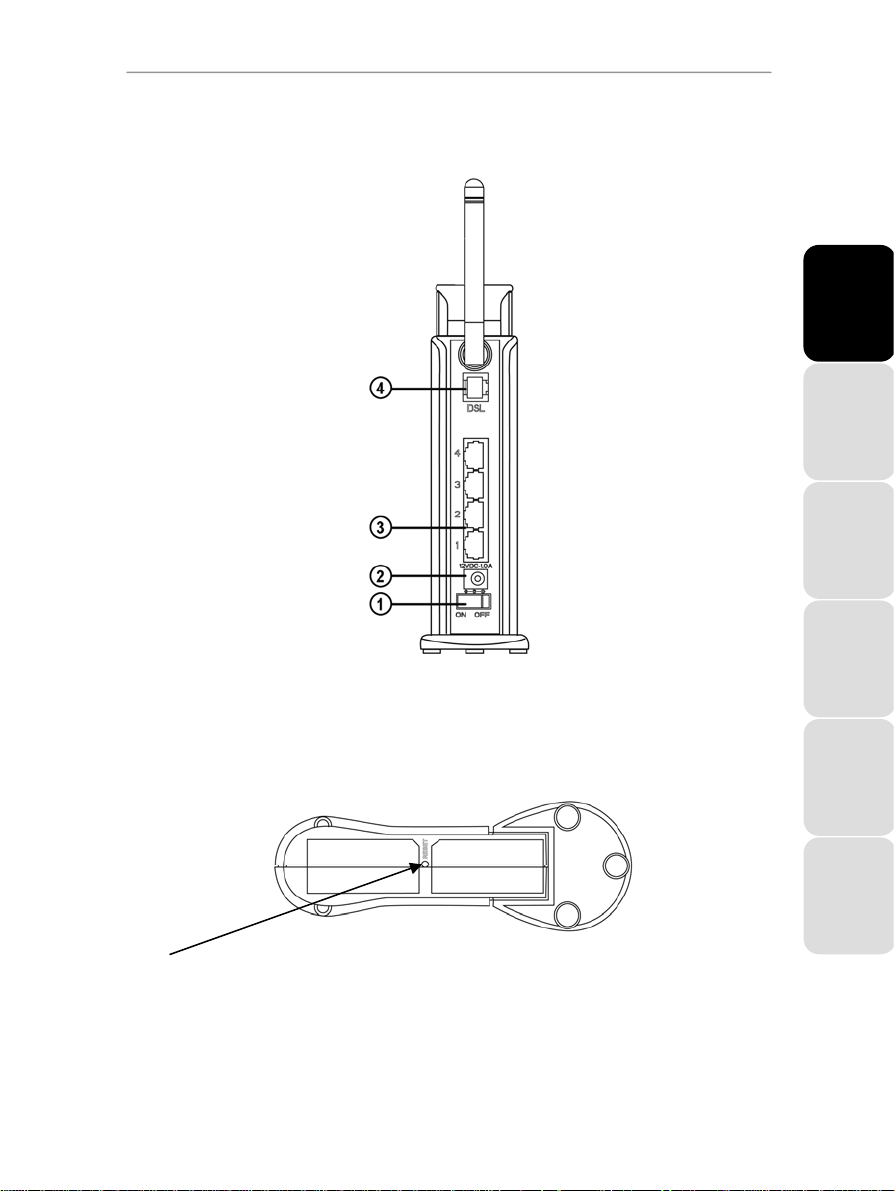
1.6. Connectivity overview
ENGLISH FRANÇAIS DEUTSCH
1 On/Off button
2 Power plug to connect power adapter
3 Four Ethernet ports allowing the Hercules Modem Router to be connected to 4 desktop computers and/or
laptop computers and/or game consoles equipped with Ethernet (RJ-45) ports, in order to create a network
4 ADSL plug to connect the Hercules Modem Router to a telephone jack
[RESET] Return to factory settings button: Switch on the Hercules Modem Router and wait until initialization is
complete. Next, press the RESET button using an object with a pointed tip for 10 seconds. Release the
button and wait for the Modem Router to restart.
User Manual – 7/113
ESPAÑOL NEDERLANDS ITALIANO
Page 8
Hercules ADSL2/2+ Wireless G Modem Router HWGADSL2P-54V2 AnnexA
2. INSTALLING YOUR HERCULES MODEM ROUTER
To simplify this task, Hercules proposes launching an Assistant which will verify with you, step by step, that
the installation of your Modem Router is carried out correctly.
2.1. Launching the Hercules Modem Router Installation Assistant
The Assistant, available on the CD-ROM included with the Modem Router, will guide you through the different
steps of the installation procedure. To help you with the installation, each of the steps is described below.
- Insert the included CD-ROM into your CD-ROM drive.
The Installation Assistant appears automatically.
If the installation menu does not launch automatically:
- Double-click My Computer.
- Double-click
- Double-click Setup.exe, if necessary.
.
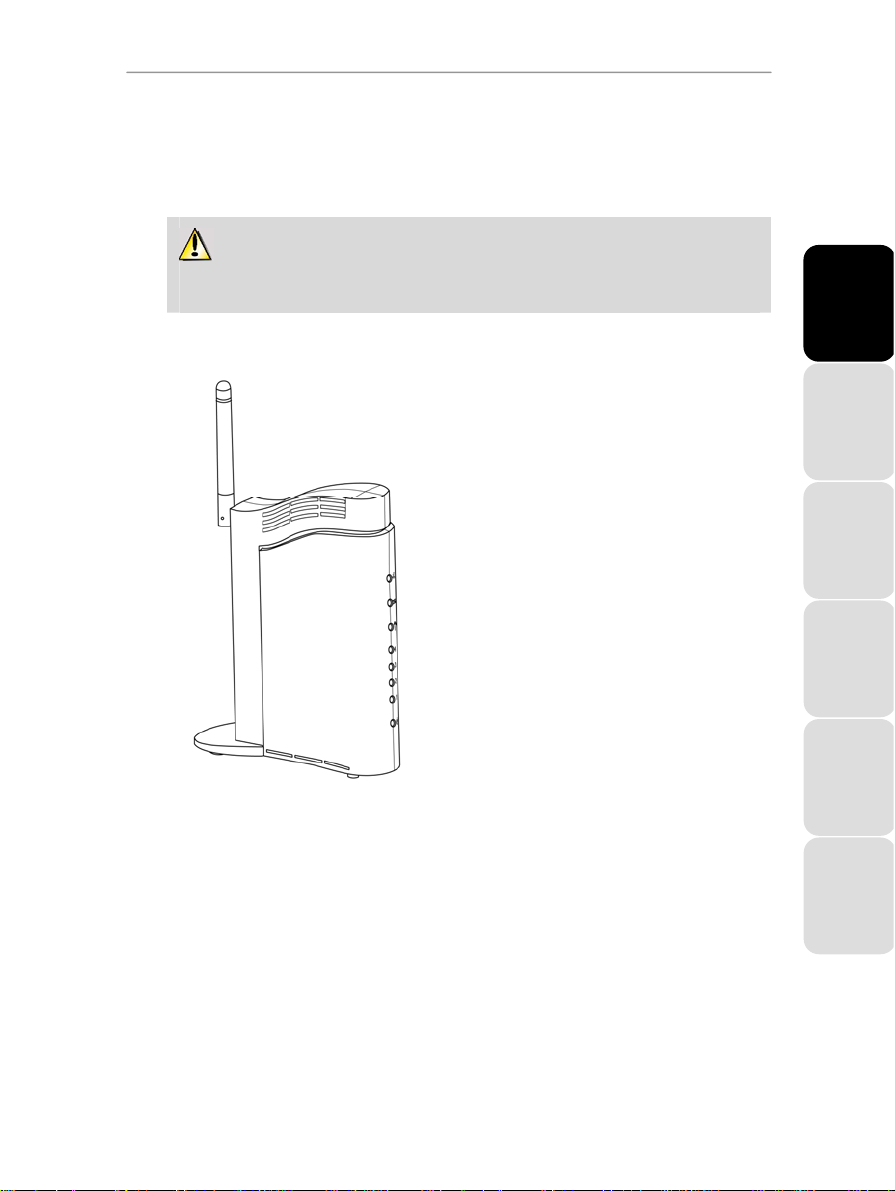
2.2. Step 1: How to position your Modem Router
Remove the Modem Router from its box, along with its base. Attach the base to the back of the Modem
Router, until it is fixed in place.
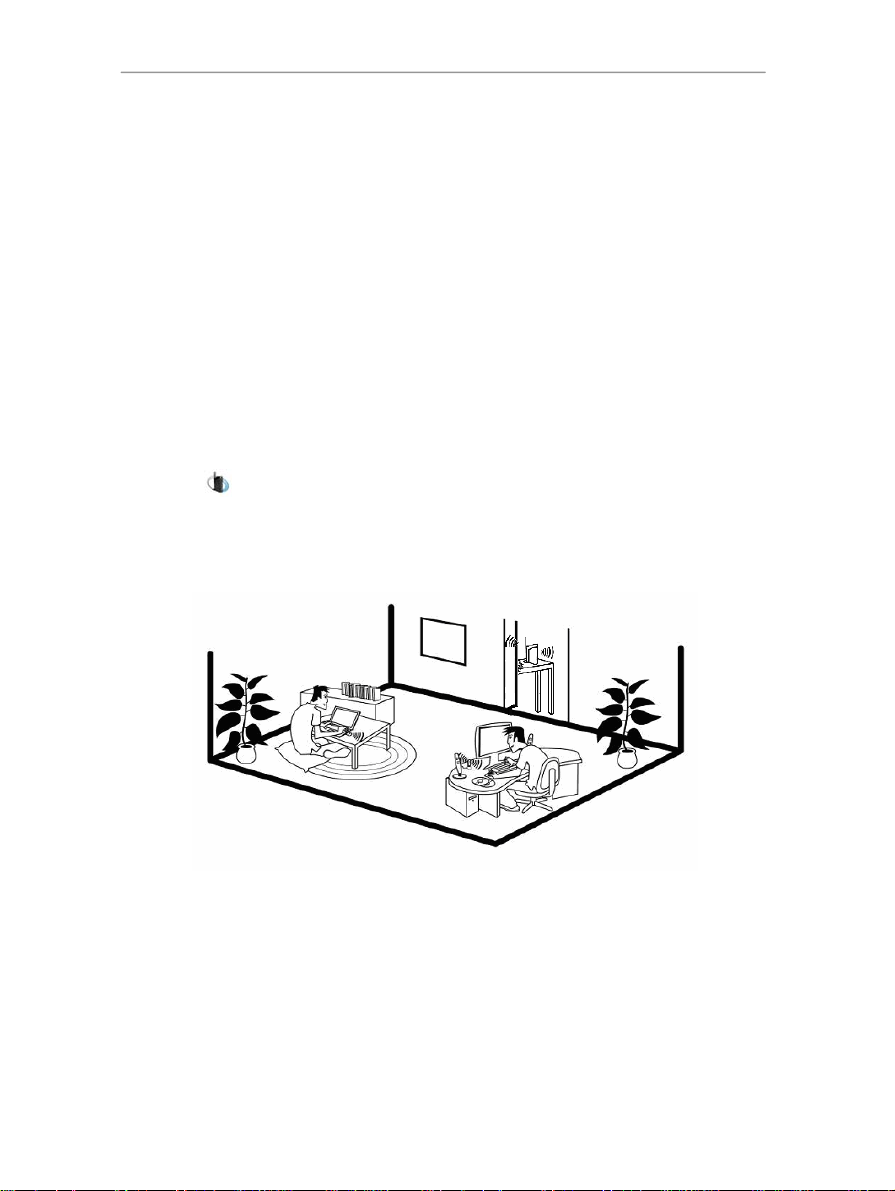
To help you select the best spot to position your Hercules Modem Router, we are pleased to offer you the
following tips, which you may adapt according to your environment (the number of rooms, computers, floors in
your home, the presence of any obstacles, the locations of power and telephone plugs…).
Position the Modem Router near a wall telephone jack and a power outlet. Avoid using any telephone
cable extensions, which may affect the quality and speed of your ADSL connection.
Try to place your Modem Router in a room centrally located in relation to your other computers and WiFi
devices.
8/113 – User Manual
Page 9
HWGADSL2P-54V2 AnnexA Hercules ADSL2/2+ Wireless G Modem Router
Keep a minimum distance of 2m between the Modem Router and any computers and WiFi devices.
If you have several computers or WiFi devices on different floors in your home (on the ground floor and
the second floor, for example), you should ideally try to place your Hercules Modem Router on the
ground floor.
Your Modem Router’s WiFi performance may be greatly affected by certain obstacles, such
as the presence of paper (a bookcase), metal, water (an aquarium) or a wall made of reinforced
concrete between the Hercules Modem Router and any WiFi adapters.
Position the Hercules Modem Router for the best possible f it with your surroundings:
Vertically: using the included base.
ENGLISH FRANÇAIS DEUTSCH
User Manual – 9/113
ESPAÑOL NEDERLANDS ITALIANO
Page 10

Hercules ADSL2/2+ Wireless G Modem Router HWGADSL2P-54V2 AnnexA
2.3. Step 2: How to connect your Modem Router
2.3.1. Uninstalling your old modem or disabling the automatic connection to your old modem
If you have already installed a USB or Ethernet ADSL modem on your computer and you no
longer wish to use your old modem, we recommend that you uninstall it, as explained below. If you do
not wish to uninstall it, you will have to disable the automatic connection to that modem. The
objective of this procedure is to establish the Internet connection via the local area TCP/IP network
created by the Hercules Modem Router, and no longer directly via your old ADSL modem.
If you have never installed a modem before, however, you can skip ahead directly to chapter
2.3.3. Installing a filter (recommended).
If you do not intend to use the modem furnished by your service provider anymore:
- Switch off your old modem and then disconnect it.
- Uninstall the software furnished by your service provider, as well as the modem’s drivers. For more
information, please refer to your modem’s user manual.
If you do not wish to uninstall the modem furnished by your service provider:
In order to avoid software conflicts, please follow the procedure outlined below:
- Launch your Internet Explorer browser.
- Click Tools/Internet Options.
- Select the Connections tab.
The Internet Options window appears.
10/113 – User Manual
Page 11
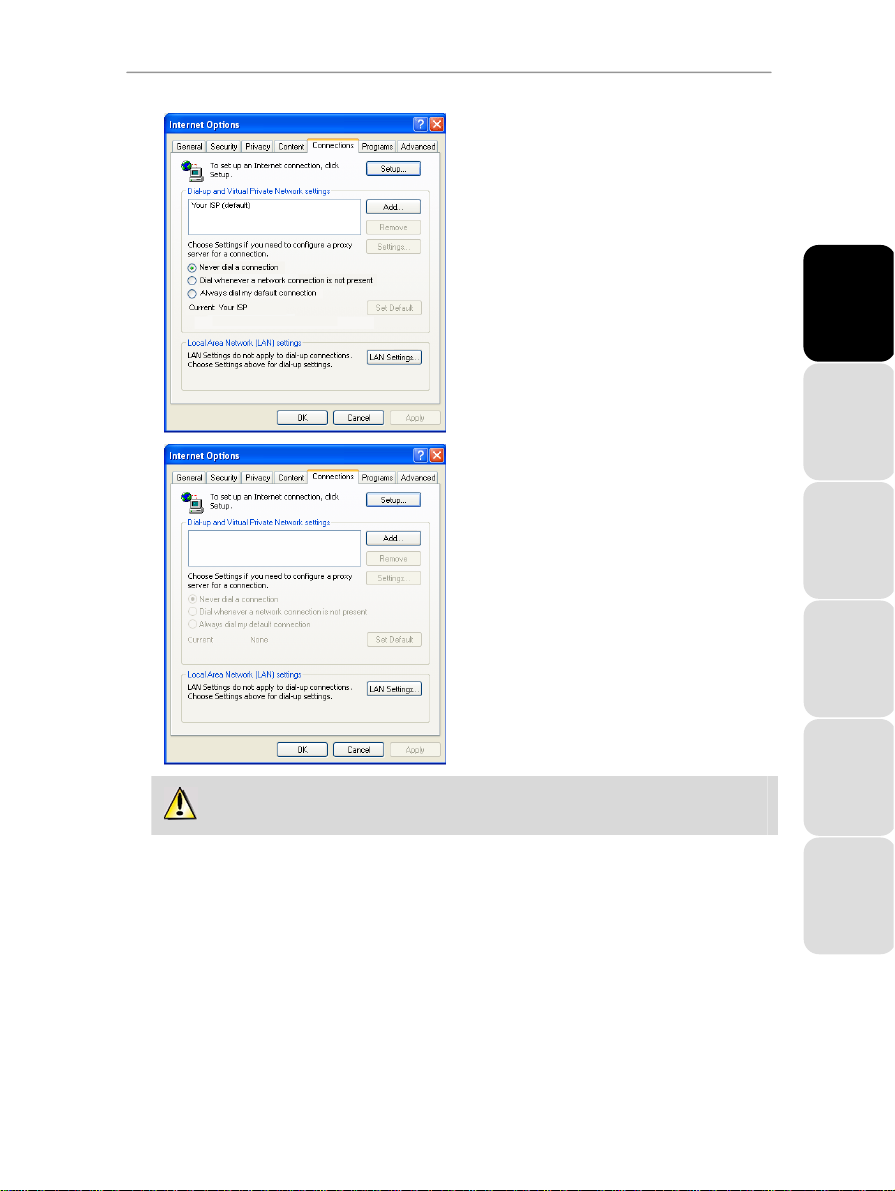
HWGADSL2P-54V2 AnnexA Hercules ADSL2/2+ Wireless G Modem Router
Scenario 1: your ISP appears in the Internet
Options window.
- Disable the automatic connection to your old
modem by selecting the Never dial a
connection option.
- Click OK.
Scenario 2: your ISP does not appear in the
Internet Options window.
The automatic connection is managed directly by
the software furnished by your ISP.
- Refer to the user manual for your old ADSL
modem or for the software furnished by your ISP
for details on how to disable the automatic
connection and/or for the Internet connection to
be established via a local area network
(TCP/IP).
Reminder: it is the Hercules Modem Router that will
create a local area network through which the
computers will access the Internet.
ENGLISH FRANÇAIS DEUTSCH
You can also find information on our website (FAQs etc.): www.hercules.com.
2.3.2. Getting past the Content Advisor (parental control)
If you have enabled the Content Advisor in your Internet browser in order to control access to certain
sites which may include contents of a violent or otherwise undesirable nature, you will not be able to
immediately connect to WiFi Manager.
After launching QuickAccess, the Content Advisor will ask you for authorization to view the site
http://192.168.1.1. This site corresponds to the WiFi Manager interface on your Modem Router. To
access the site, simply give your authorization to Always allow this Web site to be viewed. Once you
have done so, the modem’s address will be stored in your Internet browser and you will then be able to
access WiFi Manager directly.
User Manual – 11/113
ESPAÑOL NEDERLANDS ITALIANO
Page 12
Hercules ADSL2/2+ Wireless G Modem Router HWGADSL2P-54V2 AnnexA
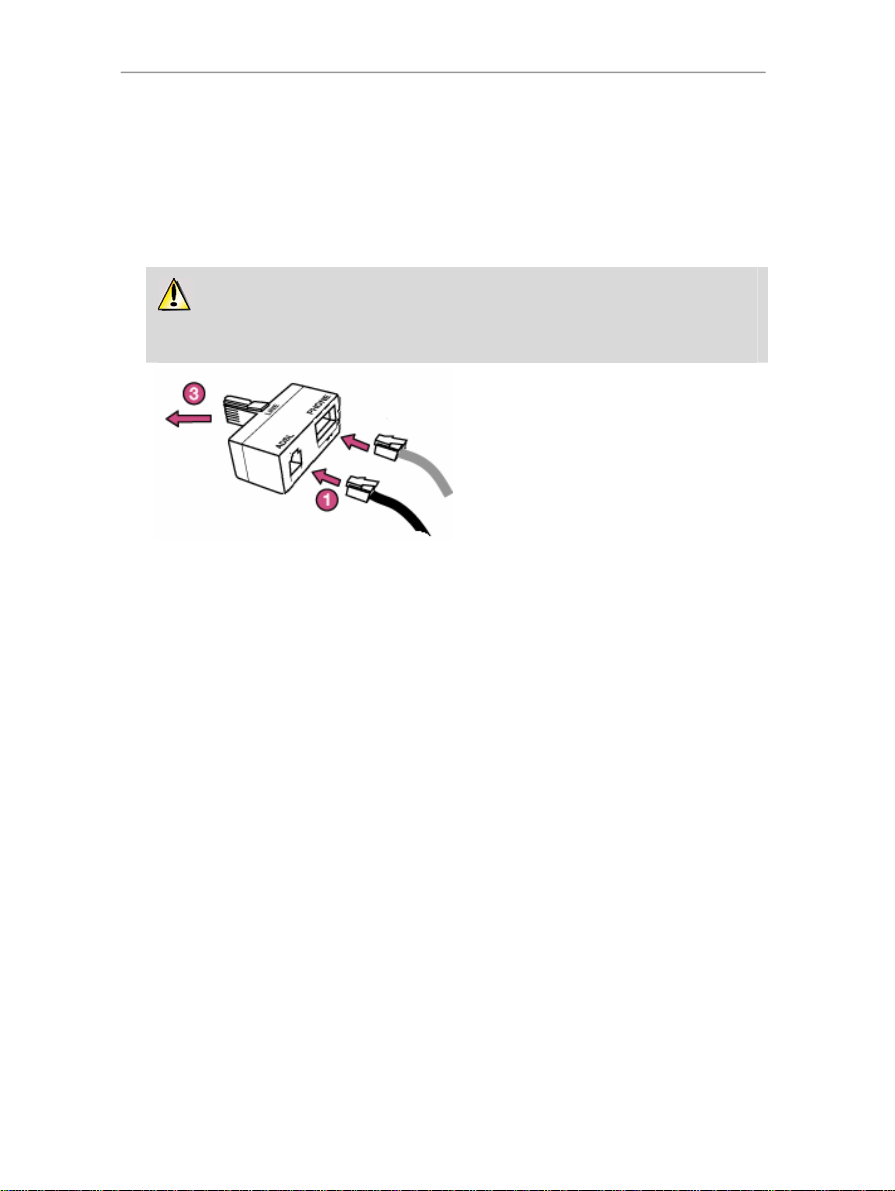
2.3.3. Installing a filter (recommended)
First off, we recommend that you install a filter (generally furnished by your ISP (Internet Service Provider)
or available for purchase, if you don’t already have one) on every telephone jack connected to a piece of
telephone equipment (a piece of telephone equipment can be a telephone, a fax machine, an answering
machine or your Modem Router). Installing a filter is not mandatory; however, without a filter, the quality of
your telephone communications may be degraded.
If you don’t have a filter, get in touch with your ADSL service provider to find out which model
you will need (filters may be purchased at do-it-yourself shops or shops specializing in telephone
equipment).
1. Connect one end of the telephone cable (dark
gray) to the ADSL (RJ11) connector on the
filter.
2. Connect the other end of the cable to the
ADSL plug 4 on your Hercules Modem
Router.
3. Connect the filter to a wall telephone jack.
The PHONE connector allows you to connect
The model may vary from one country to
another.
your telephone equipment’s standard plug. If
need be, verify that your telephone is emitting a
tone signal.
12/113 – User Manual
Page 13
HWGADSL2P-54V2 AnnexA Hercules ADSL2/2+ Wireless G Modem Router
2.3.4. Connecting the Modem Router
1. Connect the Hercules Modem Router’s power cable to the power plug 2 and plug the power adapter into
an electrical outlet.
2. Switch on the Hercules Modem Router by pressing the On/Off button 1 located at the back of the unit.
The power LED lights up and the initialization sequence begins. Initialization may take up to 5 minutes,
during which time the WiFi, DSL, Internet and 1-2-3-4 LEDs will light up or flash in succession.
Initialization is complete once the WiFi LED stays lit.
3. The DSL LED should flash for a few seconds and then stay lit. This indicates that your Modem Router is
properly synchronized with your ADSL line. If this is not the case, verify that your telephone cable is
properly connected to your ADSL filter and to your Hercules Modem Router. If the problem persists, it may
be that your ADSL line is not activated with your ISP. Please contact your ISP to verify.
4. You may now connect the included Ethernet cable (light gray cable) to one of your Hercules Modem
Router’s 4
The LED corresponding to the number of the Ethernet port you have selected lights up.
5. The Assistant prompts you to install “Hercules QuickAccess”, a utility for quick connection to the WiFi
Manager
Ethernet ports 3 and the Ethernet (RJ-45) port on your computer’s network adapter.
application.
If you do not wish to install this utility, you will only be able to access your Modem Router by
manually entering its address (please see chapter 3.1. Opening the door to WiFi Manager).
ENGLISH FRANÇAIS DEUTSCH
User Manual – 13/113
ESPAÑOL NEDERLANDS ITALIANO
Page 14
Hercules ADSL2/2+ Wireless G Modem Router HWGADSL2P-54V2 AnnexA
3. WIFI MANAGER, THE VERSATILE UTILITY
With WiFi Manager, nothing could be easier than replacing your old ADSL modem with the Hercules Modem
Router and thereby sharing your Internet access with all of the computers in your home or small business, or
simply creating a wireless network.
WiFi Manager is the interface which allows you to communicate with your Hercules Modem Router, configure
an ADSL connection, manually or automatically, turn on or cut off your public wireless network for your friends
or children, and configure your private wireless network or Internet firewall.
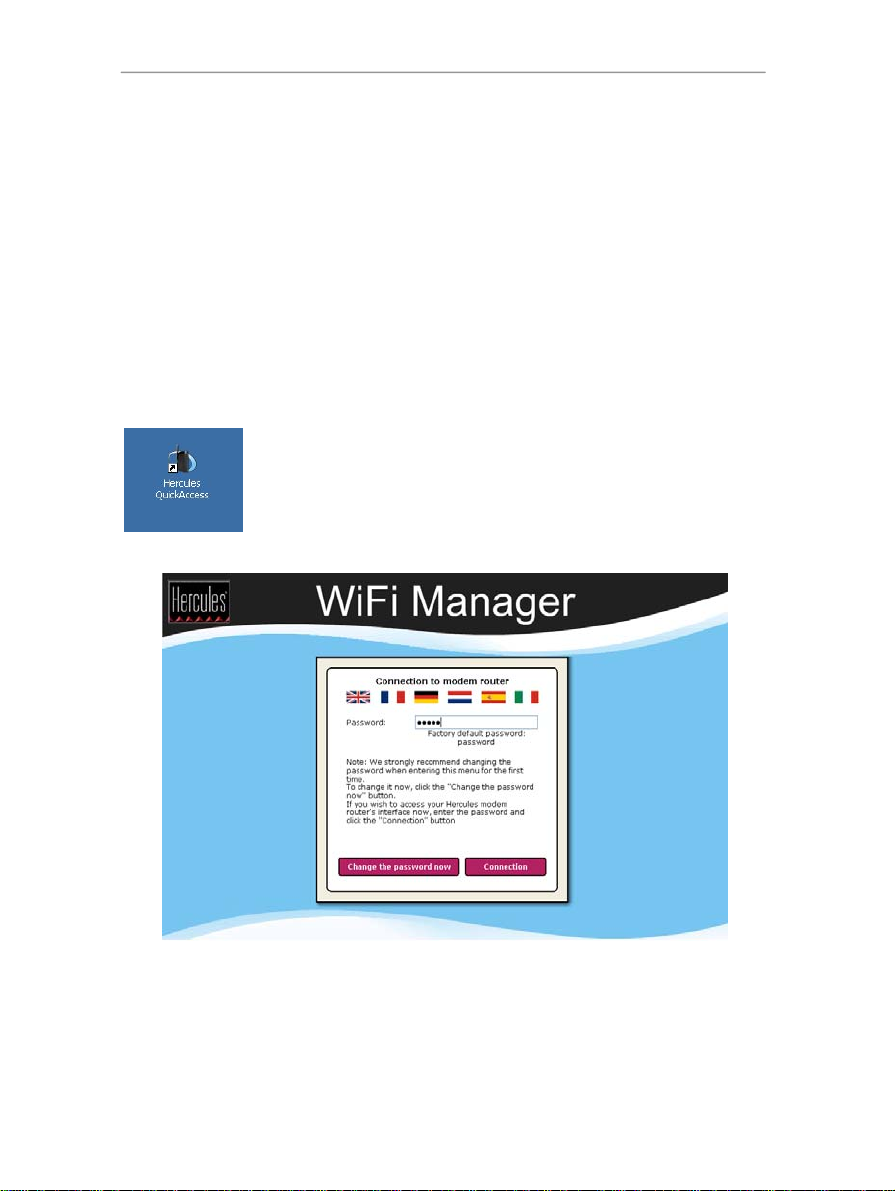
3.1. Opening the door to WiFi Manager
The Installation Assistant you have launched from the CD-ROM has installed a connection utility on your
Desktop, called “Hercules QuickAccess”. This utility will bring you straight to the door (locked with a key, for
the moment) to WiFi Manager.
- To access the door to enter WiFi Manager, simply click the Hercules QuickAccess
icon on your Desktop.
The connection window to the Modem Router appears.
14/113 – User Manual
Page 15
HWGADSL2P-54V2 AnnexA Hercules ADSL2/2+ Wireless G Modem Router
Or, if you have chosen not to install the QuickAccess icon:
- Open up the browser of your choice (Internet Explorer or Netscape Navigator) and enter the address
http://192.168.1.1.
You are now at the door to enter WiFi Manager, which you must open using a password.
- To open the door, enter the default password or enter your own password if you have already defined one
(for information on how to define your own password, please refer to chapter
Manager password
Default factory-set password: 123456
- Click Connection.
The password ensures that you are the only one who can access your WiFi Manager, and therefore
your Hercules Modem Router’s settings. For this reason, it is important that you change the password when
using WiFi Manager for the first time (see below).
).
3.2. Changing the WiFi
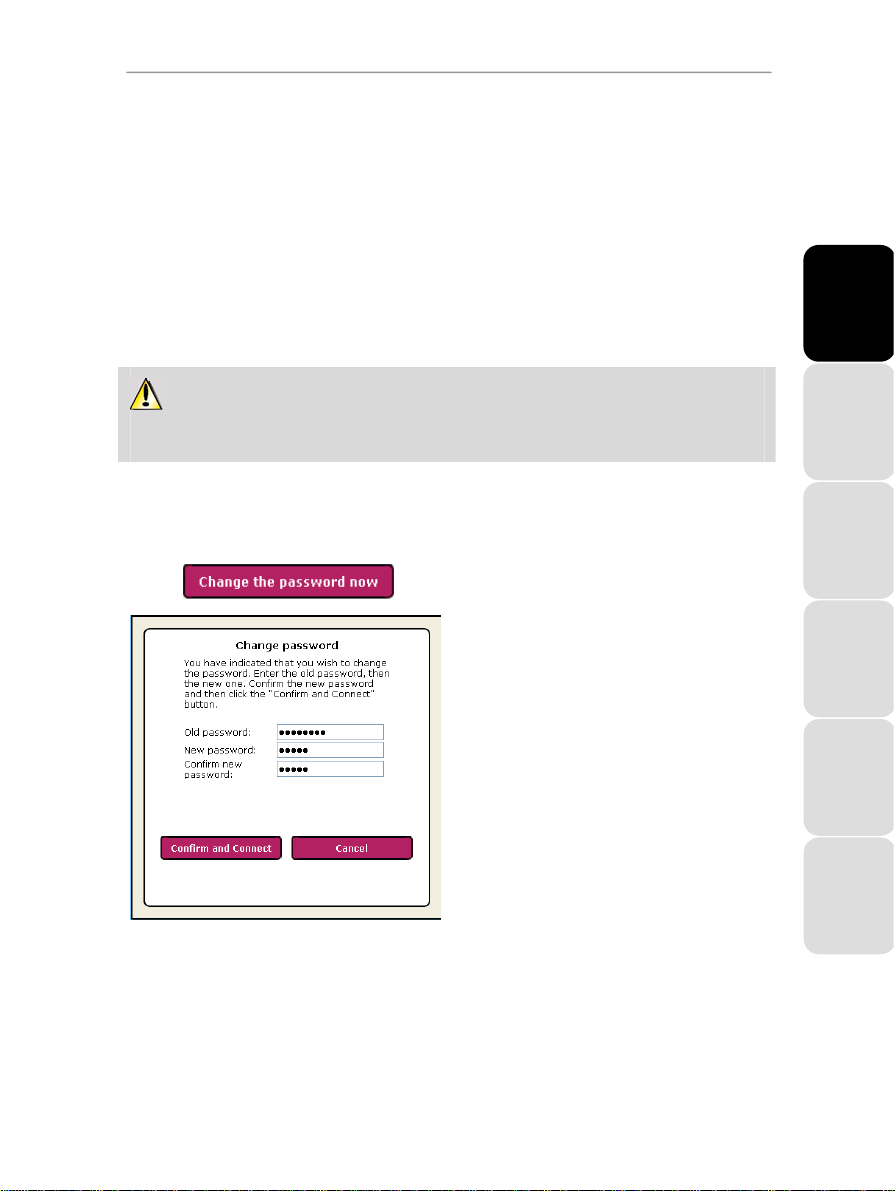
3.2. Changing the WiFi Manager password
When opening the door to WiFi Manager for the first time, we strongly recommend that you change the default
password, 123456, during your first use directly via the Connection to Modem Router window.
- Click the Change the password now button.
- Enter the old password (123456, if you are doing
this for the first time), the new password, which
you will select, and then confirm the new
password.
- Click Confirm and Connect to store your new
password and connect.
ENGLISH FRANÇAIS DEUTSCH
User Manual – 15/113
ESPAÑOL NEDERLANDS ITALIANO
Page 16
Hercules ADSL2/2+ Wireless G Modem Router HWGADSL2P-54V2 AnnexA
The door to WiFi Manager opens to the Home page depicted below. You can now explore all of your
Hercules Modem Router’s functionalities.
16/113 – User Manual
Page 17
HWGADSL2P-54V2 AnnexA Hercules ADSL2/2+ Wireless G Modem Router
3.3. Navigating within the WiFi Manager interface
The WiFi Manager interface has been designed to simplify navigation through the different menus.
Nevertheless, should you ever feel a bit lost, you can always click the Home page button at any time to return
to the Home page, the starting point for all of your Hercules Modem Router’s functionalities.
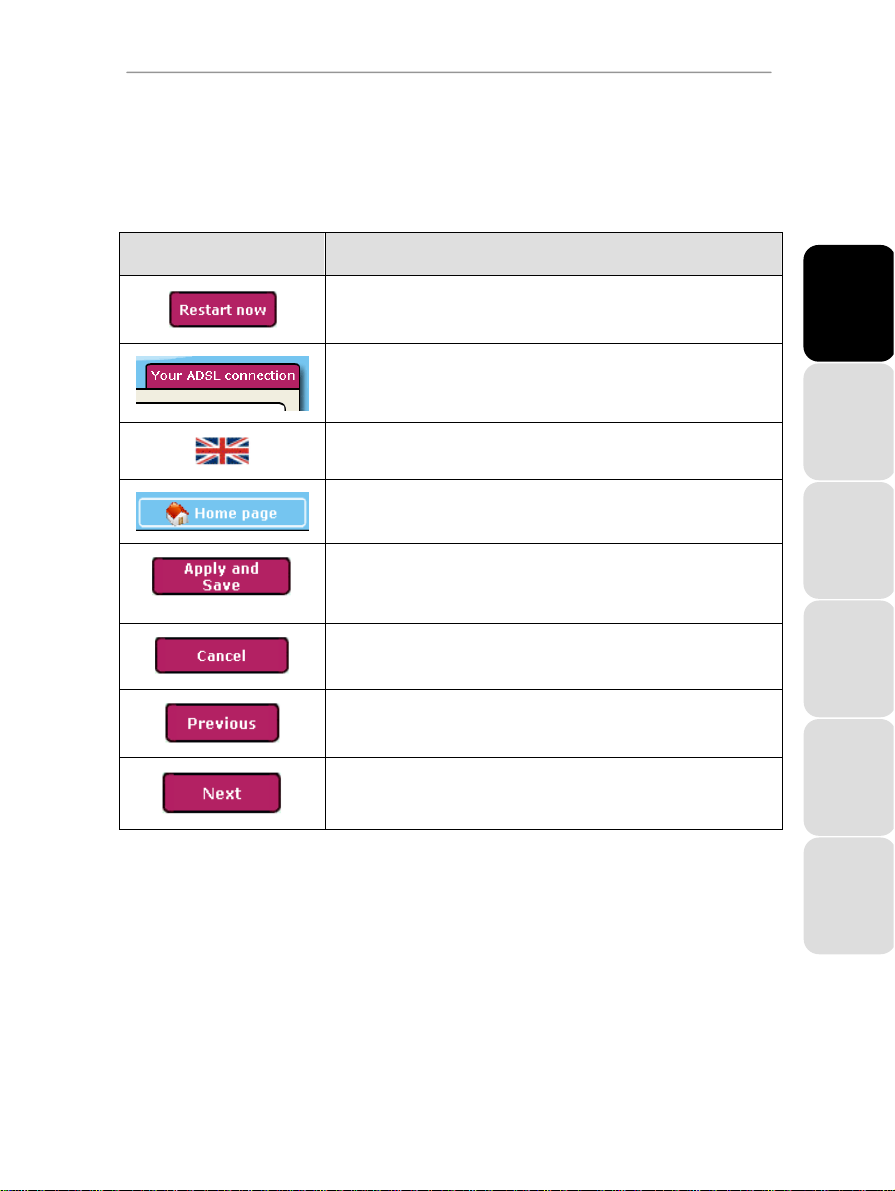
Type Description
Button launching an action on your Hercules Modem Router or opening a
new page.
Name of the page currently displayed.
ENGLISH FRANÇAIS DEUTSCH
Language in which the interface text is displayed.
Button allowing you to return to the Home page.
One of the most important buttons in WiFi Manager: if you do not click this
button, no changes you have made will be applied or stored in the
Hercules Modem Router.
Button allowing you to cancel any changes and return to the previous
page.
Button allowing you to return to the previous page.
Button allowing you to move on to the next page.
3.4. Connecting the Modem Router to your Internet account
You can replace your old ADSL modem with the Hercules Modem Router, which offers more extensive
functionalities: it is an ADSL modem (ADSL2, ADSL2+ and RE-ADSL compatible), a dual-network (dual-SSID)
WiFi 802.11g router, a 10/100 LAN switch and an Internet firewall, all rolled into one.
Once your Modem Router’s initialization is complete, your “private” WiFi connection and your firewall are
enabled. However, you must still enter your ADSL connection settings in order to be able to use the Internet.
To do so, all you need is an account with an Internet Service Provider (ISP), an active ADSL line and all the
information provided by your ISP, generally found in your confirmation of membership email or letter
(username (or login), connection password…).
ESPAÑOL NEDERLANDS ITALIANO
User Manual – 17/113
Page 18
Hercules ADSL2/2+ Wireless G Modem Router HWGADSL2P-54V2 AnnexA
3.4.1. Configuring your ADSL connection
With WiFi Manager, you don’t have to be a computer expert to configure your ADSL connection. A few items
of information are all you will need to start enjoying your Internet access immediately, as the connection
settings for the main service providers (Orange, AOL, Free (bundled), Neuf Telecom…) are already integrated
into your Hercules Modem Router.
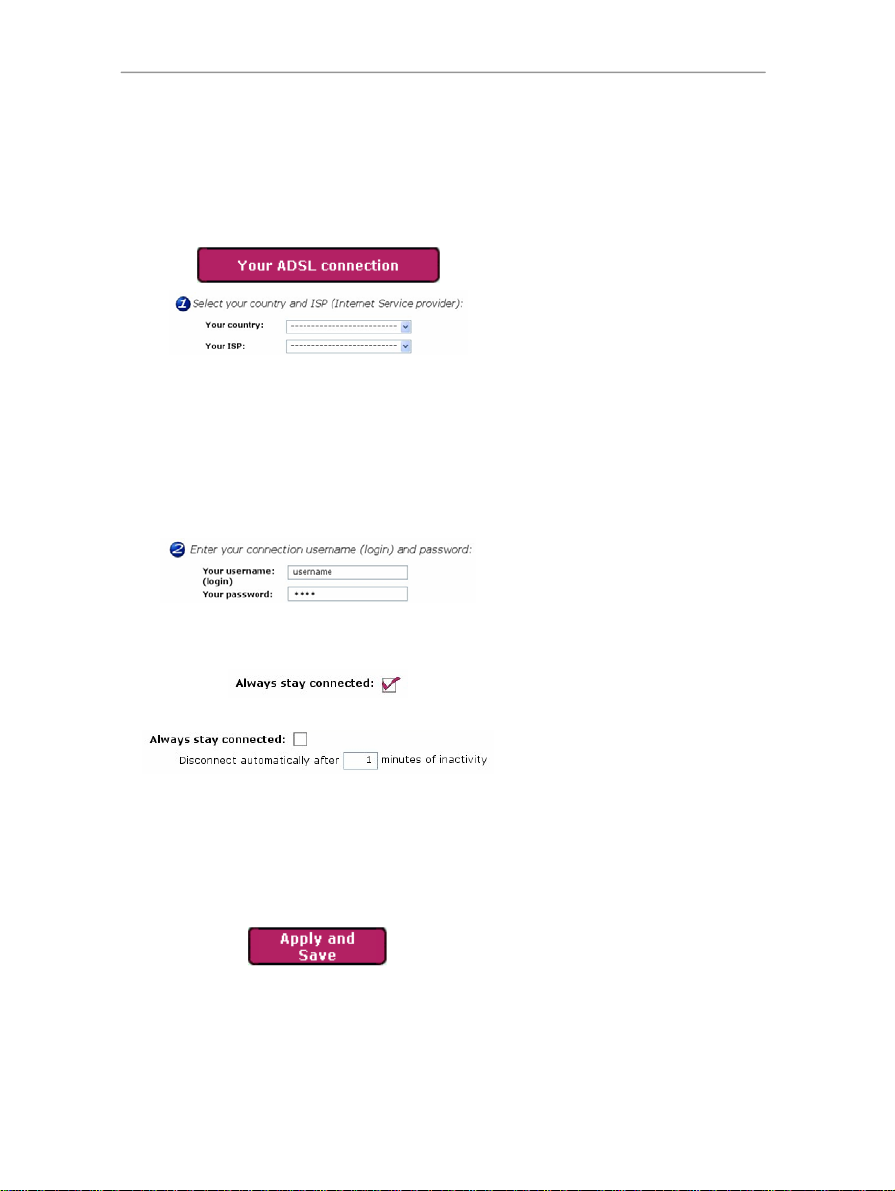
- On the Home page, click Your ADSL
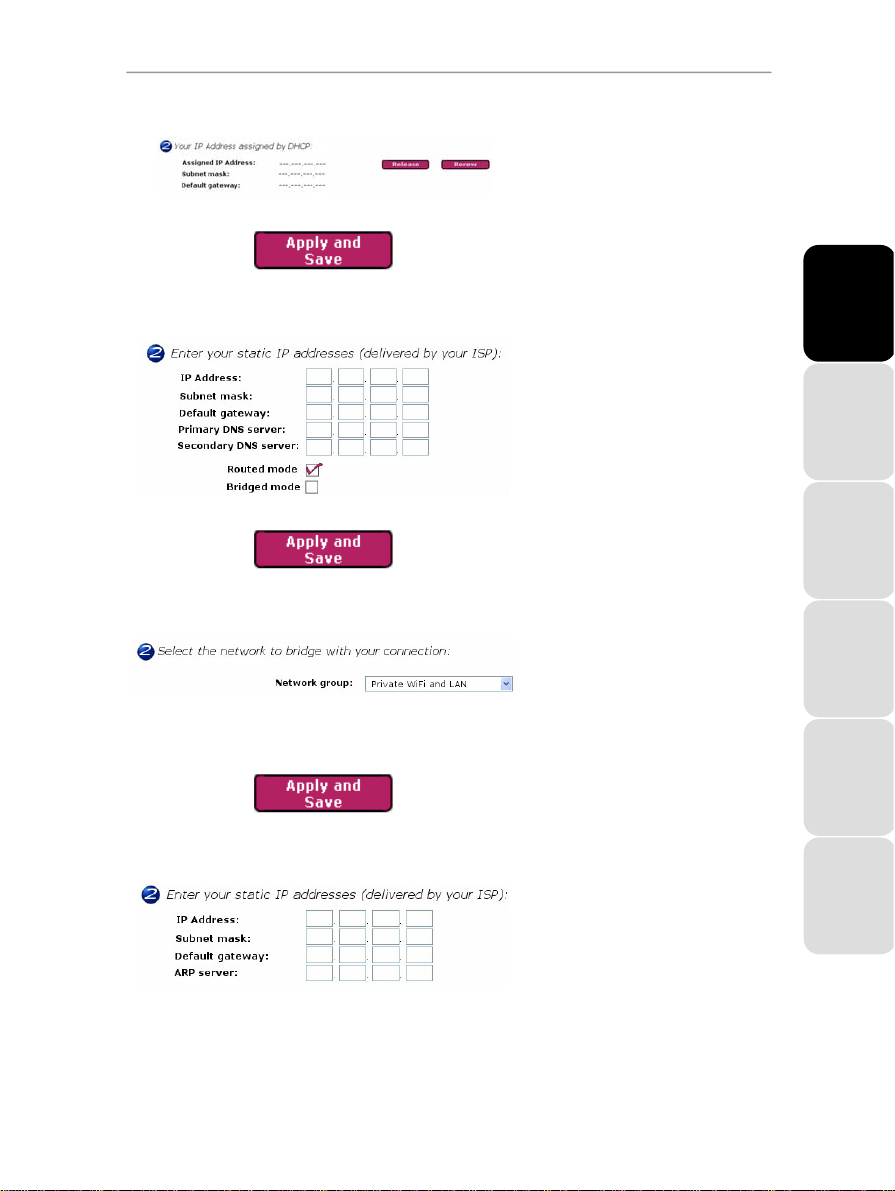
Scenario 1
Step number 2 appears as follows:
Scenario 2
connection.
- On the Your ADSL connection page,
first select your country of residence,
then your ISP.
If your country and your ISP appear in the list displayed on-screen, follow the instructions provided. Depending on your ISP, these instructions may vary:
- Your ISP only requires your
username (login) and your
connection password. Enter them in
the corresponding fields.
This information is found in your
confirmation of membership email or
letter sent to you by your ISP.
- If you wish, you can Always stay
connected, which ensures that your
Internet connection is always active.
- You can also set a time to disconnect
after a certain period of inactivity by
ticking the Always stay connected
box and then entering the number of
minutes you prefer.
If you do not use the Internet within this
period of time, the modem disconnects.
It will then reconnect automatically the
next time you try to access a new web
page on one of your computers.
- Click the Apply and Save button to
save your settings and launch the
connection to your Internet account.
18/113 – User Manual
Page 19
HWGADSL2P-54V2 AnnexA Hercules ADSL2/2+ Wireless G Modem Router
Step number 2 appears as follows:
Scenario 3
Step number 2 appears as follows:
Scenario 4
Step number 2 appears as follows:
Scenario 5
Step number 2 appears as follows:
- Your ISP does not require a username
or password.
- Click the Apply and Save button to
save your settings and launch the
connection to your Internet account.
- Your ISP requires a static IP address.
Enter your public IP address, subnet
mask, the IP address of your default
gateway as well as those of your ISP’s
DNS servers and select either
“routed” mode or “bridged” mode.
This information is found in your
confirmation of membership email or
letter sent to you by your ISP. Do not
hesitate to contact your ISP if you
require this information.
- Click the Apply and Save button to
save your settings and launch the
connection to your Internet account.
- Your ISP requires a connection in
“bridged” mode. Select the network to
“bridge” with your ADSL connection:
“Private WiFi and LAN” or “Public
WiFi”.
This ADSL connection mode does not
allow you to use two WiFi networks
(private and public) at the same time.
- Click the Apply and Save button to
save your settings and launch the
connection to your Internet account.
- Your ISP requires a static IP address.
Enter your IP address, subnet mask,
the IP address of your default
gateway as well as that of your ISP’s
ARP server.
This information is found in your
confirmation of membership email or
letter sent to you by your ISP. Do not
hesitate to contact your ISP if you
require this information.
ENGLISH FRANÇAIS DEUTSCH
ESPAÑOL NEDERLANDS ITALIANO
User Manual – 19/113
Page 20

Hercules ADSL2/2+ Wireless G Modem Router HWGADSL2P-54V2 AnnexA
- Click the Apply and Save button to
save your settings and launch the
connection to your Internet account.
If your ISP does not appear in the list displayed on-screen, or if you have specific connection settings:
Simply select Other (manual
configuration) and enter your
connection settings manually (please
refer to chapter 5. Manually
configuring your ADSL connection).
Once you have configured your connection, don’t forget to click the Apply and Save button to save
your settings.
20/113 – User Manual
Page 21
HWGADSL2P-54V2 AnnexA Hercules ADSL2/2+ Wireless G Modem Router
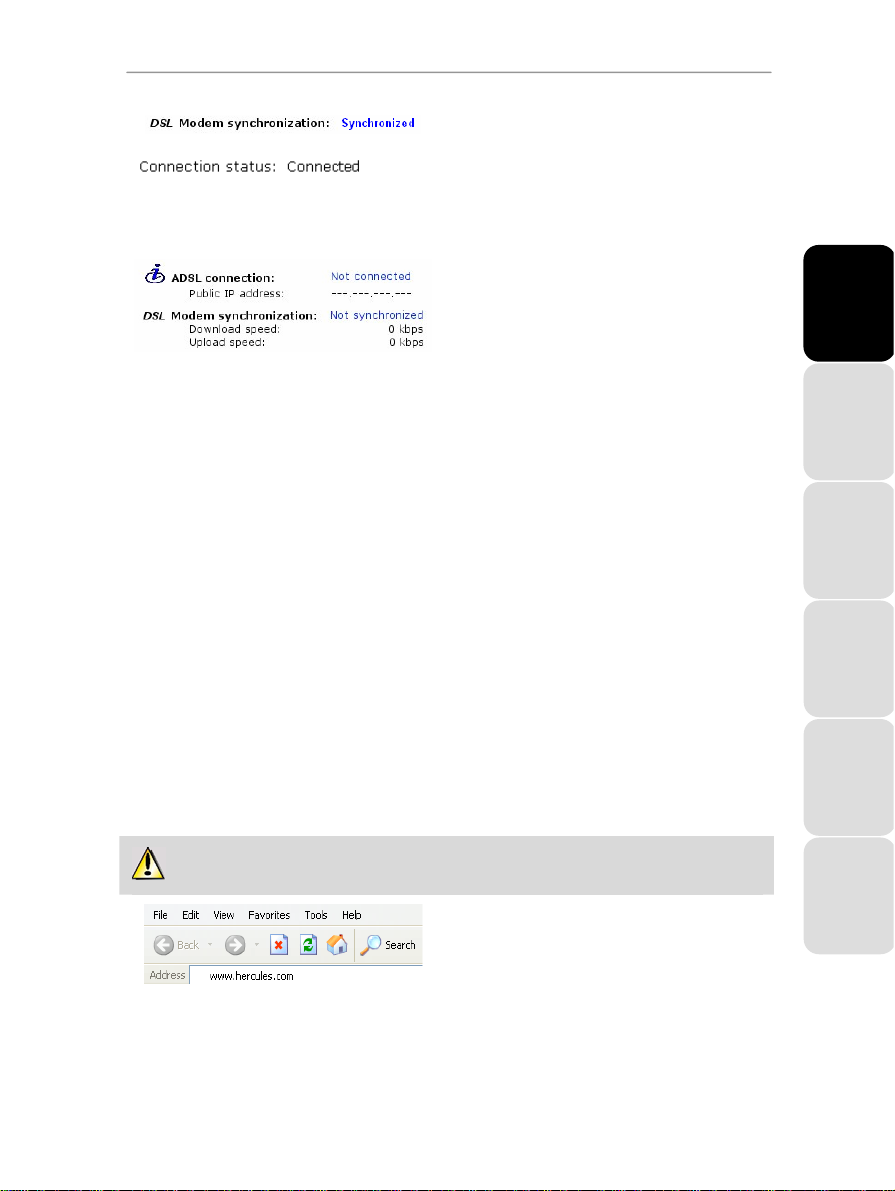
- At the bottom of the screen, verify that your
Modem Router is properly synchronized.
- At the bottom of the screen, verify that your
Modem Router is connected.
If your Modem Router is synchronized and connected:
- Have a look at the information in the Download
speed (transfer speed of Internet data to your
computer) and Upload speed (transfer speed of
data on your computer to the Internet) sections.
This information is quoted in Kilobits per second. A
ENGLISH FRANÇAIS DEUTSCH
download speed of 1024Kbps is the equivalent of 1
Megabit per second.
- You will also find the
IP address obtained by your
Modem Router on the Internet, which you will need
later on in WiFi Manager.
If your Modem Router is not connected:
- Verify that you have correctly entered your
connection settings, such as your username and
connection password.
- If you have entered either incorrectly, enter the
information again and click the Apply and Save
button.
- Otherwise, select “Other (manual configuration)”
when selecting your ISP to switch to manual
configuration mode (please refer to chapter
5. Manually configuring your ADSL connection).
3.4.2. Testing your ADSL connection
Now that your ADSL connection has been configured on your Hercules Modem Router, you can carry out a
first test of your connection and verify that you have access to the Internet.
During this test, leave the Ethernet cable connected.
- Launch an Internet browser (Internet Explorer,
Netscape Navigator or Mozilla Firefox) on your
computer.
- Enter the address
The Hercules website’s home page should be
displayed.
www.hercules.com.
User Manual – 21/113
ESPAÑOL NEDERLANDS ITALIANO
Page 22
Hercules ADSL2/2+ Wireless G Modem Router HWGADSL2P-54V2 AnnexA
If your ADSL connection is working properly:
It is now time for you to learn how to master your WiFi network (please refer to chapter 3.5. Mastering your
WiFi network at your fingertips).
Do not disconnect your Ethernet cable just yet; since your WiFi network has not yet been created, you
will still need the cable to communicate with your Modem Router.
3.4.3. Resolving any difficulties in accessing WiFi Manager or the Internet
If you have not managed to connect to the WiFi Manager interface or to the Internet, your computer’s settings
may not be properly configured. The instructions below will help you to resolve this problem.
Note: the access paths mentioned below may vary slightly if you have modified the default display
configuration in Windows XP or Vista (meaning the Start menu properties and Control Panel display).
Windows XP or Vista
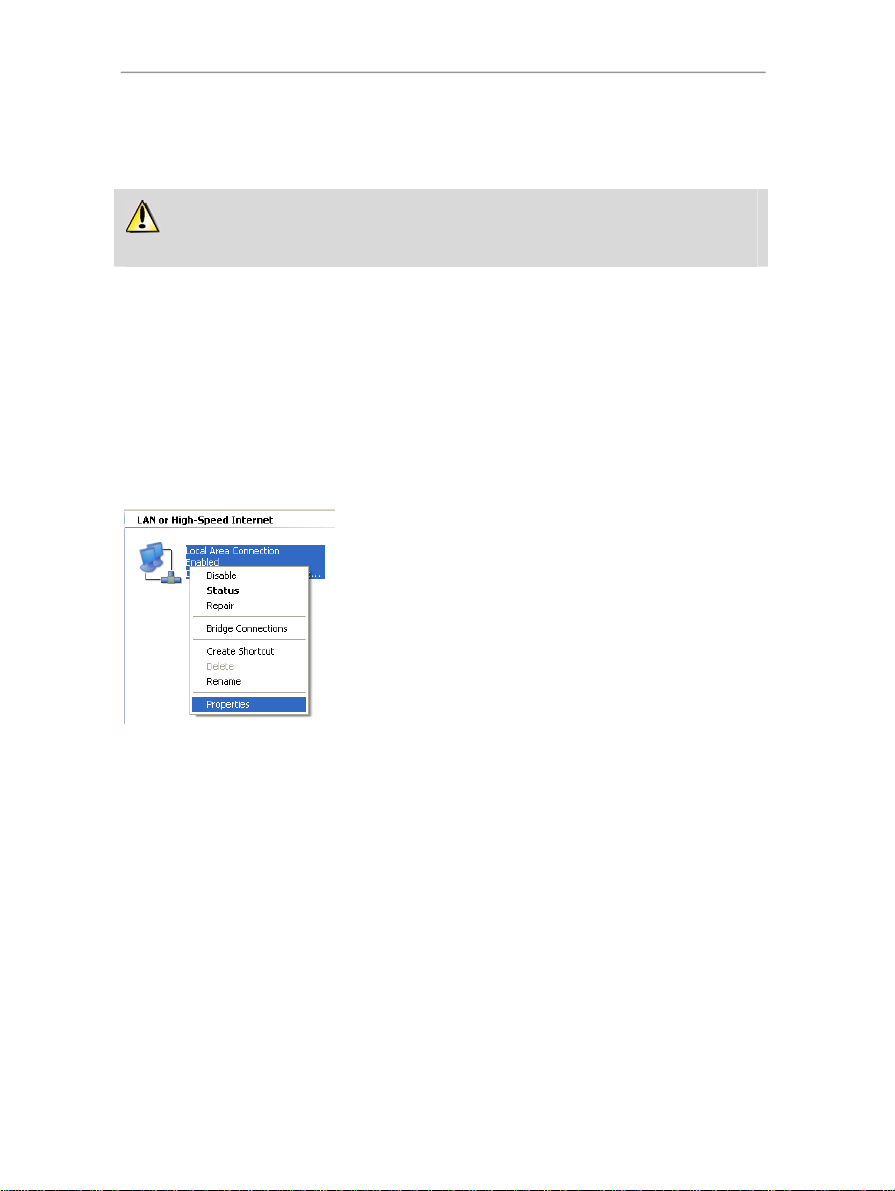
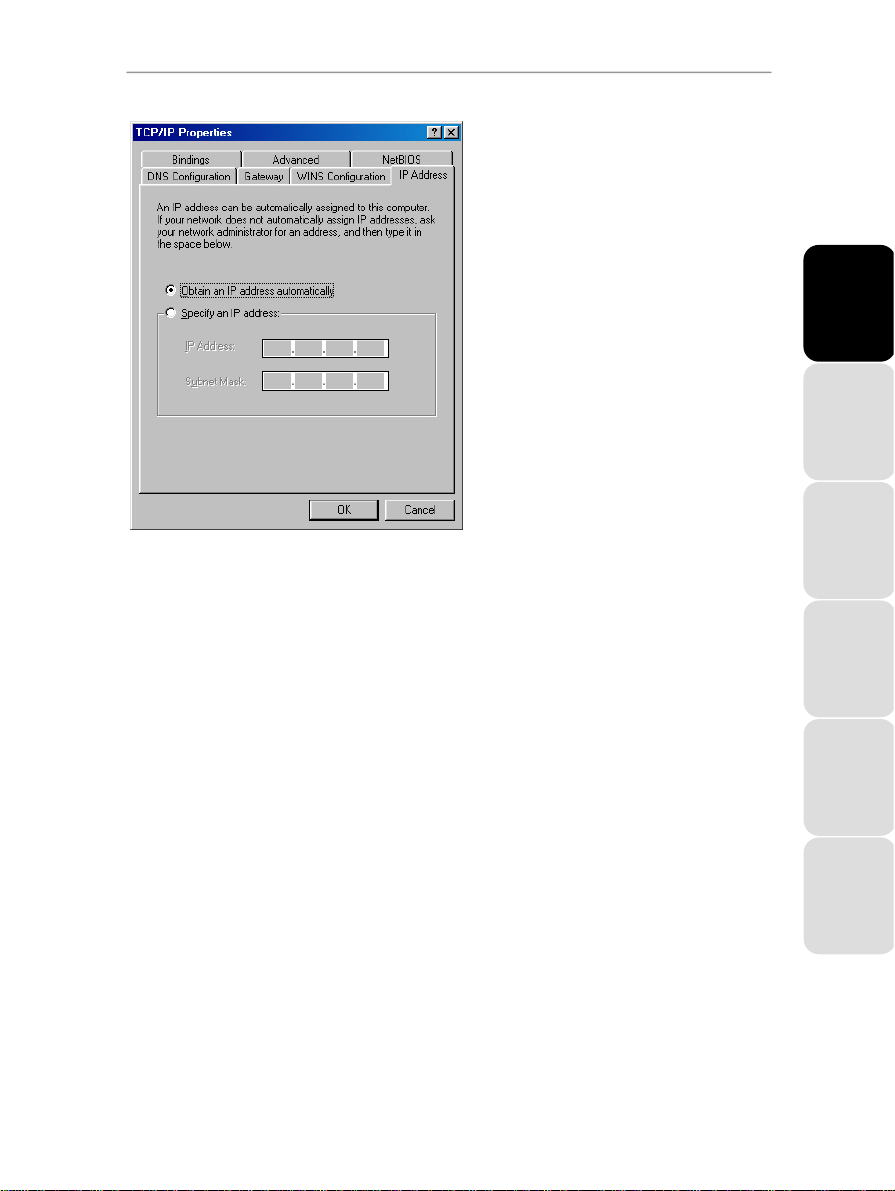
1. Click Start/Control Panel. Double-click Network
Connections.
2. In the LAN or High-Speed Internet section, right-click the
icon corresponding to your network adapter (or network
bridge, if you have created one) and select Properties.
3. In the General tab of the Local Area Connection
Properties window, scroll through the list and highlight
Internet Protocol (TCP/IP).
22/113 – User Manual
Page 23
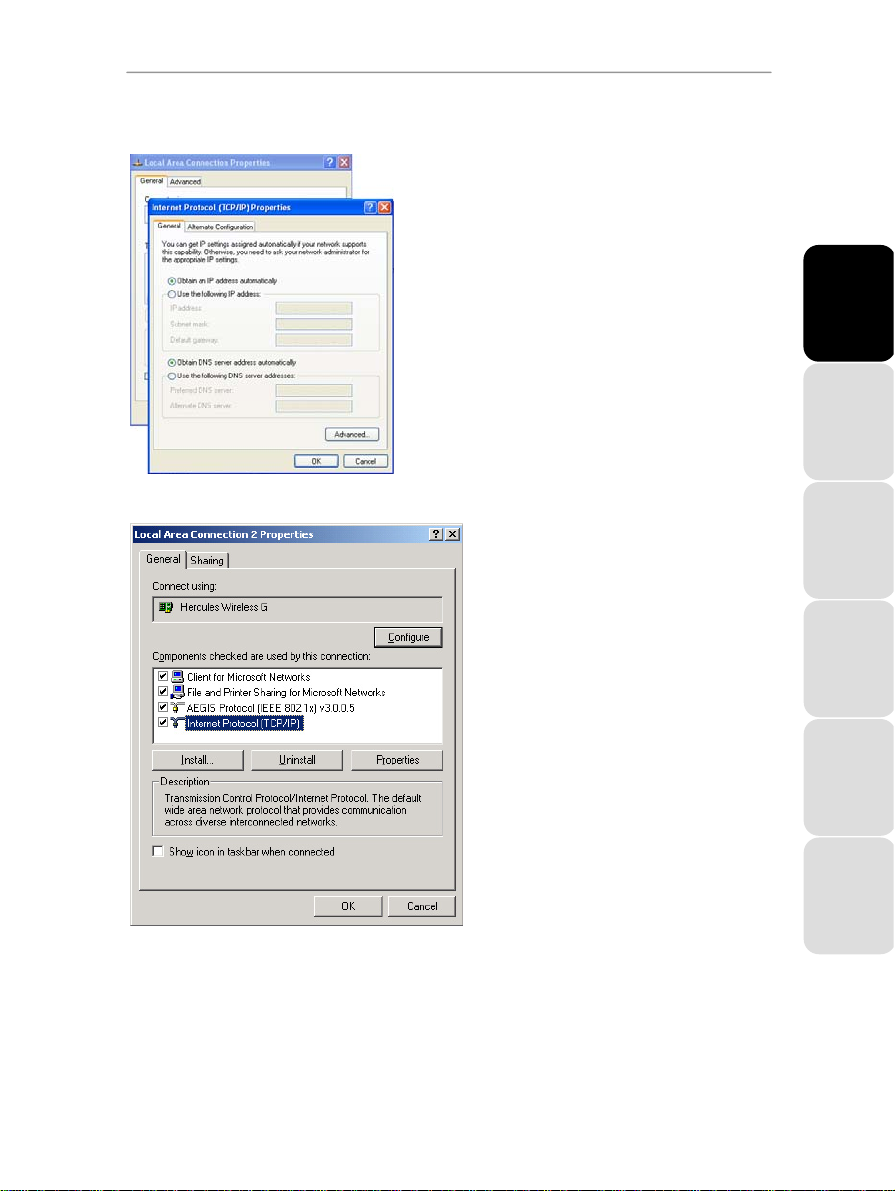
HWGADSL2P-54V2 AnnexA Hercules ADSL2/2+ Wireless G Modem Router
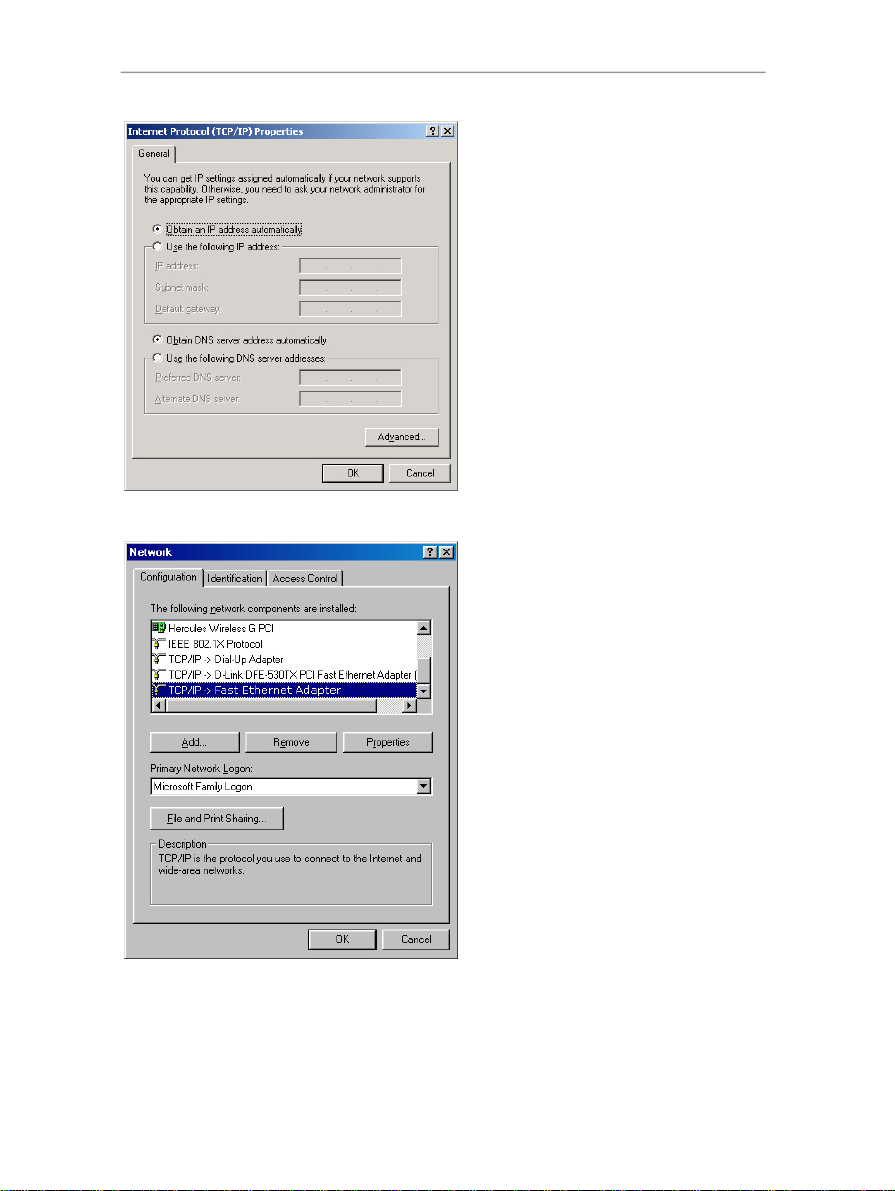
4. Click Properties, select Obtain an IP address
automatically and Obtain DNS server address
automatically.
5. Click OK to close the windows, then exit the Control
Panel.
The Hercules Modem Router will now be able to assign an IP
address to your computer.
Windows 2000
IP address is a unique address assigned by the router to
An
the computer. Each computer has its own identity, via its IP
address, allowing it to be identified within the network.
1. Click Start/Settings/Control Panel. Double-
click Network and Dial-Up Connections.
2. Right-click the appropriate connection and
select Properties.
3. In the General tab, highlight Internet Protocol
(TCP/IP).
ENGLISH FRANÇAIS DEUTSCH
User Manual – 23/113
ESPAÑOL NEDERLANDS ITALIANO
Page 24
Hercules ADSL2/2+ Wireless G Modem Router HWGADSL2P-54V2 AnnexA
4. Click Properties and select Obtain an IP
address automatically and Obtain DNS
server address automatically.
5. Click OK to close the windows, then exit the
Control Panel.
The router will now be able to assign an IP
address to your computer.
IP address is a unique address assigned by
An
the router to the computer. Each computer has its
own identity, via its IP address, allowing it to be
identified within the network.
Windows 98 SE/Me
1. Click Start/Settings/Control Panel. Double-
click Network.
2. In the Configuration tab of the Network
window, highlight the name of your network
adapter.
24/113 – User Manual
Page 25
HWGADSL2P-54V2 AnnexA Hercules ADSL2/2+ Wireless G Modem Router
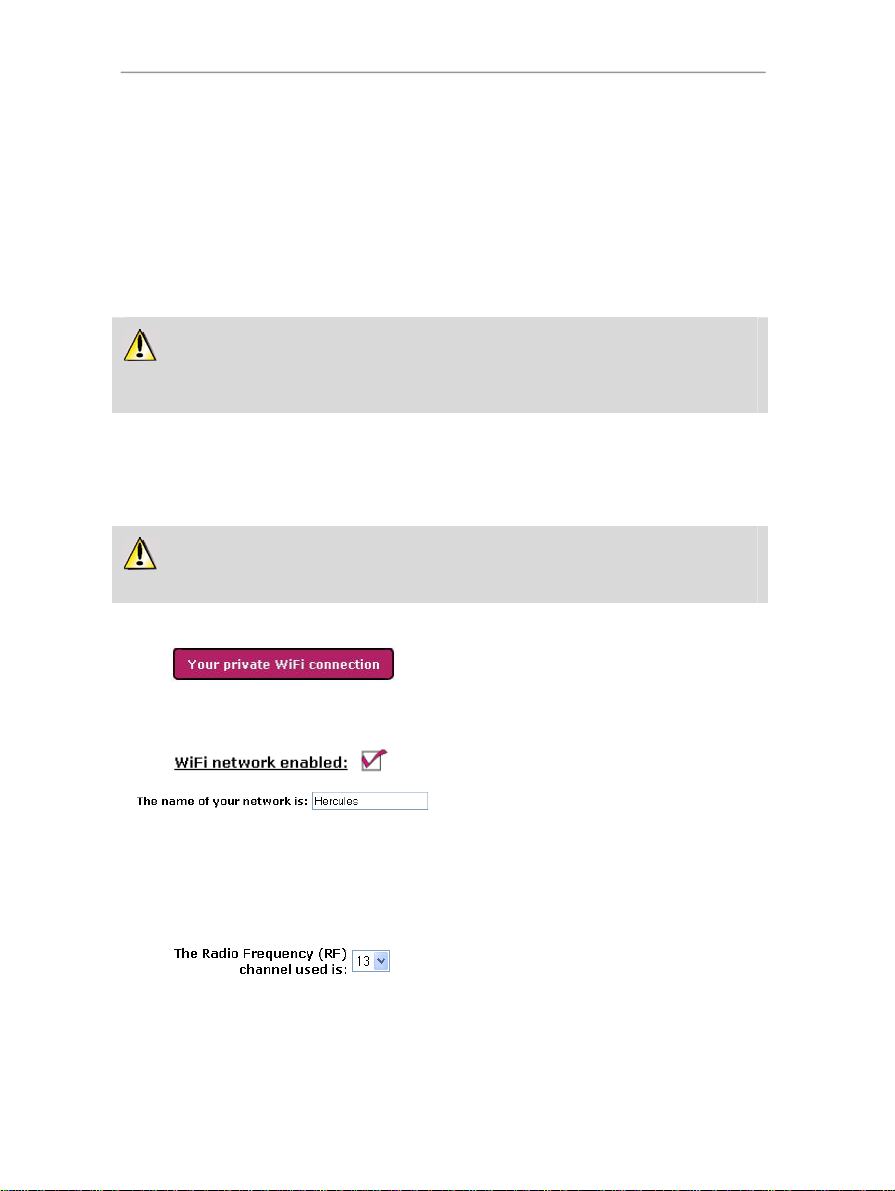
3. Click Properties and select Obtain an IP
address automatically in the IP Address tab.
4. Click OK to close the windows, then exit the
Control Panel.
The router will now be able to assign an IP
address to your computer.
IP address is a unique address assigned by
An
the router to the computer. Each computer has its
own identity, via its IP address, allowing it to be
identified within the network.
ENGLISH FRANÇAIS DEUTSCH
User Manual – 25/113
ESPAÑOL NEDERLANDS ITALIANO
Page 26
Hercules ADSL2/2+ Wireless G Modem Router HWGADSL2P-54V2 AnnexA
3.5. Mastering your WiFi network at your fingertips
In this chapter, you will learn how to personalize your private WiFi network and secure it against unwelcome
intrusion attempts.
You will also learn how to enable your second WiFi network, called the “public WiFi network”, whenever you
like, thereby allowing your friends or children to connect to the Internet wirelessly, without having to give them
your precious network password (security key). They will have access limited to the Internet, with no
possibility of accessing your shared files on your computer(s). You can disable this public WiFi network when
you wish and control users’ connection time. This can be helpful as a parental control!
Configuration of your private network is carried out via the Ethernet cable connecting your Modem
Router to your computer. Once you have finished, you can disconnect this cable and explore all the
subtleties of WiFi, described in chapter 4. Welcome to the Wireless AttitudeTM!
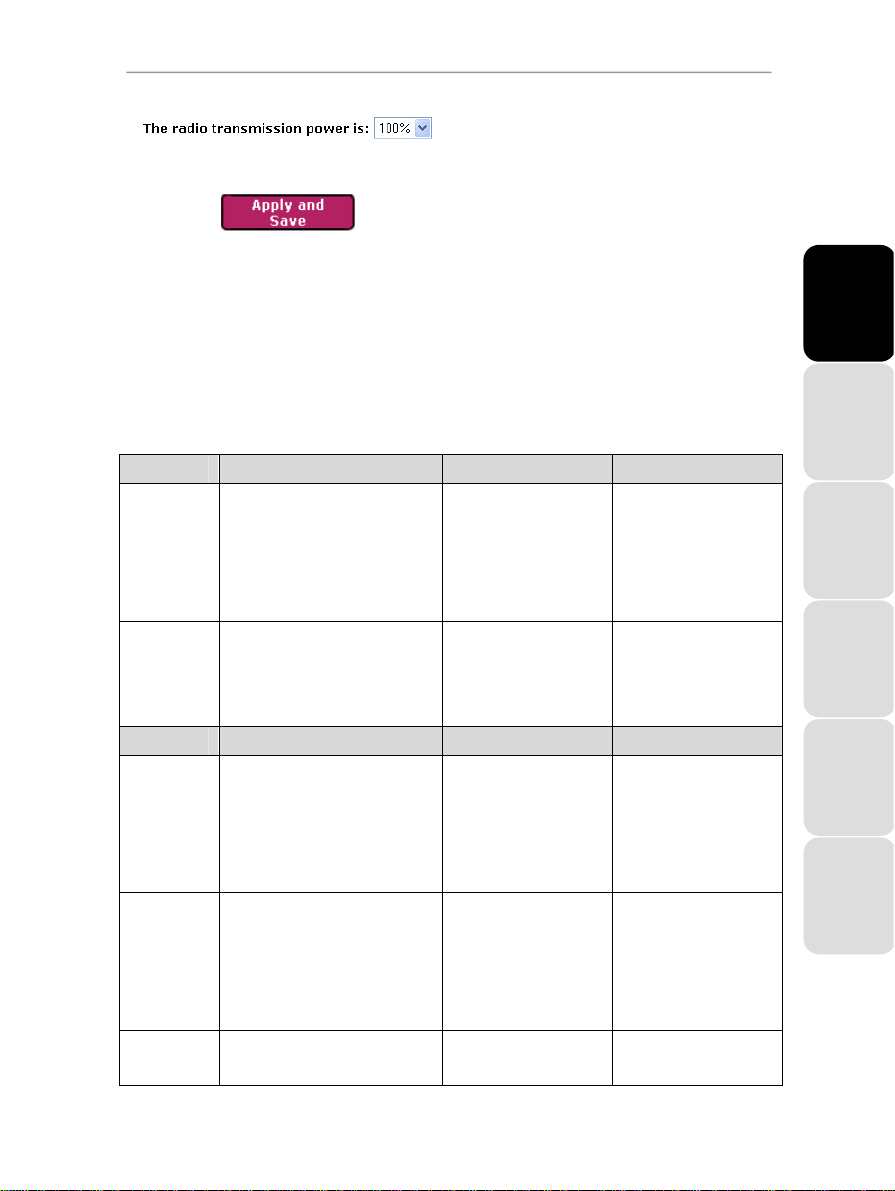
3.5.1. Personalizing your private WiFi network
When the wireless access point (your Hercules Modem Router’s WiFi function) is enabled, WiFi Manager
displays the name of your network, the Radio Frequency (RF) channel used and the radio transmission power.
These settings may be modified, under certain conditions.
Should you decide to modify certain settings, we recommend that you take care to follow the
recommendations below.
To personalize your WiFi network:
- On the Home page, select Your private WiFi
connection.
The name of your network, the RF channel used,
and the transmission power are displayed.
- Before personalizing your private WiFi network,
verify that the WiFi network enabled box is ticked.
- If you wish, you may personalize The name of
your network, or SSID (Hercules, by default).
26/113 – User Manual
The SSID (Service Set Identifier) is the unique
name shared by the WiFi adapters and the access
point in a wireless network. Make sure that you
do not lose or forget this name, as you will need
it to connect your WiFi devices.
- If necessary, change the Radio Frequency (RF)
channel used by the local area WiFi network to
communicate (from 1 to 13).
Change this setting only if another transmitter is
using the same channel, which may result in a drop
in your Modem Router’s WiFi performance.
Page 27
HWGADSL2P-54V2 AnnexA Hercules ADSL2/2+ Wireless G Modem Router
- Modify the radio transmission power (from 0 to
100%) so that your network only transmits over the
required distance (within your house or apartment,
for example).
- Click the Apply and Save button to validate your
settings.
The access point restarts. All computers or devices
connected via WiFi are disconnected. The ADSL
connection, however, remains active.
3.5.2. Securing your WiFi network using the Assistant
Creating a WiFi network is very useful if you have several wireless computers or devices, but how can you
avoid having someone on the outside connect to your network without permission or intercept your
unencrypted data exchanges? Thanks to the WiFi Security Assistant, you can define your own security
choices step by step. To help you select the best level of security for your network, we invite you to consult
the table below, which sums up the 5 types of security supported by WiFi Manager.
Type Level of security Key used Authentication
WEAK (WEP
64
MEDIUM
(
WEP 128)
Type Level of security Key used Encryption type
HIGH (WPA-
PSK
VERY HIGH
(WPA2)
WPA or WPA2 Level of security selected by the router
The lowest level of security, whereby
single encryption is carried out on
)
exchanged data. Each wireless client
in the network must use the same key
to decode the transmission.
Level of security identical to that of
WEP 64. Only the key length is
different.
Latest-generation heightened level of
security, specially designed for
)
environments such as a small office or
the home, based on a pre-shared key.
Latest-generation very heightened level
of security, specially designed for
environments such as a small office or
the home, based on a pre-shared key.
depending on the maximum level of
security supported by the devices on
64-bit (10 character) key in
hexadecimal format.
A hexadecimal key is
composed of numbers 0 to 9
and letters A to F (example:
A123BCD45E for a 64-bit
key).
128-bit (26 character) key in
hexadecimal format.
A hexadecimal key is
composed of numbers 0 to 9
and letters A to F.
Password with a minimum of
8 alphanumeric
characters.
An alphanumeric character
corresponds either to a
number (0-9), or to a letter
(a-z or A-Z).
Password with a minimum of
8 alphanumeric
characters.
An alphanumeric character
corresponds either to a
number (0-9), or to a letter
(a-z or A-Z).
Password with a minimum of
8 alphanumeric
Open (no authentication),
Shared (authentication
method via shared key) or
Auto (authentication when
requested by the device).
Open (no authentication),
Shared (authentication
method via shared key) or
Auto (authentication when
requested by the device).
TKIP
AES
TKIP or AES
ENGLISH FRANÇAIS DEUTSCH
ESPAÑOL NEDERLANDS ITALIANO
User Manual – 27/113
Page 28
Hercules ADSL2/2+ Wireless G Modem Router HWGADSL2P-54V2 AnnexA
the network. characters.
An alphanumeric character
corresponds either to a
number (0-9), or to a letter
(a-z or A-Z).
Type Level of security IP address/Port Renewal interval/Shared
PRO (radius) Heightened level of security reserved
PRO (802.1x) Heightened level of security reserved
for professional environments, using
the RADIUS protocol to authenticate
and authorize users accessing the
network via a remote connection.
for professional environments, using
the 802.1x protocol to authorize
physical access to a local area network
following an encryption and
authentication phase.
IP address of authentication
server.
Port: 1812 by default.
IP address of authentication
server.
Port: 1812 by default.
Renewal interval: 3600 sec
by default.
Key shared with
authentication server.
Renewal interval: 3600 sec
by default.
Key shared with
authentication server.
key
You must not select a level of security in WiFi Manager more advanced than that supported by your
WiFi adapters. For example, if your adapters only support the WEAK (WEP 64) or MEDIUM (WEP 128) levels,
you should not select the HIGH (WPA-PSK) level.
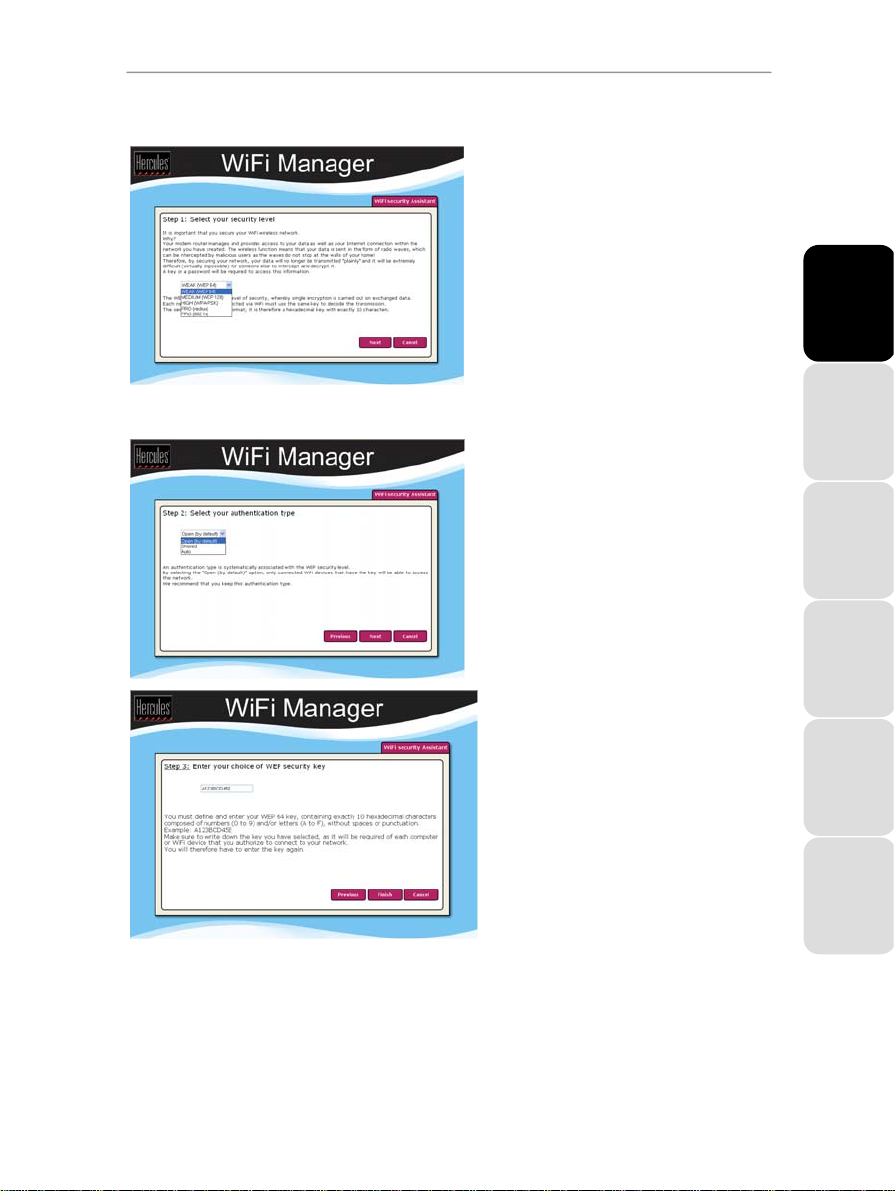
1. Before enabling security for your WiFi
network, verify that the WiFi network
enabled box is ticked.
2. To open the Assistant, enable WiFi security by
ticking the YES box in the Your WiFi
connection parameters window, then click
the Assistant button located in the lower lefthand corner of the window.
28/113 – User Manual
Page 29
HWGADSL2P-54V2 AnnexA Hercules ADSL2/2+ Wireless G Modem Router
3. Read the text explaining the concept of
security.
4. Select your level of security: WEAK
(WEP 64), MEDIUM (WEP 128), HIGH
(WPA-PSK), VERY HIGH (WPA2), WPA or
WPA2, PRO (radius) or PRO (802.1x),
according to the explanations provided by the
text.
5. Click Next.
If you have selected WEAK (WEP 64) or MEDIUM (WEP 128) security:
6. Read the text explaining the concept of
authentication.
7. Select the authentication type: Auto
(authentication carried out when requested
by the device), Open (no authentication) or
Shared (authentication via shared key).
We recommend that you keep the default
authentication type.
8. Click Next.
9. Enter a WEP security key according to the
level of security you have selected:
10 hexadecimal characters for a 64-bit
WEP key, 26 hexadecimal characters for a
128-bit WEP key.
ENGLISH FRANÇAIS DEUTSCH
A hexadecimal character is composed of
numbers 0 to 9 and letters A to F (example:
A123BCD45E for a 64-bit key).
10. Click Finish to validate these settings.
11. Click Apply and Save to apply and save
these settings.
User Manual – 29/113
ESPAÑOL NEDERLANDS ITALIANO
Page 30

Hercules ADSL2/2+ Wireless G Modem Router HWGADSL2P-54V2 AnnexA
If you have selected HIGH (WPA-PSK), VERY HIGH (wpa2), WPA or WPA2 security:
6. Read the text explaining the concept of a
WPA-PSK or WPA2 key.
7. Enter the password of your choice
(minimum of 8 alphanumeric characters).
An alphanumeric character corresponds either
to a number (0-9), or to a letter (a-z or A-Z).
8. Click Finish.
9. Click Apply and Save to apply and save
these settings.
If you have selected PRO radius or PRO 802.1x security:
6. Enter your authentication server’s IP
address and port number.
7. Click Next.
8. Enter the shared key and renewal
interval.
9. Click Finish.
10. Click Apply and Save to apply and save
these settings.
If you have mastered the concept of WiFi security, you can use the (less user-friendly) method of
directly entering your security parameters. In this case, don’t forget to click the Apply and Save button, or else
your choices will not be applied or saved.
30/113 – User Manual
Page 31

HWGADSL2P-54V2 AnnexA Hercules ADSL2/2+ Wireless G Modem Router
If you have friends who visit you with their WiFi computers or devices, you can allow them to connect to
the Internet wirelessly by enabling your “public WiFi” network, with no password required, by referring to
chapter 3.5.5. Enabling/Disabling your public WiFi network. Don’t worry, they won’t be able to access your
shared files; they’ll just be able to surf the Net.
3.5.3. Limiting access to your private WiFi network to certain WiFi computers and devices
Filtering by MAC address is a complement to your security parameters, allowing you to select the wireless
computers and devices authorized to connect to your private local area WiFi network.
A MAC address is a unique address created by the builder of the network device (WiFi or Ethernet), serving
to identify this element within a network.
Before enabling filtering, we recommend that you connect via WiFi all computers you wish to authorize.
To enable filtering by MAC address:
- Before you can enable filtering by MAC address,
verify that your WiFi network is also enabled.
- Tick the Yes box next to MAC address filtering
enabled.
To add a computer to the list:
- Click the ADD button.
The Add MAC Filtering Assistant is launched. A
text explaining the concept of filtering by MAC
address is displayed.
- Click Next.
ENGLISH FRANÇAIS DEUTSCH
User Manual – 31/113
ESPAÑOL NEDERLANDS ITALIANO
Page 32

Hercules ADSL2/2+ Wireless G Modem Router HWGADSL2P-54V2 AnnexA
If you are using this function for the
first time:
The list of all WiFi computers or devices currently
connected to your network is displayed in the first
table.
- Tick the Select box next to the names of the
connected computers and devices that you wish
to authorize.
- If a computer is not connected, you can add it
manually in the second table.
- Click Finish.
The list of all WiFi computers and devices
authorized to connect to your network is displayed
in the table.
- Click the Apply and Save button to validate
your settings.
If you have already created a filtering
list:
Any new computer or device must be added
manually.
- Manually enter its MAC address (in
AAAAAAAAAAAA format, without separators).
- Click Finish.
This address has been added to the list of WiFi
computers and devices authorized to connect.
- Click the Apply and Save button to validate
Once you have enabled the filtering by MAC address function, only the computers and devices
appearing in this list will be authorized to connect to your Hercules Modem Router.
your settings.
If you wish to connect new WiFi devices, don’t forget to add their MAC address to the filtering list, or
else they will never be able to connect.
32/113 – User Manual
Page 33

HWGADSL2P-54V2 AnnexA Hercules ADSL2/2+ Wireless G Modem Router
If you have friends who visit you with their WiFi computers or devices, you can allow them to connect
to the Internet wirelessly by enabling your “public WiFi” network, with no password required, by referring to
chapter 3.5.5. Enabling/Disabling your public WiFi network. Don’t worry, they won’t be able to access
your shared files; they’ll just be able to surf the Net.
To remove a computer from the list:
- In the Remove column, click the next to the
computers or devices you wish to remove from
the filtering list.
- Click Apply and Save.
3.5.4. Disabling your private WiFi network
If you wish to use your Modem Router as a wired modem router only (that is to say, connected to the
computer via the Ethernet port and not by WiFi), simply un-tick the WiFi network enabled box. The WiFi
LED
on the router switches off.
If you have enabled your “public WiFi” network, it will also be disabled.
3.5.5. Enabling/Disabling your public WiFi network
If in addition to your private WiFi network you wish to enable your public WiFi network, go to the home page
ENGLISH FRANÇAIS DEUTSCH
and simply click the
A new WiFi network called Hercules guest by default will then be created. Your friends or children will be
able to detect it and connect from their WiFi computers or devices. No password or security key will be
requested.
Only connection to the Internet will be authorized for users. They will not be able to access your shared files
or printers. This is a safe way of providing Internet access with no worries and your own control over
connection times.
To disable your public WiFi network, simply click the
the home page.
button next to .
button again next to on
3.5.6. Changing the public WiFi network name
To personalize your public WiFi network:
- On the home page, select Your public WiFi
connection.
The name of your network is displayed.
- Personalize the SSID name of your public WiFi
network (“Hercules Guest” by default).
User Manual – 33/113
ESPAÑOL NEDERLANDS ITALIANO
Page 34

Hercules ADSL2/2+ Wireless G Modem Router HWGADSL2P-54V2 AnnexA
- Click Apply and Save to validate your settings.
3.6. The firewall: your ultimate protection against Internet attacks
Like a secure fortress, your network is protected by a drawbridge and ramparts that are impossible to scale.
On top of this, all of your defenses are in a state of alert to repel any intrusion attempts. It is possible,
however, to lower these defenses from time to time, in order to authorize your computers to access specific
Internet services (P2P, web/FTP servers…), or simply to limit access on a specific computer to certain Internet
services. For more information, please refer to chapters 6.2.1. Opening doors in your firewall for certain
Internet services and 6.2.2. Limiting access of one of your network computers to Internet services.
We do not recommend disabling your Internet firewall, as doing so will lower the defenses of your
secure fortress, which will no longer be able to block and repel intrusion attempts via the Internet.
If your computer is equipped with a software firewall (Norton Personal Firewall, Windows Service
Pack 2 Firewall, McAfee Personal Firewall…), disable it when you connect to the modem, as your Modem
Router’s firewall is sufficiently strong on its own, or adopt the same configuration settings as those
established for your Modem Router in order to avoid any possible conflicts. If you go somewhere else with
your computer, however, or have to connect to other networks, you can re-enable your software firewall.
Be careful not to confuse a firewall with an antivirus program!
An antivirus program analyzes the contents of your computer, your emails, files you have downloaded from
the Internet, etc., and detects, blocks and/or removes any viruses, worms and Trojans in order to ensure that
your computer functions properly.
Your firewall hides your computer on the network, monitors the Internet data arriving at your computer and
blocks intrusion attempts to stop computer hackers from stealing your personal information.
34/113 – User Manual
Page 35

HWGADSL2P-54V2 AnnexA Hercules ADSL2/2+ Wireless G Modem Router
4. WELCOME TO THE WIRELESS ATTITUDETM!
Now that you have mastered the main functionalities of WiFi Manager, it is time to move on to a few practical
applications. In the following chapters, we will show you how wireless computing is closely linked to userfriendliness and ease of use. To start with, connecting to your WiFi network and sharing your folders, your
printer, or letting friends use your ADSL connection for online gaming are some examples of the things we will
help you to do. Enter the world of wireless and join in the Wireless Attitude
4.1. A few important points to bear in mind before getting started
We advise you to follow the instructions provided hereinafter for each of your computers:
- The procedures described in this chapter differ according to the various operating systems discussed.
Please ensure that you refer to the chapters corresponding to your operating system.
- These procedures also apply to the computers or devices directly connected to your Modem Router via an
Ethernet cable.
- To share an
be active.
Reminder: the WiFi network you have just finished setting up is an
to
Ad hoc mode), as it is composed of an access point and one or more computers.
ADSL connection, your Hercules Modem Router must be switched on and your ADSL line must
4.2. Computers running Windows Vista: Connecting to a wireless network
Note: The procedure described hereafter is deliberately intuitive and non-exhaustive. If you have mastered
Windows Vista, you will note that there are other ways to achieve the same results. You will find our
procedure set out in the pages that follow, although you are free to choose your own preferred method.
Once your computer is switched on, your WiFi adapter automatically detects the wireless networks available
and displays them in a specific window.
Some manufacturers of WiFi adapters supply their own connection software (example: Hercules WiFi Station
bundled with Hercules WiFi adapters). We recommend that you refer to their user manual for help on
establishing your connection.
To view the detected wireless networks:
- In the Windows Vista taskbar, click the network icon, which includes both wireless and wired networks.
TM
!
Infrastructure type network (as opposed
ENGLISH FRANÇAIS DEUTSCH
The message Wireless networks are available is displayed once your WiFi adapter has detected wireless
networks.
User Manual – 35/113
ESPAÑOL NEDERLANDS ITALIANO
Page 36

Hercules ADSL2/2+ Wireless G Modem Router HWGADSL2P-54V2 AnnexA
- Click this message to display the list of networks. The Connect to a network window appears.
- Browse through the list and select your wireless network (here, the Hercules network, highlighted in blue).
You will note that this network is unsecured. You will therefore not be asked to provide a key.
Note: If you select a security-enabled network, you must enter the key in the window. To do so, you must
know the key defined when setting up your wireless network.
- Click the Connect button.
36/113 – User Manual
Page 37

HWGADSL2P-54V2 AnnexA Hercules ADSL2/2+ Wireless G Modem Router
Wait a few moments. Once the connection to the
Hercules network has been established, you can
save this network in your favorites by ticking the
Save this network box and Start this connection
automatically, if you wish. In that case, your
computer will always attempt to connect to this
network at the start of each new session.
- Select your network location: Home, Work, Public location.
ENGLISH FRANÇAIS DEUTSCH
For our purposes, we will consider that you will be using your network at home, which will allow you as well as
other network users to view the computers present on the network (the “See and be seen” principle,
indispensable to be able to share folders, a printer and an ADSL connection).
Note: If you prefer to connect to a public hotspot, while you are in a railway station, for example, please refer
to the explanations provided by Windows Vista.
User Manual – 37/113
ESPAÑOL NEDERLANDS ITALIANO
Page 38

Hercules ADSL2/2+ Wireless G Modem Router HWGADSL2P-54V2 AnnexA
Windows Vista may not prompt you to select your network location at this point and select a public
location for you by default (this will typically be the case if you are already connected to a network). To
select another location, you must click the Customize link located opposite the name of your network in
the Hercules (public network) zone of the Network and Sharing Center.
Windows Vista prompts you to confirm your connection choice.
- Click I confirm the connection request, then Continue.
- Click Close.
- In the taskbar, click the network connection icon to verify that you are connected to the Hercules network
(the message Currently connected to: Hercules should be displayed).
- Click the Hercules network to access its properties.
The Network and Sharing Center appears. In the top part of the window, you will see that your computer
called PC-WIFI is connected to the Hercules network, which is itself connected to the Internet.
38/113 – User Manual
Page 39

HWGADSL2P-54V2 AnnexA Hercules ADSL2/2+ Wireless G Modem Router
By default, your computer is part of a private network (as opposed to a public network). For information on
the differences between private and public networks, please refer to the Computers running
Windows Vista: Sharing folders, a printer or an ADSL connection section.
ENGLISH FRANÇAIS DEUTSCH
4.3. Disconnecting from a wireless network
Once you are connected to a network, you can disconnect via the Network and Sharing Center, for example.
Via the Network and Sharing Center:
- Click the Disconnect link.
User Manual – 39/113
ESPAÑOL NEDERLANDS ITALIANO
Page 40

Hercules ADSL2/2+ Wireless G Modem Router HWGADSL2P-54V2 AnnexA
Windows Vista disconnects your network.
4.4. Managing your favorite networks
A favorite is a group of settings for connecting to a known Infrastructure or Ad hoc network (your own, a
neighbor’s, a friend’s). The Windows Vista Network and Sharing Center allows you to save the settings for a
network, or add or remove favorites.
To display your favorite networks, or add or remove a network, click the Manage wireless networks link in
the Tasks zone.
40/113 – User Manual
Page 41

HWGADSL2P-54V2 AnnexA Hercules ADSL2/2+ Wireless G Modem Router
For example, to remove the Hercules network to which you have just connected, select it in the list (it is then
highlighted in blue), then click the Remove button.
To add a network, click the Add button. Windows Vista launches the manual connection to a wireless network
assistant. Follow the on-screen instructions.
Finally, you can change the connection priority by clicking the Move down or Move up buttons.
ENGLISH FRANÇAIS DEUTSCH
4.5. Computers running Windows Vista: Sharing folders, a printer or an ADSL connection
To create a network of computers, share data, a printer or an ADSL connection between computers
running Windows Vista, it is not imperative that the computers belong to the same workgroup. However, if
you wish to share between Windows Vista and an earlier operating system, make sure to define the same
workgroup on all computers. For information on how to create a workgroup, please refer to the manual of
your Hercules product.
Note: The access paths described hereafter may vary slightly if you have modified the default display in
Windows Vista (that is to say, the Start menu properties and the Control Panel display).
You have connected your computer to a private network (as opposed to a public network). Therefore, the
discovery options (namely, the ability to view outside devices and computers and to be seen by other
networks) are enabled, but sharing options are not. You must therefore enable them manually before you
can share your folders, your Internet connection or your printer.
User Manual – 41/113
ESPAÑOL NEDERLANDS ITALIANO
Page 42

Hercules ADSL2/2+ Wireless G Modem Router HWGADSL2P-54V2 AnnexA
4.5.1. Enabling sharing
Before setting up sharing for your folders, your printer or your Internet connection, you must enable sharing in
the Network and Sharing Center.
Note: To open the Network and Sharing Center, click the network icon in the Windows taskbar, then the
Network and Sharing Center link.
Enabling file sharing
- In the Sharing and Discovery zone, click the Off link or the
- Select the Turn on file sharing radio button.
42/113 – User Manual
button located opposite File sharing.
Page 43

HWGADSL2P-54V2 AnnexA Hercules ADSL2/2+ Wireless G Modem Router
- Click Apply. In the Windows Vista confirmation window, click Continue.
Enabling public folder sharing
Note: A public folder is a folder which can be shared by other users of the same computer or of the same
network.
ENGLISH FRANÇAIS DEUTSCH
- In the Sharing and Discovery zone, click the Off link or the
sharing.
- Select the Turn on sharing so anyone with network access can open files radio button (they will only be
able to consult files) or select Turn on sharing so anyone with network access can open, change, and
create files (there will be no limitations on the contents of these folders in terms of viewing, making changes
and additions or other actions).
- Click Apply. In the Windows Vista confirmation window, click Continue.
Enabling printer sharing
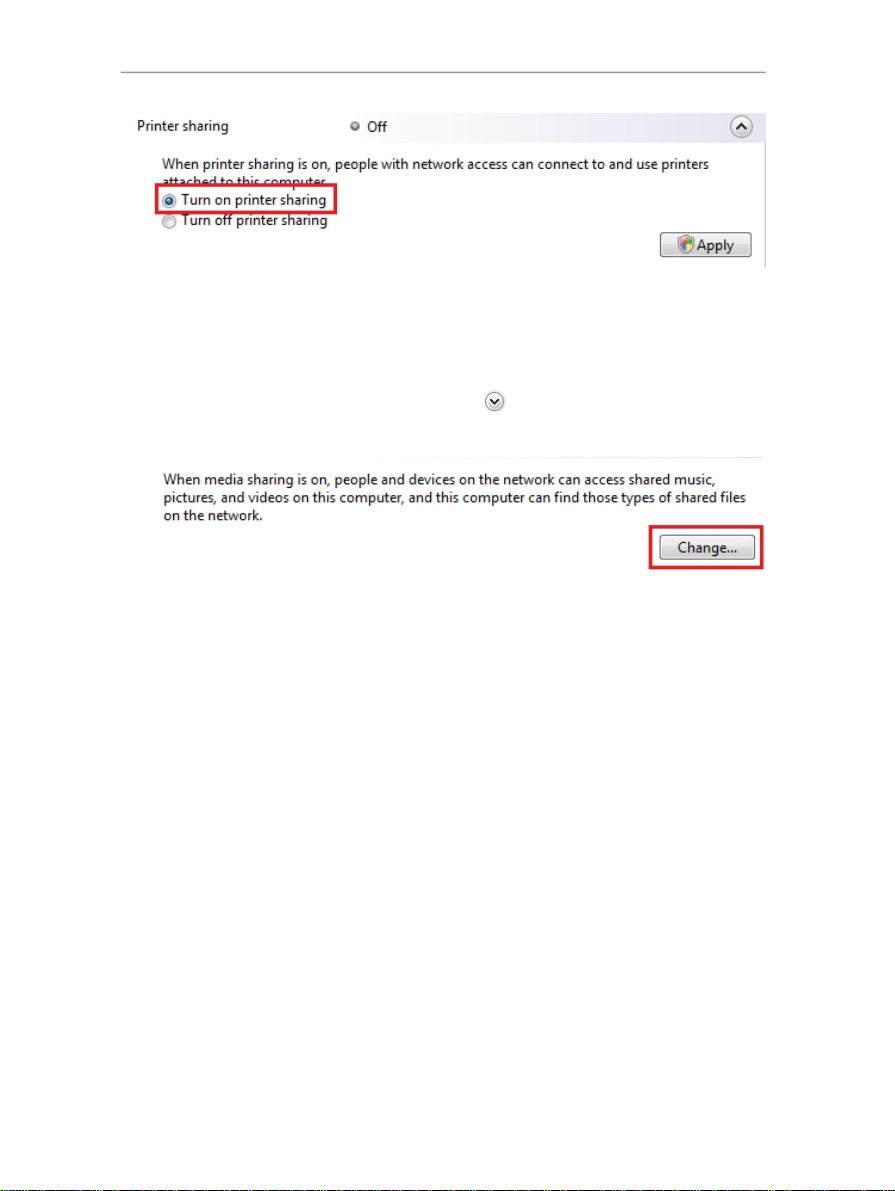
Note: To enable printer sharing, you must first have installed a printer.
- In the Sharing and Discovery zone, click the Off link or the
- Select the Turn on printer sharing radio button.
button located opposite Public folder
button located opposite Printer sharing.
ESPAÑOL NEDERLANDS ITALIANO
User Manual – 43/113
Page 44
Hercules ADSL2/2+ Wireless G Modem Router HWGADSL2P-54V2 AnnexA
- Click Apply. In the Windows Vista confirmation window, click Continue.
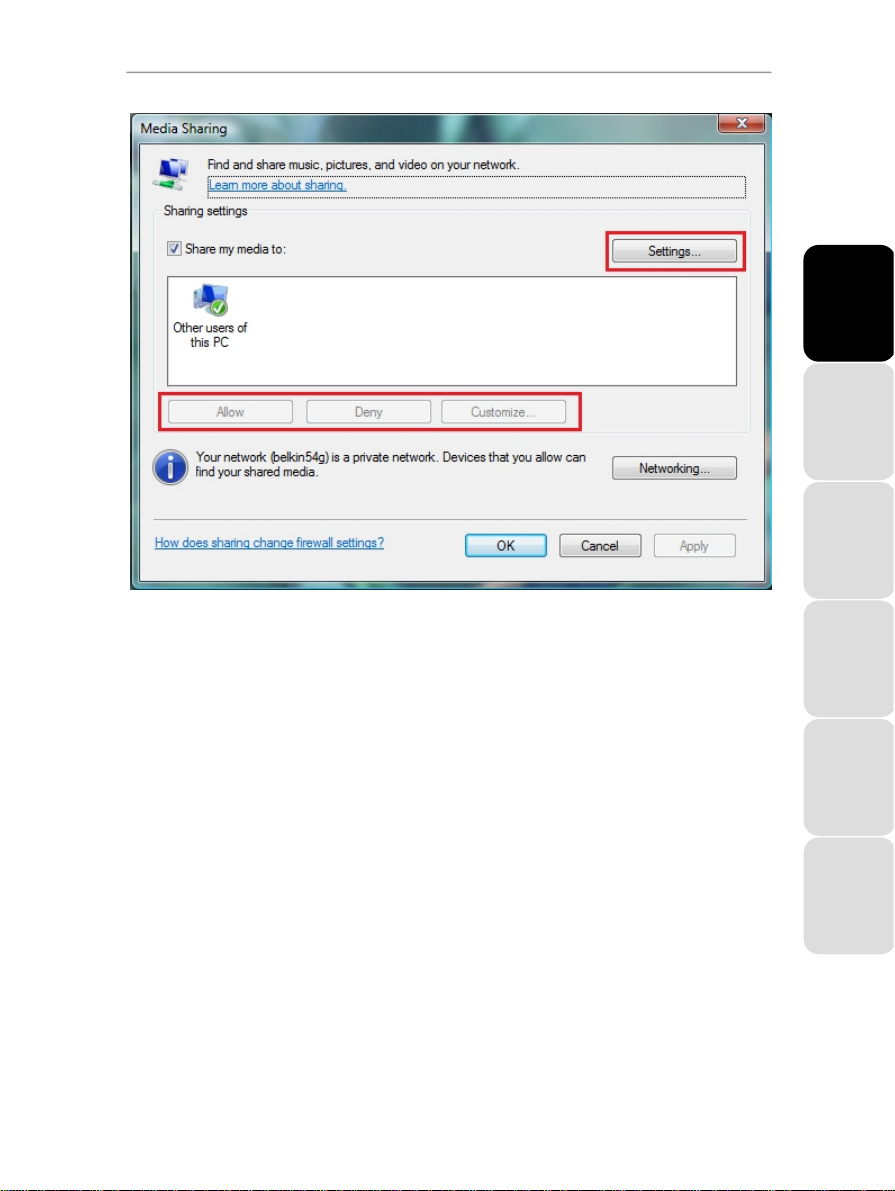
Enabling media file sharing
Note: This option allows you to enable sharing of your music, videos and images.
- In the Sharing and Discovery zone, click the Off link or the
button located opposite Media sharing.
- Click Change…
- In the Media Sharing window that appears, tick the Share my media box.
44/113 – User Manual
Page 45
HWGADSL2P-54V2 AnnexA Hercules ADSL2/2+ Wireless G Modem Router
- Click Apply. In the Windows Vista confirmation window, click Continue.
- In the following window, you can define the different settings, such as: authorize or refuse groups of users,
set parental controls, select media types to be shared, and so on.
- When you’re done, click Apply, then OK.
ENGLISH FRANÇAIS DEUTSCH
4.5.2. Windows Vista: Sharing public or personal folders
Reminder: In Windows Vista, there are two types of folders: personal or local folders and public folders.
A personal folder is a folder belonging to a specific user created on the computer, whereas a public folder is
a folder that can be shared by any other user of the same computer or the same network. In essence, a
public folder is shared, and therefore available to everyone for viewing (minimum authorization level). For
sharing personal folders (your folder of your own images, for example), you must select the users who will be
able to access their contents and set the authorization level, as indicated in the following procedure.
User Manual – 45/113
ESPAÑOL NEDERLANDS ITALIANO
Page 46

Hercules ADSL2/2+ Wireless G Modem Router HWGADSL2P-54V2 AnnexA
1. Select the folder that you wish to share, without
opening it. Here, your Pictures folder.
2. Right-click the folder. Select Share.
3. In the File Sharing window, select the user(s) who will be able to access this folder, then click Add.
Note: You can provide access to all users with no restrictions (Everyone option) or select specific users
previously created on your PC. You can also create new users by clicking Create a new user… in the dropdown list.
46/113 – User Manual
Page 47

HWGADSL2P-54V2 AnnexA Hercules ADSL2/2+ Wireless G Modem Router
4. Select the Permission Level you wish to assign by clicking on the line for that user: Reader (authorization
to view only), Contributor (authorization to view, add and delete) or Co-owner (authorization to view,
modify, add and delete).
5. Click Share. Be sure to note the path indicated, which will allow for access to the shared folder on the
network from another computer. For example:
Folders
.
6. Click Done.
The folder is now shared. You can now display all shared folders and files on the computer or the shared files
on the network by clicking the links in the Network and Sharing Center.
\\PC-WIFI\Users\My documents\Shared Pictures
4.5.3. Computers running Windows Vista: Accessing shared folders
1. In the file explorer, accessible via
Start/Computer, double-click
Network.
You access the list of the computers
on the same network. Use the path
indicated by Windows when setting up
sharing (for example :
WIFI\Users\My documents\Shared
Pictures Folders
2. Double-click the computer sharing
the folders you wish to access.
3. If a password has been defined,
enter your user name and your
password.
All shared folders appear. Depending
on your authorization level, you can
display, modify, add and/or delete
shared folders and files.
).
\\PC-
4.5.4. Windows Vista: Sharing a printer
You can put a printer on the network and thereby share it with all computers in your home equipped with a
WiFi adapter.
To access a printer on the network, sharing for the printer must first be set up in the Network and
Sharing Center (please refer to chapter 4.5.1 Enabling sharing). The printer must then be set up for
sharing on the computer to which is connected and on which it is installed.
On the computer connected to the printer:
1. Click Start/Control Panel.
2. Under the Hardware and Sound heading, click the Printer link.
ENGLISH FRANÇAIS DEUTSCH
ESPAÑOL NEDERLANDS ITALIANO
User Manual – 47/113
Page 48

Hercules ADSL2/2+ Wireless G Modem Router HWGADSL2P-54V2 AnnexA
The list of installed printers is displayed.
3. Right-click the printer and select the Sharing…
option.
48/113 – User Manual
Page 49

HWGADSL2P-54V2 AnnexA Hercules ADSL2/2+ Wireless G Modem Router
4. In the Printer Properties window, click the
Change sharing options button.
5. In the Windows Vista confirmation window, click
Continue.
6. Tick the Share this printer box.
7. Select the name of the printer which will be
displayed on the network under Share name.
8. Click Apply, then OK.
ENGLISH FRANÇAIS DEUTSCH
4.5.5. Computers running Windows Vista : Accessing the shared printer
On the computers that will use the shared printer:
1. Click Start/Control Panel.
2. Under the Hardware and Sound heading, click the Printer link.
User Manual – 49/113
ESPAÑOL NEDERLANDS ITALIANO
Page 50
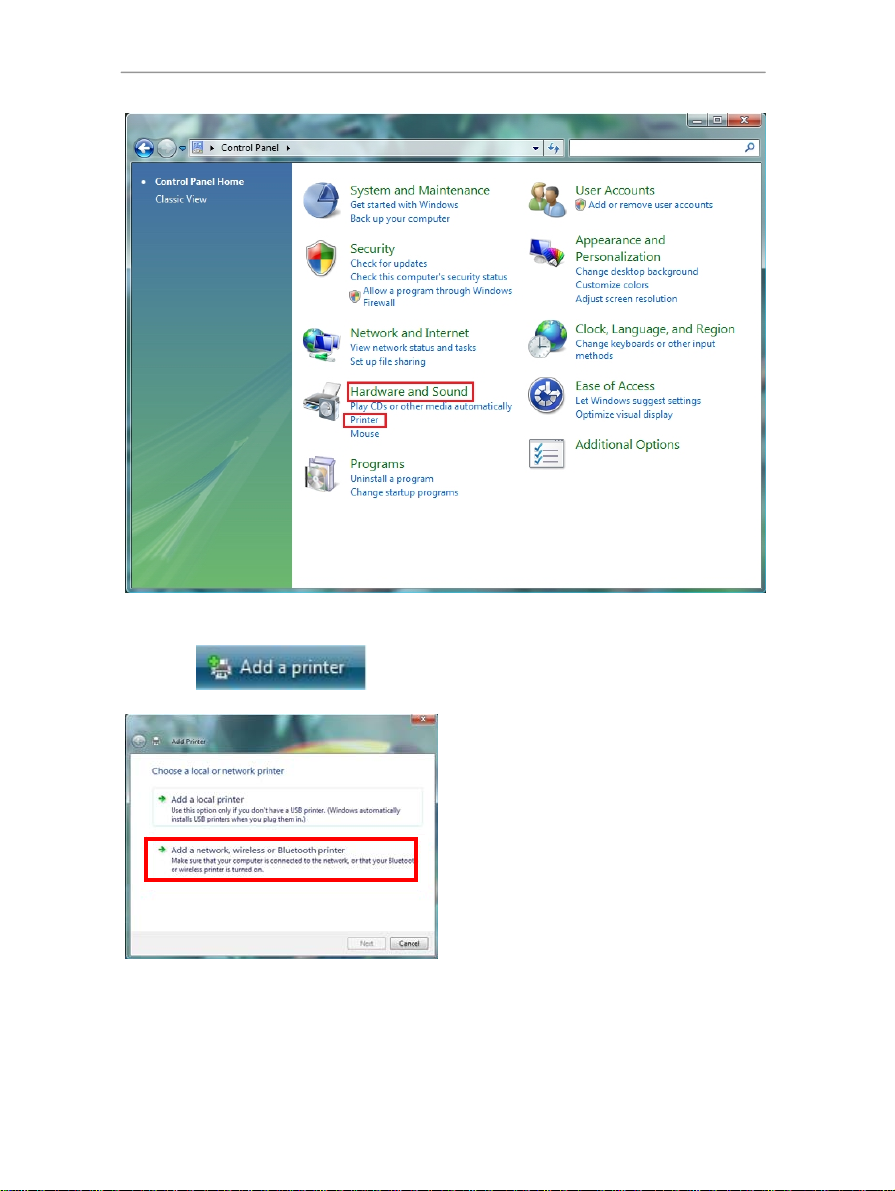
Hercules ADSL2/2+ Wireless G Modem Router HWGADSL2P-54V2 AnnexA
50/113 – User Manual
3. Click the Add a printer button.
The Add a printer assistant appears.
4. Click Add a network, wireless or Bluetooth
printer.
Page 51

HWGADSL2P-54V2 AnnexA Hercules ADSL2/2+ Wireless G Modem Router
5. Windows searches for the shared printers on your
network. Select the shared printer.
6. Click Next.
7. if required, accept installation of the printer’s
drivers when you are being prompted by
Windows.
8. Validate the name of your printer, then click Next.
9. Click Finish to close the assistant.
ENGLISH FRANÇAIS DEUTSCH
4.5.6. Windows Vista: Sharing an ADSL connection in an Infrastructure type network
Reminder: If you have a Livebox, a modem router or a router connected to a modem and one or more
computers, your network will be in
connected to your
Router connected to a modem.
sharing an Internet connection and/or printer among several computers. Follow the instructions below to
finally free yourself from the cable that connects you to your modem… without cutting the links to your ADSL
connection. Viva the Wireless Attitude!
access point, which might be your Livebox, your Hercules Modem Router or your Hercules
Proceed as follows for each computer that will use the shared Internet connection:
Infrastructure mode by default. In this mode, the WiFi adapters are
Infrastructure mode is ideal for exchanging data, playing online, and also for
1. Connect to your wireless network (Hercules or
Livebox_AAAA, for example).
2. Access the Network and Sharing Center. To do
so, click the network icon on the Windows
taskbar, then click the Network and Sharing
Center link.
3. Click the View status link.
User Manual – 51/113
ESPAÑOL NEDERLANDS ITALIANO
Page 52

Hercules ADSL2/2+ Wireless G Modem Router HWGADSL2P-54V2 AnnexA
4. In the Wireless Network Connection Status
window, click Properties.
5. In the Windows Vista confirmation window, click
Continue.
6. In the Wireless Network Connection Properties
tab, select Internet Protocol version 4
(TCP/IPv4).
7. Click Properties.
52/113 – User Manual
Page 53

HWGADSL2P-54V2 AnnexA Hercules ADSL2/2+ Wireless G Modem Router
8. In the Internet Protocol version 4 (TCP/IPv4)
window, select Obtain an IP address
automatically and Obtain DNS server address
automatically.
9. Click OK to validate.
10. Do the same for Internet Protocol version 6
(TCP/IPv6).
To access the Internet, simply launch your Internet
browser.
4.6. Computers running Windows XP: Connecting to a wireless network
Note: The procedure described hereafter is deliberately intuitive and non-exhaustive. If you have mastered
Windows XP, you will note that there are other ways to achieve the same results. You will find our procedure
set out in the pages that follow, although you are free to choose your own preferred method.
Our procedure is based upon using the WiFi connection software supplied by Windows XP, called Microsoft
Zero Config. Some manufacturers of WiFi adapters supply their own connection software (example:
Hercules WiFi Station bundled with Hercules WiFi adapters). We recommend that you refer to their user
manual for help on establishing your connection.
Once your computer is switched on, your WiFi adapter automatically detects the wireless networks available
and displays them in a specific window.
To view the detected wireless networks:
- In the Windows XP taskbar, click the wireless network icon.
ENGLISH FRANÇAIS DEUTSCH
- The Wireless Network Connection window appears.
ESPAÑOL NEDERLANDS ITALIANO
User Manual – 53/113
Page 54

Hercules ADSL2/2+ Wireless G Modem Router HWGADSL2P-54V2 AnnexA
- Browse through the list and select your wireless network (here, the Hercules network, highlighted in blue).
You will note that this network is unsecured. You will therefore not be asked to provide a key.
Note: If you select a security-enabled network, you must enter the key in the window. To do so, you must
know the key defined when setting up your wireless network.
- Click the Connect button.
- Wait a few moments. When the connection to the Hercules network has been made, the indication
“Connected” appears as illustrated in the window below:
54/113 – User Manual
Page 55

HWGADSL2P-54V2 AnnexA Hercules ADSL2/2+ Wireless G Modem Router
4.7. Computers running Windows XP: Disconnecting from a wireless network
Once you are connected to a network, you can disconnect via the Wireless Network Connection window, for
example.
Via the Wireless Network Connection window:
- Click the Disconnect link.
ENGLISH FRANÇAIS DEUTSCH
User Manual – 55/113
ESPAÑOL NEDERLANDS ITALIANO
Page 56

Hercules ADSL2/2+ Wireless G Modem Router HWGADSL2P-54V2 AnnexA
Windows XP disconnects your network.
4.8. Computers running Windows XP: Managing your favorite networks
A favorite is a group of settings for connecting to a known Infrastructure or Ad hoc network (your own, a
neighbor’s, a friend’s). The Windows XP Wireless Network Connection window allows you to save the
settings for a network, or add or remove favorites.
To display your favorite networks, or add or remove a network, click the Change advanced settings link in
the Related Tasks zone.
56/113 – User Manual
Page 57

HWGADSL2P-54V2 AnnexA Hercules ADSL2/2+ Wireless G Modem Router
- In the Wireless Network Connection Properties window, click the Wireless Networks tab.
ENGLISH FRANÇAIS DEUTSCH
For example, to remove the Hercules network to which you have just connected, select it in the list (it is then
highlighted in blue), then click the Remove button.
To add a network, click the Add button. Windows XP opens a new manual settings window. Follow the onscreen instructions.
Finally, you can change the connection priority by clicking the Move down or Move up buttons.
User Manual – 57/113
ESPAÑOL NEDERLANDS ITALIANO
Page 58

Hercules ADSL2/2+ Wireless G Modem Router HWGADSL2P-54V2 AnnexA
4.9. Computers running Windows XP: Sharing folders, a printer or an ADSL connection
A simple solution for sharing folders, a printer or an ADSL connection in Windows XP is to use the Network
Setup Wizard. This Wizard will help you create a real home network.
Note: the access paths mentioned below may vary slightly if you have modified the default display
configuration in Windows XP (meaning the Start menu properties and Control Panel display).
4.9.1. Windows XP: Using the Network Setup Wizard in an Infrastructure network
Proceed as follows for each computer:
1. Click Start/All Programs/Accessories/
Communicatio ns/ Net wor k Se tu p Wi zard .
The Network Setup Wizard is launched.
2. Click Next twice.
The window opposite may appear if The Wizard
found disconnected network hardware.
3. If your Hercules Wireless Adapter wireless
network connection is not displayed in the list,
tick the Ignore disconnected network
hardware box, then click Next. Otherwise,
exit the Wizard by clicking Cancel and
establish the connection from your network
device to your router (if you use a Hercules
Wireless G PCI, USB or PCMCIA adapter,
please refer to the “The WiFi Station utility”
chapter of your User Manual).
58/113 – User Manual
Page 59
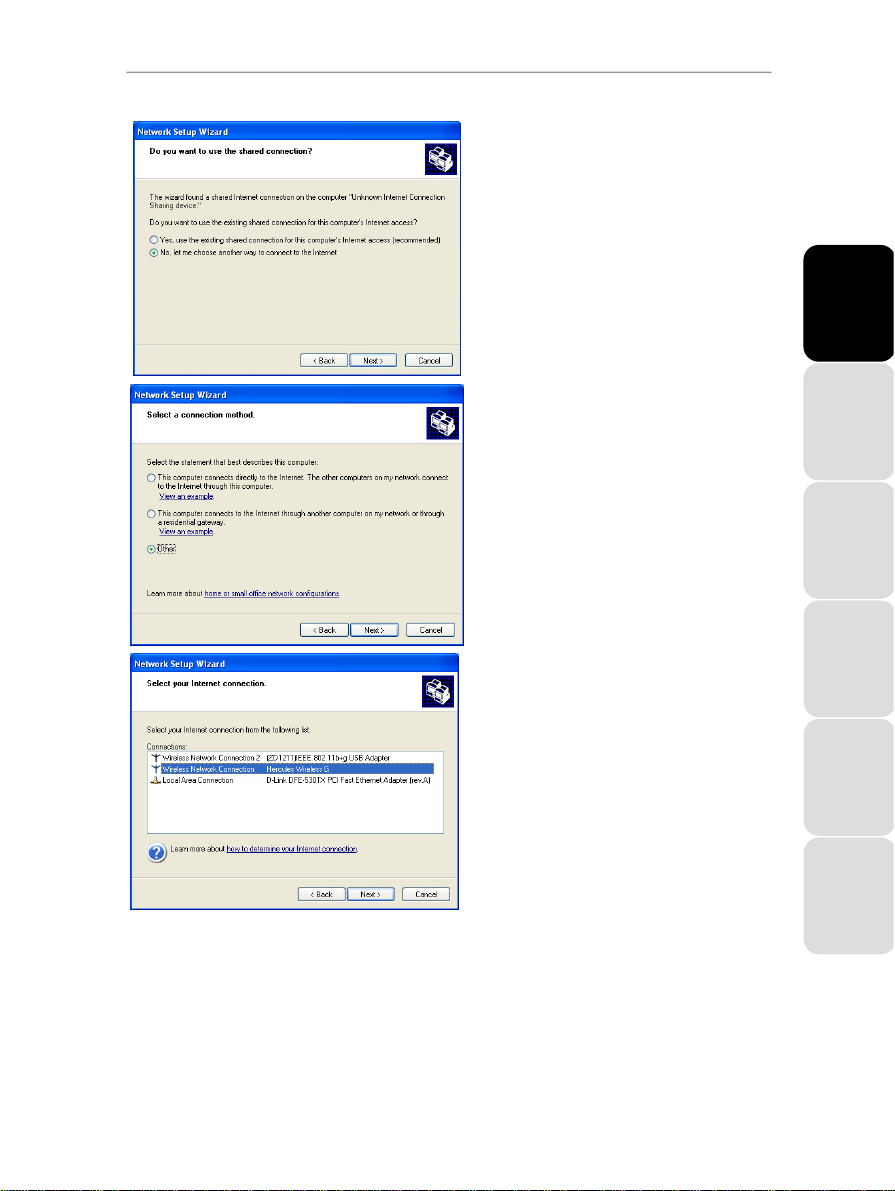
HWGADSL2P-54V2 AnnexA Hercules ADSL2/2+ Wireless G Modem Router
The window opposite may appear if The Wizard
found a shared Internet connection on the
computer.
4. Select No, let me choose another way to
connect to the Internet, then click Next.
5. In the Select a connection method window,
select the Other option.
6. In the following window, select This
computer connects to the Internet directly
or through a network hub, then click Next.
ENGLISH FRANÇAIS DEUTSCH
7. If the window opposite appears, select the
Hercules Wireless G wireless network
connection, then click Next.
ESPAÑOL NEDERLANDS ITALIANO
User Manual – 59/113
Page 60

Hercules ADSL2/2+ Wireless G Modem Router HWGADSL2P-54V2 AnnexA
8. When this warning screen appears, ignore it
by clicking Next.
If you are using the Hercules Modem Router, your
computers are already protected by the integrated
firewall.
9. If your computer has at least three
connections (or network devices), the window
opposite appears. In this case, let the Wizard
determine the appropriate connections.
10. Click Next.
11. Enter the computer name and a description, if
required.
Give the computer a name that is unique and
sufficiently distinctive, making it easy to recognize
on your network (my-computer, wifi-computer or
julie, for example).
12. Click Next.
60/113 – User Manual
Page 61

HWGADSL2P-54V2 AnnexA Hercules ADSL2/2+ Wireless G Modem Router
13. Enter the workgroup name (HOME, OFFICE
or HERCULES, for example) and a
description, if required.
The workgroup name must be identical (be sure to
respect the case of letters) for all computers you
wish to link together in a network.
14. Click Next.
15. Verify the configuration settings you have
entered in the window that appears, then click
Next.
The Wizard configures the computer for the home
network. This may take a few minutes.
16. Before completing the procedure, you may
select the Create a Network Setup Disk
option. This consists of copying this Wizard
onto a storage medium (your choice of floppy
disk or USB key) so that it can be launched on
computers equipped with operating systems
other than Windows XP.
This operation is carried out automatically, once
you have selected a medium for saving the
Wizard.
ENGLISH FRANÇAIS DEUTSCH
17. Click Finish to exit the Wizard.
Once the procedure is finished, Windows XP may
prompt you to restart your computer.
ESPAÑOL NEDERLANDS ITALIANO
The procedures described in this chapter are specific to Windows XP. For all other questions
related to sharing folders, a printer or an Internet connection, or on using Windows, please refer to the
Windows online help utility.
User Manual – 61/113
Page 62

Hercules ADSL2/2+ Wireless G Modem Router HWGADSL2P-54V2 AnnexA
4.9.2. Windows XP: Sharing folders
After having configured all of your computers using the Network Setup Wizard, you can now share data
located on different disk drives, as long as the user has authorized access.
1. Select the folder you wish to share, without opening it.
2. Right-click the folder. Select Sharing and Security.
3. In the Network sharing and security section of the
Sharing tab, tick the Share this folder on the network
box.
4. On the Share name line, enter the folder name as it will be
displayed on the network (12 characters maximum to
ensure compatibility with other operating systems).
You can also tick the Allow network users to change my
files box. In this case, the user will be able to read files and
save any changes. If this box is not ticked, the shared files
can only be read, and not changed.
The [Shared folder name] Properties window is divided into two sections. Local sharing and
security only allows for the sharing of files among several users on the same PC. The files are then placed
in a Shared Documents folder. Network sharing and security, however, allows for the sharing of files
among more than one computer.
5. Click Apply to validate your choices, then click OK to
close the window.
An icon representing a hand beneath the folder indicates that
the folder is now shared.
You can only share the contents of a folder, and not an individual file. We therefore recommend that
you create a folder specifically for this purpose where you will put files to be shared.
62/113 – User Manual
Page 63

HWGADSL2P-54V2 AnnexA Hercules ADSL2/2+ Wireless G Modem Router
4.9.3. Windows XP: Accessing shared folders
To easily access folders set up for sharing by several computers, it is preferable that the computers belong to
the same workgroup. In Windows XP, the workgroup name has been defined using the Network Setup
Wizard.
1. Click Start/My Computer.
2. Click My Network Places, then click View workgroup
computers.
You directly access the list of computers in your workgroup.
3. Double-click the computer that is sharing the folders you
wish to access.
All shared folders appear.
4.9.4. Windows XP: Sharing a printer
It is possible to put a printer on the network and share it with all computers in the house equipped with a WiFi
adapter.
To access a printer on the network, the printer must be set up for sharing on the computer where it is
connected and installed.
On the computer connected to the printer:
1. Click Start/Control Panel/Printers and Other Hardware/
Printers and Faxes.
2. Right-click the printer and select Sharing.
3. In the Sharing tab, select the Share this printer radio
button and enter a name for your printer.
Give the printer a name that is unique and sufficiently
distinctive, making it easy to recognize (my-printer or home
laser printer, for example). If one of your computers is running
Windows 98 SE, we recommend that the sharing name not
exceed 12 characters (without spaces) in order to ensure its
compatibility with this operating system.
4. Click Apply, then OK.
ENGLISH FRANÇAIS DEUTSCH
User Manual – 63/113
ESPAÑOL NEDERLANDS ITALIANO
Page 64
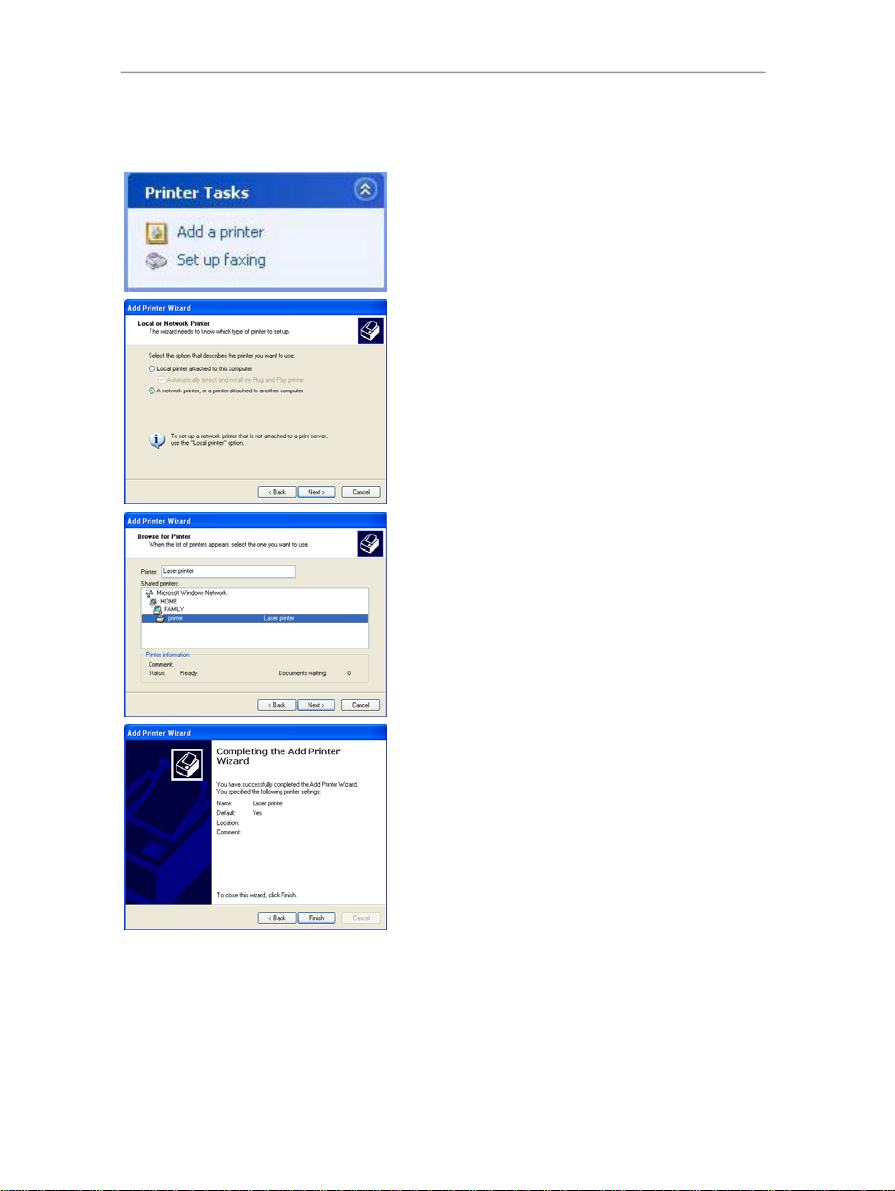
Hercules ADSL2/2+ Wireless G Modem Router HWGADSL2P-54V2 AnnexA
On the computers that will use the shared printer:
1. Click Start/Control Panel/Printers and Other Hardware/
Printers and Faxes. In the Printer Tasks section, select
Add a printer.
2. The Add Printer Wizard is launched. Click Next.
3. Select the A network printer, or a printer attached to
another computer option, then click Next.
4. In the window that appears, click Next to launch the
search for shared printers.
5. In the list displayed, double-click the computer connected
to the printer.
6. Select the shared printer, then click Next.
7. If you wish, set the shared printer as the default printer,
then click Next.
8. Click Finish to exit the Wizard.
You can now use the network printer thanks to your WiFi
connection. For more information on sharing a printer, please
refer to your printer’s manual.
64/113 – User Manual
Page 65

HWGADSL2P-54V2 AnnexA Hercules ADSL2/2+ Wireless G Modem Router
4.9.5. Windows XP: Modifying a workgroup name
It may happen that you need to change the name of your workgroup (advanced users only). To do so,
proceed as follows:
1. Click Start/Control Panel/Performance and
Maintenance/System.
2. In the System Properties window, select the Computer
Name tab.
3. Click the Change… button.
4. In the Computer Name zone, enter a name sufficiently
distinctive that it can easily be recognized in the list of
computers for the
computer or julie, for example).
5. In the Workgroup zone, enter a name for the group
(HOME, OFFICE or HERCULES, for example).
The workgroup name must be identical (be sure to respect the
case of letters) for all computers you wish to link together in a
network.
6. A Windows message indicates that the task has been
carried out successfully and that you must restart the
computer.
7. Repeat this procedure for each computer.
workgroup (my-computer, wifi-
ENGLISH FRANÇAIS DEUTSCH
ESPAÑOL NEDERLANDS ITALIANO
User Manual – 65/113
Page 66
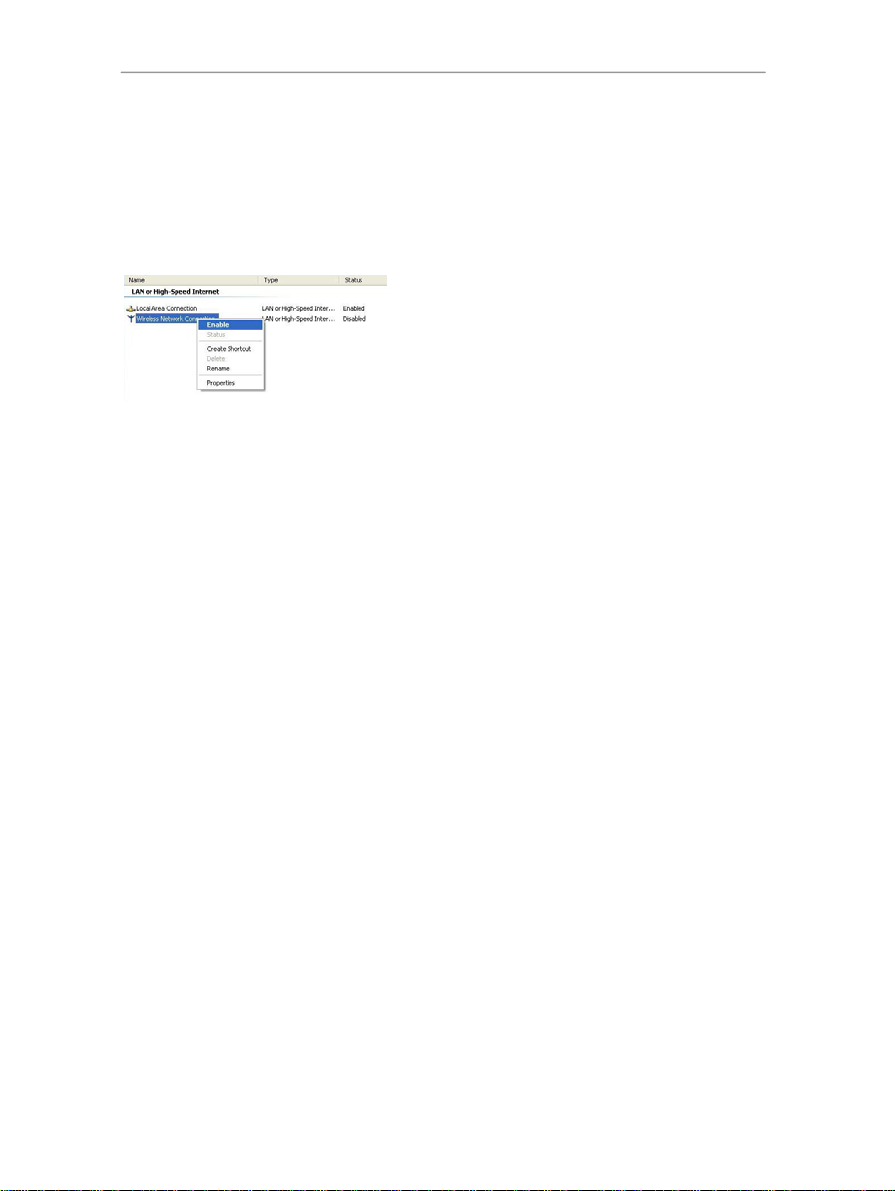
Hercules ADSL2/2+ Wireless G Modem Router HWGADSL2P-54V2 AnnexA
4.9.6. Windows XP: Manually enabling or disabling your adapter’s WiFi connection (advanced users)
You can manually enable or disable your adapter’s WiFi connection for a variety of reasons: to temporarily
avoid connecting to networks, save battery power, etc.
- Click Start/Connections/Show All Connections.
Verify that your Hercules Wireless G wireless network
connection is listed.
- If its status is Disabled, right-click your Wireless Network
Connection and select Enable.
- If its status is Enabled, right-click your Wireless Network
Connection and select Disable.
4.10. Computers running Windows 2000: Connecting to a wireless network
Manufacturers of WiFi adapters generally supply their own software for connection / disconnection (example:
Hercules WiFi Station bundled with Hercules WiFi adapters). We recommend that you refer to their user
manual for help on this topic.
4.11. Computers running Windows 2000: Disconnecting from a wireless network
Manufacturers of WiFi adapters generally supply their own software for connection / disconnection (example:
Hercules WiFi Station bundled with Hercules WiFi adapters). We recommend that you refer to their user
manual for help on this topic.
4.12. Computers running Windows 2000: Sharing folders, a printer or an ADSL connection
To create a network of computers, share data, a printer or an ADSL connection in Windows 2000, it is
preferable that the computers belong to the same
66/113 – User Manual
workgroup.
Page 67

HWGADSL2P-54V2 AnnexA Hercules ADSL2/2+ Wireless G Modem Router
4.12.1. Creating a workgroup in Windows 2000
1. Click Start/Settings/Control Panel. Double-click System.
2. In the System Properties window, select the Network
Identification tab.
3. Click the Properties button.
4. In the Computer name zone, enter a name sufficiently
distinctive that it can easily be recognized in the list of
computers for the
computer or julie, for example).
5. In the Workgroup zone, enter a name for the group
(HOME, OFFICE or HERCULES, for example).
The workgroup name must be identical (be sure to respect the
case of letters) for all computers you wish to link together in a
network.
6. Click OK. A Windows message indicates that the task has
been carried out successfully and that you must restart the
computer.
7. Click OK once more.
4.12.2. Windows 2000: Sharing folders
1. Select the folder you wish to share, without opening it.
2. Right-click the folder. Select Sharing.
3. In the Sharing tab, select Share this folder.
4. On the Share name line, enter the folder name as it will
be displayed on the network (12 characters maximum to
ensure compatibility with other operating systems).
You can also limit access to the folder by selecting a limited
number of users and the type of access by clicking the
Permissions button.
5. Click Apply, then OK.
ENGLISH FRANÇAIS DEUTSCH
workgroup (my-computer, wifi-
ESPAÑOL NEDERLANDS ITALIANO
User Manual – 67/113
Page 68

Hercules ADSL2/2+ Wireless G Modem Router HWGADSL2P-54V2 AnnexA
4.12.3. Windows 2000: Accessing shared folders
1. Click Start/Programs/Accessories/Windows Explorer.
2. Double-click My Network Places, Entire Network, then
Microsoft Windows Network.
3. Double-click your workgroup.
You access the list of the computers in your workgroup.
4. Double-click the computer that is sharing the folders you
wish to access.
All shared folders appear.
4.12.4. Windows 2000: Sharing a printer
It is possible to put a printer on the network and share it with all computers in the house equipped with a WiFi
adapter.
To access a printer on the network, the printer must be set up for sharing on the computer where it is
connected and installed.
On the computer connected to the printer:
1. Click Start/Settings/Printers.
2. Right-click the printer and select Sharing….
3. In the Sharing tab, select the Shared as: radio button and
enter a name for your printer.
Give the printer a name that is unique and sufficiently
distinctive, making it easy to recognize (my-printer or home
laser printer, for example). If one of your computers is running
Windows 98 SE, we recommend that the sharing name not
exceed 12 characters (without spaces) in order to ensure its
compatibility with this operating system.
4. Click Apply, then OK.
68/113 – User Manual
Page 69

HWGADSL2P-54V2 AnnexA Hercules ADSL2/2+ Wireless G Modem Router
On the computers that will use the shared printer:
1. Click Start/Settings/Printers. Double-click the Add
Printer icon.
2. The Add Printer Wizard is launched. Click Next.
3. Select the Network printer option, then click Next.
4. Click Next to locate the shared printer.
5. In the list displayed, double-click the computer connected
to the printer.
6. Select the shared printer, then click Next.
7. If you wish, set the shared printer as the default printer,
then click Next.
8. Click Finish to close the Wizard.
You can now use the network printer thanks to your WiFi
connection. For more information on sharing a printer, please
refer to your printer’s manual.
ENGLISH FRANÇAIS DEUTSCH
ESPAÑOL NEDERLANDS ITALIANO
User Manual – 69/113
Page 70

Hercules ADSL2/2+ Wireless G Modem Router HWGADSL2P-54V2 AnnexA
4.12.5. Windows 2000: Modifying a workgroup name
It may happen that you need to change the name of your workgroup (advanced users only). To do so,
proceed as follows:
1. Click Start/Settings/Control Panel. Double-click
System.
2. In the System Properties window, select the
Network Identification tab.
3. Click the Properties button.
4. In the Computer name zone, enter a name
sufficiently distinctive that it can easily be recognized
in the list of computers for the
computer, wifi-computer or julie, for example).
5. In the Workgroup zone, enter a name for the group
(HOME, OFFICE or HERCULES, for example).
The workgroup name must be identical (be sure to
respect the case of letters) for all computers you wish to
link together in a network.
6. Click OK. A Windows message indicates that the
task has been carried out successfully and that you
must restart the computer.
7. Repeat this procedure for each computer.
workgroup (my-
70/113 – User Manual
Page 71

HWGADSL2P-54V2 AnnexA Hercules ADSL2/2+ Wireless G Modem Router
4.12.6. Windows 2000: Sharing an ADSL connection in an Infrastructure network
Proceed as follows for each computer that will use the shared Internet connection:
1. Click Start/Settings/Network and Dial-up Connections.
2. Select the connection to the local area network
corresponding to your Hercules Wireless G device.
3. Right-click the connection and select Properties.
4. In the Local Area Connection Properties window, select
Internet Protocol (TCP/IP).
5. Click Properties.
ENGLISH FRANÇAIS DEUTSCH
6. In the Internet Protocol (TCP/IP) Properties window,
select Obtain an IP address automatically and Obtain
DNS server address automatically.
7. Click OK to close the windows.
Windows may prompt you to restart your computer.
To access the Internet, you can now simply launch your
Internet browser.
ESPAÑOL NEDERLANDS ITALIANO
User Manual – 71/113
Page 72

Hercules ADSL2/2+ Wireless G Modem Router HWGADSL2P-54V2 AnnexA
4.12.7. Windows 2000: Manually enabling or disabling your adapter’s WiFi connection (advanced users)
You can manually enable or disable your adapter’s WiFi connection for a variety of reasons: to temporarily
avoid connecting to networks, save battery power, etc.
To manually enable or disable your Hercules Wireless G adapter’s WiFi connection in Windows 2000:
- Access the Device Manager.
- Select your Hercules Wireless G adapter in the list of network adapters.
- Right-click your adapter and select Properties.
- To enable your adapter, select Enable. To disable it, select the Disable option.
For more information on manually enabling or disabling the adapter in Windows 2000, please refer to the
Windows online help utility.
72/113 – User Manual
Page 73

HWGADSL2P-54V2 AnnexA Hercules ADSL2/2+ Wireless G Modem Router
4.13. Computers running Windows Me: Connecting to a wireless network
Manufacturers of WiFi adapters generally supply their own software for connection / disconnection (example:
Hercules WiFi Station bundled with Hercules WiFi adapters). We recommend that you refer to their user
manual for help on this topic.
4.14. Computers running Windows Me: Disconnecting from a wireless network
Manufacturers of WiFi adapters generally supply their own software for connection / disconnection (example:
Hercules WiFi Station bundled with Hercules WiFi adapters). We recommend that you refer to their user
manual for help on this topic.
4.15. Computers running Windows Me: Sharing folders, a printer or an ADSL connection
A simple solution for sharing folders, a printer or an ADSL connection in Windows Me is to use the Home
Networking Wizard. This Wizard will help you create a real home network.
4.15.1. Windows Me: Using the Home Networking Wizard in an Infrastructure network
1. Click Start/Programs/Accessories/Communications/
Home Networking Wizard.
The Wizard is launched.
2. Click Next.
ENGLISH FRANÇAIS DEUTSCH
If you have already used this Wizard on this
computer, the Setup Options panel appears. Select I want
to edit my Home Networking settings on this computer,
then click Next.
3. In the Internet Connection window, select the A direct
connection to my ISP using the following device:
option.
4. Select your Hercules Wireless G adapter in the drop-
down list, then click Next.
User Manual – 73/113
ESPAÑOL NEDERLANDS ITALIANO
Page 74

Hercules ADSL2/2+ Wireless G Modem Router HWGADSL2P-54V2 AnnexA
5. If the Internet Connection Sharing window appears,
select No, I do not want to share my Internet
connection.
6. Click Next.
7. Enter the computer name.
Give the computer a name that is unique and sufficiently
distinctive, making it easy to recognize in the list of
workgroup computers (my-computer, wifi-computer or julie,
for example).
8. Select the Use this workgroup name option and enter
workgroup name (HOME, OFFICE or HERCULES,
the
for example).
The workgroup name must be identical (be sure to respect
the case of letters) for all computers you wish to link
together in a network.
9. Click Next.
10. If you wish, you can enable sharing for the My
Documents folder by ticking the My Documents folder
and folders in it box. In this case, the Wizard will
prompt you to enter a password.
11. If you wish, you can enable sharing of your printer by
selecting it in the list.
12. Click Next.
13. Before completing the procedure, you may copy this
Wizard onto a setup disk so that it can be launched on
computers equipped with operating systems other than
Windows Me. In this case, select the Yes, create a
Home Networking Setup disk option.
This operation is carried out automatically, once you have
selected a medium for saving the Wizard.
74/113 – User Manual
Page 75

HWGADSL2P-54V2 AnnexA Hercules ADSL2/2+ Wireless G Modem Router
14. Click Finish to exit the Wizard.
Once the procedure is finished, Windows Me prompts you
to restart your computer. Once your computer has
restarted, a message invites you to configure your other
computers.
4.15.2. Windows Me: Sharing folders
After having configured all of your computers using the Home Networking Wizard, you can now share data
located on different disk drives, as long as the user has authorized access.
1. Select the folder you wish to share, without opening it.
2. Right-click the folder. Select Sharing.
3. In the Sharing tab, select Shared As.
4. On the Share Name line, enter the folder name as it
will be displayed on the network (12 characters
maximum).
You can also limit access to the folder by selecting the
type of access and a password.
ENGLISH FRANÇAIS DEUTSCH
If the Sharing tab does not appear, you must
enable file sharing.
1. Click Start/Settings/Control Panel. Double-click
Network.
2. In the Network window, click the File and Print
Sharing… button.
3. Tick the I want to be able to give others access to
my files box.
Windows may prompt you to insert the installation CDROM.
ESPAÑOL NEDERLANDS ITALIANO
User Manual – 75/113
Page 76
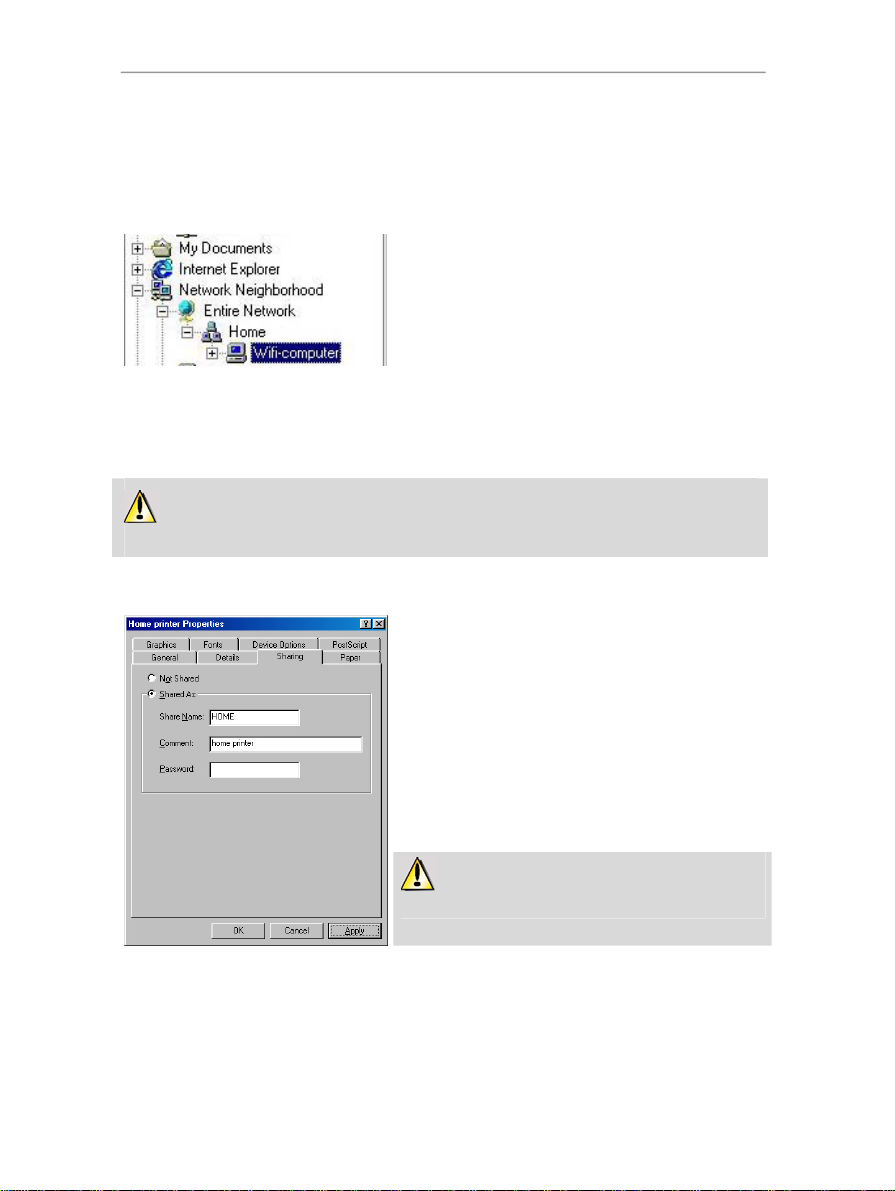
Hercules ADSL2/2+ Wireless G Modem Router HWGADSL2P-54V2 AnnexA
4.15.3. Windows Me: Accessing shared folders
To easily access folders set up for sharing by several computers, it is preferable that the computers belong to
the same workgroup. In Windows Me, the workgroup name has been defined using the Home Networking
Wizard.
1. Click Start/Programs/Windows Explorer.
2. Double-click Network Neighborhood and expand it.
You access the list of the computers in your workgroup.
3. Double-click the computer that is sharing the folders you
wish to access.
All shared folders appear.
4.15.4. Windows Me: Sharing a printer
It is possible to put a printer on the network and share it with all computers in the house equipped with a WiFi
adapter.
To access a printer on the network, the printer must be set up for sharing on the computer where it is
connected and installed.
On the computer connected to the printer:
1. Click Start/Settings/Printers.
2. Right-click the printer and select Sharing.
3. In the Sharing tab, select the Shared As radio button and
enter a name for your printer.
Give the printer a name that is unique and sufficiently
distinctive, making it easy to recognize (printer or wifi printer,
for example).
4. Click Apply, then OK.
If the Sharing tab does not appear, you must enable file
sharing.
76/113 – User Manual
Page 77

HWGADSL2P-54V2 AnnexA Hercules ADSL2/2+ Wireless G Modem Router
1. Click Start/Settings/Control Panel. Double-click
Network.
2. In the Network window, click the File and Print Sharing…
button.
3. Tick the I want to be able to allow others to pr int to my
printer(s) box.
Windows may prompt you to restart your computer.
On the computers that will use the shared printer:
1. Click Start/Settings/Printers. Double-click the Add
Printer icon.
2. The Add Printer Wizard is launched. Click Next.
3. Select the Network printer option, then click Next.
4. Click Browse… to locate the shared printer.
5. In the list displayed, double-click the computer connected
to the printer.
6. Select the shared printer, then click OK.
7. Click Next.
ENGLISH FRANÇAIS DEUTSCH
8. If you wish, set the shared printer as the default printer,
then click Next.
9. Click Finish to close the Wizard.
You can now use the network printer thanks to your WiFi
connection. For more information on sharing a printer, please
refer to your printer’s manual.
User Manual – 77/113
ESPAÑOL NEDERLANDS ITALIANO
Page 78

Hercules ADSL2/2+ Wireless G Modem Router HWGADSL2P-54V2 AnnexA
4.15.5. Windows Me: Modifying a workgroup name
It may happen that you need to change the name of your workgroup (advanced users only). To do so,
proceed as follows:
1. Click Start/Settings/Control Panel. Double-click
Network.
2. Select the Identification tab.
3. In the Computer name zone, enter a name
sufficiently distinctive that it can easily be recognized
in the list of computers for the
computer, wifi-computer or julie, for example).
4. In the Workgroup zone, enter a name for the group
(HOME, OFFICE or HERCULES, for example).
The workgroup name must be identical (be sure to
respect the case of letters) for all computers you wish to
link together in a network.
5. Click OK. A Windows message indicates that the
task has been carried out successfully and that you
must restart the computer.
6. Repeat this procedure for each computer.
workgroup (my-
4.15.6. Windows Me: Manually enabling or disabling your adapter’s WiFi connection (advanced users)
You can manually enable or disable your adapter’s WiFi connection for a variety of reasons: to temporarily
avoid connecting to networks, save battery power, etc.
To manually enable or disable your Hercules Wireless G adapter’s WiFi connection in Windows Me:
- Access the Device Manager.
- Select your Hercules Wireless G adapter in the list of network adapters.
- Right-click your adapter and select Properties.
- To enable your adapter, select Enable. To disable it, select the Disable option.
For more information on manually enabling or disabling the adapter in Windows Me, please refer to the
Windows online help utility.
78/113 – User Manual
Page 79

HWGADSL2P-54V2 AnnexA Hercules ADSL2/2+ Wireless G Modem Router
4.16. Computers running Windows 98 SE: Connecting to a wireless network
Manufacturers of WiFi adapters generally supply their own software for connection / disconnection (example:
Hercules WiFi Station bundled with Hercules WiFi adapters). We recommend that you refer to their user
manual for help on this topic.
4.17. Computers running Windows 98 SE: Disconnecting from a wireless network
Manufacturers of WiFi adapters generally supply their own software for connection / disconnection (example:
Hercules WiFi Station bundled with Hercules WiFi adapters). We recommend that you refer to their user
manual for help on this topic.
4.18. Computers running Windows 98 SE: Sharing folders, a printer or an ADSL connection
To create a network of computers, share data, a printer or an ADSL connection in Windows 98 SE, it is
preferable that the computers belong to the same
workgroup.
4.18.1. Windows 98 SE: Creating a workgroup
1. Click Start/Settings/Control Panel. Double-click
Network.
2. Select the Identification tab.
3. In the Computer name zone, enter a name sufficiently
distinctive that it can easily be recognized in the list of
computers for the
computer or julie, for example).
4. In the Workgroup zone, enter a name for the group
(HOME, OFFICE or HERCULES, for example).
workgroup (my-computer, wifi-
ENGLISH FRANÇAIS DEUTSCH
The workgroup name must be identical (be sure to respect
the case of letters) for all computers you wish to link
together in a network.
5. Click OK. Windows prompts you to restart your
computer.
6. Repeat this procedure for each computer.
ESPAÑOL NEDERLANDS ITALIANO
Note: to modify the name of a workgroup, follow the same procedure.
User Manual – 79/113
Page 80

Hercules ADSL2/2+ Wireless G Modem Router HWGADSL2P-54V2 AnnexA
4.18.2. Windows 98 SE: Sharing folders
1. Select the folder you wish to share, without opening it.
2. Right-click the folder. Select Sharing.
3. In the Sharing tab, select Shared As.
4. On the Share Name line, enter the folder name as it
will be displayed on the network (12 characters
maximum).
You can also limit access to the folder by selecting the
type of access and a password.
If the sharing tab does not appear, you must enable
file sharing.
1. Click Start/Settings/Control Panel. Double-click
Network.
2. In the Network window, click the File and Print
Sharing… button.
3. Tick the I want to be able to give others access to
my files box, then click OK.
3. Click OK to close the window.
Windows may prompt you to insert the installation CDROM and restart the computer.
4.18.3. Windows 98 SE: Accessing shared folders
1. Click Start/Programs/Windows Explorer.
2. Double-click Network Neighborhood and expand it.
You access the list of the computers in your workgroup.
3. Double-click the computer that is sharing the folders you
wish to access.
All shared folders appear.
4.18.4. Windows 98 SE: Sharing a printer
It is possible to put a printer on the network and share it with all computers in the house equipped with a WiFi
adapter.
To access a printer on the network, the printer must be set up for sharing on the computer where it is
connected and installed.
80/113 – User Manual
Page 81
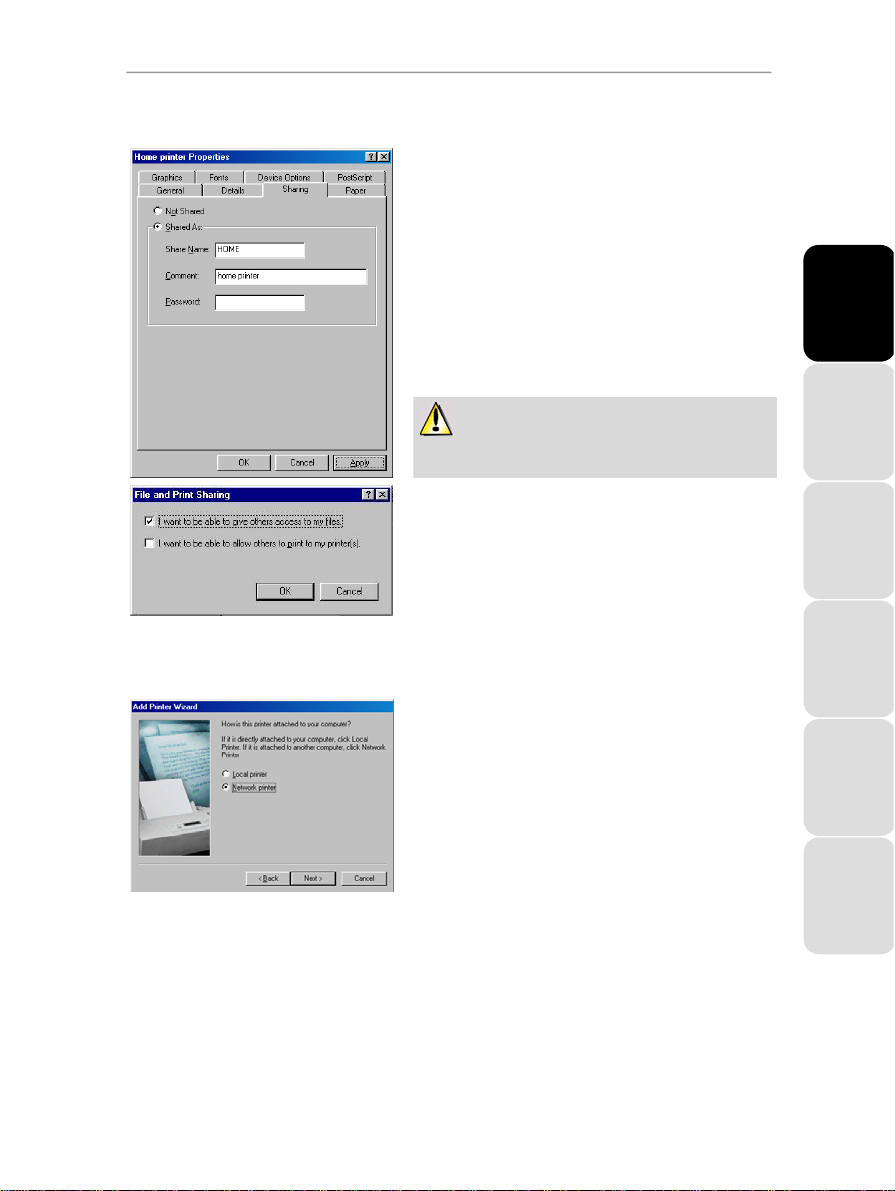
HWGADSL2P-54V2 AnnexA Hercules ADSL2/2+ Wireless G Modem Router
On the computer connected to the printer:
1. Click Start/Settings/Printers.
2. Right-click the printer and select Sharing.
3. In the Sharing tab, select Shared As and enter a name
for your printer.
Give the printer a name that is unique and sufficiently
distinctive, making it easy to recognize (printer or wifi
printer, for example).
4. Click Apply, then OK.
If the Sharing tab does not appear, you must enable
file sharing.
1. Click Start/Settings/Control Panel. Double-click
Network.
2. In the Network window, click the File and Print
Sharing… button.
3. Tick the I want to be able to allow others to print to
my printer(s) box.
Windows prompts you to restart your computer.
ENGLISH FRANÇAIS DEUTSCH
On the computers that will use the shared printer:
1. Click Start/Settings/Printers. Double-click the Add
Printer icon.
2. The Add Printer Wizard is launched. Click Next.
3. Select the Network printer option, then click Next.
4. Click Browse… to locate the shared printer.
ESPAÑOL NEDERLANDS ITALIANO
User Manual – 81/113
Page 82

Hercules ADSL2/2+ Wireless G Modem Router HWGADSL2P-54V2 AnnexA
5. In the list displayed, double-click the computer connected
to the printer.
6. Select the shared printer, then click OK.
7. Click Next.
8. If you wish, set the shared printer as the default printer,
then click Next.
9. Click Finish to close the Wizard.
You can now use the network printer thanks to your WiFi
connection. For more information on sharing a printer, please
refer to your printer’s manual.
4.18.5. Windows 98 SE: Sharing an ADSL connection in an Infrastructure network
Proceed as follows for each computer that will use the shared Internet connection:
1. Click Start/Settings/Control Panel. Double-click
Network.
2. In the Configuration tab of the Network window,
select the TCP/IP -> Hercules Wireless G component.
3. Click Properties.
82/113 – User Manual
Page 83

HWGADSL2P-54V2 AnnexA Hercules ADSL2/2+ Wireless G Modem Router
4. In the IP Address tab, select Obtain an IP address
automatically.
5. In the Gateway tab, if there are gateways installed,
select them and click Remove.
6. Click OK to close the windows.
Windows may prompt you to restart your computer.
To access the Internet, you can now simply launch your
Internet browser.
ENGLISH FRANÇAIS DEUTSCH
4.18.6. Windows 98 SE: Manually enabling or disabling your adapter’s WiFi connection (advanced users)
You can manually enable or disable your adapter’s WiFi connection for a variety of reasons: to temporarily
avoid connecting to networks, save battery power, etc.
To manually enable or disable your Hercules Wireless G adapter’s WiFi connection in Windows 98 SE:
- Access the Device Manager.
- Select your Hercules Wireless G adapter in the list of network adapters.
- Right-click your adapter and select Properties.
- To enable your adapter, select Enable. To disable it, select the Disable option.
For more information on manually enabling or disabling the adapter in Windows 98 SE, please refer to the
Windows online help utility.
User Manual – 83/113
ESPAÑOL NEDERLANDS ITALIANO
Page 84

Hercules ADSL2/2+ Wireless G Modem Router HWGADSL2P-54V2 AnnexA
5. MANUALL Y CONFIGURING YOUR ADSL CONNECTIO N
WiFi Manager allows you to manually enter your connection settings, which may prove useful if your Internet
Service Provider does not appear in the list of included ISPs, or if you are using a specific connection.
5.1. Gathering your ADSL connection settings
On the following page, you will find a reminder sheet which, once you have filled it out, will enable you to find
all of your ADSL connection information at a glance, which may be particularly useful if your Internet
Service Provider does not appear in the list, or if you are using a DHCP or static IP connection for which you
will be asked to provide additional settings.
To fill in this reminder sheet, arm yourself with a copy of your confirmation of membership email or letter,
which should contain all of the required information. If some of the information does not appear in your
confirmation of membership email or letter, you may have to contact your service provider by telephone in
order to get hold of the missing information.
84/113 – User Manual
Page 85

HWGADSL2P-54V2 AnnexA Hercules ADSL2/2+ Wireless G Modem Router
REMINDER SHEET – MY ADSL CONNECTION SETTINGS
Who is your service provider? __________________________________
What is your connection type? (only one possible answer)
1- PPPoE
1- If you are using a PPPoE connection, enter the information below:
2- If you are using a PPPoA connection, enter the information below:
3 and 4- If you are using a DHCP or Bridge connection, enter the information below:
5 and 6- If you are using a Static IP or IPoA connection, enter the information below:
2- PPPoA
□
Username (Login): _______ _____________________________________
Connection password: ____________________________________________
VPI (0-255): _______________ VCI (1-65535): ______________
Username (Login): _______ _____________________________________
Connection password: ____________________________________________
Encapsulation type (or multiplexing):
VPI (0-255): _______________ VCI (1-65535): ______________
Encapsulation type (or multiplexing):
VPI (0-255): _______________ VCI (1-65535): ______________
3- DHCP
□
IP address: ______ . ______ . ______ . ______
Subnet mask: ______ . ______ . ______ . ______
LLC
LLC
□
4- Bridge
□
□
□
VC-Mux
VC-Mux
5- Static IP
□
□
□
6- IPoA
□
ENGLISH FRANÇAIS DEUTSCH
Default gateway: ______ . ______ . ______ . ______
Preferred DNS server (for Static IP) or
ARP server (for
Auxiliary DNS server (for Static IP only): ______ . ______ . ______ . ______
Encapsulation type (or multiplexing) (for Static
VPI (0-255): _______________ VCI (1-65535): ______________
______ . ______ . ______ . ______
IPoA):
LLC
IP):
□
VC-Mux
ESPAÑOL NEDERLANDS ITALIANO
□
User Manual – 85/113
Page 86
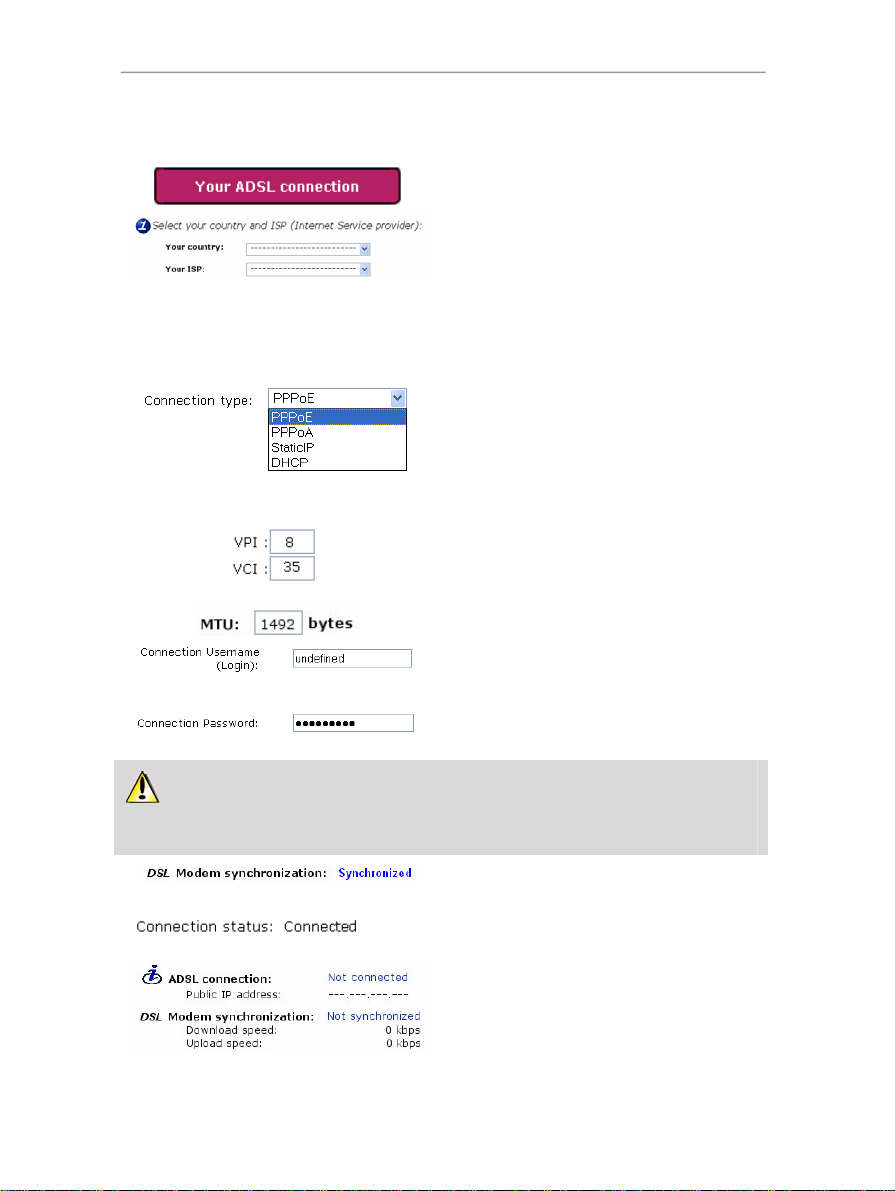
Hercules ADSL2/2+ Wireless G Modem Router HWGADSL2P-54V2 AnnexA
5.2. Entering your ADSL connection settings
- On the Home page, click Your ADSL connection.
- First, select your country of residence.
- Next, select Other (manual configuration) in the
list of ISPs.
All of the requested information will be found on the
reminder sheet which you have already filled in
(see chapter 5.1. Gathering your ADSL
connection settings).
- Select your Connection Type (PPPoE, PPPoA,
DHCP or StaticIP).
If you are configuring a PPPoE connection:
- Enter the VPI (Virtual Path Identifier) and VCI
(Virtual Circuit Identifier).
- Enter the MTU (Maximum Transmission Unit).
- Enter your Connection Username (Login) and
Connection password.
This information is found in the confirmation of
membership email or letter sent to you by your ISP,
and is already entered on your reminder sheet.
Once you have configured your connection, don’t forget to click the Apply and Save button to save
your settings. Doing so will establish an Internet connection, which you can then test (please refer to
chapter 5.2.1. Testing your ADSL connection).
- At the bottom of the screen, verify that your
Modem Router is properly synchronized.
- Verify that your Modem Router is properly
connected.
- Have a look at the information in the Download
speed (transfer speed of Internet data to your
computer) and Upload speed (transfer speed of
data on your computer to the Internet) sections.
This information is quoted in Kilobits per second. A
download speed of 1024Kbps is the equivalent of 1
86/113 – User Manual
Page 87

HWGADSL2P-54V2 AnnexA Hercules ADSL2/2+ Wireless G Modem Router
Megabit per second.
- Finally, you will find your computer’s IP address,
which you will need later on in WiFi Manager.
If you are configuring a PPPoA connection:
- Select the Encapsulation type: VC MUX or LLC
(information provided by your ISP).
- Enter the VPI (Virtual Path Identifier) and VCI
(Virtual Circuit Identifier).
Once you have configured your connection, don’t forget to click the Apply and Save button to save
your settings. Doing so will establish an Internet connection, which you can then test (please refer to
chapter 5.2.1. Testing your ADSL connection).
- Enter the MTU (Maximum Transmission Unit).
- Enter your Connection Username (Login) and
Connection password.
This information is found in the confirmation of
membership email or letter sent to you by your ISP,
and is already entered on your reminder sheet.
- At the bottom of the screen, verify that your
Modem Router is properly synchronized.
ENGLISH FRANÇAIS DEUTSCH
- Verify that your Modem Router is properly
connected.
- Have a look at the information in the Download
speed (transfer speed of Internet data to your
computer) and Upload speed (transfer speed of
data on your computer to the Internet) sections.
This information is quoted in Kilobits per second. A
download speed of 1024Kbps is the equivalent of 1
Megabit per second.
- Finally, you will find your computer’s
which you will need later on in WiFi Manager.
IP address,
ESPAÑOL NEDERLANDS ITALIANO
User Manual – 87/113
Page 88

Hercules ADSL2/2+ Wireless G Modem Router HWGADSL2P-54V2 AnnexA
If you are configuring a DHCP connection:
- Select the Encapsulation type: VC MUX or LLC
(information provided by your ISP).
- Enter the VPI (Virtual Path Identifier) and VCI
(Virtual Circuit Identifier).
- The
IP address, the subnet mask and the default
gateway are displayed.
This information is automatically assigned by your
ISP’s DHCP server.
- If you wish, click the Renew button to have the
DHCP server assign a new IP address; or
- Click Release to make the IP address available
again, then click Renew to have the DHCP server
assign a new IP address.
Once you have configured your connection, don’t forget to click the Apply and Save button to save
your settings. Doing so will establish an Internet connection, which you can then test (please refer to
chapter 5.2.1. Testing your ADSL connection).
88/113 – User Manual
- At the bottom of the screen, verify that your
Modem Router is properly synchronized.
- Verify that your Modem Router is properly
connected.
- Have a look at the information in the Download
speed (transfer speed of Internet data to your
computer) and Upload speed (transfer speed of
data on your computer to the Internet) sections.
This information is quoted in Kilobits per second. A
download speed of 1024Kbps is the equivalent of 1
Megabit per second.
- Finally, you will find your computer’s
which you will need later on in WiFi Manager.
IP address,
Page 89

HWGADSL2P-54V2 AnnexA Hercules ADSL2/2+ Wireless G Modem Router
If you are configuring a Static IP connection:
- Select the Encapsulation type: VC MUX or LLC
(information provided by your ISP).
- Enter the VPI (Virtual Path Identifier) and VCI
(Virtual Circuit Identifier).
- You must enter the following settings: the
address
, the subnet mask, the default gateway,
the Primary DNS server and the Secondary DNS
server.
- Select either Bridge Mode or Route Mode.
Once you have configured your connection, don’t forget to click the Apply and Save button to save
your settings. Doing so will establish an Internet connection, which you can then test (please see below).
- At the bottom of the screen, verify that your
Modem Router is properly synchronized.
- Verify that your Modem Router is properly
connected.
- Have a look at the information in the Download
speed (transfer speed of Internet data to your
computer) and Upload speed (transfer speed of
data on your computer to the Internet) sections.
This information is quoted in Kilobits per second. A
download speed of 1024Kbps is the equivalent of 1
Megabit per second.
IP
ENGLISH FRANÇAIS DEUTSCH
If you are configuring an IPoA connection:
- Finally, you will find your computer’s
which you will need later on in WiFi Manager.
- Select the Encapsulation type: VC MUX or LLC
(information provided by your ISP).
- Enter the VPI (Virtual Path Identifier) and VCI
(Virtual Circuit Identifier).
IP address,
ESPAÑOL NEDERLANDS ITALIANO
User Manual – 89/113
Page 90

Hercules ADSL2/2+ Wireless G Modem Router HWGADSL2P-54V2 AnnexA
- You must enter the following settings: the
, the subnet mask, the Default gateway
address
and the ARP server.
Once you have configured your connection, don’t forget to click the Apply and Save button to save
your settings. Doing so will establish an Internet connection, which you can then test (please see below).
- At the bottom of the screen, verify that your
Modem Router is properly synchronized.
- Verify that your Modem Router is properly
connected.
- Have a look at the information in the Download
speed (transfer speed of Internet data to your
computer) and Upload speed (transfer speed of
data on your computer to the Internet) sections.
This information is quoted in Kilobits per second. A
download speed of 1024Kbps is the equivalent of 1
Megabit per second.
- Finally, you will find your computer’s
which you will need later on in WiFi Manager.
IP address,
IP
5.2.1. Testing your ADSL connection
Now that your ADSL connection has been configured on your Hercules Modem Router, you can carry out a
first test of your connection and verify that you have access to the Internet.
During this test, leave the Ethernet cable connected.
- Launch an Internet browser (Internet Explorer,
Netscape Navigator or Mozilla Firefox) on your
computer.
- Enter the address
The Hercules website’s home page should be
displayed.
www.hercules.com.
If your ADSL connection is working properly:
It is now time for you to learn how to master your WiFi network (please refer to chapter 3.5. Mastering your
WiFi network at your fingertips).
Do not disconnect your Ethernet cable just yet; since your WiFi network has not yet been created, you
will still need the cable to communicate with your Modem Router.
90/113 – User Manual
Page 91

HWGADSL2P-54V2 AnnexA Hercules ADSL2/2+ Wireless G Modem Router
5.2.2. Reconnecting
If you have previously disconnected (by clicking the Disconnect button in the WiFi Manager interface), since
you did not plan on using your Internet connection for a certain length of time, you can reconnect at any time
(by clicking the Connect button) and access websites on the Internet again.
You can only store one ISP configuration in the Hercules Modem Router.
ENGLISH FRANÇAIS DEUTSCH
User Manual – 91/113
ESPAÑOL NEDERLANDS ITALIANO
Page 92

Hercules ADSL2/2+ Wireless G Modem Router HWGADSL2P-54V2 AnnexA
6. WIFI MANAGER FOR ADVANCED USERS
WiFi Manager has been designed to respond to the needs of the widest cross-section of the public. Thus,
after having explained the most useful functionalities in the previous chapters, we dedicate this chapter to
users who wish to take advantage of the subtleties of WiFi, and explore their Modem Router’s more advanced
functionalities. But be careful! Modifying certain settings may have a negative impact on the proper
functioning of your network, and therefore on your Modem Router. You should bear in mind, however, that
nothing is irreversible, and that you can always return to the original configuration or reload a personalized
configuration.
6.1. Configuring your WiFi network’s advanced options
This window contains the settings which affect the functioning of your Hercules Modem Router. If you
do not know their functions, we recommend that you keep the default settings.
- In the Your WiFi connection parameters window,
click the Advanced WiFi options button located in
the lower left-hand corner of the window.
- If you do not want the network to broadcast its
name, tick the Hide your network name (SSID)
box.
The SSID is hidden, and the network name is not
displayed during detection by a WiFi client (the
Network name (SSID) field is blank in Hercules WiFi
Station, for example).
Make sure that you do not lose or forget this name,
as you will need it to connect your WiFi devices.
- Select the WiFi mode to be used by your Modem
Router: Mixed, B only or G only.
If you select B only, 802.11 G devices will not be
able to connect.
If you select G only, 802.11 B devices will not be
able to connect.
If you select Mixed, 802.11 B and G devices will be
able to connect.
- The Beacon Period allows you to define the
wireless network detection interval.
- When an RTS threshold is defined, the wireless
device asks the
transmit data, thereby avoiding data arriving
simultaneously (risk of collision).
access point for authorization to
92/113 – User Manual
Modifying the RTS threshold may affect your
Modem Router’s performance.
Page 93
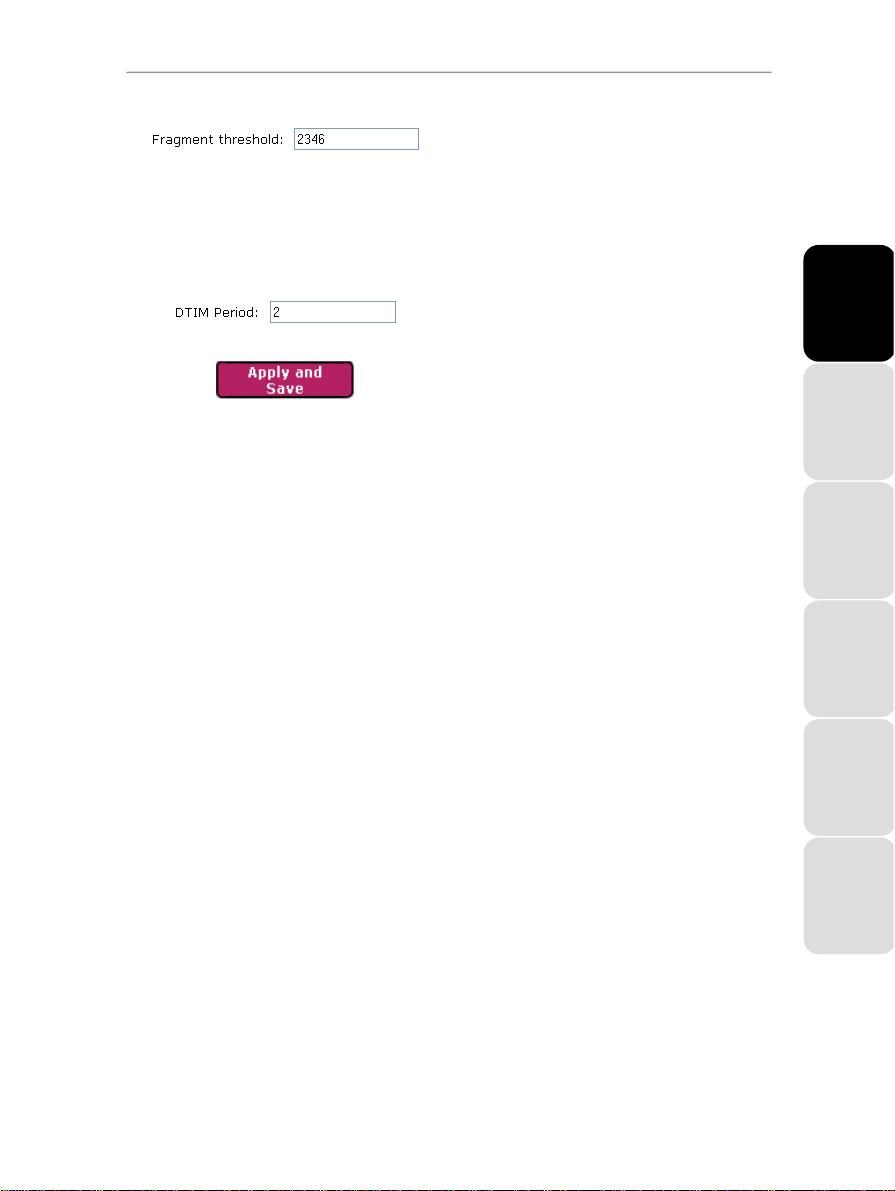
HWGADSL2P-54V2 AnnexA Hercules ADSL2/2+ Wireless G Modem Router
- The Fragment threshold consists of defining the
size in which data packets are fragmented. If the
size is less than the predefined amount, the packet
is not fragmented. By contrast, if the size is greater,
the packet is fragmented before being transmitted,
then reconstituted at the access point.
Fragmentation lets you improve the success of
transmissions.
- The DTIM Period corresponds to the
interval between two synchronous frames containing
information on the transmission messages.
- Click OK, then Apply and Save to validate and
save your settings.
The
access point restarts. All computers or
devices connected via WiFi are disconnected. The
ADSL connection, however, remains active.
ENGLISH FRANÇAIS DEUTSCH
User Manual – 93/113
ESPAÑOL NEDERLANDS ITALIANO
Page 94

Hercules ADSL2/2+ Wireless G Modem Router HWGADSL2P-54V2 AnnexA
6.2. Configuring your Internet firewall
In this chapter, you will learn how to lower certain defenses in order to authorize access to your computers for
specific Internet services (P2P, web/FTP servers…), or shore up other defenses to limit access on a specific
computer to certain Internet services.
6.2.1. Opening doors in your firewall for certain Internet services
If you would like for your computers to be able to either provide specific Internet services (P2P, web/FTP
servers…), or access specific services, you will have to open up mini-drawbridges (referred to as ports) in
your firewall using port forwarding.
To authorize one or more of your computers for specific Internet services:
- On the Home page, select Your Internet
firewall parameters.
- Click the Port Forwarding button.
- Select your computer in the drop-down list.
This list sums up all network devices (Ethernet or
wireless) currently connected to your network
(with their host name and the IP address
assigned to them).
To view or modify a rule:
94/113 – User Manual
The computer that you wish to authorize for
a service must be connected to the network.
- Select the type of service provided.
- Select the rule to apply (or create the rule
yourself: in this case, please refer to the To
create a new rule section, coming up).
- Click the Apply button.
The selected rule is added to the list of rules
applied.
- Click the Apply and Save button to validate
your settings.
- Select the type of service in the Port
Forwarding window.
Page 95

HWGADSL2P-54V2 AnnexA Hercules ADSL2/2+ Wireless G Modem Router
- Select the rule to view or modify.
This list sums up all available rules.
- Click the View/Modify the rule button.
If you have selected a rule created by WiFi Manager :
You can only view this rule; you are not able to
modify it.
If you have selected a rule created manually:
The editing window (opposite) is displayed.
- Select the Protocol (TCP, UDP or TCP/UDP).
- Enter a value in the Start port, End port and
Computer’s internal port fields (between 1 and
65536).
ENGLISH FRANÇAIS DEUTSCH
If you only open one port, the Start port and the
End port (external ports) have the same value.
The Computer’s internal port corresponds to
the port used by the service provided by the
computer and is generally equal to the Start
port.
- Click the Add button to validate the range and
display it in the table, opposite.
- Repeat this procedure for each range of ports
you wish to add.
- To remove a range, click the in the
Remove column next to the range in question.
- Once you have finished modifying the settings
for the new rule, click Apply and Save.
The new rule is stored in the Type of service
provided category, under the name New.
- If you wish to remove this rule from the list of
rules to be applied, click the Remove this rule
button.
User Manual – 95/113
ESPAÑOL NEDERLANDS ITALIANO
Page 96

Hercules ADSL2/2+ Wireless G Modem Router HWGADSL2P-54V2 AnnexA
To create a new rule:
- In the Port Forwarding window, click the
Create anew rule button.
The editing window (opposite) is displayed.
- Enter a name for the rule.
- Select the Protocol (TCP, UDP or TCP/UDP).
- Enter a value in the Start port, End port and
Computer’s internal port fields (between 1 and
65536).
If you only open one port, the Start port and the
End port (external ports) have the same value.
The Computer’s internal port is generally
equal to the Start port.
- Click the Add button to validate the range and
display it in the table, opposite.
- Repeat this procedure for each range of ports
you wish to add.
- To remove a range, click the in the
Remove column next to the range in question.
- Once you have finished modifying the settings
for the new rule, click Apply and Save.
The new rule is stored in the Type of service
provided category, under the name New.
96/113 – User Manual
Page 97

HWGADSL2P-54V2 AnnexA Hercules ADSL2/2+ Wireless G Modem Router
To no longer apply a rule to a computer:
- Select your computer.
- In the Rules applied to the selected computer
table, select the rule to be removed.
- Click the Remove from the list button.
- Once you have finished, click the Apply and
Save button to validate your settings.
6.2.2. Limiting access of one of your network computers to Internet services
By default, the computers are able to access all Internet services. If you wish to limit access on one specific
computer to certain Internet services, however (Internet access, Peer to Peer sites…), you can use the IP
address filtering system.
To limit access on a specific computer to an Internet service:
- On the Home page, select Your Internet firewall
parameters.
- Click the IP Filtering button.
- Select your computer in the drop-down list.
This list sums up all network devices (Ethernet or
wireless) currently connected to your network (with
their host name and the IP address assigned to
them).
The computer on which you wish to limit
access must be connected to the network.
- Select the type of service provided.
- Select the rule to apply (or create the rule
yourself: in this case, please refer to the To create
a new rule section, coming up).
- Click the Apply button.
The selected rule is added to the list of rules
applied.
- Click the Apply and Save button to validate your
settings.
ENGLISH FRANÇAIS DEUTSCH
ESPAÑOL NEDERLANDS ITALIANO
User Manual – 97/113
Page 98

Hercules ADSL2/2+ Wireless G Modem Router HWGADSL2P-54V2 AnnexA
To view or modify a rule:
- Select the type of service in the IP Filtering
window.
- Select the rule to view or modify.
This list sums up all available rules.
- Click the View/Modify the rule button.
If you have selected a rule created by WiFi Manager :
You can only view this rule; you are not able to
modify it.
If you have selected a rule created manually:
The editing window (opposite) is displayed.
- Select the Protocol (TCP, UDP or TCP/UDP).
- Enter a value in the Start port and End port
fields (between 1 and 65536).
If you only open one port, the Start port and the
End port (external ports) have the same value.
98/113 – User Manual
- Click the Add button to validate the range and
display it in the table, opposite.
- Repeat this procedure for each range of ports you
wish to add.
- To remove a range, click the in the Remove
column next to the range in question.
- Once you have finished modifying the settings for
the new rule, click Apply and Save.
The new rule is stored in the Type of service
provided category, under the name New.
- If you wish to remove this rule from the list of
rules to be applied, click the Remove this rule
button.
Page 99

HWGADSL2P-54V2 AnnexA Hercules ADSL2/2+ Wireless G Modem Router
To create a new rule:
- In the IP Fi ltering window, click the Create a
new rule button.
The editing window (opposite) is displayed.
- Enter a name for the rule.
- Select the Protocol (TCP, UDP or TCP/UDP).
- Enter a value in the Start port and End port
fields.
If you only open one port, the Start port and the
End port (external ports) have the same value.
- Click the Add button to validate the range and
display it in the table, opposite.
- Repeat this procedure for each range of ports
you wish to add.
- To remove a range, click the in the Remove
column next to the range in question.
- Once you have defined the settings for the new
rule, click Apply and Save.
The new rule is stored in the Type of service
provided category, under the name New.
ENGLISH FRANÇAIS DEUTSCH
To no longer apply a rule to a computer:
- Select your computer.
- In the Rules applied to the selected
computer table, select the rule to be removed.
- Click the Remove from the list button.
- Once you have finished, click the Apply and
Save button to validate your settings.
User Manual – 99/113
ESPAÑOL NEDERLANDS ITALIANO
Page 100
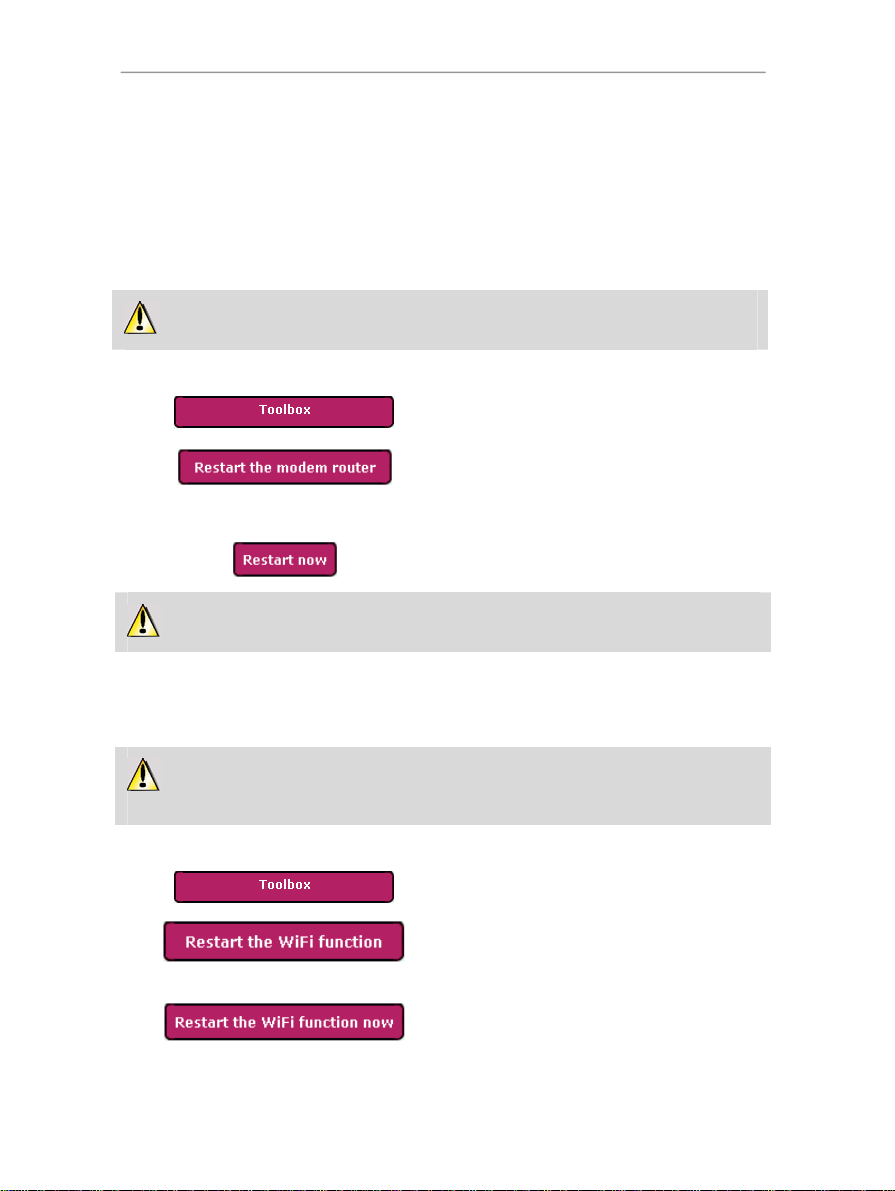
Hercules ADSL2/2+ Wireless G Modem Router HWGADSL2P-54V2 AnnexA
6.3. A toolbox with multiple facets
WiFi Manager functions as a toolbox which can help you to correct any mistakes you might make.
6.3.1. Restarting the Hercules Modem Router
The Restart the Modem Router function cuts off all of the Hercules Modem Router’s functions (WiFi and
ADSL connection, firewall, router) and restarts WiFi Manager.
All computers or devices connected via WiFi or Ethernet will be disconnected.
To restart the Modem Router:
- On the Home page, click the Toolbox button.
- Select Restart the Modem Router.
An explanatory text details the function of this
button.
- Click the Restart now button.
The Modem Router restarts with the last settings saved. No data is lost.
6.3.2. Restarting the WiFi function
If your WiFi devices are having trouble connecting to the Modem Router, you can use the Restart the WiFi
function option.
All computers or devices connected via WiFi will be disconnected. The ADSL connection, however,
remains active.
To restart the WiFi function:
- On the Home page, click the Toolbox button.
- Select Restart the WiFi function.
An explanatory text details the function of this
button.
- Click the Restart the WiFi function now button.
100/113 – User Manual
 Loading...