

Page 1
Thank you for purchasing the HERCULES 'TabGrab' tablet holder! The product
you are about to use was designed by musicians for musicians, to provide the
best options for using your tablet in performance or wherever you want!
この度は、HERCULES "TabGrab" タブレット・ホルダーをお買い上げ頂きまして誠に有難うございます。 "TabGrab" は、
演奏者のために演奏家がデザインしたタブレット PC 専用のホルダーです。"TabGrab" は、マイクスタンド等に取り付
け、タブレット PC を好みの角度に設定することで、ディスプレイも見易く、タッチパネルの操作も容易になります。
"TabGrab" を、正しく安全にご使用頂くために、ご使用の前にこの取扱い説明書を必ずお読み下さい。
USING YOUR TABLET HOLDER WITH A STAND
1. Put the yellow ring (note: cutaway side facing upward) through the
universal ball joint. Insert the ball joint into the socket of clamp and
loosely screw the ring on.
1. Bewegen Sie den gelben Ring (Achtung: Gewindeseite nach oben)
durch das Universal-Kugelgelenk. Schieben Sie das Kugelgelenk in
die Klemmhülse und schrauben Sie den Ring locker an.
1. Enclencher l’anneau jaune (face coupée orientée vers le haut) dans la
boule pivotante. Visser le bras d’attache sur la boule pivotante sans
trop serrer.
1. Coloque el anillo amarillo (con la pestaña hacia abajo) sobre la bola.
Inserte la bola en el brazo y enrosque el anillo.
1. Fissare l'anello giallo (nota: il lato tagliato va rivolto verso l'alto) al
giunto sferico universale. Inserire il giunto sferico nell'apposito alloggiamento del sistema di aggancio e avvitare l'anello
su di esso.
1.
黄色いリングをジョイントボールに通します。この場合、黄色いリングの突起部が上を向くようにして下さい。クラ
ンプをボール式ジョイントにはめ込み、黄色いリングを締めます。
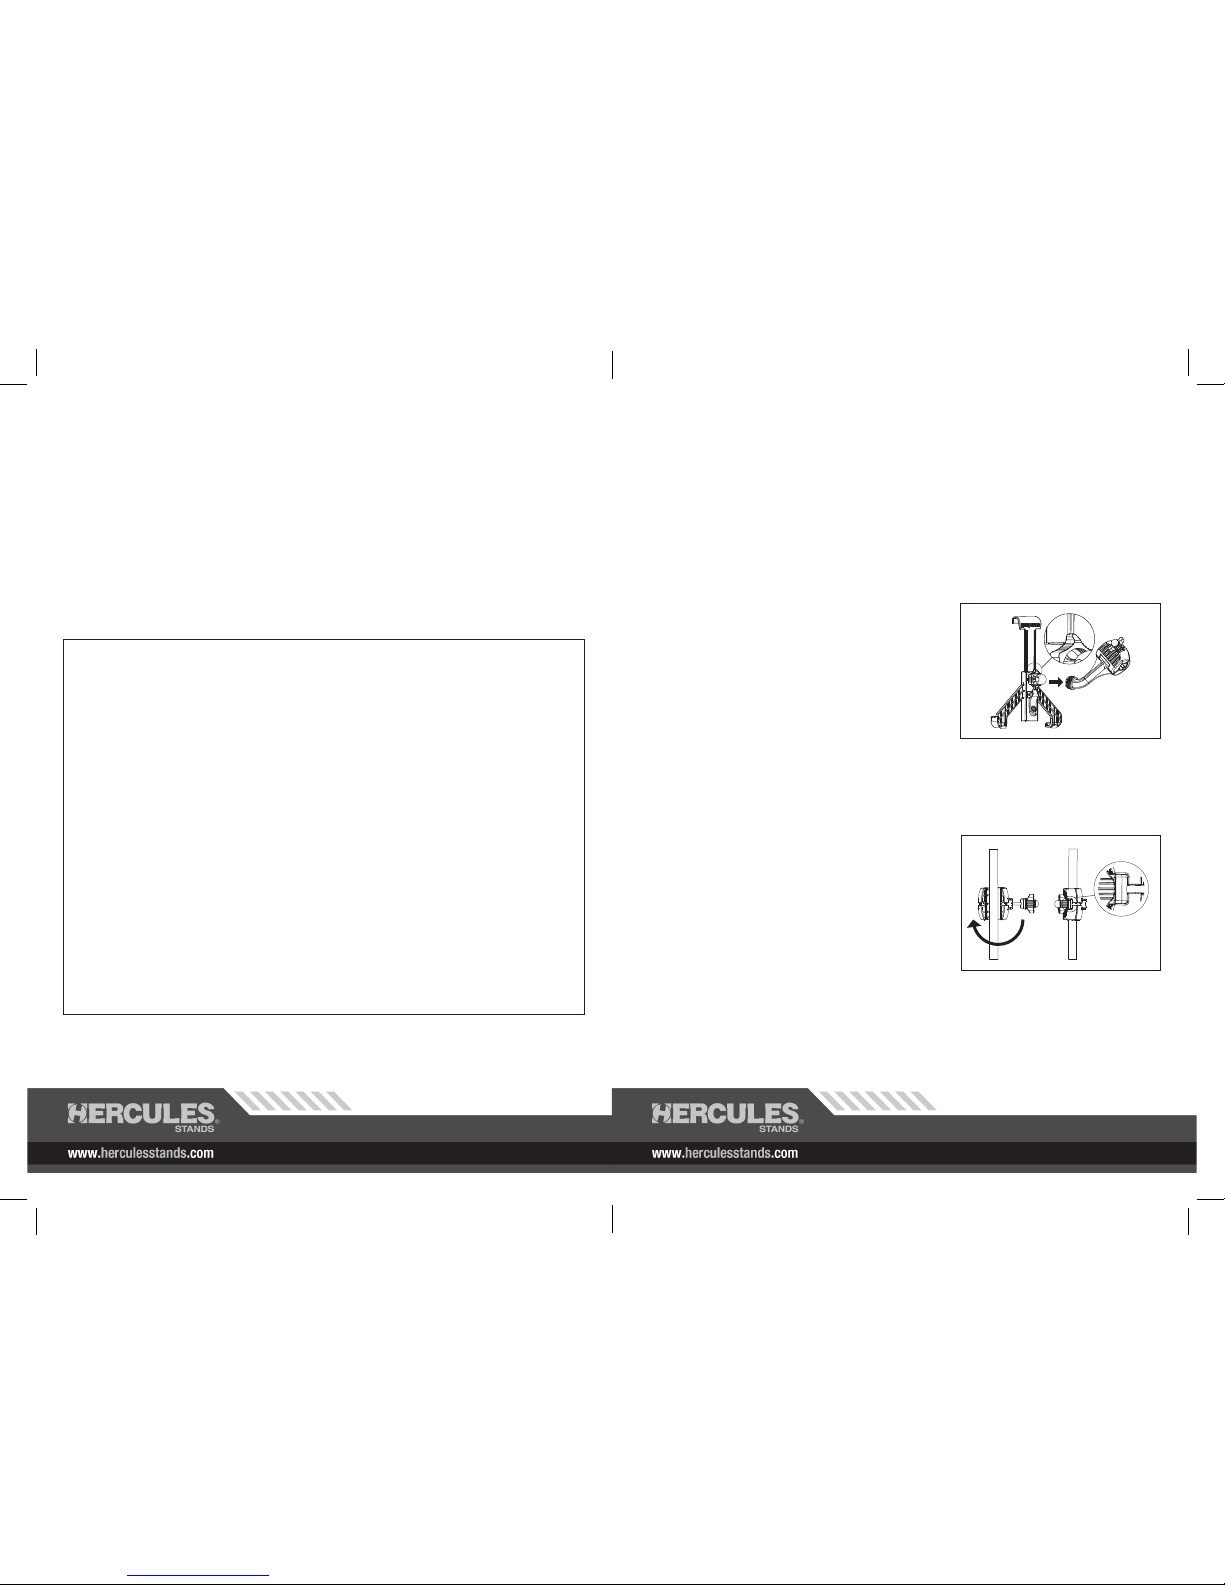
2. Open the clamp by loosening the knob, clip the clamp onto the stand,
and place the tightening cube (illustration 1) in its slot to securely
tighten the knob.
2. Öffnen Sie die Klemme durch Lösen der Flügelschraube und klemmen
Sie den Halter an das Rohr (für eckige Rohre bitte zuerst das
innere Formteil entfernen). Platzieren Sie den Befestigungswürfel
(Abb. 1) in der dafür vorgesehenen Aussparung und ziehen Sie die
Flügelschraube vorsichtig fest.
2. Ouvrir la pince en dévissant la molette, placer la pince autour de votre
support (si vous voulez l'adapter sur un tube carré, merci de bien
vouloir enlever la capsule intérieure). Placer le joint devant la molette
de manière à pouvoir la resserrer.
2. Abra el brazo soltando la tuerca, ajústelo en el soporte (si desea usarlo en un tubo cuadrado, extraiga la pieza interior)
y coloque el cubo de ajuste (dibujo 1) en su ranura para enroscar la tuerca.
2. Aprire il gancio allentando la manopola, agganciare il gancio al supporto (se si vuole agganciarlo a un tubo a sezione
quadrata, rimuovere prima la parte interna del gancio), quindi posizionare il cubo di ssaggio (illustrazione 1)
nell'apposito alloggiamento e stringere nuovamente la manopola.
2. ウイング型ノブを緩めクランプを開きます。クランプをマイクスタンド等のパイプ部分に挟み込みます。ノブを調整
し、固定キューブ ( 拡大図 1) と共に向い側のクランプの溝にはめ込んで締めつけます。(四角いパイプに取り付けを
する場合、あらかじめクランプ部のインナーキャップを取り外して下さい)
1
HA300 TABLET HOLDER USER MANUAL
• Questo prodotto è stato specicatamente progettato per i tablet! Non cercate di utilizzare altri oggetti! Capacità di catico:
2kg (4.4 lbs).
• Assicuratevi di disporre i due supporti a “L” rivolti verso il basso (nella stessa direzione del logo HERCULES), in
particolare quando ssate il tablet o lo rimuovete, per evitare scivolamenti dello stesso quanto la leva di ssaggio è
sbloccata.
• Assicuratevi che i bracci di ssaggiotengano saldamente il tablet in posizione e che il peso sia ben distribuito.
•
この製品は、タブレット PC 専用にデザインされています。特に、自重2kg 以上のものには適していません。
•
この製品は、2又の L 型サポートが下になり "HERCULES" のロゴマークが水平になるように使用することをお勧めしま
す。特に、ホルダー裏側のロック・レバーを開いた場合、タブレット PC は滑り落ちます。
•
タブレット PC が L 型サポートに確実に納まって入ることを常に確認して下さい。また設定された角度によっては不安
定になることも十分に考慮して下さい。
USA Patent Appl. No. # 13/281488
Germany Patent # 20 2011 051 755.1
HERCULES 製品を安全にご使用いただくための注意事項
この製品を安全に使用していただくために、下記事項を守ってください。
楽器用およびマイク用のスタンド、そして譜面台などを総称してスタンドと呼びます。
注意/警告
•
これらのスタンドは、重量バランスが片寄ると倒れることがあります。このことが原因で、怪我をしないよう十分
注意してご使用ください。また、これらのスタンドは基本的に水平な場所で使用することを前提にデザインされて
いますので、水平な場所でご使用下さい。
•
これらのスタンドは、取り付け部分が、しっかり固定されていることを確認してください。このことが原因とな
って、楽器などが外れて落ちたりすることで、怪我をしたり楽器などを破損しないよう十分注意してご使用くださ
い。
•
これらのスタンドは調整用のネジが多用されています。全ての機能が正しく調整されていない場合、倒れたりす
ることがあります。このことが原因となって、怪我をしたり楽器などを破損しないよう十分注意してご使用くださ
い。
•
これらのスタンドは、部分的に鋭利な場所があります。このことが原因となって、怪我をしたり楽器などを破損し
ないよう十分注意してご使用ください。
•
これらのスタンドを調整する場合に、調整用のネジなどで指を挟むなど、怪我をしないように十分注意して作業を
行ってください。
•
これらのスタンドを長期間使用しない場合は、汚れを拭き取った後、乾燥した場所に収納してください。湿度の高
い状態で保管すると、腐食が発生する場合があります。万一これらが口に入るなどすると、健康を害することがあ
ります。
•
これらのスタンドの化学合成質の部分は、熱により変化する場合があります。暖房機器など熱の発生する場所での
使用は避けて下さい。
•
これらのスタンドの化学合成質の部分は、他の化学合成質のものや塗料などと接触し続けると化学変化をする場合
があります。充分確かめてご使用下さい。
Page 2
2. Follow the same above step 3 and 4. (Left page)
2. Fahren Sie fort wie Schritt 3 und 4 oben.
2. Suivre les mêmes étapes 3 et 4 que ci-dessus.
2. Siga los mismos pasos 3 y 4 del apartado anterior.
2. Seguire i punti 3 e 4 descritti sopra.
2. 前項の3と4を参照して、タブレット PC を固定します。
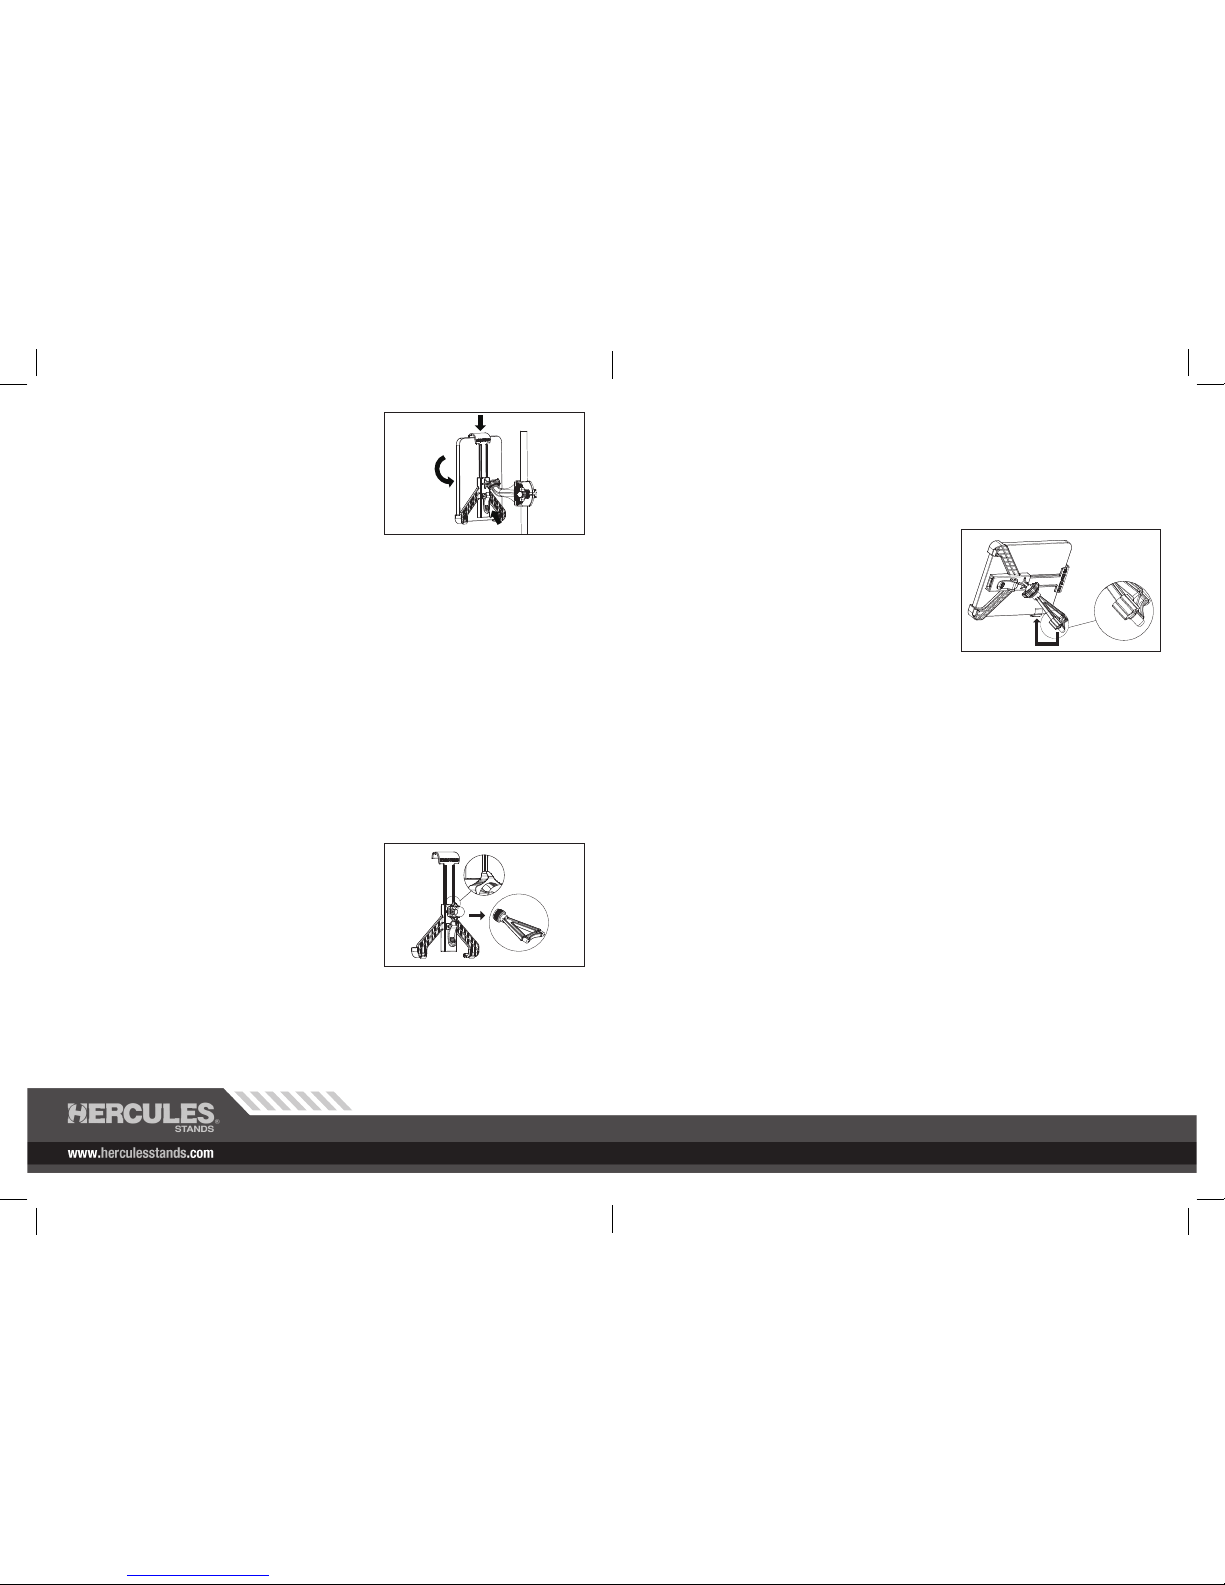
3. If you want to use landscape mode, please use the small rubber clip
provided that attaches on the table support (illustration 3) to evenly
support the tablet.
3. Falls Sie den Landscape Modus benutzen möchten, verwenden Sie
bitte den kleinen mitgelieferten Gummiclip (Abbildung 3), der an der
Tischauage befestigt wird um das Tablett gleichmäßig zu stützen.
3. Pour l’utiliser en mode paysage, utiliser les petits clips fournis en les
attachant à la tablette.
3. Si desea usarlo de modo horizontal, utilice el tope de caucho del
lateral de la base (dibujo 3) para apoyarlo en la mesa.
3. Se si vuole utilizzare il tablet in modalità landscape, servirsi
dell'apposita clip piccola in gomma fornita in dotazione (gura 3) che si ssa al tupporto da tavolo consentendone l'uso
orizzontale.
3. タブレット PC を横向きで使用する場合、付属のラバークリップ ( 拡大図 3) を使用して下さい。
CAUTION
• The product is specially designed to hold tablets ONLY. Please do not place other objects into the Tablet Holder! Load
capacity is 2kg (4.4 lbs).
• Always put 2 “L” support side down (same direction as HERCULES logo), especially when tting and removing the
tablet, to prevent the tablet unexpectedly sliding out when the back lever is released.
• Make sure the support arms securely cradle the tablet in either landscape or portrait position and that weight is balanced
to avoid tipping.
• Das Produkt ist speziell und NUR für Tabletts konzipiert. Bitte lagern Sie andere Gegenstände nicht auf dem Tablet
Holder! Die Ladekapazität beträgt 2 kg.
• Nehmen Sie Einstellungen des Tablet Holders immer im Portrait Modus vor (HERCULES Logo rückseitig lesbar),
besonders wenn Sie das Tablet anpassen oder entfernen, damit das Tablet nicht unerwartet herausrutscht wenn der
Hebel entriegelt wird.
• Stellen Sie sicher, dass die Stützarme das Tablet sowohl in Landscape oder Portrait Stellung sicher umfassen und dass
das Gewicht ausbalanciert ist, um ein Kippen zu verhindern.
• Le produit est spécialement conçu pour des tablettes EXCLUSIVEMENT. Merci de ne pas l’utiliser pour d’autres
produits! Capacité de 2kg.
• Toujours mettre les 2 supports “L” vers le bas (même direction que le logo HERCULES) spécialement lors du montage
et du retrait de la tablette pour empêcher le glissement de celle-ci quand le levier est libéré.
• Assurez-vous que la tablette est bien retenue au fond des bras dans les positions portrait et paysage et que le poids est
équilibré pour éviter tout basculement.
• El producto está diseñado EXCLUSIVAMENTE para tablets. ¡No coloque otro tipo de objetos! La capacidad de carga es
de 2 Kg. (4,4 Lbs.)
• Coloque siempre los dos soportes en “L” hacia abajo (en la misma dirección que el logo de HERCULES), especialmente
cuando coloque y quite el tablet para prevenir deslizamientos cuando la palanca trasera esté suelta.
• Asegúrese de que los brazos sujetan el tablet en cualquier posición y de que el peso esté equilibrado para evitar
cualquier inclinación.
3. Release the locking lever on the back side of the tablet supports,
adjust them to t your tablet securely and then lock the lever.
3. Lösen Sie den Verriegelungshebel auf der Rückseite des Tablet
Support, passen Sie diesen Ihrem Tablet PC sicher an und verriegeln
Sie dann den Hebel.
3. Relacher le levier à l’arrière du support tablette, l’ajuster aux
dimensions de la tablette et verrouiller le levier.
3. Suelte la palanca del lado trasero del soporte, ajústelo para sujetar su
tablet y coloque de nuevo la palanca.
3. Rilasciare la leva di bloccaggio sul lato posteriore del supporto,
regolare il supporto stesso in base alle dimensioni del tablet e
bloccare nuovamente la leva.
3. タブレット・ホルダー裏側のロック・レバーを開くことで、スライド式サポートが稼動できます。タブレット PC を挟
み込み、レバーを閉じることでロックします。
4. Now you can adjust the holder to the best position for your needs. Make sure to loosen the yellow ring every time
before adjusting the angle. Likewise, always tighten the ring after adjusting.
4. Jetzt können Sie den Holder für Sie passend einstellen. Lockern Sie den gelben Ring jedes Mal bevor Sie den Winkel
einstellen. Ziehen Sie den Ring ebenfalls immer nach dem Einstellen fest.
4. Vous pouvez maintenant ajuster le support à la position que vous désirez. Assurez-vous de bien deserrer l’anneau
jaune à chaque fois avant d’ajuster l’angle. De la même façon, assurez-vous de bien reserrer l’anneau après avoir
positionné le support.
4. Ya puede ajustar su soporte en la posición que desee. Asegúrese de soltar el anillo amarillo cada vez que necesite
ajustar el ángulo. Siempre enrosque el anillo después de ajustarlo.
4. Ora è possibile regolare il supporto per fargli assumere l'angolazione desiderata. Assicuratevi di allentare l'anello
giallo prima di regolare l'angolazione. Allo stesso modo, accertatevi di stringerlo nuovamente, una volta raggiunta la
posizione ideale.
4. タブレット PC の角度を再調整します。角度を変える時は黄色いリングを緩めてから行って下さい。また、角度調整後
は再度リングを締めて固定して下さい。
USING YOUR TABLET HOLDER ON A TABLE
1. Keep the yellow ring on the universal ball joint. Insert the joint into the
socket of the triangle table support (illustration 2) and loosely screw
the ring on.
1. Den gelben Ring am Universal-Kugelgelenk belassen. Schieben Sie
nun das Gelenk in die Hülse der dreieckigen Tischauage (Abbildung
2) und schrauben Sie den Ring locker an.
1. Garder l’anneau jaune sur la boule pivotante. Visser sans trop serrer
le bras au niveau du joint.
1. Mantenga el anillo amarillo en la bola. Insértelo en el soporte
triangular para mesa (dibujo 2) y suelte el anillo desenroscándolo.
1. Mantenere l'anello giallo agganciato al giunto sferico.
1. 黄色いリングをジョイントボールに通します。この場合、黄色いリングの突起部が上を向くようにして下さい。テー
ブル・サポート ( 拡大図 2) をボール式ジョイントにはめ込み、黄色いリングを締めます。
3
2
 Loading...