

Page 1

Model OFE- 290
SECTION 3. OPERA TION
3-1. OPERA TING COMPONENTS
POWER/PUMP Switch A three way switch with center OFF position; move the switch to
the position marked POWER to operate the fryer; move the switch
to the position marked PUMP to operate the filter pump; certain
conditions must be met prior to operation of the filter pump; these
conditions are covered later in this section
Frypot This reservoir holds the cooking shortening, and is designed to
accommodate the heat exchanger, 6 head of product and an
adequate cold zone for collection of cracklings
Carrier This stainless steel carrier consists of five racks which contain
the food product during and after frying
Drain V alve A two-way ball valve, normally in the closed position; turn the
handle to drain the shortening from the frypot into the filter drain
pan
Drain Interlock Switch A microswitch that provides protection for the frypot in the event an
operator inadvertently drains the shortening from the frypot while
the main switch is in the POWER position; the switch is designed to
automatically shut off the heat when the drain valve is opened
Shortening Mixing System A shortening mixing capability to help ensure shortening is properly
mixed to prevent an accumulation of moisture and hence boiling
action in the pot; the filter pump is activated by the controls, at
preset intervals, to mix the shortening
Lid Latch A mechanical catch on the front of the lid which engages a bracket
on the front of the frypot, when lid is lowered
Air V alve Pumps air into the shortening, periodically , to keep the shortening at
a uniform temperature; this only functions when the unit has been
sitting idle for a period of time, and when heating upfrom a cold
start
403 3-1
Page 2
Model OFE- 290
3-1. OPERA TING COMPONENTS
(Continued)
High Limit This high temperature control senses the temperature of the
shortening; if the temperature of the shortening exceeds
450°F (230°C), this control will open and shut off the heat
to the frypot; when the temperature of the shortening drops
to a safe operation limit, the control must be manually reset by
pressing the red reset button, located under the control panel, in the
right, front of the fryer
Figure 3-1
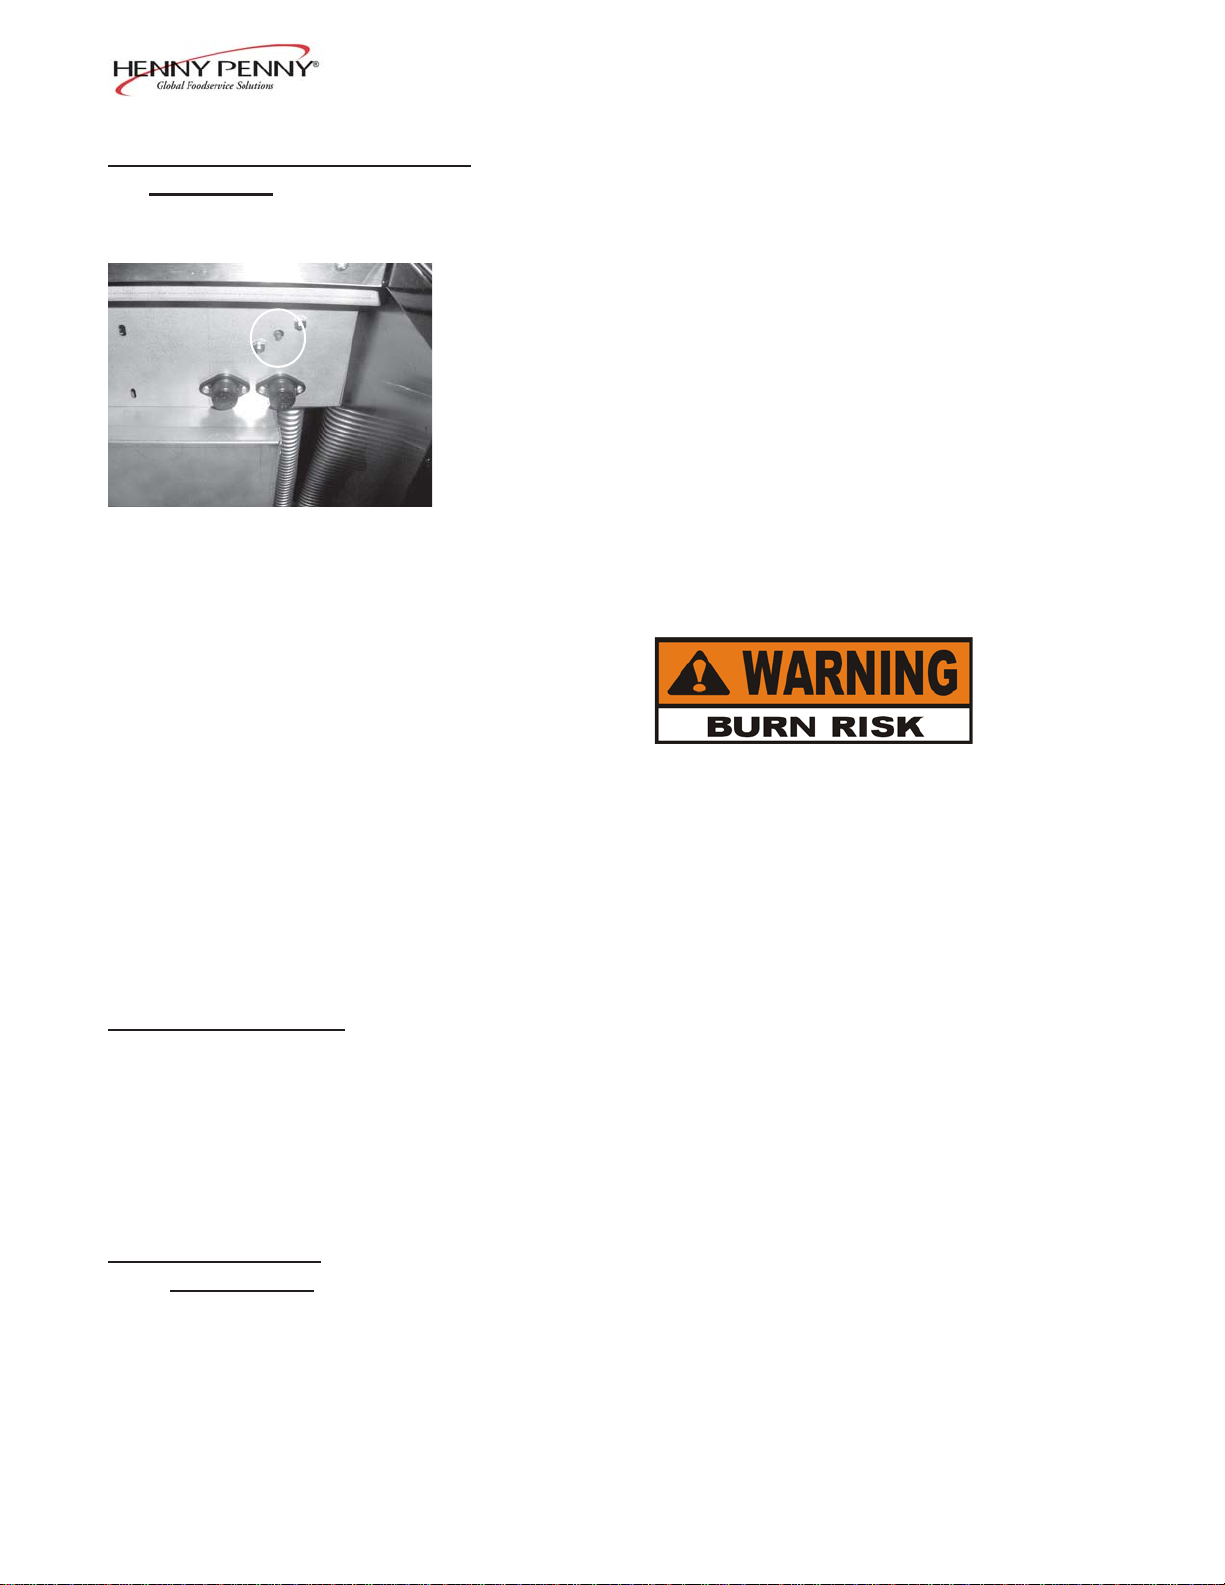
Filter Drain Pan The removable pan that houses the filter and catches the shortening
when it is drained from the frypot; also used to remove anddiscard
old shortening
When hot shortening is in this pan, use extreme care to
avoid burns.
Filter Union Connects the filter to the filter pump, and allows easy removal of the
filter and drain pan
Fuses A protective device which breaks the circuit when the current
exceeds the rated value
3-2. LID OPERA TION T o close lid:
1. Lower the lid until latch comes into contact with the pot.
T o open lid:
1. Unlatch the front lid latch.
2. Lift up on handle to raise lid.
3-3. MEL T CYCLE If the shortening is below 185°F (77°-85°C) with the POWER/
OPERATION PUMP switch in the POWER position, the fryer enters the Melt
Cycle. The shortening is heated slowly to prevent scorching of the
shortening. The heat cycles on and off to ensure slow melting of
shortening. At 185°F (85°C) the heat stays on until the Cool Mode
is reached, which is 250°F (121°C). The controls maintains this
temperature until the COOL button is pressed.
3-2 703
See Filling and Adding Shortening Section.
Page 3

Model OFE- 290
3-4. SWITCHES AND Refer to image at end of this section.
INDICATORS
Product Selection Buttons Select the number of heads, or product, to be cooked by pressing
the button below the menued item; shortening will then heat to
drop temperature of that item
Pressing the same button again begins the Cook Cycle; the display
changes from “DROP” to counting down the cook time in minutes
and seconds
At the end of the Cook Cycle, the alarm sounds and the display
reads “DONE”; press the cycle button that is flashing, to stop the
alarm ; the fryer then resets to the Cool Mode
A Cook Cycle can be aborted at any time by pressing and
holding the product button.
Time/T emperature Display A four digit LED type display which shows the remaining cook time
during Cook Cycles and also the shortening temperature on
demand from the operator
Heat Indicator Illuminates whenever the control calls for heat; when shortening
temperature has been reached, the heat light goes off
HI T emperature Indicator The display reads “HI” if the shortening temperature is 40° F above
the setpoint
Drop Indicator The display reads “DROP” when the shortening has reached
the setpoint temperature (will read “DROP” 2° before setpoint and
4° above setpoint )
Done Indicator The display reads “DONE” at the end of the Cook Cycle
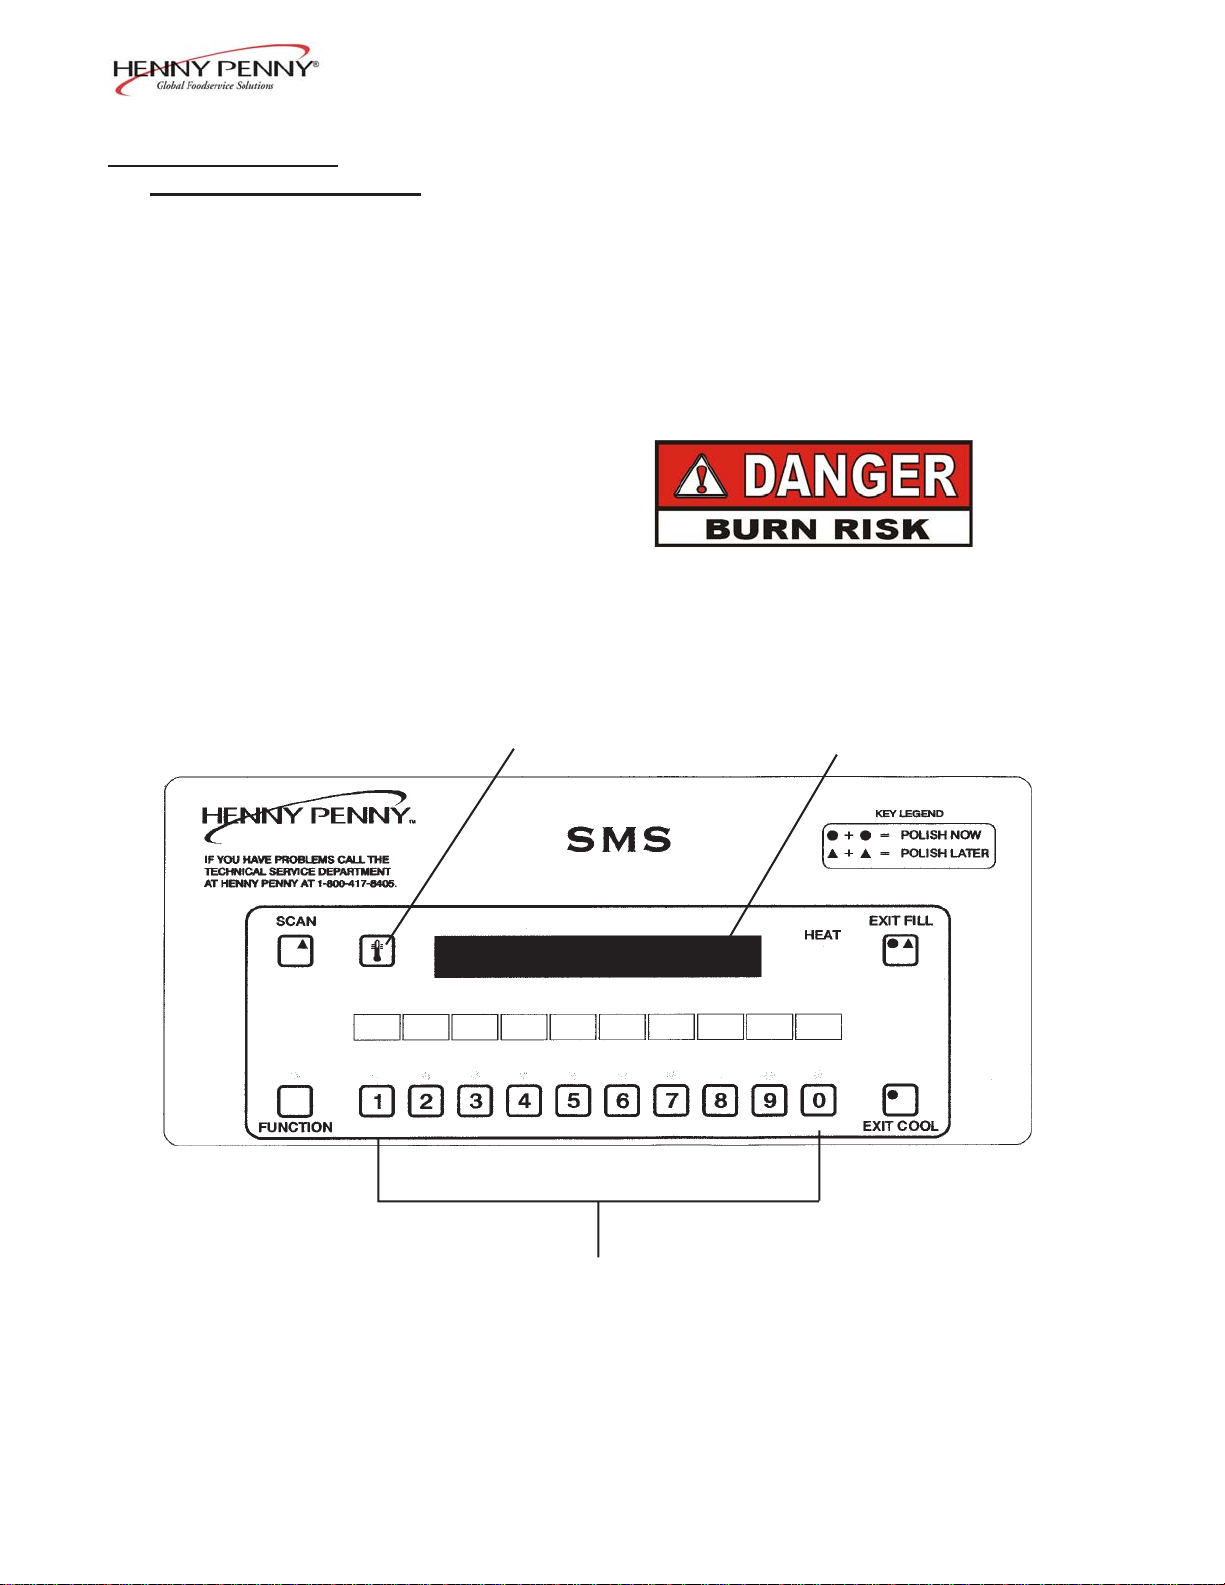
T emperature Button Press this button to read the temperature of the shortening during a
Cook Cycle
SCAN Button Pressing this button toggles through the items being programmed
FUNCTION Button Used in the programming of the controls
EXIT FILL Button After filtering the fryer, if in the filter lockout mode, the display reads
“FILL”, and the EXIT FILL button must be pressed.
504 3-3
Page 4
Model OFE- 290
3-4. SWITCHES AND
INDICATORS Continued)
EXIT COOL Button After cooking, or filtering the shortening, the temperature automati-
cally goes into the Cool Mode, which keeps shortening at a lower
temperature; this temperature extends the shortening life and
minimizes the time to heat the shortening for the next Cook Cycle;
EXIT COOL button must be pressed to heat up to setpoint temperature
AL THOUGH THE DISPLA Y WILL READ “COOL”
DURING THE ST ANDBY MODE, THE SHORTENING IS HOT AND WILL CAUSE BURNS.
TEMPERA TURE BUTTON DIGIT AL DISPLAY
Figure 3-2
3-4 504
Page 5
3-5. FILLING OR ADDING
SHORTENING
Model OFE- 290
The shortening level must always be above the heating
elements when the fryer is heating and at the frypot level
indicators on the rear of the frypot (Figure 3-3). Failure
to follow these instructions could result in a fire and/or
damage to the fryer.
When using solid shortening, it is recommended to melt
the shortening on an outside heating source befor e placing it in the frypots. The burner tubes must be completely
submerged in shortening. Fire or damage to the frypot
could result.
1. It is recommended that a high quality frying shortening
be used in the open fryer . Some low grade shortenings have a
high moisture content and will cause foaming and boiling over .
Figure 3-3
T o avoid severe burns when pouring hot shortening
into frypot, wear gloves and take care to avoid
splashing.
2. The electric model requires 100 lbs. (45 Kg.) of shortening.
The frypot has 2 level indicator lines inscribed on the rear
wall of the frypot which show when the heated shortening is at
the proper level. Figure 3-3.
3. Cold shortening should be filled to the lower indicator .
BE CERT AIN THE SHORTENING IS NEVER
ABOVE THE UPPER LEVEL INDICA TOR LINE.
FAILURE TO FOLLOW THESE INSTRUCTIONS
CAN RESUL T IN SHOR TENING OVERFLOWING
THE FRYPOT CAUSING SERIOUS BURNS, PERSONAL INJUR Y , FIRE AND/OR PROPERTY
DAMAGE.
For complete instructions, refer to KFC’s S tandards Library .
703 3-5
Page 6

Model OFE- 290
3-6. BASIC OPERA TION Follow the procedure below on the initial start-up of the fryer, and
each time the fryer is brought from a cold, or shut down condition,
back into operation. These are basic, general instructions. Be sure
to follow KFC’ s Standards Library when operating the fryer.
1. Make sure the shortening is filled to the proper level in
the frypot; to the lower indicator.
DO NOT OVERLOAD, OR PLACE PRODUCT WITH
EXTREME MOISTURE CONTENT INTO THE
RACKS. 21 LBS. (9.5 KG.) IS THE MAXIMUM
AMOUNT OF PRODUCT PER FRYPOT . FAILURE
TO FOLLOW THESE INSTRUCTIONS CAN RE
SUL T IN SHOR TENING OVERFLOWING THE
FRYPOT WHICH COULD CAUSE SERIOUS
BURNS, PERSONAL INJUR Y , FIRE AND/OR
PROPERTY DAMAGE.
2. Turn the POWER/PUMP switch to the POWER position and
press the appropriate product button to select the amount
of product to be cooked.
3. Stir the shortening as it’ s heating up from a cold start.
Be sure to stir down into the cold zone.
DO NOT STIR THE SHORTENING AT ANY OTHER
TIME EXCEPT A T MORNING ST ART-UP. FAILURE TO FOLLOW THESE INSTRUCTIONS CAN
RESUL T IN SHOR TENING OVERFLOWING THE
FRYPOT WHICH COULD CAUSE SERIOUS
BURNS, PERSONAL INJUR Y , FIRE, AND/OR
PROPERTY DAMAGE.
3-6 703
Page 7

Model OFE- 290
3-6. BASIC OPERA TION 4. Allow fryer to heat until digital display shows “DROP”.
(Continued) (Press the EXIT COOL button if the display shows COOL”)
The heat cycles on and off approximately 10 degrees before
the setpoint temperature, to help prevent overshooting the
setpoint temperature. (proportional control)
5. Slide racks of breaded product into carrier on the lid,
starting with the bottom rack, to prevent damaged product.
Before loading product onto the racks, lower the racks
into the hot shortening to prevent the product sticking to
the racks.
6. Lower and latch the lid down and press the appropriate
product button.
7. At the end of the cycle, an alarm sounds, and the display
shows “DONE”. At this time, press the appropriate product
button.
8. Unlatch and raise the lid cautiously.
9. Using the rack handles, remove the racks of product from
the carrier, starting with the top rack to prevent damaged
product.
703 3-7
Page 8

3-7. CARE OF THE
SHORTENING
Model OFE- 290
FOLLOW THE INSTRUCTIONS BELOW TO A V OID
SHORTENING OVERFLOWING THE FR YPOT ,
WHICH COULD RESUL T IN SERIOUS BURNS,
PERSONAL INJUR Y , FIRE, AND/OR PROPERTY
DAMAGE.
1. T o protect the shortening when the fryer is not in immediate
use, the fryer should be put into the Cool Mode.
2. Frying breaded products requires filtering to keep the
shortening clean. The shortening should be filtered at
least twice a day; after lunch rush and at the end of the day .
3. Maintain the shortening at the proper cooking level. Add
fresh shortening as needed.
4. Do not overload the racks with product (21 lbs. (9.5 kgs.)
maximum), or place product with extreme moisture content
into racks.
WITH PROLONGED USE, THE FLASHPOINT OF
SHORTENING IS REDUCED. DISCARD SHORTENING IF IT SHOWS SIGNS OF EXCESSIVE
SMOKING OR FOAMING. SERIOUS BURNS,
PERSONAL INJUR Y , FIRE, AND/OR PROPERTY
DAMAGE COULD RESUL T .
3-8. FIL TERING The Henny Penny gas 6 head open fryer, Model 290, must be
INSTRUCTIONS cleaned and the shortening must be cleaned and polished at
least twice daily; after lunch rush and at the end of the day .
Refer to KFC’s S tandards Library .
Filter shortening immediately following a Cook Cycle when the
shortening temperature is in the Cool Mode; 250° F
(121° C) or less.
Drain the shortening at 250° F (121° C) or less. The
higher temperatures cause cracklings to burn on the
steel frypot surfaces after the shortening has drained.
3-8 703
Page 9

3-8. FIL TERING
INSTRUCTIONS
(continued)
Model OFE- 290
ONLY FILTER WHEN “COOL” IS DISPLAYED.
FAILURE TO DO SO CAN RESULT IN SHORTENING
OVERFLOWING THE FRYPOT, CAUSING SERIOUS
BURNS, PERSONAL INJURY, FIRE,AND/OR
PROPERTY DAMAGE.
High volume cooking could cause the cold zone to fill quicker with
cracklings and cleaning may be required more often. Part of the process involves removing cracklings from the cold zone of the frypot.
1. Turn POWER/PUMP switch to OFF position.
2. Make sure filter drain pan is under fryer and the filter union
is fastened to the filter standpipe, coming out of the pan.
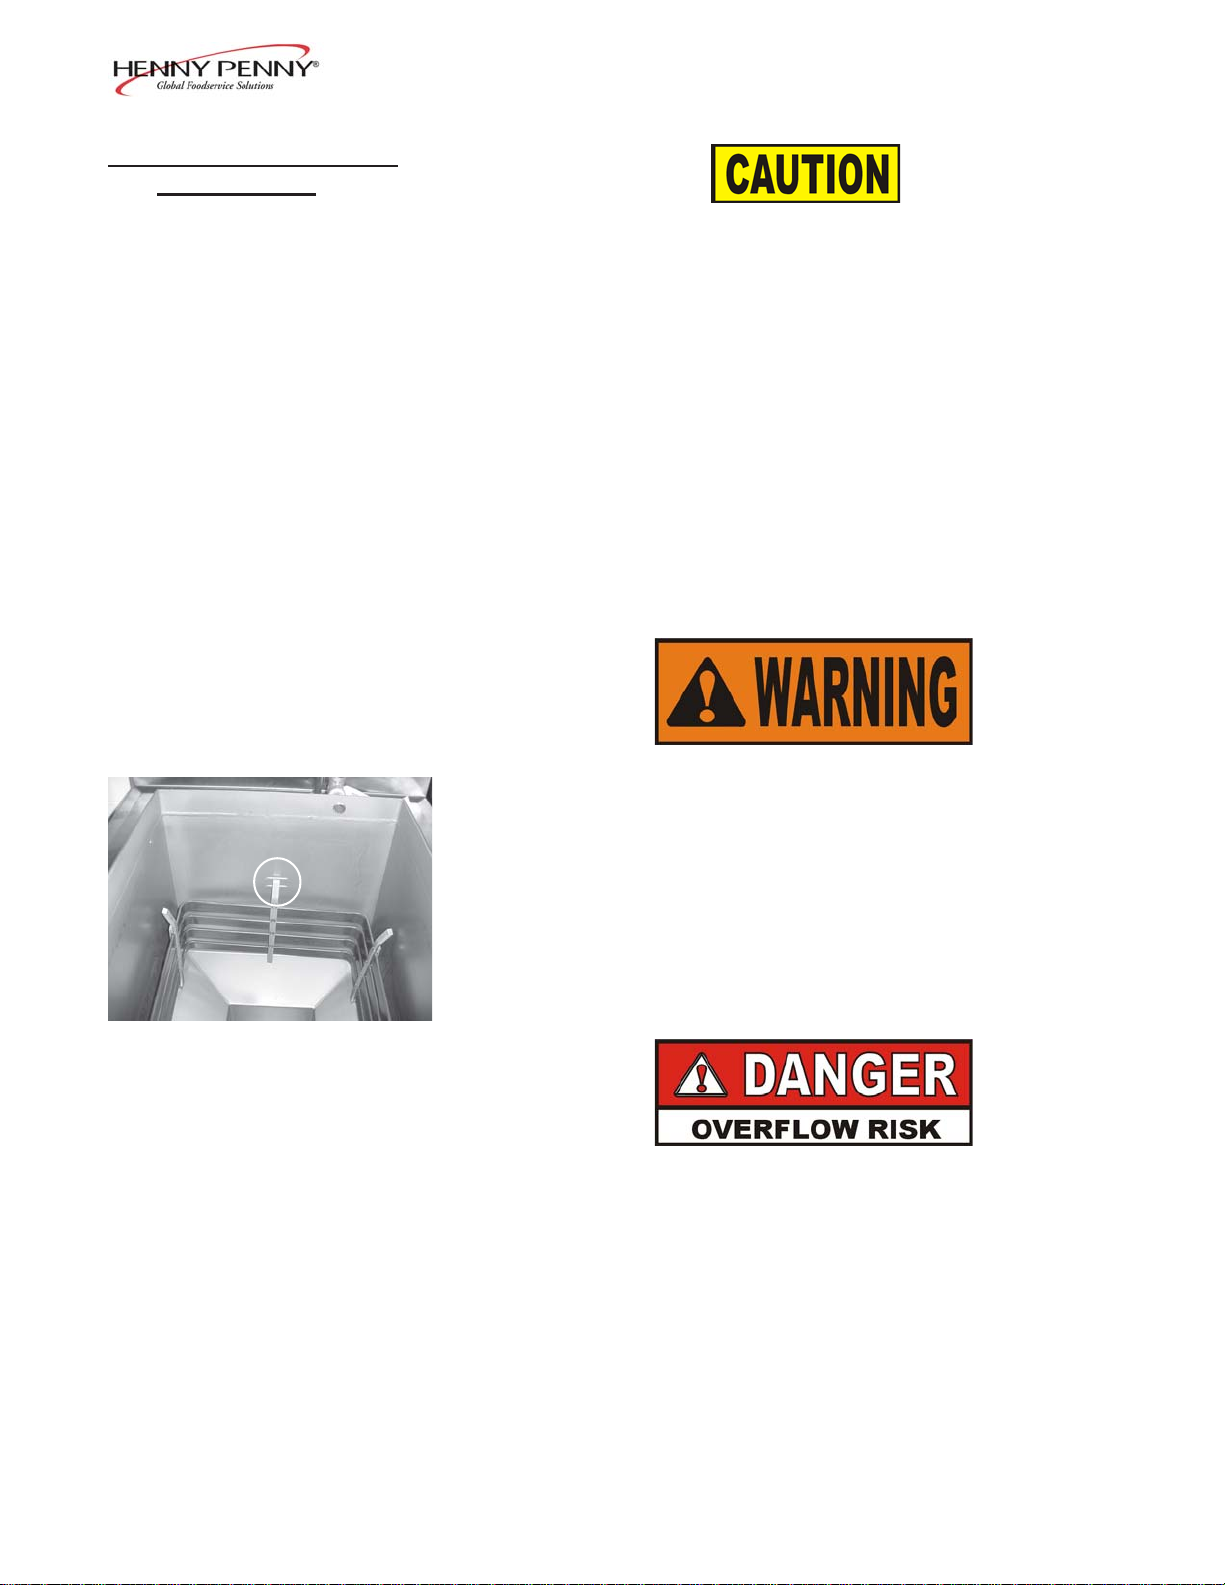
Shortening Stirrer
Drain Cleanout Small White
Rod Brush
The filter drain pan must be as far back under fryer as
it will go, and the cover in place. Be sure the hole in the
cover lines up with the drain before opening the drain.
Failure to follow these instructions causes splashing of
shortening and could result in personal injury.
Surfaces of fryer and racks will be hot. Use care when
filtering to avoid getting burned.
3. Remove cooking racks, carrier and wipe bottom of lid. Tilt
lid out of the way to clean frypot.
4. Pull drain handle towards you to open drain valve. The handle
should point straight out to the front of the fryer. Use large
white brush to clean cracklings from the elements and from
sides and bottom of frypot as shortening drains. Use the drain
cleanout rod to push cracklings through drain opening in bottom
of frypot if necessary . Using the small straight white brush,
clean between the elements and the frypot wall.
BRUSH ALL CRACKLINGS FROM FRYPOT SURFACES AND THE COLD ZONE DURING THE FILTE
TERING PROCESS. FAILURE TO DO SO CAN
RESULT IN SHORTENING OVERFLOWING THE
FRYPOT, WHICH COULD CAUSE SERIOUS BURNS,
PERSONAL INJURY, FIRE AND/OR PROPERTY
403 3-9
DAMAGE.
Page 10

Model OFE- 290
3-8. FIL TERING 5. Scrape cracklings and crackling ring from frypot and discard.
INSTRUCTIONS Do not let cracklings drain into filter drain pan. These crack-
(Continued) lings can cause a burned taste in gravy . Wipe all surfaces with
a clean damp towel. If water drops into cold zone, dry with
towel before pumping shortening back into the frypot.
6. Return drain handle to the closed position to close the drain.
7. Turn POWER/PUMP switch to PUMP , and when all shortening has been pumped into frypot swing drain handle to
the closed position to close the drain.
IF THERE ARE AIR BUBBLES COMING UP IN THE
SHORTENING, IT’S POSSIBLE THA T THE FILTER
CONNECTION A T THE UNION ON THE FILTER
TUBE IS NOT TIGHTENED PROPERL Y. IF SO,
TURN OFF THE PUMP AND USE PROTECTIVE
CLOTH OR GLOVE WHEN TIGHTENING THE
UNION. THIS UNION WILL BE HOT AND SEVERE
BURNS WILL RESULT .
3-9. CHANGING THE FILTER The filter envelope should be changed after 10-12 filterings, or
ENVELOPE whenever it becomes clogged with crumbs. Refer to KFC’s
Standards Library.
Use protective cloth or glove when disconnecting the
filter union or severe burns could result.
If the filter pan is moved while full of shortening, use
care to prevent splashing, or severe burns could result.
Be sure that the filter screens, crumb catcher, filter clips
and the standpipe are thoroughly dry before assembly of
the filter envelope or water will dissolve the filter paper.
3-10 703
Page 11

Model OFE- 290
3-10. CLEANING THE FRYPOT After the initial installation of the fryer, as well as before every
change of shortening, the frypot should be thoroughly cleaned as
follows:
1. Turn the POWER/PUMP switch to OFF positioin, and unplug
unit from wall receptacle.
Moving the fryer or filter drain pan while containing
hot shortening is not recommended. Hot shortening can
splash out and severe burns could result.
The filter drain pan must be as far back under fryer as
it will go, and the cover in place. Be sure the hole in the
cover lines up with the drain before opening the drain.
Failure to follow these instructions causes splashing
of shortening and could result in personal injury .
2. If hot shortening is present in the frypot, it must be
drained by slowly pulling the drain handle out towards you.
3. Close the drain valve and discard the shortening.
4. Raise lid, remove the racks and carrier from lid, and tilt lid
back, so that the lid won’t interfere with cleaning.
5. Refer to KFC’ s Standard’s Library on cleaning instructions.
If the cleaning solution in the frypot starts to foam and
boil over,
immediately turn the POWER Switch to OFF
or damage to components could result.
Do not use steel wool, other abrasive cleaners or cleaners/
sanitizers containing chlorine, bromine, iodine or ammonia
chemicals, as these will deteriorate the stainless steel
material and shorten the life of the unit.
Do not use a water jet (pressure sprayer) to clean the
unit, or component damage could result.
Make sure the inside of the frypot, the drain valve opening,
and all parts that come in contact with the new shortening are
as dry as possible.
703 3-11
Page 12

Model OFE- 290
3-11. FIL TER PUMP MOTOR The filter pump motor is equipped with a manual reset button,
PROTECTOR-MANUAL located on the rear of the motor, in case the motor overheats. If
RESET motor won’t run, wait about 5 minutes before attempting to reset this
protective device to allow motor to cool. Remove the access panel
on the left side panel of the unit to reset the button. It takes some
effort to reset, and a screwdriver can be used to help reset the
button.
To prevent burns caused by splashing shortening, turn
the unit’s main power switch to the OFF position before
resetting the filter pump motor’ s manual r eset
protection device.
3-12. REGULAR MAINTENANCE The Henny Penny open fryer does require care and proper mainte-
nance. The table below provides a summary of scheduled maintenance. The following paragraphs provide step-by-step preventive
maintenance procedures to be performed by the operator .
Procedure Frequency
Filtering of shortening See KFC’s S tandards Library
Changing of shortening See KFC’s S tandards Library
Changing the filter envelope See KFC’s S tandards Library
Cleaning the frypot See KFC’s S tandards Library
Cleaning Nylattrons Monthly-see below
Lubricate lid rollers Annually-see below
3-13. PREVENTIVE Cleaning Nylatrons
MAINTENANCE
1. Spray Henny Penny biodegradable, food safe, foaming
degreaser (part no. 12226) on Nylatrons.
2. Raise lid up and down several times to spread the degreaser .
3. Wipe Nylatrons to remove food soil, grease, and degreaser
residue.
Lubricating Lid Rollers
The lid rollers, in the back of the fryer, should be lubricated at
least once a year, to allow the lid easy movement.
1. Remove the back shroud of the fryer .
2. Using spindle lube, part number 12124, place a small amount
of lube on both top and bottom rollers. Make sure to lube
both left and right rollers.
3-12 810
Page 13

Model OFE- 290
3-14. PROGRAMMING 1. Press and hold the FUNCTION button for two seconds.
“REG PROGRAM” shows in the display , followed by
“CODE”.
2. Press the code1-2-3. “SELECT PRODUCT” scrolls
across the display .
If no buttons are pressed, within approximately 1 minute
while in the Program Mode, the controls will revert back
to the Cook Mode.
3. Press the appropriate product button, (1-0), to identify
what product you want to program.
4. “INT1” and “TIME” flashes on the left side of the display .
The right side shows the starting time of the Cook Cycle and
can be changed by pressing the appropriate numbers. Ex:
Press 1,0,0,0 and 10:00 flashes on the right side of the
display , setting the start time at 10 minutes.
5. After setting the time, press and release the FUNCTION
button and “INT1” and “TEMP” flashes on the left side of the
display . The right side shows the starting temperature and can
be changed by pressing the appropriate numbers. Ex: Press
2,5,0 and “250° F” shows onthe right side of the display ,
setting the start temperature at 250° Fahrenheit.
6. After setting the temperature, press and release the FUNCTION button and “INTI”, “LOAD”, and “COMP” flashes on
the left side of the display . The factory preset load compensation value shows in the right side of the display .
703 3-13
Page 14

Model OFE- 290
3-14. PROGRAMMING
(Continued)
7. After the load compensation, press and release the FUNCTION button. “PROP” and “CONTROL” shows on the
left side of the display and the factory preset proportional
control temperature shows on the right side of the display .
8. After the proportional control, press and release the
FUNCTION button. “ALM 1” and “TIME” flashes in the left
side of the display , and the first alarm time shows on the right
side of the display . T o change the time the alarm sounds,
press the appropriate product buttons to set the time. Ex:
Press 1,0,0,0. 10:00 flashes on the right side of the display ,
which means when the timer counts down to 10 minutes, an
alarm sounds.
9. After alarm is set, press and release the FUNCTION button.
“ALM 1”, “SELF-’ ’, and “CANCEL” flashes in the left side
of the display and “YES” or “NO” shows on the right side of
the display . The yes and no can be toggled by pressing any of
the product buttons, (l -0). “YES” means the alarm tone
automatically stops after several beeps. “NO” means some
one must manually press the appropriate product button to
stop the alarm tone.
10. Repeat steps 9 and 10 for alarms 2 and 3.
11. After alarm 3 is set, press and release the FUNCTION
button. “FIL TER” and “CYCLES” show on the left side of
the display and the Filter Cycle value is on the right side of the
display . The value is the number of Cook Cycles that must
completed before the control signals the operator that the
shortening needs filtered.
12. After the filter value is set, press and release the
FUNCTION button. “EOC” and “EXIT” flashes on the left
side of the display and “COOL” shows on the right side of
the display . The end-of-cycle, (EOC), exit point can be set
to COOL, SETP , or FLTR, by pressing any of the product
buttons (EOC). At the end of a Cook Cycle the controls can
be set to return to Cool Mode, the setpoint temperature, or to
signal the operator to filter the shortening.
3-14 703
Page 15

Model OFE- 290
3-14. PROGRAMMING
(continued)
13. After the end-of-cycle point is set, press and release the
FUNCTION button. “HEAD” flashes on the left side of the
display and a number shows on the right side of the display .
The number on the right, is the number of head of chicken to
be cooked at one time, when that product button is pressed.
The number can be changed by pressing the appropriate
product button. The control can then accumulate the head
count (usage) of that product,based on counting the number
of Cook Cycles.
Another product can be programmed while in the program
mode by following these procedures:
Press and hold the SCAN button at any time while in the
Program Mode and the display will scroll “SELECT PRODUCT”. Then press any of theproduct buttons, (1-0), and
now that product can be programmed.
14. T o program second interval, press and release the
SCAN button while in the Time Mode of the first mode.
“INT2” and “TIME” will flash on the left side of the display .
Then follow the steps above, starting with step 4.
3-15. SPECIAL PROGRAM MODE
Review Usage
1. Press and hold the FUNCTION button for two seconds until
“REG PROGRAM” shows in the display . As soon as
“REG PROGRAM” shows in the display , press and release
the FUNCTION button 1 time until “REVIEW USE” shows
in the display .
2. “DAIL Y” shows in the display . Press any of the product
buttons to view the usage of that product. Press and hold the
FUNCTION button to exit Special Program mode.
Reset Usage
1. Press and hold the FUNCTION button for two seconds until
“REG PROGRAM” shows in the display . As soon as “REG
PROGRAM” shows in the display , press and release the
FUNCTION button 2 times until “RESET USE” shows in
display .
2. When “CODE” shows in the display , press 1-3-5. “DAIL Y
will show in the display , and press any of the Product buttons
to reset them to 0.
703 3-15
Page 16

Model OFE- 290
3-15. SPECIAL PROGRAM MODE
(Continued) Factory Presets (F/C, Gas/Electric, Speaker Volume,
Speaker Frequency , Codes, Initialize System)
1. Press and hold the FUNCTION button for two seconds until
“REG PROGRAM” shows in the display . As soon as
“REG PROGRAM” shows in the display , press and release
the FUNCTION button 3 times until “F AC PRESET” shows
in the display .
2. When “CODE” shows on the display , enter 2957. “DEG”
and “MODE” flashes in the display . Press any of the product
buttons to toggle from ºF to ºC, and vice versa.
3. Press and release the FUNCTION button and “TYPE”
and “FR YR” flashes in the display. Press any of the product
buttons to toggle from “GAS” to “ELEC”, or vice versa.
4. Press and release the FUNCTION button twice, and
“SPKR” and “VOL” flashes in the display . The volume can
be changed from 01 to 10, 10 being the loudest.
5. Press and release the FUNCTION button 3 times, and
“SPKR” and “FREQ” will flash in the display . The frequency
can be set from 100 to 2000.
6. Press and release the FUNCTION button 10 times, and
“INITIALIZE SYSTEM” scrolls across the display . Press
and hold any of the product buttons and the display will count
down from 5. Once the display counts down, release the
product button, and the control will set factory preset parameters into the controls.
Before attempting to change the other modes in the Factory
Preset Mode, please call the Henny Penny T echnical Service
Department at 1-800-417-8405, or 1-937-456-8405.
3-16 703
Page 17

3-15. SPECIAL PROGRAM MODE
(Continued) Tech I/O Mode
Model OFE- 290
1. Press and hold the FUNCTION button for two seconds until
“REG PROGRAM” shows in the display . As soon as
“REG PROGRAM” shows in the display , press and release
the FUNCTION button 4 times until “TECH I-O” shows in
the display .
2. When “CODE” shows in the display , press 2-4-6 (1-7-7-6
for CE units). “HEA T’, and “PUMP”shows alternately in the
display . Also, the LEDs over 1 and 3 flashes alternately .
3. T o test the heat circuit, press and hold the 1 button.
4. T o test the pump system, press and hold the 3 button.
Appliance T est
Press and hold the FUNCTION button for two seconds until
“REG PROGRAM” shows in the display . As soon as
“REG PROGRAM” shows in the display , press and release
the FUNCTION button 5 times until “APPL TEST” shows
in the display .
With the power switch on, the display will show “CURR=”,
along with the time it took the unit to heat from 250º to
300º F (121º to 149º C) . This is normally recorded from the
initial heat up in the morning.
504 3-17
Page 18

Model OFE- 290
3-16. SPECIAL PROGRAM Heat Control
MODE (Continued) 1. Press and hold the FUNCTION button for two seconds until
“REG PROGRAM” shows in the display . As soon as
“REG PROGRAM” shows in the display , press and release
the FUNCTION button 6 times until “HEA T CNTRL” shows
in the display .
2. When “CODE” shows in the display , press 1-2-3-4.
“MEL T”, “EXIT”, and “TEMP” flashes in the display , along
with the shortening temperature at which the unit will exit the
melt cycle. This should be set at 180º F (82º C), and should
not be changed until the factory is consulted.
3. Press and release the FUNCTION button and ”MEL T”,
“CYCLE”, and “100s” shows alternately in the display , along
with the period (pulse) length of 4000. This should not be
changed until the factory is consulted.
4. Press and release the FUNCTION button twice and
“MEL T”, “ON-”, “TIME”, and “100s”, shows alternately in
the display , along with the length of time the heat is on. This
should be set at 1700, and should not be changed until the
factory is consulted.
5. Press and release the FUNCTION button three times and
“COOL”, “SET -”, and “POINT” shows alternately in the
display , along with the temperature at which the control exits
the melt cycle. This is set at 250º F (121º C), and should not
be changed until the factory is consulted.
6. Press and release the FUNCTION button four times and
“AUTO”, and “IDLE” shows alternately in the display , along
with “OFF”. This should not be changed until the factory is
consulted.
7. Press and release the FUNCITON button five times and
“AUTO”, “IDLE”, and “MMSS” shows alternately in the
display , along with “0:00”. This should not be changed until
the factory is consulted.
8. The last 3 functions in the Heat Control Mode are used by the
factory only , and should not be changed.
3-18 703
 Loading...