

Operator’s Manual

LIMITED WARRANTY FOR HENNY PENNY APPLIANCES
Subject to the following conditions, Henny Penny Corporation makes the following limited warranties to
the original purchaser only for Henny Penny appliances and replacement parts:
NEW EQUIPMENT:
defective in material or workmanship within two (2) years from date of original installation, will be
repaired or replaced without charge F.O.B. factory, Eaton, Ohio, or F.O.B. authorized distributor. To
validate this warranty, the registration card for the appliance must be mailed to Henny Penny w ithin ten
(10) days after installation.
REPLACEMENT PARTS:
to be defective in material or workmanship within ninety (90) days from date of original installation
will be repaired or replaced without charge F.O.B. factory, Eaton, Ohio, or F.O.B. authorized
distributor.
The warranty for new equipment and replacement parts covers only the repair or replacement of the
defective part and does not include any labor charges for the removal and installation of any parts, travel or
other expenses incidental to the repair or replacement of a part.
EXTENDED FRYPOT WARRANTY:
or workmanship issues for a period of up to seven (7) years from date of manufacture. This warranty shall not
cover any frypot that fails due to any misuse or abuse, such as heating of the frypot without shortening.
0 TO 3 YEARS:
issues will be replaced at no charge for parts, labor, or freight. Henny Penny will either install
a new frypot at no cost or provide a new or reconditioned replacement fryer at no cost.
3 TO 7 YEARS:
issues will be replaced at no charge for the frypot only. Any freight charges and labor costs to
install the new frypot as well as the cost of any other parts replaced, such as insulation,
thermal sensors, high limits, fittings, and hardware, will be the responsibility of the owner.
Any claim must be presented to either Henny Penny or the distributor from whom the appliance was
purchased. No allowance will be granted for repairs made by anyone else without Henny Penny’s written
consent. If damage occurs during shipping, notify the sender at once so that a claim may be filed.
THE ABOVE LIMITED WARRANTY SETS FORTH THE SOLE REMEDY AGAINST HENNY
PENNY FOR ANY BREACH OF WARRANTY OR OTHER TERM. BUYER AGREES T HAT NO OTHER
REMEDY (INCLUDING CLAIMS FOR ANY INCIDENTAL OR CONSEQUENTIAL DAMAGES) SHALL
BE AVAILABLE.
The above limited warranty does not apply (a) to damage resulting from accident, alteration, misuse, or
abuse; (b) if the equipment’s serial number is removed or defaced; or (c) for lamps and fuses. THE ABOVE
LIMITED WARRANTY IS EXPRESSLY IN LIEU OF ALL OTHER WARRANTIES, EXPRESS OR
IMPLIED, INCLUDING MERCHANTABILITY AND FITNESS, AND ALL OTHER WARRANTIES ARE
EXCLUDED. HENNY PENNY NEITHER ASSUMES NOR AUT HORIZES ANY PERSON TO ASSUME
FOR IT ANY OTHER OBLIGATION OR LIABILITY.
Any part of a new appliance, except lamps and fuses, which proves to be
Any appliance replacement part, except lamps and fuses, which proves
Henny Penny will replace any frypot that fails due to manufacturing
During this time, any frypot that fails due to manufacturing or workmanship
During this time, any frypot that fails due to manufacturing or workmanship

Warning:
Incorrect installation, adjustment, servicing, maintenance, cleaning, or
unauthorized modifications to the appliance can result in damage, injury
or death. Read the Operating Manual carefully before starting to use the
appliance.
For your safety:
Do not store or use any flammable gases or liquids near this appliance.
What to do in the event of danger or if you smell gas:
- Shut off the gas supply immediately
- Do not touch any electric control elements
- Make sure the area is well ventilated
- Avoid open flames or sparking
- Use an external telephone to notify the appropriate gas supplier
(if the gas supplier is unobtainable call the relevant fire station).
“RESET” (gas appliances only)
If the burner malfunctions "rES" will light up on the display.
An acoustic signal will sound after 15 sec. Press the Reset button to re-
start the automatic ignition process.
If the "rES" display does not light up again after approx. 15 sec. the
flame is burning and the appliance is operational. Please notify
Customer Support if the display is still lit after repeated pressing.
rES
-
2
-
Manual
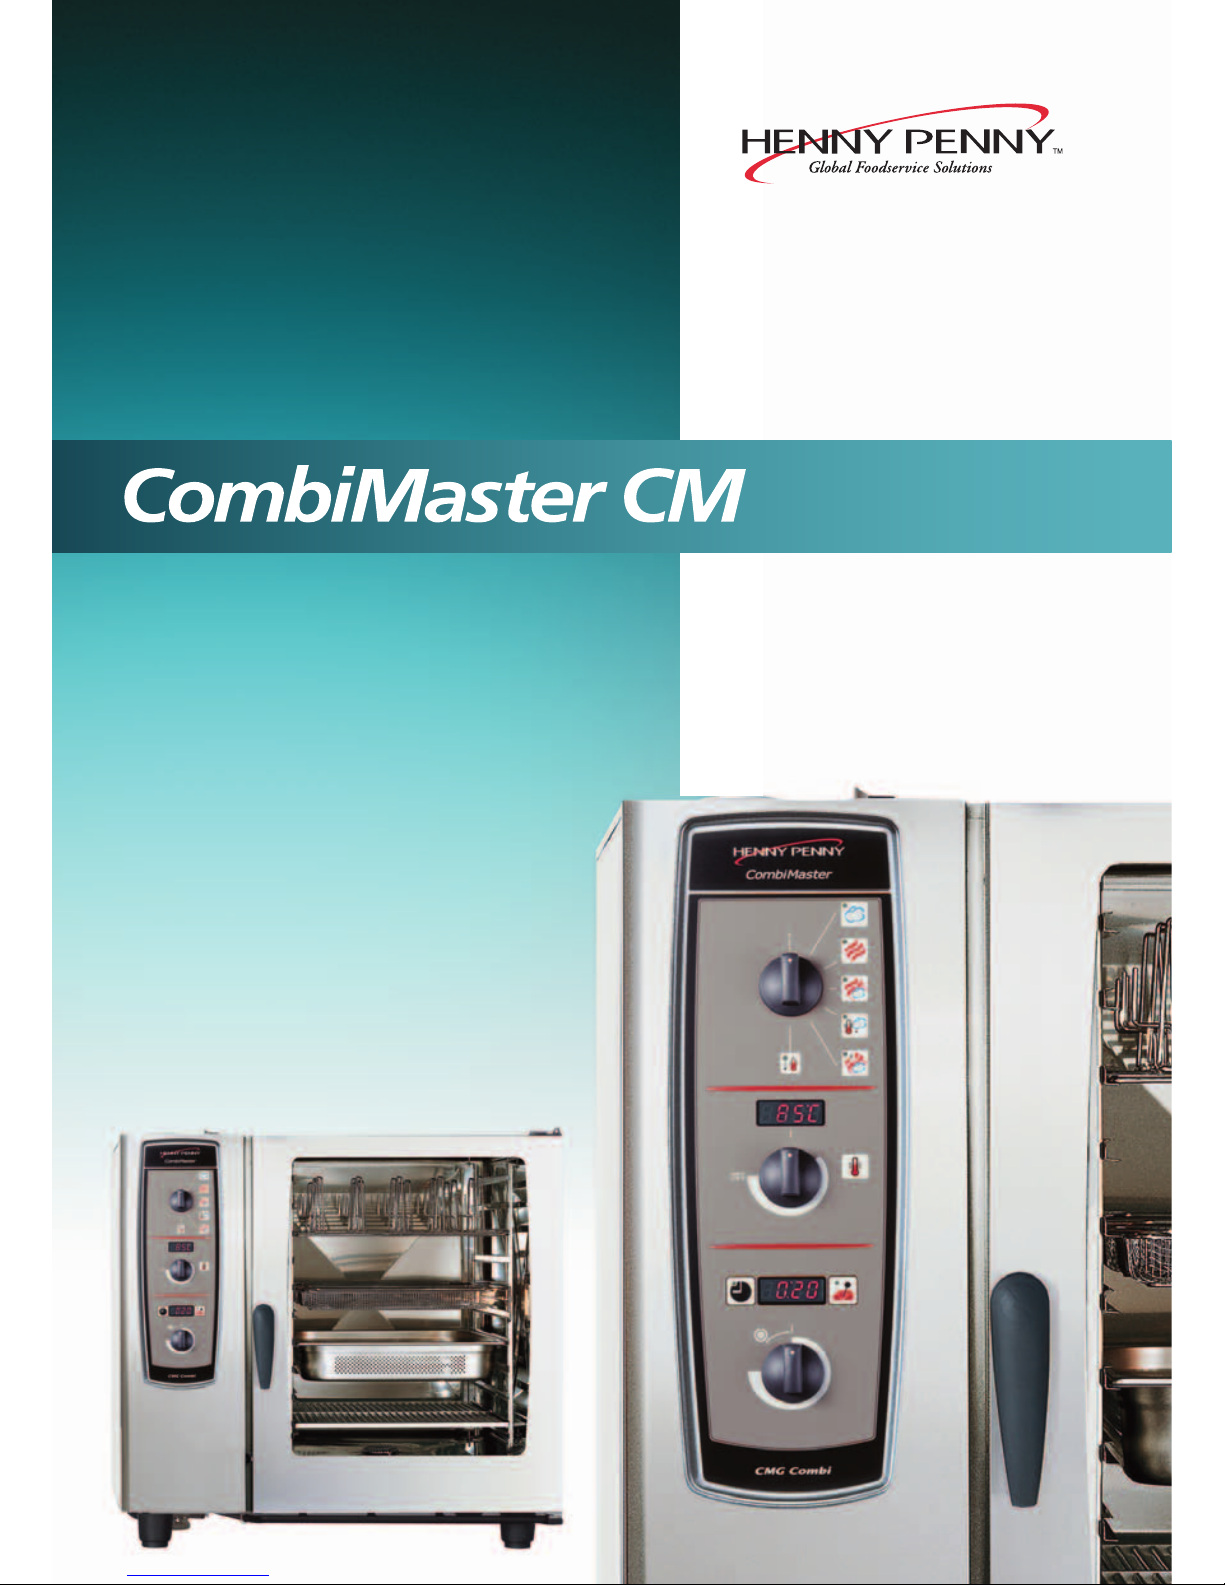
CombiMaster
TM
Dear Customer
Congratulations on the purchase of your new CombiMaster.
Your decision to buy a new CombiMaster means that you now have a top-of-the-line Combi Steamer.
Your CombiMaster will give you many years of reliable service thanks to its outstanding quality and nearly
unlimited cooking potential. You’ll enjoy the peace of mind of a12 month warranty from the date of invoice.
The warranty excludes glass damage, light bulbs and sealing material as well as damage caused by improper
installation, use, maintenance, repair or deliming.
In order to make the most of these benefits, we recommend that you study this manual carefully.
Your Authorized Henny Penny Distributor
Call Customer Service 1-937-456-8400 for any questions or problems in operating your unit.
Henny Penny reserves the right to make technical changes in the interest of progress!
As of August 16, 2005, the Waste Electrical and Electronic Equipment directive went into
effect for the European Union. Our products have been evaluated to the WEEE directive.
We have also reviewed our products to determine if they comply with the Restriction of
Hazardous Substances directive (RoHS) and have redesigned our products as needed in
order to comply. To continue compliance with these directives, this unit must not be
disposed as unsorted municipal waste. For proper disposal, please contact your nearest
Henny Penny distributor.
-3-

- 4 -
General instructions / For your safety 5
Features 9
Controls 10
Cooking techniques 11
Control modes 12
Moist Heat Mode 13
Dry Heat Mode 15
Combi-Steam Mode 18
Tender Steaming Mode 20
Finishing®Mode 22
Working with the temperature probe 24
Cool Down Function 27
Cleaning 28
Steam generator auto-rinse, deliming and manual draining 30
Settings – Fahrenheit / Celsius 31
Fault Warnings 32
Table of contents

Please take the time to read the following safety and
operating instructions carefully.
Keep this manual in a convenient location so that it is
available to anyone using the equipment.
This equipment must only be used to cook food in
commercial foodservice establishments. Any other use
is not intended and is therefore considered dangerous.
Operate using hands only. Damage caused by the use
of pointed, sharp or other objects will invalidate the
warranty.
The equipment must only be used by trained personnel.
It is vital that all users be given regular safety instruction.
Foodservice operators should provide staff with regular training to understand and avoid the risks of accident or damage to the unit.
Daily checks before switching on
• Lock air baffle top and bottom.
• Lock hinged racks properly in position in the cooking cabinet.
General
• The temperature of door glass, outer casing and
add-ons may exceed 140°F (60°C)
• Avoid having heat sources (e.g. grill plates, deep fryers etc.) near the appliance.
• If the unit is idle for prolonged periods, shut the
water supply stop valve and turn off the
appliance power supply (gas and electricity).
When setting up table-top units with the appliance
manufacturer’s original standard stand or base cabinet
the maximum top rack working height is 63 in.
(160 cm).
WARNING – If containers are filled with
liquid or contents which liquefy during cooking, do not use rack levels higher
than those where the user can see into
the container. Warning sticker is
enclosed with equipment.
Warning!
• Caution! Hot steam (risk of scalding)!
• Caution! Containers and grids are hot!
• Make sure the mobile oven rack is
correctly locked in position!
General Instructions / For your Safety
- 5 -
Loading/removal
Open appliance door slowly.
When door is opened heating and fan shut down
automatically.
The fan wheel brake is activated. The fan keeps run-
ning for a brief period only.
Do not touch the fan wheel.
Do not insert pans or grids until the hinged rack has
been properly secured and the mobile oven rack has
been pushed up to the stop and locked in place.
Only use commercial-grade heatproof accessories.
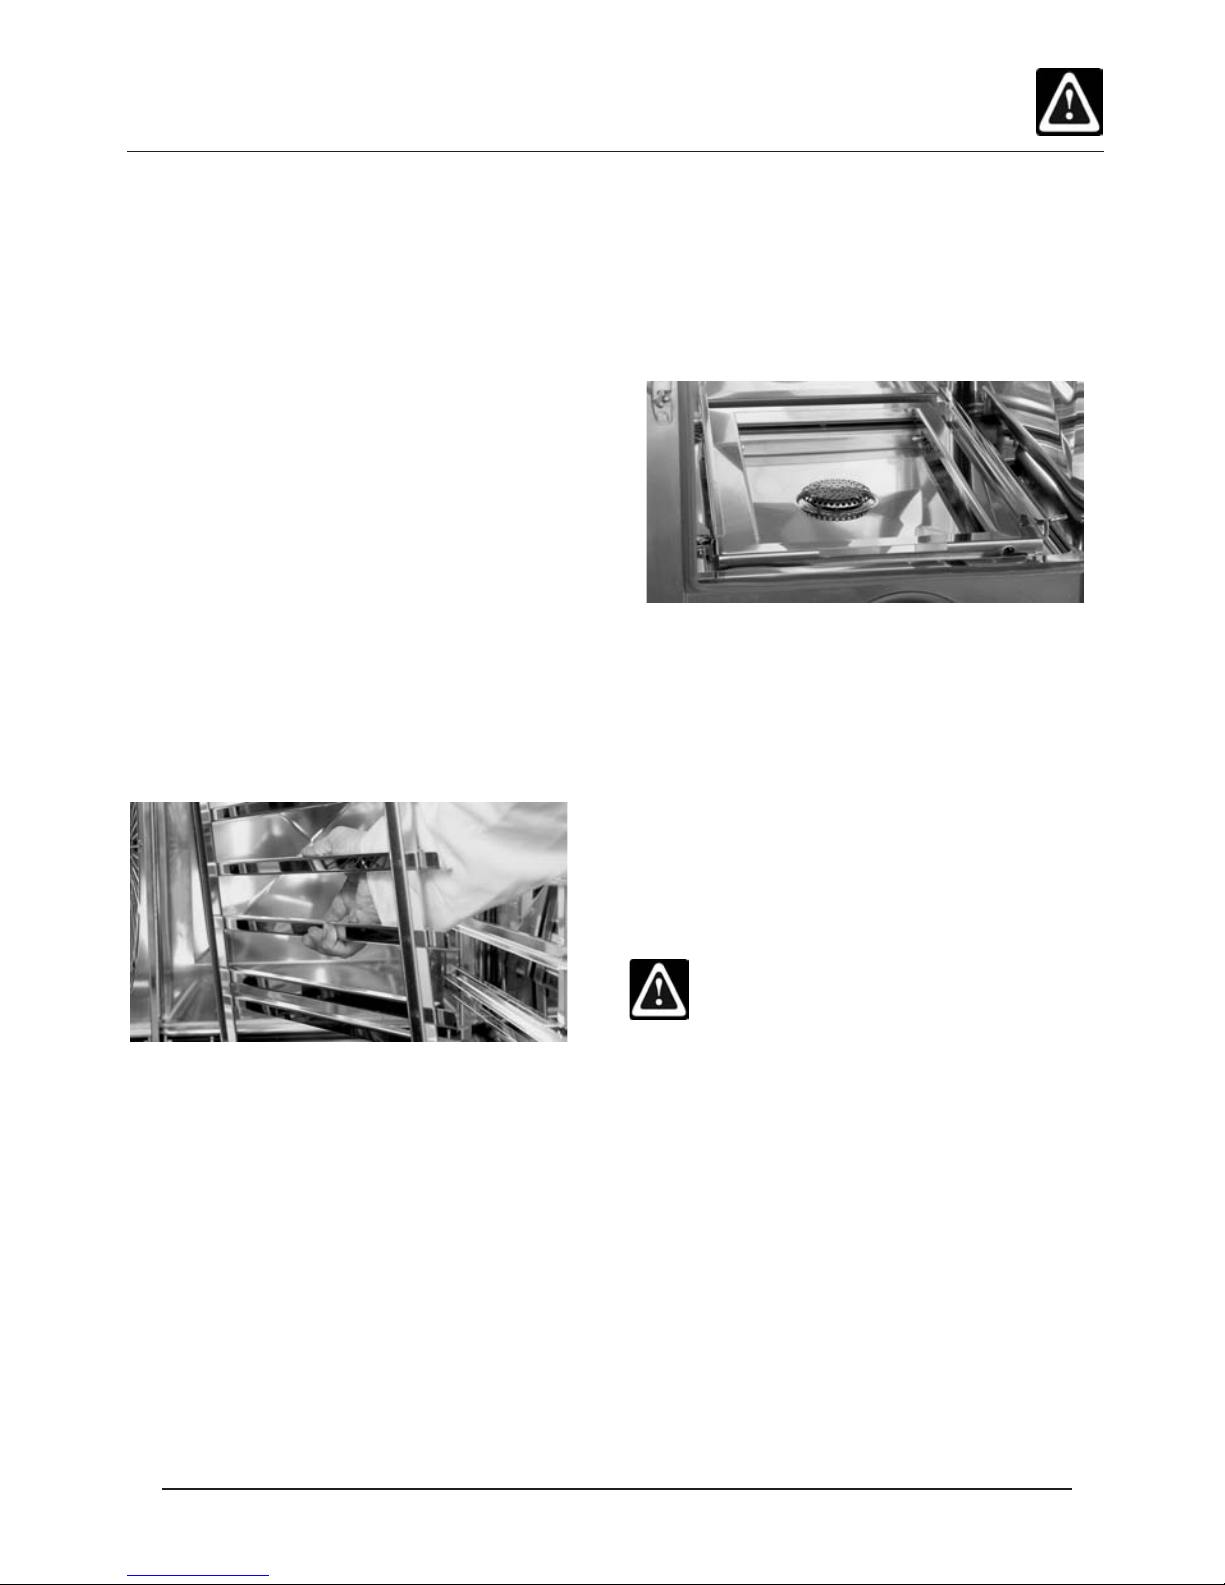
Units with hinged rack (061/062/101/102)
To remove rack
Slightly raise rack unit and lift out of front catch.
Swing rack to middle of cooking cabinet.
Lift up and out of slots. To replace, set into slots and
reverse the procedure.
Mobile oven rack
Working with mobile oven racks, mobile plate
racks and transport carts for base-top units
(option)
- Remove hinged rack.
- Set guide rails on cabinet floor.
- Push mobile oven rack or plate rack into cabinet up
to the stop and lock into place.
- Transport carts must be properly attached to the unit
using the holder.
- Unlock mobile oven rack or plate rack and roll out.
- When transporting the mobile oven rack or plate
rack on the transport cart, make sure the transport
safety catch is engaged.
- Cover and secure containers with liquids to
avoid spills and the risk of scalding.
Warning!
• Pans must be locked with pan locks on the
mobile oven rack!
• Mobile oven racks, mobile plate racks,
transport carts and units on casters can tip
over when being moved over an inclined
plane or threshold.
General Instructions / For your Safety
- 6 -
Low water
The indication H2O may appear on the display when
you switch on. This means that the steam generator is
not yet filled with water. When it is full the display
goes off automatically.
If the display does not go out, check that the water
valve is open and the strainer at the water supply
(solenoid Valve) is unblocked.
Ambient temperatures
If ambient temperatures drop below 41°F (5°C), make
sure the cooking cabinet has been warmed to a temperature greater than 41°F (5°C) before using.
Temperature probe
• The temperature probe a may be hot—
use oven mitts.
• Cool temperature probe with hand shower
before use. DO NOT spray hand shower into hot
cabinet.
• Do not let temperature probe hang out of
cooking cabinet.
• Remove temperature probe before unloading
food.
Cool Down
Use "Cool Down" function to cool the cabinet.
Warning!
• During "Cool down" the fan wheel is
running when the door is open!
• Do not switch on "Cool down" function
unless air baffle is correctly locked.
• Do not touch the fan wheel.
• Do not attempt to cool cabinet with cold
water.
Hand shower
Pull hand shower out to use.
Press hand shower control button to select from two
jet strengths.
Hand shower retracts automatically.
Make sure hand shower hose is fully rewound after
use.
Warning!
• Hand shower and hand shower water
may be hot!
H2O
General Instructions / For your Safety
-7 -
Unit size Pan capacity Max load size
GN
061 6 6x1/1 - 30 kg(15/rack)
062 12 6 6x2/1 - 60 kg(30/rack)
101 10 10x1/1 - 45 kg(15/rack)
102 20 10 10x2/1 - 90 kg(30/rack)
201 20 20x1/1 - 90 kg(15/rack)
202 40 20 20x2/1 - 180 kg(30/rack)
Full-size steam
table pans
Full size
sheet pans

Cleaning
• Leave the door slightly open if the unit is going
to be idle for a prolonged period (e.g.
overnight).
• Do not clean unit with high-pressure cleaner.
• Do not treat unit with acids or expose to acid
fumes–this will damage the protective layer of
stainless steel and units might discolor.
• Follow the instructions on the cleaner packaging.
• For detailed cleaning instructions see "Manual
Cleaning" chapters.
• Only use cleaning agents available through your
authorized distributor.
Warning!
Wear proper protective clothing, gloves, goggles and mask.
Deliming
• Note that the steam generator must be delimed
as required. Contact your Henny Penny
distributor.
Maintenance
• Inspection, maintenance and repair work should
only be done by trained technicians.
• The unit must be switched off during cleaning,
inspections, maintenance or repair work.
• Movement of units on casters must be restricted
so that connected power, water and drain lines
are not damaged. Before moving unit, make
sure that power, water and drainage lines are
correctly disconnected. If the unit is being
relocated or returned to its original position,
make sure that movement restriction devices,
power, water and drainage lines are properly
connected.
Servicing
• Your appliance should be serviced by an
authorized service technician at least once a
year to ensure that it remains in perfect
working order.
Warning!
To avoid electrical shock or property damage,
disconnect main circuit breaker or unplug
power cord at wall receptacle before opening
service doors.
General Instructions / For your Safety
- 8 -
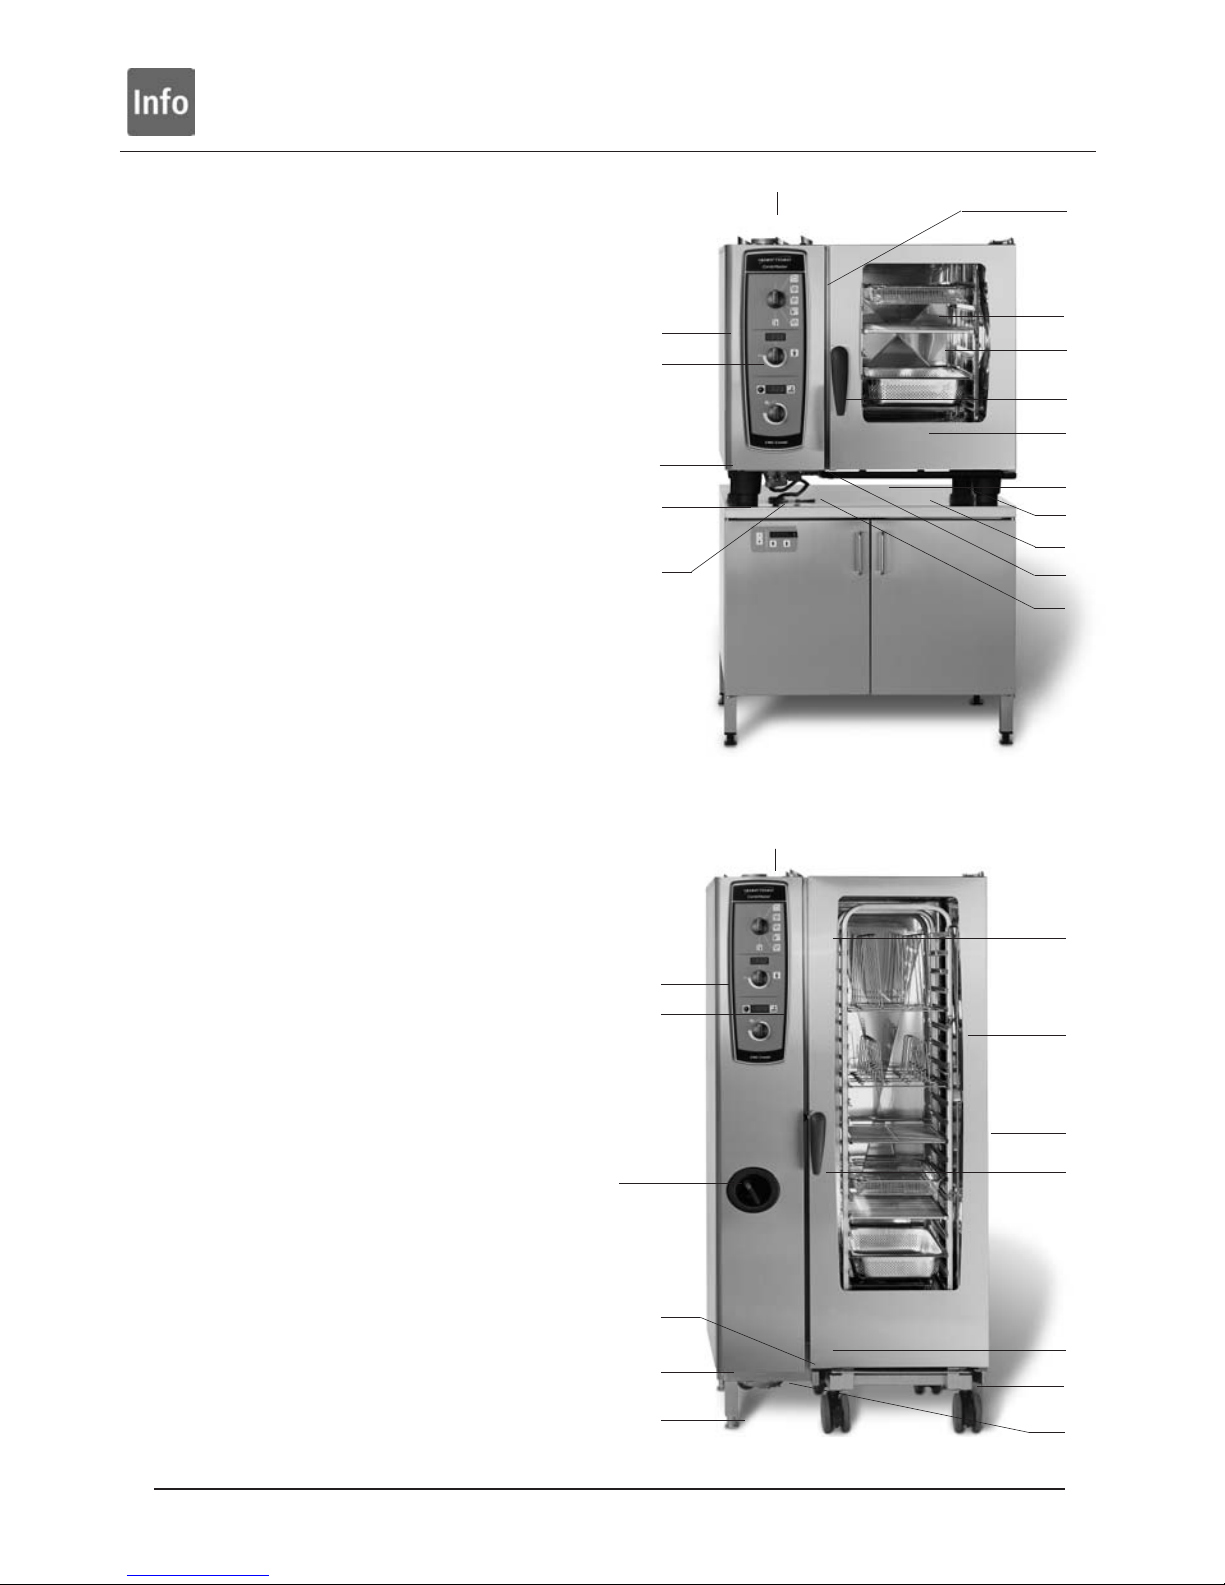
a Unit serial number
(visible only when door open)
b Exhaust diverter
(gas appliances only, optional)
c Interior lighting
d Cabinet door with double glass panel
e Door handle
Table-top units: one-handed operation with slam
function
Floor units: (One-handed operation)
f Unlocking device to open double glass door
panel
(inside)
g Integral and self-draining door drip pan
(inside)
h Drip collector connected directly to
appliance drain
i Adjustable feet
j Unit data plate
(with all important data such as power input, gas
type, voltage, phase number and frequency, as well
as model and serial number, see also
Functions/Settings/ Type)
k Control panel
l Protective cover for electrical
installation area
m Hand shower
(with automatic rewind)
n Run-in guide
(floor models)
o Air filter
(installation area ventilation)
Features
- 9-
Applies to base-top models 061, 062, 101, 102.
Applies to floor models with roll-in carts 201 and 202.
b
a
i
k
l
j
c
d
e
g
h
f
f
o
a
i
k
l
j
c
f
f
d
e
o
b
n
n
m
m
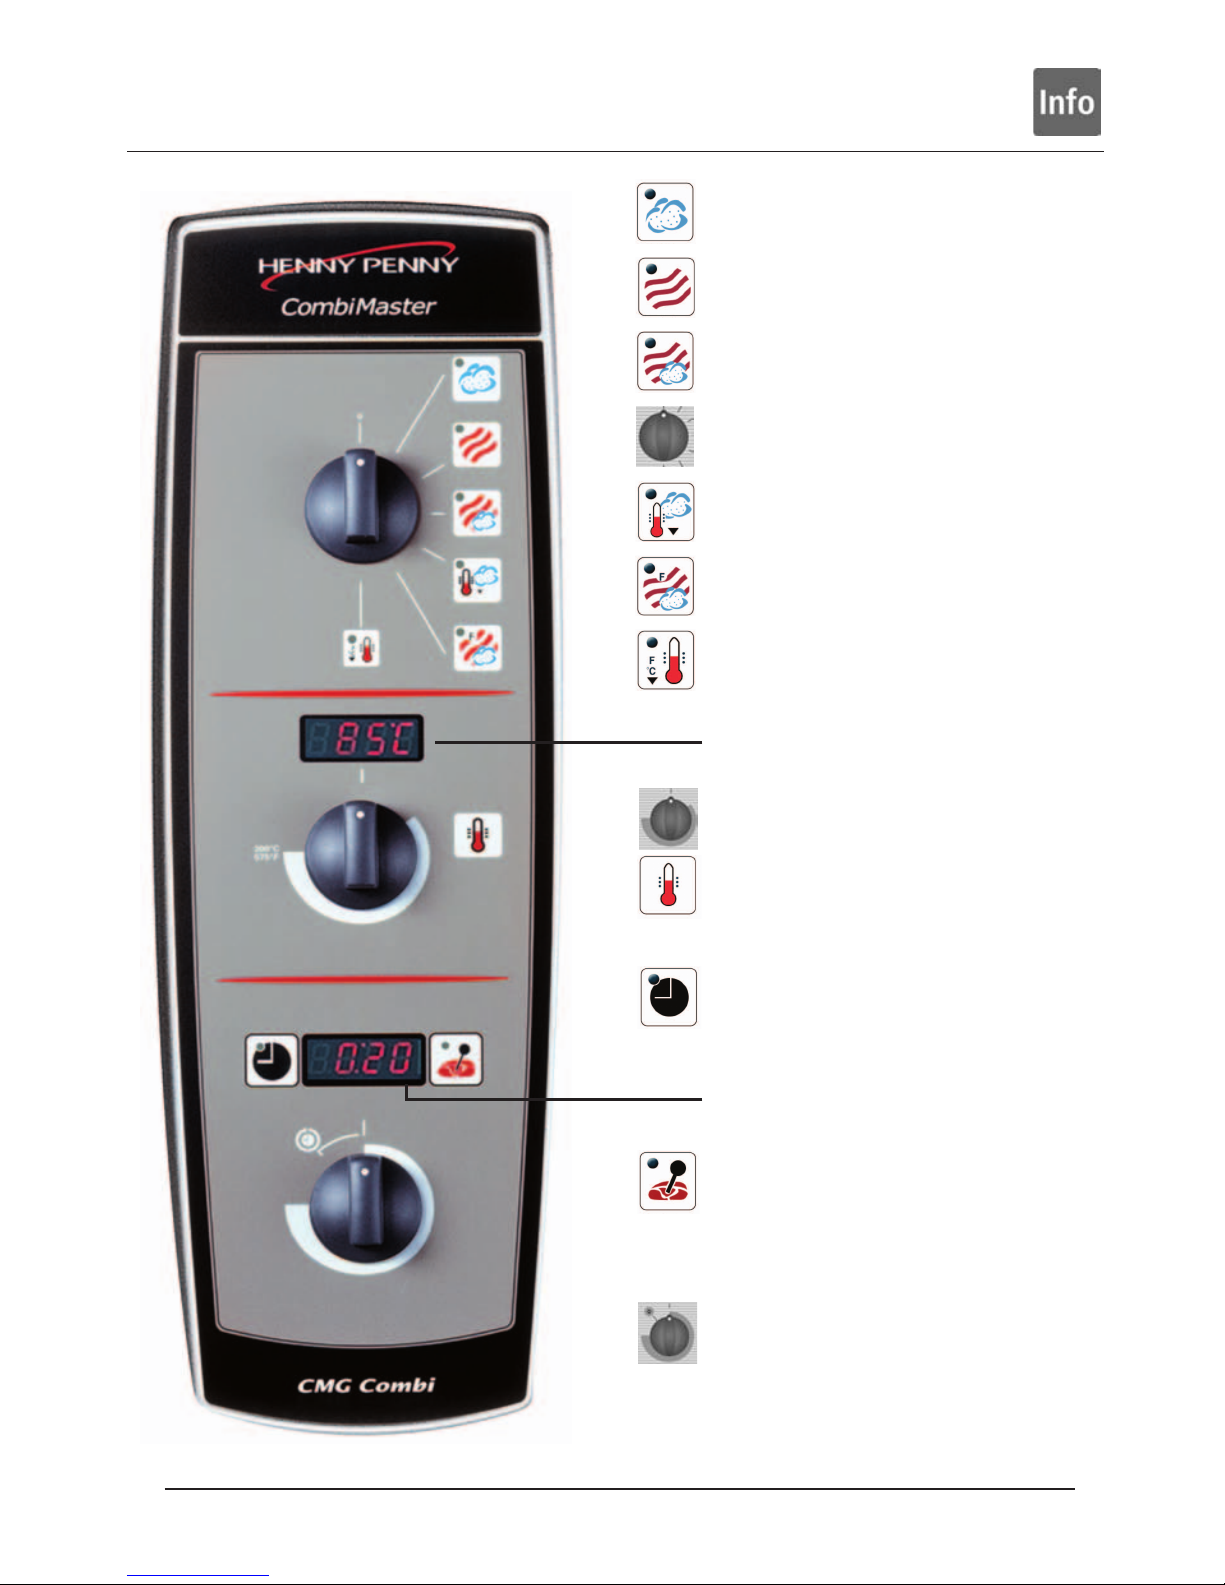
Controls
- 10 -
Moist Heat 212°F (100°C)
Dry Heat 86-575°F (30-300°C)
Combi-Steam 86-575°F (30-300°C)
Control Mode switch
Tender Steaming 86-210°F (30-99°C)
Finishing
®
86-575°F (30-300°C)
Cool Down function
Cabinet temperature display
Cabinet temperature dial
Timer key (up to 23:59)
Food probe temperature key
68-210°F (20-99°C)
Time/probe temperature display
Probe temperature/time-of-day dial

Moist Heat Dry heat
These two modes can be used either
• individually
or
• in combination
The CombiMaster gives you the capability for nearly all traditional cooking
methods in a single piece of equipment!
Cooking techniques
- 11 -
Combi-Steam

Moist Heat mode
The high-performance steam generator produces fresh steam. This is fed without pressure into the cooking cabinet and is circulated at high speed by the fan. The patented
control system regulates steam production,
supplying only as much as the food is actually
able to absorb. In this mode, cabinet temperature is set to a constant 212°F (100°C.)
Dry Heat mode
Powerful heating elements heat the dry air.
The fan circulates the hot air evenly throughout the cabinet. Cabinet temperature can be
set anywhere from 86-575°F (30-300°C.)
Combi-Steam mode
Moist Heat and Dry Heat modes are combined by the control system to create a hot,
humid climate for especially intensive cooking. Cabinet temperature can be set anywhere from 86-575°F (30-300°C.) The
humidity is controlled continually to prevent
the food from drying out.
Tender Steaming mode
A special mode that cooks with moist
heat at temperatures below 212°F
(100°C) made possible by a control
system accurate to within one degree.This
ensures a cooking climate that is just right for
many products and cooking techniques. In
this mode, cabinet temperature can be
variably set anywhere from 86-210°F
(30-99°C.)
Finishing®mode
A combination of Moist Heat and Dry Heat
mode that produces the ideal cooking climate, preventing food from drying out or
from accumulating too much moisture.
Cabinet temperature can be individually set
from 86-575°F (30-300°C.)
Control modes
- 12 -

Moist Heat
The steam generator produces and feeds fresh steam
into the cooking cabinet. In this mode the cabinet
temperature is set to a constant 212°F (100°C.)
Cooking methods:
Steaming, stewing, blanching, poaching, simmering,
vacuum cooking, thawing, preserving.
1
Preheat until mode temperature light goes
out
2
3
Or use temperature probe
2
3
Set Actual
Sample dishes
• Mise en place
Tomatoes concassé, garnishes (vegetables, fruit),
mushrooms, blanching juliennes and brunoises,
blanching vegetables for stuffings, roulades etc.,
peeling onions and chestnuts.
• Starters
Scrambled eggs, poached eggs, hard-boiled eggs,
asparagus, vegetable flans, stuffed vegetables
(onions, kohlrabi, leeks, celery, etc.).
• Soup garnishes
Dumplings, ravioli, vegetable royale
• Main courses
Boiled beef, cured ham, knuckle of pork, tongue,
boiling fowl, turkey legs, meat in aspic, fish.
• Side dishes
Risotto/rice, dumplings, pasta (noodles), fresh and
frozen vegetables, vegetable casseroles, potato
roulade, boiled/jacket potatoes.
• Desserts
Fresh or frozen fruit (e.g. hot raspberries), stewed
fruit, rice pudding.
167°F 66°F
0:33
Moist Heat mode
- 13 -

Tips
• To get the most out of your CombiMaster,
check daily the types of food which can be
cooked together in Moist Heat mode.
Remember that fish, meat, vegetables, side
dishes and fruit can be cooked together with no
flavor transfer (as long as they are all being
prepared by the same method).
• Cook potatoes and other vegetables in perfo
rated containers.The perforations let the steam
circulate for faster, more intensive cooking.
• Vegetable stock can be collected by inserting a
drip pan on the bottom rack.
• It is better to use two shallower pans rather
than one deep one. This reduces bulk and
avoids heavy layers of food that tend to
increase cook times.
• Dumplings should be placed in a shallow solid
pan.
• Rice, cereals and grains are the only foods to
which water should be added. 1 part grain with
1.5 to 2 parts water.
• An easy way to skin tomatoes: cook with Moist
Heat for approx. 1 minute, then plunge into
cold water.
Moist Heat mode
- 14 -

Dry Heat
Powerful heating elements heat and circulate dry air
within the cooking cabinet.
Cabinet temperature can be set from 86-575°F (30300°C.)
Cooking methods:
Baking, roasting, grilling, pan frying, gratinating,
glazing.
1
Preheat until mode temperature light goes out.
2
3
4
Or work with the core temperature
probe
3
4
Set Actual
Sample dishes
• Mise en place
Sweating bacon, roasting bones.
• Starters
Meatballs, vegetarian bakes, vegetables au gratin,
vegetable pastries, pies, sirloin, chicken wings, finger
food, duck breasts, quiches, shortcrust pastry,
tartlets.
• Soup garnishes
Savoury straws, cheese croûtons.
• Main courses
Steak, rump steak, T-bone steak, liver, rissoles, chicken breast, chicken legs, half / whole chickens,
turkey, pheasant, quail, breadcrumbed meat, breaded convenience food, vegetarian cutlets, duck
breasts, cutlets, pizza.
• Side dishes
Potato pancakes, roast potatoes, potato gratin, rösti,
baked potatoes, Idaho potatoes, potato soufflés,
Macaire potatoes, duchesse potatoes.
• Desserts
Sponges, marble cakes, plain cakes, fancy cakes,
flaky pastry, croissants, bread, rolls, baguettes,
shortcrust pastry, apple strudel, bakery products
(precooked), frozen pastry.
167°F 66°F
0:33
320°F
Dry Heat mode
- 15 -

Tips
Cooking times
Cooking times will depend on product quality,
weight and height. Do not overload pans, grids
or other containers. This can prevent air from
circulating evenly.
General notes on pan-frying
• Preheat to 575°F (300°C) to build up sufficient
stored heat.
• Load as quickly as possible in order to
minimize cabinet temperature drop.
• When cooking with a full load open the door
briefly to allow excess moisture to escape.
• With flash-fried and fried products which give
off a lot of moisture (e.g. chicken legs), limit
loads to from half to three-quarters of the
largest possible load.
Breaded products
• All types of breadcrumb coatings can be used.
Browning is improved by brushing with a
blend of paprika and oil. Press the bread
crumbs in firmly. Spray lightly with oil or
water to moisten. Do not overload the unit.
• Allow approx. 6 to 8 minutes per 1/3 in.
thickness of meat.
• Preheat on 575°F (300°C) until light goes
out.
• Use grids for even browning top and bottom.
Group cuts of the same thickness and similar
size on the same granite enameled pan.
Gratinating
• Light and dark meat dishes, fish, mussels,
asparagus, chicory, broccoli, fennel, tomatoes,
toast.
• Preheat on 575° (300°C) until light goes out.
Set to desired temperature after loading.
• E.G.: Grids or shallow containers for
gratinating toast, steaks and soups.
Preparing fish
• Flour and add oil.
Dry Heat mode
- 16 -

Baking
• Preheat to baking temperature. For a full load
you may need to select a higher preheating
temperature.
• Baking temperatures should be set 68-77°F
(20-25°C) lower than in a conventional
oven.
• For rolls, muffins, and yeast dough products use
only every second shelf.
• For frozen convenience products preheat to
575°F (300°C)
• Defrost frozen rolls and let rise for a short
time.
• Use perforated non-stick coated baking trays,
pans and containers.
Dry Heat mode
- 17 -

Combi-Steaming
Moist Heat and Dry Heat modes are combined by the
control system to create a hot, humid climate for
especially intensive cooking. Cabinet temperatures can
be set anywhere from 86-575°F (30-300°C).
Cooking modes: roasting, baking.
1
Preheat until mode temperature light goes out.
2
3
4
Or use temperature probe
3
4
Set Actual
Sample dishes
• Mise en place
Roasting bones.
• Starters
Quiche Lorraine, vegetable soufflés, flans, moussaka, lasagne, canneloni, paella, pasta bakes.
• Main courses
Roasts (beef, veal, pork, lamb, poultry, game),
roulades, stuffed vegetables (peppers, aubergines,
cabbage, onions, kohlrabi), vegetable gratins (cauliflower), turkey legs, stuffed breast of veal, ham with
noodles, leg of pork, belly of pork, various
omelettes.
• Side dishes
Potato gratin, frozen products (potato turnovers),
baked potatoes
• Desserts
Yeast dough.
• Miscellaneous
Bread, rolls, pretzels (frozen dough portions)
167°F 66°F
0:33
320°F
Combi-Steam mode
- 18 -

Tips
Roasts
• For more even cooking, do not place roasts too
close together.
• Roasts with rinds or larger roasts should be
steamed for approximately 1/3 of the cooking
time.
• Collect drippings in a pan on a lower rail and
make the gravy by adding it to the lightly
roasted bones.
Preparing sauces
• Place a pan on an additional rail under meat.
• Add bones, mirepoix, seasonings to the
container and roast under the meat.
• Add the collected stock.
• Braise for the duration of cooking.
• Very concentrated stock for gravies/sauces.
Roulades
Place in pan, top with hot sauce and cover.
Baking
Bake yeast dough, flaky pastry, choux pastry on sheet
pans. Non-stick sheet pans can also be used.
Combi-Steam mode
- 19 -

Tender-steaming
The steam generator produces fresh steam. Cabinet
temperature can be set to various temperatures below
boiling point, from 86-210°F (30-99°C).
1
Preheat until mode temperature light goes out.
2
3
4
Or use temperature probe
3
4
Set Actual
Sample dishes
• Mise en place
Blanching bacon and ham, poaching fish garnishes,
soups, sauces, stocks, fumets etc., pasteurising
(semi-preserved foods).
• Starters
Galantines, fish dumplings, terrines, vacuum dishes.
• Soup garnishes
Stuffing, dumplings, royale.
• Main courses
Fish (salmon, sole etc.), cured ham, poultry, vacuum
dishes (chicken breast, boiled beef, veal tongue),
turkey fillet, chicken breasts, beef fillet, Vitello
sausage.
• Side dishes
Flans, vegetable casseroles, polenta.
• Desserts
Fruit, crème caramel, cabinet pudding.
167°F 66°F
0:33
180°F
Tender Steaming mode
- 20 -

Tips
Tender Steaming times
Moist Heat cooking times can be used as approximate
values.As a general rule, the lower the cooking temperature the longer the cooking time.
Tender Steaming cabinet temperatures
(approximate)
Soup garnishes: 167-195°F (75-90°C)
Fish, shellfish, crustaceans: 150-195°F (65-90°C)
Meat and sausages: 162-167°F (72-75°C)
Light meat: 167-185°F (75-85°C)
Dark meat: 176-195°F (80-90°C)
Poultry: 176°F (80°C)
Desserts: 150-195°F (65-90°C)
Seasoning
• Season with care. Low cooking temperatures
intensify the characteristic taste of seasonings.
• When vacuum cooking be sure to add the exact
amount of alcohol, fumet, essence or reduction!
Preserving fruit/vegetables
Cover the food with hot or cold liquid, depending on
the firmness of the raw product and the type of preserve you want. The diameter of the preserving jars
used should not exceed 4 in. (100mm.) The cooking
temperature will depend on the type of product
(ripeness, size of pieces). Approximate temperature:
167-210°F (75 to 99 °C).
Advantages
• Firm textured fillings.
• Products have more intense taste and aroma.
• Stock loss very low in fatty material.
Approximate temperature: 162-176°F
(72-80°C).
• Cook direct in the serving dish, e.g. fish.
Tender Steaming
- 21 -

Finishing
®
The combination of Moist Heat and Dry Heat produces
an ideal cooking climate that prevents food from drying
out and preserves excellent characteristics of color, flavor
and texture. Cabinet temperature can be set anywhere
from 86-575°F (30-300 °C).
1
Preheat to operating temperature
2
Recommended Finishing‚ temperatures should be
from 250-285°F (120-140°C), but can be varied
for different products.
3
4
As a rule finishing time is between 5 and 8 minutes for food arranged on plates. However, times
will vary depending on the product, product temperature, number of plates, how full they are and
the desired serving temperature.
Or use temperature probe
3
4
Set Actual
Sample dishes
• Starters
All types of spaghetti, canneloni, lasagne, vegetable
dishes, cheese and herb noodles, quiche Lorraine,
spring rolls, vegetarian cutlets, onion flans.
• Main courses
All types of roast, meat loaves, bakes, ready-toserve meals, roulades, stuffed vegetables.
• Side dishes
Rice, potatoes, noodles, pasta, vegetables, soufflés,
gratins.
• Desserts
Strudel, hot fruit.
167°F 66°F
0:08
285°F
Finishing® mode
- 22 -

Tips
Finishing utensils (not supplied)
Porcelain plates, earthenware, glass, silverware, copper
pans, stainless steel, aluminum dishes.
Banqueting service/tour groups
• Reheat plates in the oven plate rack for plates
up to 12 1/4in. (31 cm).
• Large quantities in next to no time.
• Fast loading and unloading.
• Shorter serving times, so high hourly through
put, rapid table change, more turnover.
Serving dishes
Serving dishes can be heated as well. This helps food
retain heat until it reaches the table.
Thermal cover
Use the thermal cover over the oven plate rack to
keep food up to temperature during short waiting
periods or when transporting food.
Other tips
• Arrange food evenly and not too closely on
plates or dishes.
• When arranging vegetables and side dishes on
plates prior to for finishing, mix in a little butter
or vegetable oil.
• Sauces are usually added after finishing.
• Bulky items need more time to heat up.
Finishing® mode
- 23 -

Cooking with the temperature probe means that the
cooking process is regulated by the core temperature
of the food as measured by the probe. This allows
food to be done when it reaches the desired internal
temperature.
To insert:
Clean the core temperature probe before use and cool
it with cold water. Insert the core temperature probe
into the thickest part of the food until the tip of the
probe is at the center of the food.
Probe cooking is available in all control modes
1
2
3
4
Set Actual
The timer is not operational.
A buzzer sounds when the set core temperature has
been reached.
Warning!
• The temperature probe may be hot –
wear oven mitts.
• Do not let temperature probe hang out of
cooking cabinet.
• Remove temperature probe from the
food before removing a load.
167°F 66°F
167°F
Working with the temperature probe
- 24 -

Tips
• When roasting meat for slicing set the
temperature approx. 9°F (5°C) lower, as large
roasts continue to cook for a short time after
being removed from heat.
• Make sure temperature probe is cool before
inserting into food product. This helps eliminate
holes (protein coagulation) in the finished
product.
• You can change the set temperatures and
cooking modes at any time.
• Use temperature probe when Finishing
®
to
achieve the optimum serving temperature.
Approximate core temperature
values
Desired Internal
Beef Doneness Temperature
Fillet of beef medium 131-137°F (55-58°C)
Sirloin medium 131-140°F (55-60°C)
Roast beef well done 176-185°F (80-85°C)
Aitchbone well done 195°F (90°C)
Pork
Leg well done 167°F (75°C)
Leg pale pink 150-155°F (65-68°C)
Saddle pale pink 150-158°F (65-70°C)
Shoulder well done 167°F (75°C)
Belly/ well done 167-176°F (75-80°C)
stuffed
Belly/ well done 176-185°F (80-85°C)
Ham very 148-155°F (64-68°C)
succulent
Pork chops 150-158°F (65-70°C)
Cured ribs well done 150°F (65°C)
Working with the temperature probe
- 25 -

Approximate core temperature
values
Desired Internal
Veal Doneness Temperature
Veal Saddle pale pink 137-150°F (58-65°C)
Leg of veal well done 172°F (78°C)
Loin with kidneys well done 167-176°F (75-80°C)
Shoulder Roast well done 167-176°F (75-80°C)
Breast well done 167-172°F (75-78°C)
Mutton
Saddle rare 150-158°F (65-70°C)
well done 176°F (80°C)
Leg of mutton rare 158-167°F (70-75°C)
well done 180-185°F (82-85°C)
Lamb
When the meat is well done, internal temperature is between
172-185°F (72-85°C). The color is gray, slightly pale pink.
The juices are clear.
Leg rare 140-144°F (60-62°C)
Leg well done 155-167°F (68-75°C)
Saddle rare 130-137°F (54-58°C)
Saddle well done 155-167°F (68-75°C)
Shoulder well done 172-185°F (78-85°C)
Poultry
Chicken well done 185°F (85°C)
Goose/duck well done 195-198°F (90-92°C)
Turkey well done 176-185°F (80-85°C)
Miscellaneous items
Pies 162-165°F (72-74°C)
Meat loaf 162-172°F (72-78°C)
Fish (salmon) 140°F (60°C)
Working with the core temperature probe
- 26 -

Cool Down function operates the fan without heat
when door is open. Use Cool Down to cool the cooking cabinet quickly and gently when switching from
high temperature to lower temperature applications,
or for cleaning.
1 Close door..
2
Timer/Probe display reads: “DOOR.”
3 Open door.
Cabinet temperature display flashes.
Timer/Probe display reads: “COOL” To
exit Cool Down, turn Control Mode Switch to any
other mode or to OFF.
Warning!
• During Cool Down the fan wheel does
NOT switch off when the door is opened.
• Do not switch on "Cool Down" function
unless air baffle is correctly locked.
• Do not touch the fan wheel.
• Do not attempt to cool unit with cold
water.
cool
358°F
door
Cool Down Function
- 27 -

Cleaning procedure
It is essential that the unit is cleaned at the
end of every work day in order to maintain
safe food handling practices and to keep the
unit in good operating condition.
Warning!
• Always wear the correct protective
clothing (gloves, goggles and mask).
• Use only cleaner and cleaner
dispensers/pump sprayers designed for
this purpose available through your
authorized Henny Penny distributor.
• Always bleed pressure from pump
sprayers when finished. DO NOT leave
unused containers under pressure.
• Follow the safety instructions on the
spray bottle and cleaner.
• Make sure that the air baffle and hinging
racks or mobile oven rack are properly in
place and locked before starting to
clean.
Here is what to do
1
Cool cabinet to below 140°F (60 °C).
2 Switch appliance off.
3 Spray the cabinet and inside of the door, the door
gasket, the area behind the swivel air baffle and
both sides of the air baffle with Henny Penny
Oven and Grill Cleaner.
4 Lock the air baffle and hinging rack as directed.
5 Close cabinet door.
6
7
Press core temperature button down for 10 seconds.
8
Cleaning program is started.
Once the cleaning time is up you will be asked to
open the doors.
door
0:40
CLEn
Cleaning
- 28 -

9 When the cleaning is finished, rinse the cabinet
down using the retractable hand shower. Be sure
to rinse behind the air baffle.
10 Wipe cabinet and door gasket with a damp
cloth. If needed open the inner glass door pane
and wipe down as well.
11 Close cabinet doors.
When the cabinet doors are closed, Hot Air mode
automatically switches on for 10 minutes to dry the
cabinet.
12
Exit the cleaning program by selecting a cooking
mode.
Note
• Leave the cabinet door slightly open if the unit
will be idle for a prolonged period (e.g.
overnight).
• To prevent corrosion of high-quality chrome
nickel steel, the unit must be cleaned regularly,
even if it is operated only at "Moist Heat ".
• If there is heavy soiling let the residues soften
for 10 minutes in "Moist Heat" mode before
cleaning.
• Do not treat unit with acids or expose to acid
fumes. This will damage the protective layer of
stainless steel and may cause discoloring in the
finish.
• Do not use high pressure cleaners.
• Rinse the spray pistol nozzle and nozzle
extension with clear water after every use.
• Rinse the cleaning bottle with warm water after
use.
• A couple of drops of salad oil will clear any
stiffness in the pump plunger.
End
0:10
Cleaning
- 29 -

Auto-rinse
Your CombiMaster is equipped with an automatic
steam generator rinsing and draining function. This
feature significantly extends the period between
deliming intervals.
Deliming
Your CombiMaster must be delimed at regular intervals depending on water hardness and the amount of
use. Deliming must only be done by a qualified Henny
Penny service technician. Contact your Henny Penny
distributor to discuss a deliming schedule.
Draining the steam generator
You should drain the steam generator before moving,
shipping, storing the unit, or to prevent freezing in
water lines.
1 Open cabinet door.
2
Select Cool Down mode
3
Press and hold probe temperature key for
10 seconds.
4
“CLEN” will appear in cabinet temperature display.
5
Select SC with temper
ature dial
6 Close water tap
7
Press Timer key once.
Leave mode dial at Cool Down position for at least 45
seconds. Steam generator will drain.
SC
CLEN
Steam generator auto-rinse,
deliming and manual draining
- 30 -

Temperatures may be displayed in degrees Fahrenheit
or degrees Celsius.
Changing the Fahrenheit/Celsius display
Simultaneously press and hold Timer key and Probe
temperature key for at least 10 seconds. The display
will change from one format to the other.
or
100 °C
212 °F
Settings– Fahrenheit/Celsius
- 31 -

Any faults developed by your unit will be shown
on the display:
Faults displayed that do not prevent continued
operation can be bypassed by pressing the Timer
key.
E 11
Fault warnings
- 32 -
Fault Cause Remedial action
warning
E1 Appliance defective
E2 Heating switched off for more than Check energy optimization system!
2 minutes by an external energy
optimizing system.
E3 Appliance defective Notify Customer Service!
E4 Appliance defective Notify Customer Service!
E5 Core temperature probe defective Appliance can be operated without
temperature probe.
Notify Customer Service!
E6 Appliance defective Notify Customer Service!
E7 Appliance defective Notify Customer Service!
E8 Appliance defective Notify Customer Service!
E9 Appliance defective Notify Customer Service!
E10 Appliance defective Notify Customer Service!
E11 No control mode displayed after Notify Customer Service!
switching on
E13 Appliance defective Notify Customer Service!
E14 Appliance defective Notify Customer Service!
E15 Appliance defective Notify Customer Service!
E16 Appliance defective Notify Customer Service!
E17 Ambient temperature too low Room temperature must exceed 41°F (5°C)!
E18 Appliance defective Notify Customer Service!
E19 Appliance defective Notify Customer Service!
E20 Appliance defective Notify Customer Service!
E21 Appliance defective Notify Customer Service!
E22
Appliance defective
Notify Customer Service!

Henny Penny Corporation
P
.O. Box 60
Eaton, OH 45320
+1 937 456.8400
+1 937 456.8402 Fax
Toll free in USA
800 417.8417
800 417.8434 Fax
www
.henn
ypenn
y
.com
Form No
.:
FM05-036C ©2004 Henny Penny Corporation,
Eaton, OH 45320, Revised 04-06 Printed in USA
 Loading...