

Hendi Xenon Pro User Manual
BARBECUE XENON PRO
Item: 148105
User manual
Gebrauchsanweisung
Gebruiksaanwijzing
Instrukcja obsługi
Mode d’emploi
Istruzioni per l’utente
Instrucţiunile utilizatorului
Руководство по эксплуатации
Οδηγίες χρήσης
You should read this user manual carefully before
using the appliance.
Bevor Sie das Gerät in Betrieb nehmen, sollten
Sie diese Gebrauchsanweisung aufmerksam lesen.
Alvorens de apparatuur in gebruik te nemen dient
u deze gebruiksaanwijzing aandachtig te lezen.
Przed uruchomieniem urządzenia należy koniecznie
dokładnie przeczytać niniejszą instrukcję obsługi.
Lisez attentivement ce mode d’emploi avant d’utiliser
l’appareil .
Prima di utilizzare l’apparecchio in funzione leggere
attentamente le istruzioni per l’uso.
Citiţi cu atenţie prezentul manual de utilizare înainte
de folosirea aparatului.
Внимательно прочитайте руководство пользователя
перед использованием прибора.
Πρέπει να διαβάσετε αυτές τις οδηγίες χρήσης
προσεκτικά πριν χρησιμοποιήσετε τη συσκευή.
2
For indoor use only.
Nur zur Verwendung im Innenbereich.
Alleen voor gebruik binnenshuis.
Do użytku wewnątrz pomieszczeń.
Pour l’usage à l’intérieur seulement.
Destinato solo all’uso domestico.
Doar pentru uz la interior.
Используйте только в свободном пространстве.
Για χρήση μόνο σε εξωτερικό χώρο.
Keep these instructions with the appliance.
Diese Gebrauchsanweisung bitte beim Gerät aufbewahren.
Bewaar deze handleiding bij het apparaat.
Zachowaj instrukcję urządzenia
Gardez ces instructions avec cet appareil.
Conservate le istruzioni insieme all’apparecchio.
Păstraţi maualul de utilizare alături de aparat.
Хранить руководство вместе с устройством.
Φυλάξτε αυτές τις οδηγίες μαζί με τη συσκευή.

3
Dear Customer,
Thank you for purchasing this Hendi appliance. Please read these user instructions carefully before connecting the appliance in order to prevent damage due to incorrect use. Read the safety instructions in particular very carefully.
Safety Regulations
• Only use this appliance outdoors.
• Incorrect operation and improper use of the appliance can seriously
damage the appliance and injure users.
• The appliance may only be used for the purpose it was intended and de
signed for. The manufacturer is not liable for any damage caused by incorrect operation and improper use.
• Never try to open the casing of the appliance yourself.
• Do not insert any objects in the casing of the appliance.
• Do not use the appliance after it has fallen or is damaged in any other way.
Have it checked and repaired, if necessary, by a certified repair company.
• Do not try to repair the appliance yourself. This could give rise to life-threat
-
ening situations.
• Always keep an eye on the appliance when in use.
• Children do not understand that incorrect use of appliances can be dan
-
gerous. Therefore, never let children use appliances without supervision.
• Do not use any extra devices that are not supplied along with the appli
-
ance.
• The use of the installation must comply with the applicable national and
local regulations.
• This appliance is not intended for use by persons (including children) with
reduced physical, sensory or mental capabilities, or lack of experience
and knowledge, unless they have been given supervision or instruction
concerning use of the appliance by a person responsible for their safety.
• This appliance is intended solely for preparing food.
• Gas and electrical installations should be checked at least once a year.
• Note: the griddle is hot. Let it cool down before touching or removing it.
• We recommend to use only gas cylinders with a capacity of more than 10
kilograms.
• Perform gas cylinder replacement away from potential ignition sources.
• Always place the gas cylinder adjacent to the appliance, not underneath it.
• If a gas leak is detected immediately close the gas valve.
• Note that parts of the barbecue can become very hot. Wear protective
clothing (gloves) if you must touch them anyway.
EN
4
NL
Special safety instructions
• Position on a flat, stable surface.
• A service agent/qualified technician should carry out installation and
any repairs if required. Do not remove any components on this product.
• Consult Local and National Standards to comply with the following:
• Health and Safety at Work Legislation
• Fire Precautions
• Building Regulations
• DO NOT immerse the appliance in water.
• DO NOT leave the appliance unattended during operation.
• Some surfaces become hot with use - exercise caution when using the
appliance.
• Keep this appliance away from children when in use.
• DO NOT move the appliance during cooking.
• DO NOT use if the hose is damaged in any way.
• DO NOT operate the appliance without the cooking grids in place.
• ALWAYS switch off the gas supply to the appliance when not in use.
• ALWAYS store gas bottle upright, even when empty.
• DO NOT use or store gas bottles in direct sunlight.
• DO NOT use if the ambient temperature exceeds 40°C.
• Regularly inspect the hose for any flaws/defects.
• Not suitable for indoor use.
• This appliance must only be used in accordance with these instructions
and by persons competent to do so.
• This appliance is not suitable for use by children.
• Keep all packaging away from children. Dispose of the packaging in ac
-
cordance to the regulations of local authorities.
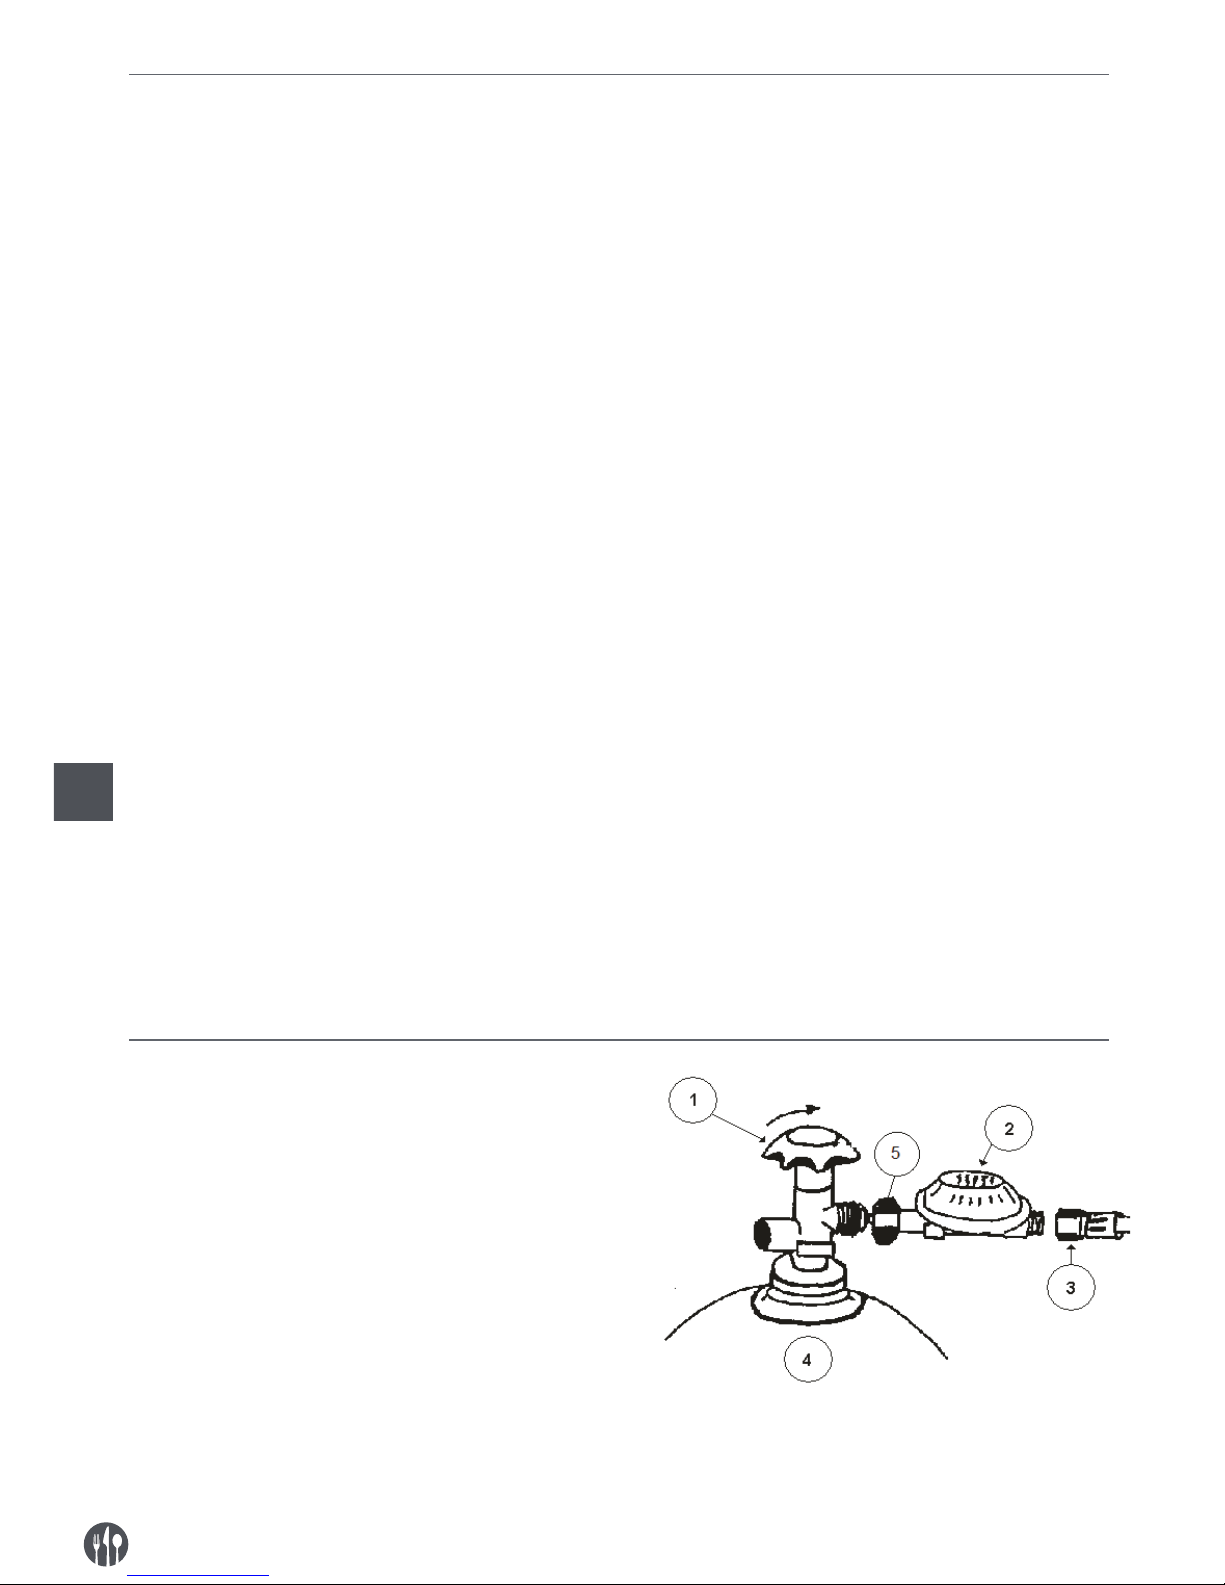
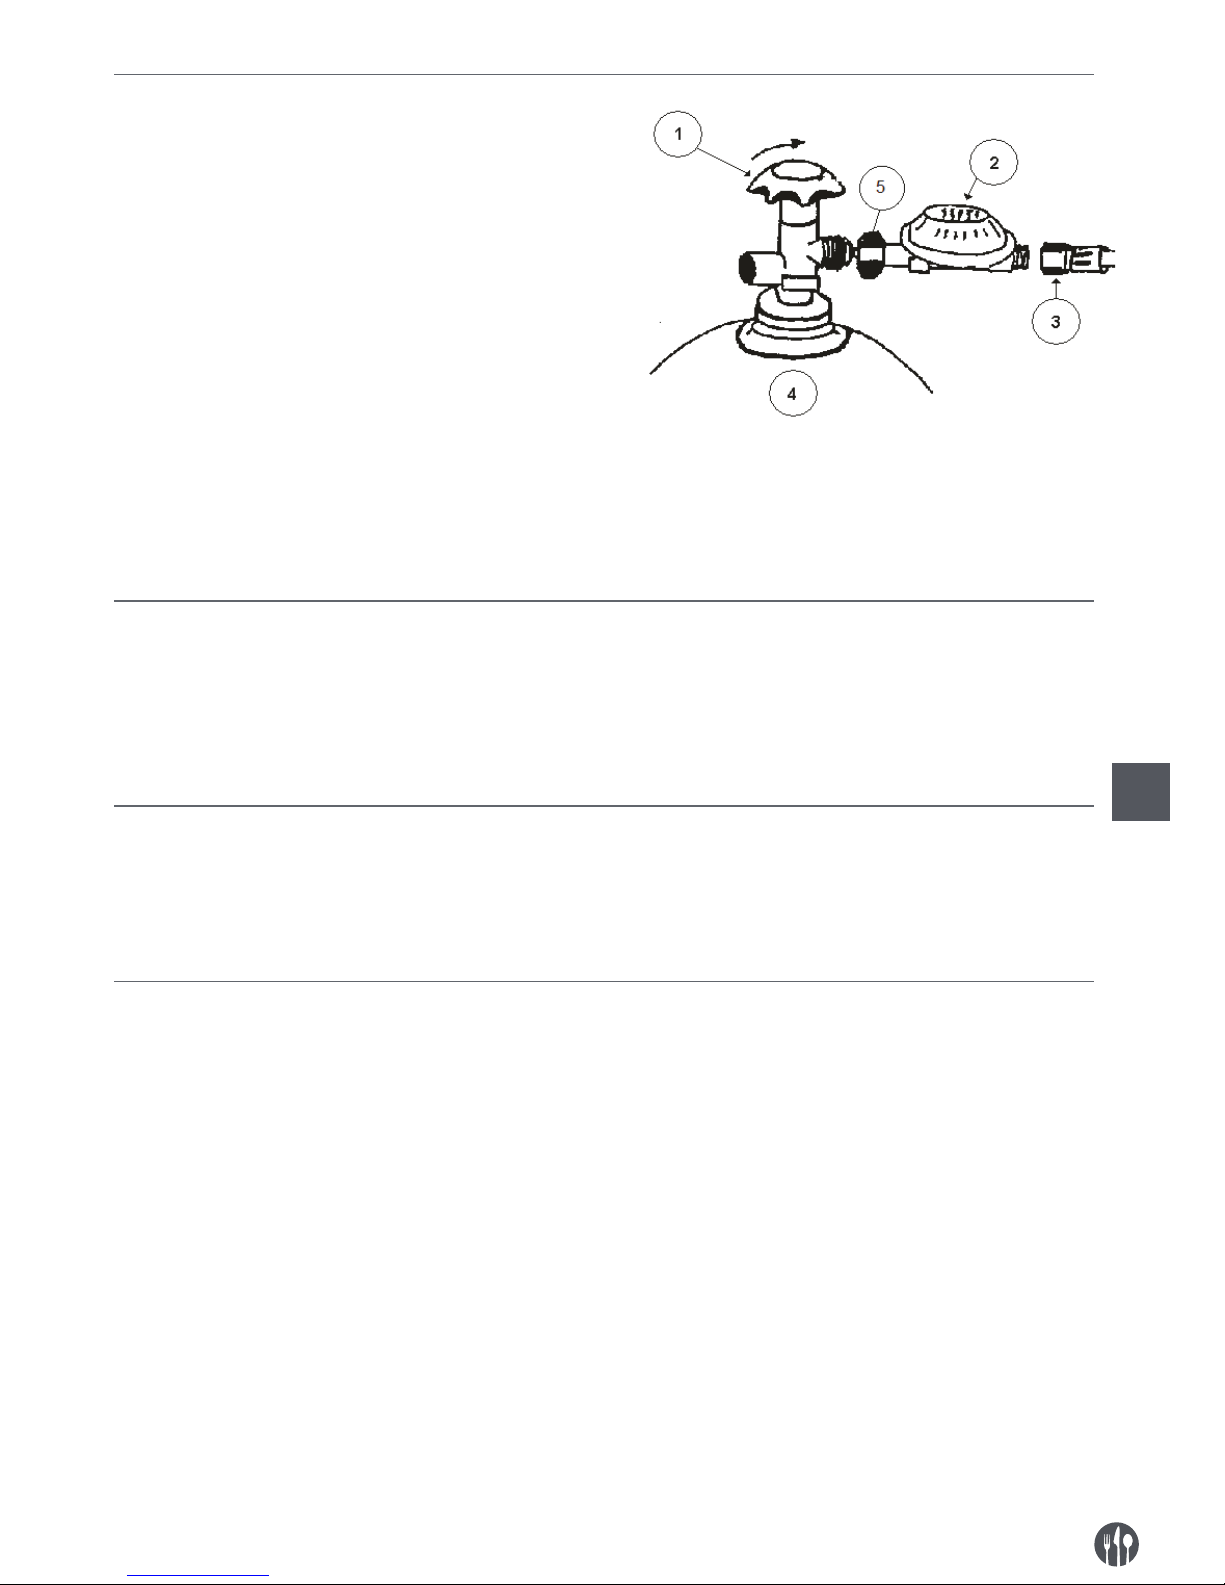
Connecting the gas bottle
1 = main tap
2 = pressure regulator
3 = gas hose
4 = gas bottle
5 = rubber washer
Attach the pressure regulator to the gas bottle using the large brass nut. Always ensure that the rubber sealing washer is present in the nut. (NB. This
rubber washer is not required for UK-type pressure
regulators). Tighten the nut well. Note that the nut
has a left-hand thread.
Check the connections for leaks using a soap and
water solution.
EN

5
NL
Igniting the gas barbecue
• Always place the grids on the Powergrill.
• Turn the knob to “normal” position, keep it
pressed-in. Press the red ignition knob in a few
times till al the burners ignite fully. Keep the knob
pressed-in for approximately 10 seconds, the
flames will now stay burning.
• Check through the looking hole if the burner burns
completely.
Extinguishing the gas barbecue
• Turn the knob completely to the right.
Note! After turning off the burner, wait approximately 10 minutes
before reigniting the burner. mAfter turning off the burner, always turn off the main tap on the gas cylinder
and the tap on the appliance!
Cleaning and maintenance
• The Powergrill has a self cleaning working. There-
fore you have to let the burner burn at it’s full power
for approximately 10 minutes. Fat and remains will
then be vaporised or burned.
• Beware: Never immerse the appliance in water or
any other liquid!
• Clean the outside of the appliance with a damp cloth
(water with mild detergent).
• The grid and/or baking tray should be cleaned regu-
larly. Use a special barbecue cleaner and follow the
instructions on its packaging.
• Clean the ventilation slots (if applicable) with a vacuum cleaner.
• Keep inside after use.
• Let specialised personnel clean the burner at least
once a year.
• Never use a high pressure cleaner.
Faults
Fault Possible cause Fault Possible cause
burner fails to
ignite at all:
defective ignition
burner does not
ignite completely:
gas cylinder (almost) empty
defective thermocouple kink in gas hose
dirty spark plug
gas cylinder valve not entirely
open
defective pressure regulator
empty gas cylinder clogged jet
kink in gas hose
defective valve
clogged jet
If in doubt, please contact your supplier.
Note
• It is to be recommended to replace the gas hose
after 3 or 4 years (see date shown on hose). The
gas hose becomes porous after a time.
• Consult the local regulations, these may differ.
• Always store gas bottles upright, even when empty.
• The Powergrill is supplied for use with propane
gas. It is not allowed to modify this appliance, if
this is desired please contact the manufacturer.
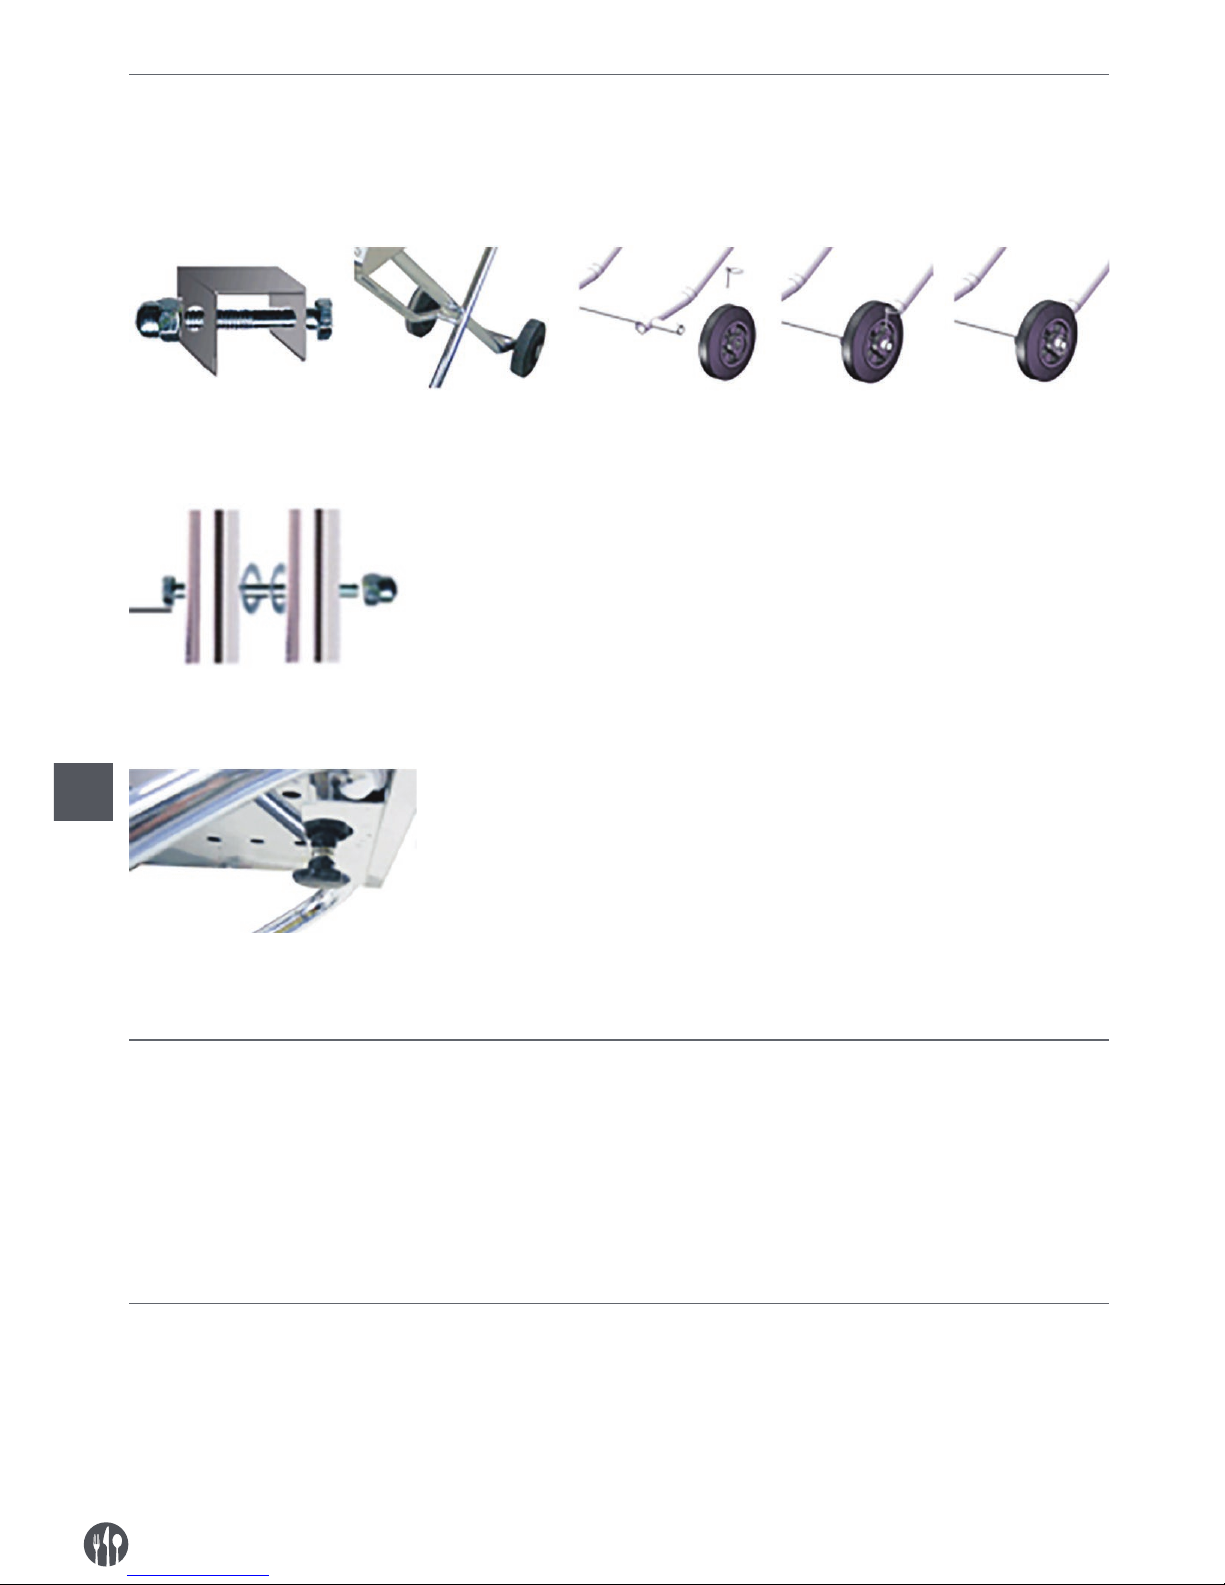
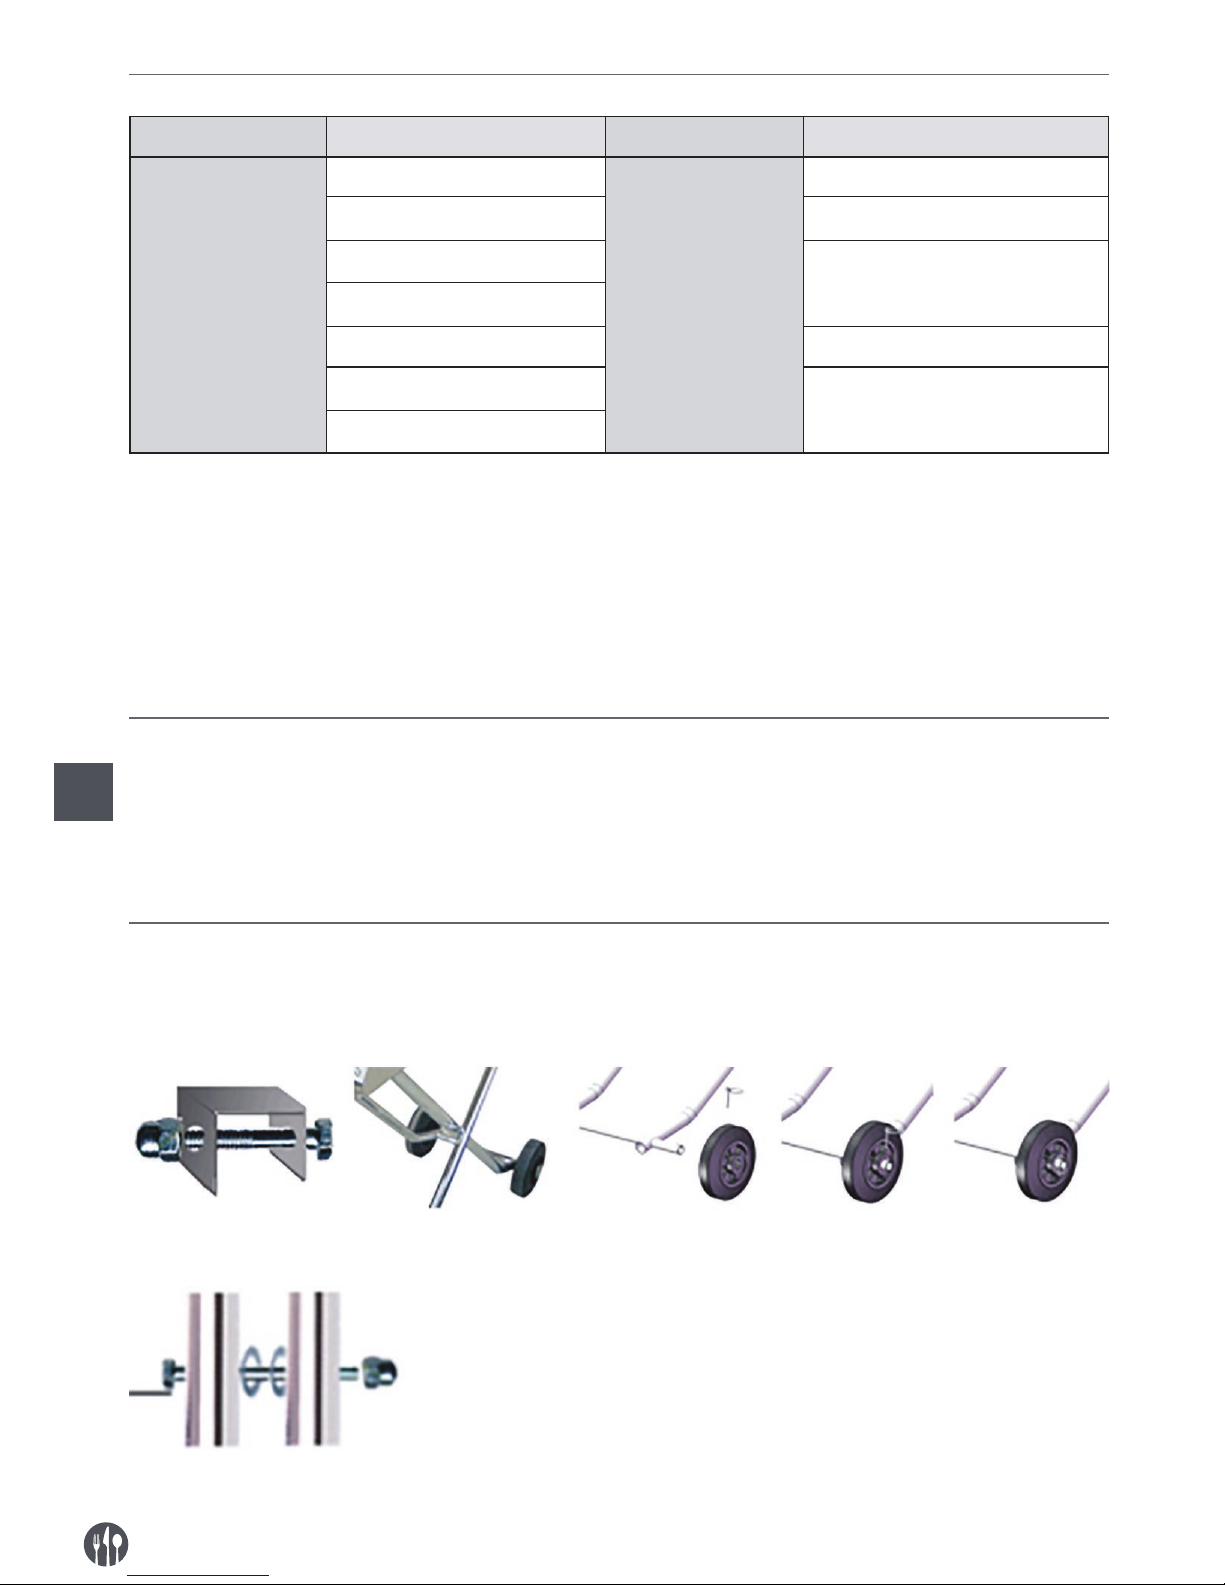
Assembling the undercarriage
The following parts have been supplied for the assembling of the under-carriage:
- 1 wheel frame
- 1 body frame
- 2 bolts M6x40.
- 2 bolts M6x65.
- 4 Cap nuts M6.
- 2 rings M6.
- 1 star bolt M6
EN
6
NL
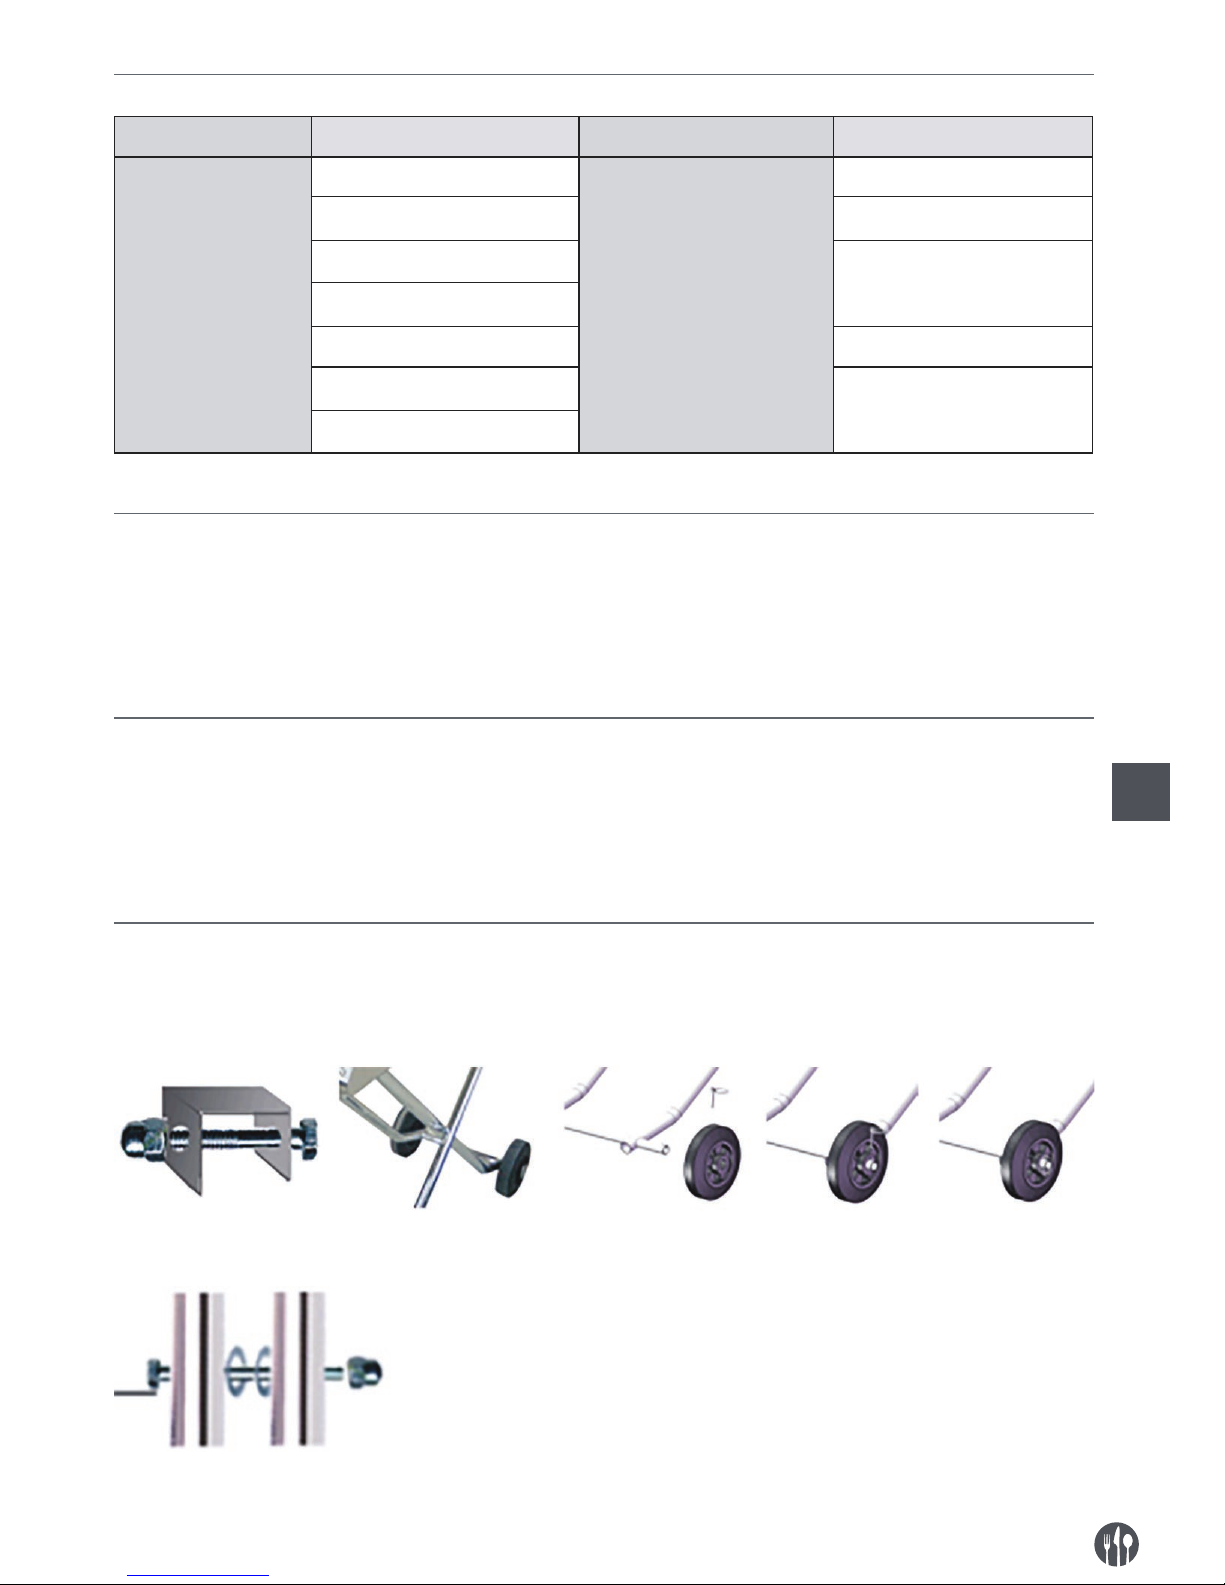
Assembly
• Remove all protective plastic foil
• Fasten the frame with the already assembled wheels to the under part of the Power grill. Use the parts
delivered; M6x40 bolts and the M6 cap nuts. Take note of the frame stand, the bend in this frame has to
be slightly bent upwards at the ends.
• Assemble the body frame the wheel frame. Take note, the supplied rings has to be positioned in the
inner side of the frame and also where the two frames join together. Use the long M6 x 65 bolts and the
M6 cap nuts.
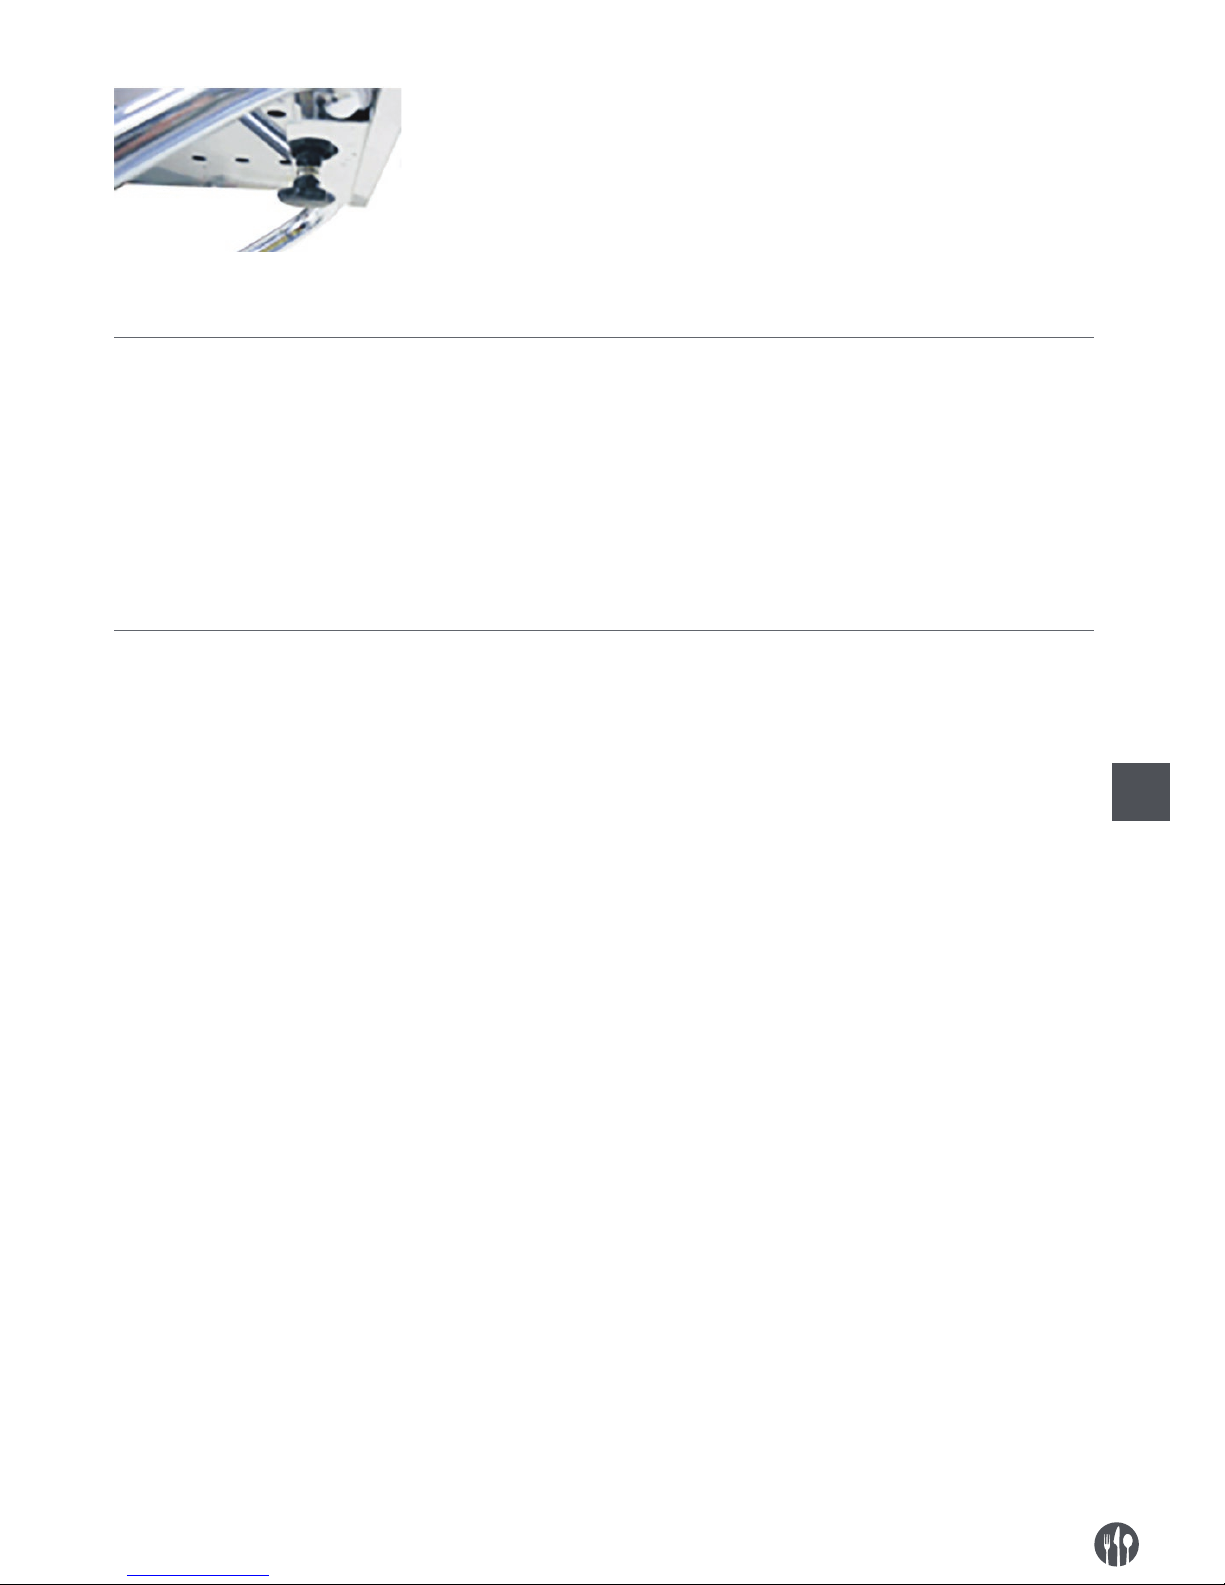
• Fasten the U-shaped part to the under part of the body frame. Use the star bolt supplied. Check if it’s
really tightened.
• Put the barbecue in up right position. The barbecue has to be positioned horizontally. If not the wheel
frame has to be turned the other way round.
Warranty
Any defect affecting the functionality of the appliance
that becomes apparent within one year after purchase will be corrected by free repair or replacement
provided the appliance has been used and maintained in accordance with the instructions and has
not been abused or misused in any way. Your statutory rights are not affected. If the appliance is claimed
under warranty, state where and when it was bought
and include proof of purchase (f.e. receipt).
In line with our policy of continuous product development we reserve the right to change the product,
packaging and documentation specifications without notice.
Discarding & Environment
At the end of the life of the appliance, please dispose
of the appliance according to the regulations and
guidelines applicable at the time.
Throw packing materials like plastic and boxes in
the appropriate containers.
EN

7
NL
Sehr geehrte(r) Kunde/in!
Herzlichen Dank für den Kauf dieses Hendi Geräts. Lesen Sie sich diese Bedienungsanleitung vor dem
Anschluss des Geräts sorgfältig durch, um Schäden durch unsachgemäße Bedienung zu verhindern. Die
Sicherheitsvorschriften besonders sorgfältig lesen.
Sicherheitsvorschriften
• Benutzen Sie die Grillgeräte nur im Freien.
• Die unsachgemäße Bedienung des Geräts kann zur schweren Beschädigung des Geräts sowie zu Verletzungen führen.
• Das Gerät ist ausschließlich zu dem Zweck zu benutzen, zu dem es
hergestellt wurde. Der Hersteller haftet nicht für Schäden, die auf
unsachgemäße Bedienung des Geräts zurückzuführen sind.
• Versuchen Sie nie eigenständig das Gehäuse des Gerätes zu öffnen.
• In das Gehäuse des Gerätes keine Gegenstände einführen.
• Das Gerät nicht mehr benutzen, wenn es heruntergefallen ist oder
sonst wie beschädigt wurde. Das Gerät von einer zugelassenen Reparaturwerkstatt prüfen und gegebenenfalls reparieren lassen.
• Nicht versuchen, das Gerät eigenständig zu reparieren. Es besteht
Lebensgefahr.
• Das Gerät bei Bedienung stets überwachen.
• Kinder kennen die Gefahr der unsachgemäßen Bedienung elektrischer Geräte nicht. Kinder daher niemals unbeaufsichtigt elektrische Geräte bedienen lassen!
• Keine zusätzlichen Hilfsmittel benutzen, die nicht mit dem Gerät mitgeliefert wurden.
• Die Verwendung von der Anlage hat den nationalen und regionalen
Vorschriften zu entsprechen.
• Dieses Gerät eignet sich nicht für den Gebrauch durch Personen (gilt
auch für Kinder) mit geringerer Motorik, Sensorik oder geistiger Fähigkeit oder mangelhafter Erfahrung und Wissen, es sei denn, sie
werden bei dem Gebrauch des Gerätes beaufsichtigt oder erhalten
Anweisungen von einer Person, die für ihre Sicherheit die Verantwortung trägt.
• Dieses Gerät dient ausschließlich der Nahrungszubereitung.
• Gas-und Elektroinstallationen sollte mindestens einmal im Jahr
überprüft werden.
• Achtung: die (Griffe der) Grillplatte wird heiß. Entfernen /berühren
Sie die Grillplatte erst bis die vollständig abgekühlt ist.
• Wir empfehlen nur Gasflaschen mit einer Kapazität von mindestens
10 Kilo zu benutzen.
• Bewahren Sie die Gasflasche niemals in der Nähe von potenziellen
Zündquellen auf.
DE

8
NL
• Stellen Sie die Gasflasche neben das Gerät, nicht darunter.
• Wenn Sie ein Gasleck festgestellen, schließen Sie sofort das Gasventil
• Beachten Sie, dass Teile des Grills sehr heiß werden können. Tragen Sie Schutzkleidung (Hand schuhe), wenn Sie diese Teile berühren
müssen
Spezielle Sicherheitshinweise
• Stellen Sie das Gerät auf eine ebene und stabile Fläche.
• Die Montage und eventuelle Reparaturen des Gerätes sollten durch
einen Servicemitarbeiter oder Fachtechniker durchgeführt werden.
Demontieren Sie keine Teile des Gerätes.
• Machen Sie sich mit den lokalen und nationalen Normen vertraut, um
die Übereinstimmung mit den nachfolgenden Vorgaben und Vorschrif
-
ten zu gewährleisten:
• Arbeitsschutzordnung
• Brandschutzvorschriften
• Bauvorschriften
• Tauchen Sie das Gerät NICHT in Wasser.
• Während der Nutzung darf das Gerät NICHT ohne Aufsicht belassen
werden.
• Einige Teile des Gerätes können sich bei seinem Betrieb auf sehr hohe
Temperaturen erwärmen - seien Sie vorsichtig.
• Halten Sie Kinder vom Gerät fern.
• Verlegen Sie das Gerät NICHT während seines Betriebs.
• Verwenden Sie das Gerät NICHT, wenn der Schlauch beschädigt ist.
• Verwenden Sie das Gerät NICHT, bevor Sie die Grillplatte auf es nicht
legen.
• Sperren Sie IMMER die Gaszufuhr zum Gerät, wenn Sie es nicht be
-
nutzen.
• Lagern Sie IMMER die Gasflaschen aufrecht, auch wenn sie leer sind.
• Setzen Sie NIE die Gasflasche direkter Sonneneinstrahlung.
• Verwenden Sie das Gerät NICHT, wenn die Umgebungstemperatur 40°C
überschreitet.
• Prüfen Sie regelmäßig den Schlauch auf eventuelle Beschädigungen.
• Nur zur äußerlichen Anwendung.
• Das Gerät darf ausschließlich durch befähigte Personen entsprechend
den in der vorliegenden Anweisung enthaltenen Hinweisen verwendet
werden.
• Die Kinder dürfen das Gerät nicht benutzen.
• Bewahren Sie die Verpackung außer Reichweite von Kindern auf. Ent
-
sorgen Sie die Verpackung gemäß den lokalen Vorschriften.
DE
9
NL
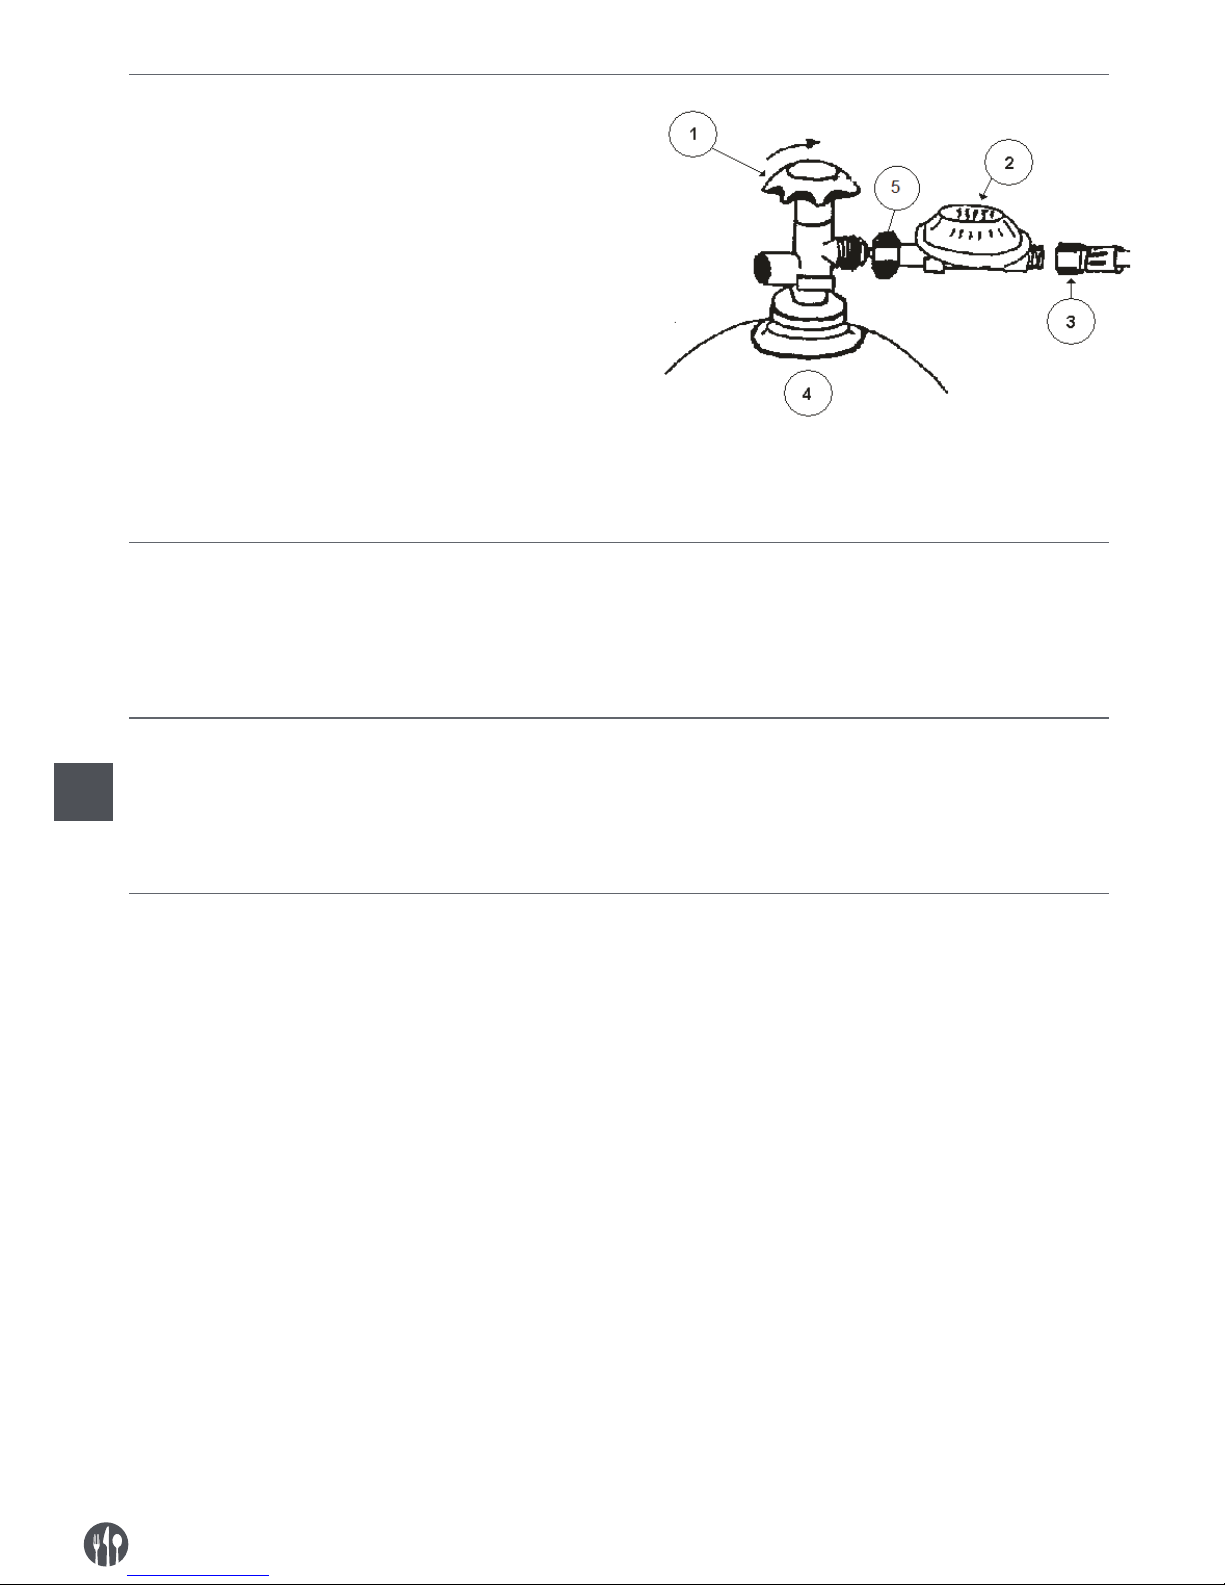
Anschluss an der Gasflasche
1 = Haupthahn
2 = Druckregler
3 = Gasschlauch
4 = Gasflasche
5 = Dichtungsring
Befestigen Sie den Druckregler mit der großen
Messingmutter an der Gasflasche. Achten Sie
darauf, dass sich der Gummidichtungsring in
der Mutter befindet. (PS: Der Gummiring wird in
Großbritannien beim Anschluss des Druckreglers
nicht benutzt.) Ziehen Sie die Mutter kräftig an.
Beachten Sie bitte, dass es sich hier um ein linksdrehendes Schraubgewinde handelt. Kontrollieren
Sie die Verbindung mit Seifenlauge auf eventuell
vorhandene Undichtigkeiten.
Anzünden des Powergrills
• Legen Sie den beiden Grillroste auf den Grill.
• Stellen Sie den Regler auf “Normal” und halten Sie
den Regler eingedrückt. Drücken Sie nun einige
Male auf den Zündknopf bis der Brenner vollständig entflammt. Halten Sie den Regler weitere ca.
10 Sekunden gedrückt. Nun sollte der Brenner
weiterbrennen.
• Kontrollieren Sie bitte durch das Guckloch ob der
Brenner vollständig brennt.
Abschalten des Powergrills
Drehen Sie den Knopf ganz nach rechts.
ACHTUNG! Denken Sie bitte daran, dass Sie nach dem Löschen ca. 10 Minuten warten müssen, bis Sie den
Brenner erneut anzünden. Nach dem Löschen des Brenners ist der Gasflaschenregler immer zu schließen!
Reinigung und Wartung
• Der Powergrill hat ein selbstreinigungswirkung.
Dafür brauchen Sie nach Gebrauch der Powergrill
etwa 10 minuten auf maximalen Leistung brennen
zu lassen. Fett und Resten sollen dadurch verdampfen ob verbrennen.
• Achtung: Tauchen Sie das Gerät nicht in Wasser
oder andere Flüssigkeiten ein!
• Das Gehäuse mit einem feuchten Tuch (Wasser
mit einem milden Reinigungsmittel) reinigen.
• Der Grillrost bzw die Grillpfanne sollte regelmäßig
nach Gebrauch gereinigt werden. Verwenden Sie
einen speziellen Grillreiniger und befolgen Sie
dessen Reinigungshinweise.
• Die eventuelle Lüftungsöffnungen mit dem Staubsauger reinigen.
• Lagern Sie das Gerät nach dem Gebrauch nicht
im Freien.
• Lassen Sie mindestens 1x pro Jahr der Brenner
durch einen qualifizierten Techniker reinigen.
• Benutzen Sie niemals einen Hochdruckreiniger.
• Pflegehinweise nach jedem Gebrauch: Reinigen
Sie den Rost, das Lüftungsgitter, das Abtropfblech
sowie den Windfang nach jedem Gebrauch.
DE
10
DE
Störungen
Störung Mögliche Ursache Störung Mögliche Ursache
Brenner zündet
überhaupt nicht:
defekte Zündung
Brenner zündet nur
teilweise
Gasflasche ist fast leer
defektes Thermoelement geknickter Gasschlauch
schmutzige Zündkerze
das Gasventil ist nicht ganz
geöffnet.
defekte Gasregler
leerer Gaszylinder verstopfte Düse
Gasschlauch ist geknickt
defektes Ventil
verstopfte Düse
Nehmen Sie im Zweifelsfall immer Kontakt mit dem Lieferanten auf.
Anmerkung
• Der Gasschlauch ist nach 3 bis 4 Jahren durch einen neuen zu ersetzen ( sehe Datum auf der Gasschlauch) , da diese mit der Zeit porös wird.
• Bitte heranziehen Sie ihre örtliche Norm.
• Gasflaschen- auch leere – sind immer vertikal zu
lagern.
• Der Powergrill wird gelievert geeignet für propangas. Es ist nicht erlaubt der Powergrill zu modifizieren, wann es doch erwünscht ist, bitte kontactieren Sie der Fabrikant.
Montageanleitung untergestell
Für den Montage des Untergestells sind die folgendes Unterteile mitgelievert:
- 1 Gestell mit Radern
- 1 Gestell
- 2 Schraubenbolzen M6x40.
- 2 Schraubenbolzen M6x65.
- 4 Sicherungsmuttern M6.
- 2 Ringen M6.
- 1 Sternbolzen M6
Montage
• Entfernen Sie bitte das weiße Schutzfolie.
• Montieren Sie bitte das Gestell mit den Radern in den U-formigen Sparung vorne. Gebrauchen Sie bitte
die kurze M6x40 Bolzen und M6 Sicherungsmutter. Achten Sie darauf dass der Knick unter ist.
• Montieren Sie bitte das Gestell gekreuzt an das Gestell mit den Radern. Gebrauchen Sie bitte die lange
M6x65 Bolzen und M6 Ringen. Achten Sie darauf dass der Ring zwischen die zwei Gestelle gesetzt ist.
• Sicheren Sie bitte das Gestell ohne Radern in der U-formigen Sparung an der Hintenseite. Gebrauchen
Sie bitte die Sternbolzen. Kontrollieren Sie ob das Gestell gesichert ist.
11
DE
• Stellen Sie der Powergrill aufrecht. Der Powergrill soll jetzt horizontal stehen. Wenn der Powergrill nicht
horizontal steht, bitte drehen Sie das Gestell.
Garantie
Jeder Defekt, der die Funktion des Geräts nachteilig
beeinflusst und der sich innerhalb eines Jahres nach
Ankauf des Geräts zeigt, wird durch Reparatur oder
Auswechslung kostenlos behoben, falls das Gerät
den Anleitungen entsprechend gebraucht und gewartet wurde und nicht in irgendeiner Weise falsch
behandelt oder unzweckmäßig benutzt wurde. Ihre
gesetzlich verbrieften Rechte bleiben davon un-
berührt. Ist die Garantie rechtsgültig, geben Sie an,
wo und wann Sie das Gerät gekauft haben und legen
Sie eine Quittung (z.B. Kassenzettel) bei.
Auf Grund unserer Zielsetzung, die Produktentwicklung stetig fortzusetzen, behalten wir uns das Recht
vor, das Produkt, die Verpackung und die Unterlagen
ohne vorherige Inkenntnissetzung zu ändern.
Entsorgung & Umwelt
Am Ende der Lebensdauer das Geräts bitte gemäß den
aktuell geltenden Vorschriften und Richtlinien entsorgen.
Entsorgen Sie Verpackungsmaterialien wie Kunststoff und
Kartons nach den entsprechenden nationalen Vorschriften.

12
NL
Geachte klant,
Hartelijk dank voor de aankoop van dit Hendi apparaat. Leest u deze gebruikshandleiding zorgvuldig voordat u het apparaat aansluit, dit om schade door verkeerd gebruik te voorkomen. Lees vooral de veiligheidsvoorschriften aandachtig door.
Veiligheidsvoorschriften
• De barbecue uitsluitend geschikt voor gebruik buitenshuis.
• Onjuiste bediening en verkeerd gebruik van het apparaat kan ernstige schade aan het apparaat en verwonding van personen tot gevolg
hebben.
• Het apparaat mag alleen worden gebruikt voor het doel waarvoor
het werd ontworpen. De fabrikant aanvaardt geen enkele aansprakelijkheid voor schade als gevolg van onjuiste bediening en verkeerd
gebruik.
• Probeer nooit zelf de behuizing van het apparaat te openen.
• Steek geen voorwerpen in de behuizing van het apparaat.
• Gebruik het apparaat niet nadat het is gevallen of op andere wijze
beschadigd is. Laat het bij een erkend reparatiebedrijf controleren en
zo nodig repareren.
• Probeer het apparaat niet zelf te repareren. Dit kan levensgevaar opleveren.
• Houd het apparaat als u het gebruikt steeds in de gaten.
• Kinderen zien de gevaren van onjuist gebruik van apparaten niet. Laat
kinderen daarom nooit zonder toezicht met apparatuur werken.
• Gebruik geen extra hulpmiddelen die niet bij het apparaat zijn meegeleverd.
• Het gebruik van de installatie dient te voldoen aan de nationale en
plaatselijk geldende voorschriften.
• Dit apparaat is niet geschikt voor gebruik door personen (inclusief
kinderen) met een verminderd fysiek, sensorisch of geestelijk vermogen, of gebrek aan ervaring en kennis, tenzij supervisie of instructie is gegeven betreffende het gebruik van het apparaat door een persoon welke verantwoordelijk is voor hun veiligheid.
• Dit apparaat is uitsluitend bedoeld voor het bereiden van voedsel.
• Gas en elektrische apparaten dienen minimaal eenmaal per jaar te
worden nagekeken.
• N.B. de bakplaat wordt heet. Verwijder de bakplaat pas als deze geheel is afgekoeld.
• Wij adviseren alleen gasflessen te gebruiken met een capaciteit van
meer dan 10 kilo.

13
NL
• Vervanging van de (lege) gasfles nooit uitvoeren in de buurt van mogelijke ontstekingsbronnen.
• Plaats de gasfles altijd naast het apparaat, niet er onder.
• Als er een gaslek geconstateerd wordt, draai dan direct de gaskraan
dicht.
• Let op, dat onderdelen van de barbecue zeer heet kunnen worden.
Draag beschermende kleding (handschoenen) als u deze toch aan
moet raken.
Speciale veiligheidsvoorschriften
• Plaats het apparaat op een vlakke, stabiele ondergrond.
• Een onderhoudsagent/bevoegde monteur moet de installatie en indien
nodig enige reparaties uitvoeren. Verwijder geen componenten van dit
product.
• Raadpleeg lokale en nationale normen om aan het volgende te voldoen:
• Wetgeving betreffende gezondheid en veiligheid op het werk
• Voorzorgsmaatregelen tegen brand
• Bouwvoorschriften
• Dompel het apparaat NIET onder in water.
• Laat het apparaat NIET onbeheerd als het in werking is.
• Sommige oppervlakken worden tijdens het gebruik heet; wees voor
-
zichtig wanneer u het apparaat gebruikt.
• Houdt kinderen uit de buurt van het apparaat als het in werking is.
• Verplaats het apparaat NIET tijdens het koken.
• Gebruik het apparaat NIET als de slang op enige manier is beschadigd.
• Gebruik het apparaat NIET zonder geplaatste kookroosters.
• Draai ALTIJD de gastoevoer naar het apparaat dicht wanneer het niet
wordt gebruikt.
• Sla gasflessen ALTIJD rechtop op, zelfs wanneer deze leeg zijn.
• Gasflessen NIET gebruiken of opslaan in direct zonlicht.
• Gebruik het apparaat NIET als de omgevingstemperatuur hoger is dan
40°C.
• Inspecteer de slang regelmatig op barsten/defecten.
• Niet geschikt voor gebruik binnenshuis.
• Dit apparaat mag uitsluitend worden gebruikt in overeenstemming met
deze aanwijzingen en door personen die bevoegd zijn om dit te doen.
• Dit apparaat is niet geschikt voor gebruik door kinderen.
• Houd alle verpakkingsmaterialen uit de buurt van kinderen. Voer de ver
pakkingsmaterialen af in overeenstemming met de voorschriften van
lokale autoriteiten.
14
NL
Aansluiten van de gasfles
1 = Hoofdkraan
2 = Drukregelaar
3 = Gasslang
4 = Gasfles
5 = Rubber afdichtring
Bevestig de drukregelaar aan de gasfles met de
grote messing moer. Denk erom dat de rubber afdichtring in de moer aanwezig is. (NB. Deze rubberen ring wordt in Groot-Brittannië niet gebruikt
bij aansluiting van de drukregelaar). Draai de moer
goed vast. Let op dit is een linkse schroefdraad.
Controleer de verbindingen met zeepsop om eventuele
lekken op te sporen.
Ontsteken van de gasbarbecue
• Plaats altijd de roosters op de Powergrill.
• Draai de knop op de stand “normaal”. Blijf de knop
indrukken en druk enkele malen op de ontstekingsknop tot de brander volledig vlam geeft. Blijf de
knop nog circa 10 seconden ingedrukt houden. De
brander zal nu blijven branden.
• Controleer door het kijkgat of de brander volledig
brandt.
Doven van de gasbarbecue
Draai de knop geheel naar rechts. De branders zullen doven.
Let op! Na het doven ca. 10 minuten wachten alvorens de branders opnieuw te ontsteken. Na het doven van
de branders altijd de hoofdkraan van de gasfles en de kraan van het apparaat dichtdraaien!
Reiniging en onderhoud
• De Powergrill heeft een zelfreinigende werking. Hiervoor dient u na gebruik de barbecue circa 10 minuten
op vol vermogen te laten doorbranden. Vetten en resten
zullen hierdoor verdampen of verbranden.
• Let op: Nooit het apparaat in water of een andere vloeistof onderdompelen!
• De buitenkant maakt u schoon met een vochtig doekje
(water met mild reinigingsmiddel).
• De roosters en de bakplaat dienen regelmatig te worden
schoongemaakt. Reinigen met een speciale barbecuereiniger. Volgt u de instructies op de verpakking.
• U kunt de branders verwijderen om zo de bak gemakkelijk te kunnen reinigen.
• Reinig de eventueel aanwezige ventilatieopeningen met
de stofzuiger.
• Na gebruik binnenshuis bewaren.
• Laat tenminste 1 x per jaar de brander reinigen door
een erkend installateur
• Nooit met een hogedrukreiniger reinigen.
• Onderhoud na elk gebruik: bovenrooster en bakplaat
goed reinigen, roestvaststalen vetopvangbak reinigen,
rooster invetten.
15
NL
Storingen
Storing Mogelijke oorzaak Storing Mogelijke oorzaak
brander wil niet
aanspringen:
ontsteking defect
brander brandt niet
volledig:
gasfles (bijna) leeg
thermokoppel defect slang geknikt
bougie vuil
kraan op gasfles niet
helemaal open
drukregelaar defect
gasfles leeg hoofdsproeier verstopt
gasslang geknikt
gaskraan defect
sproeier verstopt
Neem in geval van twijfel altijd contact op met uw leverancier
Opmerking
• Het is aan te raden na 3 tot 4 jaar de gasslang te
vervangen ( zie de datum op de slang ), deze wordt op
den duur poreus.
• Raadpleeg ook de plaatselijk geldende normen, deze
kunnen afwijken.
• Gasflessen, ook lege; altijd rechtop bewaren
• De Powergrill wordt geleverd geschikt voor propaangas. Het is niet toegestaan het apparaat te modificeren, indien dit wel gewenst is dient u contact met de
fabrikant op te nemen.
Montagehandleiding onderstel
Voor de montage van het onderstel zijn de volgende
onderdelen meegeleverd:
- 1 wielframe
- 1 vast frame
- 2 bouten M6x40.
- 2 bouten M6x65.
- 4 borgmoeren M6.
- 2 ringen M6.
- 1 sterbout M6
Montage
• Verwijder alle witte beschermfolie
• Monteer het wielframe in de U-vormige uitsparing aan de voorzijde. Gebruik hiervoor de korte M6x40
bout en M6 borgmoer. Let op dat de knik onderaan naar beneden wijst.
• Monteer het vaste frame kruislings aan het wielframe. Gebruik hiervoor lange M6x65 bouten en M6 ringen. Let op dat de ring tussen de twee framedelen geplaatst is.
• Borg het vaste frame in de U-vormige uitsparing aan de achterzijde. Gebruik hiervoor de sterbout. Controleer dat het frame geborgd is.
 Loading...