

Page 1
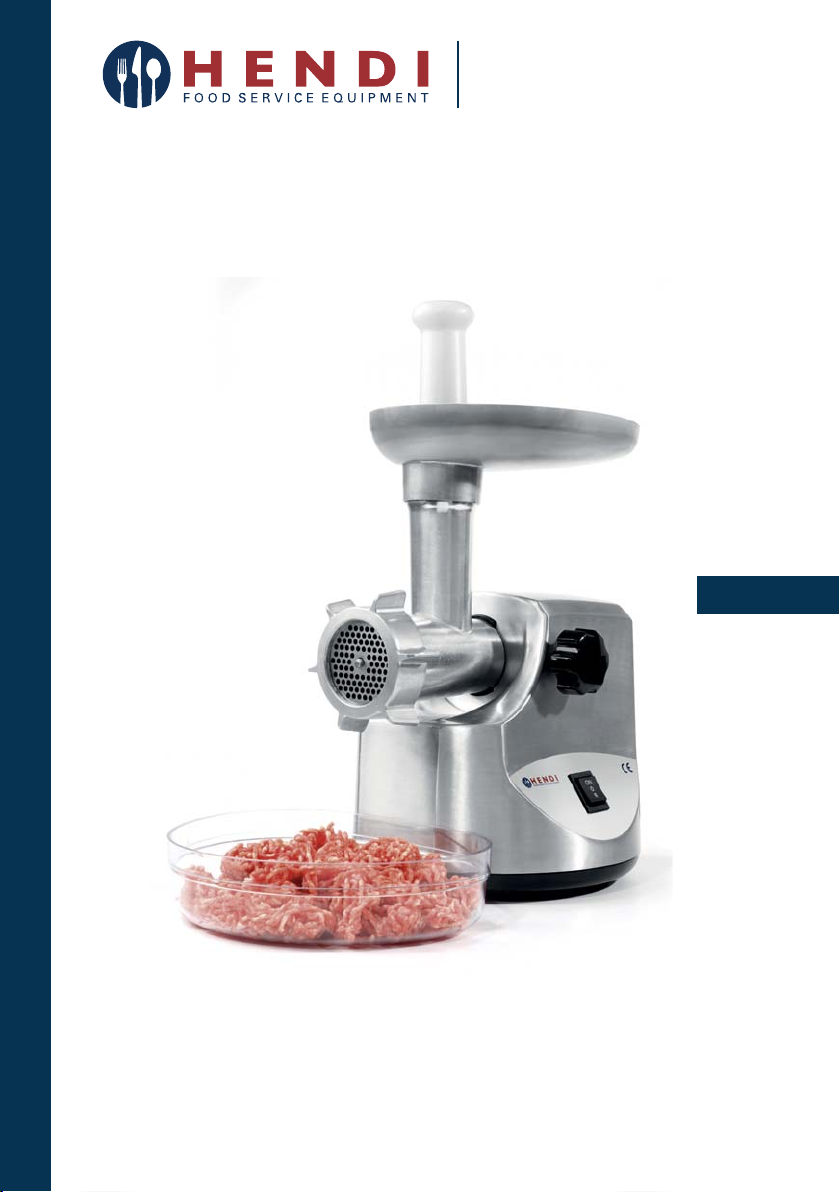
User manual
Gebrauchsanweisung
Gebruiksaanwijzing
Instrukcja obsługi
Mode d’emploi
Istruzioni per l’utente
Instrucţiunile utilizatorului
Руководство по эксплуатации
MEAT MINCER
MASZYNKA DO MIELENIA MIĘSA
Item: 210864
You should read this user manual carefully before
using the appliance
Bevor Sie das Gerät in Betrieb nehmen, sollten
Sie diese Gebrauchsanweisung aufmerksam lesen
Alvorens de apparatuur in gebruik te nemen dient
u deze gebruiksaanwijzing aandachtig te lezen
Przed uruchomieniem urządzenia należy koniecznie
dokładnie przeczytać niniejszą instrukcję obsługi
Lisez attentivement ce mode d’emploi avant d’utiliser
l’appareil
Prima di utilizzare l’apparecchio in funzione leggere
attentamente le istruzioni per l’uso
Citiţi cu atenţie prezentul manual de utilizare înainte
de folosirea aparatului
Внимательно прочитайте руководство пользователя
перед использованием прибора
Page 2

Keep this manual with the appliance.
Diese Gebrauchsanweisung bitte beim Gerät aufbewahren.
Bewaar deze handleiding bij het apparaat.
Zachowaj instrukcję urządzenia.
Gardez ces instructions avec cet appareil.
Conservate le istruzioni insieme all’apparecchio.
Păstraţi manualul de utilizare alături de aparat.
Хранить руководство вместе с устройством.
For indoor use only.
Nur zur Verwendung im Innenbereich.
Alleen voor gebruik binnenshuis.
Do użytku wewnątrz pomieszczeń.
Pour l’usage à l’intérieur seulement.
Destinato solo all’uso domestico.
Numai pentru uz casnic.
Использовать только в помещениях.
INDEX
1. PRODUCT DESCRIPTION ......................................... 3
2. SAFETY REGULATIONS ...........................................4
3. IMPORTANT SAFEGUARDS .....................................5
4. FOR THE FIRST TIME ..............................................5
5. INSTRUCTION FOR USE ..........................................6
6. MAKING KIBBE ........................................................7
7. MAKING SAUSAGE ..................................................8
8. CLEANING AND MAINTENACE................................8
9. SPECIFICTION .........................................................9
10. WARRANTY ..............................................................9
11. DISCARDING & ENVIRONMENT ..............................9
Page 3
Dear Customer,
Thank you for purchasing this Hendi appliance. Please read this manual carefully before connecting the
appliance in order to prevent damage due to incorrect use. Read the safety regulations in particular very
carefully.
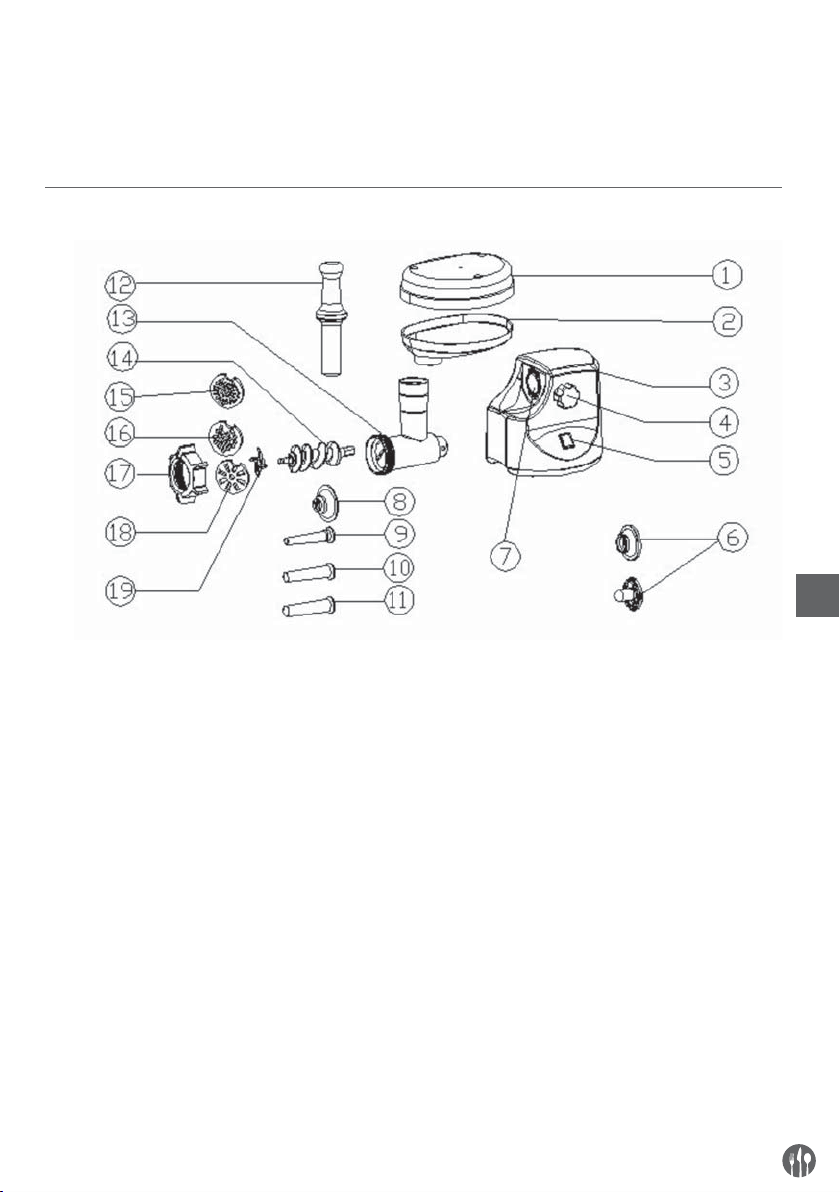
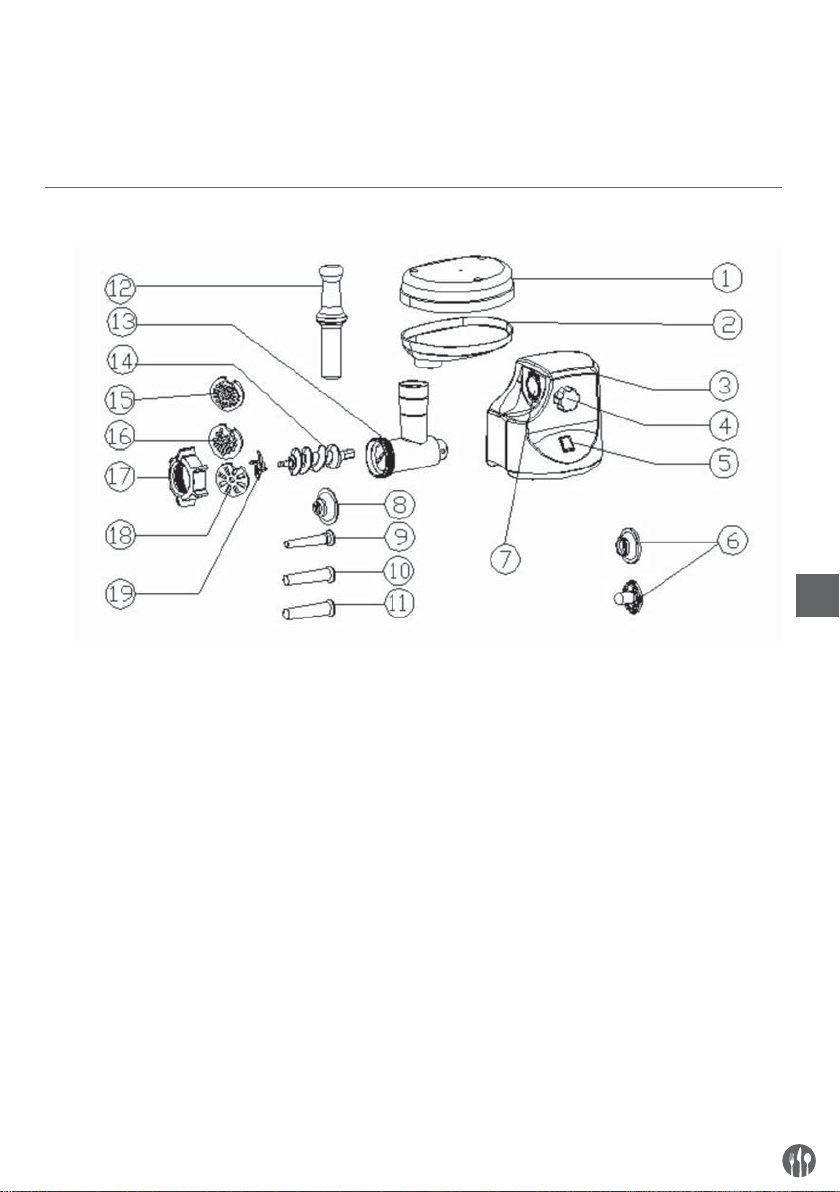
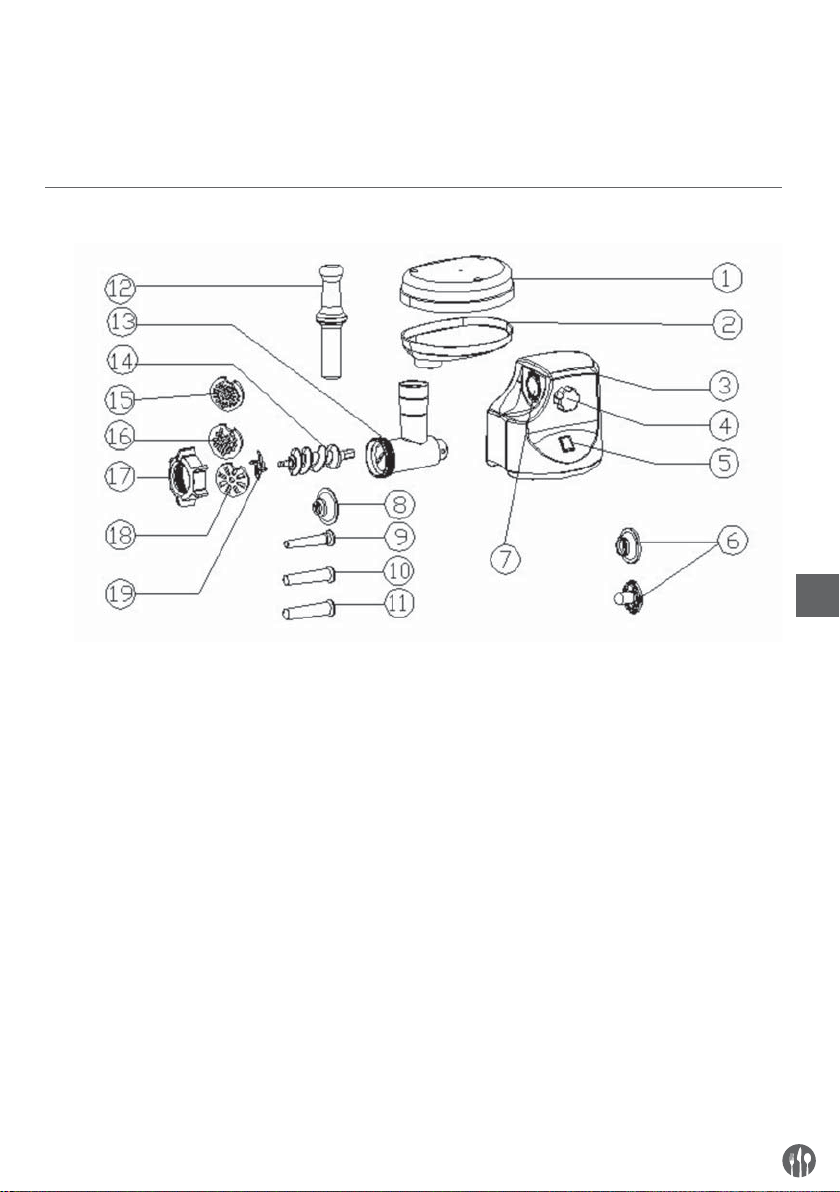
1. PRODUCT DESCRIPTION
EN
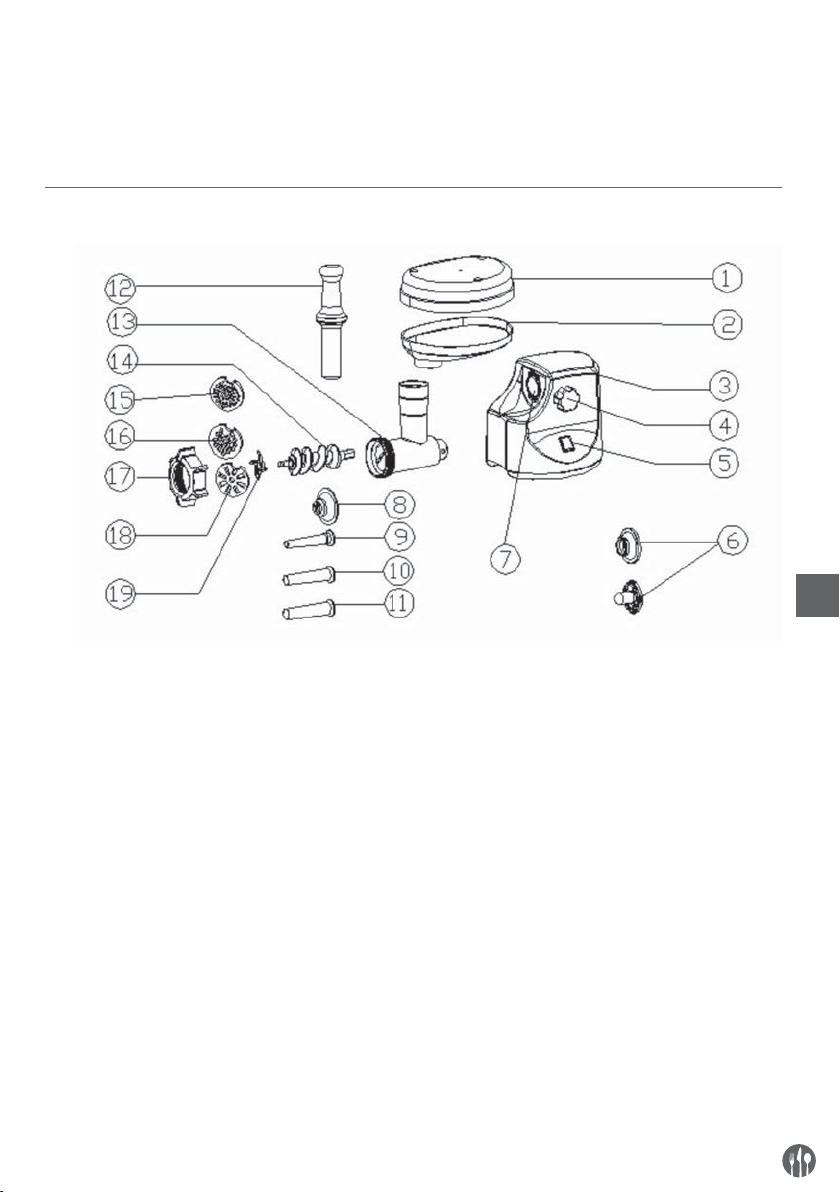
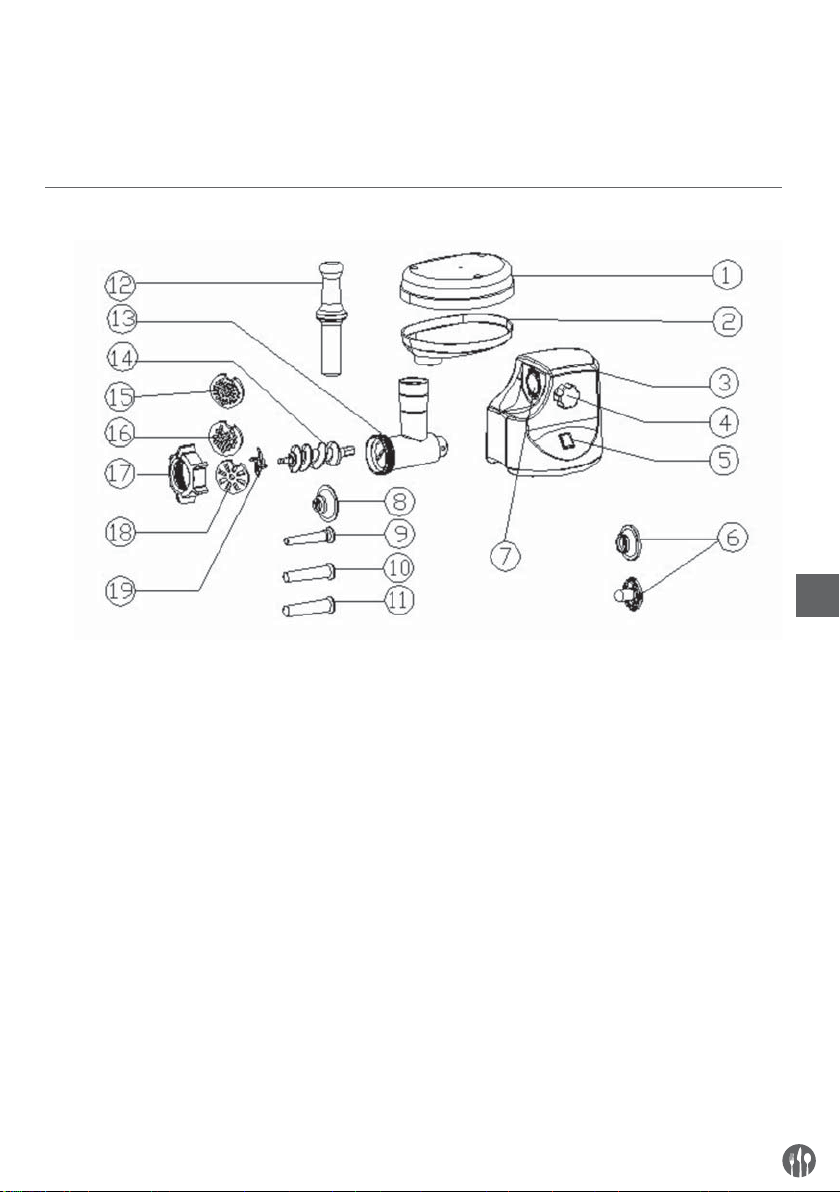
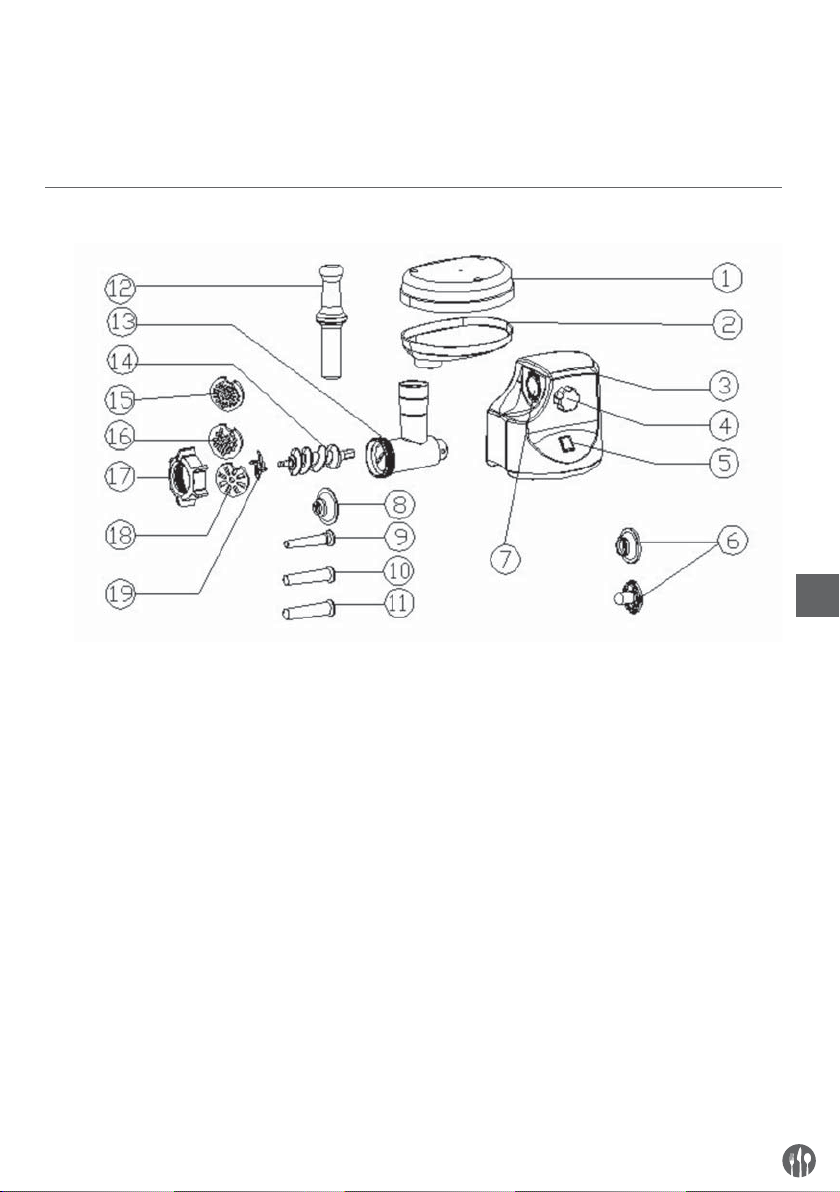
1. Food dish
2. Hopper plate
3. Body
4. Fasten button
5. Switch
6. Kibbe attachment
7. Head inlet
8. Sausage attachment (block)
9. Sausage attachment (fi ne)
10. Sausage attachment (medium)
11. Sausage attachment (large)
12. Food pusher
13. Head
14. Snake
15. Cutting plate (fi ne)
16. Cutting plate (medium)
17. Fixing ring
18. Cutting plate (large)
19. Cutting blade
3
Page 4

2. SAFETY REGULATIONS
• Incorrect operation and improper use of the appliance can seriously damage the appliance and
injure users.
• The appliance may only be used for the purpose
for which it was intended and designed. The manufacturer is not liable for any damage caused by
incorrect operation and improper use.
• Keep the appliance and electrical plug away from
water and any other liquids. In the unlikely event
that the appliance should fall into water, immediately pull the plug out of the socket and have
the appliance checked by a certifi ed technician.
Not following these instructions could give rise to
life-threatening situations.
• Never try to open the casing of the appliance yourself.
• Do not insert any objects in the casing of the appliance.
• Do not touch the plug with wet or damp hands.
• Regularly check the plug and cord for any damage. Should the plug or cord be damaged have it/
them repaired by a certifi ed repair company.
EN
• Do not use the appliance after it has fallen or is
damaged in any other way. Have it checked and repaired, if necessary, by a certifi ed repair company.
• Do not try to repair the appliance yourself. This
could give rise to life-threatening situations.
• Make sure the cord does not come in contact with
sharp or hot objects and keep it away from open
fi re. To pull the plug out of the socket, always pull
on the plug and not on the cord.
• Make sure that no one can accidentally pull the
cord (or extension cord) loose or trip over the cord.
• This appliance may only be used for the purpose it
was initially designed for.
• Always keep an eye on the appliance when in use.
• Children do not understand that incorrect use of
electrical appliances can be dangerous. Therefore, never let children use home appliances without supervision.
• Always pull the plug out of the socket when the
appliance is not being used and always before
cleaning.
• Warning! As long as the plug is in the socket the
appliance is connected to the power source.
• Turn off the appliance before pulling the plug out
of the socket.
• Never carry the appliance by the cord.
• Do not use any extra devices that are not supplied
along with the appliance.
• Only connect the appliance to an electrical outlet
with the Voltage and frequency mentioned on the
appliance label.
• Avoid overloading.
• Turn off the appliance after use by removing the
plug from the socket.
• Always remove the plug from the socket when fi lling or cleaning the appliance.
• The electrical installation must comply with the
applicable national and local regulations.
• This appliance is not intended for use by persons
(including children) with reduced physical, sensory or mental capabilities, or lack of experience and
knowledge, unless they have been given supervision or instruction concerning use of the appliance by a person responsible for their safety.
4
Page 5

3. IMPORTANT SAFEGUARDS
When using electrical appliances, basic safety precautions should always be followed including the
following:
• It is for household use and semi-professional: Do
not use outdoors.
• Unplug from outlet while not in use, before putting
on or taking off parts, and before cleaning.
• Unplug when assembling and disassembling the unit.
• Close supervision is necessary when any appliance is used near children.
• When carrying the unit be sure to hold the body
with both hands. Do not carry the unit by the hoppper plate or head.
• Do not fi x the cutting blade and cutting plate when
using kibbe attachment.
• Never push products by hand. Use food pusher.
• Do not grind hard food such as bones, nuts, etc.
• Do not grind ginger and other materials with hard
fi ber.
• Continuous running of meat grinder should be not
more than 10 minutes with the following 10 minutes interval for motor cooling.
• Operate the unit from “ON” to “R” or from “R” to
4. FOR THE FIRST TIME
“ON” after the previous working condition stops
more than 30 seconds, or it may cuase some unnormal case such as moving up and down and
easily destroy the unit.
• To avoid jamming, do not force to operate the unit
with excessive pressure.
• When the circuit breaker activates, do not switch on.
• Never try to replace the parts and repair the unit
by yourself.
• Do not immerse cord or the body of mixer into water as this would give rise to electric shock.
• This appliance is not intended for use by persons(including children) with reduced physical,
sensory or mental capabilities, or lack of experience and knowledge, unless they have been given
supervision or instruction concerning use of the
appliance by a person responsible for their safety
• Children should be supervised to ensure that they
do not play with the appliance.
• Do not operate this appliance if the cord or plug is
damaged. Return it to the store of service or repair
by professional serviceman.
EN
• Check that voltage indicated on the rating label
corresponds the mains voltage in your home.
• Wash other parts except body(motor housing) in
warm soapy water.
• Wash all parts (except body) in warm soapy water.
• Before plug in, make sure the key switch in the
“OFF” position, that is the natural state of all keys.
5
Page 6
5. INSTRUCTION FOR USE
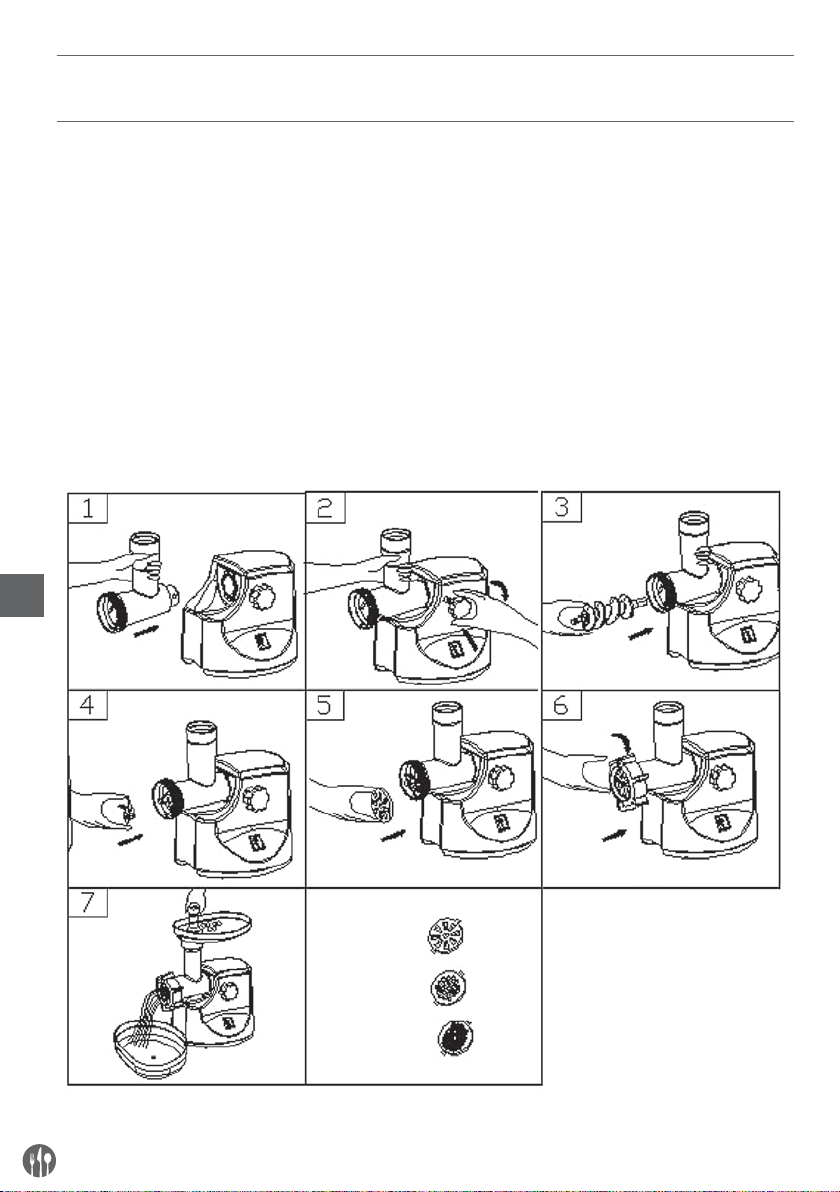
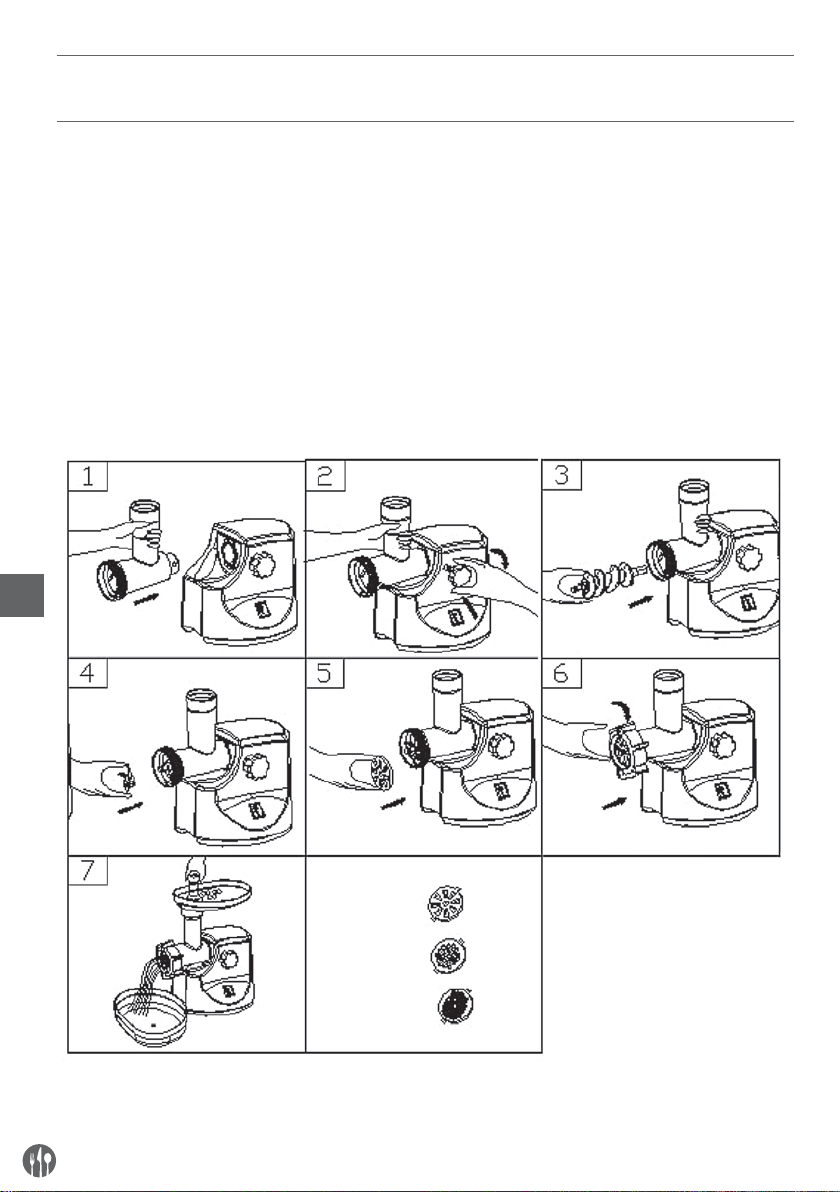
5.1. ASSEMBLING
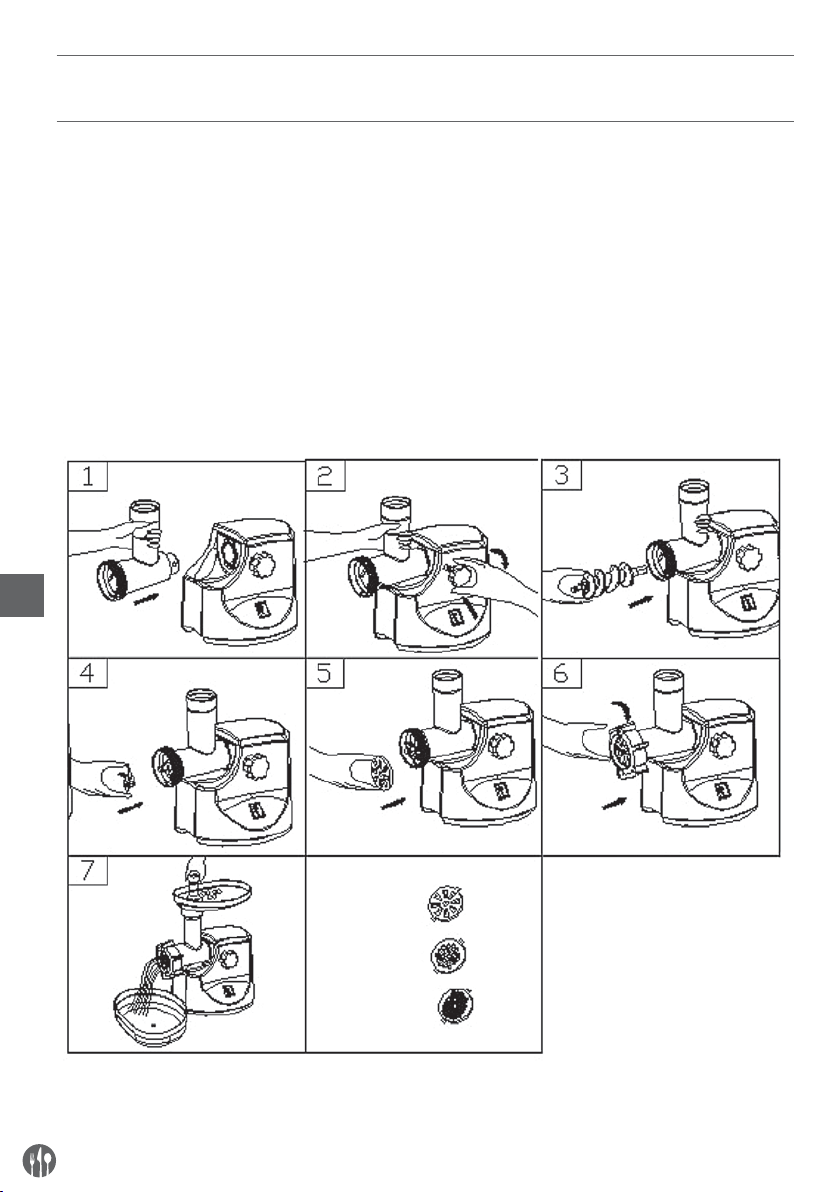
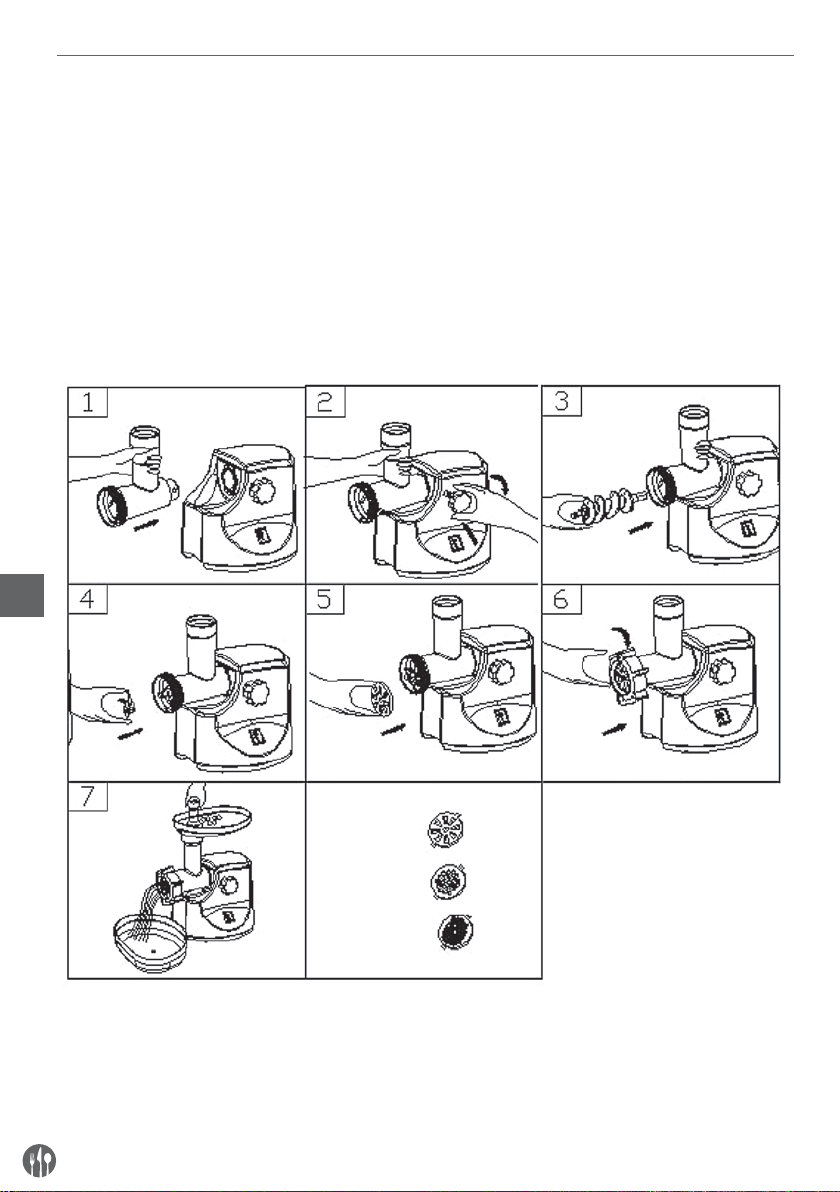
• Due to unintended starting up of the KS100E
• Place grinder/feeder head tightly into attachment
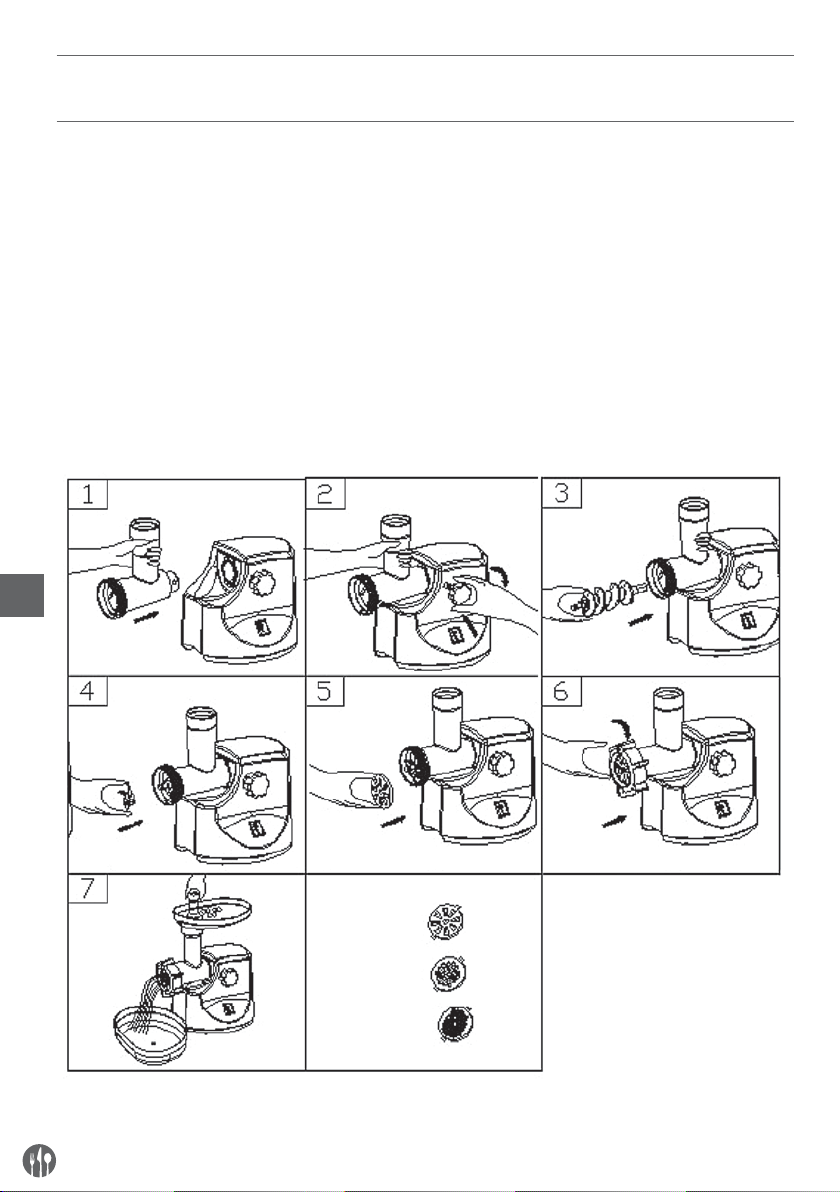
opening (fi g.1). Holding head with one hand, place
locking knob into the hole on the side of the motor housing and tighten knob by turning clockwise
(fi g.2).
• Place the snake into the head, long end fi rst, and
turn to feed the screw slightly until it is set into the
motor housing (fi g.3).
• Place the cutting blade onto the snake shaft with
the blade facing the front as illustrated (fi g.4). If
it is not fi tted properly, meat will not be grinded.
EN
• Place the desired cutting plate next to the cutting
blade, fi tting protrusions in the slot (fi g.5).
• Support or press the centre of the cutting plate
with one fi nger then screw the fi xing ring tight with
another hand (fi g.6). Do not over tighten.
• Place the hopper plate on the head and fi x it into
position.
• Locate the unit on a fi rm place.
• The air passage at the bottom and the side of
the motor housing should be kept free and not
blocked.
6
Page 7
5.2. MINCING MEAT
• Cut all foods into pieces (Sinewless, boneless and
fatless meat is recommended, approximate size:
20 mm x 20 mm x 60 mm) so that they fi t easily into
the hopper opening.
• When cutting the meat, press small switch in the
back “ON” position, and then press “ON” on the
front panel.
5.3. REVERSAL FUNCTION
• If blockade is happened, use “REVERSE” function
to pull out the meat. Firstly press the small switch
“R” position, and then press the big “R” knob for
6. MAKING KIBBE
RECIPE
STUFFING
Mutton 100 g
Olive oil 1 1/tablespoons
Onion (cut fi nely) 1 1/tablespoons
Spices to your taste
Salt to your taste
Flour 1 1/tablespoons
MUST MAKE SURE THAT BOTH “ON” POSITION,
THEN THE MEAT GRINDER START TO WORK.
• Feed foods into the hopper plate. Use for it only
the food pusher (fi g.7)
• After using, Press“O”to let appliance to stop, then
pull plug out.
several seconds, then the meat will be pull out.
• After unblocking, release“R” ,and pull plug out,
then clean food out from head of appliance.
EN
• Mince mutton once or twice.
• Fry onion until brown and add minces mutton, all
spice, salt and fl our.
OUTLET COUVER
Lean meat 450 g
Flour 150-200 g
Spices to your taste
Nutmeg (cut fi nely) 1
Powdered red pepper to your taste
Pepper to your taste
• Mince meat three times and mix all ingredients
together in a bowl. More meat and less fl our for
outlet cover create better consistency and taste.
• Grind the mixture three times.
• Disassemble by reversing the steps from 5-3 to
remove the cutting plate and cutting blade.
7
Page 8
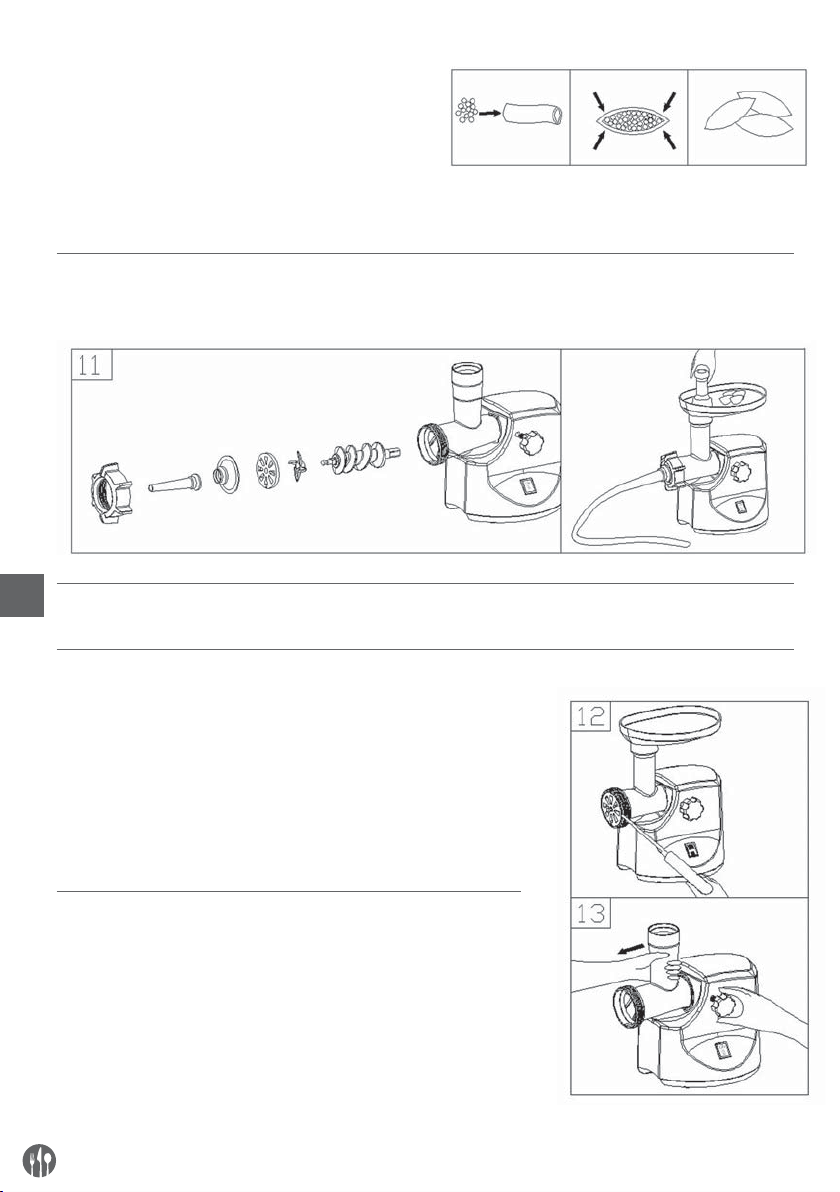
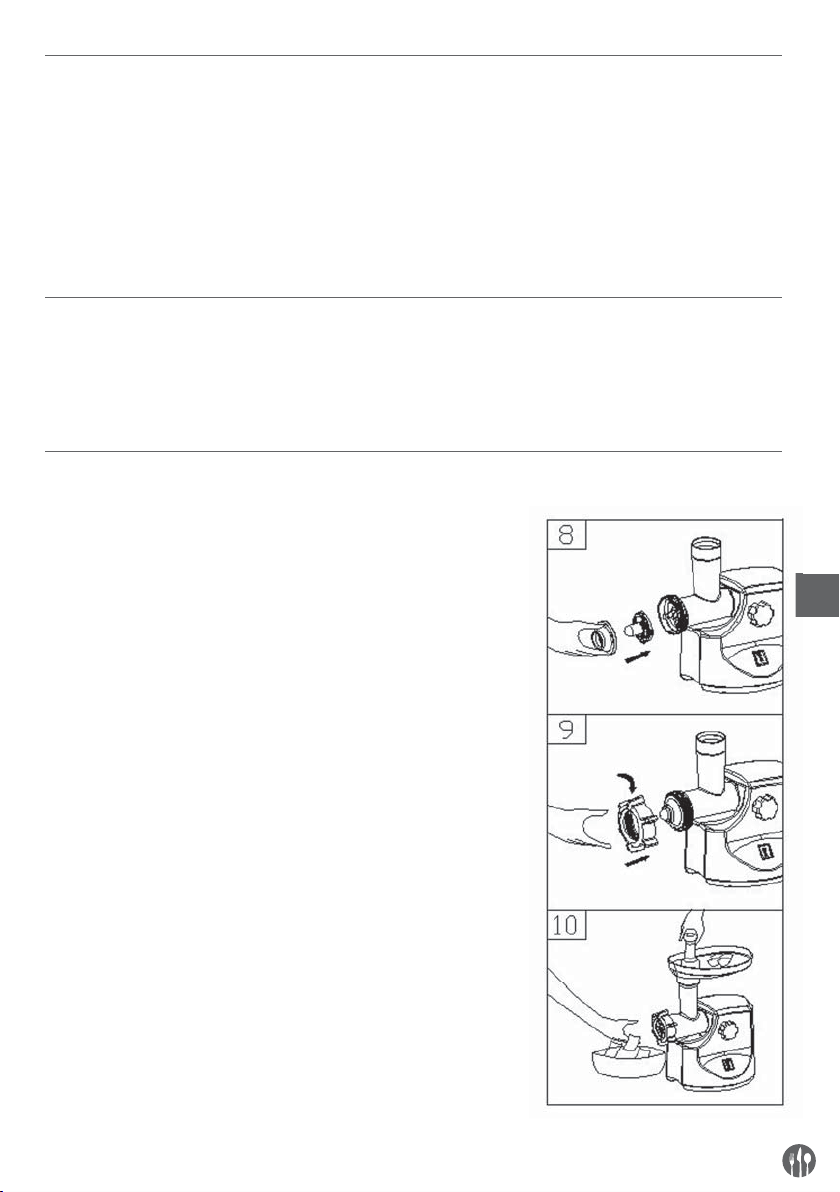
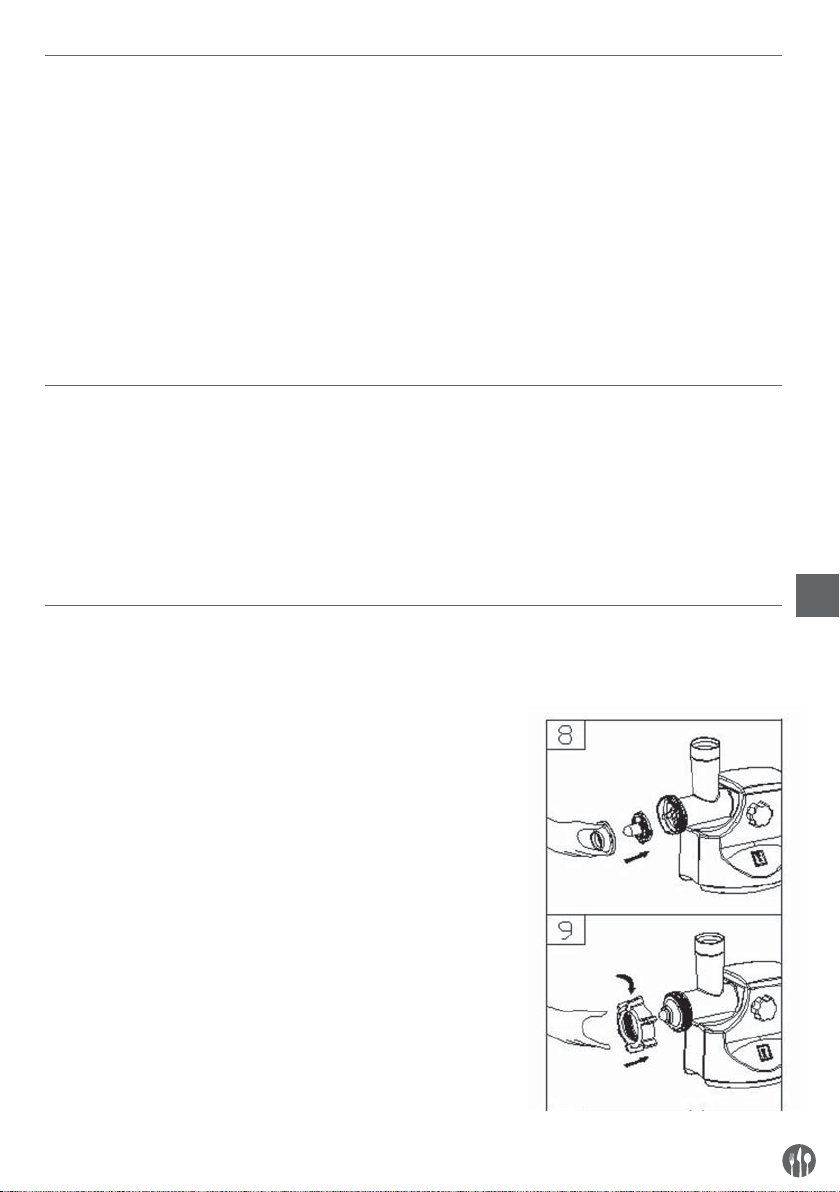
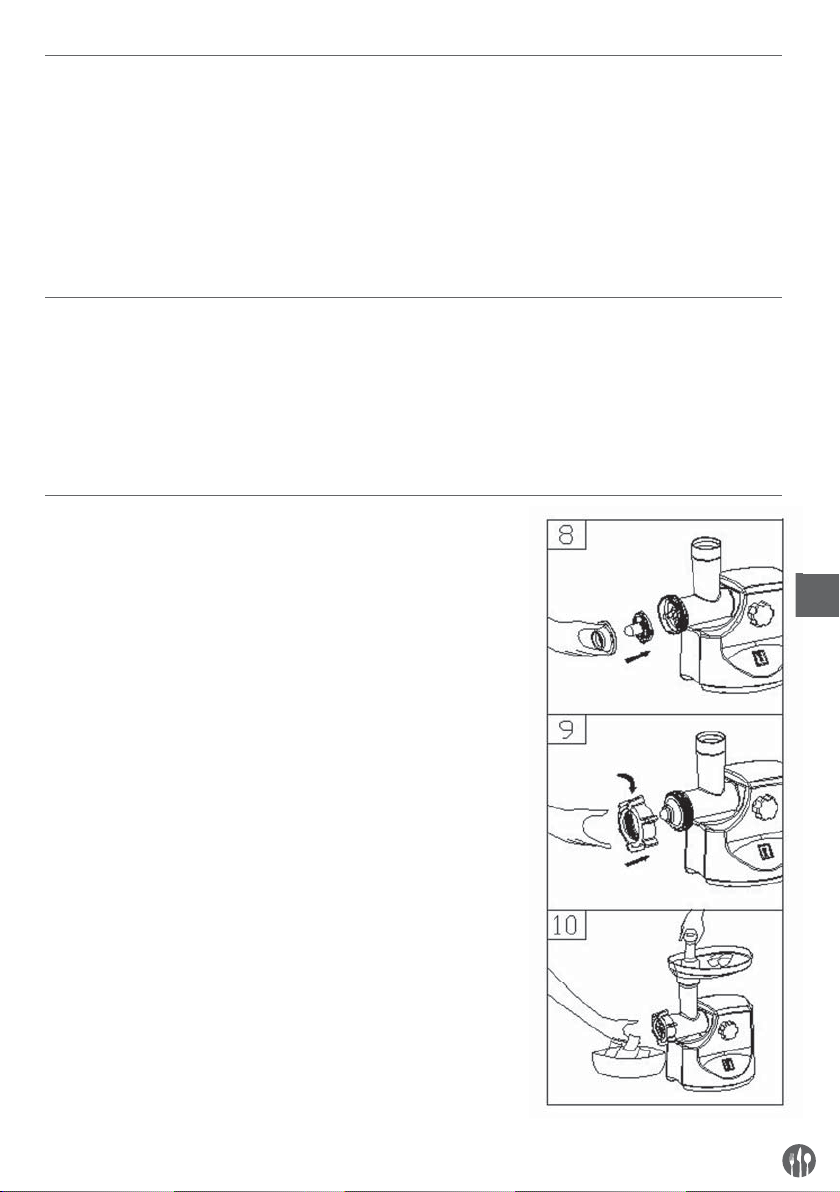
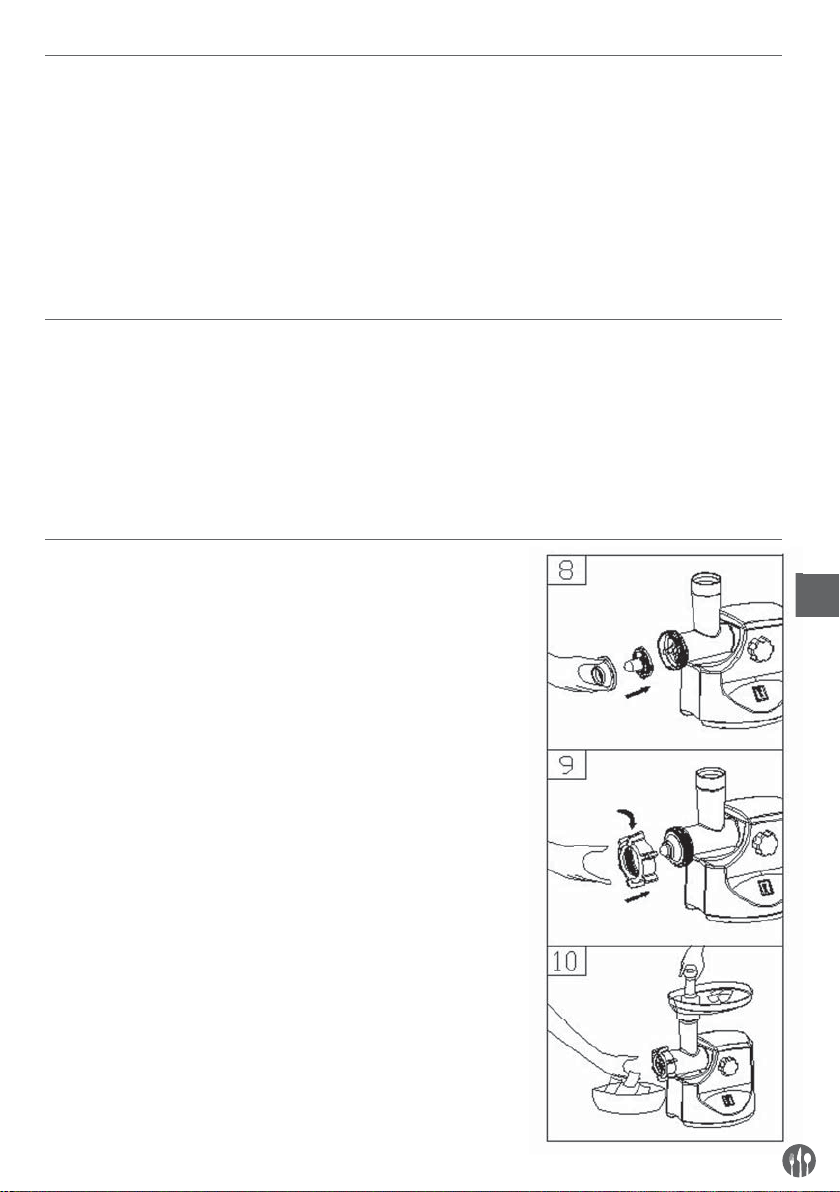
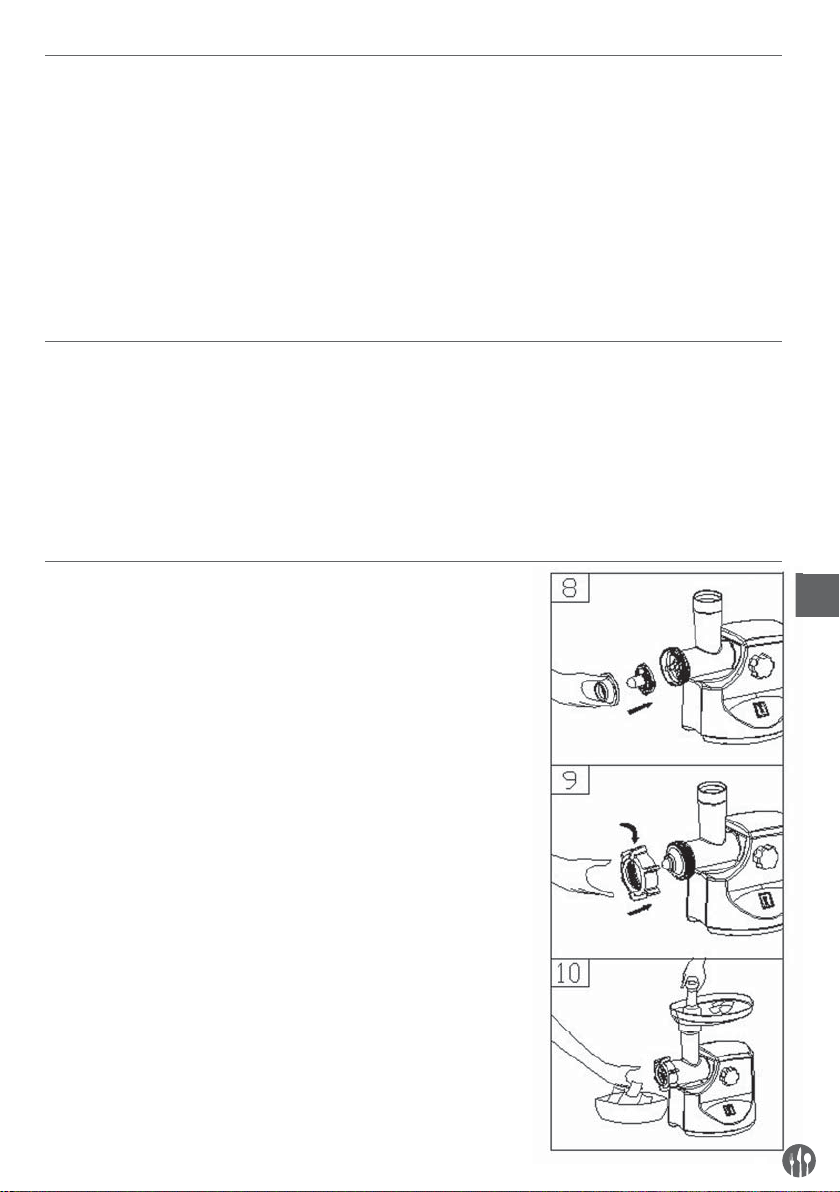
• Place kibbe attachments A and B onto the feed
screw shaft together, fi tting protrusions in the
slots (fi g.8).
• Screw cap into place until tight. Do not over tighten (fi g.9).
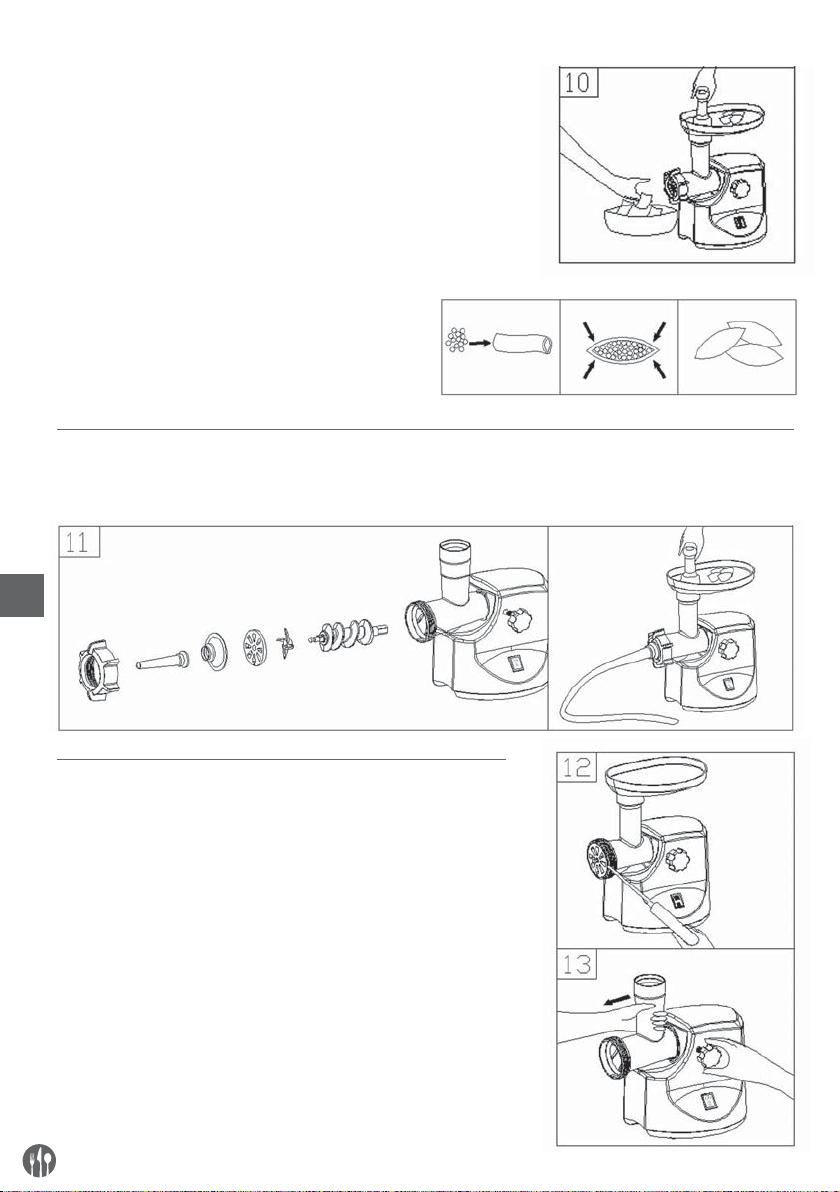
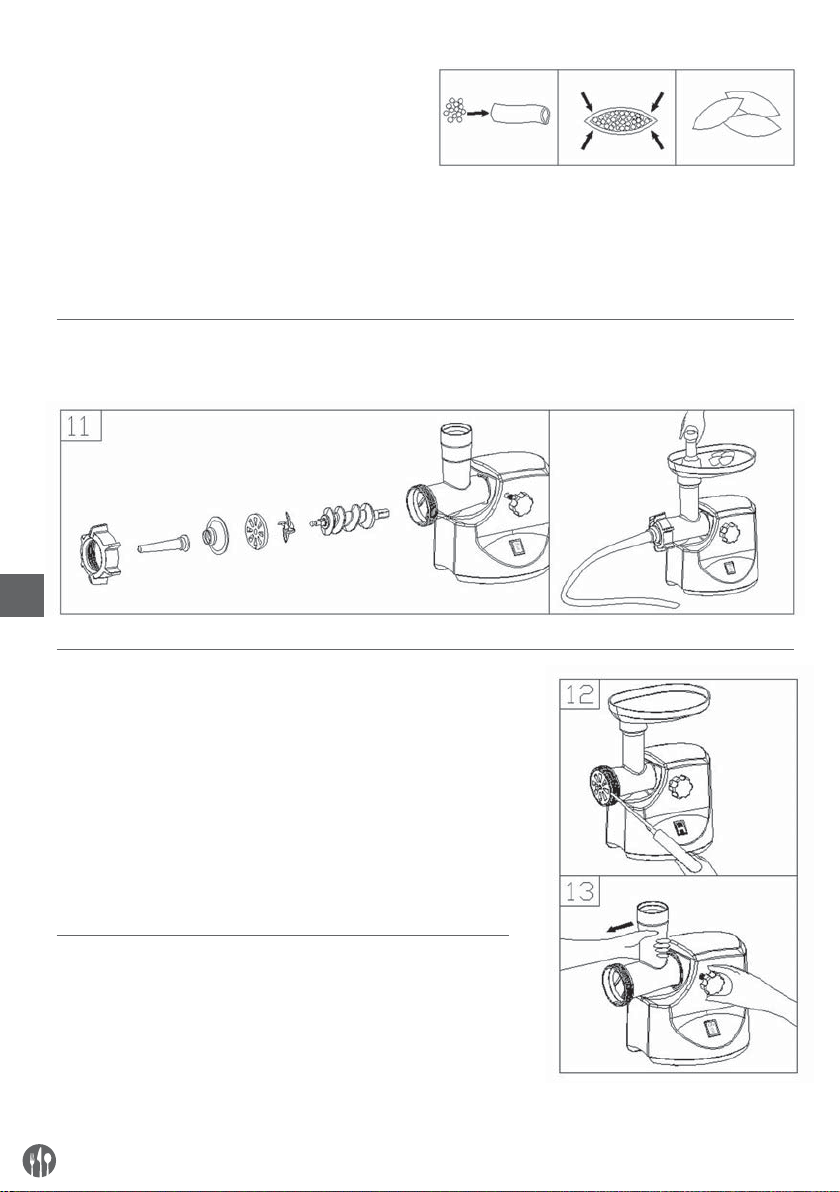
• Make the cylindrical outlet cover (fi g.10).
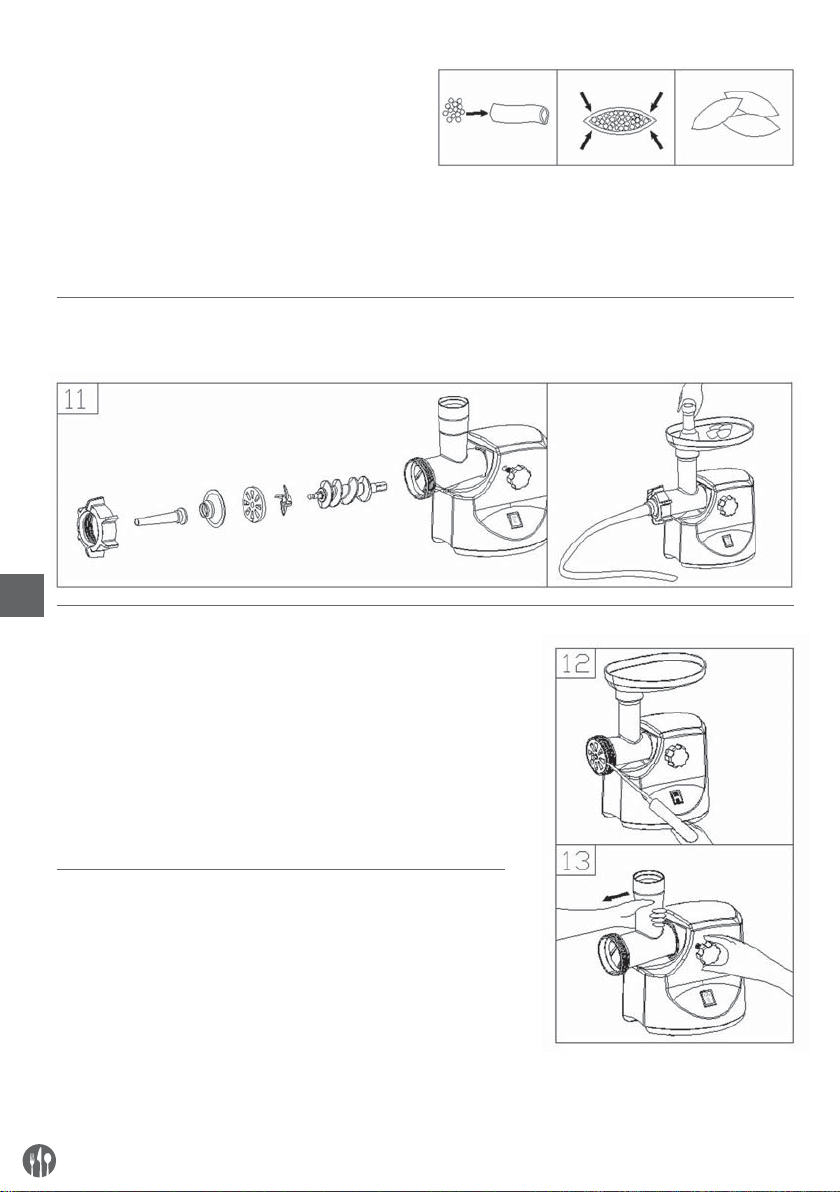
• Form kibbe ad illustrated below and deep fry.
7. MAKING SAUSAGE
Before starting please assemble sausage attachment as per following (fi g.11)
EN
8. CLEANING AND MAINTENACE
8.1. DISADDEMBLING
• Make sure that the motor has stopped completely.
• Disconnect the plug from the power outlet.
• Disassemble by reversing the steps from 1-6 pictures.
• To remove the cutting plate easily, place a screwdriver between
the cutting plate and the head as illustrated and lift it up (fi g.12).
• Press the fasten knob, move the head as per direction illustrated
on fi g 13, then you can take out the head.
8.2. CLEANING
• Remove meat, etc. Wash each part in warm soapy water.
• A bleaching solution containing chlorine will discolor aluminum
surfaces.
• Do not immerse the motor housing in water, but only wipe it with
a damp cloth.
• Thinners and petrol will crack or change the color of the unit.
• Wipe all the cutting parts by vegetable oil-wet cloth.
8
Page 9

8.3. PACKAGING
• After cleaning, put cordset into cordset box which is on back of appliance
9. SPECIFICTION
Power supply 220-240 V AC, 50/60 Hz, 400 W
Net/Gross weight 5.2 Kg/5.8 Kg
10. WARRANTY
Any defect affecting the functionality of the appliance that becomes apparent within one year after
purchase will be corrected by free repair or replacement provided the appliance has been used and
maintained in accordance with the instructions and
has not been abused or misused in any way. Your
statutory rights are not affected. If the appliance is
11. DISCARDING & ENVIRONMENT
At the end of the life of the appliance, please dispose
of the appliance according to the regulations and
guidelines applicable at the time.
claimed under warranty, state where and when it was
bought and include proof of purchase (f.e. receipt).
In line with our policy of continuous product development we reserve the right to change the product,
packaging and documentation specifi cations without notice.
Throw packing materials like plastic and boxes in
the appropriate containers.
EN
9
Page 10

DE
INHALTSVERZEICHNIS
1. BESCHREIBUNG .................................................... 11
2. SICHERHEITSREGELN ..........................................12
3. WICHTIGE VORSICHTSMASSNAHMEN .................13
4. VOR ERSTEM GEBRAUCH .....................................13
5. NUTZUNGSANLEITUNG ........................................14
6. VORBEREITUNG VON KEBBE ................................ 15
7. FÜLLEN DER WURST ............................................16
8. TECHNISCHE DATEN ............................................. 17
9. GARANTIE.............................................................. 17
10. ENTSORGUNG UND UMWELTSCHUTZ .................. 17
10
Page 11
Sehr geehrte Kundin, sehr geehrter Kunde,
wir danken Ihnen für den Kauf des Gerätes Hendi. Machen Sie sich bitte mit dieser Anleitung noch vor der
Inbetriebnahme des Gerätes vertraut, um Schäden durch die unsachgemäße Bedienung zu vermeiden. Den
Sicherheitsregeln ist besondere Aufmerksamkeit zu widmen.
1. BESCHREIBUNG
DE
1. Fülltablett für das Hackfl eisch
2. Tablett des Trichters
3. Gehäuse (Gehäuse des Motorgeräts)
4. Drehknopf der Blockade
5. Schalter
6. Kebbe-Aufsätze
7. Öffnung im Gehäuse
8. Wurstaufsatz für die Endstücke
9. Wurst-Endstück: Ø12 mm
10. Wurst-Endstück: Ø15 mm
11. Wurst-Endstück: Ø20 mm
12. Stopfer
13. T-Stück
14. Schnecke
15. Sieb: Ø4 mm
16. Sieb: Ø7 mm
17. Befestigungsring
18. Zerkleinerer
19. Messer
11
Page 12

2. SICHERHEITSREGELN
• Die unsachgemäße Bedienung des Geräts kann
zur schweren Beschädigung des Geräts sowie zu
Verletzungen führen.
• Das Gerät ist ausschließlich zu dem Zweck zu
benutzen, zu dem es hergestellt wurde. Der Hersteller haftet nicht für Schäden, die auf unsachgemäße Bedienung des Geräts zurückzuführen sind.
• Den Kontakt des Gerätes und des Steckers mit
Wasser oder einer anderen Flüssigkeit vermeiden.
Den Stecker unverzüglich aus dem Stecker ziehen
und das Gerät von einem anerkannten Fachmann
prüfen lassen, wenn das Gerät unbeabsichtigterweise ins Wasser fällt. Bei Nichteinhaltung dieser
Sicherheitsvorschriften besteht Lebensgefahr.
• Nie eigenständig das Gehäuse des Gerätes zu öffnen versuchen.
• In das Gehäuse des Gerätes keine Gegenstände
einführen.
• Den Stecker nicht mit nassen oder feuchten Händen berühren.
• Den Stecker regelmäßig auf eventuelle Schäden
hin prüfen. Beschädigte Stecker oder Kabel von
DE
einer zugelassenen Reparaturwerkstatt reparieren lassen.
• Das Gerät nicht mehr benutzen, wenn es heruntergefallen ist oder sonst wie beschädigt wurde.
Das Gerät von einer zugelassenen Reparaturwerkstatt prüfen und gegebenenfalls reparieren
lassen.
• Nicht versuchen, das Gerät eigenständig zu reparieren. Dann besteht Lebensgefahr.
• Das Kabel von scharfen und heißen Gegenständen
sowie von offenem Feuer fernhalten. Beim Rausziehen des Steckers stets am Stecker und nicht
am Kabel ziehen.
• Beachten Sie, dass das (Verlängerungs-) Kabel
nicht irrtümlicherweise gelöst wird und dass man
nicht darüber stolpern kann.
• Dieses Gerät darf ausschließlich benutzt werden
für das Ziel wofür es ursprünglich entwürfen ist.
• Das Gerät bei Bedienung stets überwachen.
• Kinder kennen die Gefahr der unsachgemäßen
Bedienung elektrischer Geräte nicht. Kinder daher niemals unbeaufsichtigt Haushaltsgerät bedienen lassen!
• Den Stecker rausziehen wenn das Gerät nicht benutzt wird und auch vor jeder Reinigung.
• Gefahr! Befi ndet sich der Stecker in der Steckdose, so wird das Gerät mit Netzspannung versorgt.
• Das Gerät ausschalten, bevor Sie den Stecker abziehen.
• Das Gerät nie am Kabel tragen.
• Keine zusätzlichen Hilfsmittel benutzen, die nicht
mit dem Gerät mitgeliefert wurden.
• Das Gerät darf nur an eine Steckdose angeschlossen werden mit dem auf dem Typenschild angegebene Spannung und Frequenz.
• Überlastung ist zu vermeiden.
• Das Gerät ist nach dem Gebrauch auszuschalten,
indem der Stecker aus der Steckdose herausgezogen wird.
• Vor dem Nachfüllen oder Reinigen ist immer der
Stecker aus der Steckdose herauszuziehen.
• Die elektrische Anlage hat den nationalen und regionalen Vorschriften zu entsprechen.
• Dieses Gerät eignet sich nicht für den Gebrauch
durch Personen (gilt auch für Kinder) mit geringerer Motorik, Sensorik oder geistiger Fähigkeit
oder mangelhafter Erfahrung und Wissen, es sei
denn, sie werden bei dem Gebrauch des Gerätes
beaufsichtigt oder erhalten Anweisungen von einer Person, die für ihre Sicherheit die Verantwortung trägt.
12
Page 13

3. WICHTIGE VORSICHTSMASSNAHMEN
Während der Nutzung von Elektroanlagen muss man
grundlegende Vorsichtsmaßnahmen anwenden, u.a.:
• Denken Sie daran, dass das Gerät für den Hausund Halbprofessionellgebruach vorgesehen ist. Es
darf nicht darussen verwendet werden.
• In der Zeit, wo das Gerät nicht verwendet wird,
vor dem Anlegen oder Abnehmen von Teilen und
der Reinigung, ist es von der Stromversorgung zu
trennen.
• Ebenso muss das Gerät während der Montage und
Demontage von der Stromversorgung getrennt sein.
• Wird das Gerät in der Nähe von Kindern genutzt,
muss man sie besonders beaufsichtigen.
• Beim Tragen des Gerätes ist es mit beiden Händen am Gehäuse festzuhalten bzw. es darf weder
am Tablett des Trichters noch am T-Stück gehalten werden.
• Wenn ein Kebbe-Aufsatz benutzt wird, darf man
weder ein Messer noch die Mahlscheibe montieren
• Niemals die Produkte mit der Hand nach vorn stoßen. Verwenden Sie dafür den Stopfer (12).
• Es dürfen keine harten Lebensmittelprodukte gemahlen werden, solche wie z.B. Knochen, Nüsse
usw.
• Es darf weder Ingwer noch andere harte, faserhaltige Produkte gemahlen werden.
• Verwenden Sie den Fleischwolf im Dauerbetrieb
nicht länger als 10 Minuten und machen Sie eine
10-minütige Pause zwischen den Zyklen zum Ab-
kühlen des Motorgeräts.
• Bei einer Richtungsänderung des Mahlens von
„ON“ auf „R“ oder umgekehrt muss man 30 Sekunden abwarten, um das Gerät nicht zu beschädigen.
• Um ein Verklemmen zu vermeiden, sind die Produkte nicht zu stark anzudrücken.
• Nach dem Ansprechen des Differentialstrom-
Schal-
ters das Gerät nicht einschalten.
• Probieren Sie niemals die Teile selbst auszutauschen noch das Gerät zu reparieren.
• Weder die Stromversorgungsleitung noch das Gehäuse dürfen in Wasser eingetaucht werden, da
sonst die Gefahr eines Stromschlags besteht.
• Das Gerät ist nicht für eine Bedienung durch Personen (darunter auch Kinder) mit verminderten
körperlichen, sinnlichen und geistigen Fähigkeiten oder die keine Erfahrung und das Wissen
.
haben, vorgesehen, höchstens dass sie unter
Aufsicht von Personen tätig sind, die auch für ihre
Sicherheit die Verantwortung tragen.
• Das Gerät ist nicht als Spielzeug für Kinder bestimmt.
• Benutzen Sie das Gerät nicht, wenn die Stromversorgungsleitung oder der Stecker beschädigt
sind. Wenden Sie sich an den Verkäufer oder den
Servicedienst zwecks Reparatur durch einen dazu
qualifi zierten Servicemitarbeiter.
DE
4. VOR ERSTEM GEBRAUCH
• Es ist zu prüfen, ob die auf dem Typenschild ausgewiesene Spannung auch der installierten Spannung entspricht.
• Waschen Sie alle Teile mit Ausnahme des Gehäuses (Gehäuse des Motorgeräts - 3) im warmen
Wasser mit einem Waschmittel.
• Alle Teile (außer dem Gehäuse) im warmen Wasser mit einem Waschmittel waschen.
• Vor dem Anschließen des Steckers ist zu prüfen,
ob der Schalter (5) sich in der Stellung AUS (OFF)
befi ndet.
13
Page 14
5. NUTZUNGSANLEITUNG
5.1. MONTAGE
• Das T-Stück in die Öffnung im Gehäuse (Abb. 1)
legen. Mit der einen Hand hält man das T-Stück
und mit der anderen dreht man den Drehgriff der
Blockade an der Seite des Motorgehäuses nach
rechts (Abb. 2).
• Im T-Stück die Schnecke (14) montieren, und zwar
mit dem längeren Ende nach vorn, und dann so
lange verdrehen, bis sie im Gehäuse des Motors
aufsitzt.
• An der Schnecke das Messer (19) anlegen, und
zwar mit der Schneide nach außen (Abb. 4). Das
nicht richtige Anlegen des Messers ermöglicht
auch kein Zermahlen des Fleisches.
DE
• Beim Messer die entsprechende Scheibe (15, 16,
18) anbringen, indem man die Angüsse an die Rille
anpasst (Abb. 5).
• Die Scheibe festhalten oder mit dem Finger andrücken, danach mit der anderen Hand den Befestigungsring anschrauben (17) (Abb. 6). Nicht zu
fest anschrauben.
• Das Tablett des Trichters (2) auf dem T-Stück (13)
anbringen und befestigen.
• Das Gerät auf einen stabilen Untergrund stellen.
• Die Lüftungsöffnungen unten und an der Seite des
Gehäuses dürfen nicht blockiert werden.
14
Page 15
5.2. ZERKLEINERN BZW. ZERMAHLEN DES FLEISCHES
• Das Produkt in Stücke schneiden (Es wird empfohlen, das Fleisch ohne Sehnen und Fett zu zerkleinern, die Stücke müssen die Abmessungen
von ca. 20 x 20 x 60 mm haben), um sie leicht in
die Öffnung des T-Stückes einlegen zu können.
• Nach dem Schneiden des Fleisches drückt man
hinten die kleine Taste in die Stellung „ON“; danach wird die Taste „ON“ (5) auf dem vorderen
Panel gedrückt
MAN MUSS SICH DAVON ÜBERZEUGEN, OB BEI-
DE TASTEN SICH IN DER STELLUNG „ON“ BE-
5.3 . FUNKTION DER RICHTUNGSÄNDERUNG
• Beim Verklemmen des Produktes kann man dies
durch Einschalten der Richtungsänderungsfunktion beseitigen. Zunächst muss den kleinen
Schalter (hinten am Gerät) in die Stellung „R“
verstellen, danach drückt man den großen Schalter (5) auf die Position „R“ und hält ihn für einige
6. VORBEREITUNG VON KEBBE
ZUBEREITUNG
FLEISCHFÜLLUNG
Hammelfl eisch 100g
Olivenöl 1 Löffel
Zwiebel (fein geschnitten) 1 Löffel
Gewürze für den Geschmack
Salz für den Geschmack
Mehl 1 Löffel
FINDEN. IST DAS NICHT DER FALL, DANN KANN
DAS GERÄT NICHT IN BETRIEB GENOMMEN
WERDEN.
• Legen Sie die Stücke des Produktes auf das Tablett der Zuführung (2). Zum Nachdrücken ist
ausschließlich nur der Stopfer (12) (Abb. 7) zu verwenden.
• Nach dem Gebrauch ist „O“ zu drücken, um das
Gerät anzuhalten und es danach von der Stromversorgung zu trennen.
Sekunden fest, bis das Gerät wieder entleert ist.
• Nach dem Entblocken den Schalter (5) freigeben,
den kleinen Schalter wieder auf die Position ON
stellen, das Gerät von der Stromversorgung trennen und das Produkt aus dem T-Stück entfernen.
DE
• Hammelfl eisch ein- oder zweimal zerkleinern.
• Zwiebel anbraten, das Fleisch, alle Gewürze, Salz
und Mehl hinzugeben.
TEIG
Magerfl eisch 450g
Mehl 150-200g
Gewürze für den Geschmack
Muskatnuss (fein gemahlen) 1
Roter Paprika als Pulver für den Geschmack
Pfeffer für den Geschmack
15
Page 16
• Das Fleisch dreimal zerkleinern und alle Bestandteile in einer Schüssel mischen. Eine größere Menge Fleisch bei geringer Menge an Mehl sichert eine
bessere Konsistenz und Geschmack des Teigs.
• Dreimal das Gemisch zermahlen bzw. zerkleinern.
• Das Gerät auseinandernehmen, indem man die Tätigkeiten 5-3 ausführt, sowie die Scheibe und das
Messer abnehmen.
• Die Zusatzgeräte für Kebbe (6) anlegen und auf die
Welle legen, indem man die Angüsse an die Rille anpasst (Abb. 8).
• Den Befestigungsring anschrauben; aber nicht zu
fest (Abb. 9).
• Zylindrische Außenschiacht ausführen (Abb. 10).
• Kebbe formen und im tiefen Fett anbraten.
7. FÜLLEN DER WURST
Vor dem Beginn muss man das Zusatzgerät zum Füllen der Würste montieren, und zwar entsprechend der
Abbildung 11.
DE
7.1. DEMONTAGE
• Abwarten bis zum völligen Stillstand des Motorgeräts.
• Den Stecker aus der Netzsteckdose ziehen.
• Das Gerät auseinandernehmen, wobei die Tätigkeiten in umgekehrter Reihenfolge wie in den Abbildungen 1-6 auszuführen sind.
• Um die Scheibe leicht abzunehmen, muss man den Schraubenzieher zwischen die Scheibe und dem T-Stück einschieben,
so wie in der Abb. 12 dargestellt, und die Scheibe anheben.
• Auf den Drehknopf für die Befestigung drücken und das
T-Stück, wie in der Abbildung 13 gezeigt, herausnehmen.
16
Page 17

7.2. WASCHEN
• Die Fleischreste entfernen. Jedes Teil im warmen
Wasser mit einem Waschmittel waschen.
• Die Verwendung von Mitteln auf Chlorbasis bewirkt eine Verfärbung der Aluminiumfl ächen.
• Das Gehäuse (3) (des Motorgehäuses) darf nicht
in Wasser getaucht, sondern muss ausschließlich
mit einem feuchten Lappen abgerieben werden.
• Das Anwenden eines Lösungsmittels oder Benzin
ruft die Rissbildung oder die Verfärbung des Gerätes hervor.
• Alle Elemente mit Schneiden sind mit einem Lappen, der mit Pfl anzenöl angefeuchtet ist, abzuwischen.
• Nach dem Waschen ist die Stromversorgungsleitung in die Kammer hinten am Gehäuse des Gerätes zu legen.
8. TECHNISCHE DATEN
Leistung 220-240 V AC, 50/60 Hz, 400 W
Gewicht Netto/Brutto 5.2 Kg/5.8 Kg
9. GARANTIE
Alle innerhalb von einem Jahr nach dem Kaufdatum
festgestellten Defekte oder Mängel, die die Funktionalität des Gerätes beeinträchtigen, werden auf
dem Wege der unentgeltlichen Reparatur bzw. des
unberührt. Eine in der Garantiefrist einzureichende
Beanstandung hat die Angabe des Kaufortes und
Kaufdatums und in der Anlage einen Kaufbeleg (z.B.
Kassenzettel) zu enthalten.
Austausches unter der Voraussetzung beseitigt,
dass das Gerät in einer der Bedienungsanleitung
gemäßen Art und Weise betrieben und gewartet
wird und weder vorsätzlich vernichtet noch nicht
bestimmungsgemäß genutzt wurde. Ihre Rechte
aus den entsprechenden Gesetzen bleiben davon
Gemäß unserer Politik der ständigen Weiterent-
wicklung unserer Produkte behalten wir uns vor,
Änderungen am Produkt, an seiner Verpackung und
an den dokumentierten technischen Daten ohne
vorherige Ankündigung vorzunehmen.
DE
10. ENTSORGUNG UND UMWELTSCHUTZ
Nach Beendigung seiner Lebensdauer ist das Gerät
rechtmäßig und den jeweils geltenden Richtlinien
entsprechend zu entsorgen.
Verpackungsmaterial, wie Kunststoffe bzw. Schach-
teln, in die entsprechenden Behälter geben.
17
Page 18

NL
INDEX
1. BESCHRIJVING ............................................................19
2. VEILIGHEIDSINSTRUCTIES .........................................20
3. VEILIGHEIDSVOORSCHRIFTEN ...................................21
4. VOOR DE EERSTE KEER GEBRUIKEN .........................21
5. GEBRUIKSINSTRUCTIES .............................................22
6. KIBBE MAKEN .............................................................23
7. WORST MAKEN ...........................................................24
8. REINIGEN EN ONDERHOUD ........................................24
9. SPECIFICATIES ............................................................25
10. GARANTIE....................................................................25
11. AFDANKEN & MILIEU ..................................................25
18
Page 19
Geachte klant,
Hartelijk dank voor de aankoop van dit Hendi apparaat. Leest u deze gebruiksaanwijzing zorgvuldig voordat
u het apparaat aansluit, dit om schade door verkeerd gebruik te voorkomen. Lees vooral de veiligheidsvoorschriften aandachtig door.
1. BESCHRIJVING
NL
1. Voedselschotel
2. Trechterplaat
3. Hoofdapparaat
4. Ontgrendelingsknop
5. Schakelaar
6. Kibbe-hulpstuk
7. Kopinlaat
8. Worsthulpstuk (stop)
9. Worsthulpstuk (fi jn)
10. Worsthulpstuk (mediun)
11. Worsthulpstuk (groot)
12. Stamper
13. Kop
14. Aanvoerschroef
15. Snijplaat (fi jn)
16. Snijplaat (mediun)
17. Bevestigingsring
18. Snijplaat (groot)
19. Snijmes
19
Page 20

2. VEILIGHEIDSINSTRUCTIES
• Onjuiste bediening en verkeerd gebruik van het
apparaat kan ernstige schade aan het apparaat en
verwonding van personen tot gevolg hebben.
• Het apparaat mag alleen worden gebruikt voor het
doel waarvoor het werd ontworpen. De fabrikant
aanvaardt geen enkele aansprakelijkheid voor
schade als gevolg van onjuiste bediening en verkeerd gebruik.
• Zorg dat het apparaat en de stekker niet met water
of een andere vloeistof in aanraking komen. Mocht
het apparaat onverhoopt in het water vallen, trek
dan onmiddellijk de stekker uit het stopcontact
en laat het apparaat controleren door een erkend
vakman. Niet-naleving hiervan kan levensgevaar
opleveren.
• Probeer nooit zelf de behuizing van het apparaat
te openen.
• Steek geen voorwerpen in de behuizing van het
apparaat.
• Raak de stekker niet met natte of vochtige handen aan.
• Controleer stekker en snoer regelmatig op eventuele beschadiging. Indien stekker of snoer be-
NL
schadigd is, laat het bij een erkend reparatiebedrijf repareren.
• Gebruik het apparaat niet nadat het is gevallen
of op andere wijze beschadigd is. Laat het bij een
erkend reparatiebedrijf controleren en zo nodig
repareren.
• Probeer het apparaat niet zelf te repareren. Dit
kan levensgevaar opleveren.
• Zorg dat het snoer niet met scherpe of hete voorwerpen in aanraking komt en houd het uit de buurt
van open vuur. Als u de stekker uit het stopcontact
wilt trekken, pak dan altijd de stekker zelf beet en
trek nooit aan het snoer.
• Zorg dat niemand het snoer (of verlengsnoer)
abusievelijk kan lostrekken of erover kan struikelen.
• Dit apparaat mag uitsluitend gebruikt worden
voor het doel waarvoor het oorspronkelijk werd
ontworpen.
• Houd het apparaat als u het gebruikt steeds in de
gaten.
• Kinderen zien de gevaren van onjuist gebruik van
elektrische apparaten niet. Laat kinderen daarom
nooit zonder toezicht met huishoudelijke apparatuur werken.
• Trek altijd de stekker uit het stopcontact als het
apparaat niet wordt gebruikt en telkens voordat
het wordt schoongemaakt.
• Gevaar! Zo lang de stekker in het stopcontact zit,
staat het apparaat onder de netspanning.
• Schakel het apparaat uit voordat u de stekker uit
het stopcontact trekt.
• Draag het apparaat nooit aan het snoer.
• Gebruik geen extra hulpmiddelen die niet bij het
apparaat zijn meegeleverd.
• Sluit het apparaat alleen aan op een stopcontact
met de op het typeplaatje aangegeven spanning en
frequentie.
• Vermijd overbelasting.
• Schakel de apparatuur na gebruik uit door de
stekker uit het stopcontact te verwijderen.
• Tijdens het bijvullen of schoonmaken altijd de
stekker uit het stopcontact verwijderen.
• De elektrische installatie dient te voldoen aan de
nationale en plaatselijk geldende voorschriften.
• Dit apparaat is niet geschikt voor gebruik door
personen (inclusief kinderen) met een verminderd
fysiek, sensorisch of geestelijk vermogen, of gebrek aan ervaring en kennis, tenzij supervisie of
instructie is gegeven betreffende het gebruik van
het apparaat door een persoon welke verantwoordelijk is voor hun veiligheid.
20
Page 21

3. VEILIGHEIDSVOORSCHRIFTEN
Bij het gebruik van elektrische apparaten dienen
altijd elementaire voorzorgsmaatregelen gevolgd te
worden, waaronder de volgende:
• Het apparaat is bestemd voor semi-professioneel
gebruik: Gebruik niet buitenshuis.
• Haal de stekker uit stopcontact als het apparaat
niet wordt gebruikt, vóór het bevestigen of loskoppelen van onderdelen en voordat u het apparaat
reinigt.
• Haal de stekker uit het stopcontact als u het apparaat monteert of demonteert.
• Er is nauw toezicht vereist wanneer het apparaat
in de buurt van kinderen wordt gebruikt.
• Als u het apparaat draagt, houd het hoofdapparaat
dan goed vast met beide handen. Houd het apparaat niet vast bij de trechterplaat of kop.
• Bevestig het snijmes en de snijplank niet wanneer
u gebruik maakt van het kibbe-hulpstuk.
• Duw producten nooit met de hand in het apparaat.
Gebruik de stamper.
• Maal geen hard voedsel, zoals botten, noten, etc.
• Maal geen gember of andere materialen met harde vezels.
• De vleesmolen mag maximaal 10 minuten aan één
stuk worden gebruikt, laat het apparaat daarna 10
minuten afkoelen.
• Bedien het apparaat van “ON” (AAN) naar “R” of
van “R” naar “ON” (AAN) nadat de vorige werktoe-
stand langer dan 30 seconden is gestopt. Als u dit
niet doet, kan dit leiden tot abnormale werking,
zoals het op en neer bewegen, en schade aan het
apparaat.
• Gebruik geen overmatige druk om voedsel in het
apparaat te duwen om te voorkomen dat het apparaat vastloopt.
• Probeer het apparaat niet in te schakelen als de
stroomonderbreker activeert.
• Probeer nooit zelf onderdelen te vervangen of het
apparaat te repareren.
• Dompel het netsnoer of het hoofdapparaat nooit
onder in water, dit kan leiden tot risico op elektrische schokken.
• Dit apparaat is niet bedoeld voor gebruik door personen (met inbegrip van kinderen) met verminderde lichamelijke, zintuiglijke of psychische capaciteiten, of met een gebrekkige ervaring en kennis,
tenzij ze m.b.t. het gebruik van dit apparaat onder
toezicht staan van of geïnstrueerd zijn door een
persoon verantwoordelijk voor hun veiligheid.
• Houd toezicht op kinderen om ervoor te zorgen dat
ze niet met het apparaat spelen.
• Gebruik het apparaat niet als het netsnoer of de
stekker is beschadigd. Breng het apparaat terug
naar de winkel of laat het repareren door een erkend onderhoudsmonteur.
NL
4. VOOR DE EERSTE KEER GEBRUIKEN
• Controleer of de spanning die is vermeld op het
typeplaatje overeenkomt met de netspanning in
uw woning.
• Was alle onderdelen (behalve het hoofdapparaat/
motorbehuizing) in warm zeepsop.
• Was alle onderdelen (behalve het hoofdapparaat)
in warm zeepsop.
• Zorg er voordat u de stekker in het stopcontact
steekt voor dat de schakelaar in de stand “OFF”
(UIT) staat, dat is de natuurlijke stand voor alle
toetsen.
21
Page 22
5. GEBRUIKSINSTRUCTIES
5.1. MONTAGE
• Plaats de molen/aanvoerkop stevig in de opening
voor koppelstukken (fi g.1).Houd de kop met één
hand vast, plaats de vergrendelingsknop in het gat
aan de zijkant van de motorbehuizing en draai de
knop aan door met de klok mee te draaien (fi g.2).
• Plaats de aanvoerschroef in de kop, met de lange
zijde eerst, en draai licht aan de schroef tot deze
goed is vastgezet in de motorbehuizing (fi g.3).
• Plaats het snijmes op de as van de aanvoerschroef
met het blad naar de voorkant gericht, zoals geillustreerd (fi g.4). Als het snijmes niet juist wordt
geplaatst, zal het vlees niet worden gemalen.
• Plaats de gewenste snijplaat naast het snijmes en
NL
steek daarbij de uitsteeksels in de uitsparingen
(fi g.5).
• Ondersteun of druk met één vinger op het midden
van de snijplaat en schroef met de andere hand
de bevestigingsring stevig vast (fi g.6). Draai niet te
stevig aan.
• Plaats de trechterplaat op de kop en bevestig in
de juiste positie.
• Plaats het apparaat op een stevige ondergrond.
• De luchtopeningen aan de onderkant en de zijkant
van de motorbehuizing moeten vrijgehouden worden en mogen niet worden geblokkeerd.
22
Page 23
5.2. VLEES MALEN
• Snij alle levensmiddelen in stukjes (vlees zonder
pees, been en vet wordt aanbevolen, grootte ca. 20
mm x 20 mm x 60 mm) zodat ze eenvoudig in de
trechteropening passen.
• Druk, tijdens het snijden van vlees, de kleine schakelaar op de achterkant naar de stand “ON” en
druk daarna op “ON” op het voorpaneel.
5.3. OMKEERFUNCTIE
• Gebruik in geval van opstopping of vastlopen de
“REVERSE” functie om het vlees uit het apparaat
te trekken. Druk de kleine schakelaar eerst naar
de stand “R”, en druk daarna enkele seconden op
de grote knop “R”, het vlees wordt daarna naar
6. KIBBE MAKEN
RECEPT
VULLING
Schapenvlees 100 g
Olijfolie 1 1/eetlepels
Uit (fi jngesneden) 1 1/eetlepels
Kruiden naar smaak
Zout naar smaak
Bloem 1 1/eetlepels
• Maal het schapenvlees één of twee keer.
• Bak de uien bruin en voeg gemalen schapenvlees,
alle kruiden, zout en bloem toe.
• U MOET ERVOOR ZORGEN DAT BEIDE SCHAKE-
LAARS IN DE STAND “ON” STAAN, PAS DAN BEGINT DE MOLEN MET WERKEN.
• Voer het voedsel in de trechterplaat aan. Gebruik
daarvoor alleen de stamper (fi g.7)
• Druk na gebruik op “O” om het apparaat te stoppen en trek daarna de stekker uit het stopcontact.
buiten getrokken.
• Laat, als de verstopping is verholpen, “R” los en
trek de stekker uit het stopcontact. Haal daarna
het voedsel uit de kop van het apparaat.
NL
OMHULSEL
Mager vlees 450 g
Bloem 150-200 g
Kruiden naar smaak
Nootmuskaat (fi jngesneden) 1
Gemalen rode peper naar smaak
Peper naar smaak
• Maal het vlees driemaal en meng alle ingrediënten samen in een kom. Gebruik voor het omhulsel
meer vlees en minder bloem voor een betere consistentie en smaak.
• Maal het mengsel drie keer.
• Demonteer door de stappen van 5-3 in omgekeerde volgorde uit te voeren om de snijplaat en het
snijmes te verwijderen.
23
Page 24
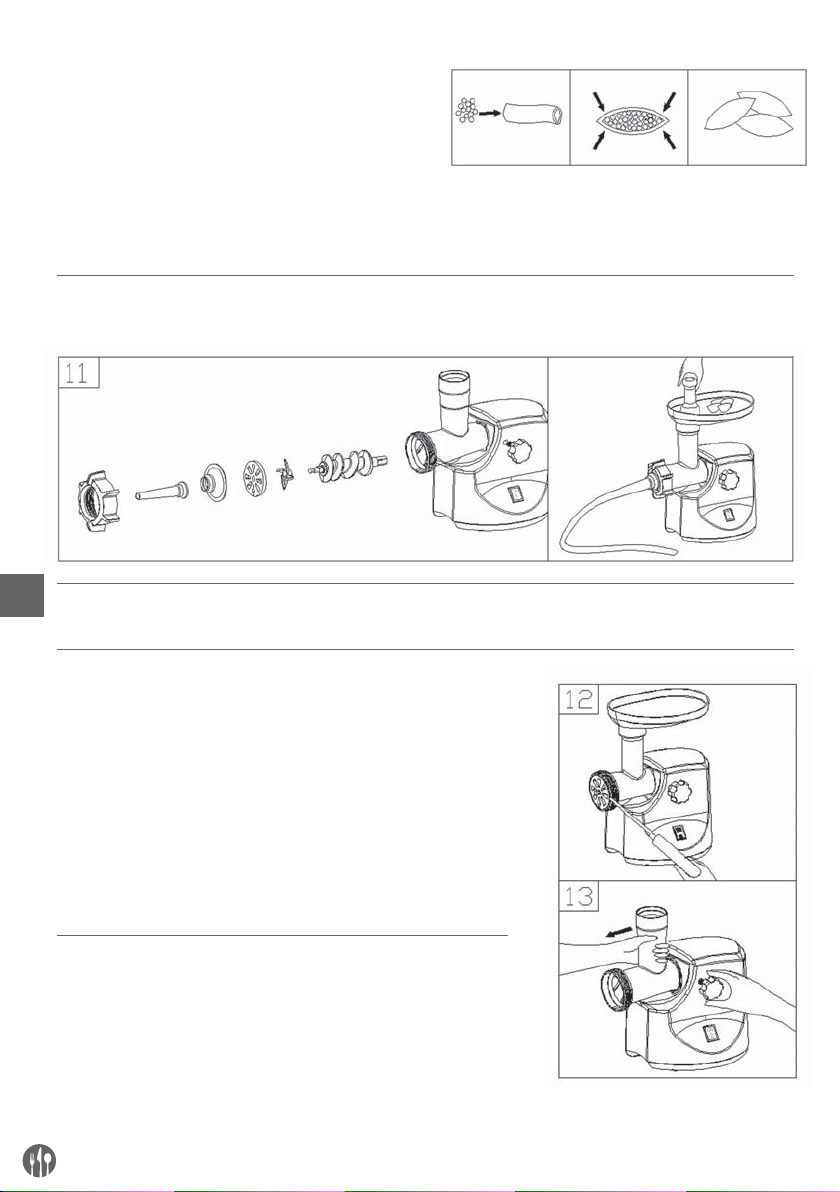
• Plaats de kibbe-hulpstukken A en B samen op de
as van de aanvoerschroef, steek de uitsteeksels
daarbij in de uitsparingen (fi g. 8).
• Schroef de dop op zijn plaats totdat deze stevig
vastzit. Draai niet te stevig aan (fi g. 9).
• Maak het cilindrische omhulsel (fi g. 10).
• Vorm de kibbe zoals hieronder geïllustreerd en
frituur het.
7. WORST MAKEN
Voordat u worst maakt, moet u eerst het worsthulpstuk monteren, zoals hieronder afgebeeld (fi g.11)
NL
8. REINIGEN EN ONDERHOUD
8.1. DEMONTEREN
• Controleer of de motor volledig is gestopt.
• Haal de stekker uit het stopcontact.
• Demonteer door de stappen van afbeelding 1-6 in omgekeerde
volgorde te volgen.
• U kunt de snijplaat eenvoudig verwijderen door een schroevendraaier tussen de snijplank en de kop te plaatsen, zoals afgebeeld, en vervolgens omhoog te tillen (fi g.12).
• Druk op de ontgrendelingsknop, verplaats de kop in de richting
die wordt aangegeven in fi g 13. U kunt de kop nu verwijderen.
8.2. REINIGEN
• Verwijder vlees, etc. Was elk onderdeel in een warm zeepsopje.
• Een bleekoplossing met chloor zal de aluminium oppervlakken
verkleuren.
• Dompel de motorbehuizing niet onder in water, maar veeg de
behuizing alleen af met een vochtige doek.
24
Page 25

• Verdunners en benzine zullen voor barsten op het apparaat
zorgen of het apparaat doen verkleuren.
• Veeg alle snijonderdelen af met een met plantaardige olie
bevochtigde doek.
8.3. OPSLAG
• Plaats het snoer na het reinigen in het vak voor het snoer op de achterkant van het apparaat
9. SPECIFICATIES
Voeding 220-240 V AC, 50/60 Hz, 400 W
Netto-/Brutogewicht 5,2 Kg/5,8 Kg
10. GARANTIE
Elk defect waardoor de werking van het apparaat
nadelig wordt beïnvloed dat zich binnen één jaar
aankoop van het apparaat voordoet, wordt gratis
na
hersteld door reparatie of vervanging, mits het apparaat
conform de instructies is gebruikt en onderhouden
en niet op enigerlei wijze verkeerd is behandeld
of misbruikt. Dit laat onverlet uw bij wet bepaalde
rechten. Als de garantie van kracht is, vermeld dan
11. AFDANKEN & MILIEU
Aan het einde van de levensduur, het apparaat afdanken volgens de op dat moment geldende voorschriften en richtlijnen.
waar en wanneer u het apparaat hebt gekocht en
sluit een aankoopbewijs bij (bijv. kassabon of factuur).
Gezien ons streven naar voortdurende verdere productontwikkeling behouden wij ons het recht voor,
zonder voorafgaande kennisgeving wijzigingen aan
t
e brengen aan product, verpakking en documentatie.
Werp verpakkingsmateriaal zoals plastic en dozen
in de daarvoor bestemde containers.
NL
25
Page 26

PL
SPIS TREŚCI
1. OPIS ....................................................................... 27
2. ZASADY BEZPIECZEŃSTWA .................................. 28
3. WAŻNE ŚRODKI OSTROŻNOŚCI ............................29
4. PIERWSZE UŻYCIE ................................................ 29
5. INSTRUKCJA EKSPLOATACJI ................................ 30
6. PRZYGOTOWYWANIE KIBBE .................................31
7. NADZIEWANIE KIEŁBASY .....................................32
8. KONSERWACJA ..................................................... 32
9. DANE TECHNICZNE .............................................. 33
10. GWARANCJA .........................................................33
11. WYCOFANIE Z UŻYTKOWANIA
I OCHRONA ŚRODOWISKA .................................... 33
26
Page 27
Szanowny Kliencie,
Dziękujemy za zakup urządzenia firmy Hendi. Prosimy o uważne zapoznanie się z niniejszą instrukcją przed
podłączeniem urządzenia, aby uniknąć uszkodzeń spowodowanych niewłaściwą obsługą. Należy zwrócić
szczególną uwagę na zasady bezpieczeństwa.
1. OPIS
PL
1. Taca na zmielone mięso
2. Taca podajnika
3. Korpus (obudowa silnika)
4. Pokrętło blokady
5. Przełącznik
6. Elementy do tatara (kibbe)
7. Otwór w korpusie na trójnik
8. Nakładka do końcówek do wyrobu kiełbas
9. Końcówka do wyrobu kiełbas: Ø12 mm
10. Końcówka do wyrobu kiełbas: Ø15 mm
11. Końcówka do wyrobu kiełbas: Ø20 mm
12. Kołek dociskowy
13. Trójnik
14. Wałek ślimakowy
15. Sitko: Ø4 mm
16. Sitko: Ø7 mm
17. Pierścień mocujący
18. Szarpak
19. Nóż
27
Page 28

2. ZASADY BEZPIECZEŃSTWA
• Nieprawidłowa obsługa i niewłaściwe użytkowanie
mogą spowodować poważne uszkodzenie urządzenia lub zranienie osób.
• Urządzenie należy stosować wyłącznie zgodnie z przeznaczeniem.
Producent i/lub Sprzedawca nie ponosi żadnej odpowiedzialności za szkody spowodowane nieprawidłową obsługą i niewłaściwym
użytkowaniem urządzenia.
• W czasie użytkowania zabezpiecz urządzenie i wtyczkę
kabla zasilającego przed kontaktem z wodą
lub innymi płynami. W mało prawdopodobnym
przypadku zanurzenia urządzenia w wodzie, należy natychmiast wyciągnąć wtyczkę z kontaktu,
a następnie zlecić kontrolę urządzenia specjaliście. Nieprzestrzeganie tej instrukcji może spowodować zagrożenie życia.
• Nigdy nie otwieraj samodzielnie obudowy urządzenia.
• Nie wtykaj żadnych przedmiotów w obudowę urządzenia.
• Nie dotykaj wtyczki kabla zasilającego wilgotnymi
rękami.
PL
• Regularnie kontroluj stan wtyczki i kabla. W przypadku wykrycia uszkodzenia wtyczki lub kabla,
zleć naprawę w wyspecjalizowanym punkcie naprawczym.
• W przypadku, gdy urządzenie spadnie lub ulegnie
uszkodzeniu w inny sposób, przed dalszym użytkowaniem zawsze zleć przeprowadzenie kontroli
i ewentualną naprawę w wyspecjalizowanym punkcie
naprawczym.
• Nigdy nie naprawiaj urządzenia samodzielnie
może to spowodować zagrożenie życia.
• Chroń kabel zasilający przed kontaktem z ostrymi
gorącymi przedmiotami i chroń go przed otwartym
ogniem. Jeżeli chcesz odłączyć urządzenie z kontaktu, zawsze chwytaj za wtyczkę, nigdy nie ciągnij
za kabel.
• Zabezpiecz kabel (lub przedłużacz), aby nikt przez
omyłkę nie wyciągnął go z kontaktu ani się o niego
nie potknął.
• Urządzenie powinno być używane tylko do celów,
dla których zostały pierwotnie zaprojektowane.
• Kontroluj funkcjonowanie urządzenia w czasie
użytkowania.
• Dzieci nie uświadamiają sobie zagrożeń, jakie
może spowodować użytkowanie urządzeń elektrycznych. Nigdy nie pozwalaj dzieciom posługiwać się elektrycznymi urządzeniami gospodarstwa domowego bez nadzoru.
• Gdy urządzenie nie jest użytkowane oraz zawsze
przed czyszczeniem odłącz je od źródła zasilania,
wyciągając wtyczkę z kontaktu.
• Uwaga! Jeżeli wtyczka kabla zasilającego jest
podłączona do kontaktu, urządzenie cały czas pozostaje pod napięciem.
• Wyłącz urządzenie, zanim wyciągniesz wtyczkę
z kontaktu.
• Nigdy nie przenoś urządzenia za kabel zasilający.
• Nie używaj akcesoriów innych niż dostarczone
z urządzeniem.
• Urządzenie można podłączać wyłącznie do gniazda o natężeniu i częstotliwości zgodnej z danymi
znajdującymi się na tabliczce znamionowej.
• Unikaj przeciążenia.
• Po użyciu wyłącz urządzenie wyjmując wtyczkę
z gniazda.
• Przed napełnieniem lub czyszczeniem zawsze należy wyjmować wtyczkę z gniazda.
• Instalacja elektryczna musi odpowiadać krajowym
i lokalnym przepisom.
• Z urządzenia nie mogą korzystać osoby (także
lub
dzieci), u których stwierdzono osłabione zdolności
fi zyczne, sensoryczne lub umysłowe, albo którym
brakuje odpowiedniej wiedzy i doświadczenia,
chyba że odbywa się to pod nadzorem lub zgodnie
z instrukcjami osoby odpowiedzialnej za ich bezpieczeństwo.
28
Page 29

3. WAŻNE ŚRODKI OSTROŻNOŚCI
Podczas eksploatacji urządzeń elektrycznych należy
zachować podstawowe środki ostrożności, między
innymi:
• Pamiętać, że urządzenie przeznaczone jest do
użytku domowego i półprofesjonalnego jako urządzenie dodatkowe a nie główne. Nie używać na
zewnątrz.
• Odłączyć od zasilania na czas nieużywania, przed
zakładaniem albo zdejmowaniem części i czyszczeniem.
• Odłączyć od zasilania na czas montażu i demontażu urządzenia.
• W przypadku eksploatacji urządzenia w pobliżu
dzieci należy zastosować ścisły nadzór.
• Urządzenie przenosić trzymając oburącz za korpus. Nie przenosić urządzenia trzymając za tacę
podajnika ani za trójnik.
• Nie montować noża ani tarczy mielącej, jeśli używana jest przystawka do kibbe (6).
• Nigdy nie popychać produktów ręką. Używać kołka
dociskowego (12)
• Nie mielić twardych produktów spożywczych, takich
jak kości, orzechy itp.
• Nie mielić imbiru ani innych twardych, włóknistych produktów.
• Nie używać wilka w trybie ciągłym dłużej niż
10 minut, robić 10-minutowe przerwy pomiędzy
cyklami w celu ostudzenia silnika.
• W przypadku zmiany kierunki mielenia z „ON” na
„R” albo odwrotnie, należy odczekać 30 sekund,
aby nie uszkodzić urządzenia.
• Aby uniknąć zakleszczenia i/lub zapchania mechanizmu mielącego nie dociskać kołkiem dociskowym (12) zbyt mocno produktów.
• Po zadziałaniu wyłącznika różnicowo-prądowego
nie włączać urządzenia.
• Nigdy nie próbować wymieniać części ani naprawiać urządzenia samodzielnie.
• Nie zanurzać kabla zasilającego ani korpusu w wodzie,
ponieważ stanowi to zagrożenie porażeniem
prądem.
• Urządzenie nie jest przeznaczone do obsługi przez
osoby (w tym dzieci) o obniżonych zdolnościach fi zycznych, zmysłowych lub umysłowych lub nieposiadające doświadczenia i wiedzy, o ile nie działają
pod nadzorem osób odpowiadających za ich bezpieczeństwo.
• Urządzenie nie jest przeznaczone do zabawy dla
dzieci.
• Nie używać urządzenia, jeśli kabel zasilający albo
wtyczka są uszkodzone. Zwrócić je do sprzedawcy
albo serwisu w celu naprawy przez wykwalifi kowanego serwisanta.
PL
4. PIERWSZE UŻYCIE
• Sprawdzić, czy napięcie wskazane na tabliczce
znamionowej odpowiada napięciu instalacji.
• Umyć wszystkie części z wyjątkiem korpusu (obudowy silnika - 3) w ciepłej wodzie ze środkiem myjącym.
• Wszystkie części (poza korpusem) umyć w ciepłej
wodzie ze środkiem myjącym.
• Przed podłączeniem wtyczki sprawdzić, czy prze-
-łącznik (5) znajduje się w położeniu WYŁ. (OFF).
29
Page 30
5. INSTRUKCJA EKSPLOATACJI
5.1. MONTAŻ
• Założyć trójnik na otwór w korpusie (rys. 1). Przytrzymując trójnik jedną ręką wkręcić pokrętło blokady z boku obudowy silnika i dokręcić w prawo
(rys. 2).
• W trójniku zamontować wałek ślimakowy (14),
dłuższym końcem do przodu, przekręcić aż osiądzie w sprzęgle silnika.
• Założyć nóż (19) na wałku ślimakowym ostrzem
na zewnątrz (rys. 4). Niepoprawne założenie noża
uniemożliwia mielenie mięsa.
• Umieścić przy nożu odpowiednią tarczę (15, 16 lub 18)
PL
dopasowując występy tarczy do rowka w trójniku
(rys. 5).
• Przytrzymać albo docisnąć palcem tarczę, następnie drugą ręką dokręcić pierścień mocujący (17)
(rys. 6). Nie dokręcać zbyt mocno.
• Umieścić tacę podajnika (2) na trójniku (13) i zamocować.
• Postawić urządzenie na stabilnej powierzchni.
• Nie blokować otworów wentylacyjnych u dołu i z boku
obudowy silnika.
•
30
Page 31
5.2. MIELENIE MIĘSA
• Pokroić produkt na kawałki (zaleca się mielić mięso bez ścięgien i tłuszczu, kawałki powinny mieć
wymiary ok. 20 x 20 x 60 mm), aby łatwo zmieścić
je w otworze trójnika.
• Po pokrojeniu mięsa nacisnąć mały przycisk z tyłu
do położenia „ON”, następnie nacisnąć przycisk
„ON” (5) na panelu przednim.
UPEWNIĆ SIĘ, ŻE OBA PRZYCISKI ZNAJDUJĄ SIĘ
5.3. FUNKCJA ZMIANY KIERUNKU
• W przypadku zakleszczenia produktu można go
usunąć włączając funkcję zmiany kierunku obrotów wałka ślimakowego. Najpierw przestawić
mały przełącznik (z tyłu urządzenia) do położenia
„R”, następnie nacisnąć duży przełącznik (5) na
pozycję „R” i przytrzymać przez kilka sekund aż
6. PRZYGOTOWYWANIE KIBBE
PRZEPIS
FARSZ
Baranina 100 g
Oliwa z oliwek 1 łyżka
Cebula (drobno pokrojona) 1 łyżka
Przyprawy do smaku
Sól do smaku
Mąka 1 łyżka
W POŁOŻENIU „ON”, W PRZECIWNYM RAZIE
URZĄDZENIE NIE URUCHOMI SIĘ.
• Umieścić kawałki produktu na tacy podajnika (2).
Do popychania używać wyłącznie kołka dociskowego (12) (rys. 7).
• Po użyciu maszynki nacisnąć przycisk do pozycji
„O”, aby zatrzymać urządzenie, następnie odłączyć od zasilania.
urządzenie się odblokuje.
• Po odblokowaniu zwolnić przełącznik (5) a mały
przełącznik (z tyłu urządzenia) ponownie ustawić
w pozycji ON, odłączyć urządzenie od zasilania i usunąć
produkt z trójnika.
PL
• Baraninę zmielić raz lub dwukrotnie.
• Podsmażyć cebulę, dodać mięso, wszystkie
przyprawy, sól i mąkę.
WARSTWA ZEWNĘTRZNA
Chude mięso 450 g
Mąka 150-200 g
Przyprawy do smaku
Gałka muszkatołowa (drobno zmielona) 1
Czerwona papryka w proszku do smaku
Pieprz do smaku
• Zmielić mięso trzy razy i wymieszać wszystkie składniki w misce. Większa ilość mięsa przy
mniejszej ilości mąki zapewni lepszą konsystencję
i smak warstwy zewnętrznej.
31
Page 32
• Trzy razy zmielić mieszankę.
• Rozłożyć urządzenie wykonując czynności 5-3 i zdjąć
tarczę i nóż.
• Złożyć elementy do kibbe (6) i założyć je na wał,
dopasowując występy do rowków (rys. 8).
• Dokręcić pierścień mocujący. Nie dokręcać zbyt
mocno (rys. 9).
• Wykonać cylindryczną warstwę zewnętrzną (rys. 10).
• Uformować kibbe i usmażyć w głębokim tłuszczu.
7. NADZIEWANIE KIEŁBASY
Przed rozpoczęciem należy złożyć przystawkę do nadziewania kiełbas zgodnie z rysunkiem 11.
PL
8.1. DEMONTAŻ
• Odczekać do zupełnego zatrzymania silnika.
• Odłączyć wtyczkę od gniazda zasilania.
• Rozłożyć urządzenie wykonując czynności z rysunków 1-6
w odwrotnej kolejności.
• Aby łatwo zdjąć tarczę, wsunąć śrubokręt między tarczę a trójnik w sposób przedstawiony na rys. 12 i lekko wysunąć tarczę.
• Odkręcić pokrętło blokady (4), wyjąć trójnik w sposób wskazany
na rysunku 13.
8.2. MYCIE
• Usunąć mięso itp. ze wszystkich elementów urządzenia. Każdą
część umyć w ciepłej wodzie ze środkiem myjącym np. dostępnym w handlu płynem do mycia naczyń
• Użycie środków na bazie chloru spowoduje odbarwienie powierzchni aluminiowych.
• Nie zanurzać korpusu (3) (obudowy silnika) w wodzie, przecierać ją wyłącznie wilgotną ściereczką.
• Zastosowanie rozpuszczalnika albo benzyny spowoduje pękanie albo odbarwienie urządzenia.
32
Page 33

• Wszystkie elementy z ostrzami przetrzeć ściereczką zwilżoną
olejem roślinnym.
• Po umyciu kabel zasilający wsunąć do schowka z tyłu korpusu
urządzenia.
9. DANE TECHNICZNE
Moc 220-240 V AC, 50/60 Hz, 400 W
Waga netto/brutto 5,2 kg/5,8 kg
10. GWARANCJA
Każda wada bądź usterka powodująca niewłaściwe
funkcjonowanie urządzenia, która ujawni się w ciągu jednego roku od daty zakupu, zostanie bezpłatnie
usunięta lub urządzenie zostanie wymienione na
sów prawa. W przypadku zgłoszenia urządzenia do
naprawy lub wymiany w ramach gwarancji należy
podać miejsce i datę zakupu urządzenia i dołączyć
dowód zakupu (np. paragon lub fakturę).
nowe, o ile było użytkowane i konserwowane zgodnie z instrukcją obsługi i nie było wykorzystywane w
niewłaściwy sposób lub niezgodnie z przeznaczeniem. Postanowienie to w żadnej mierze nie narusza
innych praw użytkownika wynikających z przepi-
Zgodnie z polityką ciągłego doskonalenia wyrobów
zastrzegamy sobie prawo do wprowadzania bez
uprzedzenia zmian w wyrobie, opakowaniu oraz da-
nych technicznych podawanych w dokumentacji.
11. WYCOFANIE Z UŻYTKOWANIA I OCHRONA ŚRODOWISKA
Urządzenie zużyte i wycofane z użytkowania należy
zutylizować zgodnie z przepisami i wytycznymi obwiązującymi w momencie wycofania urządzenia.
Materiały opakowaniowe, jak tworzywa sztuczne i pudła,
należy umieszczać w pojemnikach na odpady wła-
ściwych dla rodzaju materiału.
PL
33
Page 34

FR
SOMMAIRE
1. DESCRIPTION ....................................................... 35
2. RÈGLES DE SÉCURITÉ ..........................................36
3. REGLES DE SECURITE ..........................................37
4. PREMIERE UTILISATION ....................................... 37
5. MONTAGE ..............................................................38
6. RECETTE POUR KEBBE......................................... 39
7. SAUSSISSES .......................................................... 40
8. DEMONTAGE .......................................................... 40
9. CARACTÉRISTIQUES TECHNIQUES ......................41
10. GARANTIE.............................................................. 41
11. RETRAIT DE L’EXPLOITATION ET PROTECTION
DE L’ENVIRONNEMENT ......................................... 41
34
Page 35
Cher client,
Merci d’avoir acheté cet appareil de Hendi. Veuillez lire attentivement ce mode d’emploi avant de brancher l’appareil afin d’éviter tout endommagement pour cause d’usage abusif. Veuillez notamment lire les
consignes de sécurité avec la plus grande attention.
1. DESCRIPTION
FR
1. Plateau pour viande hachée
2. Plateau d’alimentation
3. Corps (bloc-moteur)
4. Bouton de verrouillage
5. Interrupteur
6. Kit (kebbé)
7. Logement du bloc-moteur
8. Kit à saucisses
9. Tube pour fabrication de saucisses: Ø12 mm
10. Tube pour fabrication de saucisses: Ø15 mm
11. Tube pour fabrication de saucisses: Ø20 mm
12. Poussoir
13. Tête hachoir
14. Vis sans fi n
15. Grille: Ø4 mm
16. Grille: Ø7 mm
17. Anneau de fi xation
18. Hachoir
19. Couteau
35
Page 36

2. RÈGLES DE SÉCURITÉ
• L’utilisation abusive et le maniement incorrect de
l’appareil peuvent entraîner une grave détérioration de l’appareil ou provoquer des blessures.
• L’appareil doit être utilisé uniquement pour le but
il a été conçu. Le fabricant décline toute responsabilité en cas de dommage consécutif à un usage
abusif ou un maniement incorrect.
• Veillez à tenir l’appareil et la prise électrique hors
de portée de l’eau ou de tout autre liquide. Si malencontreusement l’appareil tombe dans l’eau,
débranchez immédiatement la prise électrique et
faites contrôler l’appareil par un réparateur agréé.
La non-observation de cette consigne entraîne un
risque d’accident mortel.
• Ne tentez jamais de démonter vous-même le bâti
de l’appareil.
• N’enfoncez aucun objet dans la carcasse de l’appareil.
• Ne touchez pas la prise avec les mains mouillées
ou humides.
• Contrôlez régulièrement la prise électrique et le
cordon pour détecter toute éventuelle détério-
FR
ration. Si la prise ou le cordon est endommagé,
confi ez la réparation à un réparateur agréé.
• N’utilisez pas l’appareil si celui-ci est tombé ou
s’il a subi un choc pour toute autre raison. Dans
ce cas, faites contrôler l’appareil par un réparateur agréé à qui vous confi erez la réparation le cas
échéant.
• Ne tentez pas de réparer vous-même l’appareil.
Cela présente un risque d’accident mortel.
• Veillez à tenir le cordon électrique éloigné de tout
objet coupant ou chaud et à l’écart des fl ammes.
Pour débrancher la prise électrique, saisissez
toujours la prise et ne tirez jamais directement
sur le cordon.
• Veillez à disposer le cordon électrique (ou la rallonge) de sorte que l’appareil ne puisse pas être
débranché accidentellement et que personne ne
trébuche sur le cordon.
• Cet appareil doit être utilisé uniquement pour le
but il a été conçu.
• Surveillez continuellement l’appareil lorsqu’il est
en cours de fonctionnement.
• Les enfants n’ont pas conscience de l’usage incorrect des appareils électriques. Pour cette raison,
ne laissez jamais les enfants utiliser des appareils
ménagers sans surveillance.
• Débranchez toujours la prise électrique lorsque
l’appareil n’est pas utilisé et lors de son nettoyage.
• Danger ! Tant que la prise électrique est branchée,
l’appareil demeure sous tension.
• Arrêtez l’appareil avant de débrancher la prise
électrique.
• Ne portez jamais l’appareil par le cordon électrique.
• N’utilisez pas d’accessoires qui n’ont pas été livrés avec l’appareil.
• Branchez l’appareil seulement sur une prise de
courant avec la tension et la fréquence indiqués
sur la plaque indiquant le type.
• Evitez toute surcharge.
• Après utilisation, débranchez l’appareil en retirant
la fi che de la prise de courant.
• Débranchez aussi toujours l’appareil quand vous
le remplissez ou le nettoyez.
• L’installation électrique doit satisfaire aux règles
nationales et locales en vigueur.
• Cet appareil n´est pas apte à être utilisé par des
personnes (enfants compris) avec capacités physiques, sensorielles ou intellectuelles diminuées
ou ne possédant pas l´expérience et les connaissances suffi santes, à moins qu´une personne responsable de leur sécurité assure la supervision ou
donne des instructions en ce qui concerne l´utilisation de l´appareil.
36
Page 37

3. REGLES DE SECURITE
Lors de l’exploitation des équipements électriques
il y a lieu d’observer des règles de sécurité de base,
entre autres:
• N’oubliez pas que l’appareil est destiné pour être
utilisé à la maison et une moitié professionnellement. Ne l’utilisez pas en dehors.
• Éteignez le hachoir à viande et débranchez-le
lorsqu’il n’est pas en utilisation ou lorsque vous
effectuez les opérations de montage et de démontage et avant le nettoyage.
• Débranchez l’appareil du secteur pour la durée du
montage et du démontage de celui-ci.
• En cas d’utilisation de l’appareil à proximité des
enfants, surveillez-les très strictement.
• Transportez l’appareil en tenant le corps entre
deux mains. Ne transportez pas l’appareil en le
tenant par le plateau d’alimentation ou par la tête
hachoir.
• Ne montez ni couteau ni tête de hachoir si vous
utilisez l’accessoire pour kebbé.
• N’utilisez jamais vos doigts afi n de pousser la
viande vers la vis sans fi n ; utilisez uniquement le
poussoir (12)
• Ne moulez pas de produits alimentaires durs tels
qu’os, noix etc.
• Ne moulez ni gingembre ni autres produits durs
et fi breux.
• N’utilisez pas l’appareil en mode continu plus de
10 minutes; faites de pause de 10 minutes entre
les cycles de fonctionnement pour laisser refroidir
le moteur.
• En cas de changement de rotation de „ON” en
„R” ou à l’inverse, patientez au moins 30 secondes
pour ne pas endommager l’appareil.
• Pour éviter l’engorgement et le blocage, ne poussez pas trop les produits.
• Si l’interrupteur différentiel arrête le fonctionnement de l’appareil, ne le branchez pas.
• N’essayez jamais de remplacer des éléments ou
de réparer l’appareil par vos propres soins.
• N’immergez pas le câble d’alimentation ou le
corps dans l’eau pour éviter tout risque d’électrocution.
• Votre appareil n’est pas prévu pour être utilisé par
des personnes (y compris les enfants) dont les capacités physiques, sensorielles ou mentales sont
réduites, ou des personnes dénuées d’expérience
ou de connaissance, sauf si elles ont pu bénéfi cier,
par l’intermédiaire d’une personne responsable
de leur sécurité, d’une surveillance ou d’instructions préalables concernant son utilisation en
toute sécurité.
• Il convient de surveiller les enfants pour s’assurer
qu’ils ne jouent pas avec l’appareil.
• N’utilisez pas l’appareil si le câble d’alimentation
ou la prise sont endommagés. Adressez-vous au
vendeur ou au service pour les faire réparer par
un professionnel agréé.
FR
4. PREMIERE UTILISATION
• Vérifi er si la tension indiquée sur la plaque signalétique correspond à la tension de l’installation.
• Lavez tous les éléments sauf le corps (le bloc-moteur - 3) avec de l’eau chaude et du détergent.
• Tous les kits et éléments (sauf le corps) doivent
être lavés avec de l’eau chaude et du détergent.
• Avant de brancher la prise, vérifi ez si l’interrupteur (5) est dans la position ARRET (OFF).
37
Page 38
5.1. MONTAGE
• Insérez la tête hachoir dans le logement du
bloc-moteur (schéma 1). En retenant la tête hachoir avec une main, vissez le bouton de verrouillage situé sur le bloc-moteur en le tournant à droite
(schéma 2).
• Placez la vis (14) dans la tête hachoir en mettant
l’extrémité plus longue en avant, tournez pour
l’installer dans le bloc-moteur.
• Placez le couteau (19) sur le vis les lames tranchantes vers l’extérieur (schéma 4). Une pose incorrecte du couteau empêche de hacher la viande.
FR
• Placez la grille voulue (15, 16, 18) sur le couteau
en adaptant l’orifi ce au sailli (schéma 5).
• Maintenez ou poussez la grille avec le doigt et,
avec l’autre main, vissez anneau de fi xation (17)
(schéma 6). Ne vissez pas trop fortement.
• Placez le plateau d’alimentation (2) sur la tête hachoir (13) et fi xez-le.
• Posez l’appareil sur une surface stable.
• N’obstruez pas les orifi ces de ventilation situés en
bas et de côté du bloc moteur.
38
Page 39
5.2. POUR HACHER LA VIANDE
• Coupez la viande en morceaux (il est préconisé de
hacher la viande sans ligaments et graisse; les
morceaux devraient avoir les dimensions d’environ 20 x 20 x 60 mm), pour les placer facilement
dans l’entrée de la tête hachoir.
• Après avoir coupé la viande, appuyez sur le petit
bouton à l’arrière - position ON, en ensuite appuyez sur le bouton ON (5) sur le panneau avant.
ASSUREZ-VOUS QUE LES DEUX BOUTONS SONT
5.3. FONCTION MARCHE ARRIERE ANTIBOURRAGE
• Afi n de libérer les aliments bloqués dans le mécanisme de la tête hachoir, il faut brancher la fonction marche arrière. En premier lieu, mettez le
petit interrupteur (à l’arrière de l’appareil) à la position R, et, ensuite, appuyez sur le grand (5) pour
le mettre en position R et maintenez quelques se-
6. RECETTE POUR KEBBE
RECETTE
FARCE
Viande d’agneau ou maigre de mouton 100g
Olive d’huile 1 cuillerée
Oignon (fi nement coupé) 1 cuillerée
Épices pincée
Sel pincée
Farine 1 cuillerée
BIEN EN POSITION ON, SINON L’APPAREIL NE SE
METTRA PAS EN MARCHE.
• Placez les morceaux de viande sur le plateau
d’alimentation (2). Pour pousser, utilisez exclusivement le poussoir (12) (schéma 7).
• Après l’utilisation, appuyez sur le bouton O pour
arrêter l’appareil et ensuite débranchez-le de l’alimentation.
condes jusqu’à la libération des aliments.
• Après le déblocage, lâchez l’interrupteur (5) et
mettez le petit interrupteur en position ON, débranchez l’appareil de l’alimentation et enlevez le
produit de la tête hachoir.
FR
• Hacher la viande une ou deux fois.
• Faire revenir l’oignon, ajouter la viande, toutes les
épices, le sel et la farine.
OUTLET COUVER
Viande maigre 450g
Farine 150-200g
Quatre-épices pincée
Noix de muscat (fi nement moulu) 1
Poivron rouge en poudre pincée
Poivre pincée
• Hacher trois fois la viande et mélanger tous les
ingrédients dans une casserole. Une plus grande
quantité de viande avec moins de farine assure une
39
Page 40
meilleure consistance et le goût de l’enveloppe.
• Passez trois fois le mélange par le hachoir.
• Démonter l’appareil en exécutant les actes 5-3 et
enlever la grille et le couteau.
• Placer le kit à kebbé (6) et l’installer sur la vis et
l’emboiter dans les ergots prévus à cet effet (schéma 8).
• Visser l’anneau de fi xation. Ne pas visser trop fortement (schéma 9).
• Réaliser l’enveloppe cylindrique (schéma 10).
• Former les kebbés et faire frire dans l’huile.
7. SAUSSISSES
Avant de commencer, placer le kit à saucisses comme indiqué sur le schéma 11.
FR
8.1. DEMONTAGE
• Attendez jusqu’à l’arrêt complet du moteur.
• Débranchez le cordon d’alimentation de la prise.
• Démontez l’appareil en exécutant les actes comme indiqué sur
les schémas 1 à 6 dans l’ordre inversé.
• Pour enlevez facilement la grille, glissez le tournevis entre la
grille et la tête hachoir comme indiqué sur le schéma 12 et
enlevez la grille.
• Appuyez sur le bouton de verrouillage, enlevez la tête hachoir
comme indiqué sur le schéma 13.
8.2. ENTRETIEN ET LAVAGE
• Enlevez la viande etc. Lavez chaque élément avec de l’eau chaude
et du détergent.
• N’utilisez pas de produits à base de chlorure; ils risquent de
décolorer les surfaces en aluminium.
• N’immergez pas le corps (3) (bloc-moteur) dans l’eau; nettoyez-le uniquement avec un chiffon doux humide.
40
Page 41

• N’utilisez pas de solvants ou d’essence; ils causent des décolorations et de fi ssures sur l’appareil.
• Enduisez tous les éléments avec lames avec de l’huile végétale.
• Après le nettoyage, enroulez le câble d’alimentation dans le
range-cordon à l’arrière du corps de l’appareil.
9. CARACTÉRISTIQUES TECHNIQUES
Puissance 220-240 V AC, 50/60 Hz, 400 W
Poids net/brut 5,2 kg / 5,8 kg
10. GARANTIE
Tout vice ou toute défaillance entraînant un dysfonctionnement de l’appareil qui se déclare dans les 12
mois suivant la date de l’achat sera éliminé à titre
gratuit ou l’appareil sera remplacé par un appa-
à la réparation ou doit être remplacé dans le cadre
de la garantie, il y a lieu de spécifi er le lieu et la date
de l’achat de l’appareil et produire un justifi catif né-
cessaire (par ex. facture ou ticket de caisse).
reil nouveau si le premier a été dûment exploité et
entretenu conformément aux termes de la notice
d’exploitation et s’il n‘a pas été indûment exploité
ou de manière non conforme à sa destination. La
présente stipulation ne porte pas de préjudice aux
autres droits de l’utilisateurs prévus par les dispositions légales. Dans le cas où l’appareil est donné
Conformément à notre politique d’amélioration
permanente de nos produits, nous nous réservons
le droit d’introduire sans avertissement préalable
des modifi cations à l’appareil, à l’emballage et aux
caractéristiques techniques précisées dans la docu-
mentation.
11. RETRAIT DE L’EXPLOITATION ET PROTECTION DE L’ENVIRONNEMENT
L’équipement usé et retiré de l’exploitation doit être
valorisé conformément aux dispositions légales et
aux recommandations en vigueur à la date de son
Les matériaux d’emballage tels que matières plas-
tiques et cartons doivent être déposés dans les
bennes prévues pour le type du matériau considéré.
retrait.
FR
41
Page 42

IT
INDICE
1. DESCRIZIONE ........................................................ 43
2. PRECAUZIONI DI SICUREZZA................................44
3. PRINCIPALI NORME DI SICUREZZA ...................... 45
4. PRIMO UTILIZZO .................................................... 45
5. ISTRUZIONI D’USO ................................................ 46
6. KIBBEH .................................................................. 47
7. SALSCICCE ............................................................48
8. SMONTAGGIO ........................................................48
9. DATI TECNICI ......................................................... 49
10. GARANZIA ............................................................. 49
11. SMALTIMENTO & AMBIENTE ................................ 49
42
Page 43
Caro cliente,
grazie per aver acquistato questa apparecchiatura Hendi. Vogliate leggere attentamente questo manuale
di utilizzo prima di mettere in funzione l´apparecchio al fine di evitare tutti danni derivanti da un´utilizzo
inappropriato. Vogliate altresi´leggere gli avvisi di sicurezza con la piu´ grande attenzione.
1. DESCRIZIONE
IT
1. Coperchio/piatto per carne tritata
2. Vassoio
3. Corpo motore
4. Manopola di fermo
5. Interruttore
6. Attrezzi per kibbeh
7. Foro nel corpo
8. Attrezzo per ugelli per salsicce
9. Ugello per salsicce: Ø12 mm
10. Ugello per salsicce: Ø15 mm
11. Ugello per salsicce: Ø20 mm
12. Spingitore
13. Braccio
14. Chiocciola
15. Disco forato: Ø4 mm
16. Disco forato: Ø7 mm
17. Ghiera fi lettata
18. Disco tritacarne
19. Lama/coltello
43
Page 44

2. PRECAUZIONI DI SICUREZZA
• L’uso scorretto e improprio dell’apparecchio possono danneggiare seriamente l’apparecchio e ferire gli utenti.
• L’apparecchio può essere utilizzato solo per lo
scopo per cui è stato concepito e progettato. Il
produttore non è responsabile di eventuali danni
provocati da uso scorretto ed improprio.
• Tenere l’apparecchio e la spina elettrica lontani
da acqua ed altri liquidi. Nel caso improbabile che
l’apparecchio cada in acqua, staccare immediatamente la spina dalla presa e fare ispezionare
l’apparecchio da un tecnico certifi cato. . L’inosservanza delle presenti istruzioni può dare luogo
a situazioni pericolose
• Non provare mai ad aprire l’involucro dell’apparecchio da soli.
• Non inserire oggetti nell’involucro dell’apparecchio.
• Non toccare la presa con le mani bagnate o umide.
• Controllare regolarmente la spina ed il cavo per
la presenza di eventuali danni. Qualora la spina o
il cavo fossero danneggiati, farli riparare da una
IT
società di riparazione certifi cata.
• Non utilizzare l’apparecchio dopo che è caduto o si
è danneggiato in qualsiasi altro modo. Farlo controllare e riparare, se necessario, da una società
di riparazione certifi cata.
• Non tentare di riparare l’apparecchio da soli. Questo potrebbe dar luogo a situazioni pericolose.
• Assicurarsi che il cavo non venga a contatto con
oggetti appuntiti o caldi e tenerlo lontano da fi amme libere. Per staccare la spina dalla presa, tirare
sempre la spina e non il cavo.
• Assicurarsi che nessuno possa accidentalmente
tirare il cavo (o la prolunga) o inciampare sul cavo
• Questo apparecchio deve essere utilizzato solo per
gli scopi per cui è stato originariamente previsto.
• Controllare sempre l’apparecchio mentre è in funzione.
• I bambini non comprendono che l’uso improprio di
apparecchiature elettriche può essere pericoloso.
Pertanto, non lasciare mai che i bambini utilizzino
gli elettrodomestici senza supervisione.
• Staccare sempre la spina dalla presa di corrente se l’apparecchio non è in uso e sempre prima
della pulizia.
• Avvertenza! Fino a quando la spina è inserita nella
presa di corrente, l’apparecchio è collegato alla
fonte di alimentazione
• Spegnere l’apparecchio prima di estrarre la spina
dalla presa di corrente.
• Non trasportare mai l’apparecchio per il cavo.
• Non utilizzare dispositivi aggiuntivi che non sono
in dotazione con l’apparecchio
• Collegare l’apparecchio solo a una presa elettrica
con tensione e frequenza precisati sull’etichetta.
• Evitare di sovraccaricare.
• Spegnare l’apparecchio dopo l’uso togliendo la
spina della presa di corrente.
• Rimuovere sempre la spina dalla presa quando si
riempie o pulisce il dispositivo.
• L’installazione elettrica deve soddisfare le normative nazionali e locali applicabili. Questo apparecchio non è destinato all’uso da parte di persone
(inclusi i bambini) con capacità fi siche, sensoriali
o mentali ridotte, o senza esperienza e conoscenza, a meno che non siano controllati o istruiti
sull’uso dell’apparecchio da una persona responsabile della loro sicurezza.
44
Page 45

3. PRINCIPALI NORME DI SICUREZZA
Durante l’uso dell’apparecchio occorre rispettare le
principali misure di sicurezza, tra l’altro:
• L’apparecchio è progettato per l’uso domestico e
semi-professionale. Non è adatto all’uso esterno.
• Togliere sempre la spina dell’apparecchio dalla
presa di corrente quando l’apparecchio non è in
uso, prima di montare o smontare i componenti e
prima della pulizia.
• Occorre sorvegliare attentamente i bambini quando l’apparecchio è usato vicino a loro.
• Trasportare l’apparecchio tenendo il corpo con
due mani. Non trasportare mai l’apparecchio
tenendo il vassoio o il braccio.
• Non montare il coltello né il disco tritacarne quando è usato l’attrezzo per kibbeh.
• Non spingere mai i prodotti da tritare con la mano.
Usare sempre lo spingitore (12).
• Non tritare alimenti duri, quali ossa, noci, ecc.
• Non tritare lo zenzero né altri alimenti duri e fi brosi.
• Non utilizzare l’apparecchio per più di 10 minuti
consecutivi, occorre fare intervalli di 10 minuti tra
un ciclo e l’altro per permettere al motore di raffreddarsi.
• Per invertire la marcia da “ON” in “R” o vice versa,
occorre aspettare 30 secondi per evitare il danneggiamento dell’apparecchio.
• Non spingere gli alimenti da lavorare con troppa
forza per evitare che essi si blocchino dentro il
tritacarne.
• Quando è attivo l’interruttore differenziale, non accendere l’apparecchio.
• Non sostituire pezzi né riparare l’apparecchio da
soli.
• Per evitare il rischio di elettrocuzione non immergere mai in acqua il cavo di alimentazione né
il corpo motore.
• L’utilizzo dell’apparecchio non deve essere affi dato alle persone (inclusi i bambini) con capacità
motorie, sensoriali o mentali ridotte o senza esperienza o conoscenze insuffi cienti a meno che non
siano controllate da una persona responsabile
della loro sicurezza.
• L’apparecchio non è un giocattolo.
• Non utilizzare l’apparecchio se il cavo di alimentazione o la spina risultano danneggiati. In tal caso
occorre restituire l’apparecchio al venditore o farlo
riparare da un centro di assistenza autorizzato.
IT
4. PRIMO UTILIZZO
• Controllare se la tensione indicata sulla targhetta
corrisponda alla tensione di rete.
• Lavare tutti gli elementi tranne il corpo motore (3)
immergendoli in acqua calda con detersivo.
• Lavare tutti gli elementi (tranne il corpo motore)
immergendoli in acqua calda con detersivo.
• Prima di collegare la spina alla rete, controllare se
l’interruttore (5) sia in posizione OFF.
45
Page 46
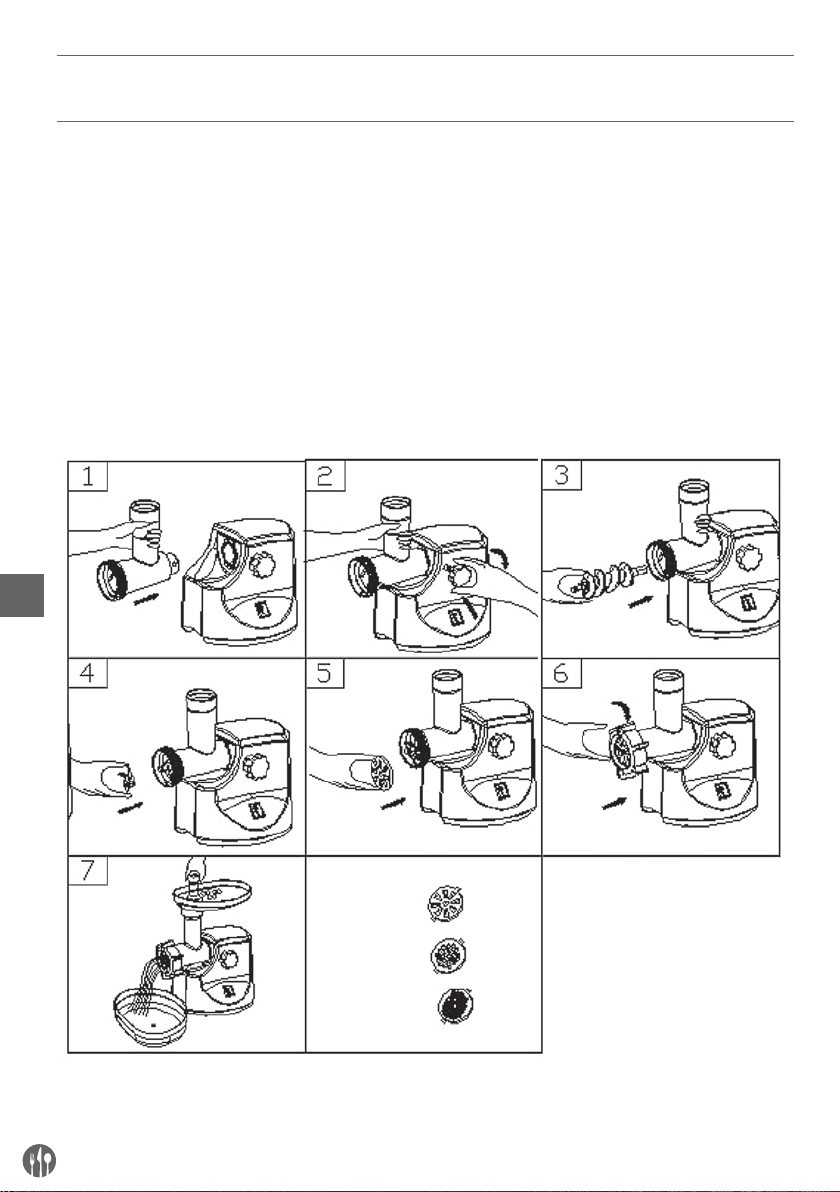
5. ISTRUZIONI D’USO
5.1. MONTAGGIO
• Inserire il braccio nel foro del corpo (dis. 1). Tenendo il braccio in una mano, inserire la manopola di fermo sul lato del corpo e avvitarla bene
girandola verso destra (dis. 2).
• Inserire la chiocciola (14) dentro il braccio, con
l’estremità più lunga indirizzata in avanti, quindi
girarla fi no a quando venga posizionato all’interno
del corpo motore.
• Inserire il coltello (19) sulla chiocciola, con la lama
rivolta verso l’esterno (dis. 4). Non è possibile tritare la carne con il coltello montato in modo inadeguato.
IT
• Montare un disco forato desiderato (15, 16, 18)
vicino al coltello sistemando il perno nell’intaglio
(dis. 5)
• Tenere o premere il disco forato con un dito, con
l’altra mano avvitare la ghiera fi lettata (17) (dis. 6).
Non avvitare troppo.
• Mettere il vassoio (2) sul braccio (13) e fi ssarlo.
• Posizionare l’apparecchio su una superfi cie stabile.
• Non chiudere/non coprire i fori di ventilazione
collocati sulla parte inferiore e sui lati del corpo
motore.
46
Page 47
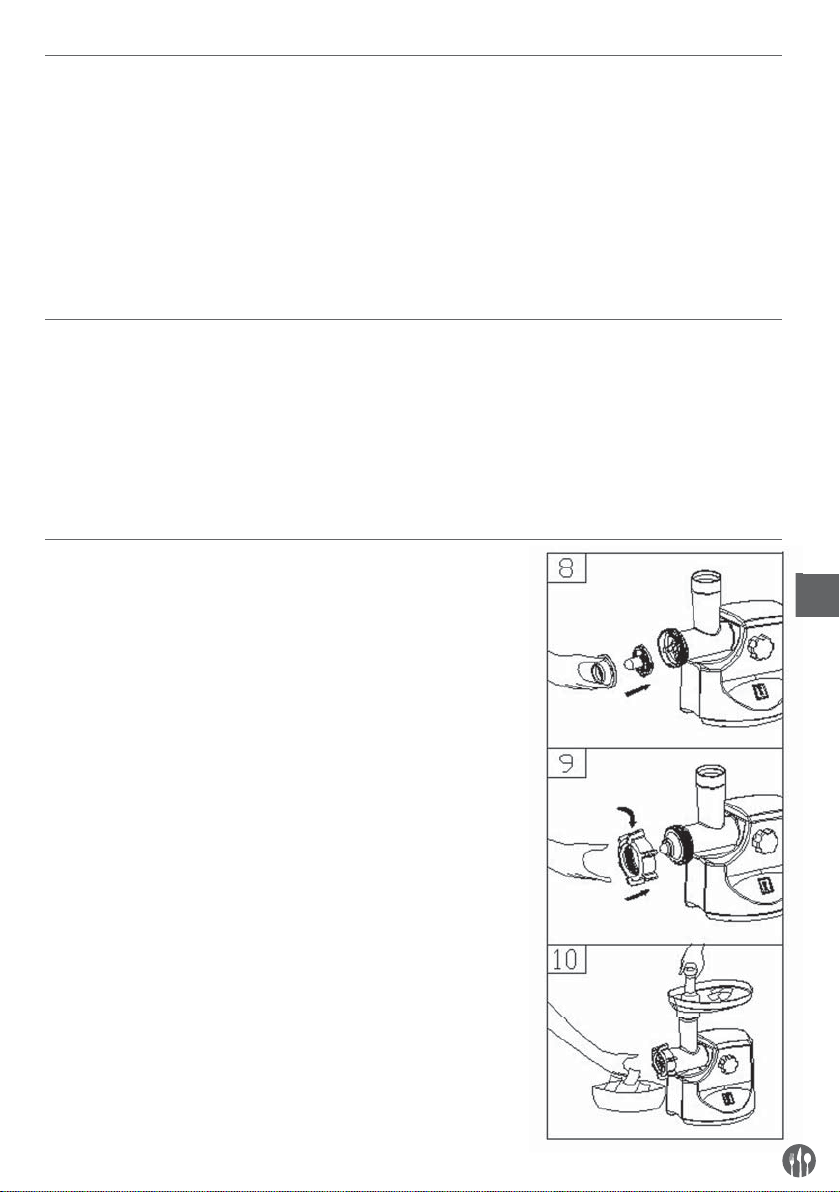
5.2. COME TRITARE LA CARNE
• Tagliare la carne in pezzi (si raccomanda di tritare
la carne priva di tendini e grasso, le dimensioni
dei pezzi di carne devono essere di ca. 20x20x60
mm) per facilitarne l’inserimento dentro il foro del
braccio.
• Una volta tagliata la carne, premere il piccolo tasto collocato sul retro dell’apparecchio (posizione
“ON”), quindi premere il tasto “ON” (5) sul pannel-
5.3. INVERSIONE DI MARCIA
• In caso di intrappolamento del cibo dentro il braccio, è possibile toglierlo utilizzando l’inversione di
marcia. Prima occorre mettere il piccolo interruttore (sul retro dell’apparecchio) in posizione “R”,
e quindi premere il grande interruttore (5) mettendolo in posizione “R” e tenerlo premuto per qual-
6. KIBBEH
RICETTA
RIPIENO
Carne di montone 100 g
Olio di oliva 1 cucchiaio
Cipolla tagliata minutamente 1 cucchiaio
Condimenti a piacere
Sale a piacere
Farina 1 cucchiaio
lo anteriore.
OCCORRE VERIFICARE SE AMBEDUE I TASTI SIA-
NO IN POSIZIONE “ON”. ALTRIMENTI NON SARÀ
POSSIBILE AVVIARE L’APPARECCHIO.
• Mettere i pezzi della carne sul vassoio (2). Spingere i prodotti usando solo lo spingitore (12) (dis. 7).
• Una volta fi nito il lavoro, premere “0” per fermare
l’apparecchio, e quindi scollegare dalla rete.
che secondo fi no a quando l’apparecchio si svuota
completamente.
• Una volta sbloccato l’apparecchio, rilasciare l’interruttore (5) e rimettere il piccolo interruttore in
posizione ON, scollegare l’apparecchio dalla rete e
togliere il cibo dal braccio.
IT
• Tritare la carne di montone una o due volte.
• Friggere la cipolla, aggiungere la carne, tutti i condimenti, il sale e la farina.
INVOLUCRO
Carne magra 450 g
Farina 150-200 g
Condimenti a piacere
Noce moscata tritata
Pepe rosso in polvere a piacere
Pepe a piacere
• Tritare la carne tre volte e mescolare bene tutti gli
ingredienti in una pentola. Per migliorare la consistenza e il sapore dell’involucro occorre usare una
quantità della carne maggiore rispetto a quella
della farina.
47
Page 48
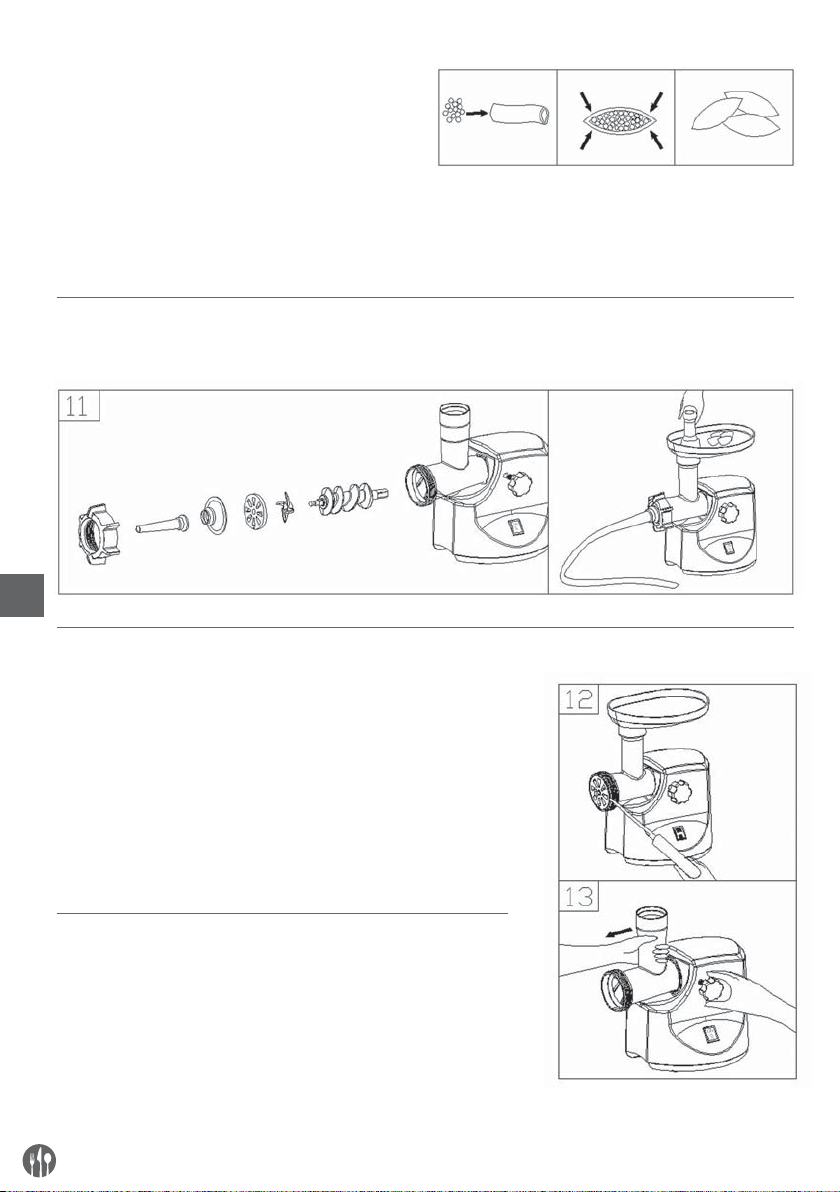
• Tritare la miscela tre volte.
• Smontare l’apparecchio, seguendo i passi 5-3,
togliere il disco forato e il coltello.
• Mettere insieme gli accessori per il kibbeh (6)
e inserirli sulla chiocciola, sistemando i perni negli
intagli (dis. 8).
• Avvitare la ghiera fi lettata. Non avvitarla troppo (dis. 9).
• Eseguire un involucro in forma cilindrica (dis. 10).
• Formare dei kibbeh e friggerli in olio profondo.
7. SALSCICCE
Prima di procedere all’insaccatura delle salsicce, occorre inserire ugelli per salsicce (dis. 11).
IT
8.1. SMONTAGGIO
• Aspettare fi no a quando il motore si ferma completamente.
• Togliere la spina dalla presa di corrente.
• Smontare l’apparecchio eseguendo i passi riportati sui disegni
1-6 in ordine inverso.
• Per facilitare lo smontaggio del disco forato, inserire il cacciavite tra il disco forato e il braccio in modo indicato sul disegno
12 e quindi sollevare il disco forato.
• Premere la manopola di fermo, togliere il braccio in modo indicato sul disegno 13.
8.2. LAVAGGIO
• Togliere la carne, ecc. Lavare ogni componenete in acqua calda
con detersivo.
• I detersivi a base di cloro possono provocare la decolorazione
delle superfi ci in alluminio.
• Non immergere in acqua il corpo motore (3). Il corpo motore
viene pulito con un panno umido.
• I solventi o la benzina possono provocare la spaccatura o la
decolorazione dell’apparecchio.
48
Page 49

• Tutti gli elementi affi lati vengono puliti con un panno imbevuto
di olio alimentare.
• Una volta lavato l’apparecchio, mettere il cavo di alimentazione
dentro un nascondiglio sul retro del corpo motore.
9. DATI TECNICI
Potenza 220-240 V AC, 50/60 Hz, 400 W
Peso netto/lordo 5,2 kg / 5,8 kg
10. GARANZIA
Qualsiasi difetto che infl uenza la funzionalità del
dispositivo che compaia entro un anno dall’acquisto sarà corretto a titolo interamente gratuito o con
la sostituzione del prodotto che è stato utilizzato e
sottoposto a manutenzione corretta seguendo le
istruzioni, senza alcuna violazione. I diritti legali del
cliente non sono assolutamente modifi cati. Nel caso
in cui l’intervento di manutenzione o sostituzione sia
11. SMALTIMENTO & AMBIENTE
Alla fi ne della vita utile del dispositivo, smaltire conformemente alle normative e linee guida applicabili.
previsto nel periodo di validità della garanzia, precisare dove e quando si è acquistato il prodotto, possibilmente allegando lo scontrino.
In linea con la nostra politica di sviluppo continuo dei
prodotti, ci riserviamo il diritto di modifi care il prodotto, l’imballo e le specifi che di documentazione,
senza notifi ca alcuna.
IT
Eliminare i materiali di imballaggio, quali plastica e
cartone, negli specifi ci contenitori.
49
Page 50

RO
INDEX
1. DESCRIERE ........................................................... 51
2. REGULI DE SIGURANȚĂ ........................................52
3. DISPOZITIVE DE SECURITATE IMPORTANTE ........ 53
4. PRIMA UTILIZARE .................................................53
5. INSTRUCȚIUNI DE UTILIZARE ..............................54
6. CUM SĂ FACEȚI KIBBE .......................................... 55
7. CUM SĂ FACEȚI CÂRNAȚI .....................................56
8. CURĂȚARE ȘI ÎNTREȚINERE ................................. 56
9. SPECIFICAȚII ......................................................... 57
10. GARANȚIE.............................................................. 57
11. ELIMINAREA ŞI MEDIUL ÎNCONJURĂTOR ............ 57
50
Page 51
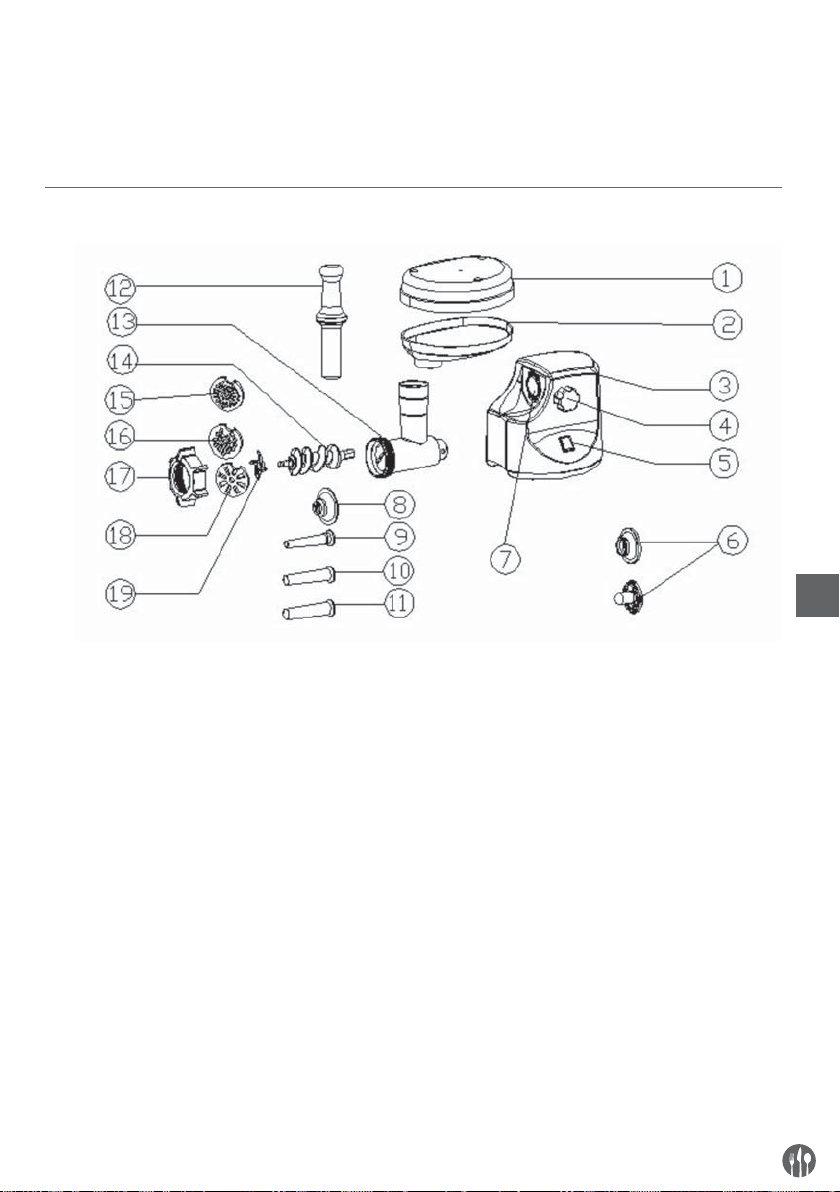
Stimate client,
Vă mulțumim pentru achiziționarea acestui aparat Hendi. Vă rugăm să citiți cu atenția acest manual înainte
de a conecta aparatul pentru evitarea defectării ca urmare a utilizării incorecte. Acordați o atenție deosebită
regulilor de siguranță.
1. DESCRIERE
RO
1. Vas pentru alimente
2. Placă de încărcare
3. Corp
4. Buton de fi xare
5. Comutator
6. Accesoriu pentru kibbe
7. Cap intel
8. Accesoriu pentru cârnați (blocare)
9. Accesoriu pentru cârnați (fi n)
10. Accesoriu pentru cârnați (mediu)
11. Accesoriu pentru cârnați (mare)
12. Dispozitiv de împingere a alimentelor
13. Cap
14. Șarpe
15. Placă de tăiere (fi n)
16. Placă de tăiere (mediu)
17. Inel de fi xare
18. Placă de tăiere (mare)
19. Lamă de tăiere
51
Page 52

2. REGULI DE SIGURANȚĂ
• Operarea incorectă şi utilizarea necorespunzătoare a aparatului poate avaria grav aparatul şi poate
cauza răni oamenilor.
• Aparatul poate fi folosit doar în scopul pentru care
a fost proiectat. Producătorul nu este răspunzător
pentru orice avariere cauzată operării incorecte şi
a utilizării necorespunzătoare.
• Asiguraţi-vă că aparatul şi ştecherul nu intră în
contact cu apă sau alte lichide. În cazul în care
aparatul este scăpat în apă, scoateţi imediat ştecherul din priză şi un tehnician autorizat trebuie
să-l verifi ce. Dacă nu respectaţi aceste instrucţiuni, acest lucru poate cauza situaţii care vă pot
pune viaţa în pericol.
• Nu incercati sa deschideti singuri carcasa aparatului.
• Nu introduceţi nici un fel de obiecte în carcasa
aparatului.
• Nu atingeţi ştecherul cu mâinile ude sau umede.
• Verifi caţi în mod regular ştecherul şi cablul ca
acestea să nu fi e avariate. Dacă ştecherul şi cablul
sunt avariate, acestea trebuie reparate de către o
RO
fi rmă de reparaţii autorizată.
• Nu utilizaţi aparatul după ce a suferit vreo căzătură sau altă daună. Duceţi-l la reparat, dacă este
necesar, la o companie specializată.
• Nu încercaţi să reparaţi aparatul singuri. Dacă nu
respectaţi aceste instrucţiuni, acest lucru poate
cauza situaţii care vă pot pune viaţa în pericol.
• Asiguraţi-vă ca nici un obiect ascuţit sau fi erbinte
să nu intre în contact cu cablul şi feriţi-l de foc.
Pentru a scoate ştecherul din priză, întotdeauna
prindeţi cu mâna priza şi nu scoateţi niciodată din
priză prinzând de cablu.
• Asiguraţi-vă că nimeni nu poate trage de cablu în
mod accidental (sau cablul prelungitor) sau să se
împiedice de cablu.
• Acest aparat este folosit doar în scopul pentru
care a fost produs.
• Întotdeauna supravegheaţi aparatul atunci când
se utilizează.
• Copiii nu înţeleg că utilizarea incorectă a aparatelor electrice poate fi periculoasă. Prin urmare,
nu permiteţi copiilor să folosească electrocasnice
fără supraveghere.
• Întotdeauna scoateţi aparatul din priză atunci
când aparatul nu este folosit sau înainte de curăţare.
• Avertizare! Cât timp ştecherul este în priză, aparatul este conectat la sursa de curent.
• Opriţi aparatul înainte de a scoate ştecherul din
priză.
• Nu transportaţi niciodată aparatul de cablu.
• Nu folosiţi alte dispozitive decât acelea furnizate
împreună cu aparatul.
• Conectaţi aparatul la o sursă de electricitate cu
voltajul şi frecvenţa menţionate pe eticheta aparatului.
• Evitaţi supraîncărcarea.
• Opriţi aparatul după utilizare, scoţând ştecherul
din priză.
• Întotdeauna scoateţi ştecherul din priză când umpleţi sau curăţaţi aparatul.
• Instalaţia electrică trebuie să fi e în conformitate
cu reglementările naţionale şi locale.
• Acest aparat nu trebuie folosit de copii sau persoane care au capacităţi mentale, senzoriale sau
fi zice reduse, sau lipsă de experienţă şi cunoştinţe, decât dacă sunt supravegheaţi de o persoană
responsabilă care are instructiunile cu privire la
utilizarea corecta a aparatului.
52
Page 53

3. DISPOZITIVE DE SECURITATE IMPORTANTE
La utilizarea de aparate electrice, trebuie să respectați
întotdeauna măsurile de siguranță de bază, cum ar fi :
• Aparatul este pentru uz casnic și semi-profesionale;
A nu se utiliza în exterior.
• Deconectați aparatul de la sursa de alimentare
atunci când nu este utilizat, înainte de montarea
sau demontarea pieselor și înainte de curățare.
• Deconectați aparatul de la sursa de alimentare la
asamblarea sau dezasamblarea unității.
• Este necesară supravegherea cu atenție la utilizarea oricărui aparat în apropierea copiilor.
• La deplasarea unității, susțineți corpul cu ambele
mâini. Nu deplasați unitatea susținând-o de placa
de încărcare sau de cap.
• Nu fi xați lama de tăiere și placa de tăiere la utilizarea accesoriului pentru kibbe.
• Nu împingeți niciodată produsele cu mâna. Utilizați dispozitivul de împingere a alimentelor.
• Nu tocați alimente dure cum ar fi oase, nuci etc.
• Nu tocați ghimbir sau alte materiale cu fi bre dure.
• Mașina de tocat carne nu trebuie să funcționeze
timp de mai mult de 10 minute cu următorul interval de 10 minute pentru răcirea motorului.
• Acționați unitatea de la “ON” la “R” sau de la “R”
la “ON” după ce starea de funcționare anterioară
se oprește timp de mai mult de 30 de secunde, în
caz contrar se pot produce situații anormale cum
ar fi mișcarea în sus sau în jos ducând la distrugerea unității.
• Pentru a evita blocarea, nu forțați funcționarea
unității cu forță excesivă.
• Când se activează întrerupătorul, nu porniți aparatul.
• Nu încercați niciodată să înlocuiți piesele sau să
reparați unitatea fără asistență.
• Nu scufundați în apă cablul sau corpul mixerului,
acest lucru putând genera un șoc electric.
• Acest aparat nu este destinat folosirii de către
persoane (inclusiv copii) cu capacități fi zice, senzoriale sau mentale reduse ori lipsite de experiență și cunoștințe, cu excepția cazului în care acestea sunt supravegheate sau au primit instrucțiuni
de folosire a aparatului din partea unei persoane
responsabile pentru siguranța acestora
• Copiii trebuie supravegheați pentru a vă asigura
că nu folosesc produsul în joacă.
• Nu acționați aparatul în cazul în care cablul sau
priza sunt avariate. Returnați aparatul la magazin
sau la centrul de reparații pentru a fi reparat de
un profesionist.
RO
4. PRIMA UTILIZARE
• Verifi cați dacă tensiunea indicată pe eticheta de
capacitate corespunde cu tensiunea de alimentare din locuință.
• Spălați alte piese cu excepția copului (carcasa
motorului) cu apă caldă cu săpun.
• Spălați toate piesele (cu excepția copului) cu apă
caldă cu săpun.
• Înainte de conectarea la sursa de alimentare, asigurați-vă că întrerupătorul este în poziția ”OFF”,
aceasta este poziția normală pentru toate tastele.
53
Page 54
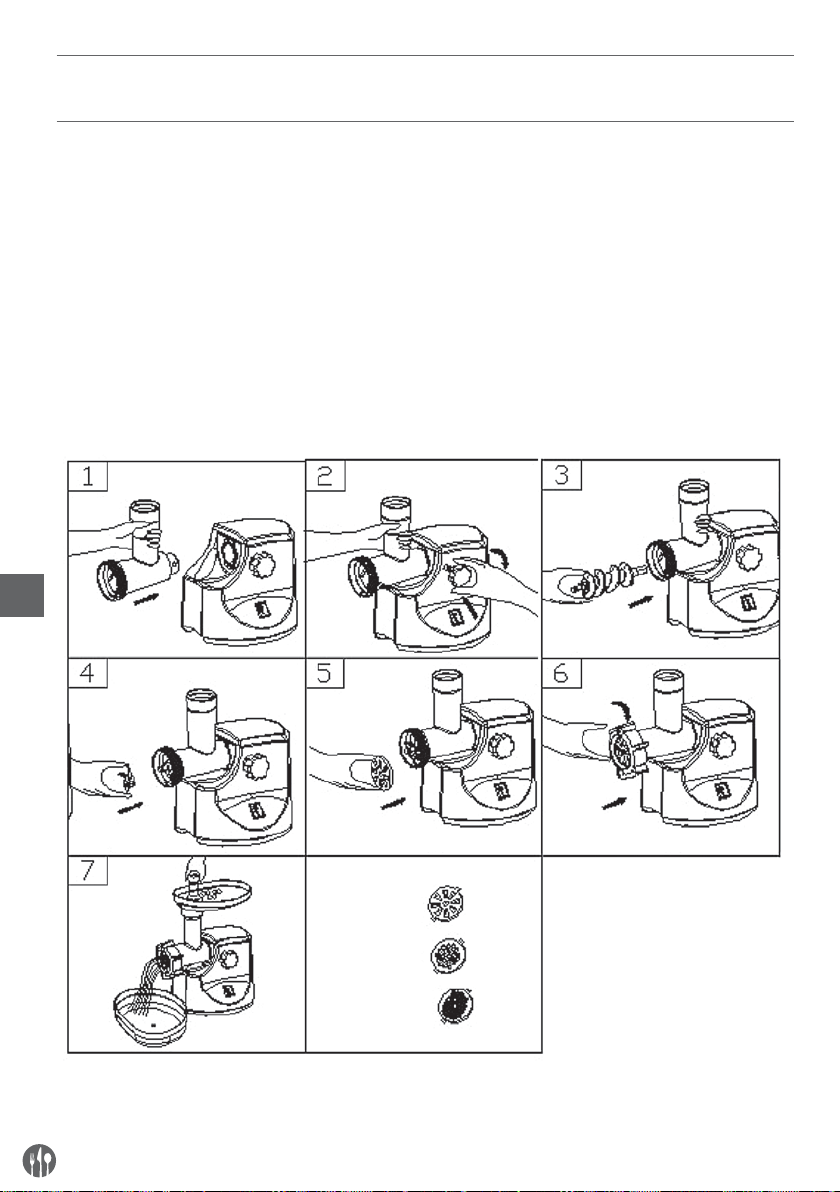
5. INSTRUCȚIUNI DE UTILIZARE
5.1. MONTAJ
• Fixați bine capul mașinii de tocat/alimentatorului
în orifi ciul accesoriului (fi g. 1). Ținând capul cu o
mână, poziționați butonul de fi xare în orifi ciul din
partea laterală a carcasei motorului și apoi strângeți butonul rotindu-l în sensul acelor de ceasornic (fi g. 2).
• Poziționați șarpele pe cap, cu capătul mai lung
mai întâi, și rotiți ușor șurubul până ce acesta se
fi xează pe carcasa motorului (fi g. 3).
• Poziționați lama de tăiere pe axul șarpelui cu lama
orientată către partea din față după cum se indică
în imagine (fi g. ă.4). Dacă aceasta nu este bine fi -
RO
xată, carnea nu va fi tocată.
• Poziționați placa de tăiere dorită lângă lama de
tăiere, fi xând ieșiturile în canal (fi g. 5).
• Susțineți sau apăsați centrul plăcii de tăiere cu un
deget, apoi înșurubați inelul de fi xare cu cealaltă
mână (fi g. 6). Nu strângeți prea tare.
• Poziționați placa de încărcare pe cap și fi xați-o în
poziție.
• Amplasați unitatea pe o suprafață plată.
• Trecerea aerului prin partea de jos și prin partea
laterală a carcasei motorului trebuie să fi e liberă
și neobstrucționată.
•
54
Page 55
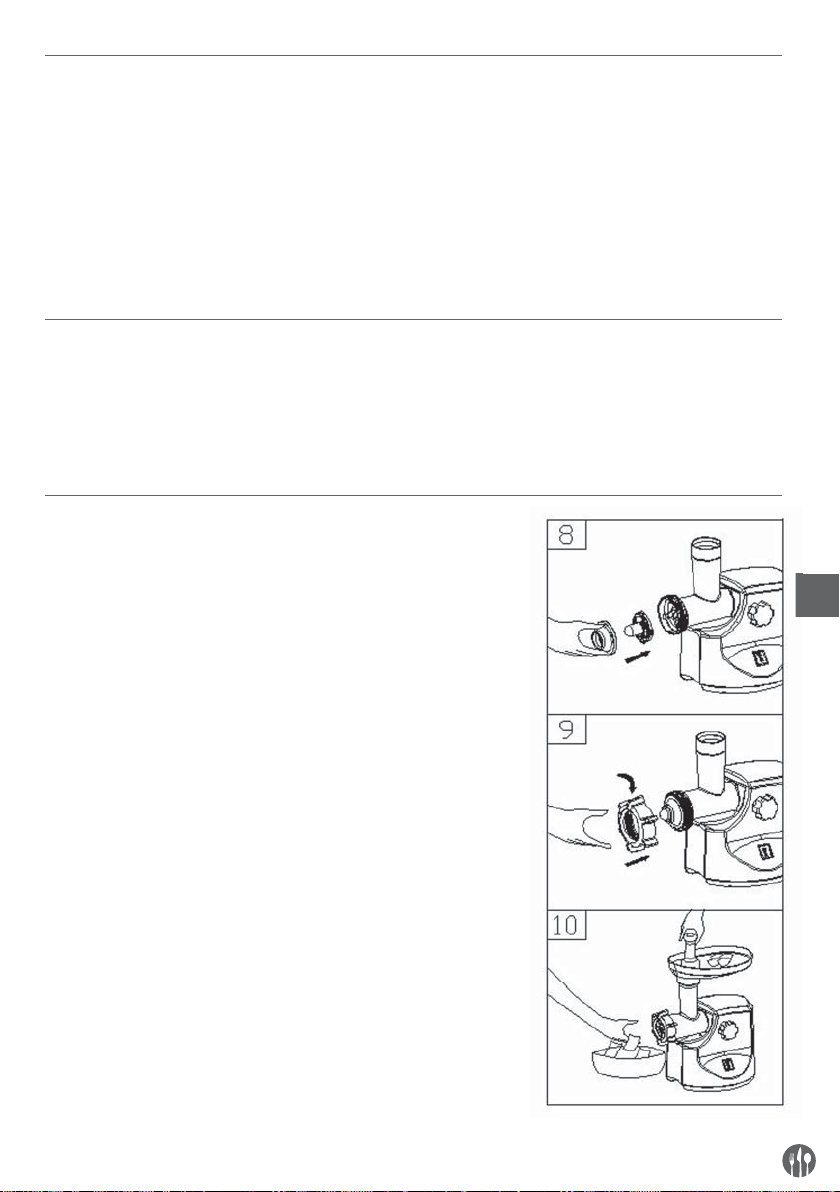
5.2. TOCAREA CĂRNII
• Tăiați alimentele în bucăți (serecomandă carnea
fără mușchi, fără os și fără grăsime, cu dimensiunea aproximativă :20 mm x 20 mm x 60 mm)
pentru a încăpea cu ușurință în orifi ciul alimentatorului.
• La tăierea cărnii, fi xați comutatorul mic din spate în poziția ”ON” și apoi apăsați ”ON” pe panoul
frontal.
5.3. FUNCȚIE DE INVERSARE
• Dacă aparatul de înfundă, utilizați funcția „INVERSARE” pentru a scoate carnea. Fixați mai întâi
comutatorul mic în poziția “R”, apoi țineți apăsat
butonul mare “R” timp de câteva secunde, după
6. CUM SĂ FACEȚI KIBBE
REȚETĂ
UMPLUTURĂ
Carne de oaie 100g
Ulei de măsline 1 1/linguri
Ceapă (tăiată fi n) 1 1/linguri
Condimente după gust
Sare după gust
Făină 1 1/linguri
TREBUIE SĂ VĂ ASIGURAȚI CĂ AMBELE SUNT ÎN
POZIȚIA ”ON”, APOI MAȘINA DE TOCAT CARNE
VA ÎNCEPE SĂ FUNCȚIONEZE.
• Amplasați alimentele pe placa de încărcare. Utilizați numai dispozitivul de împingere a alimentelor
(fi g. 7)
• După utilizare, apăsați “O” pentru oprirea aparatului, apoi scoateți-l din priză.
care carnea va fi evacuată.
• După deblocare, eliberați “R” și scoateți aparatul
din priză, apoi scoateți alimentele din capul aparatului.
RO
• Tocați carnea de oaie o dată sau de două ori.
• Căliți ceapa până devine aurie și adăugați carnea
de oaie tocată, toate condimentele, sarea și făina.
CAPACUL DE EVACUARE
Carne slabă 450g
Făină 150-200g
Condimente după gust
Nucșoară (tăiată fi n) 1
Piper roșu măcinat după gust
Piper după gust
• Tocați carnea de trei ori și amestecați toate ingredientele într-un bol. Puteți spori consistența
și gustul adăugând mai multă carne și mai puțină
făină în capacul de evacuare.
• Tocați amestecul de trei ori.
55
Page 56
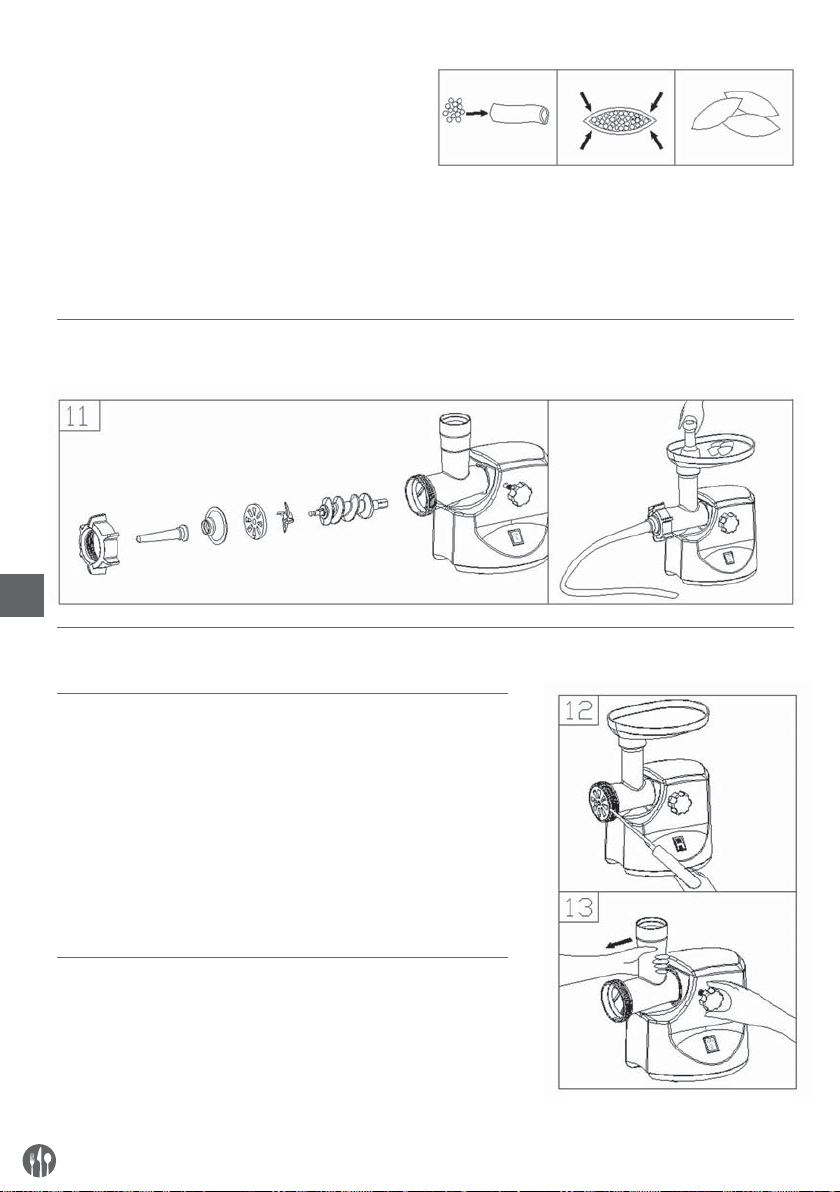
• Demontați executând în ordine inversă etapele 5-3
pentru a scoate placa de tăiere și lama de tăiere.
• Amplasați accesoriile pentru kibbe A și B împreună pe axul șurubului de alimentare, fi xând ieșiturile în canale (fi g. 8).
• Înșurubați capacul până la fi xarea acestuia. Nu
strângeți prea tare (fi g. 9).
• Poziționați capacul de evacuare cilindric (fi g. 10).
• Formați kibbe conform ilustrației de mai jos și
prăjiți în baie de ulei.
7. CUM SĂ FACEȚI CÂRNAȚI
Înainte de a începe vă rugăm să instalați accesoriul pentru cârnați după cum se indică în continuare (fi g. 11).
RO
8. CURĂȚARE ȘI ÎNTREȚINERE
8.1. DEMONTARE
• Asigurați-vă că motorul s-a oprit complet.
• Scoateți ștecherul din priză.
• Demontați executând în ordine inversă etapele din imaginile 1-6.
• Pentru a scoate cu ușurință placa de tăiere, amplasați o șurubelniță între placa de tăiere și cap, conform ilustrației, și ridicați-o (fi g. 12).
• Apăsați butonul de fi xare, rotiți butonul în direcția indicată în
fi g. 13, apoi puteți îndepărta capul.
8.2. CURĂȚARE
• Scoateți carnea etc. Spălați fi ecare piesă cu apă caldă cu săpun.
• Soluțiile de înălbire conținând clor vor duce la decolorarea suprafețelor de aluminiu.
• Nu scufundați în apă carcasa motorului, ștergeți-o doar cu o cârpă
umedă.
56
Page 57

• Diluanții și gazolina vor duce la fi surarea sau modifi carea culorii unității.
• Ștergeți toate piesele pentru tăiere cu o cârpă înmuiată în ulei
vegetal.
8.3. AMBALAJ
• După curățare, amplasați cablurile în cutia pentru cabluri afl ată în spatele aparatului.
9. SPECIFICAȚII
Putere 220-240 V AC, 50/60 Hz, 400 W
Greutate netă/brută 5,2 Kg/5,8 Kg
10. GARANȚIE
Orice defecțiune care afectează funcționarea aparatului apărută la mai puțin de un an de la cumpărarea
acestuia va fi remediată prin reparație sau înlocuire
gratuită, cu condiția ca aparatul să fi fost folosit și
întreținut conform instrucțiunilor nu să nu fi fost
bruscat sau folosit necorespunzător în vreun fel.
Drepturile dumneavoastră legale nu sunt afectate.
11. ELIMINAREA ŞI MEDIUL ÎNCONJURĂTOR
La sfârșitul vieții aparatului, vă rugăm să-l eliminați
conform regulamentelor și instrucțiunilor aplicabile
în acel moment.
Dacă aparatul este în garanție, menționați când și
de unde a fost cumpărat și includeți dovada cumpărării (de ex. chitanța).
Conform politicii noastre de dezvoltare continuă
a produsului, ne rezervăm dreptul de a modifi ca produsul, ambalajul și documentația fără notifi care.
Aruncați ambalajul (plastic sau carton) în recipientele corespunzătoare.
RO
57
Page 58

RU
СОДЕРЖАНИЕ
1. ОПИСАНИЕ............................................................59
2. ПРАВИЛА ТЕХНИКИ БЕЗОПАСНОСТИ ................60
3. ВАЖНЫЕ МЕРЫ БЕЗОПАСНОСТИ.......................61
4. ПЕРВОЕ ИСПОЛЬЗОВАНИЕ ................................. 61
5. РУКОВОДСТВО ПО ЭКСПЛУАТАЦИИ ................... 62
6. ПРИГОТОВЛЕНИЕ КЕББЕ .................................... 63
7. ПРИГОТОВЛЕНИЕ КОЛБАСЫ ..............................64
8. РАЗБОРКА............................................................. 64
9. ТЕХНИЧЕСКИЕ ДАННЫЕ ..................................... 65
10. ГАРАНТИЯ ............................................................. 65
11. СПИСАНИЕ С ЭКСПЛУАТАЦИИ. ЗАЩИТА
ОКРУЖАЮЩЕЙ СРЕДЫ .......................................65
58
Page 59
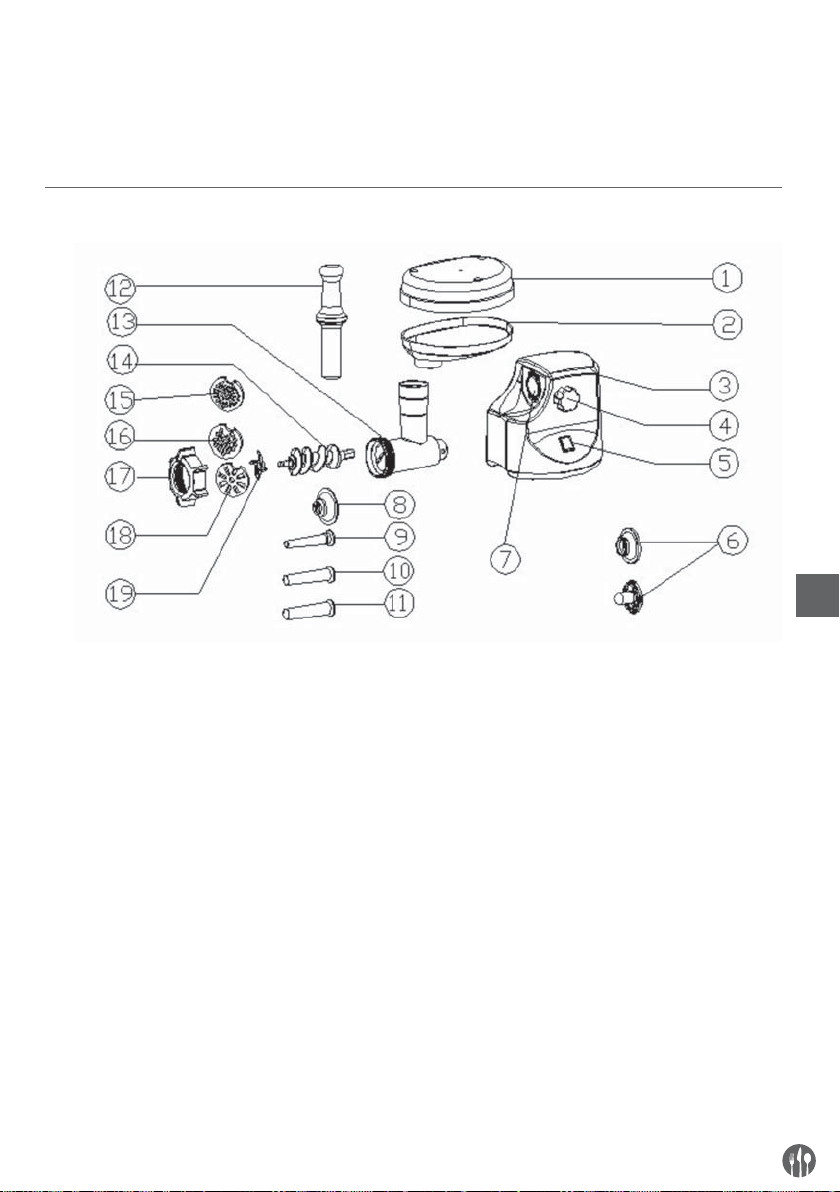
Уважаемый Клиент,
Большое Вам спасибо за то, что Вы купили оборудование фирмы Hendi. Вам следует внимательно прочитать настоящую инструкцию пользователя во избежание повреждения машины в результате неправильной эксплуатации. Особенно рекомендуем ознакомиться с предупреждениями.
1. ОПИСАНИЕ
RU
1. Поднос для фарша
2. Лоток
3. Корпус (корпус двигателя)
4. Ручка блокировки
5. Переключатель
6. Насадки для приготовления кеббе
7. Отверстие в корпусе
8. Насадка для приготовления колбасы
9. Наконечник для приготовления колбасы:
Ø12 мм
10. Наконечник для приготовления колбасы:
Ø15 мм
11. Наконечник для приготовления колбасы:
Ø20 мм
12. Толкатель
13. Тройник с загрузочной горловиной
14. Шнек
15. Решётка: Ø4 мм
16. Решётка: Ø7 мм
17. Прижимная гайка
18. Крупная решётка
19. Нож
59
Page 60

2. ПРАВИЛА ТЕХНИКИ БЕЗОПАСНОСТИ
• Неправильная эксплуатация и неподходящее
использование агрегата может привести к его
поломке и поранить оператора.
• Оборудование следует использовать точно по
назначению. Производитель не несет ответственности за повреждения, вызванные неправильной эксплуатацией или неправильным
обслуживанием оборудования.
• Оборудование и электрическую штепсельную
вилку следует держать вдали от воды и прочих
жидкостей. Если штепсельная вилка попадет
в воду, ее следует тут же вытащить из розетки
электропитания и обратиться в службу сертифицированного сервиса для проверки устройства.
Несоблюдение данных указаний может повлечь
за собой угрозу здоровью и жизни обслуживающего персонала.
• Нельзя снимать кожух без особого разрешения.
• Нельзя класть никаких посторонних предметов
вовнутрь агрегата.
• Нельзя касаться мокрыми, или влажными руками штепсельной вилки.
RU
• Необходимо систематически проверять состояние штепсельной вилки и кабеля на предмет
возможных повреждений. В случае обнаружения таковых нужно обращаться в службу сертифицированного сервиса для устранения повреждений.
• Нельзя пользоваться оборудованием, которое
упало, или было повреждено иным способом. В
таком случае оборудование следует осмотреть и
обратиться в службу сертифицированного сервиса для устранения возможных повреждений.
• Нельзя проводить ремонт оборудования самостоятельно. Это может привести к угрозе здоровью и жизни обслуживающего персонала!
• Следует удостовериться в том, что провод не
касается острых и горячих предметов и, кроме
того, следует оберегать его от открытого огня.
Если нужно вытащить штепсельную вилку из
розетки, нужно тянуть за вилку, а не за провод.
• Нужно сделать все возможное, чтобы нельзя
было даже случайно вытащить вилку из розетки, зацепиться за неправильно расположенный
провод или удлинитель, споткнуться и упасть.
• Необходимо следить за работой оборудования.
• Дети не понимают, что неправильное использование электрооборудования опасно. Нельзя
допускать, чтобы дети пользовались электрооборудованием без присмотра взрослых.
• Перед каждой чисткой оборудования, или отключением на продолжительное время, штепсельную вилку следует вытащить из розетки.
• Предупреждение! Если вилка остается в розетке
– это означает, что оборудование остается под
напряжением.
• Перед тем, как вытащить вилку из розетки, оборудование следует выключить.
• Нельзя тащить оборудование за провод электропитания.
• Нельзя использовать никаких нештатных, не поставленных вместе с оборудованием устройств.
• Агрегат нужно подключать к электросети, которой параметры – напряжение и частота – соответствуют параметрам, указанным на щитке
агрегата.
• Оборудование нельзя перегружать.
• После окончания работы оборудование следует
обесточить, вытащив вилку из розетки.
• После окончания работы оборудование следует
обесточить, вытащив вилку из розетки.
• Электропроводка должна соответствовать требованиям общегосударственных и местных норм.
• Без надлежащего контроля или предварительного обучения эксплуатации оборудования проводимого лицом, отвечающим за безопасную
эксплуатацию, оборудованием не могут пользоваться ни дети, ни лица с ограниченными физическими, или психическими возможностями, ни
лица, которые не обладают необходимым опытом работы и знаниями в данной области.
60
Page 61

3. ВАЖНЫЕ МЕРЫ БЕЗОПАСНОСТИ
Во время работы электрических приборов следует
соблюдать основные меры предосторожности, в
том числе:
• Помните, что устройство предназначено для использования в бытовых и полупрофессиональных условиях; не используйте его на открытом
воздухе.
• Отключите питание, когда не пользуетесь устройством, перед установкой или разборкой частей
и чисткой.
• Отключайте питание во время сборки и разборки устройства.
• При работе устройства рядом с детьми соблюдайте строгий надзор.
• Переносите устройство обеими руками за корпус.
• Не переносите устройства за лоток или тройник.
• Не устанавливайте нож или поднос для фарша,
если используется насадка для приготовления
кеббе.
• Никогда не проталкивайте продуктов рукой.
Пользуйтесь толкателем (12)
• Не измельчайте твёрдых продуктов, таких как
кости, орехи и т.п.
• Не измельчайте имбирь или другие твёрдые,
волокнистые продукты.
• Не используйте мясорубку в непрерывном режиме более, чем 10 минут, делайте 10-минутный
перерыв между циклами, чтобы дать двигателю
остыть.
• В случае изменения направления измельчения
из положения „ON” в положение „R” или наоборот, подождите 30 секунд, чтобы не повредить
устройство.
• Для того, чтобы избежать заклинивания, не нажимайте слишком сильно на продукты.
• Не включайте мясорубку после срабатывания
устройства защитного отключения.
• Никогда не пытайтесь заменить детали или самостоятельно отремонтировать устройство.
• Не погружайте шнур питания или корпус в воду
– это представляет опасность поражения электрическим током.
• Устройство не предназначено для обслуживания лицами (в том числе детьми) с ограниченными физическими и умственными способностями или не имеющими необходимого опыта и
знаний, если они не работают под наблюдением
лиц, ответственных за их безопасность.
• Устройство не предназначено для игр детей.
• Не пользуйтесь устройством, если повреждены
шнур питания или вилка. Верните его продавцу
или обратитесь в авторизованный сервисный
центр к квалифицированным специалистам.
RU
4. ПЕРВОЕ ИСПОЛЬЗОВАНИЕ
• Проверьте напряжение, указанное на щитке, соответствует ли оно напряжению сети.
• Вымойте все части кроме корпуса (корпуса двигателя - 3) в тёплой воде с моющим средством.
• Все части (кроме корпуса) вымойте в тёплой
воде с моющим средством.
• Прежде, чем вставить вилку, проверьте, что переключатель (5) находится в положении ВЫКЛ.
(OFF).
61
Page 62
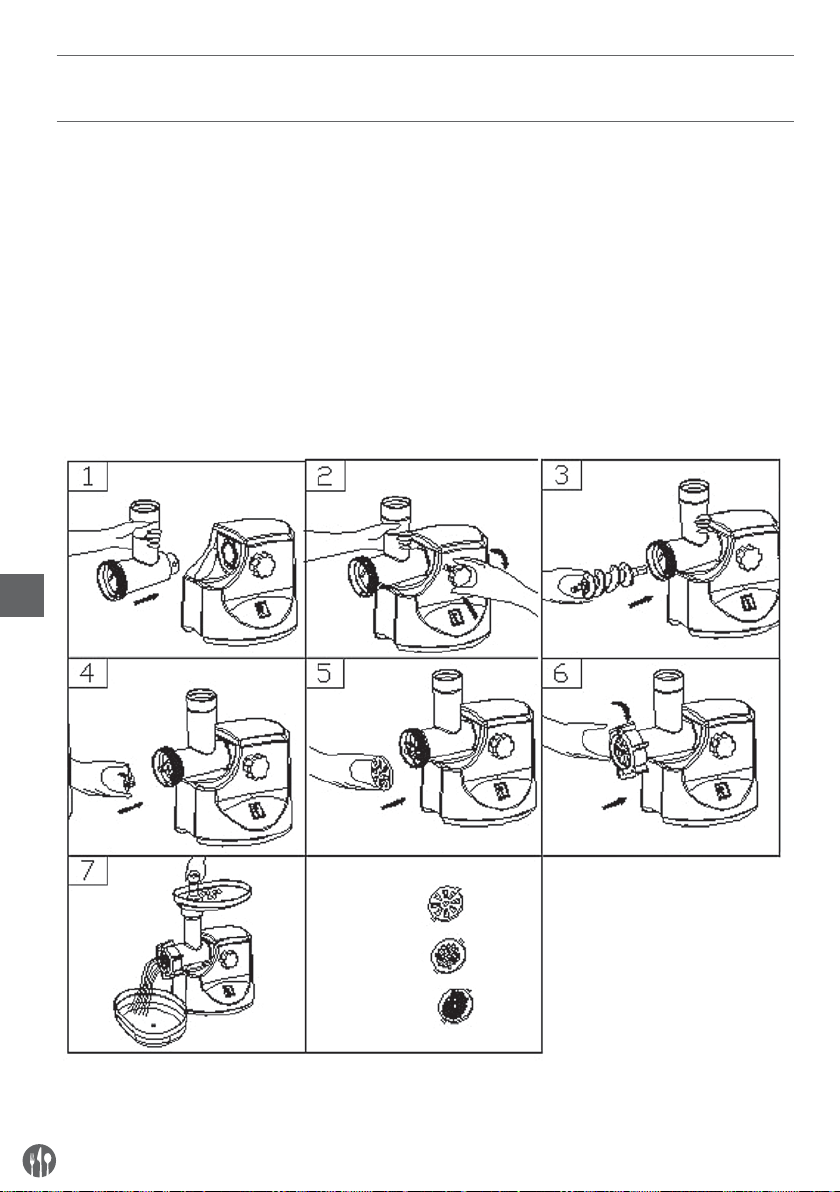
5. РУКОВОДСТВО ПО ЭКСПЛУАТАЦИИ
5.1. СБОРКА
• Установите тройник в отверстие для крепления
на корпусе (рис. 1). Удерживая тройник в одной
руке, поверните ручку блокировки с боковой
стороны корпуса двигателя и закрутите вправо
(рис. 2).
• В тройник установите шнек (14), длинным концом внутрь, слегка поворачивайте, чтобы зафиксировать его в корпусе двигателя.
• Наденьте нож (19) на посадочное место шнека,
режущей стороной наружу (рис. 4). Если нож
установлен неправильно, мясо не будет измельчаться.
RU
• Установите решётку нужного типа (15, 16, 18)
следом за ножом, убедитесь, что выступы совпадают с пазами решётки (рис. 5).
• Удерживая решётку или нажимая по центру одним пальцем, плотно прикрутите другой рукой
прижимную гайку (17) (рис. 6). Не закручивайте
слишком сильно.
• Установите лоток (2) на тройник (13) и зафиксируйте.
• Поставьте устройство на ровной поверхности.
• Не закрывайте вентиляционные отверстия на
дне и в боковой части корпуса двигателя.
62
Page 63
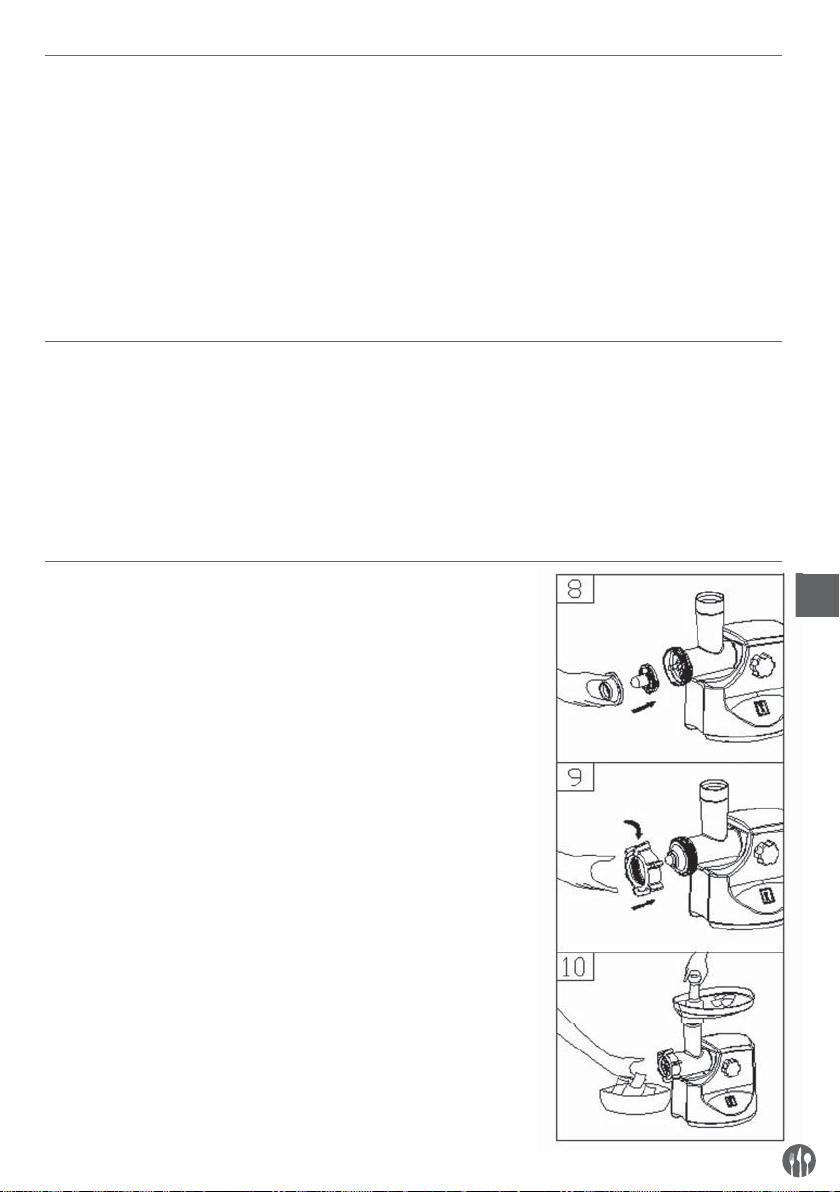
5.2. РУБКА МЯСА
• Нарежьте мясо на куски (рекомендуется измельчать мясо без сухожилия и жира, куски должны
быть размером примерно 20 x 20 x 60 мм), чтобы
они свободно проходили в загрузочную горловину.
• После резки мяса, нажмите сзади на маленькую
кнопку выключателя, чтобы установить его в положение „ON”, потом нажмите кнопку „ON” (5)
на передней панели.
УБЕДИТЕСЬ, ЧТО ОБЕ КНОПКИ НАХОДЯТСЯ
В ПОЛОЖЕНИИ „ON”, В ПРОТИВНОМ СЛУЧАЕ
УСТРОЙСТВО НЕ НАЧНЁТ РАБОТУ.
• Положите куски мяса на лоток (2).
Для проталкивания пользуйтесь исключительно
толкателем (12) (рис. 7).
• После использования нажмите „O”, чтобы остановить устройство,
Затем отключите его от сети.
5.3. ФУНКЦИЯ ПЕРЕКЛЮЧЕНИЯ НАПРАВЛЕНИЯ ВРАЩЕНИЯ (РЕВЕРС)
• В случае, если мясо застряло, его можно удалить, включая функцию переключения направления вращения. Во-первых, переместите
маленький переключатель (сзади устройства)
в положение „R”, затем нажмите большой пе-
несколько секунд пока мясо не выйдет.
• После этого выключите переключатель (5), а малый переключатель установите в положение ON,
отключите устройство от сети и удалите мясо из
тройника.
реключатель (5) в положение „R” и придержите
6. ПРИГОТОВЛЕНИЕ КЕББЕ
РЕЦЕПТ
ФАРШ
Баранина 100г
Оливковое масло 1 ложка
Лук (измельчённый) 1 ложка
Специи по вкусу
Соль по вкусу
Мука 1 ложка
RU
• Баранину пропустите через мясорубку один или два раза.
• Поджарьте лук, добавьте мясо, все специи, соль и муку.
ОБОЛОЧКА
Постное мясо 450г
Мука 150-200г
Специи по вкусу
Мускатный орех (измельчённый) 1
Порошок красного перца по вкусу
Перец по вкусу
• Пропустите мясо три раза и смешайте все ингредиенты в ёмкости. Большее количество мяса при меньшем количестве
муки обеспечит лучшую консистенцию и вкус оболочки.
63
Page 64
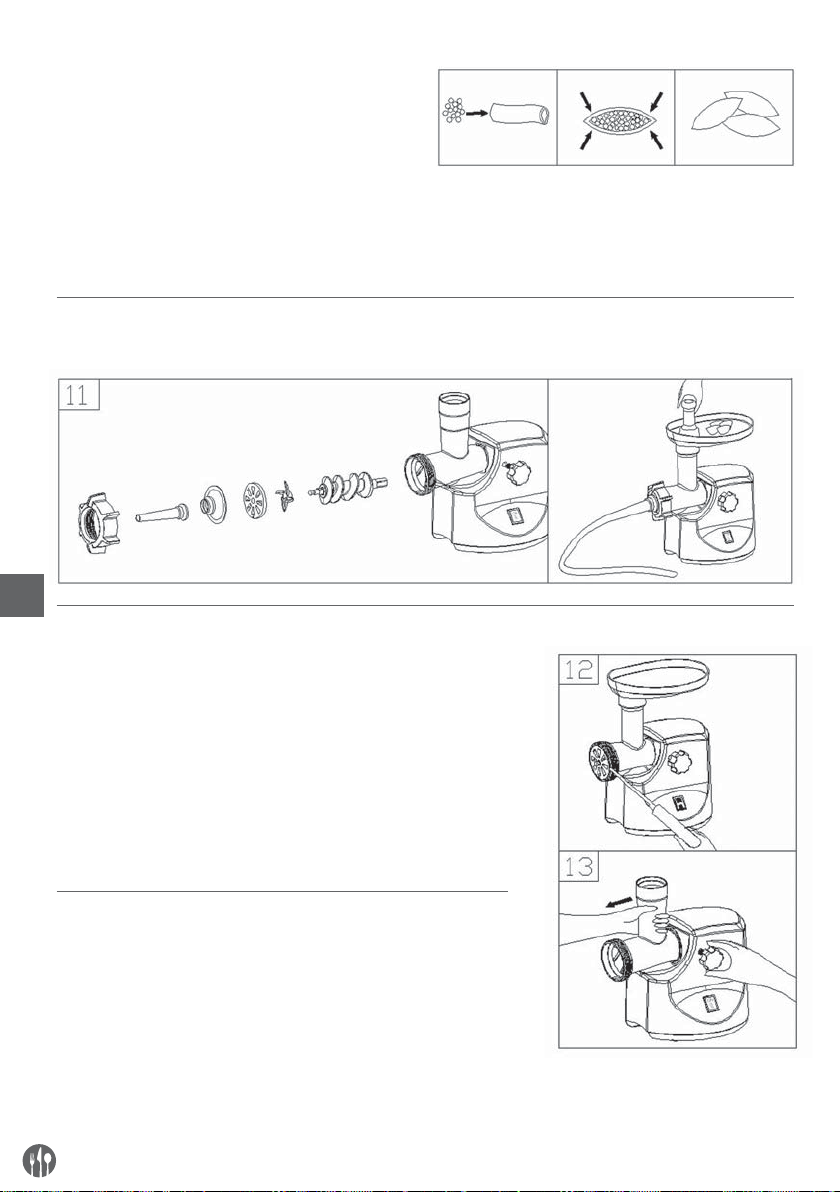
• Пропустите мясо три раза.
• Разберите мясорубку, выполняя шаги 5-3 и снимите решётку и нож.
• Наденьте насадку для кеббе (6) и установите её
на вал, подгоняя выступы с пазами (рис. 8).
• Закрутите плотно прижимную гайку. Не перекручивайте гайку (рис. 9).
• Сделайте трубочку оболочки (рис. 10).
• Приготовьте кеббе и обжарьте во фритюре.
7. ПРИГОТОВЛЕНИЕ КОЛБАСЫ
Перед началом установите насадку для приготовления колбасы в соответствии с рисунком 11.
RU
8.1. РАЗБОРКА
• Убедитесь, что двигатель полностью остановился.
• Отключите вилку от сети.
• Разберите устройство, выполняя шаги рисунков 1-6 в обратной очерёдности.
• Чтобы легко отделить решётку, поместите отвертку между
решёткой и тройником способом, представленным на рис.
12 и отодвиньте решётку.
• Нажмите кнопку снятия тройника, отсоедините тройник способом, представленным на рисунке 13.
8.2. ЧИСТКА
• Удалите остатки мяса и т.п. Вымойте каждую деталь в тёплой
воде с моющим средством.
• Использование химических веществ на основе хлора вызовет обесцвечивание алюминиевых поверхностей.
• Не погружайте корпус (3) (корпус двигателя) в воду, только
протрите его влажной тканью.
• Использование растворителя или бензина вызовет образование трещин или обесцвечивание устройства.
64
Page 65

• Все режущие элементы протрите тканью, смоченной растительным маслом.
• После мытья уберите шнур в отсек в задней части корпуса
устройства.
9. ТЕХНИЧЕСКИЕ ДАННЫЕ
Мощность 230 B/AC/50 Гц, 400 Вт
Вес нетто/брут то 5,2 кг / 5,8 кг
10. ГАРАНТИЯ
Любая недоделка или поломка, которая влечет
за собой неправильную работу устройства, которая будет выявлена в течение первого года от
даты покупки, будет устранена бесплатно, или же
тельстве. В случае заявления устройства в ремонт
или на замену в рамках гарантии, следует указать
место и дату покупки устройства и приложить счет,
или чековую квитанцию.
все устройство будет заменено новым, если оно
эксплуатировалось и обслуживалось согласно
инструкции по обслуживанию и не использовалось неправильно, или в разрез с назначением.
Данное положение ни коей мере не нарушает
иных прав потребителя, изложенных в законода-
Согласно нашей политике совершенствования
наших продуктов оставляем за собой право на
ввод изменений в конструкцию, упаковку и в тех-
нические параметры, указываемые в технической
документации без предупреждения.
11. СПИСАНИЕ С ЭКСПЛУАТАЦИИ. ЗАЩИТА ОКРУЖАЮЩЕЙ СРЕДЫ
Оборудование, изношенное и списанное с эксплуатации следует утилизировать согласно правилам
и указаниям, действующим на день снятия с экс-
Материалы упаковки, такие как пластик, картон-
ные коробки, древесина, следует складировать
раздельно в соответствующие контейнеры.
плуатации.
RU
65
Page 66

66
Page 67

Page 68

(ver. 2016/10/10/MP/MD)
Hendi B.V.
Steenoven 21
3911 TX Rhenen, The Netherlands
Hendi Polska Sp. z o.o.
ul. Magazynowa 5
62-023 Gądki, Poland
Hendi Food Service Equipment GmbH
Gewerbegebiet Ehring 15
5112 Lamprechtshausen, Austria
Hendi Food Service Equipment Romania S.R.L.
Str. 13 decembrie 94A, Hala 14
Brașov 500164 RO, Romania
Hendi HK Ltd.
1208, 12/F Exchange Tower
33 Wang Chiu Road, Kowloon Bay, Hong Kong
Tel: +852 2154 2618
Email: [email protected]
Find Hendi on internet:
www.hendi.eu
www.facebook.com/HendiFoodServiceEquipment
www.linkedin.com/company/hendi-food-service-equipment-b.v.
www.youtube.com/HendiEquipment
- Changes, printing and typesetting errors reserved.
- Änderungen und Druckfehler vorbehalten.
- Wijzigingen en drukfouten voorbehouden.
- Producent zastrzega sobie prawo do zmian
oraz błędów drukarskich w instrukcji.
- Variations et fautes d’impression réservés.
- Errori di cambiamenti, di stampa e di impaginazione riservati.
- Drepturi rezervate cu privire la modifi cări şi greşeli de imprimare.
- Изменения, печати и верстки ошибки защищены.
© 2016 Hendi BV Rhenen - The Netherlands Ver: 10-10-2016
 Loading...