

Page 1
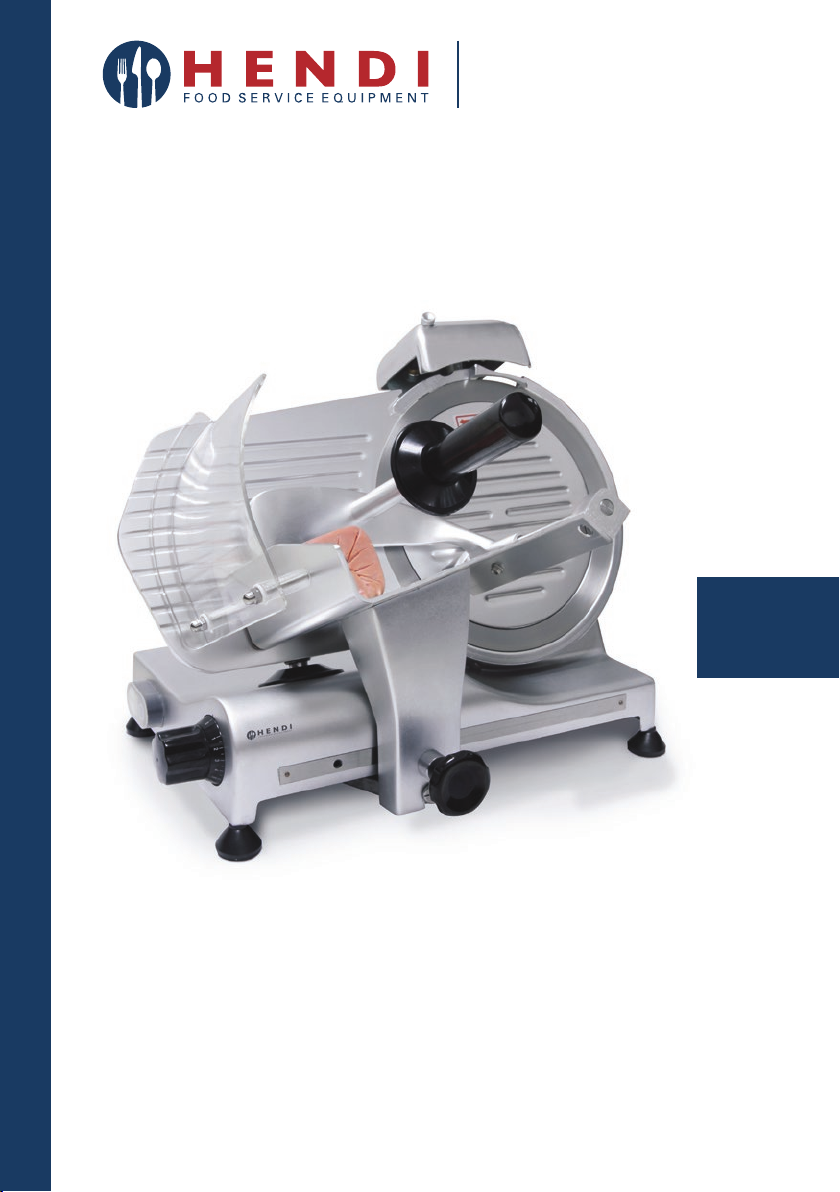
User manual
Gebrauchsanweisung
Gebruiksaanwijzing
Instrukcja obsługi
Mode d’emploi
SLICER PROFI LINE
Istruzioni per l’utente
Instrucţiunile utilizatorului
Руководство по эксплуатации
Οδηγίες χρήσης
Item: 210000
210017
210031
210048
You should read this user manual carefully before
using the appliance.
Bevor Sie das Gerät in Betrieb nehmen, sollten
Sie diese Gebrauchsanweisung aufmerksam lesen.
Alvorens de apparatuur in gebruik te nemen dient
u deze gebruiksaanwijzing aandachtig te lezen.
Przed uruchomieniem urządzenia należy koniecznie
dokładnie przeczytać niniejszą instrukcję obsługi.
Lisez attentivement ce mode d’emploi avant d’utiliser
l’appareil .
Prima di utilizzare l’apparecchio in funzione leggere
attentamente le istruzioni per l’uso.
Citiţi cu atenţie prezentul manual de utilizare înainte
de folosirea aparatului.
Внимательно прочитайте руководство пользователя
перед использованием прибора.
Πρέπει να διαβάσετε αυτές τις οδηγίες χρήσης
προσεκτικά πριν χρησιμοποιήσετε τη συσκευή.
Page 2
Keep these instructions with the appliance.
Diese Gebrauchsanweisung bitte beim Gerät aufbewahren.
Bewaar deze handleiding bij het apparaat.
Zachowaj instrukcję urządzenia
Gardez ces instructions avec cet appareil.
Conservate le istruzioni insieme all’apparecchio.
Păstraţi maualul de utilizare alături de aparat.
Хранить руководство вместе с устройством.
Φυλάξτε αυτές τις οδηγίες μαζί με τη συσκευή.
For indoor use only.
Nur zur Verwendung im Innenbereich.
Alleen voor gebruik binnenshuis.
Do użytku wewnątrz pomieszczeń.
Pour l’usage à l’intérieur seulement.
Destinato solo all’uso domestico.
Doar pentru uz la interior.
Использовать только в помещениях.
Για χρήση μόνο σε εσωτερικό χώρο.
For item 210017 only.
Nur für Artikel 210017.
Alleen voor artikel 210017.
Dla pozycji numer 210017 tylko.
Pour l’article 210017 seulement.
Solo per articolo 210017.
Numai pentru articolul 210017.
Только для элемента 210017.
Για το στοιχείο 210017 μόνο.
Technical specifications / Technische daten / Technische gegevens / Parametry techniczne /
Données techniques / Dati technici / Specificaţii tehnice / Технические данные
Article number / Artikelnummer / Artikel nummer / Numer artykułu / Numéro d’article / Codice / Numarul articolului / Номер артикула /
Αριθμός προϊόντος
AC power supply / Versorgungsspannung / Voedingsspanning / Zasilanie AC / Consommation
/ Alimentazione / AC de alimentare / Питание
AC / Παροχή εναλλασσόμενου ρεύματος AC
Power / Leistung / Opgenomen vermogen /
Moc wejściowa / Puissance / Potenza / Putere
/ Мощность / Ισχύς εισόδου
Blade diameter / Messerdurchmesser /
Diameter mes / Średnica ostrza / Diamètre /
Diametro lama / Diametrul lamei / Диаметр
лезвия / Διάμετρος λεπίδας
Waterproof protection class / Wasserbeständigkeitsklasse / Beschermingsklasse waterdichtheid / Klasa wodoodporności / Résistance
à l’eau / Classe di resistenza all’acqua / Clasa
de protecție contra apei / Класс влагозащиты /
Κλάση προστασίας νερού
Protecion class / Sichterheitsklasse / Beschermingsklasse / Stopień ochrony / Classe de protection / Classe di sicurezza / Clasă protecţie /
Степень защиты / Βαθμός προστασίας
Noise level / Geräuschpegel / Geluidsproductie
/ Poziom hałasu / Niveau sonore / Livello
di rumore / Nivel zgomot / Уровень шума /
Επίπεδο θορύβου
210031 210048 210000 210017
220-240V~ / 50 Hz
220-240В~ / 50 Гц
200W 280W 320W 420W
195 mm / мм 220 mm / мм 250 mm / мм 300 mm / мм
IP33
Class I / Klasse I / Klasse I / Klasa I / Classe I / Classe I / Clasa I / Класс I / Κατηγορία Ι
< 70 dB (A) / дБ (А)
/
Τεχνικές προδιαγραφές
2
Page 3

Dear Customer,
Thank you for purchasing this Hendi appliance. Before using the appliance for the first time, please read
this manual carefully, paying particular attention to the safety regulations outlined below.
Safety regulations
• This appliance is intended for commercial use only and must not be used for household
use.
• The appliance must only be used for the purpose for which it was intended and designed.
The manufacturer is not liable for any damage caused by incorrect operation and
improper use.
• Keep the appliance and electrical plug away from water and any other liquids. In the
event that the appliance should fall into water, immediately remove plug from the socket
and do not use until the appliance has been checked by a certified technician. Failure to
follow these instructions could cause a risk to lives.
• Never attempt to open the casing of the appliance yourself.
• Do not insert any objects in the casing of the appliance.
• Do not touch the plug with wet or damp hands.
• Danger of electric shock! Do not attempt to repair the appliance yourself. In case of
malfunctions, repairs are to be conducted by qualified personnel only.
• Never use a damaged appliance! Disconnect the appliance from the electrical outlet and
contact the retailer if it is damaged.
• Warning! Do not immerse the electrical parts of the appliance in water or other liquids.
Never hold the appliance under running water.
• Regularly check the power plug and cord for any damage. If the power plug or power cord
is damaged, it must be replaced by a service agent or similarly qualified persons in order
to avoid danger or injury.
• Make sure the cord does not come in contact with sharp or hot objects and keep it away
from open fire. To pull the plug out of the socket, always pull on the plug and not on the
cord.
•
Ensure that the cord (or extension cord) is positioned so that it will not cause a trip hazard.
• Always keep an eye on the appliance when in use.
•
Warning! As long as the plug is in the socket the appliance is connected to the power source.
• Turn off the appliance before pulling the plug out of the socket.
• Never carry the appliance by the cord.
• Do not use any extra devices that are not supplied along with the appliance.
• Only connect the appliance to an electrical outlet with the voltage and frequency
mentioned on the appliance label.
• Connect the power plug to an easily accessible electrical outlet so that in case of
emergency the appliance can be unplugged immediately. To completely switch off the
appliance pull the power plug out of the electrical outlet.
• Always turn the appliance off before disconnecting the plug.
EN
3
Page 4
• Never use accessories other than those recommended by the manufacturer. Failure to do
so could pose a safety risk to the user and could damage the appliance. Only use original
parts and accessories.
• This appliance is not intended for use by persons (including children) with reduced
physical, sensory or mental capabilities, or lack of experience and knowledge.
• This appliance must not be used by children under any circumstances.
• Keep the appliance and its cord out of reach of children.
• Always disconnect the appliance from the mains if it is left unattended or is not in use,
and before assembly, disassembly or cleaning.
• Never leave the appliance unattended during use.
Special safety regulations
• This appliance is a commercial food processing machine and intended only for slicing
foodstuff, e.g. meat, cheese, sausage, bread, etc. The food to be sliced must be thawed,
unpacked and free from bones before it can be sliced with the appliance. Any other use
may lead to damage of the appliance or personal injury.
• This appliance should not be used for cutting or slicing frozen food, bone-in meat, fish or
any non-food product, etc.
• Use the appliance only as described in this manual.
• This appliance should be operated by trained personnel in kitchen of the restaurant,
canteens or bar staff, etc.
NL
EN
• Do not place the appliance on a heating object. (gasoline, electric, charcoal cooker, etc.)
Keep the appliance away from any hot surfaces and open flames. Always operate the
appliance on a level, stable, clean, heat-resistant and dry surface.
• This appliance is not intended to be operated by means of an external timer or separate
remote-control system.
•
An equipotential bonding terminal is provided to allow cross bonding with other
equipment.
• Never bypass any safety interlocks on the appliance.
• WARNING: Keep all ventilation openings in the appliance clear of obstruction.
• WARNING: ALWAYS switch off the appliance and unplug from electrical power supply
before cleaning, maintenance or storage.
• WARNING: ALWAYS keep hands, long hair and clothing away from the moving parts.
• WARNING: Take great care when handling the cutting blade. Wear protective gloves (not
supplied) if necessary.
• Allow at least 15 cm spacing around the appliance for ventilation purpose during use.
• Caution! Securely route the power cord if necessary in order to prevent unintentional
pulling or contact with the heating surface.
• Do not wash the appliance with water or waterjet. Washing with water can cause leakage
and increase the risk of electric shock. No parts are dishwasher safe.
• Do not clean or store the appliance unless it is completely cooled down.
4
Page 5
• Do not move the appliance while it is under operation. Unplug the appliance when moving
and hold it at the bottom.
• Special care should be taken when moving or transporting the appliance due to heavy
weight. With at least 2 people or using a trolley for assistance. Move the machine slowly,
carefully and never be inclined over 45°.
Intended use
• The appliance is intended for professional use
and can be operated only by qualified personnel.
•
The appliance is designed only for slicing foodstuff,
e. g. meats, cheese, breads, etc. Any other use may
lead to damage to the appliance or personal injury.
Grounding installation
This appliance is classified as protection class I
and must be connected to a protective ground.
Grounding reduces the risk of electric shock by
providing an escape wire for the electric current.
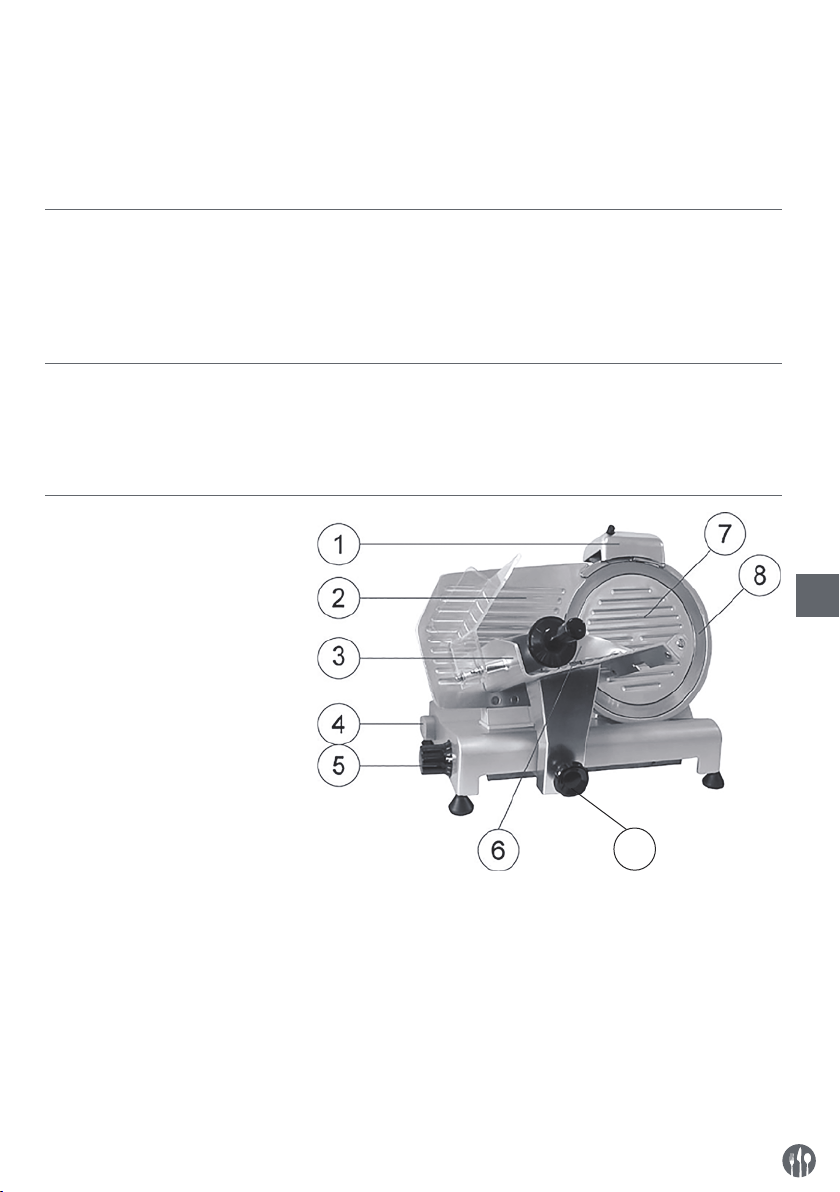
Main parts of the appliance
1 Blade sharpener
2 Stop plate
3 Carriage
4 On/off switch
[White (I): ON; Black (O): OFF]
5 Slice thickness dial
6 Product clamp
7 Blade guard
8 Blade
9 Carriage lock
10 Blade guard bolt (not displayed)
• Operating the appliance for any other purpose
shall be deemed a misuse of the device. The user
shall be solely liable for improper use of the device.
This appliance is equipped with a cord having a
grounding wire with a grounding plug. The plug
must be plugged into an outlet that is properly installed and grounded.
NL
EN
9
5
Page 6
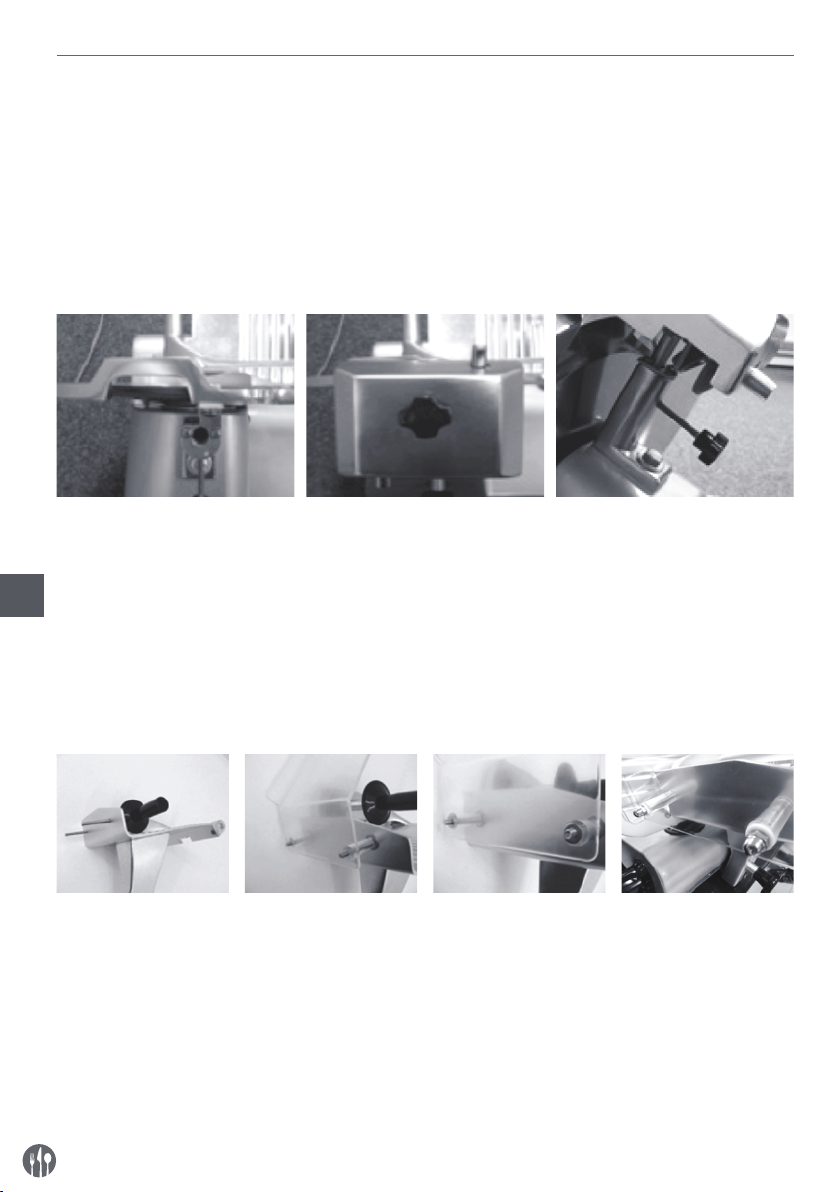
Preparations before using for the first time
• Check to make sure no parts are missing. If any
parts are missing, contact your supplier.
• Remove all the packing material.
• Check the appliance for completeness and transport damages. In case of incomplete delivery or
damage, contact supplier immediately. DO NOT
use the appliance. (See ==> Warranty).
• Clean the blade. Be careful: the blade is very
sharp. (Use gloves if necessary, not included)
• Keep open a space of at least 10 cm around the
appliance to allow for adequate ventilation.
• Position the appliance in such a way that the plug
is always accessible.
• If the sharpening device is not attached, proceed
as follows:
1. Top view of the appliance 2. Attach the sharpening module
in such a way that the blade
does not move between the
wheels.
NL
EN
3. Secure the sharpening device
to the machine by tightening
the holder. Check to make
sure that the sharpening device is well secured before using the machine.
NOTE! The sharpening device is equipped with a safety switch. If the sharpening device is not properly attached, you will not be able to use the appliance.
• Attach the hand guard.
1. Place both screws in
the carriage.
2. Attach the hand
guard.
3. Place the two washers over the white
4. Screw on the two
dome nuts.
bolts.
NOTE! You are advised not to use the appliance if the hand guard is not attached as instructed! These are
safety features that will prevent possible injury. If you do not attach these features, there will be a risk of
injury.
6
Page 7
Instructions for use
• Position the appliance so that the on/off switch is
facing the user.
• If the blade sharpener has not been installed,
proceed as follows:
- Position the blade sharpener in its support so
that the blade does not extend between the
gears.
- Tighten the safety screw on the blade sharpen-
er.
- Note! The appliance is equipped with a safe-
ty switch and will turn off automatically if the
sharpening device is removed)
• Push the plug in the wall socket.
• Turn the dial with the graduated scale to the desired slice thickness.
• Switch ON the appliance by pressing the “WHITE
(I)” button of the ON/OFF switch.
• Put the food product on the carriage and adjust
the clamp to hold the product firmly in place.
Make sure the product is positioned against the
stop plate.
• Once the product has been sliced, switch OFF the
appliance by pressing the “BLACK (O)” button of
the ON/OFF switch.
• Turn the thickness dial back to “0”.
NL
EN
7
Page 8
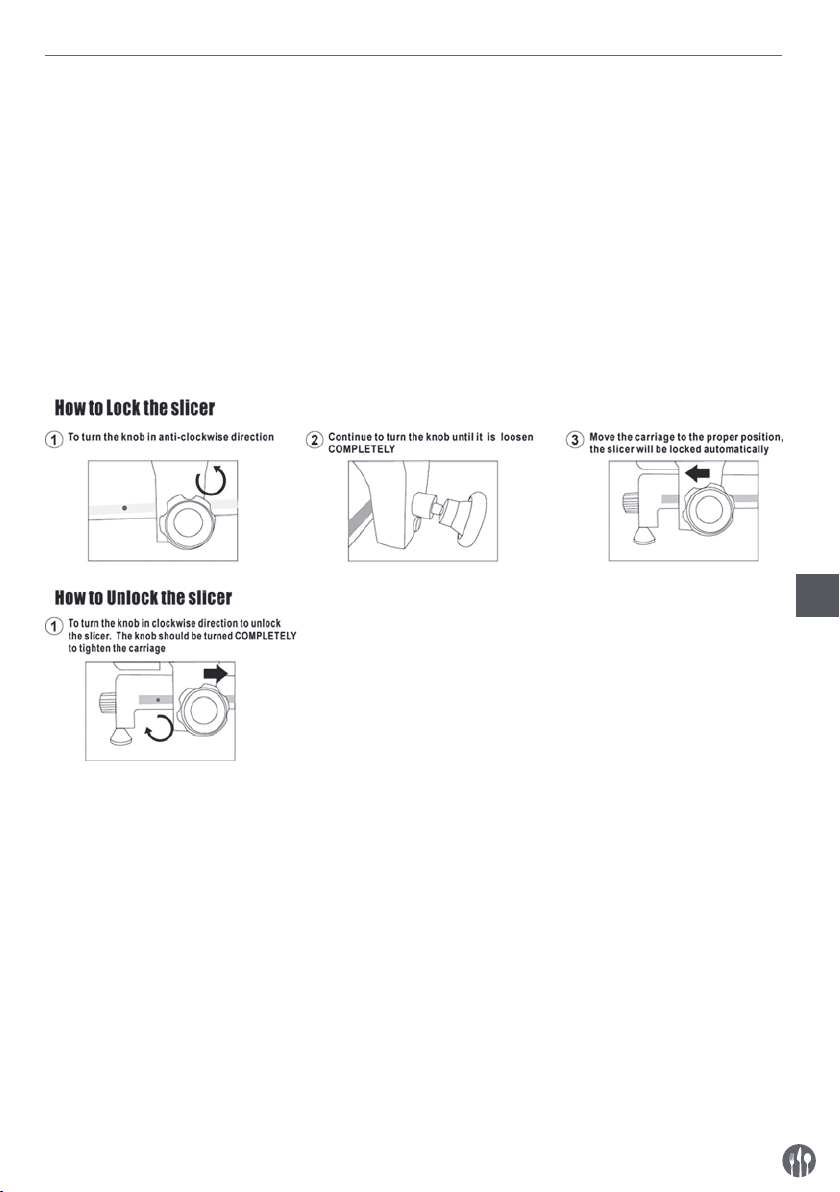
Sharpening the blade
Sharpen the blade when it becomes blunt. The
blade is extremely resistant to wear. If used regularly and properly, it should only need to be sharpened once a year.
• Pull the plug from the wall socket.
• Turn the thickness dial to “0”.
• Clean the blade.
• Unscrew the sharpener’s locking knob.
• Lift the sharpener from the locking device and
turn it 180°.
• Both sides of the blade should have 1 sharpening
stone.
• Lower the sharpener until it slips back into the
locking device.
• Fix the sharpener in place by tightening the locking knob.
• Switch on the appliance. The blade will start to
turn.
• Use the button to press the tilted sharpening
stone against the blade and keep it there for 2
minutes. The sharpening stone should turn along
with the blade.
NL
EN
Cleaning and maintenance
• Attention: Always unplug the appliance from the
electrical power outlet and let it cool down completely before cleaning and storage and set the
slice thickness knob to “0” position.
• Clean the appliance after each use.
• Warning: Never submerge the appliance in water
or other liquids!
• Use a damp cloth to clean surfaces (solution of
water and a mild cleaning agent).
• Never use corrosive or abrasive cleaning agents.
• Use the button to press the vertical sharpening
stone briefly against the blade to remove burrs.
The sharpening stone should turn along with the
blade.
• Switch off the appliance and pull the plug from
the wall socket.
• Unscrew the sharpener’s locking knob and clean
the sharpening stones with alcohol.
• Replace the sharpener in its original position on
the appliance and tighten the locking knob to fix it
in place. The blade must not extend between the
sharpening stones.
• Immerse in warm, mild soapy water for several
minutes. Rinse and dry thoroughly.
• Push the plug in the wall socket. Handle with
great care.
• The appliance is ready for use.
Do not use sharp or pointed objects for cleaning.
Do not use benzene or solvents! Clean with a
damp cloth. Use washing-up liquid if needed, but
never abrasive cleaning agents.
• Immerse in warm, mild soapy water for several
minutes. Rinse and dry thoroughly.
• Handle with great care.
• If the food carriage stops sliding smoothly, lay the
machine on its side. Clean the slide bar carefully
and lubricate it with Vaseline
Storage
• Before storage, always make sure the appliance
has already been disconnected from the electrical outlet and cooled down completely.
8
• Store the appliance in a cool, clean and dry place.
Page 9
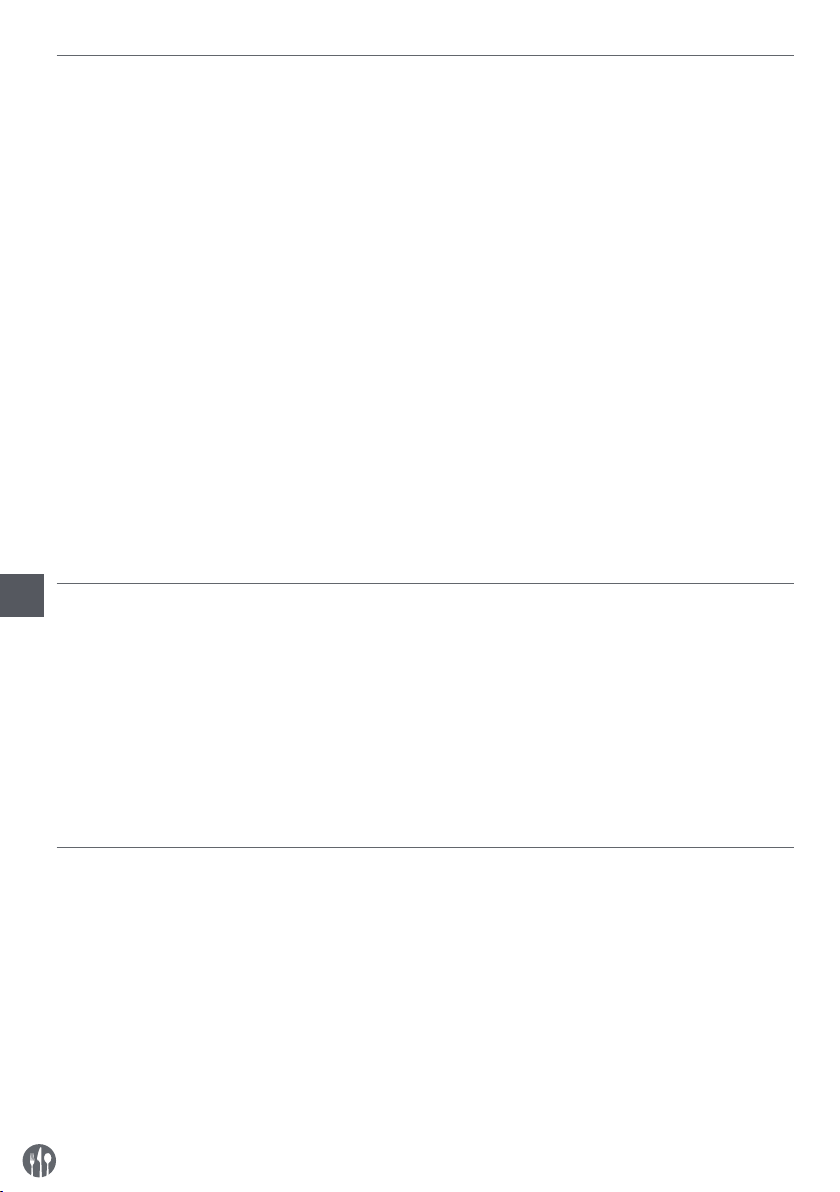
Troubleshooting
If the appliance does not function properly, please check the below table for the solution. If you are still
unable to solve the problem, please contact the supplier/service provider.
Problem Possible cause Solution
Appliance does not
slice evenly
Appliance stops
slicing
Carriage does not
slide
Blunt blade Sharpen blade
Dirty appliance Clean the appliance
Overheated motor Let the machine cool off for an extended period. The
motor’s safety thermostat will reset itself automatically.
Dirty slide bar Clean the slide bar and lubricate with Vaseline
Some food stick to the
blade.
Switch off the appliance & unplug it. Let it come to a
complete stop. Remove any blockage. Wipe the blade
with a damp cloth.
Blade stops when
v-belt worn out or dirty Contact the supplier.
product is being cut
When in doubt, always contact your supplier!
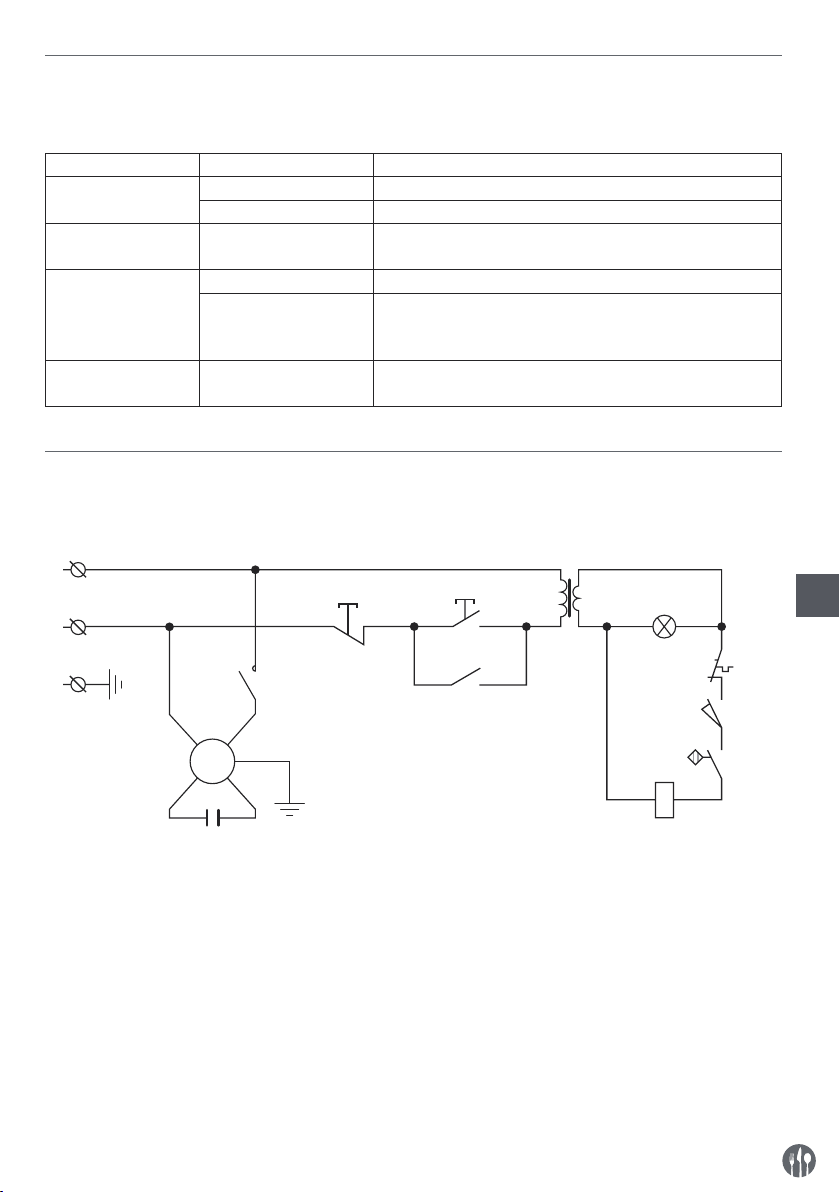
Circuit diagram for 210000, 210017, 210031, 210048
AC voltage input: AC220-240V 50Hz
N
L
PE
KC
M
PE
C
M : Motor
T : Transformer
C : Capacitor
PE : Protective earthing (Grounding)
L : Live
N : Neutral
SB1
T
SB2
KC HL
SB1, SB2 : Switch
KC : Relay
HL : Indicator lamp
ST : Thermal cut-out
SQ1, SQ2 : Micro switch
KM
ST
SQ1
SQ2
NL
EN
9
Page 10
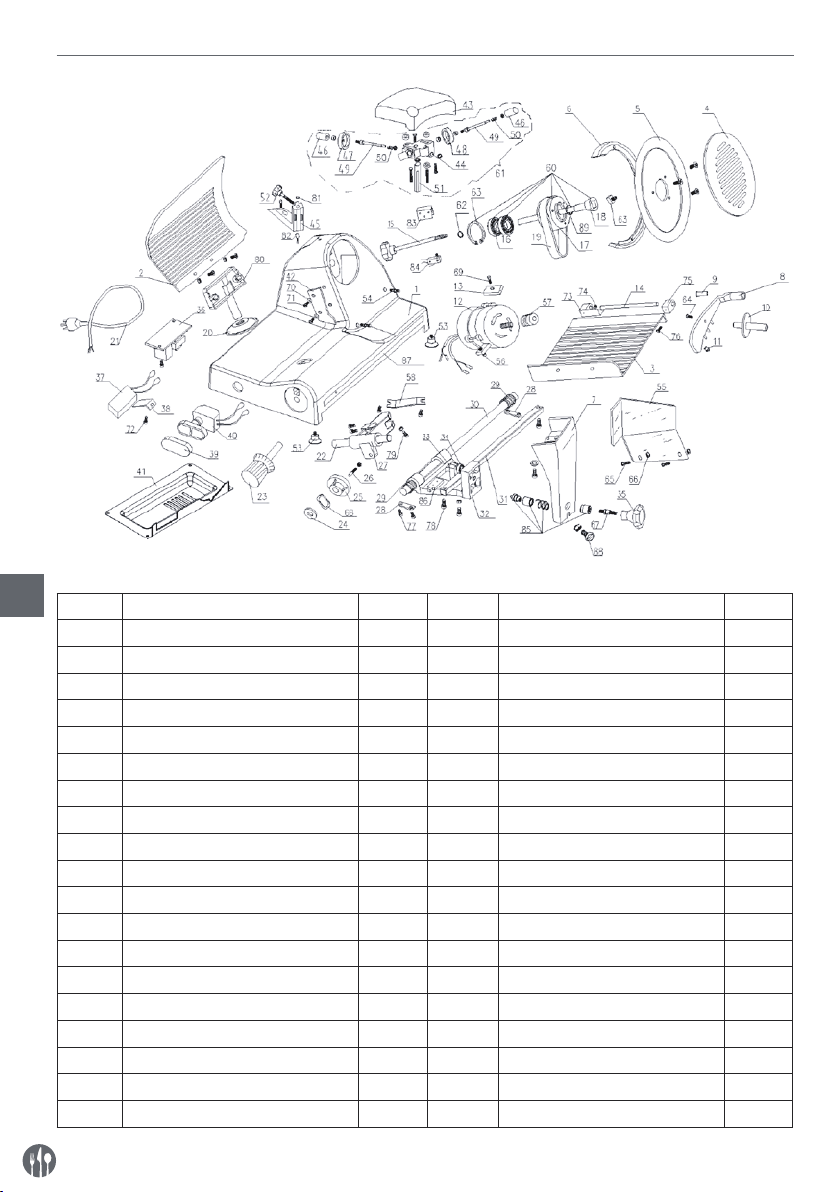
Part list (Item no: 210000, 210031, 210048)
EN
Part no. Part name Quantity Part no. Part name Quantity
1 Encloser 1 20 Slide mulch 1
2 Active clapboard 1 21 Power line 1
3 Food salver 1 22 Slide axle 1
4 Blade guard disc 1 23 Knob with scale 1
5 Blade 1 24 Spring gasket 1
6 Blade guarding ring 1 25 Cam 1
7 Tray bracket 1 26 Cam osculant staff 1
8 Food and fixed-arm 1 27 Slider 1
9 Fixed-arm bushing 1 28 Slide axle briquetting 2
10 Fixed-arm handle 1 29 Spring of towing bracket axle 2
11 Plastic granule 1 30 Towing bracket axle 1
12 Motor 1 31 Quadrate axis 1
13 Motor briquetting 1 32 Towing bracket 1
14 Fixed-arm pin Ø12×185 1 33 M8×35Hexagonal screw 1
15 Blade guard bolts 1 34 Ball bearing607 1
16 Ball bearing 6202 2 35 Towing bracket cover knob 1
17 Blade belt wheel Ø66 1 36 Relay 1
18 Pin of belt wheel 1 37 Capacitor 1
19 BeltSV.330 2 38 Capacitor retainer 1
10
Page 11

Part no. Part name Quantity Part no. Part name Quantity
39 Button mulch 1 65 Fixed-arm handle bolt 1
40 Button switch 1 66 Finger baffle bolt 2
41 Motherboard 1 67 Finger baffle nut 2
42 Meatscraper 1 68 Bracket knob bolt 1
43 Sharpener mulch 1 69 Undee spring gascket 1
44 Sharpener base of subassembly 1 70 Motor impacted bolt 1
45 Sharpener base of assembled 1 71 Meat scraping shim 2
46 Button of sharpener 2 72 Meat scraper bolt 2
47 Fine grinding wheel Ø45 1 73 Capacitor fixation clamp bolt 1
48 Crude grinding wheel Ø45 1 74 Tray bearing cover A 1
49 Pin of rubbing stone 2 75 Meat board bracket 1
50 Spring 2 76 Tray bearing cover B 1
51 Pin of sharpener bracket 1 77 Cross recessed countersunk head
M6×12
52 Sharpener tighten knob 1 78 Slide axle briquetting bolt 4
53 Active clapboard mandril 1 79 Quadrate axis locking screw 2
54 Rubber foot 4 80 Slider adjust bolt 1
55 Pin of blade guarding ring 2 81 Magnet 1
56 Meat blocking board 1 82 Magnet switch 1
57 Slide axle bracket 2 83 Aluminium block 1
58 Small belt wheel of motor 1 84 Microswitch 1
59 Slide driver 1 85 Stainless steel lock 1
60 Belt wheel setting 1 86 Limited block 1
61 Sharpener setting 1 87 Stainless steel bar 1
62 Ø15 Spring gasket for bearing 1 88 Set screw for tray bracket 1
63 Ø15 Spring gasket for bearing 1 89 Oil seal 1
64 Blade guard disc square-head nut 1
2
EN
11
Page 12
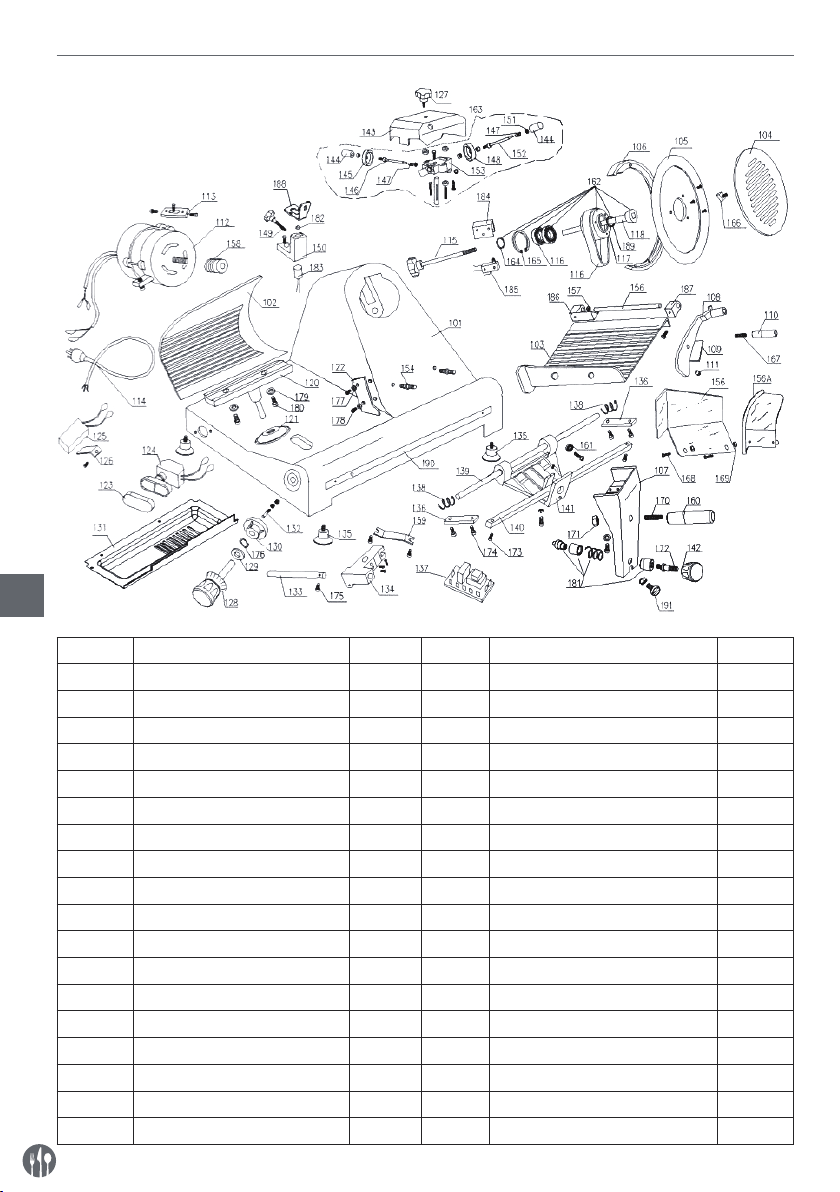
Part list (Item no: 210017)
EN
Part no. Part name Quantity Part no. Part name Quantity
101 Encloser 1 119 BeltSV.400 2
102 Active clapboard 1 120 Supportng base 1
103 Food salver 1 121 Cable jacket 1
104 Guarding blade disc 1 122 Mearscraper 1
105 blade 1 123 Button mulch 1
106 Blade guarding ring 1 124 Button switch 1
107 Tray bracket 1 125 Capacitor 1
108 Food fixed-arm 1 126 Capacitor retainer 1
109 Fixed-arm bushing 1 127 Screw of oriented staff 1
110 Handle 1 128 Knob with scale 1
111 Plastic granule 1 129 Spring gasket 1
112 Motor 1 130 Cam300 1
113 Motor briquetting 1 131 Motherboard 1
114 Power line 1 132 Cam osculant pin 1
115 Blade guard bolts 1 133 Sliding axle 1
116 Ball bearing6204 2 134 Slider 1
117 Belt wheel 1 135 Rubber foot 4
118 Pin of belt wheel 1 136 Sliding axle briquetting 2
12
Page 13

Part no. Part name Quantity Part no. Part name Quantity
137 Relay 1 165 Ø 47Spring gasket for hole 1
138 Spring of sliding axle 2 166 Blade guard disc square-head nut 1
139 Towing bracket sliding axle 1 167 Fixed-arm handle bolt 1
140 Quadrate axis 1 168 Finger baffle bolt 2
141 Towing bracket 1 169 Finger baffle nut 2
142 Button of towing bracket 1 170 Bracket knob bolt 1
143 Sharpener mulch 1 171 Bracket knob nut 1
144 Button 2 172 Bracket bottom bolt 1
145 Fine grinding wheel Ø45 1 173 Quadrate axis locking screw 2
146 Pin of burr cleaning wheel 2 174 Slide axle briquetting bolt 4
147 Spring of burr cleaning wheel 2 175 Slide axle bolt 1
148 Crude grinding wheel Ø45 2 176 Ø 12 Under spring gasket 1
149 Sharpener tighten knob 1 177 Meat scraping shim 2
150 Supporting base of outer ring 1 178 Meat scraper bolt 1
151 Ø 4.751Wheel 1 179 Fulcrum bearing shim 2
152 Pin of rubbing stone 1 180 Fulcrum bearing bolt 2
153 Sharpener base of subassembly 1 181 Stainless steel lock 1
154 pin of blade guading ring 2 182 Magnet 1
155 Pin of food tray 1 183 Magnet switch 1
156/156A Meat blocking board 1 184 Limited block 1
157 Bracket of sliding axle 1 185 Microswitch 1
158 Small belt wheel of motor 1 186 Tray bearing cover A 1
159 Slide transmitting wheel 1 187 Tray bearing cover B 1
160 Towing bracket handle 1 188 Fulcrum bearing shim 1
161 Sliding axle608 1 189 Oil seal 1
162 Belt wheel setting 1 190 Stainless steel bar 1
163 Sharpener setting 1 191 Set screw for tray bracket 1
164 Ø 20Spring gasket for bearing 1
EN
13
Page 14

WARRANTY
Any defect affecting the functionality of the appliance which becomes apparent within one year
after purchase will be repaired by free repair or replacement provided the appliance has been used
and maintained in accordance with the instructions
and has not been abused or misused in any way.
Your statutory rights are not affected. If the appliance is claimed under warranty, state where and
DISCARDING & ENVIRONMENT
When decommissioning the appliance, the product must not be disposed of with other household
waste. Instead, it is your responsibility to dispose to
your waste equipment by handing it over to a designated collection point. Failure to follow this rule
may be penalized in accordance with applicable
regulations on waste disposal. The separate collection and recycling of your waste equipment at
the time of disposal will help conserve natural re-
EN
when it was purchased and include proof of purchase (e.g. receipt).
In line with our policy of continuous product development we reserve the right to change the product,
packaging and documentation specifications without notice.
sources and ensure that it is recycled in a manner
that protects human health and the environment.
For more information about where you can drop off
your waste for recycling, please contact your local
waste collection company. The manufacturers and
importers do not take responsibility for recycling,
treatment and ecological disposal, either directly
or through a public system.
14
Page 15

Sehr geehrte Kundin, sehr geehrter Kunde,
wir danken Ihnen für den Kauf des Gerätes Hendi. Machen Sie sich bitte mit dieser Anleitung noch vor der
Inbetriebnahme des Gerätes vertraut, um Schäden durch die unsachgemäße Bedienung zu vermeiden. Den
Sicherheitsregeln ist besondere Aufmerksamkeit zu widmen.
Sicherheitsregeln
• Die unsachgemäße Bedienung des Geräts kann zur schweren Beschädigung des Geräts
sowie zu Verletzungen führen.
• Das vorliegende Gerät ist ausschließlich für den gewerblichen Gebrauch bestimmt und
darf nicht im Haushalt verwendet werden.
• Das Gerät ist ausschließlich zu dem Zweck zu benutzen, zu dem es hergestellt wurde.
Der Hersteller haftet nicht für Schäden, die auf unsachgemäße Bedienung des Geräts
zurückzuführen sind.
• Den Kontakt des Gerätes und des Steckers mit Wasser oder einer anderen Flüssigkeit
vermeiden. Den Stecker unverzüglich aus dem Stecker ziehen und das Gerät von einem
anerkannten Fachmann prüfen lassen, wenn das Gerät unbeabsichtigterweise ins Was
-
ser fällt. Bei Nichteinhaltung dieser Sicherheitsvorschriften besteht Lebensgefahr.
• Nie eigenständig das Gehäuse des Gerätes zu öffnen versuchen.
• In das Gehäuse des Gerätes keine Gegenstände einführen.
• Den Stecker nicht mit nassen oder feuchten Händen berühren.
• Gefahr eines Stromschlags! Das Gerät darf nicht selbstständig repariert werden. Sämt
liche Mängel und Unzulänglichkeiten sind ausschließlich durch qualifiziertes Personal
zu beseitigen.
• Niemals ein beschädigtes Gerät benutzen! Das beschädigte Gerät vom Netz trennen
und sich mit dem Verkäufer in Verbindung setzen.
• Warnung: Die Elektroteile des Gerätes dürfen weder in Wasser noch in andere Flüssig
keiten getaucht werden. Ebenso ist das Gerät nicht unter fließendes Wasser zu halten.
• Der Stecker und die Stromversorgungsleitung sind regelmäßig auf Beschädigungen zu
prüfen. Der beschädigte Stecker oder Leitung sind an eine Servicestelle oder einer an
deren qualifizierten Person zur Reparatur zu übergeben, um eventuellen Gefahren und
Verletzungen des Körpers vorzubeugen.
• Man muss sich davon überzeugen, ob die Stromversorgungsleitung weder mit scharf
kantigen noch mit heißen Gegenständen in Berührung kommt; halten Sie die Leitung
weit entfernt von einer offenen Flamme. Um den Stecker aus der Netzsteckdose zu neh
men, muss man immer am Stecker und nicht an der Leitung ziehen.
• Die Stromversorgungsleitung (oder Verlängerungsleitung) ist vor dem zufälligen Heraus
ziehen aus der Steckdose zu schützen. Die Stromversorgungsleitung muss so geführt
werden, dass niemand zufällig darüber stolpern kann.
• Das Gerät muss während seiner Anwendung ständig kontrolliert werden.
• Warnung! Wenn der Stecker in der Netzsteckdose ist, muss man das Gerät als an die
Stromversorgung angeschlossen betrachten.
DE
15
Page 16

• Bevor der Stecker aus der Netzsteckdose genommen wird, ist das Gerät auszuschalten.
• Das Gerät darf beim Tragen nicht an der Leitung gehalten werden.
• Benutzen Sie kein Zubehör, das nicht mit diesem Gerät mitgeliefert wurde.
• Das Gerät muss man ausschließlich an die Steckdose mit solch einer Spannung und
Frequenz anschließen, wie auf dem Typenschild angegeben wird.
• Stecken Sie den Stecker in die Steckdose, die an einem leicht und bequem zugänglichen
Ort angeordnet ist, und zwar so, dass das Gerät bei einer Störung sofort abgeschaltet
werden kann. Um das Gerät vollständig auszuschalten, muss man es von der Stromquel
le trennen. Zu diesem Zweck muss man den Stecker, der sich am Ende der vom Gerät
getrennten Leitung befindet, aus der Netzsteckdose ziehen.
• Vor dem Abtrennen des Steckers ist das Gerät auszuschalten!
• Benutzen Sie kein Zubehör, das nicht vom Hersteller empfohlen wird. Die Anwendung
vom nicht empfohlenen Zubehör stellt eine Gefahr für den Nutzer dar und kann zur Be
schädigung des Gerätes führen. Benutzen Sie ausschließlich Ersatzteile und Zubehör im
Original.
• Dieses Gerät eignet sich nicht für den Gebrauch durch Personen (gilt auch für Kinder)
mit geringerer Motorik, Sensorik oder geistiger Fähigkeit oder mangelhafter Erfahrung
und Wissen.
• Auf keinen Fall darf das Bedienen des Gerätes durch Kinder zugelassen werden.
• Das Gerät mit Stromversorgungsleitung ist außerhalb der Reichweite von Kindern zu
lagern.
DE
• Ebenso muss dafür gesorgt werden, dass die Kinder das Gerät nicht zum Spielen benut
zen.
• Das Gerät ist immer dann von der Stromversorgung zu trennen, wenn es ohne Aufsicht
bleiben soll bzw. auch vor der Montage, Demontage und Reinigung.
• Während der Nutzung darf das Gerät nicht ohne Aufsicht gelassen werden.
-
-
-
Spezielle Sicherheitsvorschriften
• Dieses Gerät ist eine gewerbliche Maschine zur Verarbeitung von Lebensmitteln und nur
zum Aufschneiden von Lebensmitteln bestimmt, wie z.B. Fleisch, Käse, Wurst, Brot usw.
Die zu schneidenden Lebensmittel müssen aufgetaut, ausgepackt und frei von Knochen
sein, bevor sie mit dem Gerät in Scheiben geschnitten werden können. Jede andersartige
Verwendung kann zur Beschädigung des Gerätes oder zu Personenschäden führen.
• Dieses Gerät darf nicht zum Schneiden oder Aufschneiden von gefrorenen Lebensmit
teln, Fleisch mit Knochen, Fisch oder anderen Non-Food-Produkten usw. verwendet
werden.
• Verwenden Sie das Gerät nur für den in diesem Handbuch beschrieben Zweck.
• Dieses Gerät muss von geschultem Küchenpersonal eines Restaurants, Kantinen oder
Barpersonal usw. bedient werden.
• Stellen Sie das Gerät nicht auf einen Heizapparat. (Benzin-, Elektro-, Holzkohlekocher
usw.) Halten Sie das Gerät von heißen Oberflächen und offenen Flammen fern. Betreiben
Sie das Gerät immer auf einer ebenen, stabilen, sauberen, hitzebeständigen und trocke
-
nen Oberfläche.
16
Page 17

• Dieses Gerät darf nicht mit einer externen Zeitschaltuhr oder einem separaten Fernbedienungssystem betrieben werden.
•
Es besitzt einen Potenzialausgleichsanschluss, um eine Querverbindung mit ande-
ren Geräten zu ermöglichen.
• Überbrücken Sie niemals die Sicherheitsverriegelungen am Gerät.
• WARNUNG: Bedecken Sie keine Belüftungsöffnungen am Gerät.
• WARNUNG: Schalten Sie das Gerät IMMER aus und trennen Sie es von der Stromversor
gung, bevor Sie es reinigen, warten oder abstellen.
• WARNUNG: Halten Sie Hände, langes Haar und Kleidung IMMER von beweglichen Teilen
fern.
• WARNUNG: Lassen Sie Vorsicht beim Umgang mit dem Schneidmesser walten. Tragen
Sie bei Bedarf Schutzhandschuhe (werden nicht mitgeliefert).
• Sehen Sie während des Gebrauchs einen Abstand von mindestens 15 cm um das Gerät
herum vor.
• Vorsicht! Verlegen Sie das Netzkabel auf sichere weise, um ein unbeabsichtigtes Ziehen
oder Berühren mit der Heizfläche zu verhindern.
• Waschen Sie das Gerät nicht mit Wasser oder unter einem Wasserstrahl ab. ein Waschen
mit Wasser kann zu Leckagen führen und die Gefahr eines Stromschlags erhöhen. Es
gibt keine Teile, die spülmaschinenfest sind.
• Reinigen oder lagern Sie das Gerät erst dann, wenn es vollständig abgekühlt ist.
• Bewegen Sie das Gerät nicht, während es in Betrieb ist. Ziehen Sie den Netzstecker des
Geräts vor dem Bewegen ab und halten Sie es an der Unterseite.
• Beim Bewegen oder Transportieren des Geräts müssen Sie aufgrund des hohen Gewich
tes besondere Vorsicht walten lassen. Mit mindestens 2 Personen oder mithilfe eines
Stellwagens. Bewegen Sie die Maschine langsam, vorsichtig und neigen Sie sie niemals
über 45°.
-
DE
-
Verwendungszweck des Gerätes
• Das Gerät ist für den professionellen Einsatz ge-
eignet, deshalb darf es nur durch qualifiziertes
Personal bedient werden.
• Das Gerät ist nur zum Schneiden von Lebens-
mitteln bestimmt, z. G. Fleisch, Käse, Brot usw.
Die Verwendung des Gerätes für andere Zwecke
kann zu seiner Beschädigung sowie zu Körperverletzungen führen.
Montage der Erdung
Der Ofen ist ein Gerät der I. Schutzklasse und erfordert eine Erdung. Auf Grund der Verwendung eines Stromableiters, verringert die Erdung das Risiko eines Stromschlags. Das Gerät ist mit einem
• Jede andere Verwendung des Gerätes gilt als
nicht bestimmungsgemäß. Der Benutzer ist allein verantwortlich für die unsachgemäße Nutzung des Gerätes.
Schutzleiter und einem Schutzkontakt für die Erdung ausgerüstet. Stecken Sie den Stecker nicht in
die Steckdose, bevor nicht das Gerät entsprechend
installiert und geerdet wurde.
17
Page 18
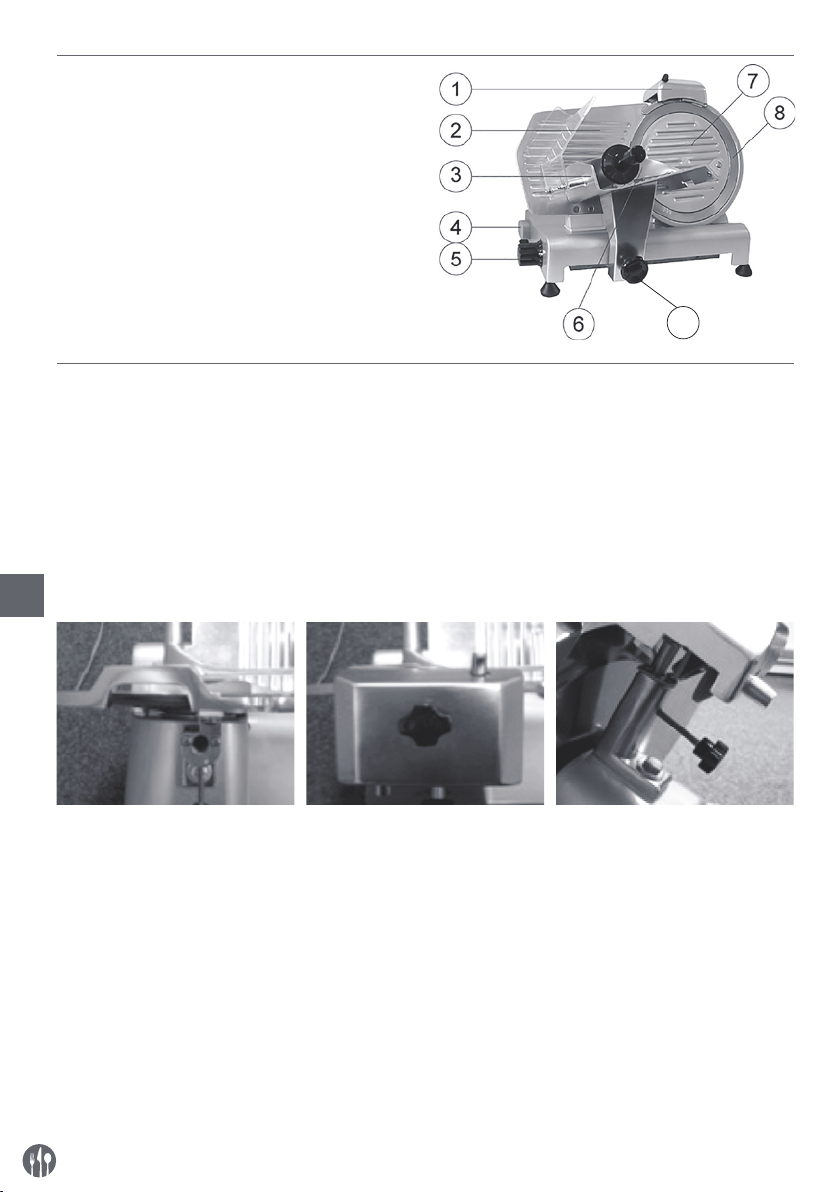
Hauptbestandteile des Geräts
1 Schleifvorrichtung für Messer
2 Anschlag
3 Wagen
4 Ein-/Ausschalter
[Weiß (I): EIN; Schwarz (O): AUS]
5 Dickeneinstellungsknopf
6 Fingerschutz
7 Messerschutz
8 Messer
9 Wagenverriegelung
10 Messerschutz Schraube
(wird nicht angezeigt)
Vorbereitung der erstmaligen Inbetriebnahme
• Prüfen Sie, ob alle Teile geliefert wurden. Bitte
setzen Sie sich mit Ihrem Lieferanten in Verbindung, wenn Teile fehlen.
• Die gesamte Verpackung entfernen.
• Überprüfen Sie das Gerät auf Vollständigkeit sowie Transportschäden. Wenden Sie sich im Falle
einer unvollständigen Lieferung oder Beschädigung sofort an den Lieferanten. Verwenden Sie
das Gerät in einem solchen Fall NICHT. (Siehe
DE
==> Garantie).
9
• Das Messer reinigen. Vorsicht! Das Messer ist
sehr scharf. (Verwenden Sie Handschuhe falls
nötig, diese sind im Lieferumfang nicht enthalten)
• Die Maschine sollte für die Ventilation einen Freiraum von mindestens 10 cm haben.
• Die Maschine dermaßen aufstellen, dass der Stecker jederzeit zu erreichen ist.
• Wurde die Schleifvorrichtung nicht montiert, bitte
folgendermaßen vorgehen:
1. Draufsicht der Maschine 2. Das Schleifmodul so einbauen, dass das Messer nicht
durch die Schleifrädchen
läuft.
ACHTUNG! Aus Sicherheitsgründen kann das Gerät nur nach Montage der Schleifvorrichtung in Betrieb
genommen werden
18
3. Die Schleifvorrichtung der
Maschine sichern, indem
Sie den Haltering anziehen.
Vor der Inbetriebnahme der
Maschine die Festigkeit der
Schleifvorrichtung prüfen.
Page 19
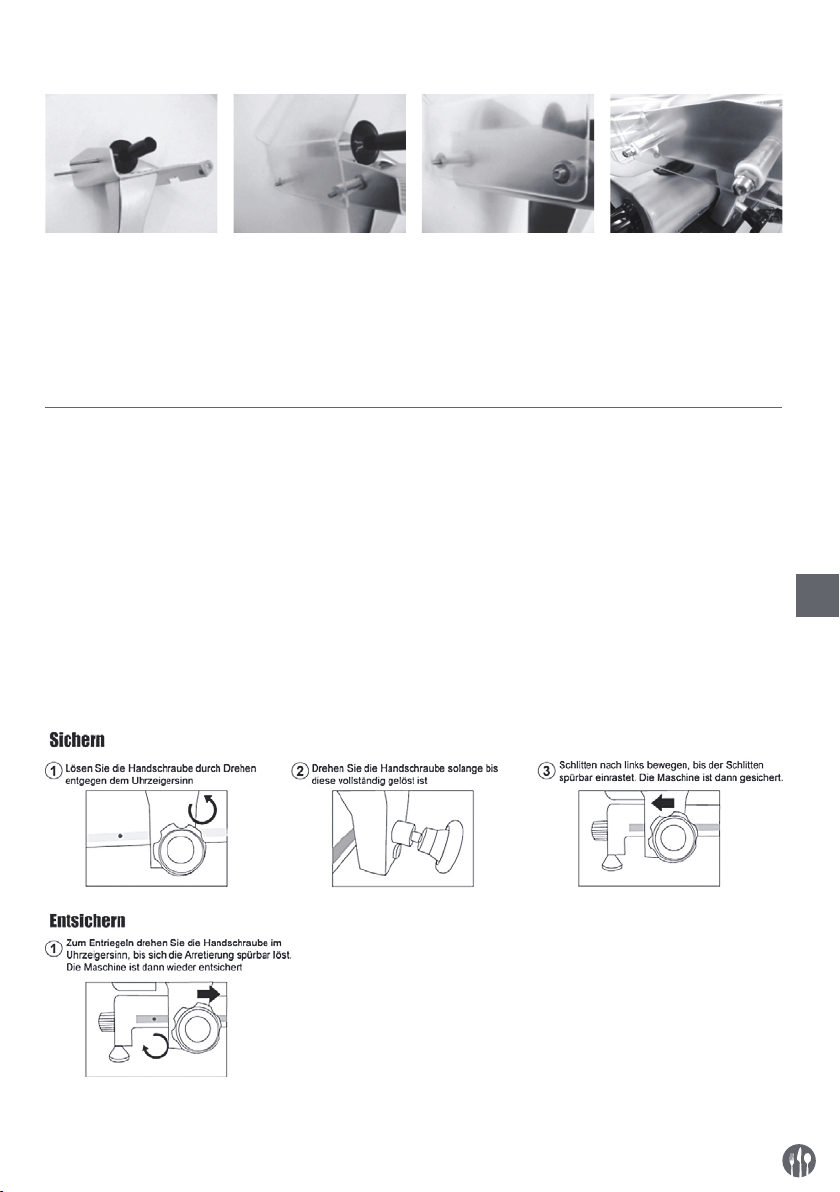
• Den Handschutz einbauen
1. Beide Schrauben in
den Schlitten ste-
2. Den Handschutz
platzieren.
3. Die beiden Unterlegscheiben platzieren.
4. Die beiden Kapselmuttern anziehen.
cken.
ACHTUNG: Vom Gebrauch der Maschine ohne den vorgeschriebenen Einbau des Handschutzes wird abgeraten! Dabei handelt es sich um Sicherheitsvorrichtungen, die den Bediener vor möglichen Verletzungen
schützen. Bauen Sie diese Vorrichtungen nicht ein, besteht Verletzungsgefahr.
Bedienungsanleitung
• Die Maschine so aufstellen, dass der Benutzer
den Ein-/Ausschalter betätigen kann.
• Folgendermaßen vorgehen, wenn die Schleifvorrichtung nicht eingebaut wurde:
- Die Schleifvorrichtung in die Halterung ste-
cken, damit das Messer nicht durch die Räder
läuft.
- Die Sicherungsschraube der Schleifvorrich-
tung anziehen.
- HINWEIS!
Die Maschine hat einen Sicherheitsschalter und schaltet sich selbsttätig aus, wenn
die Schleifvorrichtung entfernt wird.
• Den Stecker in die Steckdose stecken.
• Die erwünschte Dicke einstellen, indem Sie den
Knopf mit der Skala drehen.
• Schalten Sie das Gerät ein, indem Sie die Taste
„WEISS (I)“ des EIN-/AUS-Schalters drücken.
• Das Schneidgut auf den Wagen legen. Das Produkt mit der dazu dienenden Klemme einklemmen. Das Produkt sollte sich am Anschlag befinden.
• Sobald das Produkt geschnitten wurde, schalten Sie das Gerät aus, indem Sie die „SCWARZ
(O)“-Taste des EIN-/AUS-Schalters drücken.
• Den Knopf der Dickeneinstellung wieder auf „0”
schalten.
DE
19
Page 20

Schleifvorgang
Durchzuführen, wenn das Messer stumpf ist.
Wir machen Sie darauf aufmerksam, dass das Messer
besonders abnutzungsfest ist und man es daher bei
regelmäßigem, sachgemäßem Gebrauch nur einmal
im Jahr zu schleifen braucht.
• Den Stecker abziehen.
• Den Knopf der Dickeneinstellung auf „0” schalten.
• Das Messer reinigen.
• Den Sicherungsknopf der Schleifvorrichtung lösen.
• Die Schleifvorrichtung hochziehen und 180° wenden.
• Beide Seiten der Klinge sollte ein Schleifstein haben.
• Die Schleifvorrichtung herabsenken bis sie einrastet.
• Die Schleifvorrichtung befestigen, indem Sie den Sicherungsknopf anziehen.
• Die Maschine einschalten. Das Messer dreht sich
nun.
• Mit dem Knopf den schrägen Schleifstein zum Messer drücken und den Schleifstein zwei Minuten lang
an das Messer halten. Der Schleifstein sollte sich
nun mit dem Messer mitbewegen.
Reinigung und Wartung
• Beachtung: Ziehen Sie den Netzstecker des Ge-
DE
räts immer aus der Steckdose und lassen Sie
es vor der Reinigung und Lagerung vollständig
abkühlen. Stellen Sie den Scheibendicke-Knopf
auf „0“.
• Reinigen Sie das Gerät nach jeder Verwendung.
• Achtung: Tauchen Sie das Gerät nicht in Wasser
oder andere Flüssigkeiten ein!
• Das Gehäuse mit einem feuchten Tuch (Wasser
mit einem milden Reinigungsmittel) reinigen.
• Mit dem Knopf den senkrechten Schleifstein kurz
an das Messer halten, um die Grate, die durch den
Schleifvorgang entstehen, zu beseitigen. Der Schleifstein sollte sich nun mit dem Messer mitbewegen.
• Die Maschine ausschalten und den Stecker abziehen.
• Den Sicherungsknopf der Schleifvorrichtung lösen
und die Schleifsteine mit Alkohol reinigen.
• Die Schleifvorrichtung wieder in ihre ursprüngliche
Lage versetzen und den Sicherungsknopf anziehen.
Das Messer sollte sich nicht zwischen den Schleifsteinen bewegen.
• Ein paar Minuten in warmes, mildes Seifenwas-
ser eintauchen. Spülen und gründlich trocknen.
• Stecken Sie den Stecker in die Steckdose. Gehen
Sie mit großer Sorgfalt vor.
• Die Maschine ist nun wieder betriebsber
eit.
• Keine aggressiven Reinigungs- oder Scheuer-
mittel benutzen. Keine scharfen, spitzen Gegenstände benutzen. Kein Benzin und keine
Lösungsmittel benutzen! Das Gerät mit einem
feuchten Tuch und eventuell Spülmittel reinigen.
Keine Scheuermittel benutzen.
• Ein paar Minuten in warmes, mildes Seifenwas-
ser eintauchen. Spülen und gründlich trocknen.
• Gehen Sie mit großer Sorgfalt vor.
• Bewegt sich der Wagen nur noch ruckartig,
die Maschine seitlich ablegen. Die Gleitstange
gründlich reinigen und mit Vaselin schmieren.
Lagerung
• Stellen Sie vor einer Lagerung immer sicher,
dass der Netzstecker des Geräts bereits von der
Steckdose getrennt wurde und das Gerät vollständig abgekühlt ist.
20
• Lagern Sie das Gerät an einem kühlen, sauberen
und trockenen Ort.
Page 21
Fehlerbehebung
Sollte das Gerät nicht ordnungsgemäß funktionieren, überprüfen Sie bitte die nachfolgende Tabelle für eine
Lösung. Sollten Sie das Problem noch immer nicht lösen können, wenden Sie sich bitte an den Lieferanten/
Dienstanbieter.
Problem Mögliche Ursache Lösung
Gerät schneidet
nicht gleichmäßig
Schneidevorgang
unterbrochen
Messer stumpf Messer schleifen
Maschine schmutzig Maschine reinigen
Motor zu heiß Die Maschine lange abkühlen lassen. Temperatursiche-
rung des Motors schaltet sich selbsttätig wieder ein.
Wagen holpert Gleitstange schmutzig Die Gleitstange reinigen und mit Vaselin schmieren
Speisereste kleben an
der Klinge
Schalten Sie das Gerät aus und ziehen Sie den Netzstecker ab. Warten Sie, bis die Klinge zu einem völligen Stillstand gekommen ist. Entfernen Sie jegliche Hemmnisse.
Wischen Sie die Klinge mit einem feuchten Tuch ab.
Klinge stoppt,
wenn Produkt
Keilriemen abgenutzt
oder verschmutzt
Kontaktieren Sie den Lieferanten.
wird geschnitten
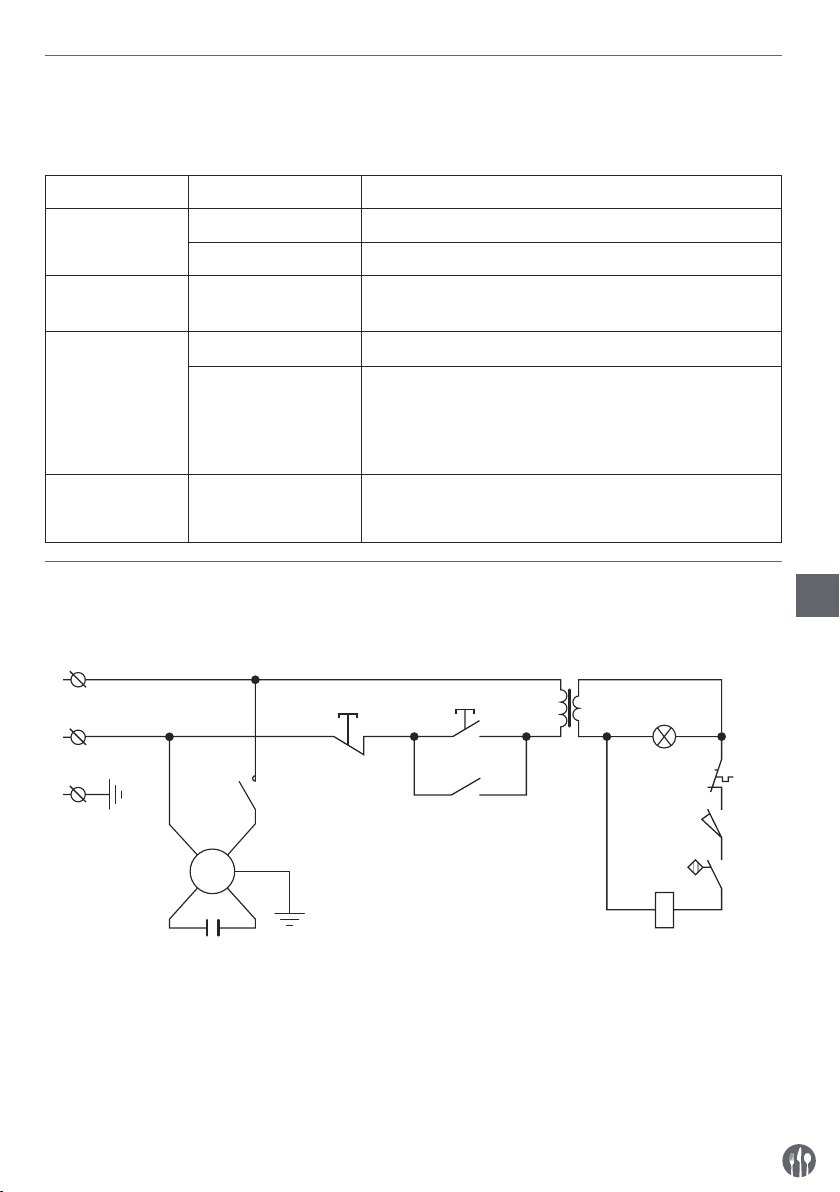
Schaltplan für 210000, 210017, 210031, 210048
Wechselspannungseingang: AC220-240V 50Hz
N
SB1
L
PE
KC
M
PE
C
T
SB2
KC HL
KM
DE
ST
SQ1
SQ2
M : Motor
T : Transformator
C : Kondensator
PE : Schutzerde (Masse)
L : Stromführend
N : Neutralleiter
SB1, SB2 : Schalter
KC : Relais
HL : Anzeigelampe
ST : Temperaturbegrenzer
SQ1, SQ2 : Mikroschalter
21
Page 22
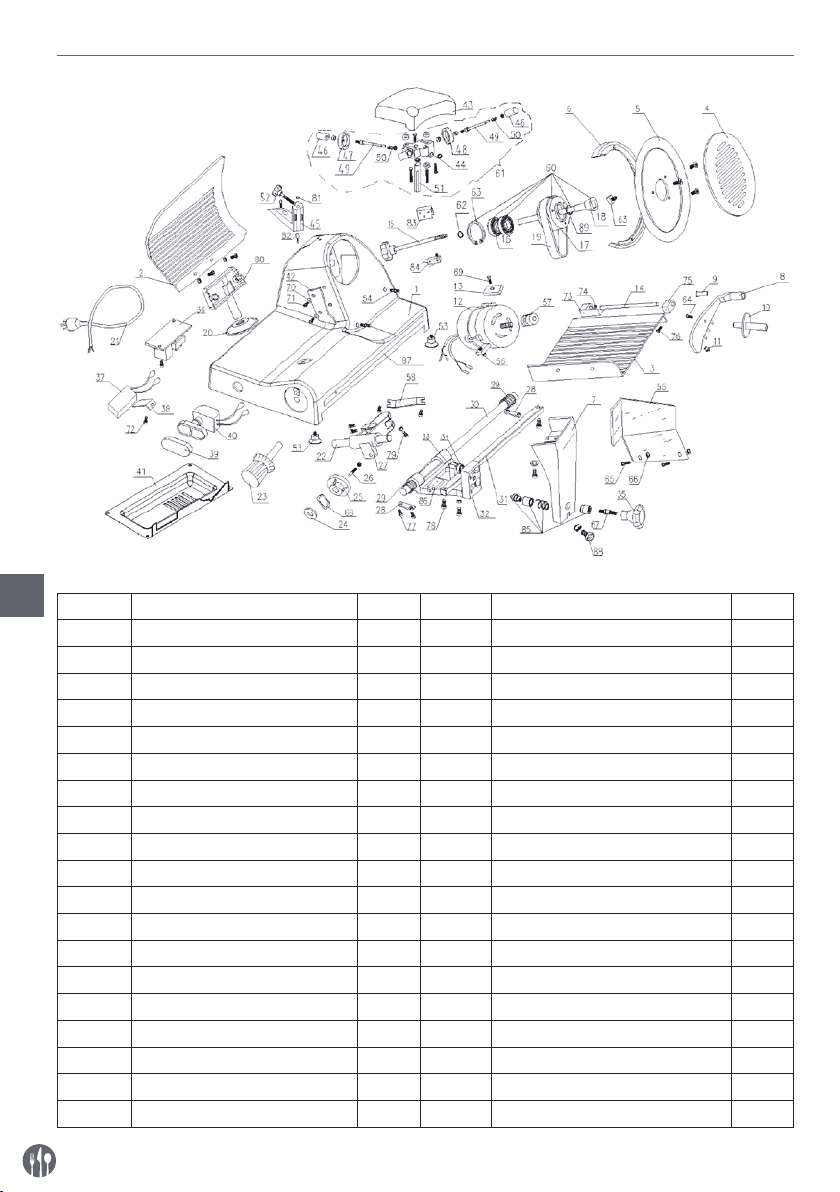
Teileliste (Artikel-Nr. : 210000, 210031, 210048)
DE
Teile-Nr. Teilename Menge Teile-Nr. Teilename Menge
1 Gehäuse 1 20 Folienmulch 1
2 Aktives Schalbrett 1 21 Stromleitung 1
3 Speiseausgabe 1 22 Gleitachse 1
4 Klingenschutzhaube 1 23 Skalierknopf 1
5 Klinge 1 24 Federdichtung 1
6 Klingenschutzring 1 25 Nocken 1
7 Schalenhalterung 1 26 Nockenschmiegungsarmatur 1
8 Speisen und Starrarm 1 27 Schieber 1
9 Starrarmbuchse 1 28 Brikettieren-Gleitachse 2
10 Starrarmgriff 1 29 Feder der Zugbremsgleitachse 2
11 Kunststoffgranulate 1 30 Anhängerzugvorrichtungsachse 1
12 Motor 1 31 Quadratische Achse 1
13 Motorbrikettierung 1 32 Zugvorrichtung 1
14 Starrarm-Pin Ø12 × 185 1 33 M8×35 Sechskantschraube 1
15 Klingenschutzbolzen 1 34 Kugellager 607 1
16 Kugellager 6202 2 35 Abdeckknopf der Zugvorrichtung 1
17 Klingenriemenrad Ø66 1 36 Relais 1
18 Riemenradstift 1 37 Kondensator 1
19 Riemen SV.330 2 38 Kondensatorhalterung 1
22
Page 23

Teile-Nr. Teilename Menge Teile-Nr. Teilename Menge
39 Mulchtaste 1 65 Schraube für Starrarmgriff 1
40 Tastenschalter 1 66 Schraube für Finger-Trennwand 2
41 Hauptplatine 1 67 Mutter für Finger-Trennwand 2
42 Fleischschaber 1 68 Schraube für Halterungsknopf 1
43 Mulchschärfer 1 69 Undee-Federdichtung 1
44 Schärfersockel der Unterbau-
gruppe
45 Schärfersockel der Baugruppe 1 71 Ausgleichsscheibe für Fleischscha-
46 Schärfertaste 2 72 Schraube für Fleischschaber 2
47 Feinschleifrad Ø45 1 73 Klemmschraube für die Befestigung
48 Rohschleifrad Ø45 1 74 Schalenlagerabdeckung A 1
49 Reibesteinstift 2 75 Fleischbrettkorb 1
50 Feder 2 76 Schalenlagerabdeckung B 1
51 Schärferhalterungsstift 1 77 Kreuzschlitzkopf M6 × 12 2
52 Anziehknopf für Schärfer 1 78 Mutter für Brikettieren-Gleitachse 4
53 Aktives Schalbrettdom 1 79 Sperrschraube für quadratische
54 Gummifuß 4 80 Anpassschraube für Schieber 1
55 Stift für Klingenschutzring 2 81 Magnet 1
56 Blockierbrett für Fleisch 1 82 Magnetschalter 1
57 Gleitachsenhalterung 2 83 Aluminiumblock 1
58 Kleines Riemenrad für Motor 1 84 Mikroschalter 1
59 Schieberschlitten 1 85 Edelstahlschloss 1
60 Riemenradeinstellung 1 86 Begrenzungsblock 1
61 Schärfereinstellung 1 87 Edelstahlleiste 1
62 Ø15 Federdichtung für Lager 1 88 Schalenhalterung-Einstellschraube 1
63 Ø15 Federdichtung für Lager 1 89 Öldichtung 1
64 Rechteckmutter für Klingen-
schutzscheibe
1 70 Motorgeschützte Schraube 1
2
ber
1
des Kondensators
2
Achse
1
DE
23
Page 24
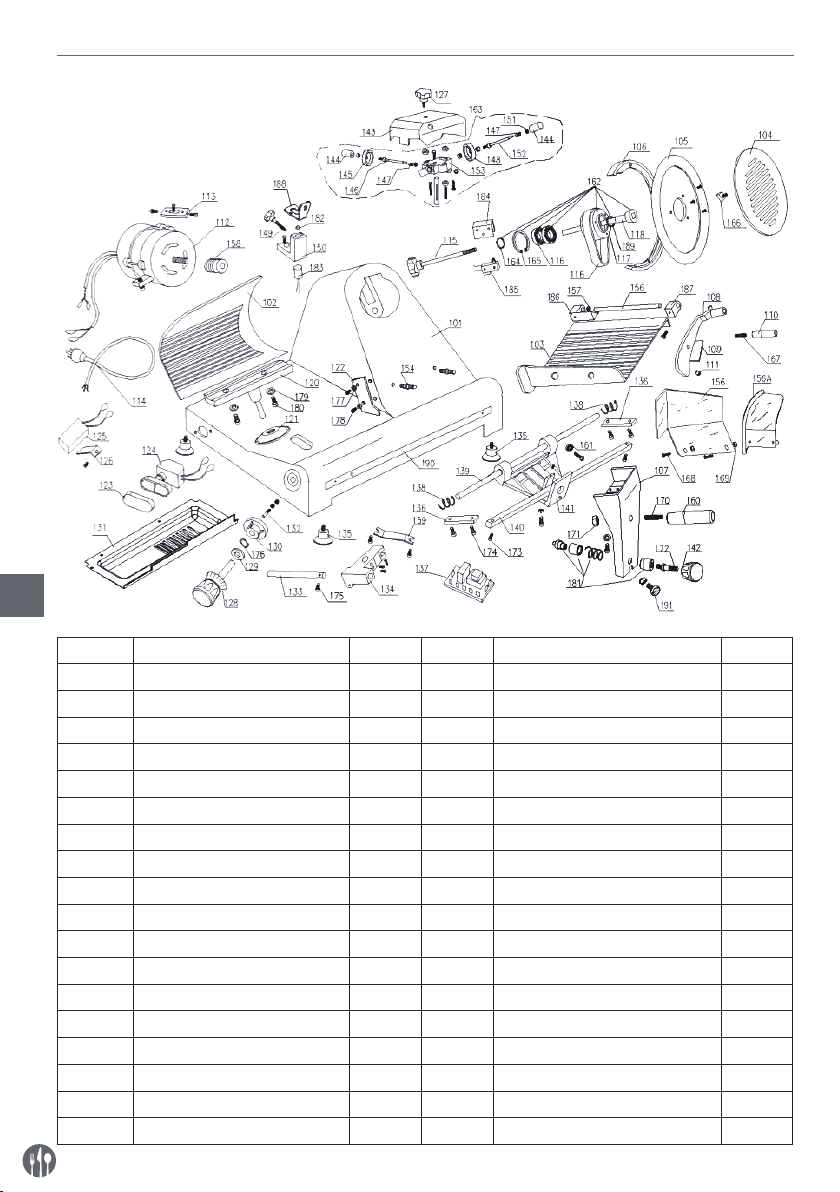
Teileliste (Artikel-Nr. : 210017)
DE
Teile-Nr. Teilename Menge Teile-Nr. Teilename Menge
101 Gehäuse 1 119 Riemen SV.400 2
102 Aktives Schalbrett 1 120 Grundträger 1
103 Speiseausgabe 1 121 Kabelschlauch 1
104 Klingenscheibenschutz 1 122 Fleischabstreifer 1
105 Klinge 1 123 Mulchtaste 1
106 Klingenschutzring 1 124 Tastenschalter 1
107 Schalenhalterung 1 125 Kondensator 1
108 n und fester Arm 1 126 Kondensatorhalterung 1
109 Starrarmbuchse 1 127 Mitarbeiterorientierte Schraube 1
110 Griff 1 128 Skalierknopf 1
111 Kunststoffgranulate 1 129 Federdichtung 1
112 Motor 1 130 Cam300 1
113 Motorbrikettierung 1 131 Hauptplatine 1
114 Stromleitung 1 132 Nockenschmiegungsstift 1
115 Klingenschutzbolzen 1 133 Gleitachse 1
116 Kugellager 6204 2 134 Schieber 1
117 Riemenrad 1 135 Gummifuß 4
118 Riemenradstift 1 136 Brikettieren-Gleitachse 2
24
Page 25

Teile-Nr. Teilename Menge Teile-Nr. Teilename Menge
137 Relay 1 165 Ø 47Spring gasket for hole 1
138 Spring of sliding axle 2 166 Blade guard disc square-head nut 1
139 Towing bracket sliding axle 1 167 Fixed-arm handle bolt 1
140 Quadrate axis 1 168 Finger baffle bolt 2
141 Towing bracket 1 169 Finger baffle nut 2
142 Button of towing bracket 1 170 Bracket knob bolt 1
143 Sharpener mulch 1 171 Bracket knob nut 1
144 Button 2 172 Bracket bottom bolt 1
145 Fine grinding wheel Ø45 1 173 Quadrate axis locking screw 2
146 Pin of burr cleaning wheel 2 174 Slide axle briquetting bolt 4
147 Spring of burr cleaning wheel 2 175 Slide axle bolt 1
148 Crude grinding wheel Ø45 2 176 Ø 12 Under spring gasket 1
149 Sharpener tighten knob 1 177 Meat scraping shim 2
150 Supporting base of outer ring 1 178 Meat scraper bolt 1
151 Ø 4.751Wheel 1 179 Fulcrum bearing shim 2
152 Pin of rubbing stone 1 180 Fulcrum bearing bolt 2
153 Sharpener base of subassembly 1 181 Stainless steel lock 1
154 pin of blade guading ring 2 182 Magnet 1
155 Pin of food tray 1 183 Magnet switch 1
156/156A Meat blocking board 1 184 Limited block 1
157 Bracket of sliding axle 1 185 Microswitch 1
158 Small belt wheel of motor 1 186 Tray bearing cover A 1
159 Slide transmitting wheel 1 187 Tray bearing cover B 1
160 Towing bracket handle 1 188 Fulcrum bearing shim 1
161 Sliding axle608 1 189 Oil seal 1
162 Belt wheel setting 1 190 Stainless steel bar 1
163 Sharpener setting 1 191 Set screw for tray bracket 1
164 Ø 20Spring gasket for bearing 1
DE
Garantie
Alle innerhalb von einem Jahr nach dem Kaufdatum festgestellten Defekte oder Mängel, die die
Funktionalität des Gerätes beeinträchtigen, werden auf dem Wege der unentgeltlichen Reparatur
bzw. des Austausches unter der Voraussetzung
beseitigt, dass das Gerät in einer der Bedienungsanleitung gemäßen Art und Weise betrieben und
gewartet wird und weder vorsätzlich vernichtet
noch nicht bestimmungsgemäß genutzt wurde.
Ihre Rechte aus den entsprechenden Gesetzen
bleiben davon unberührt. Eine in der Garantiefrist
einzureichende Beanstandung hat die Angabe des
Kaufortes und Kaufdatums und in der Anlage einen
Kaufbeleg (z.B. Kassenzettel) zu enthalten.
Gemäß unserer Politik der ständigen Weiterentwicklung unserer Produkte behalten wir uns vor,
Änderungen am Produkt, an seiner Verpackung
und an den dokumentierten technischen Daten
ohne vorherige Ankündigung vorzunehmen.
25
Page 26

Entsorgung und Umweltschutz
Wird das Gerät außer Betrieb genommen, darf es
nicht über den Hausmüll entsorgt werden. Der
Benutzer ist für die Übergabe des Gerätes an eine
geeignete Sammelstelle für Altgeräte verantwortlich. Die Nichteinhaltung dieser Regel kann gemäß
den geltenden Vorschriften über die Abfallentsorgung bestraft werden. Die getrennte Sammlung
und das Recycling der Altgeräte trägt zur Schonung der natürlichen Ressourcen bei und sorgt
DE
für eine umwelt- und gesundheitsschonende Verwertungsweise. Weitere Informationen darüber, wo
Sie Ihre Altgeräte entsorgen können, erhalten Sie
bei Ihrem örtlichen Entsorgungsunternehmen. Der
Hersteller und der Importeur übernehmen keine
Verantwortung für das Recycling sowie die umweltfreundliche Verwertung von Abfällen, weder
direkt noch über ein öffentliches System.
26
Page 27

Geachte klant,
Hartelijk dank voor de aankoop van dit Hendi apparaat. Leest u deze gebruiksaanwijzing zorgvuldig voordat
u het apparaat gebruikt, dit om schade door verkeerd gebruik te voorkomen. Lees vooral de veiligheidsinstructies aandachtig door.
Veiligheidsinstructies
• Onjuiste bediening en verkeerd gebruik van het apparaat kan ernstige schade aan het
apparaat en verwonding van personen tot gevolg hebben.
• Dit apparaat mag alleen worden gebruikt voor commerciële doeleinden en mag niet wor
-
den gebruikt voor huishoudelijk gebruik.
• Het apparaat mag alleen worden gebruikt voor het doel waarvoor het werd ontworpen.
De fabrikant aanvaardt geen enkele aansprakelijkheid voor schade als gevolg van onjuis
-
te bediening en verkeerd gebruik.
• Zorg dat het apparaat en de stekker niet met water of een andere vloeistof in aanra
king komen. Mocht het apparaat onverhoopt in het water vallen, trek dan onmiddellijk
de stekker uit het stopcontact en laat het apparaat controleren door een erkend vakman.
Niet-naleving hiervan kan levensgevaar opleveren.
• Probeer nooit zelf de behuizing van het apparaat te openen.
• Steek geen voorwerpen in de behuizing van het apparaat.
• Raak de stekker niet met natte of vochtige handen aan.
• Gevaar van elektrische schokken! Probeer het apparaat niet zelf te repareren. In het
geval van storingen, laat reparaties alleen uitvoeren door gekwalificeerd personeel.
• Gebruik nooit een beschadigd apparaat! Als het apparaat is beschadigd, haal de stekker
dan uit het stopcontact en neem contact op met de winkel.
• Waarschuwing! Dompel de elektrische onderdelen van het apparaat niet onder in water
of andere vloeistoffen. Houd het apparaat nooit onder stromend water.
• Controleer de stekker en het netsnoer regelmatig op schade. Als de stekker of het net
snoer is beschadigd, moet het worden vervangen door de technische dienst of een soortgelijk gekwalificeerd persoon om gevaar of letsel te voorkomen.
• Zorg ervoor dat het netsnoer niet in contact komt met scherpe of hete voorwerpen en
houd het uit de buurt van open vuur. Als u de stekker uit het stopcontact wilt halen, trek
dan altijd aan de stekker en niet aan het netsnoer.
• Zorg ervoor dat niemand per ongeluk aan het netsnoer (of verlengsnoer) kan trekken of
kan struikelen over het netsnoer.
• Houd het apparaat in de gaten tijdens gebruik.
• Waarschuwing! Zolang de stekker in het stopcontact zit, is het apparaat aangesloten op
de voedingsbron.
• Schakel het apparaat uit voordat u de stekker uit het stopcontact trekt.
• Draag het apparaat nooit aan het netsnoer.
• Gebruik geen extra hulpmiddelen die niet worden meegeleverd met het apparaat.
• Sluit het apparaat alleen aan op een stopcontact met de spanning en frequentie die is
vermeld op het typeplaatje.
27
NL
Page 28

• Sluit de stekker aan op een stopcontact dat eenvoudig bereikt kan worden, zodat de
stekker in geval van nood onmiddellijk uit het stopcontact kan worden getrokken. Trek de
stekker volledig uit het stopcontact om het apparaat volledig uit te schakelen. Gebruik de
stekker om het apparaat los te koppelen van het lichtnet.
• Schakel het apparaat altijd uit voordat u de stekker uit het stopcontact trekt.
• Gebruik nooit accessoires die niet worden aanbevolen door de fabrikant. Zij kunnen mo
gelijk een veiligheidsrisico vormen voor de gebruiker en kunnen het apparaat mogelijk
beschadigen. Gebruik alleen originele onderdelen en accessoires.
• Dit apparaat is niet geschikt voor gebruik door personen (inclusief kinderen) met een
verminderd fysiek, sensorisch of geestelijk vermogen, of gebrek aan ervaring en kennis.
• Dit apparaat mag onder geen enkele omstandigheid worden gebruikt door kinderen.
• Houd het apparaat en het netsnoer buiten bereik van kinderen.
• Kinderen mogen niet met het apparaat spelen.
• Koppel het apparaat altijd los van het lichtnet als het onbeheerd wordt achtergelaten en
voordat het apparaat wordt gemonteerd, gedemonteerd of gereinigd.
• Laat het apparaat nooit onbeheerd achter tijdens gebruik.
Speciale veiligheidsvoorschriften
• Dit apparaat is een commerciële voedselverwerkingsmachine en is uitsluitend bedoeld
voor het snijden van voedingsmiddelen, bijv. vlees, kaas, worst, brood, etc. Het te snijden
voedsel moet ontdooid, uit de verpakking gehaald en vrij van botten zijn voordat het kan
worden gesneden met het apparaat. Elk ander gebruik kan leiden tot schade of lichame
NL
lijk letsel.
• Dit apparaat mag niet worden gebruikt voor het snijden of in plakken snijden van bevro
ren voedsel, vlees met been, vis of andere niet-voedselproducten, etc.
• Gebruik het apparaat alleen zoals beschreven in deze handleiding.
• Dit apparaat moet worden gebruikt door getraind personeel in keukens van restaurants,
kantines of barpersoneel, etc.
• Plaats het apparaat niet op een verwarmingsvoorwerp (kooktoestel op benzine, elek
triciteit, houtskool, etc.). Houd het apparaat uit de buurt van warme oppervlakken en
open vuur. Gebruik het apparaat altijd op een vlakke, stabiele, schone, hittebestendige
en droge ondergrond.
• Dit apparaat is niet bedoeld om gebruikt te worden in combinatie met een externe timer
of apart systeem voor gebruik op afstand.
•
Het apparaat is voorzien van een potentiaalvereffeningsaansluiting voor ‘cross bon-
ding’ met andere apparatuur.
-
-
-
-
• Omzeil nooit de veiligheidsmechanismen op het apparaat.
• WAARSCHUWING: Houd alle ventilatieopeningen in het apparaat vrij.
• WAARSCHUWING: Schakel het apparaat ALTIJD uit en trek de stekker uit het stopcon
tact alvorens het apparaat te reinigen, onderhouden of op te bergen.
• WAARSCHUWING! Houd uw handen, lange haren en kleding ALTIJD uit de buurt van de
bewegende onderdelen.
28
-
Page 29

• WAARSCHUWING: Wees uiterst voorzichtig bij de omgang met het mes. Draag bescher-
mende handschoenen (niet meegeleverd) indien nodig.
• Laat tijdens gebruik minimaal 15 cm ruimte vrij rond het apparaat voor voldoende ven
-
tilatie.
• Let op! Plaats het netsnoer indien nodig op een veilige manier om te voorkomen dat
het in contact kon komen met het verwarmingsoppervlak en dat er per ongeluk aan het
netsnoer kan worden getrokken.
• Was het apparaat niet met water of een waterstraal. Wassen met water kan lekkage ver
oorzaken en het risico op elektrische schokken verhogen. Geen van de onderdelen zijn
vaatwasmachinebestendig.
• Niet reinigen of opbergen tenzij het apparaat volledig is afgekoeld.
• Verplaats het apparaat niet tijdens gebruik. Trek de stekker uit het stopcontact en houd
het apparaat vast aan de onderkant als u het apparaat verplaatst.
• Er is speciale aandacht vereist als u het apparaat wilt verplaatsen of transporteren, om
dat het apparaat zeer zwaar is. Verplaats met minimaal 2 personen of gebruik een karretje om te helpen bij het verplaatsen. Verplaats het apparaat langzaam, voorzichtig en
nooit gekanteld onder een hoek groter dan 45°.
Beoogd gebruik
• Het apparaat is bestemd voor professioneel gebruik en mag alleen worden bediend door gekwalificeerd personeel.
• Het apparaat is alleen bedoeld voor het snijden
van levensmiddelen, bijv. vlees, kaas, brood, etc.
Elk ander gebruik kan leiden tot schade aan het
apparaat of lichamelijk letsel.
• Gebruik van het apparaat voor andere doeleinden
wordt beschouwd als verkeerd gebruik van het
apparaat. De gebruiker is volledig aansprakelijk
voor alle risico’s die voortvloeien uit verkeerd gebruik van het apparaat.
NL
Installatie met aarding
Dit apparaat is geclassificeerd als beschermingsklasse I en moet worden aangesloten op een aansluiting met aarde. Aarding verlaagt de kans op
elektrische schokken doordat elektrische stroom
via een ontsnappingsdraad kan weglopen. Dit ap-
paraat is uitgerust met een snoer met een aardedraad en een geaarde stekker. De stekker moet in
een stopcontact worden gestoken dat juist is geïnstalleerd en geaard.
29
Page 30
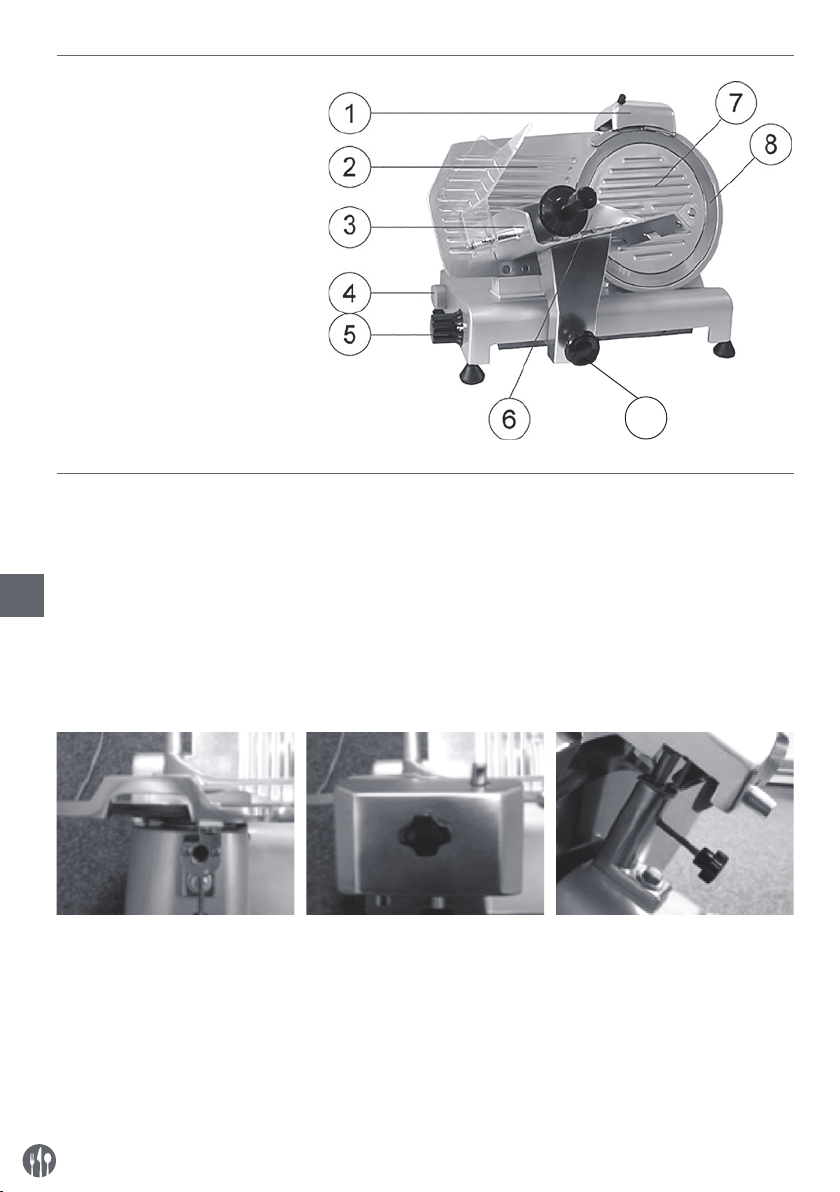
Belangrijkste onderdelen van het apparaat
1 Slijper voor mes
2 Aanslag
3 Slede
4 Aan/uit schakelaar
[Wit (I): AAN; Zwart (O): UIT]
5 Knop voor instellen snijdiktel
6 Producthouderarm
7 Mesafscherming
8 Mes
9 Sledevergrendeling
10 Bout van mesafscherming
(niet afgebeeld)
Voorbereiding voor eerste ingebruikname
• Controleer of alle onderdelen inbegrepen zijn.
Indien u onderdelen mist, neem contact op met
uw leverancier.
• Verwijder al het verpakkingsmateriaal.
NL
• Controleer het apparaat op volledigheid en eventuele transportschade. Neem in geval van schade
of een onvolledige levering onmiddellijk contact
op met de leverancier. Gebruik het apparaat
NIET. (Zie ==> Garantie).
9
• Reinig het mes. Wees zeer voorzichtig, mes is
zeer scherp. (Gebruik handschoenen indien nodig, niet meegeleverd)
• Zorg ervoor dat er rondom de machine minstens
10cm vrij blijft, Dit in verband met de ventilatie
van de machine
• Plaats de machine zo dat de stekker te allen tijde
bereikbaar is.
• Wanneer de slijpvoorziening niet gemonteerd is,
ga dan als volgt te werk:
1. Bovenaanzicht van de machine
LET OP! De slijpvoorziening is voorzien van een veiligheidsschakelaar. Indien de slijpvoorziening niet is
gemonteerd, kunt u de machine niet inschakelen
30
2. Plaats de slijpmodule zo dat
het mes niet tussen de slijpwieltjes door loopt
3. Borg de slijpvoorziening aan
de machine door de borging
aan te draaien. Controleer
of de slijpvoorziening vast zit
voordat u de machine in gebruik neemt.
Page 31
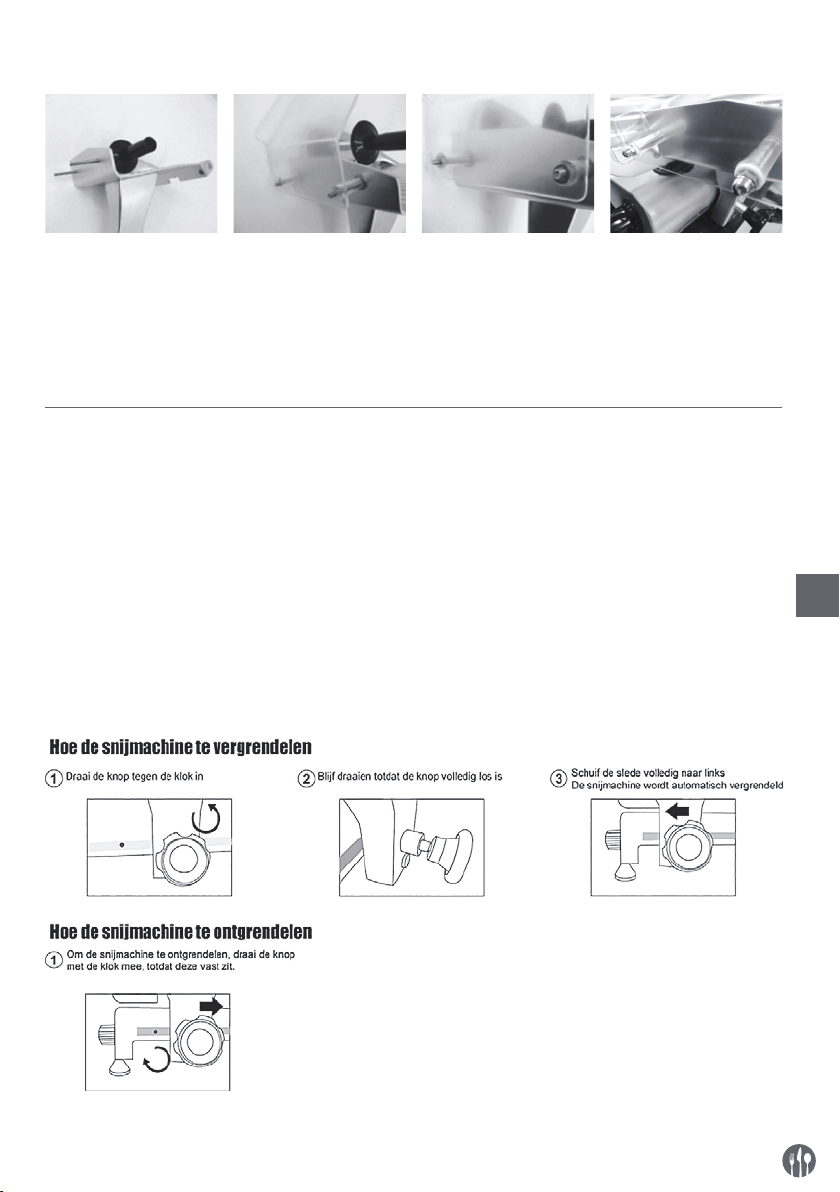
• Monteer de handafschermer
1. Plaats de beide
schroeven in de
2. Plaats de handbeschermer
3. Plaats de twee
sluitringen
4. Draai de twee dopmoeren aan
slede
LET OP: het gebruiken van de machine zonder de handbeschermer wordt afgeraden! Dit zijn veiligheidsvoorzieningen die mogelijk verwondingsgevaar uitsluiten. Indien u deze voorzieningen niet monteert, bestaat het risico op verwondingen.
Gebruiksaanwijzing
• Plaats de machine dusdanig, dat de aan/uit schakelaar naar de gebruiker toegekeerd is.
• Wanneer de slijpvoorziening niet gemonteerd is,
ga dan als volgt te werk:
- Plaats de slijpvoorziening in zijn steun zodat
het mes niet tussen wieltjes doorloopt.
- Draai de veiligheidsschroef op de slijpvoorzie-
ning aan.
- LET OP! De slijpvoorziening is voorzien van een
veiligheidsschakelaar. De machine kan niet
worden ingeschakeld indien de slijpvoorziening niet is gemonteerd.
• Steek de stekker in de wandcontactdoos.
• Stel de gewenste dikte in door aan de knop met
de schaalverdeling te draaien.
• Schakel het apparaat in door op de “WITTE (I)”
knop van de aan/uit schakelaar te drukken.
• Plaats het te snijden product op de wagen. Klem
het product met de hiervoor aanwezige klem.
Zorg ervoor dat het product tegen de aanslag aan
ligt.
• Schakel het apparaat, zodra het product is gesneden, uit door op de “ZWARTE (O)” knop van de
aan/uit schakelaar te drukken.
• Draai de knop voor de instelling van de dikte terug naar “0”.
NL
31
Page 32

Slijpen van het mes
Uitvoeren wanneer het mes bot geworden is. Wij
wijzen u erop dat het mes zeer slijtvast is en dus
slechts een keer per jaar geslepen hoef te worden
bij regelmatig en juist gebruik.
• Zet de machine uit (de machine is voorzien van
een veiligheidsschakelaar en schakelt vanzelf uit
indien de slijpvoorziening wordt verwijderd)
• Zet de knop van de dikte-instelling op “0”
• Reinig het mes.
• Draai de borgknop van de slijper los.
• Trek de slijper omhoog en draai hem 180°.
• Aan iedere zijde van het mes moet één steentje
zijn.
• Laat de slijper zakken totdat deze weer in de vergrendeling valt.
• Zet de slijper vast door de borgknop weer aan te
draaien.
• Zet de machine aan. Het mes begint nu te draaien.
Reiniging en onderhoud
• Let op: Trek de stekker van het apparaat altijd uit
NL
het stopcontact, draai de knop voor de instelling
van de dikte naar “0” en laat het apparaat volledig afkoelen alvorens het apparaat te reinigen en
op te bergen.
• Reinig het apparaat na elk gebruik.
• Let op: Nooit het apparaat in water of een andere
vloeistof onderdompelen!
• De buitenkant maakt u schoon met een vochtig
doekje (water met mild reinigingsmiddel).
• Gebruik nooit agressieve schoonmaakmiddelen
of schuurmiddelen. Geen scherpe en puntige
• Druk met de knop de schuinstaande slijpsteen
tegen het mes en houd de slijpsteen 2 minuten
tegen het mes aan. De slijpsteen moet nu met
het mes mee gaan draaien.
• Druk met de knop de rechtopstaande slijpsteen
korte tijd tegen het mes om de bramen van het
slijpen van het mes te verwijderen. De slijpsteen
moet nu met het mes mee gaan draaien.
• Zet de machine uit en trek de stekker uit het
wandcontact.
• Draai de borgknop van de slijper los en reinig de
slijpstenen met alcohol.
• Zet de slijper weer in de oorspronkelijke wijze op
de machine en draai de borgknop aan. Het mes
moet niet tussen de slijpstenen doorlopen.
• Dompel voor enkele minuten onder in een warm,
mild zeepsopje. Spoel af en droog grondig.
• Druk de stekker in het stopcontact. Wees zeer
voorzichtig.
• De machine is nu weer klaar voor gebruik.
voorwerpen gebruiken. Geen benzine of oplosmiddelen gebruiken! Schoonmaken met een
vochtige doek en eventueel afwasmiddel, geen
schurende middelen gebruiken.
• Dompel voor enkele minuten onder in een warm,
mild zeepsopje. Spoel af en droog grondig.
• Wees zeer voorzichtig.
• Wanneer de wagen niet meer soepel beweegt, leg
de machine dan op de zijkant. Maak de glijstang
zorgvuldig schoon en smeer deze in met vaseline.
Opslag
• Zorg er vóór het opbergen van het apparaat altijd
voor dat de stekker van het apparaat uit het stopcontact is getrokken en dat het apparaat volledig
is afgekoeld.
32
• Bewaar het apparaat op een koele, schone en
droge plek.
Page 33
Probleemoplossing
Als het apparaat niet goed werkt, controleer dan onderstaande tabel voor de oplossing. Als u het probleem
nog steeds niet kunt oplossen, neem dan contact op met de leverancier/dienstverlener.
Probleem Mogelijke oorzaak Oplossing
Apparaat snijdt niet
gelijkmatig
Machine stopt met
snijden
Mes bot Slijp het mes
Machine is vuil Reinig de machine
Motor te warm
Laat de machine geruime tijd afkoelen. De thermische
beveiliging van de motor schakelt vanzelf weer in.
Glijstang vuil Reinig de glijstang en smeer met vaseline
Wagen glijdt niet
soepel
Er plakt wat voedsel
aan het mes
Schakel het apparaat uit & trek de stekker uit het
stopcontact. Wacht tot het mes volledig tot stilstand is
gekomen. Verwijder eventuele verstoppingen. Vees het
mes af met een vochtige doek.
Mes stopt bij belasting
V-riem versleten of vuil Neem contact op met de leverancier
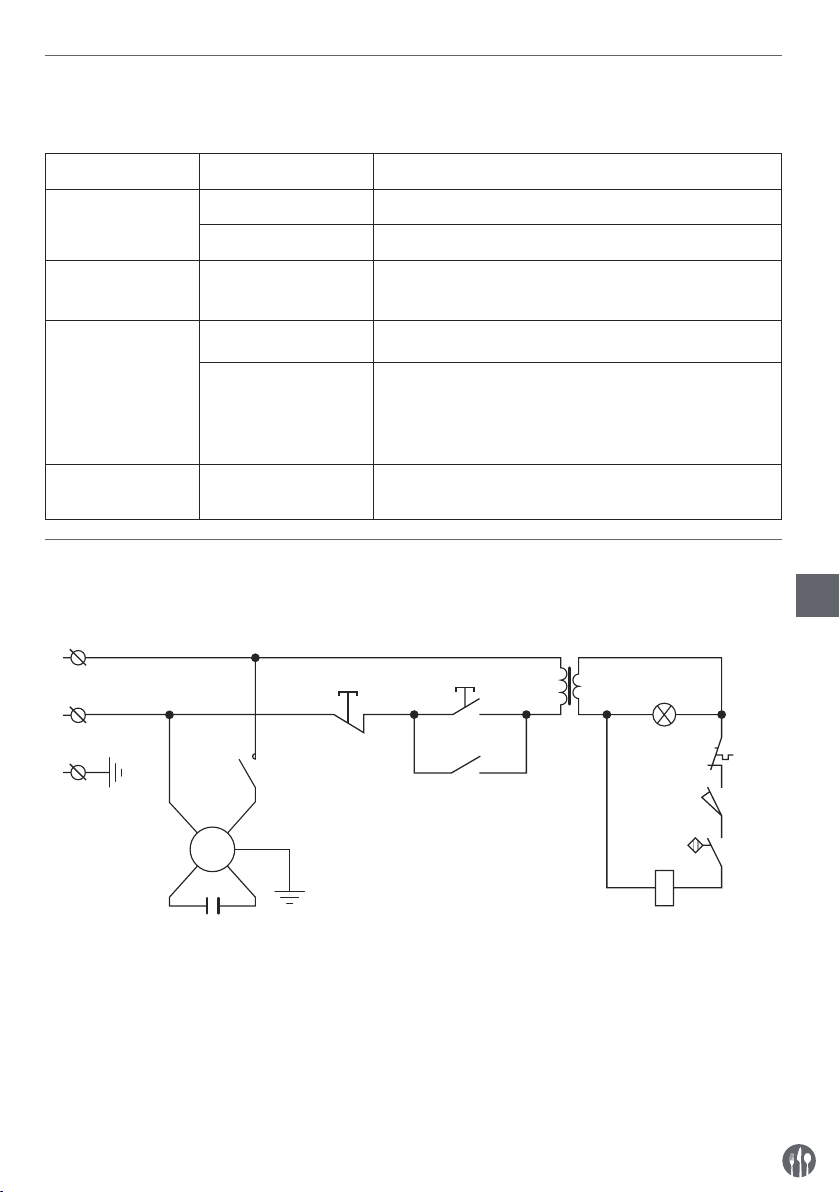
Schakelschema voor 210000, 210017, 210031, 210048
Netspanningsingang: AC220-240V 50Hz
N
SB1
L
PE
KC
T
SB2
KC HL
NL
ST
M
PE
C
M : Motor
T : Transformator
C : Condensator
PE : Beschermende aarding (aarding)
L : Fase
N : Neutraal
KM
SB1, SB2 : Schakelaar
KC : Relais
HL : Indicatielampje
ST : Thermische beveiliging
SQ1, SQ2 : Microschakelaar
SQ1
SQ2
33
Page 34
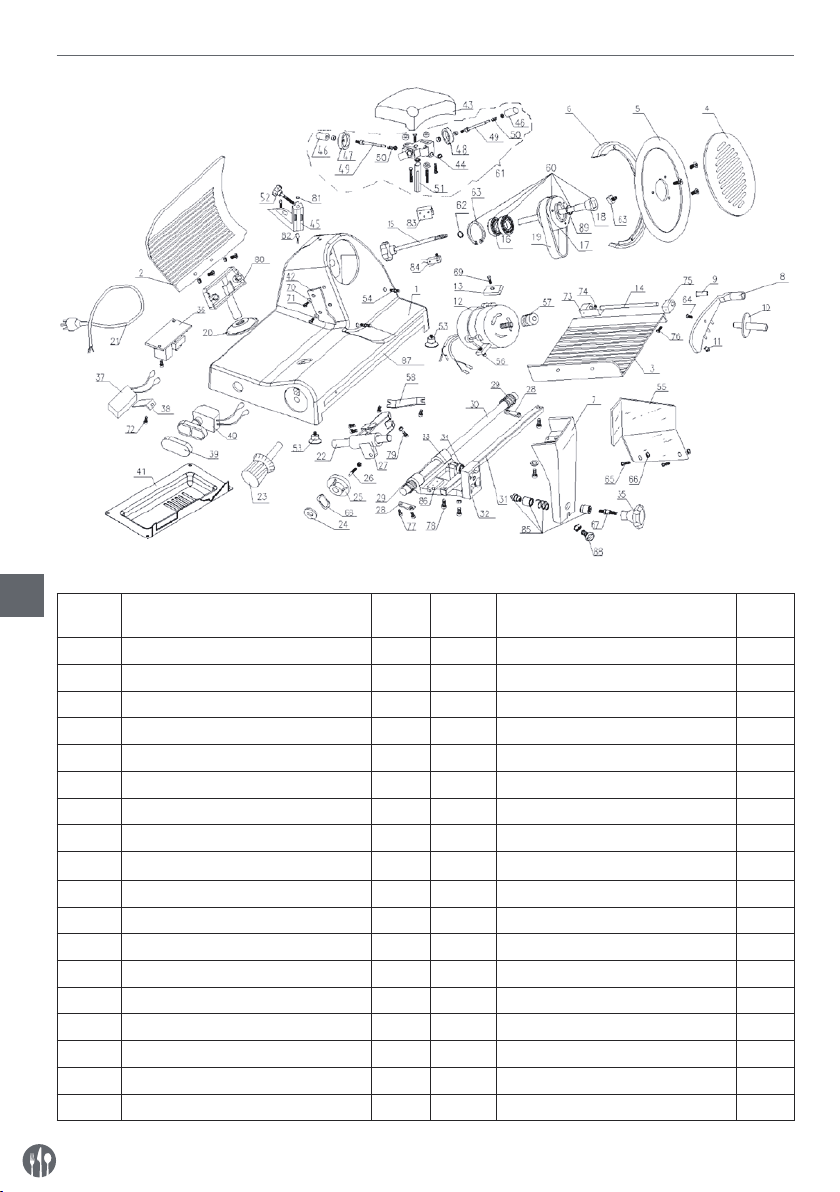
Onderdelenlijst (Artikelnr.: 210000, 210031, 210048)
NL
Nr. onderdeel
1 Behuizing 1 19 RiemSV.330 2
2 Actieve duig 1 20 Schuifkap 1
3 Voedselblad 1 21 Netsnoer 1
4 Beschermschijf mes 1 22 Schuifas 1
5 Mes 1 23 Knop met schaal 1
6 Beschermring mes 1 24 Veerpakking 1
7 Beugel lade 1 25 Nok 1
8 Vaste arm voedsel 1 26 Nokkenstaaf 1
9 Huls vaste arm 1 27 Schuiver 1
10 Handgreep vaste arm 1 28 Brikettering schuifas 2
11 Plastic korrel 1 29 Veer van trekbeugel schuifas 2
12 Motor 1 30 Trekbeugel-as 1
13 Brikettering motor 1 31 Vierkante as 1
14 Pen vaste arm Ø12×185 1 32 Trekbeugel 1
15 Bouten mesbescherming 1 33 M8×35Inbusschroef 1
16 Kogellager 6202 2 34 Kogellager 607 1
17 Wiel mesriem Ø66 1 35 Knop afdekking trekbeugel 1
18 Pen van mesriem 1 36 Relais 1
Naam onderdeel Aantal Nr. on-
derdeel
Naam onderdeel Aantal
34
Page 35

Nr. onderdeel
37 Condensator 1 64 Kruiskopmoer beschermschijf mes 1
38 Condensatorhouder 1 65 Bout handgreep vaste arm 1
39 Knopkap 1 66 Bout vingerplaat 2
40 Knopschakelaar 1 67 Moer vingerplaat 2
41 Moederbord 1 68 Knopbout beugel 1
42 Vleesschraper 1 69 Undee veerpakking 1
43 Slijperkap 1 70 Inslagbout motor 1
44 Slijpbasis van subassemblage 1 71 Afstandsplaat vleesschraper 2
45 Slijpbasis van assemblage 1 72 Bout vleesschraper 2
46 Knop van slijper 2 73 Klembout condensatorbevestiging 1
47 Fijne slijpschijf Ø45 1 74 Lagerkap lade 1
48 Grove slijpschijf Ø45 1 75 Beugel vleesbord 1
49 Pen slijpsteen 2 76 Lagerkap lade B 1
50 Veer 2 77 Verzonken kop en kruisgleuf M6×12 2
51 Pen slijpbeugel 1 78 Briketteringsbout schuifas 4
52 Aandraaiknop slijper 1 79 Borgschroef vierkante as 2
53 Mandril actieve duig 1 80 Afstelbout schuiver 1
54 Rubberen voetje 4 81 Magneet 1
55 Pen van beschermring mes 2 82 Magneetschakelaar 1
56 Vleesblokkeerbord 1 83 Aluminium blok 1
57 Beugel schuifas 2 84 Microschakelaar 1
58 Klein riemwiel van motor 1 85 Roestvrijstalen slot 1
59 Schuifaandrijver 1 86 Begrensd blok 1
60 Instelling riemwiel 1 87 Roestvrijstalen balk 1
61 Instelling slijper 1 88 Stelschroef voor beugel lade 1
62 Ø15 Veerpakking voor lager 1 89 Olieafdichting 1
63 Ø15 Veerpakking voor lager 1
Naam onderdeel Aantal Nr. on-
derdeel
Naam onderdeel Aantal
NL
35
Page 36
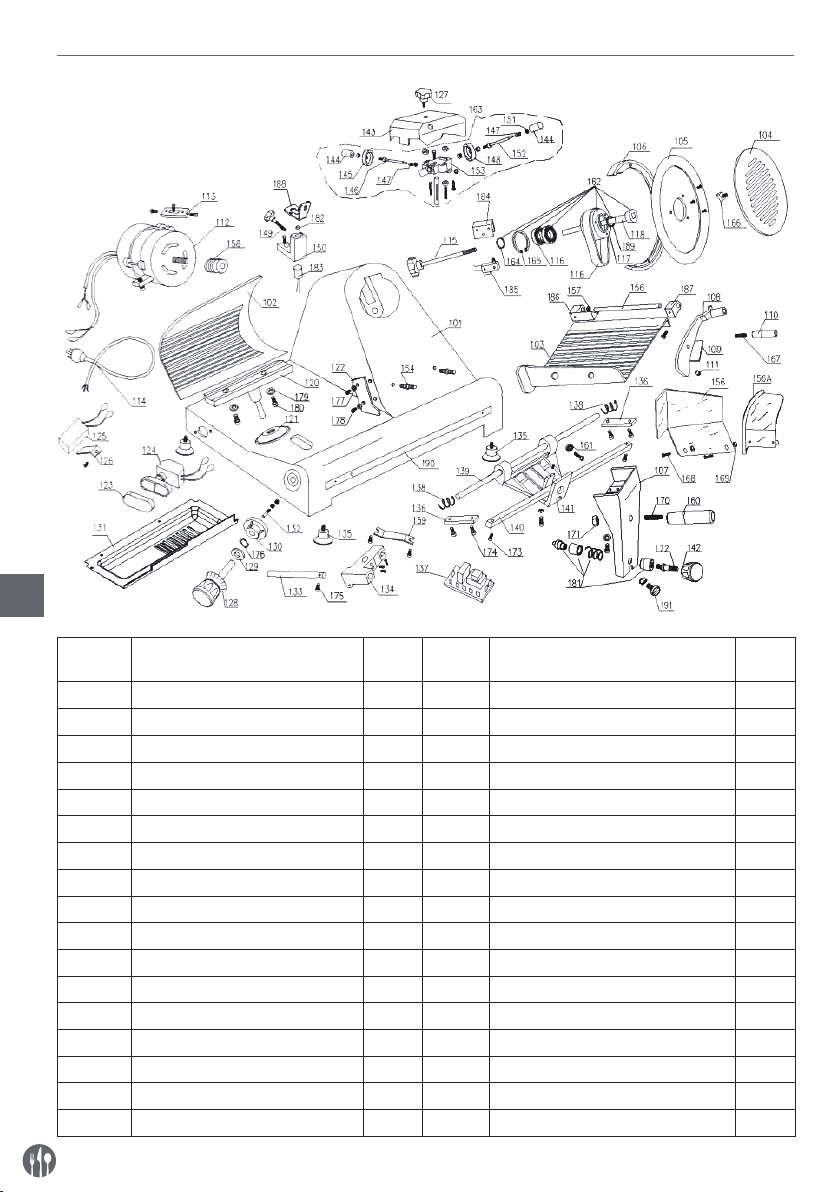
Onderdelenlijst (Artikelnr.: 210017)
NL
Nr. onderdeel
101 Behuizing 1 118 Pen van riemwiel 1
102 Actieve duig 1 119 RiemSV.400 2
103 Voedselblad 1 120 Ondersteunende basis 1
104 Beschermschijf mes 1 121 Kabelmantel 1
105 Mes 1 122 Vleesschraper 1
106 Beschermring mes 1 123 Knopkap 1
107 Beugel lade 1 124 Knopschakelaar 1
108 Vaste arm voedsel 1 125 Condensator 1
109 Huls vaste arm 1 126 Condensatorhouder 1
110 Handgreep 1 127 Schroef van gerichte staf 1
111 Plastic korrel 1 128 Knop met schaal 1
112 Motor 1 129 Veerring 1
113 Brikettering motor 1 130 Nok300 1
114 Netsnoer 1 131 Moederbord 1
115 Bouten mesbeschermer 1 132 Nokkenpen 1
116 Kogellager 6204 2 133 Schuifas 1
117 Riemwiel 1 134 Schuiver 1
36
Naam onderdeel Aantal Nr. on-
derdeel
Naam onderdeel Aantal
Page 37
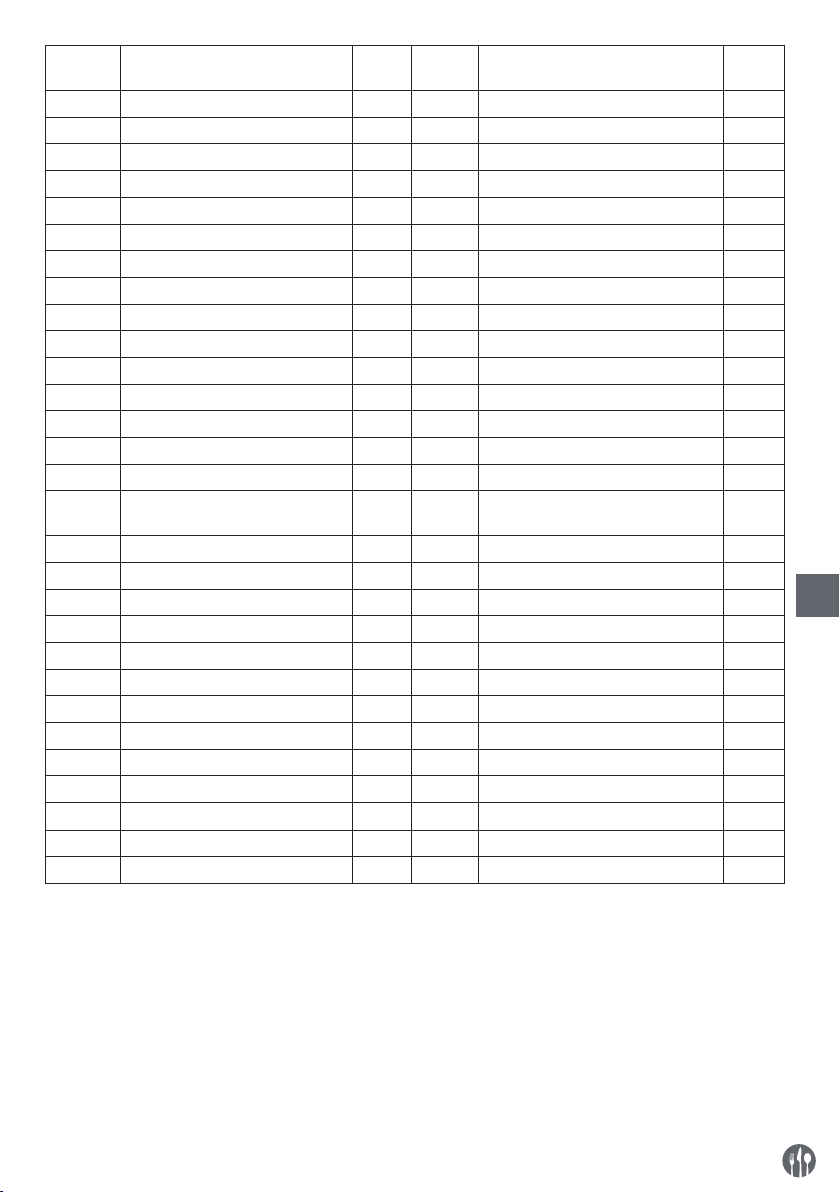
Nr. onderdeel
135 Rubberen voetje 4 164 Ø 20Veerring voor lager 1
136 Brikettering schuifas 2 165 Ø 47Veerring voor gat 1
137 Relais 2 166 Kruiskopmoer beschermschijf mes 1
138 Veer van schuifas 1 167 Bout handgreep vaste arm 1
139 Schuifas trekbeugel 1 168 Bout vingerplaat 2
140 Vierkante as 1 169 Moer vingerplaat 2
141 Trekbeugel 1 170 Knopbout beugel 1
142 Knop van trekbeugel 1 171 Knopmoer beugel 1
143 Slijperkap 2 172 Bout knop beugel 1
144 Knop 1 173 Borgschroef vierkante as 2
145 Fijne slijpschijf Ø45 2 174 Briketteringsbout schuifas 4
146 Pen van braamreinigingswiel 2 175 Bout schuifas 1
147 Veer van braamreinigingswiel 2 176 Ø 12Undee veerpakking 1
148 Grove slijpschijf Ø45 1 177 Afstandsplaat vleesschraper 2
149 Spanknop slijper 1 178 Bout vleesschraper 1
150 Ondersteunende basis buitenste
151 Ø 4.751Wiel 1 180 Steunpunt lagerbout 2
152 Pen van slijpsteen 1 181 Roestvrijstalen slot 1
153 Slijpbasis van subassemblage 2 182 Magneet 1
154 Pen van beschermring mes 1 183 Magneetschakelaar 1
155 Pen van voedsellade 1 184 Begrensd blok 1
156/156A Vleesblokkeerbord 1 185 Microschakelaar 1
157 Beugel van schuifas 1 186 Lagerkap lade A 1
158 Klein riemwiel van motor 1 187 Lagerkap lade B 1
159 Schuifoverdrachtswiel 1 188 Steunpunt afstandsplaat lager 1
160 Handgreep trekbeugel 1 189 Olieafdichting 1
161 Schuifas608 1 190 Roestvrijstalen balk 1
162 Instelling riemwiel 1 191 Stelschroef voor beugel lade 1
163 Instelling slijper 1
Naam onderdeel Aantal Nr. on-
derdeel
1 179 Steunpunt afstandsplaat lager 2
ring
Naam onderdeel Aantal
NL
37
Page 38

Garantie
Elk defect waardoor de werking van het apparaat
nadelig wordt beïnvloed dat zich binnen één jaar na
aankoop van het apparaat voordoet, wordt gratis hersteld door reparatie of vervanging, mits het apparaat
conform de instructies is gebruikt en onderhouden en
niet op enigerlei wijze verkeerd is behandeld of misbruikt. Dit laat onverlet uw bij wet bepaalde rechten.
Als de garantie van kracht is, vermeld dan waar en
Verwijdering & milieu
Bij de buitengebruikstelling van het apparaat, mag
het niet met het overige huisafval worden verwijderd.
In plaats daarvan is het uw verantwoordelijkheid om
uw afgedankte apparatuur in te leveren bij een daartoe aangewezen inzamelpunt. Het niet opvolgen van
deze regel kan worden bestraft in overeenstemming
met de geldende voorschriften voor afvalverwerking.
De gescheiden inzameling en recycling van uw afgedankte apparatuur ten tijde van buitengebruikstelling
helpt bij de instandhouding van natuurlijke hulpbron-
NL
wanneer u het apparaat hebt gekocht en sluit een
aankoopbewijs bij (bijv. kassabon of factuur).
Gezien ons streven naar voortdurende verdere productontwikkeling behouden wij ons het recht voor,
zonder voorafgaande kennisgeving wijzigingen aan te
brengen aan product, verpakking en documentatie
.
nen en waarborgt dat de apparatuur wordt gerecycled op een manier die de volksgezondheid en het
milieu beschermt. Voor meer informatie over waar u
uw afval kunt inleveren voor recycling kunt u contact
opnemen met uw lokale afvalverwerkingsbedrijf. De
fabrikant en importeurs nemen geen verantwoordelijkheid voor de recycling, behandeling en ecologische
verwijdering, hetzij rechtstreeks of via een openbaar
systeem
.
38
Page 39

Szanowny Kliencie,
Dziękujemy za zakup urządzenia firmy Hendi. Prosimy o uważne zapoznanie się z niniejszą instrukcją przed
podłączeniem urządzenia, aby uniknąć uszkodzeń spowodowanych niewłaściwą obsługą. Należy zwrócić
szczególną uwagę na zasady bezpieczeństwa.
WAŻNE ZASADY BEZPIECZEŃSTWA
• Nieprawidłowa obsługa i niewłaściwe użycie mogą spowodować poważne uszkodzenie
urządzenia lub zranienie osób.
• Urządzenie stosuj wyłącznie zgodnie z przeznaczeniem. Producent i/lub Sprzedawca nie
ponosi żadnej odpowiedzialności za szkody spowodowane nieprawidłową obsługą i nie
-
właściwym użytkowaniem urządzenia.
• W czasie użycia zabezpiecz urządzenie i wtyczkę kabla zasilającego przed kontaktem z
wodą lub innymi płynami. W mało prawdopodobnym przypadku zanurzenia urządzenia w
wodzie, natychmiast wyciągnij wtyczkę z kontaktu, a następnie zleć kontrolę urządzenia
specjaliście. Nieprzestrzeganie tej instrukcji może spowodować zagrożenie życia.
• Nigdy nie otwieraj samodzielnie obudowy urządzenia.
• Nie wtykaj żadnych przedmiotów w obudowę urządzenia.
• Nie dotykaj wtyczki kabla zasilającego wilgotnymi rękami.
• Ryzyko porażenia prądem! Regularnie kontroluj stan wtyczki i kabla. W przypadku wy
krycia uszkodzenia wtyczki lub kabla, zleć naprawę w wyspecjalizowanym punkcie naprawczym.
PL
• Nigdy nie używaj uszkodzonego urządzenia! W przypadku, gdy urządzenie spadnie lub
ulegnie uszkodzeniu w inny sposób, przed dalszym użyciem zawsze zleć przeprowadze
nie kontroli i ewentualną naprawę w wyspecjalizowanym punkcie naprawczym.
• Ostrzeżenie! Nie zanurzaj elektrycznych części urządzenia w wodzie lub w innych pły
nach. Nigdy nie trzymaj urządzenia pod bieżącą wodą.
• Nigdy nie naprawiaj urządzenia samodzielnie może to spowodować zagrożenie życia.
• Chroń kabel zasilający przed kontaktem z ostrymi lub gorącymi przedmiotami i chroń go
przed otwartym ogniem. Jeżeli chcesz odłączyć urządzenie z kontaktu, zawsze chwytaj
za wtyczkę, nigdy nie ciągnij za kabel.
• Zabezpiecz kabel (lub przedłużacz), aby nikt przez omyłkę nie wyciągnął go z kontaktu
ani się o niego nie potknął.
• Urządzenie powinno być używane tylko do celów, dla których zostały pierwotnie zapro
-
jektowane.
• Kontroluj funkcjonowanie urządzenia w czasie użytkowania.
• Dzieci nie uświadamiają sobie zagrożeń, jakie może spowodować użycie urządzeń elek
trycznych. Nigdy nie pozwalaj dzieciom posługiwać się elektrycznymi urządzeniami gospodarstwa domowego bez nadzoru.
• Gdy urządzenie nie jest używane oraz zawsze przed czyszczeniem, odłącz je od źródła
zasilania, wyciągając wtyczkę z kontaktu.
• Uwaga! Jeżeli wtyczka kabla zasilającego jest podłączona do kontaktu, urządzenie cały
39
Page 40

czas pozostaje pod napięciem.
• Wyłącz urządzenie, zanim wyciągniesz wtyczkę z kontaktu.
• Nigdy nie przenoś urządzenia za kabel zasilający.
• Nie używaj akcesoriów innych niż dostarczone z urządzeniem.
• Urządzenie można podłączać wyłącznie do gniazda o napięciu i częstotliwości zgodnej z
danymi znajdującymi się na tabliczce znamionowej.
• Unikaj przeciążenia.
• Po użyciu wyłącz urządzenie wyjmując wtyczkę z gniazda.
• Instalacja elektryczna musi odpowiadać krajowym i lokalnym przepisom.
• Z urządzenia nie mogą korzystać osoby (także dzieci), u których stwierdzono osłabione
zdolności fizyczne, sensoryczne lub umysłowe, albo którym brakuje odpowiedniej wiedzy
i doświadczenia, chyba że odbywa się to pod nadzorem lub zgodnie z instrukcjami osoby
odpowiedzialnej za ich bezpieczeństwo.
Szczególne zasady bezpieczeństwa
• To urządzenie jest profesjonalną maszyną do przetwarzania żywności, przeznaczoną wyłącznie do krojenia artykułów spożywczych, jak mięso, ser, kiełbasa, chleb itp. Żywność
musi być rozmrożona, rozpakowana i bez kości, żeby można ją pokroić za pomocą tego
urządzenia. Wykorzystanie urządzenia do innych celów może doprowadzić do jego uszko
dzenia lub obrażeń ciała.
• Urządzenie nie powinno być wykorzystywane do cięcia lub krojenia mrożonej żywności,
mięsa z kością, ryb lub innych produktów niespożywczych itp.
PL
• Urządzenia należy używać tylko w sposób opisany w tej instrukcji.
• Urządzenie powinno być obsługiwane przez przeszkolony personel w kuchni restauracji,
pracowników barów i stołówek itp.
• Nie należy umieszczać urządzenia na obiektach grzewczych (kuchenka elektryczna, na
węgiel drzewny, benzynę itp.). Należy trzymać urządzenie z dala od gorących powierzchni
i otwartego ognia. Zawsze należy używać urządzenia na równej, stabilnej, czystej, odpor
nej na wysoką temperaturę i suchej powierzchni.
• Urządzenie nie jest przeznaczone do pracy przy użyciu zewnętrznego zegara lub oddziel
nego systemu zdalnego sterowania.
•
Wraz z urządzeniem dostarczony jest przewód wyrównania potencjałów, umożliwia-
jący łączenie krzyżowe z innymi urządzeniami.
-
-
-
• Nigdy nie należy omijać żadnych zabezpieczeń urządzenia.
• OSTRZEŻENIE: Nie należy zasłaniać żadnych otworów wentylacyjnych urządzenia.
• OSTRZEŻENIE: ZAWSZE należy wyłączać urządzenie i odłączać od zasilania przed czysz
-
czeniem, konserwacją lub przechowywaniem.
• OSTRZEŻENIE: ZAWSZE należy trzymać ręce, długie włosy i ubrania z dala od ruchomych
części urządzenia.
• OSTRZEŻENIE: Należy zachować szczególną ostrożność podczas posługiwania się
ostrzem tnącym. W razie potrzeby należy założyć rękawice ochronne (brak w zestawie).
40
Page 41
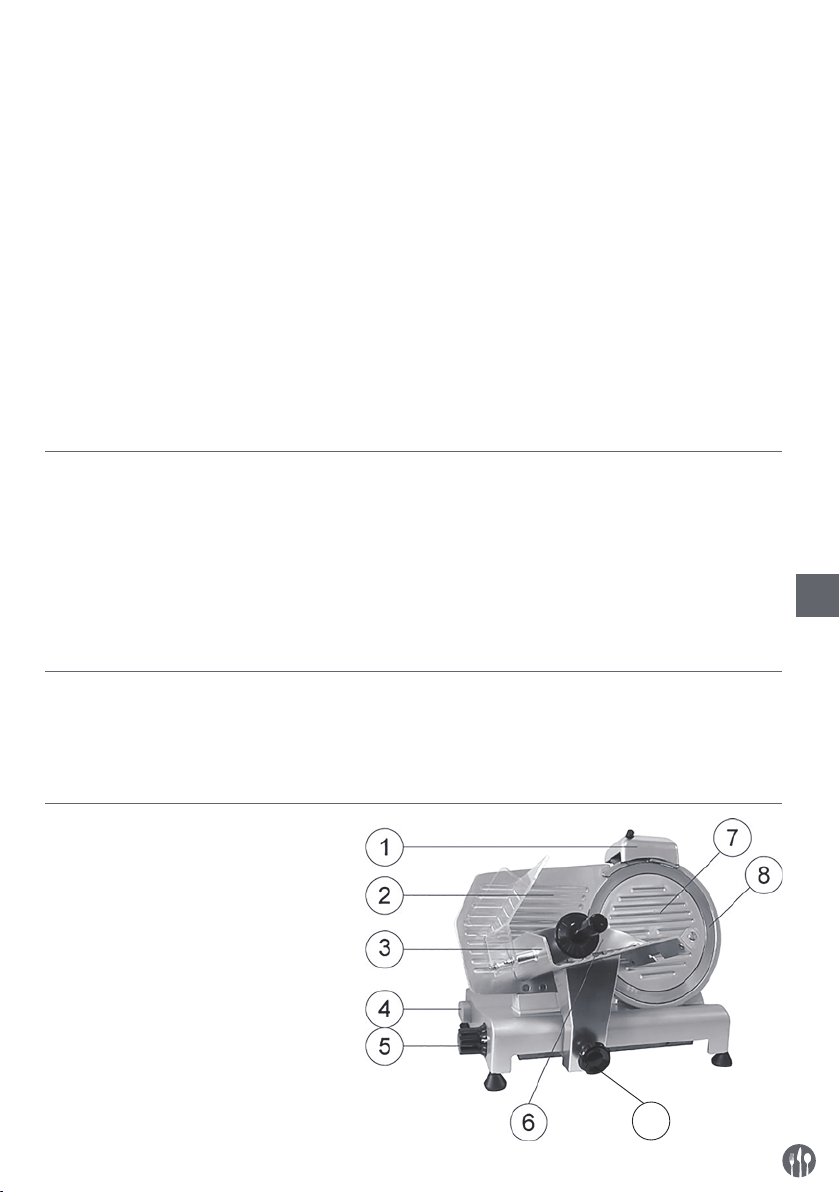
• Dla celów wentylacyjnych podczas użytkowania należy zostawić co najmniej 15 cm wolnej
przestrzeni wokół urządzenia.
• Uwaga! Jeśli to konieczne, należy bezpiecznie poprowadzić przewód zasilający, aby zapo
-
biec niezamierzonemu pociągnięciu lub kontaktowi z powierzchnią grzewczą.
• Nie należy myć urządzenia wodą lub strumieniem wody. Mycie wodą może spowodować
wyciek i zwiększyć ryzyko porażenia prądem. Żadne części urządzenia nie są przeznaczo
-
ne do mycia w zmywarce.
• Nie należy czyścić ani umieszczać urządzenia w miejscu przechowywania, dopóki nie
zostanie całkowicie schłodzone.
• Nie należy przesuwać urządzenia, gdy jest ono używane. Przed przenoszeniem należy
odłączyć urządzenie i przytrzymać je od spodu.
• Ze względu na dużą wagę urządzenia, podczas jego przenoszenia lub transportu należy
zachować szczególną ostrożność. Urządzenie należy przenosić co najmniej w 2 osoby lub
przy pomocy wózka. Urządzenie należy przenosić powoli, ostrożnie i nigdy nie przechylać
go o więcej niż 45°.
Przeznaczenie
• Urządzenie przeznaczone jest do zastosowania
profesjonalnego i powinno być obsługiwane wyłącznie przez wykwalifikowany personel.
• Urządzenie jest przeznaczone tylko do krojenia
artykułów spożywczych, np. mięsa, sery, pieczywo itp. Użycie urządzenia w jakimkolwiek innym
celu może prowadzić do jego uszkodzenia lub do
obrażeń ciała.
• Wykorzystanie urządzenia w jakimkolwiek innym
celu uznane będzie za wykorzystanie niezgodne
z przeznaczeniem. Użytkownik będzie wyłącznie
odpowiedzialny za nieprawidłowe wykorzystanie
urządzenia.
PL
Montaż uziemienia
Piec jest urządzeniem I klasy ochronności i wymaga uziemienia. Uziemienie zmniejsza ryzyko
porażenia prądem, dzięki zastosowaniu przewodu
odprowadzającego prąd elektryczny. Urządzenie
Główne części urządzenia
1 Ostrzałka
2 Krawędź boczna wózka
3 Wózek
4 Włącznik
[Białe (I): Włączone;
Czarne (O): Wyłączone]
5 Pokrętło grubości krojenia
6 Dociskacz produktu
7 Osłona osi
8 Ostrze
9 Blokada wózek
10 Wkręt osłony ostrza
(niewidoczny na zdjęciu)
wyposażone jest w przewód z uziemieniem z wtykiem uziemiającym. Nie wkładaj wtyczki do gniazdka, jeśli urządzenie nie zostało odpowiednio zainstalowane i uziemione.
9
41
Page 42
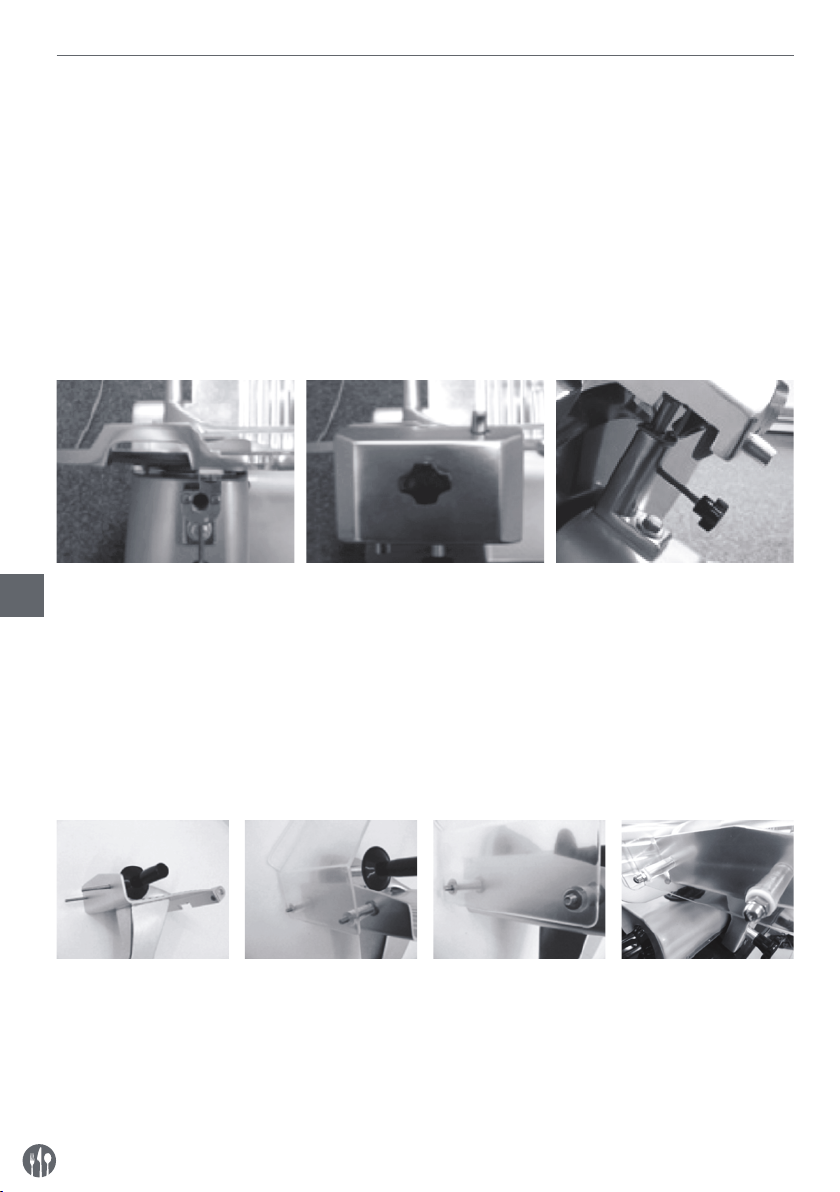
Przed pierwszym użyciem
• Upewnij się, że nie brakuje żadnych części. W
przeciwnym razie, skontaktuj się z dostawcą.
• Usuń materiał opakowania.
• Należy sprawdzić, czy urządzenie jest kompletne
i czy nie zostało uszkodzone podczas transportu.
W przypadku braku części lub uszkodzenia należy natychmiast skontaktować się z dostawcą. NIE
wolno używać urządzenia. (Zobacz ==> Gwarancja).
• Wyczyść ostrze. Uwaga: jest ono bardzo ostre! (W
razie potrzeby należy korzystać z rękawic, brak
w zestawie)
• Pozostaw wolną przestrzeń min.10 cm wokół
urządzenia, aby zapewnić odpowiednią wentylację.
• Ustaw urządzenie w taki sposób, aby umożliwić
swobodny dostęp do wtyczki.
• Jeśli ostrzałka nie jest zamontowana, postępuj
zgodnie z poniższymi wskazówkami:
1. Widok z góry 2. Zamontuj moduł ostrzałki w
PL
taki sposób, aby ostrze nie poruszało się między kamieniami ostrzącymi.
3. Zaciśnij uchwyt, aby ostrzałka pozostała nieruchomo na
miejscu. Przed użyciem urządzenia upewnij się, że ostrzałka jest stabilnie zamontowana.
UWAGA! Ostrzałka została wyposażona w wyłącznik bezpieczeństwa. W przypadku gdy nie jest zamontowana w odpowiedni sposób, korzystanie z urządzenia będzie niemożliwe.
• Zamontuj osłonę zabezpieczającą dłonie.
1. Umieść dwie śruby
w wózku.
2. Zamocuj osłonę
zabezpieczającą.
3. Umieść dwie podkładki na śrubach.
4. Nakręć dwie nakrętki kołpakowe.
UWAGA! Zaleca się, aby nie używać urządzenia, jeśli osłona zabezpieczająca dłonie nie jest zamocowana w
sposób pokazany powyżej! Osłona ma ochronić użytkownika przed odniesieniem obrażeń. Jeśli nie zamontujesz zabezpieczeń, istnieje ryzyko odniesienia obrażeń.
42
Page 43
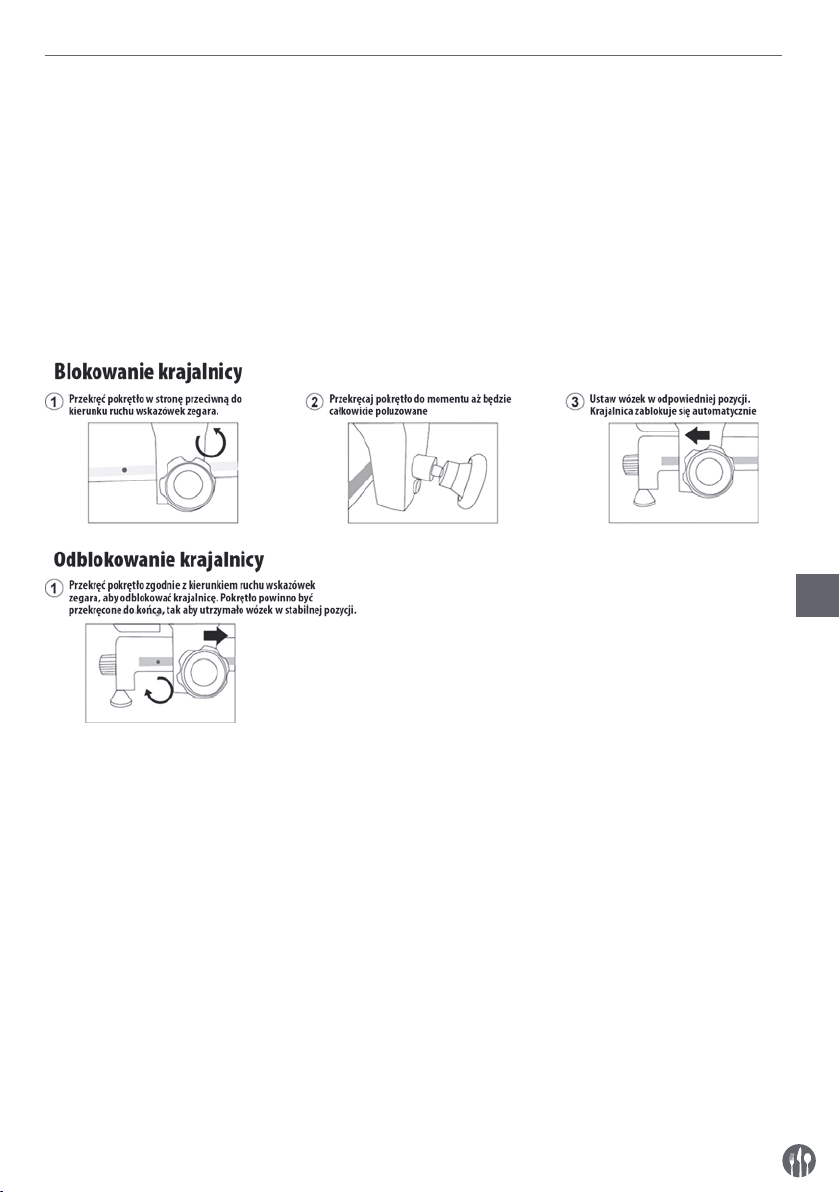
Korzystanie z urządzenia
• Ustaw urządzenie w taki sposób, aby włącznik był
skierowany w stronę użytkownika
• Jeśli ostrzałka nie jest zamontowana, postępuj
zgodnie z poniższymi wskazówkami:
- Zamontuj ostrzałkę we wsporniku w taki spo-
sób, aby ostrze nie wystawało poza kamienie
ostrzące.
- Dokręć śrubę bezpieczeństwa na ostrzałce.
- Uwaga! Jest ono wyposażone w wyłącznik
bezpieczeństwa, który automatycznie wyłączy
urządzenie, jeśli zostanie usunięta ostrzałka.
• Włóż wtyczkę do gniazda sieciowego.
• Przekręć pokrętło ze skalą i ustaw wymaganą
grubość krojenia.
• Włączyć urządzenie, naciskając „BIAŁY (I)” przycisk przełącznika WŁ./WYŁ.
• Połóż produkt na wózku i ustaw dociskacz tak,
aby stabilnie utrzymał produkt na miejscu.
Upewnij się, że produkt przylega do krawędzi
bocznej wózka.
• Po pokrojeniu produktu wyłączyć urządzenie,
naciskając „CZARNY (O)” przycisk przełącznika
WŁ./WYŁ.
• Ustaw pokrętło z powrotem na pozycję “0”.
PL
43
Page 44
Ostrzenie
Jeśli ostrze jest stępione, należy je naostrzyć.
Ostrze jest niezwykle wytrzymałe. Jeśli jest eksploatowane w regularny i odpowiedni sposób, wystarczy je naostrzyć raz do roku.
• Wyciągnij wtyczkę z gniazdka sieciowego
• Ustaw pokrętło grubości krojenia na pozycję “0”.
• Wyczyść ostrze.
• Odkręć pokrętło blokujące ostrzałkę.
• Podnieś ostrzałkę z elementu blokującego i obróć
ją o 180°.
• Kamień ostrzący powinien znajdować się po obu
stronach ostrza.
• Opuść ostrzałkę do momentu aż zablokuje się w
elemencie blokującym.
• Zabezpiecz ostrzałkę w danej pozycji przykręcając pokrętło blokujące.
• Włącz urządzenie. Ostrze zacznie się obracać.
• Użyj przycisku, aby docisnąć pochyły kamień
ostrzący do ostrza i utrzymaj go w takiej pozycji
przez 2 minuty. Kamień ostrzący powinien obracać się razem z ostrzem.
Czyszczenie i konserwacja
PL
• Uwaga: Przed czyszczeniem i przechowywaniem
urządzenia zawsze należy odłączyć je od źródła
zasilania i zaczekać, aż będzie całkowicie schłodzone. Dodatkowo, należy ustawić pokrętło grubości plastra w pozycji „0”.
• Czyścić urządzenie po każdym użyciu.
• UWAGA: Nie zanurzaj urządzenia w wodzie lub
jakiejkolwiek innej cieczy!
• Powierzchnie czyść wilgotną ściereczką (z wodą i
łagodnym środkiem czyszczącym).
• Nie używaj żrących lub ściernych środków chemicznych. Nie używaj ostrych narzędzi. Nie używaj benzyny ani rozpuszczalników. Urządzenie
czyść wilgotną ściereczką z dodatkiem płynu do
mycia naczyń (jeśli wystąpi taka potrzeba).
• Użyj przycisku, aby lekko docisnąć pionowy kamień ostrzący do ostrza w celu usunięcia zadziorów. Kamień ostrzący powinien obracać się
razem z ostrzem.
• Wyłącz urządzenie i wyciągnij wtyczkę z gniazdka
sieciowego.
• Odkręć pokrętło blokujące ostrzałkę i wyczyść
kamienie ostrzące przy użyciu alkoholu.
• Ułóż ostrzałkę z powrotem na urządzeniu w pozycji wyjściowej i dokręć pokrętło blokujące, aby pozostała nieruchomo na miejscu. Ostrze nie może
wystawać pomiędzy kamieniami ostrzącymi.
• Zanurzyć w ciepłej, lekko namydlonej wodzie
przez kilka minut. Dokładnie wypłukać i osuszyć.
• Włożyć wtyczkę do gniazdka elektrycznego. Postępować bardzo ostrożnie.
• Urządzenie jest gotowe do pracy.
• Zanurzyć w ciepłej, lekko namydlonej wodzie
przez kilka minut. Dokładnie wypłukać i osuszyć.
• Postępować bardzo ostrożnie.
• W przypadku gdy wózek utrzymujący produkt
nie działa płynnie, ustaw urządzenie na boku.
Ostrożnie wyczyść pręt, po którym porusza się
wózek i nasmaruj go wazeliną.
Przechowywanie
• Przed schowaniem urządzenia należy upewnić
się, że zostało odłączone od gniazdka elektrycznego i jest całkowicie schłodzone.
44
• Urządzenie należy przechowywać w chłodnym,
czystym i suchym miejscu.
Page 45
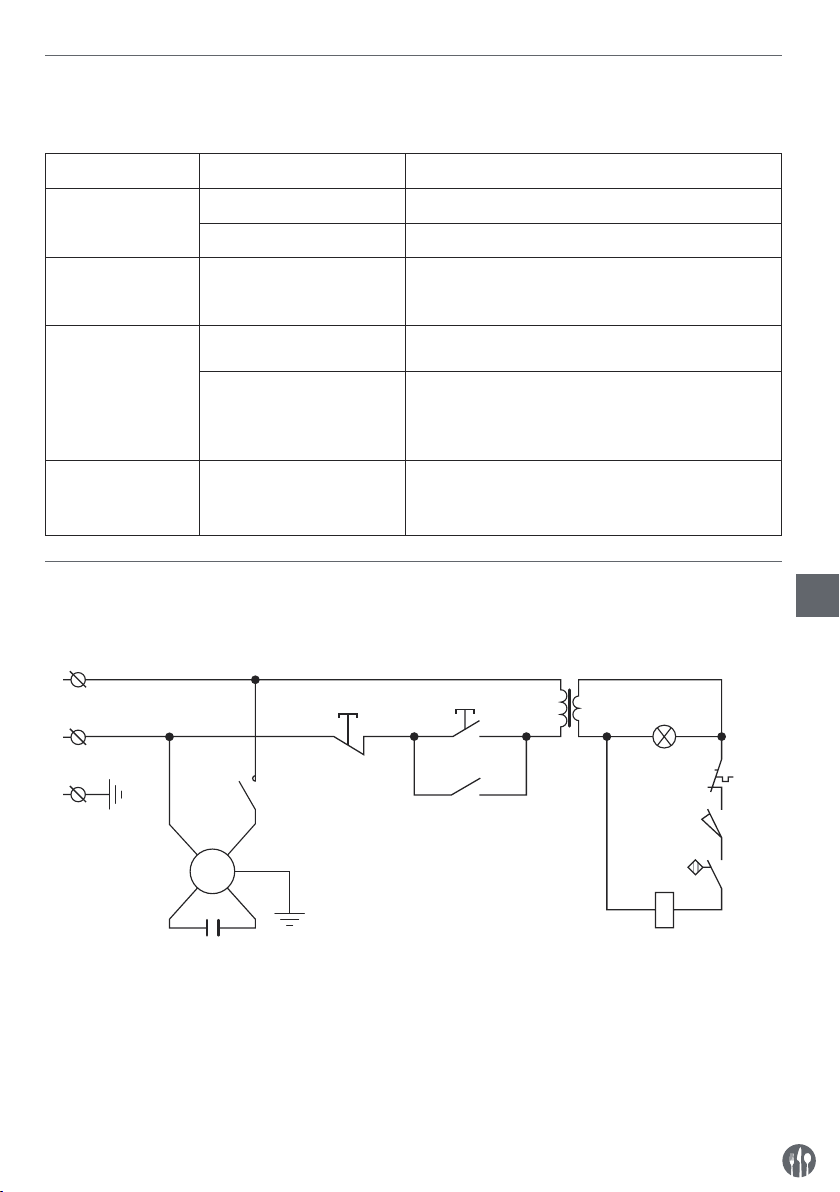
Rozwiązywanie problemów
Jeżeli urządzenie nie działa prawidłowo, spróbuj znaleźć rozwiązanie w poniższej tabeli. Jeżeli nadal nie
możesz rozwiązać problemu, należy skontaktować się z dostawcą/dostawcą usługi.
Problem Możliwa przyczyna Rozwiązanie
Urządzenie kroi
nierówno
Stępione ostrze Ostrze wymaga naostrzenia
Brudne urządzenie Wyczyść urządzenie
Urządzenie nie kroi Silnik się przegrzał Zostaw maszynę do ostygnięcia na dłuższy czas.
Termostat bezpieczeństwa na silniku, automatycz-
nie zresetuje się.
Wózek się nie
przesuwa
Zabrudzony pręt, po którym
porusza się wózek.
Części żywności przyklejają
się do ostrza.
Reinig de glijstang en smeer met vaseline
Wyłączyć urządzenie i odłączyć je od zasilania. Za-
czekać, aż się całkowicie zatrzyma. Usunąć wszel-
kie przeszkadzające fragmenty żywności. Wytrzeć
ostrze wilgotną szmatką.
Ostrze przestaje się
obracać podczas
Zużyty lub zabrudzony
pasek napędowy
Skontaktować się z dostawcą
krojenia produktu
Schemat obwodu dla 210000, 210017, 210031, 210048
Napięcie wejściowe AC: AC220-240V 50Hz
N
SB1
SB2
T
L
PE
KC HL
KC
PL
ST
M
PE
C
M : Silnik
T : Transformator
C : Kondensator
PE : Przewód ochronny (uziemienie)
L : Przewód fazowy
N : Przewód neutralny
KM
SB1, SB2 : Włącznik
KC : Przekaźnik
HL : Żarówka
ST : Bezpiecznik termiczny
SQ1, SQ2 : Mikro włącznik
SQ1
SQ2
45
Page 46
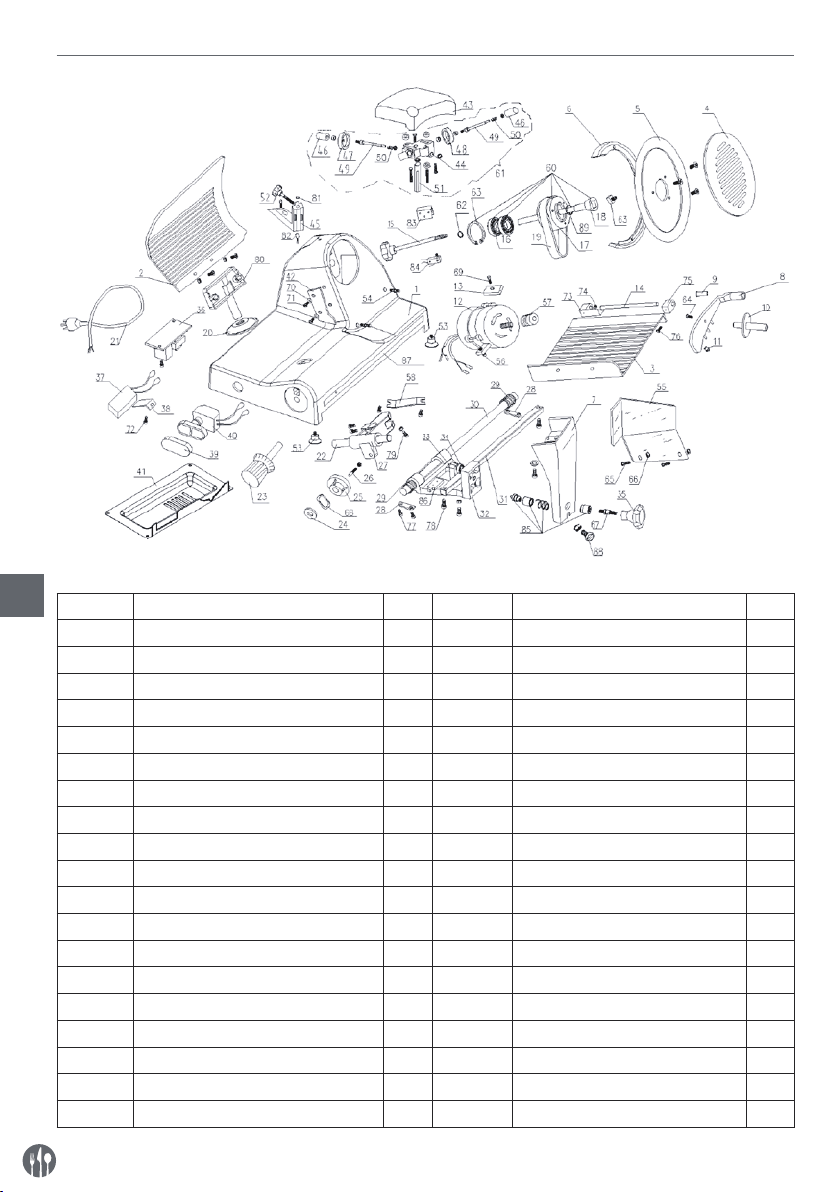
Lista części (część nr : 210000, 210031, 210048)
PL
Nr części Nazwa części Ilość Nr części Nazwa części Ilość
1 Obudowa 1 20 Przykrycie suwaka 1
2 Aktywna deska 1 21 Przewód zasilania 1
3 Taca na żywność 1 22 Oś suwaka 1
4 Tarcza ochronna ostrza 1 23 Pokrętło z podziałką 1
5 Ostrze 1 24 Uszczelka sprężynowa 1
6 Pierścień ochronny ostrza 1 25 Krzywka 1
7 Wspornik tacy 1 26 Oś krzywki 1
8 Stałe ramię do żywności 1 27 Suwak 1
9 Tuleja stałego ramienia 1 28 Podkładka osi suwaka 2
10 Rączka stałego ramienia 1 29 Sprężyna osi wózka 2
11 Plastikowa granulka 1 30 Oś wózka 1
12 Silnik 1 31 Oś czworoboczna 1
13 Podkładka silnika 1 32 Wózek 1
14 Bolec stałego ramienia Ø12×185 1 33 Wkręt sześciokątny M8 × 35 1
15 Wkręty osłony ostrza 1 34 Łożysko kulkowe 607 1
16 Łożysko kulkowe 6202 2 35 Pokrętło pokrywy wózka 1
17 Rolka ostrza Ø66 1 36 Przekaźnik 1
18 Bolec rolki 1 37 Kondensator 1
19 Pasek SV.330 2 38 Osłona kondensatora 1
46
Page 47

Nr części Nazwa części Ilość Nr części Nazwa części Ilość
39 Przykrycie przycisku 1 65 Bolec rączki stałego ramienia 1
40 Przełącznik przycisku 1 66 Śruba przegrody 2
41 Płyta główna 1 67 Nakrętka przegrody 2
42 Skrobaczka do mięsa 1 68 Śruba pokrętła wspornika 1
43 Przykrycie ostrzarki 1 69 Podkładka uszczelki sprężynowej 1
44 Podstawa ostrzarki 1 70 Śruba silnika 1
45 Podstawa ostrzarki 1 71 Podkładka skrobaczki mięsa 2
46 Przycisk ostrzarki 2 72 Śruba skrobaczki mięsa 2
47 Drobno szlifujące kółko Ø45 1 73 Śruba mocująca wspornik konden-
48 Grubo szlifujące kółko Ø45 1 74 Pokrywa łożyska tacy A 1
49 Bolec ostrzarki 2 75 Wspornik deski do mięsa 1
50 Sprężyna 2 76 Pokrywa łożyska tacy B 1
51 Bolec wspornika ostrzarki 1 77 Śruba M6×12 2
52 Pokrętło dokręcania ostrzarki 1 78 Śruba podkładki osi suwaka 4
53 Trzpień aktywnej deski 1 79 Śruba blokująca osi czworobocznej 2
54 Gumowa stopka 4 80 Śruba do regulacji suwaka 1
55 Bolec pierścienia ochronnego ostrza 2 81 Magnes 1
56 Płytka blokująca mięso 1 82 Przełącznik magnesu 1
57 Wspornik osi suwaka 2 83 Blok aluminiowy 1
58 Mała rolka silnika 1 84 Mikro włącznik 1
59 Sterownik suwaka 1 85 Zamek ze stali nierdzewnej 1
60 Montaż rolki 1 86 Ogranicznik 1
61 Ustawienie ostrzenia 1 87 Listwa ze stali nierdzewnej 1
62 Ø15 Uszczelka sprężynowa do łożyska 1 88 Śruba wspornika podajnika 1
63 Ø15 Uszczelka sprężynowa do łożyska 1 89 Uszczelka olejowa 1
64 Kwadratowa nakrętka tarczy ochron-
nej ostrza
1
satora
1
PL
47
Page 48
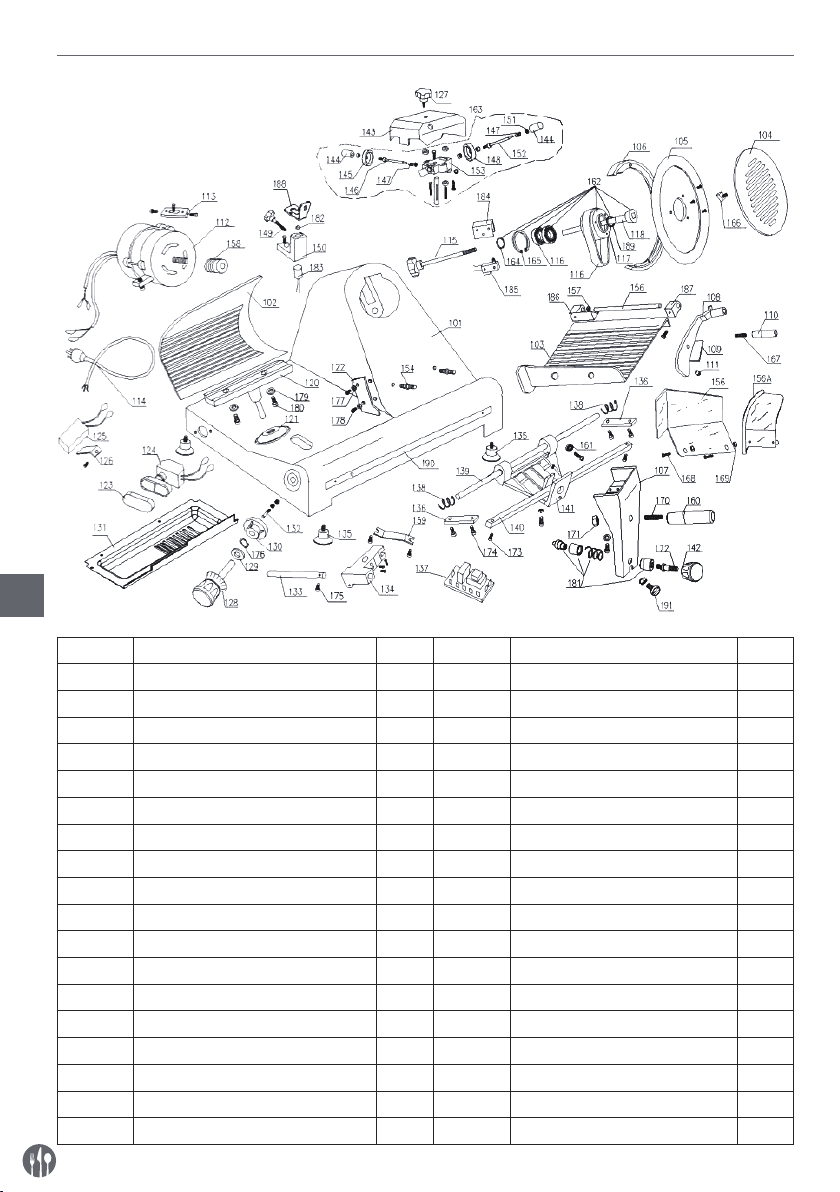
Lista części (część nr : 210017)
PL
Nr części Nazwa części Ilość Nr części Nazwa części Ilość
101 Obudowa 1 119 Pasek SV.400 2
102 Aktywna deska 1 120 Podstawa wspierająca 1
103 Taca na żywność 1 121 Izolacja przewodu 1
104 Tarcza ochronna ostrza 1 122 Skrobaczka do mięsa 1
105 Ostrze 1 123 Przykrycie przycisku 1
106 Pierścień ochronny ostrza 1 124 Przełącznik przycisku 1
107 Wspornik tacy 1 125 Kondensator 1
108 Stałe ramię do żywności 1 126 Osłona kondensatora 1
109 Tuleja stałego ramienia 1 127 Śruba osi 1
110 Uchwyt 1 128 Pokrętło z podziałką 1
111 Plastikowa granulka 1 129 Uszczelka sprężynowa 1
112 Silnik 1 130 Krzywka 300 1
113 Podkładka silnika 1 131 Płyta główna 1
114 Przewód zasilania 1 132 Bolec krzywki 1
115 Wkręty osłony ostrza 1 133 Oś suwaka 1
116 Łożysko kulkowe 6204 2 134 Suwak 1
117 Rolka 1 135 Gumowa stopka 4
118 Bolec rolki 1 136 Podkładka osi suwaka 2
48
Page 49

Nr części Nazwa części Ilość Nr części Nazwa części Ilość
137 Przekaźnik 1 165 Ø 47 Uszczelka sprężynowa 1
138 Sprężyna osi suwaka 2 166 Kwadratowa nakrętka tarczy
139 Oś suwaka wózka 1 167 Bolec rączki stałego ramienia 1
140 Oś czworoboczna 1 168 Śruba przegrody 2
141 Wózek 1 169 Nakrętka przegrody 2
142 Przycisk wózka 1 170 Śruba pokrętła wspornika 1
143 Przykrycie ostrzarki 1 171 Nakrętka pokrętła wspornika 1
144 Przycisk 2 172 Dolna śruba wspornika 1
145 Drobno szlifujące kółko Ø45 1 173 Śruba blokująca osi czworobocznej 2
146 Bolec kółka czyszczącego 2 174 Śruba podkładki osi suwaka 4
147 Sprężyna kółka czyszczącego 2 175 Śruba osi suwaka 1
148 Grubo szlifujące kółko Ø45 2 176 Podkładka uszczelki sprężynowej
149 Pokrętło dokręcania ostrzarki 1 177 Podkładka skrobaczki mięsa 2
150 Podstawa zewnętrznego pierścienia 1 178 Śruba skrobaczki mięsa 1
151 Kółko Ø 4,751 1 179 Podkładka podstawy 2
152 Bolec ostrzarki 1 180 Śruba podstawy 2
153 Podstawa ostrzarki 1 181 Zamek ze stali nierdzewnej 1
154 Bolec pierścienia ochronnego ostrza 2 182 Magnes 1
155 Bolec tacy na żywność 1 183 Przełącznik magnesu 1
156/156A Płytka blokująca mięso 1 184 Ogranicznik 1
157 Wspornik osi suwaka 1 185 Mikro włącznik 1
158 Mała rolka silnika 1 186 Pokrywa łożyska tacy A 1
159 Sterownik suwaka 1 187 Pokrywa łożyska tacy B 1
160 Rączka wózka 1 188 Podkładka podstawy 1
161 Oś suwaka 608 1 189 Uszczelka olejowa 1
162 Montaż rolki 1 190 Listwa ze stali nierdzewnej 1
163 Ustawienie ostrzenia 1 191 Śruba wspornika podajnika 1
164 Ø 20 Uszczelka sprężynowa do łoży-
ska
1
ochronnej ostrza
Ø 12
1
1
PL
49
Page 50
Gwarancja
Każda usterka powodująca złe funkcjonowanie
urządzenia, która ujawni się w ciągu jednego roku
od zakupu, zostanie bezpłatnie usunięta lub urządzenie zostanie wymienione na inne, pod warunkiem, że było użytkowane i konserwowane zgodnie
z instrukcją obsługi i nie było wykorzystywany do
innych celów lub w jakikolwiek inny niewłaściwy
sposób. Nie narusza to innych praw użytkownika,
rzystania z gwarancji, należy podać miejsce i czas
zakupu urządzenia, dołączając do niego dowód zakupu (np. paragon).
Zgodnie z naszą polityką ciągłego udoskonalania
produktów zastrzegamy sobie prawo do wprowadzania zmian w produkcie, opakowaniu oraz specyfikacjach zawartych w dokumentacji bez uprzedniego powiadomienia.
wynikających z przepisów prawa. W przypadku ko-
Wycofanie z użytkowania i ochrona środowiska
Pamiętaj!
Nie wyrzucaj zużytego sprzętu łącznie z innymi odpadami
Nie demontuj zużytych urządzeń zawierających niebezpieczne składniki na własną rękę!
Grożą Ci za to kary grzywny!
Po zakończeniu eksploatacji produktu nie wolno
gromadzić razem z odpadami komunalnymi, tylko
należy odstawić do punktu odbioru odpadów elektrycznych i elektronicznych. Użytkownik ponosi odpowiedzialność za przekazanie wycofanego z użyt-
PL
kowania urządzenia do punktu gospodarowania
odpadami. Nieprzestrzeganie tej zasady może być
karane zgodnie z lokalnie obowiązującymi przepisami dotyczącymi gospodarowania odpadami.
Jeśli urządzenie wycofane z użytkowania jest poprawnie odebrane jako osobny odpad, może zostać
przetworzone i zutylizowane w sposób przyjazny
dla środowiska, co zmniejsza negatywny wpływ na
środowisko i zdrowie ludzi. Aby uzyskać więcej informacji dotyczących dostępnych usług w zakresie
odbioru odpadów, należy skontaktować się z lokalną firmą odbierającą odpady.
Symbol przekreślonego kosza na
śmieci oznacza, że tego produktu nie
wolno wyrzucać do zwykłych pojemników na odpady.
Zużyte urządzenia elektryczne i elektronicznie
mogą zawierać niebezpieczne składniki np. rtęć,
ołów, kadm lub freon. Jeśli tego typu substancje
przedostaną się w sposób niekontrolowany do środowiska, spowodują skażenie wody i gleby, a także
wpłyną niekorzystnie na zdrowie ludzi i zwierząt.
Właściwe postępowanie ze zużytym sprzętem zapobiega potencjalnym negatywnym konsekwencjom
dla środowiska naturalnego i ludzkiego zdrowia.
Jednocześnie oszczędzamy naturalne zasoby naszej Ziemi wykorzystując powtórnie surowce uzyskane z przetwarzania sprzętu.
50
Page 51

Cher client,
Merci d’avoir acheté cet appareil de Hendi. Veuillez lire attentivement ce mode d’emploi avant de brancher
l’appareil afin d’éviter tout endommagement pour cause d’usage abusif. Veuillez notamment lire les consignes
de sécurité avec la plus grande attention.
Règles de sécurité
• L’utilisation abusive et le maniement incorrect de l’appareil peuvent entraîner une grave
détérioration de l’appareil ou provoquer des blessures.
• Cet appareil est conçu exclusivement à des fins commerciales et non pour un usage
domestique.
• L’appareil doit être utilisé uniquement pour le but il a été conçu. Le fabricant décline
toute responsabilité en cas de dommage consécutif à un usage abusif ou un maniement
incorrect.
• Veillez à tenir l’appareil et la prise électrique hors de portée de l’eau ou de tout autre li
quide. Si malencontreusement l’appareil tombe dans l’eau, débranchez immédiatement
la prise électrique et faites contrôler l’appareil par un réparateur agréé. La non-observa
tion de cette consigne entraîne un risque d’accident mortel.
• Ne tentez jamais de démonter vous-même le bâti de l’appareil.
• N’enfoncez aucun objet dans la carcasse de l’appareil.
• Ne touchez pas la prise avec les mains mouillées ou humides.
• Risque d’électrocution! Ne tentez jamais de réparer l’appareil. Tous défauts et dysfonc
tionnement doivent être supprimés par le personnel qualifié.
• N’utilisez jamais l’appareil endommagé! Débranchez l’appareil endommagé de l’ali
mentation électrique et contactez votre revendeur.
• Avertissement: N’immergez pas les pièces électriques de l’appareil dans l’eau ou dans
d’autres liquides. Ne mettez pas l’appareil sous l’eau courante.
• Vérifiez régulièrement la fiche et le câble d’alimentation pour les dommages. La fiche
ou le câble d’alimentation endommagé(e) transmettre pour la réparation au service ou
à une personne qualifiée, pour prévenir tous les menaces ou les blessures possibles.
• Assurez-vous que le câble d’alimentation n’est pas en contact avec les objets pointus ou
chauds ; gardez le câble loin des flammes nues. Pour retirer la fiche de la prise murale,
tirez toujours en tenant la fiche et non le câble d’alimentation.
• Protégez le câble d’alimentation (ou la rallonge) contre le débranchement accidentel de
la prise murale. Le câble doit être posé de manière ne provocant pas les chutes acciden
-
telles.
• Surveillez en permanence l’appareil pendant l’utilisation.
• Avertissement ! Si la fiche est insérée dans la prise murale, l’appareil doit être considéré
comme branché à l’alimentation.
• Avant de retirer la fiche de la prise, éteignez l’appareil !
• Ne transportez jamais l’appareil en tenant le câble.
• N’utilisez aucuns accessoires qui n’ont pas été fournis avec l’appareil.
FR
51
Page 52
• L’appareil doit être branché à la prise murale avec une tension et la fréquence indiquées
sur la plaque signalétique.
• Insérez la fiche à la prise murale située dans un endroit facilement accessible de sorte
qu’en cas de panne l’appareil puisse être immédiatement déconnecté. Pour éteindre
complètement l’appareil, débranchez-le de la source d’alimentation. Pour cela, retirez la
fiche à l’extrémité du câble d’alimentation de la prise murale.
• Eteignez l’appareil avant de débrancher l’appareil de la prise!
• N’utilisez jamais les accessoires non recommandés par le fabricant. L’utilisation des ac
cessoires non recommandés peut présenter des risques pour l’utilisateur et provoquer
les dommages à l’appareil. Utilisez uniquement des pièces et accessoires originaux.
• Cet appareil n´est pas apte à être utilisé par des personnes (enfants compris) avec capa
cités physiques, sensorielles ou intellectuelles diminuées ou ne possédant pas l´expérience et les connaissances suffisantes.
• Ne laissez jamais les enfants utiliser l’appareil.
• L’appareil et le câble d’alimentation doivent être stockés hors de la portée des enfants.
• Ne permettez pas aux enfants d’utiliser l’appareil pour jouer
• Débranchez toujours l’appareil de l’alimentation s’il doit être laissé sans surveillance et
également avant le montage, le démontage et le nettoyage.
• Ne laissez jamais l’appareil sans surveillance lorsqu’il est utilisé.
Règles particulières de sécurité
FR
• Cet appareil est une machine de transformation des aliments commerciaux et destiné
uniquement pour le tranchage des aliments, comme par exemple, la viande, le fromage,
les saucisses, le pain, etc. Les aliments à trancher doivent être décongelés, déballés
et exempts d’os avant de procéder au découpage avec l’appareil. Toute autre utilisation
pourrait endommager l’appareil ou causer des dommages corporels.
• Cet appareil ne doit pas être utilisé pour couper ou trancher les aliments surgelés, la
viande non désossée, le poisson ou tous produits non alimentaires, etc.
• Utiliser uniquement l’appareil sous la forme décrite dans ce manuel.
• Cet appareil doit être exploité par le personnel qualifié dans la cuisine du personnel de
restaurant, cantines ou bar, etc.
• Ne pas placer l’appareil sur un objet de chauffage. (essence, cuisinière électrique, à
charbon, etc.) Tenir l’appareil à l’écart de surfaces chaudes et de flammes nues. Toujours
utiliser l’appareil sur une surface plane, stable, propre, résistant à la chaleur et sèche.
• Cet appareil ne peut être utilisé au moyen d’une minuterie externe ou un système de
contrôle à distance séparé.
•
Une borne de liaison équipotentielle est destinée à garantir le collage croisé avec
d’autres équipements.
-
-
• Ne jamais contourner les verrous de sécurité sur l’appareil.
• ATTENTION: Maintenir toutes les ouvertures d’aération de l’appareil libres de toutes
obstructions.
52
Page 53

• ATTENTION: TOUJOURS éteindre l’appareil et débrancher d’une alimentation électrique
avant le nettoyage, l’entretien ou le stockage.
• ATTENTION: TOUJOURS tenez toujours vos mains, cheveux longs et vêtements à l’écart
des parties mobiles.
• ATTENTION: Soyez vigilant lorsque vous manipulez la lame de coupe. Portez des gants
de protection (non fournis) si nécessaire.
• Laissez au moins 15 cm d’espace autour de l’appareil pour la ventilation durant l’utili
-
sation.
• Attention! Placez fermement le cordon d’alimentation, si nécessaire, afin d’éviter une
traction ou un contact involontaire avec la surface chaude.
• Ne pas laver l’appareil avec de l’eau ou un jet d’eau. Le lavage à l’eau peut causer
des fuites et augmenter le risque de choc électrique. Aucune pièce ne peut passer au
lave-vaisselle.
• Ne pas nettoyer ou stocker l’appareil, à moins qu’il ne soit complètement refroidi.
• Ne pas déplacer l’appareil pendant le fonctionnement. Débranchez l’appareil lorsqu’il est
en marche et tenez-le par le bas.
• Soyez particulièrement vigilant lorsque vous déplacez ou transportez l’appareil car il est
très lourd. Au moins 2 personnes ou l’utilisation d’un chariot pour l’assistance. Déplacer
la machine lentement, avec soin et ne jamais incliner à plus de 45°.
Destination de l’appareil
• L’appareil est destiné à un usage professionnel et
ne doit être utilisé que par du personnel qualifié.
• L’appareil est conçu uniquement pour trancher
des aliments, par ex. viande, fromage, pain, etc.
L’utilisation de l’appareil à d’autres fins peut entraîner des dommages ou des blessures.
Mise à la terre
Le four est un appareil de la Ière classe de protection et doit être obligatoirement mis à la terre. La
mise à la terre réduit le risque de choc électrique
grâce à un conduit évacuant le courant électrique.
• L’utilisation de l’appareil à d’autres fins sera
considérée comme une utilisation inappropriée.
L’utilisateur sera seul responsable de l’utilisation
incorrecte de l’appareil.
L’appareil est équipé d’un conduit avec la mise à la
terre et la prise de terre. N’insérez pas la fiche à la
prise murale si l’appareil n’a pas été correctement
installé et mis à la terre.
FR
53
Page 54
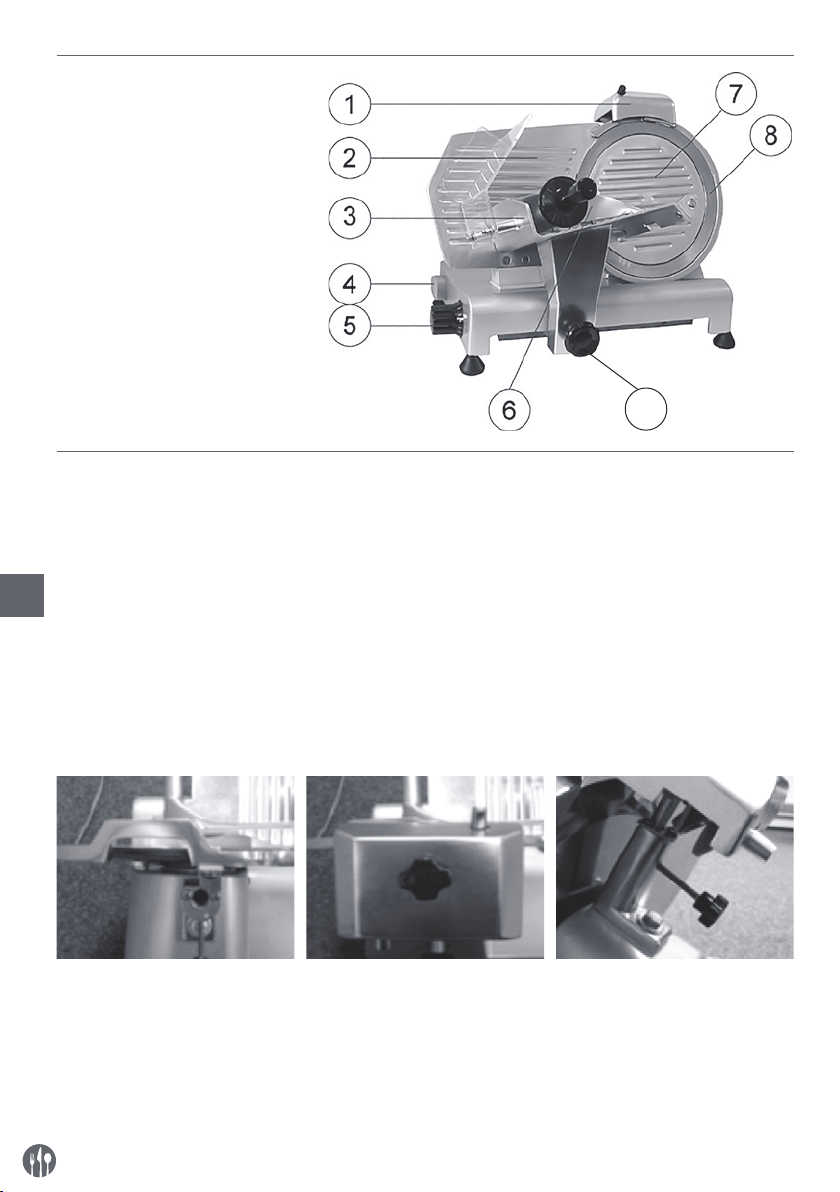
Principales pièces de l’appareil
1 Affûteuse de lame
2 Plaque d´appui
3 Chariot
4 Bouton marche/arrêt
[Blanc (I): ON; Noir (O): OFF]
5 Bouton de réglage d´épaisseur de
tranche
6 Equerre de maintien du produit
7 Plaque couvre-lame
8 Lame
9 Verrou de chariot
10 Boulon de protecteur de lame
(non affiché)
Préparation avant la première utilisation
• Vérifiez que toutes les pièces sont livrées avec
l’appareil. S’il vous manque un élément, prenez
contact avec votre fournisseur.
• Enlevez tout le matériel d’emballage.
• Vérifier intégralement l’appareil et les dommages
FR
liés au transport. En cas de livraison incomplète
ou de dommage, contacter immédiatement le
fournisseur. NE PAS utiliser l’appareil. (Voir ==>
Garantie).
• Nettoyez la lame. Soyez très prudent : la lame est
très tranchante. (Utiliser des gants si nécessaire,
non inclus)
1. Vue de dessus de l´appareil 2. Positionnez le module d´ai-
guisage de sorte que la lame
ne soit pas placée entre les
petites meules
9
• Veillez à ce qu’un espace libre d’au moins 10 cm
demeure autour de l´appareil pour des raisons
de ventilation.
• Installez l´appareil en veillant à ce que la prise
de courant demeure accessible à tout moment.
• Si le dispositif d´aiguisage n´est pas monté, procédez de la façon suivante :
3.
Fixez le dispositif d´aiguisage
sur l´appareil en serrant la molette de fixation. Contrôlez que
le dispositif d´aiguisage est bien
fixé avant d´utiliser l´appareil.
ATTENTION ! Le dispositif d´aiguisage est équipé d´un interrupteur de sécurité. Si le dispositif d´aiguisage
n´est pas installé, vous ne pourrez pas mettre l´appareil en marche
54
Page 55
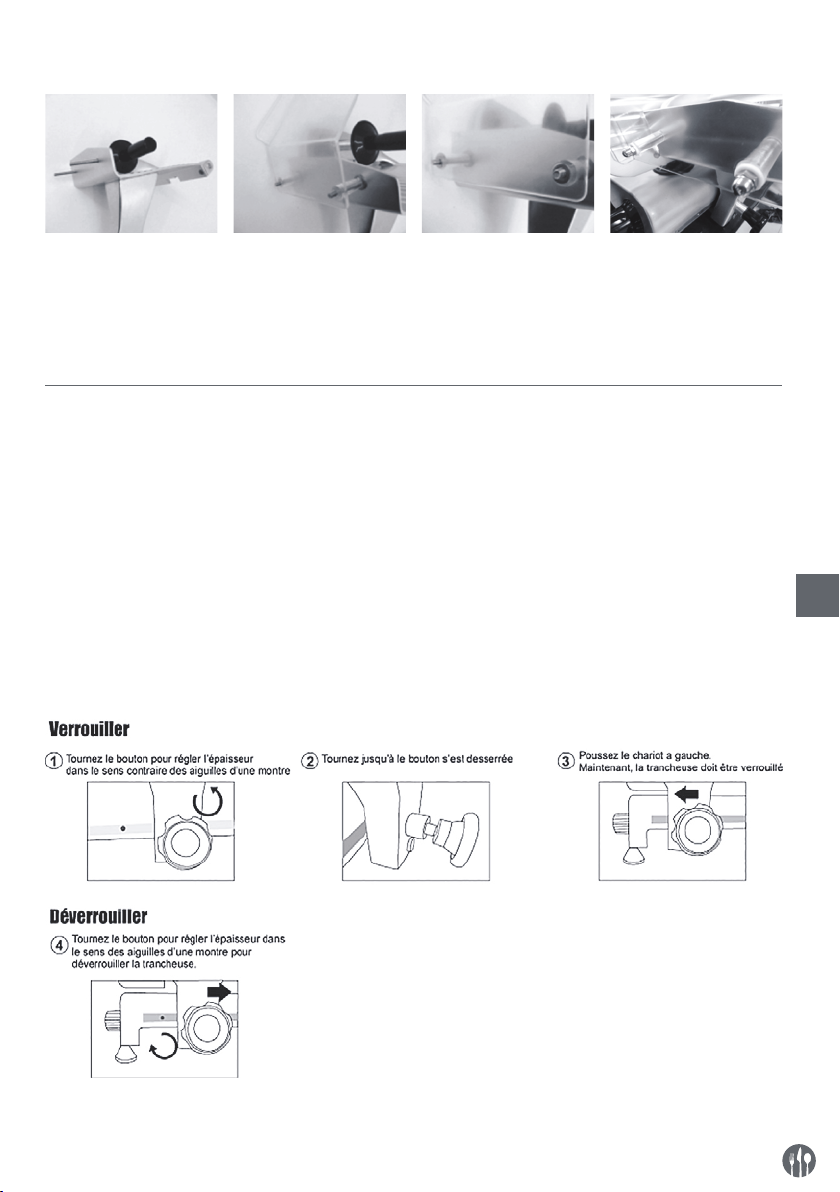
• Montez la plaque de protection
1. Insérez les deux vis
dans le chariot
2. Placez la plaque de
protection
3. Placez les deux rondelles de blocage
4. Serrez les deux
écrous à chapeau
ATTENTION: il est déconseillé d´utiliser l´appareil si celui-ci n´est pas équipé de la plaque de protection
et des pieds montés correctement ! Ce sont des accessoires de sécurité qui protègent contre les blessures
possibles. Si vous ne montez pas ces accessoires, il existe un risque de blessure pour l´utilisateur.
Mode d’emploi
• Placez la machine de façon à ce que le bouton
marche/arrêt soit face à l’utilisateur.
• Si l’affûteuse n’est pas installée, procéder de la
façon suivante :
- Placez l´affûteuse dans son support en veillant
à ce que la lame ne tourne pas entre les affiloirs.
- Serrez la vis de sécurité de l´affûteuse.
- ATTENTION ! Utilisation sans l’équipement de
meulage est dangereux ! HENDI vous conseille
que vous utilisez la machine seulement avec
équipement monté
• Branchez la fiche dans la prise murale.
• Ajustez l’épaisseur de tranche désirée en tournant le bouton gradué.
• Allumez l’appareil en appuyant sur le bouton
“Blanc (I)” de l’interrupteur ON/OFF.
• Placez l´aliment à trancher sur le chariot. Bloquez le produit avec l´équerre de maintien.
Veillez à ce que le produit repose sur la plaque
d´appui.
• Après le tranchage du produit, éteignez l’appareil
en appuyant sur le bouton “Noir (O)” de l’interrupteur ON/OFF.
• Remettez le bouton de réglage d´épaisseur en
position “0”.
FR
55
Page 56

Affûtage de la lame
À effectuer lorsque la lame est émoussée. Il faut
noter que la lame est en matériau à très haute résistance. Lorsqu’elle est utilisée régulièrement et
correctement, elle ne nécessite donc d’être affûtée
qu’une fois par an.
• Débranchez la fiche de la prise murale.
• Mettez le bouton de réglage d´épaisseur sur “0”
• Nettoyez la lame.
• Desserrez le bouton de sûreté de l´affûteuse.
• Tirez l´affûteuse vers le haut et faites-la pivoter
à 180°.
• Laissez redescendre l´affûteuse jusqu´à ce le
dispositif de verrouillage s’enclenche.
• Fixez l´affûteuse en serrant le bouton de sûreté.
• Mettez la machine en marche. La lame se met
à tourner.
• Appuyez sur le bouton pour que l´affiloir incliné
vienne au contact de la lame et maintenez l´affiloir dans cette position pendant 2 minutes. L´affiloir doit tourner avec la lame.
Nettoyage et entretien
• Attention: Débranchez toujours l’appareil d’une
FR
prise électrique et laissez-le refroidir complètement avant le nettoyage et le stockage et réglez
le bouton de l’épaisseur des tranches sur la position “0”.
• Nettoyez l’appareil après chaque utilisation.
• Attention : Ne plongez jamais l´appareil dans
l´eau ou dans tout autre liquide !
• Nettoyez l’extérieur de la machine avec un chiffon humide (eau avec détergent doux).
• N´utilisez jamais de détergent agressif ni de
poudre à récurer. N´utilisez jamais d´objet tranchant ou pointu. N´utilisez jamais d´essence ou
de solvant ! Nettoyez toujours avec un chiffon
humide et éventuellement un peu de liquide vaisselle, mais n´employez jamais de produit abrasif.
• Appuyez sur le bouton pour que l´affiloir vertical
vienne au contact de la lame un court instant afin
d´enlever les bavures produites par l´affûtage.
L´affiloir doit tourner avec la lame.
• Arrêtez la machine et débranchez la prise électrique.
• Desserrez le bouton de sûreté de l´affûteuse et
nettoyez les affiloirs avec de l’alcool.
• Remettez l’affûteuse dans sa position d´origine
sur la machine et serrez le bouton de sûreté. La
lame ne doit pas tourner entre les affiloirs.
• Immergez dans de l’eau chaude, au savon doux
durant plusieurs minutes. Rincez et séchez complètement.
• Branchez dans la prise électrique murale. Manipulez avec grand soin.
• La machine est de nouveau prête à l´emploi.
• Immergez dans de l’eau chaude, au savon doux
durant plusieurs minutes. Rincez et séchez complètement.
• Manipulez avec grand soin.
• Si le chariot se déplace avec difficulté, couchez
la trancheuse sur le flanc. Nettoyez avec précaution la barre coulissante et lubrifiez-la avec de
la vaseline.
Stockage
• Avant le stockage, veillez systématiquement à
ce que l’appareil soit déjà débranché d’une prise
électrique et complètement refroidi.
56
• Stockez l’appareil dans un endroit frais, propre
et sec.
Page 57
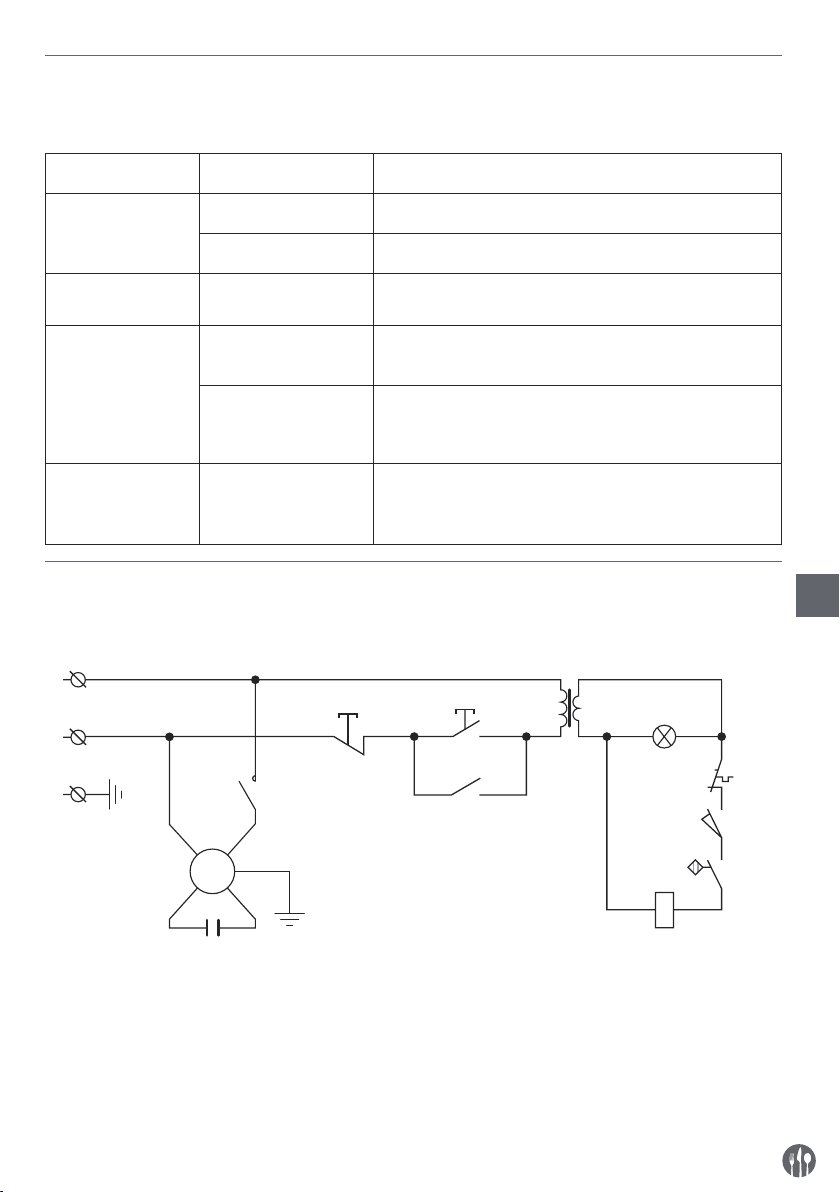
Résolution des problèmes
Si l’appareil ne fonctionne pas correctement, reportez-vous au tableau ci-dessous pour y trouver une solution. Si vous n’arrivez toujours pas à résoudre le problème, contactez votre distributeur/fournisseur
Problème Cause possible Solution
L’appareil ne
Lame émoussée Affûtez la lame
tranche pas uniformément
La machine interrompt le tranchage
Le chariot ne coulisse pas souplement
Machine encrassée Nettoyez la machine
Moteur trop chaud Laissez la machine refroidir suffisamment. La protection
thermique du moteur se réenclenche automatiquement.
Barre coulissante
encrassée
Les aliments n’ad-
hèrent pas à la lame
Nettoyez la barre coulissante et lubrifiez-la avec de la
vaseline
Éteignez l’appareil & débranchez-le. Attendez l’arrêt
complet. Éliminez toute obstruction. Essuyez la lame à
l’aide d’un chiffon humide.
Ostrze przestaje się
obracać podczas
Zużyty lub zabrudzony
pasek napędowy
Contactez le fournisseur
krojenia produktu
Schéma de câblage pour 210000, 210017, 210031, 210048
Tension d’entrée alternative: AC220-240V 50Hz
N
SB1
L
PE
KC
T
SB2
KC HL
FR
ST
M
PE
C
M : Moteur
T : Transformateur
C : Condensateur
PE : Mise à la terre de protection (Mise à la terre)
L : Sous tension
N : Neutre
SB1, SB2 : Interrupteur
KC : Relais
HL : Témoin indicateur
ST : Découpe thermique
SQ1, SQ2 : Micro-interrupteur
KM
SQ1
SQ2
57
Page 58
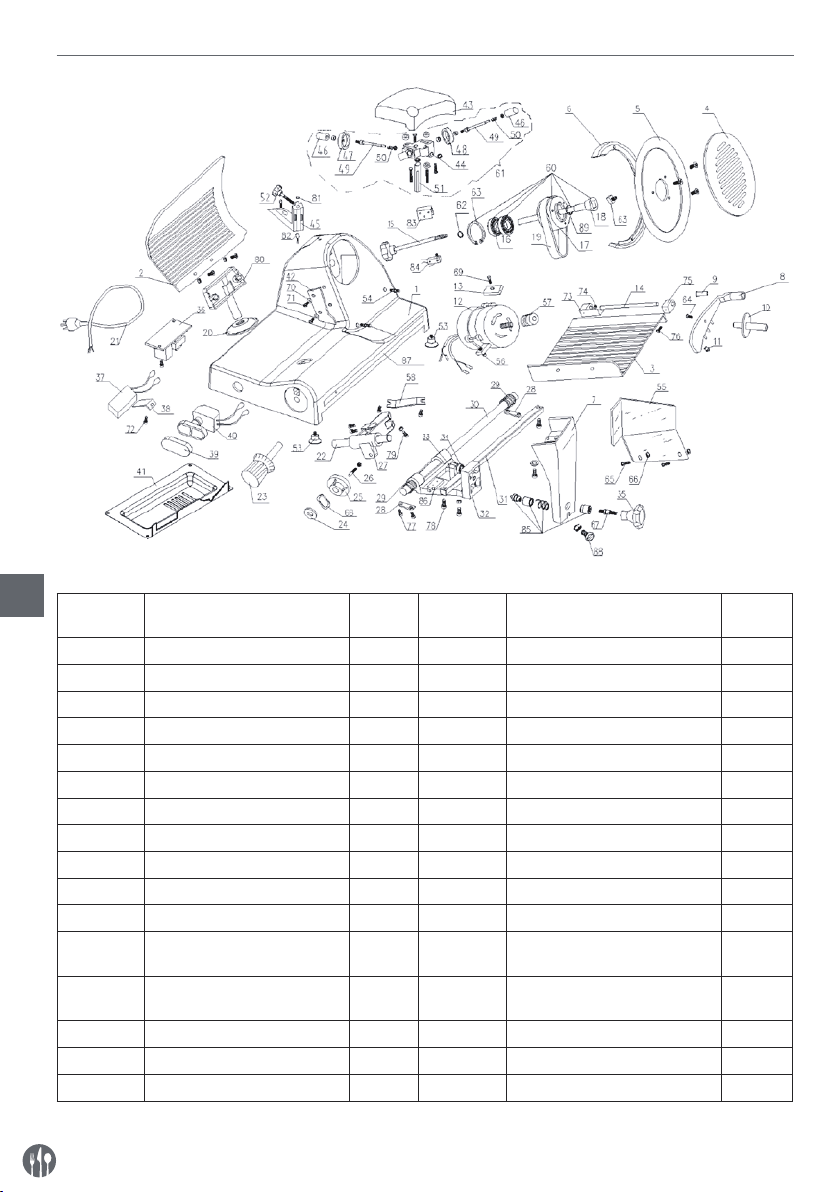
Liste des pièces (Numéro de l’article: 210000, 210031, 210048)
FR
Numéro de
la pièce
1 Enclos 1 17 Roue de courroie de la lame Ø66 1
2 Bardeau actif 1 18 Tige de la roue de courroie 1
3 Plateau pour aliments 1 19 Courroie SV.330 2
4 Disque de couvre-lame 1 20 Paillis glissant 1
5 Lame 1 21 Ligne électrique 1
6 Bague du couvre-lame 1 22 Coulissement de I’essieu 1
7 Support du plateau 1 23 Poignée à échelle 1
8 Alimentation et bras fixe 1 24 Joint à ressort 1
9 Bague à bras fixe 1 25 Came 1
10 Poignée à bras fixe 1 26 Bâton de raccord à cames 1
11 Granulé plastique 1 27 Glisseur 1
12 Moteur 1 28 Briquetage pour le coulissement
13 Briquetage du moteur 1 29 Ressort de l’essieu coulissant de
14 Tige à bras fixe Ø12×185 1 30 Essieu de la barre d’attelage 1
15 Boulons du couvre-lame 1 31 Axe quadrangulaire 1
16 Roulement à billes 6202 2 32 Barre d’attelage 1
Nom de la pièce Quantité Numéro de
la pièce
Nom de la pièce Quantité
de l’essieu
la barre d’attelage
2
2
58
Page 59

Numéro de
la pièce
33 Vis à tête hexagonale M8×35 1 62 Ø15 Joint à ressort pour le rou-
34 Roulement à billes 607 1 63 Ø15 Joint à ressort pour le rou-
35 Bouton du couvercle de la
36 Relais 1 65 Boulon de la poignée à bras fixe 1
37 Condensateur 1 66 Boulon de chicane en forme de
38 Arrêtoir du condensateur 1 67 Écrou de chicane en forme de
39 Paillis du bouton 1 68 Boulon du bouton de support 1
40 Interrupteur à bouton 1 69 Sous support de ressort 1
41 Carte mère 1 70 Boulon visé par le moteur 1
42 Racleur de viande 1 71 Cale de raclage de la viande 2
43 Paillis de l’affûteur 1 72 Boulon du racleur de viande 2
44 Base de l’affûteur du sous-en-
45 Base d’affûtage du montage 1 74 Couvercle du plateau A 1
46 Bouton d’affûtage 2 75 Support de planche pour la
47 Disque de meulage fin Ø45 1 76 Couvercle du plateau B 1
48 Disque de meulage brut Ø45 1 77 Vis cruciforme à tête fraisée
49 Tige pour le frottement de la
50 Ressort 2 79 Vis de serrage de l’axe quadran-
51 Tige du support d’affûtage 1 80 Boulon de réglage du glisseur 1
52 Bouton de serrage de l’affûteur 1 81 Aimant 1
53 Mandrin à bardeaux actif 1 82 Interrupteur magnétique 1
54 Pied en caoutchouc 4 83 Bloc en aluminium 1
55 Tige de la bague du couvre-
56 Planche de blocage de la
57 Coulissement du support de
58 Petite roue de courroie du mo-
59 Commande de glissement 1 88 Vis de réglage du support du
60 Réglage de la roue de courroie 1 89 Joint d’huile 1
61 Réglage de l’affûteur 1
Nom de la pièce Quantité Numéro de
la pièce
1 64 Écrou à tête carrée du disque du
barre d’attelage
1 73 Boulon de serrage du conden-
semble
2 78 Boulon de briquetage de l’essieu
pierre
2 84 Micro-interrupteur 1
lame
1 85 Verrou en acier inoxydable 1
viande
2 86 Bloc restreint 1
l'essieu
1 87 Barre en acier inoxydable 1
teur
Nom de la pièce Quantité
lement
lement
couvre-lame
doigt
doigt
sateur
viande
M6×12
coulissant
gulaire
plateau
1
1
1
2
2
1
1
FR
2
4
2
1
59
Page 60
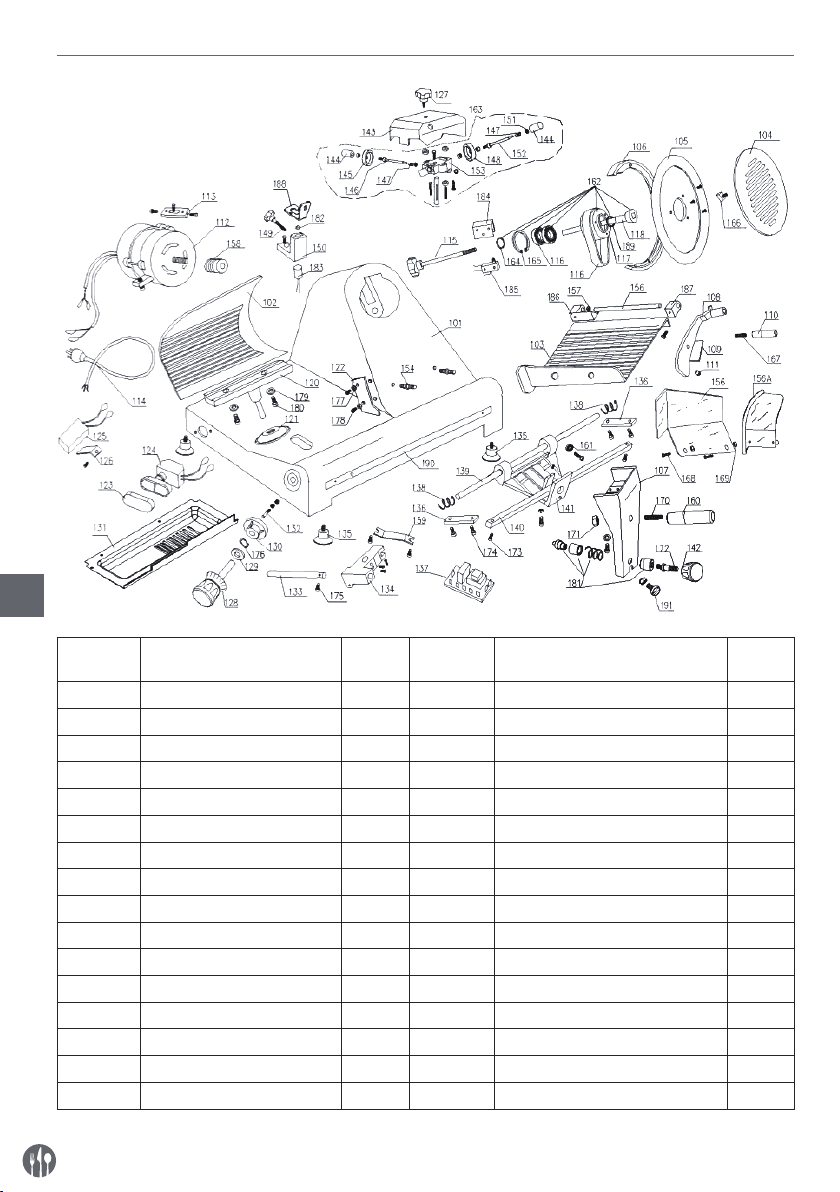
Liste des pièces (Numéro de l’article: 210017)
FR
Numéro de
la pièce
101 Enclos 1 117 Roue de courroie 1
102 Bardeau actif 1 118 Tige de la roue de courroie 1
103 Plateau pour aliments 1 119 Courroie SV.400 2
104 Disque de la lame de protection 1 120 Base de support 1
105 lame 1 121 Gaine de câble 1
106 Bague du couvre-lame 1 122 Limite du racleur 1
107 Support du plateau 1 123 Paillis du bouton 1
108 Bras fixe pour aliments 1 124 Interrupteur à bouton 1
109 Bague à bras fixe 1 125 Condensateur 1
110 Poignée 1 126 Arrêtoir du condensateur 1
111 Granulé plastique 1 127 Vis du bâton adapté 1
112 Moteur 1 128 Poignée à échelle 1
113 Briquetage du moteur 1 129 Joint à ressort 1
114 Ligne électrique 1 130 Came 300 1
115 Boulons du couvre-lame 1 131 Carte mère 1
116 Essieu coulissant 6204 2 132 Tige de raccord à cames 1
60
Nom de la pièce Quantité Numéro de
la pièce
Nom de la pièce Quantité
Page 61

Numéro de
la pièce
133 Essieu coulissant 1 163 Réglage de l’affûteur 1
134 Glisseur 1 164 Joint à ressort Ø 20 pour le palier 1
135 Pied en caoutchouc 4 165 Ø 47 Joint à ressort du trou 1
136 Briquetage de l’essieu coulis
137 Relais 1 167 Boulon de la poignée à bras fixe 1
138 Ressort de l’essieu coulissant 2 168 Boulon de chicane en forme de doigt 2
139 Essieu coulissant de la barre
140 Axe quadrangulaire 1 170 Boulon du bouton de support 1
141 Barre d’attelage 1 171 Écrou du bouton de support 1
142 Bouton de la barre d’attelage 1 172 Boulon de support inférieur 1
143 Paillis de l’affûteur 1 173 Vis de serrage de l’axe quadrangu
144 Bouton 2 174 Boulon de briquetage de l’essieu
145 Disque de meulage fin Ø45 1 175 Boulon de l’essieu coulissant 1
146 Tige de la roue de nettoyage de
147 Ressort de la route de net
148 Disque de meulage brut Ø45 2 178 Boulon du racleur de viande 1
149 Bouton de serrage de l’affûteur 1 179 Cale du palier du point d’appui 2
150 Base de support de la bague
151 Ø 4.751 Roue 1 181 Verrou en acier inoxydable 1
152 Tige pour le frottement de la
153 Base de l’affûteur du sous-en
154 tige de la bague du couvre-
155 Tige du plateau des aliments 1 185 Micro-interrupteur 1
156/156A Planche de blocage de la
157 Support de l’essieu coulissant 1 187 Couvercle du plateau B 1
158 Petite roue de courroie du mo
159 Roue de transmission coulis
160 Poignée de la barre d’attelage 1 190 Barre en acier inoxydable 1
161 Essieu coulissant 608 1 191 Vis de réglage du support du plateau 1
162 Réglage de la roue de courroie 1
Nom de la pièce Quantité Numéro de
2 166 Écrou à tête carrée du disque du
sant
d’attelage
la bavure
toyage de la bavure
extérieure
pierre
semble
lame
viande
teur
sante
-
1 169 Écrou de chicane en forme de doigt 2
2 176 Ø 12 Sous le joint à ressort 1
2 177 Cale de raclage de la viande 2
-
1 180 Boulon de palier 2
1 182 Aimant 1
1 183 Interrupteur magnétique 1
-
2 184 Bloc restreint 1
1 186 Couvercle du plateau A 1
1 188 Cale du palier du point d’appui 1
-
1 189 Joint d’huile 1
-
la pièce
Nom de la pièce Quantité
couvre-lame
-
laire
coulissant
1
2
4
FR
61
Page 62

Garantie
Tout vice ou toute défaillance entraînant un dysfonctionnement de l’appareil qui se déclare dans
les 12 mois suivant la date de l’achat sera éliminé
à titre gratuit ou l’appareil sera remplacé par un
appareil nouveau si le premier a été dûment exploité et entretenu conformément aux termes de
la notice d’exploitation et s’il n‘a pas été indûment
exploité ou de manière non conforme à sa destination. La présente stipulation ne porte pas de préjudice aux autres droits de l’utilisateurs prévus par
les dispositions légales. Dans le cas où l’appareil
est donné à la réparation ou doit être remplacé
Élimination et protection de l’environnement
En cas de retrait du produit de l’exploitation l’appareil ne peut pas être jeté avec d’autres déchets
ménagers. L’utilisateur est responsable de la remise de l’équipement au point de collecte approprié pour l’équipement usagé. Le non-respect des
dispositions ci-dessus peut entraîner les pénalités conformément à la réglementation applicable
en matière d’élimination des déchets. La collecte
sélective et le recyclage des équipements usagés
FR
contribuent à la conservation des ressources na-
dans le cadre de la garantie, il y a lieu de spécifier
le lieu et la date de l’achat de l’appareil et produire
un justificatif nécessaire (par ex. facture ou ticket
de caisse).
Conformément à notre politique d’amélioration
permanente de nos produits, nous nous réservons
le droit d’introduire sans avertissement préalable
des modifications à l’appareil, à l’emballage et aux
caractéristiques techniques précisées dans la documentation.
turelles et assurent un recyclage sans danger pour
la santé et l’environnement. Pour plus d’informations sur les endroits de collecte des équipements
usagés pour le recyclage, contactez la société de
collecte des déchets locale. Le producteur et l’importateur ne sont pas responsables du recyclage et
du traitement des déchets d’une manière respectueuse de l’environnement directement et dans le
système public.
62
Page 63

Gentile cliente,
grazie per aver acquistato questo apparecchio Hendi. Ti invitiamo a leggere queste istruzioni per l’uso con
attenzione prima di collegare l’apparecchio al fine di evitare danni dovuti a uso improprio. Ti invitiamo inoltre a prestare particolare attenzione alle precauzioni di sicurezza.
Precauzioni di sicurezza
• L’uso scorretto e improprio dell’apparecchio possono danneggiare seriamente l’apparecchio e ferire gli utenti.
• Questo dispositivo è destinato esclusivamente per uso commerciale e non può essere
utilizzato per uso domestico.
• L’apparecchio può essere utilizzato solo per lo scopo per cui è stato concepito e proget
tato. Il produttore non è responsabile di eventuali danni provocati da uso scorretto ed
improprio.
• Tenere l’apparecchio e la spina elettrica lontani da acqua ed altri liquidi. Nel caso impro
babile che l’apparecchio cada in acqua, staccare immediatamente la spina dalla presa
e fare ispezionare l’apparecchio da un tecnico certificato. . L’inosservanza delle presenti
istruzioni può dare luogo a situazioni pericolose
• Non provare mai ad aprire l’involucro dell’apparecchio da soli.
• Non inserire oggetti nell’involucro dell’apparecchio.
• Non toccare la presa con le mani bagnate o umide.
• Pericoli di scosse elettriche! Non tentare de riparare l’apparecchio da solo. Eventuali
difetti e malfunzionamenti devono essere rimossi soli da personale qualificato.
• Non usare l’apparecchio danneggiato! L’apparecchio difettoso deve essere immediata
mente scollegato dalla rete e contattare il rivenditore.
• Attenzione: Non immergere parti elettriche in acqua o altri liquidi. Non mettere l’appa
recchio sotto l’acqua corrente.
• Controllare regolarmente se la spina e il cavo di alimentazione non sono danneggiati. La
spina o il cavo danneggiati trasmettere al servizio o alla persona qualificare per riparare,
per evitare eventuali pericoli e lesioni.
• Assicurarsi che il cavo di alimentazione non è in contatto con oggetti appuntiti o caldi. Te
nere il cavo lontano da fiamme libere. Per scollegare la spina dalla presa, tirare sempre
la spina, mai il cavo.
• Proteggere il cavo di alimentazione (o di estensione) per la sconnessione accidentale
dalla presa. Disporre il cavo in modo per evitare lo slittamento accidentale.
• Sorvegliare l’apparecchio continuamente durante l’uso.
• Attenzione! Se la spina è inserita nella presa, l’apparecchio è considerato come collegato.
• Prima di rimuovere la spina dalla presa, spegnere l’apparecchio!
• Non trasportare l’apparecchio tenendo il cavo di alimentazione.
• Non utilizzare qualsiasi accessorio che non è stato fornito con l’apparecchio.
• L’apparecchio deve essere collegato ad una presa con tensione e frequenza indicate sulla
targhetta.
IT
63
Page 64

• Inserire la spina nella presa situata in un punto facilmente accessibile in modo che in
caso di guasto sia possibile scollegare immediatamente l’apparecchio. Per spegnere
completamente l’apparecchio, scollegarlo dalla presa di corrente. Per questo staccare la
spina che si trova sull’estremità del cavo di alimentazione.
• Prima di scollegare la spina, ricordarsi sempre di spegnere l’apparecchio!
• Non usare gli accessori non raccomandati dal produttore. L’uso di accessori non racco
mandati può creare i rischi per l’utente e provocare i danni all’apparecchio. Usare unicamente solo pezzi ed accessori originali.
• L’installazione elettrica deve soddisfare le normative nazionali e locali applicabili. Questo
apparecchio non è destinato all’uso da parte di persone (inclusi i bambini) con capacità
fisiche, sensoriali o mentali ridotte, o senza esperienza e conoscenza.
• Non permettere ai bambini di utilizzare l’apparecchio.
• Tenere l’apparecchio con il cavo fuori dalla portata dei bambini.
• Non permettere ai bambini di giocare con l’apparecchio.
• Scollegare l’apparecchio dalla rete se esso deve essere lasciato incustodito e prima del
montaggio, dello smontaggio o della pulizia.
• Non lasciare l’apparecchio incustodito durante l’utilizzazione.
Regole di sicurezza particolari
• Questo apparecchio è una macchina per la lavorazione di cibi a livello commerciale
ed è destinata esclusivamente al taglio di prodotti alimentari, come ad esempio carne,
formaggio, salsicce, pane, ecc. Il cibo da affettare dev’essere scongelato, disimballato e
IT
privato delle ossa prima di essere trattato. Qualsiasi altro utilizzo può provocare danni al
dispositivo o lesioni personali.
• Questo dispositivo non deve essere utilizzato per tagliare o affettare cibi congelati, carni
con ossa, pesce o prodotti non alimentari, ecc.
• Utilizzare il dispositivo solo come descritto in questo manuale.
• Questo dispositivo deve essere maneggiato da personale specializzato nella cucina di
ristoranti e mense o da personale di bar, ecc.
• Non appoggiare l’apparecchio su una fonte di calore (piani cottura a gas, elettrici, a car
bone, ecc.). Tenere il dispositivo lontano da superfici calde e fiamme libere. Azionare
sempre il dispositivo su una superficie piana, stabile, pulita, resistente al calore e asciut
ta.
• Questo dispositivo non è destinato a essere azionato attraverso un timer esterno o tele
comando separato.
•
Un terminale di collegamento equipotenziale è previsto per consentire il collega-
mento ad altre apparecchiature.
-
-
-
-
• Mai ignorare gli eventuali interblocchi di sicurezza del dispositivo.
• AVVERTENZA: Tenere tutte le aperture di ventilazione del dispositivo libere da ostacoli.
• AVVERTENZA: Spegnere SEMPRE il dispositivo e scollegarlo dall’alimentazione elettrica
prima di eseguire le operazioni di pulizia, manutenzione o stoccaggio.
• AVVERTENZA: Tenere SEMPRE mani, capelli e abiti lontano dalle parti in movimento.
64
Page 65
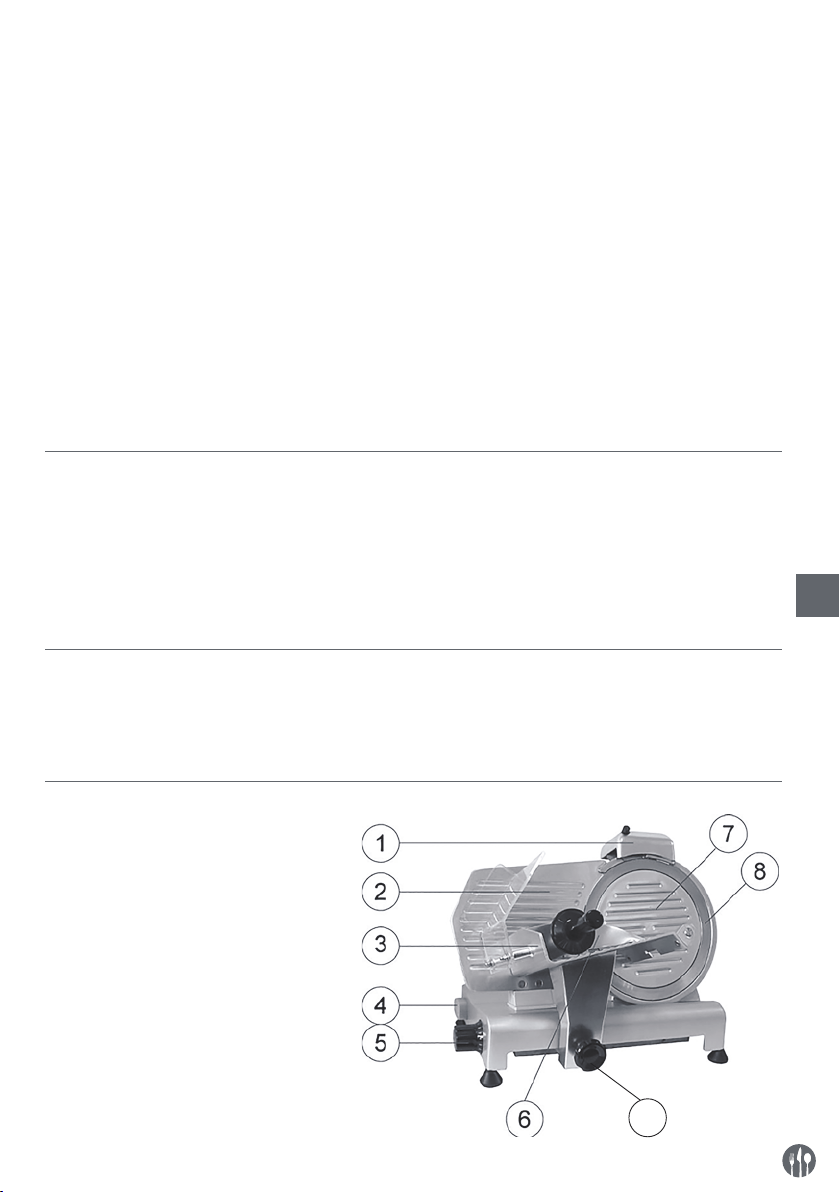
• AVVERTENZA: Prestare molta attenzione quando si maneggiano le lame. Se necessario,
indossare guanti di protezione (non in dotazione).
• Lasciare almeno 15 cm di distanza intorno al dispositivo per facilitare la ventilazione
durante l’uso.
• Attenzione! Far scorrere in modo sicuro il cavo di alimentazione, se necessario, al fine di
evitare accidentali trazioni o il contatto con una fonte di calore.
• Non lavare il dispositivo con acqua o con getto d’acqua. Il lavaggio con acqua può cau
sare delle perdite e aumentare il rischio di scosse elettriche. Non ci sono parti lavabili in
lavastoviglie.
• Non pulire o conservare il dispositivo a meno che non sia completamente raffreddato.
• Non spostare il dispositivo mentre è in funzione. Scollegare il dispositivo dall’alimenta
zione elettrica quando viene spostato e afferrarlo alla base.
• Prestare particolare attenzione durante lo spostamento o il trasporto a causa del peso
notevole. Effettuarlo con almeno 2 persone o utilizzando un carrello. Spostare la macchi
-
na lentamente e con cautela e mai inclinata oltre 45°.
Destinazione del dispositivo
• Il dispositivo è destinato all’uso professionale e
deve essere utilizzato esclusivamente da personale qualificato.
• Questa apparecchiatura è ideata solo per affetta-
re alimenti, ad esempio carni, formaggio, pane,
ecc. L’uso del dispositivo per qualsiasi altro scopo può causare danni o lesioni.
• L’uso del dispositivo per qualsiasi altro scopo
sarà considerato un uso improprio. L’utente sarà
l’unico responsabile per l’uso scorretto del dispositivo.
IT
Messa a terra
Il forno è l’apparecchio della I classe di protezione
e deve esser messo a terra.
La messa a terra riduce il rischio di scosse elettriche grazie al cavo evacuante il corrente elettrico.
Parti principali del dispositivo
1 Affilatrice per lama
2 Piastra di arresto
3 Carrello
4 Interruttore di accensione/
spegnimento on/off
[Bianco (I): ON; Nero (O): OFF]
5 Quadrante spessore
6 Morsa prodotto
7 Protezione lama
8 Lama
9 Blocco del carrello
10 Bullone protezione lama
(non visualizzato)
L’apparecchio è dotato di un cavo con una messa a
terra. Non inserire la spina nella presa di corrente
se l’apparecchio non è stato correttamente installato o messo a terra.
9
65
Page 66
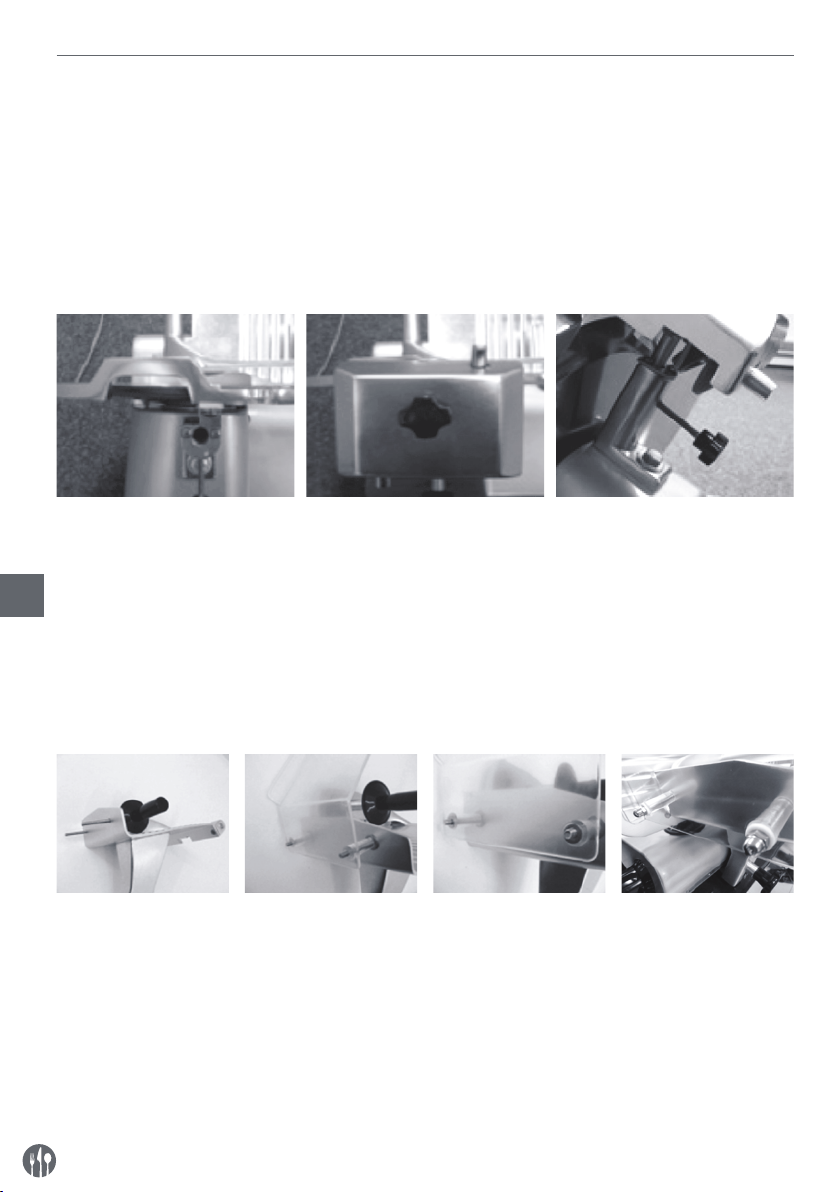
Preparazione prima del primo utilizzo
• Verificare che non manchi alcuna parte. In caso
qualche parte sia mancante, contattare il proprio
fornitore.
• Rimuovere tutto il materiale d’imballaggio.
• Controllare che il dispositivo sia completo e non
abbia subito danni durante il trasporto. In caso di
consegna incompleta o danni, contattare immediatamente il fornitore e NON utilizzare il dispositivo. (Vedi ==> Garanzia).
• Pulire la lama. Prestare attenzione dato che la
lama è molto affilata. (Se necessario, utilizzare
guanti, non in dotazione).
• Mantenere uno spazio libero di almeno 10 cm
intorno all’apparecchio per consentire una ventilazione adeguata.
• Collocare l’apparecchio in modo tale che la spina
sia sempre accessibile.
• Se il dispositivo di affilatura non è collegato, procedere nel modo seguente:
1. Vista dall’alto dell’apparecchio 2. Collegare il modulo di affilatura in modo tale che la lama
non si muova tra i dischi
3. Fissare il dispositivo di affilatura alla macchina serrando
il supporto. Accertarsi che
il dispositivo di affilatura sia
IT
saldamente fissato prima di
utilizzare la macchina.
NOTA! Il dispositivo di affilatura è dotato d’interruttore di sicurezza. Se il dispositivo di affilatura non è collegato correttamente, non sarà possibile utilizzare l’apparecchio.
• Collegare la protezione per le mani.
1. Inserire entrambe le
viti nel carrello.
2. Collegare la protezione per le mani.
3. Inserire le due rondelle sui bulloni.
4. Avvitare in sede
i due dadi della
cupola.
NOTA! Si raccomanda di non utilizzare l’apparecchio se la protezione per le mani non è collegata secondo
le istruzioni! Le presenti istruzioni di sicurezza servono a prevenire eventuali lesioni. Se non si collegano i
suddetti elementi funzionali, esiste il pericolo di lesioni.
66
Page 67
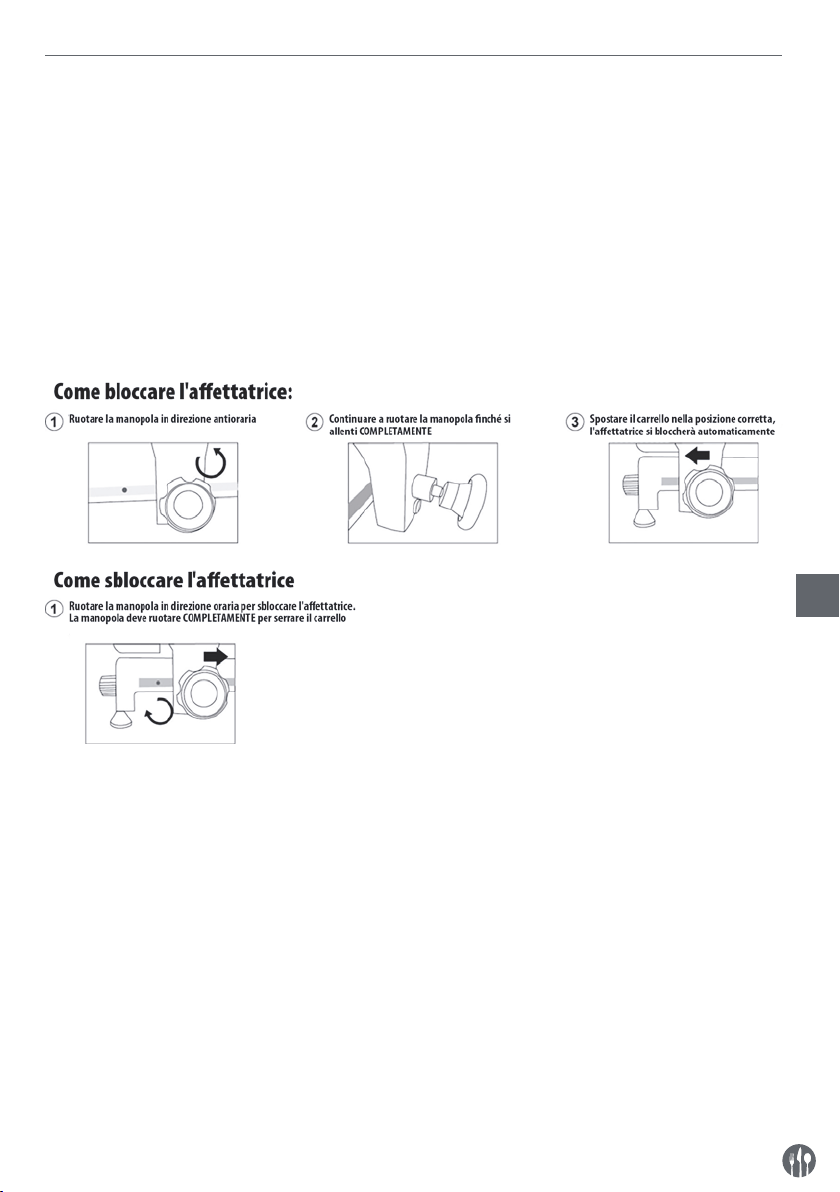
Istruzioni d’uso
• Collocare l’apparecchio in modo che l’interruttore di accensione/spegnimento (on/off) sia rivolto
verso l’utente.
• Se l’affilatrice della lama non è stato installato,
procedere nel modo seguente:
- Collocare l’affilatrice per lama nel proprio sup-
porto in modo che la lama non si estenda tra
gli ingranaggi.
- Serrare la vite di sicurezza sull’affilatrice per
lama.
-
Nota! L’apparecchio è dotato di interruttore di
sicurezza e si spegnerà automaticamente se il
dispositivo di affilatura viene rimosso.
• Inserire la spina nella presa a muro.
• Portare il quadrante con la scala graduata sullo
spessore desiderato.
• Accendete il dispositivo premendo il tasto “BIANCO (I)” dell’interruttore ON/OFF.
• Collocare il prodotto alimentare sul carrello e
regolare la morsa per tenere il prodotto saldamente in posizione. Accertarsi che il prodotto sia
collocato contro la piastra di arresto.
• Una volta che il prodotto è stato affettato, spegnere premendo il tasto “NERO (O)” dell’interruttore ON/OFF.
• Riportare a “0” il quadrante dello spessore.
IT
67
Page 68

Affilare la lama
Affilare la lama quando perde l’affilatura. La lama
è estremamente resistente all’usura. Se utilizzata
regolarmente e correttamente, deve solo essere
affilata una volta all’anno.
• Estrarre la spina dalla presa a muro.
• Portare a “0” il quadrante dello spessore
• Pulire la lama.
• Svitare la manopola di blocco dell’affilatrice.
• Sollevare l’affilatrice dal dispositivo di blocco e
ruotarla di 180°.
• Entrambi i lati della lama devono presentare 1
pietra di affilatura.
• Abbassare l’affilatrice finché si reinserisca nel
dispositivo di blocco.
• Fissare l’affilatrice in sede serrando la manopola
di blocco.
• Accendere l’apparecchio. La lama inizierà a ruotare.
• Utilizzare il pulsante per premere la pietra di affilatura obliqua contro la lama e tenerla in tale
posizione per 2 minuti. La pietra di affilatura deve
ruotare insieme alla lama.
IT
Pulizia e manutenzione
• Attenzione: Scollegare sempre il dispositivo dalla
presa di alimentazione elettrica e lasciarlo raffreddare completamente prima di procedere a pulirlo
e riporlo e impostare la manopola di regolazione
dello spessore della fetta in posizione “0”.
• Pulire il dispositivo dopo ogni utilizzo.
• Attenzione: Non immergere mai l’apparecchio in
acqua o altri liquidi!
• Utilizzare un panno umido per pulire le superfici
(soluzione di acqua e di un agente pulente delicato).
• Utilizzare il pulsante per premere la pietra di affilatura verticale brevemente contro la lama per
rimuovere le bave. La pietra di affilatura deve
ruotare insieme alla lama.
• Spegnere l’apparecchio ed estrarre la spina della
presa a muro.
• Svitare la manopola di blocco dell’affilatrice e pulire le pietre di affilatura con alcol.
• Ricollocare l’affilatrice nella sua posizione originale sull’apparecchio e serrare la manopola di
blocco per fissarla in posizione. La lama non deve
estendersi tra le pietre di affilatura.
• Immergere in acqua calda e leggermente insaponata per diversi minuti. Sciacquare e asciugare
completamente.
• Inserire la spina nella presa di corrente. Maneggiare con molta cura.
• L’apparecchio è pronto all’uso.
• Non usare mai agenti pulenti corrosivi o abrasivi.
Non utilizzare oggetti affilati o appuntiti per la pulizia. Non utilizzare benzene o solventi! Pulire con
un panno umido. Utilizzare se necessario detersivo
liquido per i piatti ma mai agenti pulenti abrasivi.
• Immergere in acqua calda e leggermente insa-
ponata per diversi minuti. Sciacquare e asciugare
completamente.
• Maneggiare con molta cura.
• Se il carrello porta cibo non scorre più agevolmen-
te, poggiare la macchina sul proprio lato. Pulire
con cura la barra di scorrimento e lubrificarla con
vaselina.
Conservazione
• Prima di riporre il dispositivo, accertarsi sempre
che sia stato scollegato dalla presa elettrica e si
sia raffreddato completamente.
68
• Conservare il dispositivo in un luogo fresco, pulito
e asciutto.
Page 69
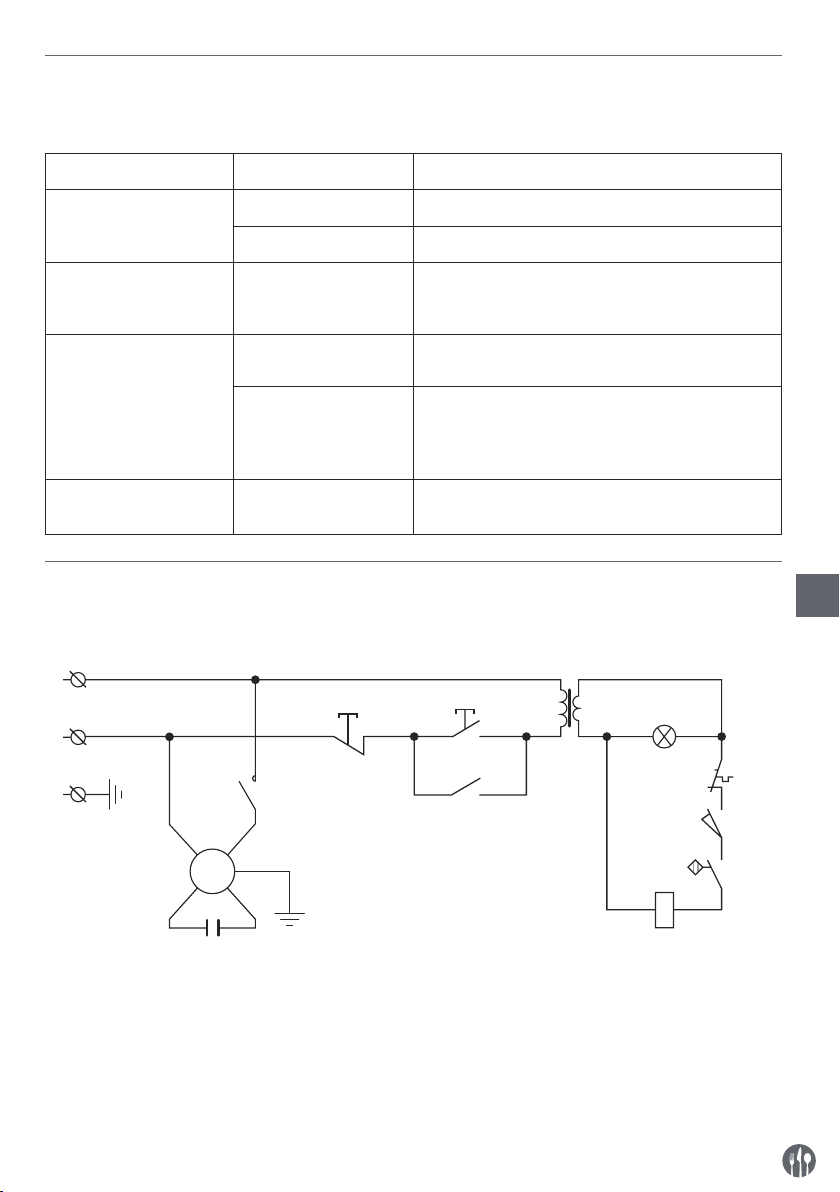
Risoluzione dei problemi
Se l’apparecchio non funziona correttamente, si prega di controllare la tabella seguente per la soluzione.
Se non si è ancora in grado di risolvere il problema, contattare il fornitore/centro assistenza.
Problema Causa possibile Soluzione
Il dispositivo non affetta
in modo uniforme
L’apparecchio cessa di
Lama non affilata Affilare la lama
Apparecchio sporco Pulire l'apparecchio
Motore surriscaldato Lasciar raffreddare la macchina per un periodo
affettare
Il carrello non scorre Barra di scorrimento
sporca
Alcuni alimenti si attac-
cano alla lama
La lama si arresta quando si taglia il prodotto
Cinghia a v usurata o
sporca
Schema elettrico per 210000, 210017, 210031, 210048
Tensione AC in ingresso: AC220-240V 50Hz
N
SB1
L
PE
KC
prolungato. Il termostato di sicurezza del motore
si ripristinerà automaticamente.
Pulire la barra di scorrimento e lubrificare con
vaselina
Spegnere il dispositivo e scollegarlo dalla presa di
corrente. Aspettare che sia completamente fermo.
Rimuovere eventuali ostruzioni. Pulire la lama con
un panno umido.
Contattare il fornitore
T
SB2
KC HL
ST
IT
M
C
M : Motore
T : Trasformatore
C : Condensatore
PE : Messa a terra (massa)
L : Fase
N : Neutro
PE
KM
SB1, SB2 : Interruttore
KC : Relè
HL : Spia
ST : Interruttore magneto-termico
SQ1, SQ2 : Microinterruttore
SQ1
SQ2
69
Page 70
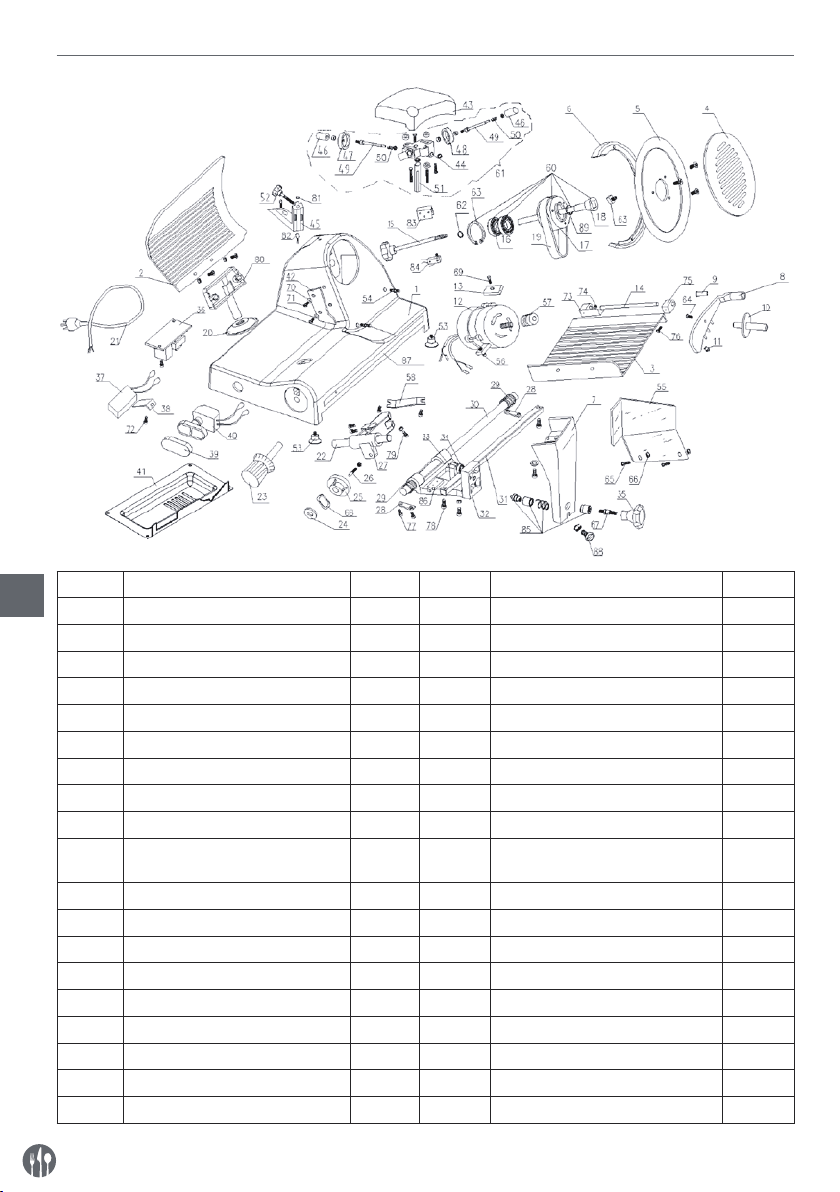
Elenco delle parti (Cod. Art.: 210000, 210031, 210048)
N. parte Nome della parte Quantità Cod. Art. Nome della parte Quantità
IT
1 Involucro 1 20 Sede supporto vela 1
2 Vela 1 21 Cavo di alimentazione 1
3 Vassoio per il cibo 1 22 Asse scorrevole 1
4 Disco di protezione della lama 1 23 Manopola zigrinata 1
5 Lama 1 24 Guarnizione a molla 1
6 Anello di protezione della lama 1 25 Camma 1
7 Staffa del vassoio 1 26 Corpo osculatore camma 1
8 Braccio blocca cibo 1 27 Scivolo 1
9 Boccola fissa braccio 1 28 Bricchetta asse scorrevole 2
10 Maniglia fissa braccio 1 29 Molla della staffa scorrevole di
11 Granulo plastico 1 30 Asse staffa traino 1
12 Motore 1 31 Asse perpendicolare 1
13 Bricchetta del motore 1 32 Staffa traino 1
14 Perno braccio fisso Ø12×185 1 33 Vite esagonale M8×35 1
15 Bulloni protezione lama 1 34 Cuscinetto a sfere 607 1
16 Cuscinetto a sfere 6202 2 35 Manopola copertura staffa traino 1
17 Ruota della cinghia della lama Ø66 1 36 Relè 1
18 Perno della ruota della cinghia 1 37 Condensatore 1
19 Cinghia SV.330 2 38 Fermo del condensatore 1
traino
2
70
Page 71

N. parte Nome della parte Quantità N. parte Nome della parte Quantità
39 Chiusura pulsante 1 65 Bullone maniglia fissa braccio 1
40 Interruttore a pulsante 1 66 Bullone deflettore dito 2
41 Scheda madre 1 67 Dado deflettore dito 2
42 Raschia carne 1 68 Bullone manopola staffa 1
43 Sede affilalama 1 69 Guarnizione molla sottostante 1
44 Base del sottogruppo affilatore 1 70 Bullone inciso motore 1
45 Base dell’affilatore montato 1 71 Spessore raschia carne 2
46 Pulsante dell’affilatore 2 72 Bullone raschia carne 2
47 Ruota di affilatura fine Ø45 1 73 Bullone morsetto del condensatore 1
48 Ruota di affilatura grossolana Ø45 1 74 Copertura cuscinetto vassoio A 1
49 Perno della pietra di sfregamento 2 75 Cestino tavola per la carne 1
50 Molla 2 76 Copertura cuscinetto vassoio B 1
51 Perno della staffa affilatrice 1 77 Vite a testa incassata con intaglio a
52 Manopola serraggio affilatrice 1 78 Bullone bricchetta asse scorrevole 4
53 Piedino 1 79 Vite di fissaggio asse perpendico-
54 Piedino in gomma 4 80 Bullone di regolazione scivolo 1
55 Perno dell’anello di protezione
della lama
56 Pannello di bloccaggio carne 1 82 Interruttore magnetico 1
57 Staffa asse scorrevole 2 83 Blocco di alluminio 1
58 Ruota piccola della cinghia del
motore
59 Guida di scorrimento 1 85 Blocco di acciaio inossidabile 1
60 Impostazione ruota della cinghia 1 86 Blocco parziale 1
61 Impostazione affilatrice 1 87 Barra in acciaio inossidabile 1
62 Guarnizione a molla Ø15 per cu-
scinetto
63 Guarnizione a molla Ø15 per cu-
scinetto
64 Dado a testa quadra del disco di
protezione della lama
2 81 Magnete 1
1 84 Microinterruttore 1
1 88 Vite di fissaggio per la staffa del
1 89 Guarnizione di tenuta olio 1
1
croce M6×12
lare
vassoio
2
2
1
IT
71
Page 72
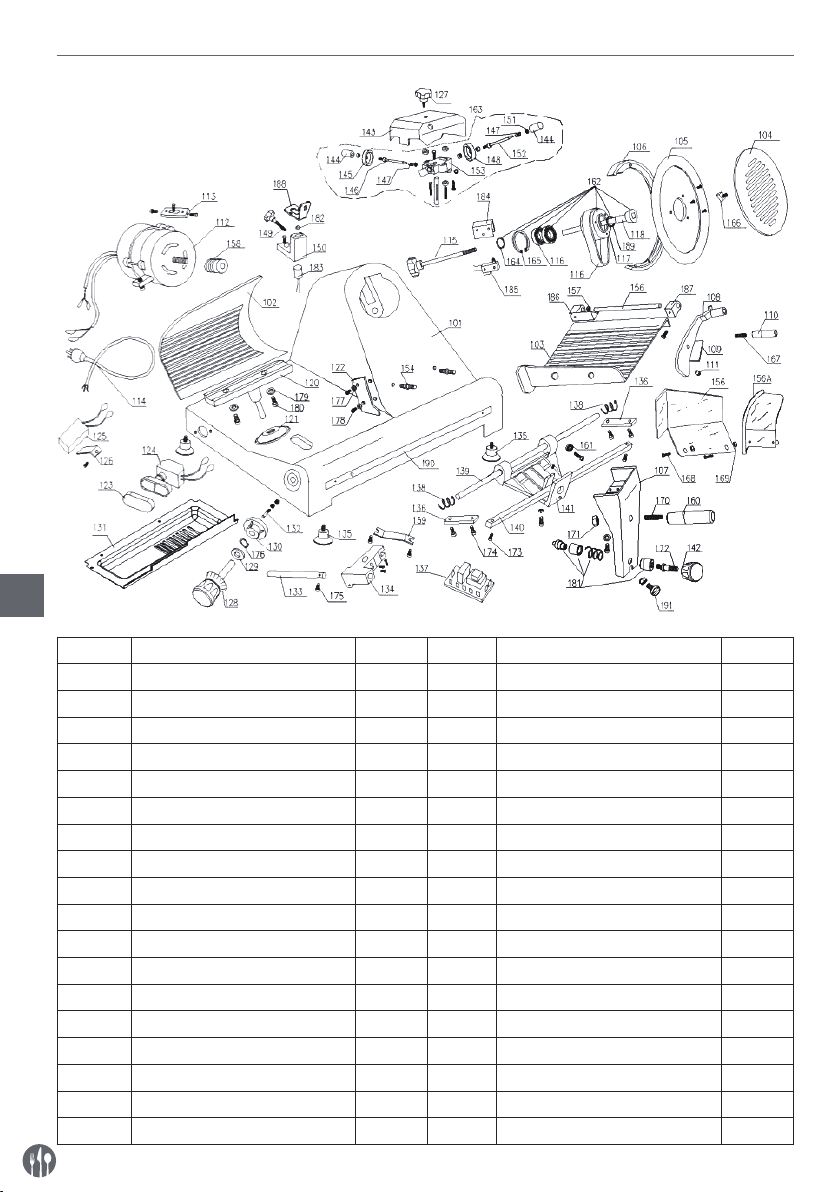
Elenco delle parti (Cod. Art.: 210017)
IT
N. parte Nome della parte Quantità N. parte Nome della parte Quantità
101 Involucro 1 119 Cinghia SV.400 2
102 Vela 1 120 Base di supporto 1
103 Vassoio per il cibo 1 121 Rivestimento cavo 1
104 Protezioni della lama a disco 1 122 Raschia carne 1
105 Lama 1 123 Chiusura pulsante 1
106 Anello di protezione della lama 1 124 Interruttore a pulsante 1
107 Staffa del vassoio 1 125 Condensatore 1
108 Braccio blocca cibo 1 126 Fermo del condensatore 1
109 Boccola fissa braccio 1 127 Vite della staffa orientabile 1
110 Maniglia 1 128 Manopola zigrinata 1
111 Granulo plastico 1 129 Guarnizione a molla 1
112 Motore 1 130 Camma 300 1
113 Bricchetta motore 1 131 Scheda madre 1
114 Cavo di alimentazione 1 132 Perno osculatore camma 1
115 Bulloni protezione lama 1 133 Asse scorrevole 1
116 Cuscinetto a sfere 6204 2 134 Scivolo 1
117 Ruota della cinghia 1 135 Piedino in gomma 4
118 Perno della ruota della cinghia 1 136 Bricchetta asse scorrevole 2
72
Page 73

N. parte Nome della parte Quantità N. parte Nome della parte Quantità
137 Relè 1 165 Guarnizione della molla per foro
138 Molla dell’asse scorrevole 2 166 Dado a testa quadra del disco di
139 Asse scorrevole staffa traino 1 167 Bullone maniglia fissa braccio 1
140 Asse perpendicolare 1 168 Bullone deflettore dito 2
141 Staffa traino 1 169 Dado deflettore dito 2
142 Pulsante della staffa di traino 1 170 Bullone manopola staffa 1
143 Sede affilalama 1 171 Dado manopola staffa 1
144 Pulsante 2 172 Bullone base staffa 1
145 Ruota di affilatura fine Ø45 1 173 Vite di fissaggio asse perpendico-
146 Perno della ruota di pulizia bava 2 174 Bullone bricchetta asse scorre-
147 Molla della ruota di pulizia bava 2 175 Bullone asse scorrevole 1
148 Ruota di affilatura grossolana Ø45 2 176 Guarnizione molla sottostante Ø 121
149 Manopola serraggio affilatrice 1 177 Spessore raschia carne 2
150 Base di supporto dell'anello
esterno
151 Ruota Ø 4.751 1 179 Spessore del cuscinetto del fulcro 2
152 Perno della pietra di sfregamento 1 180 Bullone del cuscinetto del fulcro 2
153 Base del sottogruppo affilatore 1 181 Blocco di acciaio inossidabile 1
154 Perno dell’anello di protezione
della lama
155 Perno del vassoio per alimenti 1 183 Interruttore magnetico 1
156/156A Pannello di bloccaggio carne 1 184 Blocco parziale 1
157 Staffa dell’asse scorrevole 1 185 Microinterruttore 1
158 Ruota piccola della cinghia del
motore
159 Ruota di trasmissione scorrevole 1 187 Copertura cuscinetto vassoio B 1
160 Maniglia staffa traino 1 188 Spessore del cuscinetto del fulcro 1
161 Assale scorrevole 608 1 189 Guarnizione di tenuta olio 1
162 Regolazione ruota della cinghia 1 190 Barra in acciaio inossidabile 1
163 Regolazione affilatrice 1 191 Vite di fissaggio per la staffa del
164 Guarnizione della molla per cu-
scinetto Ø 20
1 178 Bullone raschia carne 1
2 182 Magnete 1
1 186 Copertura cuscinetto vassoio A 1
1
Ø 47
protezione della lama
lare
vole
vassoio
1
1
2
4
1
IT
73
Page 74

Garanzia
Qualsiasi difetto che influenza la funzionalità del
dispositivo che compaia entro un anno dall’acquisto sarà corretto a titolo interamente gratuito o con
la sostituzione del prodotto che è stato utilizzato
e sottoposto a manutenzione corretta seguendo
le istruzioni, senza alcuna violazione. I diritti legali
del cliente non sono assolutamente modificati. Nel
caso in cui l’intervento di manutenzione o sostitu-
Smaltimento e protezione dell’ambiente
In caso di ritiro dell’apparecchiatura dal funzionamento il prodotto non può essere smaltito con
altri rifiuti domestici. L’utente è responsabile della consegna dell’attrezzatura al punto di raccolta
appropriato per l’attrezzatura usata. Il mancato
rispetto delle disposizioni sopramenzionate può
comportare l’imposizione di sanzioni in conformità
con le normative vigenti in materia di smaltimento dei rifiuti. La raccolta e il riciclaggio selettivi di
attrezzature usate contribuiscono alla conserva-
IT
zione sia previsto nel periodo di validità della garanzia, precisare dove e quando si è acquistato il
prodotto, possibilmente allegando lo scontrino.
In linea con la nostra politica di sviluppo continuo
dei prodotti, ci riserviamo il diritto di modificare il
prodotto, l’imballo e le specifiche di documentazione, senza notifica alcuna.
zione delle risorse naturali e garantiscono il riciclaggio in modo tale da non nuocere alla salute e
all’ambiente. Per ulteriori informazioni sui luoghi
di smaltimento delle apparecchiature usate per il
riciclaggio, contattare la società locale di raccolta dei rifiuti. Il produttore e l’importatore non sono
responsabili per il riciclaggio e il trattamento dei
rifiuti in modo ecologico, sia direttamente che nel
quadro del sistema pubblico.
74
Page 75

Stimate client,
Vă mulțumim pentru achiziționarea acestui aparat Hendi. Vă rugăm să citiți cu atenția acest manual înainte
de a conecta aparatul pentru evitarea defectării ca urmare a utilizării incorecte. Acordați o atenție deosebită
regulilor de siguranță.
Reguli de siguranță
• Operarea incorectă şi utilizarea necorespunzătoare a aparatului poate avaria grav aparatul şi poate cauza răni oamenilor.
• Aparatul este utilizat exclusiv în scopuri comerciale și nu trebuie folosit pentru uz casnic.
• Aparatul poate fi folosit doar în scopul pentru care a fost proiectat. Producătorul nu este
răspunzător pentru orice avariere cauzată operării incorecte şi a utilizării necorespun
-
zătoare.
• Asiguraţi-vă că aparatul şi ştecherul nu intră în contact cu apă sau alte lichide. În cazul
în care aparatul este scăpat în apă, scoateţi imediat ştecherul din priză şi un tehnician
autorizat trebuie să-l verifice. Dacă nu respectaţi aceste instrucţiuni, acest lucru poate
cauza situaţii care vă pot pune viaţa în pericol.
• Nu incercati sa deschideti singuri carcasa aparatului.
• Nu introduceţi nici un fel de obiecte în carcasa aparatului.
• Nu atingeţi ştecherul cu mâinile ude sau umede.
• Pericol de electrocutare! Nu încercați să reparați singur/ă aparatul. În cazul unei defec
-
țiuni, reparațiile vor fi efectuate întotdeauna numai de personal calificat.
• Nu utilizați niciodată un aparat defect! Deconectați aparatul de la priza electrică și con
-
tactați distribuitorul în cazul unei defecțiuni.
• Avertisment! Nu scufundați părțile electrice ale aparatului în apă sau în alte lichide. Nu
țineți niciodată aparatul sub jet de apă.
• Verificați în mod regulat ștecărul și cablul pentru a vă asigura că nu sunt deteriorate. În
cazul în care ștecărul sau cablul de alimentare este deteriorat, acesta trebuie înlocuit de
agentul de service sau de alt personal calificat similar pentru a evita orice pericol
• Cablul nu trebuie să intre în contact cu obiecte ascuțite sau fierbinți și trebuie păstrat
departe de foc. Pentru a scoate ștecărul din priză, trageți întotdeauna de ștecăr, nu de
cablu.
• Asigurați-vă că nimeni nu poate trage din greșeală cablul (sau prelungitorul) și că nimeni
nu se poate împiedica de el.
• Supravegheați întotdeauna aparatul atunci când este în funcțiune.
• Avertisment! Atât timp cât ștecărul este în priză, aparatul este conectat la sursa de elec
-
tricitate.
• Opriți aparatul înainte de a scoate ștecărul din priză.
• Nu cărați niciodată aparatul ținându-l de cablu.
• Nu utilizați dispozitive suplimentare care nu sunt livrate împreună cu aparatul.
• Conectați aparatul doar la prize electrice cu intensitatea și frecvența electrice menționa
-
te pe eticheta aparatului.
RO
75
Page 76

• Conectați cablul de alimentare la o priză electrică ușor accesibilă, astfel încât aparatul
să poată fi deconectat imediat în caz de urgență. Scoateți cablul de alimentare din priza
electrică pentru a opri complet aparatul. Utilizați cablul de alimentare ca dispozitiv de
deconectare.
• Opriți întotdeauna aparatul înainte de a deconecta cablul de alimentare.
• Nu utilizați niciodată accesorii care nu sunt recomandate de către producător. Acestea
pot reprezenta un risc de siguranță pentru utilizator și pot deteriora aparatul. Utilizați
numai piese și accesorii originale.
• Acest aparat nu trebuie folosit de copii sau persoane care au capacităţi mentale, senzo
riale sau fizice reduse, sau lipsă de experienţă şi cunoştinţe.
• Acest aparat nu trebuie utilizat sub nicio formă de către copii.
• Nu țineți produsul și cablurile sale la îndemâna copiilor.
• Copiii nu trebuie să se joace cu acest produs.
• Deconectați întotdeauna aparatul de la sursa de alimentare în cazul în care este lăsat
nesupravegheat, precum și înainte de asamblare, dezasamblare sau curățare.
• Nu lăsați niciodată aparatul nesupravegheat pe parcursul utilizării.
Instrucțiuni speciale de siguranță
• Acest aparat este un echipament de procesare comercială a alimentelor, precum, de ex.
carne, brânză, cârnați, pâine, etc. Alimentele de feliat trebuie dezghețate, despachetate
și nu trebuie să includă oase înainte ca acestea să poată fi feliate cu ajutorul aparatului.
RO
Orice altă utilizare poate duce la deteriorarea aparatului sau la vătămare personală.
• Acest aparat nu trebuie utilizat la tăierea sau felierea alimentelor congelate, a cărnii cu
oase, a peștelui sau a oricăror produse non-alimentare, etc.
• Utilizați aparatul numai așa cum este descris în acest manual.
• Acest aparat trebuie operat de personal instruit din bucătăria restaurantului, din cantine,
sau personalul barului, etc.
• Nu poziționați aparatul pe un obiect de încălzire. (cuptor cu benzină, electric, cu cărbune,
etc.) Țineți aparatul la distanță față de orice suprafețe fierbinți și orice flăcări deschise.
Operați întotdeauna aparatul pe o suprafață stabilă, curată, rezistentă la căldură și us
cată.
• Acest aparat nu este conceput pentru a fi operat printr-un temporizator extern sau un
sistem de control la distanță separat.
•
Un terminal echipotențial este furnizat pentru a permite îmbinarea cu alte echipa-
mente.
-
-
• Nu omiteți niciodată interblocajele de siguranță de pe aparat.
• AVERTISMENT: Țineți toate deschiderile de ventilație din aparat neobstrucționate.
• AVERTISMENT: ÎNTOTDEAUNA opriți aparatul și deconectați-l de la alimentarea electri
că înainte de curățare, întreținere sau depozitare.
• AVERTISMENT: ÎNTOTDEAUNA păstrați mâinile, părul lung și articolele de îmbrăcăminte
departe de piesele mișcătoare.
76
-
Page 77
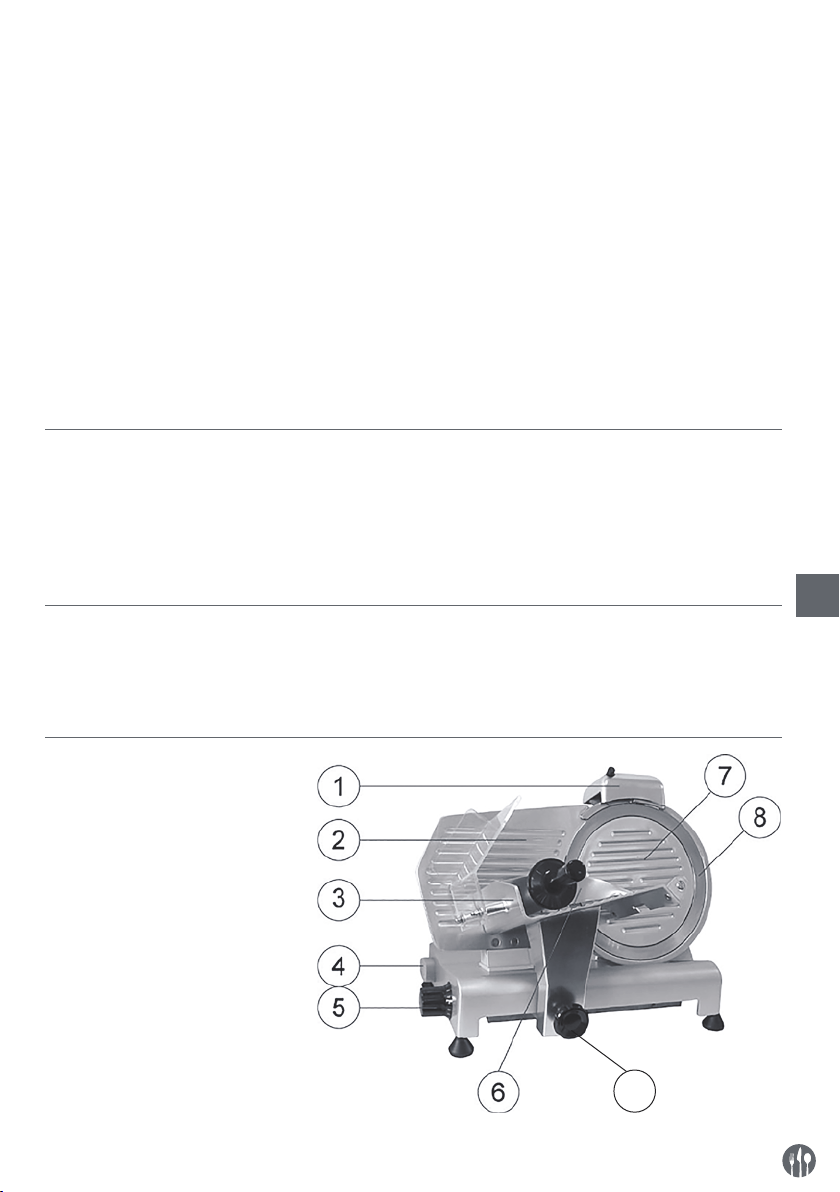
• AVERTISMENT: Aveți grijă la manipularea lamei de tăiere. Purtați mănuși de protecție
(nefurnizate) după caz.
• Permiteți un spațiu de cel puțin 15 cm în jurul aparatului pentru ventilație în timpul uti
-
lizării.
• Atenție! Așezați în siguranță cablul de alimentare după caz pentru a preveni tragerea a
sau contactul accidental cu suprafața de încălzire.
• Nu spălați aparatul cu apă sau jet de apă. Spălarea cu apă poate cauza scurgeri și poate
mări riscul de electrocutare. Nicio piesă nu este sigură pentru aparatul de spălat vase.
• Nu curățați sau depozitați aparatul înainte ca acesta să se răcească în mod complet.
• Nu mutați aparatul în timp ce este în funcțiune. Scoateți aparatul din priză atunci când îl
mutați și țineți-l de partea inferioară.
• Trebuie acordată atenție specială la mutarea sau transportarea aparatului din cauza gre
utății ridicate. Trebuie transportat de cel puțin 2 persoane, sau trebuie utilizat un cărucior. Deplasați aparatul încet, cu atenție și niciodată la un unghi de peste 45°.
Destinația produsului
• Acesta este un aparat de uz profesional și poate fi
utilizat numai de către personalul calificat.
• Aparatul este destinat doar pentru felierea alimentelor, de exemplu, mezeluri, brânză, pâine
etc. Orice altă utilizare poate provoca avarierea
aparatului sau accidentarea persoanelor.
Instalația de împământare
Acest aparat este încadrat în clasa de protecție I
și trebuie împământat. Împământarea reduce riscul electrocutării prin asigurarea unui fir de ieșire
pentru curentul electric. Acest aparat este dotat cu
• Utilizarea aparatului în orice alt scop reprezintă o
utilizare incorectă. Utilizatorul este singurul răspunzător de orice utilizare incorectă a aparatului.
un cablu cu fir de împământare cu fișă. Fișa trebuie conectată la o priză instalată corespunzător și
împământată.
RO
Părțile principale ale aparatului
1 Ascuţitoarea lamei
2 Placă rotitoare
3 Suport
4 Întrerupător On/off
[Alb (I): PORNIT; Negru (O): OPRIT]
5 Butonul pentru reglarea grosimii
6 Clema produsului
7 Protecţia lamei
8 Lamă
9 Blocare suport
10 Șurubul de protecție Lama
(nu se afișează)
9
77
Page 78
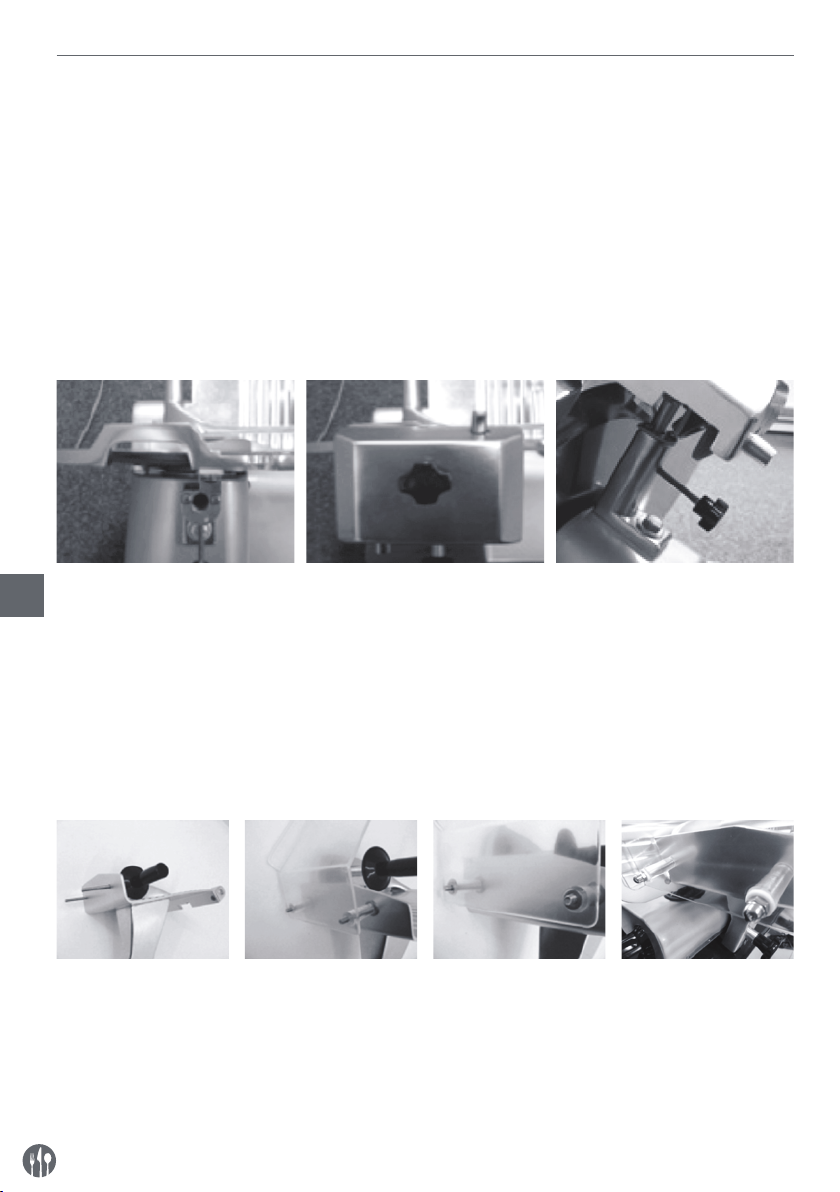
Pregătirea pentru prima sa utilizare
• Verificaţi ca aparatul să nu fie avariat. În cazul
unor avarii, contactaţi imediat furnizorul dumneavoastră şi NU utilizaţi aparatul.
• Scoateţi ambalajul acestuia
• Verificați caracterul complet al aparatului și pentru eventuale daune din timpul transportului. În
caz de livrare incompletă sau daune, contactați
imediat furnizorul. NU utilizați aparatul. (Consultați ==> Garanție).
• Curăţaţi lama. Fiţi atenţi: lama este foarte ascuţită. (Utilizați mănuși dacă este necesar, acestea
nu sunt incluse)
• Păstraţi deschis un spaţiu de cel puţin 10 cm
în jurul aparatului pentru a permite o aerisire
adecvată.
• Poziţionaţi aparatul în aşa fel încât priza să fie
întotdeauna accesibilă.
• Dacă dispozitivul de ascuţit nu este ataşat, procedaţi după cum urmează:
1. Vedere de sus a aparatului 2. Ataşaţi modulul de ascuţire
RO
în aşa fel încât lama să nu se
mişte între cele două roţi.
3. Fixaţi dispozitivul de ascuţire
la aparat prin strângerea
suportului. Verificaţi pentru a
vă asigura că dispozitivul de
ascuţire este bine securizat
înainte de a utiliza aparatul.
IMPORTANT! Dispozitivul de ascuțire este dotat cu un întrerupător de siguranță. Dacă dispozitivul de ascuțire nu este atașat în mod corespunzător, nu veți putea utiliza aparatul.
• Ataşaţi protecţia pentru mână.
1. Aşezaţi ambele şuruburi pe suport.
2. Ataşaţi protecţia
pentru mână.
3. Aşezaţi ambele
garnituri peste
4. Înşurubaţi cele două
piuliţe.
şuruburi.
IMPORTANT! Vă recomandăm să nu folosiți aparatul dacă suportul și apărătoarea de mâini nu sunt atașate conform instrucțiunilor! Acestea sunt măsuri de siguranță pentru prevenirea eventualelor accidentări.
Dacă nu respectați aceste măsuri, riscați să vă accidentați.
78
Page 79
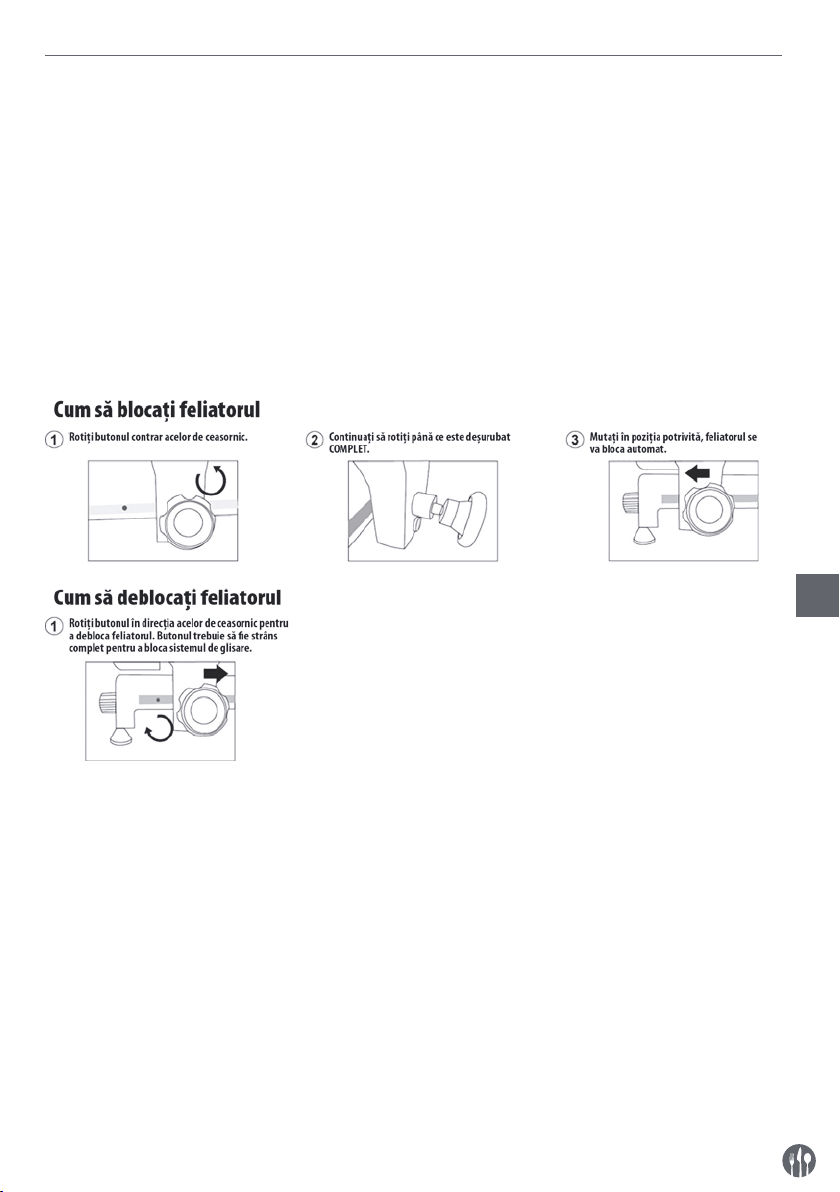
Instrucțiuni de folosire
• Aşezaţi aparatul astfel încât întrerupătorul on/off
să fie poziţionat cu faţa la utilizator.
• Dacă ascuţitoarea lamei nu a fost instalată, procedaţi după cum urmează:
- Aşezaţi ascuţitoarea lamei în suportul său ast-
fel încât lama să nu ajungă la angrenaj.
- Strângeţi şurubul de siguranţă de pe ascuţi-
toarea lamei.
- NOTĂ! Aparatul este dotat cu un întrerupător
de siguranţă şi se va opri automat în cazul în
care dispozitivul de ascuţire este îndepărtat.
• Împingeţi ştecherul în priza din perete.
• Rotiţi discul cu scară gradată până la grosimea
feliei dorite.
• PORNIȚI aparatul apăsând butonul „ALB (I)” al
comutatorului PORNIT/OPRIT.
• Puneţi produsul alimentar pe suport şi reglaţi
clema astfel încât să ţină produsul bine pe loc.
Asiguraţi-vă că produsul este poziţionat pe platoul rotativ.
• Odată ce produsul a fost feliat, OPRIȚI aparatul
apăsând butonul „NEGRU (O)” al comutatorului
PORNIT/OPRIT.
• Rotiţi butonul pentru reglarea grosimii înapoi la
“0”.
RO
79
Page 80

Ascuțirea lamei
Ascuţiţi lama când aceasta se toceşte.Lama este
extrem de rezistentă la uzură. Dacă aparatul este
folosit cu regularitate şi în mod corespunzător,
lama nu trebuie ascuţită decât o dată pe an.
• Scoateţi ştecherul din priza din perete.
• Rotiţi butonul pentru reglarea grosimii la “0”.
• Curăţaţi lama.
• Deşurubaţi butonul rotativ pentru blocarea ascuţitorii.
• Ridicaţi ascuţitoarea din dispozitivul de blocare
şi rotiţi-l la 180°.
• Coborâţi ascuţitoarea până când aceasta alunecă înapoi în dispozitivul de blocare.
• Fixaţi ascuţitoarea prin strângerea butonului de
blocare.
• Opriţi aparatul. Lama va începe să se rotească.
• Utilizaţi butonul pentru a apăsa piatra de ascuţire
înclinată pe lamă şi menţineţi timp de două minute. Piatra de ascuţire ar trebui să se rotească
Sfaturi pentru curățare şi întreținere
• Atenție: Deconectați întotdeauna aparatul de la
priza electrică și lăsați-l să se răcească complet
RO
înainte de curățare și depozitare și setați butonul
rotativ pentru grosimea feliilor în poziția „0”.
• Curățați aparatul după fiecare utilizare.
• Atenţie! Nu introduceţi niciodată aparatul în apă
sau în orice alt lichid!
• Curăţaţi aparatul cu o cârpă umedă (apă cu detergent uşor).
împreună cu lama.
• Utilizaţi butonul pentru a apăsa pentru scurt timp
piatra de ascuţire verticală pe lamă pentru a îndepărta bavurile. Piatra de ascuţire ar trebui să
se rotească împreună cu lama.
• Opriţi aparatul şi scoateţi ştecherul din priza din
perete.
• Deşurubaţi butonul de blocare a ascuţitorii şi curăţaţi pietrele ascuţite cu alcool.
• Înlocuiţi ascuţitoarea în poziţia sa iniţială pe aparat şi strângeţi butonul de blocare pentru a-l fixa
la loc. Lama nu trebuie să ajungă între pietrele
ascuţite.
• Scufundați în apă călduță, cu puțin săpun, timp
de câteva minute. Clătiți și uscați complet.
• Împingeți fișa în priza din perete. Manipulați cu
atenție.
• Aparatul poate fi utilizat.
• Nu utilizaţi niciodată agenţi de curăţare puternici
sau corozivi. Nu folosiţi obiecte ascuţite sau contondente. Nu folosiţi petrol sau solvenţi! Curăţaţi
cu o cârpă umedă şi detergent dacă este necesar.
Nu folosiţi materiale abrazive.
• Scufundați în apă călduță, cu puțin săpun, timp
de câteva minute. Clătiți și uscați complet.
• Manipulați cu atenție.
• În cazul în care suportul de alimente nu mai alunecă uşor, puneţi maşina pe o parte. Curăţaţi glisiera cu atenţie şi lubrifiaţi cu vaselină.
Depozitare
• Înainte de depozitare, asigurați-vă că aparatul a
fost deja deconectat de la priza electrică și că s-a
răcit complet.
80
• Depozitați aparatul într-un loc rece, curat și uscat.
Page 81
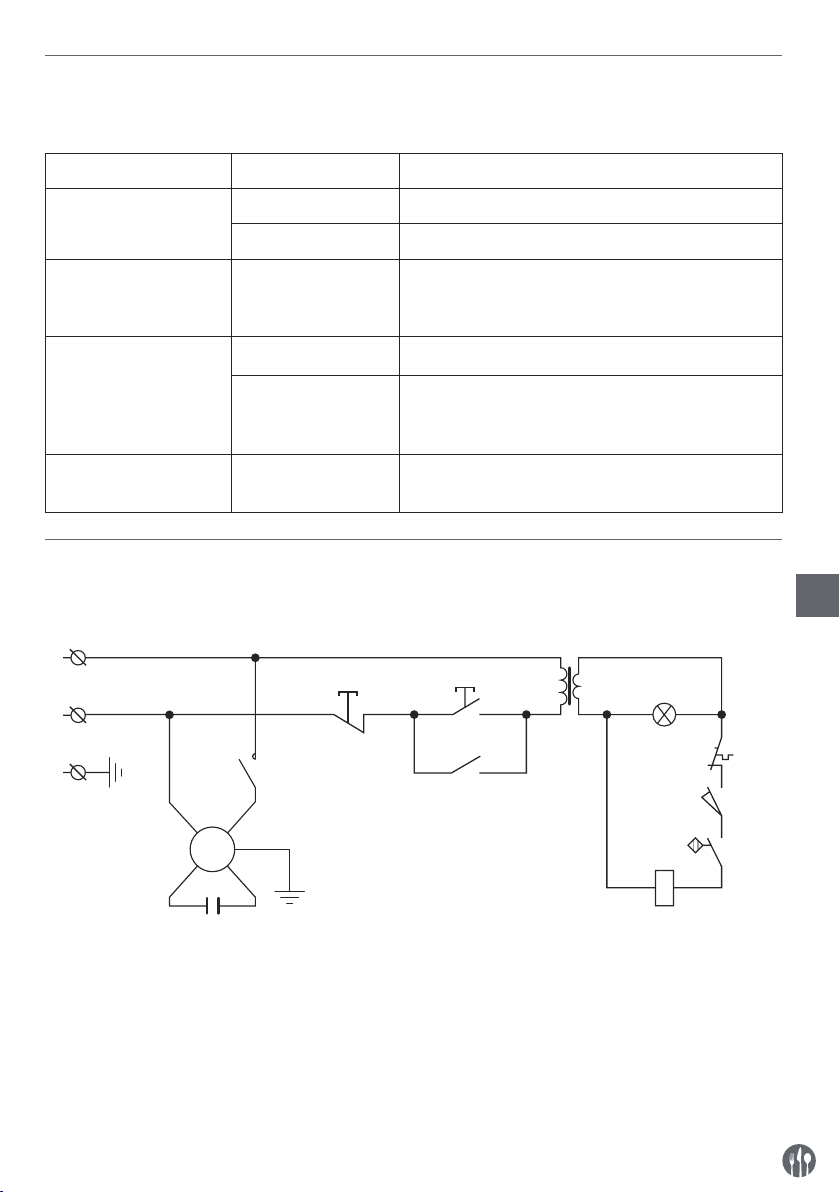
Risoluzione dei problemi
Se l’apparecchio non funziona correttamente, si prega di controllare la tabella seguente per la soluzione.
Se non si è ancora in grado di risolvere il problema, contattare il fornitore/centro assistenza.
Problem Possible cause Solution
Aparatul nu feliază în
mod egal
Lamă tocită Ascuţiţi lama
Aparat murdar Curăţaţi aparatul
Aparatul nu mai feliază Motor supraîncălzit Lăsaţi maşina să se răcească pentru o perioadă
îndelungată. Termostatul motorului de siguranţă se
va reseta automat.
Suportul nu alunecă Glisieră murdară Curăţaţi glisiera şi lubrifiaţi cu vaselină
Se lipesc bucăți de
alimente de lamă
Opriți aparatul și scoateți-l din priză. Lăsați-l să se
oprească în mod complet. Eliminați orice blocaje
Ștergeți lama cu o cârpă umedă.
Lama se oprește atunci
când se taie produse.
Cureaua v este uzată
sau murdară
Contactați furnizorul
Diagramă de circuit pentru 210000, 210017, 210031, 210048
Intrare tensiune CA: 220-240 VCA 50Hz
N
SB1
SB2
T
L
PE
KC HL
KC
RO
ST
M
PE
C
M : Motor
T : Transformator
C : Condensator
PE : Împământare de protecție (Împământare)
L : Sub tensiune
N : Neutru
SB1, SB2 : Comutator
KC : Releu
HL : Lampă indicatoare
ST : Decupare termică
SQ1, SQ2 : Microcomutator
KM
SQ1
SQ2
81
Page 82
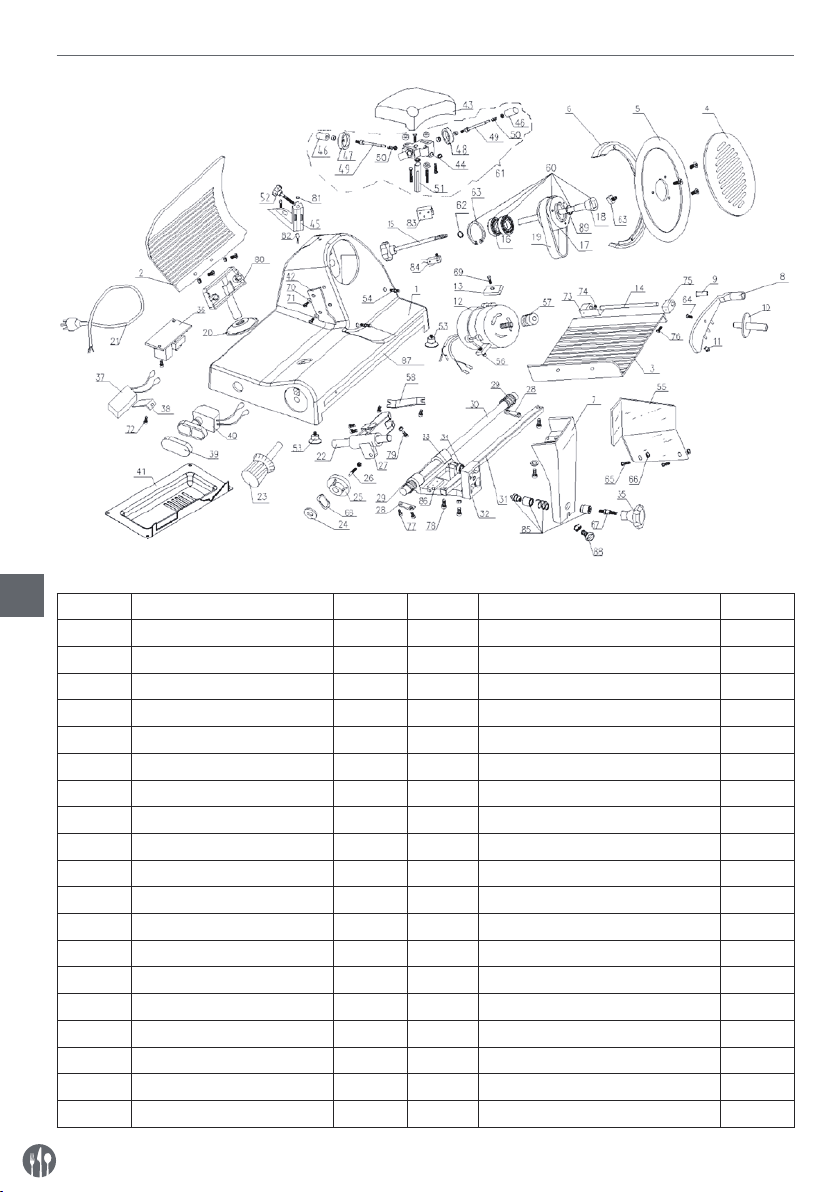
Listă de piese (Nr. articol: 210000, 210031, 210048)
RO
Nr. piesă Nume piesă Cantitate Nr. piesă Nume piesă Cantitate
1 Element de închidere 1 20 Element auxiliar glisant 1
2 Sită 1 21 Linie de alimentare 1
3 Tavă pentru alimente 1 22 Ax glisant 1
4 Disc protecție lamă 1 23 Buton rotativ cu scară 1
5 Lamă 1 24 Garnitură cu arc 1
6 Inel protecție lamă 1 25 Camă 1
7 Consolă tavă 1 26 Ax basculant camă 1
8 Braț fix și pentru alimente 1 27 Glisor 1
9 Bucșă pentru braț fix 1 28 Element brichetare ax glisant 2
10 Mâner pentru braț fix 1 29 Arc pentru ax glisant consolă tragere 2
11 Granulă din plastic 1 30 Ax consolă tragere 1
12 Motor 1 31 Ax pătrat 1
13 Element brichetare motor 1 32 Consolă tragere 1
14 Știft braț fix Ø12×185 1 33 M8×35 Șurub hexagonal 1
15 Șuruburi protecție lamă 1 34 Rulment 607 1
16 Rulment 6202 2 35 Buton rotativ capac consolă tragere 1
17 Roată curea lamă Ø66 1 36 Releu 1
18 Știftul roții cu curea 1 37 Condensator 1
19 Curea SV 330 2 38 Element reținere condensator 1
82
Page 83

Nr. piesă Nume piesă Cantitate Nr. piesă Nume piesă Cantitate
39 Buton element auxiliar 1 65 Șurub mâner braț fix 1
40 Comutator buton 1 66 Șurub ecran deget 2
41 Placă principală 1 67 Piuliță ecran deget 2
42 Element eliminare carne 1 68 Șurub buton rotativ consolă 1
43 Element auxiliar element as-
cuțire
44 Bază subansamblu element
ascuțire
45 Bază ansamblu element as-
cuțire
46 Buton element ascuțire 2 72 Șurub element eliminare carne 2
47 Roată de rectificare fină Ø45 1 73 Șurub clemă fixare condensator 1
48 Roată de rectificare brută Ø45 1 74 Capac A rulment tavă 1
49 Știftul pietrei de frecare 2 75 Consolă placă pentru carne 1
50 Arc 2 76 Capac B rulment tavă 1
51 Știftul consolei elementului de
ascuțire
52 Buton rotativ strângere ele-
ment ascuțire
53 Arbore sită activ 1 79 Șurub blocare ax pătrat 2
54 Picior de cauciuc 4 80 Șurub ajustare glisor 1
55 Știft inel protecție lamă 2 81 Magnet 1
56 Placă blocare carne 1 82 Comutator magnet 1
57 Consolă ax glisant 2 83 Bloc din aluminiu 1
58 Curea mică roată motor 1 84 Micro-comutator 1
59 Element acționare glisare 1 85 Element blocare oțel inoxidabil 1
60 Setare roată curea 1 86 Bloc limitat 1
61 Setare element ascuțire 1 87 Bară din oțel inoxidabil 1
62 Consolă arc Ø15 pentru rul-
ment
63 Consolă arc Ø15 pentru rul-
ment
64 Piuliță cap pătrat disc protec-
ție lamă
1 69 Consolă arc inferior 1
1 70 Șurub procesat motor 1
1 71 Lamelă eliminare carne 2
1 77 Cap adâncit încastrat în cruce M6×12 2
1 78 Șurub brichetare ax glisant 4
1 88 Șurub de fixare pentru consolă tavă 1
1 89 Etanșare ulei 1
1
RO
83
Page 84
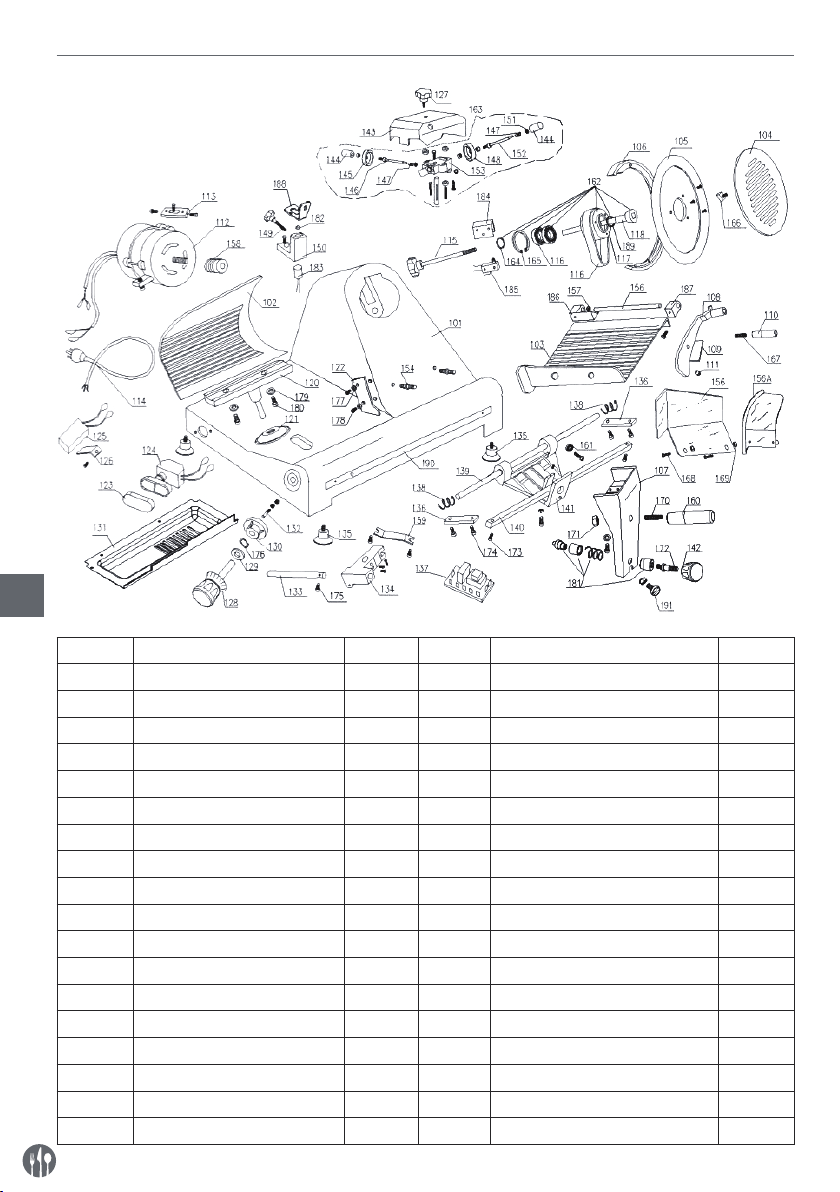
Listă de piese (Nr. articol: 210017)
RO
Nr. piesă Nume piesă Cantitate Nr. piesă Nume piesă Cantitate
101 Element de închidere 1 119 Curea SV 400 2
102 Sită 1 120 Bază de suport 1
103 Tavă pentru alimente 1 121 Element protector cablu 1
104 Disc protecție lamă 1 122 Element eliminare carne 1
105 lamă 1 123 Buton element auxiliar 1
106 Inel protecție lamă 1 124 Comutator buton 1
107 Consolă tavă 1 125 Condensator 1
108 Braț fix pentru alimente 1 126 Element reținere condensator 1
109 Bucșă pentru braț fix 1 127 Șurubul axului orientat 1
110 Mâner 1 128 Buton rotativ cu scară 1
111 Granulă din plastic 1 129 Garnitură cu arc 1
112 Motor 1 130 Camă 300 1
113 Element brichetare motor 1 131 Placă principală 1
114 Linie de alimentare 1 132 Știft basculant camă 1
115 Șuruburi protecție lamă 1 133 Ax glisant 1
116 Rulment 6204 2 134 Glisor 1
117 Roată curea 1 135 Picior de cauciuc 4
118 Știftul roții cu curea 1 136 Element brichetare ax glisant 2
84
Page 85

Nr. piesă Nume piesă Cantitate Nr. piesă Nume piesă Cantitate
137 Releu 1 165 Consolă arc pentru orificiu Ø 47 1
138 Arc ax glisant 2 166 Piuliță cap pătrat disc protecție
139 Ax glisant consolă tragere 1 167 Șurub mâner braț fix 1
140 Ax pătrat 1 168 Șurub ecran deget 2
141 Consolă tragere 1 169 Piuliță ecran deget 2
142 Buton consolă tragere 1 170 Șurub buton rotativ consolă 1
143 Element auxiliar element as-
cuțire
144 Buton 2 172 Șurub buton consolă 1
145 Roată de rectificare fină Ø45 1 173 Șurub blocare ax pătrat 2
146 Știft roată curățare piatră de
ascuțit
147 Arc roată curățare piatră de as-
cuțit
148 Roată de rectificare brută Ø45 2 176 Consolă arc inferior Ø 12 1
149 Buton rotativ strângere element
ascuțire
150 Baza de susținere a inelului ex-
terior
151 Roată Ø 4,751 1 179 Lamelă rulment punct de sprijin 2
152 Știft piatră frecare 1 180 Șurub rulment punct de sprijin 2
153 Bază subansamblu element
ascuțire
154 știft inel protecție lamă 2 182 Magnet 1
155 Știft tavă alimente 1 183 Comutator magnet 1
156/156A Placă blocare carne 1 184 Bloc limitat 1
157 Consolă ax glisant 1 185 Micro-comutator 1
158 Curea mică roată motor 1 186 Capac A rulment tavă 1
159 Roată transmitere glisare 1 187 Capac B rulment tavă 1
160 Mâner consolă tragere 1 188 Lamelă rulment punct de sprijin 1
161 Ax glisant 608 1 189 Etanșare ulei 1
162 Setare roată curea 1 190 Bară din oțel inoxidabil 1
163 Setare element ascuțire 1 191 Șurub de fixare pentru consolă
164 Consolă arc pentru orificiu rul-
ment Ø 20
1 171 Piuliță buton rotativ consolă 1
2 174 Șurub brichetare ax glisant 4
2 175 Șurub ax glisant 1
1 177 Lamelă eliminare carne 2
1 178 Șurub element eliminare carne 1
1 181 Element blocare oțel inoxidabil 1
1
lamă
tavă
1
1
RO
85
Page 86

Garanție
Orice defecțiune care afectează funcționarea aparatului apărută la mai puțin de un an de la cumpărarea acestuia va fi remediată prin reparație sau
înlocuire gratuită, cu condiția ca aparatul să fi fost
folosit și întreținut conform instrucțiunilor nu să nu
fi fost bruscat sau folosit necorespunzător în vreun
fel. Drepturile dumneavoastră legale nu sunt afec-
Eliminarea şi mediul înconjurător
La dezafectarea aparatului, produsul nu trebuie aruncat împreună cu alte deșeuri menajere. În
schimb, este responsabilitatea dumneavoastră să
eliminați echipamentul uzat prin predarea acestuia
la un punct de colectare desemnat. Nerespectarea
acestei reguli poate fi penalizată în conformitate cu reglementările aplicabile privind eliminarea
deșeurilor. Colectarea separată și reciclarea echipamentului dumneavoastră uzat la momentul debarasării contribuie la conservarea resurselor na-
RO
tate. Dacă aparatul este în garanție, menționați
când și de unde a fost cumpărat și includeți dovada
cumpărării (de ex. chitanța).
Conform politicii noastre de dezvoltare continuă a
produsului, ne rezervăm dreptul de a modifica produsul, ambalajul și documentația fără notificare.
turale și asigură realizarea reciclării într-un mod
care protejează sănătatea ființelor umane și a mediului. Pentru informații suplimentare privind modul în care puteți preda deșeurile dumneavoastră
în scopul reciclării, vă rugăm să contactați compania locală de colectare a deșeurilor. Producătorii
și importatorii nu își asumă responsabilitatea cu
privire la reciclarea, tratarea și eliminarea ecologică a deșeurilor, fie direct, fie prin intermediul unui
sistem public.
86
Page 87

Уважаемый Клиент,
Большое Вам спасибо за то, что Вы купили оборудование фирмы Hendi. Вам следует внимательно прочитать настоящую инструкцию пользователя во избежание повреждения машины в результате неправильной эксплуатации. Особенно рекомендуем ознакомиться с предупреждениями.
Правила техники безопасности
• Неправильная эксплуатация и неподходящее использование агрегата может привести к его поломке и поранить оператора.
• Настоящее устройство предназначено исключительно для коммерческого использо
-
вания и не должно использоваться в домашних условиях.
• Оборудование следует использовать точно по назначению. Производитель не несет
ответственности за повреждения, вызванные неправильной эксплуатацией или не
-
правильным обслуживанием оборудования.
• Оборудование и электрическую штепсельную вилку следует держать вдали от воды
и прочих жидкостей. Если штепсельная вилка попадет в воду, ее следует тут же вы
тащить из розетки электропитания и обратиться в службу сертифицированного сервиса для проверки устройства. Несоблюдение данных указаний может повлечь за
собой угрозу здоровью и жизни обслуживающего персонала.
• Нельзя снимать кожух без особого разрешения.
• Нельзя класть никаких посторонних предметов вовнутрь агрегата.
• Нельзя касаться мокрыми, или влажными руками штепсельной вилки.
RU
• Опасность поражения током! Не следует самостоятельно чинить электроаппаратуру.
Любые поломки и неисправности должны устраняться квалифицированным персо
налом.
• Никогда не следует пользоваться поврежденной электроаппаратурой. Поврежден
ное устройство нужно отсоединить от электросети и обратиться к продавцу.
• Предупреждение: не следует погружать электрических деталей в воду, или иные
жидкости. Не омывать в струе воды.
• Регулярно проверять вилку и провод электропитания на предмет повреждений. По
врежденные вилку или провод передать для ремонта в сервисную точку, или обратиться к квалифицированному электрику во имя предотвращения опасности травм.
• Удостовериться, что провод электропитания не касается острых и горячих предметов;
держать электропровод вдали от открытого огня. Для того, чтобы вынуть вилку из
розетки всегда нужно тянуть за вилку, а не за электропровод.
• Защитить провод электропитания (удлинитель) от случайного выпадения из розетки
Электропровод прокладывать так, чтобы случайно не зацепиться за него.
• Непрестанно наблюдать за работающей электроаппаратурой.
• Предупреждение! Если вилка находится в розетке – это означает, что электроаппара
-
тура считается подключенной к электропитанию.
• Перед том, как вынуть вилку из розетки, электроаппаратуру следует выключить!
• Никогда нельзя переносить, передвигать электроаппаратуру держа за электропро
-
вод.
87
Page 88

• Не использовать никаких деталей, аксессуаров, которые не поставляются вместе с
этой электроаппаратурой.
• Электроаппаратуру следует подключать исключительно к розетке, в которой имеется
напряжение и частоту, указанную на щитке электроаппаратуры.
• Вилку следует вставлять в розетку, расположенную в удобном и легкодоступном ме
сте, так чтобы в случае аварии можно бы ее немедленно вынуть. Для полного обесточивания электроаппаратуры ее следует отсоединить от электропитания; для этого
следует вынуть вилку, находящуюся на конце провода электропитания, из розетки.
• Перед тем, как вынуть вилку всегда следует помнить о том, чтобы сначала выключить
электроаппаратуру!
• Не следует использовать детали, аксессуары, не рекомендуемые производителем
данной электроаппаратуры, т.к. использование таких деталей, аксессуаров может
создать для пользователя угрозу его здоровью и жизни, а также может привести к
поломке электроаппаратуры. Следует всего использовать оригинальные детали, ак
сессуары.
• Без надлежащего контроля или предварительного обучения эксплуатации оборудо
вания проводимого лицом, отвечающим за безопасную эксплуатацию, оборудованием не могут пользоваться ни дети, ни лица с ограниченными физическими, или
психическими возможностями, ни лица, которые не обладают необходимым опытом
работы и знаниями в данной области.
• Ни в коем случае нельзя допускать к использованию электроаппаратуры детей.
RU
• Электроаппаратуру следует хранить в месте недоступном для детей.
• Нельзя разрешать детям использовать электроаппаратуру в качестве игрушки.
• Всегда электроаппаратуру следует отсоединить от электропитания, если оставляем
ее без надзора, перед монтажом, демонтажем и чисткой.
• Нельзя оставлять работающую электроаппаратуру без надзора.
-
-
-
Особые меры предосторожности
• Данное устройство представляет собой коммерческий аппарат для обработки пищи
и предназначено только для нарезки пищевых продуктов, в том числе мяса, сыра,
колбас, хлеба и т. д. Перед нарезанием необходимо разморозить и распаковать про
дукты и очистить их от костей. Любое другое использование может повлечь за собой
повреждение устройства или травму.
• Данное устройство не следует использовать для нарезания замороженных продук
тов, мяса с костями, рыбы, любых непищевых продуктов и т. д.
• Устройство следует использовать только в соответствии с настоящим руководством.
• Эксплуатацию устройства должен осуществлять обученный персонал на кухнях ре
сторанов, столовых, баров и т. д.
• Запрещается ставить устройство на нагревающиеся поверхности. (газовые, элек
трические, угольные плиты и т. д.) Устройство не следует держать вблизи горячих
поверхностей и открытого огня. Устройство следует использовать на ровной, устой
чивой, термостойкой и сухой поверхности.
88
Page 89

• Данное устройство не предназначено для эксплуатации с использованием внешнего
таймера или отдельного пульта дистанционного управления.
•
На устройстве имеется клемма системы уравнивания потенциалов для соедине-
ния с другим оборудованием.
• Не следует обходить никакие предохранительные системы устройства.
• ПРЕДУПРЕЖДЕНИЕ. Запрещается закрывать любые вентиляционные отверстия на
устройстве.
• ПРЕДУПРЕЖДЕНИЕ. ВСЕГДА выключайте устройство и отключайте его от электро
-
сети перед очисткой, техобслуживанием или помещением на хранение.
• ПРЕДУПРЕЖДЕНИЕ. ВСЕГДА держите руки, длинные волосы и предметы одежды на
безопасном расстоянии от движущихся частей.
• ПРЕДУПРЕЖДЕНИЕ. При работе с режущим лезвием необходимо соблюдать особую
осторожность. При необходимости следует использовать защитные перчатки (не вхо
-
дят в комплект).
• Во время использования вокруг устройства должно быть не менее 15 см свободного
пространства для нормальной вентиляции.
• Осторожно! При необходимости следует надежно закрепить кабель питания для пре
-
дотвращения случайного дергания или соприкосновения с горячей поверхностью.
• Запрещается мыть устройство водой или водяной струей. При мойке водой возможна
протечка и повышается вероятность поражения током. Никакие детали устройства
нельзя мыть в посудомоечной машине.
• Запрещается проводить чистку устройства или помещать его на хранение до того,
как оно полностью остынет.
• Запрещается перемещать устройство во время эксплуатации. При необходимости
перемещения устройства следует отключить его от электросети и держать его за дно.
• При перемещении или транспортировке устройства следует соблюдать особую осто
рожность в связи с его большим весом. Для перемещения следует задействовать не
менее 2 человек или использовать тележку. Устройство следует перемещать медлен
но и аккуратно и не наклонять под углом более 45°.
RU
Назначение устройства
• Устройство предназначено для профессионального использования и должно эксплуатироваться только квалифицированным персоналом.
• Настоящее устройство предназначено только для нарезания пищевых продуктов, в том
числе мяса, сыра, хлеба и т. д. Использование
устройства для любых других целей может привести к повреждению или травме тела.
• Использование устройства для любых других
целей будет рассматриваться, как использование не по назначению. Пользователь будет
нести исключительную ответственность за неправильное использование устройства.
89
Page 90
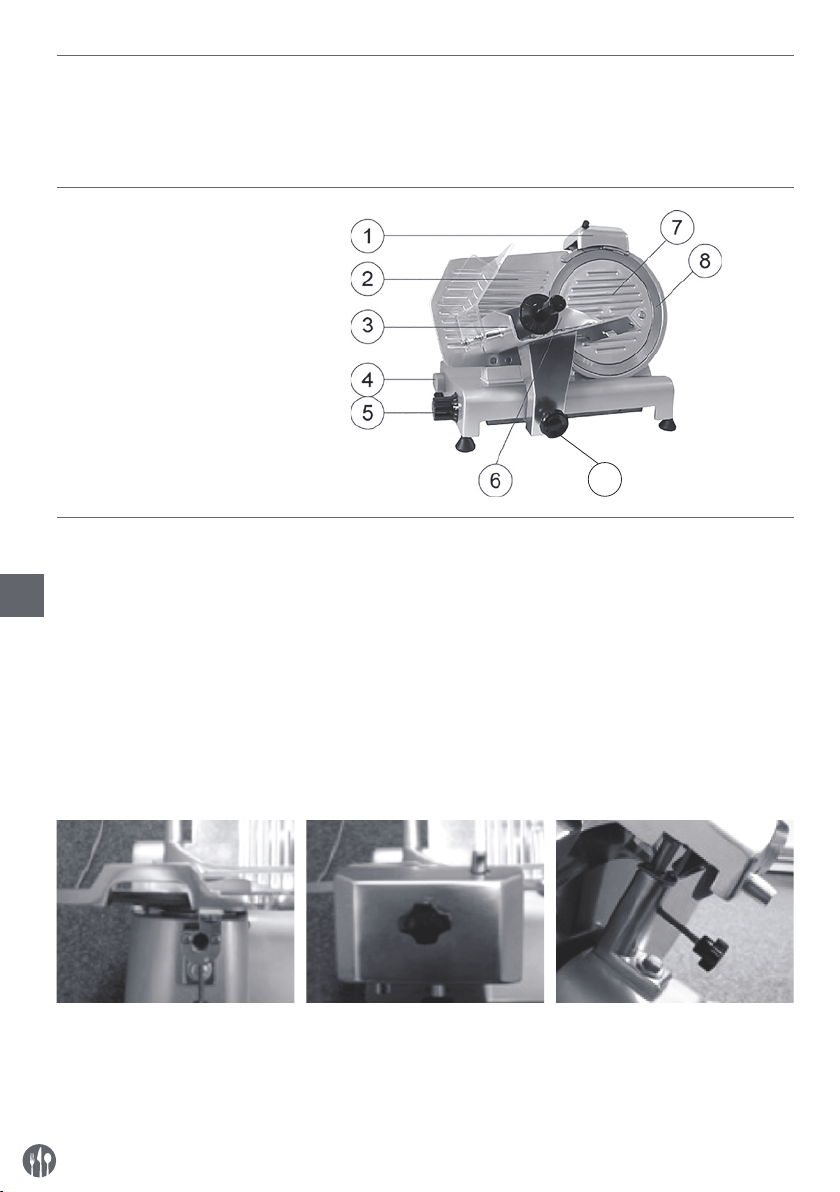
Монтаж заземления
Печь представляет собой устройство I класса
защиты и должно быть заземлено. Заземление
снижает риск поражения электрическим током
за счет отводящего провода. Устройство оснаще-
Основные детали устройства
1 Затачивающее устройство
2 Боковой край каретки
3 Каретка
4 Включатель
[Белый (I): ВКЛ; Черный (O): ВЫКЛ]
5 Ручка толщины резки
6 Прижимное устройство продукта
7 Крышка оси
8 Лезвие
9 Замок каретка
10 Кожух болт
(не отображается))
Перед первым использованием
• Убедитесь, что нет никаких недостающих частей. В противном случае обратитесь к постав-
RO
щику.
• Устраните упаковочный материал.
• Необходимо проверить устройство на полноту комплектации и наличие повреждений при
транспортировании. В случае обнаружения неполной комплектации или повреждений следует незамедлительно связаться с поставщиком.
Такое устройство ЗАПРЕЩАЕТСЯ использовать. (См. ==> Гарантия).
но заземляющим проводом с вилкой с заземляющим контактом. Не вставляйте вилку в контакт,
если устройство не установлено надлежащим
образом и не заземлено.
9
• Очистите лезвие. Внимание: оно очень острое!
(При необходимости следует использовать
перчатки, не входящие в комплект)
• Оставьте свободное пространство мин.10см
вокруг устройства, чтобы обеспечить необходимую вентиляцию.
• Установить устройство таким образом, чтобы
обеспечить свободный доступ к вилке.
• Если затачивающее устройство не установлено, действуйте согласно представленными
ниже указаниям:
1. Вид сверху 2. Установите затачивающее
устройство таким образом,
чтобы лезвие не передвигалось между точильными
камнями.
90
3.
Затяните ручку, чтобы затачивающее устройство было неподвижным. Перед использованием устройства убедитесь,
что затачивающее устройство
надежно закреплено.
Page 91
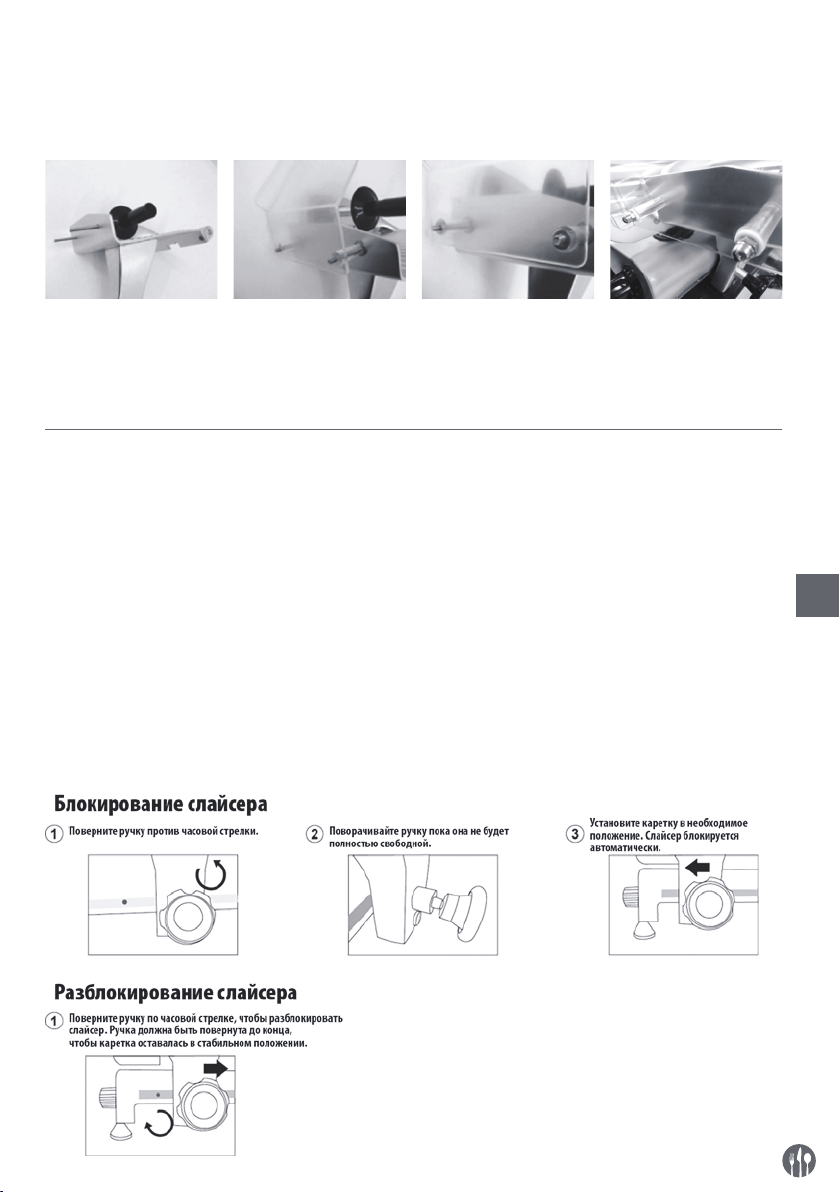
ВНИМАНИЕ! Затачивающее устройство оснащено аварийным выключателем. В случае, если он не
установлен, нельзя будет пользоваться устройством.
• Укрепите экран, защищающий руки.
1. Установите два
винта в каретке.
2. Установите защитный экран.
3. Установите две
шайбы на винты.
4. Закрутите две глухие гайки.
ВНИМАНИЕ! Рекомендуется не пользоваться устройством, если защитный экран для рук не был установлен так, как показано выше! Экран должен защищать пользователя от травм. Если экраны не установлены, существует риск получения травмы.
Использование устройства
• Установите устройство таким образом, чтобы
включатель был направлен в сторону потребителя.
• Если затачивающее устройство не установлено, действуйте в соответствии с указанными
ниже рекомендациями:
- Установите затачивающее устройство на
держателе так, чтобы лезвие не выступало за
пределы точильных камней.
- Затяните запорный винт на затачивающем
устройстве.
- Внимание! Если оно оснащено аварийным
выключателем, он автоматически выключит
• Вложите вилку в сетевую розетку.
• Поверните ручку со шкалой и установите необходимую толщину резки.
• Включите устройство, нажав БЕЛУЮ (I) кнопку
выключателя.
• Положите продукт на каретке и установите прижимное устройство так, чтобы продукт стабильно удерживать на месте. Убедитесь, что продукт
прилегает к боковой кромке каретки.
• После завершения нарезания выключите
устройство, нажав ЧЕРНУЮ (O) кнопку выключателя.
• Установите ручку опять в положение “0”.
устройство, когда будет устранено затачивающее устройство.
RU
91
Page 92

Лезвие
Если лезвие затупилось, его следует заточить.
Лезвие очень прочное. Если оно эксплуатируется правильно и надлежащим образом, его достаточно затачивать один раз в год.
• Выньте вилку из сетевой розетки
• Установите ручку толщины резки в положение
“0”.
• Очистите лезвие.
• Открутите ручку, блокирующую затачивающее
устройство.
• Поднимите затачивающее устройство на блокирующем элементе и поверните его на 180°.
• Точильный камень должен находиться с двух
сторон лезвия.
• Опустите затачивающее устройство пока оно не
заблокируется в запирающем элементе.
• Защитите затачивающее устройство в необходимом положении, крутя блокирующую ручку.
• Включите устройство. Лезвие начнет вращаться.
• Пользуйтесь кнопкой, чтобы прижать точильный камень к лезвию и придержите его в таком положении в течение 2 минут. Точильный
RU
камень должен вращаться вместе с лезвием.
Чистка и обслуживание
• Внимание: Перед очисткой и помещением
на хранение устройство следует отключить от
электрической розетки, дать ему полностью
остыть и установить ручку регулировки толщины нарезания в положение 0.
• После каждого использования необходимо
проводить чистку устройства.
• ВНИМАНИЕ: Не погружайте устройство в воду
или любую другую жидкость!
• Поверхности чистить влажной тряпкой (с водой
и мягким чистящим средством).
• Не пользуйтесь агрессивными или абразивными химическими средствами. Не пользуйтесь
острым инструментом. Не используйте бензин
или растворители. Устройство чистить влажной
тряпкой с добавлением жидкости для мытья
посуды (если будет такая необходимость).
• Пользуйтесь кнопкой, чтобы можно легко прижать вертикальный точильный камень к лезвию с целью устранения заусенец. Точильный
камень должен вращаться вместе с лезвием.
• Выключите устройство и вытяните вилку из сетевой розетки.
• Открутите ручку, блокирующую затачивающее
устройство и очистите точильные камни с помощью алкоголя.
• Поместите затачивающее устройство в исходное положение и затяните блокирующую ручку,
чтобы устройство осталось неподвижным на
своем месте. Лезвие не может выступать между
точильными камнями.
• Погрузить в теплый слабый мыльный раствор
на несколько минут. Сполоснуть и тщательно
высушить.
• Вставить штекер в электрическую розетку. Обращаться с особой осторожностью.
• Устройство готово к работе.
• Погрузить в теплый слабый мыльный раствор
на несколько минут. Сполоснуть и тщательно
высушить.
• Обращаться с особой осторожностью.
• Если каретка, которая поддерживает продукт,
не работает плавно, поставьте устройство на
бок. Осторожно очистите стержень, по котором
передвигается каретка и смажьте его вазелином.
Хранение
• Перед помещением на хранение устройство
следует отключить от электрической розетки и
дать ему полностью остыть .
92
• Устройство следует хранить в чистом, сухом и
прохладном месте.
Page 93
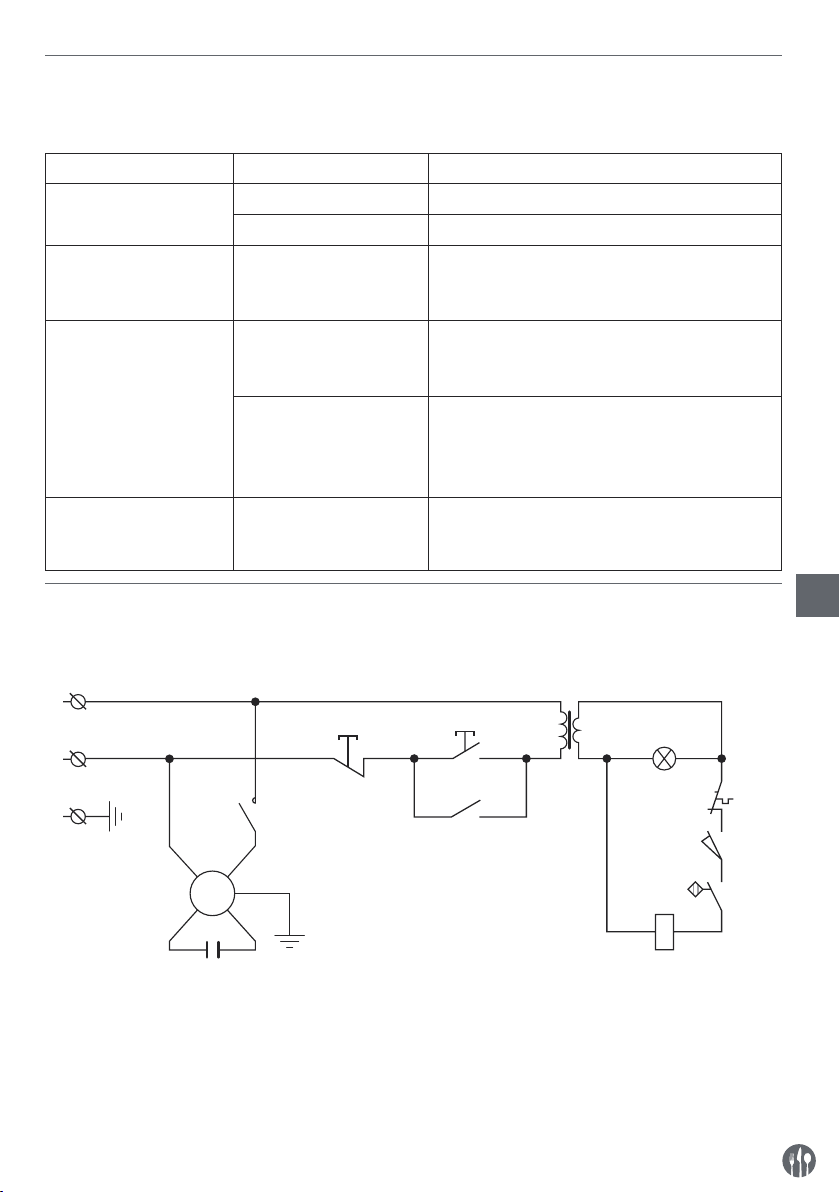
Диагностика и устранение неисправностей
Если устройство не работает надлежащим образом, используйте следующую таблицу для поиска решения. Если вы не можете решить проблему, свяжитесь с поставщиком / сервисным специалистом.
Проблема Возможная причина Решение
Устройство нарезает
продукты неравномерно
Тупое лезвие Лезвие следует заточить
Грязное устройство Очистить устройство
Устройство не режет Перегрелся двигатель Оставить машину для охлаждения на длитель-
ное время. Защитный термостат от двигателя
автоматически сбрасывается.
Каретка не передвигается
Загрязнился стержень,
по котором передвигает-
Очистить стержень и смазать его вазелином
ся каретка
К лезвию прилипли
остатки продуктов
Выключите устройство и отключите его от
электросети. Подождите, пока устройство
полностью не остановится. Удалите налипшие
продукты. Протрите лезвие влажной тканью.
Лезвие перестает вращаться во время резки
Изношенный или грязный приводной ремень
Обратитесь к поставщику
продукта
Схема цепи для 210000, 210017, 210031, 210048
Ввод напряжения переменного тока: 220-240 В 50 Гц пер. тока
N
SB1
SB2
L
PE
KC HL
KC
M
PE
C
M : Двигатель
T : Трансформатор
C : Конденсатор
PE : Защитное заземление
L : Фаза
SB1, SB2 : Выключатель
KC : Реле
HL : Индикаторная лампа
ST : Термический выключатель
SQ1, SQ2 : Микровыключатель
N : Нейтральный
RU
T
ST
SQ1
KM
SQ2
93
Page 94
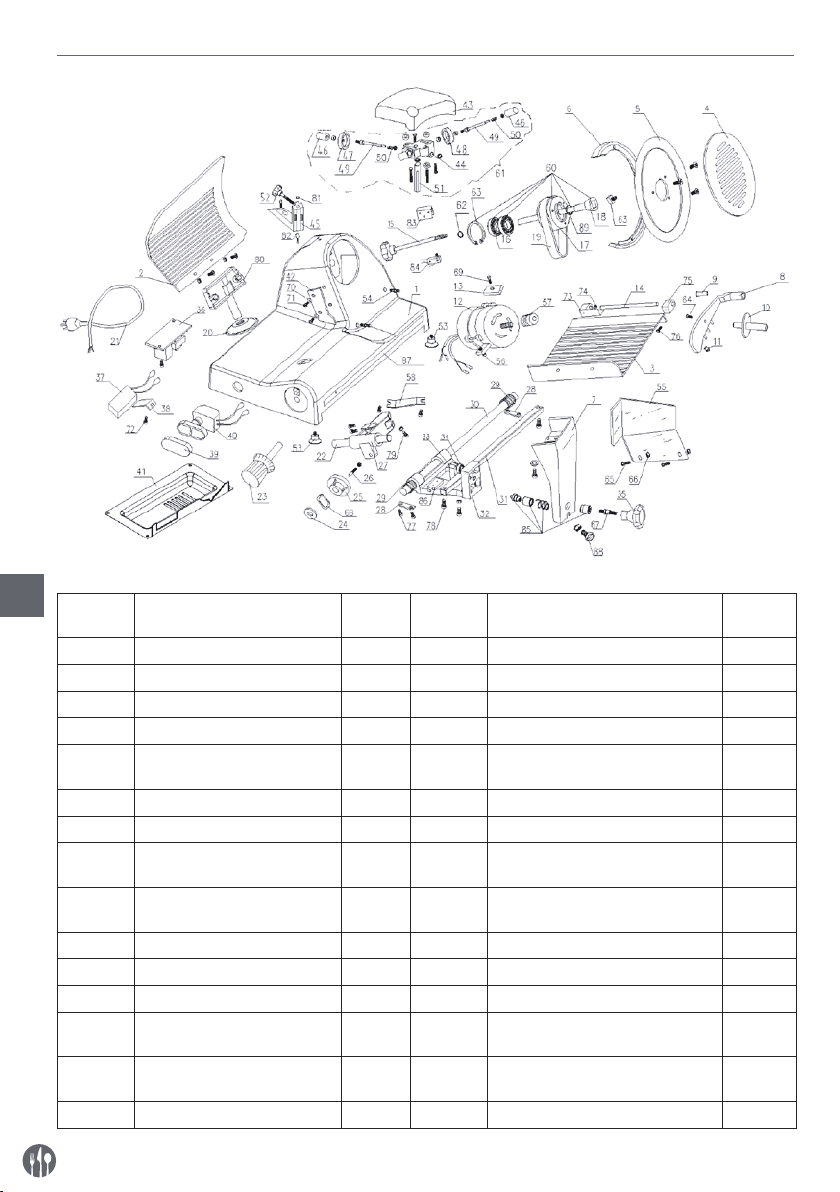
Список деталей (№ позиции : 210000, 210031, 210048)
RU
№ детали Название детали Количе-
1 Ограждение 1 16 Шариковый подшипник 6202 2
2 Активная планка 1 17 Колесо для ремня лезвия Ø66 1
3 Поднос для продуктов 1 18 Штифт колеса для ремня 1
4 Диск защиты лезвия 1 19 Ремень SV.330 2
5 Лезвие 1 20 Скользящий контейнер для обрез
6 Кольцо защиты лезвия 1 21 Линия питания 1
7 Скоба для поддона 1 22 Ось скольжения 1
8 Фиксированный рычаг для
продуктов
9 Втулка фиксированного ры
чага
10 Ручка фиксированного рычага 1 25 Эксцентрик 1
11 Пластиковая гранула 1 26 Нивелир эксцентрика 1
12 Двигатель 1 27 Слайдер 1
13 Мотор для нарезки брикетов 1 28 Скользящая ось для нарезания
14 Штифт фиксированного рыча
га Ø12×185
15 Болты защиты лезвия 1 30 Ось тянущей скобы 1
ство
1 23 Ручка с циферблатом 1
1 24 Упругая прокладка 1
-
1 29 Пружина оси скольжения тянущей
-
№ детали Название детали Количе-
ков
брикетов
скобы
ство
1
-
2
2
94
Page 95
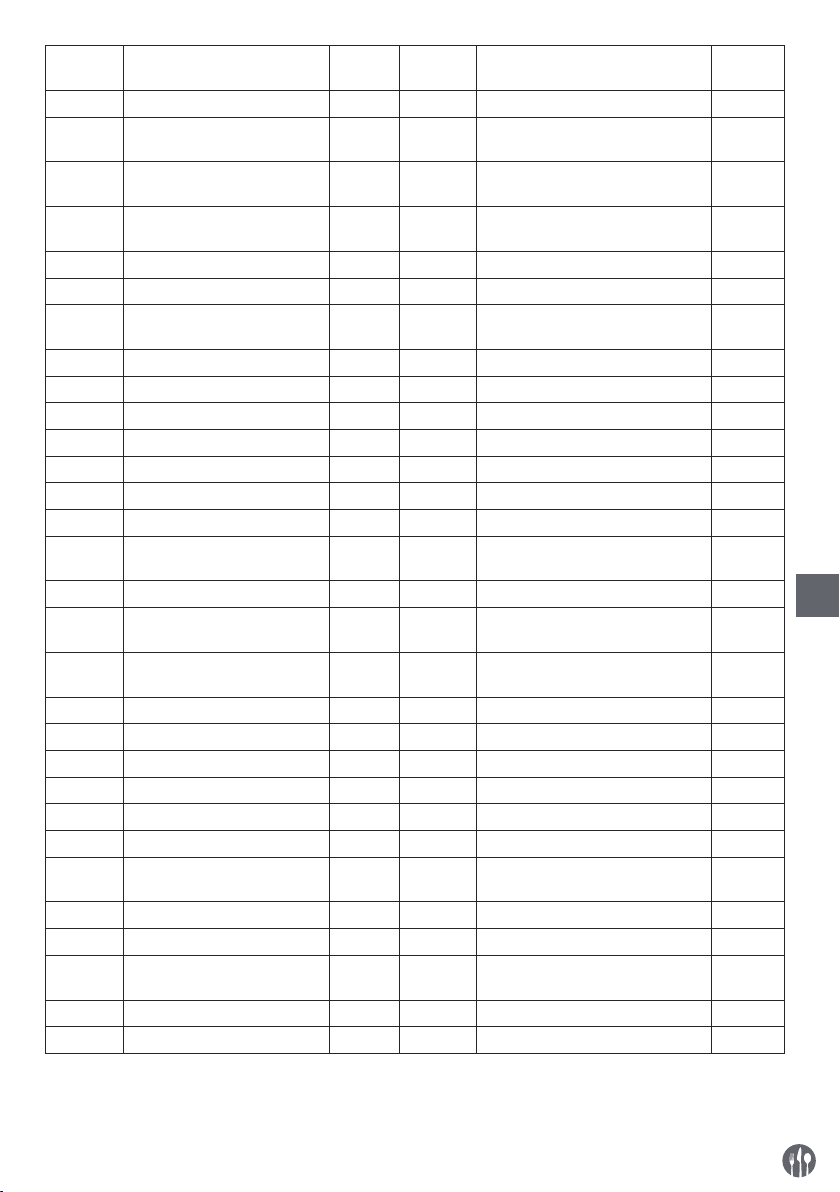
№ детали Название детали Количе-
31 Квадратная ось 1 61 Настройка точила 1
32 Тянущая скоба 1 62 Упругая прокладка Ø15 для под
33 M8×35 Винт с шестигранной
головкой
34 Шариковый подшипник 607 1 64 Гайка для винта с квадратной го
35 Ручка крышки тянущей скобы 1 65 Болт ручки фиксированного рычага 1
36 Реле 1 66 Болт заслонки для защиты пальцев 2
37 Конденсатор 1 67 Гайка заслонки для защиты паль
38 Держатель конденсатора 1 68 Болт ручки скобы 1
39 Кнопка измельчения 1 69 Нижняя упругая накладка 1
40 Кнопочный выключатель 1 70 Болт мотора 1
41 Материнская плата 1 71 Шайба скребка для мяса 2
42 Скребок для мяса 1 72 Болт скребка для мяса 2
43 Валик для заточки 1 73 Фиксирующий болт конденсатора 1
44 Основание блока заточки 1 74 Крышка поддона A 1
45 Основание блока заточки в
сборе
46 Кнопка заточки 2 76 Крышка поддона B 1
47 Колесо измельчения Ø45 1 77 Болты с утопленной головкой
48 Колесо крупного измельчения
Ø45
49 Штифт точила 2 79 Фиксирующий винт оси квадрата 2
50 Пружина 2 80 Болт регулировки слайдера 1
51 Штифт скобы точила 1 81 Магнит 1
52 Ручка крепления точила 1 82 Магнитный выключатель 1
53 Активная планка пробойника 1 83 Алюминиевый блок 1
54 Резиновая ножка 4 84 Микровыключатель 1
55 Защитное кольцо штифта лез-
вия
56 Доска блокировки мяса 1 86 Блок ограничителя 1
57 Скоба скользящей оси 2 87 Планка из нержавеющей стали 1
58 Небольшое колесо ремня мо-
тора
59 Привод скольжения 1 89 Масляное уплотнение 1
60 Установка колеса ремня 1
ство
1 63 Упругая прокладка Ø15 для под
1 75 Прокладка доски для мяса 1
1 78 Болт скользящей оси для нареза-
2 85 Замок из нержавеющей стали 1
1 88 Установочный винт скобы поддона 1
№ детали Название детали Количе-
-
шипника
-
шипника
-
ловкой диска защиты лезвия
-
цев
M6×12
ния брикетов
ство
1
1
1
2
RU
2
4
95
Page 96
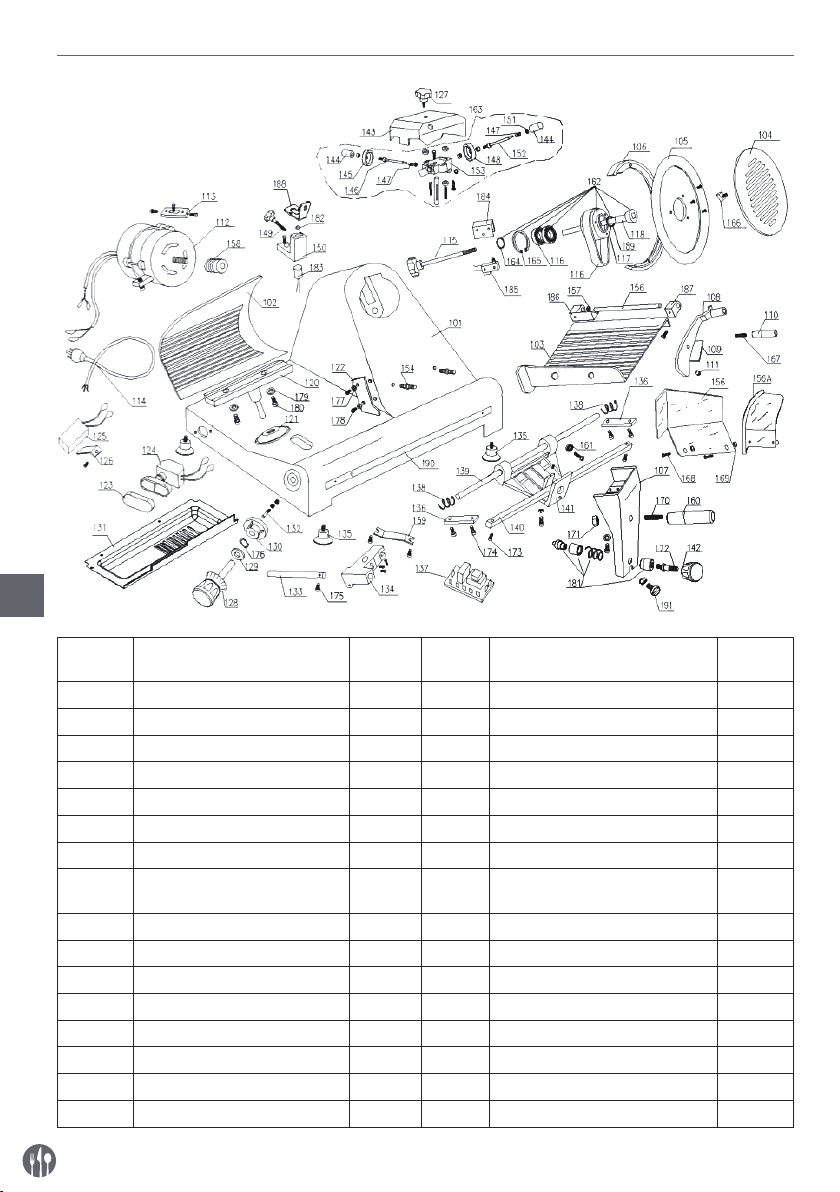
Список деталей (№ позиции : 210017)
RU
№ дета-лиНазвание детали Количе-
101 Ограждение 1 117 Колесо ремня 1
102 Активная планка 1 118 Штифт колеса для ремня 1
103 Поднос для продуктов 1 119 Ремень SV.400 2
104 Диск защиты лезвия 1 120 Опорное основание 1
105 лезвие 1 121 Кабельная муфта 1
106 Кольцо защиты лезвия 1 122 Скребок для мяса 1
107 Скоба для поддона 1 123 Кнопка измельчения 1
108 Фиксированный рычаг продук-
тов
109 Втулка фиксированного рычага 1 125 Конденсатор 1
110 Ручка 1 126 Держатель конденсатора 1
111 Пластиковая гранула 1 127 Винт ориентации штока 1
112 Двигатель 1 128 Ручка с циферблатом 1
113 Мотор для нарезки брикетов 1 129 Упругая прокладка 1
114 Линия питания 1 130 Эксцентрик 300 1
115 Болты защиты лезвия 1 131 Материнская плата 1
116 Шариковый подшипник 6204 2 132 Штифт нивелира эксцентрика 1
96
ство
1 124 Кнопочный выключатель 1
№ дета-лиНазвание детали Количе-
ство
Page 97

№ дета-лиНазвание детали Количе-
133 Скользящая ось 1 163 Настройка точила 1
134 Слайдер 1 164 Ø 20 Упругая прокладка для под
135 Резиновая ножка 4 165 Упругая прокладка Ø 47 для отвер
136 Ось скольжения для нарезания
брикетов
137 Реле 1 167 Болт ручки фиксированного ры
138 Пружина оси скольжения 2 168 Болт заслонки для защиты паль
139 Ось скольжения тянущей скобы 1 169 Гайка заслонки для защиты паль
140 Квадратная ось 1 170 Болт ручки скобы 1
141 Тянущая скоба 1 171 Гайка ручки скобы 1
142 Кнопка тянущей скобы 1 172 Болт дна скобы 1
143 Валик для заточки 1 173 Фиксирующий винт оси квадрата 2
144 Кнопка 2 174 Болт скользящей оси для нареза
145 Колесо измельчения Ø45 1 175 Болт скользящей оси 1
146 Штифт колеса для удаления об
резков
147 Пружина колеса для удаления
обрезков
148 Колесо крупного измельчения
Ø45
149 Ручка крепления точила 1 179 Тонкая прокладка подшипника
150 Опорное основание наружного
кольца
151 Колесо Ø 4,751 1 181 Замок из нержавеющей стали 1
152 Штифт точильного камня 1 182 Магнит 1
153 Основание блока заточки 1 183 Магнитный выключатель 1
154 Защитное кольцо штифта лезвия 2 184 Блок ограничителя 1
155 Штифт поддона для продуктов 1 185 Микровыключатель 1
156/156A Доска блокировки мяса 1 186 Крышка поддона A 1
157 Скоба оси скольжения 1 187 Крышка поддона B 1
158 Небольшое колесо ремня мотора 1 188 Тонкая прокладка подшипника
159 Колесо передачи скольжения 1 189 Масляное уплотнение 1
160 Ручка тянущей скобы 1 190 Планка из нержавеющей стали 1
161 Ось скольжения 608 1 191 Set screw for tray bracket 1
162 Установка колеса ремня 1
ство
2 166 Гайка для винта с квадратной го
2 176 Нижняя упругая накладка Ø 12 1
-
2 177 Шайба скребка для мяса 2
2 178 Болт скребка для мяса 1
1 180 Болт подшипника центра враще
№ дета-лиНазвание детали Количе-
-
шипника
-
стия
-
ловкой диска защиты лезвия
-
чага
-
цев
-
цев
-
ния брикетов
центра вращения
-
ния
центра вращения
ство
1
1
1
1
2
2
4
RU
2
2
1
97
Page 98

Гарантия
Любая недоделка или поломка, которая влечет
за собой неправильную работу устройства, которая будет выявлена в течение первого года от
даты покупки, будет устранена бесплатно, или же
все устройство будет заменено новым, если оно
эксплуатировалось и обслуживалось согласно
инструкции по обслуживанию и не использовалось неправильно, или в разрез с назначением.
Данное положение ни коей мере не нарушает
иных прав потребителя, изложенных в законо-
Утилизация и защита окружающей среды
В случае вывода оборудования из эксплуатации,
продукт нельзя утилизировать вместе с другими
бытовыми отходами. Пользователь несет ответственность за передачу оборудования в соответствующий пункт приёма техники бывшей в
употреблении. Несоблюдение вышеуказанного
положения может привести к наложению штрафов в соответствии с действующими правилами
в отношении утилизации отходов. Селективный
сбор и утилизация использованного оборудования способствуют сохранению природных
RU
ресурсов и обеспечивают рециркуляцию таким
дательстве. В случае заявления устройства в ремонт или на замену в рамках гарантии, следует
указать место и дату покупки устройства и приложить счет, или чековую квитанцию.
Согласно нашей политике совершенствования
наших продуктов оставляем за собой право на
ввод изменений в конструкцию, упаковку и в технические параметры, указываемые в технической документации без предупреждения.
образом, который не вреден для здоровья и
окружающей среды. Для получения дополнительной информации о том, где можно отдать
использованное оборудование для утилизации,
обратитесь в местную компанию по сбору отходов. Производитель и импортер не несут ответственности за рециркуляцию и переработку отходов экологически безопасным способом, как
непосредственно, так и в рамках государственной системы.
98
Page 99

Αγαπητέ πελάτη,
Ευχαριστούμε που αγοράσατε αυτό το προϊόν Hendi. Διαβάστε προσεκτικά το παρόν εγχειρίδιο πριν συνδέσετε
τη συσκευή, προκειμένου να προλάβετε πιθανή βλάβη που μπορεί να οφείλεται σε λαν- θασμένη χρήση.
Διαβάστε ιδίως τους κανονισμούς ασφαλείας πολύ προσεκτικά.
Κανονισμοί ασφαλείας
• Αυτή η συσκευή προορίζεται μόνο για επαγγελματική χρήση και δεν πρέπει να χρησιμοποιείται
για οικιακή χρήση.
• Η συσκευή πρέπει να χρησιμοποιείται μόνο για τον σκοπό για τον οποίο προορίζεται και
σχεδιάστηκε. Ο κατασκευαστής δεν ευθύνεται για τυχόν ζημιές που προκλήθηκαν από
εσφαλμένη λειτουργία και ακατάλληλη χρήση.
• Κρατήστε τη συσκευή και το βύσμα μακριά από νερό και άλλα υγρά. Σε περίπτωση που
η συσκευή πέσει μέσα σε νερό, αφαιρέστε αμέσως το βύσμα από την πρίζα και μην τη
χρησιμοποιήσετε μέχρι να ελεγχθεί η συσκευή από πιστοποιημένο τεχνικό. Η μη τήρηση των
οδηγιών ενδέχεται να προκαλέσει κίνδυνο προς τη ζωή.
• Μην επιχειρήσετε ποτέ να ανοίξετε μόνοι σας το περίβλημα της συσκευής.
• Μην εισάγετε αντικείμενα στο περίβλημα της συσκευής.
• Μην αγγίζετε το βύσμα με υγρά χέρια.
• Κίνδυνος ηλεκτροπληξίας! Μην επιχειρήσετε να επισκευάσετε μόνοι σας τη συσκευή. Σε
περίπτωση δυσλειτουργίας, οι επισκευές πρέπει να διενεργούνται μόνο από εξειδικευμένο
προσωπικό.
• Μην χρησιμοποιείτε ποτέ συσκευή με βλάβη! Σε περίπτωση βλάβης, αποσυνδέστε τη
συσκευή από την πρίζα και επικοινωνήστε με τον πωλητή.
• Προειδοποίηση! Μην βυθίζετε τα ηλεκτρικά μέρη της συσκευής σε νερό ή άλλα υγρά. Μην
βάζετε ποτέ τη συσκευή κάτω από τρεχούμενο νερό.
• Ελέγχετε τακτικά το βύσμα και το καλώδιο τροφοδοσίας για τυχόν ζημιές. Εάν το βύσμα ή το
καλώδιο τροφοδοσίας είναι κατεστραμμένο, πρέπει να αντικατασταθεί από τεχνικό σέρβις ή
εξειδικευμένα άτομα για την αποφυγή τυχόν κινδύνου ή τραυματισμού.
• Βεβαιωθείτε ότι το καλώδιο δεν έρχεται σε επαφή με αιχμηρά ή θερμά αντικείμενα και
κρατήστε το μακριά από φωτιά. Για να βγάλετε το βύσμα από την πρίζα, να τραβάτε πάντα το
βύσμα και όχι το καλώδιο.
• Βεβαιωθείτε ότι το καλώδιο (ή το καλώδιο επέκτασης) είναι τοποθετημένο έτσι ώστε να μην
προκαλέσει κίνδυνο να σκοντάψει κανείς.
• Να προσέχετε πάντα τη συσκευή κατά τη χρήση.
• Προειδοποίηση! Όσο το βύσμα είναι στην πρίζα, η συσκευή είναι συνδεδεμένη στην πηγή
τροφοδοσίας.
• Απενεργοποιήστε τη συσκευή πριν τραβήξετε το βύσμα από την πρίζα.
• Ποτέ μην μεταφέρετε τη συσκευή από το καλώδιο.
• Μην χρησιμοποιείτε συσκευές που δεν παρέχονται μαζί με τη συσκευή.
• Συνδέστε τη συσκευή μόνο σε ηλεκτρική πρίζα με τάση και συχνότητα που αναφέρονται στην
ετικέτα της συσκευής.
GR
99
Page 100

• Συνδέστε το βύσμα σε μια εύκολα προσβάσιμη ηλεκτρική πρίζα έτσι ώστε σε περίπτωση
έκτακτης ανάγκης η συσκευή να μπορεί να αποσυνδεθεί αμέσως. Για να απενεργοποιήσετε
πλήρως τη συσκευή, βγάλτε το βύσμα από την πρίζα.
• Απενεργοποιείτε πάντα τη συσκευή πριν αποσυνδέσετε το βύσμα.
• Μην χρησιμοποιείτε ποτέ εξαρτήματα διαφορετικά από αυτά που συνιστώνται από τον
κατασκευαστή. Σε αντίθετη περίπτωση, μπορεί να δημιουργηθεί κίνδυνος για τον χρήστη και
να προκληθεί ζημιά στη συσκευή. Χρησιμοποιείτε μόνο αυθεντικά εξαρτήματα και αξεσουάρ.
• Αυτή η συσκευή δεν προορίζεται για χρήση από άτομα (συμπεριλαμβανομένων παιδιών)
με μειωμένες σωματικές, αισθητήριες ή διανοητικές ικανότητες ή με έλλειψη πείρας και
γνώσης.
• Αυτή η συσκευή δεν πρέπει, σε καμία περίπτωση, να χρησιμοποιείται από παιδιά.
• Κρατήστε τη συσκευή και το καλώδιο μακριά από παιδιά.
• Να αποσυνδέετε πάντα τη συσκευή από το ρεύμα εάν αφήνεται χωρίς επιτήρηση ή
δεν χρησιμοποιείται και πριν από εργασίες συναρμολόγησης, αποσυναρμολόγησης ή
καθαρισμού.
• Μην αφήνετε ποτέ τη συσκευή χωρίς επιτήρηση ενώ βρίσκεται σε λειτουργία.
Ειδικοί κανόνες ασφαλείας
• Αυτή η συσκευή είναι επαγγελματική μηχανή επεξεργασίας τροφίμων και προορίζεται μόνο
για το κόψιμο τροφίμων, π.χ. κρέας, τυρί, λουκάνικο, ψωμί κλπ. Τα τρόφιμα που θα τεμαχι
στούν πρέπει να αποψυχθούν, να αποσυσκευαστούν και να μην έχουν κόκαλα για να τεμαχιστούν με τη συσκευή. Οποιαδήποτε άλλη χρήση μπορεί να προκαλέσει ζημιά στη συσκευή
GR
ή τραυματισμό.
• Αυτή η συσκευή δεν πρέπει να χρησιμοποιείται για κοπή ή τεμαχισμό κατεψυγμένων τροφί
μων, κρέατος με κόκαλα, ψαριών ή οποιουδήποτε μη εδώδιμου προϊόντος κ.λπ.
• Χρησιμοποιήστε τη συσκευή μόνο όπως περιγράφεται σε αυτό το εγχειρίδιο.
• Αυτή η συσκευή πρέπει να χρησιμοποιείται από εκπαιδευμένο προσωπικό στην κουζίνα του
εστιατορίου, σε κυλικεία, από άτομα που εργάζονται σε μπαρ κλπ.
• Μην τοποθετείτε τη συσκευή πάνω σε θερμαντικά αντικείμενα. (βενζίνη, ηλεκτρική κουζίνα,
σχάρα με κάρβουνα κλπ.). Κρατήστε τη συσκευή μακριά από θερμές επιφάνειες και γυμνή
φλόγα. Χρησιμοποιείτε πάντα τη συσκευή σε επίπεδη, σταθερή, καθαρή, ανθεκτική στη θερ
μότητα και στεγνή επιφάνεια.
• Αυτή η συσκευή δεν προορίζεται για λειτουργία με εξωτερικό χρονοδιακόπτη ή ξεχωριστό
σύστημα τηλεχειρισμού.
•
Παρέχεται ένας τερματικός σταθμός πρόσδεσης που επιτρέπει την εγκάρσια σύνδεση
με άλλο εξοπλισμό.
-
-
-
• NΜην παραβιάζετε ποτέ τους μηχανισμούς ασφαλείας της συσκευής.
• ΠΡΟΕΙΔΟΠΟΙΗΣΗ: Διατηρήστε όλες τις οπές αερισμού καθαρές από εμπόδια.
• ΠΡΟΕΙΔΟΠΟΙΗΣΗ: Αποσυνδέετε ΠΑΝΤΑ τη συσκευή από το ρεύμα πριν τον καθαρισμό, τη
συντήρηση και την αποθήκευση.
• ΠΡΟΕΙΔΟΠΟΙΗΣΗ: Έχετε ΠΑΝΤΑ τα χέρια, τα μακριά μαλλιά και τα ρούχα σε απόσταση από
τα κινούμενα μέρη.
100
 Loading...