

HENAN ESHOW ELECTRONIC COMMERCE RETEVISRT388 User Manual
R T3 88
R T 3 8 8
PIC 01
1
PIC 02
2

EN~Instructions for use
This set includes 2 two way radio units: these are communication devices
which operate on mobile radio frequencies. They come with 8/20/22
channels as well as a back-lit LCD screen, enabling you to communicate
over several kilometers free-of-charge.
N O TE : Please read these user instructions carefully before using the
equipment and retain for future consultation!
SPECIFIC RECOMMENDAT
·If you carry any kind of personal medical disease, consult a doctor before
use.
To avoid the risk of burns, do not use the device if the antenna is damaged
·
in any way.
Do not use the device in a potentially explosive environment(e.g. around
·
petrol pumps, on the lower deck of a boat or around a fuel storage
installation or chemical products)
Switch off the device if on an airplane or in a hospital.
Never use the device in close proximity to a radio to avoid interference.
·
Remove the batteries if the device is not in use for an extended period of
·
time. Never mix used and new b
Leave the transmitter and antenna at least 5 cm from your face. Direct the
·
antenna upwards and speak normally.
I
ONS
atteries
3

·Clean the device with a damp cloth. Do not use cleaning agents and
solvents.
·Do not modify the device in any way. If the device damaged ,please
checked by a qualified professional.
·The device cannot be used to contact the emergency services.
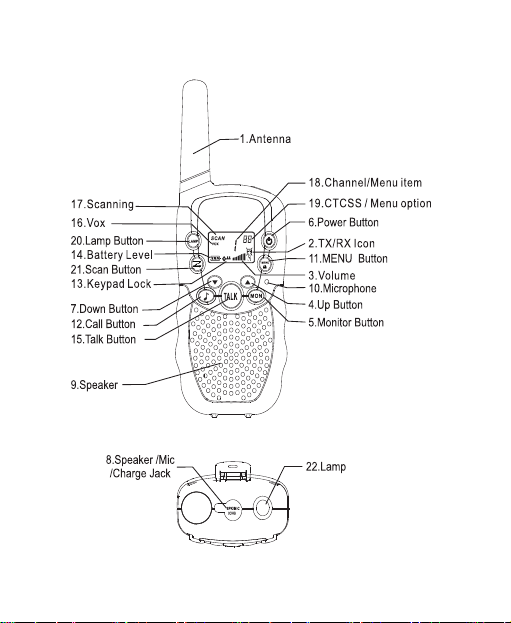
ITEM DESCRIPTION (Pi c01,02)
1. Antenna
2. RX icon -Displayed when receiving
TX icon -Displayed when transmitting
3. Volume level indicator
4. Up adjustor button (▲)
5. Continued reception (MON)
6. On / off button ( )
7. Down adjustor button (▼)
8. Earphone socket
9. Loud speaker
10.Microphone
11. Enter the menu settings (Menu)
12. Call button (CALL)
4

13. Keypad lock indicator
14. Battery level indicator
15. Push to talk (TALK) button
16. VOX indication
17.Scanning indication:
Displayed during scan mode
18.Channel/Menu item indication
19.CTCSS/Menu option-value
20.Lamp Button
21.Scan Button
22.Lamp
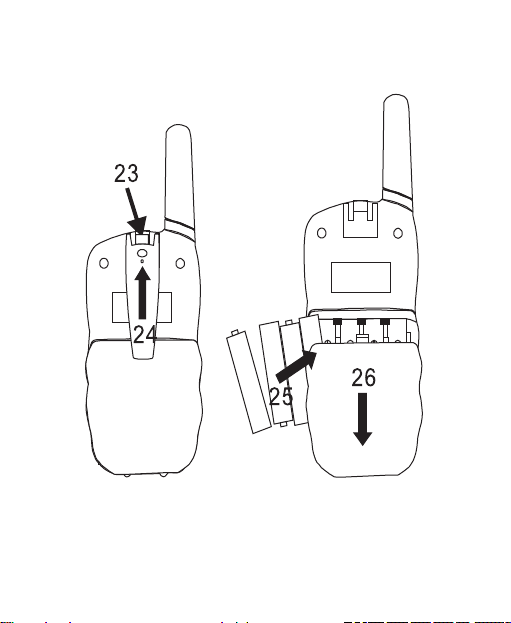
23. Belt attachment clip
24.
Belt attachment
25. Batteries (not supplied)
26. Battery compartment
To install the batteries
Remove the belt clip:there are a secret button to press, then take the belt off.
Open the battery compartment (26) and insert 4AAA batteries (25)(not
ed),ensuring that the poles are correctly alighed.The closed the lid
suppli
5

USING THE WA LKIE TALKIE
1. Turn the d ivice on/off:
To turn on the devices on or off , hold down the on/off button(6) for 3 seconds,
a beep sound will be played to confirm.
2.Adjusti ng the volume:
To increase the volume, press the Up adjustor button ▲(4) and press the
▼(7) button to decrease volume.
N ote: The volume level (3) is displayed on the screen.
3.Battery Charge Level/Low Battery Indication
The battery charge level is indicated by the number of squares present inside
the battery icon on the LCD screen.
Battery Full
Battery 2/3 charged
Battery 1/3 charged
Battery empty
When the battery charge level is low, the battery icon will flash and a beep
will be heard to indicate that the batteries need to be replaced or recharged.
6

4. Receiving/Transmitti ng communications:
The devices are in ‘Reception’ mode when lit up, i.e. they are ready to
receive a call or sound transmitting on the activated frequency.
When you press the Call tone button (12), the device switches to
‘Transmission’ mode. You are then transmitting a sound signal to the other
device.
To send a voice message, press the TALK button (15) and speak into the
microphone (10). Continue to press the button until you have finished
transmitting your message.
Please keep press the Talk button until you finish the transmitting.
d the Mic with a minimum distance of 5 cm from your face.
Hol
N ote:
- The other device must be set to the same channel and same CTCSS code.
- When you finish the communication, please lose the hand, the other device
will email the beep to indicate that the this device is ready to transmit.
5. Changing Channels
·Press the MENU button (11) once, the current channel number flashes
on the display.
·Press the ▲ button (4) or ▼ button (7) to change the channel .
·Press the TALK button to (15) confirm and return to stand-by mode.
N ote: If no button is pressed within 15 seconds during setting, the unit
will return to standby .
7
 Loading...