

Page 1
User’s Manual
RT45
Two Way Radio
Page 2

To CUSTOMERS
Thank you very much for using our two-way radios.
This product has a newly developed function menu and
humanism operation design, making it easy to use. It will
meet your requirement by the compact size and reasonable
price.
1
Page 3
Package Contents
• 2 x RT45 Two Way Radio
• 2 x Belt Clip
• 1 x AC Adapter
• 6 x 650mAh AA NiMH Rechargeable Batteries
• 1 x RT45 User Manual
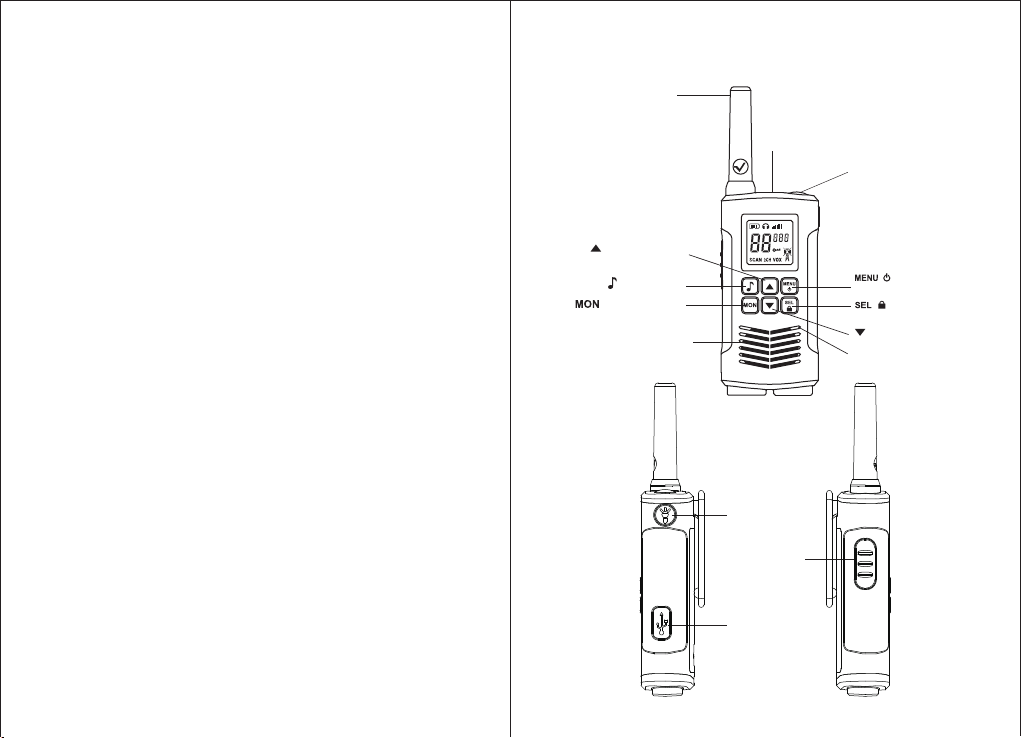
Control and Function
Antenna
Headset Jack
(Headset not included)
LED Light
Features and Specifications
22 Channel
121 Sub-Codes(38 CTCSS Codes&83 DCS Codes)
VOX Function
10 Selectable Call Tone Alerts
Backlit LCD Display
Headset jack for Optional Headset
Roger Beep
Room Monitor
Battery Charger
Battery Level Meter
Channel Monitor
Channel Scan
Dual Watch
Keypad Lock
LED Torch
Battery Low Alert
Power Source: 6 AA NIMH Rechargeable Batteries
2
(Volume/Channel
Up) Button
(Call) Button
(Monitor) Button
Speaker
LED Torch
Button
PTT
(Push-To-Talk)
Button
Micro USB Jack
/ (Menu/
Power) Button
/ (Select/Lock)
Button
(Volume/Channel
Down) Button
Microphone
3
Page 4
Display
YOUR NEW RADIO
The two-way radios operate on mobile radio frequencies, and can be
used in any country where mobile radio frequencies are authorized,
1
6
subject to applicable regulations.
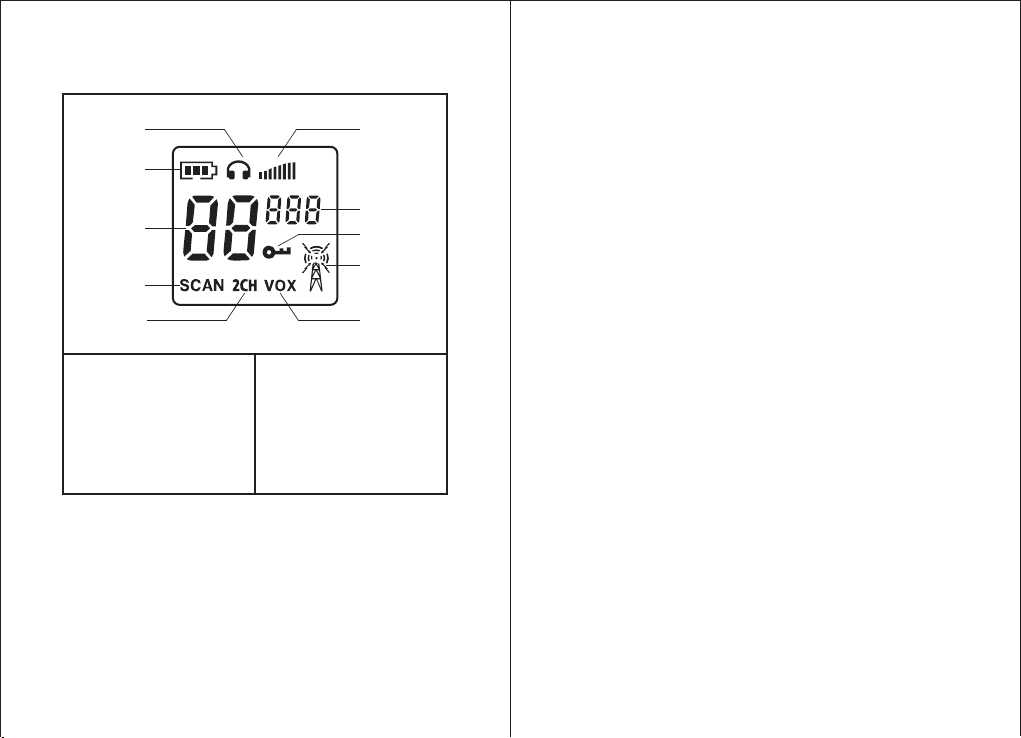
1. Room Monitor
2. Battery Level Meter
3. Channel Indicator
4. Scan Indicator
5. Dual Watch Indicator
6. Volume Level Indicator
4
2
3
4
5
7. Sub-code Indicator
8. Keypad Lock Indicator
9. Transimit/Receive
Indicator
10. VOX Indicator
7
8
9
10
Turning Your Radio On And Off
To turn on the radio press and hold the POWER ON/OFF button
until a channel number appears and the radio Beeps . Press and
hold POWER ON/OFF button until the display goes blank to turn
off.
Monitor Function
It is good radio etiquette to monitor the channel for activity before
you transmit, to ensure that you do not interrupt other users already
on the channel. Press and hold "Mon" to check for channel activity.
If you hear static, the channel is clear for use.
The Battery Meter
The battery meter located in the display indicates how much
battery power you have remaining, to protect the rechargeable
battery, when battery power is low, the final bar in the Battery Low
icon will blink and an audible tone will sound twice before the radio
shuts off. Your batteries should be replaced or recharged, if using
rechargeable batteries.
TALKING AND LISTENING
Read this manual carefully before use.
Your radio has 22 channels. If you are in a group and you wish to
talk to each other, all radios must be set to the same channel and
interference eliminator code (CTCSS). If you experience
interference and need to change channel, ensure that you change
5
Page 5

the channel and code of all radios in your group.
• For maximum clarity, hold radio 5 to 7 centimeters from mouth.
• Press and hold “PTT” and speak into the microphone. LED
indicator light glows continuously when transmitting.
• To receive messages, release “PTT”.
Time-out Timer
The Time-out Timer feature helps extend battery life by preventing
accidental transmission. The radio will emit a continuous warning
tone after “PTT” button is pressed for 3 minutes and will stop
transmitting.
Volume
Press Up button to increase or DOWN button to decrease the
volume .The volume level icon v is displayed. Select volume
level 1-8.
Channel
• Press “MENU” button the channel number will begin to flash.
• Use “UP” or “DOWN“ button to change channel.
• Press “PTT” button to set new channel.
Interference Eliminator Code
Interference eliminator codes help minimize interference by
providing you with a choice of code combinations.
• Press “MENU” button until the code number begins to flash.
• Use “UP” or “DOWN“ button to change the code.
• Press “PTT” to set new code.
You can specify a different code for each channel.
• To set a channel and code combination, press “MENU” button
and then press “UP” or “DOWN“ button to select the channel.
• Press “MENU” button again and then press “UP” or “DOWN “
button to select a code.
• Press “PTT” to exit the menu and to save the channel and code
combination.
To set another channel and code combination, repeat these steps.
6
Keypad Lock
The keypad lock disables the “MENU” , “UP” and “DOWN“ buttons.
It also disables the scan function, but allows you to use the “MON”
button to monitor the channel.
Press and hold the “LOCK” button for three seconds to lock or
unlock the keypad. When the radio is locked the lock icon will
show in the display.
Scan
By scanning, you can monitor channels and codes for transmissions
and lock in on the one that interests you. More importantly, you can
find someone in your group who has accidentally changed channels
and is talking during your scan.
• To start scanning, briefly press and release the “MON” button.
• If you activate scan while your code is set to 0, then the radio will
check for any activity on each channel, regardless of the code in
use on that channel.
• If you activate scan while the code is set on 1 to 121, then the
radio will check for any activity on each channel, except the code
0 in use on that channel.
• While the radio is scanning, Scan Icon will display and the radio
will scroll through the channels.
• When activity is detected on a channel, the radio will stop
scanning and you will hear whatever transmissions are detected.
7
Page 6

The radio’s display will show the channel and code on which
activity was detected.
• If you want to respond to the transmission, press “PTT” button
within 5 seconds and you can respond.
• The radio will resume scanning after 5 seconds of inactivity on the
channel.
• To stop scanning, briefly press and release “MON” button.
Scan Advance
If scan stops on a channel that you don’t want to listen to, briefly
press “UP” or “DOWN“ button to resume scanning for the next active
channel.
Hands Free Use (VOX)
VOX allows you to transmit "hands-free" by talking while using VOX
accessories connected to the radio.
Note: When using audio accessories with your radio, turn your radio
off before you place the accessory on your head or in your ear.
How To Use The VOX Feature
In VOX mode, your radio can be used“hands-free,” automatically
transmitting when you speak. You can set the VOX sensitivity level
to fit the volume of your voice and avoid transmissions triggered by
background noise.
To turn VOX mode on or off
1. Press the Menu/Power button until the VOX iconflashes on the
display. The current On or Off setting is displayed.
2. Press the “UP” and “DOWN” button to turn VOX On or Off.
3. Choose one of the following:
a. Press the Menu/Power button to enter the new setting and
proceed to other functions.
b. Press “PTT” button to save the setting and return to Standby
mode.
To set VOX sensitivity
1. Press the Menu/Power button until the VOX sensitivity icon
flashes and the current sensitivity level is displayed.
2. Press the “Up” or “Down” button to change the setting.
3. Choose one of the following:
a. Press the Menu/Power button to enter the new setting and
proceed to other functions.
b. Press “PTT” button to save the setting and return to Standby
mode.
Call Tone
Press “CALL” button to transmit your call tone, alerting users on
the same channel and code that you are about to talk. Your radio
has 10 call tones (depend on model) to choose from.
To Set the Call Tone
• With the radio on, press “MENU” button until "C" appears in the
display.
• Current call tone setting will begin to flash.
• Press “UP” or “DOWN” to change and hear call tones while the
setting number is flashing.
• Press “PTT” to set new call tone.
Room Monitor
Enables your radio to detect voice/noises ( according to the
sensitivity level set) and transmit back to the listening radio
8
9
Page 7

without pushing the PTT button. The monitoring radio is not able
receive any transmissions in this mode.
TO turn Room Monitor On
1. Press Menu button until the Room monitor icon blinks.
2. Press UP or DOWN button to the desired room monitor sensitivity
level.
3. Press the LOCK button to turn on room monitor.
Press the Menu button to turn off room monitor.
Note: When the voice/noise in the monitored room continues for more
than 60 seconds, the monitoring radio stop monitoring for 5
seconds, and resumes.
Dual watch receiver [dual scan]
Dual Scan is a user selectable feature. In dual scan, the radio looks
for activity on home channel and selected dual scan channel in the
radio.
[Dual scan:1] The user can select dual scan channel through menu,
when dual scan channel was selected, the dual scan
code is the code in dual scan channel, because our
radio have different code in each channel through
menu setting.
[Dual scan:2] when dual scan feature is enable(user selected a dual
scan channel through menu) , a dual icon “2CH” is
displayed in LCD.
[Dual scan:3] In dual scan mute state(no signal in home channel
and dual scan channel), the home channel with home
channel’s code and dual scan icon in display. If home
channel is actively , the display do not change. If dual
scan channel is actively, the radio will display dual
scan channel with dual scan channel’s code and dual
10
scan icon. After RX hang time, the radio will return
to home channel display.
[Dual scan:4] The dual scan is same as normal scan except this
scan have not CSQ feature.Reference scan
description , dual scan have scan mute, scan
unmute, RX hang time ,TXhang time state..
11
Page 8
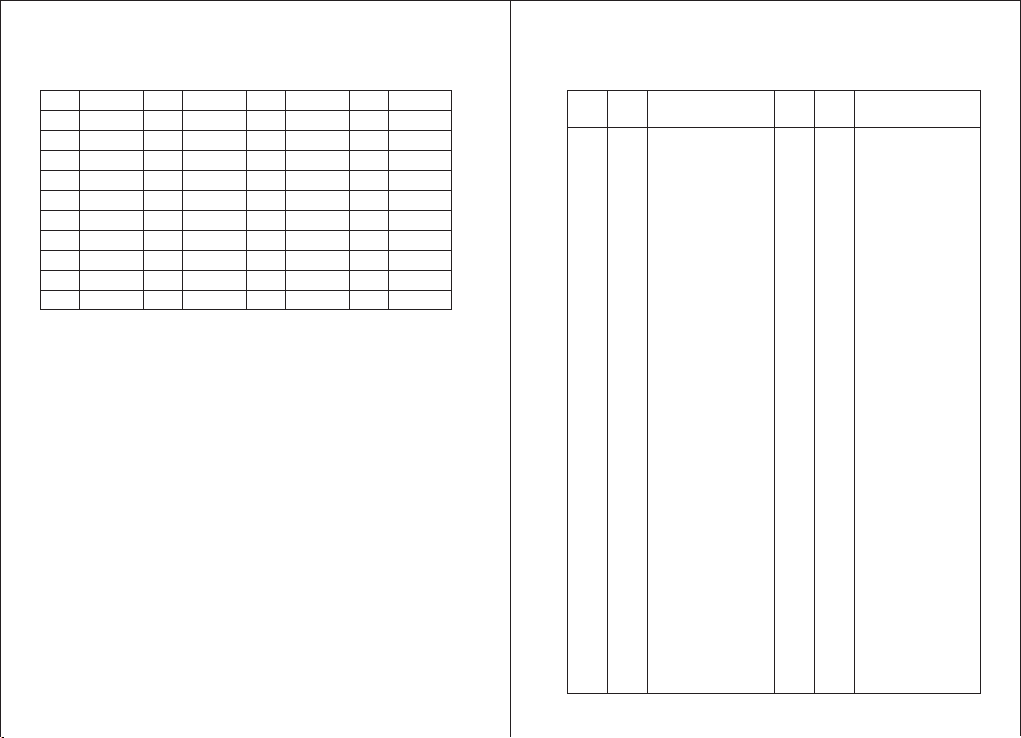
CTCSS FREQUENCY (38 groups)
CDCSS CODE WORD TABLE (83 groups)
Code Frea(Hz) Code Frea(Hz) Code Frea(Hz) Code Frea(Hz)
1
2
3
4
5
6
7
8
9
10
67.0
71.9
74.4
77.0
79.7
82.5
85.4
88.5
91.5
94.8
11
97.4
21
136.5
12
100.0
13
103.5
14
107.2
15
110.9
16
114.8
17
118.8
18
123.0
19
127.3
20
131.8
22
23
24
25
26
27
28
29
30
141.3
146.2
151.4
156.7
162.2
167.9
173.8
179.9
186.2
31
32
33
34
35
36
37
38
12
192.8
203.5
210.7
218.1
225.7
233.6
241.8
250.3
Code
Number
39
40
41
42
43
44
45
56
47
48
49
50
51
52
53
54
55
56
57
58
59
60
61
62
63
64
65
66
67
68
69
70
71
72
73
74
75
76
77
78
79
80
Octal
Code
MSB LSB
11101100011100000010011
023
11010110111100000010101
025
11001011101100000010110
026
10100011111100000011001
031
10111110101100000011010
032
10110110110100000100011
043
00011111101100000100111
047
11111001010100000101001
051
11011110100100000101100
054
10111010001100000110101
065
11001111001100000111001
071
11010010011100000111010
072
01011100110100000111011
073
11101000111100000111100
074
01101011110100001001100
114
11100101011100001001101
115
11111000001100001001110
116
00001111011100001010101
125
01111010011100001011001
131
01100111001100001011010
132
01011101101100001011100
134
01101111010100001100011
143
00111101100100001101010
152
10001001101100001101101
155
10010100111100001101110
156
11010111100100001110010
162
01100011101100001110101
165
00001011111100001111010
172
00110001011100001111100
174
11011101001100010000101
205
11010001110100010010011
223
11110110000100010010110
226
10001011011100010100011
243
00111111010100010100100
244
10110001111100010100101
245
11000100111100010101001
251
00101110111100010110001
261
10111101000100010110011
263
10000111100100010110101
265
11110010100100010111001
271
00011001111100011000110
306
01110001101100011001001
311
Bit Pattern
Code
Number
81
82
83
84
85
86
87
88
89
90
91
92
93
94
95
96
97
98
99
100
101
102
103
104
105
106
107
108
109
110
111
112
113
114
115
116
117
118
119
120
121
Octal
Code
MSB LSB
11011000110100011001101
315
01000111110100011011001
331
01010010111100011100011
343
01110101001100011100110
346
00011101011100011101001
351
11010000101100011110100
364
01011110000100011110101
365
00101011000100011111001
371
11101110110100100001001
411
11110011100100100001010
412
01111101001100100001011
413
10010111001100100010011
423
11011000101100100011001
431
11000101111100100011010
432
11110111000100100100101
445
01001111110100100110100
464
11000001011100100110101
465
11011100001100100110110
466
01111000110100101000011
503
01011111000100101000110
506
10000011011100101001110
516
00011100011100101011010
532
00110011110100101100110
546
00011000111100101110101
565
10111011001100110000110
606
11001110001100110001010
612
00011110101100110010100
624
00000011111100110010111
627
11100101000100110011001
631
11111000010100110011010
632
10011000011100110101100
654
01001000111100110110010
662
01110010011100110110100
664
01000101011100111000011
703
00010111101100111001010
712
01110011000100111010011
723
00111100100100111011001
731
00100001110100111011010
732
00011011010100111011100
734
00101001101100111100011
743
01000001111100111101100
754
Bit Pattern
13
Page 9
Warnings
Product safety and RF Exposure for two way radio:
Before using this two way radio, please read the manual
which contains important operating instructions for safe
usage, RF Energy Awareness, control information and
operational instructions for compliance with RF Energy
Exposure limits in applicable national and international
standards, and also read the operational instructions for
safe use.
CAUTION
Test position and configuration Head SAR was performed with the
device configured in the positions according to IEEE1528, and face
up SAR was performed with the device 25mm from the phantom,
Body SAR was performed with the belt clip on the device 0 mm
from the phantom. Body SAR was also performed with the headset
attached and without.
WARNING
Antennas
1) For safe operation, the antenna for the product shall be least
25mm away from your face, when speaking.
2) Switching to other antennas is prohibited and will affect the radio
performance.
3) DO NOT use any portable radio that has a damaged antenna. If
a damaged antenna comes into contact with your skin, a minor
burn can result.
WARNING
Batteries
All batteries can cause property damage and/or bodily injury such
as burns if a conductive material touches exposed terminals. The
conductive material may complete an electrical circuit (short circuit)
and become hot.
• Exercise care when removing NiMH or AA batteries. Do not use
sharp or conductive tools to remove these batteries.
• Exercise care in handling any charged battery, particularly when
placing it inside a pocket, purse or other container with metal
objects.
• Do not discard your battery in a fire.
• Do not replace the battery in any area labeled “Hazardous
Atmosphere”. Any sparks created in a potentially explosive
atmosphere can cause explosion or fire.
• Do not disassemble, crush, puncture, shred or otherwise attempt
to change the form of your battery.
• Do not dry a wet battery or damp battery with an appliance or
heat source, such as a hair dryer or microwave oven.
• If the radio battery contact area has been submerged in water,
dry and clean the battery contacts before attaching the battery
to the radio.
14
15
Page 10
CAUTION
Battery Charger Safety Instructions
1. Turn the radio off when charging the battery.
2. Do not expose the charger to outside environment. Chargers
should only be used indoors.
3. Do not operate or disassemble the charger. Do not use a charger
that has been dropped or damaged in any way.
4. Never alter the AC cord or plug provided with the unit. If the plug
will not fit the outlet, have the proper outlet installed by a qualified
electrician. An improper condition can result in a risk of electric
shock.
5. To reduce the risk of damage to the cord or plug, pull the plug
rather than the cord when disconnecting the charger from the AC
receptacle.
6. To reduce the risk of electric shock, unplug the charger from the
outlet before attempting any maintenance or cleaning.
7. Use of an attachment not recommended or sold by Eshow Solut-
ions may result in a risk of fire, electric shock or personal injury.
8. Make sure the cord is located so it will not be stepped on, tripped
over or subjected to damage or stress.
9. An extension cord should not be used unless absolutely necessary.
Use of an improper extension cord could result in a risk of a fire
and/or electric shock. If an extension cord must be used, make
sure that:
• The pins on the plug of the extension cord are the same number,
size and shape as those on the plug of the charger.
• The extension cord is properly wired and in good condition.
10. The supply cord of the AC adaptor cannot be replaced. If the
cord is damaged, call customer service.
WARNING
The information listed below provides the user with the information
needed to make him or her aware of RF exposure, and what to do
to as-sure that this radio operates with the FCC RF exposure limits
of this radio.
Electromagnetic Interference/Compatibility
Note: Nearly every electronic device is susceptible to electromag-
netic interference (EMI) if inadequately shielded, designed
or otherwise configured for electromagnetic compatibility.
During transmissions, radio generates R
F energy that
can possibly cause interference with other devices or
systems.
Facilities
To avoid electromagnetic interference and/or compatibility conflicts,
turn off your radio in any facility where posted notices instruct you
to do so. Hospitals or health care facilities may be using equipment
that is sensitive to external RF energy.
Aircraft
When instructed to do so, turn off your radio when onboard an
aircraft. Any use of a radio must be in accordance with applicable
regulations per airline crew instructions.
Medical Devices – Pacemakers, Defibrillators or other Implanted
Medical Devices
16
17
Page 11

Persons with pacemakers, Implantable cardioverter
defibrillators (ICDs) or other active implantable
medical devices (AIMD) should
• Consult with their physicians regarding the potential risk of
interference from radio frequency transmitters, such as portable
radios (poorly shielded medical devices may be more susceptible
to interference).
• Turn the radio OFF immediately if there is any reason to suspect
that interference is taking place.
• Do not carry the radio in a chest pocket or near the implantation
site, and carry or use the radio on the opposite side of their body
from the implantable device to minimize the potential for
interference.
Hearing Aids
Some digital wireless radios may interfere with some hearing aids.
In the event of such interference, you may want to consult your
hearing aid manufacturer to discuss alternatives.
Other Medical Devices
If you use any other personal medical device, consult the
manufacturer of your device to determine if it is adequately
shieldedfrom RF energy. Your physician may be able to assist
you in obtaining this information.
Use of Communication Devices While Driving
Always check the laws and regulations on the use of radios in
the areas where you drive.
• Give full attention to driving and to the road.
• Use hands-free operation, if available.
• Pull off the road and park before making or answering a call, if
driving conditions or regulations so require.
For Vehicle with Air Bags
Refer to the vehicle manufacturer’s manual prior to installation of
electronic equipment to avoid interference with air bag wiring. Do
not place a portable radio in the area over an air bag or in the air
bag deployment area. Air bags inflate with great force. If a portable
radio is placed in the air bag deployment area and the air bag
inflates, the radio may be propelled with great force and cause
serious injury to occupants of the vehicle.
Potentially Explosive Atmosphere
Turn off your radio prior to entering any area with a potentially
explosive atmosphere. Only radio types that are especially
qualified should be used in such areas as “Intrinsically Safe”. Do
not remove, install or charge batteries in such areas. Sparks in a
potentially explosive atmosphere can cause an explosion or fire
resulting in bodily injury or even death.
Note: The areas with potentially explosive atmosphere referred
to above include fueling areas such as below decks on
boats, fuel or chemical transfer or storage facilities, areas
where the air contains chemicals or particles (such as
grain, dust or metal powders) and any other area where
you would normally be advised to turn off your vehicle
engine. Areas with potentially explosive atmospheres are
often – but not always posted.
18
19
Page 12
Blasting Caps and Areas
To avoid possible interference with blasting operations, turn off
your radio when you are near electrical blasting caps, in a
blasting area, or in areas posted “Turn off two-way radios”. Obey
all signs and instructions.
Warning: CHOKING HAZARD – Small Parts. Not for children
under 3 years.
Attention! RISQUE D’ÉTOUFFEMENT – Contient de petits
éléments. Ne convient pas aux enfants de moins de 3 ans.
Advertencia: PELIGRO DE ASFIXIA – Contiene piezas
pequeñas. No conveniente para niños menores de 3 años.
Achtung: ERSTICKUNGSGEFAHR – Kleinteile. Nicht für
Kinder unter 3 Jahren geeignet.
Waarschuwing: VERSTIKKINGSGEVAAR – Bevat kleine
onderdelen. Niet geschikt voor kinderen jonger dan 3 jaar.
Attenzione: RISCHIO DI SOFFOCAMENTO – Contiene pezzi
di piccole dimensioni. Non adatto a bambini di età inferiore a
3 anni.
Aviso: RISCO DE ASFIXIA – Peças pequenas. Produto não
recomendado para crianças com menos de 3 anos.
Technical specifications and warnings (US)
Technical specifications (US)
Technical Parameters (US)
Operating frequency:462.5500MHz~467.7125MHz
Output Power:≤0.5W
Channels:22 FRS
Modulation type:F3E
Power source:AA Alkaline 4.5V DC /
NiMH battery 3.6V DC 650mAh
Channel and frequency correspondence list (US)
1
2
3
4
5
6
7
8
9
10
11
Frequencies
(MHz)
462.5625
462.5875
462.6125
462.6375
462.6625
462.6875
462.7125
467.5625
467.5875
467.6125
467.6375
Channel
Note:Above channels are FRS license free channels
Power
-Watts
0.5
0.5
0.5
0.5
0.5
0.5
0.5
0.5
0.5
0.5
0.5
Channel
12
13
14
15
16
17
18
19
20
21
22
Frequencies
(MHz)
467.6625
467.6875
467.7125
462.5500
462.5750
462.6000
462.6250
462.6500
462.6750
462.7000
462.7250
Power
-Watts
0.5
0.5
0.5
0.5
0.5
0.5
0.5
0.5
0.5
0.5
0.5
20
21
Page 13
Warnings (US)
WARNING
Your radio is designed to comply with the following national
and international standards and guidelines regarding exposure of
human beings to radio frequency electromagnetic energy:
- United States Federal Communications Commission, Code of
Federal Regulations: 47 CFR part 2.1093
- IEEE Std. 1528:2013 and KDB447498, Evaluating Compliance
with FCC Guidelines for Human Exposure to Radio Frequency
Electromagnetic Fields.
- American National Standards Institute (ANSI)/Institute of Electrical
& Electronic Engineers (IEEE) C95. 1-2005
- Institute of Electrical and Electronic Engineers (IEEE) C95.3-2002
- International Electrotechnical Commission IEC62209-2:2010
CAUTION
This product is compliance to FCC RF Exposure requirements and
refers to FCC website
https://apps.fcc.gov/oetcf/eas/reports/GenericSearch.cfm
search for FCC ID: 2AAR8RETEVISRT45 to gain further information
include SAR Values.
WARNING
SAFETY INFORMATION
Your wireless hand-held portable transceiver contains a low
power transmitter. This product sends out radio frequency (RF)
signals when the Push-to-Talk (PTT) button is pressed. The
device is authorized to operate at a duty factor not to exceed 50%.
In August 1996, the Federal Communications Commissions (FCC)
adopted RF exposure guidelines with safety levels for hand-held
wireless devices.
To control your exposure and ensure compliance with the general
population or uncontrolled environment exposure limits, transmit
no more than 50% of the time. The radio generates measurable
RF energy exposure only when transmitting.
WARNING
Any Changes or modifications not expressly approved by the
party responsible for compliance could void the user’s authority
to operate the equipment and should not be made. To comply
with FCC requirements, transmitter adjustments should be
made only by or under the supervision of a person certified as
technically qualified to perform transmitter maintenance and
repairs in the private land mobile and fixed services as certified
by an organization representative of the user of those services.
Replacement of any transmitter component (crystal, semiconductor,
etc) not authorized by the FCC equipment authorization for this
22
23
Page 14

radio could violate FCC rules.
Note: Use of this radio outside the country where it was intended
to be distributed is subject to government regulations and
may be prohibited.
WARNING
Body-Worn Operation
To maintain compliance with FCC’s RF exposure guidelines, for
body-worn operation, this radio has been tested and meets the
FCC RF exposure guidelines when used with Eshow Radio Corp.
accessories supplied or designated for this product. Use of other
accessories may not ensure compliance with FCC RF exposure
guidelines.
If you wear the radio on your body when transmitting always use
Eshow supplied or approved belt clip, holster, case, or body
harness for this product.
If you do not use any accessories supplied or approved by Eshow,
ensure the radio and its antenna are at least 1 inch (2.5cm) from
your body when transmitting.
This product is authorized to operate at a duty factor not to
exceed 50%.To transmit(talk),push the PTT key,to receive calls,
release PTT key.Transmitting 50% of the time or less is important
because the radio generates RF energy only when it transmit.
24
25
 Loading...