

Page 1

TOC-Cover
Operating Instructions
Autotool 2000 CPK
Page 2

Translation of the original operating instructions 3
2
Page 3

Operating Instructions
Translation of the original operating instructions
Table of contents
1 Notes for the user ................... 5
1.1 Information about the product ....... 5
1.2 Warranty ........................ 5
1.3 Contact data ..................... 5
1.4 Information about these Operating
Instructions ...................... 5
1.5 Copyright and intellectual property rights 5
1.5.1 Keeping and dissemination of the
Operating Instructions .............. 5
1.6 Target group of these Operating
Instructions ...................... 5
1.7 General information ...............5
1.8 Conventions adopted in these Operating
Instructions ...................... 6
1.8.1 Classification of the precautionary notices 6
1.8.2 Other notational conventions ........ 6
2 Safety warnings .................... 6
2.1 General power tool safety warnings ... 6
2.1.1 Work area safety .................. 6
2.1.2 Electrical safety ................... 6
2.1.3 Personal safety ...................7
2.1.4 Power tool use and care ............ 7
2.1.5 Servicing ........................ 7
2.2 Intended use ..................... 7
2.3 Misuse. . . . . . . . . . . . . . . . . . . . . . . . . . 7
2.4 Personnel qualification .............. 8
2.4.1 Specialist personnel for operation ..... 8
2.4.2 Specialist personnel for maintenance and
servicing ........................ 8
2.4.3 Authorised person for low-voltage
electrical equipment ............... 8
2.4.4 Authorised specialist for repair and
testing .......................... 8
2.5 Underlying hazards associated with use of
the device ....................... 8
2.5.1 Cleanliness at the workplace ......... 8
2.5.2 Spare parts and accessories .......... 8
3 Design and function ................. 9
3.1 Overview of the device ............. 9
3.1.1 Scope of supply ................... 9
3.1.2 Serial number .................... 9
3.1.3 Checking scope of supply ........... 9
3.2 Functional description ............. 10
3.2.1 Tool AT2000 CPK .................10
3.2.2 Power pack CPK ................. 10
4 Transport, disposal and storage ....... 11
4.1 Transporting the device ............ 11
4.2 Disposal ....................... 11
4.3 Storage ........................ 11
5 Installation ....................... 11
5.1 Installing the accessories ........... 11
5.2 Connecting the device ............. 11
6 Operation ........................ 11
6.1 Switching on .................... 11
6.2 Switching off .................... 11
6.3 Loading cable ties ................ 11
6.4 Positioning and binding items for
bundling ....................... 12
6.4.1 Emptying the waste box ........... 12
7 Service menu ...................... 12
7.1 Navigation ...................... 12
7.2 Start menu ..................... 13
7.3 Main menu ..................... 13
7.4 Languages menu ................. 13
7.5 Status menu .................... 13
7.6 Settings menu ................... 13
7.6.1 Force level ...................... 13
7.6.2 Quality ........................14
7.6.3 Interruption front sensor ........... 14
7.6.4 Date / time ..................... 14
7.6.5 Check of binding ................. 14
7.7 Contact menu ................... 14
8 HT Data Management ............... 15
8.1 First steps ...................... 15
8.2 Access levels .................... 15
8.2.1 Start page/Binding menu ........... 15
8.2.2 Service menu .................... 15
8.2.3 Memory menu. . . . . . . . . . . . . . . . . . . 15
8.2.4 Update menu ................... 15
8.2.5 Measurement environment menu .... 15
8.3 Binding menu ................... 16
8.3.1 Entering password ................ 16
8.3.2 Select a language ................ 17
8.3.3 Show binding information .......... 17
8.3.4 Change binding parameter settings ... 17
8.3.5 Status indicators ................. 17
Operating Instructions • AT2000 CPK • 02-2017 • v02 • 106-29004
3
Page 4

8.3.6 Synchronising time and date ........ 17
8.4 Service menu .................... 18
8.4.1 Changing other parameter settings ... 18
8.4.2 Changing the access code in the AT2000
CPK .......................... 18
8.5 Memory menu. . . . . . . . . . . . . . . . . . . 19
8.5.1 Refresh memory of the tool ......... 19
8.5.2 Select bindings .................. 19
8.5.3 Select messages ................. 19
8.5.4 Export process data ............... 20
8.6 Update menu ................... 20
8.6.1 Update firmware ................. 21
8.6.2 Change password ................ 21
8.6.3 Update binding parameter settings ... 21
8.6.4 Install other languages. . . . . . . . . . . . . 21
8.7 Measurement environment menu .... 22
8.7.1 Using measurement mode .......... 22
8.7.2 Deleting measurement results ....... 23
8.7.3 Saving measurement results ......... 23
8.7.4 Deactivating measurement mode ....23
8.8 Exporting process data from the power
pack .......................... 23
8.8.1 Converting CSV file ............... 23
11 Technical data ..................... 32
11.1 Tool AT2000 CPK .................32
11.2 PowerpackCPK ................. 33
11.3 Noise and vibration information ...... 33
12 Declarations of conformity ........... 34
12.1 AT2000 CPK automatic tool system ... 34
12.2 Power pack CPK ................. 35
9 Troubleshooting ................... 24
9.1 Important notes ................. 24
9.2 Performing a reset ................ 24
9.3 Display messages ................. 25
9.4 Possible fault .................... 28
9.4.1 Troubleshooting a cable-tie bandoleer
malfunction ..................... 28
9.4.2 Changing back-up battery .......... 29
10 Maintenance ...................... 29
10.1 Important notes ................. 29
10.2 Accessories and extras ............. 29
10.3 Servicing by manufacturer .......... 29
10.4 Maintenance schedule ............. 30
10.5 Repair ......................... 30
10.5.1 Checking upper jaw ............... 30
10.5.2 Replacing upper jaw .............. 30
10.5.3 Checking front cap and position of c
utter .......................... 31
10.5.4 Checking tie advancer ............. 31
10.5.5 Replacing tie advancer ............. 31
Operating Instructions • AT2000 CPK • 02-2017 • v02 • 106-29004
4
Page 5

Notes for the user
1 Notes for the user
These Operating Instructions are very important for
correct use of the device.
They contain important information and safety
instructions that will enable you to utilise the product
correctly and economically for its intended use.
The instructions help avoid hazards, reduce repair costs
and downtimes, and enhance the dependability and
durability of the device.
Non-compliance of any nature whatsoever can lead to
accidents with fatal consequences, injury or damage to
property.
1.1 Information about the product
Product designation: AT2000 CPK
Article number: 106-00000
1.2 Warranty
The warranty is in accordance with statutory
requirements. Warranty entitlement applies only in the
country in which the device was originally purchased.
Batteries, fuses and light sources are not covered by the
warranty.
1.3 Contact data
The manufacturer of the product described in these
Operating Instructions is:
HellermannTyton GmbH
Grosser Moorweg 45
D-25436 Tornesch, Germany
Tel. +49 4122 701-0
www.HellermannTyton.de
1.4 Information about these Operating Instructions
Last update: 08.09.2017
1.5.1 Keeping and dissemination of the Operating
Instructions
These Operating Instructions must be kept in the
immediate vicinity of the workplace and must be
available at all times to all operating personnel. The
operating company shall inform the operating personnel
of the location of these Operating Instructions.
The operating company shall obtain replacement from
the manufacturer if these instructions are, become or are
rendered no longer easily legible.
If the device is acquired by or sold on to a third party the
following documents must be handed over to the new
owner:
• Operating Instructions
• Documents relating to repair work
• Logs of repair work undertaken
f Protect these Operating Instructions from moisture,
direct sunlight and extreme heat.
1.6 Target group of these Operating Instructions
These Operating Instructions must be read and complied
with by every person charged with any of the following
tasks:
• Installation
• Operation
• Servicing
• Repair
• Fault rectification
1.7 General information
All accompanying drawings are not covered by the
change service.
1.5 Copyright and intellectual property rights
The manufacturer retains the copyright to these
Operating Instructions. Under no circumstances may
these instructions be reproduced or electronically
processed, replicated or disseminated, in whole or in
part, without the prior written consent of
HellermannTyton GmbH (hereinafter referred to as
HellermannTyton). Any breach or infringement of these
stipulations will result in liability for damages.
Operating Instructions • AT2000 CPK • 02-2017 • v02 • 106-29004
5
Page 6

Safety warnings
1.8 Conventions adopted in these Operating Instructions
1.8.1 Classification of the precautionary notices
Precautionary notices in these Operating Instructions
draw attention to hazards associated with use of the
device and indicate how they can be avoided.
The precautionary notices are subdivided into three
groups according to the severity of the potential hazard:
DANGER
Texts accompanied by the signal word "DANGER" indicate
hazardous situations which, in the event of non-compliance
with the appropriate precautions, will cause death or severe
injury.
WARNING
Texts accompanied by the signal word "WARNING" indicate
hazardous situations which, in the event of non-compliance
with the appropriate precautions, can cause death or serious
injury.
CAUTION
Texts accompanied by the signal word "CAUTION" indicate
hazardous situations which, in the event of non-compliance
with the appropriate precautions, can cause slight or serious
injury.
1.8.2 Other notational conventions
f Indicates an instruction
• Indicates an item in a bulleted list
; Indicates the result of an action
This text highlight is used for names of menus,
clickable on-screen buttons, pushbuttons and switches.
This text highlight is used for display
messages.
à This text highlight is used for cross-references.
NOTE
Texts accompanied by the signal word "NOTE" indicate
situations which, in the event of non-compliance with the
appropriate precautions, can cause damage to the device or
the surroundings.
Texts accompanied by this symbol contain useful additional
information.
2 Safety warnings
2.1 General power tool safety warnings
The safety warnings in this section contain general power
tool safety warnings to be set out verbatim in the Operating
Instructions as required by EN 60745. Consequently, some
instructions might not be relevant for the AT2000 CPK.
WARNING
Read all safety warnings and all instructions.
Failure to follow the warning and instructions may
result in electric shock, fire and/or serious injury.
Save all safety warnings and other instructions for
future reference. The term "power tool" in the
warnings refers to your mains-operated (corded) power
tool or battery-operated (cordless) power tool.
2.1.1 Work area safety
a) Keep work area clean and well lit. There is an
increased risk of accident in cluttered or poorly lit areas.
b) Do not operate power tools in explosive
atmospheres, such as in the presence of flammable
liquids, gases or dust. Power tools create sparks
which may ignite the dust or fumes.
c) Keep children and bystanders away while operating
a power tool. Distractions can cause you to lose
control.
2.1.2 Electrical safety
a) Power tool plugs must match the outlet. Never
modify the plug in any way. Do not use any adapter
plugs with earthed (grounded) power tools.
Unmodified plugs and matching outlets will reduce risk
of electric shock.
b) Avoid body contact with earthed or grounded
surfaces, such as pipes, radiators, ranges and
refrigerators. There is an increased risk of electric shock
if your body is earthed or grounded.
c) Do not expose power tools to rain or wet conditions.
Water entering a power tool will increase the risk of
electric shock.
d) Do not abuse the cord. Never use the cord for
carrying, pulling or unplugging the power tool. Keep
cord away from heat, oil, sharp edges or moving
parts. Damaged or entangled cords increase the risk of
electric shock.
Operating Instructions • AT2000 CPK • 02-2017 • v02 • 106-29004
e) Use a suitable extension cord. Use of a suitable
extension cord reduces the risk of electric shock.
f) If operating a power tool in a damp location is
unavoidable, use a residual current device (RCD)
protected supply. Use of an RCD reduces the risk of
electric shock.
6
Page 7

Safety warnings
2.1.3 Personal safety
a) Stay alert, watch what you are doing and use
common sense when operating a power tool. Do not
use a power tool while you are tired or under the
influence of drugs, alcohol or medication. A moment
of inattention while operating power tools may result in
serious personal injury.
b) Use personal protective equipment. Always wear eye
protection. Protective equipment such as dust mask,
non-skid safety shoes, hard hat, or hearing protection
used for appropriate conditions will reduce personal
injuries.
c) Prevent unintentional starting. Ensure the switch is
in the off-position before connecting to power
source and/or battery pack, picking up or carrying
the tool. Carrying power tools with your finger on the
switch or energising power tools that have the switch on
invites accidents.
d) Remove any adjusting key or wrench before turning
the power tool on. A wrench or a key left attached to
a rotating part of the power tool may result in personal
injury.
e) Do not overreach. Keep proper footing and balance
at all times. This enables better control of the power
tool in unexpected situations.
f) Dress properly. Do not wear loose clothing or
jewellery. Keep your hair, clothing and gloves away
from moving parts. Loose clothes, jewellery or long
hair can be caught in moving parts.
g) If devices are provided for the connection of dust
extraction and collection facilities, ensure these are
connected and properly used. Use of dust collection
can reduce dust-related hazards.
2.1.4 Power tool use and care
a) Do not force the power tool. Use the correct power
tool for your application. The correct power tool will
do the job better and safer at the rate for which it was
designed.
b) Do not use the power tool if the switch does not
turn it on and off. Any power tool that cannot be
controlled with the switch is dangerous and must be
repaired.
c) Disconnect the plug from the power source and/or
the battery pack from the power tool before making
any adjustments, changing accessories, or storing
power tools. Such preventive safety measures reduce
the risk of starting the power tool accidentally.
d) Store idle power tools out of the reach of children.
Do not allow persons unfamiliar with the power tool
or these instructions to operate the power tool.
Power tools are dangerous in the hands of untrained
users.
e) Maintain power tools. Check for misalignment or
binding of moving parts, breakage of parts and any
other condition that may affect the power tool’s
operation. If damaged, have the power tool repaired
before use. Many accidents are caused by poorly
maintained power tools.
f) Keep cutting tools sharp and clean. Properly
maintained cutting tools with sharp cutting edges are
less likely to bind and are easier to control.
g) Use the power tool, accessories and tool bits etc. in
accordance with these instructions, taking into
account the working conditions and the work to be
performed. Use of the power tool for operations
different from those intended could result in a
hazardous situation.
2.1.5 Servicing
Have your power tool serviced by a qualified repair
person using only identical replacement parts. This
will ensure that the safety of the power tool is
maintained.
2.2 Intended use
Use the device only when it is in full working order and
safe, always be safety-conscious and aware of the
hazards.
The AT2000 CPK is suitable for and intended for the
following uses:
• Automatic binding of bundles up to a diameter of max.
20 mm
• Use indoors and, under rainproof roofing, outdoors
• Industrial use
2.3 Misuse
Use other than as stated in the section entitled
"à"Intended use" on page7" is misuse. The
operator of the device bears sole responsibility for injury
and damage resulting from misuse.
The following are specifically prohibited:
• Use with faulty parts
• Use in explosive environments or in the presence of a fire
hazard
• Use in high humidity and/or direct sunlight
• Simultaneous use by two or more persons
• Unauthorised alterations and modifications to the device
and its accessories without the prior consent of
HellermannTyton
• Use of spare parts and accessories not tested and
approved beforehand by HellermannTyton
• Operation of the device without closed service covers
fitted at the gate
Operating Instructions • AT2000 CPK • 02-2017 • v02 • 106-29004
7
Page 8

Safety warnings
2.4 Personnel qualification
Under-age persons and trainees are permitted to use the
device only under the supervision of an experienced
specialist and only with the express permission of the
operating company.
2.4.1 Specialist personnel for operation
The tasks and authorisations assigned to specialist
personnel for extended operation are as follows:
• Operation of the device
• Rectification of faults or, as applicable, initiation of
measures for the rectification of faults
• Cleaning of the device
These individuals have the specialist training or practical
experience that will ensure correct handling.
2.4.2 Specialist personnel for maintenance and
servicing
Always have maintenance and servicing carried out by
duly qualified specialist personnel. These individuals have
the specialist training that affords sucient knowledge
of the device for them to judge when it is in safe
working order.
These individuals are also familiar with the following
rules and regulations:
• Applicable national health and safety regulations
2.5 Underlying hazards associated with use of the device
2.5.1 Cleanliness at the workplace
Orderliness, good lighting and cleanliness at the
workplace all help to make work easier, minimise
hazards and reduce the risk of injury.
Always comply with the following principles of
orderliness and cleanliness at the workplace.
f Put tools away as soon as they are no longer needed.
f Avoid trips (e.g. immediately dispose of waste by placing
it in the containers provided for the purpose).
f Immediately remove spillages of grease, oil and other
liquids.
f Clean smears off the controls.
2.5.2 Spare parts and accessories
f Use only OEM spare parts.
f After parts have been replaced, always make sure that
everything is in full working order.
f Use only accessories approved by HellermannTyton.
Accessories can affect the way in which the device
works.
• Accident prevention regulations
• Generally accepted rules of engineering practice (e.g.
employers' liability insurance association codes, DIN
standards, VDE regulations, technical rules of other
European Union member states or other states party to
the Agreement on the European Economic Area).
2.4.3 Authorised person for low-voltage electrical
equipment
Work on the electrical supply and on parts that are live
when the device is in operation should always be carried
out by a person duly authorised to work on low-voltage
electrical equipment.
2.4.4 Authorised specialist for repair and testing
Only service technicians from HellermannTyton or service
technicians certified by HellermannTyton are permitted
to carry out repairs and safety checks.
Operating Instructions • AT2000 CPK • 02-2017 • v02 • 106-29004
8
Page 9

3 Design and function
Data Signal Power
Power pack CPK
198 2
35 467
3.1 Overview of the device
3.1.1 Scope of supply
Design and function
1 AT2000 CPK
2 Case, complete with 2 keys
3 CPK safety warnings
4 CPK Operating Instructions on CD
5 USB connecting cable A/B (separate delivery)
6 Connecting cable for connecting power pack and AT2000 CPK
7 power pack CPK (separate delivery)
8 Power cord (separate delivery)
9 Tie advancer
3.1.2 Serial number
1
3.1.3 Checking scope of supply
f Check that nothing is missing and that there are no
visible signs of damage in transit or other damage. Have
damage confirmed by the freight forwarder and notify
HellermannTyton immediately in writing.
Serial number 1 is inside the AT2000 CPK. It is visible when the gate is open.
Operating Instructions • AT2000 CPK • 02-2017 • v02 • 106-29004
9
Page 10

Design and function
3.2 Functional description
3.2.1 Tool AT2000 CPK
13
12
11
10
9
8 6 5 47
1 Release button for left service cover
2 Actuator bandoleer cutter
3 Socket for connection to power pack
4 Enter button for confirming a selection
5 Select and reset button for selecting a menu
6 LED status indicator
7 Start trigger
8 Box for waste material
9 Display with touch-sensitive controls
10 Front cap with level sensor, upper and lower jaws
11 Catch
12 Drum
13 Cable tie bandoleer
The AT2000 CPK is an electrically powered system for
bundling electrical wires, for example, and for securing
parts of various kinds with T18RA cable ties, 100 mm ×
2.5 mm × 1 mm (L×W × T).
Force and quality of the binding can be softwarecontrolled or set by means of the display on the device.
The items to be bundled have to be positioned between
the jaws and against the front cap. The device then
closes the tie as soon as the trigger is pressed.
If a fault occurs, messages appear on the display to step
the user through the recommended fault-diagnosis
routine.
Process data of various kinds are collected during use.
These data can be analysed by PC software and used to
document process capability, for example. In addition,
the operator is notified if the tension force exceeds the
preset.
3.2.2 Power pack CPK
Power pack CPK
6
1
Data Signal Power
2
3
1 Main switch
2 LED indicator Power:
Green: Power pack ON
3 LED indicator Signal:
Green: AT2000 CPK Connected and ready,
Red: Fault
Yellow: Binding cycle active
Blue: Navigation in main menu, binding not possible
4 LED indicator Data:
Green: PC connected; AT2000 CPK connected; USB stick found; USB stick can be
removed,
Red/green flashing: Data are being written to USB stick
5 USB port for exporting process data to USB memory stick
6 Socket for connection to AT2000 CPK
Out: Error
In: Last Tie
max. 250V~
2345
Out: Busy
Serial port
3
1 Socket for foot pedal
2 USB port for connection to PC
3 Socket for power supply
In automatic systems, the AT2000 CPK can be integrated
with the power pack with control box (106-00110) via a
serial interface.
1
1
2
Operating Instructions • AT2000 CPK • 02-2017 • v02 • 106-29004
10
Page 11

4 Transport, disposal and storage
Data Signal Power
Power pack CPK
Transport, disposal and storage
4.1 Transporting the device
f Always use the case that comes with the device to
transport the AT2000 CPK.
4.2 Disposal
End-of-life (EOL) disposal of the device and individual
subassemblies and the disposal of consumables and
auxiliaries are subject in part to statutory regulations.
Detailed information is available on request from the
appropriate authorities (e.g. regional or national water
boards or environmental authorities).
f Dispose of packaging materials.
Always dispose of packaging materials in accordance with
the currently valid materials-disposal and environmental
protection regulations.
f Always take materials for disposal to certified collection
points.
f Contact the manufacturer if there is any uncertainty
regarding disposal.
4.3 Storage
f Store the tool and the power pack in a cool, dry place.
f Avoid direct sunlight.
f Store the tool and the power pack in dustproof
packaging.
f Store electrical components (tool and power pack) in
impact-absorbing packaging and separately from the
accessories.
f Consult and comply with the appropriate data sheets for
storage of the accessories.
3
2
f Use connecting cord 2 to connect the power pack to
toolAT2000 CPK 3 .
6 Operation
6.1 Switching on
f The power-supply outlet must be readily accessible so
that the system can be de-energised if the need arises.
f Keep the main switch OFF when the AT2000 CPK is not
in use and when a change is to be made.
f Switch the power pack ON at the main switch.
; The Signal and Power LEDs on the power pack show
green.
; The Status LED on the AT2000 CPKshows green.
; The welcome screen appears on the display:
Autotool 2000 CPK
5 Installation
5.1 Installing the accessories
f Always proceed in accordance with the instructions
supplied with the accessory in question.
5.2 Connecting the device
1 2
In: Last Tie Out: Error Out: Busy
Serial port
f Connect power pack 2 to power-supply outlet 1 .
; The device is ready for use.
6.2 Switching off
f Switch the power pack OFF at the main switch.
6.3 Loading cable ties
1 2
3
f Insert cable tie bandoleer 1 parallel with the drum.
; Make sure that cable-tieheads 2 are facing up.
f Press start trigger 3 .
Operating Instructions • AT2000 CPK • 02-2017 • v02 • 106-29004
11
Page 12
Service menu
1
Zurück
f If there are no cable ties in the device three blank shots
are fired.
; The cable ties are loaded.
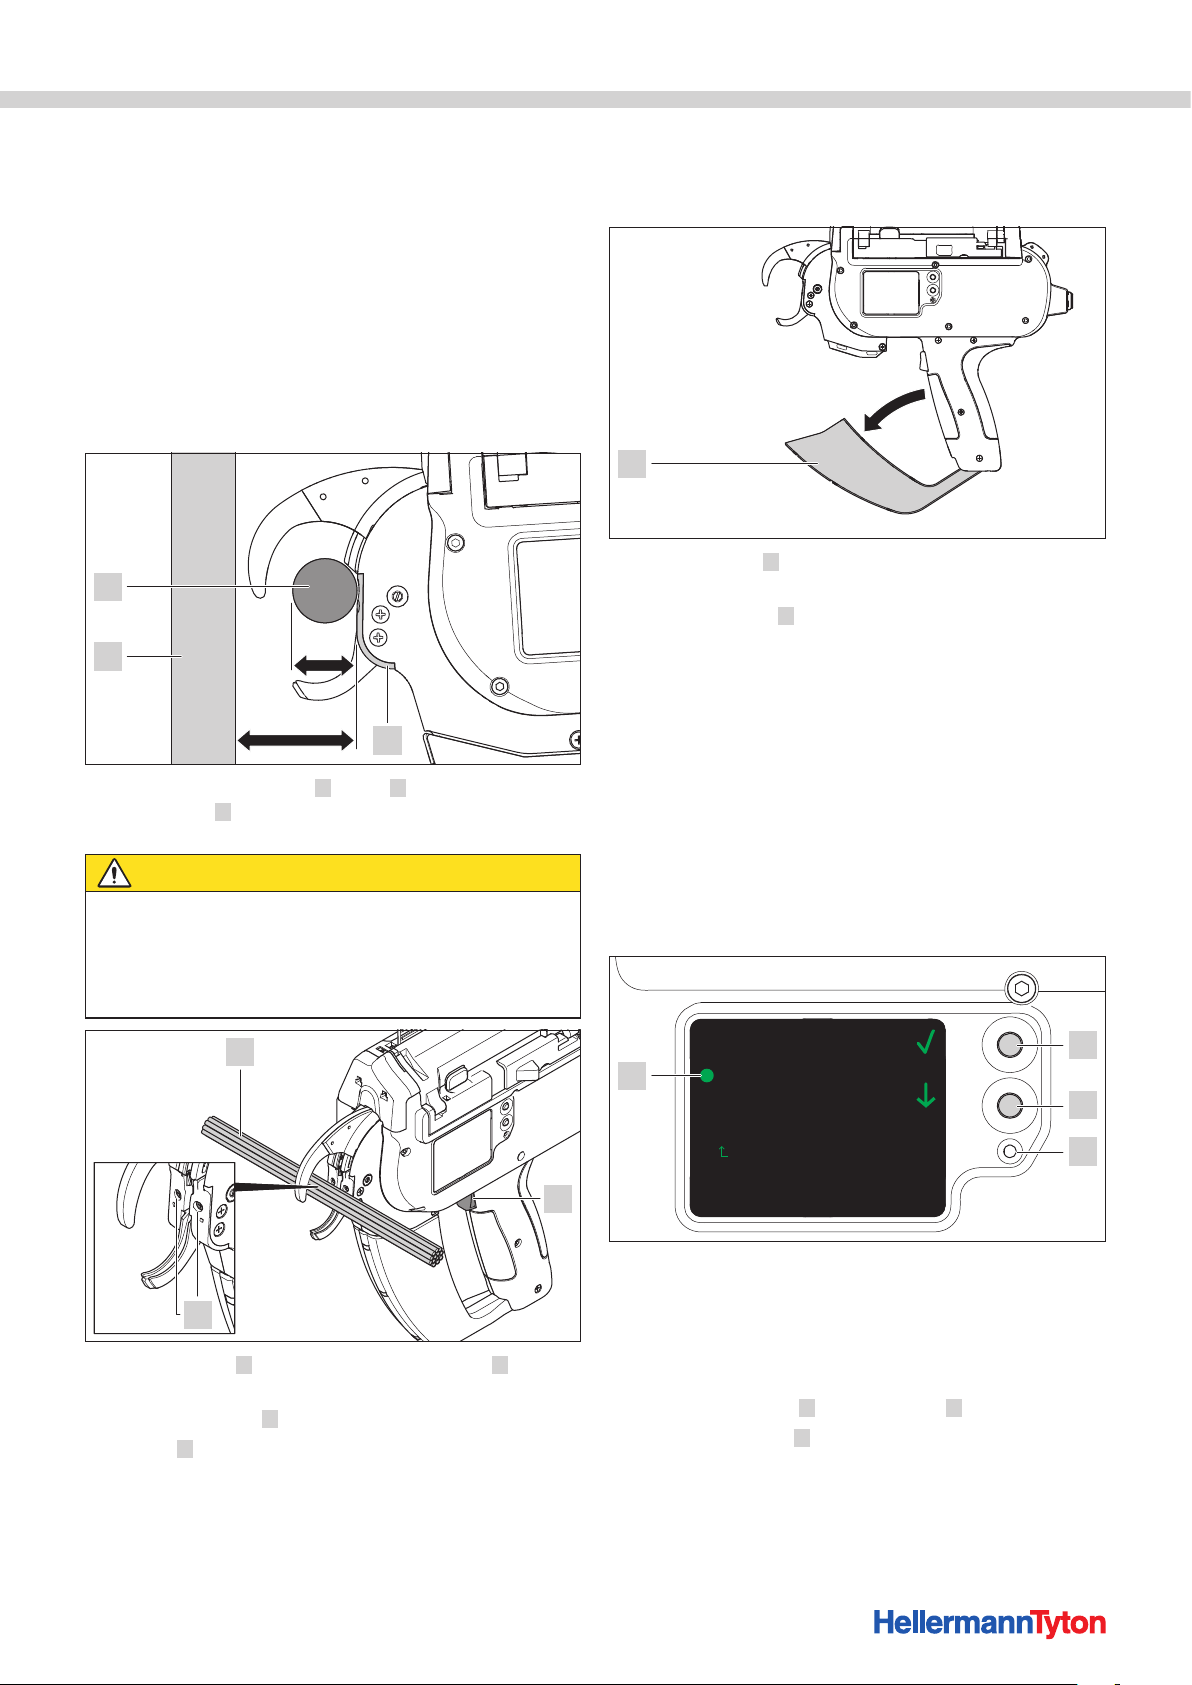
6.4 Positioning and binding items for bundling
f Set the Force level and/or Quality parameters,
à"Settings menu" on page13 or à"Change
binding parameter settings" on page17.
f Check the time and date; set if necessary,à"Date /
time" on page14 .
The device is suitable for the following bundle
geometries:
3
2
20 mm
42 mm
1
The distance from front cap 1 to flat 2 must be at least
42mm. Bundle 3 can be no more than 20mm in
diameter.
CAUTION
Crush hazard when jaws close.
f Do not insert fingers between upper and lower jaws and
do not keep your finger on the trigger.
f Always keep the power pack switched OFF when
clearing a blockage.
6.4.1 Emptying the waste box
The waste box has to be emptied after a maximum of
120 bindings at a bundle diameter of 3mm.
f Pull waste box 1 in the direction indicated by the arrow
and empty the box.
f Close waste box 1 .
7 Service menu
The AT2000 CPK has a Service menu for setting and
checking numerous functions.
The menu covers:
• Language setting
• Device status
• Settings
• Contact
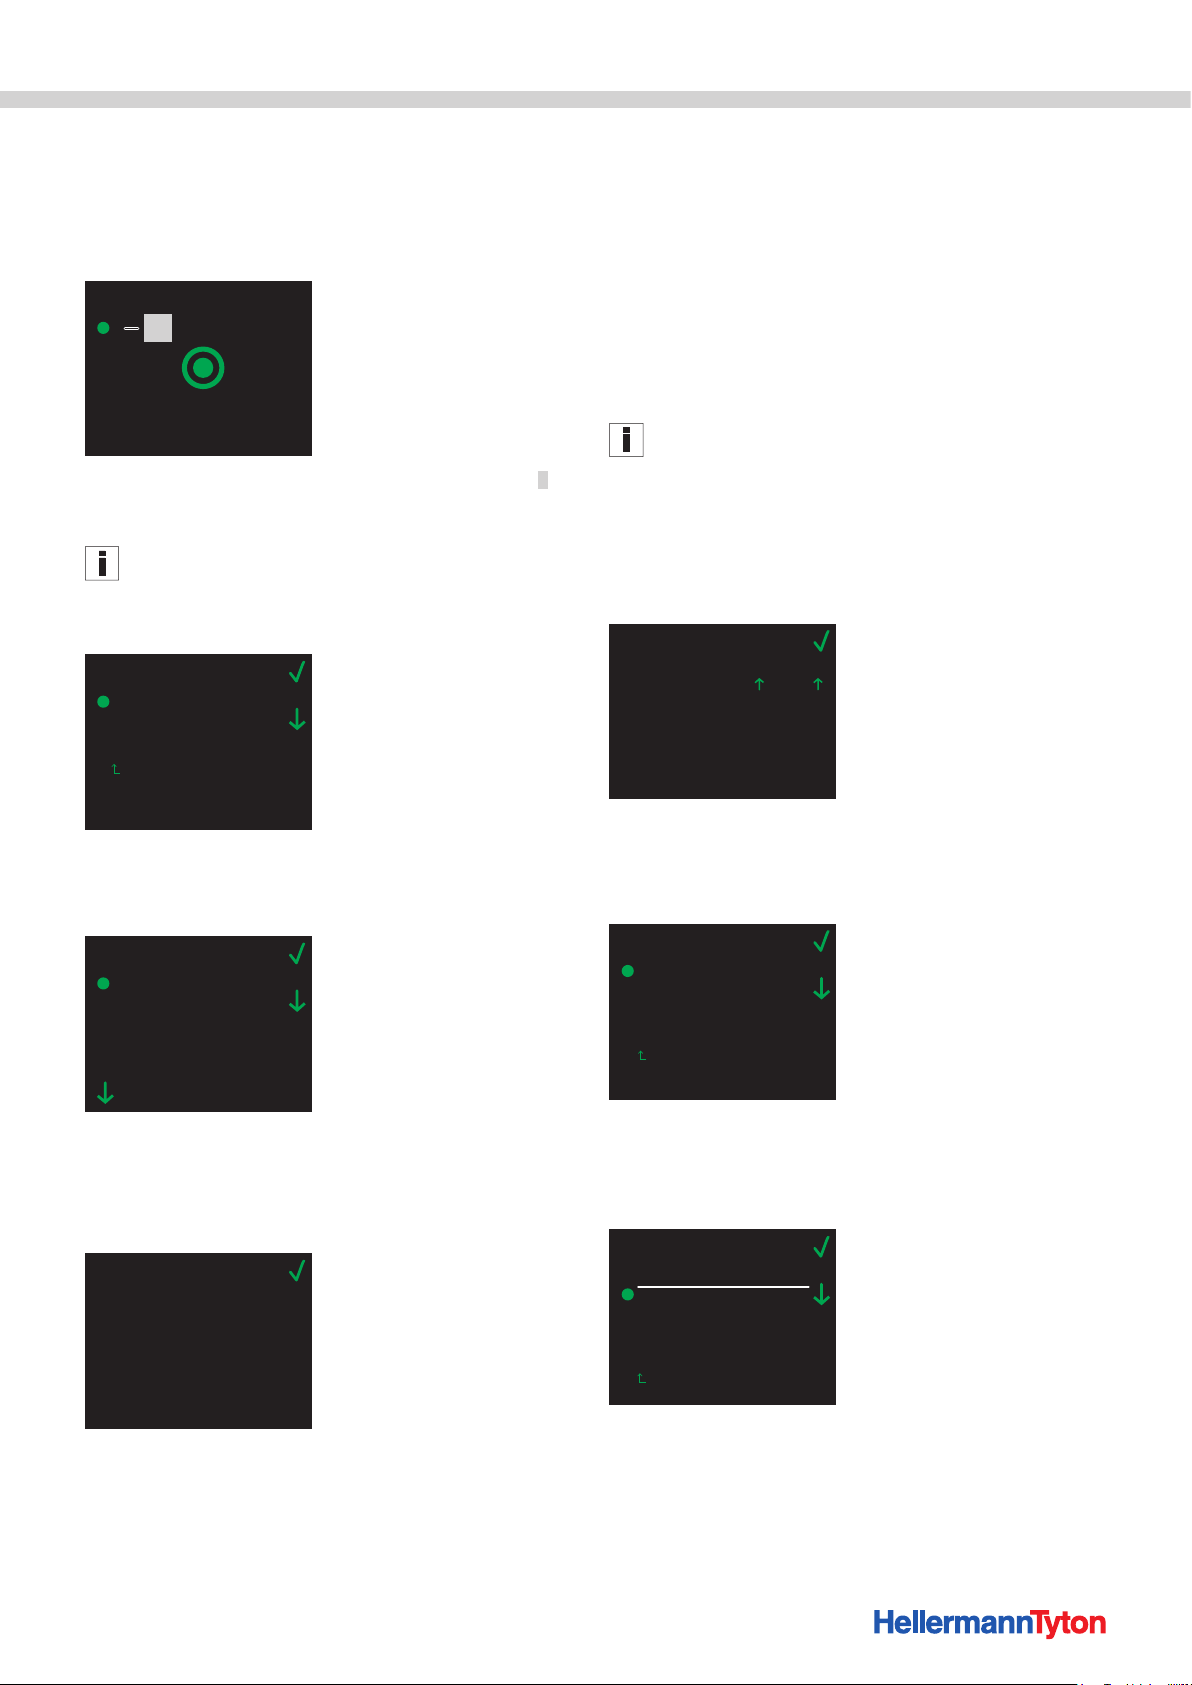
7.1 Navigation
1
2
3
f Centre bundle 1 in line with front-cap screws 3 . Space
adjacent cable ties at least 10 mm apart.
f Press start trigger 2 .
; Bundle 1 is secured by the cable tie.
Hauptmenü
4
1 Enter button for confirming a selection
2 Select and reset button for selecting a menu
3 LED status indicator Signal:
Green: AT2000 CPK connected and ready
Red: Error
4 Green marker to indicate which menu has been selected
f Press Select button 2 to select menu 4 of your choice.
f Press Enter button 1 .
Sprachen
Status
Einstellungen
Kontakt
1
2
3
f Check the LED status indicator, à"Troubleshooting" on
page24.
Operating Instructions • AT2000 CPK • 02-2017 • v02 • 106-29004
12
Page 13
Service menu
0000000
Cntr.rdng.lastSer
Back
Back
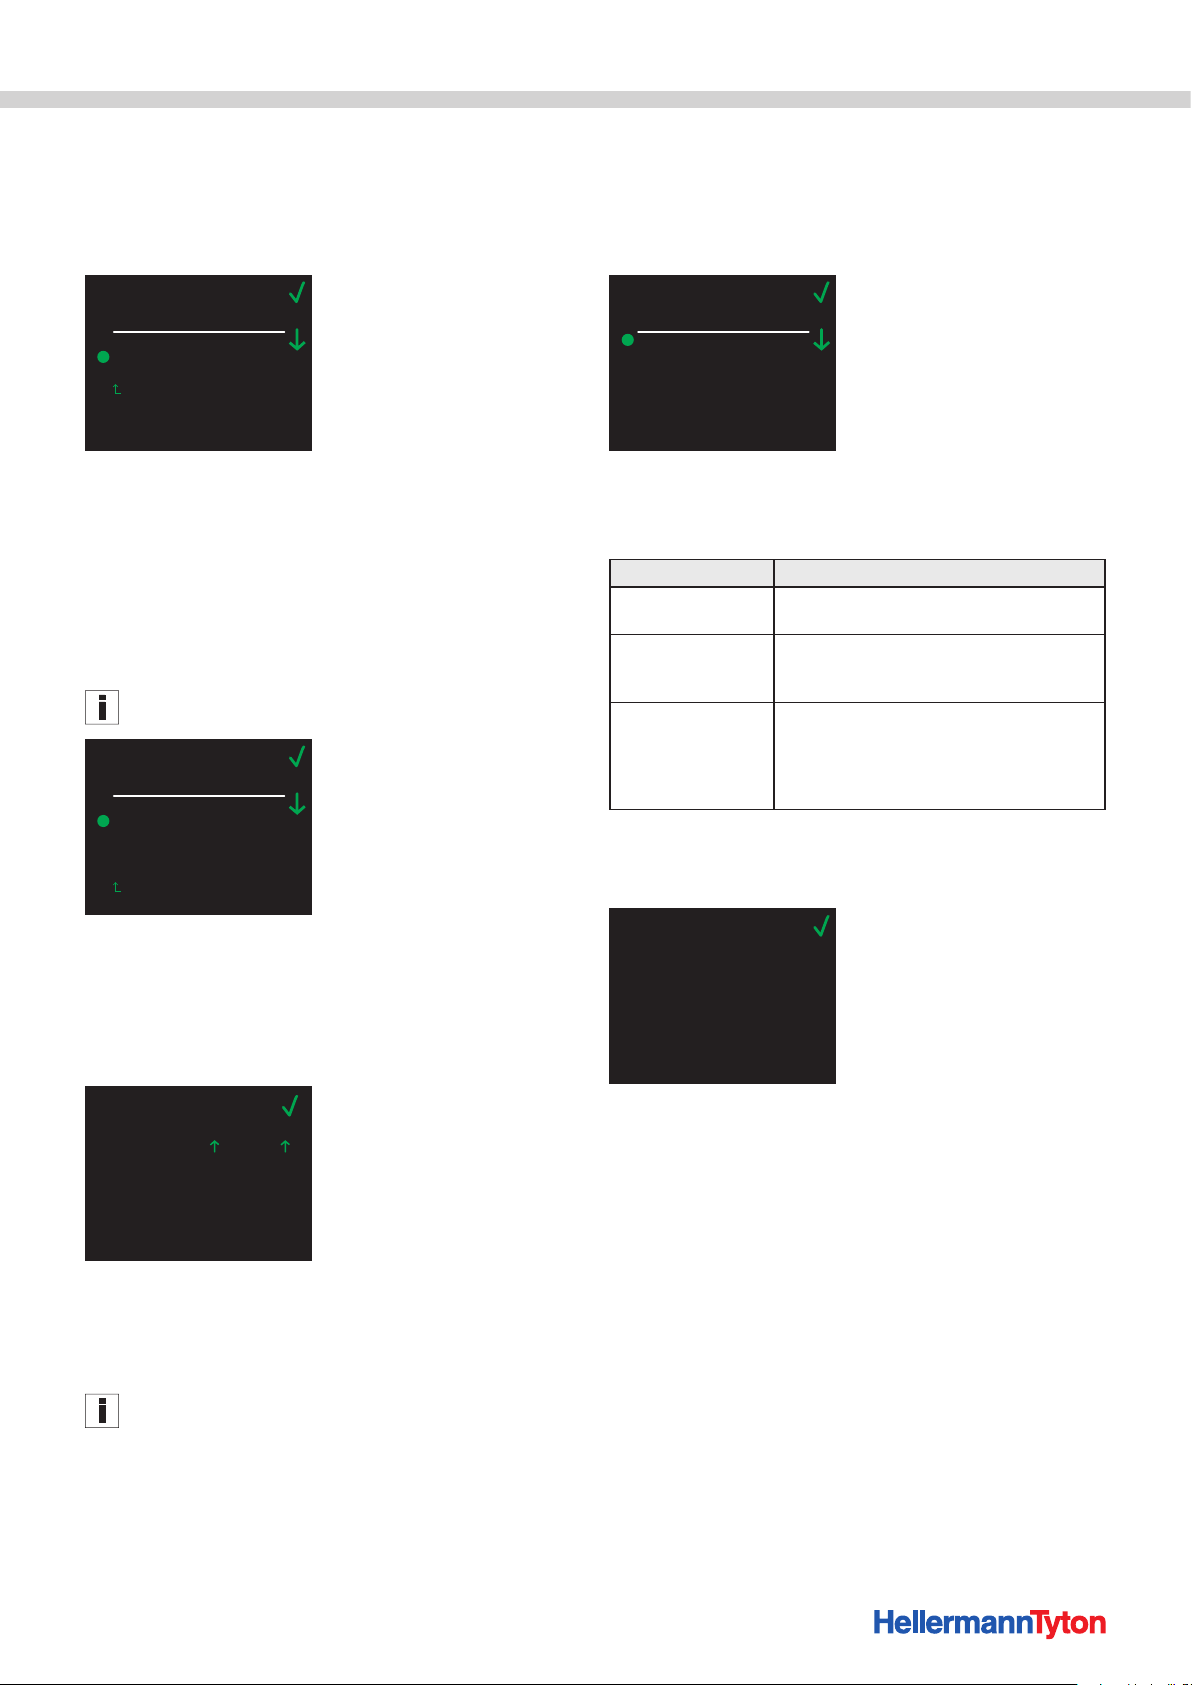
7.2 Start menu
f Switch the AT2000 CPK ON, à"Switching on" on
page11.
; Wait approximately 5 seconds for the Start menu to
appear on the display.
Menu
1
1
2
3
4
5
Reset
; The green highlight indicates the current force level 1.
7.3 Main menu
Bindings cannot be triggered while you are navigating in the
main menu. The Signal LED on the power pack shows blue.
f Press the Enter button.
; The Main menu appears on the display.
Main menu
Languages
Status
Settings
Contact
Back
• Software version of the power pack
• Serial number of the tool
• Ambient temperature and humidity
• Date of last service
• Counter reading at last service
7.6 Settings menu
You use the Settings menu to set important parameters
of the AT2000 CPK.
Access to the Settings menu is protected by a three-digit
access code that can be changed in the HT Data
Management software, à"Changing the access code in the
AT2000 CPK" on page18. The default access code is 000.
f Use the Select button in the Main menu to select the
Settings menu.
f Press the Enter button.
; The prompt for the access code appears on the display.
Settings
000Access code
7.4 Languages menu
You use the Languages menu to select the language for
the menus.
Languages
Deutsch
English
Italiano
Français
Türkçe
Polski
Español
f Use the Select button to select the language.
f Press the Enter button.
; The display switches to the language you selected.
7.5 Status menu
Status
Counter reading
Tool software
Power-pack SW
Serial number
Temperature
Humidity
Last service
00000001
1.38- 8
1.07
00000013
26
32
23 Jan 2017
The Status menu shows you the following status
readings.
• Counter reading
f Use the Select button to enter each digit of the access
code.
f Press the Enter button to confirm each digit.
; The Settings menu appears on the display.
Settings
Force level
Quality
Interruption front sensor
Date / time
Check of binding
7.6.1 Force level
The Force level setting corresponds to the force applied by the AT2000 CPK when binding, and it can be set from Level1 (lowest force) to Level 5 (highest force).
Settings
Force level
Level 1
Level 2
Level 3
Level 4
Level 5
f Use the Select button to select the force level.
f Press the Enter button.
; The setting changes to the level you selected.
• Software version of the tool (Tool) and an index number
for the language version
Operating Instructions • AT2000 CPK • 02-2017 • v02 • 106-29004
13
Page 14
Service menu
Back
Back
18 Feb. 2015
7.6.2 Quality
The Quality setting corresponds to the quality of binding and it can be set from Level1 (lowest quality) to Level 3 (highest quality). The higher the level the longer the cycle time, so the bundle has more time to settle.
Settings
Quality
Level 1
Level 2
Level 3
f Use the Select button to select the quality level.
f Press the Enter button.
; The setting changes to the quality you selected.
7.6.3 Interruption front sensor
The Interruption front sensor setting enables you to decide how long the level sensor can remain busy without the Error, front cap message appearing on the display.
This function is intended for use with the device integrated
into an automatic system.
Settings
Interruption front sensor
Level 1
Level 2
Level 3
Level 4
Level 5
0.0 sec.
0.3 sec.
0.5 sec.
0.7 sec.
0.9 sec.
7.6.5 Check of binding
The Check of binding setting enables you to decide whether or not the Error, binding force message appears on the display, à"Display messages" on
page25.
Settings
Check of binding
OFF
Error notification
Acknowledgement
f Use the Select button to select the option of your choice.
f Press the Enter button.
; The setting changes to the option you selected.
Setting Meaning
OFF The Error, binding force message does
not appear on the display.
Error notification The Error, binding force message
appears when applicable but does not require
confirmation.
Confirmation The Error, binding force message
appears when applicable and requires
confirmation. The next binding is not possible
until the trigger has been pulled to confirm the
message.
7.7 Contact menu
The Contact menu shows you the current website with
country-specific contact data.
f Use the Select button to select the level.
f Press the Enter button.
; The setting changes to the level you selected.
7.6.4 Date / time
You can set the Date / time for process documentation.
Settings
Date
Clock time
10:23
f Use the Select button to change the date and time, as
applicable.
f Press the Enter button to confirm each digit.
; The setting changes to the option you selected.
Date and time can also be synchronised with the PC date and
time, à"Date / time" on page14.
Contact
www.HellermannTyton.com
Operating Instructions • AT2000 CPK • 02-2017 • v02 • 106-29004
14
Page 15
HT Data Management
In: Last Tie
Out: Error
Out: Busy
Serial port
1
8 HT Data Management
The HT Data Management software enables you to:
• Update the software for the power pack and the
AT2000 CPK.
• Export production data.
• Change parameter settings.
8.1 First steps
f Copy the HT Data Management software to the hard
drive of a PC.
f Switch the AT2000 CPKON, à"Switching on" on
page11.
8.2 Access levels
There are two access levels. Each level permits access to
the features available on the lower levels:
• Operator level
• Setup-specialist level
8.2.1 Start page/Binding menu
Function
Level
Operator Read No Ye s Yes
Setup
specialist
Binding in-
formation
Read Yes Yes Yes
Binding pa-
rameters
Change
lan-
guage
Synchronise
with PC time
8.2.2 Service menu
Function
level
Operator No No No
Setup specialist
Change service
parameter set-
tings
No Yes Yes
Change param-
eter settings
Change access
code
8.2.3 Memory menu
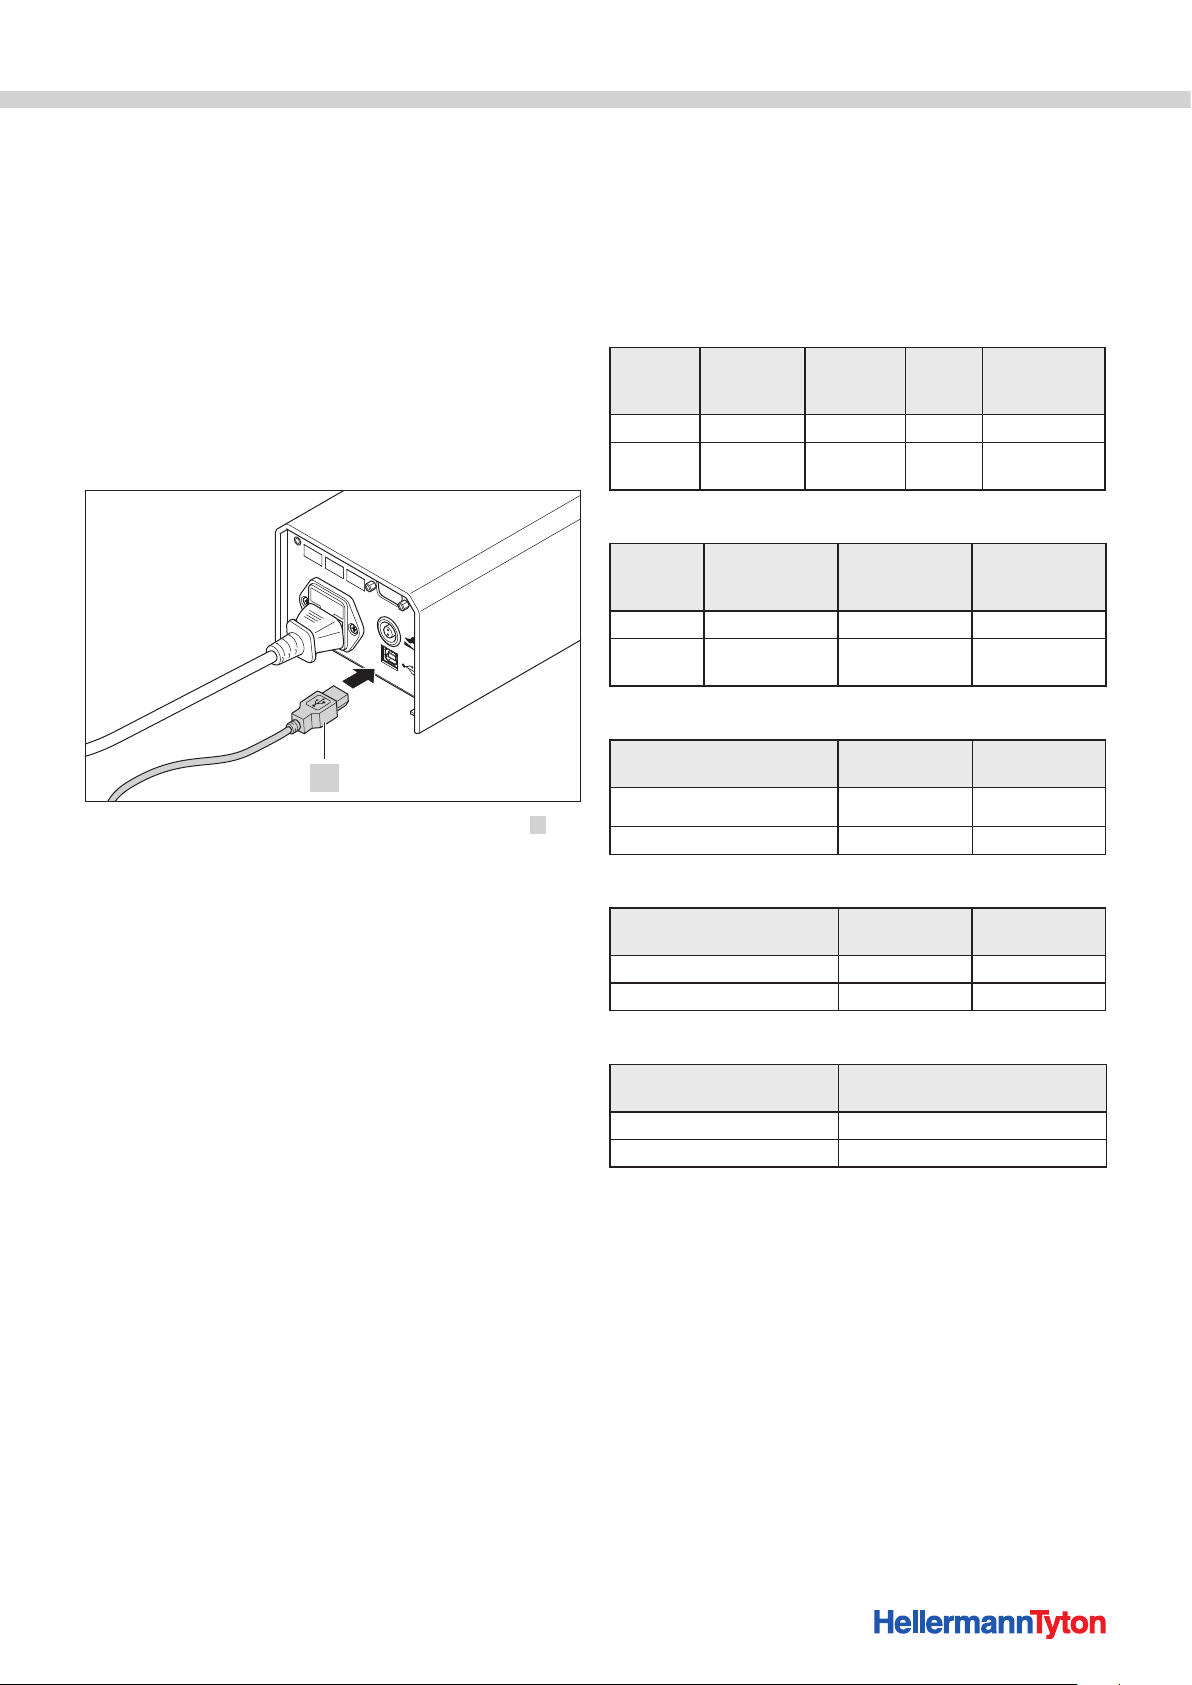
f Connect the PC to the power pack with USB cable 1
provided for the purpose.
f Launch the HT Data Management software.
; The HT Data Management start page appears on the
screen, à"Binding menu" on page16.
Function level Export data Delete memory
Operator Yes No
Setup specialist Yes No
8.2.4 Update menu
Function
Level
Operator No No
Setup specialist Yes Yes
Perform up-
dates
Change access
code
8.2.5 Measurement environment menu
Function
Level
Operator No
Setup specialist Yes
Visibility
Operating Instructions • AT2000 CPK • 02-2017 • v02 • 106-29004
15
Page 16
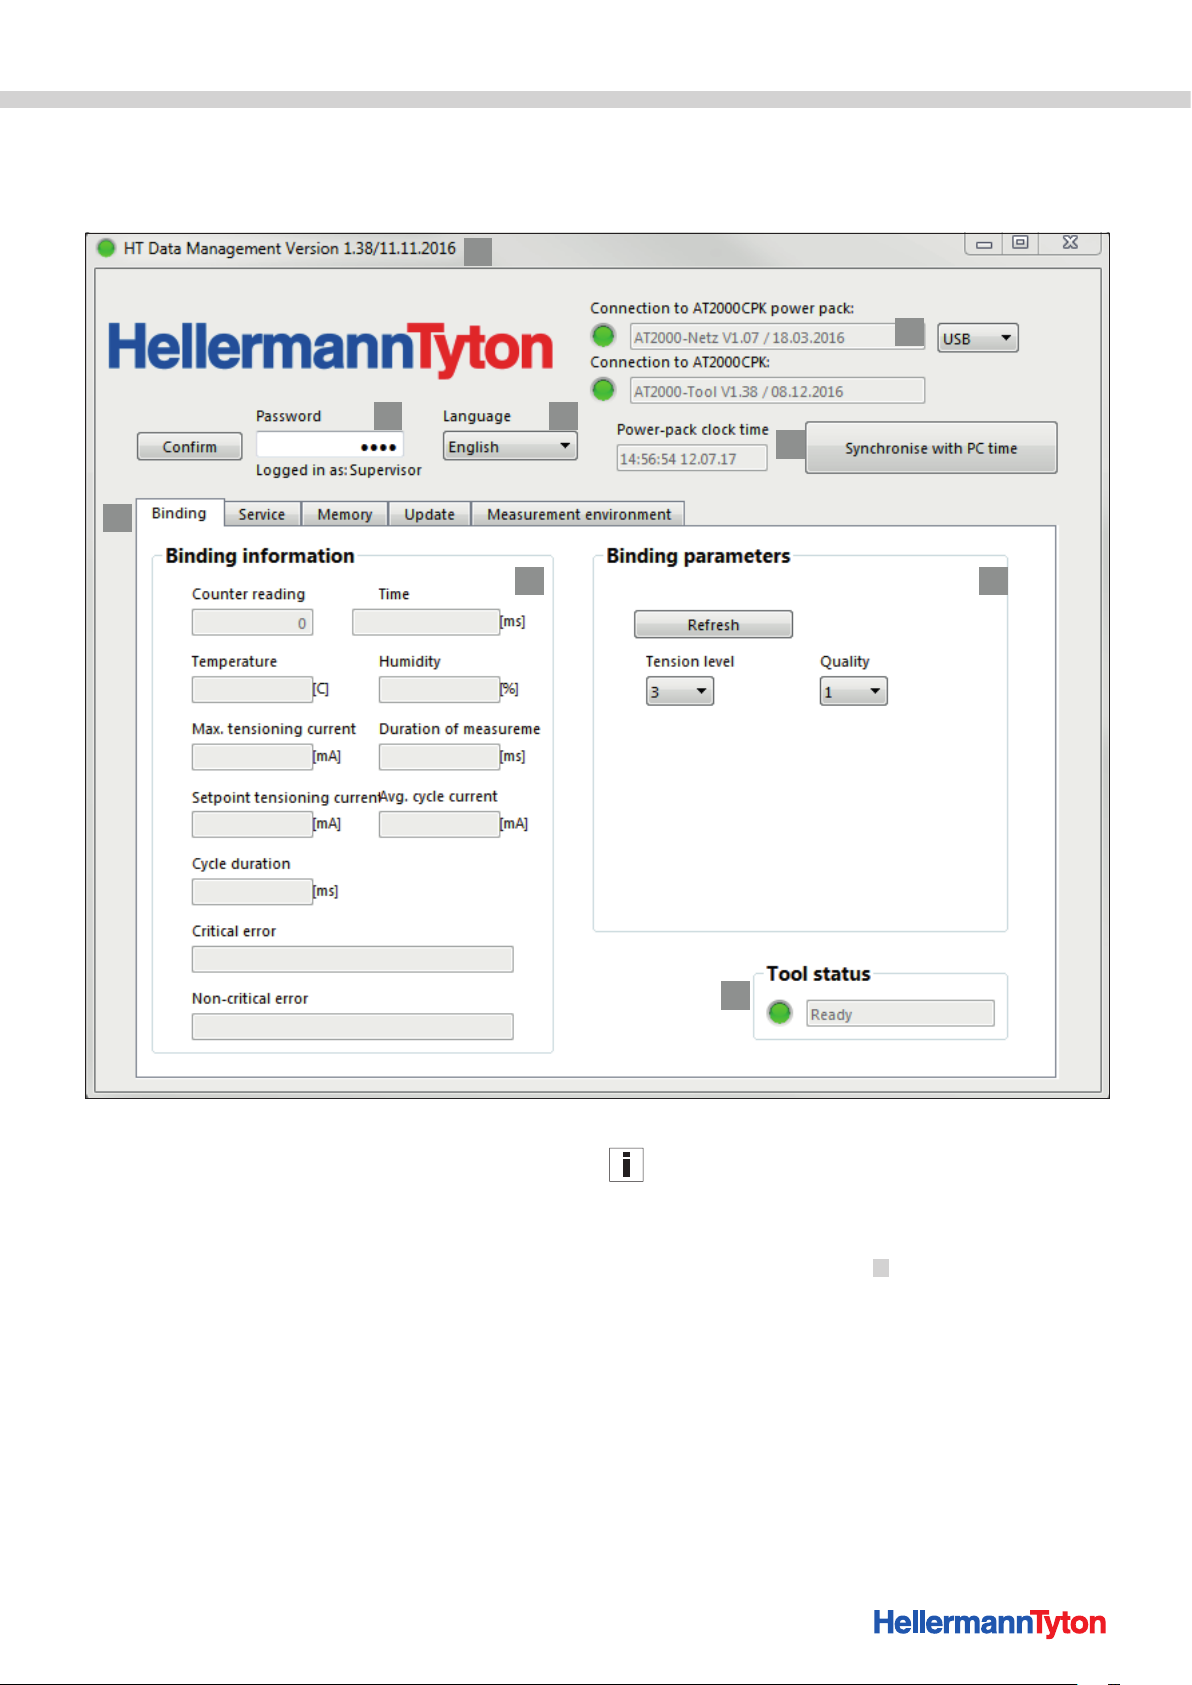
8.3 Binding menu
The Binding menu appears on the display when you
launch the software.
1
2 3
6
HT Data Management
4
5
7 8
1 Version information and date of publication of the software
2 Entry box for password for access level
3 Language setting
4 Connection states and software version
5 Time and date synchronisation
6 Menus
7 Show binding information
8 Change binding parameter settings
9 Status of the AT2000 CPK
9
8.3.1 Entering password
The password consists of four characters and the default
setting is 0000.
f Enter the password.
f Click on Confirm.
; What you see in Menu field 6 view depends on your
access rights, à"Access levels" on page15.
; Certain fields can be greyed, hidden or active, depending
on the access level.
Operating Instructions • AT2000 CPK • 02-2017 • v02 • 106-29004
16
Page 17

8.3.2 Select a language
f Open the drop-down Language menu.
f Select the language.
; The setting immediately changes to the language you
selected.
In the measurement environment the column headings do
not change until the next restart of the software.
8.3.3 Show binding information
Binding information shows the process data of the last
binding performed with the AT2000 CPK in connected
status.
8.3.4 Change binding parameter settings
f Change the settings for the Force level and/or Quality
parameters.
; The parameter settings are changed and the new
settings are transmitted to the AT2000 CPK.
If force level and/or quality are changed at the
AT2000 CPK, the new values are uploaded to the
HT Data Management software, à"Force level" on
page13 and à"Quality" on page14.
f Click on the Refresh button.
; The settings from the AT2000 CPK are uploaded to the
HT Data Management software.
HT Data Management
8.3.5 Status indicators
Colour Status
Connection to the
power pack CPK
Connection to the
AT2000 CPK
Status, tool Green Ready
Green Connection active
Red Error message active
Green Connection active
Red Error message active
Yellow Busy
Blue Main menu on tool active
Binding not possible
Red Error message active
8.3.6 Synchronising time and date
f Click on Synchronise with PC time.
; Clock time and date of the power pack are synchronised
with the PC connected to the device.
Time and date are saved in the power pack and have to be
rechecked if the power pack is subsequently changed.
Operating Instructions • AT2000 CPK • 02-2017 • v02 • 106-29004
17
Page 18
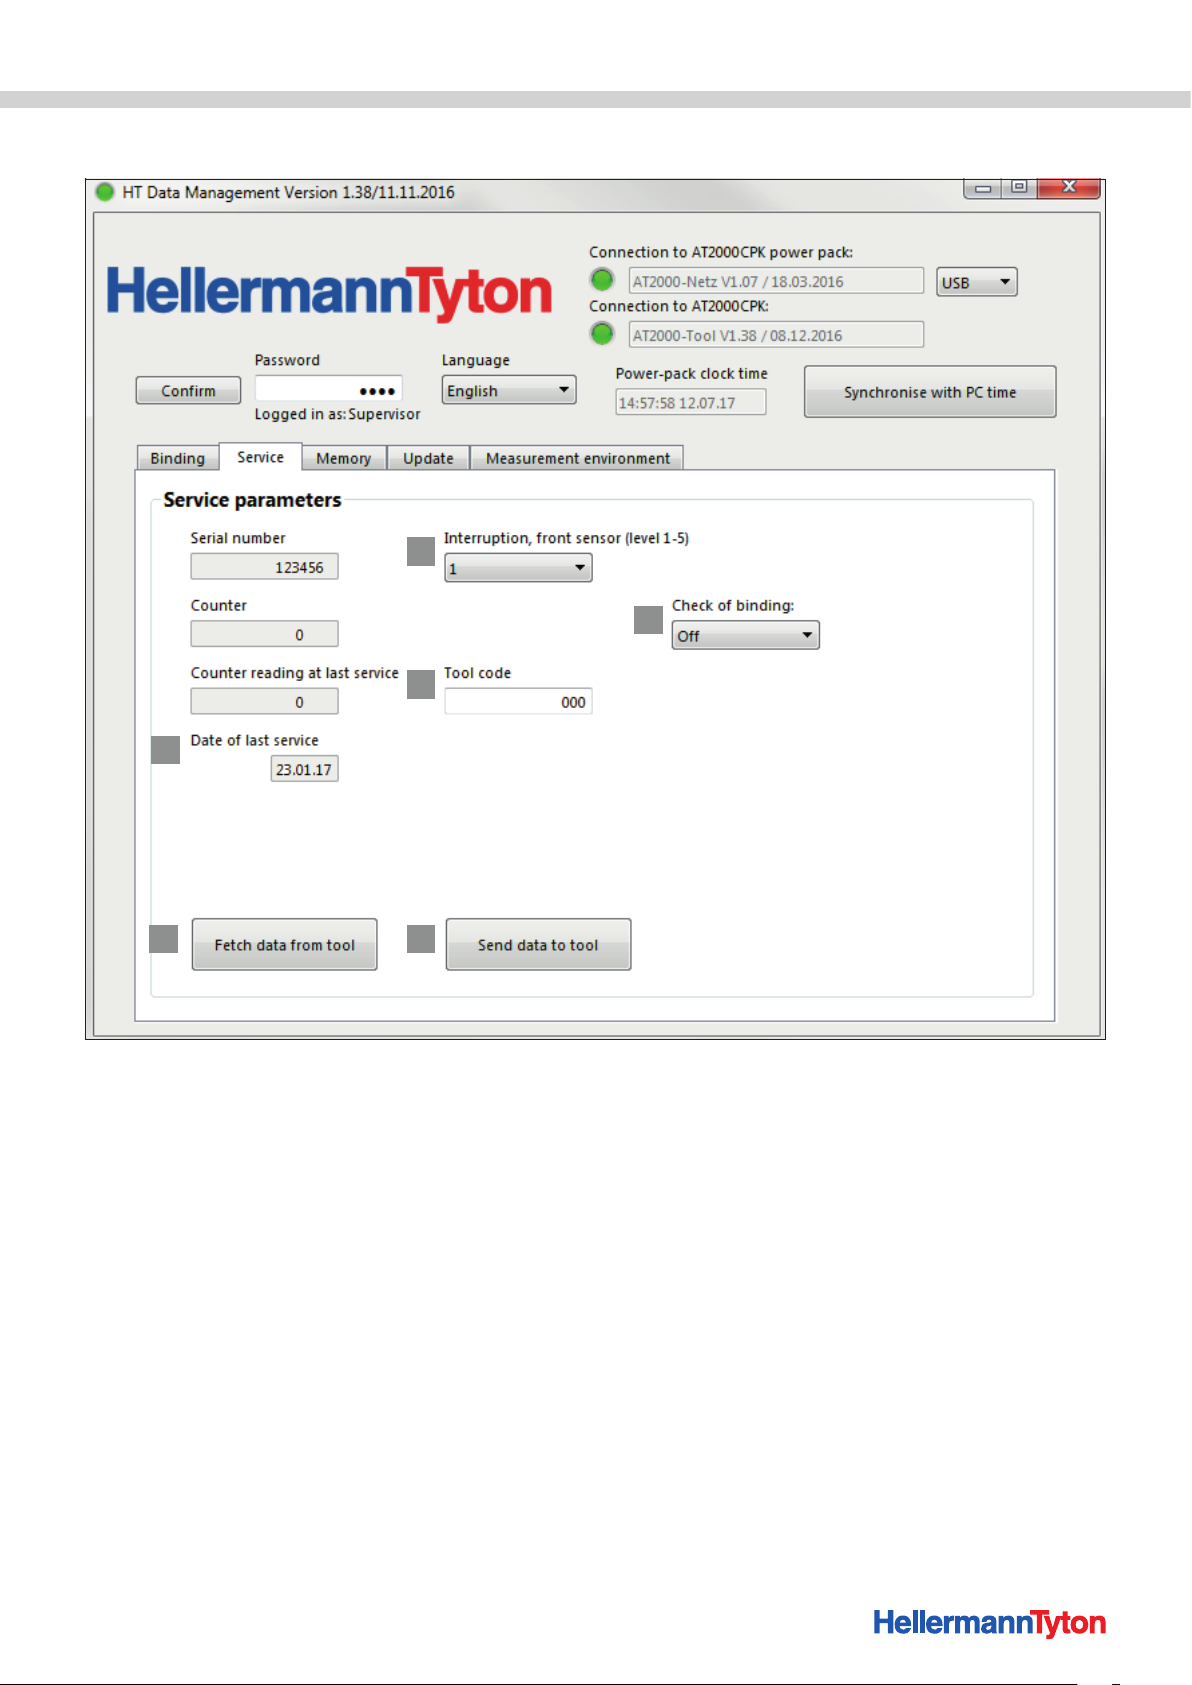
8.4 Service menu
HT Data Management
1
2
6
6
1 Interruption level sensor
2 "Check of binding" setting
3 Tool access code (AT2000 CPK)
4 Send data to tool (AT2000 CPK)
5 Refresh the service information and parameters
6 Information for HellermannTyton service
3
45
8.4.1 Changing other parameter settings
f Change the settings for the Interruption front sensor
(level 1-5) and/or Check of binding parameters.
f Click on Send data to tool.
; The parameter settings are changed and the new
settings are transmitted to the AT2000 CPK.
8.4.2 Changing the access code in the AT2000 CPK
f Enter the new code at Tool code. The code is a
three-digit number and the default setting is 000.
f Click on Send data to tool.
; The access code is changed and transmitted to the
AT2000 CPK.
Operating Instructions • AT2000 CPK • 02-2017 • v02 • 106-29004
18
Page 19
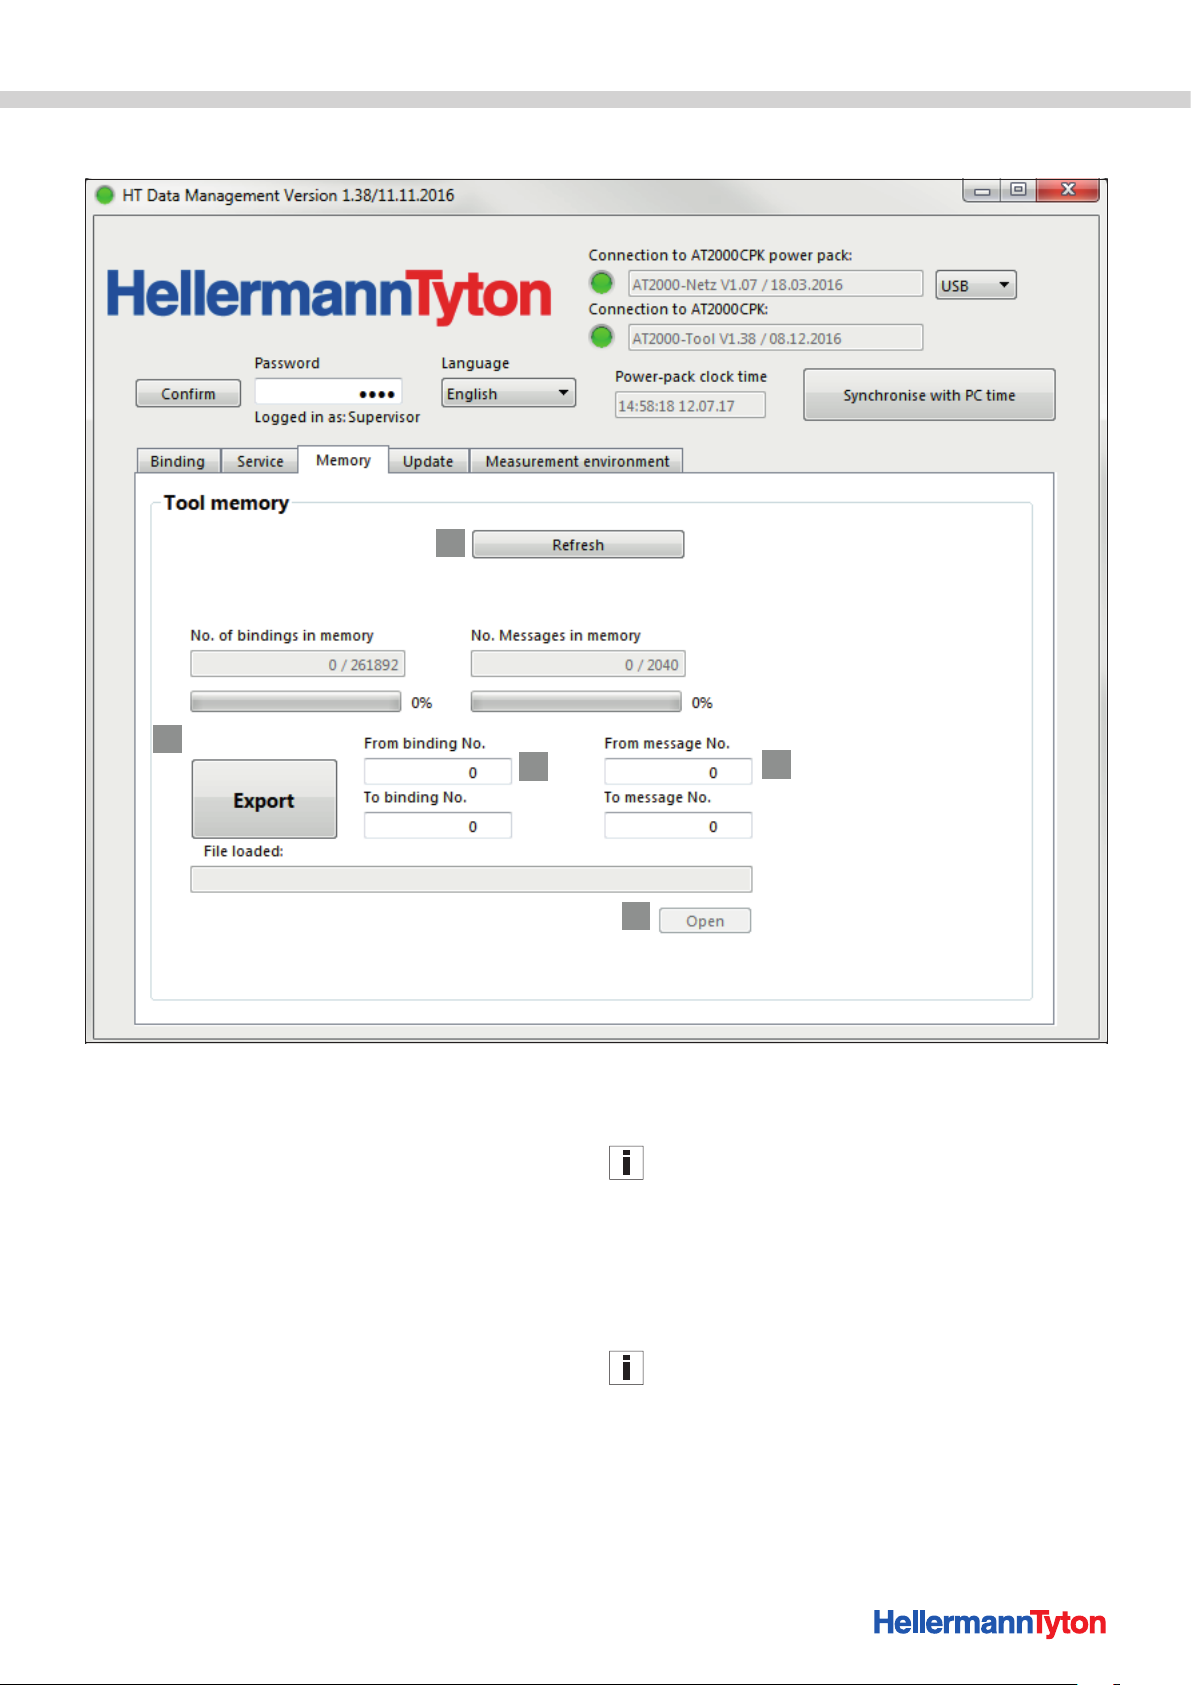
8.5 Memory menu
HT Data Management
1
5
1 Refresh memory status
2 Select messages
3 Open created file
4 Select bindings
5 Export messages and binding data
8.5.1 Refresh memory of the tool
Updates the number of data records, bindings and
messages stored in the tool's memory.
f Click on the Refresh button.
; The current values appear in the corresponding fields.
4
3
2
8.5.2 Select bindings
Select the bindings to be exported. The data exported
contain the information about the individual bindings.
It is advisable to set a filter to restrict the choice if the volume
of data involved is large.
f Restrict the binding data for export by setting a From
binding No. and a To binding No. as a filter.
8.5.3 Select messages
Select the messages to be exported. The data exported
contain the errors or messages.
It is advisable to set a filter to restrict the choice if the volume
of data involved is large.
Operating Instructions • AT2000 CPK • 02-2017 • v02 • 106-29004
f Restrict the messages for export by setting a From
message No. and a To message No. as a filter.
19
Page 20
HT Data Management
8.5.4 Export process data
The data are not deleted after they have been exported.
A Data elds have not been initialised
message is issued if the process data have not been
refreshed.
f Click on the Refresh button, à"Refresh memory of the
tool" on page19.
f Click on Export.
f Define the path for saving the *.CSV file.
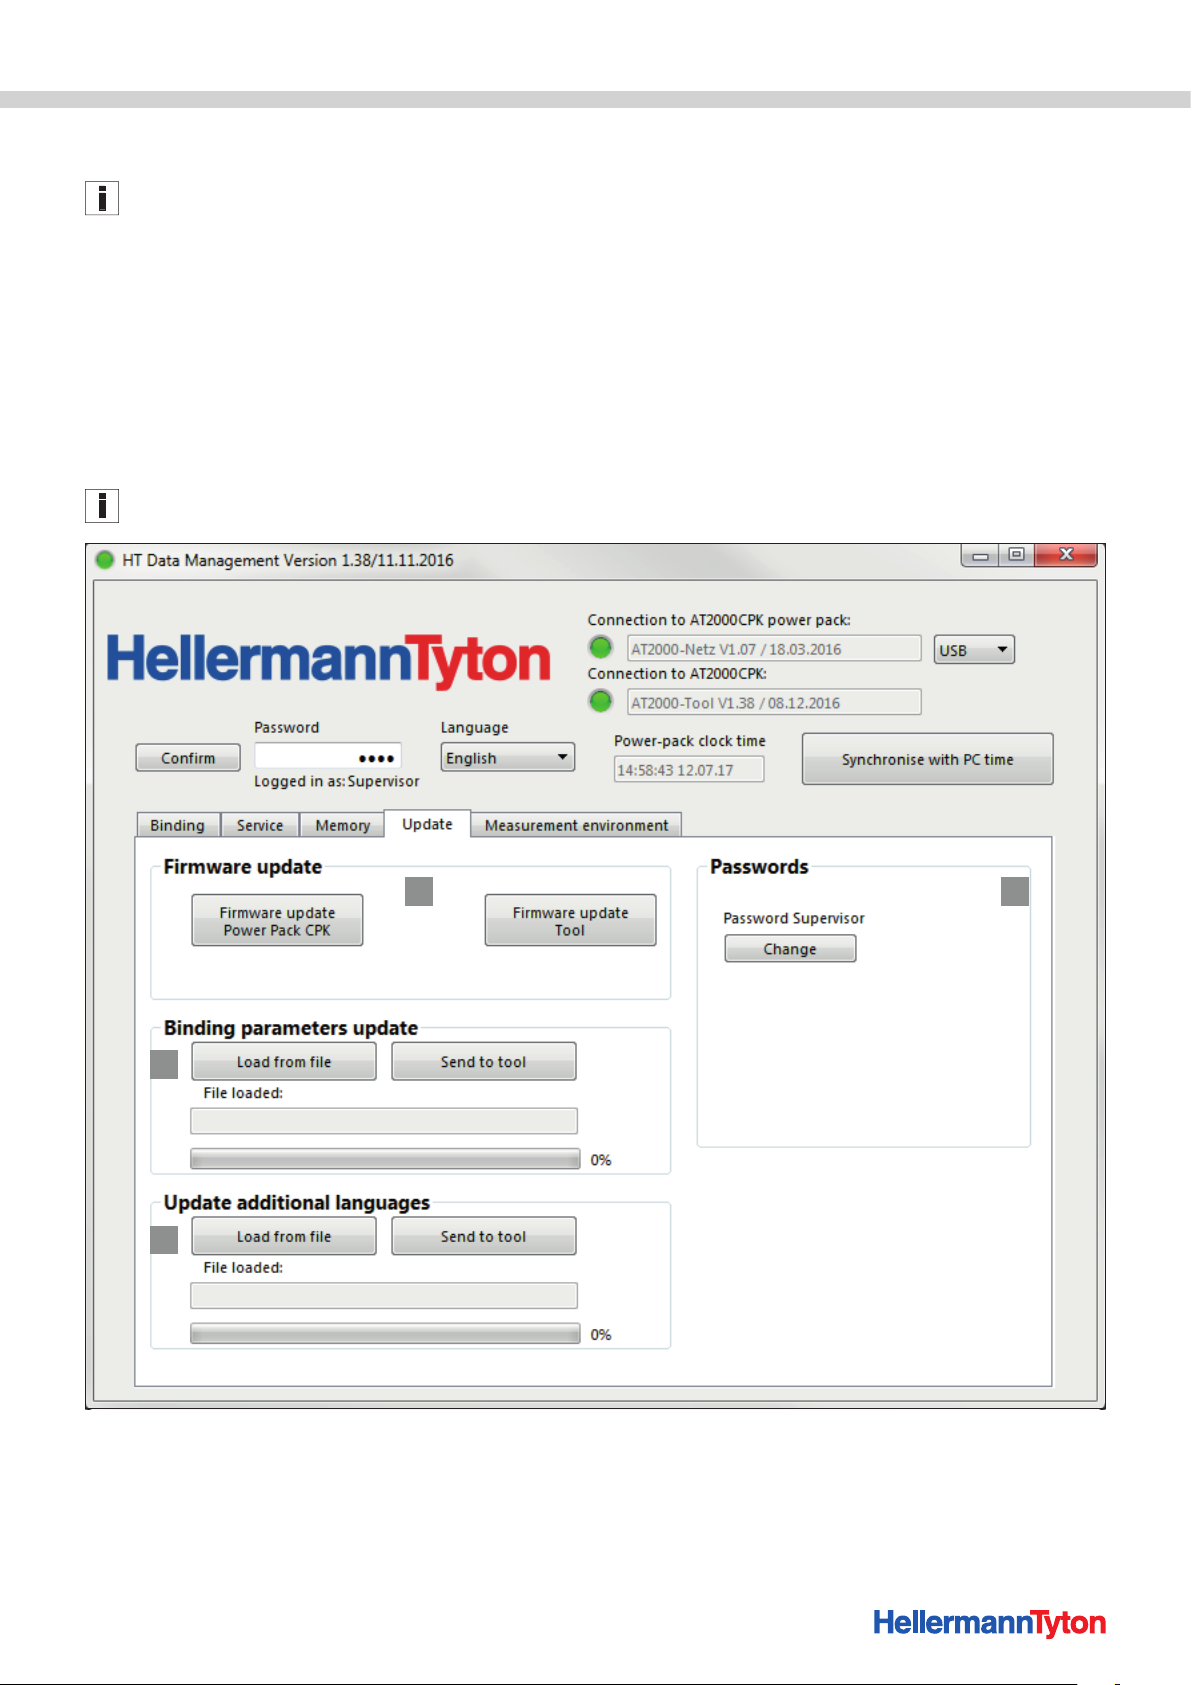
8.6 Update menu
The Update menu appears only if the user has logged on
with the setup specialist's password.
f In the window opened by the operating system, click on
the Save button.
; The bindings and messages are exported from the
AT2000 CPK and saved.
; The progress bar shows progress of the data transfer in
percent (%).
; When export completes the name of the saved file
appears in File loaded.
f Click on Open.
; The *.CSV file containing the exported data is opened.
3
4
1 Update firmware
2 Change password
3 Update binding parameter settings
4 Install other languages
1
2
Operating Instructions • AT2000 CPK • 02-2017 • v02 • 106-29004
20
Page 21

HT Data Management
8.6.1 Update firmware
A firmware update includes an update for the installed
languages.
Languages such as Asiatic languages that do not use the
Latin alphabet have to be updated separately, à"Install
other languages" on page21.
f Click on Firmware update power pack.
or
f Click on Firmware update tool.
There are separate *.HEX files for the AT2000 CPKand the
power pack:
AT2000 CPK: AT2000CPK_Tool_Vxxx
Power pack: AT2000CPK_PowerPack_Vxxx
f Select the appropriate *.HEX file.
f In the window opened by the operating system, click on
the Open button.
; The Start upload button appears on the screen.
f Click on Start upload.
; The new firmware is uploaded.
8.6.2 Change password
The setup specialist's password consists of four characters
and the default setting is 0000. HellermannTyton
recommends setting an alphanumeric password that includes
at least one special character.
f Click on Change.
f Enter the current password and click on OK to confirm.
f Enter the new password and click on OK to confirm.
f Re-enter the new password and click on OK to confirm.
; The password is changed.
8.6.4 Install other languages
Function for updating languages such as Asiatic
languages, for example, that do not use the Latin
alphabet.
f Click on Load from file.
f Select the appropriate *.BIN file.
There are separate *.BIN files for updating the binding
parameter settings and adding additional languages.
f In the window opened by the operating system, click on
the Open button.
; The name of the file appears in File loaded ("More_
Languages-Index8.bin).
f Click on Send to tool.
; The new languages are uploaded to the AT2000 CPK.
; The progress bar shows progress of the data transfer in
percent (%).
8.6.3 Update binding parameter settings
The update for the binding parameter settings is a *.BIN
file.
f Click on Load from file.
f Select the appropriate *.BIN file.
There are separate *.BIN files for updating the binding
parameter settings and adding additional languages.
f In the window opened by the operating system, click on
the Open button.
; The name of the file appears in File loaded.
f Click on Send to tool.
; The new binding parameters are uploaded to the
AT2000 CPK.
; The progress bar shows progress of the data transfer in
percent (%).
Operating Instructions • AT2000 CPK • 02-2017 • v02 • 106-29004
21
Page 22
HT Data Management
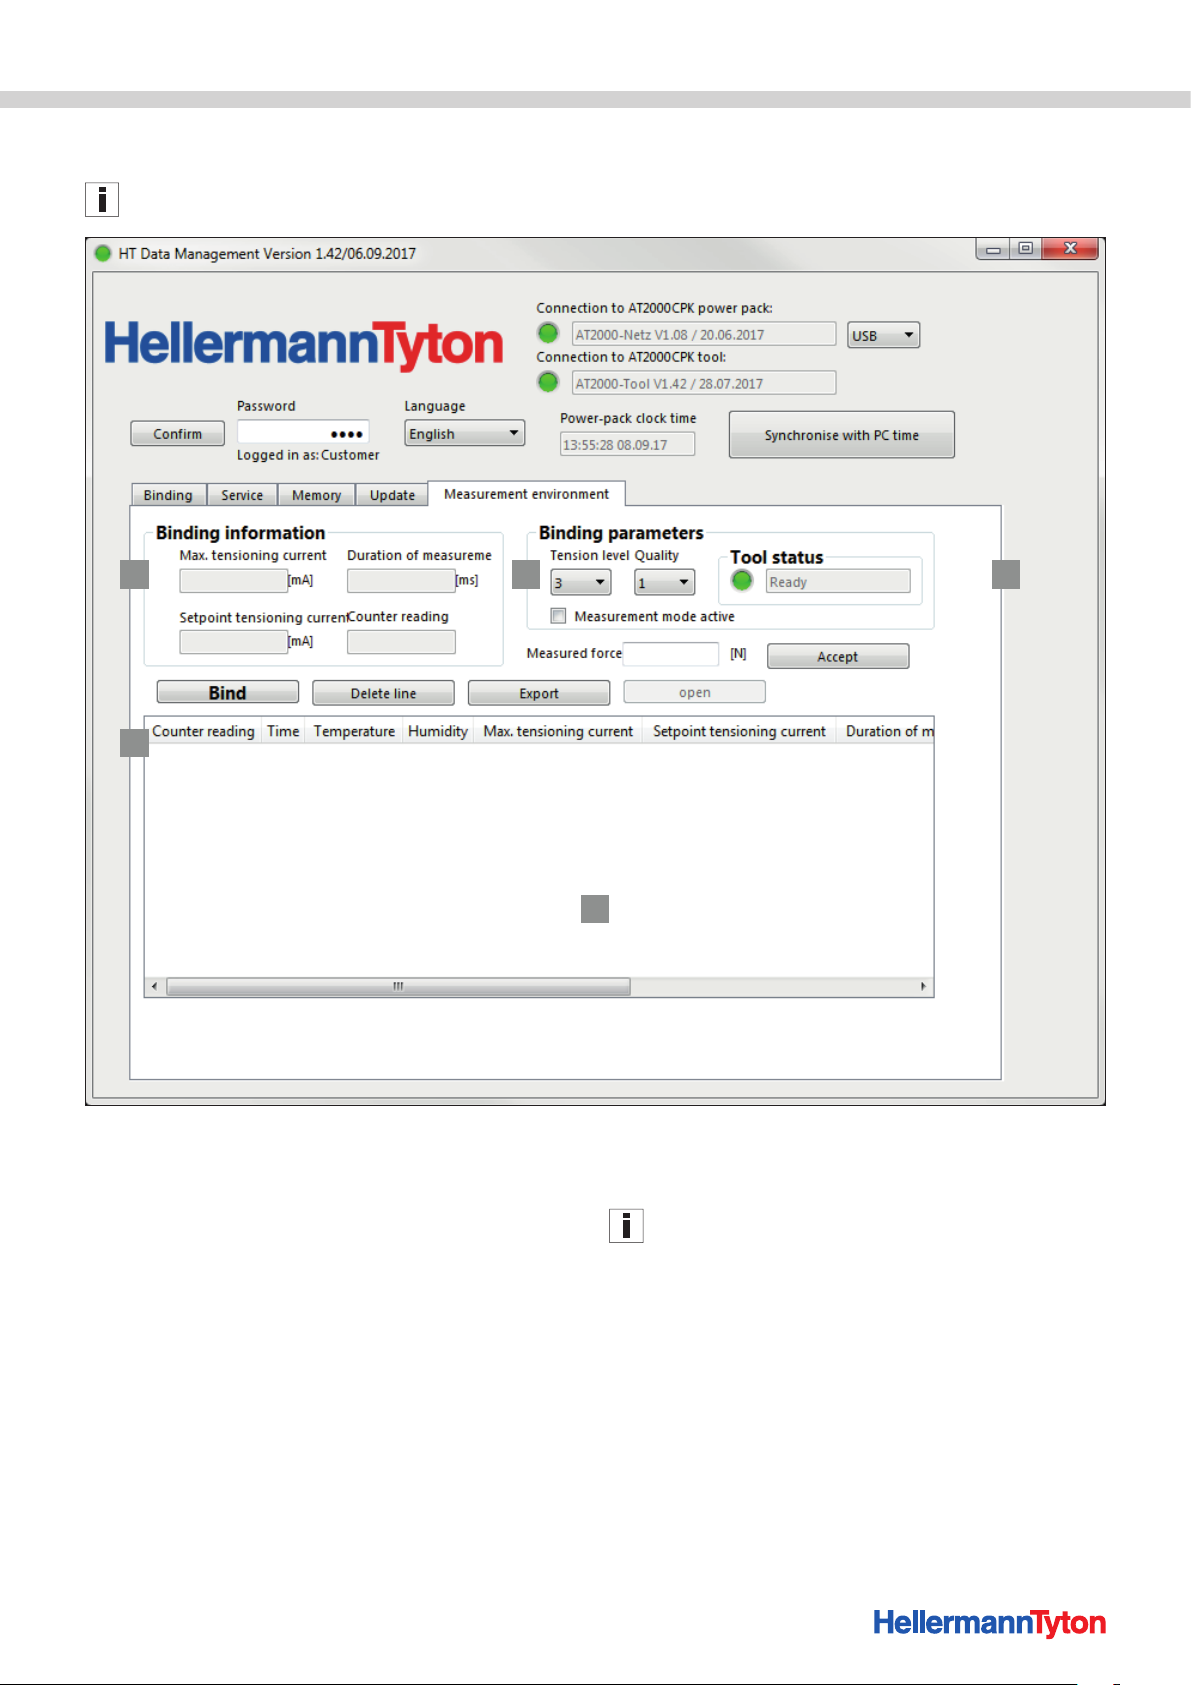
8.7 Measurement environment menu
The Measurement environment menu appears only if the
user has logged on with the setup specialist's password.
1 2 3
4
1 Show binding information
2 Show binding parameter settings
3 Status des AT2000 CPK
4 measurement results
5 List of measurement results
In measurement mode, the binding information for a
binding cycle with a measured force are documented in
a log file. This file can be used for the purposes of
monitoring tool performance.
5
8.7.1 Using measurement mode
The measurement mode is dependent on the
measurement process.
No cycle movement or jaw movement takes place while
measurement mode is active. Only the tensioning drive is
active, with the current binding parameter settings.
f Depending on the measurement process, activate the
measurement mode.
f Select the settings for the Force level and Quality
parameters.
f Perform one binding.
; The binding information appears in the left pane of the
window.
f Enter the calculated force in the field on the right.
f Click on Accept.
; A new line is added to the logfile.
f Repeat the measurement procedure several times.
Operating Instructions • AT2000 CPK • 02-2017 • v02 • 106-29004
22
Page 23
HT Data Management
8.7.2 Deleting measurement results
f To delete a line, highlight it and hit the Delete key on the
keypad.
8.7.3 Saving measurement results
f To save the table, click on the Export button.
; The *.CSV file can be saved.
f To analyse the CSV file in the data macro and view the
information, click on the Open button.
8.7.4 Deactivating measurement mode
f To deactivate measurement mode, either switch off the
tool or clear the Measurement mode active checkbox.
8.8 Exporting process data from the power pack
Bindings cannot be triggered while a data transfer is in
progress.
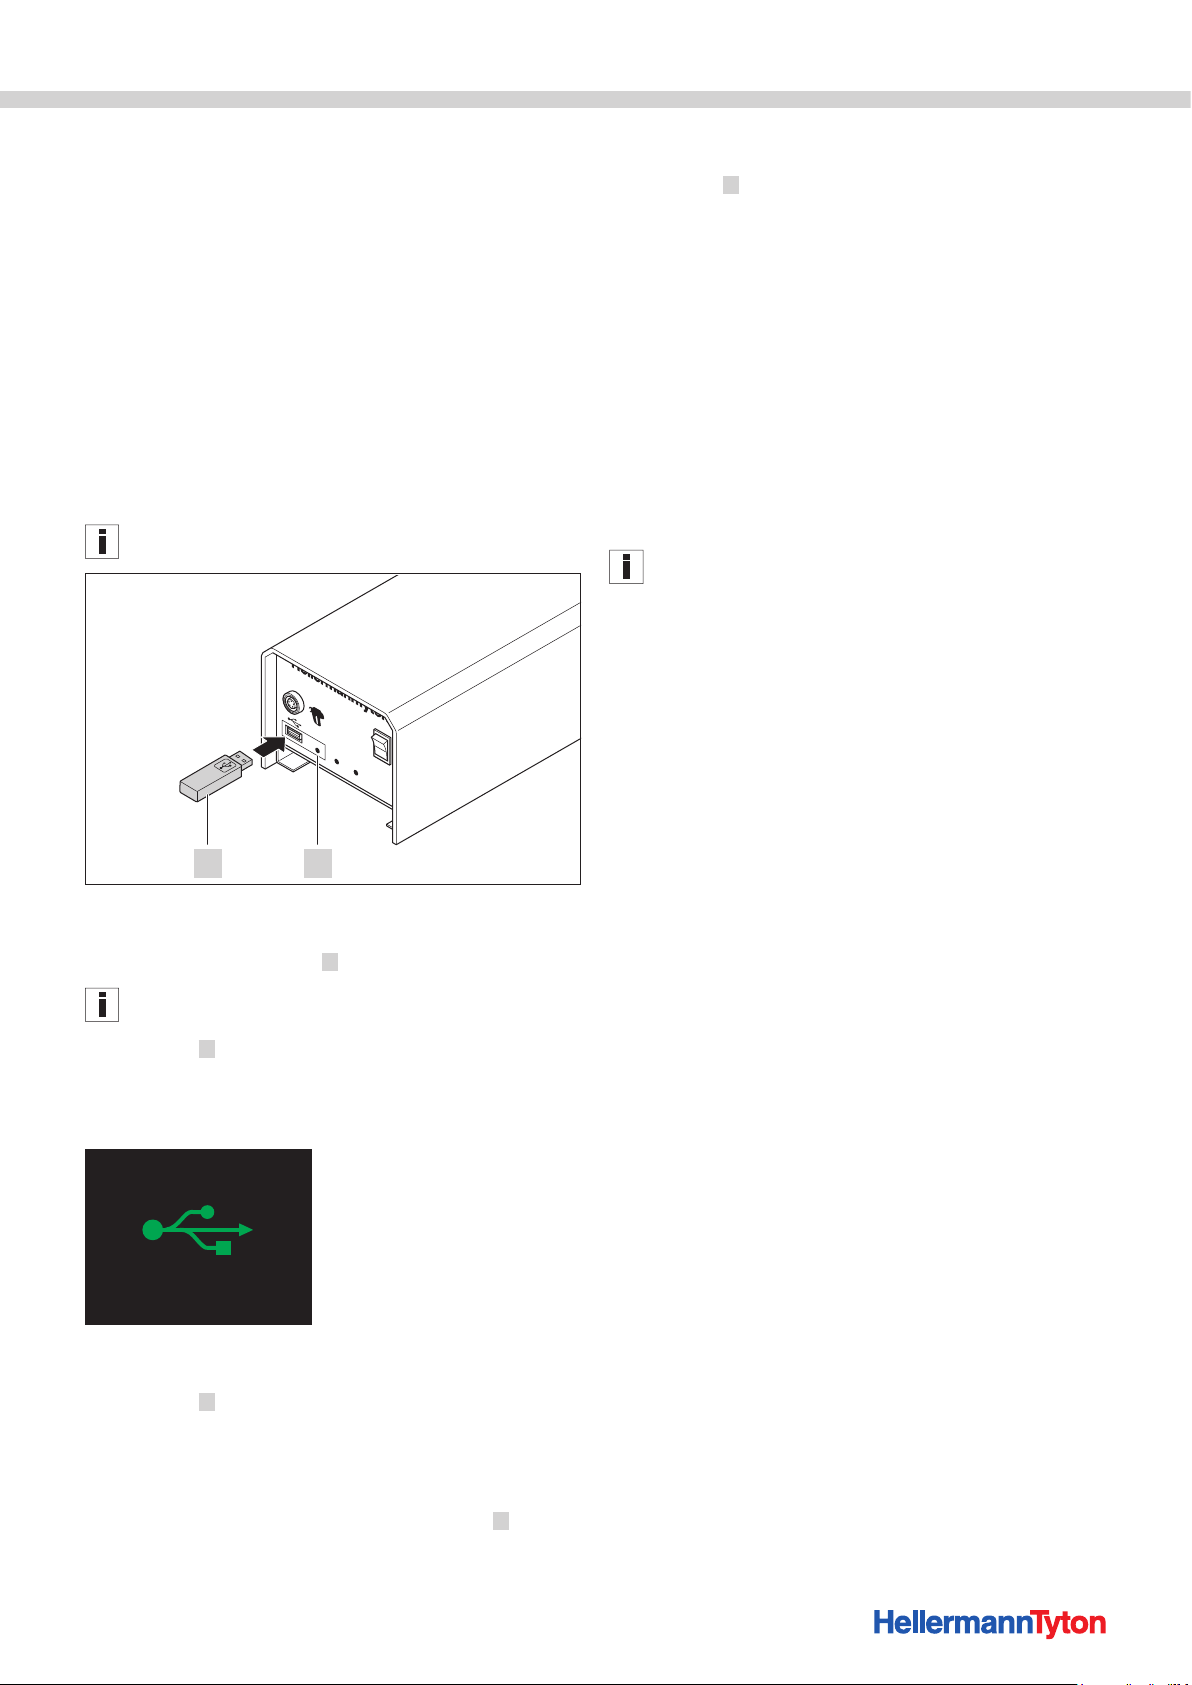
Power pac k CPK
f Unplug the USB memory stick.
; DataLED 1 goes out and the AT2000 CPK is ready for
use.
8.8.1 Converting CSV file
The "Datenmakro.xlms" conversion file can be used to
render the data more readily legible.
f Open the "Datenmakro.xlms" file in the
HT DataManagement/Excel/ directory.
f Click on the Import data button in the spreadsheet.
f Select the *.CSV file saved beforehand.
f In the window opened by the operating system, click on
the Open button.
; The *.CSV file containing the data exported beforehand
from the tool is converted into an Excel spreadsheet.
In the Excel spreadsheet you can change the language by
clicking on the Language button. The converted Excel file
can be saved.
Data Signal Power
2 1
f Switch the AT2000 CPKON, à"Switching on" on
page11.
f Plug a USB memory stick 2 into the power pack CPK.
The USB memory stack must be FAT32-formatted.
; DataLED 1 shows green as soon as the device
recognises the USB memory stick.
; The data are exported to the USB memory stick.
; The display shows:
USB active
Do not switch off
While data are being saved, the status indicators show
as follows:
• DataLED 1 flashes blue.
• The progress bar shows progress of the data transfer in
percent (%).
As soon as the data transfer completes, a Data transfer
ended message appears on the display. Data LED 1
shows green.
Operating Instructions • AT2000 CPK • 02-2017 • v02 • 106-29004
23
Page 24
9 Troubleshooting
9.1 Important notes
CAUTION
Crush hazard when jaws close.
f Do not insert fingers between upper and lower jaws and
do not keep your finger on the trigger.
f Always keep the power pack switched OFF when
clearing a blockage.
CAUTION
Crush hazard due to moving/rotating parts when
service covers are open.
f Do not insert fingers underneath the drum and do not
keep your finger on the trigger.
f Always keep the power pack switched OFF when
clearing a blockage.
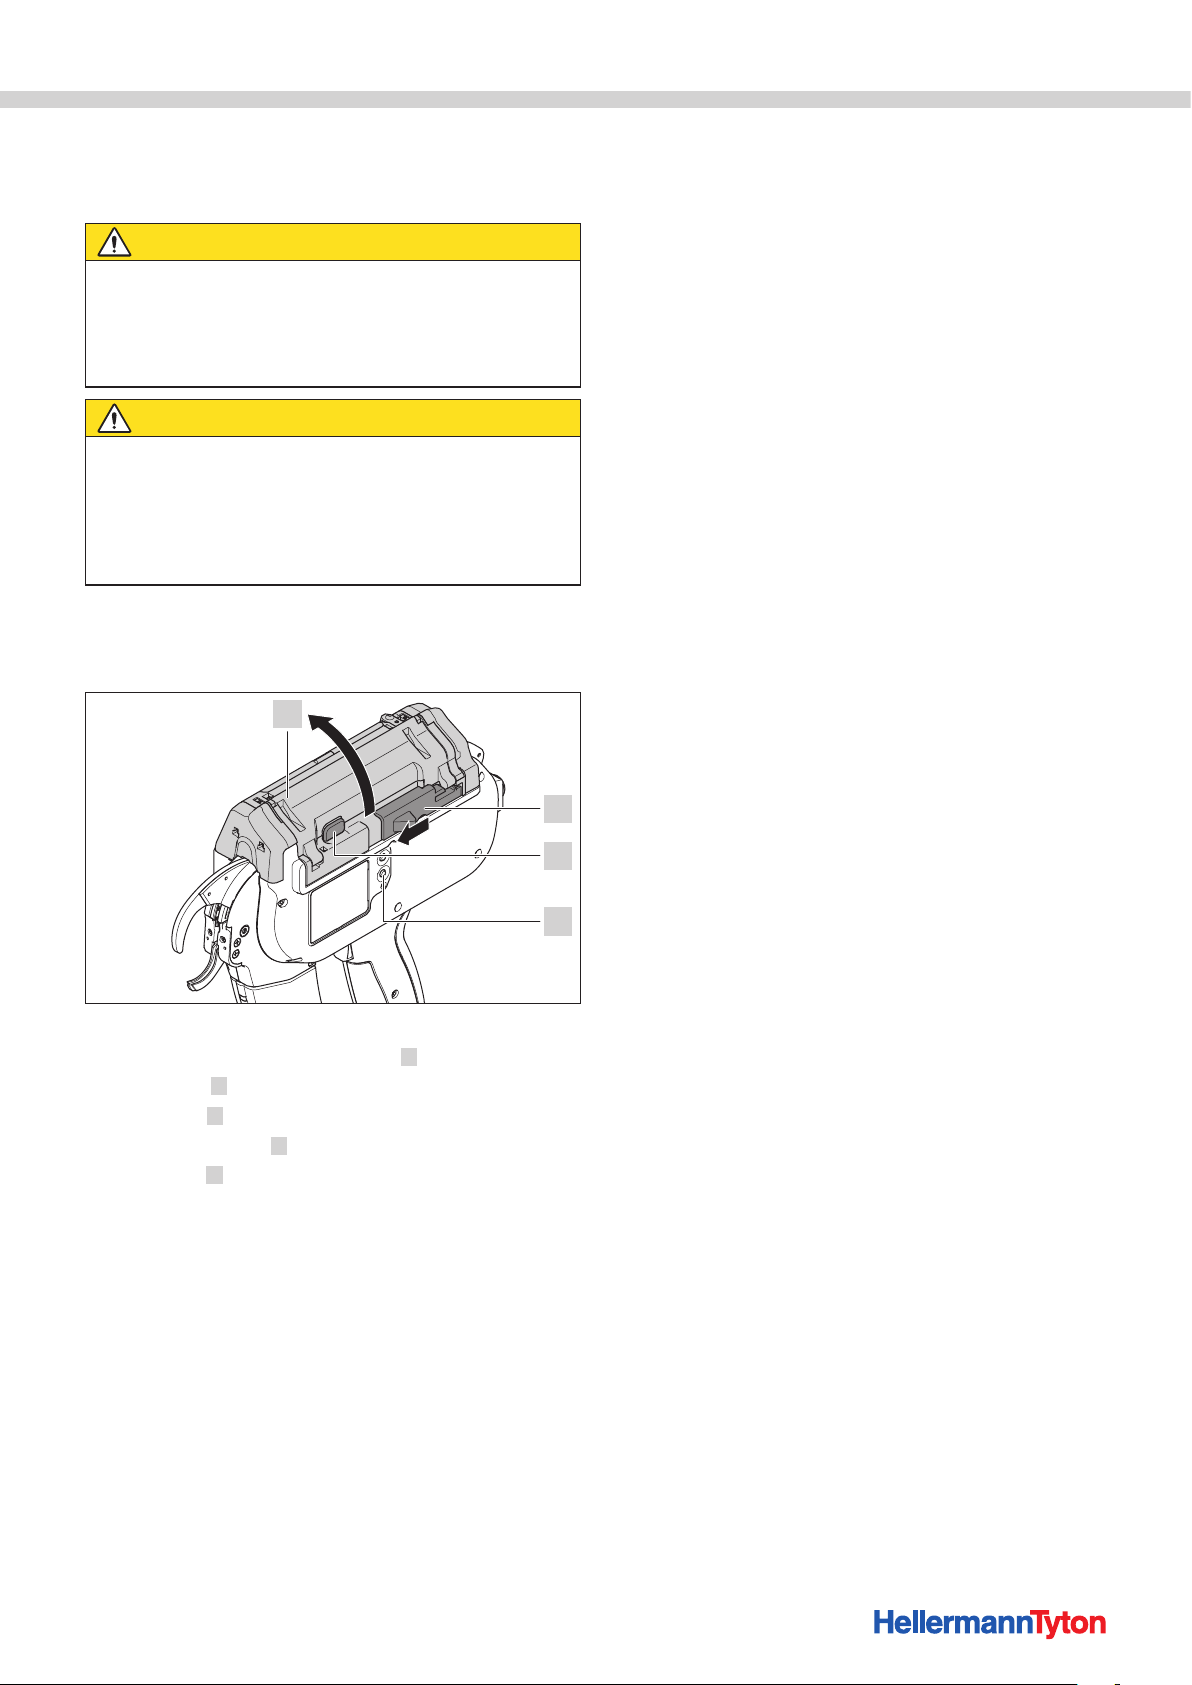
9.2 Performing a reset
A reset of the tool always has to be performed before
repair work is undertaken.
Troubleshooting
1
f Switch the AT2000 CPK ON.
f Push actuator for bandoleer cutter 2 to the left.
f Press catch 3 .
f Open gate 1 .
f Press Reset button 4 .
f Close gate 1 .
2
3
4
Operating Instructions • AT2000 CPK • 02-2017 • v02 • 106-29004
24
Page 25
9.3 Display messages
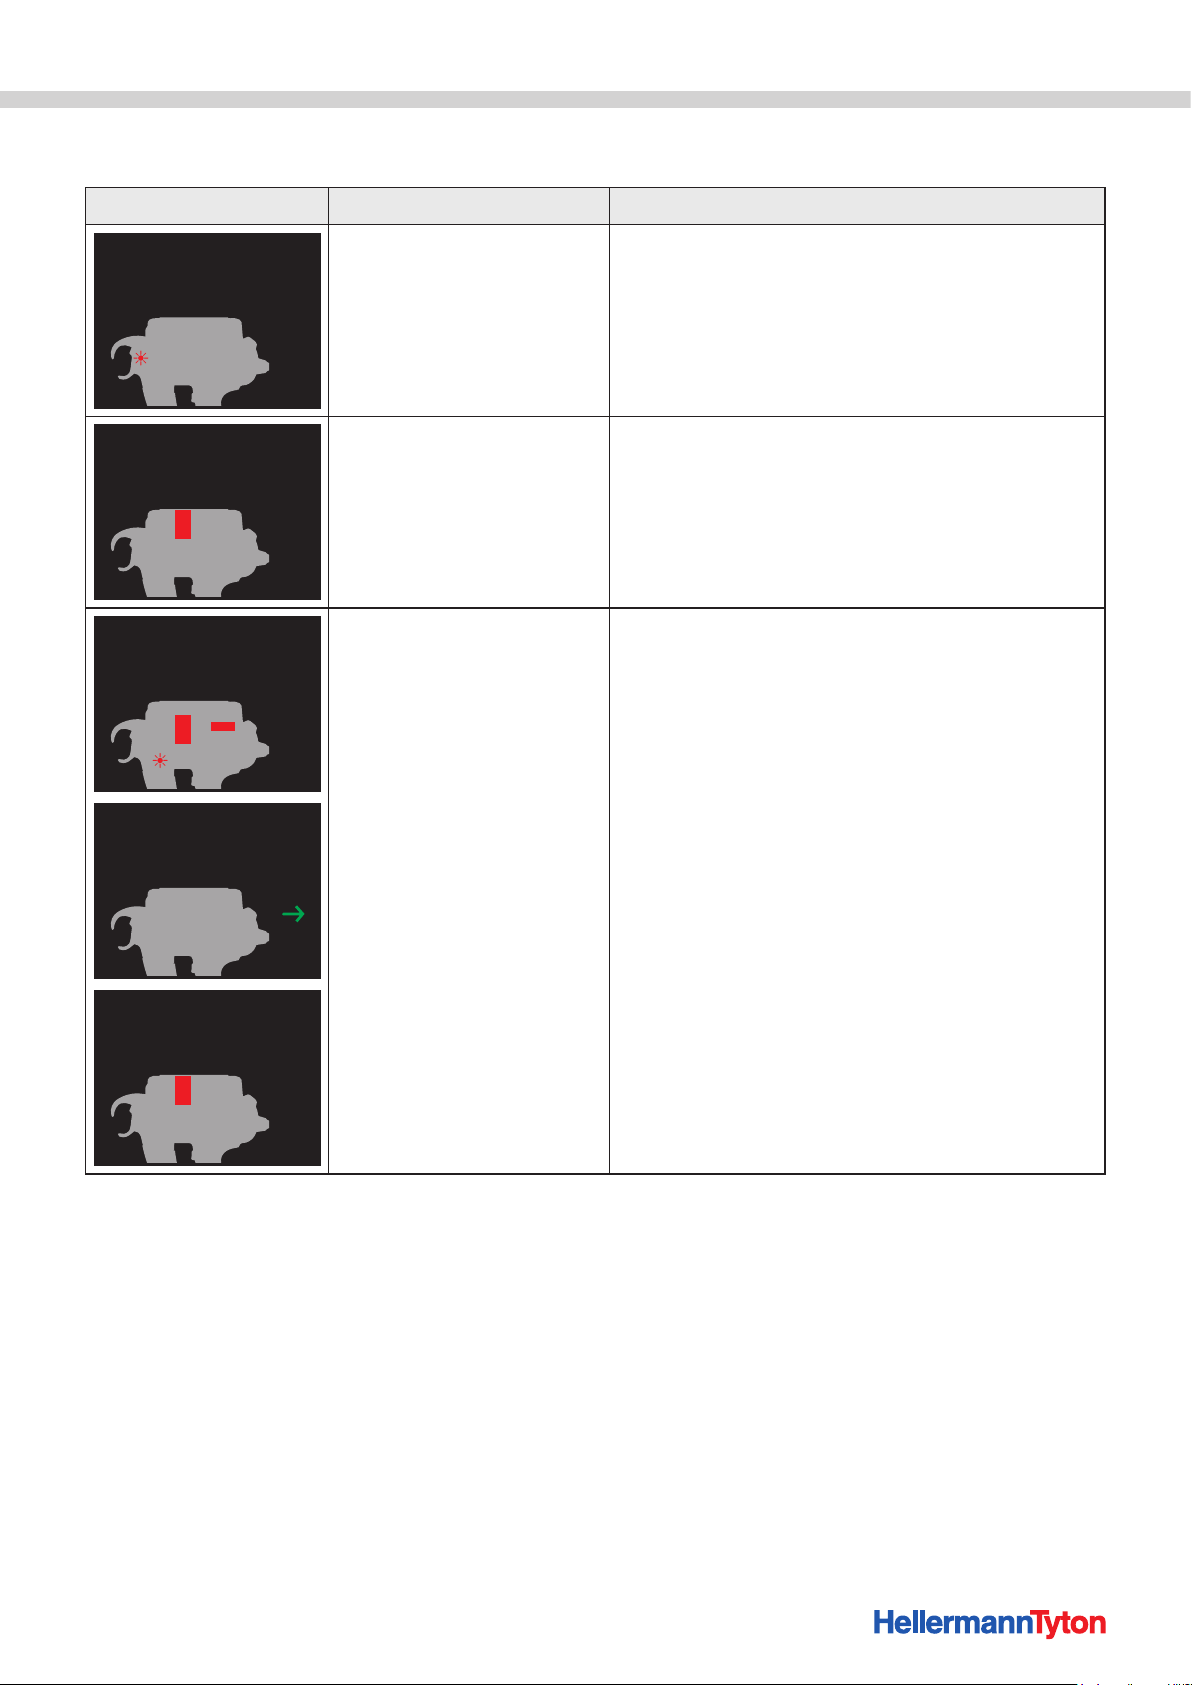
DISPLAY MESSAGE POSSIBLE CAUSE SOLUTION
Troubleshooting
Error, front cap
Remove cable-tie residues
Error, gate
Close gate
Error, start position
1. Operate bandoleer cutter
2. Open gate
Error, start position
1. Remove cable-tie residues
2. Press Reset button
• There are residues of cable
ties trapped behind the front
cap.
• The level sensor is busy.
• Drum is not in the correct
position.
• The gate is open.
• The AT2000 CPK is not in
the start position.
f Clean the front sensor.
f If applicable, carefully remove the cable-tie residues.
f Open the gate and turn the drum to the correct
position.
f Close the gate.
f Push actuator for bandoleer cutter to the left.
f Open the gate.
; Error, start position appears as the next
message on the display.
f If applicable, carefully remove the cable-tie residues.
f Press the Reset button.
; Error, start position appears as the next
message on the display.
Error, start position
Close gate
f Close the gate.
Operating Instructions • AT2000 CPK • 02-2017 • v02 • 106-29004
25
Page 26
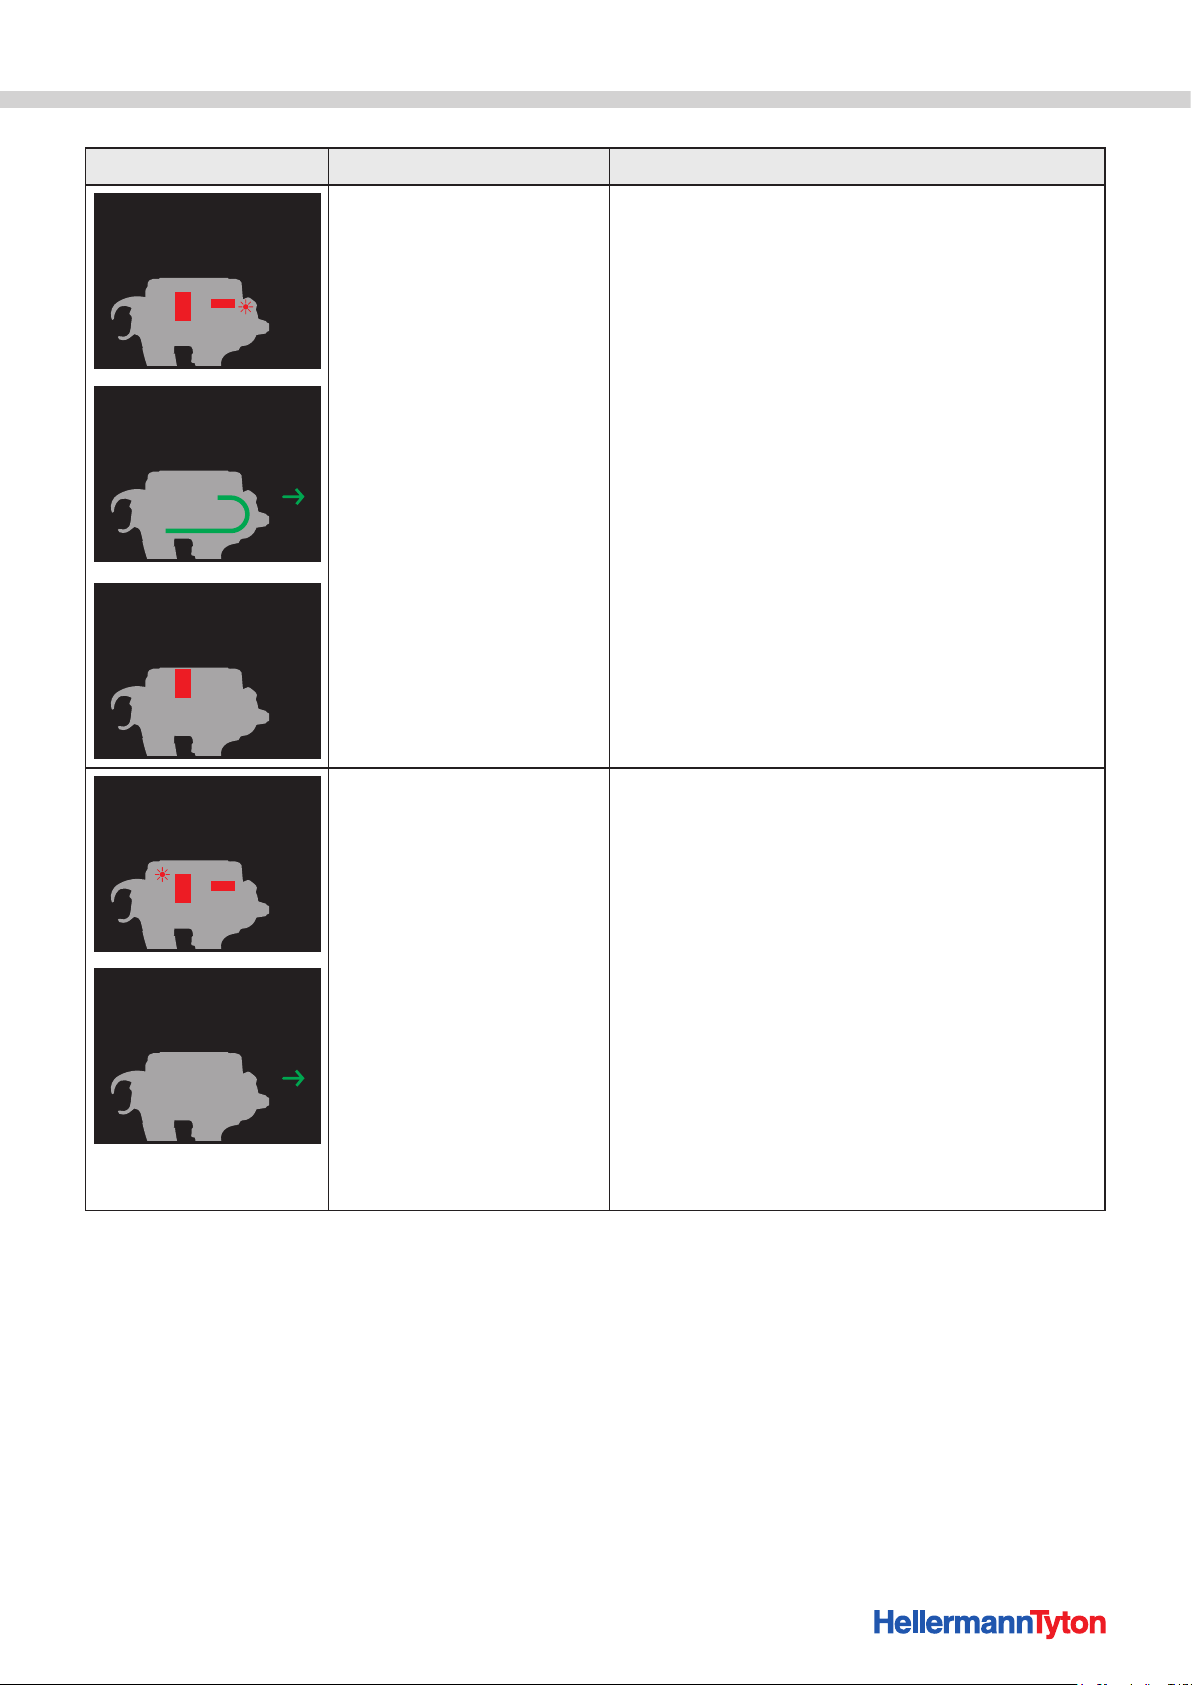
DISPLAY MESSAGE POSSIBLE CAUSE SOLUTION
Troubleshooting
Position of tie advancer
1. Operate bandoleer cutter
2. Open gate
Position of tie advancer
1. Press Reset button
2. Check position of tie advancer
Position of tie advancer
Close gate
• No tie advancer present.
• The tie advancer is faulty.
f Push actuator for bandoleer cutter to the left.
f Open the gate.
; Position of tie advancer appears as the
next message on the display.
f If applicable, carefully remove the cable-tie residues.
f Press the Reset button.
f Open the roller block, à"Checking tie advancer" on
page31.
f Check the tie advancer; replace if necessary.
; Position of tie advancer appears as the
next message on the display.
f Close the gate.
Error, drum
1. Operate bandoleer cutter
2. Open gate
Error, drum
1. Remove cable-tie residues
2. Press Reset button
• The cable tie bandoleer is
pulled in at an angle.
• Roller lever drum is jammed
or is defective.
f Push actuator for bandoleer cutter to the left.
f Open the gate.
f Open the two transparent flaps at the gate,
à"Troubleshooting a cable-tie bandoleer
malfunction" on page28.
; Error, drum appears as the next message on the
display.
f If applicable, carefully remove the cable-tie residues.
f Open the roller lever drum and turn the drum to the
correct position.
f Press the Reset button.
; Error, gate appears as the next message on the
display.
f Close the gate.
f Load a new cable tie bandoleer, à"Loading cable
ties" on page11.
Operating Instructions • AT2000 CPK • 02-2017 • v02 • 106-29004
26
Page 27
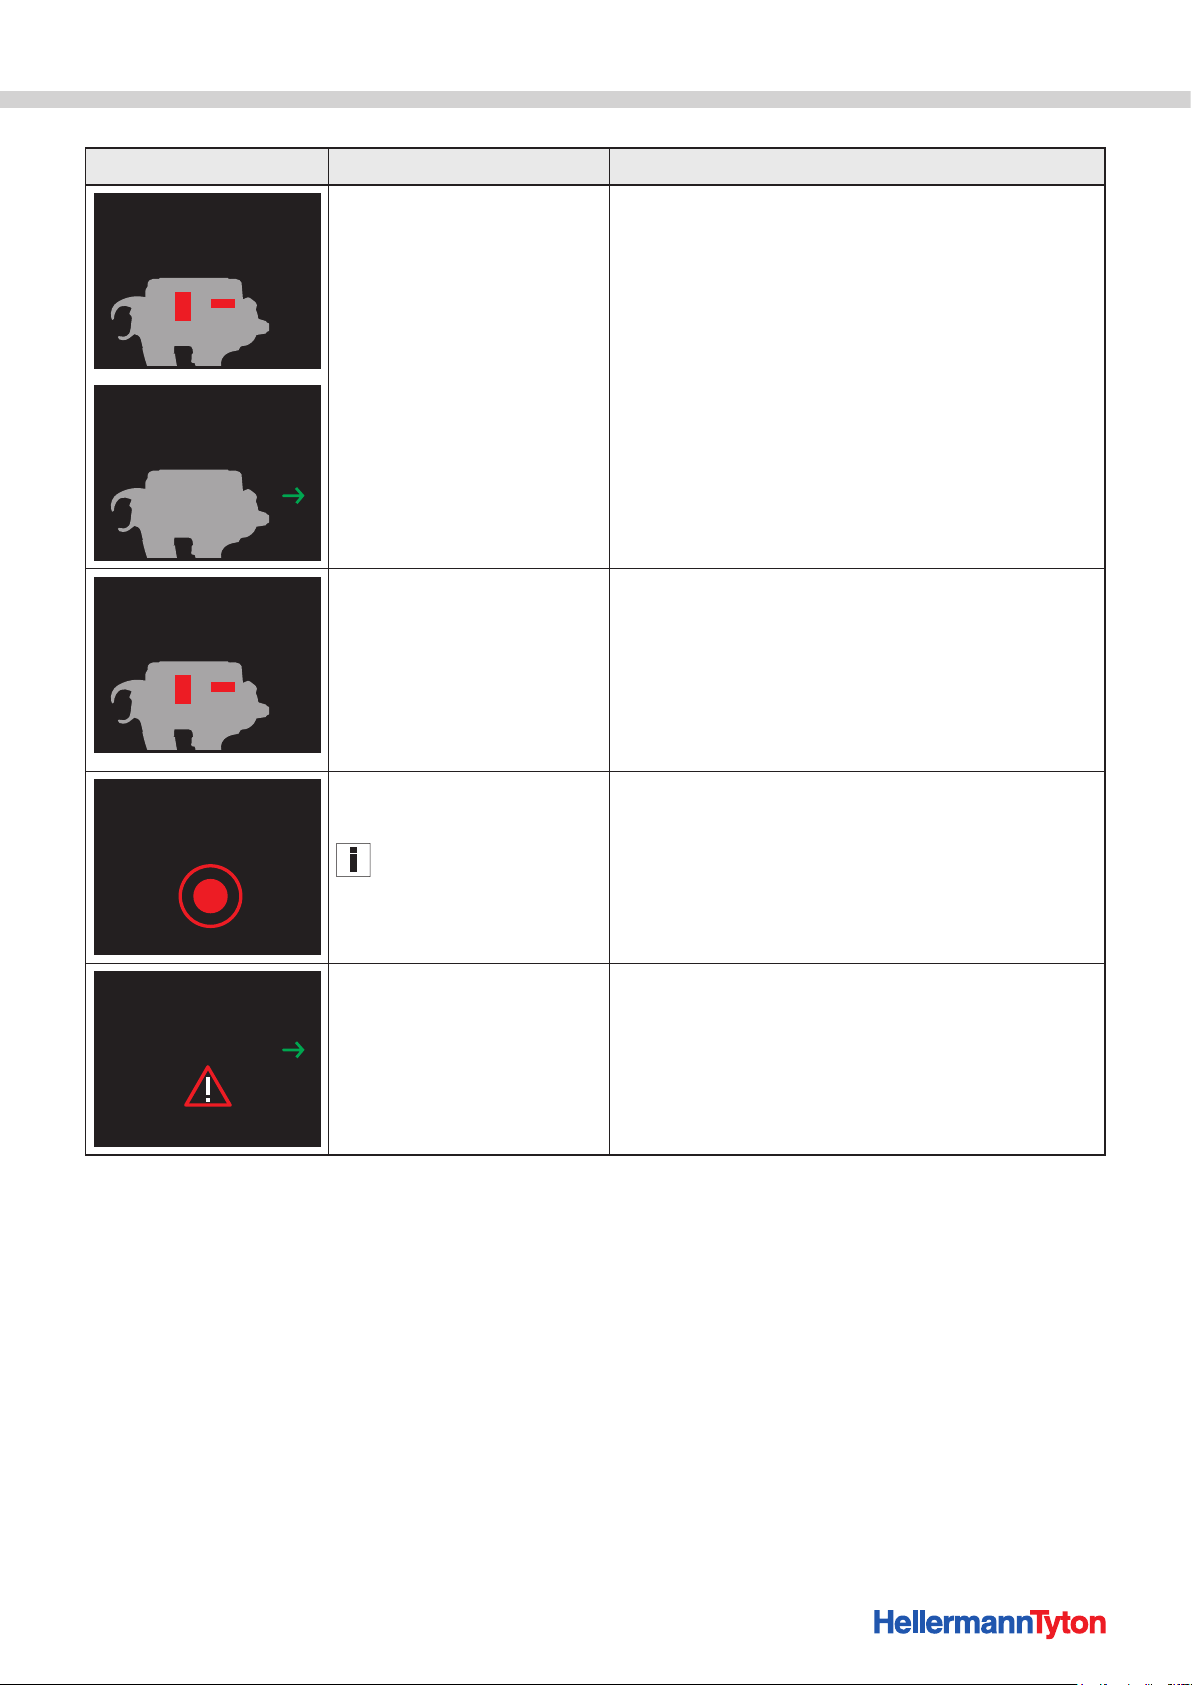
DISPLAY MESSAGE POSSIBLE CAUSE SOLUTION
Troubleshooting
Overload
1. Operate bandoleer cutter
2. Open gate
Overload
1. Remove cable-tie residues
2. Press Reset button
Error, tensioning motor
1. Operate bandoleer cutter
2. Open gate
Error, binding force
1. Check binding
2. Confirm with trigger
• The drum is blocked.
• The bandoleer cutter does
not cut off the cable ties.
• The cable tie bandoleer is
pulled in at an angle.
• Drive is jammed or is
defective.
• The specified binding force
is not achieved.
The message appears only if
error notification is activated,
à"Check of binding" on
page14.
f Push actuator for bandoleer cutter to the left.
f Open the gate.
f Open the two service flaps at the gate,
à"Troubleshooting a cable-tie bandoleer
malfunction" on page28.
; Error, overload appears as the next message on
the display.
f If applicable, carefully remove the cable-tie residues.
f Press the Reset button.
; Error, gate appears as the next message on the
display.
f Close the gate.
f Push actuator for bandoleer cutter to the left.
f Open the gate.
f If applicable, carefully remove the cable-tie residues.
f Press the Reset button.
; Error, gate appears as the next message on the
display.
f Close the gate.
f Check the binding.
f If applicable, reset the binding force.
f If applicable, carefully remove the cable-tie residues.
f Press the trigger as confirmation.
Time loss
1. Check battery in power pack
2. Press Reset button
• The back-up battery for the
clock in the power pack has
discharged.
f Change the back-up battery, à"Changing back-up
battery" on page29.
f Press the Reset button.
Operating Instructions • AT2000 CPK • 02-2017 • v02 • 106-29004
27
Page 28
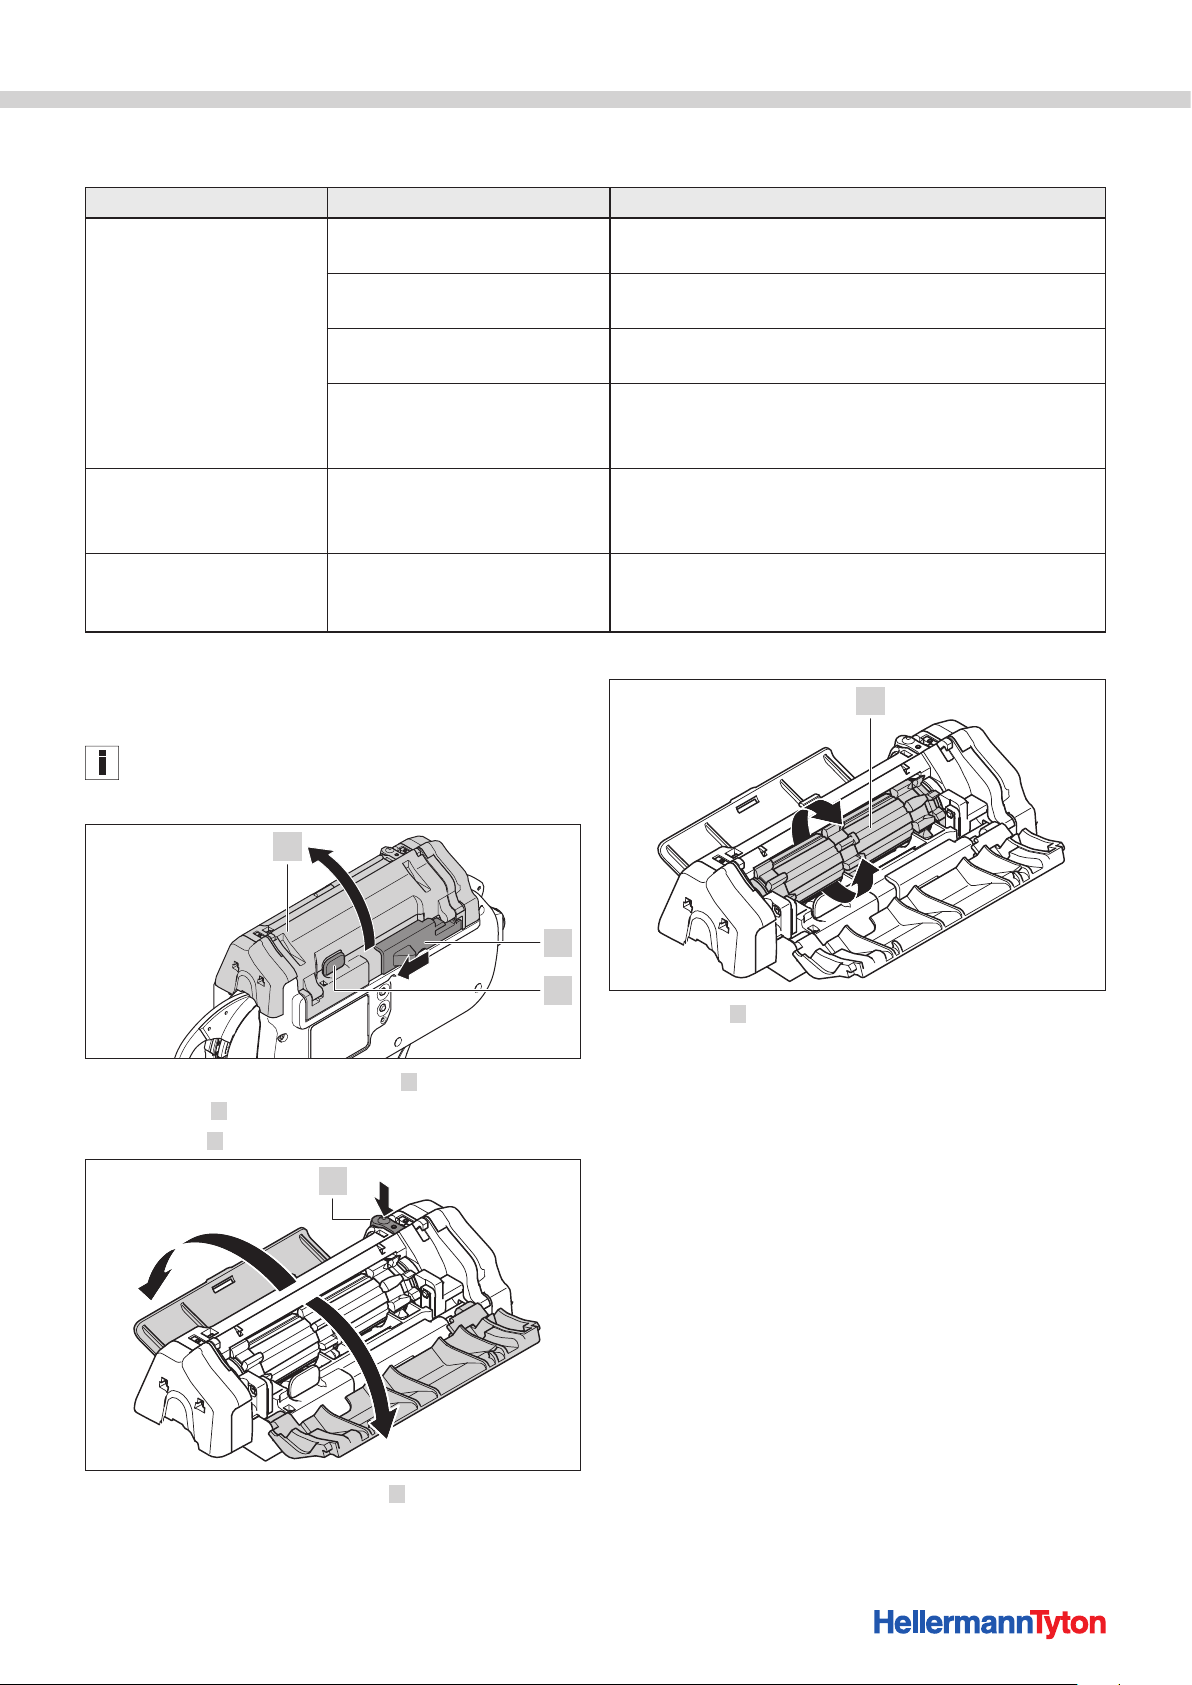
9.4 Possible fault
1
2
3
FAULT PATTERN POSSIBLE CAUSE SOLUTION
Loops form
• Bundle diameter is
unsuitable.
• Tie advancer is not in the
correct position.
f Use a suitable bundle diameter,à"Positioning and
binding items for bundling" on page12.
f Check the position of the tie advancer, à"Checking
tie advancer" on page31.
• Spring in upper jaw is faulty. f Check upper jaw flap in upper jaw with spring,
à"Replacing upper jaw" on page30.
• Lower jaw is blocked.
f Check lower jaw, à"Checking front cap and position
of cutter" on page31.
f Remove blockage.
Binding not possible.
Cable tie shoots straight
out.
Cable tie is not cut off
flush.
• Upper jaw is blocked.
• Cutter in front cap is not in
correct position.
f Check upper jaw, à"Checking upper jaw" on
page30.
f Remove blockage.
f Check position of cutter in front cap and remove
cable-tie residues, à"Checking front cap and position
of cutter" on page31.
Troubleshooting
9.4.1 Troubleshooting a cable-tie bandoleer
malfunction
Be sure to check the information on the display, à"Display
messages" on page25.
f Switch the power pack OFF.
f Push actuator for bandoleer cutter 2 to the left.
f Press catch 3 .
f Open gate 1 .
4
5
f Turn drum 5 past the point of indexing resistance and
remove the cable-tie residues.
f Close the left and right service flaps.
f Switch the power pack ON.
f Close the gate.
f Load a new cable tie bandoleer, à"Loading cable ties"
on page11.
f Press actuator for service flap left 4 .
f Open the left service flap.
f Open the right service flap.
Operating Instructions • AT2000 CPK • 02-2017 • v02 • 106-29004
28
Page 29
Maintenance
3
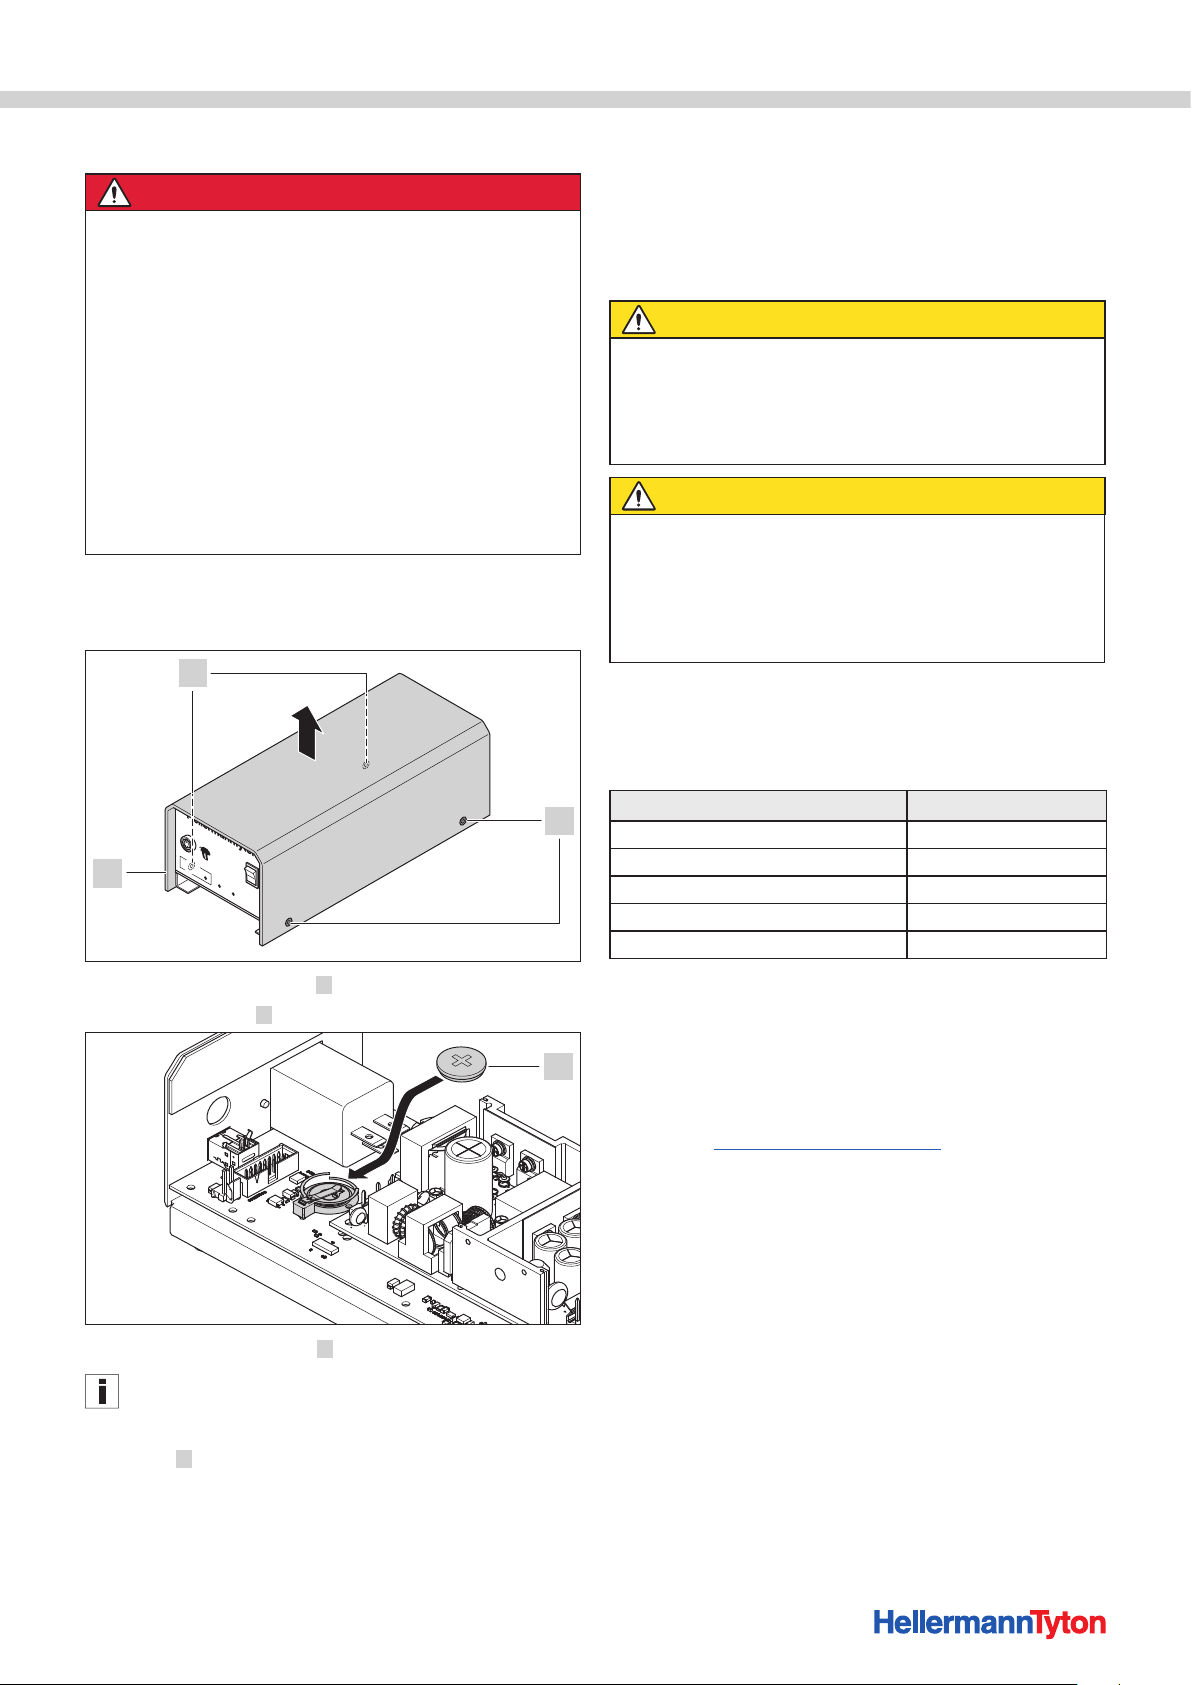
9.4.2 Changing back-up battery
DANGER
A hazardous electrical current flows though the body
in direct or indirect contact with electrically live parts.
Electric shock, burns or death can result.
f Work on the electrical supply and on parts that are live
when the device is in operation should always be carried
out by a person duly authorised to work on low-voltage
electrical equipment.
f Use only OEM fuses of the specified amperage.
f Have faulty electrical components replaced immediately.
f Always disconnect the plug from the power-supply outlet
before starting maintenance work and troubleshooting.
f Check the electrical equipment of the device at regular
intervals. Have defects such as loose connections or
scorched wiring repaired immediately.
f Switch the power pack OFF.
f Disconnect the power cord from the power-supply
outlet.
1
Power pack CPK
2
Data Signal Power
10 Maintenance
10.1 Important notes
Regular servicing is essential in order to ensure that the
device remains in safe working order, à"Maintenance
schedule" on page30.
CAUTION
Crush hazard when jaws close.
f Do not insert fingers between upper and lower jaws and
do not keep your finger on the trigger.
f Always keep the power pack switched OFF while
maintenance is in progress.
CAUTION
Crush hazard due to moving/rotating parts when service
covers are open.
f Do not insert fingers underneath the drum and do not
keep your finger on the trigger.
f Always keep the power pack switched OFF while
maintenance is in progress.
10.2 Accessories and extras
Accessories and extras can be ordered directly from your
national HellermannTyton representative, àseparate
spare parts list.
1
Name Article number
Power pack CPK 106-00100
CPK Operating Instructions on CD 106-29004
CPK safety warnings 106-29003
Bench mount kit CPK 106-00040
Overhead suspension CPK 106-00050
f Remove housing screws 1 .
f Remove housing 2 from the power pack.
f Change back-up battery 3 .
For details of battery type, à"PowerpackCPK" on
page33
f Refit the housing and secure it by tightening housing
screws 1 .
f Set the date and time, à"Date / time" on page14.
10.3 Servicing by manufacturer
It is advisable to have the AT2000 CPK serviced by
HellermannTyton once a year or after every approx. 1
million bindings. This will allow the AT2000 CPK to be
checked and updated to the latest modification status.
Service contact addresses for all countries are posted on
the website: www.HellermannTyton.com
Operating Instructions • AT2000 CPK • 02-2017 • v02 • 106-29004
29
Page 30
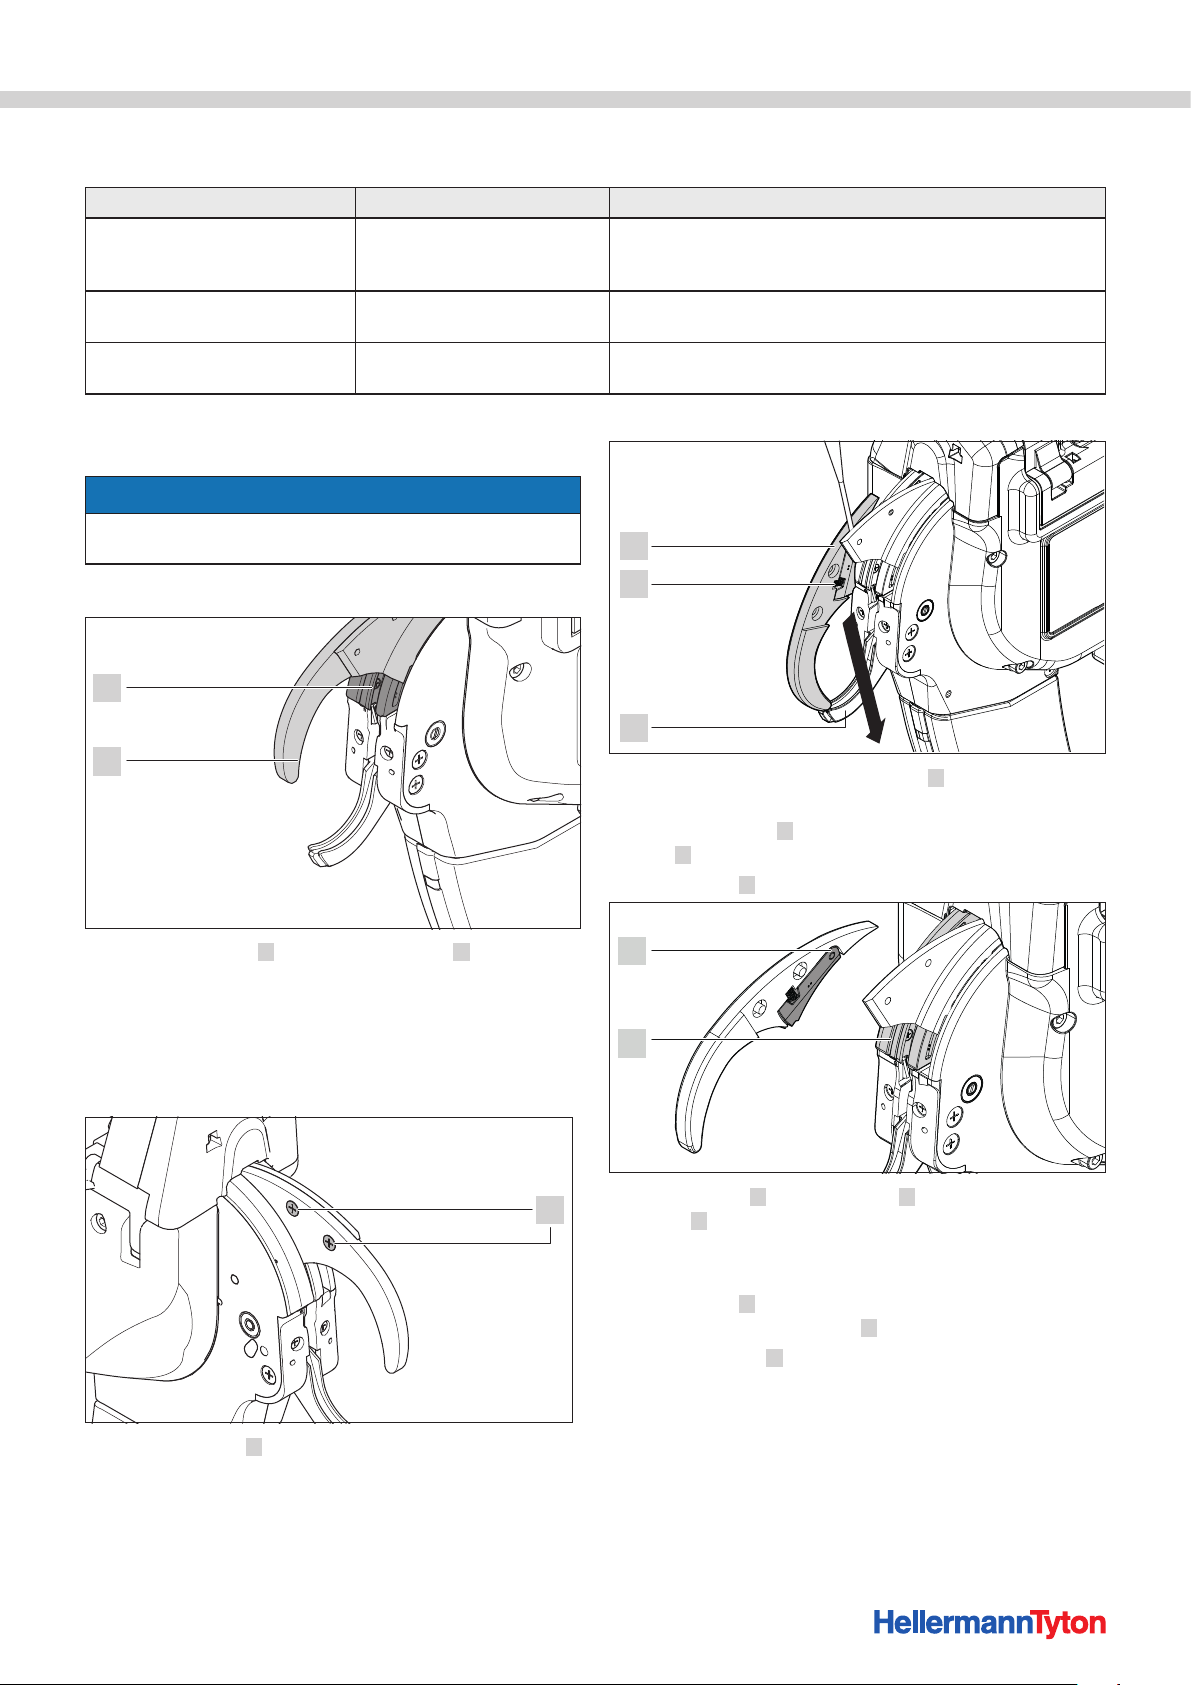
10.4 Maintenance schedule
WHEN? WHO? WHAT AND HOW?
Approx. every 300,000
bindings
Approx. every 50,000 bindings Setup specialist
Approx. every 300,000
bindings
Setup specialist
Setup specialist
f Check the upper jaw; replace if necessary, à"Checking
upper jaw" on page30 and à"Replacing upper jaw"
on page30
f Check the tie advancer; replace if necessary, à"Checking
tie advancer" on page31.
f Check the front cap; replace if necessary, à"Checking
front cap and position of cutter" on page31.
10.5 Repair
NOTE
Always perform a reset before commencing repair work,
à"Performing a reset" on page24.
2
3
10.5.1 Checking upper jaw
Maintenance
1
2
f Check upper jaw 2 and upper-jaw guide 1 for wear and
chipping.
f If necessary, replace upper jaw, à"Replacing upper jaw"
on page30.
10.5.2 Replacing upper jaw
f Switch the power pack OFF.
4
f Use a screwdriver to pry upper jaw 2 apart (approx.
3mm) at the top.
f Work upper jaw 2 down and to the side past lower
jaw 4 .
f Hold spring 3 in place during removal of the upper jaw.
5
6
1
f Check spring 3 , upper jaw flap 5 and upper jaw
guide 6 for wear and chipping.
f Angle the upper jaw past the lower jaw and seat it in the
guide.
f Hold spring 3 in place during installation of the upper
jaw. Make sure that spring 3 is correctly positioned.
f Tighten screws 1 .
f Remove screws 1 .
Operating Instructions • AT2000 CPK • 02-2017 • v02 • 106-29004
30
Page 31
Maintenance
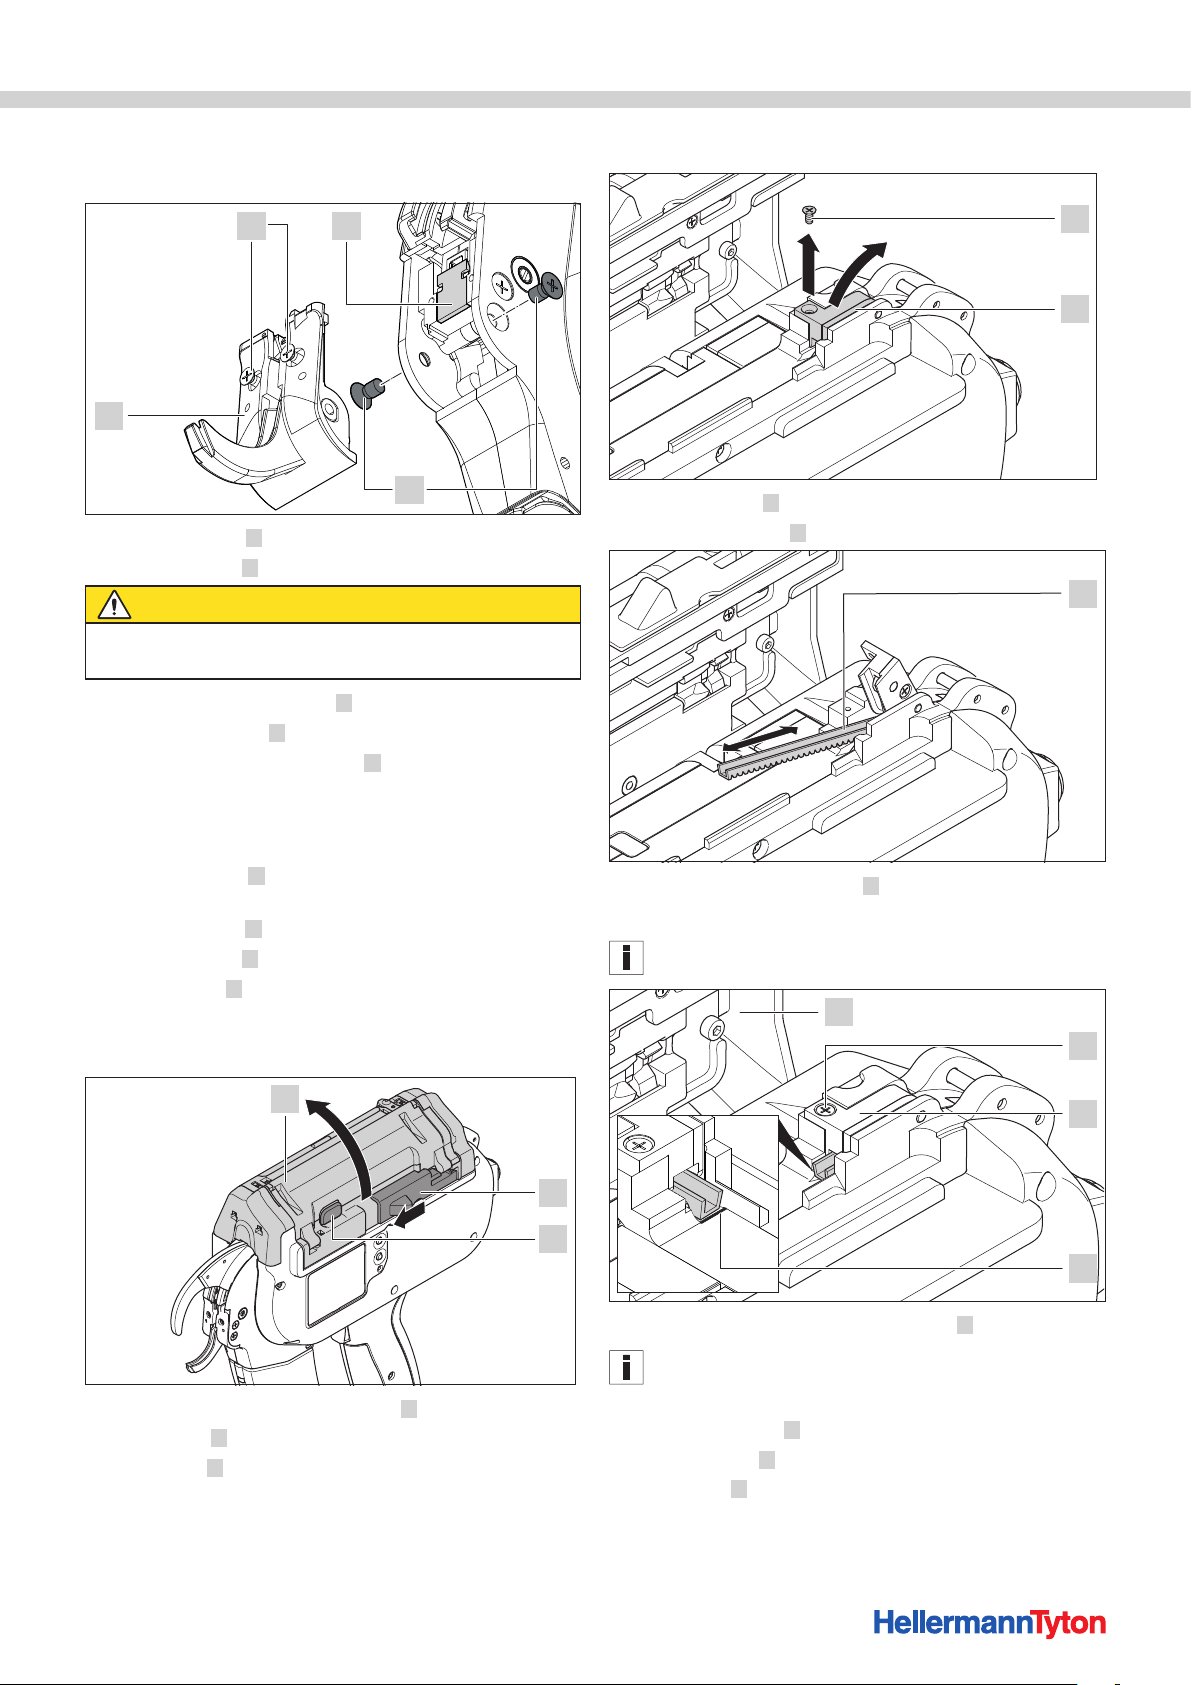
10.5.3 Checking front cap and position of cutter
f Switch the power pack OFF.
1 2
4
3
f Remove screws 3 .
f Slacken screws 1 .
CAUTION
Cut hazard. The cutter is extremely sharp.
f Never touch the cutting edge with your fingers.
f Carefully remove front cap 4 with the lower jaw.
f Remove tail cutter 2 .
f If necessary, replace tail cutter 2 .
f Remove cable-tie residues.
f Use compressed air to blow the tension gear and the
waste channel clean.
f Insert tail cutter 2 into the recess with the cutting
edge facing in.
f Insert front cap 5 with the lower jaw.
f Tighten screws 1 .
f Insert screws 3 and tighten.
10.5.4 Checking tie advancer
f Switch the power pack OFF.
10.5.5 Replacing tie advancer
4
5
f Remove screw 4 .
f Swing roller block 5 up.
6
f Replace faulty tie advancer 6 .
; The teeth of the tie advancer face down.
The tie advancer can be inserted in both directions.
1
4
1
f Push actuator for bandoleer cutter 2 to the left.
f Press catch 3 .
f Open gate 1 .
Operating Instructions • AT2000 CPK • 02-2017 • v02 • 106-29004
5
2
3
6
f Push in the tie advancer as far as mark 6 .
A Position of tie advancer message appears if
positioning is not correct, à"Display messages" on
page25.
f Close roller block 5 .
f Tighten screw 4 .
f Close gate 1 .
31
Page 32
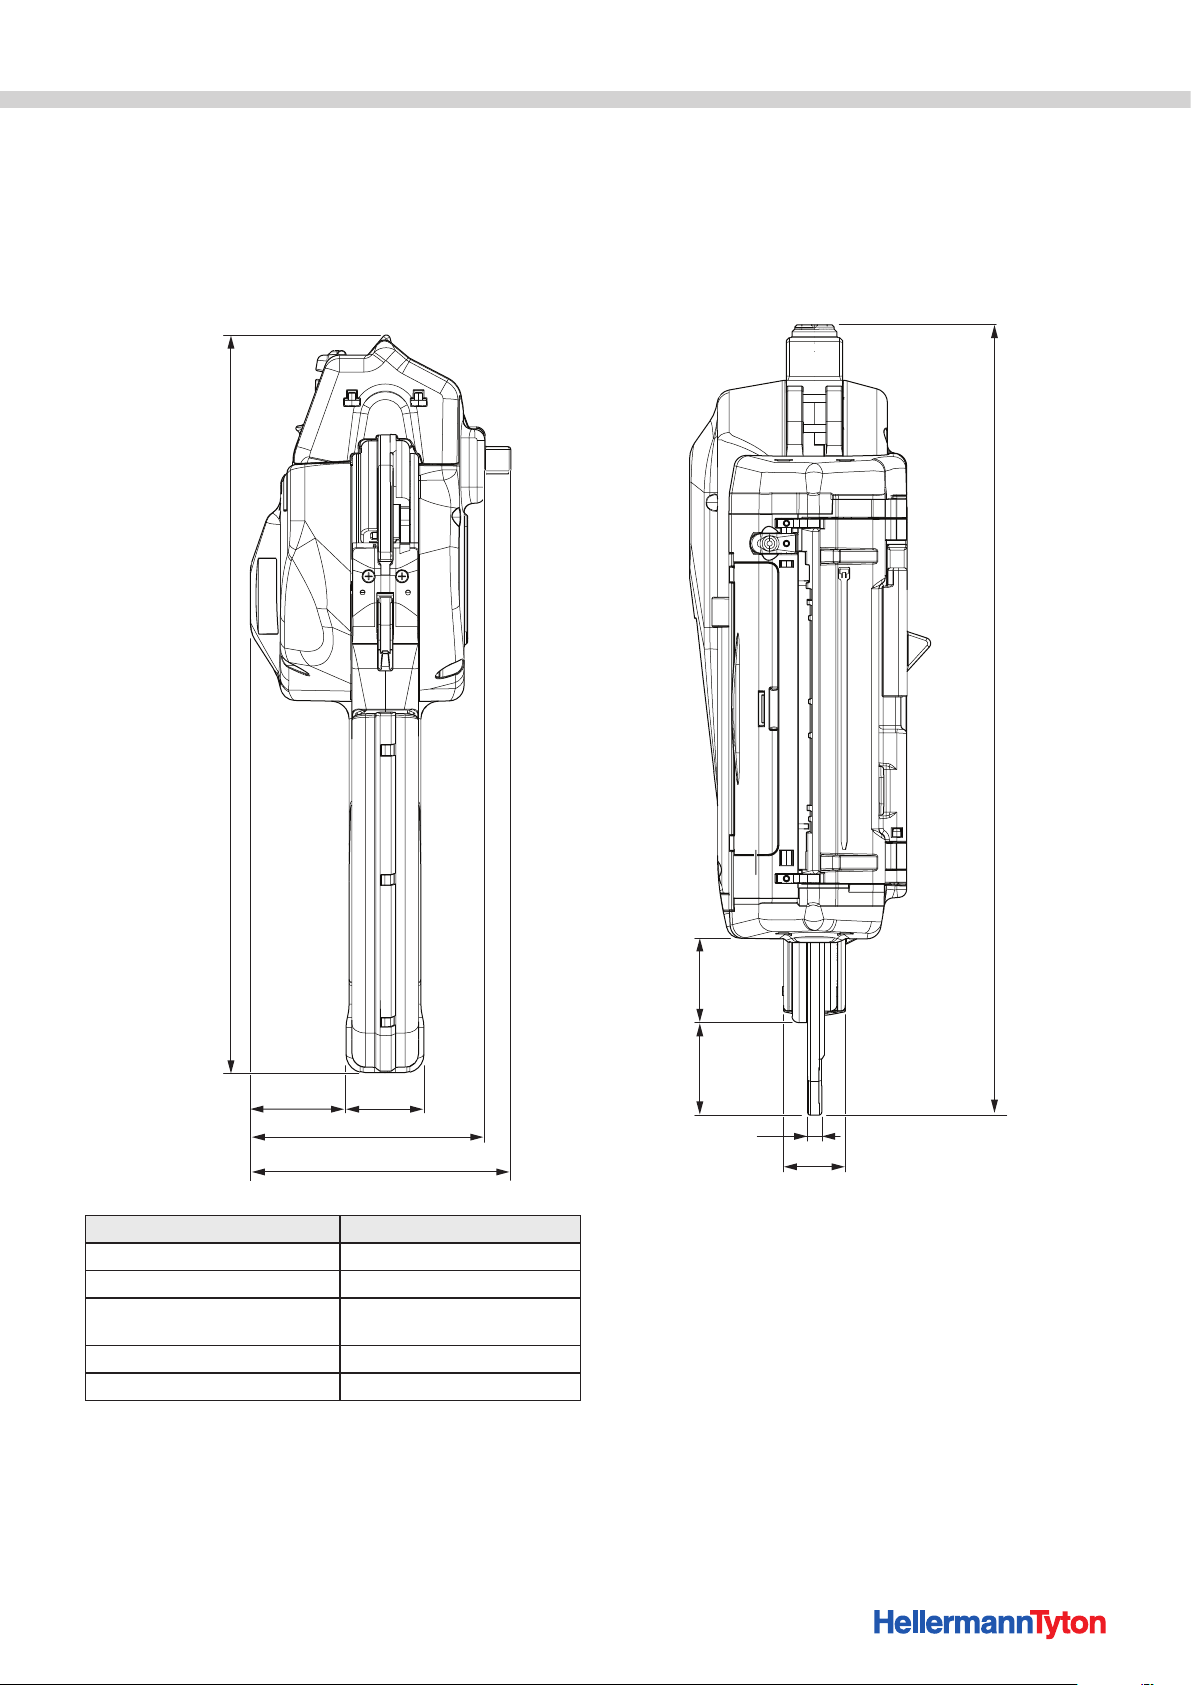
11 Technical data
11.1 Tool AT2000 CPK
243
Technical data
2532
77 5
85
Value
Max. power draw 50 W
Input voltage 25.2 V
Size L × W × H approx. 285 mm × 86 mm × 245
mm
Weight approx. 1800 g
Bundle thickness up to max. 20 mm in diameter
282
34 30
22
Operating Instructions • AT2000 CPK • 02-2017 • v02 • 106-29004
32
Page 33
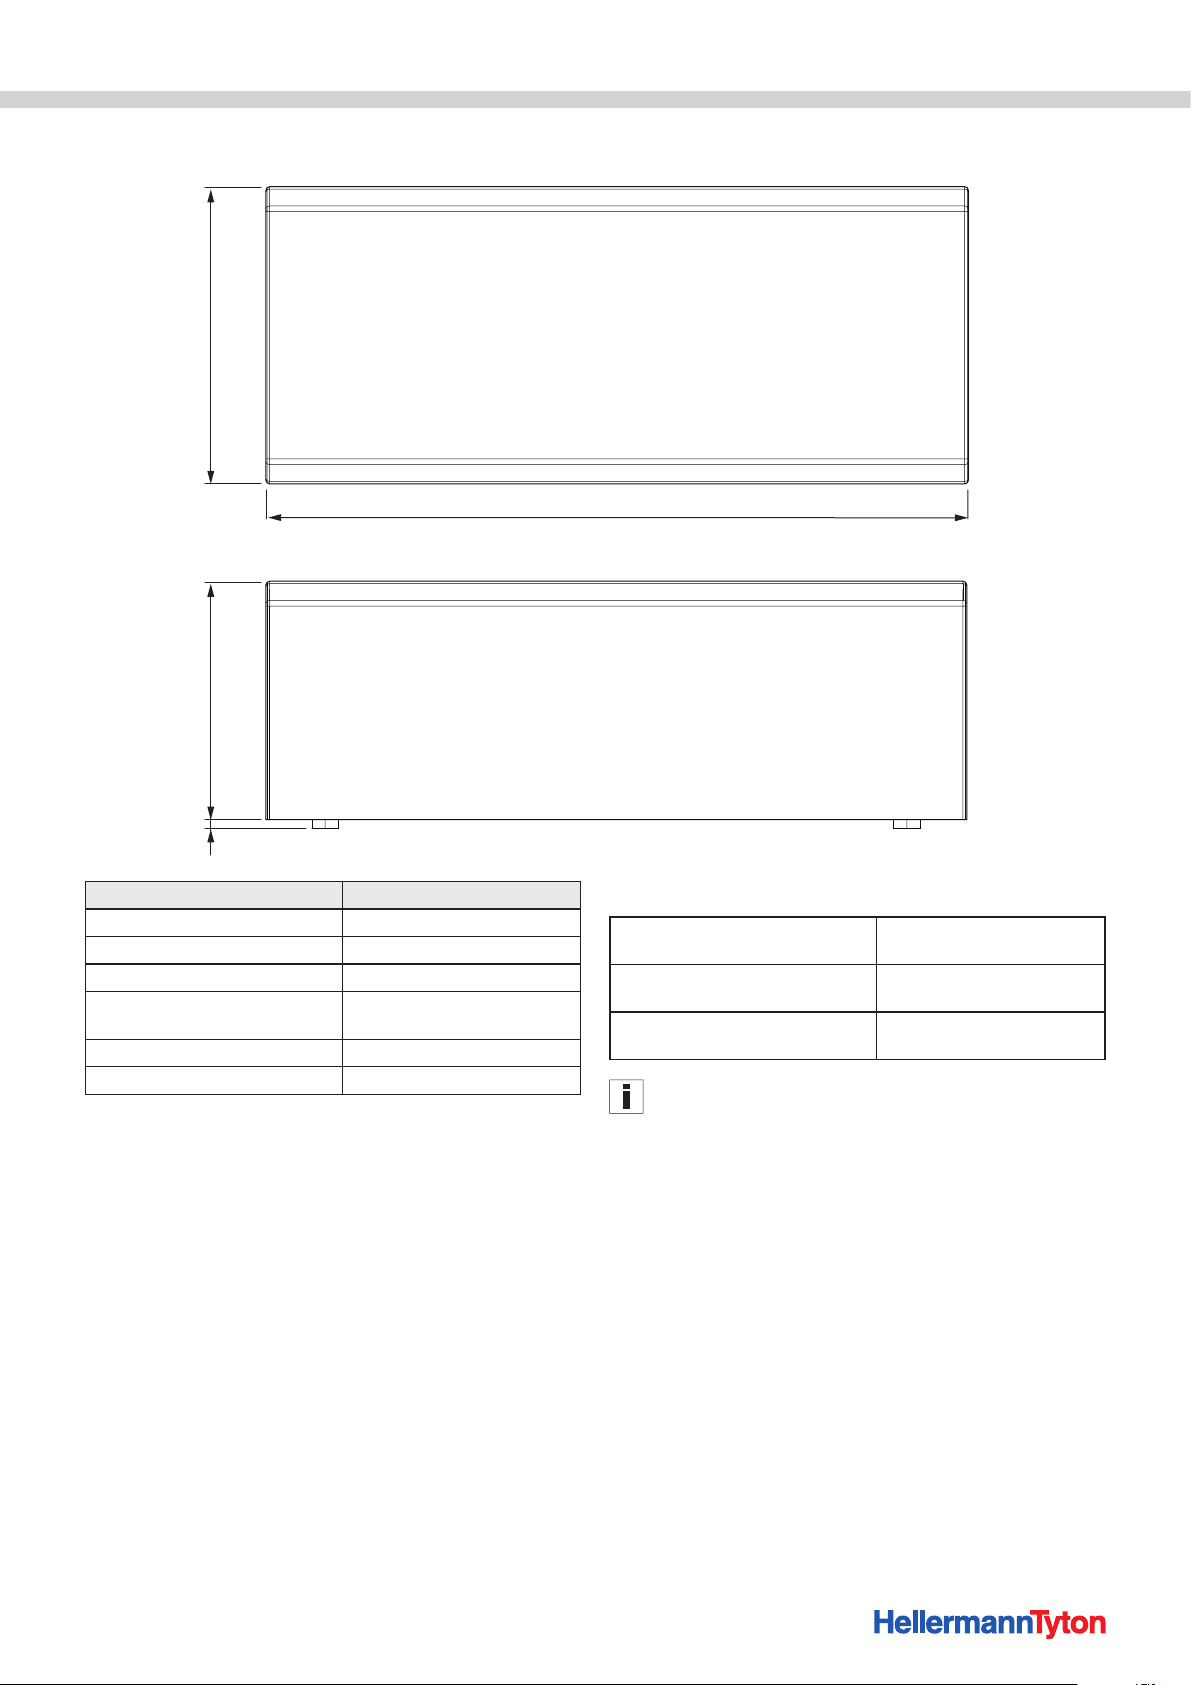
11.2 PowerpackCPK
3,3
110
Technical data
258
93
Value
Line voltage 100 V – 230 V
Line frequency 50/60 Hz
Protection class I
Size L × W × H approx. 260 mm × 110 mm × 93
mm
Weight approx. 1300 g
Back-up battery CR 2032 3V or equivalent
11.3 Noise and vibration information
Emission sound pressure level L
Uncertainty K
Sound power level L
Uncertainty K
Aggregate figure for vibration a
Uncertainty K
pA
WA
WA
pA
h
The vibration level as stated here is a measured value
obtained by the standardised method set out in EN 607451:2009; it can be used for the purposes of device
comparison.
65 dB re20 μPa
3 dB
76dB re1pW
3 dB
2
0.8 m/s
2
1.5 m/s
The figure for vibration stated here is for the power tool
in conditions of its intended use and can differ from the
actual figure for the power tool in conditions of other
use or if not adequately serviced.
Accurately estimating vibration load over a certain work
period entails making due allowance for the times
during which the device is switched off or running, but
not actually in use. This can reduce vibration load over
the entire work period by a significant margin.
f Implement additional safety measures to protect the
operator from the effects of vibration, for example:
• Servicing of power tools and use tools
Operating Instructions • AT2000 CPK • 02-2017 • v02 • 106-29004
• Keeping hands warm
• Workflow organisation
33
Page 34
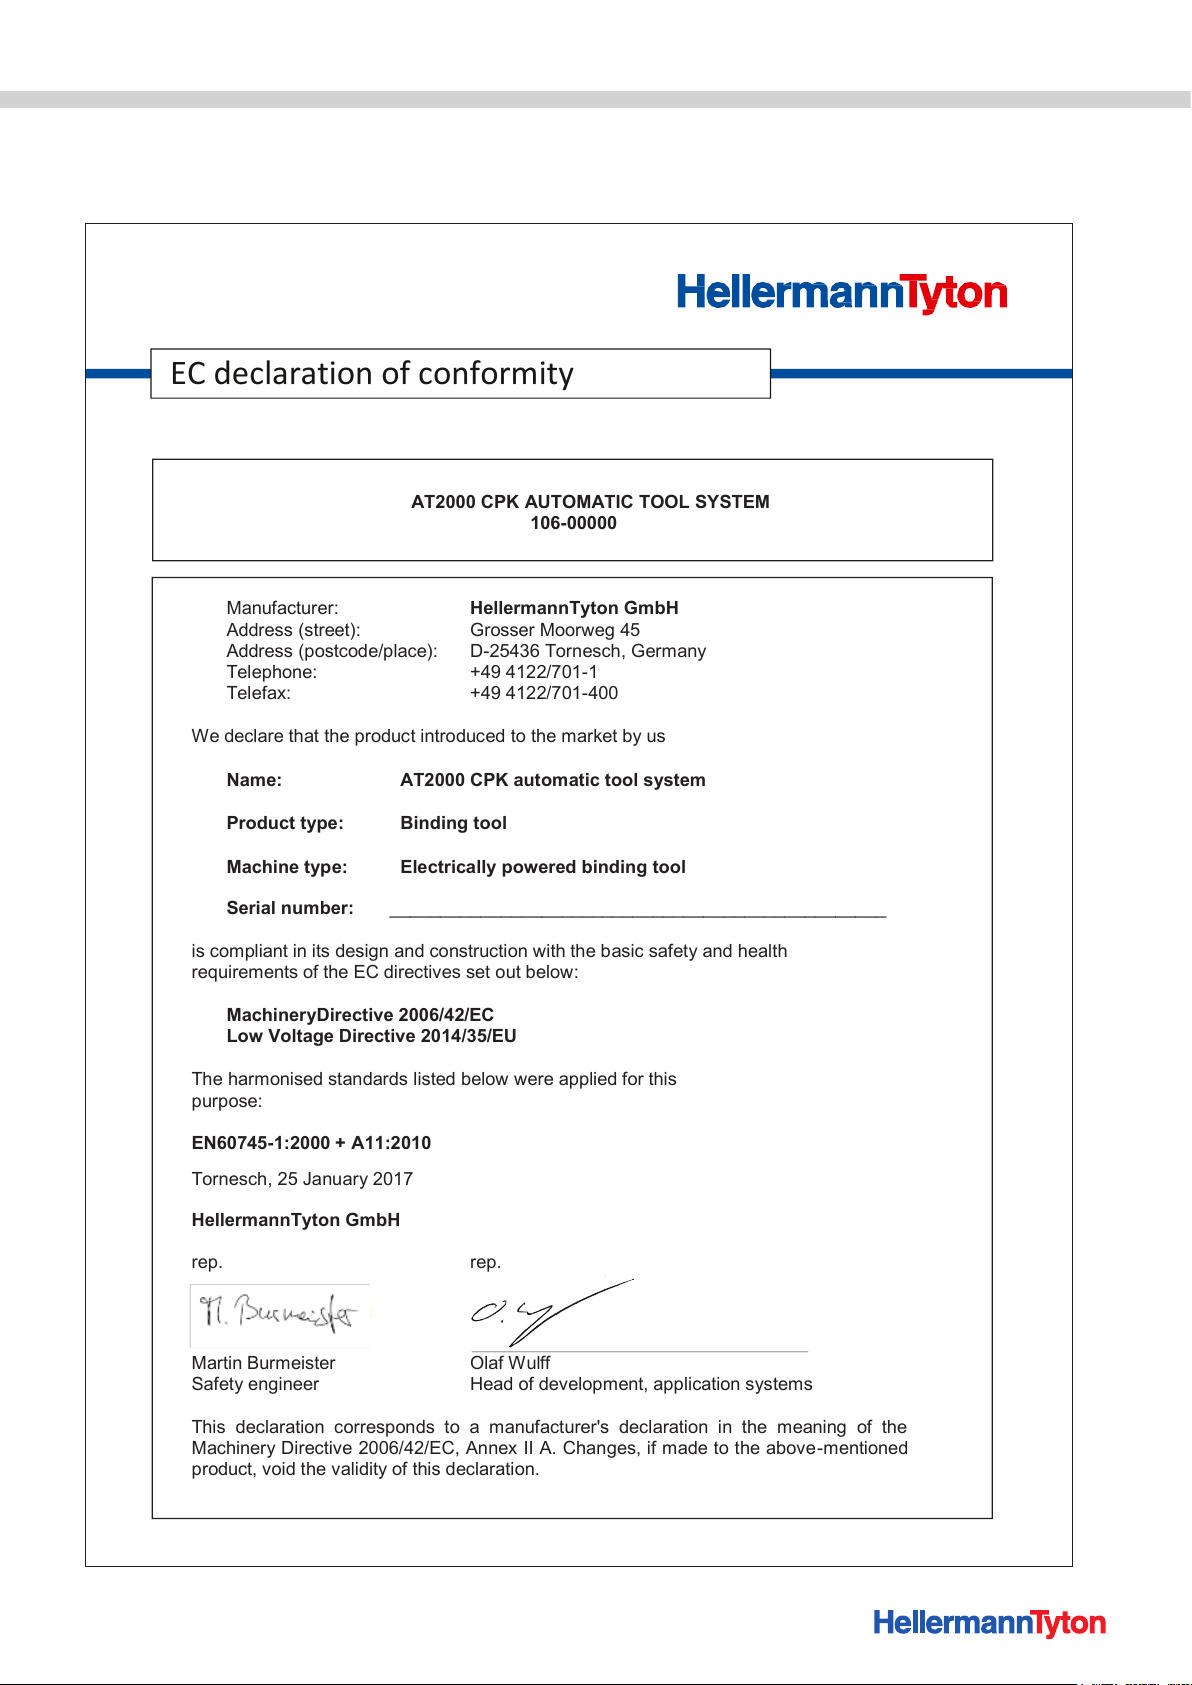
12 Declarations of conformity
EC declaration of conformity
AT2000 CPK AUTOMATIC TOOL SYSTEM
106-00000
Manufacturer: HellermannTyton GmbH
Address (street): Grosser Moorweg 45
Address (postcode/place): D-25436 Tornesch, Germany
Telephone: +49 4122/701-1
Telefax: +49 4122/701-400
We declare that the product introduced to the market by us
Name: AT2000 CPK automatic tool system
Product type: Binding tool
Machine type: Electrically powered binding tool
Serial number: _________________________________________________
is compliant in its design and construction with the basic safety and health
requirements of the EC directives set out below:
MachineryDirective 2006/42/EC
Low Voltage Directive 2014/35/EU
The harmonised standards listed below were applied for this
purpose:
EN60745-1:2000 + A11:2010
Tornesch, 25 January 2017
HellermannTyton GmbH
rep. rep.
Martin Burmeister Olaf W ulff
Safety engineer Head of development, application systems
This declaration corresponds to a manufacturer's declaration in the meaning of the
Machinery Directive 2006/42/EC, Annex II A. Changes, if made to the above-mentioned
product, void the validity of this declaration.
12.1 AT2000 CPK automatic tool system
Declarations of conformity
Operating Instructions • AT2000 CPK • 02-2017 • v02 • 106-29004
34
Page 35
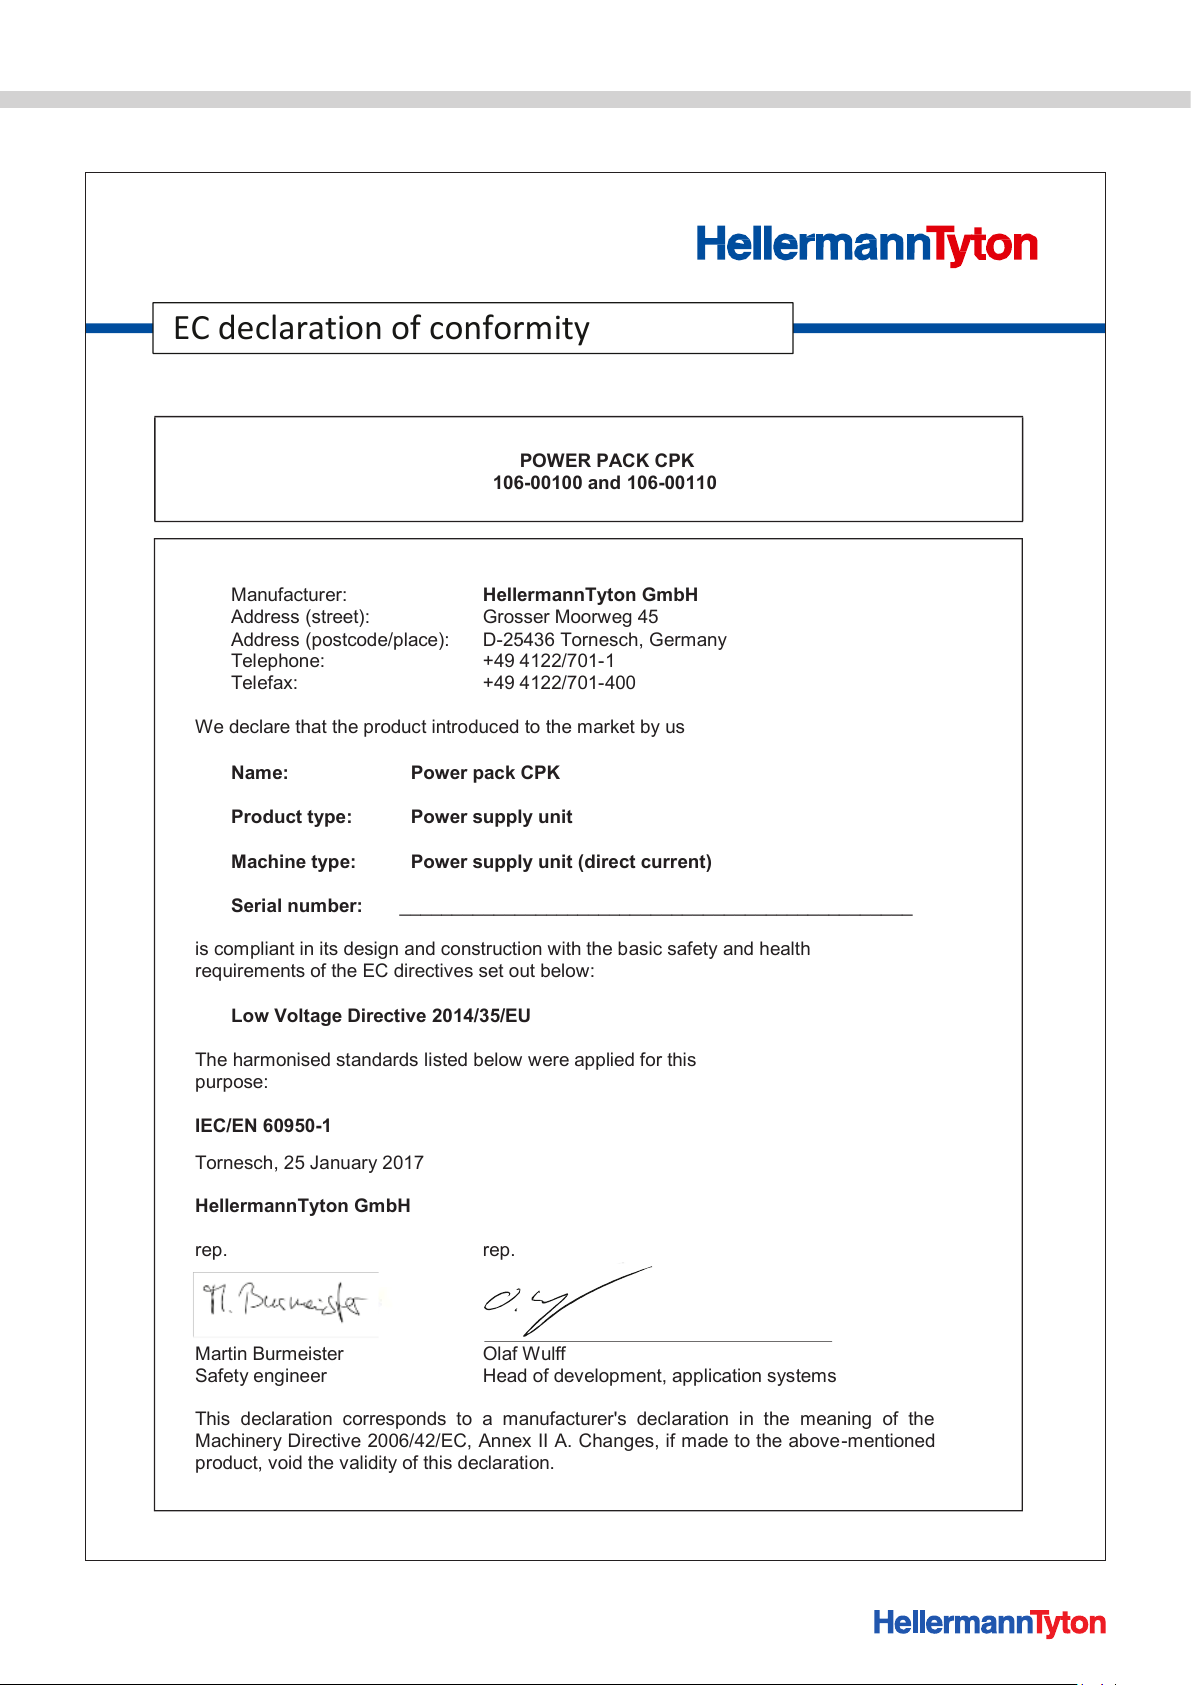
12.2 Power pack CPK
EC declaration of conformity
POWER PACK CPK
106-00100 and 106-00110
Manufacturer: HellermannTyton GmbH
Address (street): Grosser Moorweg 45
Address (postcode/place): D-25436 Tornesch, Germany
Telephone: +49 4122/701-1
Telefax: +49 4122/701-400
We declare that the product introduced to the market by us
Name: Power pack CPK
Product type: Power supply unit
Machine type: Power supply unit (direct current)
Serial number: _________________________________________________
is compliant in its design and construction with the basic safety and health
requirements of the EC directives set out below:
Low Voltage Directive 2014/35/EU
The harmonised standards listed below were applied for this
purpose:
IEC/EN 60950-1
Tornesch, 25 January 2017
HellermannTyton GmbH
rep. rep.
Martin Burmeister Olaf Wulff
Safety engineer Head of development, application systems
This declaration corresponds to a manufacturer's declaration in the meaning of the
Machinery Directive 2006/42/EC, Annex II A. Changes, if made to the above -mentioned
product, void the validity of this declaration.
Declarations of conformity
Operating Instructions • AT2000 CPK • 02-2017 • v02 • 106-29004
35
Page 36
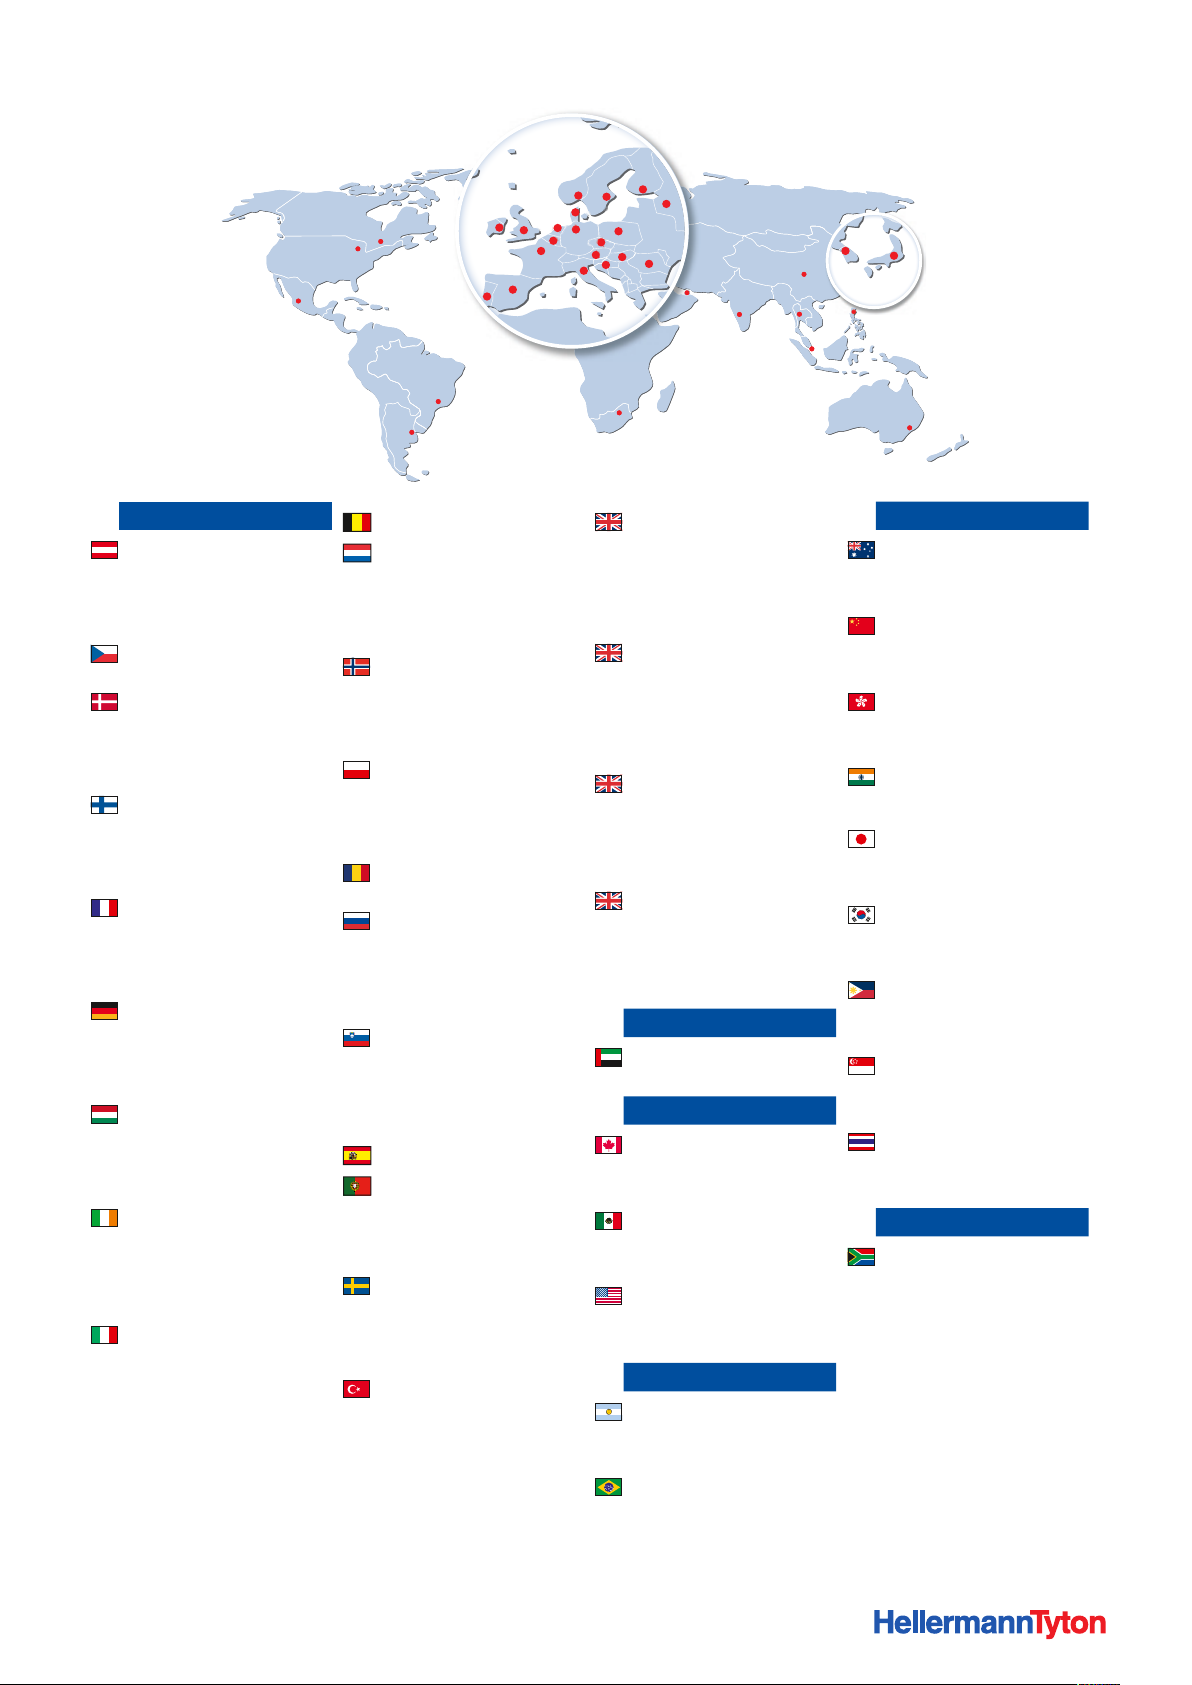
HellermannTyton operates globally in 37 countries
Europe
HellermannTyton GmbH – Austria
Rennbahnweg 65
1220 Vienna
Tel.: +43 12 59 99 55-0
Fax: +43 12 59 99 11
Email: o[email protected]
www.HellermannTyton.at
HellermannTyton – Czech Republic
Email: o[email protected]
www.HellermannTyton.cz
HellermannTyton – Denmark
Industrivej 44A, 1.
4000 Roskilde
Tel.: +45 702 371 20
Fax: +45 702 371 21
Email: [email protected]
www.HellermannTyton.dk
HellermannTyton – Finland
Sähkötie 8
01510 Vantaa
Tel.: +358 9 8700 450
Fax: +358 9 8700 4520
Email: myynti@HellermannTyton.fi
www.HellermannTyton.fi
HellermannTyton S.A.S. – France
2 rue des Hêtres - CS 80543
78197 Trappes Cedex
Tel.: +33 1 30 13 80 00
Fax: +33 1 30 13 80 60
Email: [email protected]
www.HellermannTyton.fr
HellermannTyton GmbH – Germany
Großer Moorweg 45
25436 Tornesch
Tel.: +49 4122 701-0
Fax: +49 4122 701-400
Email: [email protected]
www.HellermannTyton.de
HellermannTyton KFT – Hungary
Kisfaludy u. 13
1044 Budapest
Tel.: +36 1 369 4151
Fax: +36 1 369 4151
Email: o[email protected]
www.HellermannTyton.hu
HellermannTyton Ltd – Ireland
Unit A5 Cherry Orchard
Business Park
Ballyfermot, Dublin 10
Tel.: +353 1 626 8267
Fax: +353 1 626 8022
Email: [email protected]
www.HellermannTyton.co.uk
HellermannTyton S.r.l. – Italy
Via Visco, 3/5
35010 Limena (PD)
Tel.: +39 049 767 870
Fax: +39 049 767 985
Email: [email protected]
www.HellermannTyton.it
HellermannTyton B.V. –
Belgium/Netherlands
Vanadiumweg 11-C
3812 PX Amersfoort
Tel.: +31 33 460 06 90
Fax: +31 33 460 06 99
Email (NL): [email protected]
Email (BE): [email protected]
www.HellermannTyton.nl
www.HellermannTyton.be
HellermannTyton AS – Norway
PO Box 240 Alnabru
0614 Oslo
Tel.: +47 23 17 47 00
Fax: +47 22 97 09 70
Email: fi[email protected]
www.HellermannTyton.no
HellermannTyton Sp. z o.o. – Poland
Kotunia 111
62-400 Słupca
Tel.: +48 63 2237 111
Fax: +48 63 2237 110
Email: [email protected]
www.HellermannTyton.pl
HellermannTyton – Romania
Email: o[email protected]
www.HellermannTyton.at
OOO HellermannTyton – Russia
40/4, Pulkovskoe road
BC Technopolis Pulkovo, oce A 8081
196158, St. Petersburg
Tel.: +7 812 386 00 09
Fax: +7 812 386 00 08
Email: [email protected]
www.Hellermanntyton.ru
HellermannTyton – Slovenia
Branch Oce Ljubljana
Podružnica Ljubljana, Leskoškova 6
1000 Ljubljana
Tel.: +386 1 433 70 56
Fax: +386 1 433 63 21
Email: o[email protected]
www.HellermannTyton.si
HellermannTyton España s.l. –
Spain/Portugal
Avda. de la Industria 37 2 2
28108 Alcobendas, Madrid
Tel.: +34 91 661 2835
Fax: +34 91 661 2368
Email:
[email protected]
www.HellermannTyton.es
HellermannTyton AB – Sweden
Isafjordsgatan 5
16440 Kista
Tel.: +46 8 580 890 00
Fax: +46 8 580 348 02
Email: [email protected]
www.HellermannTyton.se
HellermannTyton
Engineering GmbH – Turkey
Saray Mah Dr. Adnan Büyükdeniz Cad. No:4
Akkom Oce Park 2. Blok Kat: 10
34768 Ümraniye-İstanbul
Tel.: +90 216 687 03 40
Fax: +90 216 250 32 32
Email: [email protected]
www.HellermannTyton.com.tr
HellermannTyton Ltd – UK
William Prance Road
Plymouth International Medical
and Technology Park
Plymouth, Devon PL6 5WR
Tel.: +44 1752 701 261
Fax: +44 1752 790 058
Email: [email protected]
www.HellermannTyton.co.uk
HellermannTyton Ltd – UK
Sharston Green Business Park
1 Robeson Way
Altrincham Road, Wythenshawe
Manchester M22 4TY
Tel.: +44 161 947 2200
Fax: +44 161 947 2220
Email: [email protected]
www.HellermannTyton.co.uk
HellermannTyton Ltd – UK
Cley Road, Kingswood Lakeside
Cannock, Staffordshire
WS11 8AA
Tel.: +44 1543 728282
Fax: +44 1543 728284
Email: [email protected]
www.HellermannTyton.co.uk
HellermannTyton Data Ltd – UK
Cornwell Business Park
43-45 Salthouse Road, Brackmills
Northampton NN4 7EX
Tel.: +44 1604 707 420
Fax: +44 1604 705 454
Email: [email protected]
www.htdata.co.uk
Middle East
HellermannTyton – UAE
Email: [email protected]
www.HellermannTyton.ae
North America
HellermannTyton – Canada
Tel.: +1 905 726 1221
Fax: +1 905 726 8538
Email: [email protected]
www.HellermannTyton.ca
HellermannTyton – Mexico
Tel.: +52 333 133 9880
Fax: +52 333 133 9861
Email: [email protected]
www.HellermannTyton.com
HellermannTyton – USA
Tel.: +1 414 355 1130
Fax: +1 414 355 7341
Email: [email protected]
www.HellermannTyton.com
South America
HellermannTyton – Argentina
Tel.: +54 11 4754 5400
Fax: +54 11 4752 0374
Email: [email protected]
www.HellermannTyton.com.ar
HellermannTyton – Brazil
Tel.: +55 11 4815 9000
Fax: +55 11 4815 9030
Email: [email protected]
www.HellermannTyton.com.br
Asia-Pacific
HellermannTyton – Australia
Tel.: +61 2 9525 2133
Fax: +61 2 9526 2495
Email: [email protected]
www.HellermannTyton.com.au
HellermannTyton – China
Tel.: +86 510 8528 2536
Fax: +86 510 8528 2731
Email: [email protected]
www.HellermannTyton.com.cn
HellermannTyton – Hong Kong
Tel.: +852 2831 9090
Fax: +852 2832 9381
Email: [email protected]
www.HellermannTyton.com.sg
HellermannTyton – India
Tel.: +91 120 413 3384
Email: [email protected]
www.HellermannTyton.co.in
HellermannTyton – Japan
Tel.: +81 3 5790 3111
Fax: +81 3 5790 3112
Email: [email protected]
www.HellermannTyton.co.jp
HellermannTyton – Republic of Korea
Tel.: +82 32 833 8012
Fax: +82 32 833 8013
Email: [email protected]
www.HellermannTyton.co.kr
HellermannTyton – Philippines
Tel.: +63 2 752 6551
Fax: +63 2 752 6553
Email: [email protected]
www.HellermannTyton.com.ph
HellermannTyton – Singapore
Tel.: +65 6 586 1919
Fax: +65 6 752 2527
Email: [email protected]
www.HellermannTyton.com.sg
HellermannTyton – Thailand
Tel.: +662 237 6702 / 266 0624
Fax: +662 266 8664
Email: [email protected]
www.HellermannTyton.com.sg
Africa
HellermannTyton – South Africa
Tel.: +27 11 879 6600
Fax: +27 11 879 6603
Email: [email protected]
www.HellermannTyton.co.za
21. Februar 2017, 10:30 vorm.
 Loading...