

Page 1
1
Model: TFT
Model: Touchpad (TFT)
Page 2
2
Touchpad
2Model: TFT
Table of Contents
1-10
1
2
3-4
5-7
8
9-10
Set-Up
Product Image
Table of Contents
Installation Procedure
Initial Setup
Setting the Clock
LCD Display
Model: Touchpad TFT
Touchpad1
11-14
12
13
14
My System
Locking the Thermostat
Temperature Hold
Set Back Mode
15-19
16
17-18
19
Timer Zones
History
Editing the Switching Times
Timer Override
20-24
21
22
23
23-24
Programmable Zones
Temperature Hold
History
Temperature Control
Editing the Comfort Levels
25-26
25-26
Programmable Zones With
Hot Water Output
Editing the Switching Times
27-42
27-28
29
29
30
31
32
33-34
35-38
39-40
41-42
General
Holiday
Summer Mode
Quick View
Temp Hold (Multiple Zones)
Hot Water Boost
Home/Away Mode
Groups
Proles
Touch Pad Settings
System Settings
Page 3
43
Touchpad Model: TFT
1
Installation Procedure
This Touchpad is designed to be ush mounted and requires a back box of 35mm
(minimum depth) to be sunk into the wall prior to installation.
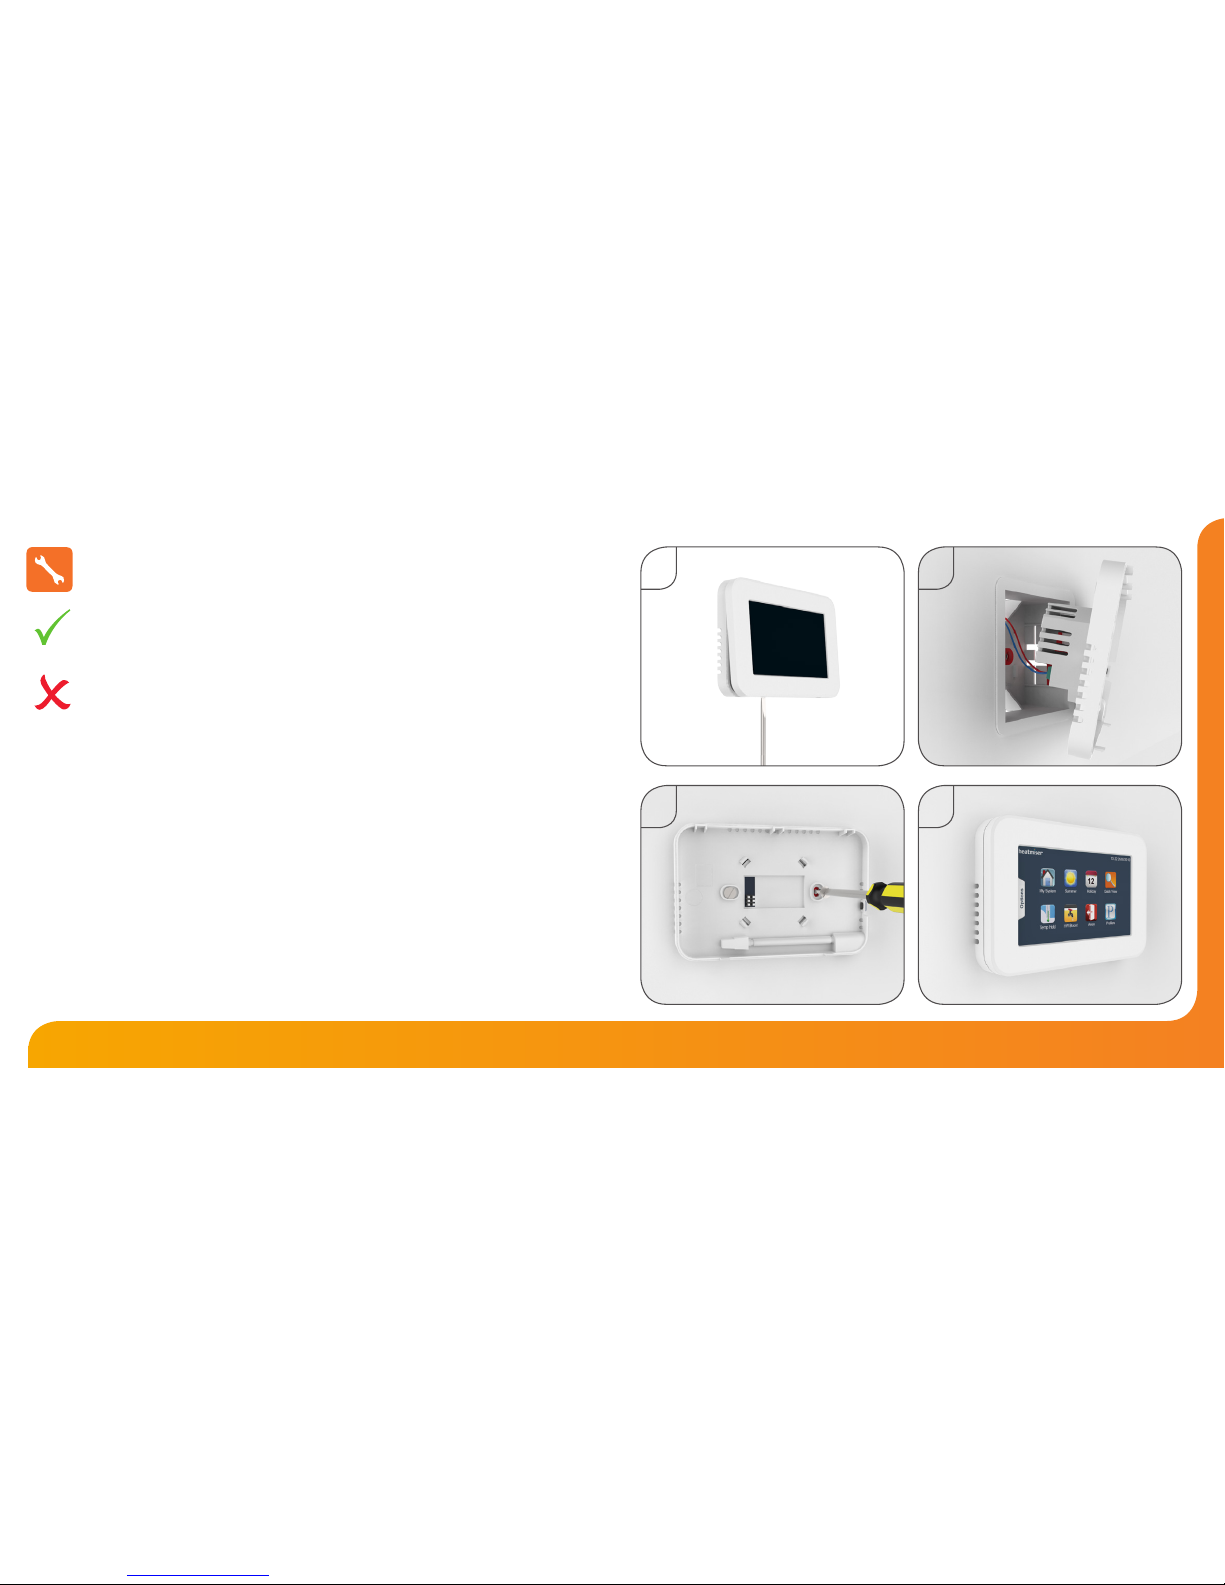
Step 1
Carefully separate the front half of the Touchpad from the back plate by placing a
small at head terminal driver into the slots on the bottom face of the Touchpad.
Step 2
Place the Touchpad front somewhere safe.
Terminate the Touchpad as shown in the diagrams on page 43 of this booklet.
Step 3
Screw the Touchpad back plate securely into the back box.
Step 4
Clip the front of the touchpad back onto the wall mounting plate.
Do
Mount the touchpad at eye level.
Read the instructions fully so you get the best from our product.
Don’t
Do not push hard on the LCD screen as this may cause irreparable damage.
2
3 4
Page 4
65
Touchpad Model: TFT
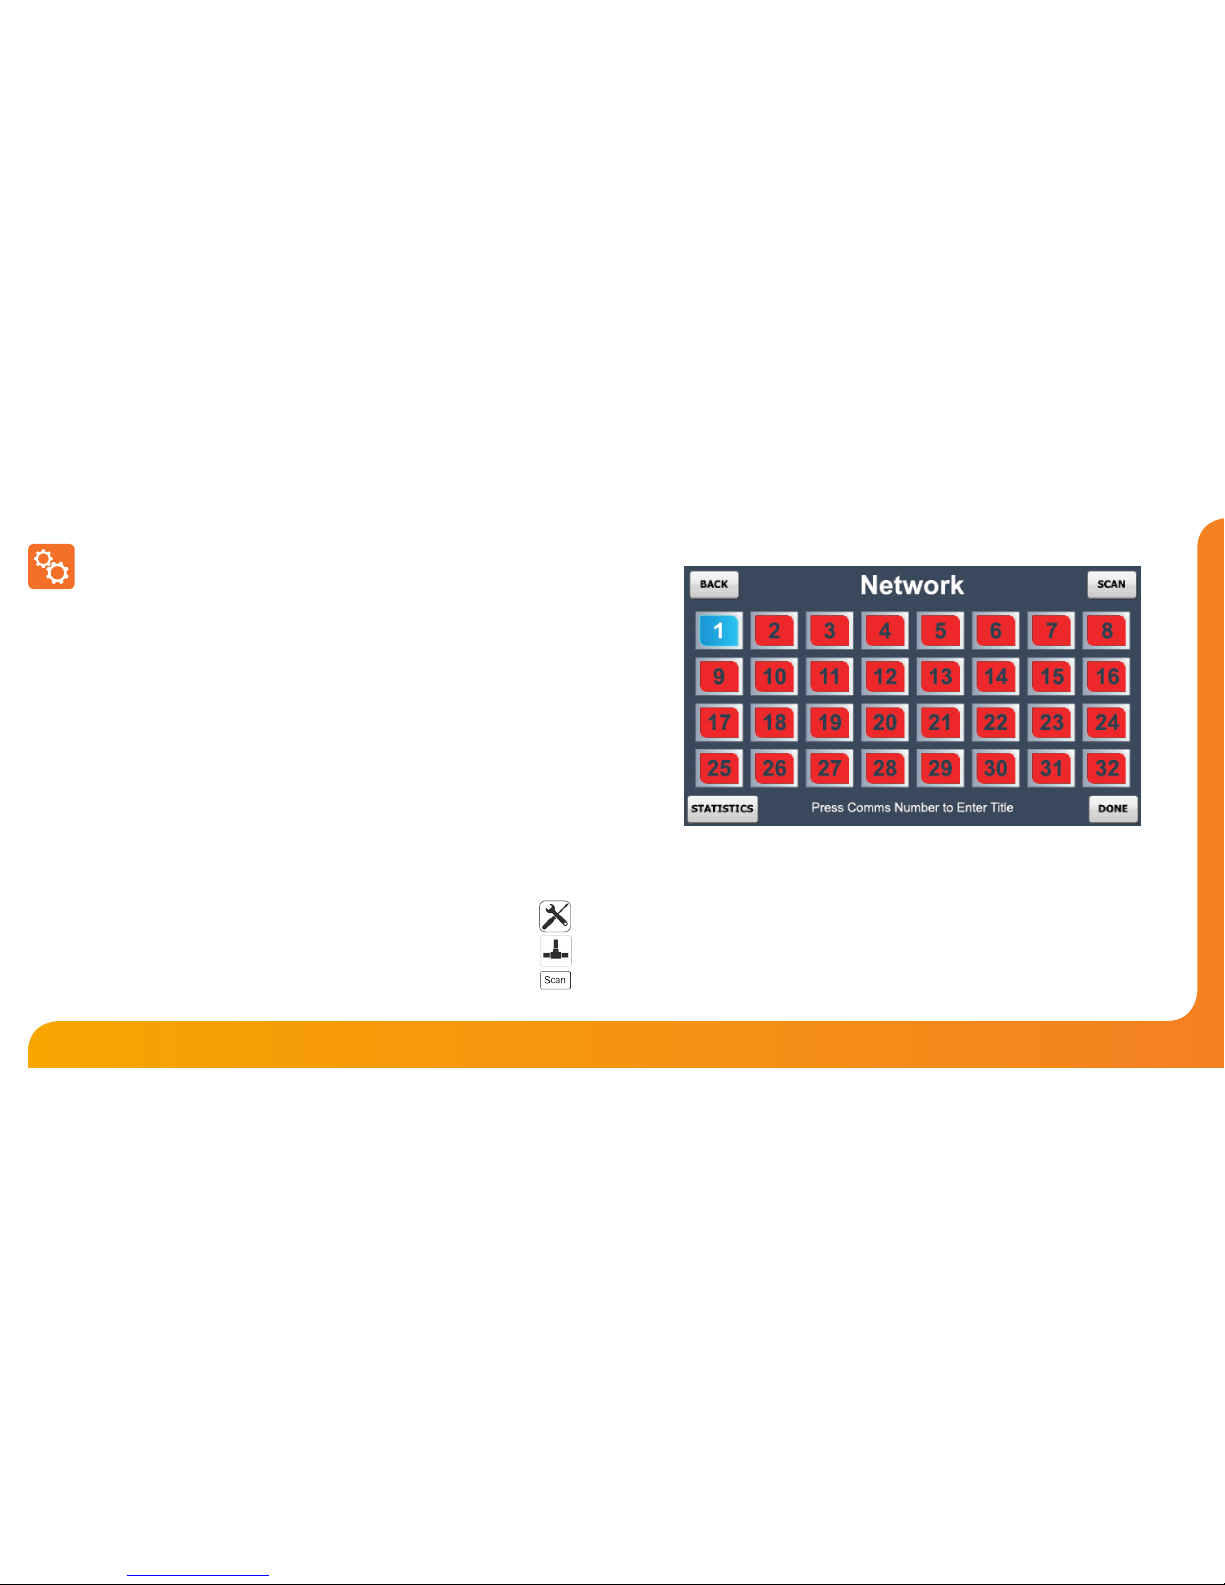
Up to 32 thermostats can be connected to the Touchpad and these are added by
performing a network scan.
Prior to performing the scan, a communication number needs to be entered in each of the
thermostats on the system.
You should consult the thermostat manual for instructions on how to do this.
Once you have entered a communication number in each thermostat, follow these steps;
• On power up of a new Touchpad, you should see the Network Scan screen.
• This screen shows 32 boxes which represents the 32 possible thermostats on your
system.
• To perform the network scan, press Scan.
If the box stays red, it means no thermostat has been found at that location.
If the box turns blue, it means a thermostat has been successfully identied.
If you have previously scanned the network and would like to perform a new network
scan, follow these steps;
• Press the Options tab.
• Press the Settings icon .......................................................................................................
• Press the Network icon ......................................................................................................
• Press Scan ...............................................................................................................................
Initial Setup
Adding thermostats to your system
Statistics
The statistics screen shows the communication rate to each of the thermostats on the
system.
This screen can help to identify problems on the network.
Page 5
87
Touchpad Model: TFT
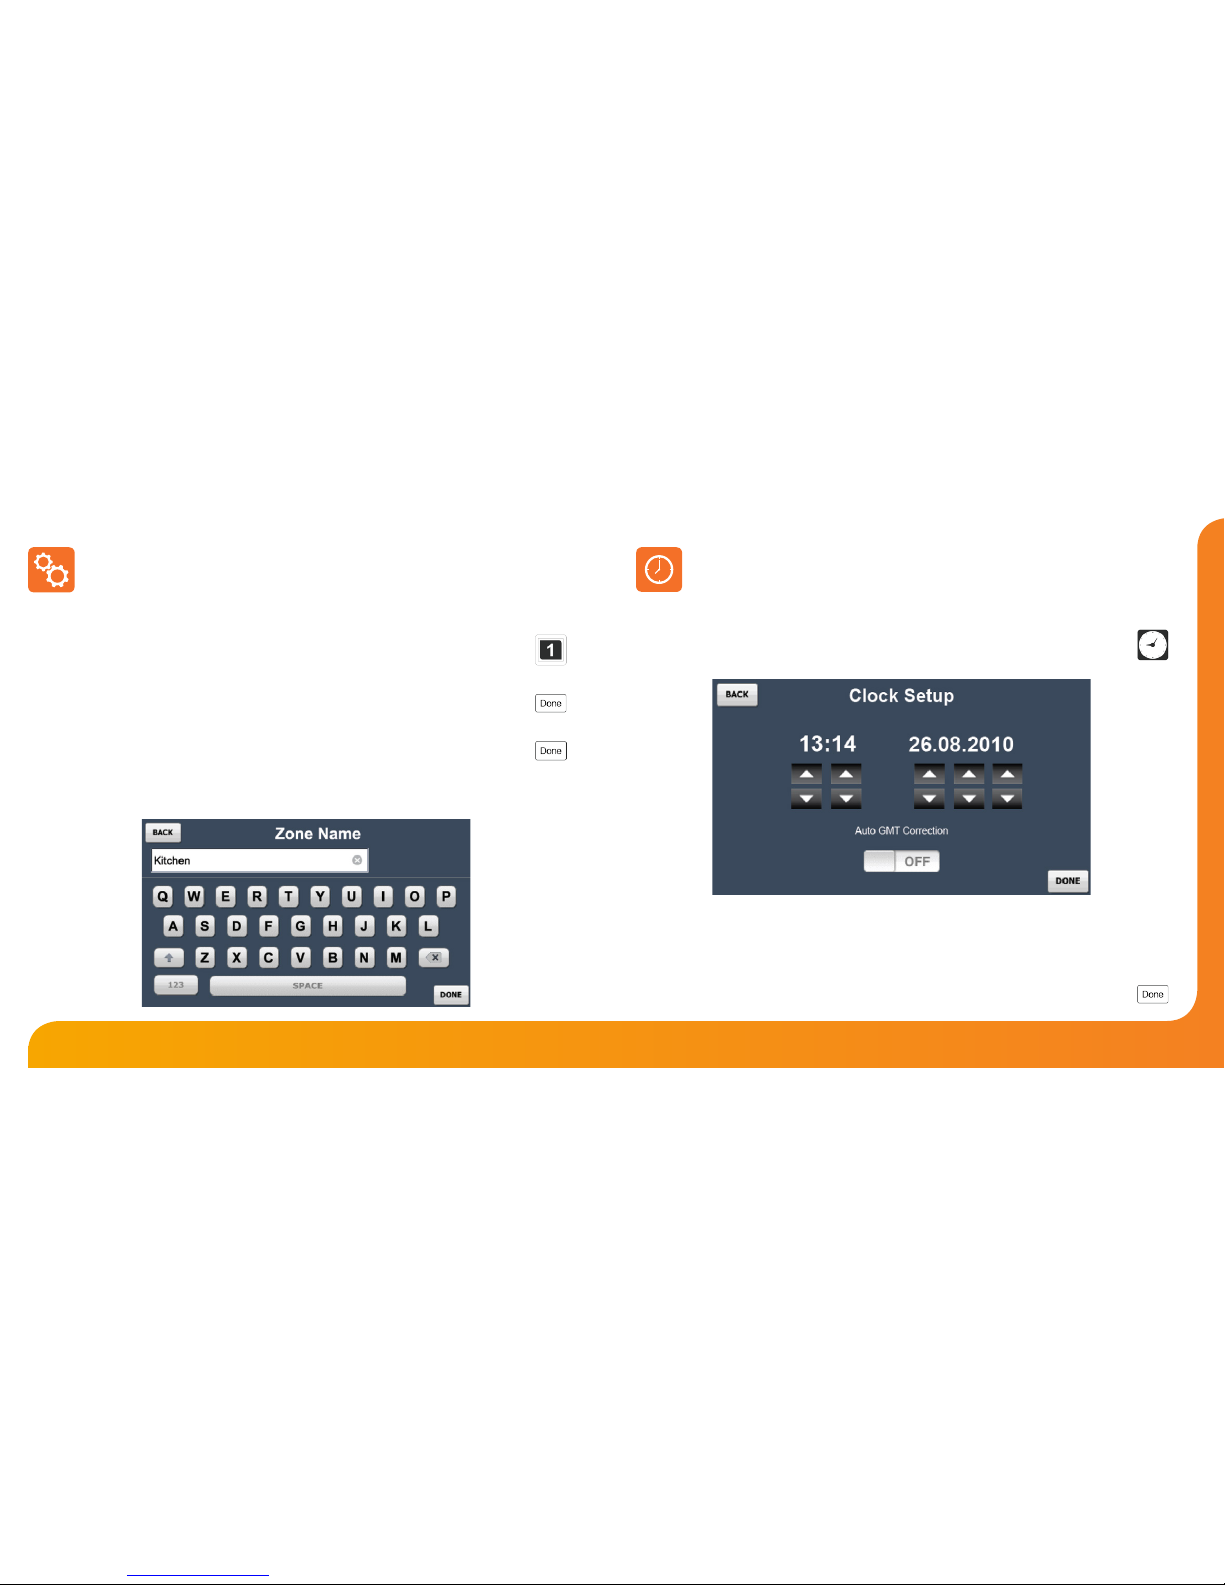
Setting the Clock
To set the clock, follow these steps.
Press the Options tab.
Press the Clock icon ......................................................................................................................
Here you can set the current time and date and select whether the Touchpad should
observe GMT Correction. GMT correction will automatically change the clock on the
Touchpad and Thermostats in March and October as the clocks change for Winter/
Summer time.
Press Done to store and exit ......................................................................................................
Initial Setup
Entering a Room Title
A room title of 13 characters can be entered for each room on the system.
To enter a room title follow these steps.
Press the Communication number ...........................................................................................
Using the alphanumeric keypad, enter a title.
Press Done to store and return to the network screen ......................................................
Repeat as necessary for the other rooms.
When nished, press Done from the Network screen to store and exit ......................
Note: You must perform a new network scan after adding additional thermostats to your
system.
Page 6
109
Touchpad Model: TFT
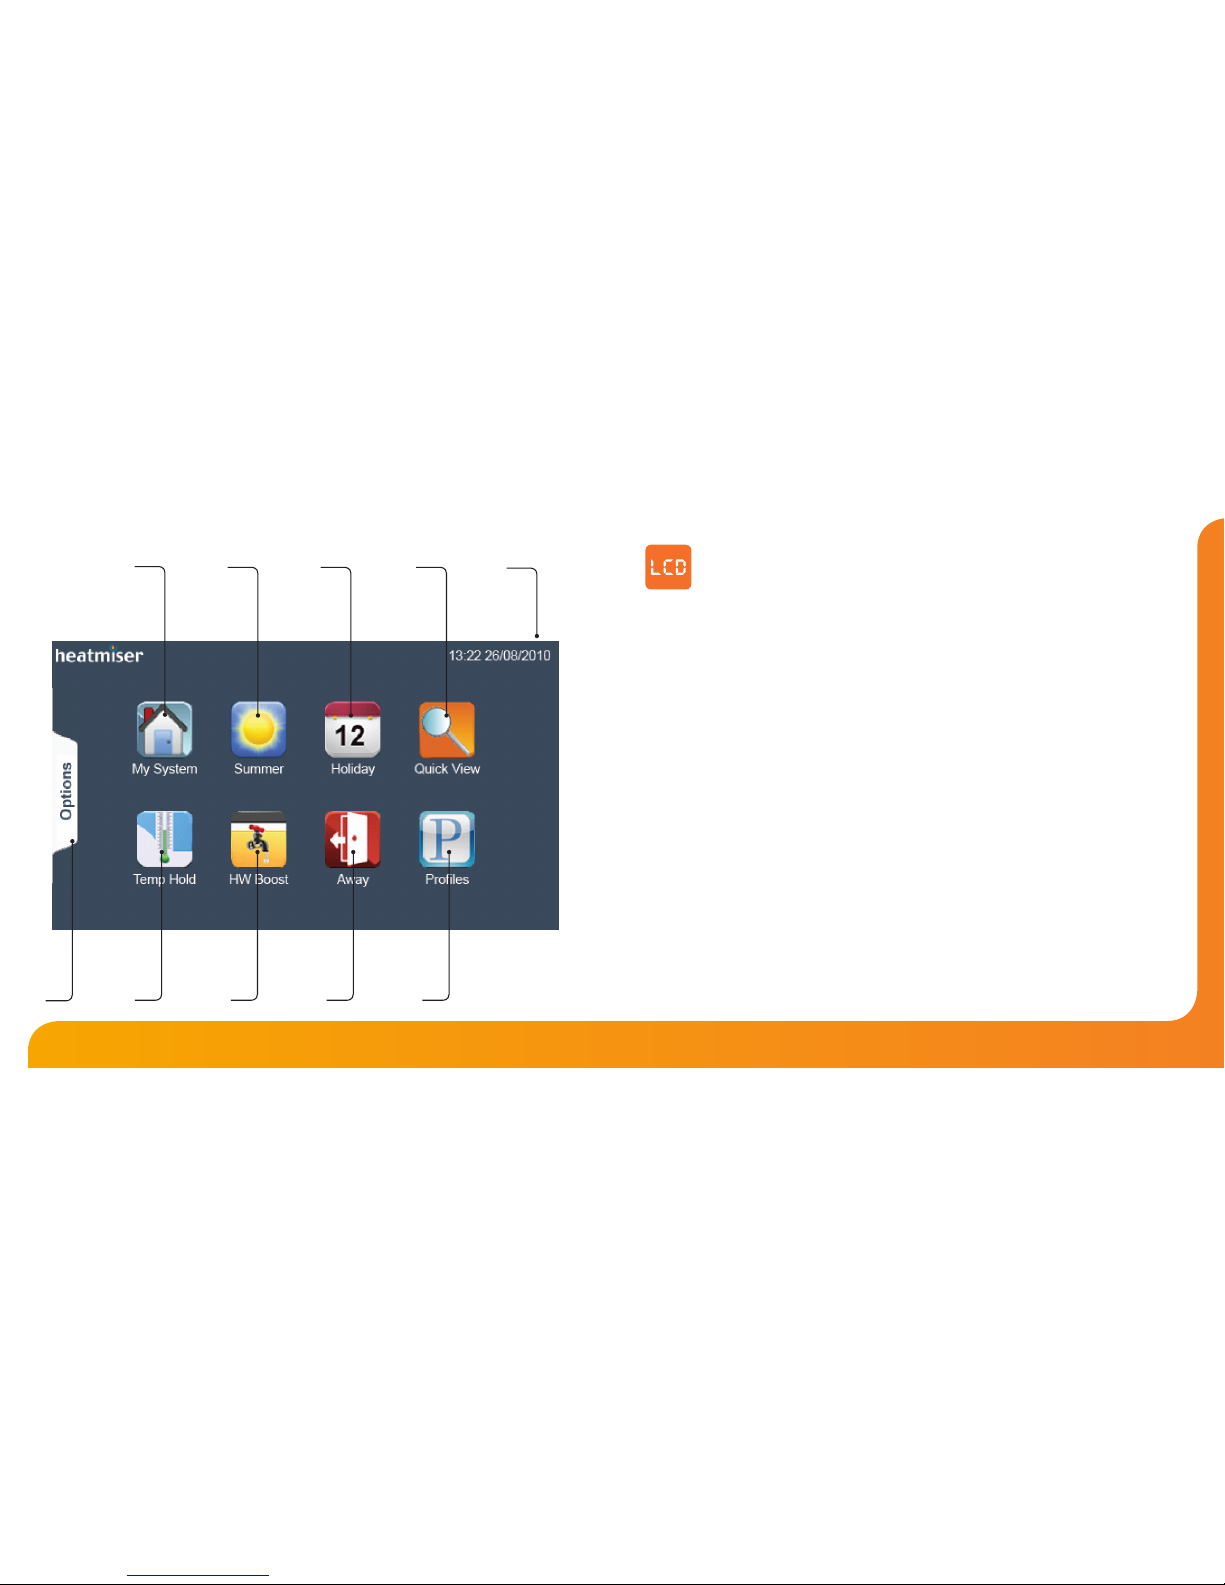
1. My System: Provides access to view and control individual system zones.
2. Summer: Disables the comfort levels when activated and defaults to frost
protection.
3. Holiday: Turns o the heating/hotwater for a set period.
4. Quick View: Gives an overview of all stats on the system.
5. Date and Time: Displays current date and time.
6. Options tab: Provides access to Clock, Settings and Power icons.
7. Temperature Hold: Overrides target temperature outside the programme
schedule for a set duration.
8. Hot Water Boost: Overrides the timer output to on for a set duration.
9. Away: Places the system into Holiday mode indenitely.
10. Proles: Stores a set of comfort levels for a group of thermostats.
LCD Display
1
6
2 3 4
5
7 8 9 10
Page 7
1211
Touchpad Model: TFT
My System
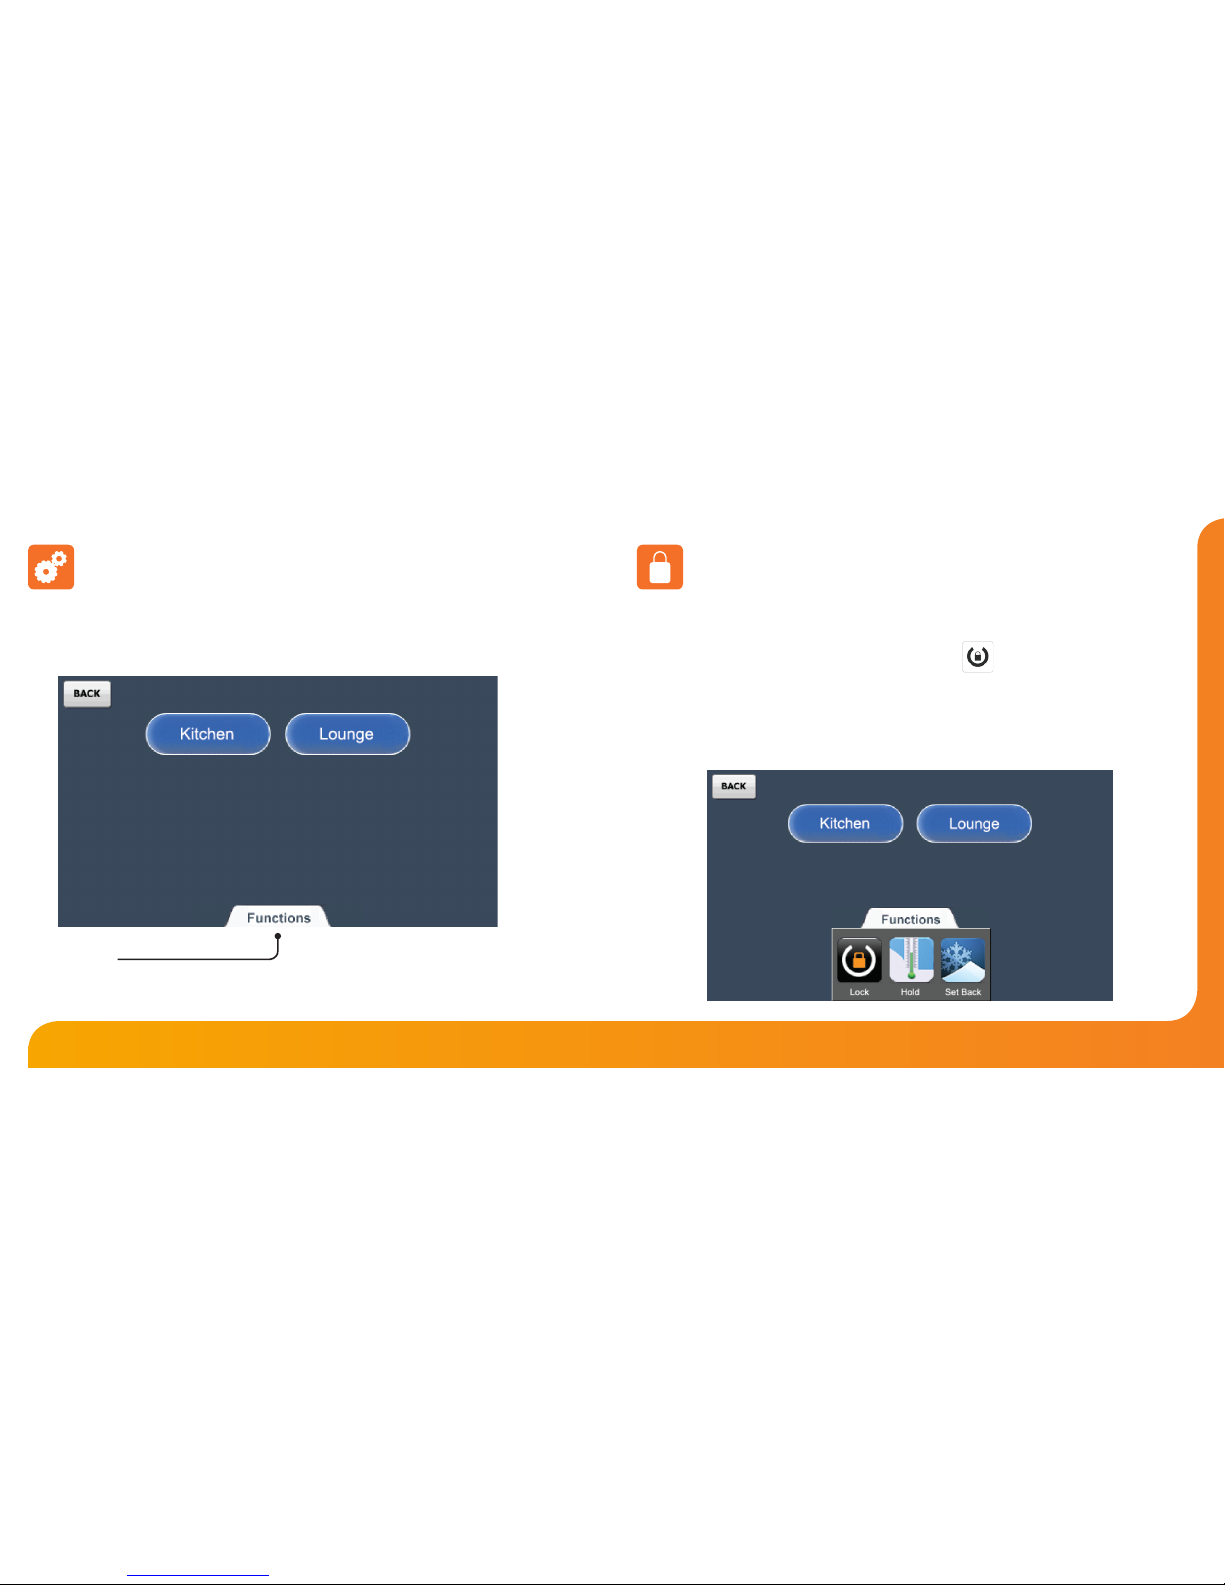
Pressing My System will show a list of all rooms on your system.
Rooms in blue indicate that the communication is working correctly.
Rooms in red have a communication fault.
Functions tab
The function tab gives access to the global functions such as Lock, Hold and Setback.
This function allows you to lock the keypad on selected thermostats.
To apply a keypad lock follow these steps.
• Press the Functions tab.
• Press the Lock icon ................................................
• Select one or more thermostats by pressing the Zone name. When selected the
zone will display green. Alternatively, press the Functions tab to use the Select /
UnSelect All function.
• Press Done.
My System
Locking the Thermostat
Page 8
1413
Touchpad Model: TFT
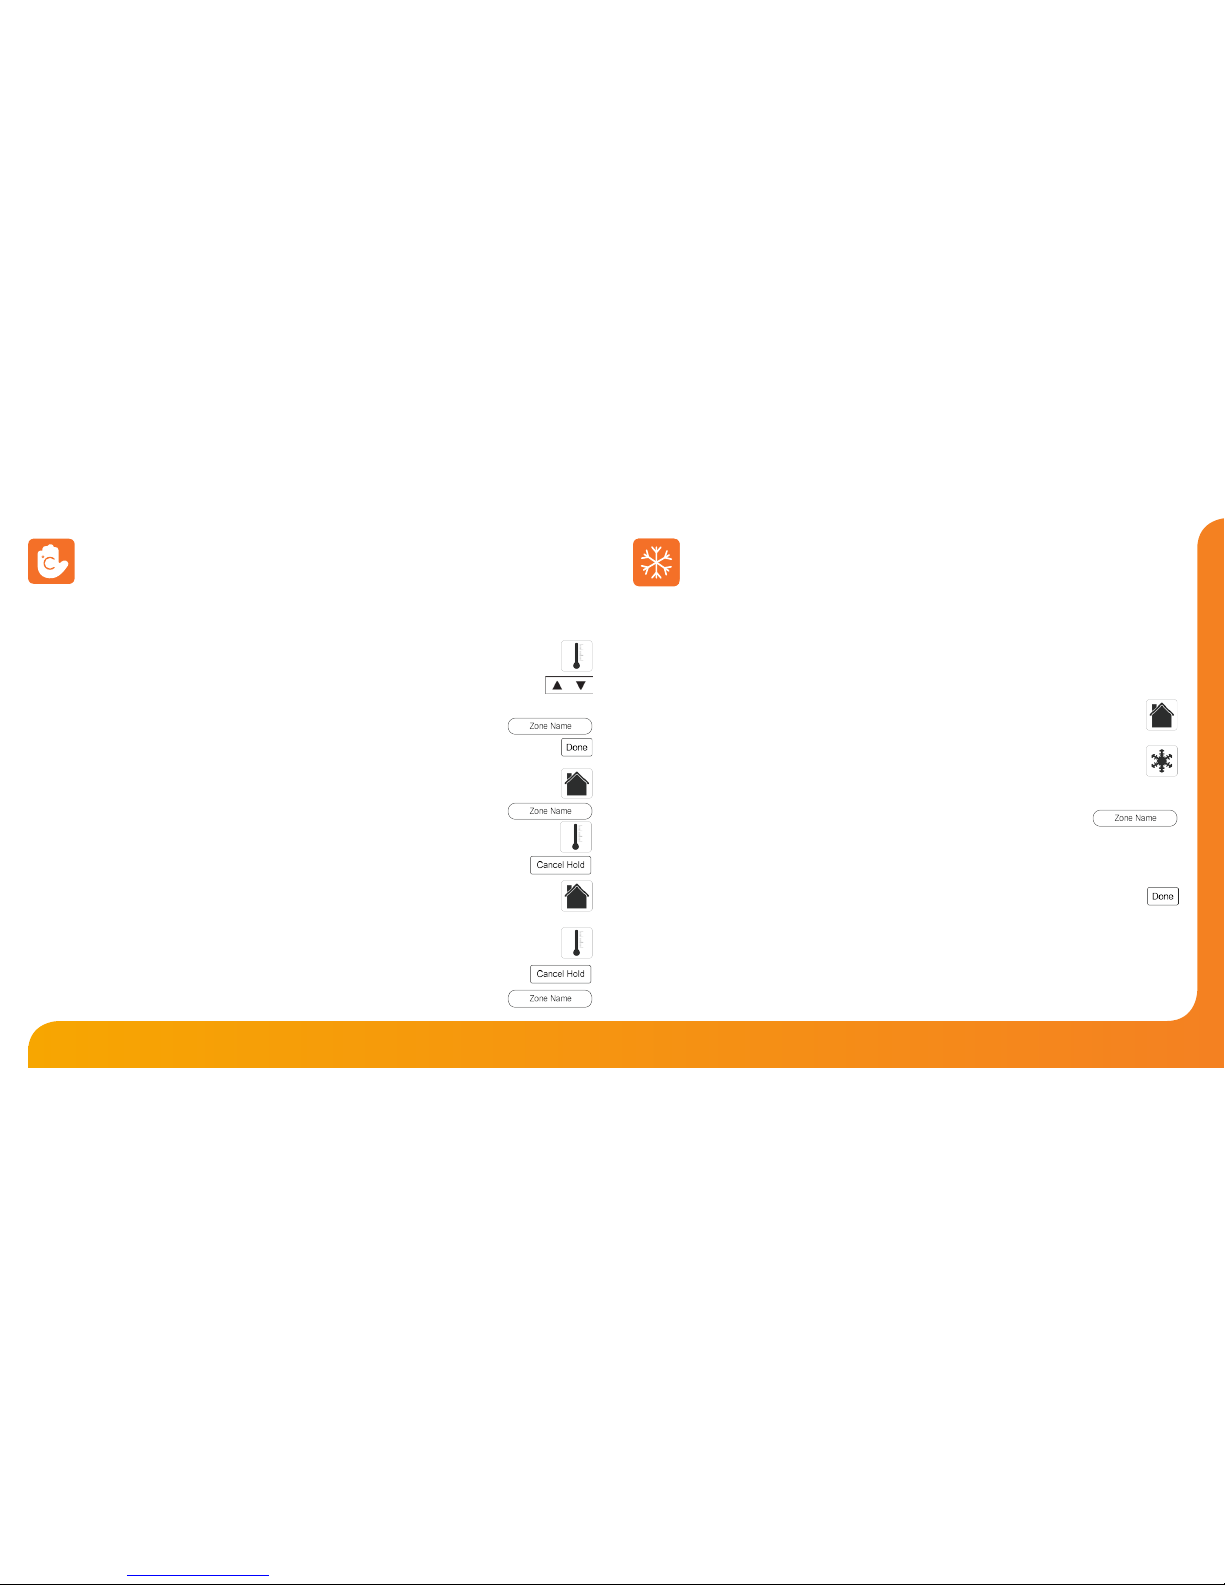
The temperature hold function allows you to manually override the current operating
program for a single or group of thermostats and set a dierent temperature for a
desired period.
• Press the Temperature Hold icon .................................................................................................
• Enter the hold temperature and time period ....................................................................
• Press next
• Select one or more thermostats or press the functions tab to select all ...
• Press the Done key to conrm and exit .....................................................................................
To cancel temperatures hold on a SINGLE thermostat follow these steps.
• Press the My System icon ................................................................................................................
• Select a thermostat ..........................................................................................................
• Press the Temp Hold icon ................................................................................................................
• Press the Cancel Hold key .....................................................................................................
To cancel a temperature hold on MULTIPLE thermostats follow these steps.
• Press the My System icon ...............................................................................................................
• Press the Functions tab.
• Press the Hold icon ............................................................................................................................
• Press the Cancel Hold key ....................................................................................................
• Select the thermostats to apply the cancel to .....................................................
My System
Temperature Hold
The Set Back function allows you to place individual or multiple thermostats into
Set Back Mode (also referred to as Frost Mode).
In this mode, the thermostat will display the frost icon and will only turn the heating
on should the room temperature drop below the set frost temperature.
To apply Frost Mode to a single or group of thermostats follow these steps.
• Press the My System icon ...................................................................................................
• Press the Functions tab.
• Press the Set Back icon ........................................................................................................
• Select a zone or multiples zones to apply the set back, or alternatively press
Functions tab a second time and Select All. .............................................
Room buttons in green will be set back
Room buttons in blue will not be set back
Room buttons in grey are time clocks and cannot be set back
• Press the Done key ...............................................................................................................
Editing the Set Back Temp
The set back temperature range is 7-17°C and is set to 12°C as default.
Pressing EDIT from the Set Back screen allows you to adjust this setting and then
select which thermostats this should apply to.
My System
Set Back Mode (Frost Mode)
Page 9
1615
Touchpad Model: TFT
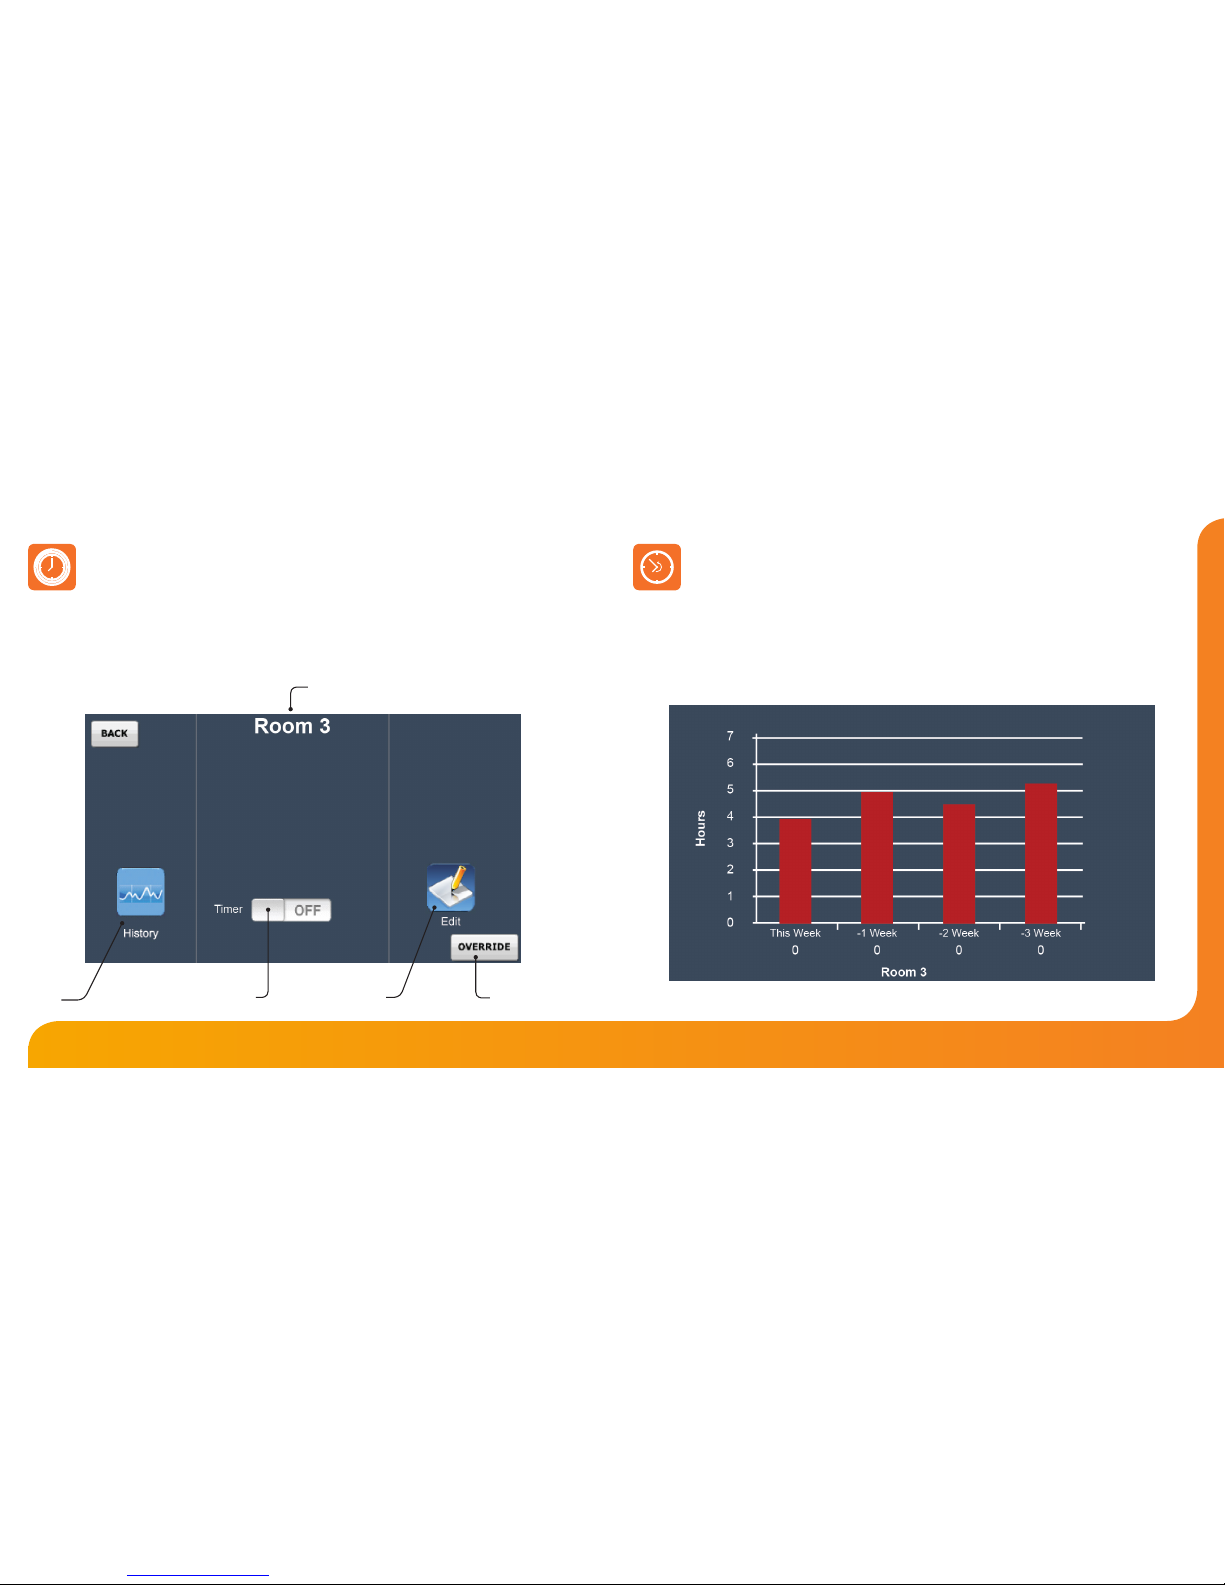
Timer Zones
Time clocks can be added to the network to provide control over many appliances,
such as lighting, hot water and towel rails.
The time clock view screen displays the current status and provides a function to
toggle on and o the output.
Timer Zones
History
The history function enables you to see the hours run for the last 4 weeks.
This is displayed in a bar chart and gives you an indication of which zones are using
the most energy.
Edit Icon
Current
Temperature
History
Icon
Override Key
Zone Name
Page 10
1817
Touchpad Model: TFT
Timer Zones
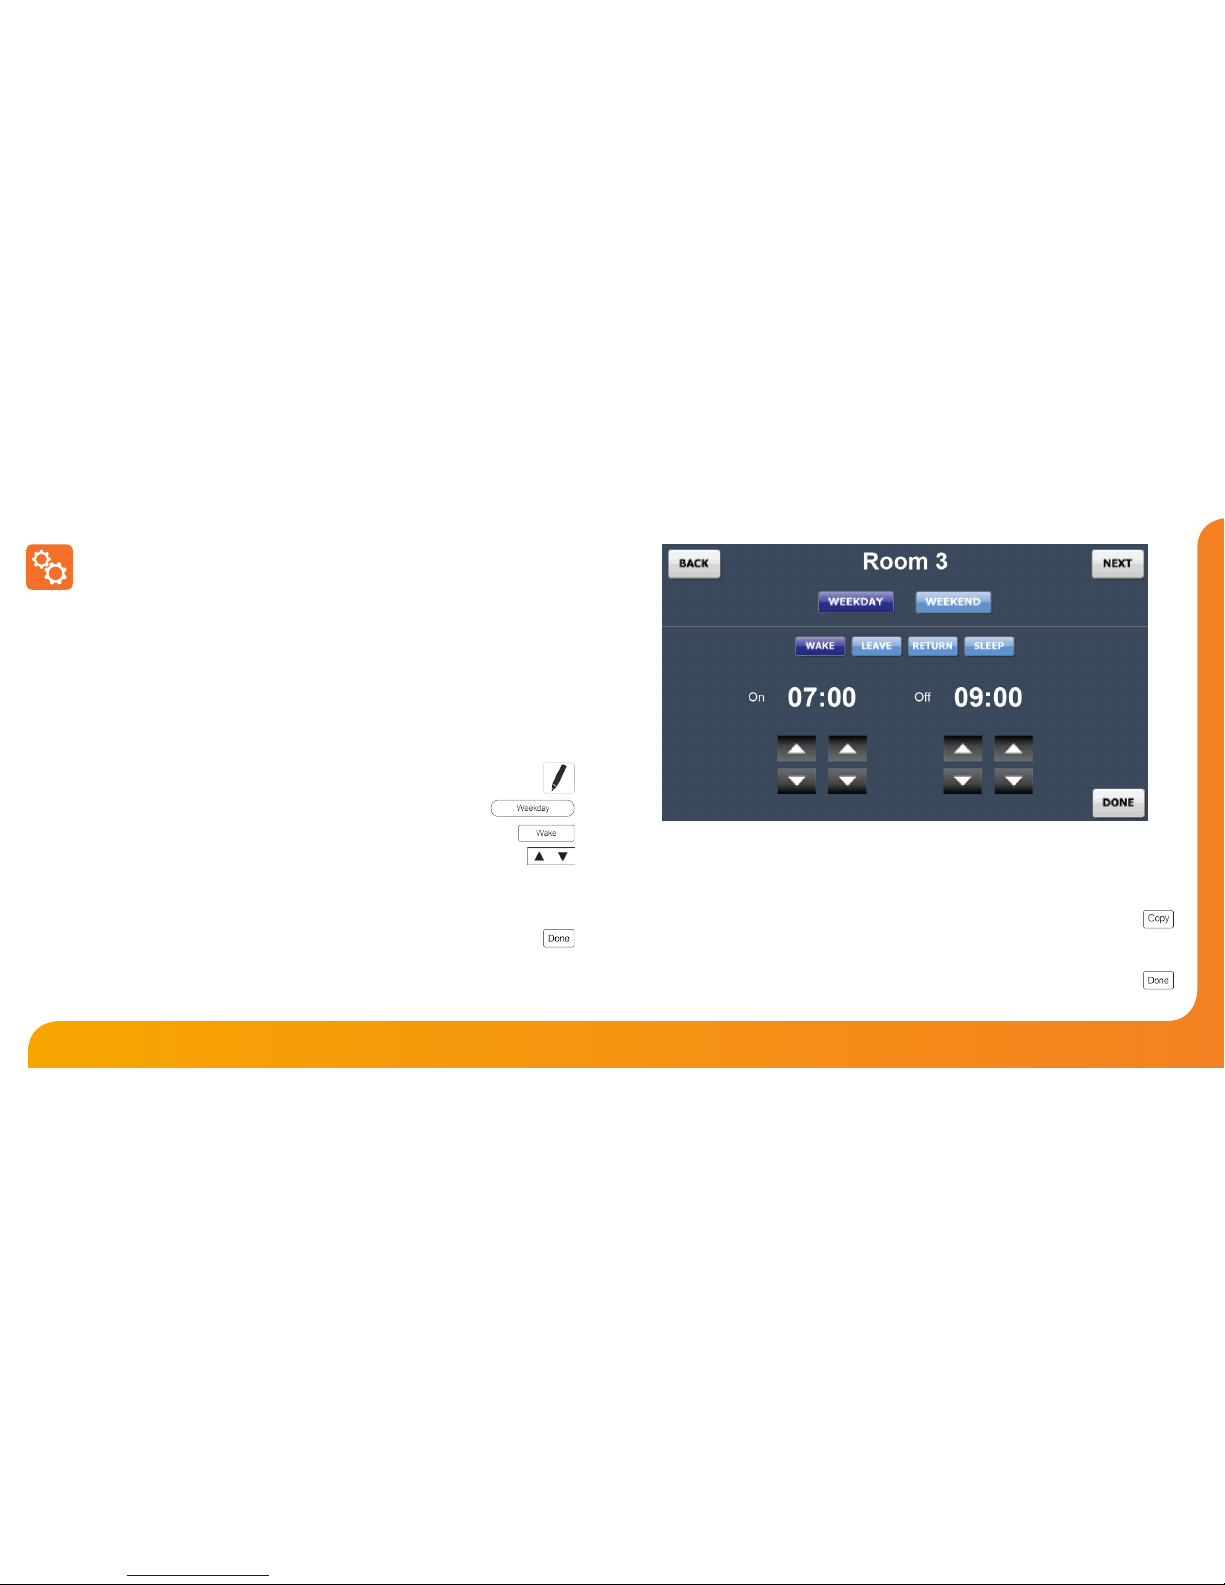
Editing the Switching Times
The Edit icon enables you to program the switching times for the selected time clock.
Time clocks provide Weekday/Weekend or 7 Day Programming options.
If the time clock shows Weekday/Weekend it is operating in 5/2 day mode, and if it
shows each day of the week it is operating in 7 day mode.
This mode can be changed on the time clock, and will be updated automatically on the
Touchpad. Please consult the time clock manual for instructions on how to change this.
There are 4 settings per day, these are called Wake, Leave, Return and Sleep.
For each setting a Timer ON and a Timer OFF time can be programmed.
To program the switching times follow these steps.
• Press the Edit icon .................................................................................................................
• Select a day or period ..........................................................................................
• Select a setting to program ........................................................................................
• Edit the Timer ON and Timer OFF times using the arrow keys .........................
Times should be entered in 24 hour format.
For unused periods set the time to -- : -- and the time clock will ignore the setting.
• Repeat these steps for the remaining days/periods.
• Press the Done key to conrm and exit ..........................................................................
Note: For Weekday/Weekend programming, the 4 switching times are the same for all
weekdays but can be dierent for the weekends.
For 7 Day programming, each day can have 4 dierent switching times.
Copy Settings
The Copy key enables you to copy the programmed switching times to other time
clocks that are operating in the same mode (5/2 or 7 day).
To Copy and apply switching times follow these steps.
• Press the Copy key .........................................................................................................
Zones that can be selected will be blue and will turn green when selected.
Zones in grey cannot be selected.
• Press the Done key to conrm and exit ...................................................................
Page 11
2019
Touchpad Model: TFT
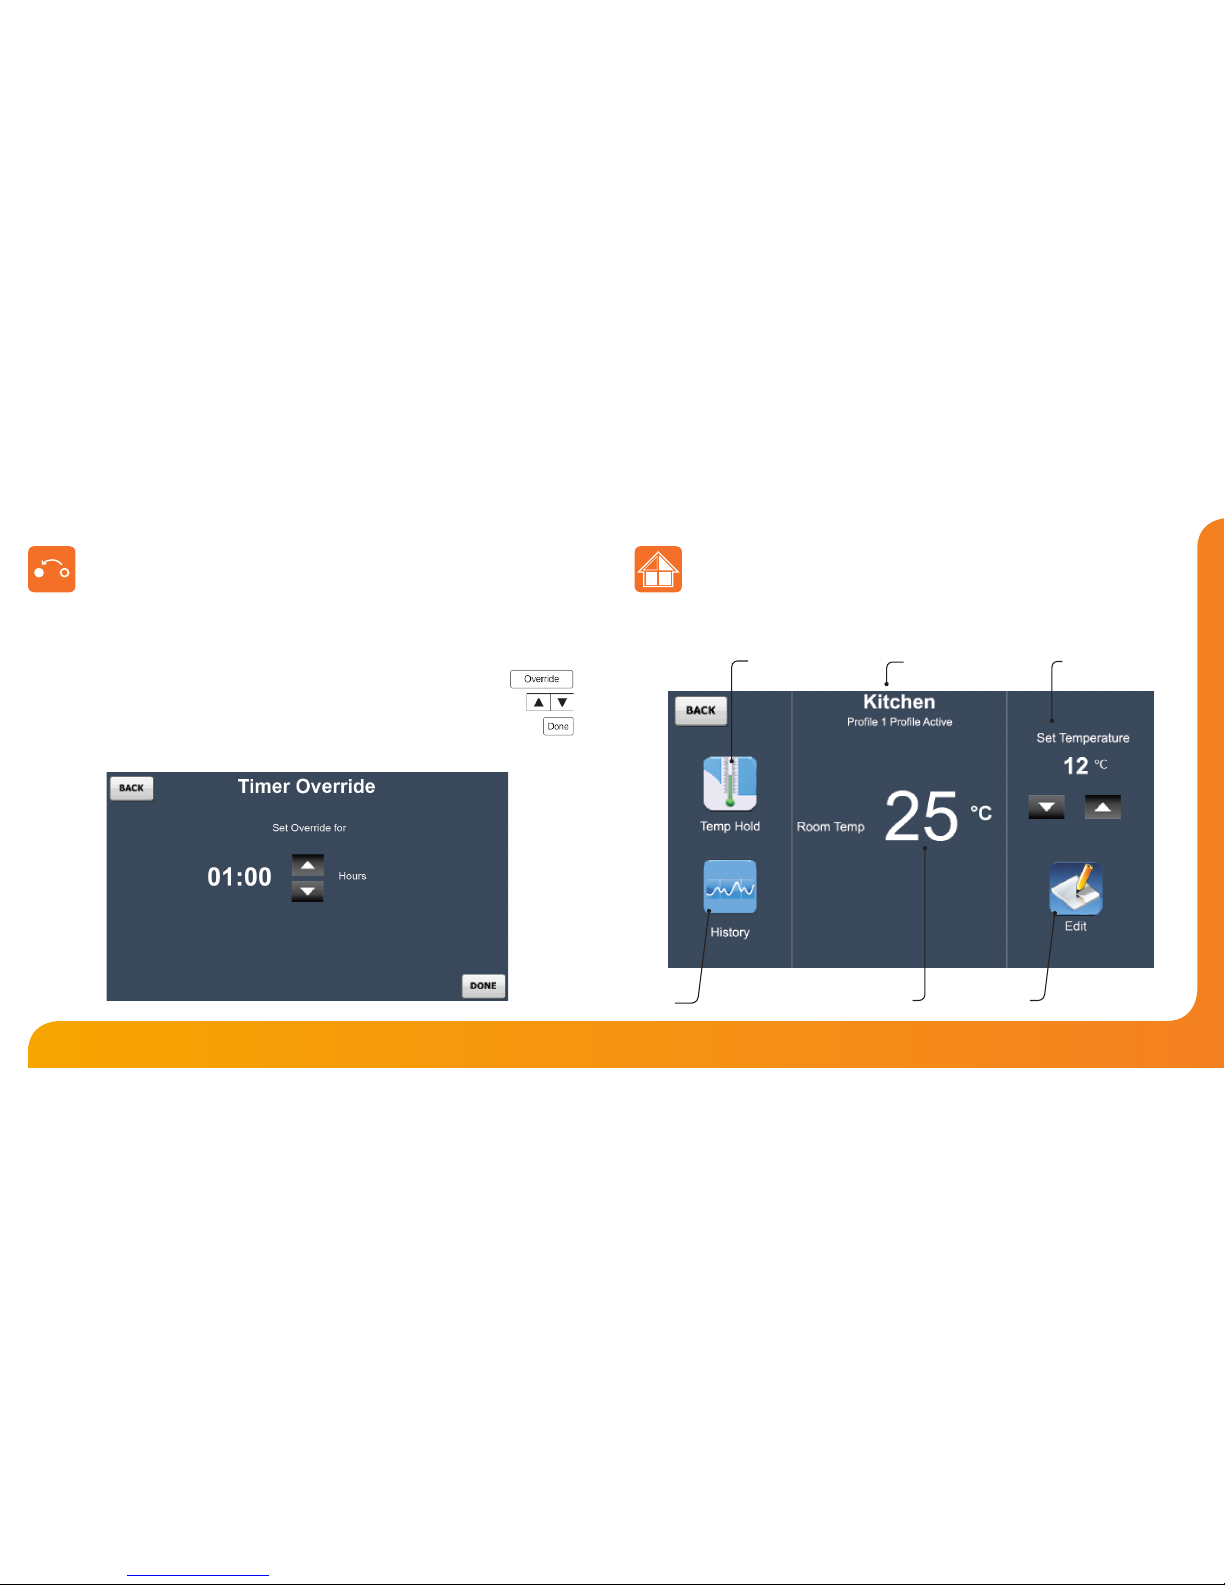
Programmable Zones
An override function is available on the time clock, enabling you to override the output
for a number of hours.
To apply an override follow these steps.
• Press the Override key ..............................................................................................
• Using the arrow keys set the override duration ....................................................
• Press the Done key ................................................................................................................
Timer Zones
Override
Programmable zones show the actual room temperature, and if applicable a toggle
function to display the oor temperature.
Edit Icon
Current
Temperature
History
Icon
Temp Hold
Icon
Zone Name Set Temperature
and Control
Page 12
2221
Touchpad Model: TFT
Programmable Zones
Temperature Hold (Individual Zone)
The temperature hold function allows you to manually override the current operating
program of a specic zone and set a dierent temperature for a desired period
To set a hold a temperature for a group of thermostats, use the Hold function from the
main screen.
To set a hold time follow these steps.
• Press the Temp Hold icon ....................................................................................................
• Set the Hold temperature and Hold time using the arrow keys ......................
• Press the Done key to conrm and exit .........................................................................
The thermostat and zone screen will show the hold time remaining.
To cancel a hold in operation, press Temp Hold icon and then the Cancel Hold key ..
Programmable Zones
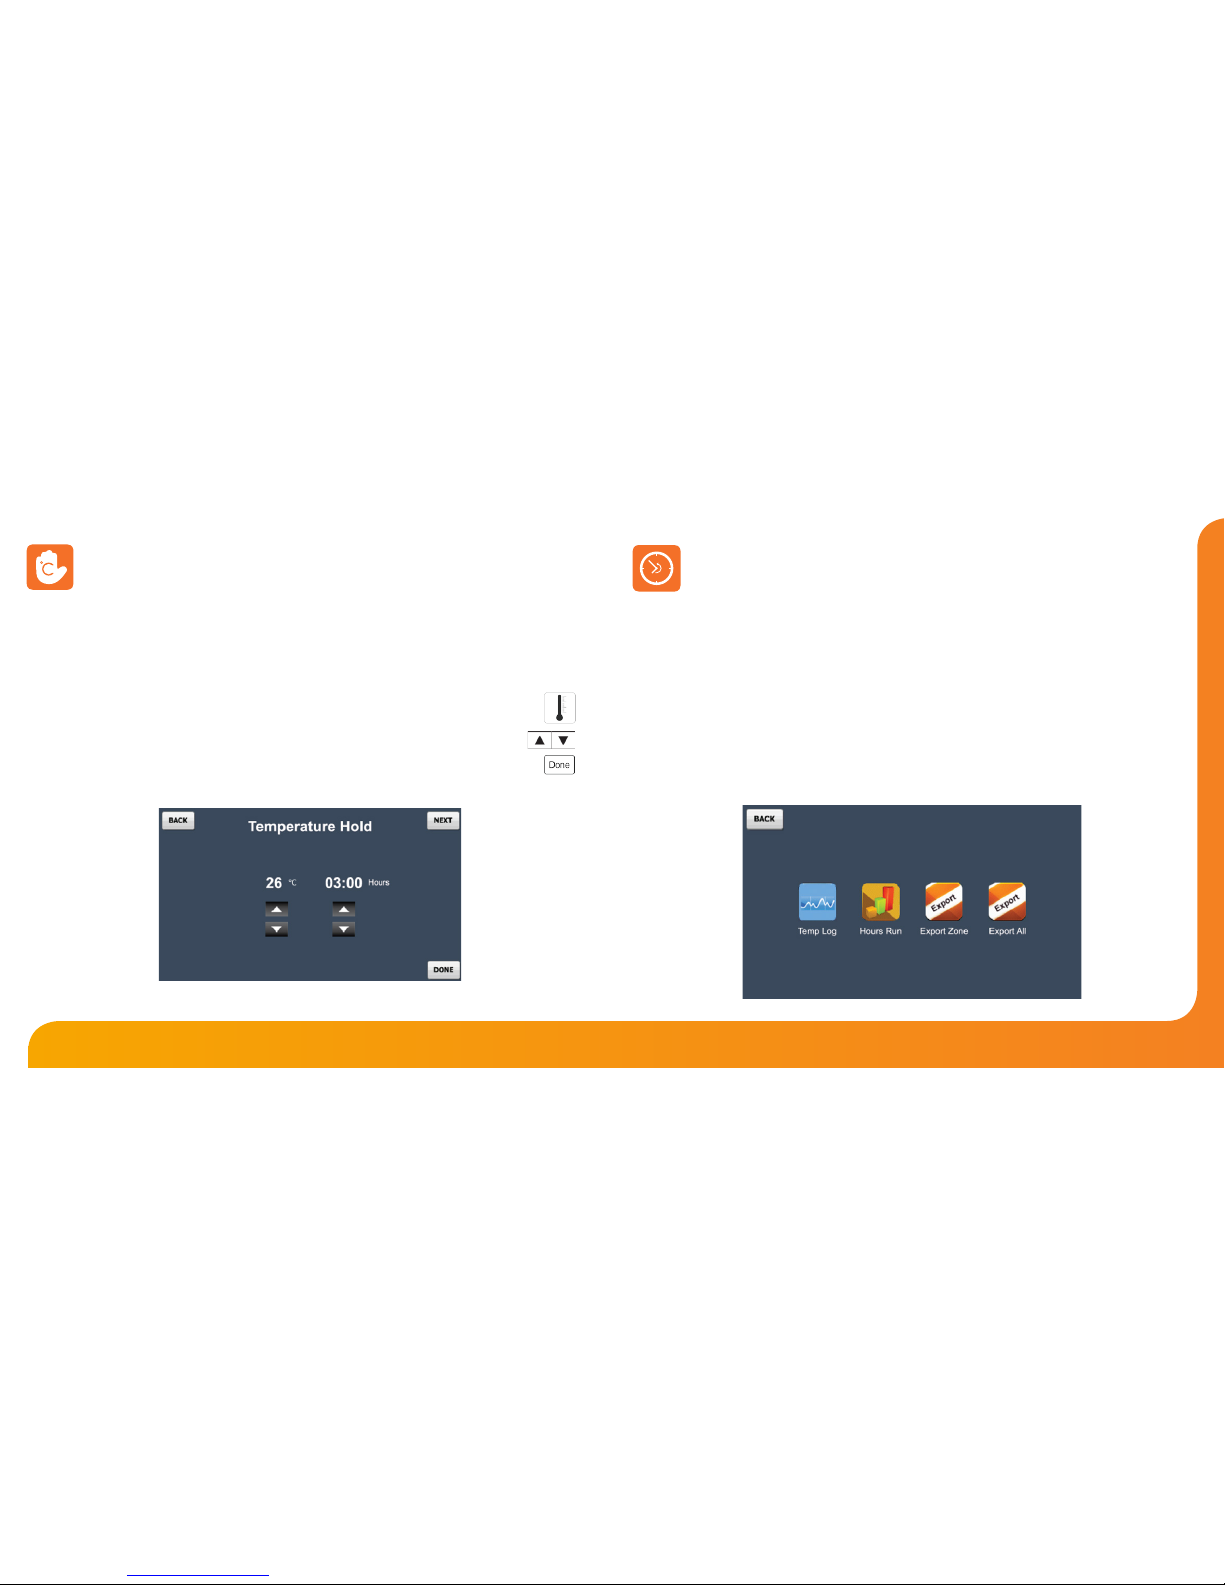
History
The history function on a programmable zone enables you to see the hours run as a
and temperature prole for the last 4 weeks.
This is displayed in a bar chart and line graph and provides an indication of which
zones are using the most energy.
The information can additionally be exported to your PC.
There are two export methods:
• Export All will export the temperature prole for all zones.
• Zone Export will export just the selected zone.
The exported data is saved to csv format and can be edited in Excel.
Page 13
2423
Touchpad Model: TFT
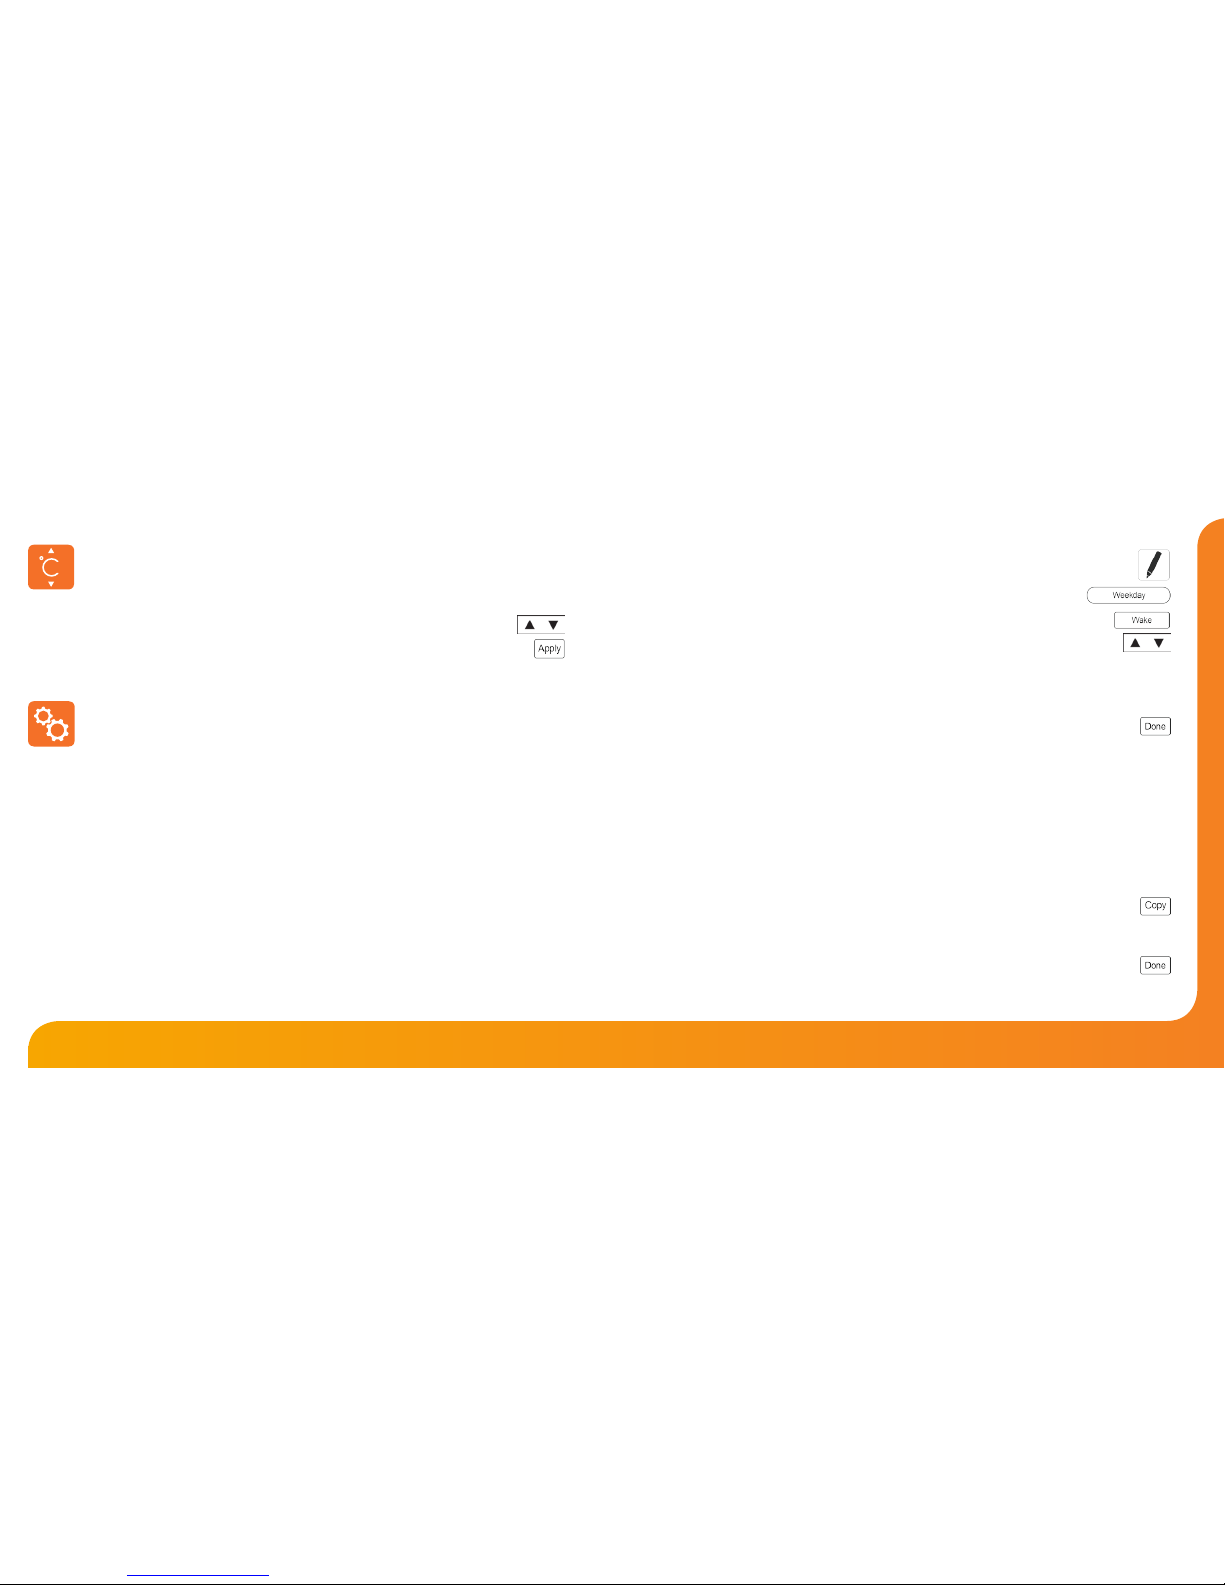
The set temperature can be adjusted by using the Up/Down keys.
• Use the Up/Down keys to select a temperature .................................................
• Press the Apply key ............................................................................................................
Note: This override will be maintained until the next programmed comfort level.
The Edit icon enables you to program the comfort levels for the selected thermostat.
Thermostats provide Weekday/Weekend or 7 Day Programming options.
If the thermostat shows Weekday/Weekend it is operating in 5/2 day mode, and if it
shows each day of the week it is operating in 7 day mode.
This mode can be changed on the thermostat, and will be updated automatically on
the Touchpad.
Please consult the thermostat manual for instructions on how to change this.
There are 4 settings per day, these are called Wake, Leave, Return and Sleep.
For each setting a start time and temperature can be programmed, this temperature
will be maintained until the next comfort level.
Programmable Zones
Temperature Control
Programmable Zones
Editing the Comfort Levels
To program the comfort levels follow these steps.
• Press the Edit icon ...............................................................................................................
• Select a day or period .........................................................................................
• Select a setting to program ........................................................................................
• Edit the time and temperature values using the Up/Down keys ....................
Times should be entered in 24 hour format.
For unused periods set the time to -- : -- and the thermostat will ignore the setting.
• Repeat these steps for the remaining days/periods.
• Press the Done key to conrm and exit ........................................................................
Note: For Weekday/Weekend programming, the 4 comfort levels are the same for all
weekdays but can be dierent for the weekends.
For 7 Day programming, each day can have 4 dierent comfort levels.
Copy Settings
The Copy key enables you to copy the programmed comfort levels to other thermostats
that are operating in the same mode (5/2 or 7 day).
To Copy and apply comfort levels follow these steps.
• Press the Copy key ...............................................................................................................
Zones that can be selected will be blue and will turn green when selected.
Zones in grey cannot be selected.
• Press the Done key to conrm and exit ........................................................................
Page 14
2625
Touchpad Model: TFT
Programmable Zones with Hot Water Output
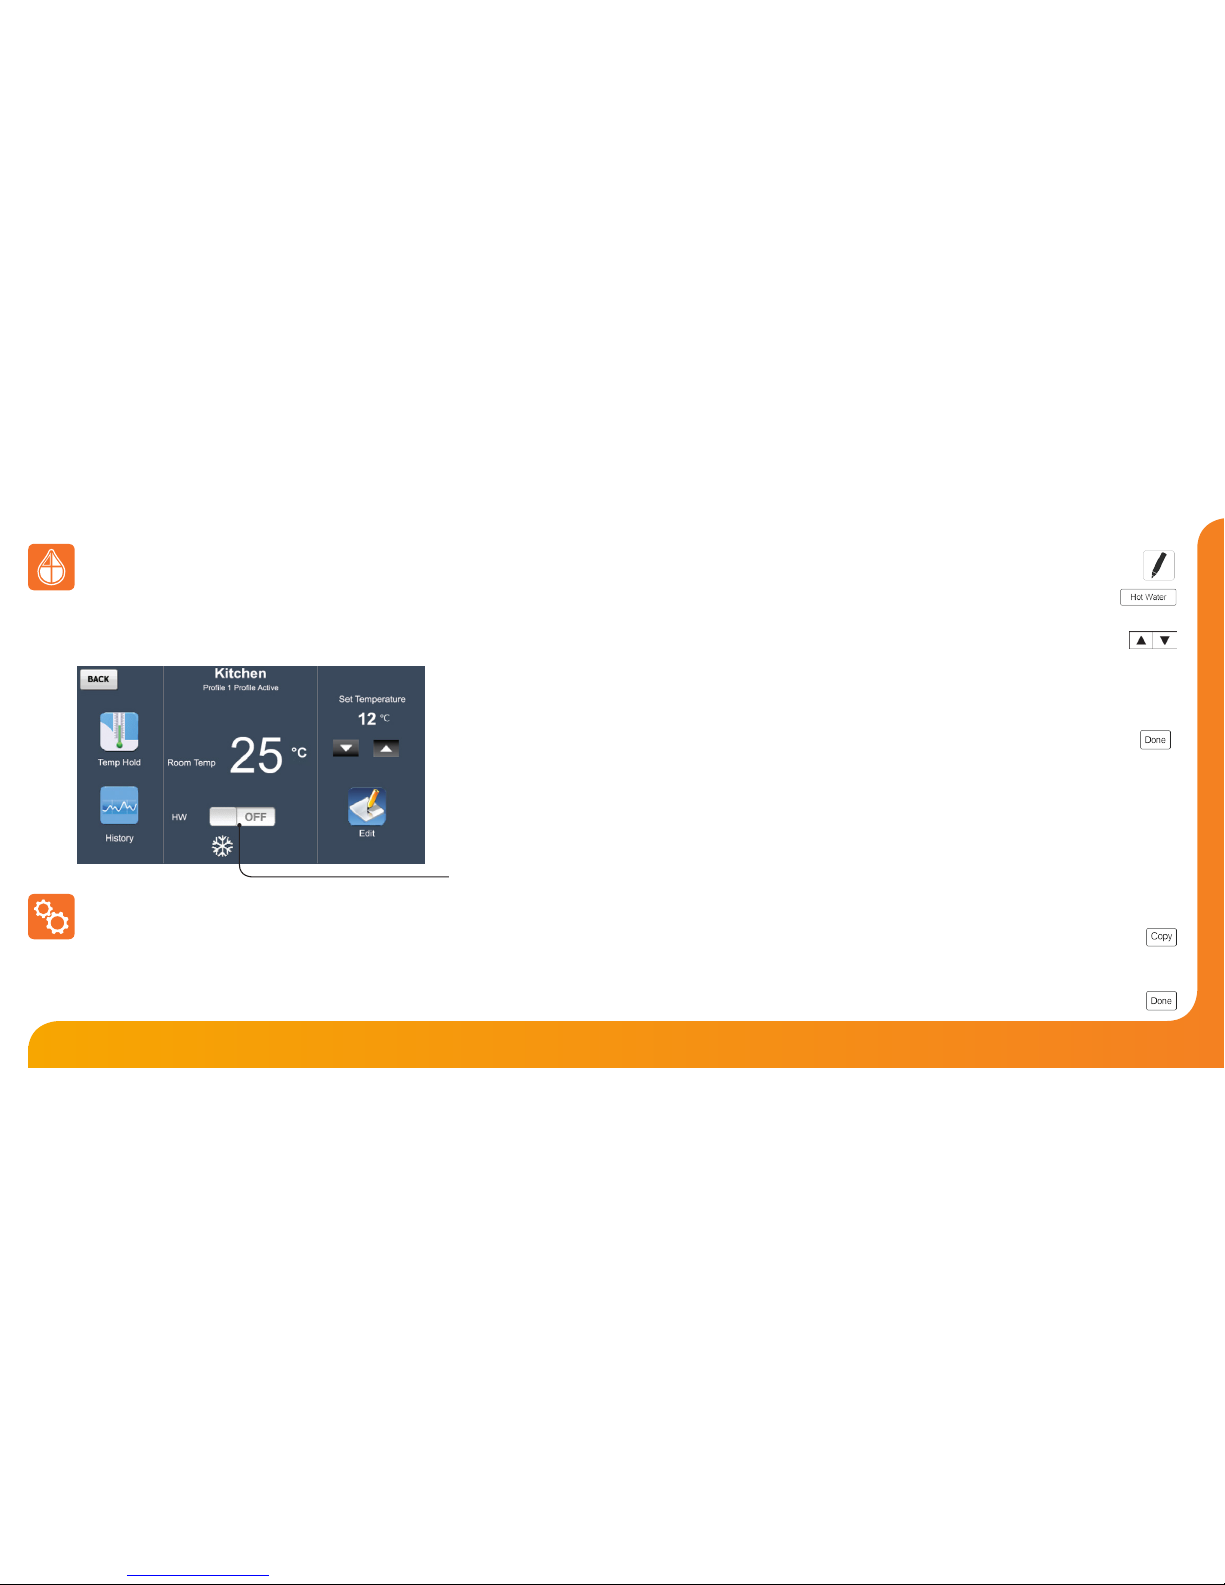
These type of zones operate the same as Programmable Zones but have an
additional output for controlling a hot water cylinder.
A toggle function allows you to manually turn the hot water on and o.
Programmable Zones with Hot Water Output
Editing the Hot Water Switching Times
In addition to editing the comfort levels, hot water switching times can be edited.
There are 4 settings per day, these are called Wake, Leave, Return and Sleep.
For each setting an ON time and an OFF time can be programmed.
To program the hot water switching times follow these steps.
• Press the Edit icon ...............................................................................................................
• Press the Hot Water key ..............................................................................................
For information on editing the comfort levels, see page 24
• Edit the Timer ON and Timer OFF times using the arrow keys ......................
Times should be entered in 24 hour format.
For unused periods set the time to -- : -- and the time clock will ignore the
setting.
• Repeat these steps for the remaining days/periods.
• Press the Done key to conrm and exit .....................................................................
Note: For Weekday/Weekend programming, the 4 switching times are the same for all
weekdays but can be dierent for the weekends.
For 7 Day programming, each day can have 4 dierent switching times.
Copy Settings
The Copy key enables you to copy the programmed switching times to other
thermostats that are operating in the same mode (5/2 or 7 day).
To Copy and apply switching times follow these steps.
• Press the Copy key ...............................................................................................................
Zones that can be selected will be blue and will turn green when selected.
Zones in grey cannot be selected.
• Press the Done key to conrm and exit ........................................................................
Hot Water Toggle
Page 15
2827
Touchpad Model: TFT
Holiday
The holiday function reduces the set temperature in selected zones to the frost
protection temperature setting.
Thermostats will maintain this frost protection temperature and time clocks will
maintain TIMER OFF for the duration of the holiday.
When the holiday is complete the specic zones will then automatically return to
the program mode.
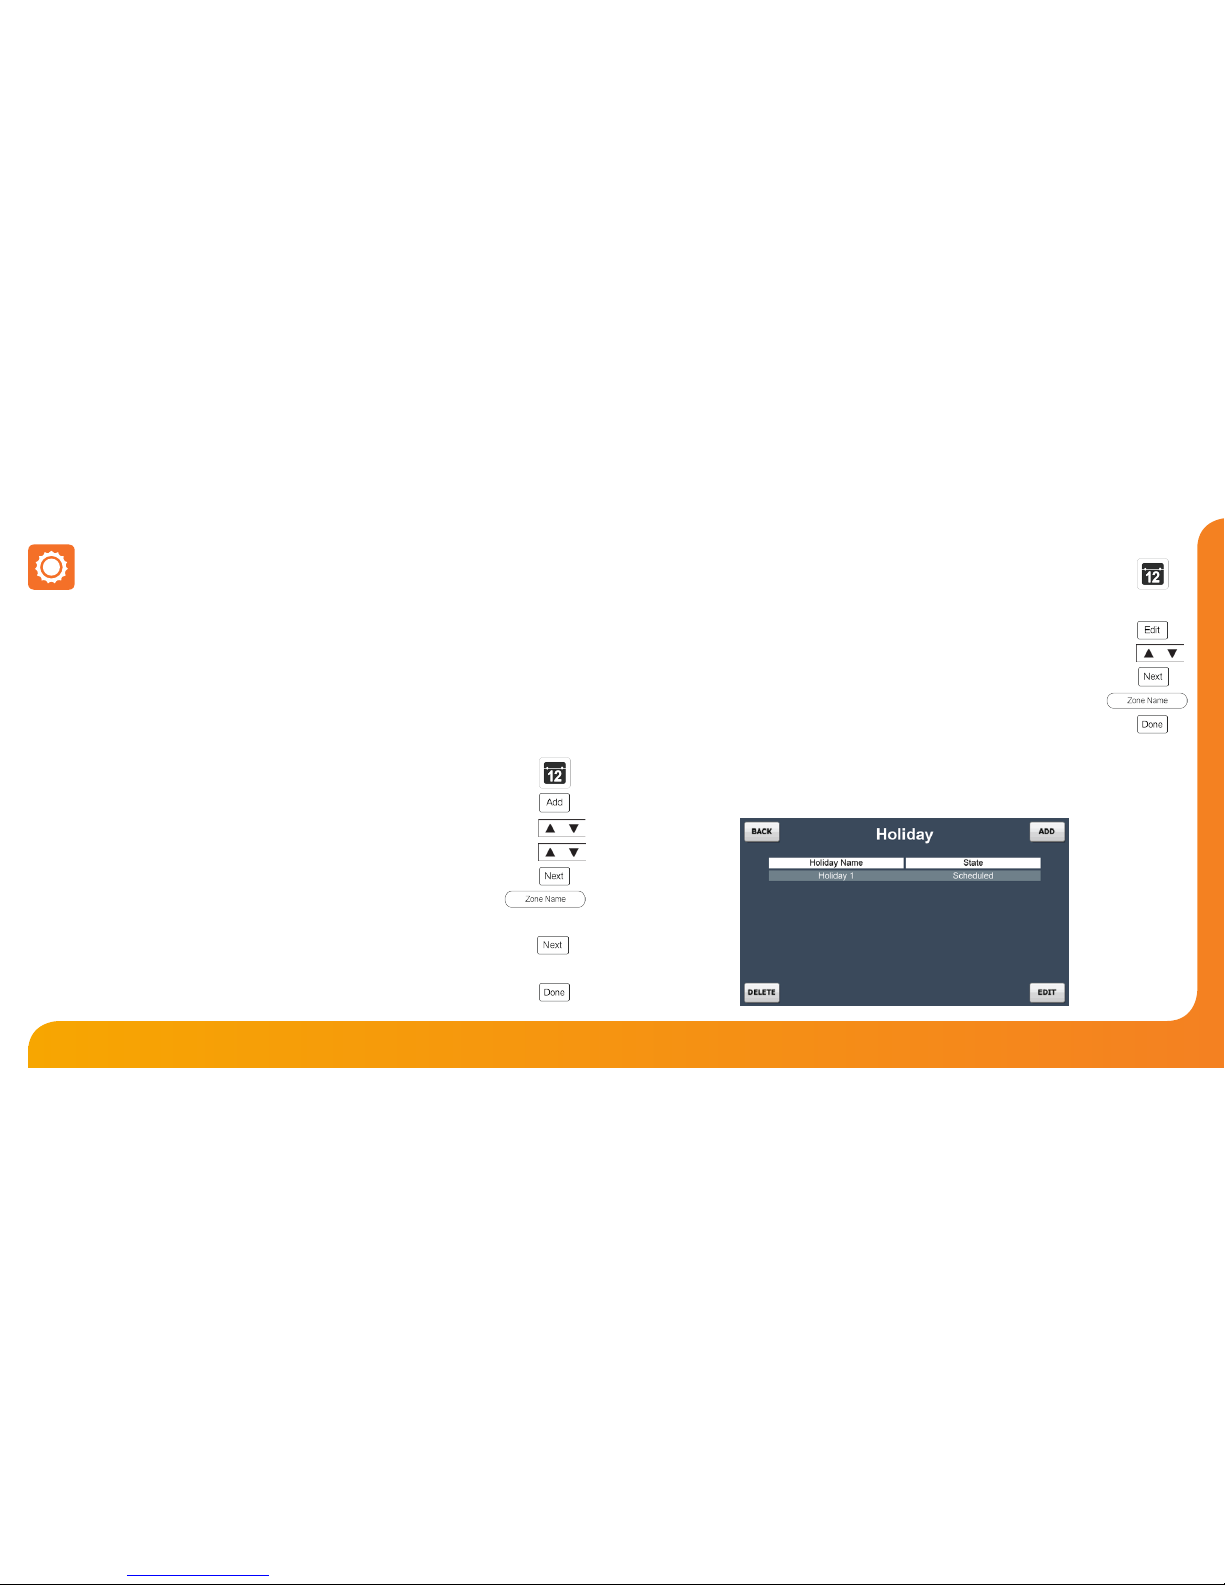
Up to 8 holidays can be scheduled using the Touchpad
• To program a holiday follow these steps;
• Press the Holiday icon ........................................................................................................
• Press the Add key ................................................................................................................
• Using the Up/Down keys, enter the START date and time of the holiday ......
• Using the Up/Down keys, enter the FINISH date and time of the holiday ......
• Press the Next key ................................................................................................................
• Select which zones the holiday is applied to ...................................................
• Zones in Green are selected, and those in blue are not.
• Press the Next key ...............................................................................................................
• Enter a holiday title using the keypad. This title can be 13 characters in length.
• Press Done to store and exit .............................................................................................
Should you need to edit a scheduled holiday, follow these steps.
• Press the Holiday icon ....................................................................................................
• Select the holiday you wish to edit.
• Press the Edit key .............................................................................................................
• Using the Up/Down keys, adjust the holiday start/nish date and time .....
• Press the Next key ............................................................................................................
• Select which zones the holiday is applied to .............................................
• Conrm the title and press Done the done key ....................................................
Holiday Status
The holiday screen indicates the scheduled holidays.
Once the holiday starts, this screen will display that the holiday is active.
Page 16
3029
Touchpad Model: TFT
Temperature Hold (Multiple Zones)
The temperature hold function allows you to manually override the current operating
program of multiple zones and set a dierent temperature for a desired period
To set a temperature hold follow these steps.
• Press the Temp Hold icon ..............................................................................................
• Using the Up/Down arrow keys, set the hold temperature and duration ...
• Press the Next key ............................................................................................................
• Select which zones to apply the hold to .......................................................
• Press the Done key ...........................................................................................................
To cancel a hold in operation follow these steps.
• Press the Temp Hold icon ..............................................................................................
• Press the Cancel Hold key ...................................................................................
• Select which zones should have the temperature hold function canceled.
Zones in grey do not have a hold in operation.
Zones in green will have the hold canceled and those in blue will remain active.
• Press the Done key ...........................................................................................................
Summer Mode
Quick View
The Quick View screen gives an overview of all the zones on your system.
The zone temperatures as well as the output status are displayed.
You can use this screen to quickly access any zone on your system by rst
highlighting the zone and then pressing Detail.
The Touchpad Summer mode oers a quick and easy way to place selected heating zones
into set back without having to reprogram the comfort levels. The hot water times will
not be eected during summer operation.
The set back temperature can be set on each thermostat between 07-17°C or this can be
done from the Touchpad (See page xx)
As an indication, the heating zone screens will display the frost icon whilst the summer
mode is active. As a default, all heating zones will follow the summer condition, but you
can deselect certain zones if required. The setup should be as follows….
• Press Summer
• Zones buttons in green (selected by default) will follow the summer mode and
zones in blue will not.
• Press Zones to deselect any thermostat/s that you don’t want to apply summer to.
• Press Done.
To cancel summer mode....
• Press Summer.
• Select Functions tab.
• Press Unselect All.
• Select Done.
Page 17
3231
Touchpad Model: TFT
Hot Water Boost Home / Away Mode
If you have thermostats with hot water function on your system, you can override
the hot water output.
During an override, the thermostat will ash TIMER ON / HW ON depending on the
model of your thermostat.
To use this function, follow these steps;
• Press the HW Boost icon ...................................................................................................
• Using the Up/Down arrow keys enter the boost period ......................................
• Press the Done key .............................................................................................................
To cancel, repeat the steps reducing the boost time to 00 hours.
Once the boost period has ended, the zone will revert back to its programmed
setting.
Away mode places selected zones into setback mode indenitely for use when you
are unsure when the building will next be occupied.
The zones will control to the setback temperature during this time and the hot
water will be turned o.
Pressing Home will cancel the Away function, and the zones will revert back to their
programmed level.
As a default, all heating zones will follow the Away mode, but you can deselect
certain zones if required.
To place the system in away mode follow these steps.
• Press the Away icon ......................................................................................................
• Toggle the switch to the on position.
• Press the Edit key ..........................................................................................................
• Select zones to apply the Away mode to ..............................................
Zones buttons in green will follow the
Away mode and zones in blue will not
• Press the Done key ........................................................................................................
Page 18
3433
Touchpad Model: TFT
Groups
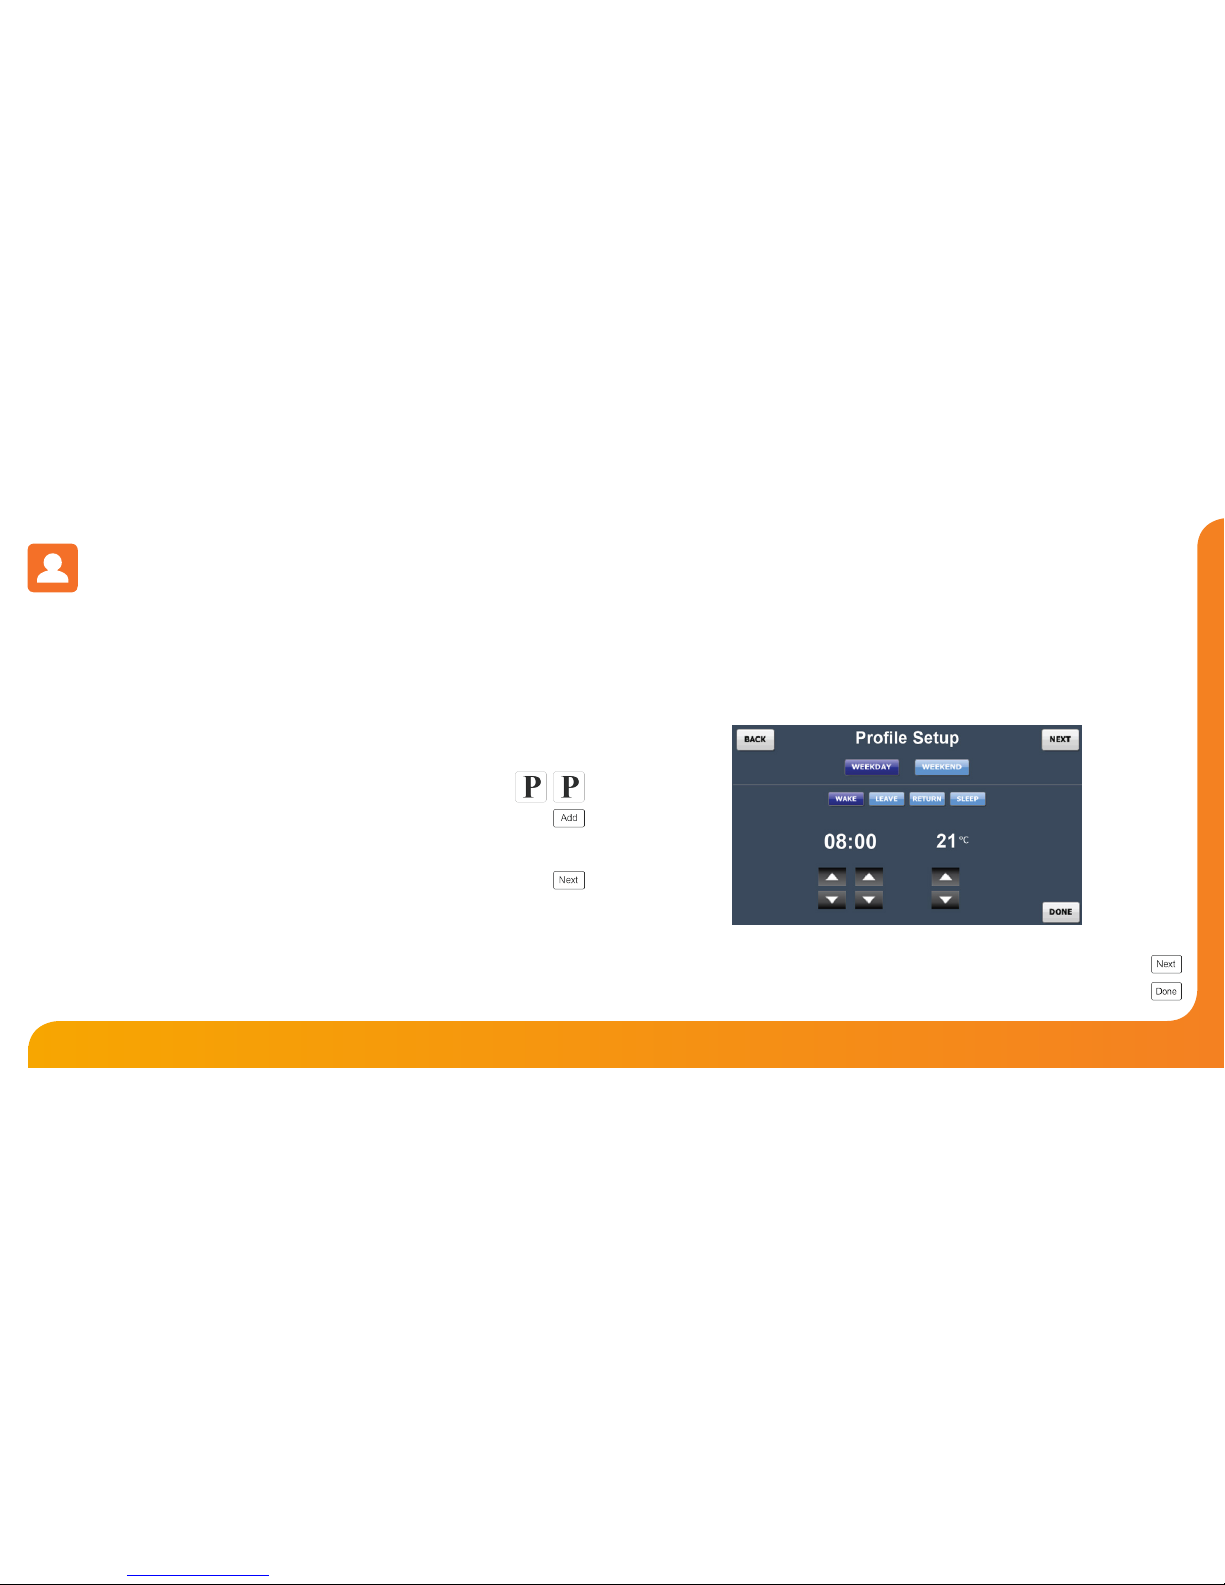
Using the Group function, zones can be assigned into groups allowing them to be
collectively controlled. Using the Proles function (see page 35), predened settings
can be quickly applied to all zones within a group.
Up to 8 groups can be setup in the Touchpad. To create a group, follow these steps.
• Press the Proles icon ........................................................................................................
• Press the Groups icon ........................................................................................................
• Press the Add key ................................................................................................................
• Select the zones to be added to the group ...............................................
• The zone list is ltered based on the rst selection and the following restrictions:
Weekday/Weekend or 7 Day Mode: You can only group thermostat/time Clocks that
are in the same mode.
Heating Only Group: Programmable thermostat and programmable thermostats with
hot water output can be grouped, allowing you to create a heating prole.
HW Timer Group: Programmable Thermostats with Hot water output can be grouped
with timers, allowing you to create a HW Timer Prole.
• Press the Next key ...............................................................................................................
• Enter a group title using the keypad.
• Press the Done key .............................................................................................................
To edit a group, follow these steps.
• Press the Proles icon and then the Groups icon .....................................
• Select a Group to edit.
• Press the Edit key ..............................................................................................................
• Select zones to add/remove from the group .........................................
• Press the Next key ............................................................................................................
• Conrm the group title and press the Done key ...................................................
To delete a group, follow these steps.
• Press the Proles icon and then the Groups icon ......................................
• Select a Group to delete.
• Press the Delete key ..........................................................................................................
Page 19
3635
Touchpad Model: TFT
Proles
At least 1 Group must be created (see page 33) before the Prole can be accessed.
Proles are predened comfort levels and switching time settings that can be
applied to groups (see page 33). When a prole is run, the settings are sent
immediately to the devices within the prole group overwriting their current
settings.
For example, a shift working with a varying schedule could create 2 proles - Day
Shift and Night Shift. By having two proles stored it is easy to quickly switch the
heating system between programs when shift patterns change.
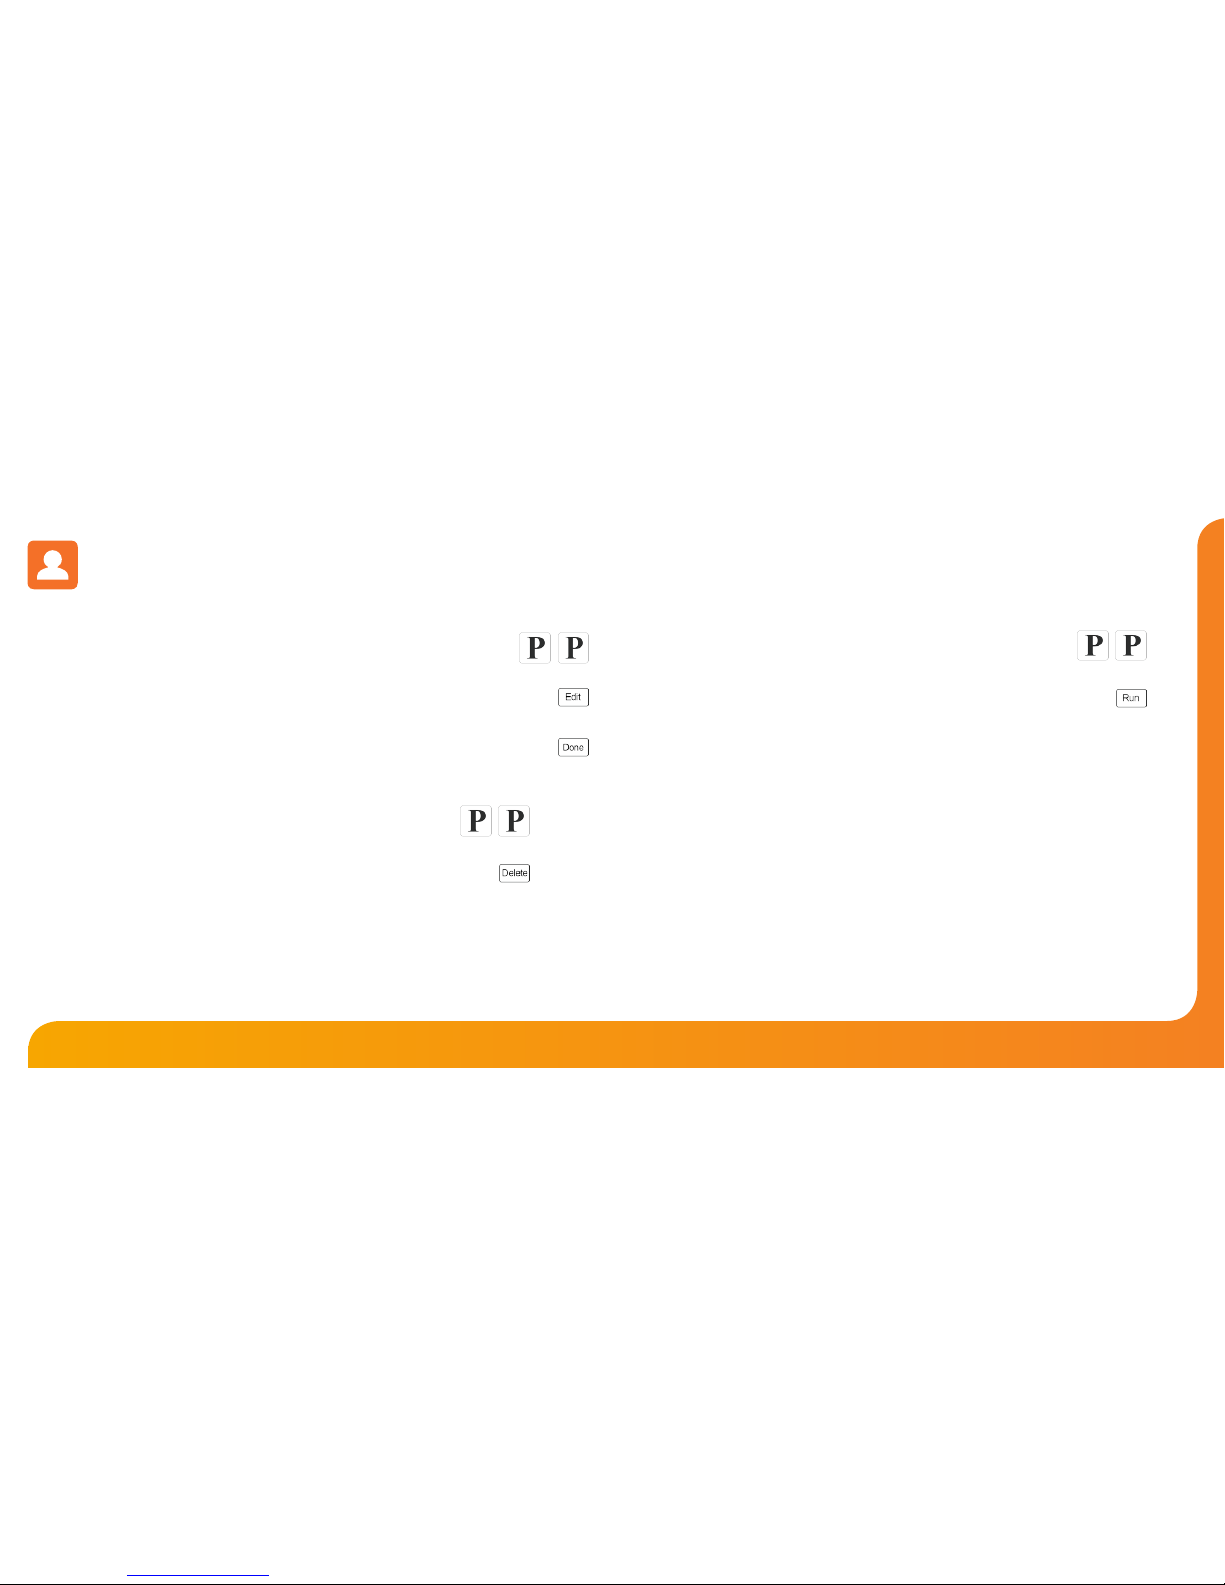
To create a prole, follow these steps.
• Press the Proles icon and then select the Proles icon again ....................
• Press the Add key .....................................................................................................................
• Select a group the prole should apply to.
See page 33 for information on how to create a group.
• Press the Next key ....................................................................................................................
The type of prole created is driven by the type of thermostats in the group.
Heating Prole (5/2 Day Mode): This type of prole allows you to program comfort
levels for the Weekday/Weekend. See pages 23-24 for programming instructions.
Heating Prole (7 Day Mode): This type of prole allows you to program comfort
levels for each day of the week. See pages 23-24 for programming instructions.
Hot Water/Timer Prole (5/2 Day Mode): This type of prole allows you to program
switching times for the weekday/weekend. See pages 17-18 (time clock) and 25-26
(hot water) for programming instructions.
Hot Water/Timer Prole (7 Day Mode): This type of prole allows you to program
switching times for each day of the week. See pages 17-18 (time clock) and 25-26 (hot
water) for programming instructions.
• Program the prole following the instructions on pages 17-18, 23-24 or 25-26.
• Press the Next key ................................................................................................................
• Enter a prole title using the keypad and press done ............................................
Page 20
3837
Touchpad Model: TFT
Running a Prole
To run a prole , follow these steps.
• Press Proles icon and press the prole icon again ........................
• Select the Prole to run.
• Press the Run key .....................................................................................................
The settings will be sent immediately to the zones in the group and their zone
screen will show the prole is active.
Notes:
1. When you run a prole, all of the existing settings in the thermostat will be
overwritten with the prole settings.
2. Only one heating prole per zone can be run at once.
3. If the zone has a heating & hot water model thermostat, It is possible to run a
heating and a hot water prole at the same time. The Touchpad will indicate that
two proles are in operation.
Proles Continued
Editing a Prole
To edit a prole, follow these steps.
• Press Proles icon and press the prole icon again ..........................................
• Select the Prole to edit.
• Press the Edit key ........................................................................................................................
• Edit the prole.
• Press the Done key ....................................................................................................................
Deleting a Prole
To delete a prole, follow these steps.
• Press Proles icon and press the prole icon again ........................
• Select the Prole to delete.
• Press the Delete key ...............................................................................................
Page 21
4039
Touchpad Model: TFT
Touchpad Settings
Security Setup
The Touchpad has a security function that allows you to limit access, so for example
zone settings cannot be altered without entering a code.
To enable this function, follow these steps.
• Press the Options tab.
• Press the Settings icon .......................................................................................................
• Press the Security icon .......................................................................................................
• Move the toggle to ON and then set a security code.
• Press the Done key ..............................................................................................................
Note: If you forget or misplace your user code, contact your equipment supplier for
assistance.
• Press the Options tab.
• Press the Settings icon .......................................................................................................
• Press the System Info icon ................................................................................................
This screen displays the current version of your Touchpad
The master timer function can only be used with non-programmable thermostats.
During setup, you can select which zones should follow these times.
During the programmed time, the thermostat will control to its set temperature and
then outside of the programmed time it will control to its setback temperature
The brightness control enables you to control the brightness level of the Touchpad
display.
The calibration function can be used to recalibrate the touchscreen.
This is factory set and should not need to be adjusted.
The Touchpad can store 4 weeks of data per zone. To delete the history, use the delete
history function.
Touchpad Settings
Master Timer
Touchpad Settings
Display Screen
Touchpad Settings
System Information
Touchpad Settings
Delete History
Page 22
4241
Touchpad Model: TFT
The set back temperature is used when a holiday, away or set back function is active.
The set back temperature range is 07-17°C and is set to 12°C as default.
The set back temperature function enables you to set this for individual or all
thermostats.
The max oor limit is used on thermostats with a oor limiting sensor and is used to
protect the oor surface from overheating.
The oor limit range is 20-45°C and is set to 28°C as default.
The oor limit temperature function enables you to set this for individual or all
thermostats with oor limiting function.
The system reset function will delete all thermostats and history information in your
system.
After a system reset, you will need to perform a new network scan to add thermostats
to your system.
The Touchpad rmware can be updated as and when new features are introduced.
Check the latest version by visiting the Support Section on www.heatmiser.com
To perform the update the Touchpad has to remain powered up.
Connect the Touchpad to a laptop using the USB cable provided.
Extract the TFT.BIN le from the download ZIP le.
Copy and paste the TFT.BIN le onto the Touchpad drive on the PC.
You now need to follow these steps.
• Press Options TAB.
• Press the Settings icon ........................................................................................
• Press the System icon ..........................................................................................
• Press the Firmware Update icon ......................................................................
• Press the Done key ...............................................................................................
The TFT will now update and the display will reset.
To conrm the update was successful, check the version number in the Systems Info Tab.
System
Set Back Temp
System
Max Floor Limit
System
System Reset
System
Firmware Update
Page 23
4443
Touchpad Model: TFT
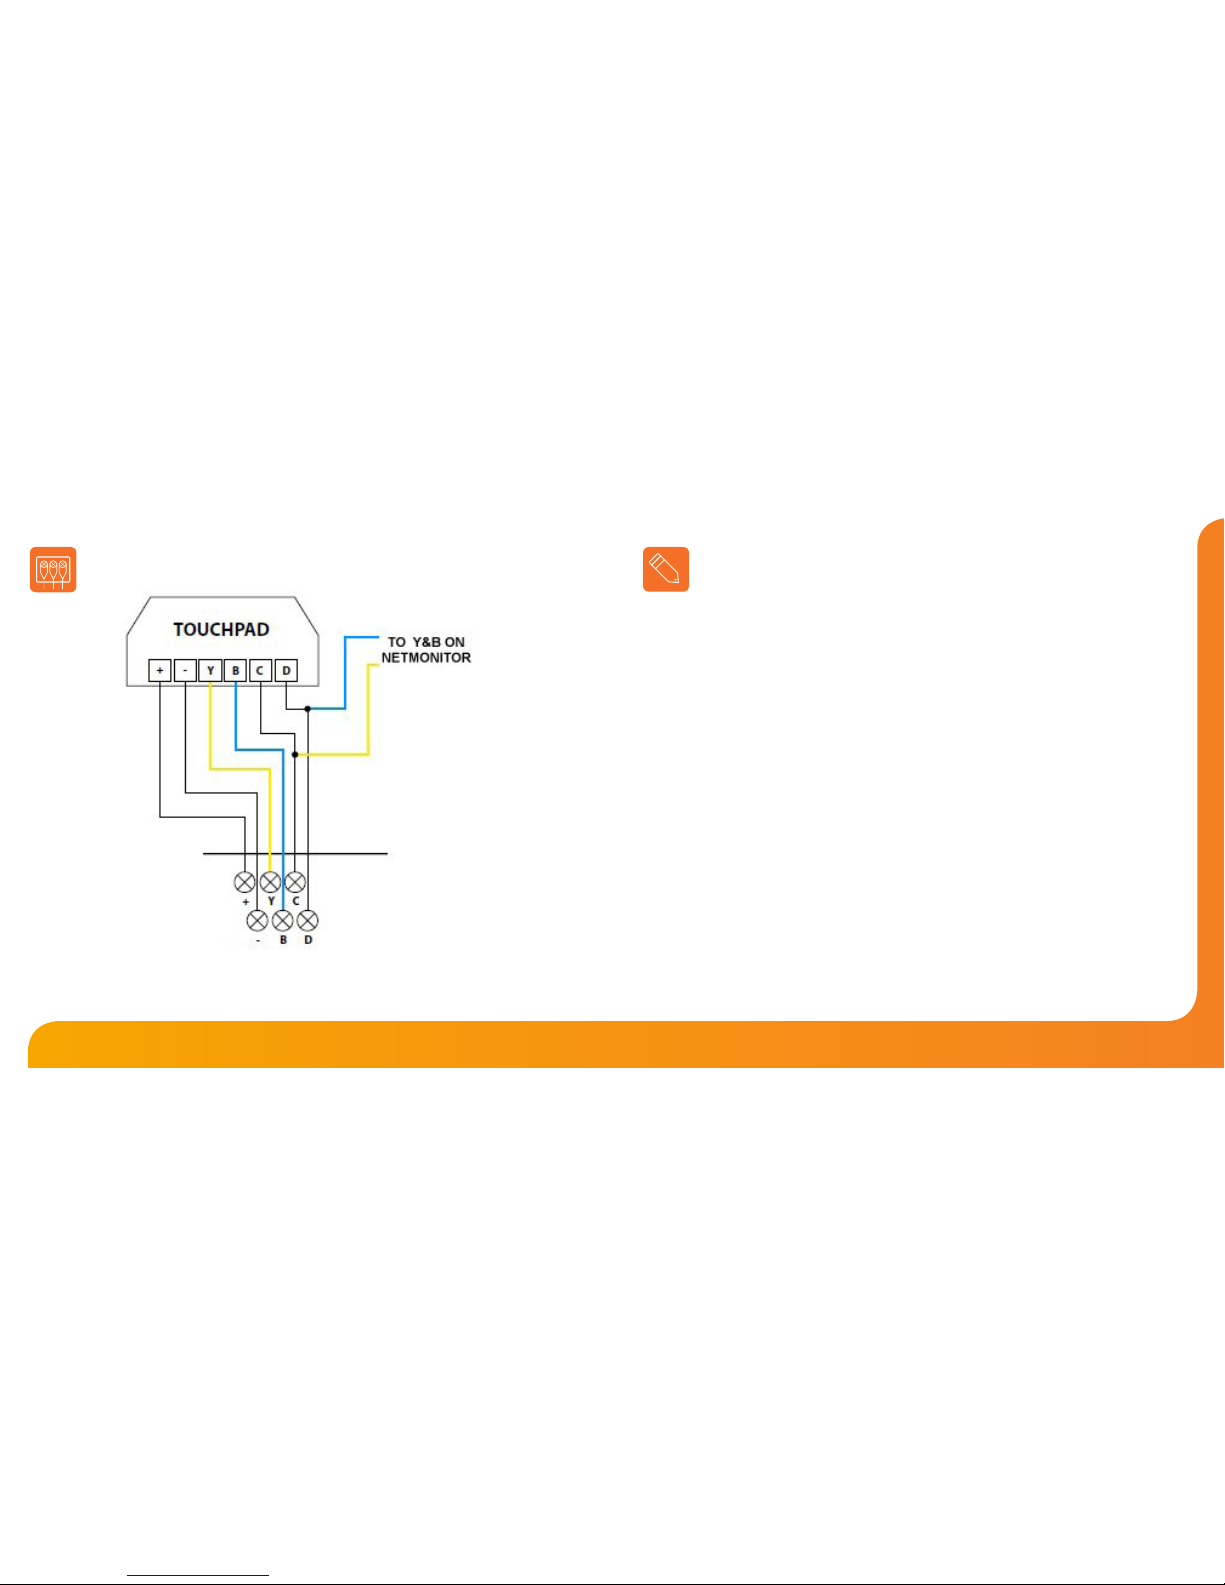
Wiring Diagram - Touchpad to UH1
This product must only be installed by a qualied electrician
and comply with local installation regulations.
Notes
.........................................................................................................................................................................
.........................................................................................................................................................................
.........................................................................................................................................................................
.........................................................................................................................................................................
.........................................................................................................................................................................
.........................................................................................................................................................................
.........................................................................................................................................................................
.........................................................................................................................................................................
.........................................................................................................................................................................
.........................................................................................................................................................................
.........................................................................................................................................................................
.........................................................................................................................................................................
.........................................................................................................................................................................
TOUCHPAD CONNECTIONS TO UH1
Page 24

4645
Touchpad Model: TFT
Notes
.........................................................................................................................................................................
.........................................................................................................................................................................
.........................................................................................................................................................................
.........................................................................................................................................................................
.........................................................................................................................................................................
.........................................................................................................................................................................
.........................................................................................................................................................................
.........................................................................................................................................................................
.........................................................................................................................................................................
.........................................................................................................................................................................
.........................................................................................................................................................................
.........................................................................................................................................................................
.........................................................................................................................................................................
Notes
.........................................................................................................................................................................
.........................................................................................................................................................................
.........................................................................................................................................................................
.........................................................................................................................................................................
.........................................................................................................................................................................
.........................................................................................................................................................................
.........................................................................................................................................................................
.........................................................................................................................................................................
.........................................................................................................................................................................
.........................................................................................................................................................................
.........................................................................................................................................................................
.........................................................................................................................................................................
.........................................................................................................................................................................
Page 25
47
Touchpad
Video
Twitter: heatmiseruk
Facebook:
facebook.com/thermostats
Want More Information?
Call our support team on: +44 (0)1254 669090
Or view technical specications directly on our website:
www.heatmiser.com
PDF FAQ
Heating Professionals:
Request a copy of our product
installation guide containing
detailed technical specications
for our complete product range:
www.heatmiser.com/guide
 Loading...