

Page 1

Operating Instructions
Model : DT / PRT
DT-N / PRT-N
This product should be installed by a qualified electrician.
Improper installation may result in injury, death or
property damage.
Page 2

Contents Table
Contents 1
What is a room thermostat 2-3
What is a programmable thermostat 4-6
Installation 7-8
Initial Setup Procedure 9-12
Symbols Explained 13
Button Layout 14
Temperature Display 15
Setting the Clock 15
Temperature Override 16
Frost Mode 16
Setting the Comfort Levels 17-18
Keylock 19
Wiring
DT & DT-N Wiring Diagrams 20-25
PRT & PRT-N Wiring Diagrams 26-31
1
Page 3

What is a room thermostat ?
A room thermostat simply switches the heating system on and off
as necessary. It works by sensing the air temperature, switching
on the heating when the air temperature falls below the thermostat
setting, and switching it off once this set temperature has been
reached.
Turning a room thermostat to a higher setting will not make the
room heat up any faster. How quickly the room heats up depends
on the design of the heating system, for example, the size of the
boiler and radiators.
Neither does the setting effect how quickly the rooms cools down.
Turning a room thermostat to a lower setting will result in the room
being controlled at a lower temperature, and saves energy.
The heating system will not work if a time switch or programmer
has switched it off.
The way to set and use your room thermostat is to find the lowest
temperature setting that you are comfortable with and then leave it
alone to do its job. The best way to do this is to set the room
thermostat to a low temperature - say 18ºC - and turn it up by 1ºC
2
Page 4

each day until you are comfortable with the temperature. You won’t
have to adjust the thermostat further. Any adjustment above this
setting will waste energy and cost you more money.
If your heating system is a boiler with radiators, there will usually be
only one room thermostat to control the whole house. But you can
have different temperatures in individual rooms by installing
thermostatic radiator valves (TRV’s) on individual radiators. If you
don't have TRVs you should choose a temperature that is
reasonable for the whole house. If you do have TRVs you can
choose a slightly higher setting to make sure that even the coldest
room is comfortable, then prevent any overheating in other rooms
by adjusting the TRVs.
Room thermostats need a free flow of air to sense the temperature,
so they must not be covered by curtains or blocked by furniture.
Nearby electric fires, televisions, wall or table lamps may prevent
the thermostat from working properly.
3
Page 5

4
What is a programmable room thermostat ?
A programmable room thermostat is both a programmer and a
room thermostat. A programmer allows you to set On and "Off time
periods to suit your own lifestyle. A room thermostat works by
sensing the air temperature, switching on the heating when the air
temperature falls below the thermostat setting, and switching it off
once this set temperature has been reached.
So, a programmable room thermostat lets you choose what times
you want the heating to be on, and what temperature it should
reach while it is on. It will allow you to select different temperatures
in your home at different times of the day (and days of the week) to
meet your particular needs.
Turning a programmable room thermostat to a higher setting will not
make the room heat up any faster. How quickly the room heats up
depends on the design of the heating system, for example, the size
of the boiler and radiators.
Neither does the setting effect how quickly the room cools down.
Turning a programmable room thermostat to a lower setting will
result in the room being controlled at a lower temperature, and
saves energy.
Page 6

The way to set and use your programmable room thermostat is to
find the lowest temperature settings that you are comfortable with
and the different times you have chosen and then leave it alone to
do its job.
The best way to do this is to set low temperatures first, say 18ºC,
and then turn them up by one degree each day until you are
comfortable with the temperatures. You wont have to adjust the
thermostat further. Any adjustment above these setting will waste
energy and cost you more money.
If your heating system is a boiler with radiators, there will usually be
only one programmable room thermostat to control the whole
house. But you can have different temperatures in individual rooms
by installing thermostatic radiator valves (TRVs) on individual
radiators. If you don't have TRVs, you should choose a temperature
that is reasonable for the whole house. If you do have TRVs, you
can choose a slightly higher setting to make sure that even the
coldest room is comfortable, then prevent any overheating in other
rooms by adjusting the TRVs.
The time on the programmer must be correct. Some types have to
be adjusted in spring and Autumn at the change between
Greenwich Mean Time and British Summer Time.
5
Page 7

You may be able to temporarily adjust the heating programme, for
example “Override”, “Advance” or “Boost” These are explained in
the manufacturers instructions.
Programmable room thermostats need a free flow of air to sense
the temperature, so they must not be covered by curtains or blocked
by furniture. Nearby electric fires, televisions, wall or table lamps
may prevent the thermostat from working properly.
6
Page 8

Installation Procedure
DO’s
1.Do mount the thermostat at eye level.
2.Do read the instructions fully so that you get the best from our
product.
DON’Ts
1.Do not install near a direct heat source as this will effect the
workings of the thermostat.
2.Do not push hard on the LCD otherwise you will damage the liquid
crystal display and this is not repairable.
Installation
The thermostat is designed to be flush mount, a back box of 35mm
should have been sunk in the wall prior to installation.
Step 1
Carefully separate the front half of the thermostat from the back
plate by placing a small flat head terminal driver in to the slots on
the bottom face of the thermostat.
7
Page 9

Step 2
Carefully unplug the ribbon connector which is plugged in to the
front half of the thermostat.
Place the thermostat front half somewhere safe.
Terminate the thermostat as shown in the diagrams at the back of
this booklet.
Screw the thermostat back plate on to the back box
Step 3
Re-connect the thermostat ribbon cable and clip the two halves
together.
Step 4
Turn on the power to the thermostat and allow
the thermostat to stabilise for 1 hour before
calibrating.
8
Page 10

.
9
How To Setup Your Thermostat
This thermostat has many options available to you. Once you have
set these settings you can leave them. They will be stored in the
thermostat memory and do not need to be adjusted later.
You need to use the table opposite as a reference guide when
initially setting up the thermostat.
We strongly suggest you read the next few pages so that you fully
understand the features available and the intended use.
You should also understand that by enabling one feature, another
feature maybe made unavailable. This is because the feature is not
available in that mode.
Please read the features now
, and then follow the setup routine
on the following pages.
Page 11
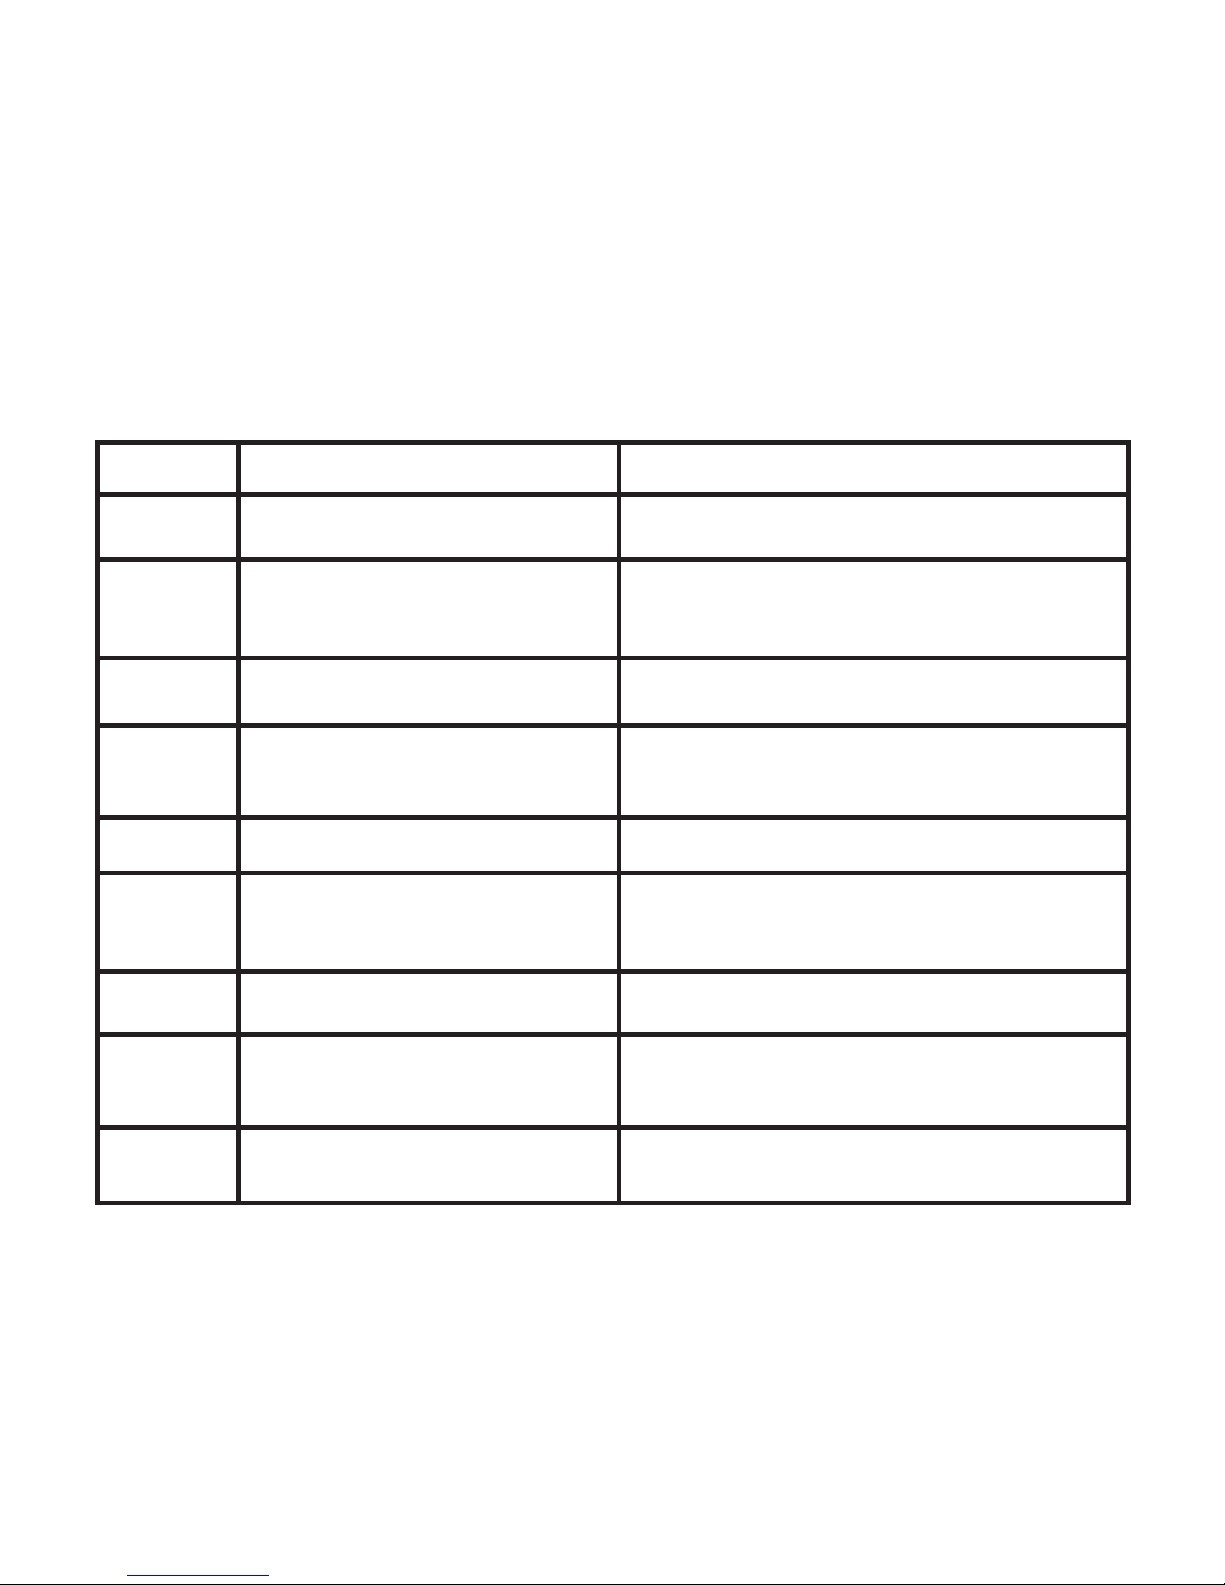
10
Feature Description Setting
01 Temperature Format 00=°C 01=°F (°C Default)
02 Switching Differential 01=1°C/F, 02=2°C/F 03=3°C/F
(01=default)
03 Temperature Calibrate Enter value
04 Frost Mode 00=Disabled 01=Enabled
(01 = Default)
05 Frost Protection Temp 07-17°C (12°C Default)
06 Output Delay Enter value
00 - 30 minutes (00 = default)
07 Comms (DT-N PRT-N) Enter unique value
08 Optimum Start
PRT only
00 = Disabled (Default)
01 01hr 02-02hr 03=03hr
09 Rate of Change For information only
Feature Table
Page 12

Understanding the Features
The installer should read the following features and then setup
the thermostat according to the features required.
T
emperature Format: Select between°C or °F
Switching Differential: This is the number of degrees the heating
switches back on below the set temperature.
T
emperature Calibrate: The thermostat is calibrated from the
factory, but you can use this function to calibrate if required.
Frost Mode:
You can set whether the thermostat will maintain the
frost temperature even when the thermostat has been turned off
with the power button. As a default, this is enabled.
Frost Protection Temperature: This is used to set the required
frost temperature. The range is 07 - 17°C
Output Delay:
To prevent rapid switching, an output delay can be
entered. This can be from 00 - 30 minutes.
11
Page 13

Understanding the Features (Cont)
Optimum Start: Optimum start will delay the start up of the heating
system to the latest possible moment to avoid unnecessary heating,
so that the dwelling is comfortably warm by the programmed time.
The thermostat uses the rate of change (See below) setting to
calculate how long the building needs to take to raise the building
1°C (With a rate of change of 20, the thermostat has calculated the
building needs 20 minutes to raise the building 1°C).
The Optimum start setting is the maximum number of hours the
heating will come on before the programmed time. 00hr = Disabled.
03 is the maximum, and this means the heating will come on a
maximum of 03 hrs before the programmed time.
Rate of Change:
(This feature is only available on the PRT
model) This setting is calculated by the thermostat.
Setting up the Features:
With the thermostat turned off, press for 3 seconds
On the LCD you will see 01(small) to the top right, and 00 (large) in
the centre.
Small setting = Feature # Large setting = Setting
• Use the Up/Down arrow key to change the setting.
• Press to accept and proceed to the next feature.
12
Page 14
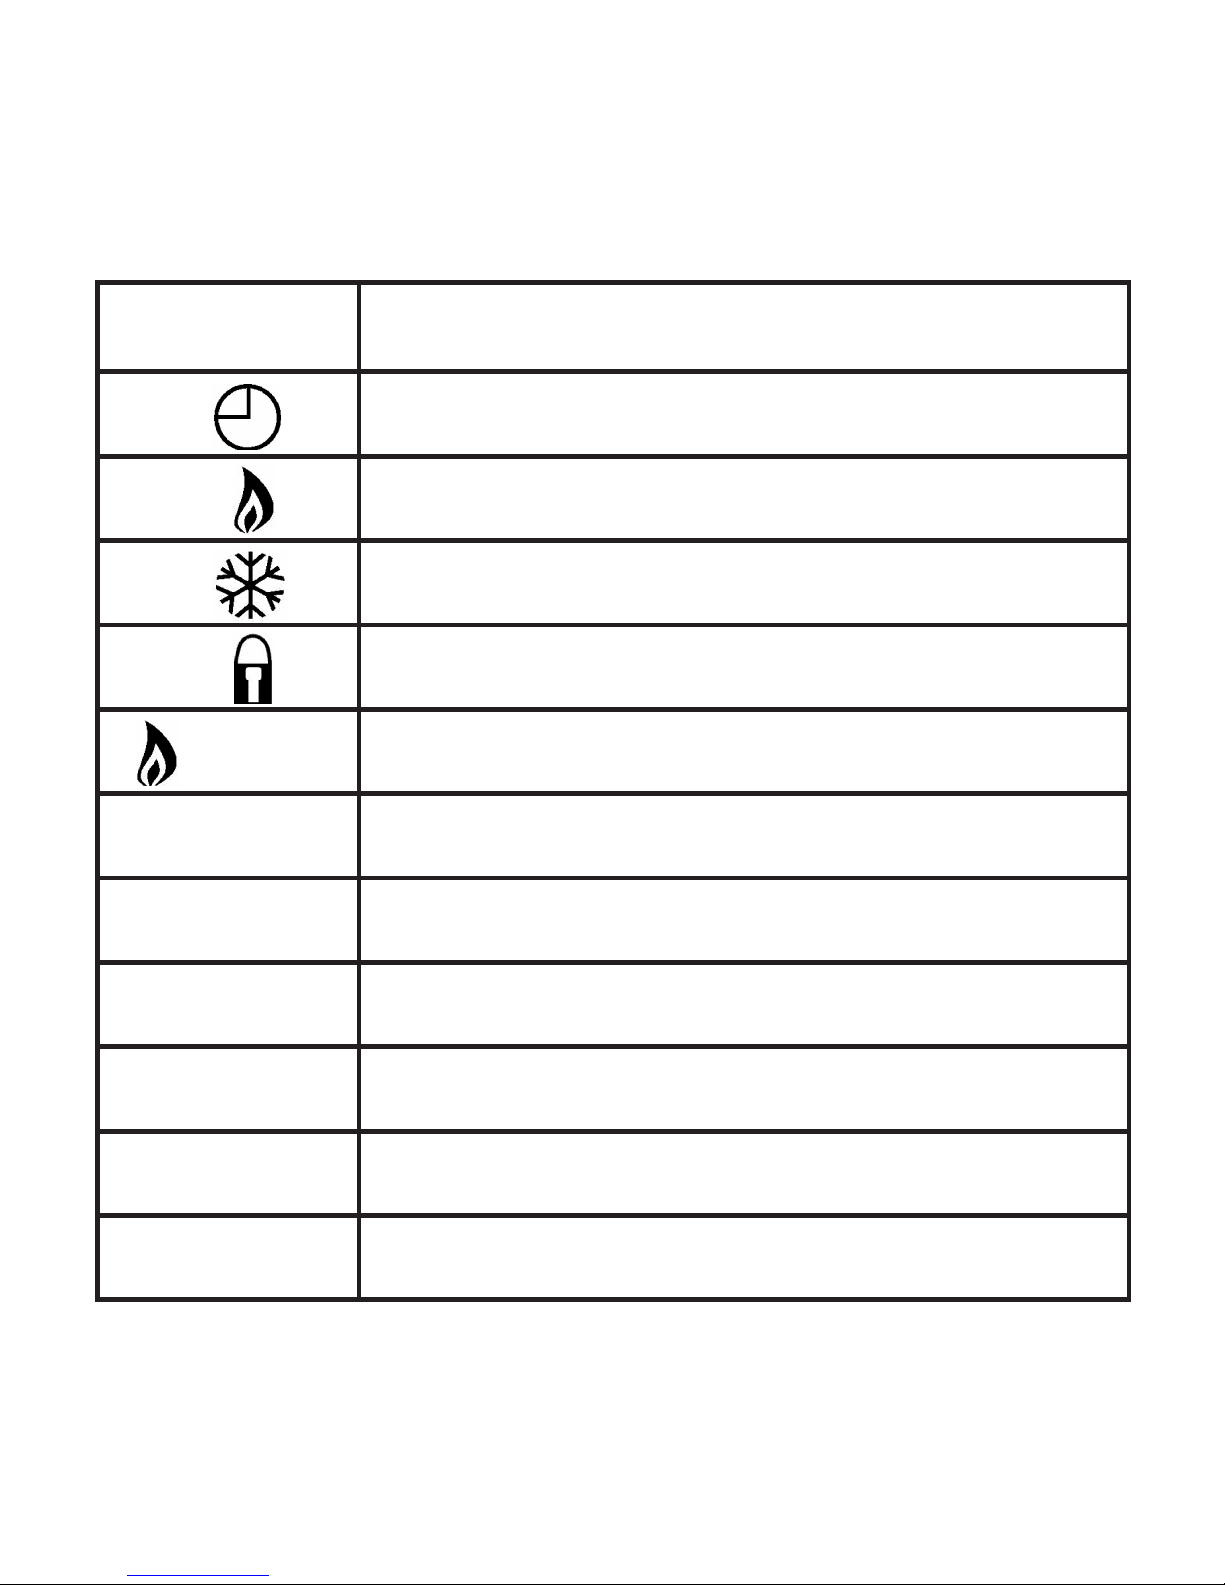
LCD Symbols
Clock Indicator
Heat Active Indicator
Frost Mode On
Keylock On
Flashing
Optimum Start Mode Active
13
Page 15
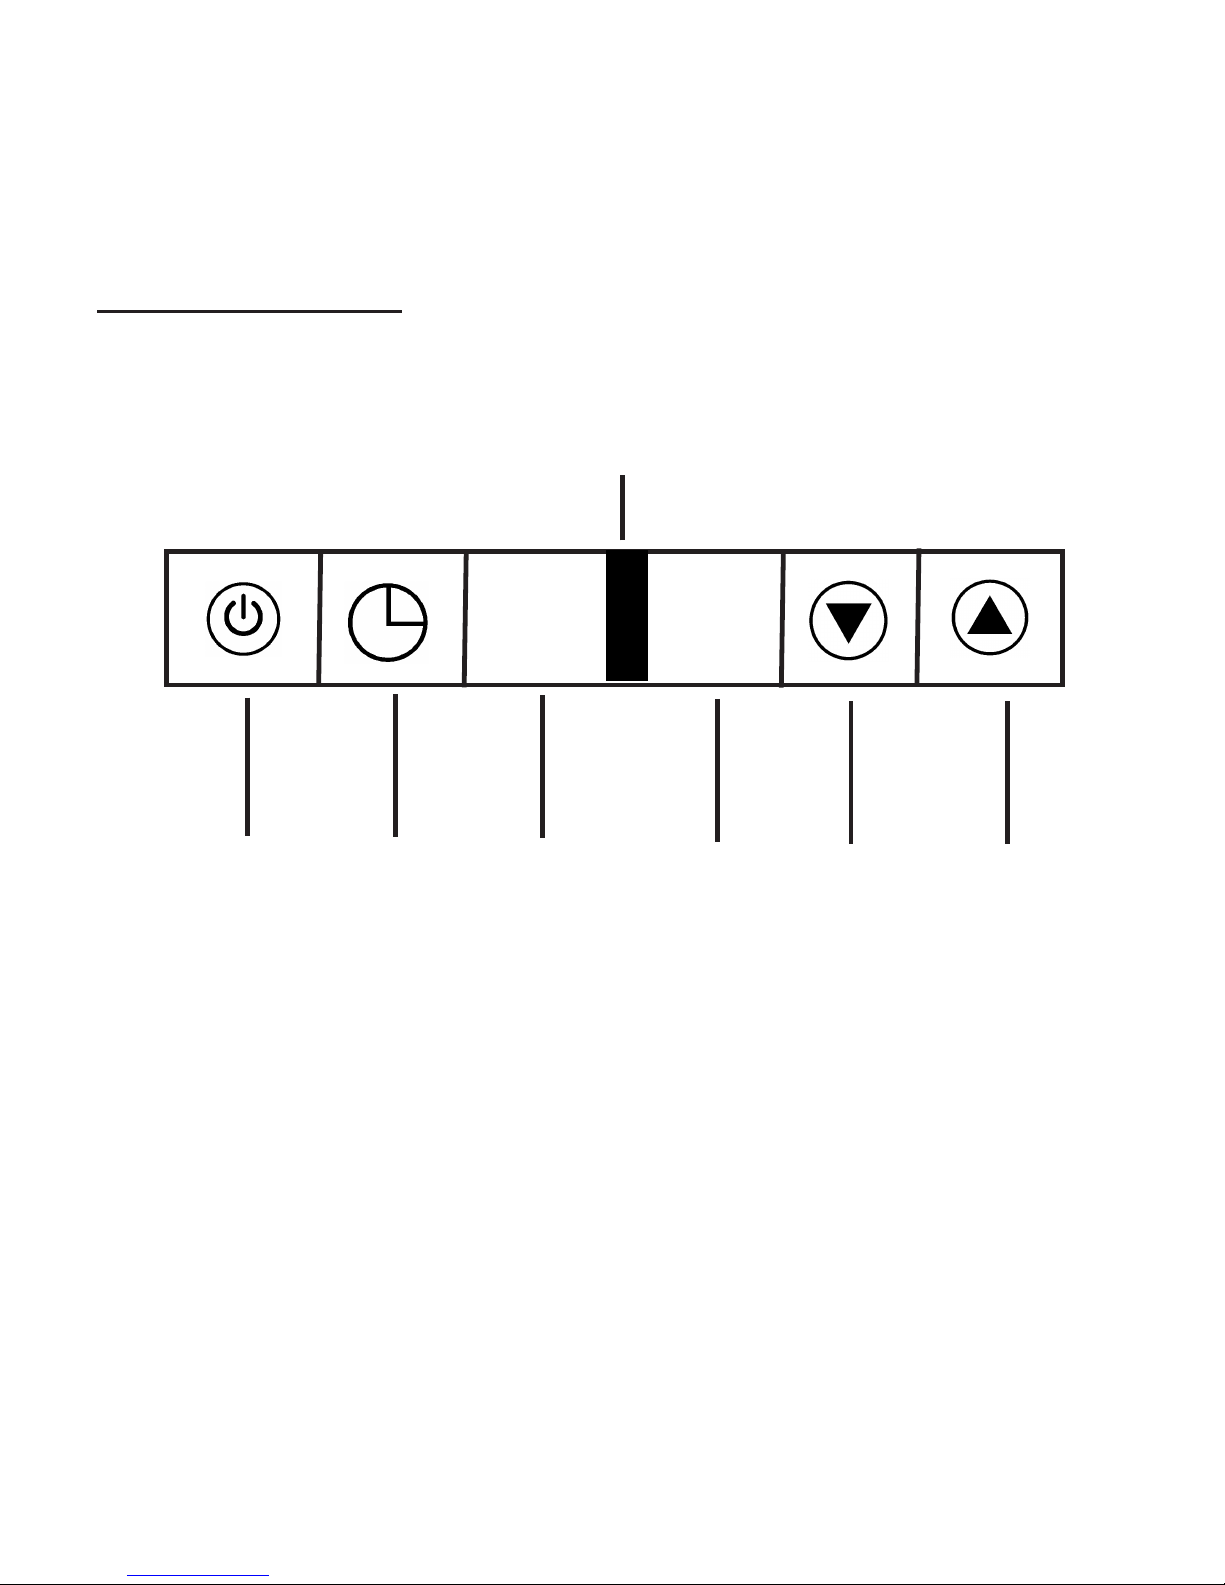
14
3. Button Layout
H A
On/Off
Button
Clock
Button
H
Button
A
Button
Down
Button
Up
Button
Infrared Receiver
Page 16

Temperature Display
Room Temp = Current room temperature
Floor Temp = Current floor temperature (Displayed in Mode 0)
SET = Displayed when you are adjusting the temperature setting.
Setting the Clock (PRT model Only)
To set the clock within the PRT, follow the steps below.
• With the thermostat turned on, press twice
• You are now able to set the minutes using the up/down keys
• Press H to accept
• You are now able to set the hours using the up/down keys
• Press H to accept
• You are now able to set the day of the week using the up/down
keys
• Press A to store and exit
The clock is now set. The PRT has a battery which maintains the
clock on a power failure. All program settings are retained in flash
memory for 10 years.
15
Page 17

Temperature Override
Using the Up/Down arrow keys you can adjust the current set
temperature. On the screen, you will see SET and the new
temperature displayed.
This temperature will be maintained until the next programmed
comfort level. Press A to accept and exit.
Frost Mode
By pressing the “H” button, the thermostat will switch into frost
protection mode. You will see on screen.
The frost protection temperature will now be maintained. To cancel
press H. To change the frost temperature setting, see page 10.
16
Page 18

Setting the Comfort Levels (PRT Model Only)
The PRT has 4 comfort levels for the weekday and 4 for the
weekend. This method of control is not to have on/off times but to
allow the occupant to set varying temperatures throughout the day.
For example;
08.00 - 21°C (Wake) 09.30 - 16°C (Go to work)
16.30 - 22°C (Return home) 23.00 - 17°C (Sleep)
If you only want to use 2 levels, you should program the unused
levels to --.--
You are now able to program the first comfort level for the weekday.
Follow these steps;
17
Page 19

18
• To begin programming the comfort levels, press clock once.
You will see Mo - Fr displayed.
• Use the Up/Down arrow keys to select the time for the 1st comfort
level for the weekday.
• Press H to accept
• Enter the required temperature for the 1st comfort level.
• Repeat for comfort levels 2-4.
• You will now see Sa Su on the screen. Repeat for the comfort
levels for the weekend.
• Press A to store and exit
.
Page 20

19
Enabling Keylock
The thermostat has a keylock facility. To enable this press the “A”
and “Down” arrow key for 10 seconds.
When the keylock function has been activated, you will see
on screen.
To cancel, repeat the steps above.
Page 21
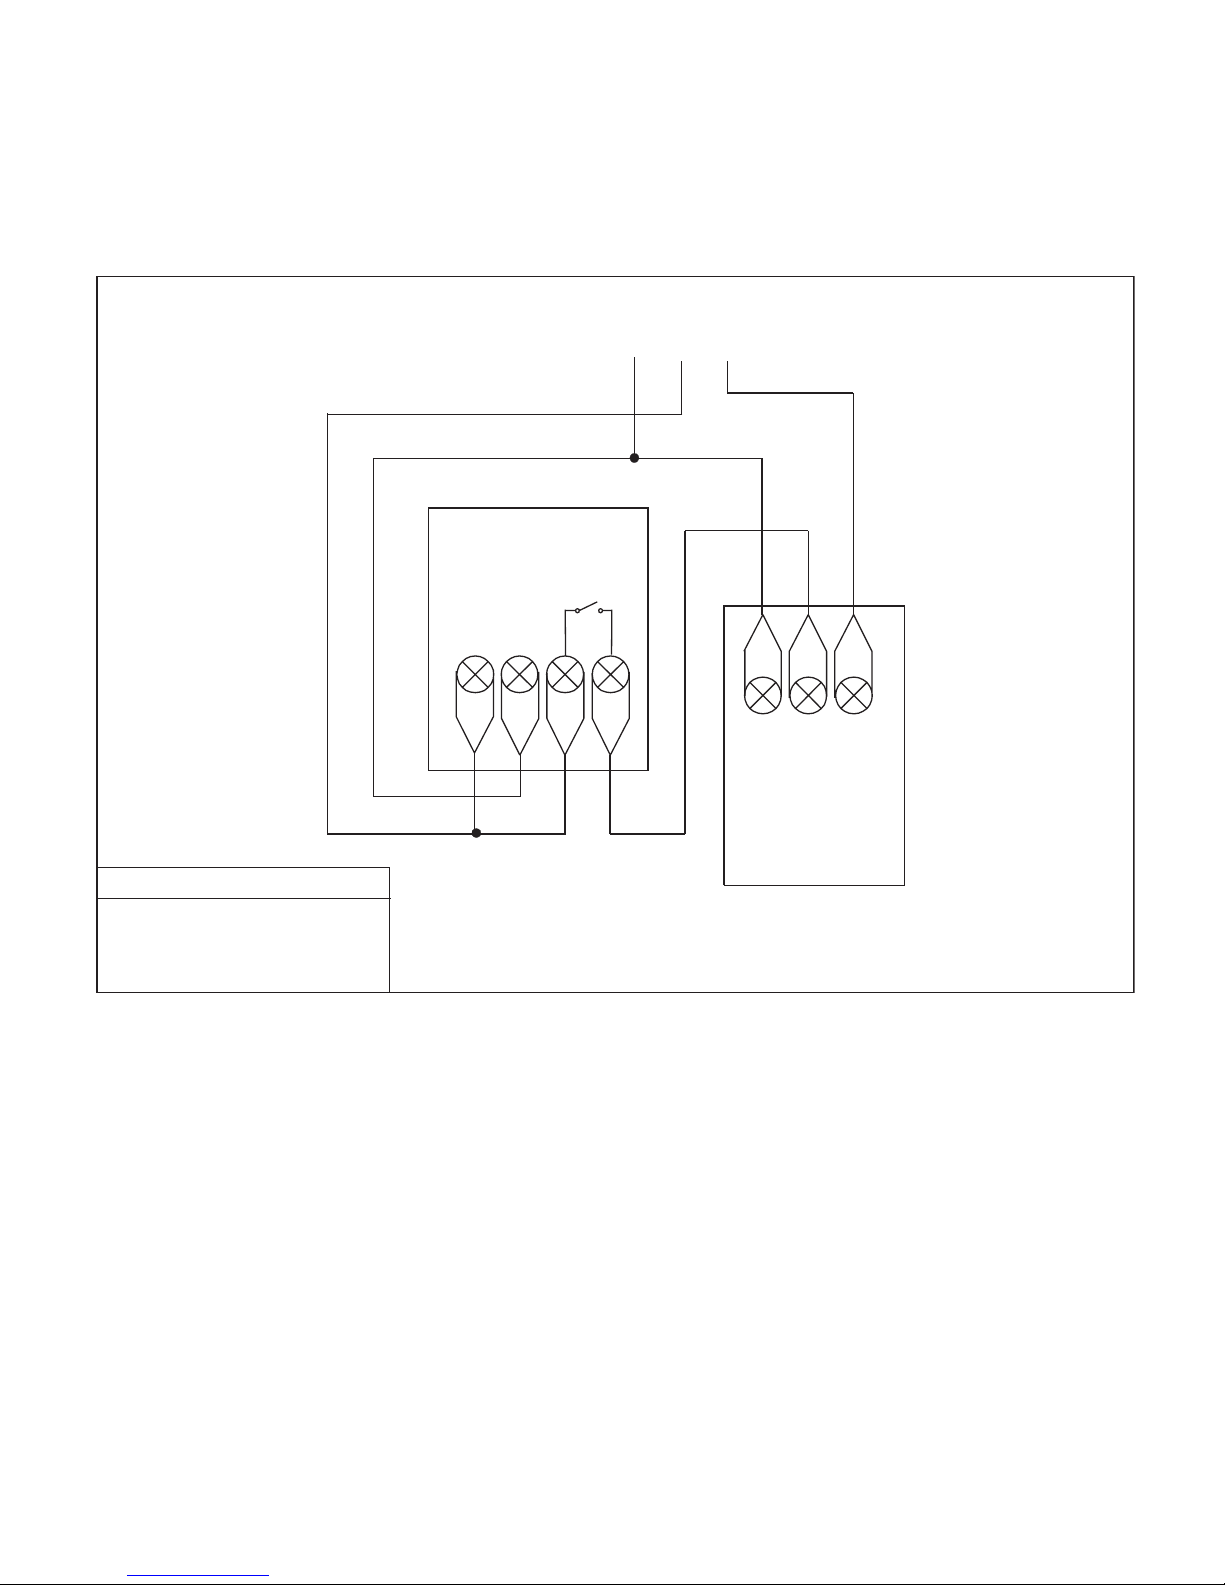
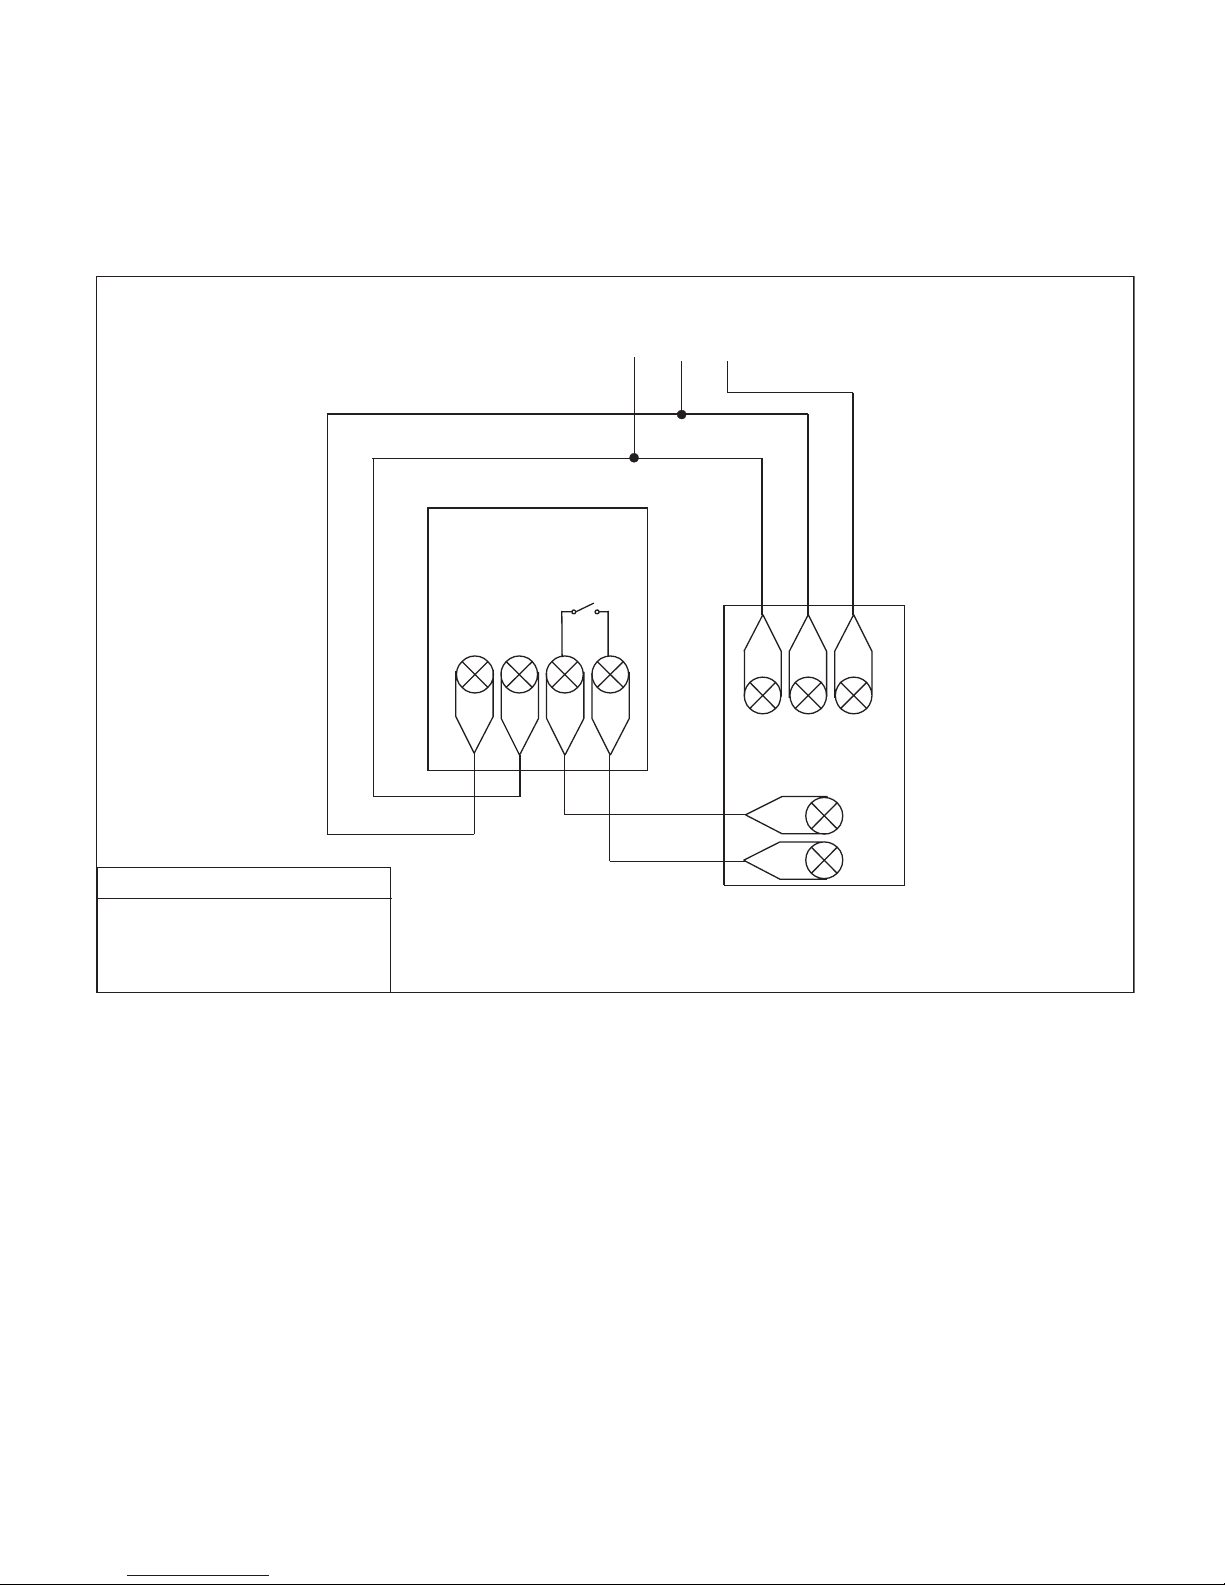
20
L
NA1
A2
DT
DT 240V SWITCHING
L
N
E
BOILER
MAINS SUPPLY IN
N
L
E
RECOMMENDATIONS
MAXCABLESIZE1.5MM
BACK BOX DEPTH 35MM
MAX LOAD 3 AMPS
Page 22
21
L
NA1
A2
DT
DT VOLTFREE SWITC HING
L
N
E
BOILER
MAINS SUPPLY IN
N
L
E
Boiler thermostat or
timeclock connections
RECOMMENDATIONS
MAX CABLE SIZE 1.5MM
BACK BOX DEPTH 35MM
MAX LOAD 3 AMPS
Page 23
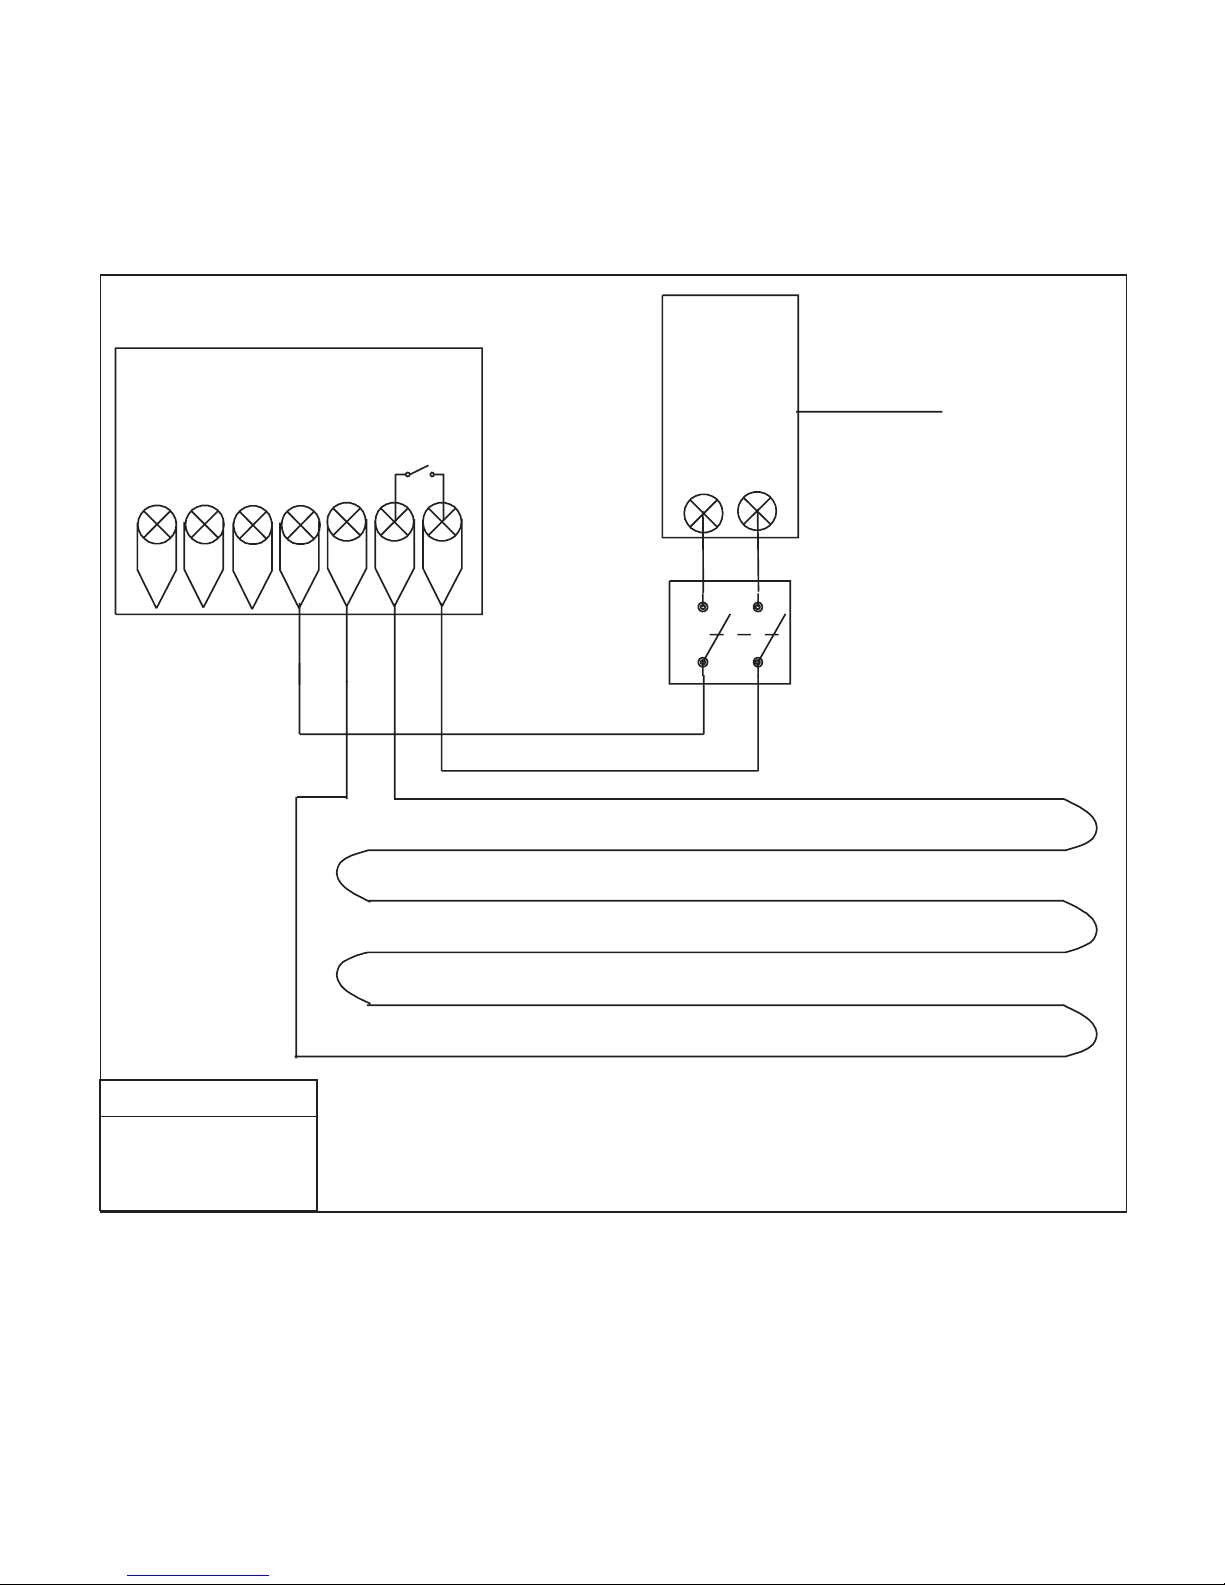
22
L
N
DT
LOAD
RT
L
N
MAINS SUPPLY
RCD
( highly recommended )
RT
-
N
1
MATTING
FUSED
SPUR
MAX CABLE SIZE 1.5 mm2
MAX LOAD 13 AMPS
BACK BOX DEPTH 35MM
RECOMENDATIONS
DT HIGH POWER
Page 24
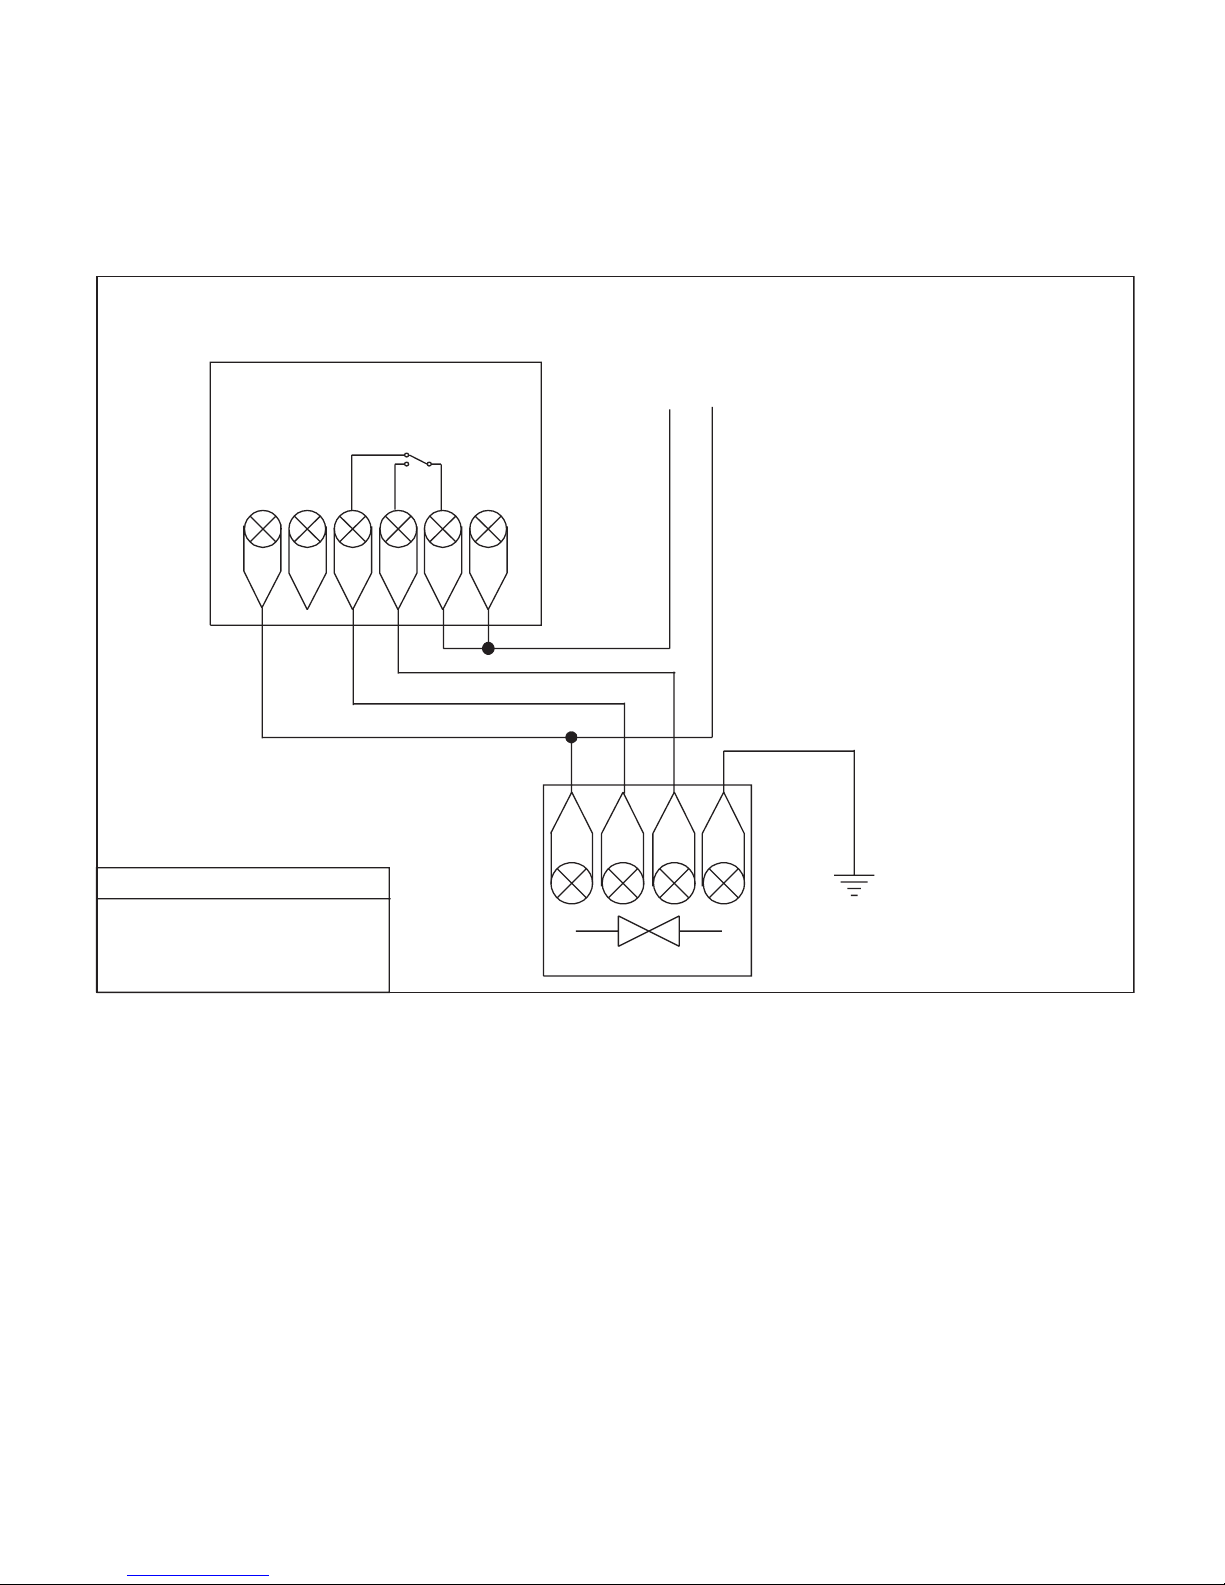
23
L
NNC
NO
DT
DT 240V CHANGEOVER SWITCHING
N
VALVE
RECOMMENDATIONS
MAXCABLESIZE1.5MM
BACK BOX DEPTH 35MM
MAX LOAD 3 AMPS
COM
E
OPEN
CLOSE
L
N
MAINS SUPPLY IN
Page 25
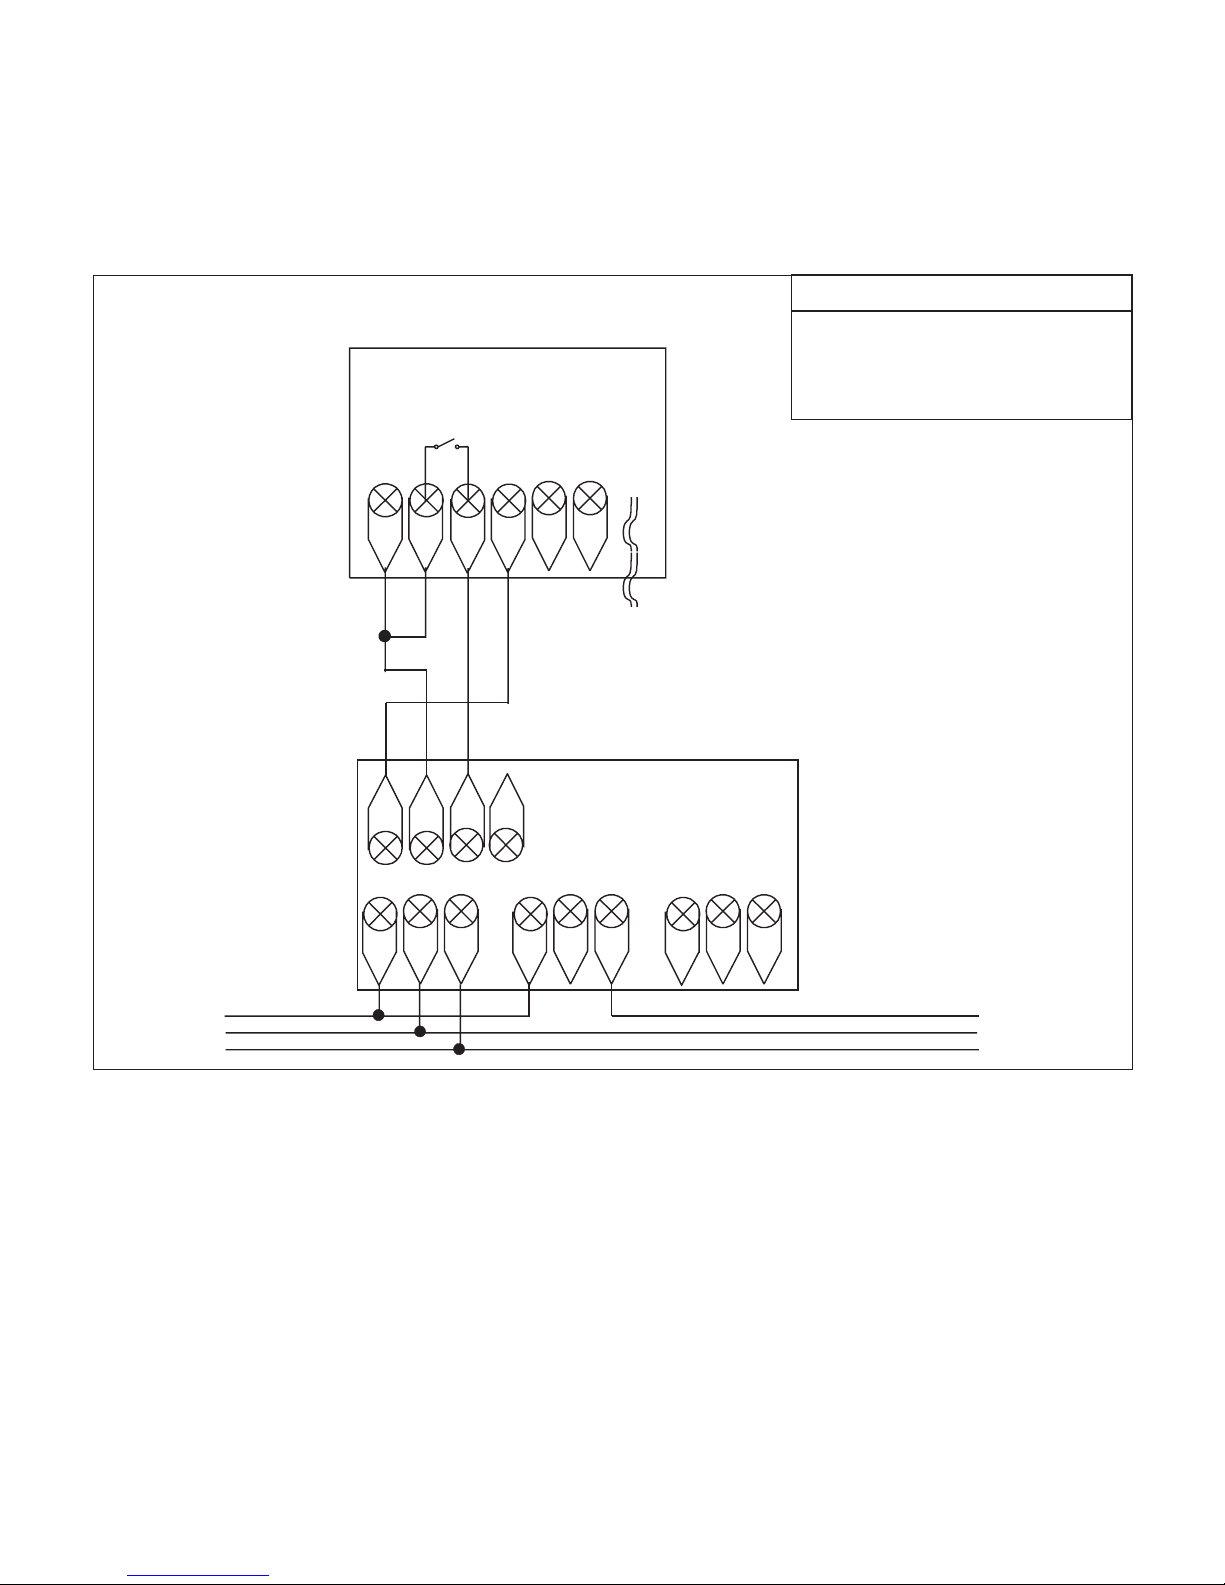
24
+
A1
A2
-
RT1
RT2
YB
COMMS
CABLE
DT - N 240V SWITCHING
12v
-
+A2B2
LE
N
C
NC NO C NC NO
POWERED RELAY CARD
MAINS IN
TO BOILER
RECOMMENDATIONS
MAX CABLE SIZE 1.5MM
BACK BOX DEPTH 35MM
MAX LOAD 3 AMPS
L
E
N
Page 26
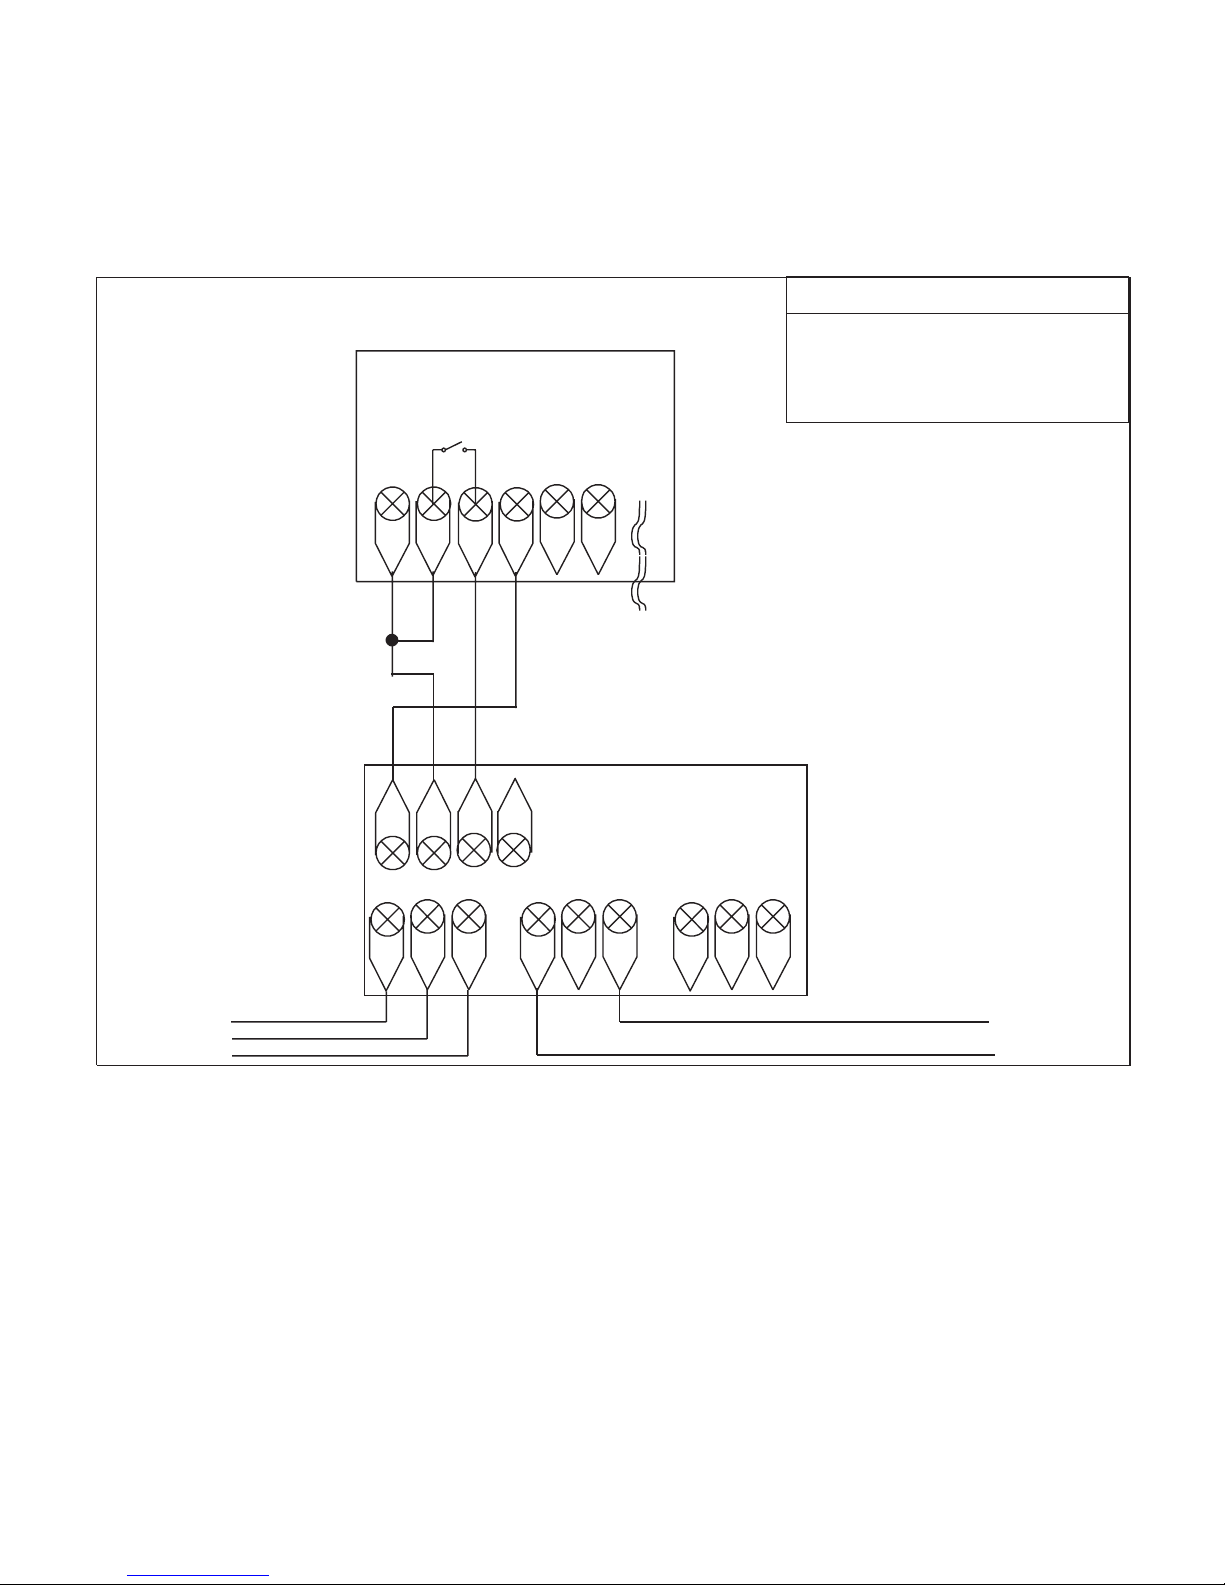
25
+
A1
A2
-
RT1
RT2
YB
COMMS
CABLE
DT - N VOLTFREE SWITCHING
12v
-
+A2B2
LE
N
C
NC NO C NC NO
POWERED RELAY CARD
MAINS IN
TO BOILER THERMOSTAT CONNECTIONS
RECOMMENDATIONS
MAX CABLE SIZE 1.5MM
BACK BOX DEPTH 35MM
MAX LOAD 3 AMPS
Page 27
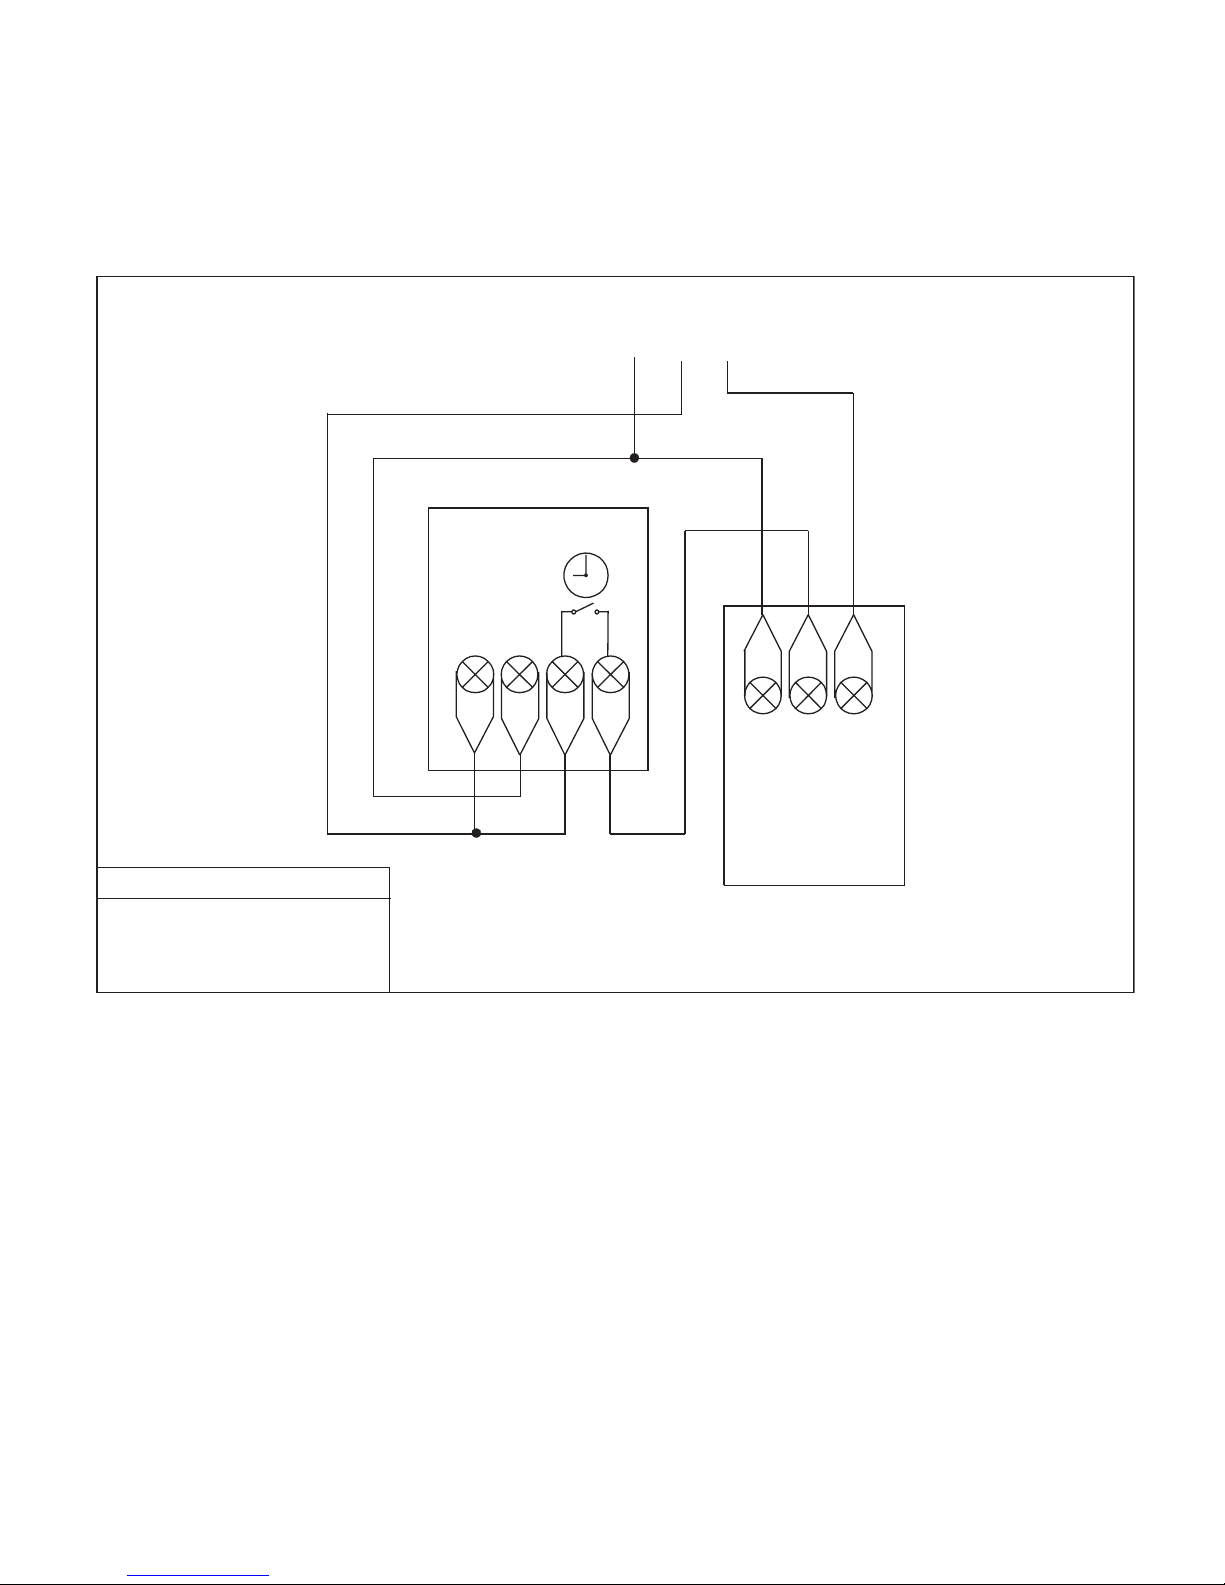
26
L
NA1
A2
PRT
PRT 240V SWITCH IN G
L
N
E
BOILER
MAINS SUPPLY IN
N
L
E
RECOMMENDATIONS
MAXCABLESIZE1.5MM
BACK BOX DEPTH 35MM
MAX LOAD 3 AMPS
Page 28
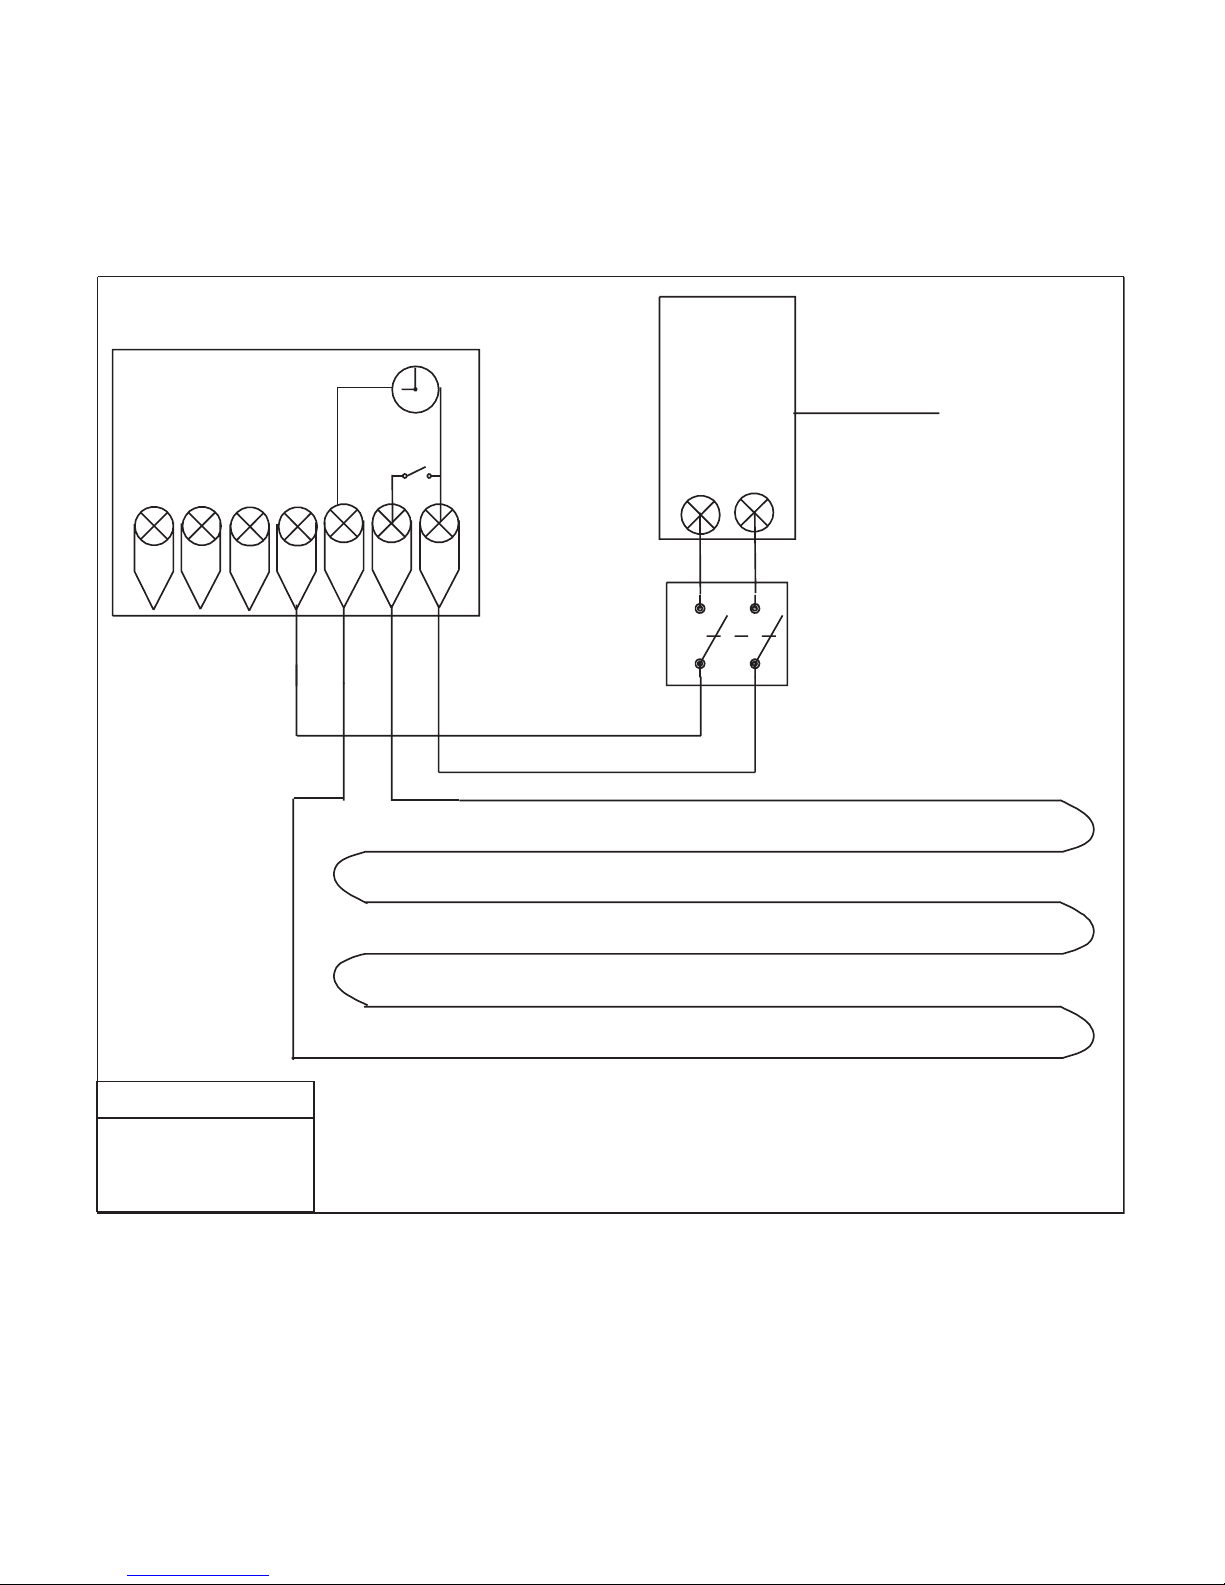
27
L
N
PRT
LOAD
RT
L
N
MAINS SUPPLY
RCD
( highly recommended )
RT
-
N
1
MATTING
FUSED
SPUR
MAX CABLE SIZE 1.5 mm2
MAX LOAD 13 AMPS
BACK BOX DEPTH 35MM
RECOMENDATIONS
PRT HIGH POWER
Page 29
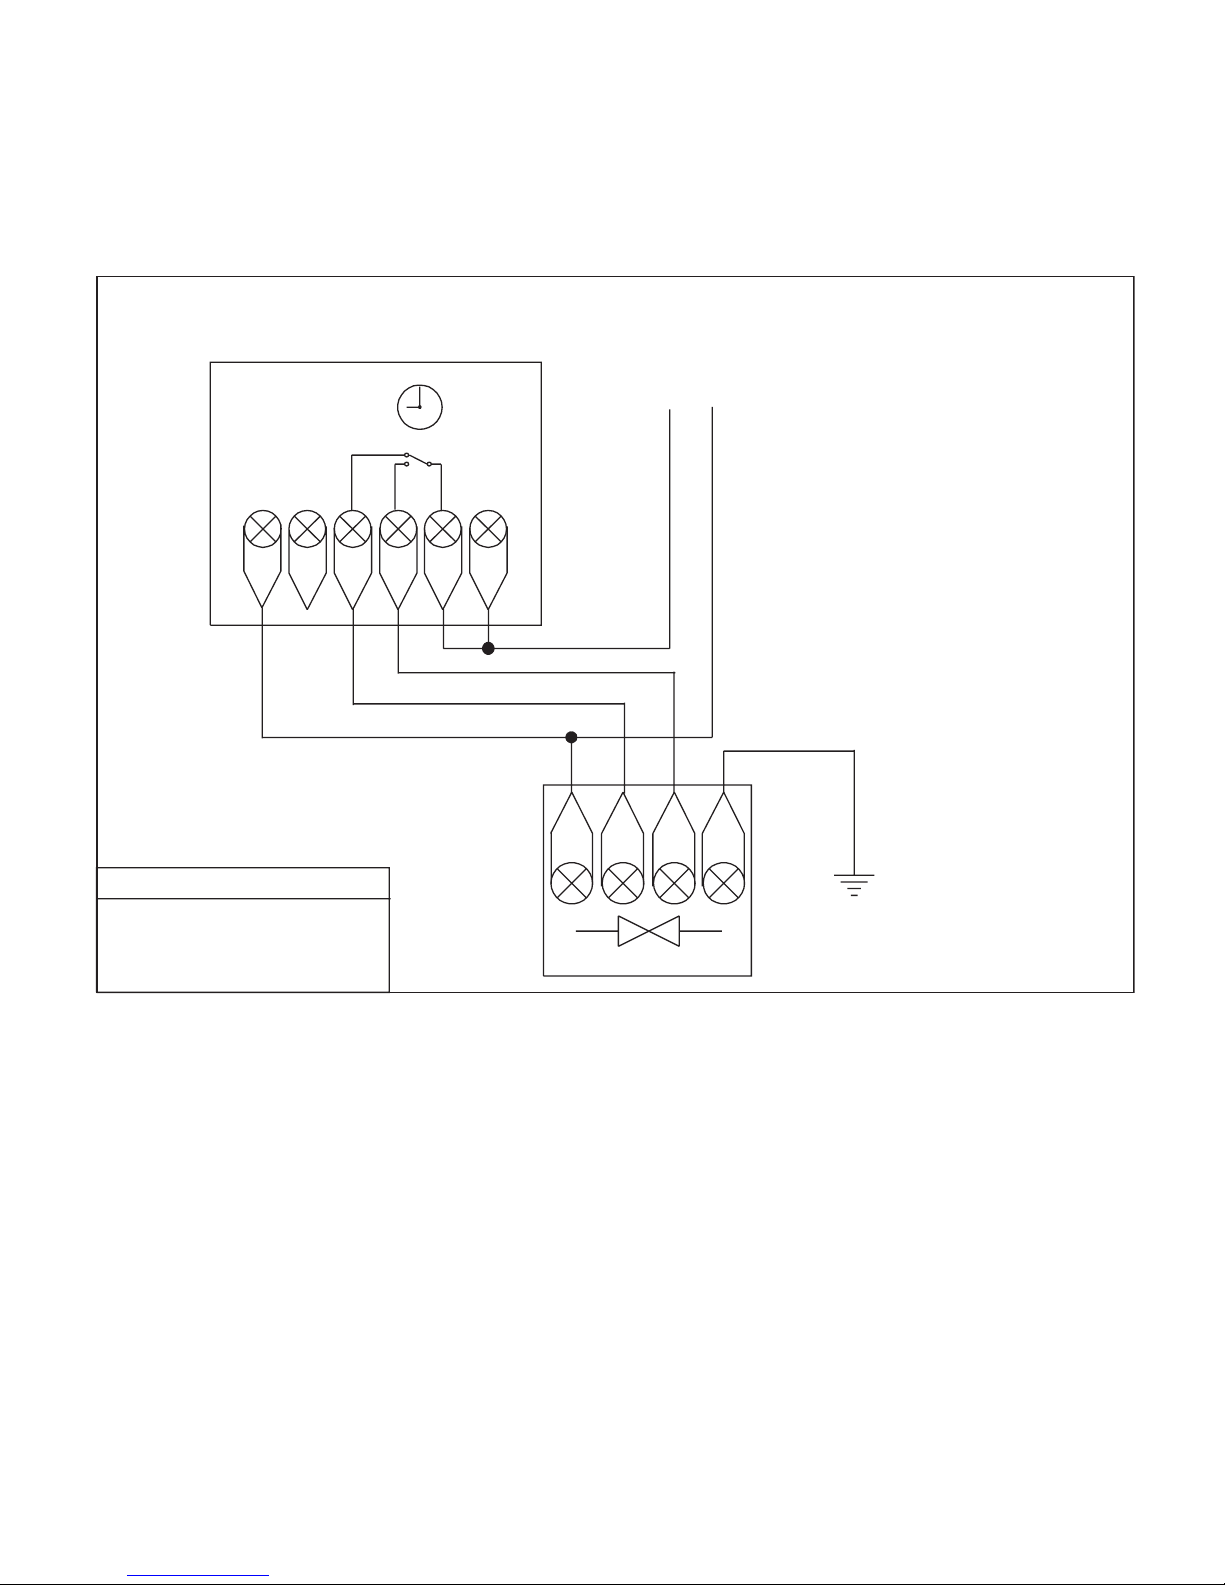
28
L
NNC
NO
PRT
PRT 240V CHANGEOVER SWITCHIN G
N
VALVE
RECOMMENDATIONS
MAXCABLESIZE1.5MM
BACK BOX DEPTH 35MM
MAX LOAD 3 AMPS
COM
E
OPEN
CLOSE
L
N
MAINS SUPPLY IN
Page 30
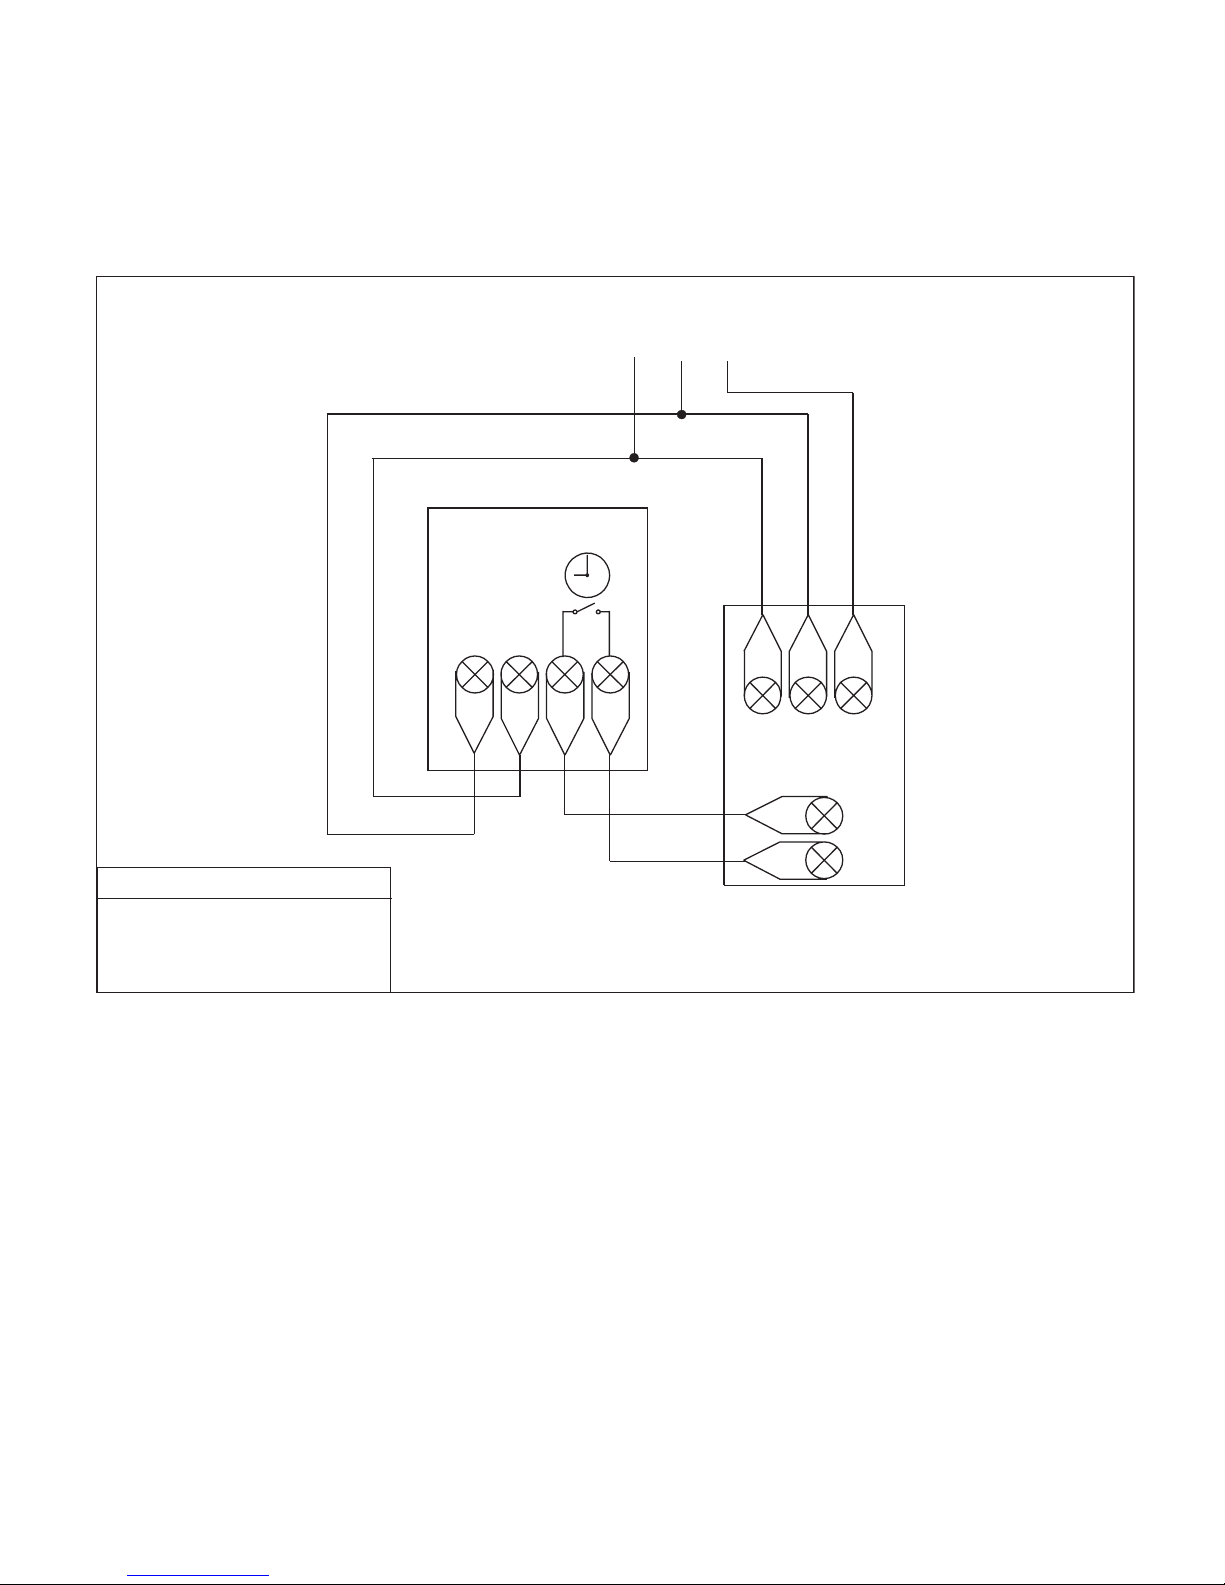
29
L
NA1
A2
PRT
PRT VOLTFREE SWITCHING
L
N
E
BOILER
MAINS SUPPLY IN
N
L
E
Boiler thermostat or
timeclock connections
RECOMMENDATIONS
MAX CABLE SIZE 1.5MM
BACK BOX DEPTH 35MM
MAX LOAD 3 AMPS
Page 31
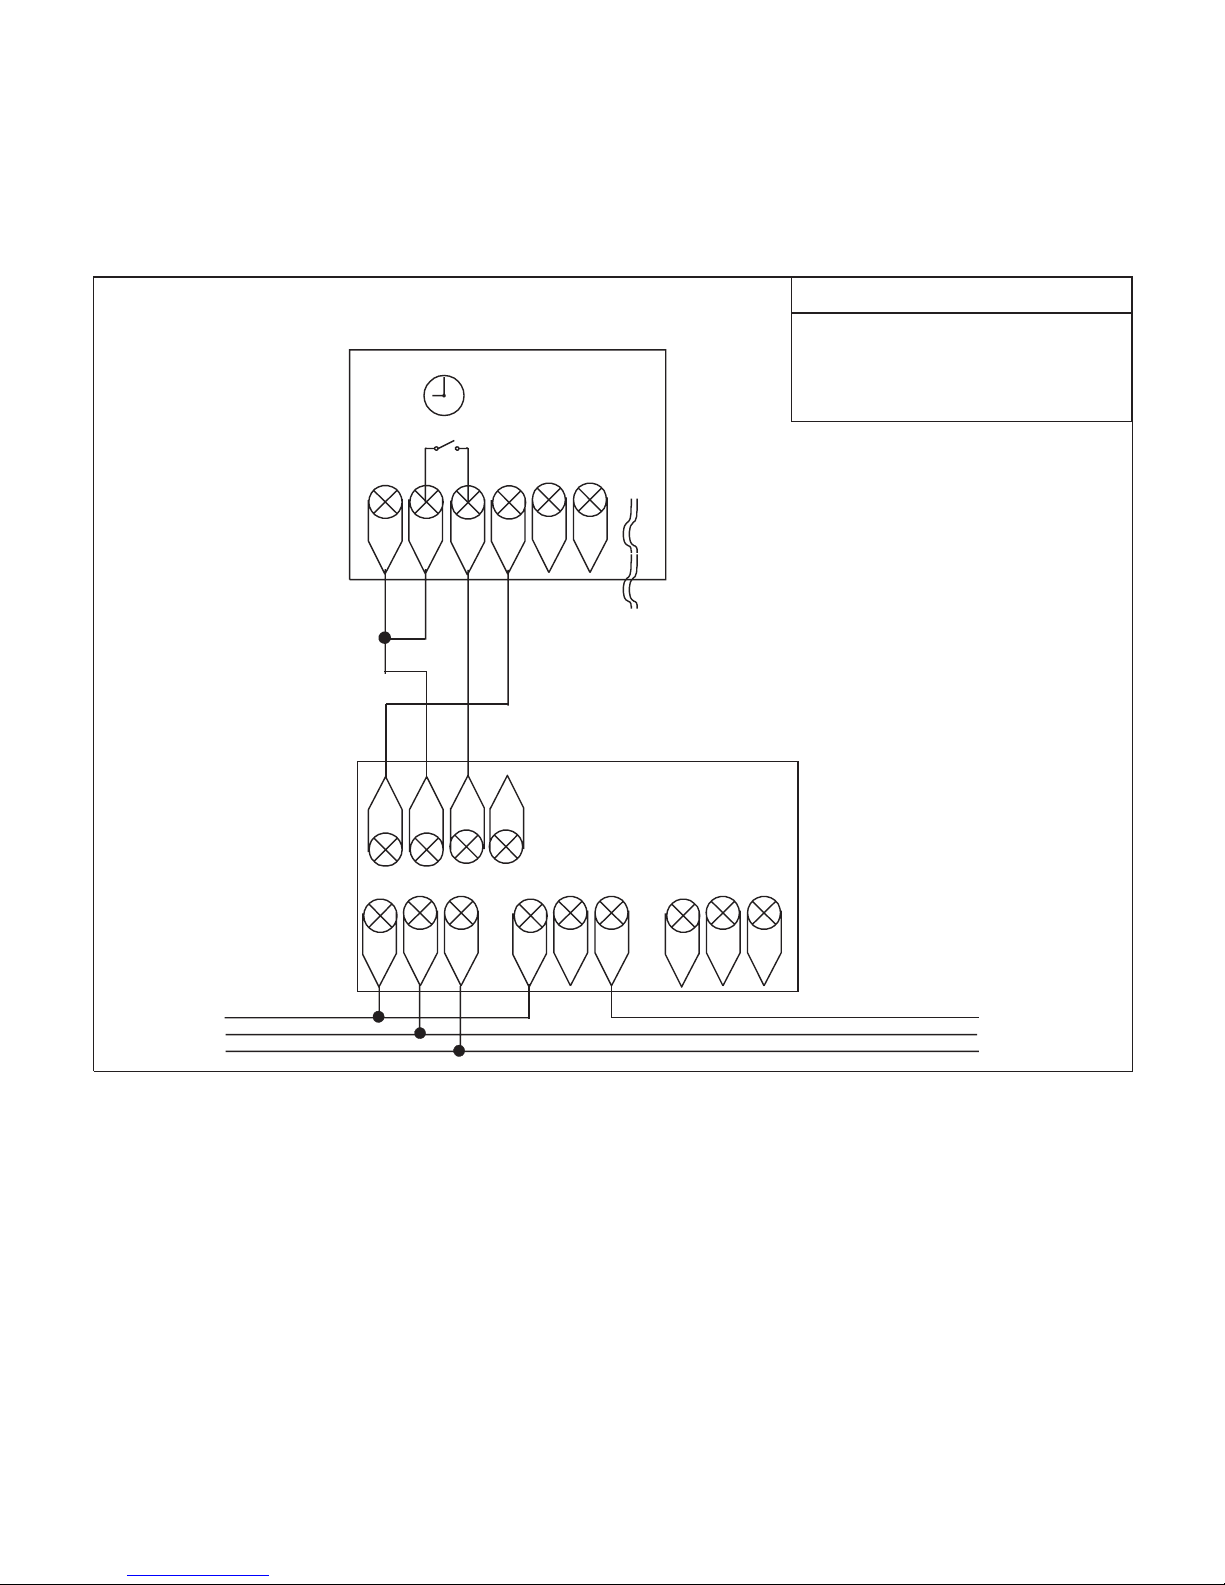
30
+
A1
A2
-
RT1
RT2
YB
COMMS
CABLE
PRT-N 240V SWITCHING
12v
-
+A2B2
LE
N
C
NC NO C NC NO
POWERED RELAY CARD
MAINS IN
TO BOILER
RECOMMENDATIONS
MAX CABLE SIZE 1.5MM
BACK BOX DEPTH 35MM
MAX LOAD 3 AMPS
L
E
N
Page 32
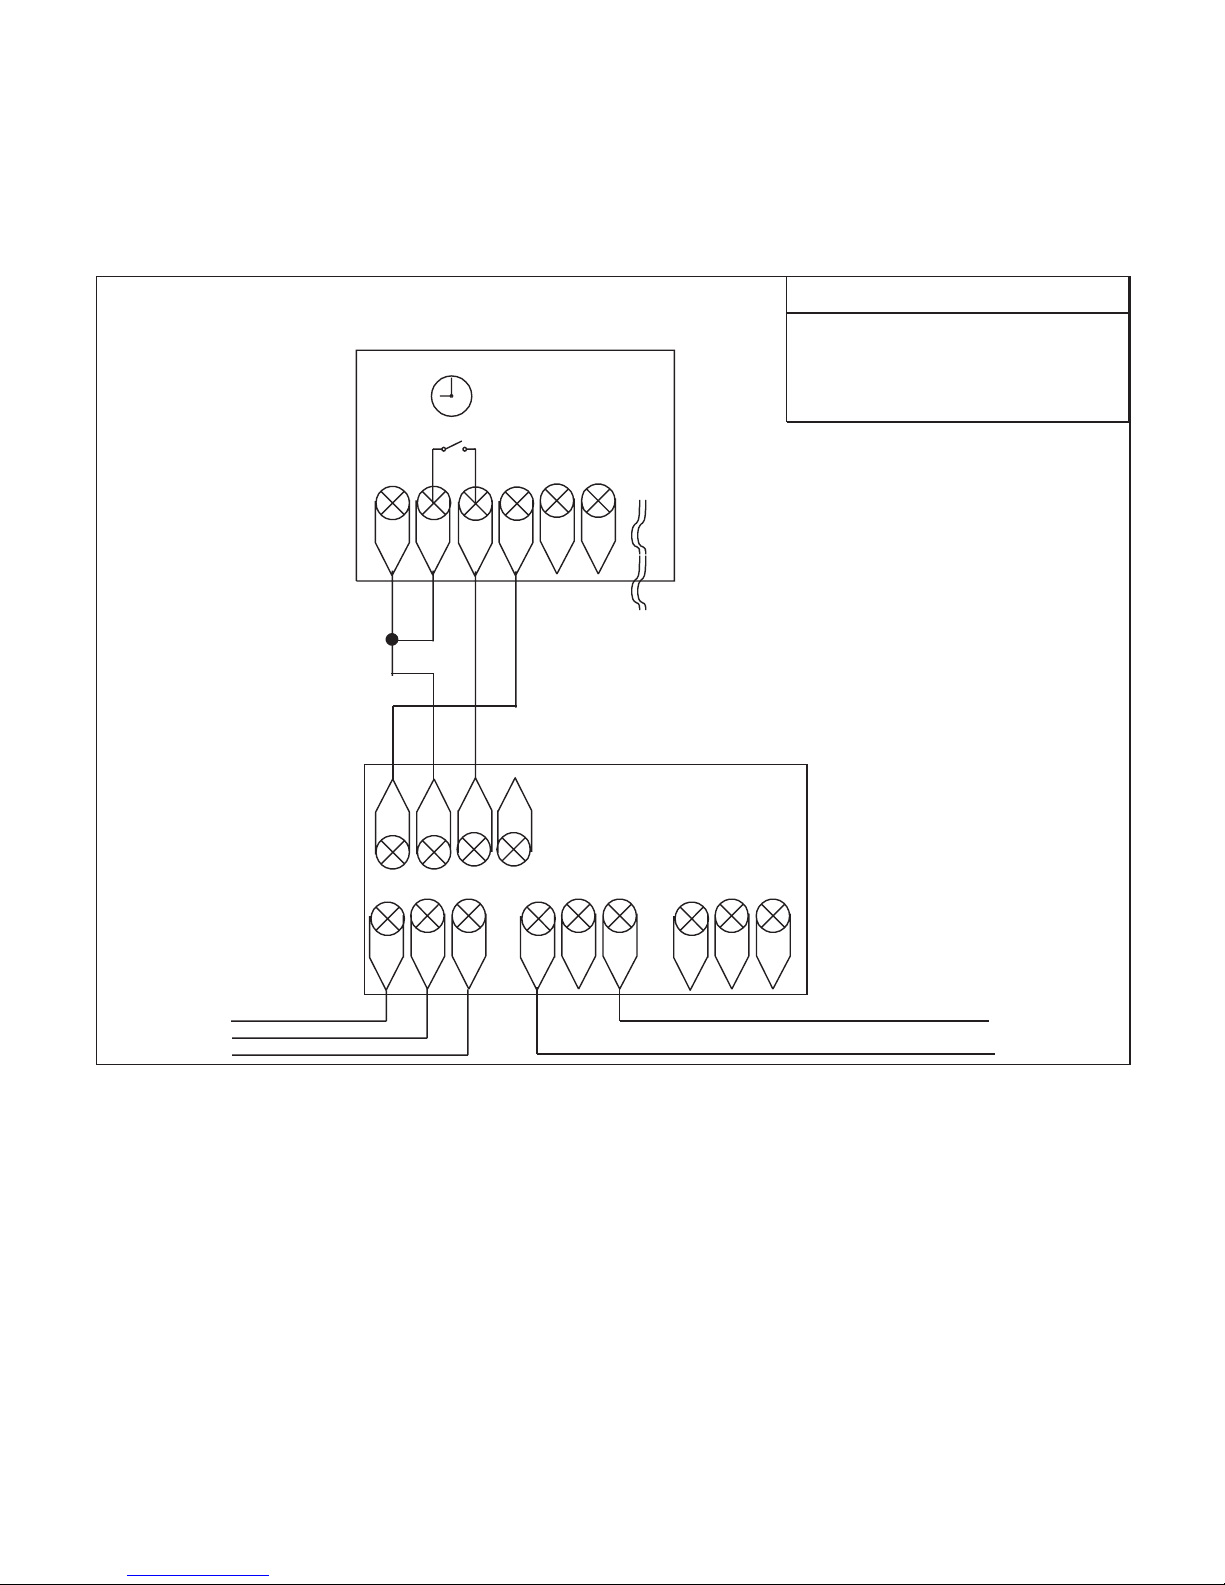
31
+
A1
A2
-
RT1
RT2
YB
COMMS
CABLE
PRT-N VOLTFREE SWITCHING
12v
-
+A2B2
LE
N
C
NC NO C NC NO
POWERED RELAY CARD
MAINS IN
TO BOILER THERMOSTAT CONNECTIONS
RECOMMENDATIONS
MAX CABLE SIZE 1.5MM
BACK BOX DEPTH 35MM
MAX LOAD 3 AMPS
Page 33

Support Tel: 0870 8032 372
Revision 2 01/12
Ref. DT1
Certification mark
 Loading...