

Page 1
Operating
Instructions
DT, PRT, PRT/HW
PRT-R, PRT-R2
Heatmiser UK Ltd Tel: +44(0)1254 776343
Primrose House www.heatmiser.co.uk
Primrose Street
Darwen
Lancashire
BB3 2DE
Page 2
Contents
1.Installation
1. The thermostat is flush mount, a back box of
35mm should have been sunk in the wall prior to
installation.
2. The thermostat should be mounted at around
6ft or eye level.
3. Do not install near a direct heat source.
Step 1
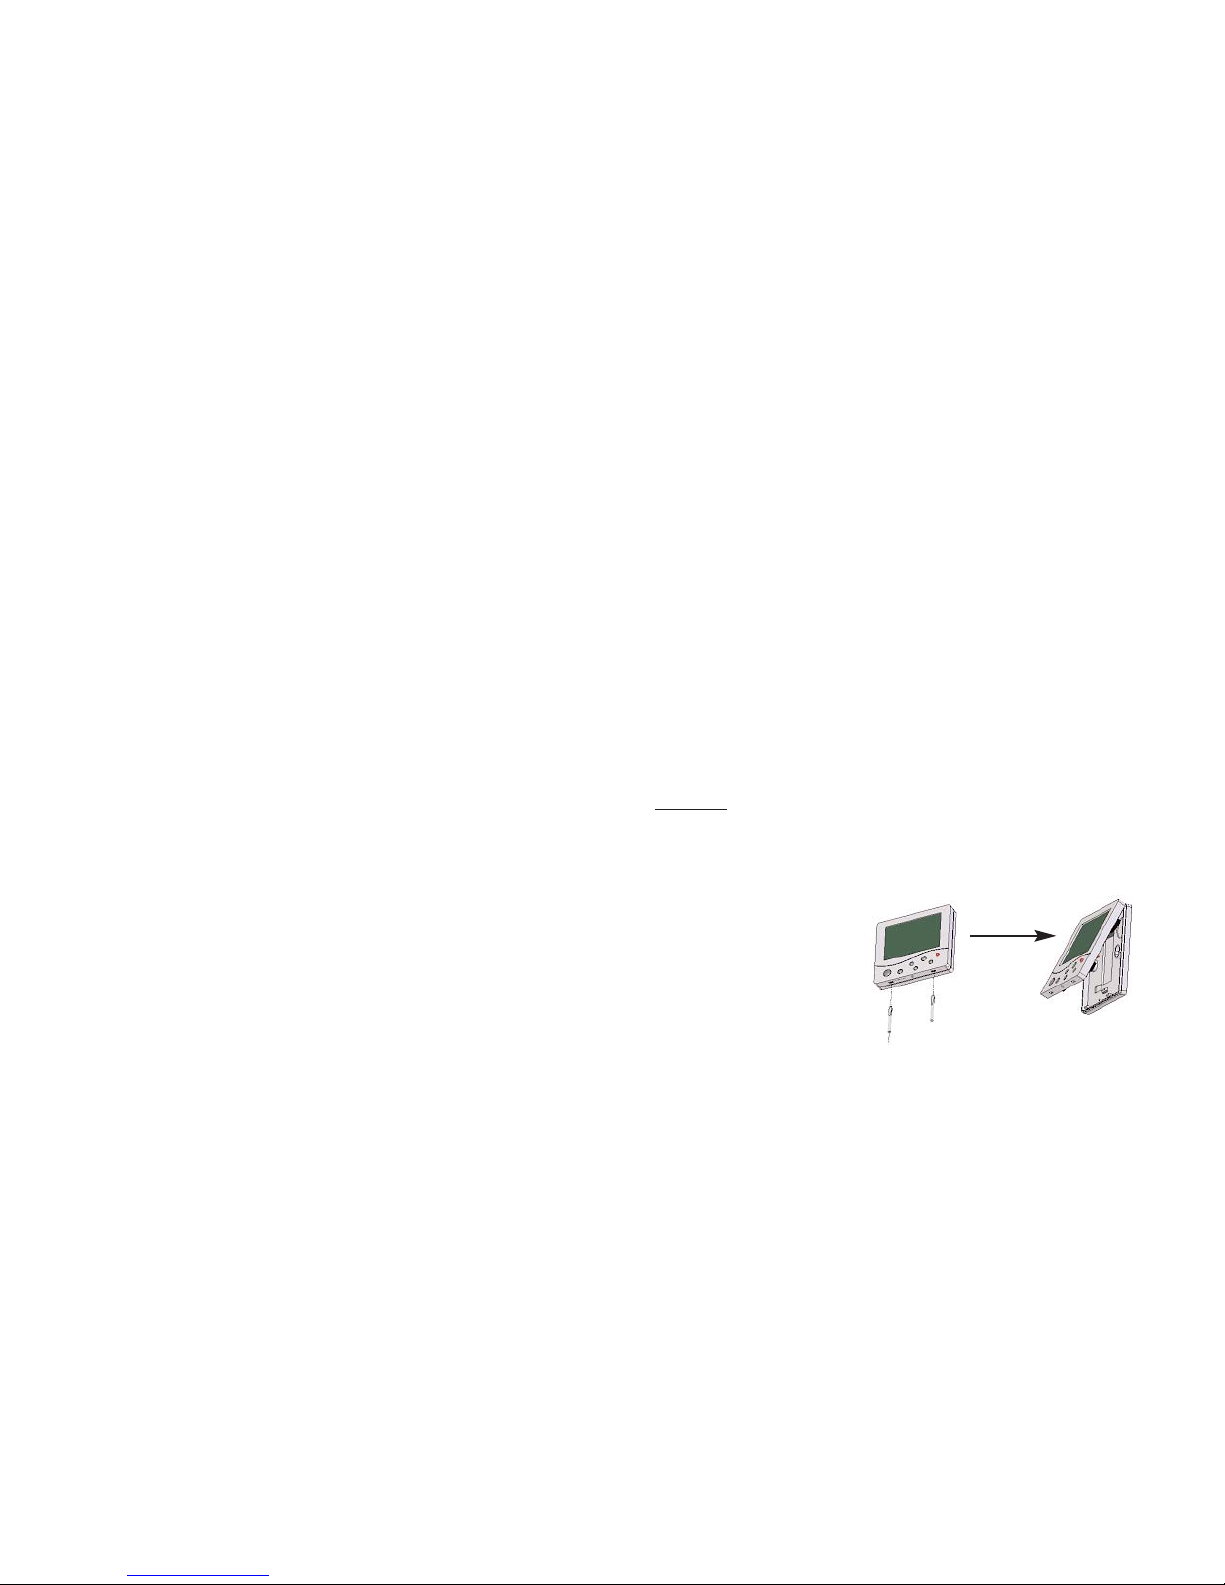
Carefully separate the front half of the thermostat
from the back plate by placing a small flat head
terminal driver in to the slots on the bottom face
of the thermostat.
Contents 1
Installation 2-4
Terminology 5-7
Frost protection (Stat off) 8
Temperature calibration 8
Setting the clock 9
Manual heating override 10
Floor limit setting 10
Programming comfort levels 11-12
Programming hot water levels 12
Hot water override 13
Wiring
DT Wiring Diagrams 14-16
PRT Wiring Diagrams 15-20
PRT/HW Wiring Diagrams 21-22
PRT-R Wiring Diagrams 23
PRT-R2 Wiring Diagrams 24
1
2
Page 3
Step 2
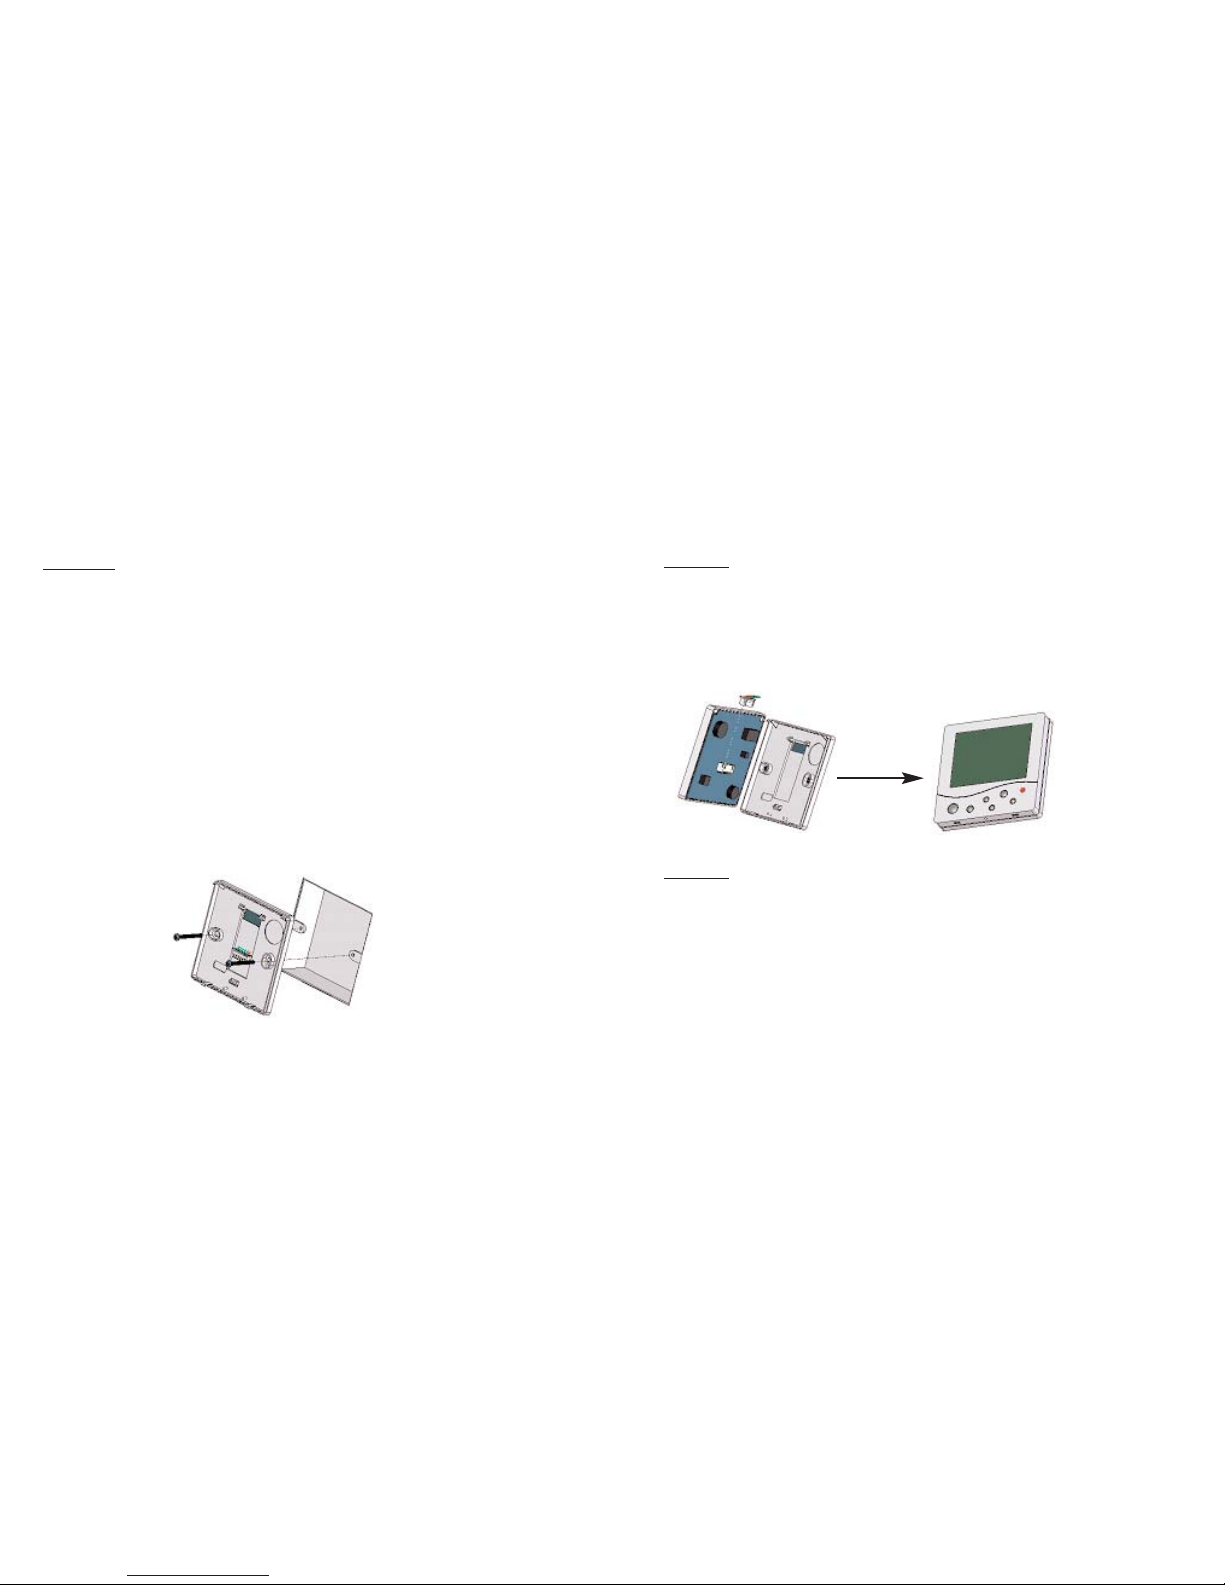
Carefully unplug the ribbon connector which is
plugged in to the front half of the thermostat.
Place the thermostat front half somewhere safe.
Terminate the thermostat as shown in the
diagrams at the back of this booklet.
Screw the thermostat back plate on to the back
box.
Step 3
Re-connect the thermostat ribbon cable and clip
the two halves together.
Step 4
Turn on the power to the thermostat and allow
the thermostat to stabilise for 1 hour before
calibrating.
3
4
Page 4

2.Terminology
Set Temperature
This is the temperature the thermostat is currently
controlling to. At any time, you can press the
Up/Down arrow key and the display will show the
Set Temperature for 30 seconds.
R
T (Room Temperature)
This is the actual room temperature.
Fr
ost Protection ( By pressing “H”)
To protect the fabric of the building, the
thermostat has a “frost protection” facility. Should
the temperature drop below this temperature the
heating will be switched on. On certain models
the frost protection temperature is adjustable.
Temperature Calibrating
When the thermostat is first installed it requires
calibrating. This means taking an accurate
reading from a thermometer and then adjusting
the thermostat to compensate for any difference.
This only needs to be done once and it is
recommended that it is done after the thermostat
has been operating for 1 hour.
Clock
The programmable models in the range have a
built in clock. This is displayed in 24 hr format.
Fr
ost Protection (Thermostat Off)
The thermostat can be made to offer frost
protection even when the thermostat is turned off
by the On/Off button. In order for this to work, this
function must be enabled.
6
5
Page 5

3.Frost Pr
otection (Thermostat Off)
To enable this operation for the steps below.
Turn the thermostat off by pressing
Press for 3 seconds.
Select 01 to enable
Select 00 to disable
The thermostat will maintain the frost protection
temperature during this mode.
4.Temperature Calibration
When you first install the thermostat, you must
calibrate it.
Turn off the thermostat by pressing
Press and H for 3 seconds.
Comfort Levels
The programmable thermostats have 4 comfort
levels per weekday/weekend.
The new method of control is not to have on / off
times but to allow the occupant to set varying
temperature levels throughout the day.
For example;
08.00 - 21 (Wake) 09.30 - 16 (Go to Work)
16.30 - 22 (Return home) 23.00 - 17 (Sleep)
As the programmable thermostats incorporate a
5/2 day clock, 4 levels can be programmed for
the weekday and 4 different levels can be
programmed for the weekend.
7
8
Page 6

The display will show the actual temperature.
Use the Up/Down arrow keys to adjust the
temperature to the correct value.
Press to turn off the thermostat and to store the
new setting.
5. Setting the Clock (All models, except DT)
With the thermostat turned on, press twice
will be displayed.
Use the Up/Down arrow keys to set the minutes
Press H to accept the minutes
Use the Up/Down arrow keys to set the hours
Press H to accept the hours
Use the Up/Down arrow keys to set the week day.
To store the new setting, press A
6.Manual Heating Override (Frost Protection)
To put the thermostat in to frost protection mode,
press H. A frost protection symbol will appear on
the screen.
To cancel the frost protection mode, press H
again. The frost symbol will be removed.
7. Floor Sensor Limit (PRT-R2 Only)
The PRT-R2 allows you to program a floor limit
temperature. To enable this feature, press and
UP for 3 seconds. 00 = Disabled 01=enabled
To set the floor maximum limit, follow these steps.
With the PRT-R2 turned off
Press H and UP for 3 seconds
You are now prompted to enter the floor limit
Range = 20 - 45 °C
10
9
Page 7

Enter the first comfort level time. (eg - 07.00)
Press H to accept this time setting.
Then enter the desired temperature. (eg - 21°)
Press H to accept this temperature setting.
You should now repeat this operation for comfort
levels 2,3,4. program these in the same way. You
will notice that whilst programming the weekend
levels, Sa, Su is highlighted on the display.
8. Setting the Comfort Levels (Except DT)
To begin programming the comfort levels, press
is displayed as well as the number 1 and
Mo, Tu, We, Th, Fr,
You are now able to program the first comfort
level for the weekday. You first program a time,
followed by the desired temperature.
As described earlier, you should think of these
temperatures as “wake, leave, return and sleep”
For any unused levels, set the time and
temperature to --.--
After you have programmed the week day
comfort levels you are prompted to program the
weekend levels.
You should program these in the same way.
9. Setting the Hot Water Timings. (Only PRT/HW)
To begin programming the HW timings, press
twice, TIMER ON is displayed as well as the number
1 and Mo, Tu, We, Th, Fr,
You are now prompted to enter the start time for
HW timing 1 (Weekday) Eg: 08.00
11
12
Page 8
Press H to accept the start time.
Enter the End time for switching time 1.
You should repeat this for the other 3 switching
times for the weekday, and again for the
weekend.
For any unused switching times, leave the times set
to --.--
HW Override
Pressing the A button changes the current state of
the HW. For example, if the HW is currently timed
to be off pressing A will turn on the hot water.
TIMER ON will flash to indicate the hot water has
been overridden and it will remain in this state until
the A button is pressed again.
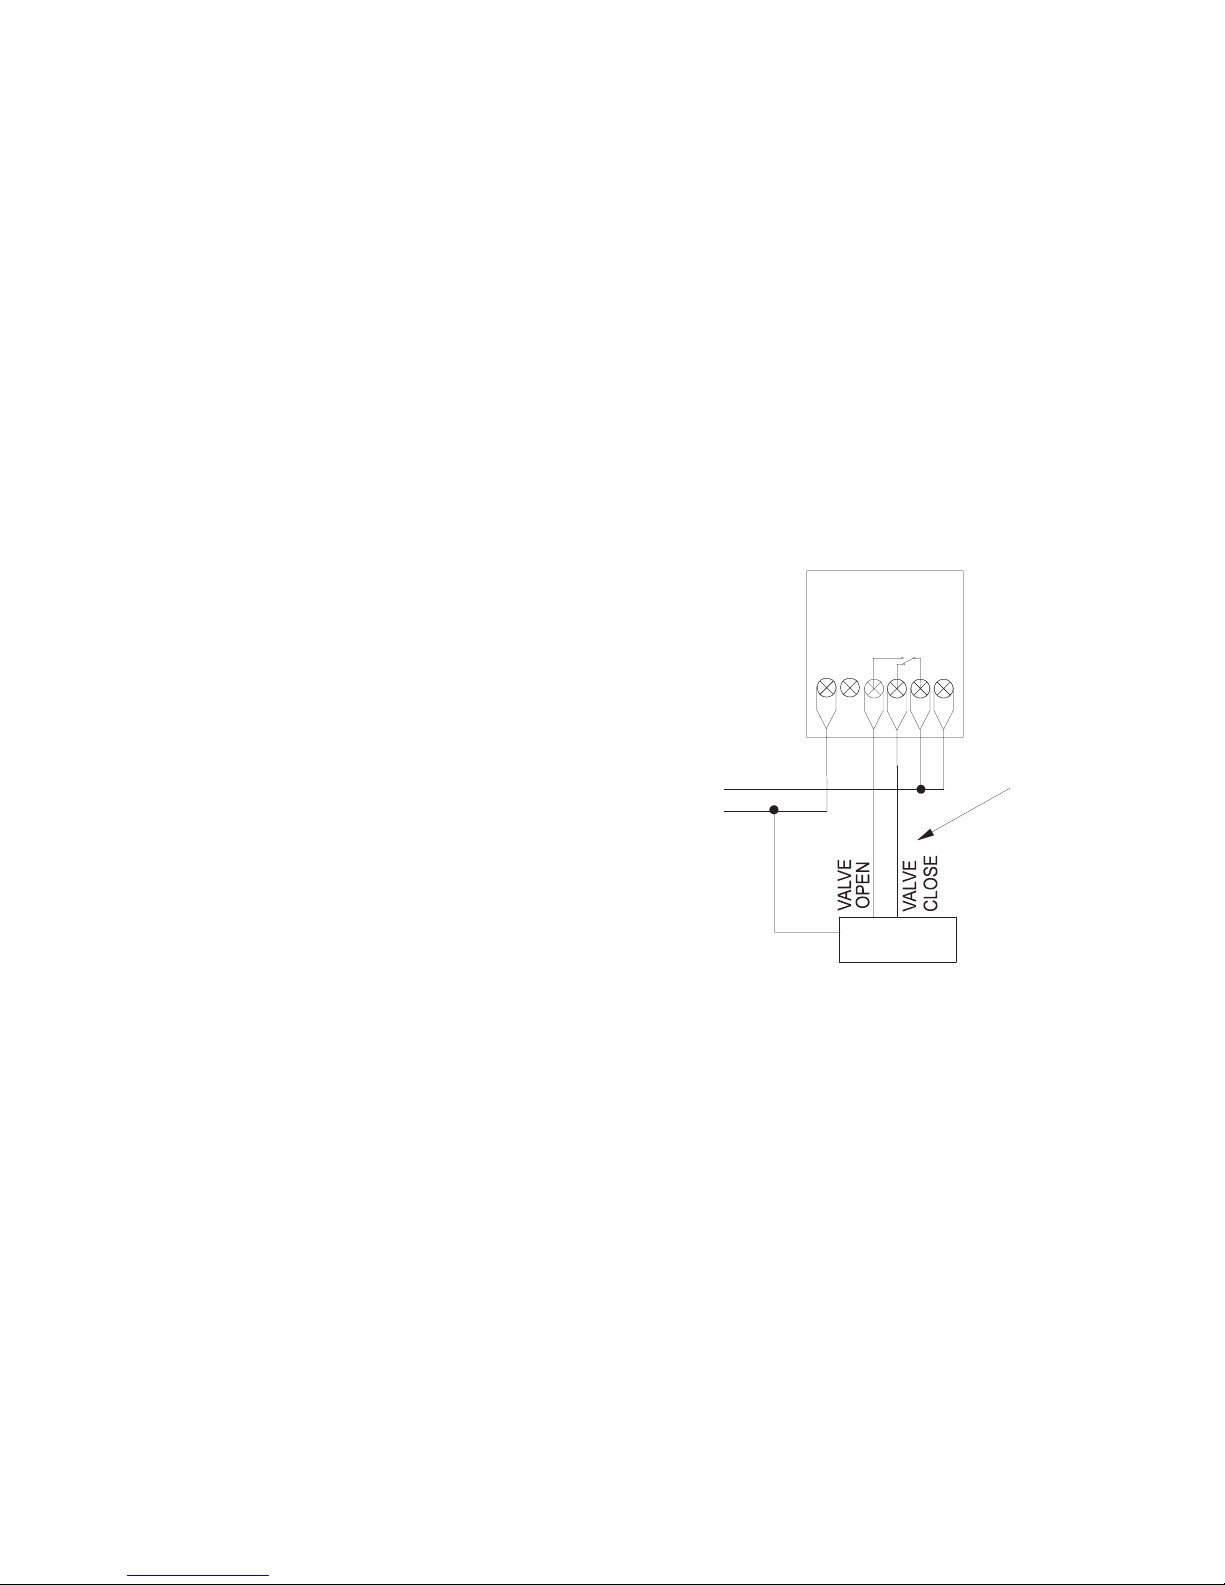
NC
L
N
COM
NO
DT
FUSE AT 3 AMPS
STANDARD
CHANGE OVER
L
N
VAL VE
NEUTRAL
OMIT THIS CONNECTION
FOR SPRING RETURN
VALV ES
Set-point range: 5-35 °C (Room)
Switch Current Rating: <3A
Heatmiser DT
14
13
Page 9
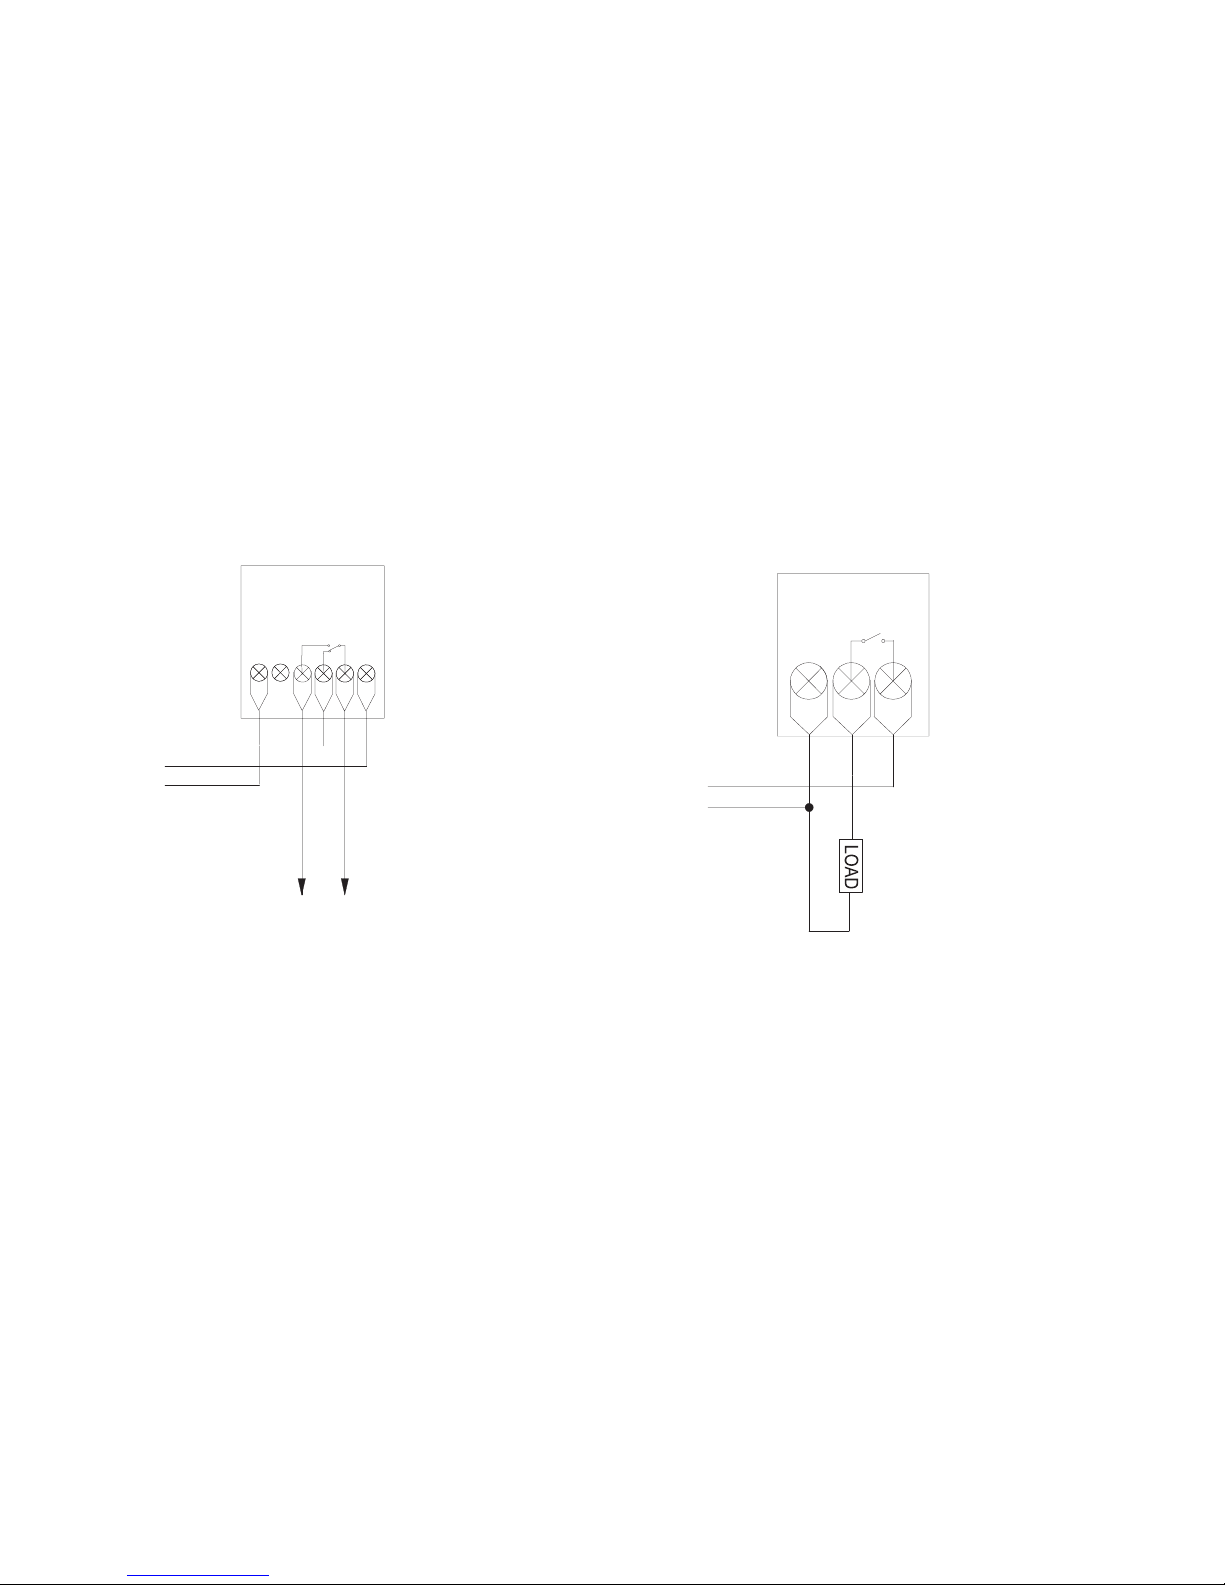
NC
L
N
COM
NO
DT
FUSE AT 3 AMPS
CHANGE OVER
L
N
VOLT FREE
TO BOILER
CONTROL
CIRCUIT
Set-point range: 5-35 °C (Room)
Switch Current Rating: <3A
N
LOAD
L
FUSE AT 16 AMPS
DT
DT
HIGH POWER
L
N
e.g.
Electric Underfloor heating
Set-point range: 5-35 °C (Room)
Switch Current Rating: <16A
Heatmiser DT
Heatmiser DT
15 16
Page 10
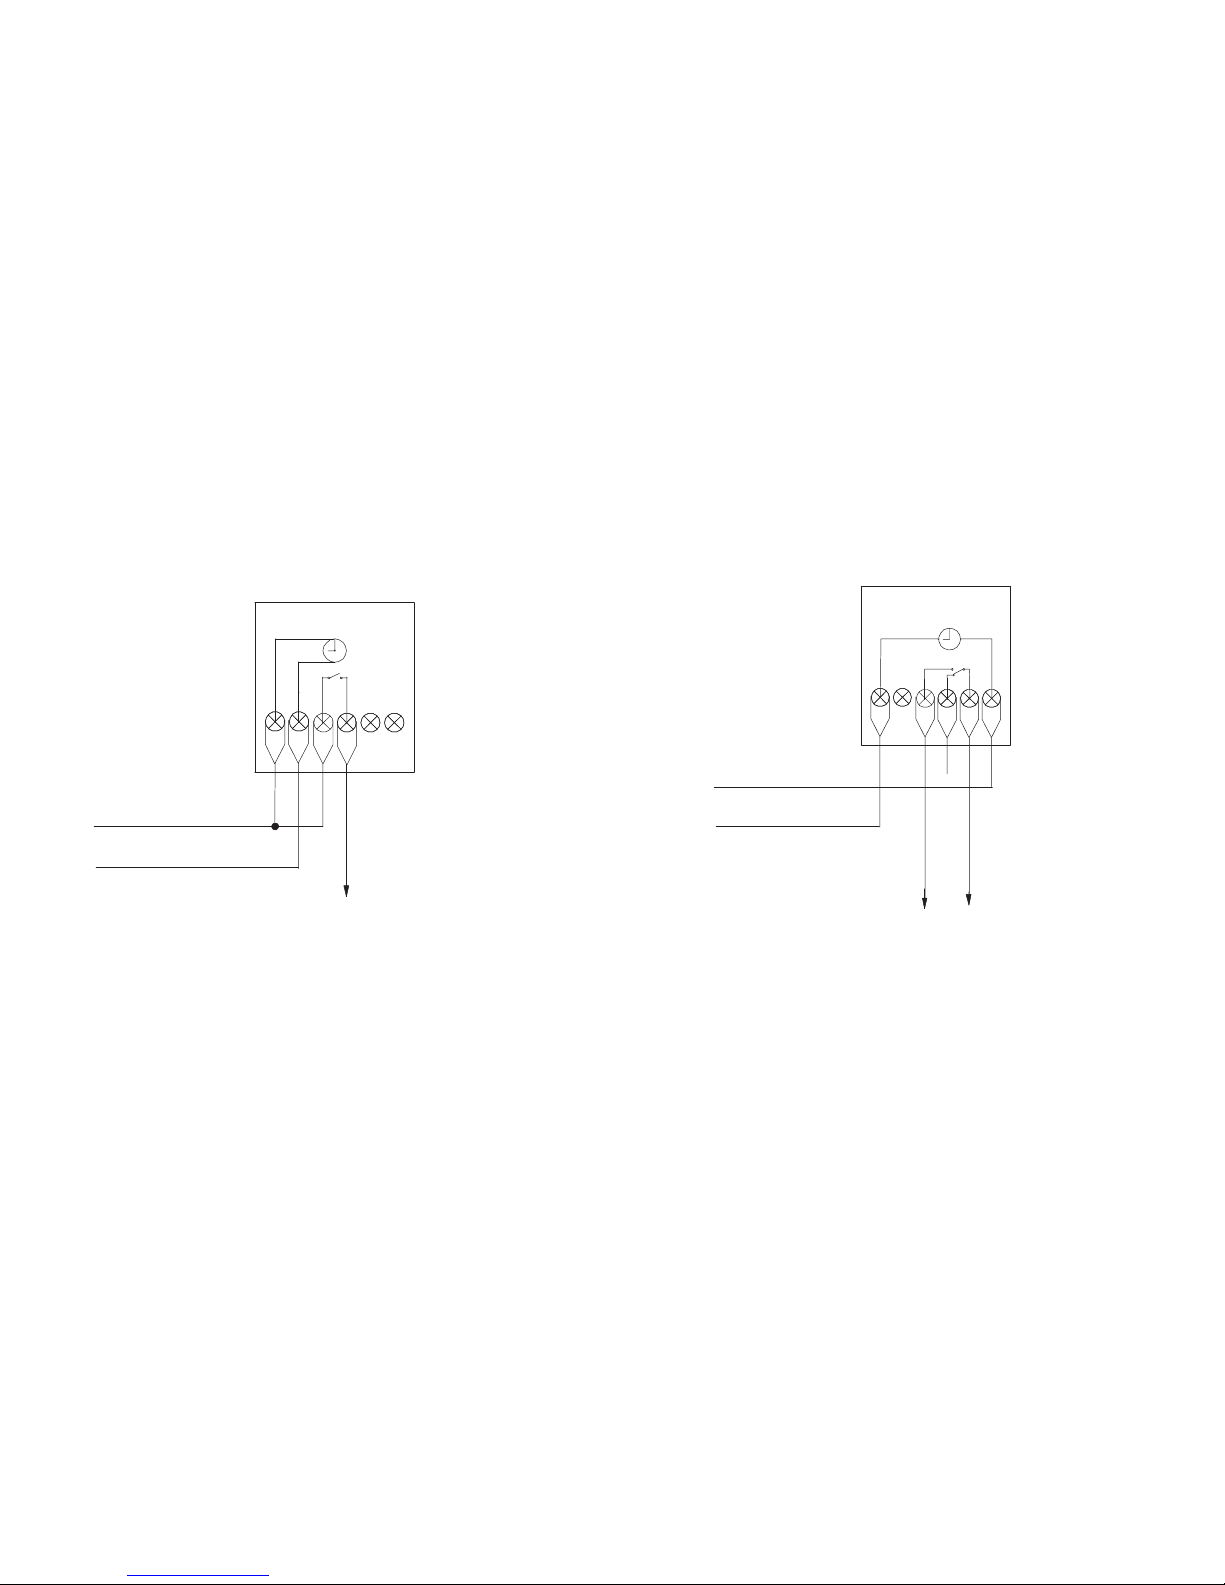
Set-point range: 5-35 °C (Room)
Switch Current Rating: <3A
Set-point range: 5-35 °C (Room)
Switch Current Rating: <3A
L
N
A1
A2
PRT
STANDARD
FUSE AT 3 AMPS
N
L
SWITCHED LIVE
OUTPUT
Heatmiser PRT
Standard
Heatmiser PRT
Changeover
Volt Free
NC
LN
PRT
COM
NO
CHANGE OVER
FUSE AT 3 AMPS
N
L
VOLTFREE
TO BOILER
CONTROL
CIRCUI T
17 18
Page 11
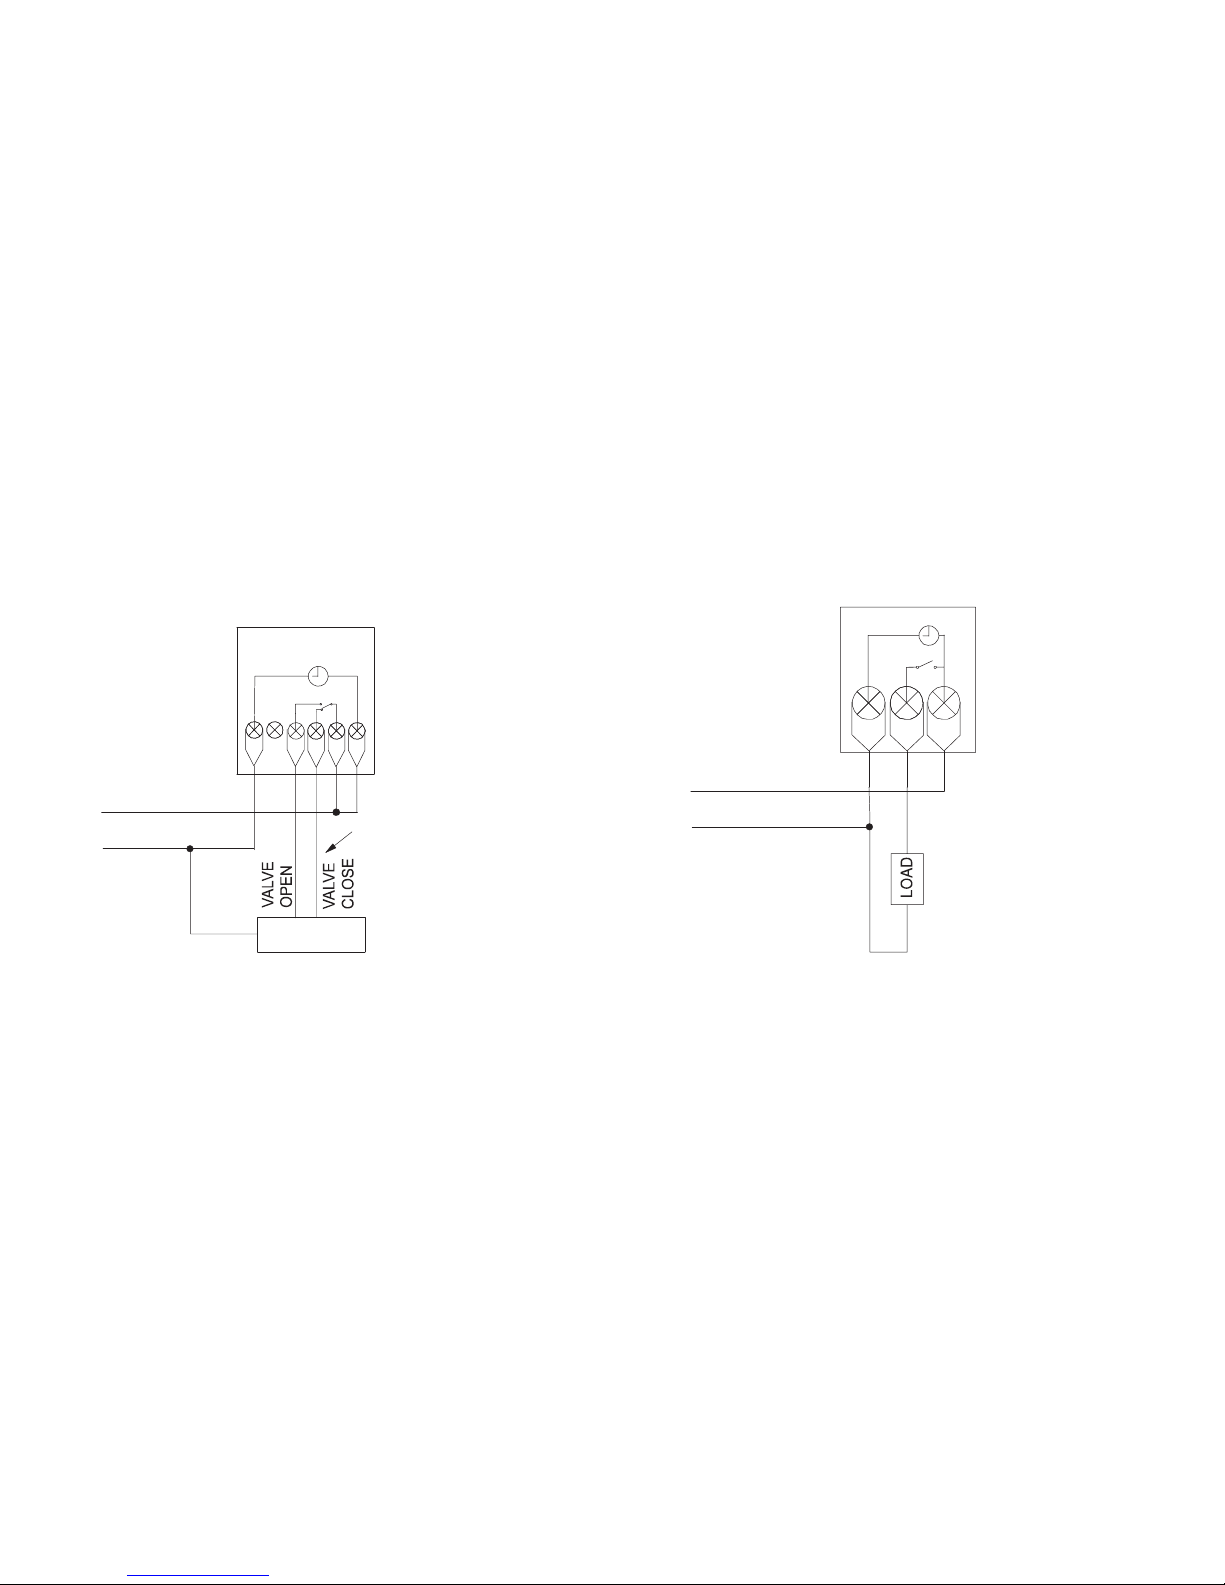
Set-point range: 5-35 °C (Room)
Switch Current Rating: <3A
NC LN
PRT
COM
NO
CHANGE OVER
FUSE AT 3 AMPS
N
L
VOLTFREE
VALV E
NEUTRAL
OMIT THIS CONNECTI ON
FOR SPRING RETURN
VALVES
Heatmiser PRT
Changeover
Volt Free
Heatmiser PRT
High Power
PRT
N
LOAD
L
HIGH POWER
FUSE AT 16 AMPS
N
L
e.g.
Underfloor heating pads
Set-point range: 5-35 °C (Room)
Switch Current Rating: <16A
20
19
Page 12
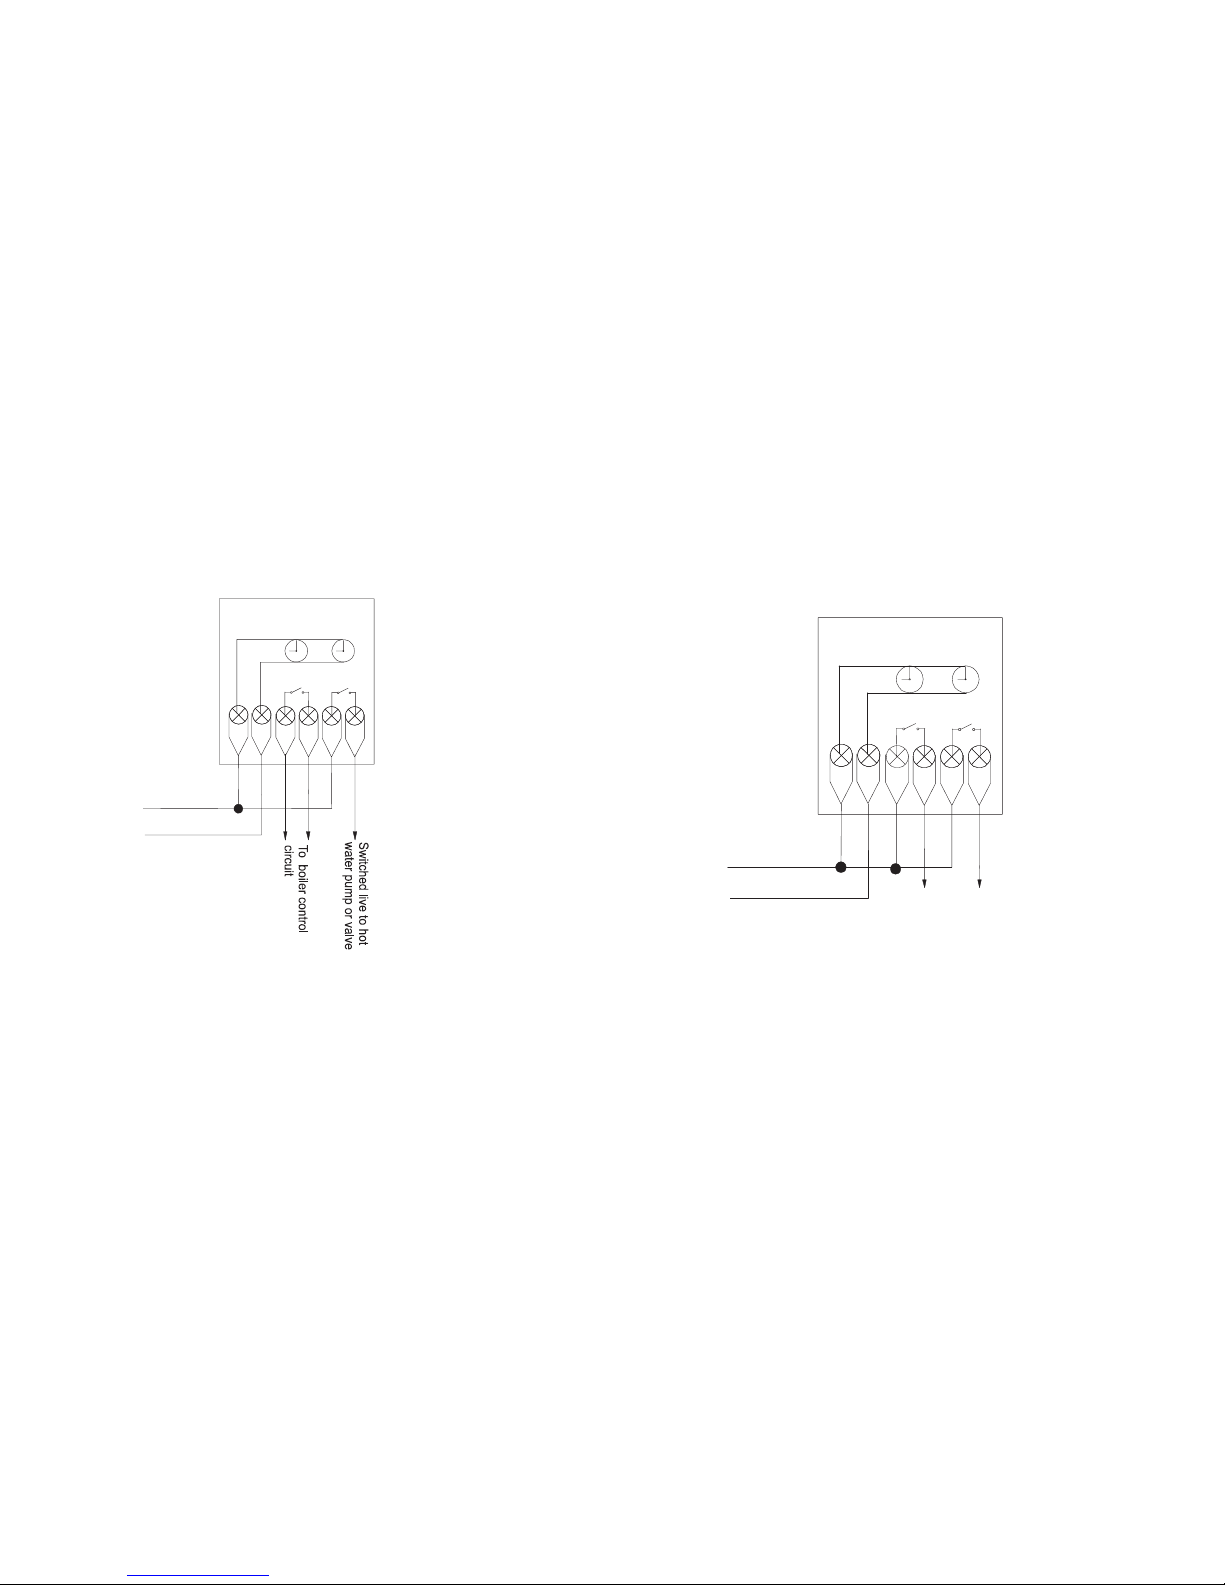
Set-point range: 5-35 °C (Room)
Switch Current Rating: <3A
L
N
A1
A2
PRT/HW
B1
B2
FUSE AT 3 AMPS
L
L
N
Heatmiser PRT/HW
Volt Free
L
N
A1
A2
PRT/HW
B1
B2
FUSE AT 3 AMPS
L
L
N
Switched live
to boiler
Switched live to hot
water pump or valve
Set-point range: 5-35 °C (Room)
Switch Current Rating: <3A
Heatmiser PRT/HW
Switched Live
22
21
Page 13
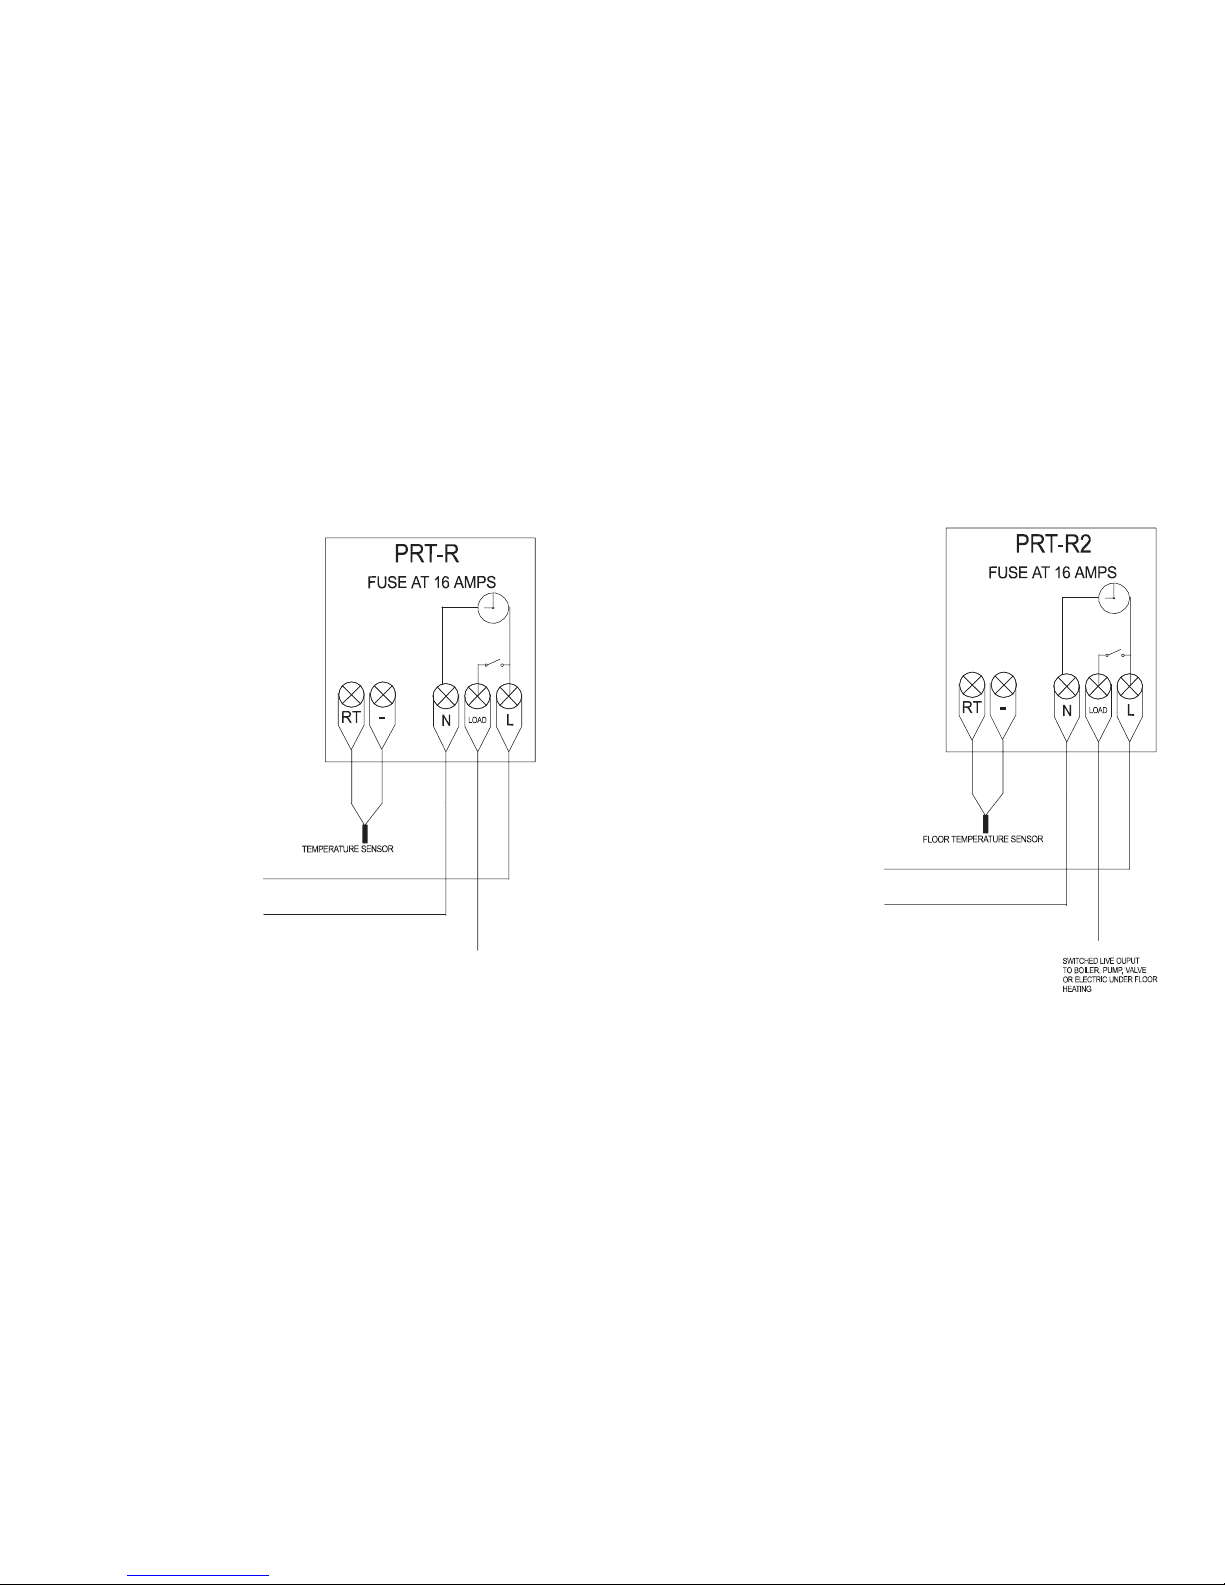
Set-point range: 5-35 °C (Room)
Set-point range: 20-45 °C (Floor)
Switch Current Rating: <16A
Set-point range: 5-70 °C
Switch Current Rating: <16A
L
N
Heatmiser PRT-R
Heatmiser PRT-R2
L
N
24
23
 Loading...