

Page 1

INSTRUCTION MANUAL
G
U
A
R
A
N
T
E
E
Motif Design Group
Bartreth House, Lodge Lane, Salfords, Surrey RH1 5DJ UK
Tel: ++44 (0) 1293 78 68 58 Fax: ++44 (0) 1293 82 47 47
email: sales@motifdesign.info web: www.motifdesign.info
SLIMLINE SUPER U2BS-R24SLIMLINE SUPER U2BS-R24
ELECTRIC INFRARED
PATIO HEATER-LIGHT
ELECTRIC INFRARED
PATIO HEATER-LIGHT
FOR OTHER HEATMASTER PRODUCTS PLEASE CONTACT OUR SALES
DEPARTMENT, WHO WILL BE DELIGHTED TO SEND YOU OUR FULL
RANGE, EITHER ELECTRONICALLY OR AS A HARD COPY CATALOGUE.
Page 2
MOUNTING AND OPERATING INSTRUCTIONS
HEAT, LIGHT, ATMOSPHERE
AT THE FLICK OF A SWITCH!
Switch on for:
Disposal of Waste Electrical and Electronic Equipment
This symbol on the product or on its packaging indicates that this product
should not be disposed of with your normal household waste.
The seperate collection and recycling of your waste electrical equipment at the
time of its disposal will help to conserve natural resources and ensure that it is
recycled in a manner that protects human health and the environment.
SLIMLINE SUPER U2BS-R24SLIMLINE SUPER U2BS-R24
ELECTRIC INFRARED
PATIO HEATER-LIGHT
ELECTRIC INFRARED
PATIO HEATER-LIGHT
We are delighted that you have purchased this QUALITY HEATER-LIGHT. THIS PRODUCT MUST ONLY BE
USED UNDER AN UMBRELLA/PARASOL OR USING THE HEATMASTER U3CM CEILING MOUNT IN A
GAZEBO OR OTHER COVERED LOCATION.
For best results and your safety, please follow the instructions carefully. DO NOT modify this product in any way
as the manufacturer will accept no liability for improper use.
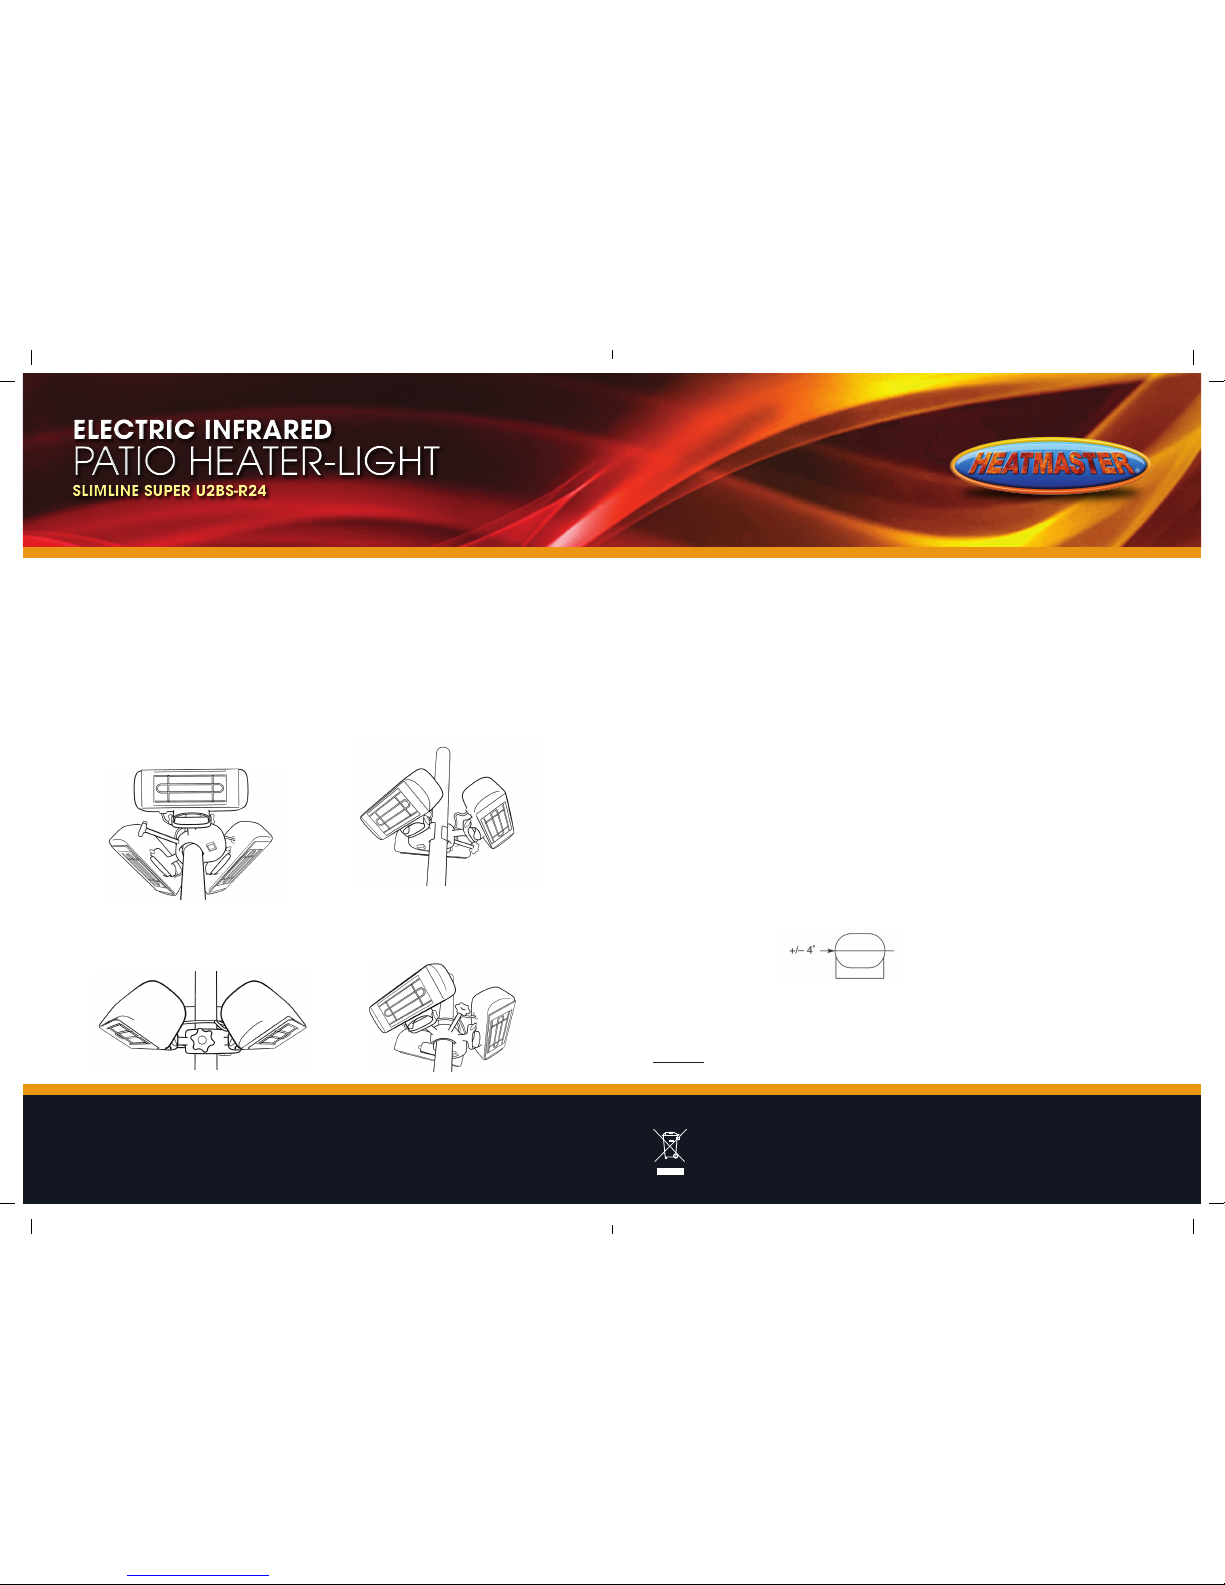
MOUNTING THE UNIT
(Follow diagrams below)
POSITIONING THE UNIT
1. When choosing a mounting position, it is important to ensure the heater lights are NOT pointed towards
combustible surfaces. To adjust, loosen the wing nuts on the side, set the heater-light to desired position
and re-tighten. Take care not to pinch the cable between the back of the fittings and the plate. DO NOT
ADJUST WHEN HOT!
2. This appliance is not intended for use by persons (including children) with reduced physical, sensory
or mental capabilities, or lack of knowledge, unless they have been given supervision or instruction
concerning use of the appliance by a person responsible for their safety.
3. Children should be supervised to ensure they do not play with the appliance.
4. Heater must be installed at least 1.8m above the floor.
5. Only fit hardened tempered grill in this unit. Any other type of grill could melt and cause damage to the unit
or set on fire.
6. Do not use this appliance again if the cable was destroyed.
7. Unit must not be modified in any way.
8. Do not use the heater if the power cord is damaged in any way – contact Heatmaster for a replacement.
REPLACING THE BULB
1. Unplug the unit.
2. Loosen the screw at the top of the unit and hinge the front open. Release the bulb from the spring loaded
lampholders. Insert new bulb into lampholders ensuring it is mounted within 4 degrees of horizontal along
its length. It is important that the end-caps on the lamp are making good contact with the lampholders.
Take care not to handle the bulb surface. Should the bulb be accidentally handled during installation, it should
be thoroughly cleaned with methylated spirit and a lint free cloth. Close the front and tighten the screw.
Spare parts are available from your supplier.
WARNING: DO NOT TOUCH THE UNIT BEFORE IT COOLS DOWN
1. Ensure parasol is secure and stable
by using a suitable parasol base.
2. Place unit on the parasol pole.
3. Slide unit up the parasol pole to the desired
height (no less than 1.8m) and tighten large
horizontal clamping thumbscrew.
4. Bring 10m mains lead through hole in table,
wind around parasol pole and connect into
base of unit.
5. Connect plug on mains lead into an RCD
protected outdoor weatherproof socket.
 Loading...