

Heatmaster MGVF-MV-20LP, MGVF-MV-20NAT, MGL-20 Installation And Operating Instructions Manual
Page 1
UNVENTED (GAS LOG) ROOM HEATER
INSTALLATION AND OPERATING INSTRUCTIONS
MirageGlo™ Gas Log Set
MGVF-MV-20LP & MGVF-MV-20NAT Burner Units
with MGL-20 Log Set
WARNING:
maintenance can cause property damage, personal injury or loss of life.
Refer to this manual for information.
This is an unvented gas-fired heater. It uses air (oxygen) from the
room in which it is installed. Provisions for adequate combustion and
ventilation air must be provided. Refer to page 4 of these instructions.
Improper installation, adjustment, alteration, service or
This appliance is for supplemental heating only. It should not be
used as the primary heat source for a dwelling.
- Do not store or use gasoline or other flammable vapors and liquids in the vicinity of this or any other
- WHAT TO DO IF YOU SMELL GAS
♦
♦
♦
♦
- Installation and service must be performed by a qualified installer, service agency or the gas supplier.
WARNING: If the information in this manual is not followed exactly, a fire or explosion
may result causing property damage, personal injury or loss of life.
appliance.
Do not try to light any appliance.
Do not touch any electrical switch; do not use any phone in your building.
Immediately call your gas supplier from a neighbor’s phone. Follow the gas supplier's instructions.
If you cannot reach your gas supplier, call the fire department.
IMPORTANT:
READ INSTRUCTIONS CAREFULLY BEFORE BEGINNING
INSTALLATION OF THIS ROOM HEATER.
ATTENTION INSTALLER:
REVIEW AND LEAVE THESE INSTRUCTIONS WITH
THE CUSTOMER FOR FUTURE REFERENCE.
IM-105 3/01
Page 2
DO NOT TAMPER WITH PILOT LIGHT SAFETY SYSTEM
This heater is equipped with a PILOT LIGHT SAFETY SYSTEM designed to turn off the heater if not
enough fresh air is available. If the heater shuts off, do not relight until you have provided fresh air. If heater
keeps shutting off, have it serviced by a qualified installer, service agency or the gas supplier. Keep burner and
control compartment clean.
WARNING
♦
When used without fresh air, this room heater may give off CARBON MONOXIDE, an odorless and
poisonous gas.
♦
Early signs of carbon monoxide poisoning resemble the flu. with headache, dizziness and/or nausea. If you
have these signs, heater may not be working properly. Get fresh air at once! Have heater serviced.
♦
Some people - pregnant women, persons with heart or lung disease, anemia, those under the influence of
alcohol and those at high altitudes are more affected by carbon monoxide than others.
♦
Due to high surface temperatures, the appliance should be located out of traffic and away from furniture
and draperies.
♦
Children and adults should be alerted to the hazard of high surface temperature and should stay away to
avoid burns or clothing ignition.
♦
Young children should be carefully supervised when they are in the same room with the appliance.
♦
Adults must be present at all times while operating this appliance.
♦
Do not place clothing or other flammable material on or near the appliance.
♦
Do not leave this appliance operating while unattended or while occupants are sleeping.
♦
Any safety screen or guard removed for servicing an appliance must be replaced prior to operating the
heater.
♦
Installation and repair should be done by a qualified service person. The appliance should be inspected
before use and at least annually by a professional service person. More frequent cleaning may be required
due to excessive lint from carpeting, bedding material, etc. It is imperative that control compartments,
burners and circulating air passageways of the appliance be kept clean.
♦
“WARNING: Any change to this heater or its controls can be dangerous.”
♦
Before installing in a solid fuel burning fireplace, the chimney flue and firebox must be cleaned of soot,
creosote, ashes and loose paint by a qualified chimney cleaner.
♦
This appliance is for installation in a solid-fuel burning fireplace or an approved ventless firebox enclosure
only.
♦
Do not allow fans to blow directly into the fireplace. Avoid any drafts that alter burner flame patterns.
♦
Do not use a blower insert, heat exchanger insert or other accessory not approved for use with this heater.
2
Page 3
WARNING
♦ This room heating appliance is factory designed to produce a flame having a clean and virtually
transparent appearance. If at any time the appliance begins to appear abnormal due to excessive
yellow flames, noticeable odor, or any carbon deposits on the logs, immediately turn the appliance to the
“OFF” position and contact a qualified service technician or the gas company.
♦ While operating this appliance using propane (LP) gas, the flame burning characteristics may vary as the
gas level in the LP tank approaches empty or less than 1/4 full.
♦ Unvented gas logs are intended for supplemental heat and are not to be used as a primary heating source.
When operated for an extended period of time this room heating appliance can produce moisture that
could create condensation , requiring additional ventilation to the home. (example: partially open a
window, partially open the fireplace vent if applicable).
♦ Do not remove from this unit any of the attached metal plates which contain important safety and
operating information.
IMPORTANT INFORMATION
♦
This room heater is design certified by CSA International under the ANSI Z21.11.2b-1998 Unvented
Heaters, ANSI Z21.60-1996 CGA 2.26-M96, Decorative Appliances for Installation in Solid-fuel Burning
Fireplaces. ANSI Z21.60-1996 CGA 2.26-M96 only applies to manual control valve units and does not
apply to the thermostat control units. State or local codes may only allow operation of this appliance in a
vented configuration. Check your state or local codes.
♦
A fireplace screen must be in place while the appliance is operating and, unless other provisions for
combustion air are provided, the screen shall have an opening(s) for introduction of combustion air.
♦
The flue damper in an existing vented solid-fuel burning fireplace must be closed at all times when
operated as an unvented room heater.
♦
Solid-fuels shall not be burned in a fireplace where an unvented room heater is installed.
♦
Always have glass fireplace doors open completely and have fireplace screen closed when operating this
appliance.
♦
This unvented room heater shall not be installed in a bedroom, bathroom, or any room where an occupant
could possibly be sleeping.
♦
When installing this appliance in a fireplace with a mantle, always follow guidelines listed in the
Installation Clearances section of this brochure.
♦
If a hood is required to be installed on your fireplace due to mantle clearances, contact your dealer or
HEATMASTER, INC. for availability of the hood.
♦
Do not use this room heater if any part has been under water. Immediately call a qualified service
technician to inspect the room heater and to replace any part of the gas control system which has been
under water.
3
Page 4

COMBUSTION AND VENTILATION PROVISIONS
WARNING: This heater shall not be installed in a confined space or unusually tight construction
unless provisions are provided for adequate combustion and ventilation air.
Confined Space and Unconfined Space
The National Fuel Gas Code, ANSI Z223.1 defines a confined space as a space whose volume is less
than 50 cubic feet per 1,000 Btu per hour (4.8 m³ per kw) of the aggregate input rating of all
appliances installed in that space and an unconfined space as a space whose volume is not less than
50 cubic feet per 1,000 Btu per hour (4.8 m³ per kW) of the aggregate input rating of all appliances
installed in that space. Rooms communicating directly with the space in which the appliances are
installed, through openings not furnished with doors, are considered a part of the unconfined space.
WARNING: If the area in which the heater may be operated is smaller than that defined
as an unconfined space or if the building is of unusually tight construction, provide
adequate combustion and ventilation air by one of the methods described in the National
Fuel Gas Code, ANSI Z223.1, Section 5.3 or applicable local codes.
Unusually tight construction is defined as construction where:
a. Walls and ceilings exposed to the outside atmosphere have a continuous water vapor retarder
with a rating of 1 perm (6 x10-11 kg per pa-sec-m²) or less with openings gasketed or sealed,
and
b. Weather stripping has been added to openable windows and doors, and
c. Caulking or sealants are applied to areas such as joints around window and door frames,
between sole plates and floors, between wall-ceiling joists, between wall panels, at
penetrations for plumbing, electrical, and gas lines, and at other openings.
Instructions for determining maximum Btu's for a room
Step 1
This calculation is for combustion and ventilation air provisions only and is not intended to be used
for sizing for heating comfort. To determine the maximum Btu's allowed for a given room size you
will need to calculate the volume of the room in cubic feet. To perform this calculation, fill in the
table below and multiply the room's width, length and height to obtain the room volume in cubic feet.
ROOM ROOM ROOM ROOM VOLUME
LENGTH WIDTH HEIGHT IN CUBIC FEET
X X =
Example: If your room is 20 feet in length, 16 feet wide and has an 8 foot ceiling height, the calculation
would be as follows: 20 x 16 x 8 = 2,560 cubic feet.
Step 2
Divide the room volume by 50 cubic feet to determine the maximum Btu per hour the room can utilize.
Example: Using the above example: 2,560 cubic feet divided by 50 = 51.2 x 1,000 = 51,200 Btu's.
If the rate of your appliance plus any other gas appliances installed in the space is rated at more Btu's than the
example calculated above, you must follow instructions for confined space. See shaded WARNING above.
If your appliance is rated at less Btu's than the example calculated above, then your area is considered
unconfined space.
4
Page 5
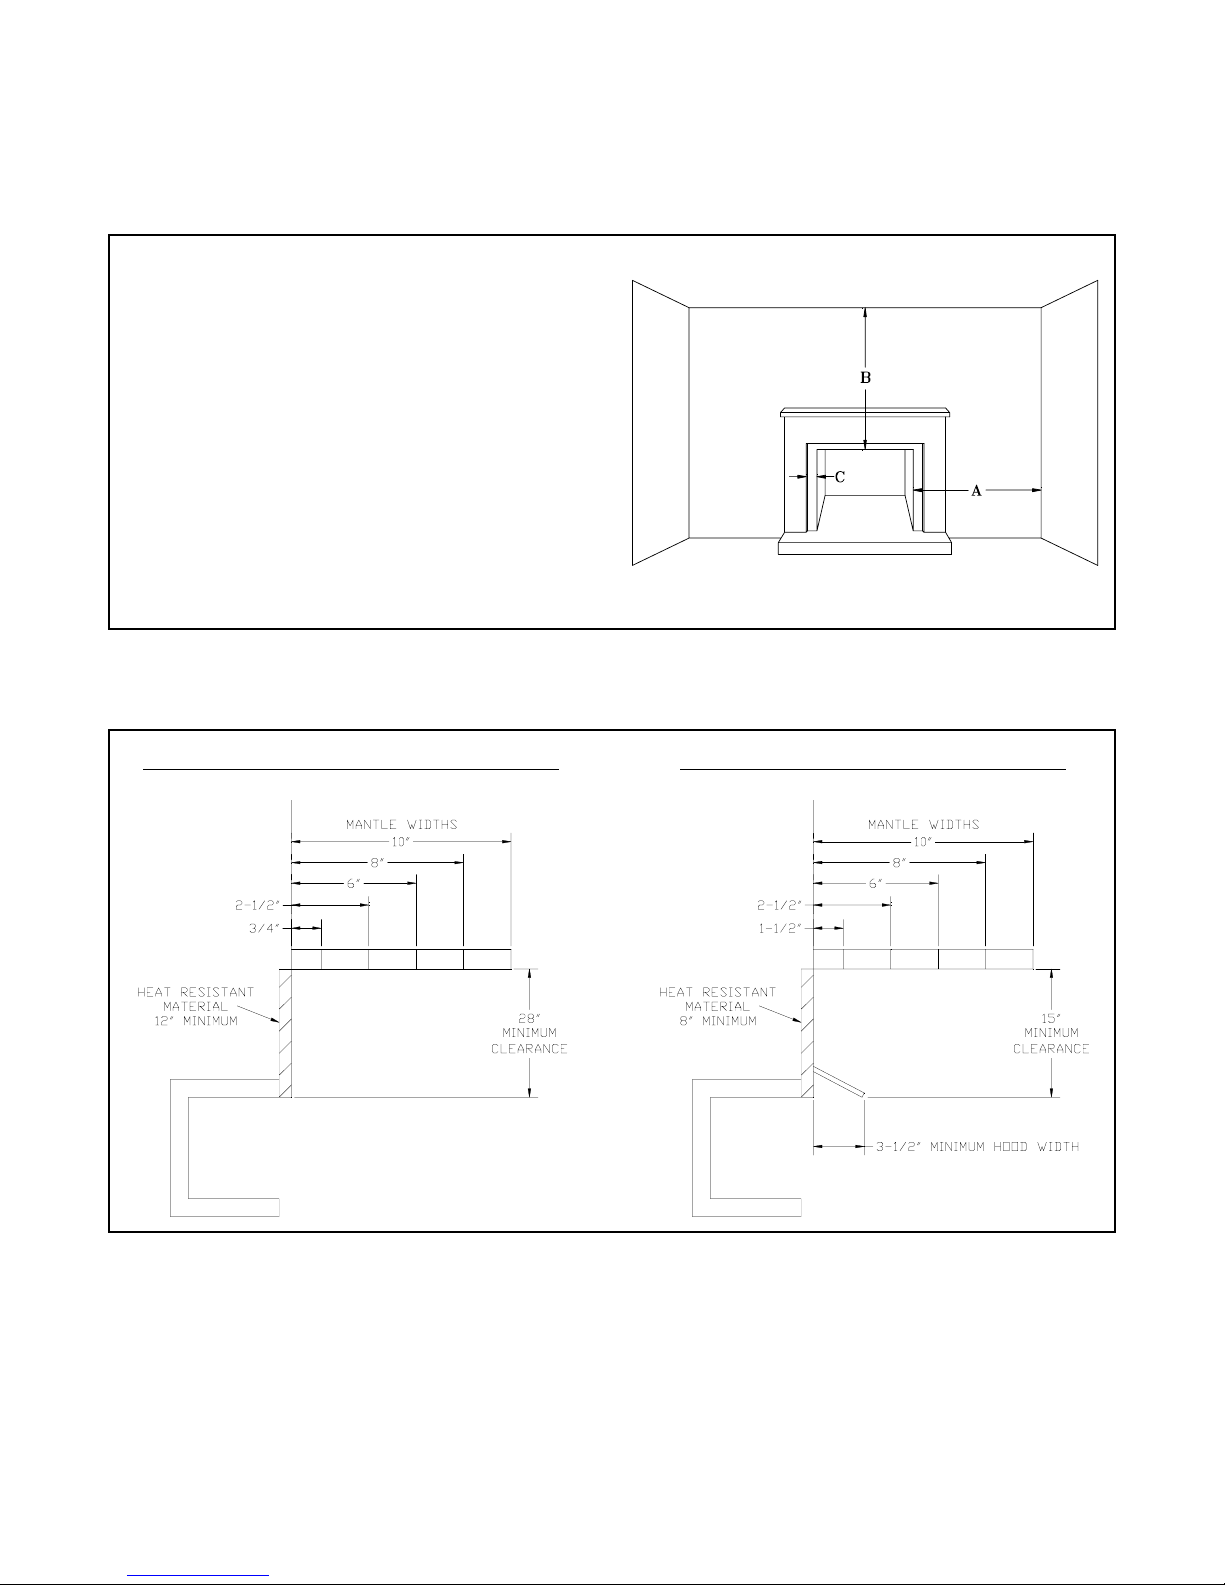
INSTALLATION CLEARANCES AND INFORMATION
To ensure a safe installation in a masonry or approved factory built fireplace, the following instructions
must be carefully followed.
A) Minimum clearance from the side of the
fireplace opening to any combustible wall
should not be less than 15 inches.
B) Minimum clearance from the top of the
fireplace opening to any combustible ceiling
should not be less than 42 inches.
C) Minimum clearance from the side of the
fireplace opening to part of a mantle piece
should not be less than 6 inches. See figure
at right.
Minimum mantle clearance when unit is installed as a vent free appliance in a pre-existing fireplace.
Minimum Mantle Clearance Without Hood Minimum Mantle Clearance With Hood
Note:
The stated installation clearances provide the safest distance for combustible materials to ensure that
walls, ceilings, and mantel components will not be affected by heat discoloration, warpage, or possible fire.
Each appliance installation presents a different set of variables which can create problems beyond the control of
the gas log manufacturer. It is the responsibility of the installer to stay within the minimum clearances stated
and set forth by the manufacturer within this instruction manual.
5
Page 6

INSTALLATION INFORMATION AND INSTRUCTIONS WHEN
INSTALLING AS A VENT FREE APPLIANCE
The installation of this room heater must conform with local codes or, in the absence of local codes with the
National Fuel Gas Code, ANSI Z223.1.
NOTE:
type you will be using.
The appliance regulator on this appliance is not intended to regulate any gas pressure above ½ psig. If using
LP gas, a low pressure regulator (not furnished) must be installed in the gas line between the tank and
appliance. Do not connect the appliance to the gas line if this regulator is not in place. If using natural gas,
check with the gas company to ensure that proper gas pressure is available.
WARNING: An explosion could occur if a connection is made directly to an unregulated LP gas tank.
GAS PRESSURE: Minimum inlet gas supply pressure must be 5.0" WC for natural gas or 11" WC for LP gas
for the purpose of input adjustment. Maximum inlet gas supply pressure must not exceed 10.5" WC for natural
gas, or 14" WC for LP gas. The gas line supplying the appliance must be sufficient size to furnish the
appropriate supply pressure to the appliance when being operated on the high setting.
♦
♦
♦
♦
♦
appliance installation.
♦ Special provisions should be made if the unit is to be installed into a sunken fireplace by raising the floor
of the fireplace using non-combustible materials to insure adequate airflow.
Before the unit is connected to any gas line, check the name plate on the unit for the proper gas
The appliance and its appliance main gas valve must be disconnected from the gas supply piping system
during any pressure testing of that system at test pressures in excess of ½ psig (3.5kPa).
The appliance must be isolated from the gas supply piping system by closing its equipment shut-off valve
during any pressure testing of the gas supply piping system at test pressures equal to or less than ½ psig
(3.5kPa).
Always keep appliance area clear and free from combustible materials, gasoline and other flammable
vapors and liquids.
Pressure tap screws must be closed before turning on gas to appliance.
Any outside air ducts and/or ash dumps in the fireplace shall be permanently closed at the time of the
This appliance may be installed in an aftermarket * permanently located, manufactured (mobile) home, where
not prohibited by state or local codes.
* Aftermarket: Completion of sale, not for the purpose of resale, from the manufacturer.
This appliance is only for use with the type of gas indicated on the rating plate. This appliance is not
convertible for use with other gases.
6
Page 7

INSTALLATION INSTRUCTIONS
WHEN INSTALLING AS A VENTED DECORATIVE APPLIANCE
When installing as a vented appliance, the following statements and charts must be followed.
♦
This appliance must be installed only in a solid-fuel burning fireplace with a working flue, and constructed of
non-combustible material.
♦
Solid fuels shall not be burned in a fireplace where a decorative appliance is installed. The minimum
permanent free opening (in square inches) that must be provided by either a fireplace chimney or chimney
damper must be provided (See Table 2 and Table 3 on page 8.)
♦
The chimney damper must be fixed in a manner which will maintain the minimum permanent vent opening at
all times. To accomplish this, install a damper clamp on the edge of the damper blade to prevent its closing, or
drill a hole or holes in the damper.
♦
See Table 1 below when installing as a vented decorative appliance for the minimum size fireplace that can be
used.
TABLE 1 for MINIMUM SIZE FIREPLACE DIMENSIONS
MGVF-MV-20LP
MGVF-MV-20NAT
Height of Front
Opening
Width of Front
Opening
Depth 12.5”
16”
24”
7
Page 8

TABLE 2
for
FACTORY BUILT FIREPLACES
Free opening area of chimney damper for venting combustion products from decorative appliances for
installation in solid fuel burning fireplaces.
MINIMUM PERMANENT FREE OPENING IN SQUARE INCHES
Chimney
Height
10
15
20
25
30
35
40
20” Log Set
LP Gas
11.3
8.6
7.5
6.6
6.2
5.7
5.3
20” Log Set
Natural Gas
16.6
12.6
10.8
9.6
9.1
8.0
7.5
TABLE 3
for
MASONRY BUILT FIREPLACES
Free opening area of chimney damper for venting combustion products from decorative appliances for
6
8
10
15
20
30
20” Log Set
LP Gas
17.6
16.5
15.1
14.1
12.9
12.2
20” Log Set
Natural Gas
25.7
23.7
21.7
19.9
18.5
16.9
installation in solid fuel burning fireplaces.
MINIMUM PERMANENT FREE OPENING IN SQUARE INCHES
Chimney
Height
8
Page 9

APPLIANCE ASSEMBLY INSTRUCTIONS
1. Carefully remove all log parts from the box and place them onto the floor off to one side of the fireplace.
DO NOT DROP ANY LOG PART AS BREAKAGE MAY EASILY OCCUR.
2. Remove the burner assembly from the box and place it onto floor of the fireplace with the grate facing the
front of the fireplace.
3. Position the burner assembly centered from side to side and as far toward the back wall of the fireplace as
possible.
4. Connect the gas line to the tubing adapter located underneath the unit.
5. Make sure the gas connections are tight. Turn on the gas and coat each joint with a soap and water solution
and then watch for air bubbles indicating leaks. DO NOT USE A FLAME OR ANY TYPE OF IGNITION
SOURCE TO CHECK FOR LEAKS. Any leaks must be corrected before proceeding with the installation.
6. Refer to the MGL-20 LOG PARTS LIST on page 14.
7. Select the Ember Plaque and carefully place it onto the burner assembly locating it behind the burner
and centered from side to side.
8. Select the Back Log and carefully place it onto the burner assembly locating it behind the Ember Plaque.
9. Select the Front Log and carefully place it onto the burner assembly locating it in front of the burner and
over the (2) log supports.
10. Select the Left Log and carefully place it onto the left pin located at the Ember Plaque and into the
impression on the far left side of the Front Log.
11. Select the Right Log and carefully place it onto the right pin located at the Ember Plaque and over the
protrusion on the far right side of the Front Log.
12. Select the Left, Middle Log and carefully place it onto the protrusion of the Left Log and over the
protrusion on the left side of the Front Log.
13. Select the Right, Middle Log and carefully place it onto the impression of the Right Log and over the
protrusion on the right side of the Front Log.
14. Refer to the MGL-20 LOG PLACEMENT PHOTOS below to determine if the assembly is correct.
MGL-20 LOG PLACEMENT PHOTOS
MGL-20 (TOP VIEW) MGL-20 (SIDE VIEW)
WARNING: Failure to position the parts in accordance with these diagrams or failure to use only the parts
specifically approved with the appliance may result in property damage or personal injury.
9
Page 10

FOR YOUR SAFETY READ BEFORE LIGHTING
WARNING:
A. This appliance has a pilot that must be lighted by hand. When lighting the pilot, follow these instructions exactly. This
appliance is equipped with a push button piezo ignition device that can be used to light the pilot. If the piezo fails to
ignite the pilot, then follow the instructions for lighting pilot with a match.
B. BEFORE LIGHTING smell all around the appliance area for gas. Be sure to smell next to the floor because some gas is
heavier than air and will settle on the floor.
WHAT TO DO IF YOU SMELL GAS
♦ Do not try to light any appliance.
♦ Do not touch any electrical switch; do not use any phone in your building.
♦ Immediately call your gas supplier from a neighbor's phone. Follow the gas supplier's instructions.
♦ If you cannot reach your gas supplier, call the fire department.
C. Use only your hand to push in or turn the gas control knob. Never use tools. If the handle will not push in or turn by
hand, do not try to repair it. Call a qualified service technician. Force or attempted repair may result in fire or explosion.
D. Do not use this appliance if any part has been under water. Immediately call a qualified service technician to inspect the
appliance and to replace any part of the gas control system that has been under water.
1. STOP! Read the safety information previously listed above.
2. Turn gas control knob clockwise 3 to the "OFF" position. Do not force.
3. Wait five (5) minutes to clear out any gas. Then smell for gas, including near the floor. If you smell gas, STOP! Follow
"B" in the safety information above. If you don't smell gas, go to the next step.
4. Locate pilot (FIG. 1) by following the small metal tube from the gas control valve. The pilot is mounted on a bracket
that is located and fastened behind the right side of the burner .
5. Make sure that the toggle switch is in the “OFF” position (Fig. 2).
6. Turn gas control knob (FIG. 2) counterclockwise 4 to "PILOT" position.
7. Push gas control knob all the way in and hold it. While still holding in the gas control knob, press the igniter
push-button (FIG. 2) several times. This will cause a spark at the pilot burner which will ignite the pilot flame.
Continue to hold the gas control knob (FIG. 2) in for about one (1) minute after the pilot is lit. Release gas control knob
and it will pop back out. Pilot should remain lit. If it goes out, repeat steps 1 through 7.
♦ If knob does not pop out when released, stop and immediately call your service technician or gas supplier.
♦ LIGHTING PILOT WITH MATCH: Turn gas control knob (FIG. 2) to "PILOT" position. Place a lit match at
♦ If pilot does not stay lit after several tries turn the gas control knob (FIG. 2) to "OFF" and call your service
If you do not follow these instructions exactly, a fire or explosion may result causing property damage,
personal injury or loss of life.
MILLIVOLT VALVE PILOT LIGHTING INSTRUCTIONS
the pilot burner (FIG. 1), then push the knob in. Continue to hold the gas control knob (FIG. 2) in for about one (1)
minute after the pilot is lit. Release gas control knob and it will pop back out. Pilot should remain lit. If it goes out
repeat the above step.
technician or gas supplier.
Turn the gas control knob (FIG. 2) clockwise 3 to "OFF". Do not force. If optional power is used, it must be turned off.
PILOT BURNER GAS CONTROL KNOB
IGNITER
FIG. 1
TO TURN OFF GAS TO APPLIANCE
TOGGLE
SWITCH
IGNITER
10
TEMPERATURE
ADJUSTMENT
KNOB
FIG. 2
Page 11

MAIN BURNER FLAME
(PROPANE)
MAIN BURNER FLAME
(NATURAL)
PILOT GAS FLAME
(PROPANE)
PILOT GAS FLAME
(NATURAL)
11
Page 12

OPERATING INSTRUCTIONS FOR THE
APPLIANCE AS IT COMES FROM THE FACTORY
MGVF-MV-20LP and MGVF-MV-20NAT
1. Follow the safety information on page 10 of this instruction manual.
2. Follow the lighting instructions on page 10 of this instruction manual.
3. Once the pilot is lit, rotate the gas control knob counter clockwise 4 to the “ON” position (Fig. 3)
in order to light the burner.
4. CAUTION: Your log set burner will ignite when you complete the next step.
5. Set the toggle switch to the “ON” position (Fig. 3).
6. Rotate the temperature adjustment knob (Fig. 3) to operate the burner within the preferred “HI” to “LO”
setting.
7. To turn the main burner off, simply rotate the gas control knob clockwise 3 to the "PILOT" position.
This will allow the pilot to continue to burn until you are ready to use the log set again.
8. To turn the log set completely off, push and rotate the gas control knob clockwise 3 to the "OFF"
position. If this is done, the pilot must be re-ignited the next time you use your log set.
GAS CONTROL KNOB
TOGGLE SWITCH
IGNITER TEMPERATURE
ADJUSTMENT KNOB
FIG. 3
12
Page 13

CLEANING AND MAINTENANCE INSTRUCTIONS
ALWAYS REMEMBER:
1. Do not place any combustible material near the appliance.
2. Do not place any paper, trash or other material on the log set or in the heater.
3. Do not touch any part of the appliance when the unit is in operation.
4. Do not operate this appliance without the fireplace screen closed.
Your heater is designed to be virtually maintenance free, although periodic visual inspection and cleaning is
required. Follow the instructions below for the correct procedures.
If at any time the flames on your log set look abnormal or an odor is noticed that is coming from the
appliance, contact a qualified service technician or the gas company.
During periods of frequent use or periodically, visually inspect the main burner flames as well as the pilot
flame for evidence of sooting. If sooting is present, turn the appliance “OFF” and contact a qualified service
technician or the gas company. The appearance of these flames should resemble the drawings on page 11.
Any measurements are approximate and flame heights may vary.
Fireplaces can be very dusty areas. Therefore inspect and clean it at least monthly during the heating season
by following the guidelines below. More frequent cleaning may be required due to excessive lint from
carpeting, bedding material, etc. It is imperative that control compartments, burners and circulating air
passageways of the appliance be kept clean.
CAUTION: Before cleaning the appliance, be sure it is turned completely off. The pilot should also be
turned off. The unit must be completely cooled.
DO NOT USE ANY CLEANING FLUIDS OR TOOLS FOR CLEANING PURPOSES
1. Remove logs from grate assembly and place on the floor close to the fireplace.
2. Lightly vacuum any loose particles or dust from the grate and burner. Pay close attention to the air
opening of the main burner. This opening is located at the point of the main burner where the gas line from
the control valve is attached. This opening must remain free of any obstruction.
3. Lightly vacuum any loose particles or dust from the pilot flame area, being sure not to touch any part
of the pilot with the vacuum attachment.
4. Lightly vacuum any dust from the logs.
5. Carefully replace logs on the grate assembly and relight the pilot as stated in this instruction manual.
NOTE: If any of the appliance parts are hit with the vacuum attachment during cleaning, a gas leak could
occur. If this happens, be sure to check for leaks as described on page 9 of this instruction manual.
13
Page 14

C
MGL-20 LOG PARTS LIST
B
A
E
D
ITEM
LOG NO.
LOG
DESCRIPTION
A MGL-20A Front
B MGL-20B Ember Plaque
C MGL-20C Back
D MGL-20D Left
E MGL-20E Left, Middle
F MGL-20F Right, Middle
G MGL-20G Right
G
F
When ordering, Please include complete part number, part name and description.
Parts may be ordered directly from:
HEATMASTER, INC.
3625 Benson Road, P.O. Box 1717, Angier, NC 27501
(919) 639-4568
14
Page 15

PARTS DIAGRAM
G
V
U
B
K
CC
K
O
DD
K
A
AA
TO PILOT
C
NATURAL GAS
PILOT REGULATOR
TO VALVE
15
BB
HI
LO
Z
W
Y
X
Page 16

MGVF-MV-20 PARTS LIST
KEY
LETTER
A BU-A104CHS Burner, LP
B 08-910 Adaptor, 3/8” FPT x 3/8” Flare
C GR-MG20 Grate Front / Burner Body Asm.
D JU-104 Wire, (4) female terminals
E FAS-10-24N Nut, 10-24, hex w/washer, zinc
F 11-1300 Elbow, 90º, 3/8” Flare x 3/8” MPT
G TB-BMG20 Tubing Assembly, Burner
H INS-MG Insulation, Millivolt Valve Bracket
I TB-31611 Tubing, Pilot, NAT
J TB-31621 Tubing, Pilot, LP
K 15-1170 Screw, 10-24 x 3/8”, zinc
L 04-1009 Screw, #10 x 3/8”, self-tap
M 11-1076 Nut, compression, 3/16”
N 11-1076F Ferrule, 3/16”
O 12-1300 Elbow, 90º, 3/8” Flare x 1/8” MPT
P 16-1130 Wire, piezo
Q 16-1040 Pilot, ODS, LP, Millivolt Valve
Q 16-1045 Pilot, ODS, NAT, Millivolt Valve
R 11-1441 Loxit, 3/16” Nut & Sleeve
S 16-1050 Regulator, 4.5”, NAT
T VA-100LP Valve, Millivolt, 10.0”, LP
T VA-100NA Valve, Millivolt, 3.5”, NAT
U 11-1185 Nipple, 3/8” MPT x 3-1/2”, blk
V 07-1020 Elbow, 90º, 3/8”, street, blk
W 11-2265 Switch, ON-OFF
X VA-100MEX Extension, Valve, Main
Y VA-100IEX Extension, Valve, Ignitor
Z VA-100HLEX Extension, Valve, HI/LO
AA MT-103BB Bracket, Burner, LP
AA MT-103BBN Bracket, Burner, NAT
BB MT-104VC Cover, Millivolt Valve
CC MT-107VB Bracket, Millivolt Valve
DD OR-MGDS#34S Orifice, #34, NAT, Vent-Free
DD OR-MGDS#53L Orifice, #53, LP, Vent-Free
PART
NUMBER
PART
DESCRIPTION
Parts may be ordered directly from:
HEATMASTER, INC.
3625 Benson Road, P.O. Box 1717, Angier, NC 27501
(919) 639-4568
When ordering, please include complete part number, and part description.
16
 Loading...