

Page 1
Dusk-to-Dawn Light
Models Model
8485 / 8486 8487
PRE-INSTALLATION
For easy installation, select an existing light with a wall
switch for replacement. IMPORTANT: Do NOT use with
dimmers or timers.
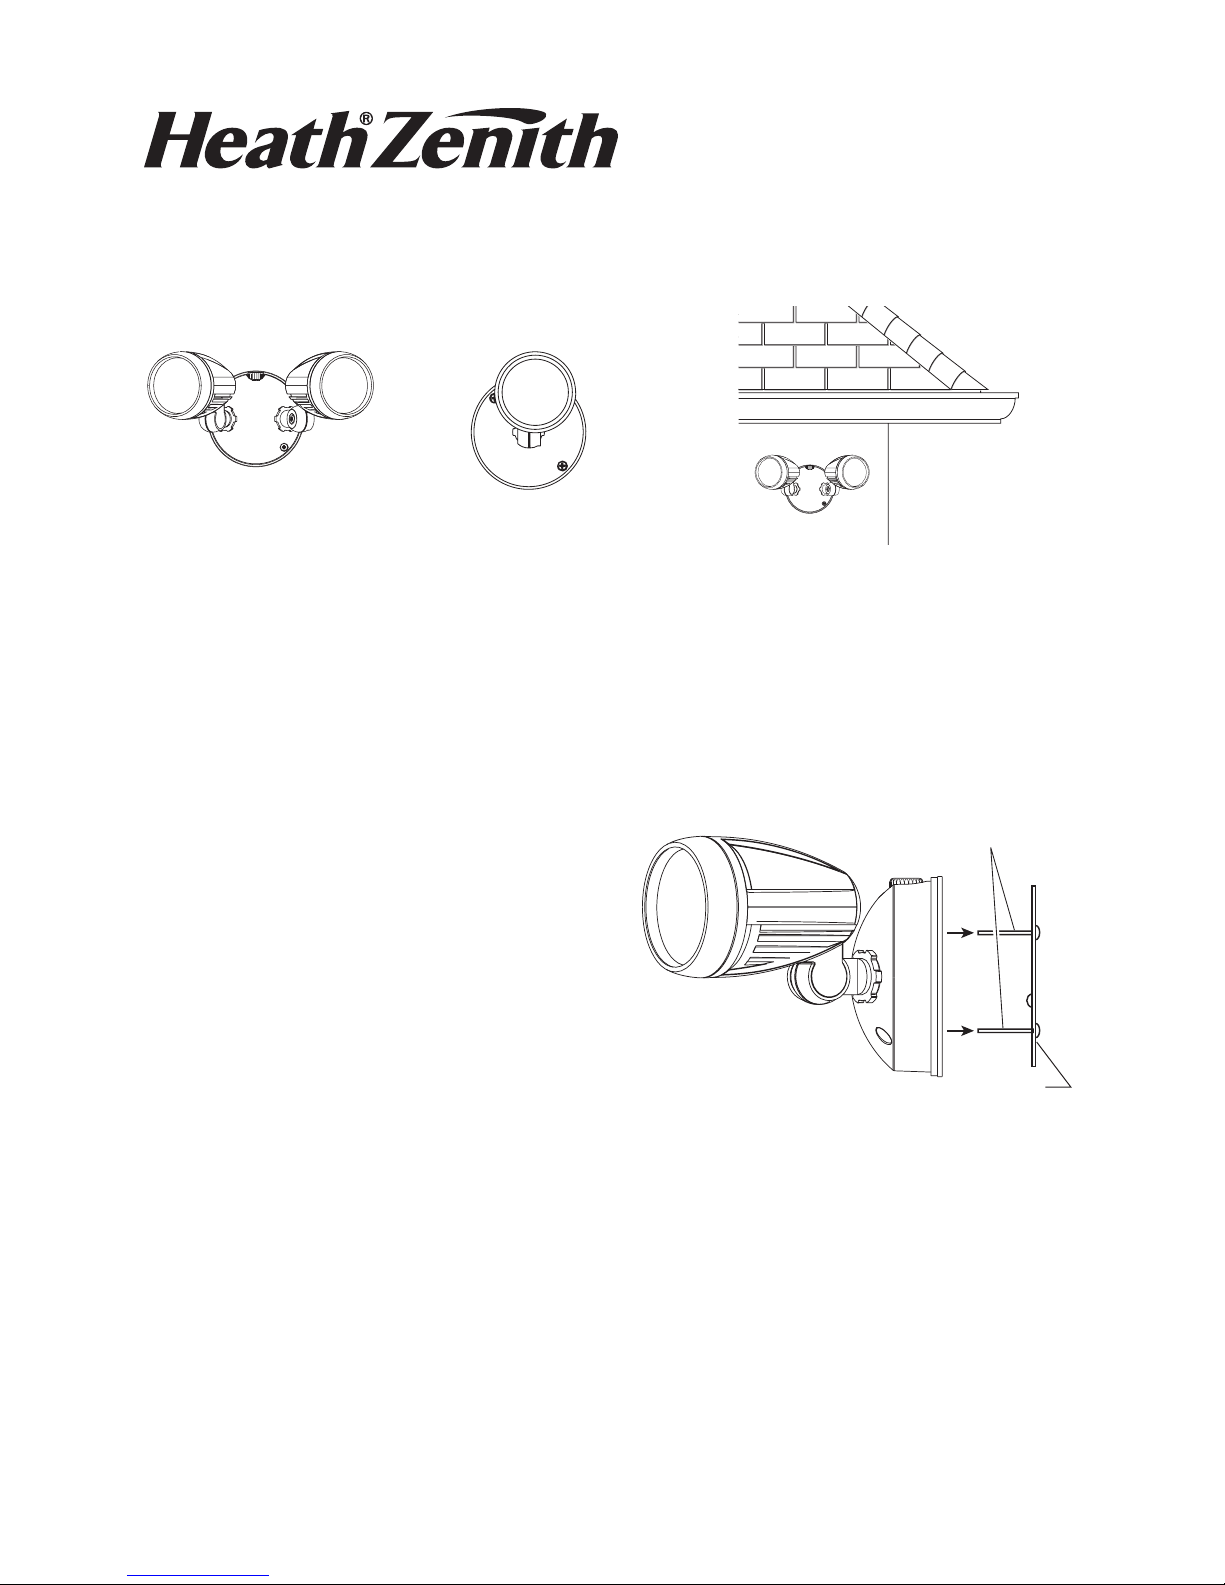
For best performance, mount the fixture about 8 ft.
(2.4 m) above the ground.
Wall Mount
Features
• Dusk-to-dawn LED light.
• Automatically operates at night only.
• Wall mount only.
Package Contents
• LED Light (see model above)
• Short Bracket Screws (2x)
• Long Fixture Screws (2x)
• Decorative Nuts (2x)
• Wire Connectors (3x)
• Mounting Bracket (1x)
Requirements
• The light control requires 120-volts AC.
• Some codes require installation by a qualified
electrician.
• This product is intended for use with a junction box
marked for use in wet locations.
Note: Light fixture should be mounted as shown above
when installed (depending upon type of installation).
Model 8485 shown above.
1. Remove mounting bracket from back of light fixture.
2. Ensure the long fixture screws are finger tight against
the mounting bracket.
Long Fixture Screws
Mounting
Bracket
© 2016 HeathCo LLC 206151-04A
Page 2
INSTALLATION
WIRING
Note: All wiring must be run in accordance with the
National Electrical Code through conduit or another acceptable means. Contact a qualified electrician if there
is any question as to the suitability of the system.
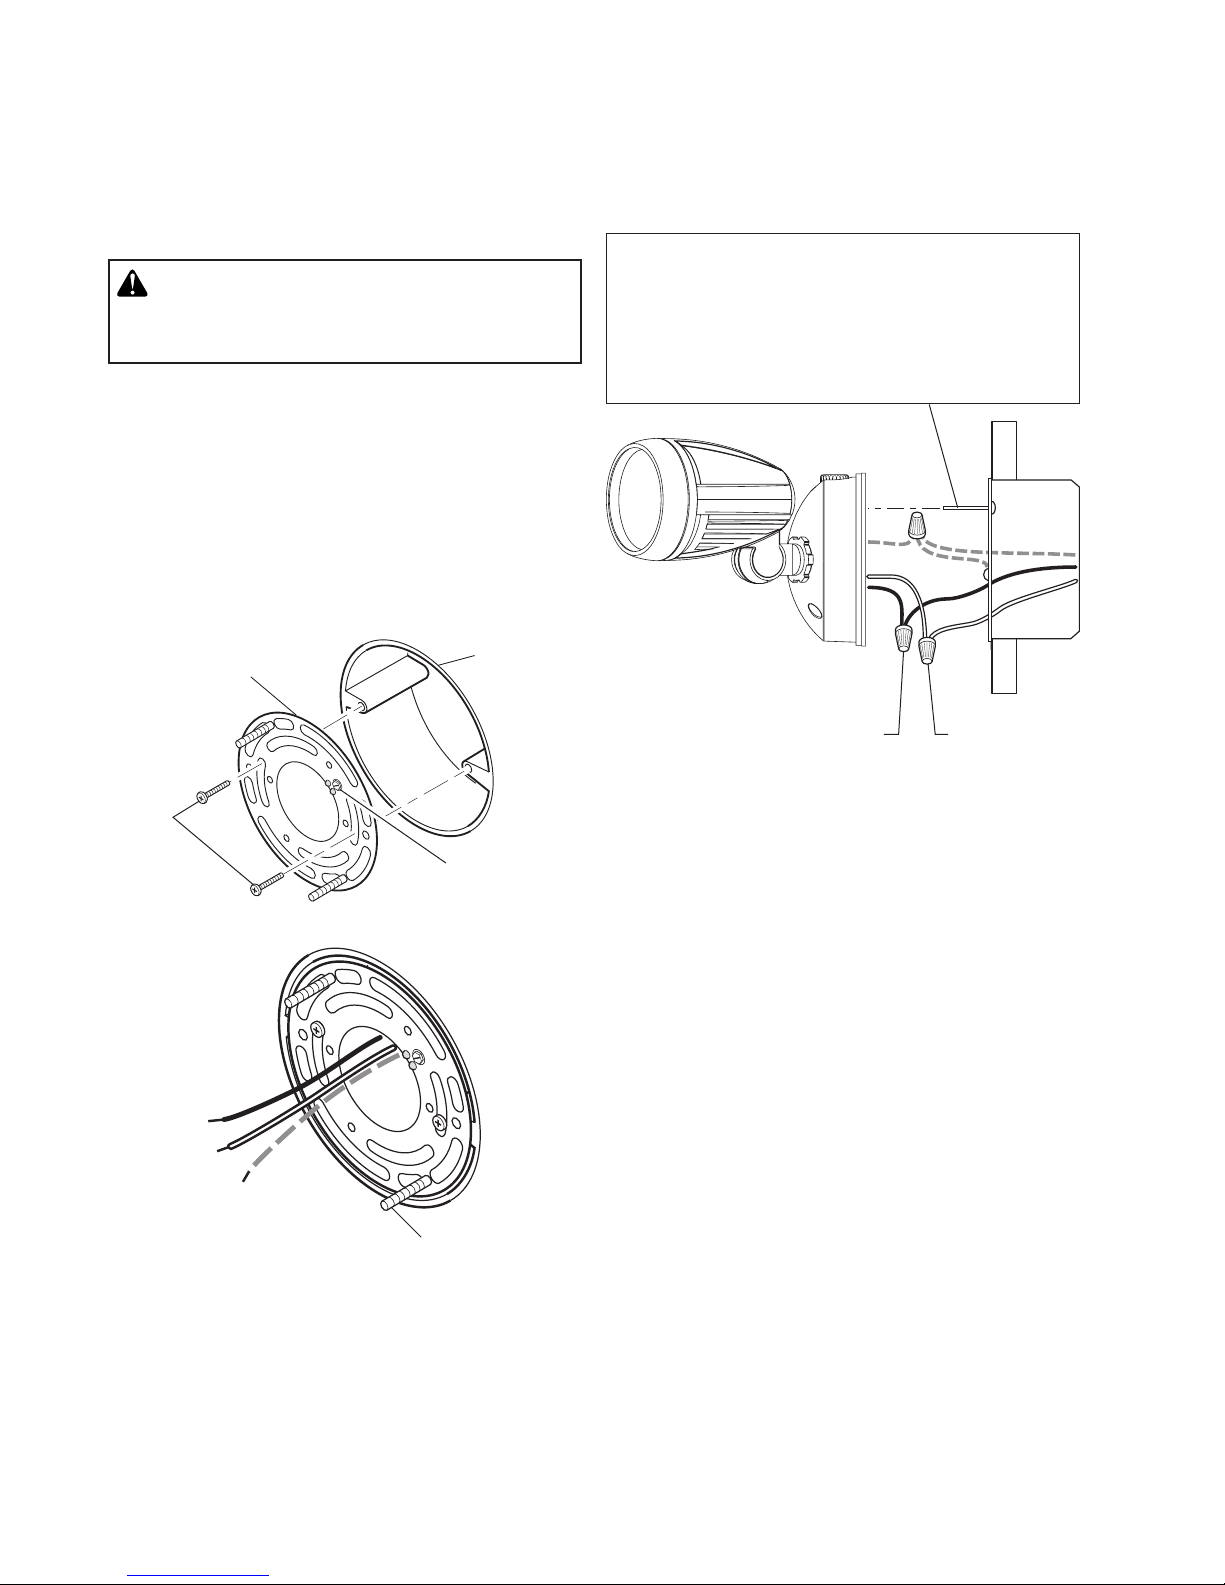
WARNING: Turn power off at circuit breaker or
fuse. Place tape over circuit breaker switch and
verify power is off at the fixture.
1. Remove the existing light fixture (if necessary).
2. Insert the junction box wires through the center of
the mounting bracket.
3. Attach the mounting bracket to the junction box using the short bracket screws. Note: Ensure the long
fixture screws are aligned with the fixture mounting
holes before tightening the bracket to the junction
box.
Junction Box
Mounting Bracket
Twist the junction box wires and fixture wires together
as shown. Secure with wire connectors.
Recommended Grounding Method
Use a green ground “pigtail” (not provided) and twist
one end together with the bare fixture wire and the
box ground wire. Secure with a wire connector. Secure
the other end of the “pigtail” with the GND screw on
the mounting plate.
Black to black White to white
Short
Bracket
Screw
GND
If you have metal junction box, you may not need the
green “pigtail”. If you are unsure about the grounding
Ground Screw
GND
Long Fixture Screw
method, consult your local building code.
2
206151-04
Page 3

FINAL ASSEMBLY
1. Push the wires into the junction box.
2.
Slide the fixture assembly onto the long fixture screws.
Tighten decorative nuts securely against fixture base.
3. Caulk the fixture base mounting surface with silicone
weather sealant.
4. Adjust lamp holder(s) as needed. Note: Loosen
the screws on the lamp heads before making any
adjustments. IMPORTANT: Do not rotate the lamp
holders more than 180° from the factory setting.
Long Fixture Screw
Decorative Nut
Photocell
TEST AND ADJUSTMENT
1. Turn on the circuit breaker and light switch.
2. To test the light during daylight, cover the photocell
with black tape and ensure the light works properly.
3. Monitor light control to verify that the lights come on
at night and turn off during the day.
4. Adjust lamp holder(s) as needed.
Junction Box
SPECIFICATIONS
Power Requirements .... 120 VAC, 60 Hz
Wattage ........................ Model 8487 - Max. 8 Watt LED
Model 8485 - Max. 2 x 10 Watt LED
LUX control level ........... Approximately 20 lux
HeathCo LLC reserves the right to discontinue products and to change specifications at any time without
incurring any obligation to incorporate new features in products previously sold.
This device complies with Part 15 of the FCC Rules. Operation is subject to the following two conditions: (1) this
device may not cause harmful interference, and (2) this device must accept any interference received, including
interference that may cause undesired operation.
CAN ICES-005 (B)/NMB-005 (B)
TROUBLESHOOTING GUIDE
SYMPTOM POSSIBLE CAUSE SOLUTION
Lights will not come on. 1. Light switch is turned off.
2. Fuse is blown or circuit breaker is turned off.
3. Daylight turn-off is in effect.
4. Incorrect circuit wiring, if this is a new installation.
Lights stay on continuously. Light control is mounted in a dark location. Relocate light control to an area that receives more light.
Lights flash on and off. Light control may be sensing shadows. Relocate light control to an area away from shadows.
1. Turn light switch on.
2. Replace fuse or turn circuit breaker on.
3. Recheck after dark.
4. Verify wiring is correct.
206151-04
3
Page 4

TECHNICAL SERVICE
Please call 1-800-858-8501 (English speaking only) for assistance before returning product to store.
If you experience a problem, follow this guide. You may also want to visit our Web site at: www.hzsupport.com.
If the problem persists, call* for assistance at 1-800-858-8501 (English speaking only), 8:00 AM to 5:00 PM CST
(M-F). You may also write* to:
HeathCo LLC, P.O. Box 90045
Bowling Green, KY 42102-9045
ATTN: Technical Service
* If contacting Technical Service, please have the following information available: Model Number, Date of Pur-
chase, and Place of Purchase.
No Service Parts Available for this Product
Please keep your dated sales receipt, it is required for all warranty requests.
THREE YEAR LIMITED WARRANTY
This is a “Limited Warranty” which gives you specific legal rights. You may also have other rights which vary
from state to state or province to province.
For a period of three years from the date of purchase, any malfunction caused by factory defective parts or
workmanship will be corrected at no charge to you.
Not Covered - Repair service, adjustment and calibration due to misuse, abuse or negligence, light bulbs,
batteries, and other expendable items are not covered by this warranty. Unauthorized service or modification of the product or of any furnished component will void this warranty in its entirety. This warranty does
not include reimbursement for inconvenience, installation, setup time, loss of use, unauthorized service, or
return shipping charges.
This warranty covers only HeathCo LLC assembled products and is not extended to other equipment and
components that a customer uses in conjunction with our products.
THIS WARRANTY IS EXPRESSLY IN LIEU OF ALL OTHER WARRANTIES, EXPRESS OR IMPLIED,
INCLUDING ANY WARRANTY, REPRESENTATION OR CONDITION OF MERCHANT ABILITY OR THAT
THE PRODUCTS ARE FIT FOR ANY PARTICULAR PURPOSE OR USE, AND SPECIFICALLY IN LIEU
OF ALL SPECIAL, INDIRECT, INCIDENTAL, OR CONSEQUENTIAL DAMAGES.
REPAIR OR REPLACEMENT SHALL BE THE SOLE REMEDY OF THE CUSTOMER AND THERE SHALL
BE NO LIABILITY ON THE PART OF HEATHCO LLC FOR ANY SPECIAL, INDIRECT, INCIDENTAL, OR
CONSEQUENTIAL DAMAGES, INCLUDING BUT NOT LIMITED TO ANY LOSS OF BUSINESS OR PROFITS, WHETHER OR NOT FORESEEABLE. Some states or provinces do not allow the exclusion or limitation
of incidental or consequential damages, so the above limitation or exclusion may not apply to you.
Please keep your dated sales receipt, it is required for all warranty requests.
4
206151-04
Page 5

Luz
crepúsculo-al-amanecer
Modelos Modelo
8485 / 8486 8487
Características
• Luz LED crepúsculo-al-amanecer.
• Opera automáticamente únicamente por la noche.
• Solamente para montaje en pared.
Contenido del paquete
• Luz LED (vea el modelo de arriba)
• Tornillos cortos del soporte (2x)
• Tornillos grandes del aparato (2x)
• Tuercas decorativas (2x)
• Conectores de alambre (3x)
• Soporte de montaje (1x)
INSTALACIÓN PREVIA
Para una fácil instalación escoja una luz con un interruptor de pared. IMPORTANTE: No lo use con tem-
porizadores o atenuadores de luz.
Para un mejor funcionamiento, instale el aparato a casi
2.4 m del suelo.
Montaje en pared
Nota: Cuando la instale, la lámpara debe montarse según
se indica arriba (dependiendo del tipo de instalación).
Modelo 8485 mostrado arriba.
1. Retire el soporte de montaje de la parte posterior
de la lámpara.
2. Esté seguro que los tornillos largos del aparato estén
apretados a mano en el soporte de montaje.
Tornillo grande del aparato
Requisitos
• El control de luz requiere 120 VCA.
• Algunos códigos requieren instalación por un
electricista calificado.
• Este producto debe ser usado con una caja de empalmes marcada para ser usada en lugares mojados.
206151-04
© 2016 HeathCo LLC 206151-04 S
5
Soporte de
montaje
Page 6

INSTALACIÓN
CABLEADO
Nota: Todo el cableado debe realizarse de acuerdo
con el Código Eléctrico Nacional usando tubería o algún otro medio aceptable. Póngase en contacto con
un electricista calificado si tiene alguna pregunta
referente a la aptitud del sistema.
ADVERTENCIA: Desconecte la energía en el
fusible o cortacircuitos. Coloque cinta encima
del interruptor de cortacircuitos y verifique que
la energía está apagada en la luminaria.
1. Quite el aparato de luz existente (si es necesario).
2. Pase los cables de la caja de conexiones por el
centro de la abrazadera de montaje.
3. Sujete el soporte de montaje a la caja de conexiones
con los tornillos cortos del sopor te. Nota: Esté seguro
que los tornillos largos del aparato estén alineados
con los orificios de montaje del aparato antes de
apretar el soporte a la caja de conexiones.
Soporte de
montaje
La caja de
empalme
Conecte los cables de la caja de empalme con los cables
del aparato de luz, como se muestra. Tuérazalos juntos
y asegúrelos con un conector de cables.
Método recomendado de conexión a tierra
Use un “cable flexible” verde de tierra (no provisto) y
tuerza un extremo con el cable desnudo del aparato y
con el cable de a tierra de la caja. Asegúrelos con un
conector de cables. Asegure el otro extremo del “cable
flexible” con el tor nillo de a tierra de la placa de montaje.
Negro a negro Blanco a blanco
Tornillo
corto del
soporte
Si tiene una caja de empalme de metal, no necesita el
GND
Tornillos del
tierra
GND
Tornillo grande
del aparato
“cable flexible”. Si no está seguro del método de conexión
a tierra, consulte con el código local de construcción.
6
206151-04
Page 7

MONTAJE FINAL
1. Meta los alambres en la caja de empalme.
2. Deslice el conjunto lámpara en sus tornillos largos.
3. Calafatee la superficie de montaje de la base del aparato con un sellador de silicona contra la intemperie.
4. Regule el o los portalámparas según se requiera.
Nota: Afloje los tornillos en los cabezales de la
lámpara antes de realizar cualquier regulación.
IMPORTANTE: No gire el portalámparas más de
180º del ajuste hecho en fábrica.
Tornillo grande del aparato
Tuerca decorativa
Fotocélula
PRUEBA Y AJUSTE
1. Prenda el cortacircuitos y el interruptor de luz.
2. Para probar la lámpara durante la luz diurna, cubra
la fotocélula con cinta negra y asegúrese que la
lámpara trabaje correctamente.
3. Monitoree el control de luz para verificar que las
luces se encienden de noche y se apagan de día.
4. Regule el o los portalámparas según se requiera.
La caja de empalme
ESPECIFICACIONES
Requisitos de potencia .....................120 V ca, 60 Hz
Potencia ............................................Modelo 8487 - LED de 8 vatios máximo
Modelo 8485 - 2 LEDs de 10 vatios máximo
Nivel del control LUX ........................Aproximadamente 20 lux
HeathCo LLC se reserva el derecho de descontinuar productos y de cambiar especificaciones a cualquier momento
sin incurrir en ninguna obligación de tener que incorporar nuevas características en los productos vendidos con
anterioridad.
Este aparato cumple con la Parte 15 de las Reglas de la FCC. La operación está sujeta a las dos siguientes
condiciones: (1) este aparato no puede causar interferencias perjudiciales y (2) este aparato debe aceptar
cualquier interferencia recibida, incluyendo una interferencia que pueda causar un funcionamiento indeseado.
CAN ICES-005 (B)/NMB-005 (B)
GUIA DE INVESTIGACION DE AVERIAS
SÍNTOMA POSIBLE CAUSA SOLUCIÓN
Las luces no se prenden. 1. El interruptor de luz está apagado.
Las luces se quedan prendidas
continuamente.
Las luces se prenden y se apagan. El control de luz puede que esté detectando
2. El fusible está quemado o el cortacircuitos
está apagado.
3. La desconexión de luz del día está en efecto.
4. Alambrado incorrecto, si ésta es una nueva
instalación.
El control de luz está instalado en un lugar
oscuro.
sombras.
1. Encienda el interruptor de luz.
2. Cambie el fusible encienda el disyuntor.
3. Compruébelo cuando comience la obscuridad
4. Verifique que el cableado esté correcto.
Mueva el control de luz a un área que reciba más luz.
Vuelva a colocar el control de luz en un área sin
sombras.
206151-04
7
Page 8

SERVICIO TÉCNICO
Favor de llamar al 1-800-858-8501 (sólo para hablar en inglés) para pedir ayuda antes de devolver el
producto a la tienda.
Si tiene algún problema, siga esta guía. Usted puede también visitar nuestro sitio Web: www.hzsupport.com.
Si el problema continúa, llame al 1-800-858-8501 (sólo para hablar en inglés), de 8:00 AM a 5:00 PM CST (LV). Usted puede también escribir a:
HeathCo LLC, P.O. Box 90045
Bowling Green, KY 42102-9045
ATTN: Technical Service (Servicio Técnico)
* Si se llama al Servicio Técnico, por favor tener lista la siguiente información: Número de Modelo, Fecha de
compra y Lugar de compra.
No hay piezas de servicio disponibles para este producto.
Por favor guarde su recibo de venta fechado; se lo requiere para cualquier solicitud de garantía.
GARANTÍA LIMITADA A 3 AÑOS
Esta es una “Garantía Limitada” que le da a Ud. derechos legales específicos. Usted puede también tener
otros derechos que varían de estado a estado o de provincia a provincia.
Por un período de 3 años desde la fecha de compra, cualquier mal funcionamiento ocasionado por partes
defectuosas de fábrica o mano de obra será corregido sin cargo para Ud.
No cubierto - Servicio de reparación, ajuste y calibración debido al mal uso, abuso o negligencia, bombillas, baterías, u otras partes fungibles no están cubiertas por esta garantía. Los Servicios no autorizados
o modificaciones del producto o de cualquier componente que se provee invalidarán esta garantía en su
totalidad. Esta garantía no incluye reembolso por inconveniencia, instalación, tiempo de instalación, perdida
de uso, servicio no autorizado, o costos de transporte de retorno.
Esta garantía cubre solamente los productos ensamblados por HeathCo LLC y no se extiende a otros equipos o componentes que el consumidor usa junto con nuestros productos.
ESTA GARANTÍA ESTÁ EXPRESAMENTE EN LUGAR DE OTRAS GARANTÍAS, EXPRESADAS O SOBREENTENDIDAS, INCLUYENDO CUALQUIER GARANTÍA, REPRESENTACIÓN O CONDICIÓN DE
COMERCIABILIDAD O QUE LOS PRODUCTOS SE ADAPTEN PARA CUALQUIER PROPÓSITO O USO
EN PARTICULAR, Y ESPECIFICAMENTE EN LUGAR DE TODOS LOS DAÑOS ESPECIALES, INDIRECTOS, INCIDENTALES Y CONSECUENTES.
LA REPARACIÓN O EL REEMPLAZO DEBERÍA SER LA ÚNICA SOLUCIÓN DEL CLIENTE Y NO HABRÁ
RESPONSABILIDAD POR PARTE DE HEATHCO LLC POR CUALQUIER DAÑO ESPECIAL, INDIRECTO,
INCIDENTAL O CONSECUENTE, INCLUIDOS PERO NO LIMITADOS A CUALQUIER PÉRDIDA DE NEGOCIO O GANACIAS SEAN O NO PREVISIBLES. Algunos estados o provincias no permiten la exclusión
o limitación de daños incidentales o consecuentes, de modo que la limitación o exclusión arriba indicada
puede que no se aplique a Ud.
Por favor guarde su recibo de venta fechado; se lo requiere para cualquier solicitud de garantía.
8
206151-04
Page 9

Éclairage nocturne
automatique
Modèles Modèle
8485 / 8486 8487
PRÉ-INSTALLATION
Pour faciliter l’installation, choisir un appareil d’éclairage
devant être remplacé et qui est déjà commandé par un
interrupteur. IMPORTANT : Ne PAS utiliser avec des
gradateurs de lumière ou des minuteries.
Pour assurer un rendement optimum, monter le luminaire
à environ 2,4 m au-dessus du sol.
Montage mural
Caractéristiques
• Éclairage nocturne automatique à DEL.
• Fonctionne automatiquement rien que la nuit.
• Installation au mur seulement.
Contenu de l’emballage
• Éclairage à DEL (voir modèle ci-dessus)
• Vis de support courtes (2x)
• Longues vis d’éclairage (2x)
• Écrous décoratifs (2x)
• Serre-fils (3x)
• Fixation de montage (1x)
Exigences
• La commande d’éclairage nécessite une alimentation
de 120 V c.a.
• Certains codes de bâtiment locaux peuvent exi-
ger que l’installation soit faite par un électricien
qualifié.
• Ce produit est conçu pour être utilisé avec une boîte
de jonction portant une indication d’utilisation possible
en milieu humide.
Remarque : L’appareil d’éclairage devrait être monté tel
qu’illustré ci-dessus quand il est installé (selon le type
d’installation). Modèle 8485 illustré ci-dessus.
1. Enlever la fixation de montage de l’arrière de l’appareil
d’éclairage.
2. S’assurer que les longues vis d’éclairage sont serrées
à la main contre la fixation de montage.
Longues vis d’éclairage
Fixation de
montage
206151-04
© 2016 HeathCo LLC 206151-04 F
9
Page 10

INSTALLATION
CÂBLAGE
Remarque : Le câblage doit être conforme aux exigences
du Code national de l’électricité et être installé dans
des canalisations ou autres dispositifs acceptables. Si
vous avez des doutes concernant la convenance du
système, consultez un électricien reconnu.
MISE EN GARDE : Coupez l’alimentation au
disjoncteur ou au fusible. Mettez le ruban gommé
sur l’interrupteur du disjoncteur et vérifiez que
l'alimentation est coupée au montage.
1. Enlever l’appareil d’éclairage existant (si besoin est).
2. Insérer les fils de la boîte de connexion par le milieu
de la fixation de montage.
3. Attacher la fixation de montage à la boîte de
connexion en utilisant les vis de support courtes.
Remarque : S’assurer que les longues vis d’éclairage sont alignées avec les orifices de montage de
l’éclairage avant de resserrer la fixation à la boîte
de connexion.
Fixation de
montage
Vis de
support
courtes
GND
Boîte de
jonction
Vis de mise à
la terre
Torsader les fils de la boîte de jonction avec ceux de
la commande d’éclairage. Les fixer ensemble à l’aide
de serre-fils.
Méthode de mise à la terre recommandée
Utilisez une «queue de cochon» verte (non fournie) et
torsadez-en une extrémité avec le fil nu du luminaire et
le fil de terre de la boîte de jonction. Utilisez un serrefils. Fixez l'autre extrémité de la «queue de cochon»
avec la vis de terre (GND) sur la plaque de montage.
noir/noir blanc/blanc
Si la boîte de jonction est en métal, vous pourriez
nécessiter une «queue de cochon» verte. Si vous avez
des doutes sur la méthode de mise à la terre, consultez
votre code du bâtiment.
GND
Longues vis
d’éclairage
10
206151-04
Page 11

ASSEMBLAGE FINAL
1. Repoussez les fils dans la boîte de raccordement.
2. Faire glisser l’assemblage de l’éclairage sur les
longues vis d’éclairage.
3. Calfeutrer la surface de montage du socle avec du
mastic silicone à l’épreuve des intempéries.
4. Ajustez le(s) support(s) de lampe, au besoin. Remar-
que : Desserrer les vis des têtes d’éclairage avant de
procéder à tout ajustement que ce soit. IMPORTANT :
Ne pas faire pivoter les douilles de lampe à plus de
180° du réglage d’usine.
Longues vis d’éclairage
Écrou décoratif
Photocellule
ESSAIS ET RÉGLAGES
1. Mettre en circuit le disjoncteur et l’interrupteur
d’éclairage.
2. Pour tester l’éclairage pendant la journée, couvrir la
photocellule de ruban noir et s’assurer qu’il fonctionne
correctement.
3. Vérifier le fonctionnement de la commande pour
vous assurer que l’éclairage s’allume à la tombée
de la nuit, puis s’éteint au lever du jour.
4. Ajustez le(s) support(s) de lampe, au besoin.
Boîte de jonction
FICHE TECHNIQUE
Alimentation électrique ............. 120 V CA, 60 Hz
Puissance .................................. Modèle 8487 – DEL de 8 W max.
Modèle 8485 – DEL 2 x 10 W max.
Niveau de contrôle LUX ............. Environ 20 lux
HeathCo LLC se réserve le doit d’abandonner tout produit et d’en changer les spécifications, en tout temps et
sans contracter quelque obligation que ce soit quant à l’incorporation de nouvelles caractéristiques aux produits
déjà vendus.
Cet appareil est conforme aux exigences de la Partie 15 des Règles du FCC. Son utilisation est assujettie aux
deux conditions suivantes : (1) cet appareil ne doit pas causer d’interférence nocive; (2) cet appareil doit accepter
les interférences, y compris celles qui peuvent causer un fonctionnement non désiré.
CAN ICES-005 (B)/NMB-005 (B)
GUIDE DE DÉPANNAGE
SYMPTÔME CAUSE POSSIBLE SOLUTION
L’éclairage ne s’allume pas. 1. L’interrupteur d’éclairage est hors tension.
L’éclairage reste allumé
continuellement.
L’éclairage clignote. La commande détecte peut-être des ombres. Déplacer la commande vers un endroit où il n’y a pas
2. Le fusible a sauté ou le disjoncteur a été déclenché.
3. Le dispositif de coupure pendant le jour fonctionne.
4. Mauvais câblage du circuit, dans le cas d’une
nouvelle installation.
La commande d’éclairage est installée dans un
endroit sombre.
1. Mettre l’interrupteur sous tension.
2. Remplacer le fusible ou réenclencher le disjoncteur.
3. Vérifiez à nouveau à la noirceur
4. S’assurer que le câblage est approprié.
Déplacer la commande d’éclairage vers un endroit
mieux éclairé.
d’ombres.
206151-04
11
Page 12

SERVICE TECHNIQUE
Veuillez faire le 1 800 858-8501 (service en anglais seulement) pour obtenir de l’aide avant de retour-
ner l’article au magasin.
En cas de problème, suivez ce guide. Vous pouvez aussi visiter notre site Web à
problème persiste, composez* le 1 800 858-8501 (service en anglais seulement), entre 8 h 00 et 17 h 00, HNC,
du lundi au vendredi. Vous pouvez aussi écrire au :
HeathCo LLC. P.O. Box 90045
Bowling Green, KY 42102-9045
ATTN: Technical Service (Service technique)
* Lors d’un appel au service technique, veuillez avoir les renseignements suivants à portée de main : numéro
du modèle, date d’achat et endroit de l’achat.
Aucune pièce de rechange n’est disponible pour ce produit.
Veuillez conserver le reçu portant la date d’achat; vous en aurez besoin pour toutes vos demandes liées
à la garantie.
GARANTIE LIMITÉE DE 3 ANS
Il s’agit d’une « Garantie limitée » qui vous confère des droits juridiques spécifiques. Vous pouvez également
jouir d’autres droits, variables d’une province à l’autre.
Pendant une période de 3 ans à compter de la date d’achat, toute anomalie de fonctionnement imputable
à un vice de matériau ou de main-d’oeuvre sera corrigée gratuitement.
Exclusions de la garantie - Réparations, réglage et calibrage dus à une mauvaise utilisation, un mauvais
traitement ou à la négligence. Les ampoules, les piles et des autres articles non durables ne sont pas
couverts par cette garantie. Le service non autorisé ou la modification du produit ou d’un ou l’autre de ses
composants fournis invalidera totalement la présente garantie. Cette garantie n’inclut pas le remboursement pour le dérangement, l’installation, le réglage, la perte d’utilisation, le service non autorisé ou les frais
d’expédition pour le renvoi de la marchandise.
La garantie ne couvre que les produits assemblés HeathCo LLC et ne s’étend pas aux autres équipements
et composants que le client pourrait utiliser conjointement avec nos produits.
CETTE GARANTIE TIENT EXPRESSÉMENT LIEU DE TOUTES AUTRES GARANTIES, EXPLICITES
OU IMPLICITES, Y COMPRIS DE TOUTE GARANTIE DE REPRÉSENTATION OU DE CONDITION DE
CONVENANCE À LA COMMERCIALISATION OU À L’EFFET QUE LES PRODUITS CONVIENNENT À UN
BUT OU À UNE UTILISATION PARTICULIÈRE, ET SPÉCIFIQUEMENT DE TOUS DOMMAGES SPÉCIAUX,
DIRECTS, INDIRECTS OU SECONDAIRES.
LE REMPLACEMENT OU LA RÉPARATION CONSTITUENT LE SEUL RECOURS DU CLIENT ET HEATHCO LLC NE POURRA ÊTRE TENUE RESPONSABLE DE TOUS DOMMAGES SPÉCIAUX, DIRECTS,
INDIRECTS OU SECONDAIRES, Y COMPRIS, SANS S’Y LIMITER, LES PERTES COMMERCIALES ET
PERTES DE PROFIT, QU’ELLES SOIENT PRÉVISIBLES OU NON. Certaines provinces n’autorisent pas
l’exclusion ou la limitation des dommages indirects ou secondaires, et la limitation ou l’exclusion ci-dessus
pourrait ne pas s’appliquer à vous. Veuillez conserver le reçu portant la date d’achat; vous en aurez
besoin pour toutes vos demandes liées à la garantie.
www.hzsupport.com.
Si le
12
206151-04
 Loading...