

Page 1

Wireless Push Button
Accessory
© 2017 HeathCo LLC 207667-03A
Model
Wireless
push
button
Wireless
push
button
Hardware
pack
7797
✔ ✔
7393
✔ ✔
The Heath® Zenith wireless push button accessory works with any Heath® Zenith
wireless chime. This package includes:
Style of push button may vary from illustration.
Note: All
illustrations show model 7797. The instructions are the
same for all models.
Page 2

Helpful Videos – www.hzsupport.com Helpful Answers – 1-800-858-8501
2
Figure 1
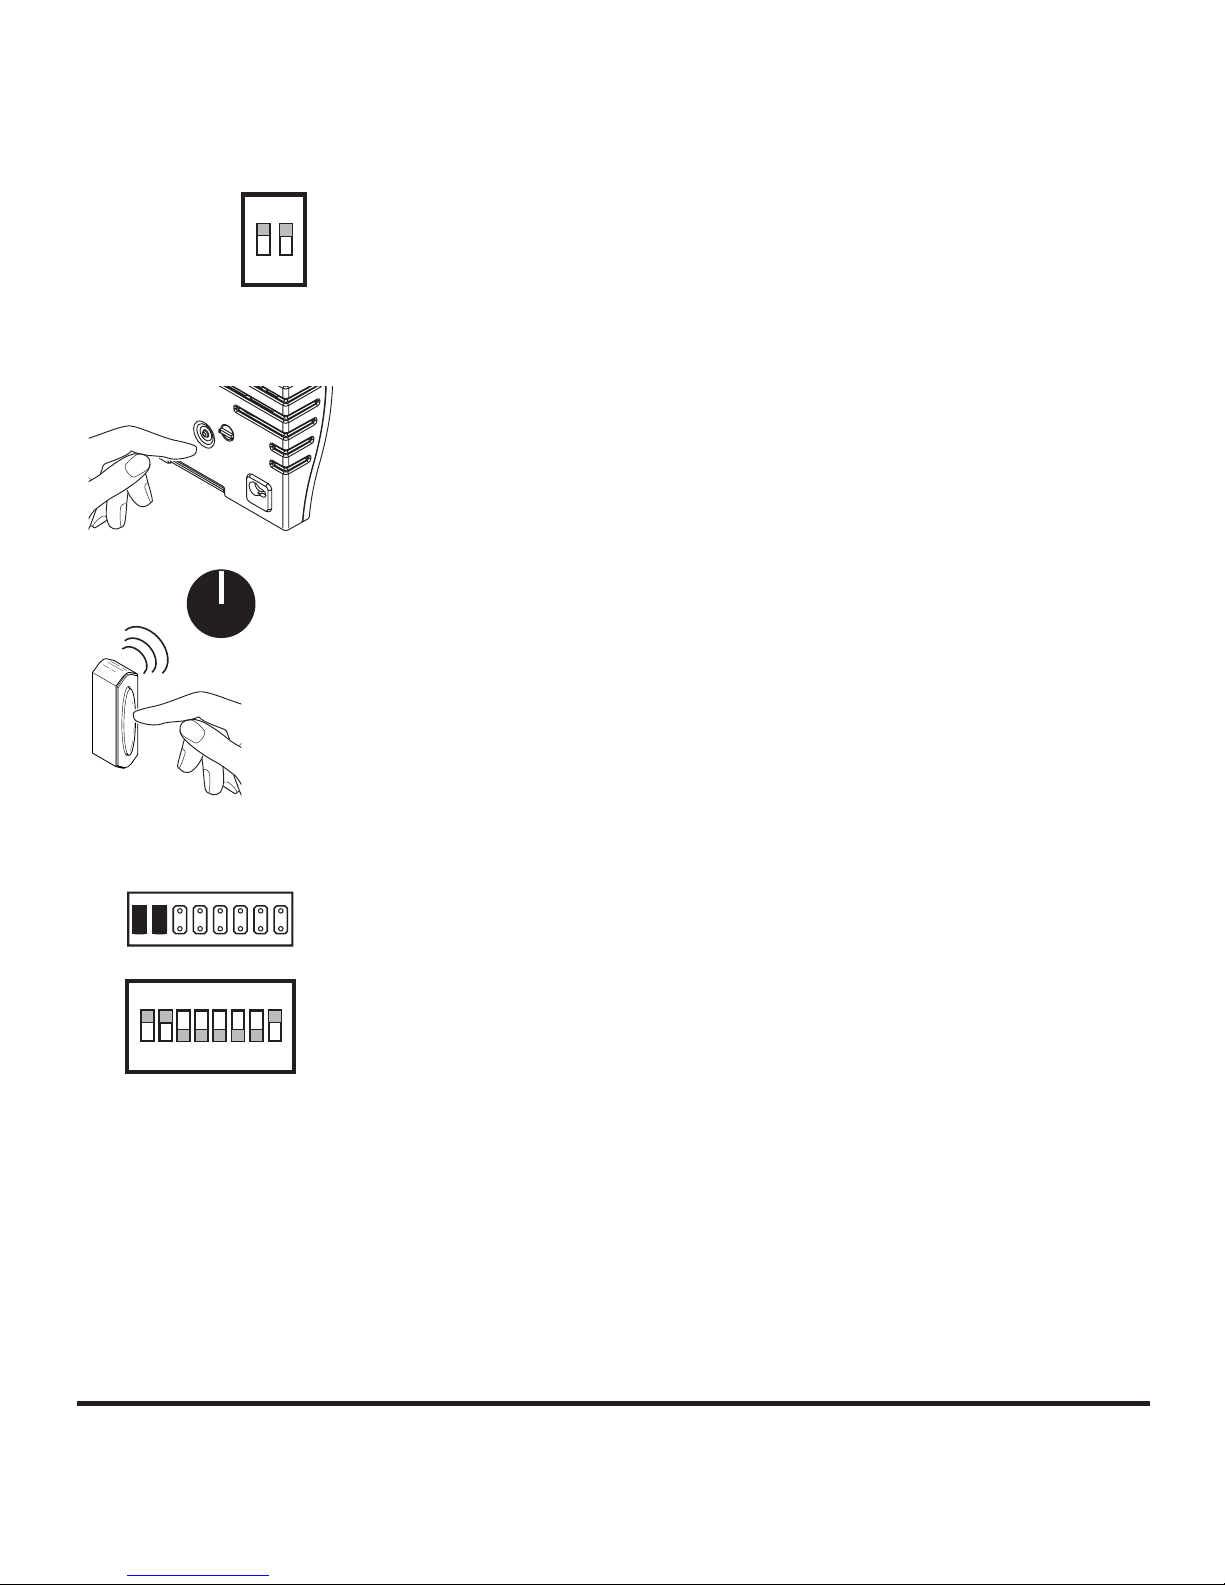
WARNING: To prevent possible SERIOUS INJURY or DEATH:
• NEVER allow small children near batteries.
• If battery is swallowed, immediately notify doctor.
Figure 2
1 2 3 4 5 6 7 8
CB
TUNE – HOLD
1 SECOND.
SYNC – HOLD
3 SECONDS.
RESET – HOLD
10 SECONDS.
C
H
I
M
E
V
O
L
U
M
E
A
MODEL: WL-4B
1 – MODE
2 – TUNE
C
H
I
M
E
V
O
L
U
M
E
ON
1 2
1. Remove orange battery tab from push button. Remove
back of case by pushing in tab on bottom with a small
screwdriver (see Figure 1). Remove orange battery tab.
2. Determine chime type. Look at the chime and determine
which type of chime will be connected to the push button
(see Figure 2).
• Chime < A > (2 Switches): The chime has only two
switches.
• Chime < B > (1 Button): The chime has a multi-function
button (“Tune/Sync/Reset” or “Sync/Reset”).
• Chime < C > (7 or 8 Jumpers or Switches): The chime
has a row of 7 or 8 jumpers or switches.
Page 3
Helpful Videos – www.hzsupport.com Helpful Answers – 1-800-858-8501
3
Continued
3. Sync the push button and chime.
Syncing Chime < A >
Step A1 (see Figure 3)
• If the chime is plugged in, unplug the chime.
• Set chime switch 1 to the ON position. If the chime was
unplugged, plug chime into wall outlet.
Step A2
• Remove battery from push button. Wait 30 seconds.
• Install battery in push button.
• Within 1 minute of installing battery, press and hold the
push button for 5 to 7 seconds.
• Press the push button to confirm sync. If chime sounds,
sync is complete.
• Go to step 4.
Syncing Chime < B >
Step B1 (see Figure 4)
• Press and hold the button on the chime until the chime
sounds a “Beep-Beep”.
• Press the push button within 60 seconds. The chime
will sound a “Beep-Beep” tone to indicate the push
button is synced.
• Press the push button to confirm sync. If chime sounds,
sync is complete.
• Go to step 4.
Syncing Chime < C >
Step C1 (see Figure 5)
• Remove all jumpers from positions 1 through 7 on the
chime and place jumpers only on positions 1 and 2, or
set switches 1 and 2 to the ON position and switches
3 through 7 to the OFF position.
Figure 3
Chime
Setting
ON
1 2
Figure 4
60 Sec.
Figure 5
Chime Setting
ON
1 2 3 4 5 6 7 8
1 2 3 4 5 6 7 8
Page 4

Helpful Videos – www.hzsupport.com Helpful Answers – 1-800-858-8501
4
Figure 6
• Remove battery from push button. Wait 30 seconds.
• Install battery in push button.
• Within 1 minute of installing battery, press and hold the
push button for 5 to 7 seconds.
• Press the push button to confirm sync. If chime sounds,
sync is complete.
• Go to step 4.
4. Test range. Temporarily position push button where you
want it mounted. Press push button to verify chime and
push button work properly. If chime does not sound, see
Troubleshooting.
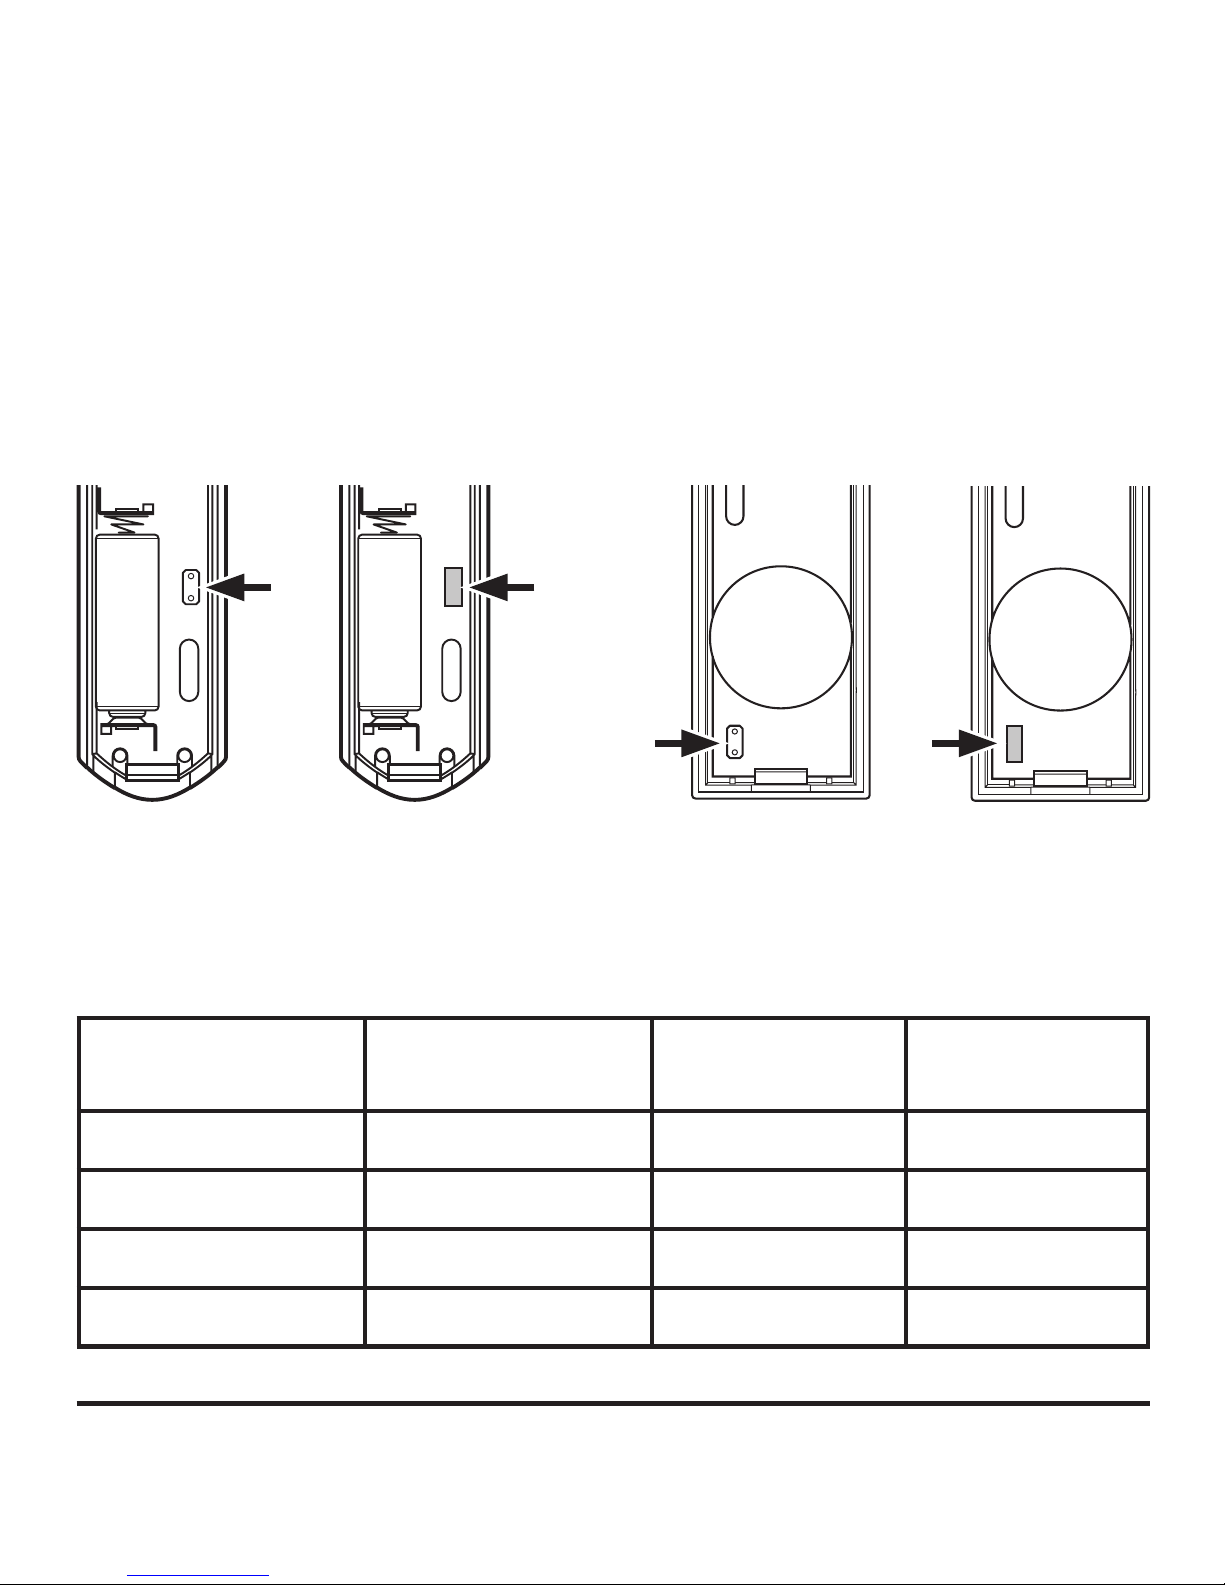
5. Mount push button. Use either screws or double sided
tape to mount push button.
• Screw Mounting: To mount with screws, remove
back of case by pushing in tab on bottom with a small
screwdriver (see Figure 1). Note: Remove material in
screw holes (if needed) before mounting with screws.
Attach back of case to door jamb or wall (see Figure
6). Snap front of push button on.
• Tape Mounting: When attaching push button using
double sided tape, make sure the surface of the door
jamb or wall is clean.
6. Battery replacement. Make sure batteries are installed
according to the diagram inside the push button.
IMPORTANT: Properly dispose of drained batteries.
Battery
Model
7797
Model
7393
Type A23 12V
✔
Type 2032 3V
✔
Page 5
Helpful Videos – www.hzsupport.com Helpful Answers – 1-800-858-8501
5
Push Button Chime < A > 2-Sounds
Chime
3-Sounds
Chime
Jumper - ON Switch 2 - ON Ding Ding
Jumper - OFF Switch 2 - ON Ding-Dong Ding-Dong
Jumper - OFF Switch 2 - OFF Ding-Dong Ding-Dong
Jumper - ON Switch 2 - OFF Ding Westminster
Tune Setting Table – Chime < A > and Push Button Settings*
*For musical chimes, refer to the chime manual when selecting tune.
Tune Settings
Wireless chimes have different selectable tunes: Ding (one note tune) and Ding-Dong
(two note tune). Some models include Westminster (eight note tune) or musical
tunes. The factory setting is for the Ding-Dong (or Westminster if applicable) tune.
This tune can be changed by following the instructions in the Tune Setting Table.
Continued
Page 6

Helpful Videos – www.hzsupport.com Helpful Answers – 1-800-858-8501
6
Push Button Chime < C > 2-Sounds
Chime
3-Sounds
Chime
Jumper - ON Jumper 8 or
Switch 8 - OFF
Ding Ding
Jumper - OFF Jumper 8 or
Switch 8 - OFF
Ding-Dong Ding-Dong
Jumper - OFF Jumper 8 or
Switch 8 - ON
Ding-Dong Westminster
Jumper - ON Jumper 8 or
Switch 8 - ON
Ding Ding
Tune Setting Table – Chime < C > and Push Button Settings*
*For musical chimes, refer to the chime manual when selecting tune.
Push Button Chime < B > 2-Sounds
Chime
3-Sounds
Chime
Jumper - ON ——— Ding Ding
Jumper - OFF Push button on
chime to select
tune
Ding-Dong Ding-Dong or
Westminster
Tune Setting Table – Chime < B > and Push Button Settings*
*For musical chimes, refer to the chime manual when selecting tune.
Page 7

Helpful Videos – www.hzsupport.com Helpful Answers – 1-800-858-8501
7
Troubleshooting
1. PROBLEM: Chime does not sound or rang one time and quit.
A. POSSIBLE CAUSE: Batteries not installed correctly.
A. CORRECTIVE ACTION: Make sure batteries are installed according to
the diagram inside the push button and chime (if applicable).
B. POSSIBLE CAUSE: Batteries are dead.
B. CORRECTIVE ACTION: Check charge of push button and chime batteries
(if applicable) and replace if necessary.
C. POSSIBLE CAUSE: Push button and chime are not synced.
C. CORRECTIVE ACTION: Follow steps 2 and 3, page 2, to sync.
2. PROBLEM:
Batteries seem okay, but the chime does not work after installation.
A. POSSIBLE CAUSE: Chime or push button is mounted on metal or near
metal studs. Note: Metal reduces transmission range.
A. CORRECTIVE ACTION: Use 1/4 in. to 1/2 in. (6 to 13 mm) wood shims
to move chime or push button away from metal surface.
B. POSSIBLE CAUSE: Chime is mounted near concrete floor or wall. Note:
Concrete may reduce range.
B. CORRECTIVE ACTION: Move chime away from concrete surface.
C. POSSIBLE CAUSE: Chime and push button are installed too far apart.
C. CORRECTIVE ACTION: Locate chime closer to push button.
Note: The range of the wireless chime can vary with location, temperature, and
battery condition.
Page 8

Helpful Videos – www.hzsupport.com Helpful Answers – 1-800-858-8501
8
Please contact us for assistance
before returning product to the
store or to HeathCo LLC.
If you experience a problem, follow this
guide. You may also contact us between
8:00 AM to 5:00 PM CST (M-F).
When contacting Technical Service,
please include the following information: Name, Street Address, Daytime
Phone Number, Email Address, Model
Number, Date of Purchase, Place of
Purchase, Product Issue, and DATED
SALES RECEIPT FOR WARRANTY
REQUESTS.
Technical Service
No Service Parts Available for this
Product
HeathCo LLC
2445 Nashville Road
Bowling Green, KY 42101, USA
ATTN: Technical Service
Internet: www.hzsupport.com
Phone: 1-800-858-8501 (English Only)
Fax: 1-800-846-8500
Regulatory Information
This device complies with Part 15 of the FCC Rules and RSS-210 of Industry Canada.
Operation is subject to the following two conditions: (1) this device may not cause
harmful interference, and (2) this device must accept any interference received,
including interference that may cause undesired operation.
The user is cautioned that changes or modifications not expressly approved by
the party responsible for regulatory compliance could void the user’s authority to
operate the equipment.
Page 9

Helpful Videos – www.hzsupport.com Helpful Answers – 1-800-858-8501
9
HeathCo LLC reserves the right to discontinue and to change specifications at any
time without notice without incurring any obligation to incorporate new features in
previously sold products.
ONE YEAR LIMITED WARRANTY
This is a “Limited Warranty” which gives you specific legal rights. You may
also have other rights which vary from state to state or province to province.
For a period of one year from the date of purchase, any malfunction caused by
factory defective parts or workmanship will be corrected at no charge to you.
Not Covered - Repair service, adjustment and calibration due to misuse,
abuse or negligence, light bulbs, batteries, and other expendable items are not
covered by this warranty. Unauthorized service or modification of the product or
of any furnished component will void this warranty in its entirety. This warranty
does not include reimbursement for inconvenience, installation, setup time,
loss of use, unauthorized service, or return shipping charges.
This warranty covers only HeathCo LLC assembled products and is not
extended to other equipment and components that a customer uses in conjunction with our products.
THIS WARRANTY IS EXPRESSLY IN LIEU OF ALL OTHER WARRANTIES,
EXPRESS OR IMPLIED, INCLUDING ANY WARRANTY, REPRESENTATION
OR CONDITION OF MERCHANT ABILITY OR THAT THE PRODUCTS ARE FIT
FOR ANY PARTICULAR PURPOSE OR USE, AND SPECIFICALLY IN LIEU OF
ALL SPECIAL, INDIRECT, INCIDENTAL, OR CONSEQUENTIAL DAMAGES.
REPAIR OR REPLACEMENT SHALL BE THE SOLE REMEDY OF THE CUSTOMER AND THERE SHALL BE NO LIABILITY ON THE PART OF HEATHCO
LLC FOR ANY SPECIAL, INDIRECT, INCIDENTAL, OR CONSEQUENTIAL
DAMAGES, INCLUDING BUT NOT LIMITED TO ANY LOSS OF BUSINESS
OR PROFITS, WHETHER OR NOT FORESEEABLE. Some states or provinces do not allow the exclusion or limitation of incidental or consequential
damages, so the above limitation or exclusion may not apply to you.
Please keep your dated sales receipt, it is required for all warranty
requests.
Page 10

Vídeos prácticos – www.hzsupport.com Respuestas prácticas – 1-800-858-8501
10
Accesorio de pulsador
inalámbrico
© 2017 HeathCo LLC 207667-03 S
El pulsador inalámbrico Heath® Zenith funciona con cualquier campana inalámbrica
Heath® Zenith. Este paquete tiene:
Modelo
Pulsador
inalámbrico
Pulsador
inalámbrico
Paquete de
ferretería
7797
✔ ✔
7393
✔ ✔
El estilo del pulsador puede variar de la ilustración. Nota: Todas
las ilustraciones muestran el modelo 7797. Las instrucciones
son las mismas para todos los modelos.
Page 11

Vídeos prácticos – www.hzsupport.com Respuestas prácticas – 1-800-858-8501
11
ADVERTENCIA: Para prevenir una posible LESIÓN SERIA o LA
MUERTE:
• NUNCA deje que los niños estén cerca de las baterías.
• Si se traga una batería, notifique inmediatamente al doctor.
1. Retire la pestaña naranja de la batería del botón pulsador. Extraer la parte posterior de la caja presionando
la aleta en el botón con un destornillador pequeño (vea
la Figura 1). Quite la aleta anaranjada de la batería.
2. Determine el tipo de timbre. Verifique y determine qué
tipo de campanilla se conectará al botón pulsador (vea
la Figura 2).
• Campanilla < A > (2 interruptores): La campanilla solo
cuenta con dos interruptores.
• Campanilla < B > (1 botón): La campanilla tiene un
botón multifunción (“Tune/Sync/Reset” o “Sync/Reset”).
•
Campanilla < C > (7 u 8 puentes o interruptores): La
campanilla tiene una fila de 7 u 8 puentes o interruptores.
3. Sincronice el botón pulsador y la campanilla.
Figura 1
Figura 2
Continúa
1 2 3 4 5 6 7 8
CB
TUNE – HOLD
1 SECOND.
SYNC – HOLD
3 SECONDS.
RESET – HOLD
10 SECONDS.
C
H
I
M
E
V
O
L
U
M
E
A
MODEL: WL-4B
1 – MODE
2 – TUNE
C
H
I
M
E
V
O
L
U
M
E
ON
1 2
Page 12

Vídeos prácticos – www.hzsupport.com Respuestas prácticas – 1-800-858-8501
12
Figura 3
Figura 4
Configuración
del timbre
ON
1 2
60 Sec.
Figura 5
Configuración del
timbre
ON
1 2 3 4 5 6 7 8
1 2 3 4 5 6 7 8
Sincronización del timbre <A>
Paso A1 (vea la Figura 3)
• Si el timbre está conectado, desconéctelo.
• Coloque el interruptor1 del timbre a la posición ON. Si
el timbre estuvo desconectado, conéctelo al tomacorriente de la pared.
Paso A2
• Retire la pila de botón pulsador. Espere 30 segundos.
• Instale la pila en el pulsador.
• Después de 1 minuto de haber instalado el timbre,
mantenga pulsado el botón durante 5 a 7 segundos.
• Pulse el botón para confirmar la sincronización. Si el
timbre suena, la sincronización se ha completado.
• Vaya al paso 4.
Sincronización del timbre <B>
Paso B1 (vea la Figura 4)
• Mantenga presionado el botón en la campanilla hasta
escuchar un “Beep-Beep”.
• Presione el botón pulsador durante 60 segundos.
Cuando el botón pulsador esté sincronizado, la campanilla hará “Beep-Beep”.
• Pulse el botón para confirmar la sincronización. Si el
timbre suena, la sincronización se ha completado.
• Vaya al paso 4.
Sincronización del timbre <C>
Paso C1 (vea la Figura 5)
• Retire todos los puentes de las posiciones 1 a 7 en
la campanilla y colóquelos solo en las posiciones 1 y
2, o ENCIENDA los interruptores 1 y 2 y APAGUE los
interruptores del 3 al 7.
• Retire la pila de botón pulsador. Espere 30 segundos.
• Instale la pila en el pulsador.
• Después de 1 minuto de haber instalado el timbre,
Page 13

Vídeos prácticos – www.hzsupport.com Respuestas prácticas – 1-800-858-8501
13
mantenga pulsado el botón durante 5 a 7 segundos.
• Pulse el botón para confirmar la sincronización. Si el
timbre suena, la sincronización se ha completado.
• Vaya al paso 4.
4. Pruebe el alcance.
Ponga provisionalmente la pulsador en
la posición donde lo quiera instalar. Presione el pulsador para
verificar que la campanay el pulsador funcionen apropiadamente. Si la campana no suena, vea Análisis de Averías.
5. Instale el pulsador. Use ya sean tornillos o cinta adhesiva
por ambas caras para instalar el pulsador.
• Montaje con tornillos: Para montar con tornillos, quite
la parte de atrás de la caja empujando hacia adentro
la lengüeta de abajo con un destornillador pequeño
y girando la cuchilla (vea la Figura 1). Nota: Quite la
suciedad de los orificios para tornillos (si es necesario)
antes de poner los tornillos. Coloque la parte de atrás
de la caja contra la jamba o la pared (vea la Figura 6).
Encaje a presión la parte frontal del pulsador.
• Montaje con cinta adhesiva: Cuando fije el pulsador
usando cinta adhesiva por ambas caras, asegúrese
que la superficie de la pared o la del batiente de la
puerta estén limpias.
6. Cambio de la batería. Asegúrese de que las baterías
estén instaladas de acuerdo con el diagrama dentro del
botón pulsador.
Continúa
Figura 6
IMPORTANTE: Deseche debidamente las pilas drenadas.
Batería
Modelo
7797
Modelo
7393
Tipo A23 de 12V
✔
Tipo 2032 de 3V
✔
Page 14

Vídeos prácticos – www.hzsupport.com Respuestas prácticas – 1-800-858-8501
14
Programación del tono
La campanilla tiene diferentes melodías que se pueden seleccionar: Ding (melodía de una nota) y Ding-Dong (melodía de dos notas). Algunos modelos incluyen
melodías musicales o melodías de Westminster (ocho melodías). La configuración
hecha en fábrica es para la melodía Ding-Dong (o Westminster si corresponde).
Esta melodía se puede cambiar siguiendo las instrucciones de la Tabla de Pro-
gramación de Melodías.
*Para información sobre las campanillas musicales, consulte el manual de la campanilla al seleccionar una melodía.
Botón pulsador Campanilla
< A >
Campanilla de
2 sonidos
Campanilla de 3
sonidos
Puente:
ENCENDIDO
Interruptor 2:
ENCENDIDO
Ding Ding
Puente:
APAGADO
Interruptor 2:
ENCENDIDO
Ding-Dong Ding-Dong
Puente:
APAGADO
Interruptor 2:
APAGADO
Ding-Dong Ding-Dong
Puente:
ENCENDIDO
Interruptor 2:
APAGADO
Ding Westminster
Tabla de programación de melodías: configuraciones de la campanilla < A >
y del botón pulsador*
Page 15

Vídeos prácticos – www.hzsupport.com Respuestas prácticas – 1-800-858-8501
15
*Para información sobre las campanillas musicales, consulte el manual de la campanilla al seleccionar una melodía.
*Para información sobre las campanillas musicales, consulte el manual de la campanilla al seleccionar una melodía.
Botón pulsador Campanilla < C > Campanilla
de 2 sonidos
Campanilla
de 3 sonidos
Puente:
ENCENDIDO
Puente 8 o interruptor 8:
APAGADO
Ding Ding
Puente:
APAGADO
Puente 8 o interruptor 8:
APAGADO
Ding-Dong Ding-Dong
Puente:
APAGADO
Puente 8 o interruptor 8:
ENCENDIDO
Ding-Dong Westminster
Puente:
ENCENDIDO
Puente 8 o interruptor 8:
ENCENDIDO
Ding Ding
Botón pulsador Campanilla < B > Campanilla
de 2 sonidos
Campanilla
de 3 sonidos
Puente:
ENCENDIDO
———
Ding Ding
Puente:
APAGADO
Presione el botón en
la campanilla para
seleccionar la melodía.
Ding-Dong Ding-Dong o
Westminster
Tabla de programación de melodías: configuraciones de la campanilla < C >
y del botón pulsador*
Tabla de programación de melodías: configuraciones de la campanilla < B >
y del botón pulsador*
Page 16

Vídeos prácticos – www.hzsupport.com Respuestas prácticas – 1-800-858-8501
16
Análisis de Averías
1. PROBLEMA: La campanilla no suena o hace ruido una sola vez y se detiene.
A. CAUSA POSIBLE: Las baterías no están bien instaladas.
A. ACCIÓN CORRECTIVA: Asegúrese de que las baterías estén instaladas
de acuerdo con el diagrama dentro del botón pulsador y de la campanilla (si
corresponde).
B. CAUSA POSIBLE: Las baterías se acabaron.
B. ACCIÓN CORRECTIVA: Revise la carga de las baterías del botón pulsador
y de la campanilla (si corresponde) y reemplácelas si fuera necesario.
C. CAUSA POSIBLE: El botón pulsador y la campanilla no están sincronizados.
C. ACCIÓN CORRECTIVA: Siga los pasos 2 y 3, página 11, para sincronizar.
2. PROBLEMA: Las baterías parecen estar bien pero la campanilla no funciona
después de la instalación.
A. CAUSA POSIBLE: La campanilla o el botón pulsador están montados sobre
metal o cerca de montantes de metal. Nota: El metal reduce el alcance de
transmisión.
A. ACCIÓN CORRECTIVA: Use calzas de madera de 6 a 13 mm (1/4 a 1/2
pulg.) para sacar la campanilla o el botón pulsador de la superficie de metal.
B. CAUSA POSIBLE: La campanilla está montada cerca de un piso o pared
de concreto. Nota: El concreto puede reducir el alcance.
B. ACCIÓN CORRECTIVA: Aleje la campanilla de la superficie de concreto.
C. CAUSA POSIBLE: La campanilla y el botón pulsador están instalados
demasiado alejados.
C. ACCIÓN CORRECTIVA: Ubique la campanilla más cerca del botón pulsador.
Nota: El alcance de la campanilla inalámbrica puede variar con la ubicación, temperatura y condición de la batería.
Page 17

Vídeos prácticos – www.hzsupport.com Respuestas prácticas – 1-800-858-8501
17
Por favor comuníquese con nosotros
antes de devolver el producto a la
tienda o a HeathCo LLC.
En caso de cualquier problema, siga
esta guía. Puede también comunicarse
con nosotros entre las 8:00 AM y las
5:00 PM (de lunes a viernes).
Cuando se comunique con el Servicio
Técnico, por favor dé la siguiente
información: nombre, dirección,
número de teléfono durante el día,
dirección de su email, número de
modelo, fecha de compra, lugar de
compra, problema del producto, y
RECIBO FECHADO DE COMPRA
PARA PETICIONES DE GARANTÍA.
Servicio Técnico
No hay piezas de servicio
disponibles para este producto.
HeathCo LLC
2445 Nashville Road
Bowling Green, KY 42101, USA
ATTN: Technical Service (Servicio
Técnic)
Internet: www.hzsupport.com
Teléfono: 1-800-858-8501 (solo inglés)
Fax: 1-800-846-8500
Información Regulatoria
Este aparato cumple con la Parte 15 de las Reglas de la FCC (Comisión Federal de
Comunicaciones) y con la RSS-210 de las Industrias del Canadá. El funcionamiento
está sujeto a las dos siguientes condiciones: (1) este aparato no puede causar interferencias dañinas, y (2) este aparato debe aceptar cualquier interferencia recibida,
incluyendo una interferencia que pueda causar un funcionamiento indeseable.
Se advierte al usuario que cambios o modificaciones no aprobadas expresamente
por la parte responsable de cumplir con los reglamentos podría invalidar la autoridad
del usuario para el uso de este equipo.
Page 18

Vídeos prácticos – www.hzsupport.com Respuestas prácticas – 1-800-858-8501
18
HeathCo LLC se reserva el derecho de descontinuar y de cambiar las especificaciones a cualquier momento, sin previo aviso, sin incurrir en ninguna obligación de tener
que incorporar nuevas características en los productos vendidos anteriormente.
GARANTÍA LIMITADA A 1 AÑO
Esta es una “Garantía Limitada” que le da a Ud. derechos legales específicos.
Usted puede también tener otros derechos que varían de estado a estado o de
provincia a provincia.
Por un período de 1 año desde la fecha de compra, cualquier mal funcionamiento
ocasionado por partes defectuosas de fábrica o mano de obra será corregido sin
cargo para Ud.
No cubierto - Servicio de reparación, ajuste y calibración debido al mal uso, abuso o
negligencia, bombillas, baterías, u otras partes fungibles no están cubiertas por esta
garantía. Los Servicios no autorizados o modificaciones del producto o de cualquier
componente que se provee invalidarán esta garantía en su totalidad. Esta garantía
no incluye reembolso por inconveniencia, instalación, tiempo de instalación, perdida
de uso, servicio no autorizado, o costos de transporte de retorno.
Esta garantía cubre solamente los productos ensamblados por HeathCo LLC y
no se extiende a otros equipos o componentes que el consumidor usa junto con
nuestros productos.
ESTA GARANTÍA ESTÁ EXPRESAMENTE EN LUGAR DE OTRAS GARANTÍAS,
EXPRESADAS O SOBREENTENDIDAS, INCLUYENDO CUALQUIER GARANTÍA,
REPRESENTACIÓN O CONDICIÓN DE COMERCIABILIDAD O QUE LOS PRODUCTOS SE ADAPTEN PARA CUALQUIER PROPÓSITO O USO EN PARTICULAR, Y ESPECIFICAMENTE EN LUGAR DE TODOS LOS DAÑOS ESPECIALES,
INDIRECTOS, INCIDENTALES Y CONSECUENTES.
LA REPARACIÓN O EL REEMPLAZO DEBERÍA SER LA ÚNICA SOLUCIÓN DEL
CLIENTE Y NO HABRÁ RESPONSABILIDAD POR PARTE DE HEATHCO LLC POR
CUALQUIER DAÑO ESPECIAL, INDIRECTO, INCIDENTAL O CONSECUENTE,
INCLUIDOS PERO NO LIMITADOS A CUALQUIER PÉRDIDA DE NEGOCIO O
GANACIAS SEAN O NO PREVISIBLES. Algunos estados o provincias no permiten
la exclusión o limitación de daños incidentales o consecuentes, de modo que la limitación o exclusión arriba indicada puede que no se aplique a Ud. Por favor guarde
su recibo de venta fechado; se lo requiere para cualquier solicitud de garantía.
Page 19

Vidéos pratiques – www.hzsupport.com Réponses pratiques – 1-800-858-8501
19
Accessoire de
bouton-poussoir sans fil
© 2017 HeathCo LLC 207667-03 F
Le bouton-poussoir sans fil HeathMD Zenith fonctionne avec tous les carillons sans
fil HeathMD Zenith. Cet emballage contient :
Modèle
Bouton-
poussoir
sans fil
Bouton-
poussoir
sans fil
Ensemble
de ferrures
7797
✔ ✔
7393
✔ ✔
Le style de bouton-poussoir peut varier de l’illustration.
Remarque : Toutes les illustrations portent sur le modèle
7797. Les directives sont identiques pour tous les modèles.
Page 20

Vidéos pratiques – www.hzsupport.com Réponses pratiques – 1-800-858-8501
20
1. Retirez la languette orange de la pile du boutonpoussoir. Ôtez la partie arrière du boîtier en enfonçant la
patte du bas au moyen d’un petit tournevis (voir la Figure
1). Retirez la languette orange.
2. Déterminez le type de carillon. Observez le carillon et
choisissez quel type de carillon sera branché au boutonpoussoir (voir la Figure 2).
•
Carillon < A > (2 interrupteurs) : le carillon ne présente
que deux interrupteurs.
• Carillon < B > (1 bouton) : le carillon est doté d’un
bouton multifonction (« Tune/Sync/Reset » ou « Sync/
Reset »).
• Carillon < C > (7 ou 8 cavaliers ou interrupteurs) : le
carillon présente une rangée de 7 ou 8 cavaliers ou
interrupteurs.
Figure 1
Figure 2
1 2 3 4 5 6 7 8
CB
TUNE – HOLD
1 SECOND.
SYNC – HOLD
3 SECONDS.
RESET – HOLD
10 SECONDS.
C
H
I
M
E
V
O
L
U
M
E
A
MODEL: WL-4B
1 – MODE
2 – TUNE
C
H
I
M
E
V
O
L
U
M
E
ON
1 2
MISE EN GARDE : Pour éviter les risques de BLESSURES GRAVES,
voire de DÉCÈS :
• Ne laissez JAMAIS un enfant seul près des piles.
•
En cas d’ingestion d’une pile, avisez immédiatement un médecin.
Page 21

Vidéos pratiques – www.hzsupport.com Réponses pratiques – 1-800-858-8501
21
Suite
3. Synchronisez le bouton-poussoir et le carillon.
Synchronisation du carillon < A >
Étape A1 (voir la Figure 3)
• Si le carillon est branché, débranchez-le.
• Placez le commutateur 1 du carillon en position ON. Si
le carillon est débranché, branchez-le dans une prise
électrique.
Étape A2
• Retirez la pile du bouton-poussoir. Attendez 30
secondes.
• Installez une pile dans le bouton-poussoir.
• Dans la minute suivant l'installation de la pile, appuyez
sur le bouton-poussoir et maintenez-le enfoncé pendant 5 à 7 secondes.
• Appuyez sur le bouton-poussoir pour confirmer la
synchronisation. Si le carillon sonne, c'est que la
synchronisation est terminée.
• Passez à l’étape 4.
Synchronisation du carillon < B >
Étape B1 (voir la Figure 4)
•
Appuyez sur le bouton du carillon et maintenez-le enfoncé
jusqu’à ce que le carillon émette un « Beep-Beep ».
• Appuyez sur le bouton-poussoir dans les 30 secondes
suivantes. Le carillon émettra un « Beep-Beep » pour
indiquer que le bouton-poussoir est synchronisé.
Attendez 30 secondes avant d’appuyer sur le boutonpoussoir afin de vous assurer qu’il fonctionne bien.
• Appuyez sur le bouton-poussoir pour confirmer la
synchronisation. Si le carillon sonne, c'est que la
synchronisation est terminée.
• Passez à l’étape 4.
Figure 3
Figure 4
Réglage
du carillon
ON
1 2
60 Sec.
Page 22

Vidéos pratiques – www.hzsupport.com Réponses pratiques – 1-800-858-8501
22
Synchronisation du carillon < C >
Étape C1 (voir la Figure 5)
•
Retirez tous les cavaliers de la position 1 à 7 sur le carillon
et placez des cavaliers seulement à la position 1 et 2, ou
réglez les interrupteurs 1 et 2 à la position ON (marche)
et les interrupteurs 3 à 7 à la position OFF (arrêt).
• Retirez la pile du bouton-poussoir. Attendez 30
secondes.
• Installez une pile dans le bouton-poussoir.
• Dans la minute suivant l'installation de la pile, appuyez
sur le bouton-poussoir et maintenez-le enfoncé pendant 5 à 7 secondes.
• Appuyez sur le bouton-poussoir pour confirmer la
synchronisation. Si le carillon sonne, c'est que la
synchronisation est terminée.
• Passez à l’étape 4.
4. Plage d’essai. Positionnez temporairement l’unité de
bouton-poussoir à l’endroit où vous désirez la monter.
Enfoncez le bouton-poussoir pour vous assurer que celuici et le carillon fonctionnent correctement. Si le carillon
ne retentit pas, consultez la section « Dépannage ».
Figure 5
Réglage du carillon
ON
1 2 3 4 5 6 7 8
1 2 3 4 5 6 7 8
Page 23

Vidéos pratiques – www.hzsupport.com Réponses pratiques – 1-800-858-8501
23
Figure 6
5. Montez l’unité de bouton-poussoir. Utilisez soit des vis,
soit du ruban adhésif double face pour monter l’unité de
bouton-poussoir.
• Au moyen de vis : Pour faire l’installation avec les vis,
enlevez le dos du boîtier en poussant sur les agrafes de
la base avec un tournevis (voir la Figure 1). Remarque :
Enlevez les débris des trous de vis (au besoin) avant
d’installer les vis. Fixez le dos du boîtier au chambranle
ou au mur (voir la Figure 6). Enclenchez la partie avant
de l’unité de bouton-poussoir en place.
• Au moyen de ruban adhésif : Lorsque vous montez
l’unité de bouton-poussoir en utilisant du ruban adhésif
double face, assurez-vous que la surface du montant
de porte ou du mur est propre.
6. Remplacement de la pile. Assurez-vous que les piles
sont insérées conformément au diagramme situé à
l’intérieur du bouton-poussoir.
Suite
IMPORTANT : Éliminez les piles mortes de manière
appropriée.
Pile
Modèle
7797
Modèle
7393
12 V de type A23
✔
3 V de type 2032
✔
Page 24

Vidéos pratiques – www.hzsupport.com Réponses pratiques – 1-800-858-8501
24
*Pour les carillons musicaux, consultez le manuel lorsque vous choisissez la
sonnerie.
Bouton-poussoir Carillon < A > Carillon à deux
sons
Carillon à trois
sons
Cavalier – ON
(marche)
Interrupteur 2 –
ON (marche)
Ding Ding
Cavalier – OFF
(arrêt)
Interrupteur 2 –
ON (marche)
Ding-Dong Ding-Dong
Cavalier – OFF
(arrêt)
Interrupteur 2 –
OFF (arrêt)
Ding-Dong Ding-Dong
Cavalier – ON
(marche)
Interrupteur 2 –
OFF (arrêt)
Ding Westminster
Tableau du réglage des mélodies – Carillon < A > et réglages du boutonpoussoir*
Réglage de la mélodie
Les carillons sans fil offrent plusieurs sonneries : « ding » (sonnerie à une note)
et « ding, dong » (sonnerie à deux notes). Certains modèles offrent une sonnerie
Westminster (sonnerie à huit notes) ou des sonneries musicales. La sonnerie
« ding-dong » (ou Westminster, le cas échéant) est le réglage par défaut. Cette
mélodie peut être changée en suivant les instructions retrouvées dans le Tableau
du réglage des mélodies.
Page 25

Vidéos pratiques – www.hzsupport.com Réponses pratiques – 1-800-858-8501
25
Bouton-poussoir Carillon < C > Carillon à
deux sons
Carillon à
trois sons
Cavalier – ON
(marche)
Cavalier 8 ou interrupteur
8 – OFF (arrêt)
Ding Ding
Cavalier – OFF
(arrêt)
Cavalier 8 ou interrupteur
8 – OFF (arrêt)
Ding-Dong Ding-Dong
Cavalier – OFF
(arrêt)
Cavalier 8 ou interrupteur
8 – ON (marche)
Ding-Dong Westminster
Cavalier – ON
(marche)
Cavalier 8 ou interrupteur
8 – ON (marche)
Ding Ding
*Pour les carillons musicaux, consultez le manuel lorsque vous choisissez la
sonnerie.
*Pour les carillons musicaux, consultez le manuel lorsque vous choisissez la
sonnerie.
Bouton-poussoir Carillon < B > Carillon à
deux sons
Carillon à
trois sons
Cavalier – ON
(marche)
———
Ding Ding
Cavalier – OFF
(arrêt)
Appuyez sur le bouton
du carillon pour choisir
la sonnerie
Ding-Dong Ding-Dong ou
Westminster
Tableau du réglage des mélodies – Carillon < B > et réglages du boutonpoussoir*
Tableau du réglage des mélodies – Carillon < C > et réglages du boutonpoussoir*
Page 26

Vidéos pratiques – www.hzsupport.com Réponses pratiques – 1-800-858-8501
26
Dépannage
1. PROBLÈME : Le carillon n’émet pas de son, ou a sonné une fois avant de
s’arrêter.
A. CAUSE POSSIBLE : Les piles ne sont pas insérées correctement.
A. MESURE CORRECTIVE : Assurez-vous que les piles sont insérées confor-
mément au diagramme situé à l’intérieur du bouton-poussoir et du carillon
(s’il y a lieu).
B. CAUSE POSSIBLE : Les piles sont à plat.
B. MESURE CORRECTIVE : Vérifiez la charge des piles du bouton-poussoir
et du carillon (s’il y a lieu) et remplacez-les au besoin.
C. CAUSE POSSIBLE : Le bouton-poussoir et le carillon ne sont pas synchro-
nisés.
C. MESURE CORRECTIVE : Pour la synchronisation, suivez les étapes 2 et 3
de la page 20.
2. PROBLÈME : Les piles ne semblent pas poser problème, mais le carillon ne
fonctionne pas une fois son installation terminée.
A. CAUSE POSSIBLE : Le carillon ou le bouton-poussoir est installé sur du
métal ou à proximité de montants en métal. Remarque : Le métal réduit la
portée de transmission.
A. MESURE CORRECTIVE : Posez des cales en bois de 6 mm à 13 mm (1/4
po à 1/2 po) pour éloigner le carillon ou le bouton-poussoir de la surface en
métal.
B. CAUSE POSSIBLE : Le carillon est installé à proximité d’un plancher ou d’un
mur en béton. Remarque : Le béton peut réduire la portée de transmission.
B. MESURE CORRECTIVE : Éloignez le carillon de toute surface en béton.
C. CAUSE POSSIBLE : Le carillon et le bouton-poussoir sont trop éloignés l’un
de l’autre.
C. MESURE CORRECTIVE : Rapprochez le carillon et le bouton-poussoir.
Remarque : La portée de transmission du carillon sans fil peut varier en fonction
de son emplacement, de la température et de la charge des piles.
Page 27

Vidéos pratiques – www.hzsupport.com Réponses pratiques – 1-800-858-8501
27
Veuillez communiquer avec nous
pour obtenir de l’aide avant de
retourner le produit au magasin ou
à HeathCo LLC.
En cas de problème, consultez ce
guide. Vous pouvez communiquer avec
nous du lundi au vendredi, entre 8 h et
17 h (HNC).
Veuillez fournir les renseignements
suivants lorsque vous communiquez
avec le service technique : nom,
adresse, n° de téléphone pendant la
journée, adresse de courriel, numéro
de modèle, date d’achat, endroit de
l’achat, problème affectant le produit
et REÇU DE CAISSE DATÉ, POUR
LES DEMANDES SOUS GARANTIE.
Service Technique
Aucune pièce de rechange n’est
disponible pour ce produit.
HeathCo LLC
2445 Nashville Road
Bowling Green, KY 42101, USA
ATTN: Technical Service (Service
technique)
Internet : www.hzsupport.com
Téléphone : 1-800-858-8501 (anglais
seulement)
Télécopieur : 1-800-846-8500
Renseignements de règlements
Ce dispositif est conforme à la partie 15 des règlements FCC et RSS-210 d’Industrie
Canada. Son fonctionnement est sujet aux deux conditions suivantes : 1) Ce dispositif
ne doit pas causer de parasites nuisibles; 2) Ce dispositif doit endurer tous les parasites reçus, y compris ceux susceptibles de provoquer un fonctionnement intempestif.
L’utilisateur est informé que tout changement ou modification, non approuvé explicitement par l’organisme de réglementation pertinent, pourrait annuler le droit de
l’utilisateur à faire fonctionner cet appareil.
Page 28

Vidéos pratiques – www.hzsupport.com Réponses pratiques – 1-800-858-8501
28
GARANTIE LIMITÉE DE 1 AN
Il s’agit d’une « Garantie limitée » qui vous confère des droits juridiques spécifiques.
Vous pouvez également jouir d’autres droits, variables d’une province à l’autre.
Pendant une période de 1 an à compter de la date d’achat, toute anomalie de
fonctionnement imputable à un vice de matériau ou de main-d’oeuvre sera corrigée
gratuitement.
Exclusions de la garantie - Réparations, réglage et calibrage dus à une mauvaise
utilisation, un mauvais traitement ou à la négligence. Les ampoules, les piles et des
autres articles non durables ne sont pas couverts par cette garantie. Le service
non autorisé ou la modification du produit ou d’un ou l’autre de ses composants
fournis invalidera totalement la présente garantie. Cette garantie n’inclut pas le
remboursement pour le dérangement, l’installation, le réglage, la perte d’utilisation,
le service non autorisé ou les frais d’expédition pour le renvoi de la marchandise.
La garantie ne couvre que les produits assemblés HeathCo LLC et ne s’étend pas
aux autres équipements et composants que le client pourrait utiliser conjointement
avec nos produits.
CETTE GARANTIE TIENT EXPRESSÉMENT LIEU DE TOUTES AUTRES
GARANTIES, EXPLICITES OU IMPLICITES, Y COMPRIS DE TOUTE GARANTIE
DE REPRÉSENTATION OU DE CONDITION DE CONVENANCE À LA COMMERCIALISATION OU À L’EFFET QUE LES PRODUITS CONVIENNENT À UN BUT
OU À UNE UTILISATION PARTICULIÈRE, ET SPÉCIFIQUEMENT DE TOUS
DOMMAGES SPÉCIAUX, DIRECTS, INDIRECTS OU SECONDAIRES.
LE REMPLACEMENT OU LA RÉPARATION CONSTITUENT LE SEUL RECOURS
DU CLIENT ET HEATHCO LLC NE POURRA ÊTRE TENUE RESPONSABLE DE
TOUS DOMMAGES SPÉCIAUX, DIRECTS, INDIRECTS OU SECONDAIRES, Y
COMPRIS, SANS S’Y LIMITER, LES PERTES COMMERCIALES ET PERTES DE
PROFIT, QU’ELLES SOIENT PRÉVISIBLES OU NON. Certaines provinces n’autorisent pas l’exclusion ou la limitation des dommages indirects ou secondaires, et la
limitation ou l’exclusion ci-dessus pourrait ne pas s’appliquer à vous.
Veuillez conserver le reçu portant la date d’achat; vous en aurez besoin pour
toutes vos demandes liées à la garantie.
HeathCo LLC se réserve le droit de mettre fin à la production de ses produits ou d’en
modifier les spécifications à tout moment, et elle n’est pas tenue d’incorporer les
nouvelles caractéristiques de ses produits aux produits vendus antérieurement.
 Loading...