

Page 1
Solar Powered Light
Model 7138
FEATURES
• LED solar powered light.
• Switch activated light.
• No wiring required.
INITIAL BATTERY CHARGE
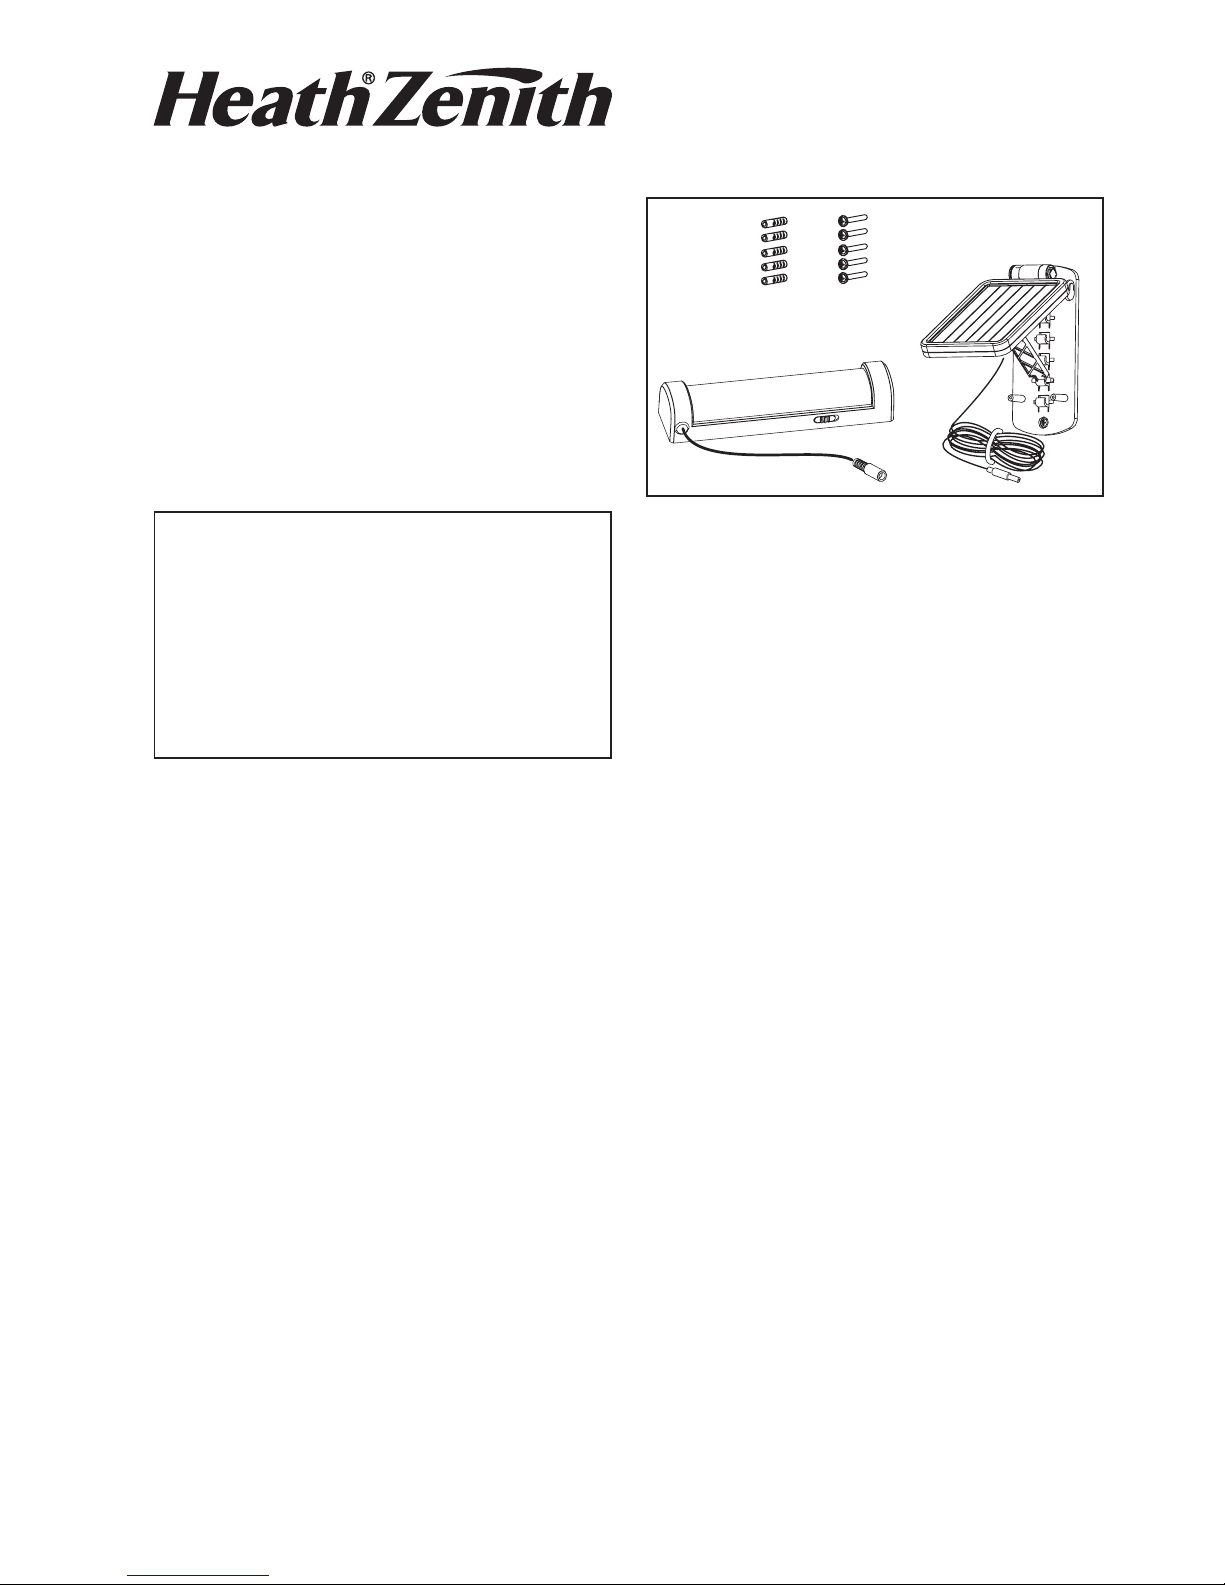
UNPACKING
Be sure to remove all contents from packaging and verify
all items are present before assembling this light fixture.
This package includes the following items:
© 2014 HeathCo LLC 206898-02A
The solar panel requires full, direct sunlight to
charge the battery. Clouds, rain, snow, and other
weather conditions may not allow the solar panel to
completely recharge the battery. Other obstructions
such as buildings or trees may block the sun as well.
When installing the solar panel, make sure it is
aimed as described below with a minimum amount
of obstructions. If possible, mount the panel facing
toward the southern sky.
• PRIOR TO USE, the battery will require 3 to 7 days
of full sun to completely charge with the power
selection switch in the OFF position. Plug the solar
panel cable into the solar panel port on the bottom of
the light fixture. If possible, aim the solar panel toward
the south and tilt it approximately 50° from horizontal
(see illustration on next page). If the solar panel cannot
be aimed toward the south, then tilt the panel approximately 30° if possible.
• Actual operating time will vary depending upon how
frequently the light is turned on and amount of sunlight
collected.
• Solar lighting is not designed to equal standard 120V
lighting. The amount of light output is reduced to allow
the sun time to fully recharge the battery between
lighting cycles.
WHERE TO MOUNT YOUR
SOLAR POWERED LIGHT
The most important thing to remember for the operation
of your solar powered light is that it works from the power
received from direct sunlight. The more direct sunlight
the solar panel receives in a day, the longer the light will
operate.
Solar Panel:
The solar panel converts the sun’s energy into electricity,
thus charging the battery stored in the solar light fixture.
The solar panel requires direct sunlight falling onto the
face of the solar panel for as long as possible over the
course of the day.
When choosing the location for the solar panel, make
sure it is aimed toward the south and is tilted to a suitable angle to allow as much direct sunlight to fall upon
it as possible. Make sure there is a minimum amount of
obstructions between the solar panel and the sun.
Also, make sure your solar panel location is not too far
away from the solar light fixture for the wires to reach
and connect.
Solar Light Fixture
Solar Panel
Mounting
Screws
and Wall
Anchors
Page 2
2
206898-02
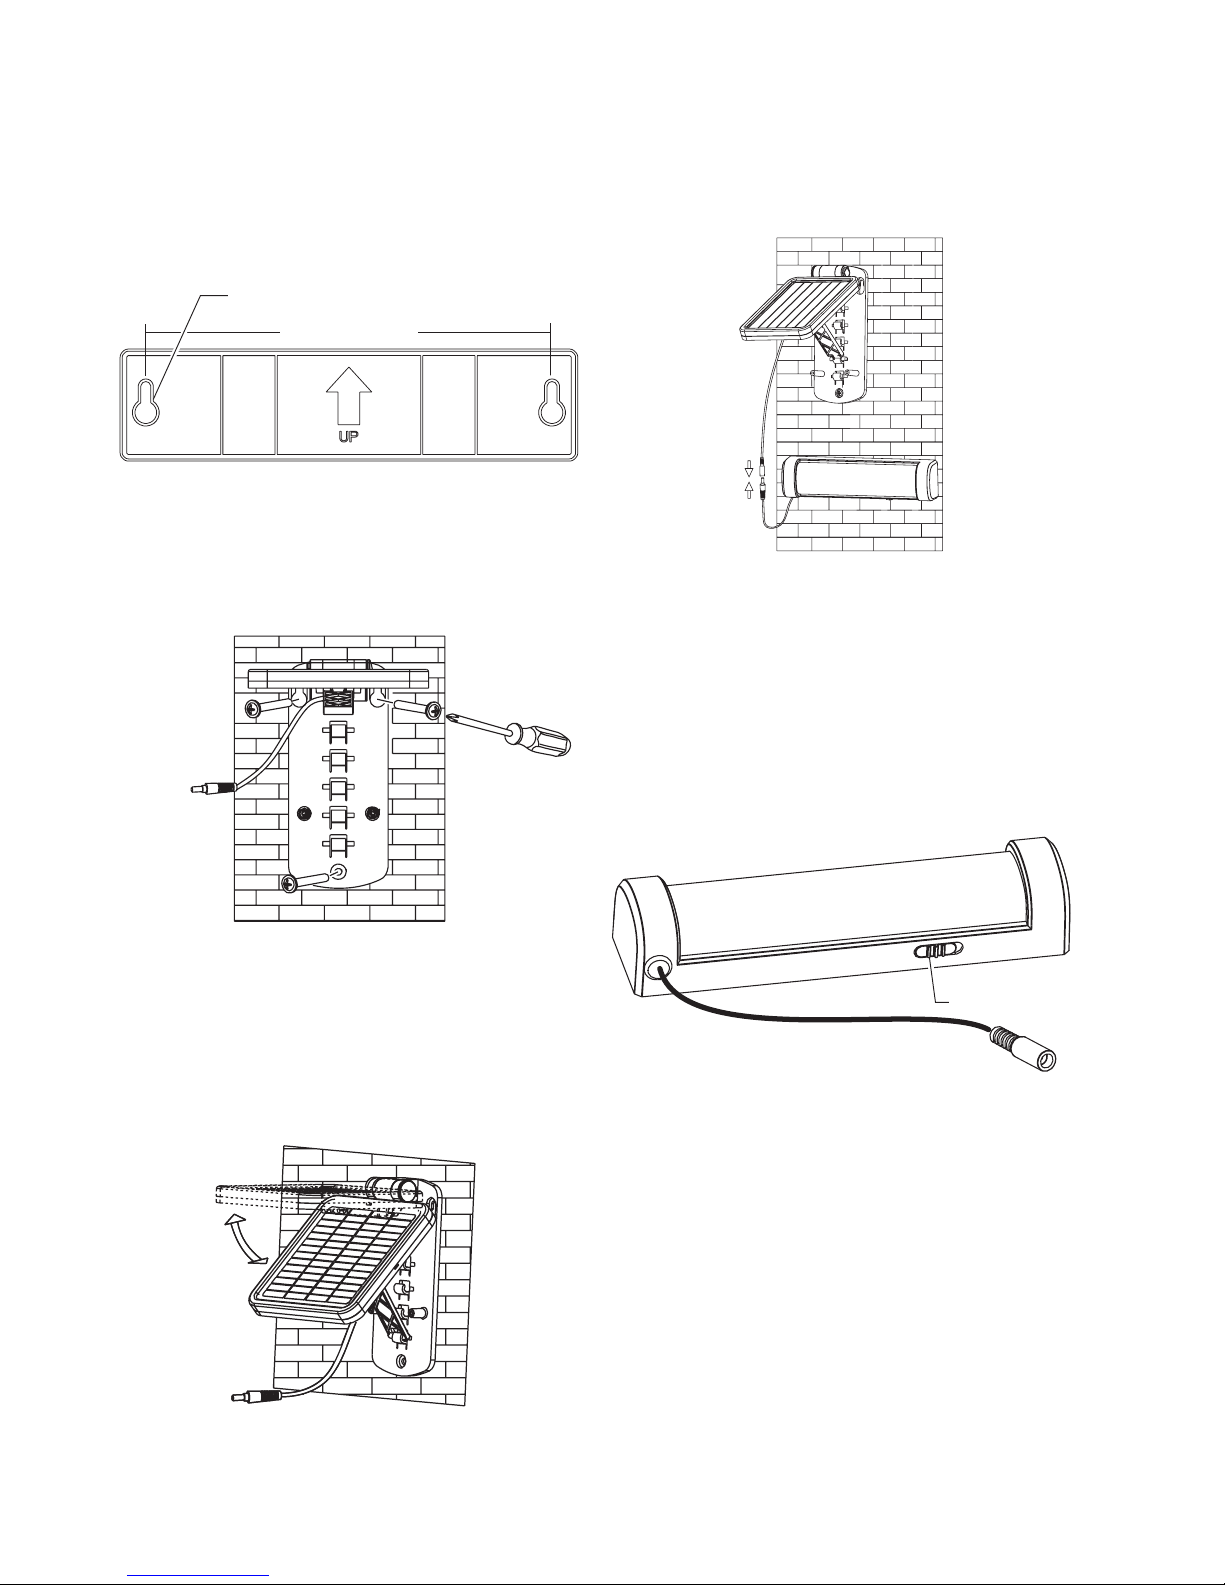
INSTALLATION
Mounting the Solar Light Fixture (Screws):
1. Mark the screw holes on a solid surface according
to the illustration below. Install the screws (provided).
Note: Ensure the fixture and the solar panel are
located close enough together for the cord to reach.
2. Place the keyholes on the rear of fixture on the screws.
OPERATION
1. Allow 3 to 7 days of charging under full sunshine before
using the light for the first time.
2. Use the switch located on the bottom of the LED light
to turn the light ON/OFF. IMPORTANT: The solar panel
will not be able to keep the battery charged if the light
is left in the ON position. Leaving the light on for a
prolonged period of time could damage the battery.
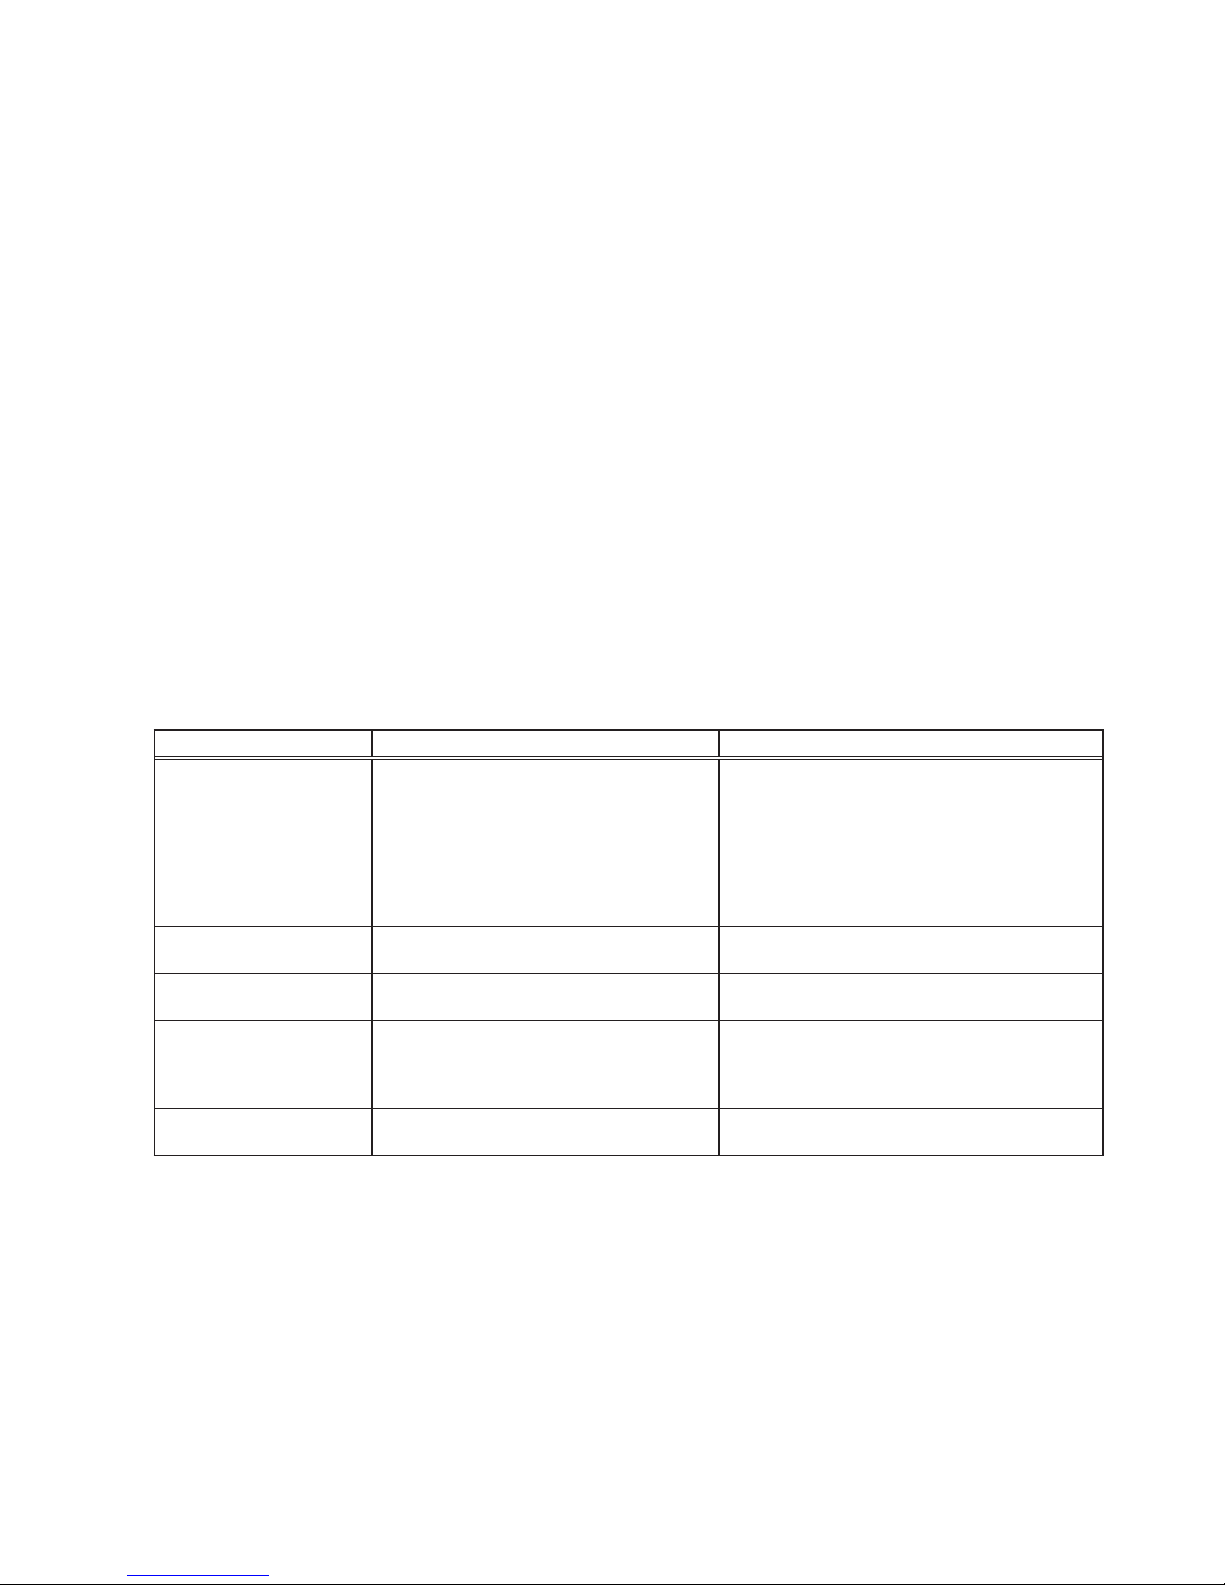
Mounting the Solar Panel:
1. Use the screws (provided) to mount the solar panel to
a solid surface. IMPORTANT: Caulk around the base
and on top of the screw heads after installation.
ON/OFF Switch
2. Adjust the angle of the solar panel by moving the
adjustment support to the appropriate hook on the
mounting bracket. Remember, the solar panel must
receive as much direct sunlight over the course of
the day as possible. Keep in mind that shadows may
block the sunlight from reaching the solar panel during
the day.
3. Carefully route the solar panel cable to the light fixture.
Plug the solar panel cable into the connector extending
from the side of the battery case.
IMPORTANT: Turn the power selection switch to
the OFF position and allow the battery to charge
with 3 to 7 days of full sunshine before testing.
7.375" (187 mm)
Horizontal Mount Keyhole (x2)
Page 3
GENERAL ELECTRICAL AND
SAFETY WARNINGS
• Do not cut the solar panel wire. Discontinue use if the
wire becomes frayed or broken.
• Do not immerse components in liquid.
• Do not use any other charging device other than the
single solar charging panel provided with this light. Doing so may result in injury or damage to the light and
voids any warranty.
• Position the cord so that it is securely fastened and will
not result in a hazard (such as tripping).
HeathCo LLC reserves the right to discontinue products and to change specifications at any time without incurring
any obligation to incorporate new features in products previously sold.
TROUBLESHOOTING GUIDE
SYMPTOM POSSIBLE CAUSE SOLUTION
Lights does not activate in
normal operation.
1. ON/OFF switch is in OFF position.
2. Motion sensor is positioned wrong.
3. Solar panel positioned wrong.
4. Low battery charge.
1. Turn ON/OFF switch to the ON position.
2. Reposition light so motion sensor is positioned
toward the area of movement.
3. Position and angle solar panel so that it gets
plenty of direct sunlight for most of the day, if
not the entire day.
4. Turn ON/OFF switch to OFF position and charge
the battery for 3 to 7 sunny days.
Lights come on in daylight. Light control is mounted in a dark location. Relocate light control to an area that receives
more light.
Lights come on for no
apparent reason.
Light control may be sensing small animals
or automobile traffic.
Reposition light so motion sensor is positioned
away from the area of movement.
Lights quickly flashes on
and off.
1. Light control may be sensing shadows.
2. Low battery charge.
1. Relocate light control to an area away from
shadows.
2. Turn ON/OFF switch to OFF position and charge
the battery for 3 to 7 sunny days.
Light is not as bright as
normal.
Low battery charge. Turn ON/OFF switch to OFF position and charge
the battery for 3 to 7 sunny days.
THINGS TO REMEMBER
• Periodically clean the solar panel with a soft cloth and
warm water. Do not hose spray. Keep the collector clear
of snow and leaves. Make sure trees and other objects
do not block sunlight from the panel.
• Solar collection is only effective in direct sunlight. Every
hour the light is on requires a minimum of 16 hours of
sunlight charging. Solar panels collect less than 10%
of the sun’s energy.
• Several days of use with overcast skies may discharge
the battery. If so, turn the power selection switch to the
OFF position and allow the sun to charge the battery
for 3 to 7 days.
STORAGE
If you wish to store your light indoors for more than two
or three days, follow these steps to prevent damage to
the battery:
1. Turn the power selection switch to the OFF position.
2. Keep the solar panel cord connected to the light and
store the light and solar panel where the solar panel
can receive some sunlight or room light each day.
The battery needs light to maintain a charge during
storage.
Page 4

4
206898-02
TWO YEAR LIMITED WARRANTY
This is a “Limited Warranty” which gives you specific legal rights. You may also have other rights which vary from state to
state or province to province.
For a period of two years from the date of purchase, any malfunction caused by factory defective parts or workmanship will
be corrected at no charge to you.
Not Covered - Repair service, adjustment and calibration due to misuse, abuse or negligence, light bulbs, batteries, and other
expendable items are not covered by this warranty. Unauthorized service or modification of the product or of any furnished
component will void this warranty in its entirety. This warranty does not include reimbursement for inconvenience, installation,
setup time, loss of use, unauthorized service, or return shipping charges.
This warranty covers only HeathCo LLC assembled products and is not extended to other equipment and components that
a customer uses in conjunction with our products.
THIS WARRANTY IS EXPRESSLY IN LIEU OF ALL OTHER WARRANTIES, EXPRESS OR IMPLIED, INCLUDING ANY
WARRANTY, REPRESENTATION OR CONDITION OF MERCHANT ABILITY OR THAT THE PRODUCTS ARE FIT FOR
ANY PARTICULAR PURPOSE OR USE, AND SPECIFICALLY IN LIEU OF ALL SPECIAL, INDIRECT, INCIDENTAL, OR
CONSEQUENTIAL DAMAGES.
REPAIR OR REPLACEMENT SHALL BE THE SOLE REMEDY OF THE CUSTOMER AND THERE SHALL BE NO LIABILITY
ON THE PART OF HEATHCO LLC FOR ANY SPECIAL, INDIRECT, INCIDENTAL, OR CONSEQUENTIAL DAMAGES, INCLUDING BUT NOT LIMITED TO ANY LOSS OF BUSINESS OR PROFITS, WHETHER OR NOT FORESEEABLE. Some states or
provinces do not allow the exclusion or limitation of incidental or consequential damages, so the above limitation or exclusion may
not apply to you. Please keep your dated sales receipt, it is required for all warranty requests.
TECHNICAL SERVICE
Please call 1-800-858-8501 for assistance before returning product to store.
If you experience a problem, follow this guide. You may also want to visit our Web site at: www.hzsupport.com. If the
problem persists, call* for assistance at 1-800-858-8501, 8:00 AM to 5:00 PM CST (M-F). You may also write* to:
HeathCo LLC
P.O. Box 90045
Bowling Green, KY 42102-9045
ATTN: Technical Service
* If contacting Technical Service, please have the following information available: Model Number, Date of Purchase,
and Place of Purchase.
No Service Parts Available for this Product
Please keep your dated sales receipt, it is required for all warranty requests.
HeathCo LLC reserves the right to discontinue products and to change specifications at any time without incurring
any obligation to incorporate new features in products previously sold.
Page 5

5
206898-02
© 2014 HeathCo LLC 206898-02 S
Luz de energía solar
Modelo 7138
CARACTERÍSTICAS
• Luz LED alimentada con luz solar.
• Interruptor de luz activados.
• No require cableado.
CARGA INICIAL DE LA BATERÍA
DESEMPAQUE
Asegúrese de retirar todo el contenido del empaque y
verificar que todos los elementos estén incluidos antes
de ensamblar este aparato de luz. Este paquete incluye
los siguientes elementos:
El panel solar requiere luz de sol directa y total
para cargar la batería. Condiciones climatológicas
como nubes, lluvia, nieve y otros pueden evitar que
el panel solar recargue completamente la batería.
Otros obstáculos tales como edificios o árboles
también pueden bloquear el sol.
Al instalar el panel solar, asegúrese de que esté
orientado como se describe a continuación con
una mínima cantidad de obstáculos. De ser posible,
monte el panel con dirección al cielo sureño.
• ANTES DE USAR, la batería requerirá de 3 a 7
días de mucho sol para cargarse completamente
y con selector de alimentación en la posición OFF.
Enchufe el cable del panel solar en el puerto de este
panel que está en la parte inferior de la lámpara. Si es
posible, apunte el panel solar hacia el sur e inclínelo
por casi 50° del nivel horizontal (vea la ilustración en
la siguiente página). Si al panel solar no se le puede
apuntar hacia el sur, entonces incline el panel por casi
30° si es posible.
• El funcionamiento real variará dependiendo de la frecuencia con la que se prende la luz y la cantidad de
luz solar recogida.
• La luz solar no se iguala al alumbrado estándar de 120
voltios. La cantidad de producción de luz se reduce para
permitir que el sol recargue por completo la batería
entre los ciclos de alumbrado.
DÓNDE INSTALAR EL APARATO
DE LUZ DE ENERGÍA SOLAR
Lo más importante que debe recordar para el funcionamiento de su luz de energía solar es que funciona con
la energía que recibe de la luz directa del sol. Mientras
el panel solar más directa recibe la luz solar durante un
día, más tiempo funcionará la luz.
Panel solar:
El panel solar convierte la energía solar en electricidad,
cargando así a la batería guardada en la lámpara solar. El
panel solar requiere que la luz solar incida directamente
en la superficie del panel el mayor tiempo posible a lo
largo del día.
Cuando escoja el sitio para el panel solar, asegúrese que
este panel esté apuntando hacia el sur e inclinado a un
ángulo adecuado que permita que incida directamente
tanta luz solar como sea posible. Asegúrese que haya
la menor cantidad de obstrucciones entre el panel solar
y el sol.
También asegúrese que la ubicación de su panel solar
no esté demasiado alejada de la lámpara solar para que
los cables puedan alcanzar y conectarse.
Aparato de Luz Solar
Panel Solar
Tornillos de
montaje y
anclas de
pared
Page 6

6
206898-02
7.375" (187 mm)
INSTALACIÓN
Montaje del aparato de luz solar (tornillos):
1. Marque los orificios de los tornillos en una superficie
sólida según la ilustración de abajo. Instale los tornillos (incluidos). Nota: asegúrese que el aparato y
el panel solar se encuentren lo suficientemente
juntos para que el cable los alcance.
2. Coloque los ojos de cerradura de la parte posterior
del aparato sobre los tornillos.
Montaje del panel solar:
1. Use los tornillos (provistos) para montar el panel solar
sobre una superficie sólida. IMPORTANTE: Calafatee
alrededor de la base y en la parte superior de las
cabezas de los tornillos luego de la instalación.
2. Gire el panel solar al ángulo deseado. Recuerde, el
panel solar debe recibir en el transcurso del día tanta
luz directa del sol como sea posible. Recuerde que
las sombras pueden durante el día impedir que la luz
solar llegue al panel solar.
3.
Guíe con cuidado el cable del panel solar hacia la lámpara. Conecte el cable del panel solar en el conector
que se extiende desde el lado de la caja de la pila.
IMPORTANTE: Coloque el selector de alimentación
en la posición OFF y deje que la batería se cargue
de 3 a 7 días de mucho sol antes de la prueba.
OPERACIÓN
1. Deje que el aparato se cargue de 3 a 7 días bajo plena
luz del sol antes de utilizarlo por primera vez.
2. Utilice el interruptor situado en la parte inferior de la
luz LED para PRENDER/APAGAR (ON/OFF) la luz.
IMPORTANTE: El panel solar no podrá mantener la
batería cargada si se deja la luz en la posición ON.
Dejar la luz encendida por un período de tiempo
prolongado puede dañar la batería.
Interrruptor de prendido/apagado (ON/OFF)
Ojo de cerradura para montaje horizontal (x2)
Page 7

7
206898-02
ADVERTENCIAS GENERALES DE
SEGURIDAD Y ELÉCTRICAS
• No corte el cable del panel solar. Deje de usar si el
cable se deshilacha o se rompe.
• No sumerja los componentes en líquidos.
• No use ningún otro dispositivo de carga que no sea el
panel de carga solar sencillo provisto con esta lámpara.
Si usa otro dispositivo, puede producirle una lesión o
un daño a la lámpara y anular cualquier garantía.
• Coloque el cordón para que esté sujeto de forma segura
y no resulte peligroso (como una desconexión).
PUNTOS QUE SE DEBEN
RECORDAR
• Limpie el panel solar per iódicamente con un trapo suave
y con agua tibia. No use una manguera. Mantenga el
colector sin nieve y sin hojas. Asegúrese que los árboles y otros objetos no cubran la luz del sol dirigida
al panel.
• La colección solar es solo efectiva bajo la luz directa del
sol. Por cada hora que la luz está prendida requiere un
mínimo de 16 horas de carga de luz solar. Los paneles
solares recolectan menos del 10% de la energÌa solar.
• Con varios días de uso en cielos nublados se puede
descargar la batería. Si es así, ponga el selector de
alimentación la posición OFF y deje que el sol cargue
la batería de 3 a 7 días.
ALMACENAMIENTO
Si desea guardar su lámpara bajo techo por más de dos o
tres días, siga estos pasos para evitar daños a la batería:
1. Mueva el selector de alimentación a la posición OFF.
2. Mantenga el cordón del panel solar conectado a la
lámpara y guarde la lámpara y el panel solar donde
el panel solar pueda recibir cada día algo de luz solar
o luz de la habitación. La batería necesita luz para
mantenerse cargada durante el almacenamiento.
HeathCo LLC se reserva el derecho de discontinuar los productos y de cambiar las especificaciones a cualquier
hora sin incurrir en ninguna obligación de tener que incorporar las nuevas características en los productos vendidos
anteriormente.
GUÍA DE ANÁLISIS DE AVERÍAS
SÍNTOMA POSIBLE CAUSA SOLUCIÓN
Las luces no se activan en
operación normal.
1. El interruptor ON/OFF está en la posición OFF.
2. El detector de movimiento está mal ubicado.
3. El panel solar está mal ubicado.
4. Baja carga en la batería.
1. Gire el interruptor ON/OFF a la posición ON.
2. Vuelva a colocar la lámpara de manera que el
detector de movimiento quede colocado hacia
el área de movimiento.
3. Posicione el ángulo del panel solar para que
reciba directamente mucha la luz solar la mayoría
del día o todo el día.
4. Gire el interruptor ON/OFF a la posición OFF y
cargue la batería de 3 a 7 días soleados.
Las luces se prenden
durante el día.
El control de luz está instalado en un lugar
oscuro.
Mueva el control de luz a un área que reciba más
luz.
Las luces se prenden sin
ninguna razón aparente.
El control de luz puede estar detectando
animales pequeños o tráfico de carros.
Vuelva a ubicar la lámpara de manera que el
detector de movimiento esté posicionado fuera
del área de movimiento.
Las luces destellan
rápidamente
encendiéndose y
apagándose.
1. El control de luz puede que esté detectando
sombras.
2. Baja carga en la batería.
1. Vuelva a colocar el control de luz en un área sin
sombras.
2. Gire el interruptor ON/OFF a la posición OFF y
cargue la batería de 3 a 7 días soleados.
La lámpara brilla menos de
lo normal.
Baja carga de la batería. Gire el interruptor ON/OFF a la posición OFF y
cargue la batería de 3 a 7 días soleados.
Page 8

8
206898-02
SERVICIO TÉCNICO
Favor de llamar al 1-800-858-8501 (sólo para hablar en inglés) para pedir ayuda antes de
devolver el producto a la tienda.
Si tiene algún problema, siga esta guía. Usted puede también visitar nuestro sitio Web: www.hzsupport.com. Si el
problema continúa, llame al 1-800-858-8501 (sólo para hablar en inglés), de 8:00 AM a 5:00 PM CST (L-V). Usted
puede también escribir a:
HeathCo LLC
P.O. Box 90045
Bowling Green, KY 42102-9045
ATTN: Technical Service
* Si se llama al Servicio Técnico, por favor tener lista la siguiente información: Número de Modelo, Fecha de compra y Lugar
de compra.
No hay piezas de servicio disponibles para este producto.
Por favor guarde su recibo de venta fechado; se lo requiere para cualquier solicitud de garantía.
HeathCo LLC se reserva el derecho de discontinuar los productos y de cambiar las especificaciones a cualquier hora sin
incurrir en ninguna obligación de tener que incorporar las nuevas características en los productos vendidos anteriormente.
GARANTÍA LIMITADA A 2 AÑOS
Esta es una “Garantía Limitada” que le da a Ud. derechos legales específicos. Usted puede también tener otros derechos
que varían de estado a estado o de provincia a provincia.
Por un período de 2 años desde la fecha de compra, cualquier mal funcionamiento ocasionado por partes defectuosas de
fábrica o mano de obra será corregido sin cargo para Ud.
No cubierto - Servicio de reparación, ajuste y calibración debido al mal uso, abuso o negligencia, bombillas, baterías, u otras
partes fungibles no están cubiertas por esta garantía. Los Servicios no autorizados o modificaciones del producto o de cualquier
componente que se provee invalidarán esta garantía en su totalidad. Esta garantía no incluye reembolso por inconveniencia,
instalación, tiempo de instalación, perdida de uso, servicio no autorizado, o costos de transporte de retorno.
Esta garantía cubre solamente los productos ensamblados por HeathCo LLC y no se extiende a otros equipos o componentes
que el consumidor usa junto con nuestros productos.
ESTA GARANTÍA ESTÁ EXPRESAMENTE EN LUGAR DE OTRAS GARANTÍAS, EXPRESADAS O SOBREENTENDIDAS,
INCLUYENDO CUALQUIER GARANTÍA, REPRESENTACIÓN O CONDICIÓN DE COMERCIABILIDAD O QUE LOS PRODUCTOS SE ADAPTEN PARA CUALQUIER PROPÓSITO O USO EN PARTICULAR, Y ESPECIFICAMENTE EN LUGAR
DE TODOS LOS DAÑOS ESPECIALES, INDIRECTOS, INCIDENTALES Y CONSECUENTES.
LA REPARACIÓN O EL REEMPLAZO DEBERÍA SER LA ÚNICA SOLUCIÓN DEL CLIENTE Y NO HABRÁ RESPONSABILIDAD POR PARTE DE HEATHCO LLC POR CUALQUIER DAÑO ESPECIAL, INDIRECTO, INCIDENTAL O CONSECUENTE,
INCLUIDOS PERO NO LIMITADOS A CUALQUIER PÉRDIDA DE NEGOCIO O GANACIAS SEAN O NO PREVISIBLES.
Algunos estados o provincias no permiten la exclusión o limitación de daños incidentales o consecuentes, de modo que la
limitación o exclusión arriba indicada puede que no se aplique a Ud.
Por favor guarde su recibo de venta fechado; se lo requiere para cualquier solicitud de garantía.
Page 9

9
206898-02
DÉBALLAGE
Retirez tout le contenu de l’emballage et assurez-vous
d’avoir en main tous les éléments avant de débuter
l’assemblage. L’emballage contient les éléments suivants :
© 2014 HeathCo LLC 206898-02 F
Luminaire solaire
Modèle 7138
CARACTÉRISTIQUES
• Lumière à DEL à alimentation solaire.
• Interrupteur activé par la lumière.
• Aucun câblage requis.
RECHARGE INITIALE DE BATTERIE
Le panneau lumineux nécessite de la lumière directe
et à pleine intensité afin de recharger la pile. Les
nuages, la pluie, la neige, et d’autres conditions
météorologiques peuvent affecter le rechargement
complet de la pile du panneau lumineux. D’autres
obstructions, tels que les immeubles ou les arbres
peuvent également bloquer le soleil.
Lors de l’installation du panneau solaire, assurezvous qu’il pointe dans la direction indiquée ci-dessous avec un minimum d’obstructions. Si possible,
installez le panneau dans la direction du sud-ouest.
• AVANT L’UTILISATION, la batterie exige une exposition complète au soleil de 3 à 7 jours avant d’être
entièrement chargée, et l’interrupteur de sélection
de l’alimentation doit être placé à OFF. Branchez le
câble du panneau solaire dans son port situé au bas
de l’appareil d’éclairage. Si possible, orientez le panneau solaire vers le sud et inclinez-le à environ 50° à
l’horizontale (voir illustration en page suivante). Si le
panneau solaire ne peut pas être orienté vers le sud,
alors inclinez le panneau d’environ 30° si possible.
• La durée réelle de fonctionnement variera en fonction
de la fréquence d’utilisation et de la période d’exposition
au soleil.
• L’éclairage solaire n’est pas conçu pour être égal à
l’éclairage standard de 120V. La quantité de flux lumineux est réduite pour permettre au soleil d’avoir assez
de temps pour complètement recharger la batterie entre
les cycles d’éclairage.
ENDROIT OÙ INSTALLER LE
LUMINAIRE SOLAIRE
L’élément le plus important en ce qui concerne le fonctionnement de votre luminaire solaire, c’est qu’il dépend
de l’éclairage du soleil. Plus le panneau solaire reçoit
directement de lumière du soleil dans une journée, plus
la lumière fonctionnera longtemps.
Panneau solaire :
Le panneau solaire convertit l’énergie solaire en électricité ce qui charge la batterie dans l’appareil d’éclairage
solaire. Le panneau solaire exige que la lumière directe
du soleil tombe sur la face du panneau solaire pendant
aussi longtemps que possible dans la journée.
Pour choisir l’emplacement du panneau solaire, s’assurer
qu’il est orienté vers le sud et incliné à un angle approprié pour recevoir autant de lumière directe du soleil que
possible. S’assurer qu’il y a le minimum d’obstructions
possible entre le panneau solaire et le soleil.
S’assurer aussi que l’endroit du panneau solaire n’est
pas trop éloigné de l’appareil d’éclairage solaire pour
que les câbles puissent être branchés.
Luminaire à énergie solaire
Panneau solaire
Vis de
montage et
dispositifs
d’ancrage
au mur
Page 10

10
206898-02
7.375" (187 mm)
INSTALLATION
Installation du luminaire solaire au moyen de vis :
1. Marquez l’emplacement des trous sur une surface
solide, comme illustré ci-dessous. Installez les vis
fournies.
Remarque : Assurez-vous que le luminaire et
le panneau solaire sont situés suffisamment proche
l’un de l’autre pour les relier au moyen du cordon.
2. Enfilez les trous en forme de poire à l’arrière du luminaire sur les vis.
Montage du panneau solaire :
1. Utilisez les vis fournies pour installer le panneau
solaire sur une surface solide. IMPORTANT : Calfatez
le tour de la base et le dessus des têtes des vis
après l’installation.
2. Faites tourner le panneau solaire à l’angle désiré.
Souvenez-vous, le panneau solaire doit directement
recevoir le plus de lumière du soleil possible au cours
de la journée. Gardez à l’esprit que des ombres peuvent
empêcher la lumière du soleil d’atteindre le panneau
solaire durant la journée.
3. Acheminer soigneusement le câble du panneau
solaire à l’appareil d’éclairage. Branchez le câble du
panneau solaire dans la prise du câble qui sort du
côté du boîtier de la pile.
IMPORTANT : Placez l’interrupteur de sélection de
l’alimentation à OFF et laissez la batterie charger
durant 3 à 7 jours en plein soleil avant de procéder
à un essai.
UTILISATION
1. Laissez le luminaire se charger pendant 3 à 7 jours, en
plein soleil, avant de vous en servir pour la première
fois.
2. Servez-vous de l’interrupteur situé au bas de la
lampe à DEL pour allumer et fermer le luminaire.
IMPORTANT : Le panneau solaire ne pourra pas
conserver la pile chargée si l’interrupteur est laissé
en position ON (marche). Laisser la lumière allumée
pendant une période prolongée pourrait endommager
la pile.
Interrupteur (marche/arrêt)
Trous (2) pour installation à l'horizontale
Page 11

11
206898-02
AVERTISSEMENTS D’ORDRE
GÉNÉRAL CONCERNANT
L’ÉLECTRICITÉ ET LA SÉCURITÉ
• Ne pas couper le fil du panneau solaire. Cesser l’utilisation si le fil est effiloché ou endommagé.
• Ne pas immerger les composants dans un liquide.
• Ne pas utiliser d’autres dispositifs de chargement que
le panneau de chargement solaire simple fourni avec
cet éclairage. Cela pourrait entraîner des blessures ou
des dommages à l’éclairage et annuler la garantie.
• Positionner le cordon afin qu’il soit attaché de manière
sécuritaire et ne présente pas de risque (comme un
risque de trébuchement).
RAPPEL
• Nettoyer périodiquement le panneau solaire au moyen
d’un chiffon doux et d’eau chaude. Ne pas l’arroser
directement au moyen du boyau. S’assurer que le
panneau n’est pas couvert de feuilles ou de neige.
S’assurer que la lumière du soleil n’est pas obstruée
par des arbres ou d’autres objets.
• Le capteur solaire fonctionne seulement lorsqu’il est
directement exposé au soleil. Pour chaque heure
d’éclairage, l’appareil doit être directement exposé au
soleil pendant 16 heures pour assurer la recharge de
la pile. Les panneaux solaires collectent moins de 10 %
de l’énergie solaire.
• Une utilisation de plusieurs jours sous un ciel couvert
peut décharger la batterie. Dans ce cas, placez l'interrupteur de sélection de l’alimentation à OFF et laissez
le soleil charger la pile durant 3 à 7 jours.
ENTREPOSAGE
Si vous souhaitez entreposer votre lumière à l’extérieur
durant plus de deux à trois jours, suivez ces étapes afin
d’éviter d’endommager la batterie :
1. Placez l’interrupteur de sélection de l’alimentation en
position OFF.
2. Maintenir le fil du panneau solaire branché à l’éclai-
rage et ranger l’éclairage et le panneau solaire dans
un endroit où le panneau solaire peut recevoir un peu
de lumière du soleil ou d’une pièce chaque jour. La
batterie a besoin de lumière pour maintenir sa charge
lors du rangement.
HeathCo LLC se réserve le doit d’abandonner tout produit et d’en changer les spécifications, en tout temps et sans
contracter quelque obligation que ce soit quant à l’incorporation de nouvelles caractéristiques aux produits déjà vendus.
GUIDE DE DÉPANNAGE
SYMPTÔME CAUSE POSSIBLE SOLUTION
Les lumières ne
sont pas activées
en fonctionnement
normal.
1. L’interrupteur MARCHE/ARRÊT est
à la position ARRÊT.
2. Le détecteur de mouvement est mal
positionné.
3. Le panneau solaire est mal positionné.
4. Faible charge de la batterie.
1. Tourner l’interrupteur MARCHE/ARRÊT à la position
MARCHE.
2. Repositionner l’éclairage afin que le détecteur de mouvement soit orienté vers le périmètre de mouvement.
3. Positionner et orienter le panneau solaire afin qu’il reçoive
amplement de lumière directe du soleil pendant la plupart
de la journée, sinon toute la journée.
4. Tourner l’interrupteur MARCHE/ARRÊT à la position
ARRÊT et charger la batterie pendant 3 à 7 jours ensoleillés.
L’éclairage s’allume
en plein jour.
La commande d’éclairage est installée
dans un endroit sombre.
Déplacer la commande d’éclairage vers un endroit mieux
éclairé.
L’éclairage s’allume
sans raison
apparente.
La commande peut détecter de petits
animaux ou la circulation automobile.
Repositionner l’éclairage afin que le détecteur de
mouvement soit positionné à l’écart du périmètre de
mouvement.
Les lumières
clignotent rapidement.
1. La commande détecte peut-être des
ombres.
2. Faible charge de la batterie.
1. Déplacer la commande vers un endroit où il n’y a pas
d’ombres.
2. Tourner l’interrupteur MARCHE/ARRÊT à la position
ARRÊT et charger la batterie pendant 3 à 7 jours ensoleillés.
L’éclairage n’est
pas aussi fort que
d’habitude.
La charge de la batterie est faible. Tourner l’interrupteur MARCHE/ARRÊT à la position
ARRÊT et charger la batterie pendant 3 à 7 jours
ensoleillés.
Page 12

12
206898-02
GARANTIE LIMITÉE DE 2 ANS
Il s’agit d’une « Garantie limitée » qui vous confère des droits juridiques spécifiques. Vous pouvez également jouir d’autres
droits, variables d’une province à l’autre.
Pendant une période de 2 ans à compter de la date d’achat, toute anomalie de fonctionnement imputable à un vice de matériau ou de main-d’oeuvre sera corrigée gratuitement.
Exclusions de la garantie - Réparations, réglage et calibrage dus à une mauvaise utilisation, un mauvais traitement ou à la
négligence. Les ampoules, les piles et des autres articles non durables ne sont pas couverts par cette garantie. Le service
non autorisé ou la modification du produit ou d’un ou l’autre de ses composants fournis invalidera totalement la présente
garantie.Cette garantie n'inclut pas le remboursement pour le dérangement, l'installation, le réglage, la perte d'utilisation, le
service non autorisé ou les frais d'expédition pour le renvoi de la marchandise.
La garantie ne couvre que les produits assemblés HeathCo LLC et ne s’étend pas aux autres équipements et composants
que le client pourrait utiliser conjointement avec nos produits.
CETTE GARANTIE TIENT EXPRESSÉMENT LIEU DE TOUTES AUTRES GARANTIES, EXPLICITES OU IMPLICITES, Y
COMPRIS DE TOUTE GARANTIE DE REPRÉSENTATION OU DE CONDITION DE CONVENANCE À LA COMMERCIALISATION OU À L’EFFET QUE LES PRODUITS CONVIENNENT À UN BUT OU À UNE UTILISATION PARTICULIÈRE, ET
SPÉCIFIQUEMENT DE TOUS DOMMAGES SPÉCIAUX, DIRECTS, INDIRECTS OU SECONDAIRES.
LE REMPLACEMENT OU LA RÉPARATION CONSTITUENT LE SEUL RECOURS DU CLIENT ET HEATHCO LLC NE
POURRA ÊTRE TENUE RESPONSABLE DE TOUS DOMMAGES SPÉCIAUX, DIRECTS, INDIRECTS OU SECONDAIRES,
Y COMPRIS, SANS S’Y LIMITER, LES PERTES COMMERCIALES ET PERTES DE PROFIT, QU’ELLES SOIENT PRÉVISIBLES OU NON. Certaines provinces n’autorisent pas l’exclusion ou la limitation des dommages indirects ou secondaires, et
la limitation ou l’exclusion ci-dessus pourrait ne pas s’appliquer à vous. Veuillez conserver le reçu portant la date d'achat;
vous en aurez besoin pour toutes vos demandes liées à la garantie.
SERVICE TECHNIQUE
Veuillez faire le 1 800 858-8501 (service en anglais seulement) pour obtenir de l’aide
avant de retourner l’article au magasin.
En cas de problème, suivez ce guide. Vous pouvez aussi visiter notre site Web à www.hzsupport.com. Si le problème
persiste, composez* le 1 800 858-8501 (service en anglais seulement), entre 8 h 00 et 17 h 00, HNC, du lundi au
vendredi. Vous pouvez aussi écrire au :
HeathCo LLC
P.O. Box 90045
Bowling Green, KY 42102-9045
ATTN: Technical Service
* Lors d’un appel au service technique, veuillez avoir les renseignements suivants à portée de main : numéro du
modèle, date d’achat et endroit de l’achat.
Aucune pièce de rechange n’est disponible pour ce produit.
Veuillez conserver le reçu portant la date d’achat; vous en aurez besoin pour toutes vos demandes liées à
la garantie.
HeathCo LLC se réserve le doit d’abandonner tout produit et d’en changer les spécifications, en tout temps et sans
contracter quelque obligation que ce soit quant à l’incorporation de nouvelles caractéristiques aux produits déjà vendus.
 Loading...