

Page 1
Lighting Control
ON
O
FF
DIM
GR
O
UP
A
B
1
2
M
O
DE
A
LL
ON
A
LL
O
FF
PA
NIC
ON
O
FF
DIM
ON
O
FF
DIM
ON
O
FF
DIM
ON
OF
F
DIM
ON
O
FF
DIM
ON
O
FF
DIM
ON
O
FF
DIM
•
•
•
AM
A
PM
9V Battery
Panel
Features
• Operational range of up to 100 feet.
• Controls all Heath®/Zenith RF Tech Communications™ products.
• Adds programmable ON/OFF function for up to
16 lighting controls.
• UL/cUL listed power supply.
• FCC/IC tested and approved.
• 12/24 Hour Digital Clock Display.
• 9 volt battery backup to prevent program loss
due to power failure (9V battery not included).
• Flash control on compatible receivers when using the Panic feature.
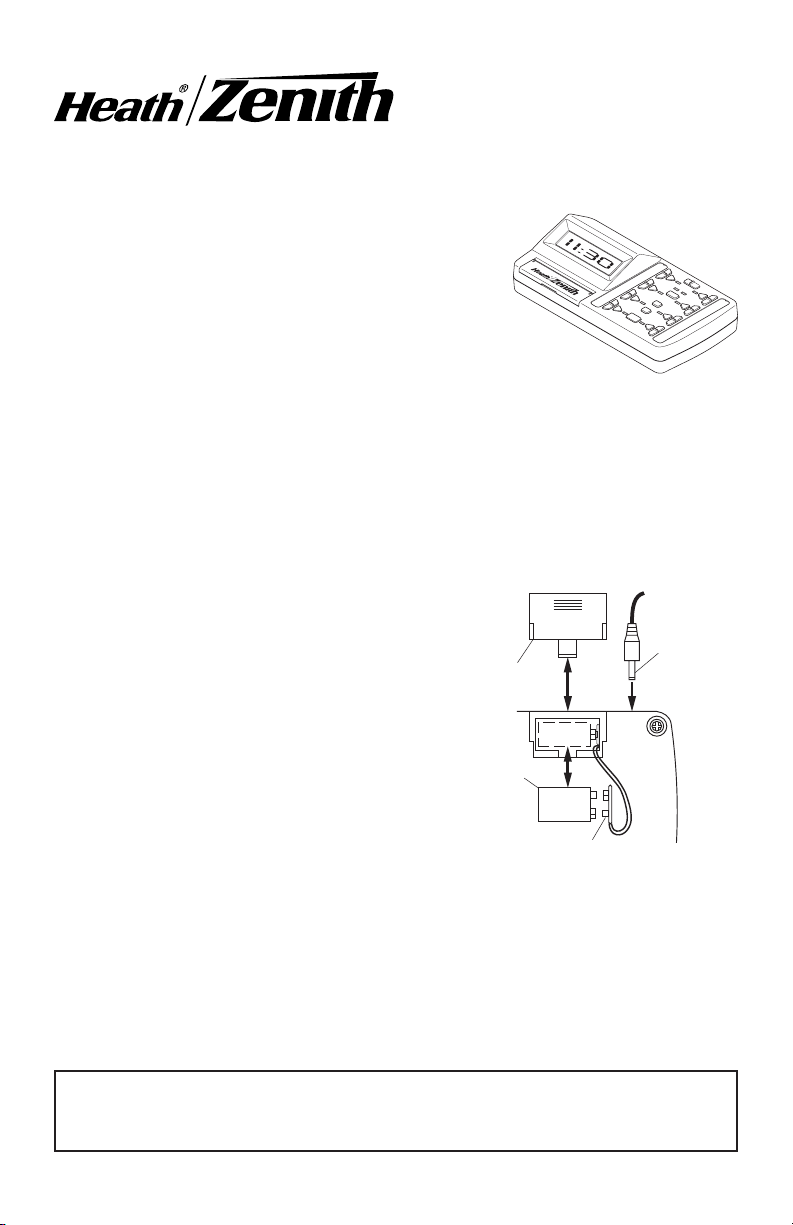
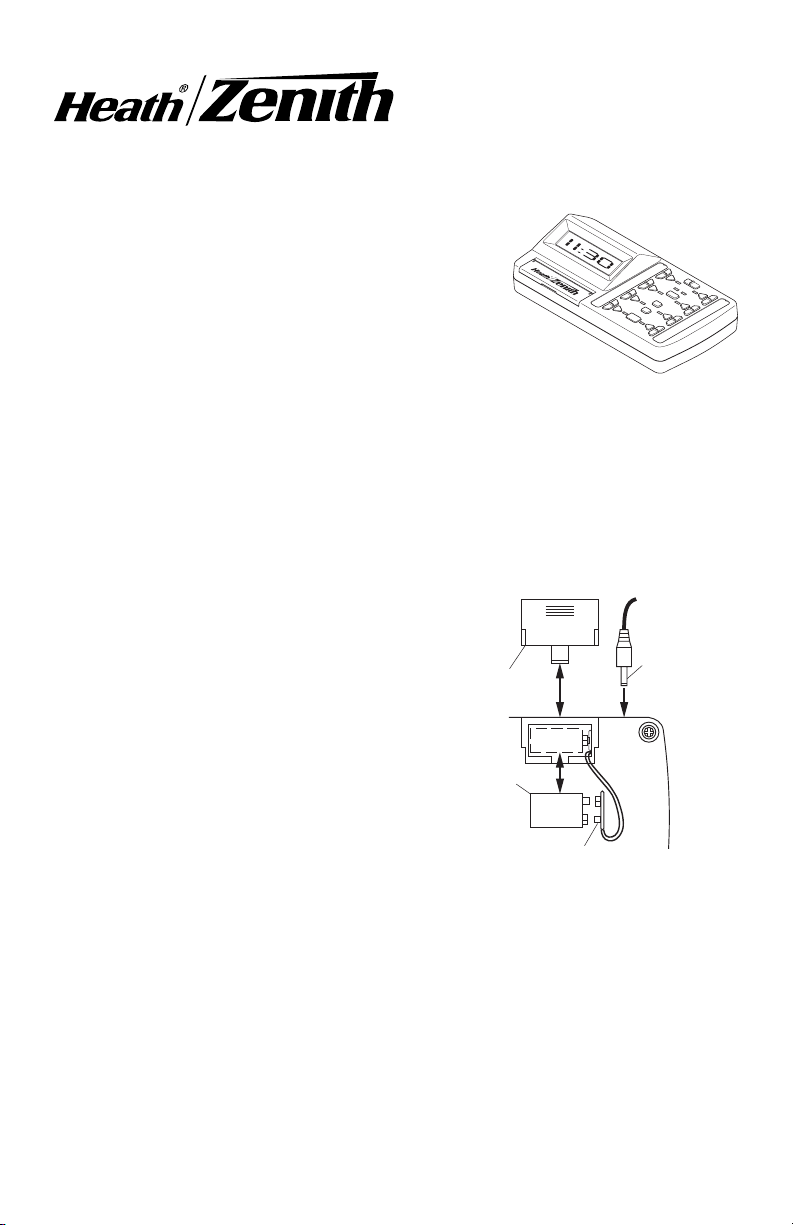
Battery Installation and Battery Backup
The Lighting Control Panel is designed for 120VAC operation using the included
DC power converter, but has the added feature of an onboard battery backup
to prevent program memory loss. To install battery:
1. Remove battery cover on rear of
housing by sliding cover down.
2. Install 9 volt battery (not included)
according to polarity markings.
3. Close battery compartment by re-
versing the previous instructions.
Batter y
Cover
Upon power failure, the battery backup
will automatically shut down all nonessential functions. The display and
keypad will not work. The battery
9 Volt
Battery (Not
Included)
backup will last in excess of 5 hours.
When power is restored, the unit will
restart the display and set all channels
to the OFF position. All programming
Battery Connector
Installing 9 Volt Battery and
DC Power Connector
will be maintained unless the battery is
depleted. If the battery is depleted, reprogramming of the time and automated
functions will be required.
Note: If Lighting Control Panel will be disconnected from 120VAC power for
a prolonged period of time, disconnect 9V battery connector from battery to
prevent discharging of battery.
DC Power
Connector
It is recommended that the battery is replaced at least once a year. You might
want to choose a date that will be easy to remember (i.e. Birthday, Anniversary,
New Years, Daylight savings time changes, etc.).
© 2007 HeathCo LLC 598-1136-04
Page 2
AM
PM
A
A B
ON
OFF
ON
OFF
DIM
GROUP
MODE
ALL
ON
ALL
OFF
PANIC
DIM
ON
OFF
ON
OFF
DIM DIM
ON
OFF
ON
OFF
DIM DIM
ON
OFF
ON
OFF
DIM DIM
– Select Time Set Program+
1 2
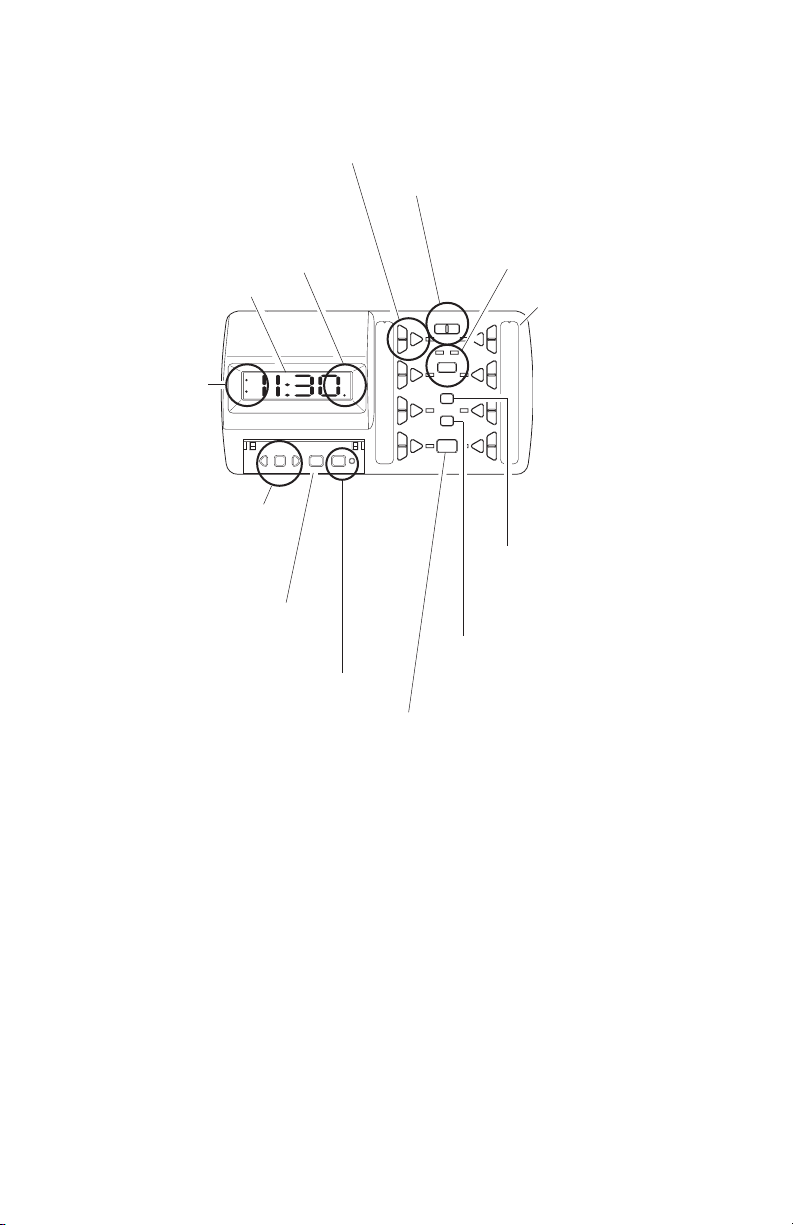
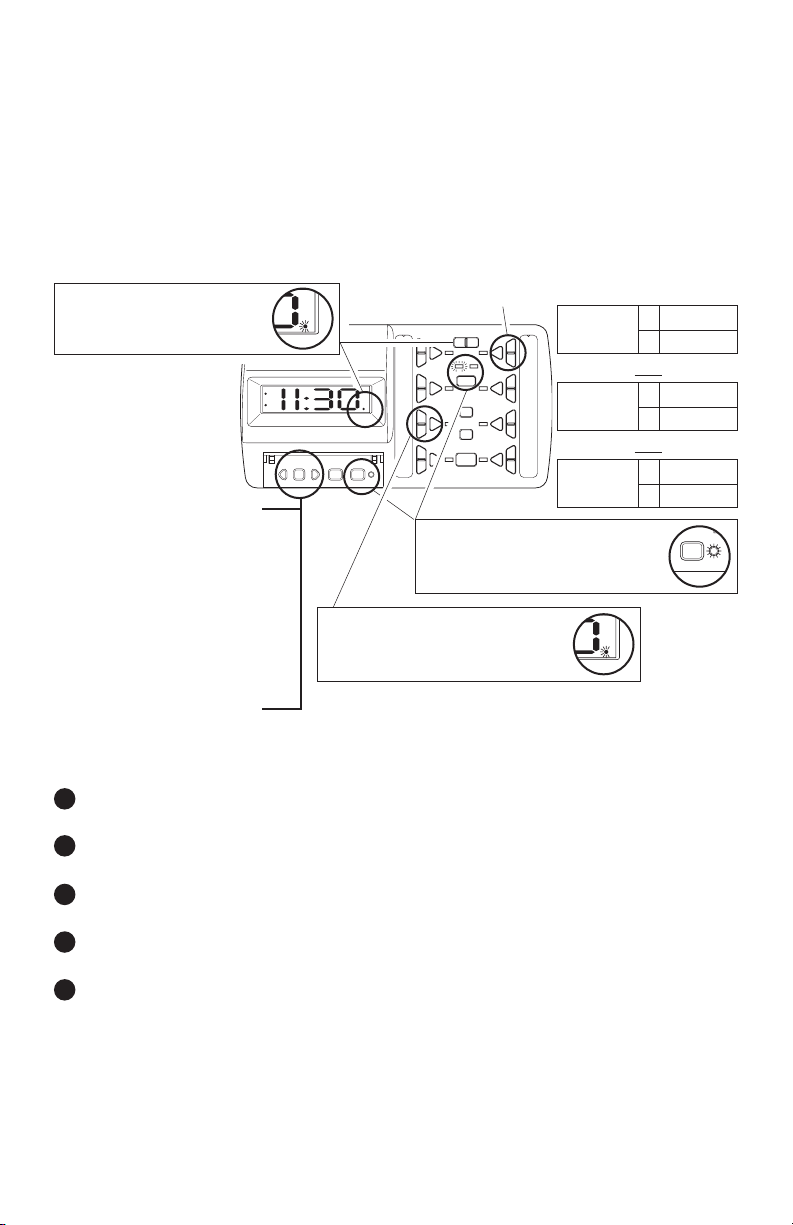
Product Identification
Light Control - ON, OFF, DIM* with
indicator light.
Control Group Indicator- Light on is
Group A, light off is Group B (Note:
also flashes upon Program entry).
Clock
AM, PM, 24 Hour
Clock Set - Lights
indicate AM or PM
setting. No light
indicates 24 Hour
setting.
SELECT, (-, +) - Set hours and
minutes for clock and ON/OFF
program setup.
TIME SET - Set the time and select
between 12-hour or 24-hour mode.
PROGRAM - Program ON/OFF times
for light controls (light is on when in
program mode).
Control Group - Select Group A or B
lighting controls.
Light Program Modes - Select Mode
1, 2, 1 & 2, or OFF (lights will indicate
which mode(s) are selected.
Control Identification Remove clear plastic film
by placing two fingers on
the plastic and “pinching”
the plastic. Remove card.
Use the decals (included)
or write on the card to label each control. Replace
card and plastic film.
ALL ON - Turns all lights within a
Group ON. Select either Group A
or B then press ALL ON.
ALL OFF - Turns all lights within a
Group OFF. Select either Group A or
B then press ALL OFF.
PANIC* - All lights within a Group will flash
ON and OFF. Select either Group A or B
then press PANIC.
*DIM Control: Dims lighting controls that are equipped with the dimming feature.
Pressing DIM will toggle through the different dim levels. Each time the DIM
button is pressed, the control LED will momentarily light.
The receiver saves the last dim setting used. To recall the last dim setting, press
the DIM control once.
Note: Not all lighting controls have the DIM and PANIC (flash) feature.
2 598-1136-04
Page 3
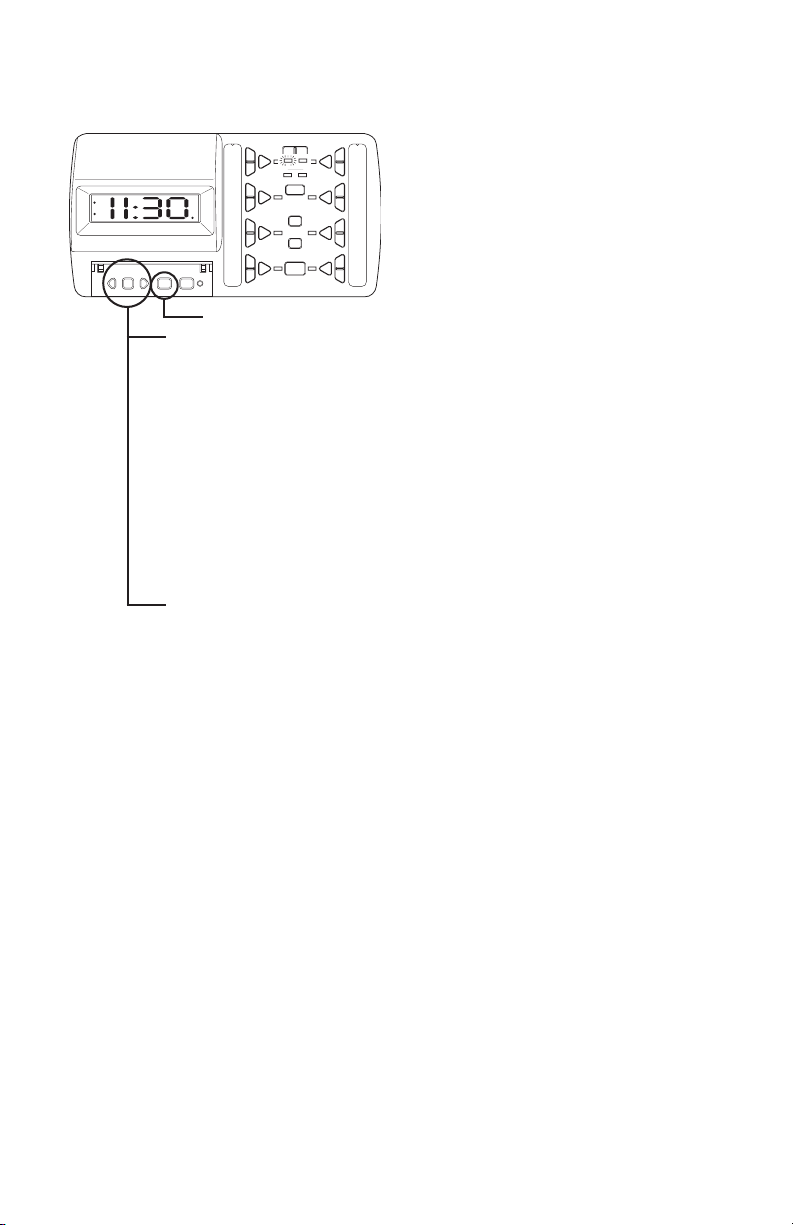
Setting The Time
AM
PM
A
A B
ON
OFF
ON
OFF
DIM
GROUP
MODE
ALL
ON
ALL
OFF
PANIC
DIM
ON
OFF
ON
OFF
DIM DIM
ON
OFF
ON
OFF
DIM DIM
ON
OFF
ON
OFF
DIM DIM
– Select Time Set Program+
1 2
A B
ON
OFF
GROUP
DIM
1 2
➊ Press Time Set button. The hour numbers are highlighted.
➋ Press (+) and (-) buttons to the desired time.
➌ Press Select button - Note minute numbers will highlight.
➍ Press (+) and (-) buttons to the desired time.
➎ Press Select button - The AM/PM/24-hour mode is now adjustable.
➏ Press (+) and (-) buttons to toggle between 12-hour and 24-hour mode.
Note: The AM or PM indicator will light when the 12-hour mode is selected. If
neither AM nor PM indicator is lit, the 24-hour mode is selected.
➐ If additional changes need to be made to the time, use the SELECT button
to scroll to the desired position.
➑ Press TIME SET button when finished setting desired time.
Note: Pressing and holding the (+) or (-) buttons will scroll through the numbers
more rapidly.
3598-1136-04
Page 4
AM
PM
A
A B
ON
OFF
ON
OFF
DIM
GROUP
MODE
ALL
ON
ALL
OFF
PANIC
DIM
ON
OFF
ON
OFF
DIM DIM
ON
OFF
ON
OFF
DIM DIM
ON
OFF
ON
OFF
DIM DIM
– Select Time Set Program+
1 2
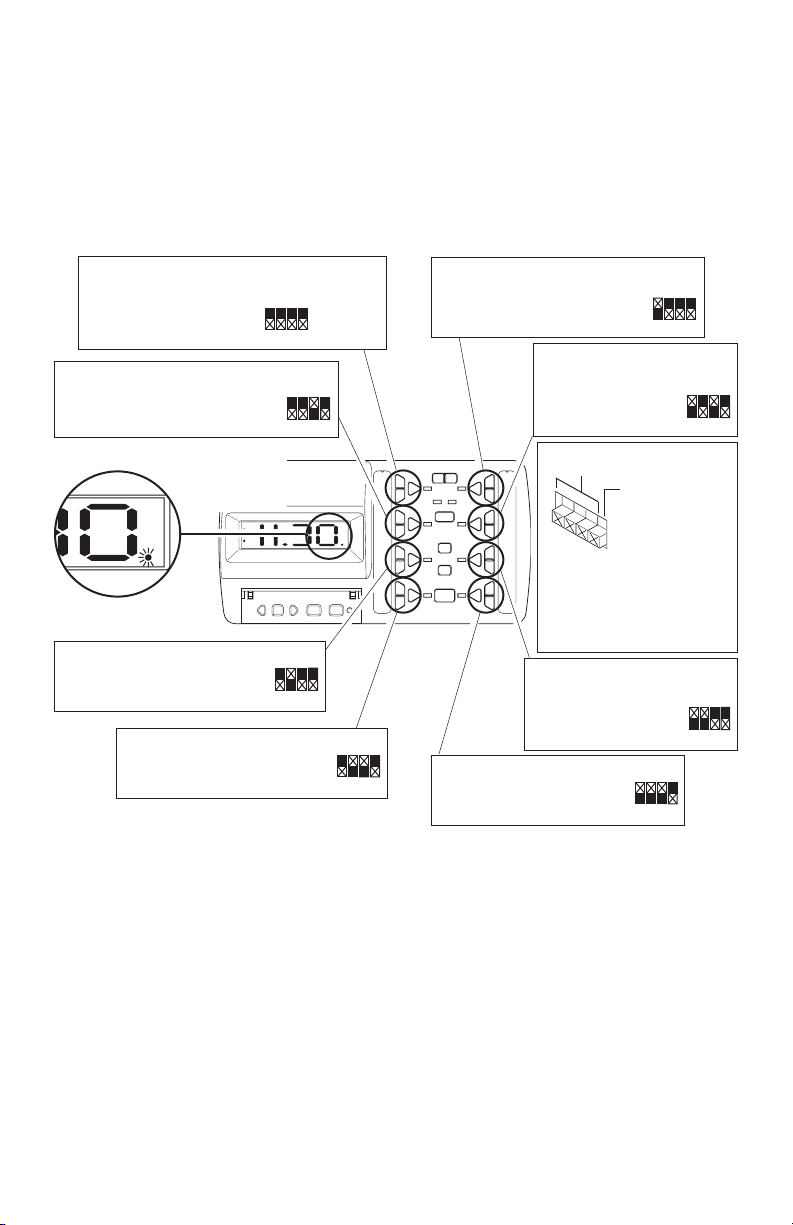
EXAMPLE 1 – Set Up Receivers
1 2 3 4
1 2 3 4
1 2 3 4
1 2 3 4
Group A Settings Group B Settings
1 2 3 4
1 2 3 4
1 2 3 4
1 2 3 4
1 2 3 4
1 2 3 4
1 2 3 4
1 2 3 4
Group A Settings Group B Settings
1 2 3 4
1 2 3 4
1 2 3 4
1 2 3 4
1 2 3 4
1 2 3 4
1 2 3 4
1 2 3 4
1 2 3 4
1 2 3 4
1 2 3 4
1 2 3 4
Group A Settings Group B Settings
1 2 3 4
1 2 3 4
1 2 3 4
1 2 3 4
1 2 3 4
1 2 3 4
1 2 3 4
1 2 3 4
1 2 3 4
1 2 3 4
1 2 3 4
1 2 3 4
1 2 3 4
1 2 3 4
1 2 3 4
1 2 3 4
Group A Settings Group B Settings
1 2 3 4
1 2 3 4
1 2 3 4
1 2 3 4
1 2 3 4
1 2 3 4
1 2 3 4
1 2 3 4
1 2 3 4
1 2 3 4
1 2 3 4
1 2 3 4
1 2 3 4
1 2 3 4
1 2 3 4
1 2 3 4
1 2 3 4
1 2 3 4
1 2 3 4
1 2 3 4
1 2 3 4
1 2 3 4
1 2 3 4
1 2 3 4
1 2 3 4
1 2 3 4
1 2 3 4
1 2 3 4
1 2 3 4
1 2 3 4
ON
OFF
DIM
ON
OFF
DIM DIM
ON
OFF
DIM DIM
A
AM
PM
A
PM
AM
A
A
A
A
ON
OFF
DIM
AM
PM
ON
1 2 3
4
Following is one example of how the Lighting Control Panel can be programmed
to operate multiple light sources within a home.
The Control Panel has two “Groups” (A and B) with up to eight lighting controls
in each group. In this example, the eight controls within Group A will operate
the following light sources: Family Room (3), Kitchen, Front Porch, Back Porch,
Garage, and Foyer.
Light: Family Room Lamp #1 and #2
Light: Family Room Lamp #1 and #2
Receiver: Plug-In (1 per lamp)
Receiver: Plug-In (1 per lamp)
Plug-In Code Setting:
Plug-In Code Setting:
Light: Family Room Ceiling Light
Receiver: Wall Switch
Wall Switch Code Setting:
Light: Family Room Lamp #3
Receiver: Wall Receptacle
Receptacle Code Setting:
Group LED
“A”-LED On (Shown)
“B”-LED Off
Light: Kitchen
Receiver: Wall Switch
Wall Switch Code Setting:
Light: Front Porch
Receiver: Wall Switch
Wall Switch Code Setting:
Set code switch 4 on receivers to Group
A setting (down) for all receivers to
operate in Group A.
Set code switches 1 through 3 on receivers to match the corresponding control
setting in above example.
To Operate:
1. Press Group A button (Note: Group
A LED will be ON).
2. Press corresponding control button
for desired action of selected light
source.
Light: Foyer
Receiver: Wall Switch
Wall Switch Code
Setting:
Code Selection
Switches
Group Selection
Switch (Group A
Shown)
Note: The “X” has been
placed on the switches
to help clarify the code
settings on this page.
Light: Garage
Receiver: Lamp Socket
Lamp Socket Code
Setting:
Light: Rear Porch
Receiver: Floodlight
Floodlight Code Setting:
To set receivers to work with Group B
controls, slide code switch 4 to Group B
(up) on receivers and set code switches
1 through 3 as shown above.
Possible Light Sources for Group B:
• Bedroom #1 (Wall Switch)
• Bedroom #2 (Wall Switch)
• Master Bedroom (Wall Switch)
• Master Bedroom Lamp #1 (Plug-In)
• Master Bedroom Lamp #2 (Plug-In)
• Master Bath (Wall Switch)
• Closet (Lamp Socket Converter)
• Hall Ceiling Light (Wall Switch)
4 598-1136-04
Page 5
AM
PM
A
A B
ON
OFF
ON
OFF
DIM
GROUP
MODE
ALL
ON
ALL
OFF
PANIC
DIM
ON
OFF
ON
OFF
DIM DIM
ON
OFF
ON
OFF
DIM DIM
ON
OFF
ON
OFF
DIM DIM
– Select Time Set Program+
1 2
EXAMPLE 2 – Programming ON/OFF Times
A B
ON
OFF
ON
OFF
DIM
GROUP
MODE
ALL
ON
ALL
OFF
DIM
ON
OFF
ON
OFF
DIM DIM
ON
OFF
ON
OFF
DIM DIM
1 2
A
AM
PM
A
PM
AM
A
A
A
A
A B
ON
OFF
ON
OFF
DIM
GROUP
DIM
AM
PM
A B
ON
OFF
GROUP
DIM
1 2
A
A B
ON
OFF
ON
OFF
DIM
GROUP
MODE
ALL
ON
ALL
OFF
PANIC
DIM
ON
OFF
ON
OFF
DIM DIM
ON
OFF
ON
OFF
DIM DIM
ON
OFF
ON
OFF
DIM DIM
1 2
A B
ON
OFF
ON
OFF
DIM
GROUP
MODE
ALL
ON
ALL
OFF
DIM
ON
OFF
ON
OFF
DIM DIM
ON
OFF
ON
OFF
DIM DIM
1 2
AM
PM
PM
AM
PM
AM
A
A
A
A
A B
ON
OFF
ON
OFF
DIM
GROUP
MODE
ALL
ON
ALL
OFF
DIM
ON
OFF
ON
OFF
DIM DIM
ON
OFF
ON
OFF
DIM DIM
1 2
AM
PM
A B
ON
OFF
ON
OFF
DIM
GROUP
MODE
ALL
ON
ALL
OFF
DIM
ON
OFF
ON
OFF
DIM DIM
ON
OFF
ON
OFF
DIM DIM
1 2
A
AM
PM
A
PM
AM
A
A
A
A
A B
ON
OFF
ON
OFF
DIM
GROUP
DIM
AM
PM
Following is an example of how to program a light source to turn ON and OFF at
preset times. In this example the kitchen lights (Group A from previous example)
will be programmed to turn ON in the morning at 6:45 am and turn OFF at 9:00
am. The same light will also be programmed to turn ON in the evening at 4:00
pm and turn OFF at 10:00 pm.
Each control can be programmed a maximum of 2 programs. See charts below for
➊ Press Group A button -
Note: Indicator light is ON.
➌ The hour numbers are high-
lighted when Program mode is
entered. Press (+) and (-) buttons - Change hours to 6 am.
➍ Press Select button - Note:
Minute numbers will highlight.
➎ Press (+) and (-) buttons
- Change minutes to 45.
To set OFF time, complete the following steps:
A Press Select button - Note: Hour
numbers will highlight.
B Press (+) and (-) buttons - Change
hours to 9 am.
C Press Select button - Note: Minute
numbers will highlight.
D Press (+) and (-) buttons - Change
E Press OFF button of kitchen light
To program 2nd ON/OFF time:
minutes to 00.
control - Note: Indicator light
FLASHES.
➋ Press Program button - Note: Mode
#2 indicator light should be ON for
this example.
➏ Press ON button of kitchen
light control - Note: Indicator
light FLASHES.
possible choices.
ON/OFF
Program
➋ Press Program button -
Note: Program indicator light
ON/OFF
Program
ON/OFF
Program
and Mode 1 light are ON.
Beginning with step 3 above, program
the ON time to 4:00 pm and the OFF
time to 10:00 pm.
To exit Program, press the Program
button until the Program indicator light
is OFF.
Note: To cancel a program, set both the
ON time and the OFF time to the same
time (Example: Set both the ON time
and the OFF time to 4:00 pm to cancel
the 2nd program above).
Note: Mode should be set to modes
1 and 2 to run both time programs in
this example.
5598-1136-04
OR
OR
1 Group A
1 Group B
2 Group A
0 Group B
0 Group A
2 Group B
Page 6

Press the MODE button to turn a pre-set program(s) ON or OFF. When the
MODE 1 LED is on, all programmed channels for MODE 1 will be activated.
When the MODE 2 LED is on, all programmed channels for MODE 2 will be
activated. To activate both MODE 1 and MODE 2 programs, press the MODE
button until both LED’s are on. To turn off all programmed channels, press the
MODE button until both LED’s are off.
Specifications
Range ...........................................................................Up to 100 feet (30.5 m)
Rated Voltage ....................................................................................... 12 VDC
Battery Backup ....................................................9 VDC (Battery not included)
Troubleshooting Guide
SYMPTOM
Controller does
not come on.
C o n t r o l l e r
does not retain
settings in a
power failure.
Controller will
not operate
receiver.
POSSIBLE CAUSE
1. Circuit breaker or fuse is
turned off. Power supply
not plugged in.
2. Switch on device is turned
off. Power supply is defective.
1. Backup battery is not in
stalled.
2.
Backup battery is defective.
1. Dip switch settings on receiver do not match controller.
2. Wrong group is selected.
3. Signals from controller are
being blocked, or transmitter is out of range.
SOLUTION
1. Turn circuit breaker or fuse
on. Plug in power supply.
2. Turned switch on. Try another power supply.
1. Install 9V battery.
-
2. Replace defective 9V bat
tery.
1. Check dip switch settings
on receiver.
2. Verify correct group is selected.
3. Check for metal objects that
could block the signal, or
reposition the transmitter.
-
Technical Service
Please call 1-800-858-8501 (English speaking only) for assistance
before returning product to store.
If you experience a problem, follow this guide. You may also want to visit our
Web site at: www.hzsupport.com. If the problem persists, call* for assistance
at 1-800-858-8501, 7:30 AM to 4:30 PM CST (M-F). You may also write* to:
HeathCo LLC, P.O. Box 90004, Bowling Green, KY 42102-9004
ATTN: Technical Service
* If contacting Technical Service, please have the following information available:
Model Number, Date of Purchase, and Place of Purchase.
No Service Parts Available for these Products
6 598-1136-04
Page 7

Regulatory Information
This device complies with Part 15 of the FCC Rules and RSS-210 of Industry
Canada. Operation is subject to the following two conditions: (1) this device may
not cause harmful interference, and (2) this device must accept any interference
received, including interference that may cause undesired operation.
The user is cautioned that changes or modifications not expressly approved by
the party responsible for regulatory compliance could void the user’s authority
to operate the equipment.
TWO YEAR LIMITED WARRANTY
This is a “Limited Warranty” which gives you specific legal rights. You may also have
other rights which vary from state to state or province to province.
For a period of two year from the date of purchase, any malfunction caused by factory defective parts or workmanship will be corrected at no charge to you.
Not Covered - Repair service, adjustment and calibration due to misuse, abuse or
negligence, light bulbs, batteries, and other expendable items are not covered by
this warranty. Unauthorized service or modification of the product or of any furnished
component will void this warranty in its entirety. This warranty does not include reimbursement for inconvenience, installation, setup time, loss of use, unauthorized
service, or return shipping charges.
This warranty covers only HeathCo LLC assembled products and is not extended
to other equipment and components that a customer uses in conjunction with our
products.
THIS WARRANTY IS EXPRESSLY IN LIEU OF ALL OTHER WARRANTIES,
EXPRESS OR IMPLIED, INCLUDING ANY WARRANTY, REPRESENTATION OR
CONDITION OF MERCHANT ABILITY OR THAT THE PRODUCTS ARE FIT FOR
ANY PARTICULAR PURPOSE OR USE, AND SPECIFICALLY IN LIEU OF ALL
SPECIAL, INDIRECT, INCIDENTAL, OR CONSEQUENTIAL DAMAGES.
REPAIR OR REPLACEMENT SHALL BE THE SOLE REMEDY OF THE CUSTOMER
AND THERE SHALL BE NO LIABILITY ON THE PART OF HEATHCO LLC FOR
ANY SPECIAL, INDIRECT, INCIDENTAL, OR CONSEQUENTIAL DAMAGES,
INCLUDING BUT NOT LIMITED TO ANY LOSS OF BUSINESS OR PROFITS,
WHETHER OR NOT FORESEEABLE. Some states or provinces do not allow the
exclusion or limitation of incidental or consequential damages, so the above limitation or exclusion may not apply to you. Please keep your dated sales receipt, it is
required for all warranty requests.
HeathCo LLC reserves the right to discontinue products and to change specifications at any time without incurring any obligation to incorporate new features
in products previously sold.
7598-1136-04
Page 8
Panel de control
ON
O
FF
DIM
GR
O
UP
A
B
1
2
M
O
DE
A
LL
ON
A
LL
O
FF
PA
NI
C
ON
O
FF
DIM
ON
O
FF
DIM
ON
O
FF
DIM
ON
OF
F
DIM
ON
O
FF
DIM
ON
O
FF
DIM
ON
O
FF
DIM
•
•
•
AM
A
PM
9V Battery
de alumbrado
Características
• Distancia de operación hasta 100 pies.
• Controla todos los productos Heath®/Zenith RF
Tech Communications™.
• Añade la función ENCENDIDO/APAGADO
programable para hasta 16 controles de alumbrado.
• Fuente de alimentación con aprobación UL/cUL.
• Probado y aprobado por FCC/IC.
• Visualizador de 12/24 horas del reloj digital.
• Respaldo con batería de 9 voltios para evitar pérdida de la programación
debido a una falla de energía (la batería de 9 voltios no se incluye).
• Control de intermitencia en receptores compatibles cuando se usa la característica Pánico.
Instalación de la batería y respaldo con la batería
El panel de control de alumbrado está diseñado para que funcione con 120 VCA
usando el convertidor a CD incluido,
pero tiene la característica adicional
de llevar un respaldo con batería para
evitar pérdida de la memoria. Para
instalar la batería:
1. Retire la tapa de la batería, de la
Tapa de la
batería
parte posterior de la caja, deslizándola hacia abajo.
2. Instale una batería de 9 voltios
(no incluida) según las marcas de
Batería de 9
voltios (No
incluida)
polaridad.
3. Cierre el compartimiento de la
batería siguiendo a la inversa la
instrucción anterior.
Al producirse una falla de energía, el res-
Conector de la batería
Instalación de la batería de 9
voltios y del conector de la
alimentación de CD
paldo con batería apagará automáticamente todas las funciones no esenciales. El visualizador y el teclado no funcionarán.
El respaldo con batería dura más de 5 horas. Cuando se reestablece la energía,
la unidad reinicia el visualizador y fija todos los canales en la posición OFF. Se
conservará toda la programación a no ser que la batería esté agotada. Si la batería
se agota, será necesario reprogramar la hora y las funciones automáticas.
Nota: Si a la energía de 120 VCA al panel de control de alumbrado se la va a
desconectar por un largo período de tiempo, desconecte la batería de 9 voltios
del conector para evitar la descarga de la batería.
© 2007 HeathCo LLC 598-1136-04 S
8 598-1136-04
Conector de
la alimentación de CD
Page 9

AM
PM
A
A B
ON
OFF
ON
OFF
DIM
GROUP
MODE
ALL
ON
ALL
OFF
PANIC
DIM
ON
OFF
ON
OFF
DIM DIM
ON
OFF
ON
OFF
DIM DIM
ON
OFF
ON
OFF
DIM DIM
– Select Time Set Program+
1 2
Se recomienda cambiar la batería por lo menos una vez al año. Es bueno
que escoja una fecha que pueda recordarse fácilmente (p. ej.: cumpleaños,
aniversario, Año Nuevo, cambios de la hora en verano, etc.).
Identificación del Producto
Control de la luz – ENCENDIDO, APAGADO,
ATENUACIÓN* con luz indicadora.
Indicador del grupo de control- Si la
luz está encendida, entonces está el
grupo A; si está apagada, entonces está
el grupo B (Nota: también destella al
ingresar una programación).
AM, PM, reloj puesto
en 24 horas- Las
Reloj
luces indican que
está en el ajuste AM
o PM. Si no hay luz
indica que está en el
ajuste de 24 horas.
SELECCIONAR (-, +) – Pone
la hora y los minutos del reloj,
y ENCIENDE/APAGA la configuración de la programación.
PUESTA DE LA HORA- Para poner
la hora seleccionando en la fase 12
ó 24 horas.
PROGRAMACIÓN – Programa las
horas de ENCENDIDO/ APAGADO
para los controles de luz ( la luz está
encendida cuando está en la fase
programación).
Grupo de control – Selecciona los controles de alumbrado del grupo A o B.
Fases de programación de la luz
- Selecciona entre fase 1, 2, 1 y 2,
o APAGADO ( las luces indicarán
que fase(s) son seleccionadas).
Identificación del control
– quite el film claro de
plástico poniendo dos
dedos sobre el plástico y
“pellizcando” el plástico.
Quite la tarjeta. Use las
calcomanías (incluidas) o
escriba en la tarjeta para
etiquetar cada control.
Ponga de nuevo la tarjeta
y el film de plástico.
ALL ON (Todos PRENDIDOS)
– Prende todas las luces dentro
de un grupo. Seleccione grupo A
o B y luego pulse ALL ON.
ALL OFF (todos APAGADOS) – Apaga todas las luces dentro de un grupo.
Seleccione grupo A o B y luego pulse
ALL OFF.
PANIC* - Todas las luces dentro de un grupo
se prenderán y apagarán. Escoja grupo A
o B y luego pulse PANIC.
*Control DIM: Reduce la intensidad de los controles que tienen reducción de
intensidad.
Al presionar DIM se pasará por los diferentes niveles de reducción de intensidad. Cada vez que se presione DIM se prenderá momentáneamente el control
LED.
El receptor guarda el último ajuste de reducción de intensidad usado. Para ver
el último ajuste de reducción de intensidad, presione el control DIM una vez.
Nota: No todos los controles de luz tienen la característica DIM y PANIC (ins-
9598-1136-04
Page 10

Para poner la hora
AM
PM
A
A B
ON
OFF
ON
OFF
DIM
GROUP
MODE
ALL
ON
ALL
OFF
PANIC
DIM
ON
OFF
ON
OFF
DIM DIM
ON
OFF
ON
OFF
DIM DIM
ON
OFF
ON
OFF
DIM DIM
– Select Time Set Program+
1 2
A B
ON
OFF
GROUP
DIM
1 2
➊ Presione el botón Time Set (poner la hora). Los números que
indican las horas están resaltados.
➋ Presione los botones (+) y (-) para poner las horas deseadas.
➌ Presione el botón Select (Seleccionar) – Note que los números que indican
los minutos se resaltan.
➍ Presione los botones (+) y (-) para poner los minutos deseados.
➎ Presione el botón Select (Seleccionar) – Ahora se puede ajustar la fase
AM/PM/24 horas.
➏ Presione los botones (+) y (-) para alternar entre las fases 12 horas-24 horas.
Nota: El indicador AM o PM se iluminará cuando se selecciona la fase 12
horas. Si no se ilumina el indicador AM ni el PM, entonces se ha seleccionado la fase 24 horas.
➐ Si se necesita hacer cambios adicionales en la hora, use el botón SELECT
(SELECCIONAR) para desplazarse a la posición deseada.
➑ Presione el botón TIME SET (PONER LA HORA) cuando termine de poner
la hora deseada.
Nota: Al mantener presionado los botones (+) o (-) los números se deslazan
más rápidamente.
10 598-1136-04
Page 11

AM
PM
A
A B
ON
OFF
ON
OFF
DIM
GROUP
MODE
ALL
ON
ALL
OFF
PANIC
DIM
ON
OFF
ON
OFF
DIM DIM
ON
OFF
ON
OFF
DIM DIM
ON
OFF
ON
OFF
DIM DIM
– Select Time Set Program+
1 2
Ejemplo 1 – Programación de los receptores
1 2 3 4
1 2 3 4
1 2 3 4
1 2 3 4
Group A Settings Group B Settings
1 2 3 4
1 2 3 4
1 2 3 4
1 2 3 4
1 2 3 4
1 2 3 4
1 2 3 4
1 2 3 4
Group A Settings Group B Settings
1 2 3 4
1 2 3 4
1 2 3 4
1 2 3 4
1 2 3 4
1 2 3 4
1 2 3 4
1 2 3 4
1 2 3 4
1 2 3 4
1 2 3 4
1 2 3 4
Group A Settings Group B Settings
1 2 3 4
1 2 3 4
1 2 3 4
1 2 3 4
1 2 3 4
1 2 3 4
1 2 3 4
1 2 3 4
1 2 3 4
1 2 3 4
1 2 3 4
1 2 3 4
1 2 3 4
1 2 3 4
1 2 3 4
1 2 3 4
Group A Settings Group B Settings
1 2 3 4
1 2 3 4
1 2 3 4
1 2 3 4
1 2 3 4
1 2 3 4
1 2 3 4
1 2 3 4
1 2 3 4
1 2 3 4
1 2 3 4
1 2 3 4
1 2 3 4
1 2 3 4
1 2 3 4
1 2 3 4
1 2 3 4
1 2 3 4
1 2 3 4
1 2 3 4
1 2 3 4
1 2 3 4
1 2 3 4
1 2 3 4
1 2 3 4
1 2 3 4
1 2 3 4
1 2 3 4
1 2 3 4
1 2 3 4
ON
OFF
DIM
ON
OFF
DIM DIM
ON
OFF
DIM DIM
A
AM
PM
A
PM
AM
A
A
A
A
ON
OFF
DIM
AM
PM
ON
1 2 3
4
A continuación tiene un ejemplo de cómo se puede programar el Panel de Control
del Alumbrado para hacer funcionar múltiples fuentes de luz dentro de una casa.
El Panel de Control tiene dos “Grupos” (A y B) con hasta ocho controles de luz
en cada grupo. En este ejemplo, los ocho controles de luz dentro del Grupo A
harán funcionar las siguientes fuentes de luz: Sala familiar (3), cocina, pórtico
del frente, pórtico de atrás, garaje y vestíbulo.
Luz: Lámpara de la sala familiar #1 y #2
Receptor: Enchufable (1 por lámpara)
Programación del
código del enchufe:
Luz: Lámpara de la sala familiar #3
Receptor: Receptáculo de pared
Programación del código
del receptáculo:
LED del grupo
“A”- LED encendido (mostrado)
“B” -LED apagado
Luz: Cocina
Receptor: Interruptor de pared
Programación del código
del interruptor de pared:
Luz: Pórtico del frente
Receptor: Interruptor de pared
Programación del código
del interruptor de pared:
Calibre el interruptor de código 4 en los receptores
del Grupo A calibrando (abajo) todos los receptores para que funcionen en el Grupo A.
Calibre los interruptores de código del 1 al 3
en los receptores para que emparejen con los
ajustes de control correspondientes en el ejemplo
de arriba.
Para hacer funcionar:
1. Pulse el botón del grupo A (Nota: El LED
del grupo A se prenderá).
2. Pulse el botón de control correspondiente
para la acción que desee de la fuente de
luz seleccionada.
Para programar los receptores para que funcionen con los controles del Grupo B, deslice el
Luz: Luz de techo de la sala familiar
Receptor: Interruptor de pared
Programación del código
del interruptor de pared:
Luz: Vestíbulo
Receptor: Interruptor de pared
Programación del código
del interruptor de pared:
Interruptores de
selección de código
Interruptor de selección de grupo
(Se muestra el
grupo A)
Nota: Se ha puesto una “X”
en los interruptores para
clarificar los ajustes de
código en esta página.
Luz: Garaje
Receptor: Enchufe de la lámpara
Programación del código
del enchufe de la lámpara:
Luz: Pórtico de atrás
Receptor: Faro
Programación del código del faro:
interruptor de código 4 al Grupo B (arriba) en
los receptores y programe los interruptores de
código del 1 al 3 como se muestra arriba.
Fuentes posibles de luz para el Grupo B:
• Dormitorio #1 (interruptor de pared)
• Dormitorio #2 (interruptor de pared)
• Dormitorio principal (interruptor de pared)
• Lámpara #1 del dormitorio principal (enchufable)
• Lámpara #2 del dormitorio principal (enchufable)
• Baño principal (interruptor de pared)
• Armario (transformador del enchufe de la
lámpara)
• Luz de techo del pasillo (interruptor de pared)
11598-1136-04
Page 12

AM
PM
A
A B
ON
OFF
ON
OFF
DIM
GROUP
MODE
ALL
ON
ALL
OFF
PANIC
DIM
ON
OFF
ON
OFF
DIM DIM
ON
OFF
ON
OFF
DIM DIM
ON
OFF
ON
OFF
DIM DIM
– Select Time Set Program+
1 2
Ejemplo 2- Programación de la hora de ENCENDIDO/
A B
ON
OFF
ON
OFF
DIM
GROUP
MODE
ALL
ON
ALL
OFF
DIM
ON
OFF
ON
OFF
DIM DIM
ON
OFF
ON
OFF
DIM DIM
1 2
A
AM
PM
A
PM
AM
A
A
A
A
A B
ON
OFF
ON
OFF
DIM
GROUP
DIM
AM
PM
A B
ON
OFF
GROUP
DIM
1 2
A
A B
ON
OFF
ON
OFF
DIM
GROUP
MODE
ALL
ON
ALL
OFF
PANIC
DIM
ON
OFF
ON
OFF
DIM DIM
ON
OFF
ON
OFF
DIM DIM
ON
OFF
ON
OFF
DIM DIM
1 2
A B
ON
OFF
ON
OFF
DIM
GROUP
MODE
ALL
ON
ALL
OFF
DIM
ON
OFF
ON
OFF
DIM DIM
ON
OFF
ON
OFF
DIM DIM
1 2
AM
PM
PM
AM
PM
AM
A
A
A
A
A B
ON
OFF
ON
OFF
DIM
GROUP
MODE
ALL
ON
ALL
OFF
DIM
ON
OFF
ON
OFF
DIM DIM
ON
OFF
ON
OFF
DIM DIM
1 2
AM
PM
A B
ON
OFF
ON
OFF
DIM
GROUP
MODE
ALL
ON
ALL
OFF
DIM
ON
OFF
ON
OFF
DIM DIM
ON
OFF
ON
OFF
DIM DIM
1 2
A
AM
PM
A
PM
AM
A
A
A
A
A B
ON
OFF
ON
OFF
DIM
GROUP
DIM
AM
PM
APAGADO
Lo que sigue es un ejemplo de cómo programar una fuente de luz para el ENCENDIDO y APAGADO a horas prefijadas. En este ejemplo las luces de la cocina
(Grupo A del ejemplo anterior) serán programadas para que enciendan en la
mañana a las 6:45 a.m. y se apaguen a las 9:00 a.m. La misma luz será también
programada para que ENCIENDA a las 4.00 p.m. y se APAGUE a las 10 p.m.
➊ Presione el botón del grupo
A - Nota: La luz indicadora está
ENCENDIDA.
➌ Los números de la hora están re-
saltados cuando se ingresa en la fase
programación. Presione los botones (+)
y (-) - Cambie la hora a 6 a.m.
➍ Presione el botón Select (Seleccio-
nar) - Nota: Los números de los minutos
resaltarán.
➎ Presione los botones (+) y (-) - Cambie
los minutos a 45.
Se puede programar como máximo 2 programaciones
por cada control. Vea en las tablas abajo las alternativas posibles.
Programación
EN CENDIDO
/APAGADO
Programación
EN CENDIDO
/APAGADO
Programación
EN CENDIDO
➏ Presione el botón ON (ENCENDIDO)
del control de luz de la cocina - Nota: La luz
➋ Presione El botón Program (Pro-
gramación) - Nota: La luz que indica
programación y la luz de la fase 1 están
ENCENDIDAS.
/APAGADO
indicadora DESTELLA.
12 598-1136-04
1 Grupo A
1 Grupo B
Ó
2 Grupo A
0 Grupo B
Ó
0 Grupo A
2 Grupo B
Page 13

Para poner la hora de APAGADO,
complete los siguientes pasos:
A Presione el botón Select (Selec-
cionar) - Nota: Los números que
indican las horas se resaltarán.
B Presione los botones (+) y (-) -
Cambie la hora a 9 a.m.
C Presione el botón Select - Nota: Los
números que indican los minutos
se resaltarán.
D Presione los botones (+) y (-) -
Cambie los minutos a 00.
E Presione el botón OFF del control
de luz de la cocina. Nota: La luz
indicadora DESTELLA.
Para programar una segunda hora de
ENCENDIDO/APAGADO:
➋ Presione EL botón programación-
Empezando con el paso 3 anterior,
programe la hora de encendido a las
4:00 p.m. y la de APAGADO a las
10:00 p.m.
Para salir de la programación, presione
el botón Program (Programación) hasta
que la luz indicadora de programación
esté APAGADA.
Nota: Para cancelar una programación,
ponga el ENCENDIDO y APAGADO a
la misma hora (Ejemplo: Ponga tanto
el encendido como el apagado a las
4:00 p.m. para cancelar la segunda
programación indicada arriba)
Nota: La fase debería ponerse en fase
1 y fase 2 para que funcionen las dos
programaciones de la hora de este
ejemplo.
Nota: La luz indicadora de la fase
Nº 2 debería estar ENCENDIDA
para este ejemplo.
Presione el botón FASE para ENCENDER o APAGAR la(s) programación(es)
pre calibradas. Cuando el LED de la FASE 1 está encendido, todos los canales
programados para la FASE 1 se activarán. Cuando el LED de la FASE 2 está
encendido, todos los canales programados para la FASE 1 se activarán. Para
activar las programaciones de la FASE 1 y FASE 2, presione el botón FASE
hasta que ambos LED estén encendidos. Para apagar todos los canales programados, presione el botón FASE hasta que ambos LEDs estén apagados.
13598-1136-04
Page 14

Especificaciones
Alcancehasta .........................................................................100 pies (30,5 m)
Voltaje nominal ..................................................................................... 12 VCC
Respaldo con batería ............................................ 9 VCD (batería no incluida)
Guía Del Análisis De Averías
SÍNTOMA
El controlador
no se enciende.
El controlador
no retiene las
calibraciones
cuando falla
la energía de
alimentación.
El controlador
no opera el
receptor.
CAUSA PROBABLE
1. El disyuntor o el fusible está
desconectado. La fuente
de alimentación no está
enchufada.
2. El interruptor del aparato
está apagado. Fuente de
alimentación defectuosa.
1. No está instalada la batería
de respaldo.
2. La batería de respaldo está
defectuosa.
1. La configuración del interruptor de circuito impreso
en el receptor no empareja
con el controlador.
2. Está seleccionado el gripo
incorrecto.
3. Las señales del controlador
están bloqueadas, o el
transmisor está fuera de
alcance.
SOLUCIÓN
1. Conecte el disyuntor o el
fusible. Enchufe la fuente
de alimentación.
2. Encienda del interruptor.
Pruebe otra fuente de
alimentación.
1. Instale una batería de 9
voltios.
2. Reemplace la batería defectuosa de 9 voltios.
1. Revise en el receptor las
configuraciones del interruptor de circuito impreso.
2. Verifique que esté seleccionado el grupo correcto.
3. Revise objetos metálicos
que podrían bloquear la
señal, o cambie de posición
al transmisor.
SERVICIO TÉCNICO
Favor de llamar al 1-800-858-8501 (sólo para hablar en inglés) para pedir
ayuda antes de devolver el producto a la tienda.
Si tiene algún problema, siga esta guía. Usted puede también visitar nuestro
sitio Web: www.hzsupport.com. Si el problema continúa, llame al 1-800-858-
8501 (sólo para hablar en inglés), de 7:30 AM a 4:30 PM CST (L-V). Usted
puede también escribir a:
HeathCo LLC, P.O. Box 90004, Bowling Green, KY 42102-9004
ATTN: Technical Service (Servicio Técnico)
* Si se llama al Servicio Técnico, por favor tener lista la siguiente información:
Número de Modelo, Fecha de compra y Lugar de compra.
No hay piezas de servicio disponibles para este producto
14 598-1136-04
Page 15

Información Regulatoria
Este aparato cumple con la Parte 15 de las Reglas de la FCC (Comisión Federal de Comunicaciones) y con la RSS-210 de las Industrias del Canadá. El
funcionamiento está sujeto a las dos siguientes condiciones: (1) este aparato
no puede causar interferencias dañinas, y (2) este aparato debe aceptar cualquier interferencia recibida, incluyendo una interferencia que pueda causar un
funcionamiento indeseable.
Se advierte al usuario que cambios o modificaciones no aprobadas expresamente por la parte responsable de cumplir con los reglamentos podría invalidar
la autoridad del usuario para el uso de este equipo.
GARANTÍA LIMITADA A 2 AÑOS
Esta es una “Garantía Limitada” que le da a Ud. derechos legales específicos.
Usted puede también tener otros derechos que varían de estado a estado o de
provincia a provincia.
Por un período de 2 años desde la fecha de compra, cualquier mal funcionamiento
ocasionado por partes defectuosas de fábrica o mano de obra será corregido sin
cargo para Ud.
No cubierto - Servicio de reparación, ajuste y calibración debido al mal uso, abuso o
negligencia, bombillas, baterías, u otras partes fungibles no están cubiertas por esta
garantía. Los Servicios no autorizados o modificaciones del producto o de cualquier
componente que se provee invalidarán esta garantía en su totalidad. Esta garantía
no incluye reembolso por inconveniencia, instalación, tiempo de instalación, perdida
de uso, servicio no autorizado, o costos de transporte de retorno.
Esta garantía cubre solamente los productos ensamblados por HeathCo LLC y
no se extiende a otros equipos o componentes que el consumidor usa junto con
nuestros productos.
ESTA GARANTÍA ESTÁ EXPRESAMENTE EN LUGAR DE OTRAS GARANTÍAS,
EXPRESADAS O SOBREENTENDIDAS, INCLUYENDO CUALQUIER GARANTÍA,
REPRESENTACIÓN O CONDICIÓN DE COMERCIABILIDAD O QUE LOS PRODUCTOS SE ADAPTEN PARA CUALQUIER PROPÓSITO O USO EN PARTICULAR, Y ESPECIFICAMENTE EN LUGAR DE TODOS LOS DAÑOS ESPECIALES,
INDIRECTOS, INCIDENTALES Y CONSECUENTES.
LA REPARACIÓN O EL REEMPLAZO DEBERÍA SER LA ÚNICA SOLUCIÓN DEL
CLIENTE Y NO HABRÁ RESPONSABILIDAD POR PARTE DE HEATHCO LLC POR
CUALQUIER DAÑO ESPECIAL, INDIRECTO, INCIDENTAL O CONSECUENTE,
INCLUIDOS PERO NO LIMITADOS A CUALQUIER PÉRDIDA DE NEGOCIO O
GANACIAS SEAN O NO PREVISIBLES. Algunos estados o provincias no permiten
la exclusión o limitación de daños incidentales o consecuentes, de modo que la
limitación o exclusión arriba indicada puede que no se aplique a Ud. Por favor guarde
su recibo de venta fechado; se lo requiere para cualquier solicitud de garantía.
HeathCo LLC se reserva el derecho de descontinuar productos y de cambiar
especificaciones, cuando desee, sin incurrir en ninguna obligación de incorporar
las nuevas características en los productos vendidos anteriormente.
15598-1136-04
Page 16

Panneau de
ON
O
FF
DIM
GR
O
UP
A
B
1
2
M
O
DE
A
LL
ON
A
LL
O
FF
PA
NI
C
ON
O
FF
DIM
ON
O
FF
DIM
ON
O
FF
DIM
ON
OF
F
DIM
ON
O
FF
DIM
ON
O
FF
DIM
ON
O
FF
DIM
•
•
•
AM
A
PM
9V Battery
commande
d’éclairage
Caractéristiques
• Portée de fonctionnement jusqu’à 30 mètres
(100 pieds).
• Commande tous les produits Heath®/Zenith RF
Tech Communications™.
• Ajoute une fonction marche/arrêt pour un maximum de 16 commandes d’éclairage.
• Alimentation conforme UL/cUL.
• Testé et approuvé FCC/IC.
• Affichage d’horloge numérique 12/24 heures.
• Pile de secours de 9 volts pour empêcher la perte de programmation due à
une panne d’électricité (pile de 9 volts non inclue).
• Commande instantanée des récepteurs compatibles lors de l’utilisation de la
fonction « panique ».
Installation de la pile et pile de secours
Le panneau de commande d’éclairage est conçu pour fonctionner avec 120
VCA à l’aide du convertisseur d’alimentation c.a., mais il possède la fonction
additionnelle d’une pile de secours intégrée pour empêcher la perte de la programmation. Pour installer la pile :
1. Enlevez le couvercle de compartiment
à pile situé à l’arrière du boîtier en
glissant le couvercle vers le bas.
2. Installez la pile de 9 volts (non inclue)
Couvercle
de la pile
selon les repères de polarité.
3. Fermez le compartiment à pile en in-
versant les instructions ci-dessus.
En cas de panne d’électricité, la pile de
Pile de 9 volts
(non inclue)
secours éteindra toutes les fonctions
non essentielles. L’affichage et le clavier
ne fonctionneront pas. La pile de secours durera plus de 5 heures. Lorsque
l’électricité sera rétablie, l’unité démarrera de nouveau l’affichage et mettra
Connecteur de pile
Installation de la pile de 9
volts et du connecteur d’ali-
mentation c.a.
tous les canaux à la position d’arrêt. Les programmes demeurent en mémoire
tant que la pile ne se décharge pas. Si la pile est épuisée, la reprogrammation
de l’heure et des fonctions automatiques sera nécessaire.
Remarque : Si vous prévoyez que le panneau de commande sera déconnecté
de l’alimentation c.a. pendant une période prolongée, déconnectez le connecteur
de la pile de 9 volts de la pile afin d’empêcher que la pile ne se décharge.
© 2007 HeathCo LLC 598-1136-04 F
16 598-1136-04
Connecteur
d’alimentation c.a
Page 17

AM
PM
A
A B
ON
OFF
ON
OFF
DIM
GROUP
MODE
ALL
ON
ALL
OFF
PANIC
DIM
ON
OFF
ON
OFF
DIM DIM
ON
OFF
ON
OFF
DIM DIM
ON
OFF
ON
OFF
DIM DIM
– Select Time Set Program+
1 2
On recommande de remplacer la pile au moins une fois par année. Il peut
être utile de choisir une date facile à retenir (p. ex. date de naissance, date
d’anniversaire, Jour de l’An, au moment du changement d’heure, etc.).
Identification du produit
Groupe de commande – Choisissez les
Commande d’éclairage – ON (marche), OFF
(arrêt), DIM* (gradateur) avec voyant.
Indication du groupe de commande – Le
voyant illuminé représente le Groupe A,
le voyant éteint représente le Groupe B
(Remarque : clignote également lors de
l’entrée de la programmation).
Horloge
AM, PM, réglage de
l’horloge de 24 heures – Les voyants
indiquent le réglage
AM ou PM. L’absence de voyant
indique le réglage
de 24 heures.
commandes d’éclairage du Groupe A ou
du Groupe B.
Modes de programmation de l’éclairage – Choisissez le mode 1, 2, 1 et
2 ou OFF (les voyants indiqueront
quels modes sont sélectionnés.
Identification des commandes – Enlevez la pellicule
transparente en plaçant
deux doigts sur le plastique et en « pinçant » le
plastique. Retirez la carte.
Utilisez les décals (inclus)
ou écrivez sur la carte pour
étiqueter chaque commande. Replacez la carte et la
pellicule en plastique.
SELECT (sélection) – (-, +)
– Réglez les heures et les
minutes pour l’horloge et la
marche et l’arrêt du réglage
de la programmation.
TIME SET (réglage de l’heure) – Réglez l’heure et choisissez entre le mode
de 12 heures ou de 24 heures.
PROGRAM (programmation) = Programmez l’heure de marche et d’arrêt pour les
commandes d’éclairage (le voyant est illuminé lorsqu’en mode de programmation).
PANIC* (panique) - Toutes les lumières à
l’intérieur d’un groupe clignoteront. Sélec-
tionnez soit le Groupe A ou le Groupe B
puis appuyez sur PANIC.
ALL ON (toutes allumées) - Allume toutes les lumières à l’intérieur d’un groupe. Sélectionnez
soit le Groupe A ou le Groupe B
puis appuyez sur ALL ON.
ALL OFF (toutes éteintes) – Éteint toutes
les lumières à l’intérieur d’un groupe. Sélectionnez soit le Groupe A ou le Groupe
B puis appuyez sur ALL OFF.
*Commande DIM (gradation) : Règle l’intensité pour les commandes d’éclairage qui
sont munies de la fonction de gradation. Le fait d’appuyer sur la touche DIM fait passer
l’éclairage par les différents niveaux de gradation. Chaque fois que vous appuyez
sur la touche DIM, le voyant DEL de la commande s’illuminera momentanément.
Le récepteur garde en mémoire le dernier réglage de gradation utilisé. Pour rappeler le dernier réglage de gradation, appuyez une fois sur la commande DIM.
Remarque : Les commandes d’éclairage ne sont pas toutes munies des fonctions DIM et PANIC (clignotement).
17598-1136-04
Page 18

Réglage de l’heure
AM
PM
A
A B
ON
OFF
ON
OFF
DIM
GROUP
MODE
ALL
ON
ALL
OFF
PANIC
DIM
ON
OFF
ON
OFF
DIM DIM
ON
OFF
ON
OFF
DIM DIM
ON
OFF
ON
OFF
DIM DIM
– Select Time Set Program+
1 2
A B
ON
OFF
GROUP
DIM
1 2
➊ Appuyez sur le bouton Time Set. Les nombres seront en évi-
dence.
➋ Appuyez sur les bouton (+) et (-) pour obtenir l'heure désirée.
➌ Appuyez sur le bouton Select – Notez que les nombres des minutes seront
en évidence.
➍ Appuyez sur les boutons (+) et (-) pour obtenir l'heure désirée.
➎ Appuyez sur le bouton Select – Le mode AM/PM/24 heures est maintenant
réglable.
➏ Appuyez sur les boutons (+) et (-) pour alterner entre le mode 12 heures
et 24 heures. Remarque : L’indicateur AM ou PM est illuminé lorsque le
mode 12 heures est sélectionné. Si ni l’indicateur AM ni l’indicateur PM
est illuminé, cela signifie que le mode 24 heures est sélectionné.
➐ Si vous devez faire d'autres changements, utilisez le bouton SELECT pour
passer la position désirée.
➑ Appuyez sur le bouton TIME SET lorsque le réglage de l'heure est com-
plété.
Remarque : Si vous appuyez les boutons (+) et (-) en le maintenant enfoncés,
les nombres avanceront plus rapidement.
18 598-1136-04
Page 19

AM
PM
A
A B
ON
OFF
ON
OFF
DIM
GROUP
MODE
ALL
ON
ALL
OFF
PANIC
DIM
ON
OFF
ON
OFF
DIM DIM
ON
OFF
ON
OFF
DIM DIM
ON
OFF
ON
OFF
DIM DIM
– Select Time Set Program+
1 2
EXEMPLE 1 – Réglage des récepteurs
1 2 3 4
1 2 3 4
1 2 3 4
1 2 3 4
Group A Settings Group B Settings
1 2 3 4
1 2 3 4
1 2 3 4
1 2 3 4
1 2 3 4
1 2 3 4
1 2 3 4
1 2 3 4
Group A Settings Group B Settings
1 2 3 4
1 2 3 4
1 2 3 4
1 2 3 4
1 2 3 4
1 2 3 4
1 2 3 4
1 2 3 4
1 2 3 4
1 2 3 4
1 2 3 4
1 2 3 4
Group A Settings Group B Settings
1 2 3 4
1 2 3 4
1 2 3 4
1 2 3 4
1 2 3 4
1 2 3 4
1 2 3 4
1 2 3 4
1 2 3 4
1 2 3 4
1 2 3 4
1 2 3 4
1 2 3 4
1 2 3 4
1 2 3 4
1 2 3 4
Group A Settings Group B Settings
1 2 3 4
1 2 3 4
1 2 3 4
1 2 3 4
1 2 3 4
1 2 3 4
1 2 3 4
1 2 3 4
1 2 3 4
1 2 3 4
1 2 3 4
1 2 3 4
1 2 3 4
1 2 3 4
1 2 3 4
1 2 3 4
1 2 3 4
1 2 3 4
1 2 3 4
1 2 3 4
1 2 3 4
1 2 3 4
1 2 3 4
1 2 3 4
1 2 3 4
1 2 3 4
1 2 3 4
1 2 3 4
1 2 3 4
1 2 3 4
ON
OFF
DIM
ON
OFF
DIM DIM
ON
OFF
DIM DIM
A
AM
PM
A
PM
AM
A
A
A
A
ON
OFF
DIM
AM
PM
ON
1 2 3
4
L’exemple ci-dessous vous indique comment le Panneau de commande d’éclairage peut être programmé pour faire fonctionner de multiples sources d’éclairage
à l’intérieur d’une maison.
Le Panneau de commande possède deux « Groupes » (A et B) avec un maximum
de huit commandes d’éclairage dans chaque groupe. Dans cet exemple, les huit
commandes du Groupe A feront fonctionner les sources d’éclairage suivantes :
salle familiale (3), cuisine, porche avant, porche arrière, garage et vestibule.
Éclairage : Lampes de la salle familiale no 1
et no 2
Récepteur : Enfichable (1 par lampe)
Réglage du code de l’enfichable :
Éclairage : Lampe de la salle familiale no 3
Récepteur : Prise de courant murale
Réglage du code de la
prise de courant murale :
Voyant DEL de groupe
« A » - voyant DEL illuminé (illustré)
« B » - voyant DEL éteint
Éclairage : Cuisine
Récepteur : Interrupteur mural
Réglage du code de
l’interrupteur mural :
Éclairage : Porche avant
Récepteur : Interrupteur mural
Réglage du code de
l’interrupteur mural :
Glissez le commutateur de code 4 sur les récepteurs
vers le réglage du Groupe A (bas) pour tous les
récepteurs pour qu’ils commandent le Groupe A.
Réglez les commutateurs de code 1 à 3 sur les
récepteurs pour qu’ils correspondent au réglage
de commande dans l’exemple ci-dessus.
Pour le fonctionnement :
1. Appuyez sur le bouton du Groupe A (Remarque:
Le voyant DEL sur Groupe A s’illuminera).
2. Appuyez sur le bouton de commande cor-
respondant pour obtenir l’action désirée de
la source de lumière sélectionnée.
Pour régler les récepteurs pour qu’ils fonctionnent
avec les commandes du Groupe B, glissez le
Éclairage : Plafonnier de la salle familiale
Récepteur : Interrupteur mural
Réglage du code de
l’interrupteur mural :
Éclairage : Vestibule
Récepteur : Interrupteur mural
Réglage du code de
l’interrupteur mural :
Commutateurs de
sélection de code
Commutateur
de sélection du
groupe (Groupe
A illustré)
Remarque : Le « X » a été
placé sur les commutateurs
pour clarifier les réglages de
code sur cette page.
Éclairage : Garage
Récepteur : Douille
Réglage du code
de la douille :
Éclairage : Porche arrière
Récepteur : Projecteur
Réglage du code
du projecteur :
commutateur de code 4 vers le Groupe B (haut)
sur les récepteurs et réglez les interrupteurs de
code 1 à 3 tel qu’indiqué ci-dessus.
Sources d’éclairage possibles pour le Groupe B :
• Chambre à coucher no 1 (interrupteur mural)
• Chambre à coucher no 2 (interrupteur mural)
• Chambre principale (interrupteur mural)
• Chambre principale, lampe no 1 (enfichable)
• Chambre principale, lampe no 2 (enfichable)
• Salle de bain de la chambre principale (interrupteur mural)
• Placard (convertisseur de douille)
• Plafonnier du couloir (interrupteur mural)
19598-1136-04
Page 20

AM
PM
A
A B
ON
OFF
ON
OFF
DIM
GROUP
MODE
ALL
ON
ALL
OFF
PANIC
DIM
ON
OFF
ON
OFF
DIM DIM
ON
OFF
ON
OFF
DIM DIM
ON
OFF
ON
OFF
DIM DIM
– Select Time Set Program+
1 2
EXEMPLE 2 – Programmation des heures de marche et d’arrêt
A B
ON
OFF
ON
OFF
DIM
GROUP
MODE
ALL
ON
ALL
OFF
DIM
ON
OFF
ON
OFF
DIM DIM
ON
OFF
ON
OFF
DIM DIM
1 2
A
AM
PM
A
PM
AM
A
A
A
A
A B
ON
OFF
ON
OFF
DIM
GROUP
DIM
AM
PM
A B
ON
OFF
GROUP
DIM
1 2
A
A B
ON
OFF
ON
OFF
DIM
GROUP
MODE
ALL
ON
ALL
OFF
PANIC
DIM
ON
OFF
ON
OFF
DIM DIM
ON
OFF
ON
OFF
DIM DIM
ON
OFF
ON
OFF
DIM DIM
1 2
A B
ON
OFF
ON
OFF
DIM
GROUP
MODE
ALL
ON
ALL
OFF
DIM
ON
OFF
ON
OFF
DIM DIM
ON
OFF
ON
OFF
DIM DIM
1 2
AM
PM
PM
AM
PM
AM
A
A
A
A
A B
ON
OFF
ON
OFF
DIM
GROUP
MODE
ALL
ON
ALL
OFF
DIM
ON
OFF
ON
OFF
DIM DIM
ON
OFF
ON
OFF
DIM DIM
1 2
AM
PM
A B
ON
OFF
ON
OFF
DIM
GROUP
MODE
ALL
ON
ALL
OFF
DIM
ON
OFF
ON
OFF
DIM DIM
ON
OFF
ON
OFF
DIM DIM
1 2
A
AM
PM
A
PM
AM
A
A
A
A
A B
ON
OFF
ON
OFF
DIM
GROUP
DIM
AM
PM
Vous trouverez ci-dessous un exemple illustrant comment programmer une
source d’éclairage pour qu’elle s’allume et s’éteigne à une heure préprogrammée.
Dans cet exemple, les lumières de la cuisine (Groupe A de l’exemple précédent)
seront programmées pour s’allumer le matin à 6:45 et s’éteindre le soir à 9:00.
La même lumière sera également programmée pour s’allumer dans la soirée
à 4:00 PM et s’éteindre à 10:00 PM.
Chaque commande peut être programmée à un
➊ Appuyez sur le bouton du
Groupe A – Remarque : le
voyant indicateur est illuminé.
➌ Appuyez sur le bouton Program – Re-
marque : les nombres indiquant l’heure
sont éclairés lorsque le mode Program
est entré. Appuyez sur les boutons (+)
et (-) – Changez l’heure à 6 am.
➍ Appuyez sur le bouton Select – Re-
marque : les nombres indiquant les
minutes seront éclairés.
➎ Appuyez sur les boutons (+) et (-)
– Changez les minutes à 45.
maximum de 2 programmes. Consultez le tableau
ci-dessous pour connaître les choix possibles.
P r o gr am mation marche/arrêt
OU
P r o gr am mation marche/arrêt
OU
P r o gr am mation marche/arrêt
➋ Appuyez sur le bouton Program
– Remarque : le voyant indicateur
de la programmation et le voyant du
Mode 1 sont illuminés.
➏ Appuyez sur le bouton ON de la com-
mande d'éclairage de la cuisine – Remarque : le voyant indicateur clignote.
1 Groupe A
1 Groupe B
2 Groupe A
0 Groupe B
0 Groupe A
2 Groupe B
20 598-1136-04
Page 21

Pour régler l’heure d’arrêt (OFF), suivez
les étapes suivantes :
A Appuyez sur le bouton Select – Re-
marque : les nombres indiquant
l’heure seront en évidence.
B Appuyez sur les bouton (+) et (-)
– Changez l’heure à 9 am.
C Appuyez sur le bouton Select – Re-
marque : les nombres indiquant les
minutes seront en évidence.
D Appuyez sur les boutons (+) et (-)
– Changez les minutes à 00.
E Appuyez sur le bouton OFF de
la commande d’éclairage de la
cuisine – Remarque : le voyant
indicateur CLIGNOTE.
Pour programmer une deuxième heure
En commençant par l’étape 3 ci-dessus,
programmez l’heure de marche à 4:00
pm et l’heure d’arrêt à 10:00 pm.
Pour quitter la programmation, appuyez
sur le bouton Program jusqu’à ce que le
voyant indicateur de la programmation
soit éteint (OFF).
Remarque :
Pour quitter la programmation, réglez l’heure de marche et d’arrêt
à la même heure (par exemple, réglez
l’heure de marche et l’heure d’arrêt
à 4:00 pm pour annuler le deuxième
programmation ci-dessus).
Remarque : le mode devrait être réglé
aux modes 1 et 2 pour faire fonctionner
les deux programmations d’heure dans
cet exemple.
de marche et d’arrêt:
➋ Appuyez sur le bouton Program
– Remarque : le voyant indicateur
du Mode #2 devrait être illuminé
pour cet exemple.
Appuyez sur le bouton MODE pour activer ou désactiver un ou plusieurs
programmes pré-réglés. Lorsque le voyant DEL du MODE 1 est illuminé, tous
les canaux programmés pour le MODE 1 sont activés. Lorsque le voyant DEL
du MODE 2 est illuminé, tous les canaux programmés pour le MODE 2 sont
activés. Pour activer les programmes de MODE 1 et de MODE 2, appuyez sur
le bouton MODE jusqu’à ce que les deux voyants DEL soient illuminés. Pour
désactiver tous les canaux programmés, appuyez sur le bouton MODE jusqu’à
ce que les deux voyants DEL soient éteints.
21598-1136-04
Page 22

Fiche Technique
Portée ............................................................... Jusqu’à 30 mètres (100 pieds)
Tension ................................................................................................12 V c.c.
Pile de secours ............................................................. 9 VAC (pile non inclue)
Guide de dépannage
SYMPTÔME
L’appareil de
commande ne
s’allume pas.
L’appareil de
commande ne
conserve pas
les réglages
programmés
l o r s d ’ u ne
panne d’électricité.
L’appareil de
commande ne
fait pas fonctionner le récepteur.
CAUSE POSSIBLE
1. Le disjoncteur ou le fusible
sont éteints. L’alimentation
en électricité n’est pas
branchée.
2. L’interrupteur sur le dispositif est à l’arrêt. L’alimentation est défaillante.
1. La pile de secours n’est pas
installée.
2. La pile de secours est défaillante.
1. Les réglages des commutateurs DIP du récepteur ne
correspondent pas à ceux
du tableau de commande.
2. Le mauvais groupe a été
sélectionné.
3. Les signaux du tableau de
commande sont bloqués ou
ce dernier est hors portée.
SOLUTION
1. Activez le disjoncteur ou
le fusible. Branchez l’alimentation.
2. Mettez l’interrupteur à la
position de marche. Essayez une autre source
d’alimentation.
1. Installez une pile de 9
volts.
2. Remplacez la pile de 9 volts
défaillante.
1. Vérifiez le réglage des
commutateurs DIP du
récepteur.
2. Assurez-vous que le bon
groupe est sélectionné.
3. Vérifiez s’il y a des objets
métalliques qui gênent le
signal ou changez la position de l’émetteur.
22 598-1136-04
Page 23

Service Technique
Veuillez faire le 1 800 858-8501 (service en anglais seulement) pour
obtenir de l’aide avant de retourner l’article au magasin.
En cas de problème, suivez ce guide. Vous pouvez aussi visiter notre site Web
à www.hzsupport.com. Si le problème persiste, composez* le 1 800 858-8501
(service en anglais seulement), entre 7 h 30 et 16 h 30, HNC, du lundi au vendredi. Vous pouvez aussi écrire au :
HeathCo LLC
P.O. Box 90004, Bowling Green, KY 42102-9004
ATTN: Technical Service (Service technique)
* Lors d’un appel au service technique, veuillez avoir les renseignements suivants
à portée de main : numéro du modèle, date d’achat et endroit de l’achat.
Aucune pièce de rechange n’est disponible pour ce produit
Renseignements de règlements
Ce dispositif est conforme aux exigences de la partie 15 des règles FCC et
RSS-210 d’Industrie Canada. Son fonctionnement est sujet aux deux conditions
suivantes: 1) Ce dispositif ne doit pas causer de parasites nuisibles, et 2) ce
dispositif doit endurer tous les parasites reçus, y compris ceux susceptibles de
provoquer un fonctionnement intempestif.
Avis à l’utilisateur : Les changements ou modifications, qui n’ont pas été explicitement approuvés par l’organisme chargé d’assurer la conformité aux règlements,
pourraient invalider le droit de l’utilisateur à faire fonctionner cet appareil.
23598-1136-04
Page 24

GARANTIE LIMITÉE DE 2 ANS
Il s’agit d’une « Garantie limitée » qui vous confère des droits juridiques spécifiques.
Vous pouvez également jouir d’autres droits, variables d’une province à l’autre.
Pendant une période de 2 ans à compter de la date d’achat, toute anomalie de
fonctionnement imputable à un vice de matériau ou de main-d’oeuvre sera corrigée
gratuitement.
Exclusions de la garantie - Réparations, réglage et calibrage dus à une mauvaise
utilisation, un mauvais traitement ou à la négligence. Les ampoules, les piles et des
autres articles non durables ne sont pas couverts par cette garantie. Le service non
autorisé ou la modification du produit ou d’un ou l’autre de ses composants fournis
invalidera totalement la présente garantie.Cette garantie n'inclut pas le remboursement pour le dérangement, l'installation, le réglage, la perte d'utilisation, le service
non autorisé ou les frais d'expédition pour le renvoi de la marchandise.
La garantie ne couvre que les produits assemblés HeathCo LLC et ne s’étend pas
aux autres équipements et composants que le client pourrait utiliser conjointement
avec nos produits.
CETTE GARANTIE TIENT EXPRESSÉMENT LIEU DE TOUTES AUTRES GARANTIES, EXPLICITES OU IMPLICITES, Y COMPRIS DE TOUTE GARANTIE DE
REPRÉSENTATION OU DE CONDITION DE CONVENANCE À LA COMMERCIALISATION OU À L’EFFET QUE LES PRODUITS CONVIENNENT À UN BUT OU À
UNE UTILISATION PARTICULIÈRE, ET SPÉCIFIQUEMENT DE TOUS DOMMAGES
SPÉCIAUX, DIRECTS, INDIRECTS OU SECONDAIRES.
LE REMPLACEMENT OU LA RÉPARATION CONSTITUENT LE SEUL RECOURS
DU CLIENT ET HEATHCO LLC NE POURRA ÊTRE TENUE RESPONSABLE DE
TOUS DOMMAGES SPÉCIAUX, DIRECTS, INDIRECTS OU SECONDAIRES, Y
COMPRIS, SANS S’Y LIMITER, LES PERTES COMMERCIALES ET PERTES
DE PROFIT, QU’ELLES SOIENT PRÉVISIBLES OU NON. Certaines provinces
n’autorisent pas l’exclusion ou la limitation des dommages indirects ou secondaires,
et la limitation ou l’exclusion ci-dessus pourrait ne pas s’appliquer à vous. Veuillez
conserver le reçu portant la date d’achat; vous en aurez besoin pour toutes vos
demandes liées à la garantie.
HeathCo LLC se réserve le droit de mettre fin à la production de ses produits
ou d’en modifier les spécifications à tout moment, et elle n’est pas tenue d’incorporer les nouvelles caractéristiques de ses produits aux produits vendus
antérieurement.
24 598-1136-04
 Loading...