

Page 1

elite
video doorbell
Owner’s Manual
Page 2

Introduction
Table of Contents
INTRODUCTION .............................2-4
SETUP ...................................5-7
HOW TO USE .............................8-11
CARE AND CLEANING ......................... 11
FAQS ..................................12-14
Thank You for Purchasing Notifi™ Elite Doorbell
Welcome to Notifi by HeathZenith. This manual will help setup the Notifi system. Please read and understand this entire manual
before attempting to assemble, install, or operate the Notifi system. For additional support and videos, go to www.heath-zenith.
com/notifi.
IMPORTANT INFORMATION
• Minimum system requirement for the Notifi app is iOS 9.0 or higher and Android 5.0 or higher.
CAUTION
To maintain the compliance with the RF exposure guideline, place the base unit at least 7.875" (20 cm) from nearby persons.
Many states regulate the use of security cameras and other recording devices. It is the purchaser’s sole
responsibility to ensure compliance with all applicable laws and to provide any legally required notices.
Check local laws regarding the use of any recording devices and cameras prior to installation.
2
Page 3

Introduction
Specifications
Power Requirements:
16 VAC/10 VA Transformer
Video Quality:
Resolution: Hi (Default) = 1280x720 (720p), Med = 640x360, Low = 320x180
Frame Rate: Adjustable up to 25 Fps
Viewing Angle: 160°
Maximum Recording Length: 2 minutes per recording
Operating Temperature: -13 to +120°F (-25°C to +50C)
NOTICE: Install the Notifi Elite doorbell in a covered location; away from direct sunlight, rain, and humidity. Do not allow
salt water or other conductive liquids to come into contact with the doorbell.
Motion Detection Range: Adjustable up to 30 ft. (9.1 m)
Minimum System Requirements for the Notifi App: iOS 9.0 or higher and Android 5.0 or higher, Broadband Internet
Connection with Home Wi-Fi®: Download speed is 3 MB/s and upload speed is 3 MB/s
Subscriptions
Notifi offers two levels of service.
Basic Service (Included):
• Notifications and photo alerts • Lighted push button
• Custom motion detection zones • 24/7 on demand live viewing
• Programmable muting • 24 Hr cloud storage
Premium Service (Available for an additional monthly or yearly fee):
Premium service includes all Basic service features plus:
• Push button activated video recording • Motion-activated video recording
• 30 day cloud storage
You Will Need
• Existing wired chime
• Password for your home network
• Broadband Internet connection with home Wi-Fi router
• Phillips screwdriver
• Flat-head screwdriver
3
Page 4
Introduction
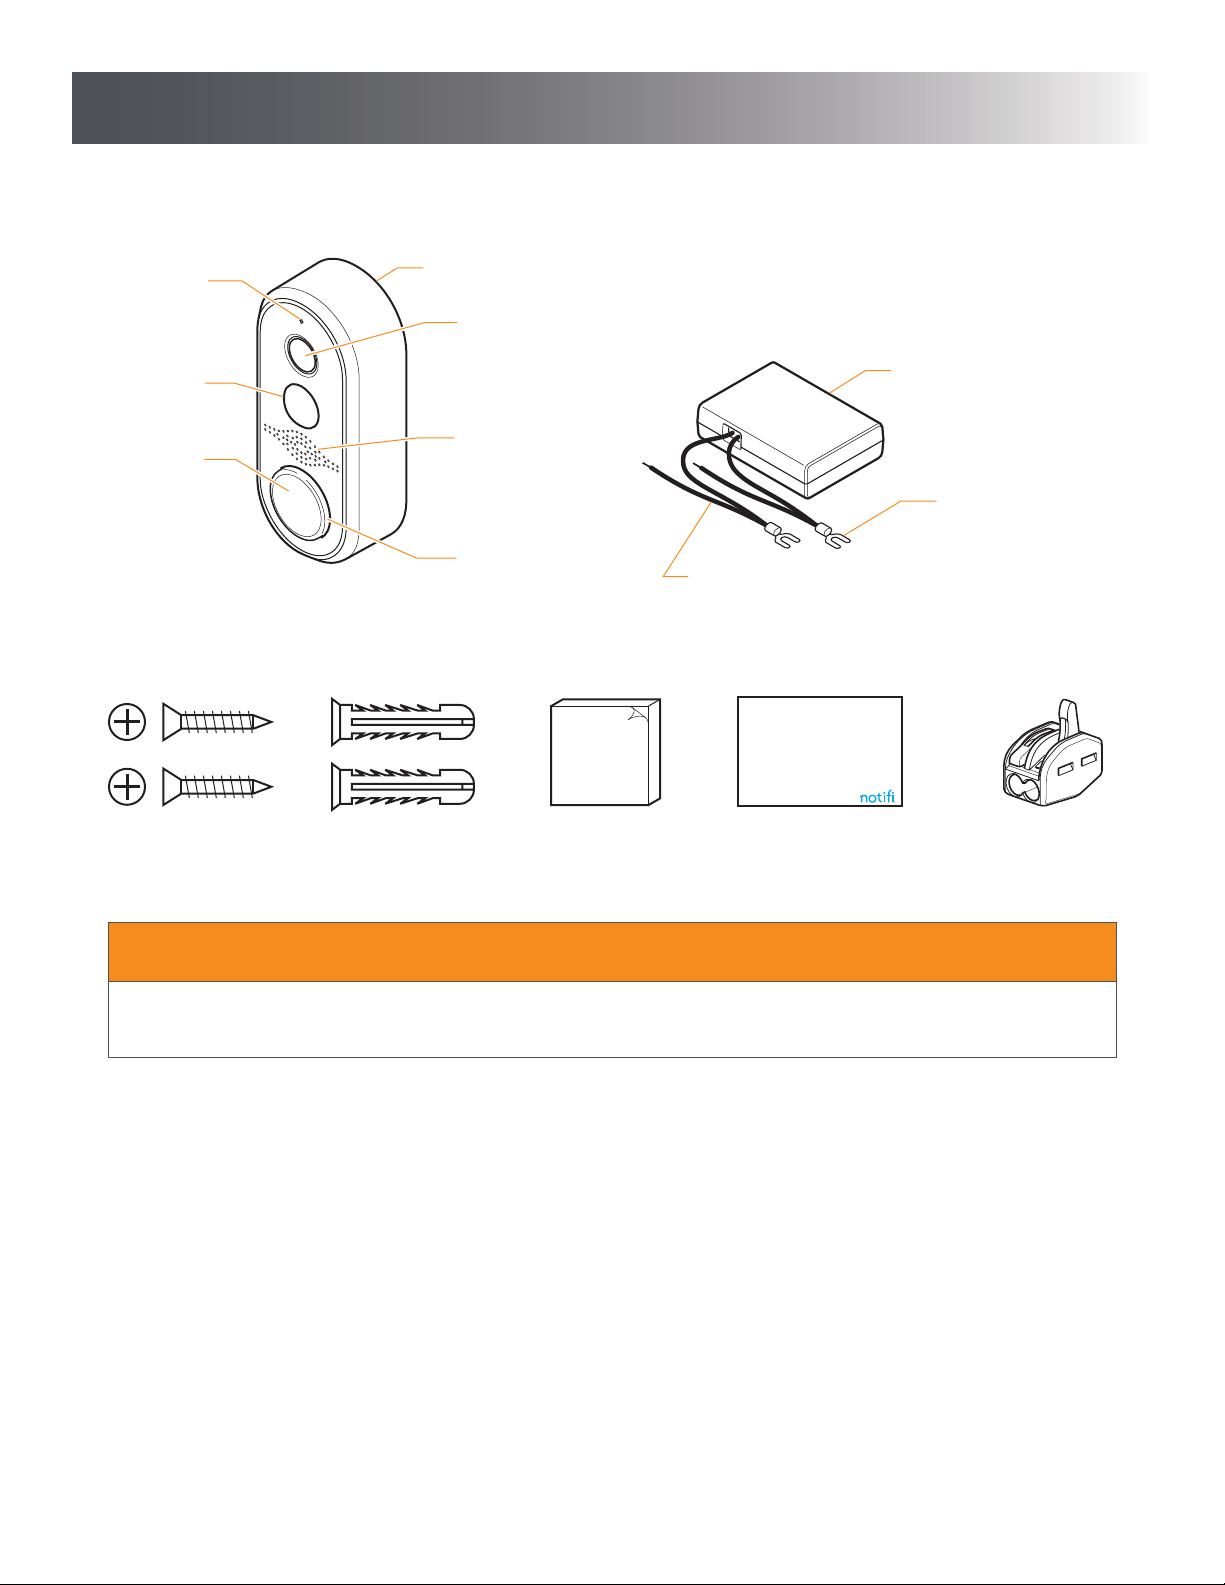
Carton Inventory
Microphone
Motion Sensor
Push Button
Notifi Elite Doorbell
Camera
Power Module
Speaker
Spade Connectors (Connect
to chime terminals)
LED Indicator Ring
Chime Wires (Connect to
existing chime wires)
All activities are
monitored &
recorded by video
camera
Screws (#6 x 3/4"), Wall Anchors, and Double-Sided Tape (for Power Module)
Window Cling Decal Wire Quick Connect
NOTICE
Install the Notifi Elite doorbell in a covered location; away from direct sunlight, rain, and humidity. Do not allow salt
water or other conductive liquids to come into contact with the doorbell.
4
Page 5
Setup
1
Install the Notifi Elite Doorbell
NOTICE
Before connecting the Notifi Elite doorbell to a multi-tune electronic chime (see illustration on bottom of page 6), set the
chime to the desired tune. See chime manual for tune selection instructions.
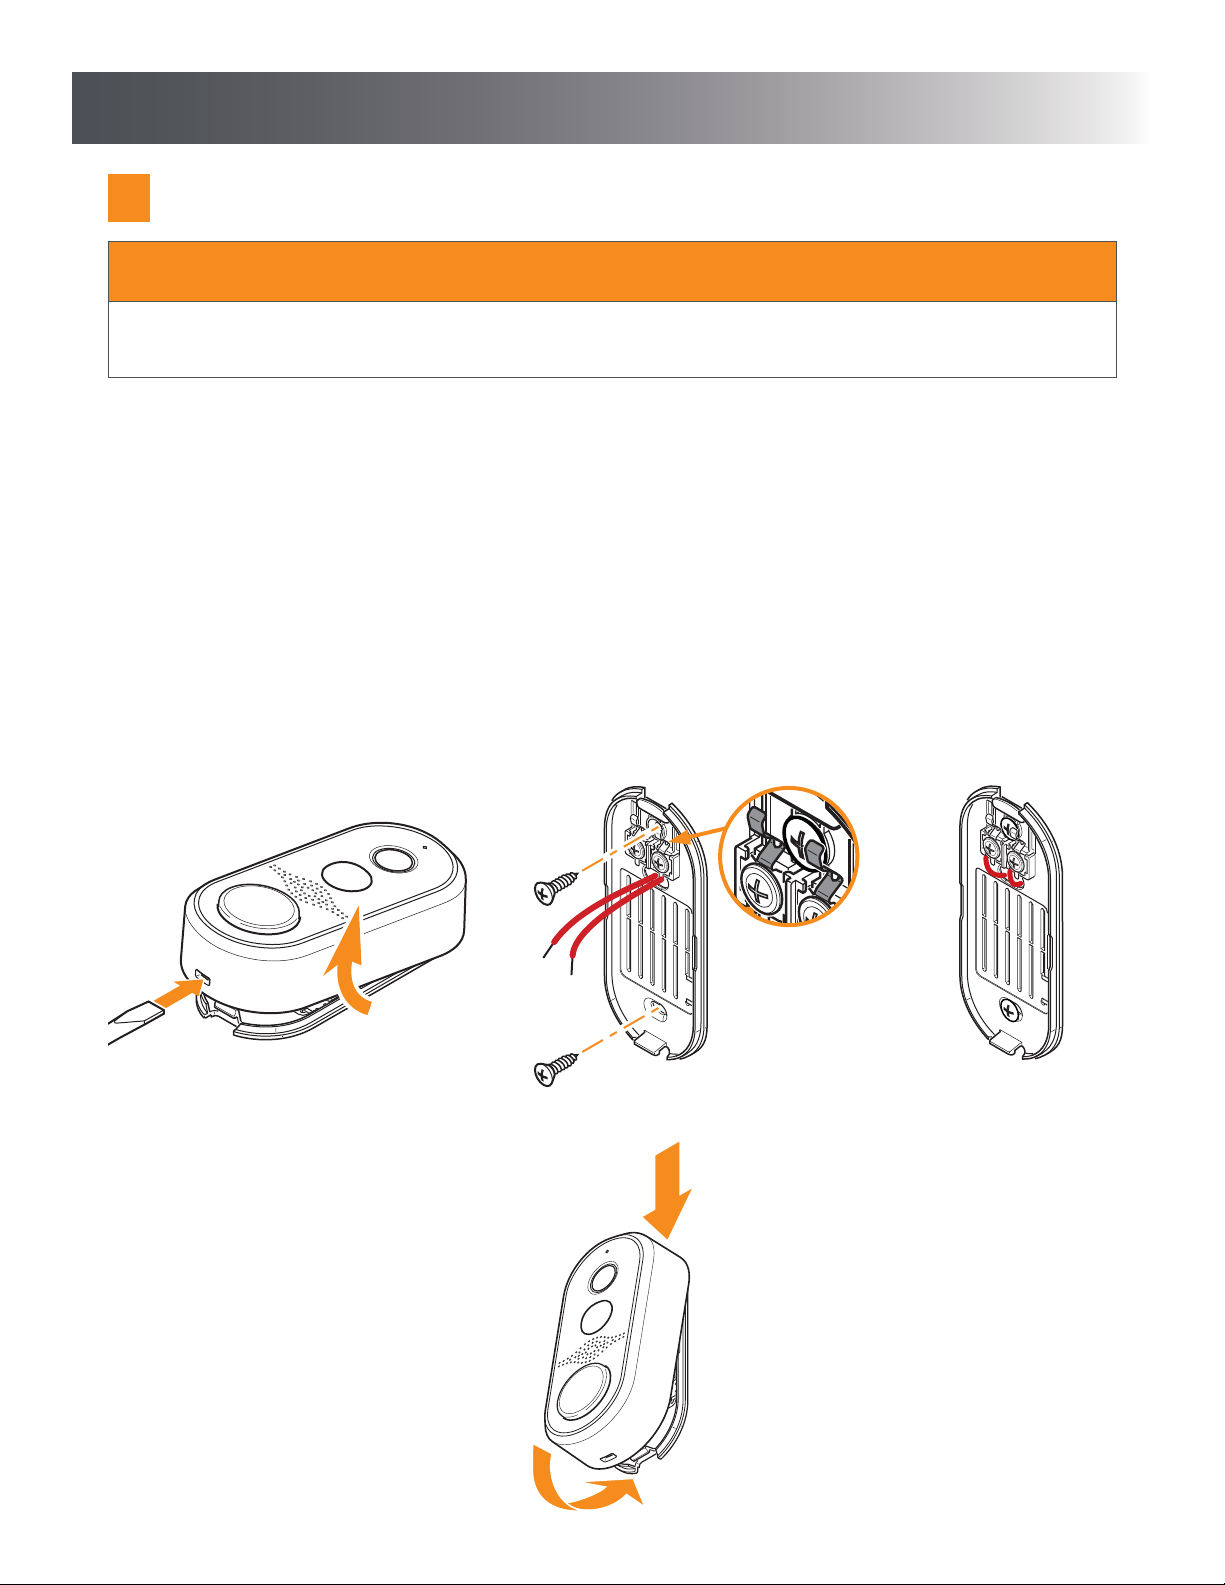
1. Remove the existing wired push button.
2. Remove the backplate of the Notifi Elite doorbell by pushing in tab on the bottom with a small, flat-head screwdriver.
3. Insert the existing push button wires through the wire hole located just below the terminal screws. Attach the backplate to
the wall using the #6 screws (only use the screws included to ensure proper installation).
IMPORTANT: Be careful not to bend the metal contacts during backplate installation or while connecting the wires to the
backplate.
4. Connect the wires to either screw terminal on the backplate.
5. Slide the top of the Notifi Elite doorbell down onto the backplate and press the bottom of the Elite doorbell against the
backplate until it snaps onto the backplate.
REMOVE COVER
Push in tab with a small screwdriver
backplate and rotate down until
INSTALL COVER
Hook top of cover onto top of
cover snaps into place
ATTACH BACKPLATE
Remove material in screw holes (if needed)
before mounting with screws.
IMPORTANT: Be
careful not to bend the
metal contacts during
backplate installation
or while connecting the
wires to the backplate.
CONNECT WIRES
Connect wires to screw terminals
5
Page 6

SetupSetup
2
Install the Power Module
The Notifi Elite doorbell requires a power module to be installed for each Notifi Elite doorbell connected to your chime.
1. Remove the chime cover from the existing chime.
2. Label the chime wires according to the terminals they are attached to (TRANS, FRONT, REAR).
3. Remove the transformer (TRANS) wire and connect it to one of the wires on the power module using the wire quick connect
(included). Connect the power module spade connector on this wire to the transformer (TRANS) screw terminal.
4. Remove the wire going to the Notifi Elite doorbell (either FRONT or REAR) and connect it to the other wire on the power
module using the wire quick connect (included). Connect the power module spade connector on this wire to the screw
terminal the wire was previously attached to. NOTE: Once the Notifi app is connected to the Notifi Elite doorbell (see Step 4,
page 7), go to
illustrations below).
5. Using the double-sided tape (included), attach the power module to the chime. If the power module prevents the cover from
being installed, install the cover and then attach the power module to the exterior of the chime cover.
6. Replace the chime cover.
IMPORTANT: Do not allow the power module or wires to touch the tone bars (mechanical chime) or cover the speaker
(electronic chime) as this may affect the sound of the chime when activated.
> Advanced Settings > Chime Selection and select the type of chime the Notifi Elite is connected to (see
CONNECTING TO AN ELECTRONIC CHIME CONNECTING TO A MECHANICAL CHIME
F
FRONT
TRANS
R
REAR
R
F
T
T
6
Page 7

Setup
3
Download the Notifi App
iOS Devices
Go to the App StoreSM and search for the “Notifi Connected Products” app and download.
Android Devices
Go to the Google Play™ store and search for the “Notifi Connected Products” app and download.
Setup the Notifi App and Camera
4
IMPORTANT: Your home password will be required during this process.
1. Allow the Notifi Elite doorbell 1 minute to fully boot-up.
2. On your mobile device, go to Settings > Wi-Fi. Select the “Notifi Elite XXXX” (“XXXX” represents the unique MAC address
of each Notifi Elite doorbell) from the available Wi-Fi networks.
3. Once connected, open the Notifi app. The app will detect your new Notifi system.
4. Select “YES” to start the setup and the app will guide you through the remaining steps.
NOTE: Your username will be your email. Your password must be a minimum of 8 characters or a maximum of 12 characters.
Alpha numeric and/or special characters may be used. IMPORTANT: The password must include at least 1 number and 1 letter.
7
Page 8

How to Use
Systems Tab
The Systems tab is the “home screen” for all of your Notifi systems. From here you can access the following choices:
• Notifi systems – The Systems tab lists all Notifi systems available. Tap on the desired Notifi system to view a live camera
view.
mute unmute
•
override any scheduled mute settings. Select “Unmute” to return to the scheduled mute settings.
• – Selecting the “Gear” icon next to a Notifi system will allow you to adjust different settings for that Notifi system.
• Add Notifi System – At the bottom of the list of Notifi systems is this selection. Tap on “Add Notifi System” to learn how
to add additional systems to your Notifi app.
• Logout – Once logged out, you will be asked to log back in if you receive a notification from a Notifi system on this device.
• Need help? – Selecting this link will take you to the Notifi FAQ website where you will have access to additional help features
as well as contacting HeathZenith technical service department.
• i – Tap on this icon to access additional information about the Notifi app.
Live-Streaming Video
– Selecting the “Mute” button will immediately mute your chime. Muting the chime from this location will
The Notifi system provides a live-stream of video from the Notifi camera to your mobile device that is viewable at any time.
To view the live-stream video, tap the name of the camera you wish to view. To return to the main app screen, tap the or
Back
in the top left corner.
From the live-streaming video screen, the microphone input on the Notifi camera will broadcast to the speaker
on your mobile device, providing you with a constant stream of audio from the location of the Notifi camera.
The microphone is muted by default. To unmute the microphone, tap the speaker icon at the bottom of the
screen. To mute the audio again, tap the speaker icon again.
Push to Talk
NOTE: The icons above will turn RED when activated.
From the live-streaming video screen, you may also talk to the person at your door by pressing and holding
Push to Talk
the
Elite doorbell. Release the button when you finish speaking to hear the person at the door.
To record video from the live-stream screen, tap the video camera icon to start recording video. Then
tap the same video camera icon to stop recording video. The video will be saved to the mobile device you are
currently using. The maximum length of recorded video is 2 minutes.
To save a still image from the live-stream screen, tap the camera icon . The image will be saved to the
mobile device you are currently using.
button. While you are holding the button, your voice is heard through the speaker on the Notifi
8
Page 9

How to Use
Events
An event is created when the push button is pressed. Two pictures from the Notifi camera will be stored to the cloud for 24
hours. With the Premium Service, when the push button is pressed two pictures and a video from the Notifi camera will be
stored to the cloud for 30 days. Also with Premium Service, two pictures and a video event will be stored for 30 days with every
motion trigger.
To view an event, tap the
the event category,
To download an event to your device, swipe left across the event you wish to download and tap the download icon . Verify
you want to download the event and it will be downloaded to your device.
To delete an event, swipe left across the event you wish to delete. Then tap the trashcan icon .
Doorbell Motion
Notifications
When the push button is pressed, two images will be stored and you will receive a push or email notification.
When you receive a push notification, you will be able to tap on the notification and the app will open to the live feed view.
Events
tab. Then tap the name of the Notifi system you would like to view events for. Then select
. The events will be listed chronologically. Tap the event you wish to view.
Push Button LED Halo Ring
The Notifi Elite Doorbell has a LED halo ring around the push button. This LED halo offers additional information as to the status
of the Notifi Elite system. See the FAQ section on page 13 for additional details.
Notifi Software Updates
Whenever a firmware update is available for a Notifi product, the “gear” icon next to the applicable product on the
“Systems” screen will change to a download icon . This icon will remain on the screen until the firmware update has
been completed. NOTE: A reminder pop-up screen will also appear each time you log into the Notifi app reminding you that a
firmware update is available. This pop-up screen will continue to appear until the firmware has been updated.
Camera Settings
> Feature Settings > Camera
The camera settings allow you to adjust the motion detection sensitivity, create motion detection zones, and adjust the video
quality settings.
Motion Detection: Adjust the Notifi camera’s sensitivity to motion in its field of view.
Motion Detection Zones: Adjust the Notifi camera’s detection area to include or exclude zones within the camera’s view.
Auto Adjust: Disabling this setting allows manual adjustments of the video’s quality settings. TIP: For best performance leave
the Auto Adjust ON.
IMPORTANT: With any setting changes make sure you press the Save button
your changes.
9
Save
in the upper right corner if you want to keep
Page 10

How to Use
Notification Settings
> Feature Settings > Notifications
The notifications settings screen allows you to enable, schedule, and disable push notifications and email notifications.
IMPORTANT: With any setting changes make sure you press the Save button
your changes.
Save
in the upper right corner if you want to keep
Mute Settings
> Feature Settings > Mute Settings
The Notifi system allows you to mute your chime from within the Notifi app. The mute settings allow you to schedule times
during the day when the chime should be muted.
Default (2 Hour): Mutes the chime for a period of two hours from the time this selection is made. This selection may be turned
OFF at any time.
Weekday: Allows for a specific time during the day to be selected to mute the chime. The scheduled time is applied to all
selected days. This selection may be turned OFF at any time.
Weekend: Allows for quick scheduling of weekend only times when the chime is to be muted. This selection may be turned OFF
at any time.
IMPORTANT: The chime can be muted quickly from the Systems selection tab by selecting “Mute” under the selected Notifi
system. Any scheduled mute settings will be overridden while the chime is muted from the Systems tab. Select “Unmute” to
return to the scheduled mute settings.
IMPORTANT: With any setting changes make sure you press the Save button
your changes.
Save
in the upper right corner if you want to keep
Multiple Users
> Advanced Settings > Manage Multiple Users
The Notifi system allows you to control multiple “guest” users within your account. These users will receive notifications when
the Notifi Elite push button is pressed and will be able to access the camera’s live feed view. The “guest” users will not be able
to access any of the Notifi settings you have setup.
To add a “guest” user to your multiple user list, tap the “Add Viewers” button and type their email address in the “To:” field, then
tap the “Send” button. The “guest” user will receive an email inviting them to view your system. They will need to download the
Notifi app and create their own account before they are able to access your Notifi system.
You can turn off their access to your Notifi system at any time by tapping their username in the list. You can turn it back on by
tapping their username again.
To delete a “guest” user from the list, swipe the username to the left and tap the trashcan icon ( ).
10
Page 11

How to Use
System Name/Photo Icon
> Advanced Settings > System Name/Photo
The Notifi systems on your account can be renamed at any time.
A photo can be added to represent each Notifi system on your mobile device. The photo will be placed inside the blue circle icon
next to the selected Notifi system. NOTE: The photo is stored on the Notifi server and will appear on any device logged into or
sharing this account.
IMPORTANT: With any setting changes make sure you press the Save button
your changes.
Save
in the upper right corner if you want to keep
Chime Selection
> Advanced Settings > Chime Selection
The Notifi Elite doorbell is designed to work with mechanical and electronic chimes. To select the type of chime the Notifi Elite is
connected to, choose either mechanical or electronic (see page 6 for illustration examples).
Tune Duration: If the Notifi Elite doorbell is connected to an multi-tune electronic chime, choose the tune duration (maximum
10 seconds) to ensure the selected tune will play completely. If the selected tune begins to repeat, select a shorter tune duration
time.
Factory Reset
> Advanced Settings > Factory Reset
This selection will reset the Notifi Elite doorbell back to the original factory setting. NOTE: Once the Notifi Elite has been factory
reset, the Notifi Elite doorbell can be used on a different account.
NOTICE
When resetting the Notifi Elite doorbell:
• The Notifi Elite doorbell will be reset to factory settings and will no longer be connected to your wi-fi or the Notifi app.
• All events (photos/videos) will be deleted from your account.
• All settings will be deleted.
• The Notifi Elite doorbell will be removed from your Heath/Zenith account.
• Remaining Premium services will be forfeited without reimbursement.
Deleting a Notifi System
Systems Tab > Notifi System
NOTE: When a Notifi device has been physically damaged and is no longer working, this process will remove the system from
the Notifi app.
• Slide the Notifi system name on the Systems Tab to the left.
• Tap the trashcan icon to delete the system.
11
Page 12

Care and Cleaning
Notifi Elite Camera Lens
To clean the Notifi camera lens, use a dry, microfiber cloth only. Do not spray the camera with a hose or power washer.
Notifi Elite Push Button
Use a dry cloth to clean the chime and push button. Do not use any fluids on the chime or push button.
FAQs
WHY CAN I NOT VIEW THE LIVE-STREAM VIDEO?
• Verify that the Notifi Elite doorbell is ONLINE. If it is online, the Notifi Elite doorbell’s name and circle will be blue within the
app and the LED halo on the push button will glow blue. If it is offline, the Notifi Elite doorbell’s name and circle will be gray
within the app and the LED halo on the push button will flash blue.
• Check the Wi-Fi signal strength at your Notifi Elite doorbell’s position by using your mobile device. You might even try
running a speed test (i.e. Speedtest.net) on your home network with your mobile device while standing at the Notifi’s
location. The camera will need a minimum of 3 MB/s download and 3 MB/s upload speeds to function properly.
• You can view your camera’s feed over both Wi-Fi as well as your phone’s data (3g/ 4g). If your network is running slowly or
congested it will affect the performance of the app and may make it so you are unable to view your camera’s feed. Please try
to view your camera’s feed over a different network or disconnect other devices from your current network if that isn’t an
option to help free up bandwidth.
• Try moving your home Wi-Fi router closer to your Notifi Elite doorbell to see if the distance from your router is causing the
camera to disconnect from your home network. Even if your Notifi Elite doorbell is located relatively close to your home
Wi-Fi router, keep in mind that different materials (metal, concrete, plaster, stucco, etc.) in your home can weaken your Wi-Fi
signal. Minimizing the number of walls and ceilings between your home Wi-Fi router and the Notifi Elite doorbell can help.
• Reboot the Notifi Elite doorbell: Remove the transformer (TRANS) wire from the chime. Wait 2 minutes. Reconnect the wire.
The Notifi Elite doorbell will automatically reconnect to the wi-fi router.
If you are still unable to view the live-stream video feed, please force quit the app and then sign back in. For instructions on
how to force quit an app, refer to your operating system’s instructions.
12
Page 13

FAQs
WHY WON’T THE NOTIFI SYSTEM CONNECT TO MY WIRELESS NETWORK (HOME ROUTER)?
To resolve issues with the Notifi Elite doorbell not connecting to the home router:
• Using your mobile device, test the Wi-Fi signal at the location of the Notifi doorbell (entryway). If the Wi-Fi signal at the
entryway is low, move the router closer to the entryway or get a Wi-Fi extender.
• Verify you are connecting to the correct wireless network and inputting the correct network password. If you are unsure of
your network password, contact the router manufacturer.
• Check if there is a firewall device installed (e.g. SonicWall, Zywall). If there is a firewall, the UDP timeout (UDP port 80 or
443) must be set to 180 seconds or greater for both inbound and outbound. If you are unsure how to set these, contact the
firewall manufacturer.
• Reboot the Notifi Elite doorbell: Remove the transformer (TRANS) wire from the chime. Wait 2 minutes. Reconnect the wire.
The Notifi Elite doorbell will automatically reconnect to the wi-fi router.
• If any changes have been made to the wireless network name, password, or security, you must setup the Notifi System
again. See “I changed my wi-fi password, how do I reconnect my Notifi Elite?”.
WHY AM I NOT RECEIVING NOTIFICATIONS?
• Ensure that your Notifi System is online.
• Ensure notifications in the device settings is turned ON.
• Ensure that your mobile device has a data connection (Wi-Fi or cellular data).
• Ensure that the notifications settings in the Notifi App is turned on. Within the Notifi app, follow:
> Feature Settings > Notifications
NOTE: Check notification scheduling to ensure notifications have not been turned OFF.
• If a device has not been used to log into the Notifi app within six months, the app will automatically “forget” the device. To
“re-activate” the device, log into the Notifi app.
• Reboot the Notifi Elite doorbell: Remove the transformer (TRANS) wire from the chime. Wait 2 minutes. Reconnect the wire.
The Notifi Elite doorbell will automatically reconnect to the wi-fi router.
WHY DO I GET LOGGED OUT SUDDENLY WHILE STREAMING VIDEO?
This would happen if two people are trying to use the same username/password at the same time on two different devices.
When the second user logs in, the first user will be kicked off. To avoid this, instead of two people sharing the same username
and password (like a husband/wife, for example) have the second person create their own account and invite them as a friend
so that you can view the camera at the same time.
WHY DOES MY CHIME NOT RING WHEN I PRESS THE PUSH BUTTON?
• Ensure that the power is turned on to the transformer. NOTE: The LED halo around the push button will glow blue.
• Ensure the chime selection is set to the correct chime type, either mechanical or electronic ( > Advanced Settings >
Chime Selection).
• Ensure the tune duration matches the length of the tune selected, if connecting to an electronic chime ( > Advanced
Settings > Chime Selection).
• Ensure the wires are connected correctly and securely to the chime and Notifi Elite doorbell.
• Ensure the transformer is rated 16 VAC/10 VA.
• Ensure the power module is connected correctly to the chime.
13
Page 14

FAQs
HOW DO I CONNECT MY NOTIFI ELITE TO MY NEW ROUTER?
There are two possible options for reconnecting the Notifi Elite doorbell to your new router:
• OPTION 1 – Press and hold the push button on the Notifi Elite for 30 seconds. This will place the Notifi Elite into a
discoverable state. Follow step 4 under Setup to connect the Notifi Elite to the new router.
• OPTION 2 – Remove the transformer (TRANS) wire from the chime. Wait 2 minutes. Reconnect the wire. This will place the
Notifi Elite into a discoverable state. Follow step 4 under Setup to connect the Notifi Elite to the new router.
I CHANGED MY WI-FI PASSWORD, HOW DO I RECONNECT MY NOTIFI ELITE?
There are two possible options for reconnecting the Notifi Elite doorbell to your router:
• OPTION 1 – Press and hold the push button on the Notifi Elite for 30 seconds. This will place the Notifi Elite into a
discoverable state. Follow step 4 under Setup to connect the Notifi Elite to the router.
• OPTION 2 – Remove the transformer (TRANS) wire from the chime. Wait 2 minutes. Reconnect the wire. This will place the
Notifi Elite into a discoverable state. Follow step 4 under Setup to connect the Notifi Elite using the new wi-fi password.
HOW DO I CHANGE THE TUNE ON MY MULTI-TUNE ELECTRONIC CHIME?
The Notifi Elite doorbell uses the power module to route the power going to the chime directly to the Notifi Elite. When the
push button is pressed, power is sent to the chime and it plays the selected tune. In order to change the tune on a multi-tune
electronic chime, the chime requires power. Follow these steps to temporarily supply power to the chime in order to change the
tune. NOTE: This process may be easier with the help of a second person.
• Open the Notifi app and navigate to the “Chime Selection” screen (
• Change the “Tune Duration” to 10 seconds.
• Press the push button on the Notifi Elite doorbell. Each press of the push button will send power to the chime for a period of
10 seconds.
• While the chime is receiving power (10 seconds), change the selected tune according to the chime’s instruction manual. If
the power to the chime times out, press the push button again and continue the tune selection process.
• Once the desired tune is selected, adjust the “Tune Duration” setting to match the length of the selected tune.
WHAT ARE THE DIFFERENT LED INDICATORS?
The LED halo around the push button shows different Notifi Elite status indicators:
LED INDICATOR ISSUE
Flashes Blue-Red, Blue-Red continuously. Wi-Fi not connected during initial installation.
Glows steady Blue. Wi-Fi is connected (Normal state).
LED indicator is off. Push Button is pressed.
Flashes Blue-OFF, Blue-OFF continuously. Wi-Fi not connected after initial installation.
> Advanced Settings > Chime Selection).
14
Page 15

1 Year Limited Warranty
This is a “Limited Warranty” which gives you specific legal rights. You may also have other rights which vary from state to state
or province to province.
For a period of one year from the date of purchase, any malfunction caused by factory defective parts or workmanship will be
corrected at no charge to you.
Not Covered - Repair service, adjustment and calibration due to misuse, abuse or negligence, batteries, and other expendable
items are not covered by this warranty. Unauthorized service or modification of the product or of any furnished component will
void this warranty in its entirety. This warranty does not include reimbursement for inconvenience, installation, setup time, loss
of use, unauthorized service, or return shipping charges.
This warranty covers only HeathCo LLC assembled products and is not extended to other equipment and components that a
customer uses in conjunction with our products.
THIS WARRANTY IS EXPRESSLY IN LIEU OF ALL OTHER WARRANTIES, EXPRESS OR IMPLIED, INCLUDING ANY WARRANTY,
REPRESENTATION OR CONDITION OF MERCHANT ABILITY OR THAT THE PRODUCTS ARE FIT FOR ANY PARTICULAR PURPOSE OR USE, AND SPECIFICALLY IN LIEU OF ALL SPECIAL, INDIRECT, INCIDENTAL, OR CONSEQUENTIAL DAMAGES. REPAIR
OR REPLACEMENT SHALL BE THE SOLE REMEDY OF THE CUSTOMER AND THERE SHALL BE NO LIABILITY ON THE PART OF
HEATHCO LLC FOR ANY SPECIAL, INDIRECT, INCIDENTAL, OR CONSEQUENTIAL DAMAGES, INCLUDING BUT NOT LIMITED TO
ANY LOSS OF BUSINESS OR PROFITS, WHETHER OR NOT FORESEEABLE.
Some states or provinces do not allow the exclusion or limitation of incidental or consequential damages, so the above limitation
or exclusion may not apply to you.
Please keep your dated sales receipt, it is required for all warranty requests.
This device complies with Part 15 of the FCC Rules and RSS-210 of Industry Canada. Operation is subject to the following
two conditions: (1) this device may not cause harmful interference, and (2) this device must accept any interference
received, including interference that may cause undesired operation.
The user is cautioned that changes or modifications not expressly approved by the party responsible for regulatory
compliance could void the user’s authority to operate the equipment.
CAN ICES-005 (B) / NMB-005 (B)
FCC ID: BJ4-WLTRX3012
IC: 3984A-WLTRX3012
Made in China
Please call 1-800-858-8501 (English speaking only) for assistance
before returning product to store.
8:00 AM to 5:00 PM CST (M-F).
You may also write* to:
HeathCo LLC
P.O. Box 90045
Bowling Green, KY 42102-9045
ATTN: Technical Service
* If contacting Technical Service, please have the following information available:
Model Number, Date of Purchase, and Place of Purchase.
Apple and the Apple logos are trademarks of Apple Inc., registered in the U.S., and
other countries. App Store is a service mark of Apple Inc.
Google Play is a trademark of Google Inc.
Android is a trademark of Google Inc.
Wi-Fi® is a registered trademark of Wi-Fi Alliance
© Copyright 2017 HeathCo LLC – All Rights Reserved
209185-01
 Loading...