

Page 1

Brass T ransmitter
Wireless Push Button
Accessory
SL-6293/94/95 Brass Transmitter Series
(Style may vary from illustration)
The Heath®/Zenith Wireless Push Button Accessory works with existing Heath®/Zenith jumper or
dip switch systems.
• Battery powered push button - No wires to run.
• 128 selectable codes allow more than one
chime system in the same house.
© 2001 DESA International 598-1105-00
Page 2
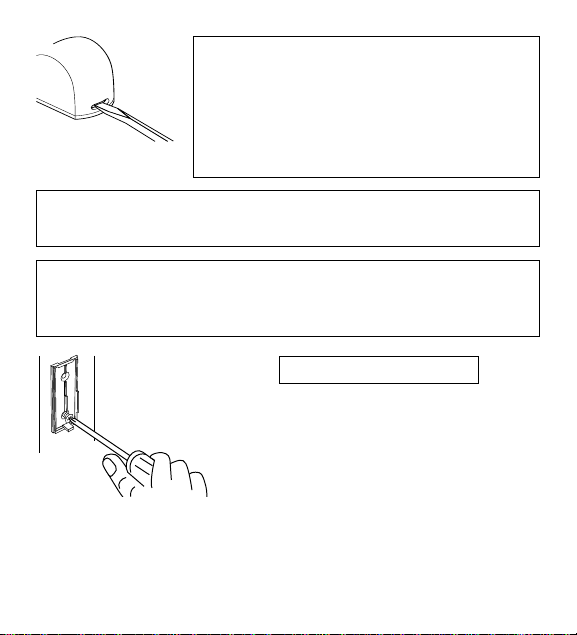
1. Install tw o lithium type CR1220 3 volt
push button batteries (included). Re-
move back of case by pushing in tab
on bottom with a small screwdriver.
Make sure batteries are oriented properly (see page 6).
2. Set the push button dip switches to match the chime
receiver code. See "Code and Tune Setting" section.
3. T est range. Temporarily position push button where you want
it mounted. Press push button to verify chime and push button
work properly . If chime does not sound, see Troubleshooting.
4. Mount push button.
Remove back of case by pushing in tab
on bottom with a small screwdriver.
Attach back of case to door jamb or wall
with screws provided. Snap front of push
button on.
-2-
598-1105-00
Page 3

Code and Tune Settings
Code Settings
Note: Most installations will not require y ou to change any jumpers or dip switch settings on your c hime and push b utton.
WARNING: Disconnect chime unit from power source before opening code access door. Close door and replace
screw before reconnecting to power.
The push button and chime communicate by using a code that
can be changed by switching dip switch positions (or removing
and/or adding jumpers) on both the push button and chime. The
code is factory set; however, there are 128 selectable codes
that allow you to expand your system and prevent outside interference. Other wireless products may cause interference and
the system may not function properly. Follow the instructions
below for setting a new code.
1.Unplug wireless chime (if applicable).
2. Open the cases and locate the jumpers or dip switches on
both the push button and chime (See illustration on page 6).
3.The push button and chime both have eight different jumper/
dip switch locations. Positions 1 through 7 are used for setting the code.
4.To change the code, add and/or remove jumpers or change
dip switch setting as needed. It is recommended to only
change one setting at a time and then check to see if system
598-1105-00
-3-
Page 4

is functioning properly. Note: Positions 1 through 7 must be
exactly the same for both the push button and chime for this
system to function.
Tune Settings
Y our Heath®/Zenith wireless chime has different selectable tunes:
Ding (one note), Ding-Dong (two note), or Westminster (eight
note) (Available on selected Heath®/Zenith chimes). The factory setting is for the Ding-Dong tune (or Westminster, when
available). This tune can be changed by following the instructions below.
• Ding (one note tune)
Push button: Location 8, Add jumper or set dip switch high (1
or ON).
• Ding-Dong (two note tune)
Push button: Location 8, Remove jumper or set dip switch
low (0 or OFF).
Chime: Remove jumper from location 8.
• Westminster (Eight note tune) (Available on selected Heath®/
Zenith chimes)
Push button: Location 8, Remove jumper or set dip switch
low (0 or OFF).
Chime: Add a jumper to location 8.
-4-
598-1105-00
Page 5

Note: All models have both front and back door tune capabilities. Y ou may purchase any Heath®/Zenith wireless push button
for a second entrance. We recommend the back door use the
Ding tune and the front door use the Ding-Dong tune (or
Westminster tune, available on selected Heath®/Zenith chimes).
Models that include two push buttons will come factory set for
front and back doors. Decals on the rear of the push button will
indicate its setting.
598-1105-00
-5-
Page 6
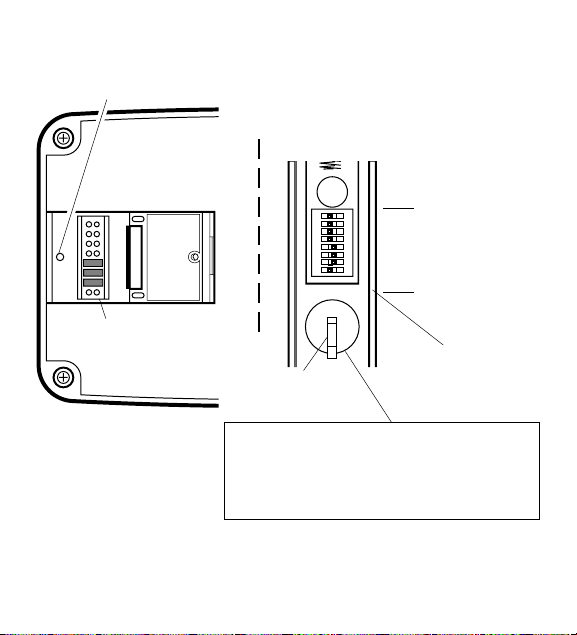
1 2 3 4 5 6 7 8
ON
Remove
screw to open
access door
Note: Some models might require the use of
tweezers to remove and replace the jumpers
or a small screw driver to set dip switches.
Inside Push
Button
Back of
Chime
12345678
* Code Settings
1-7 Must Match
Both Push
Button and
Chime
Tune Setting (Not
used on all models)
(+) Positive Battery
Tune
Setting
Terminal
Replacing Push Button Batteries
Install two lithium type CR1220 3 volt
batteries. See diagram inside push but-
ton for correct orientation of batteries.
Heath®/Zenith reserves the right to discontinue and to change
specifications at any time without notice without incurring any
obligation to incorporate new features in previously sold products.
-6-
598-1105-00
Page 7

Troubleshooting
Chime doesn't sound:
• Make sure push button and chime codes are the same (See pages 3
through 6).
• Check orientation of push button batteries (See page 6).
• Check charge of push button and chime batteries (if applicable), re-
place if necessary.
Batteries seem OK, but the chime doesn't work when installed:
• Don't mount chime or push button on metal or near metal studs. This
reduces the transmitter range. Use 1/4" to 1/2" (6 to 13 mm) wood
shims to move chime or push button off metal surface.
• Concrete floors may reduce range. Move chime away from floor.
• Try locating chime closer to push button.
The range of the wireless chime can vary with location, temperature
and battery condition.
Regulatory Information
This device (WB-SAW-TX) complies with Part 15 of the FCC Rules and
RSS-210 of Industry Canada. Operation is subject to the following two
conditions: (1) this device may not cause harmful interference, and (2)
this device must accept any interference received, including interference that may cause undesired operation.
The user is cautioned that changes or modifications not expressly approved by the party responsible for regulatory compliance could void
the user’s authority to operate the equipment.
Do not send products, please call the number listed below:
Technical Service: 1-800-858-8501, Ext. 7660, or visit our website:
www.desatech.com.
DESA International, Inc.
P.O. Box 90004, Bowling Green, KY 42102-9004
598-1105-00
-7-
Page 8

YOUR HEATH®/ZENITH FIVE YEAR LIMITED WARRANTY
This is a "Limited Warranty" which gives you specific legal rights. You may also
have other rights which vary from state to state or province to province.
For a period of five year from the date of purchase, any malfunction caused by
factory defective parts or workmanship will be corrected at no charge to you.
Batteries are not covered. To obtain a refund or a replacement, return the
product to the place of purchase.
Not Covered - Repair service, adjustment and calibration due to misuse, abuse
or negligence, light bulbs and other expendable items are not covered by this
warranty. Unauthorized service or modification of the product or of any furnished
component will void this warranty in its entirety. This warranty does not include
reimbursement for inconvenience, installation, setup time, loss of use, or unauthorized service.
This warranty covers only Heath®/Zenith assembled products and is not extended
to other equipment and components that a customer uses in conjunction with our
products.
THIS WARRANTY IS EXPRESSLY IN LIEU OF ALL OTHER WARRANTIES,
EXPRESS OR IMPLIED, INCLUDING ANY WARRANTY, REPRESENTATION
OR CONDITION OF MERCHANT ABILITY OR THAT THE PRODUCTS ARE FIT
FOR ANY PARTICULAR PURPOSE OR USE, AND SPECIFICALLY IN LIEU OF
ALL SPECIAL, INDIRECT, INCIDENTAL, OR CONSEQUENTIAL DAMAGES.
REPAIR OR REPLACEMENT SHALL BE THE SOLE REMEDY OF THE CUSTOMER AND THERE SHALL BE NO LIABILITY ON THE PART OF DESA FOR
ANY SPECIAL, INDIRECT, INCIDENTAL, OR CONSEQUENTIAL DAMAGES,
INCLUDING BUT NOT LIMITED TO ANY LOSS OF BUSINESS OR PROFITS,
WHETHER OR NOT FORESEEABLE. Some states or provinces do not allow the
exclusion or limitation of incidental or consequential damages, so the above
limitation or exclusion may not apply to you. Retain receipt for warranty claims.
-8-
598-1105-00
 Loading...