

Page 1

Models:
TiaraE
Electric Stove
Owner’s Manual
Installation and Operation
DO NOT DISCARD THIS MANUAL
• Important operating
and maintenance
instructions included.
• Keep children away.
• CAREFULLY SUPERVISE children in same room
as fireplace.
• Alert children and adults to hazards of high
temperatures.
• Keep clothing, furniture, draperies and other
combustibles away.
CAUTION
• Read, understand
and follow these
instructions for safe
installation and
operation.
• Leave this manual with
party responsible for
use and operation.
WARNING
HOT! DO NOT TOUCH.
SEVERE BURNS MAY RESULT.
CLOTHING IGNITION MAY RESULT.
Glass and other surfaces are hot
during operation and cool down.
Heat & Glo • TiaraE• 4035-822 Rev F • 01/05
1
Page 2
Read this manual before installing or operating this stove.
Please retain this owner’s manual for future reference.
Congratulations!
Congratulations on selecting a Heat & Glo electric stove. The
Heat & Glo stove you have selected is designed to provide
the utmost in safety, reliability and efficiency.
As the owner of a new electric stove, you’ll want to read and
carefully follow all of the instructions contained in this owner’s
manual. Pay special attention to all cautions and warnings.
This owner’s manual should be retained for future reference.
We suggest you keep it with your other important documents
and product manuals.
Your new Heat & Glo electric stove will give you years of
durable use and trouble-free enjoyment. Welcome to the Heat
& Glo family of electric products!
Homeowner Reference Information
We recommend that you record the following pertinent
information about your fireplace:
Model Name: Date purchased/installed:
Serial Number: Location on fireplace:
Dealership purchased from: Dealer phone:
Notes:
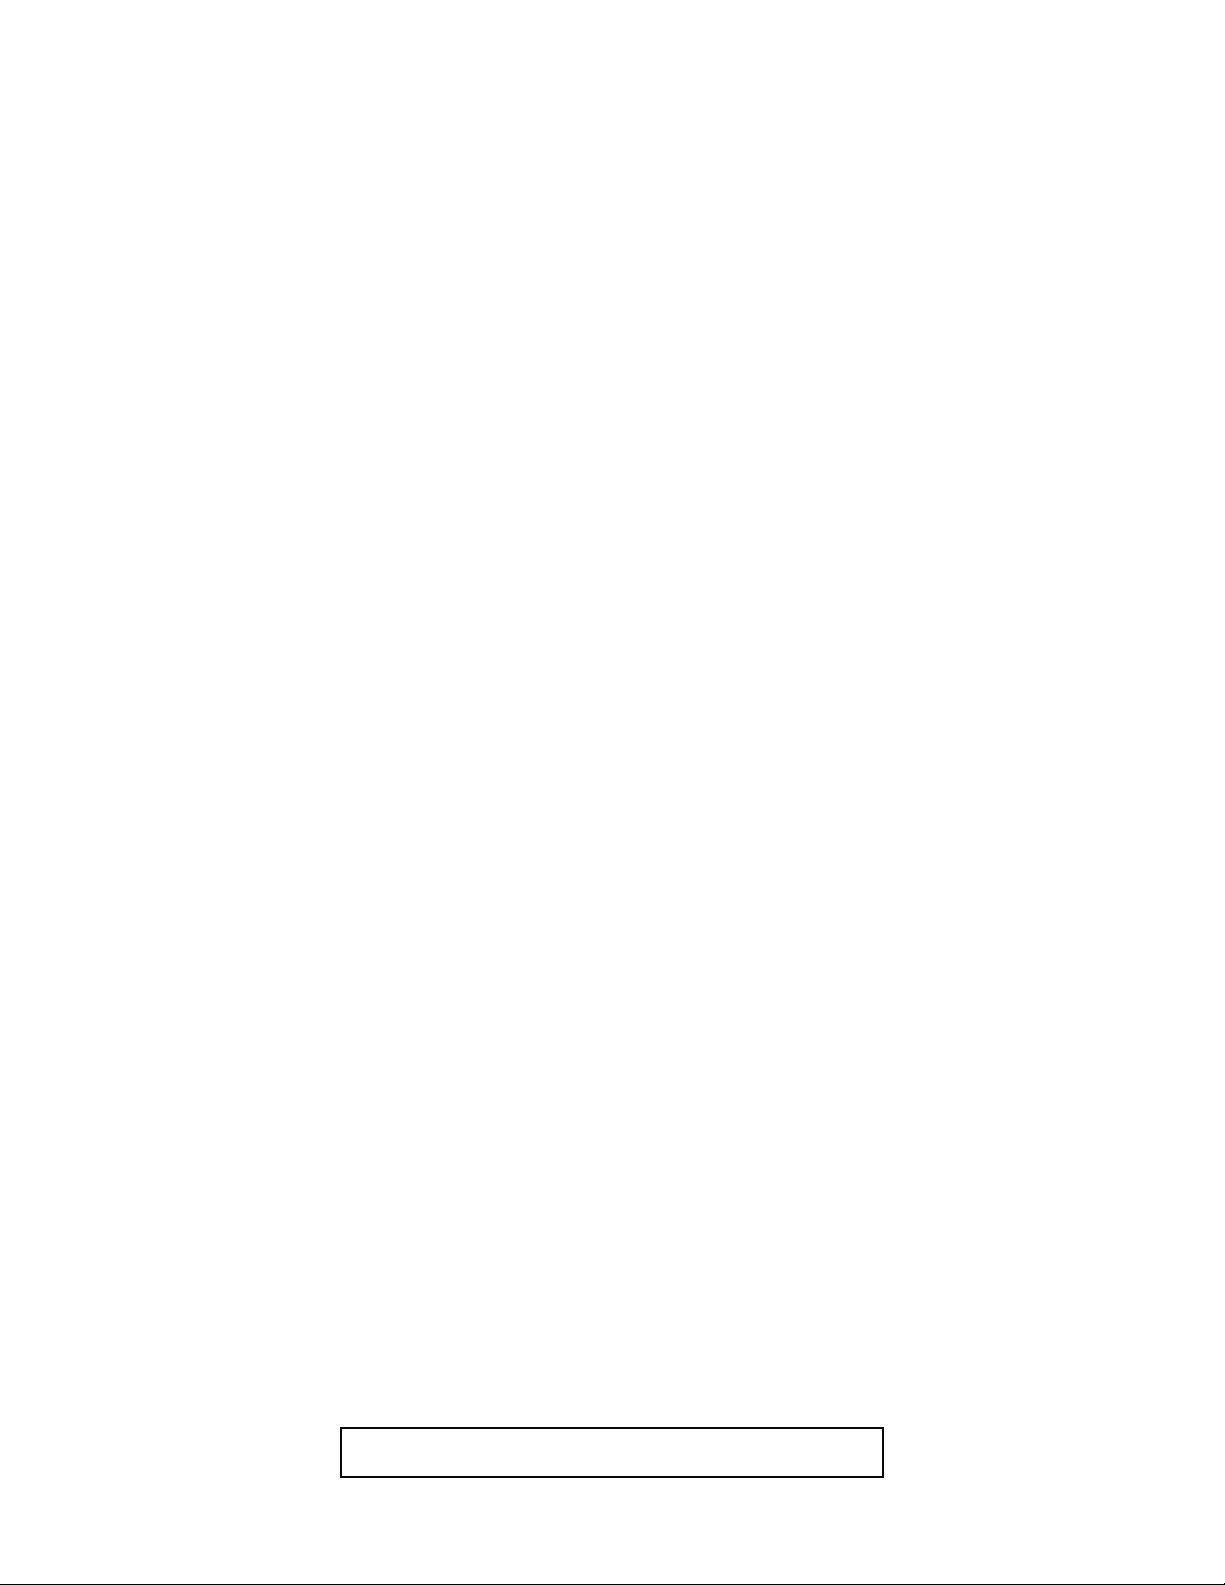
Listing Label Information/Location
The model information regarding your specific fireplace can be found on the rating plate located on the bottom of the front
viewing area behind casting.
Fireplace
Model
Unit
Serial
Number
(%!24((/-%4%#(./,/')%3).#
!$IVISIONOF(/.).$5342)%3
7*EFFERSON
,AKE#ITY-.
5,&)8%$!.$,/#!4)/.
$%$)#!4%$%,%#42)#2//-(%!4%2
-/$%,
-/$Ä,%
3%2)!,./
$%3¡2)%
4IARA%
ES000001
530!4%.40%.$).'
#!.!$)!.0!4%.40%.$).'
**
6/,436
7!4 437
&2%15%.#9(Z
TE
TIARAE 4035-840
Firebox
Serial
Number
2
Heat & Glo • TiaraE• 4035-822 Rev F • 01/05
Page 3
1 Listing and Code Approvals
A. Appliance Certification . . . . . . . . . . . . . . . . . . . . . . . . .4
2 Getting Started
A. Important Instructions . . . . . . . . . . . . . . . . . . . . . . . . .5
B. Tools and Supplies Needed . . . . . . . . . . . . . . . . . . . . .5
C. Inspect Stove and Components . . . . . . . . . . . . . . . . .5
3 Location and Clearances
A. Selecting Stove Location . . . . . . . . . . . . . . . . . . . . . . .6
B. Clearances . . . . . . . . . . . . . . . . . . . . . . . . . . . . . . . . .6
4 Electric Stove Set Up
A. Leg Leveling System . . . . . . . . . . . . . . . . . . . . . . . . . .7
5 Operating Instructions
A. Main Power Switch . . . . . . . . . . . . . . . . . . . . . . . . . . .8
B. Intensity Switch . . . . . . . . . . . . . . . . . . . . . . . . . . . . . .8
C. Heater Switch . . . . . . . . . . . . . . . . . . . . . . . . . . . . . . .8
D. Thermostat . . . . . . . . . . . . . . . . . . . . . . . . . . . . . . . . .8
6 Troubleshooting
7 Maintenance and Servicing the Fireplace
A. Cleaning Firebox and Control Compartment . . . . . . .10
B. Cleaning Glass Doors and Back Glass . . . . . . . . . . .10
C. Replacing the Light Bulbs . . . . . . . . . . . . . . . . . . . . . 11
8 Reference Materials
A. TiaraE Dimensions . . . . . . . . . . . . . . . . . . . . . . . . . .12
B. Wiring Diagram . . . . . . . . . . . . . . . . . . . . . . . . . . . . .13
C. Service Parts . . . . . . . . . . . . . . . . . . . . . . . . . . . . . . .14
D. Limited Warranty . . . . . . . . . . . . . . . . . . . . . . . . . . . .16
E. Contact Information . . . . . . . . . . . . . . . . . . . . . . . . . .17
Table of Contents
Note: An arrow (¨) found in the text signifies change in content.
Heat & Glo • TiaraE• 4035-822 Rev F • 01/05
3
Page 4

Listing and Code Approvals
1
A. Appliance Certification
This stove has been tested and listed in accordance with
UL 2021 Standards for fixed and location-dedicated electric
room heaters in the United States, the current CSA C22.2
NO. 46 in Canada, and has been listed by Underwriters’
Laboratoreis Inc. for installation as described in this manual.
All components are UL or CSA safety certified.
If you need assistance during isntallation, please contact
your local dealer or the Heat & Glo Technical Services Department, Hearth & Home Technologies Inc., 800 West Jefferson, Lake City, MN 55041, 1-888-427-3973.
Model # Description Voltage Watts Amps
TiaraE
Electric
Stove
120 1500 12.5
WARNING
Fire Risk
Shock Risk
Hearth & Home Technologies disclaims any
responsibility for, and the warranty will be
voided by, the following actions:
• Installation and use of any damaged appliance.
• Modification of the appliance.
• Installation other than as instructed by Hearth & Home
Technologies.
• Installation and/or use of any component part not
approved by Hearth & Home Technologies.
4
Heat & Glo • TiaraE• 4035-822 Rev F • 01/05
Page 5
Getting Started
2
A. Important Instructions
When using electrical appliances, basic precautions should
always be followed to reduce the risk of fire, electric shock,
and injury to persons, including the following:
• Read all instructions before using this heater.
• This heater is hot when in use. To avoid burns, do not let
bare skin touch hot surfaces. If provided, use handles
when moving this heater. Keep combustible materials,
such as furniture, pillows, bedding, papers, clothes, and
curtains at least 3 ft (.9m) from the front of the heater and
keep them away from the sides and rear.
• Extreme caution is necessary when any heater is used
by or near children or invalids and whenever the heater
is left operating and unattended.
• Always unplug heater when not in use.
• Do not operate any heater with a damaged cord or plug
or after the heater malfunctions, has been dropped or
damaged in any manner. Return heater to authorized
service facility for examination, electrical or mechanical
adjustment, or repair.
• Do not use outdoors.
• This heater is not intended for use in bathrooms, laundry
areas and similar indoor locations. Never locate heater
where it may fall into a bathtub or other water container.
• Do not run cord under carpeting. Do not cover cord with
throw rugs, runners, or the like. Arrange cord away from
traffic area and where it will not be tripped over.
• To disconnect heater, turn controls to off, then remove
plug from outlet.
• Do not insert or allow foreign objects to enter any ventilation
or exhaust opening as this may cause an electric shock
or fire, or damage the heater.
• To prevent a possible fire, do not block air intakes or
exhaust in any manner.
• A heater has hot and arcing or sparking parts inside. Do
not use it in areas where gasoline, paint, or flammable
liquids are used or stored.
• Use this heater only as described in this manual. Any other
use not recommended by the manufacturer may cause
fire, electric shock, or injury to persons.
• Avoid the use of an extension cord because the extension
cord may overheat and cause a risk of fire. However, if you
have to use an extension cord, the cord shall be No. 16
AWG minimum size and rated not less than 1875 watts.
• Always use properly grounded fused and polarized
outlets.
• Always use ground fault protection where required by
electrical code.
• Always disconnect power before performing any cleaning,
maintenance or relocation of the appliance.
• To prevent a possible fire, do not burn wood or other
materials in this appliance.
• To prevent personal injury, do not strike appliance glass.
• To prevent electric shock or fire, always use a certified
electrician should new circuits or outlets be required.
• When transporting or storing the heater, keep in a dry
place free from excessive vibration and store as to avoid
damage.
• SAVE THESE INSTRUCTIONS FOR FUTURE
REFERENCE.
B. Electric Service
All wiring must be installed by a qualified electrician. Use appropriate wire to meet local and
national codes for rated power consumption.
• The heater is wired from the factory with a polarized plug.
No provisions have been made for hard wiring.
• For ease of electrical hook up, you may wish to install the
heater near an existing outlet. A 15 amp, 120 volt circuit is
required. A dedicated circuit is preferred but not essential
in all cases. A dedicated circuit will be required if, after
installation, the circuit trips or fuse blows on a regular
basis when the heater is operated. Additional appliances
on the same circuit may exceed the current rating of the
circuit breaker.
• Before plugging the heater into the wall outlet, make sure
the control switch is in the “OFF” position.
• If the cord does not reach the outlet, a No. 16-AWG
minimum wire size extension cord rated for a minimum
of 1875 watts may be used.
C. Inspect Stove and Components
WARNING
Inspect appliance and components for
damage. Damaged parts may impair safe
operation.
• Do NOT install damaged components.
• Do NOT install incomplete components.
• Do NOT install substitute components.
Report damaged parts to dealer.
• Carefully remove the stove and components from the
packaging.
• Report to your dealer any parts damaged in shipment.
• Read all the instructions before starting the installation.
Follow these instructions carefully during the
installation to ensure maximum safety and benefit.
Heat & Glo • TiaraE• 4035-822 Rev F • 01/05
5
Page 6

Location and Clearances
3
WARNING
Fire Risk!
Due to high temperature, this appliance
should be located out of high traffic areas.
• Keep combustible materials such as
furniture, pillows, bedding, papers,
clothes and curtains at least 3 ft (.9 m)
from the front of the appliance.
A. Selecting Stove Location
Figure 3.1 illustrates a variety of ways the appliance may be
located in a room. The stove may be installed directly on the
floor or raised on a hearth.
B. Clearances
Figure 3.1 also shows all clearances that must be maintained around the stove.
1 in.
[26mm]
DANGER
Electrocution Risk!
• NEVER locate this stove where it may fall
into a bathtub or other water container.
WARNING
Fire Risk
High Temperatures
Keep combustible household items away
from appliance.
Do NOT obstruct combustion and ventilation
air.
• Do NOT place combustible items on top
of or in front of appliance.
• Keep furniture, draperies away from
appliance.
1 in.
[26mm]
1 in.
[26 mm]
2 in.
[51mm]
Figure 3.1 Appliance Locations
Minimum Clearances
from the Stove to Combustible Materials
Glass Front 36 in. (914 mm)
Floor 0 in. (0 mm)
Rear 2 in. (51 mm)
1 in.
[26 mm]
Note: Minimum clearances must be maintained at all times.
Illustrations throughout these instructions reflect t ypical
installations and are for design purposes only. Actual
installation may vary slightly due to individual design preferences.
The illustrations and diagrams used throughout these installation isntructions are not drawn to scale.
Sides 1 in. (26 mm)
Floor to Ceiling 30 in. (762 mm)
1 in. (26mm) - minimum clearance from the corners
and sides of the stove or warming
shelves.
2 in. (51mm) - minimum clearance from the back
of the appliance.
6
Heat & Glo • TiaraE• 4035-822 Rev F • 01/05
Page 7

Electric Stove Set Up
4
CAUTION
Sharp Edges
• Wear protective gloves and safety glasses
during installation.
A. Leg Leveling System
• Thread allen bolts through nuts until flush. See
Figure 4.1
• Slide assembled nuts and bolts into the slot on the legs
with the nuts on the bottom. Use a 5/32 in. (3.96 mm)
Allen wrench to adjust legs to the desired level. See
Figure 4.2.
Note: Two allen bolts and two nuts are included in the
component bag.
WARNING
Shock Risk
Improperly grounded outlets could cause
electrical shock.
• Always use properly grounded, fused and
polarized outlets.
• Always use ground fault protection where
required by electrical code.
B. Plug into Outlet
Figure 4.1 Leveling Legs Components
Figure 4.2 Assembled Leveling Legs
Heat & Glo • TiaraE• 4035-822 Rev F • 01/05
7
Page 8

Operating Instructions
5
The operating controls are located on the back of the appliance.
A. Main Power Switch
• When the main power switch is turned on, it provides
power to all functions.
• When used in conjunction with RC-ELEC-HNG the switch
should remain in the “ON” position.
B. Intensity Switch
• Controls the intensity of the ember bed and flame.
C. Heater Switch
• The heater switch provides power to the heater system.
• The RC-ELEC-HNG remote control does not control this
function.
D. Thermostat
• The thermostat allows you to adjust to the desired room
temperature.
• To adjust the thermostat, turn the control knob clockwise
all the way , then turn the knob counterclockwise until you
hear a click.
• To increase the desired temperature, turn the knob
clockwise.
• To decrease the desired temperature, turn the knob
counterclockwise.
8
Heat & Glo • TiaraE• 4035-822 Rev F • 01/05
Page 9

Troubleshooting
6
Issues Possible Causes Solutions
1. Appliance doesn’t turn on
with the main switch or
remote transmitter.
2. Appliance is on, but
no flame or low flame
intensity.
3. Flames are frozen. A. Loose wiring. Check all wiring for loose connections.
4. Excessive noise in the
lower portion of the
appliance.
5. Heating system doesn’t
come on.
A. Power switch is “OFF”. Turn the power switch to the “ON” position.
B. Circuit breaker is tripped. May need to put the appliance on a dedicated service or reduce the
C. Appliance is unplugged
from wall outlet.
D. Loose wiring. Check all wiring for loose connections.
A. The bulb(s) is (are)
burned out.
B. Loose wiring. Check all wiring for loose connections.
B. Flame element is not
attached to the motor.
C. Motor is defective. Replace the motor.
A. Flame element isn’t
seated properly.
B. Motor is defective. Replace the motor.
A. Heating system switch is
“OFF”.
B. Thermostat is set too low. Turn the thermostat knob clockwise until you hear a “click”.
number of appliances on the circuit.
Plug the cord into an outlet.
Replace the bulb(s).
Reattach the flame element to the motor.
Reinstall the flame element.
Turn the heating system switch to the “ON” position.
C. Heating system is
overheated.
D. Loose wiring. Check all wiring for loose connections.
6. Fan runs but no heat is
put out.
7. Heating element is on but
fan doesn’t run.
8. The heater doesn’t turn
off.
9. Excessive noise in upper
portion of the heater.
10. Remote control doesn’t
work.
Odor A. The heater may emit a
11.
A. Loose wiring. Check all wiring for loose connections.
B. Bad heating element. Replace the heating system.
A. Loose wiring. Check all wiring for loose connections.
B. Fan is defective. Replace the heating system.
A. Thermostat is set too
high.
A. Build up of dirt on the
fans.
B. Heater fan is defective. Replace the heating system.
A. Remote is out of range. Move remote closer to the heater.
B. Low batteries. Replace the batteries.
slight, harmless odor
when first used. This is a
normal condition caused
by initial heating of the
internal parts and will not
occur again.
The heating system is protected by a thermal cutout switch. Shut off all
switches. Wait five minutes, then turn the heater on.
Turn the thermostat knob clockwise until you hear a “click”.
Clean all fans.
Heat & Glo • TiaraE• 4035-822 Rev F • 01/05
9
Page 10

Maintenance and Servicing the Fireplace
7
WARNING
Shock Risk
Burn Risk
Cleaning, performing maintenance or moving
this electric stove without disconnecting
power and allowing the stove to cool could
create a shock or burn hazard.
• Turn controls to “OFF”.
• Remove plug from outlet or turn off the
circuit breaker to the stove.
A. Cleaning Firebox and Control Compartment
• Turn the appliance off and disconnect the power cord from
the outlet.
• Allow the appliance to cool before cleaning.
• Remove the top of the appliance by grasping the top on
both sides and lifting up.
• Remove the heater system. See Figure 7.1. Rest it on top
of the appliance so it does not fall.
• Remove the firebox top to access the log area.
• Replace all parts after cleaning has been completed.
• Plug in power cord.
B. Cleaning Glass Doors and Back Glass
The glass is cleaned in the factory during the assembly process. During shipment, installation, handling, etc. the glass
surface may collect dust particles. These can be removed by
buffing lightly with a clean dry cloth.
To remove fingerprints or other marks, the glass can be
cleaned with a damp cloth using a good quality household
glass cleaner. The glass should be completely dried with a
lint free cloth or paper towel.
In the event of glass breakage, vacuum all remaining glass
pieces with a shop vac. DO NOT V ACUUM IF PIECES ARE
HOT! Replace glass with only a glass panel ordered direct
or through your local distributor. Never use substitute material. Only fully tempered soda lime safety glass may be used
on this appliance.
Figure 7.1 Remove the Heater System
10
Heat & Glo • TiaraE• 4035-822 Rev F • 01/05
Page 11

C. Replacing the Light Bulbs
CAUTION
Burn Risk
Light bulbs are hot during operation of the
stove.
• Allow bulbs to cool at least five minutes
before touching them.
The light bulbs need to be replaced when the flame and/or
ember bed is dark on one side. Replace the bulbs with 75
watt halogen bulbs with mini-candelabra base. Do not
exceed 75 watts per bulb. Light bulbs can be purchased at a
local hardware or lighting store, online or by phone. To order
online, log onto www.lite-house.com or call 1-800-838-0977.
We recommend you use Sylvania model 75Q/CL/MC/RP or
Satco® model S3157.
• Turn off the circuit breaker or unplug the stove before
replacing the light bulbs.
• Light bulb access is on the bottom front of the stove.
• Locate and remove the three screws. See Figures 7.2 and
7.3.
• Lower the cover plate to access the light bulbs.
• Carefully remove the burned out bulb from the light socket.
Place the new bulb in the socket. Follow directions on
the light bulb package for handling requirements.
• Reinstall the cover plate. Make sure all wires are back
inside the stove.
• Reinstall the three screws removed earlier.
• Plug the stove’s power cord into the electrical outlet and
turn the switch to “ON”.
2EMOVETHESETHREESCREWS
$ONOTREMOVE
THESEFOURSCREWS
"OTTOMOFSTOVE
BACK
Figure 7.2 Screws on Bulb Access Plate
FRONT
"ULB!CCESS0LATE
CAUTION
Handle glass assembly with care.
When cleaning glass door:
• Avoid striking, scratching or slamming
glass.
• Do NOT use abrasive cleaners.
• Do NOT clean glass when it is hot.
Bulbs
Figure 7.3 Replacing the Bulbs
Sockets
Heat & Glo • TiaraE• 4035-822 Rev F • 01/05
11
Page 12

Reference Materials
8
A. TiaraE Dimensions
18-1/2 in.
(470 mm)
35-1/2 in.
(902 mm)
(with optional decorative shelves)
27 in.
(686 mm)
23-1/2 in.
(591 mm)
(without optional decorative shelves)
18-1/2 in.
(470 mm)
12
Heat & Glo • TiaraE• 4035-822 Rev F • 01/05
Page 13

B. Wiring Diagram
MAIN
POWER
ORG
BLK
BLK
BLK
M
BLK
HEATER
SWITCH
ORG
DIMMER
SWITCH
BLK
BLK
BLK
BLK
BLK
If any of the original wire as
supplied with the appliance must
be replaced, it must be replaced
with an equivalent wire gauge
and 105 degree rated wire.
WHT
WHT
L
L
WHT
WHT
PLUG
WHT
All wiring is to be done by a
qualified electrician.
THERMOSTAT
BLK
BLK
BLU
BLK
HEATER SYSTEM
FAN
BLK BLK
M
WHT
!
CAUTION
Label all wires prior to disconnection when servicing
controls. Wiring errors can cause improper and dangerous
operation. Verify proper operation after servicing.
CAUTION!
Risk of electrical shock!
Disconnect electric power
before servicing.
Heat & Glo • TiaraE• 4035-822 Rev F • 01/05
13
Page 14

D. Optional Components
RC-ELECT-HNG Remote Control
16
Heat & Glo • TiaraE• 4035-822 Rev F • 01/05
Page 15

E. Limited Warranty
Hearth & Home Technologies Inc. (HHT) Electric Fireplaces are tested and inspected prior to shipment
and are guaranteed from defect to the purchaser of each new product. Any part which proves to be
defective in material or workmanship under normal use within one year will be repaired or replaced without
charge.* The Company will not be responsible for any expense incurred for installation, removal from
service, or transportation costs. Any such defect should be brought to the attention of the Dealer where
the product was purchased and is authorized to repair or replace within the terms of this warranty.
The Company’s only obligation under this warranty will be at its sole option to repair or replace any part
proving defective or to refund the purchase price thereof.
The owner/user assumes all other risks, if any, including the risk of any direct, indirect or consequential
loss or damage arising out of the use of or inability to use the product.
The warranty will not apply if, in the sole judgement of the Company, damage or failure has resulted from
accident, alteration, misuse, abuse, incorrect installation, or operation on an incorrect power source.
The foregoing is in lieu of all other warranties expressed, implied, or statutory, and the Company neither
assumes, nor authorizes any person to assume for it any other obligation, or liability in connection with
said product.
*Light bulbs are not covered in the warranty.
How to Obtain Service
To obtain service under this warranty you must:
1. Send written notice of the claimed condition to Heat & Glo Technical Service Department, Hearth & Home
Technologies Inc., 800 W. Jefferson, Lake City, MN 55041.
2. Provide proof of purchase, model number, serial number, and manufacturing date code to HHT.
3. Provide HHT reasonable opportunity to investigate the claim, including reasonable opportunity to inspect
the Appliance prior to any repair or replacement work and before the Appliance or any component of the
Appliance has been removed from the place of original installation.
4. Obtain HHT’s consent to any warranty work before the work is done.
ADDITIONAL INFORMATION: If you would like information on current Heat & Glo products or want to locate a
dealer in your area, call 1-888-427-3973.
WARRANTY
©2003 Heat & Glo® is a Registered Trademark of Hearth & Home Technologies Inc.
Heat & Glo • TiaraE• 4035-822 Rev F • 01/05
17
Page 16

F. Contact Information
Please contact your Heatilator dealer with any questions or concerns. For
the number of your nearest Heat & Glo dealer, please call 1-888-427-3973.
Hearth & Home Technologies Inc.
800 W. Jefferson
Lake City, MN 55041
– NOTES –
CAUTION
DO NOT DISCARD THIS MANUAL
• Important operating
and maintenance
instructions included.
This product may be covered by one or more of the following patents: (United States) 4593510, 4686807, 4766876,
4793322, 4811534, 5000162, 5016609, 5076254, 5113843, 5191877, 5218953, 5263471, 5328356, 5341794, 5347983,
5429495, 5452708, 5542407, 5601073, 5613487, 5647340, 5688568, 5762062, 5775408, 5890485, 5931661, 5941237,
5947112, 5996575, 6006743, 6019099, 6048195, 6053165, 6145502, 6170481, 6237588, 6296474, 6374822, 6413079,
6439226, 6484712, 6543698, 6550687, 6601579, 6672860, 6688302B2, 6715724B2, 6729551, 6736133, 6748940,
6748942, D320652, D445174, D462436; (Canada)1297749, 2195264, 2225408; or other U.S. and foreign patents
pending.
18
• Read, understand
and follow these
instructions for safe
installation and
operation.
Heat & Glo • TiaraE• 4035-822 Rev F • 01/05
• Leave this manual with
party responsible for
use and operation.
 Loading...