

Page 1

Page 2

A. Introduction
1
Heat Controller, Inc., Air Handlers come in a variety of models and
sizes for upow or horizontal use and when combined with cool-
ing coils, are ready for air conditioning and heat pump applications.
These instructions are primarily to assist qualied individuals trained
and experienced in the proper installation of this type of equipment.
B. Rules for Safe Installation and Operation
1. Read these rules and the instructions carefully. Failure
to follow the rules and the instructions could cause a
malfunction of the unit, and a possible safety hazard.
Keep these instructions nearby the unit for future
reference.
2. This unit has been designed and manufactured to comply
with National Codes; however, it is the installer’s
responsibility to install this unit to comply with
prevailing codes and regulations. Heat Controller, Inc.,
assumes no responsibility for units installed in violation
of any code or regulation.
3. Before servicing, ALWAYS SHUT OFF
ELECTRICITY TO THE UNIT. This will prevent any
electrical shocks.
4. Ground the unit to prevent electric shock. All electrical
wiring should be in accordance with the National
Electrical Code.
5. Duct work must be installed in accordance with the
standards of the National Fire Protection Association
(NFPA) for the installation of Air Conditioning, Warm
Air Heating and Ventilating Systems (NFPA 90A and
90B). The air distribution duct system should be sized for
0.2 inches of static pressure. See National Environmental
Systems Contractors Association Manual K for duct
sizing recommendations. Ductwork in non-conditioned
spaces must be insulated to prevent formation of
condensate and for maximum operating efciency.
6. The safety testing agency label appearing on the unit
covers the unit and factory installed coil(s) only. It does
not cover any other equipment.
7. Exterior surface of cabinet may sweat when unit is installed
in non-conditioned space such as attic or garage. Installer
must provide protection such as full size auxiliary drain
pan on all units installed in non-conditioned space such as
attic or garage type installations to prevent damage from
condensation. It is recommended that units installed in
non-conditioned space be insulated on the outside with 1”
thick berglass with the vapor barrier on the outside.
8. While designed to operate quietly when properly installed,
several steps should be taken to insure this. Use of
isolation pads when mounting unit, exible duct collars
for discharge, and use of acoustical duct liners are all
good installation practices that promote quiet operation.
9. Cabinet insulation is rated for R=4.2 (standard). Some
jurisdictions require R=6.0 on installations in nonconditioned space. Add insulation 1” thick to exterior of
air handler to comply in these jurisdictions, putting the
vapor barrier on the outside.
C. Unpacking the Unit
The unit should be unpacked on receipt and if damage is found,
a claim should be made immediately to the shipping carrier. This
is the responsibility of the entity receiving the equipment. The air
handler is completely assembled, as received. Electric power, ther-
mostat wiring, refrigerant piping and duct connections are needed
to complete an installation. Additionally, a drain connection will
be needed.
Check the rating plate for unit size, voltage, phase etc. to make
sure unit meets your requirements.
D. Physical Installation
MINIMUM CLEARANCES
These units have a 0” minimum clearance to combustible materi-
als rating from all cabinet surfaces. The unit should be installed
with serviceability clearance of 30” from the front of the unit. The
unit can be serviced entirely from the front, including replacing the
lter. Be sure and route primary and secondary drain connections
so as not to obstruct lter replacement.
ARRANGEMENT
Unit is shipped from the factory arranged to be installed in a verti-
cal upow or horizontal right to left airow position (standard) or
eld convertible to a horizontal left to right airow position.
Upow Application
In an upow installation the discharge outlet is at the top. Care
should be taken to ensure unit is level to permit proper condensate
drainage. Normal upow installation will be in a basement or clos-
et. If installed in a closet, the closet should have a platform framed
in, with an opening on top of the platform centered in the closet.
Connect the supply air outlet to a discharge air plenum. Install re-
turn air grilles from outside the closet to space below the platform.
Platform must be at least 10” above the oor. Run all supply and
return ductwork in accordance with local codes.
Horizontal application
Horizontal application will normally be used in an attic or crawl
space. This type installation requires a return air duct be attached
to the air handler inlet. The opposite end of the return air duct
is attached to a return air lter grille through the ceiling or wall.
Remove lter from unit if lter grill is used. The unit is shipped in
right to left conguration.
CAUTION
A “P” trap must be installed in the coil
drain line! Cap unused drain ttings.
WARNING
To ensure unit will not interfere with drains and
refrigerant lines, modication must be made
prior to installing these lines..
FOR LEFT TO RIGHT APPLICATIONS.
1. Remove and set aside front panels.
2. Remove the coil support bracket (4-screws).
Page 3

3. Remove horizontal drain pan retaining clip (1-screw).
2
4. Carefully remove coil assembly and bottom drain pan.
5. Move horizontal drain pan from left hand side of coil to
right side.
6. Install modied coil assembly back into unit.
7. Reinstall coil support bracket and horizontal drain pan
retaining clip.
8. Determine drain holes being used and reposition knockout
caps.
9. Reinstall doors.
CAUTION
IT IS MANDATORY TO USE AN
EMERGENCY AUXILIARY DRAIN PAN
WITH ANY COIL OR AIR HANDLER
INSTALLED IN AN ATTIC OR ABOVE A
FINISHED CEIING!
E. Electric Furnace
Optional electric heating packages are available, see the unit label
for various sizes.
* See Electric Heater Kit Specications Table
F. Power Wiring
Refer to the unit’s nameplate for specic electrical data.
CAUTION
DISCONNECT POWER AT MAIN FUSE OR CIRCUIT
BREAKER DISTRIBUTION PANEL BEFORE WIRING
UNIT TO PREVENT SHOCK OR FIRE HAZARD.
Use copper conductors only. Tighten all wire connectors.
Refer to unit nameplate for minimum circuit ampacity. For correct
wire size, refer to the National Electrical Code. Use 75˚C minimum
wire in unit wiring compartment.
NOTE: SEE UNIT FOR COMPLETE WIRING DIAGRAM
LOCATED ON BLOWER HOUSING.
G. Control Wiring
Field connections are made to the low voltage terminal strip.
Consult installation instructions provided with accessory items
for specic information on control wiring. Use 18 AWG minimum
copper control conductors for control wiring up to 50 feet between
units. 16 AWG control conductors are recommended for lengths up
to 100 feet. Class 2 wiring is acceptable. Do not short control leads.
Transformer burn-out will result. Set thermostat heat anticipator at
0.15 amps for air handler.
Terminal number 4 on the (FR) fan relay is the cooling blower
speed and terminal number 6 on the (FR) is the heating blower
speed.
I. Refrigerant Piping
All air handlers have DX refrigerant cooling coils installed, liquid
and suction piping should be sized in accordance with condensing
unit manufacturer’s recommendations. An adapter (by others) may
be required to make the transition between the line set and the
coil connector. The evaporator coil has sweat copper connections.
The suction line is a swaged solder cup connection. The liquid line
connection is made to a tail piece portion of the TXV. Remove the
nut on the inlet to the expansion valve and place it on the tail piece
prior to brazing the liquid line. DO NOT connect the tail piece
to the TXV until the liquid line has been brazed to the tail piece.
Refrigerant lines should be soldered with silver solder or other
high temperature brazing alloy. Dry nitrogen must ow through the
refrigerant lines during the brazing operation to prevent oxidation.
J. Refrigerant Flow Control
As shipped, the TXV installed on the A-coil is for the nominal
capacity of a 13 SEER matched with Heat Controller, Inc.,
condensing units. The TXV is for use on an R-410A system. For
other refrigerants, contact the factory. TXV has a built-in check
valve for reverse ow and is suitable for heat pump operation. All
are externally equalized with non-adjustable superheat and have
15% bleed. Hard start capability for outdoor units is not normally
required when a 15% bleed valve is used. The external equalizer
line attached to the TXV has a female are nut and is attached to
the suction line at the coil. Install the TXV bulb to the suction line
using the bulb clamp furnished with the kit. The bulb should be
installed on a horizontal run of the suction line if possible. On a
line less than 7/8” OD, the bulb may be installed on top of the line.
With 7/8” OD or over, the bulb should be installed in a position of
about 4 or 8 o’clock. If the bulb installation is made on a vertical
run, the bulb should be located at least 6 inches from any bend
and on the tubing side opposite the plane of the bend. On vertical
bulb installations, the bulbs should be positioned with the bulb
capillary tube at the top. The bulb must be insulated using thermal
insulation to protect it from the effects of the surrounding ambient
temperature.
H. Blower Motor
Units are equipped with a three-speed blower motor. Two factoryselected motor speed leads are connected to the fan relay (FR) to
provide automatic speed change for heating and cooling airow
volumes. The pre-selected motor speeds would normally not have
to be changed in the eld. All HAH models contain a post purge
timer (TDR) that delays the blower turning off at the end of the
cooling cycle, this improves energy efciency.
Page 4
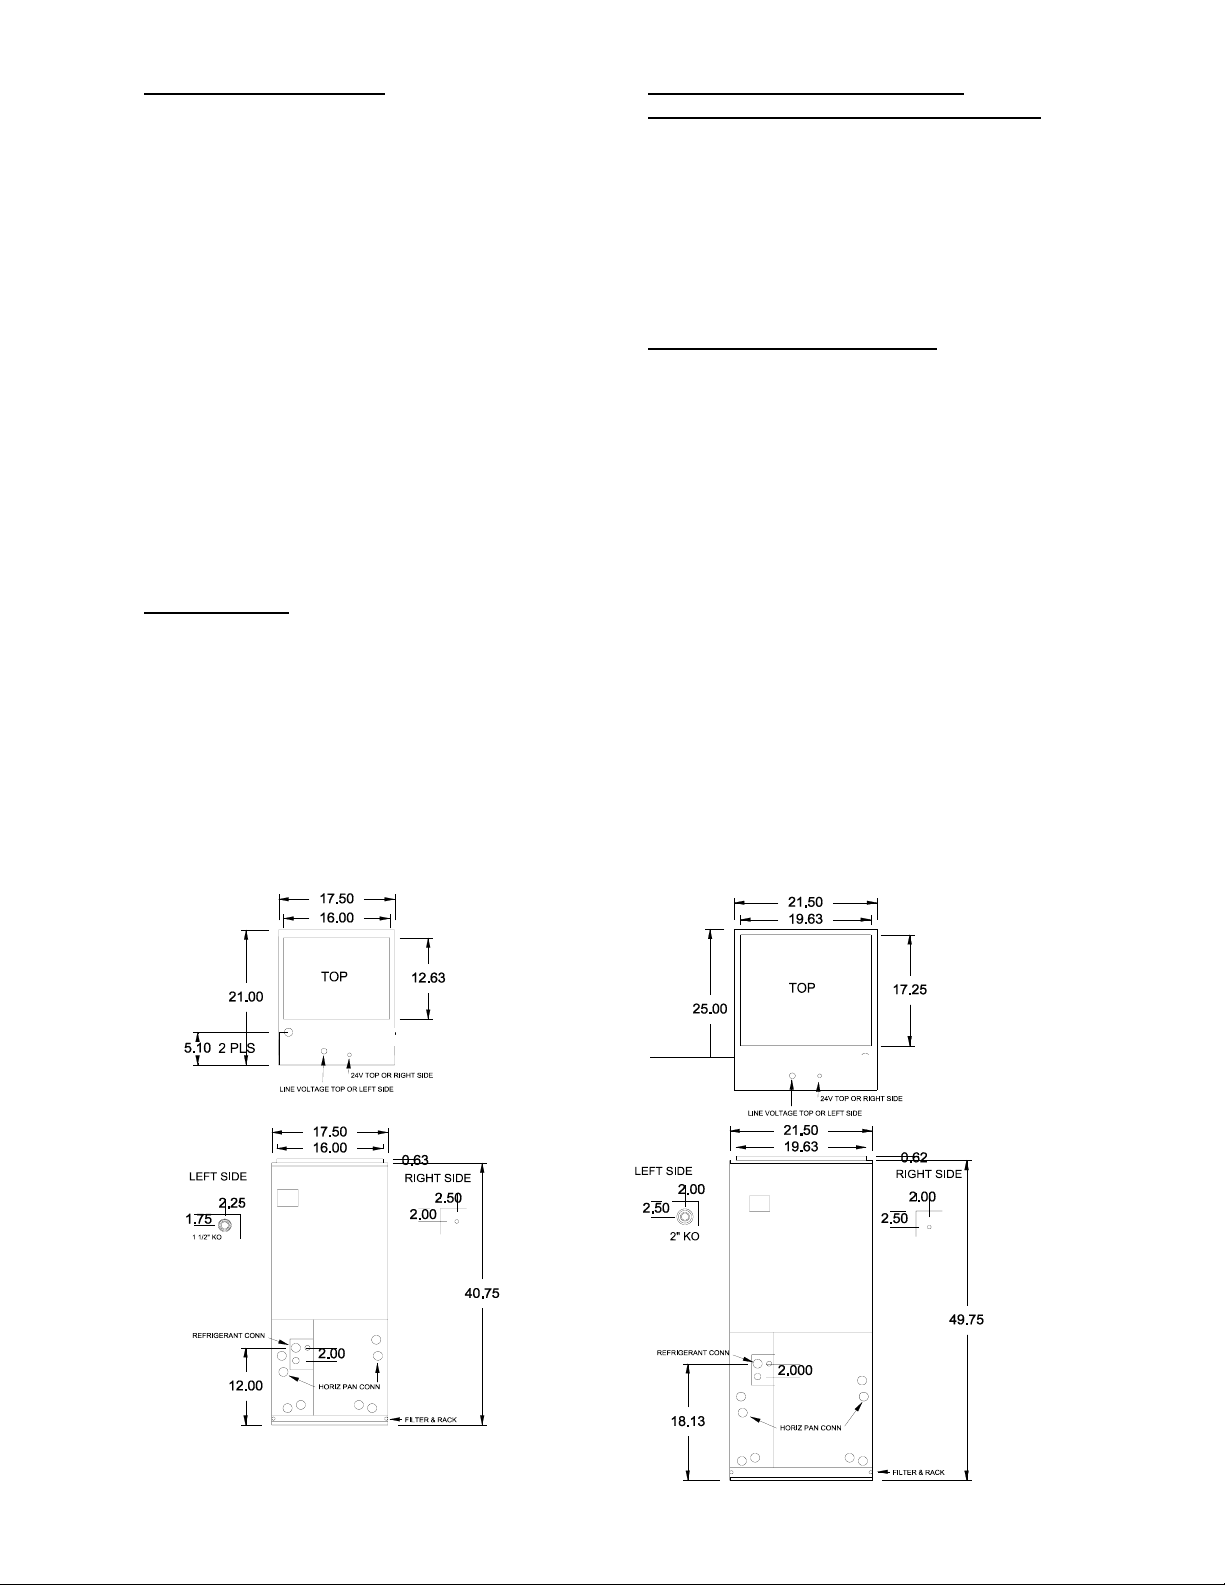
K. CONDENSATE DRAIN
3
The air handler drain pan has ¾” FPT primary and
secondary connections whether used in an upflow or
horizontal configuration. Piping from each stub is to
have a 1½” minimum trap and each run pitched so as
to provide for adequate drainage and secondary
fittings together into a common drain. When an air
handler is installed above a finished ceiling, an
auxiliary drain pan must be provided under the unit
as required by most local building codes. The
secondary drain must be piped to a location that
would provide the occupant a warning if the primary
drain is blocked.
L. AIR FILTER
Air handlers are factory equipped with an air filter.
If the return grille has its own filter, the filter
installed in the air handler should be removed. Air
filter should be inspected and cleaned or replaced as
often as is necessary to prevent restriction of air flow
(minimum every three months for normal
installations). Always replace the filter with the
same type originally furnished.
M. CHECK TEST AND START UP
TURN OFF POWER AT BREAKER PANEL
Electric heaters are high current devices. Verify that
all electrical connectors, whether push-on or
compression-type are tight. Loose connections will
cause the wire and/or terminal to fail.
The unit should be tested after the system has been
completely installed to determine proper operation.
Energize the unit by switching on the line voltage
source and the thermostat.
N. PERIODIC MAINTENANCE
Inspect and clean or replace filters at least every three
months to ensure good airflow and optimum system
capacity, efficiency and life. This equipment should
NEVER BE OPERATED WITHOUT AN AIR FILTER
in place (see Section AIR FILTER). The blower motor
is permanently lubricated. ALWAYS disconnect
power before removing access doors!
AHB 24, 30, 36
HAG 1324,1336
AHB Dimensions 24-60
Dimensions
AHB 42, 48, 60
HAG 1348,1360
Page 5
ELECTRIC HEATER KIT SPECIFICATIONS
4
MODEL
USED WITH
MINIMUM CIRCUIT
kW@
AMPACITY
240V 208V 240V 208V 240V 208V
MAX. FUSE OR
BREAKER (HACR)
N/A Without heat 0 0 2.1 1.9 15 15
7800-305B 5.0 3.8 29 25 30 25
7800-306B 8.0 6.0 44 39 45 40
7800-308B
HAG24-00-1A
10 7.5 55 48 60 50
N/A Without heat 0 0 3.5 3.4 15 15
7800-305B 5.0 3.8 30 27 30 30
7800-306B 8.0 6.0 46 40 50 40
HAG36-00-1A
7800-308B 10 7.5 56 49 60 50
7800-312B
15 11.3 56/26 49/23 60/30 50/30
N/A Without heat 0 0 4.0 3.9 15 15
7800-313B 5.0 3.8 30 27 30 25
7800-314B 8.0 6.0 46 41 50 45
7800-315B 10 7.5 57 50 60 50
HAG48-00-1A
7800-316B 15 11.3 53/30 46/27 60/30 50/30
7800-317B
20 15 57/63 50/46 60/60 50/50
N/A Without heat 0 0 6.0 5.9 15 15
7800-313B 5.0 3.8 32 29 35 30
7800-314B 8.0 6.0 48 42 50 45
7800-315B 10 7.5 59 52 60 60
HAG60-00-1A
HAG61-00-1A
7800-316B 15 11.3 5 3/32 46/29 60/35 50/30
7800-317B
20 15 59/53 52/46 60/60 60/50
7800-400 4-Pole Jumper Bar Assembly 15 and 20 kW only
Page 6
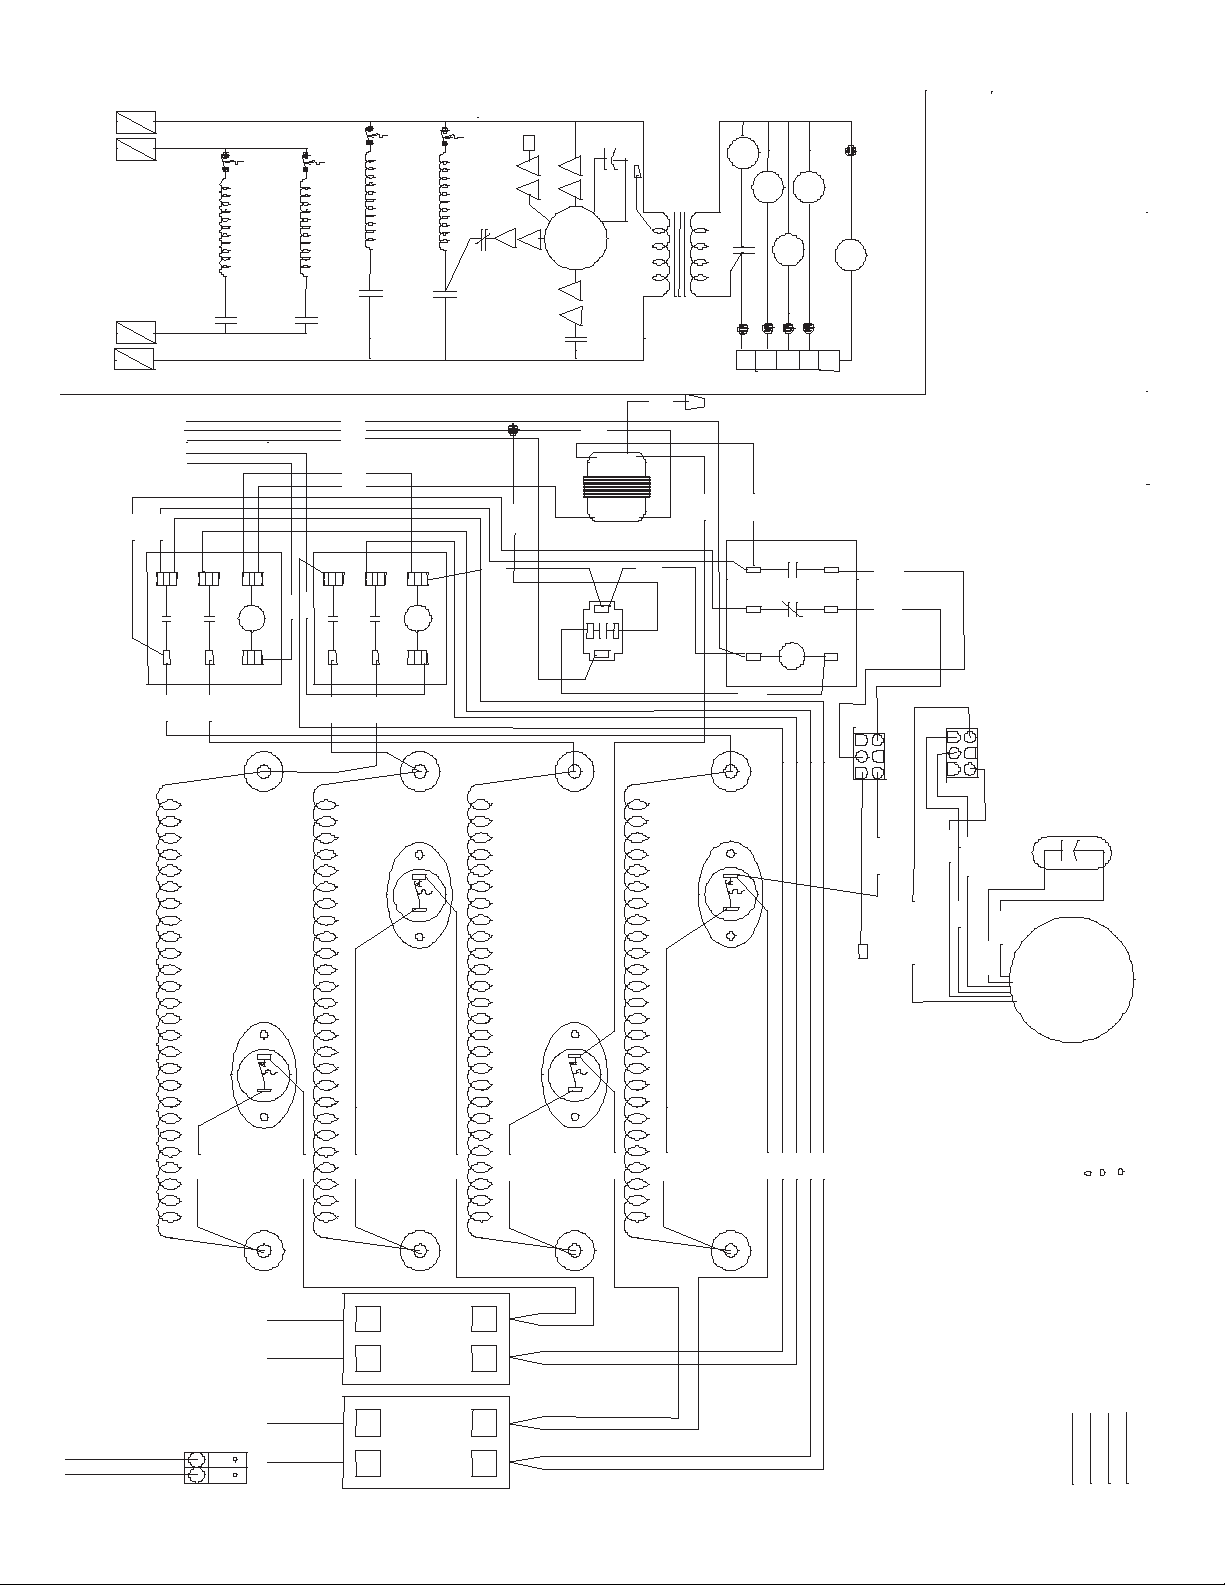
1
5
CB
2
2
L
CB
2
CB
1
1
L
CB
S-4L
AT H TE IS 4R P -
2-SH
LS-3
T RI HE AT 3S P-
H 2S-
S-2L
EAT TH IS 2R P-
S-H 1
LS-1
6
3
P2
6
3
P3
EAT IH STR 1-P
H S-1
P24P3
LO
4
FR
BLOWER
2
FR
08 C2 VA
P2
P3
RMOTO
XFMR
R F
S-2H
TD R
1H S-
TDR
C
P3
2
P2
HI
R
G
Y
W1
W2
ORG
YEL
C O N D
AN D
W2
T-STAT
W1
RED
BLK
RED
GRN
YEL
BLU
RED
YEL
13
4
WHT
H S-2
5
BLU
BLU
BLU
13
4
WHT
H S-1
5
BLU
RED
208/240240VAC
XFMR
24VAC
H
TD R
H
WHT
BLK
YEL
2 4
5 6
FR
1 3
GRN
BLK
RED
4, 5 KW RESISTIVE HEAT STRIP
RED
GROUND LUG
FEMALE P2
WHT
LS-3
LS-1
WH T/YEL
LS-4
4, 5 KW RESISTIVE HEAT STRIP
RED
RED
1 2
L L
1 2
L L
RED
2
T
1
T
2
T
1
T
CB 1 CB 2
LS-2
5 KW RESISTIVE HEAT STR IP
RED
5 KW RESISTIVE HEAT STR IP
RED
RED
RED
BLK
BLK
BLK
BLK
LEGEND
C B C I R C U IT BREAKER
C O U TD O O R U N IT C O N TAC TOR
MALE P3
RED
BLK
BLU
BRN
BRN
MOTOR
BLOWER
18 GA T YPE 1015 600V T EW 105 C 24V
12 GA TYPE 1015 600V TEW 105 C
18 GA TYPE 1015 600V TEW 105 C
FIELD WIRING PER LOCAL CODE
TD R TIM E D EL AY R EL AY
H S H EAT SEQ U EN C ER
FR F AN R ELAY
XFMR TR AN SFO R M ER
LS LI MIT SWITC H
HAG - TO 20 KW WITH TDR
Page 7

06/2009
 Loading...