

Page 1

DVP-FBHT
Firebrick Termination Cap
- Installation Instructions -
These instructions should be used along
with the Cinch Pipe and
T ermination Cap System instructions
included with this kit.
CAUTION
Sharp Edges
• Wear protective gloves
and safety glasses
during installation.
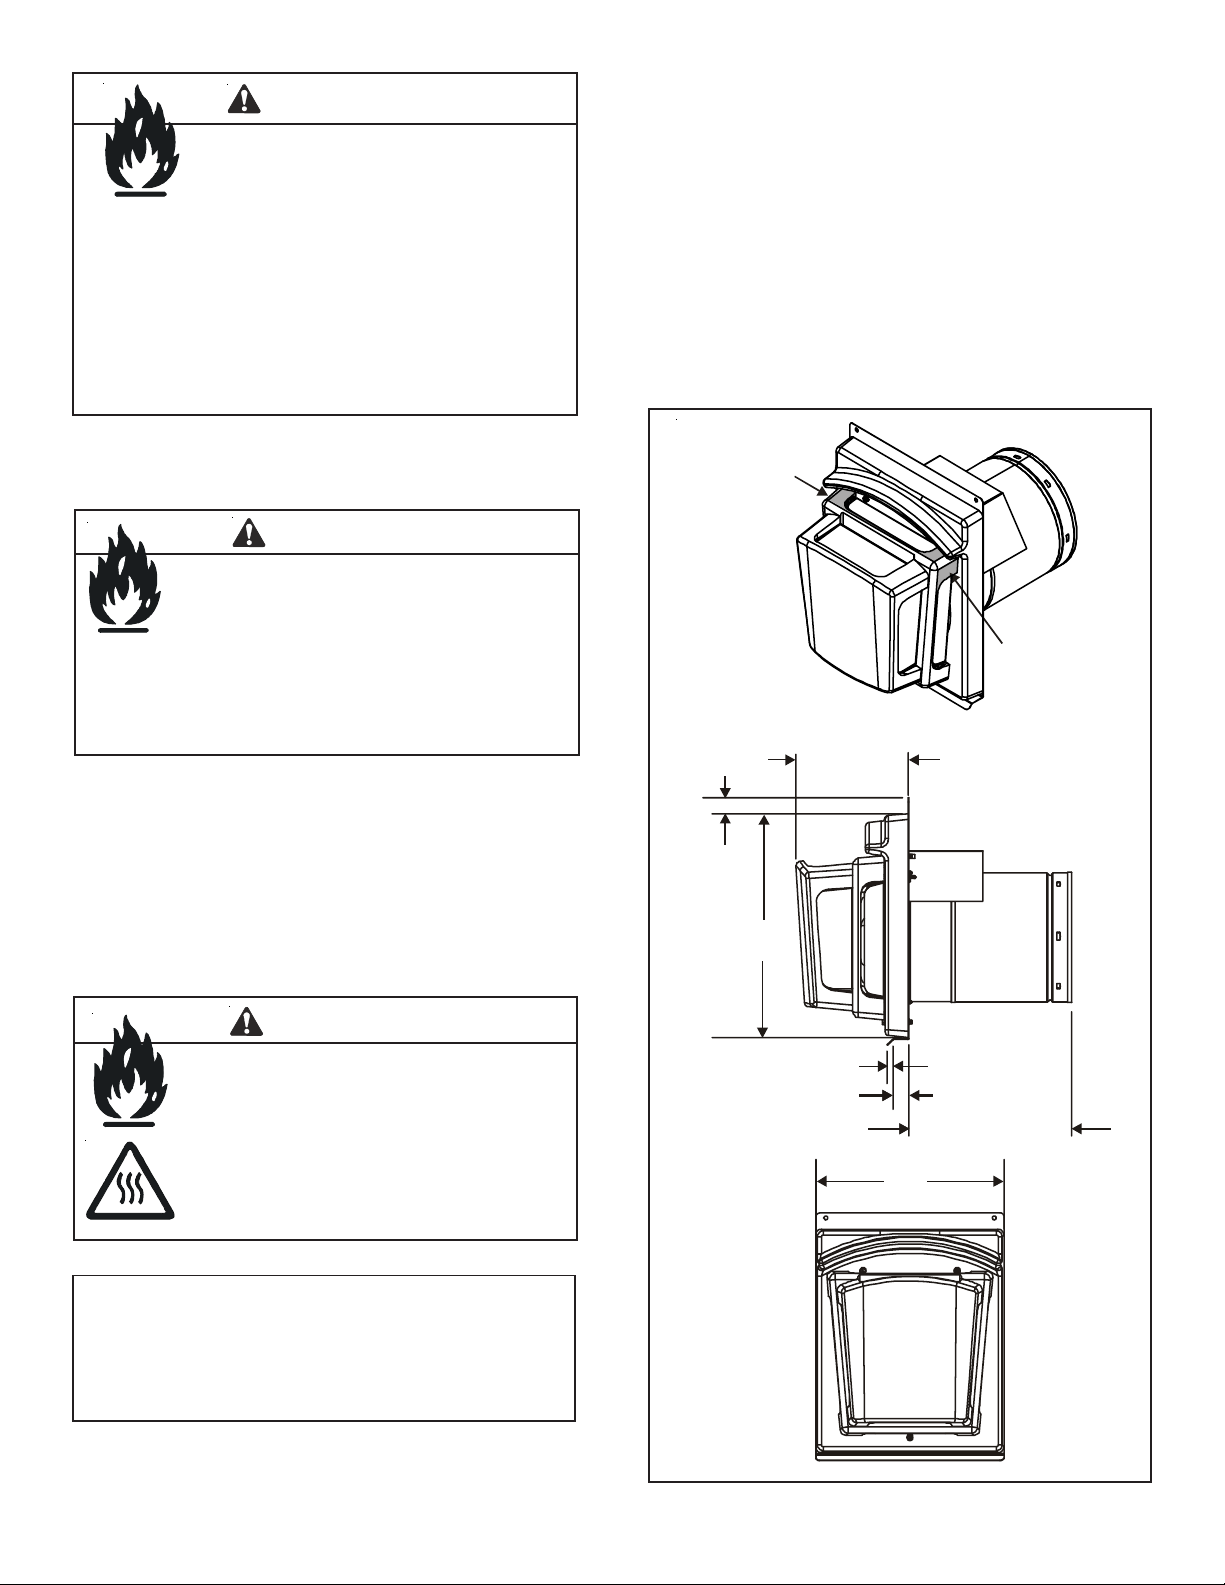
The DVP-FBHT is a horizontal firebrick termination cap with
4 inch telescoping flue (see Figure 1).
Included is the DVP-WS wall shield firestop with heat shield
and one fastener pack.
W ARNING
Fire Risk
Do NOT use this termination cap on vinyl siding.
Installation
1. Carefully remove cap from the packaging.
Note: Variation in the appearance of the termination
cap color and surface are inherent and unique
characteristics of the manufacturing process and are
to be expected with this product. Such surface
characteristics as chips, small cracks, and pits do
not affect the product performance in any manner .
2. Frame the 12 inch by 10 inch opening in the wall by
following the directions in the Cinch Pipe and T ermination
cap instructions. When housewrap or underlayment is
used, the housewrap manufacturer’s instructions for
flashing a penetration MUST be followed.
3. Install the interior wall shield firestop by following the
instructions in the Cinch Pipe and Termination cap
instructions.
WALL SHIELD
FIRESTOP
HEAT SHIELD
TELESCOPING
FLUE SECTION
Figure 1. DVP-FBHT
Printed in U.S.A. Copyright 2006
Hearth & Home Technologies, 20802 Kensington Boulevard, Lakeville, MN 55044
Exterior finishing materials allowed ONLY above line.
METAL
BACKPLATE
1 IN.
FIREBRICK
BOLT (3)
2084-900B 1/06
1
Page 2
W ARNING
7. Secure the backplate to the wall with four appropriate
length screws from the hardware pack.
Hearth & Home Technologies disclaims
any responsibility for, and the warranty will
be voided by, the following actions:
• Installation and use of any damaged vent system
component.
• Modification of the vent system.
• Installation other than as instructed by Hearth & Home
Technologies.
• Installation and/or use of any component part not
approved by Hearth & Home Technologies.
Any such action may cause a fire hazard.
4. Install the telescoping flue section included with the cap
on the last section of flue pipe.
W ARNING
Fire Hazard
Impaired performance of appliance
• Telescoping flue section of termination cap
MUST be used when connecting pipe
section to termination cap.
• Maintain a 1-1/2 inch minimum overlap on
telescoping flue section of termination cap.
5. Remove the three bolts from the firebrick cap face to
separate the firebrick part of the cap from the metal
backplate (see Figure 1).
8. Seal the backplate to the housewrap or sheathing. Follow
housewrap manufacturer’s instructions for sealing a
penetration when applicable.
9. Slide the firebrick part of the cap onto the backplate by
aligning the 5 inch collar with the 5 inch flue pipe coming
from the fireplace. Slide the two pieces together until
the firebrick part bottoms out on the backplate.
10.Replace the three bolts removed in step 2. DO NOT
OVERTIGHTEN THE BOL TS.
Measure vertical
clearances from
this surface.
Measure horizontal
clearances from
this surface.
1 in.
(25)
7-3/16 in.
(182)
6. Slide the backplate, with the 8 inch collar on it, onto the
flue pipe from the fireplace. For thinner wall construction,
you may have to trim the heat shield on the metal
backplate and interior wall shield firestop.
W ARNING
Fire Risk
Exhaust Fumes Risk
Impaired Performance of Appliance
• Overlap pipe slip sections at least 1-1/2 inches.
• Use pilot holes for screws.
• Screws must not exceed 1 inch long.
• Pipe may separate if not properly joined.
NOTE: The heat shield on the interior wall shield firestop
and the heat shield on the metal backplate must
overlap 1-1/2 inches. If wall thickness does not allow
the required 1-1/2 inch heat shield overlap, an extended
heat shield must be used.
14 in.
(356)
3/8 in. (9)
1 in. (25)
10-3/8 in. (264) Max.
7-11/16 in. (195) Min.
12 in.
(305)
Figure 2.
2
Page 3

Finishing
The DVP-FBHT cap may be stained or painted. The cap is
subject to high temperatures and stain is preferred over paint.
Laxtex paints may be used, but light colored paints may
discolor slightly. A water-based stain is recommended for
maximum life.
CAUTION
Risk of Water Intrusion or Impaired Performance
• Do NOT use exterior finishing materials thicker than
1-1/2 inch cap base.
• The flashing bend at bottom of metal backplate MUST be
on top of exterior finishing material for proper drainage.
• Maintain 1-1/2 inch minimum overlap on telescoping
flue section and wall shield firestop when adjusting for
wall thickness.
If the firebrick section of the cap is going to be left off until
after the structure’s exterior is finished, do NOT place exterior
finishing materials over the metal backplate. Only the top 1
inch of the metal backplate can be covered with finishing
material (see Figure 1).
CAUTION
Water Damage Risk
The flashing bends on the bottom of the metal backplate
MUST be clearly on top of the exterior for proper drainage.
Caulk the outer sides and top of the cap. Do not caulk the
bottom edge with the flashing bends on it.
CAUTION
Potential Risk of Damage to Finish
• Do NOT expose this cap to acid.
• Remove the firebrick section of the cap if using acid
to clean surrounding masonry.
Service Parts List
DESCRIPTION SERVICE PART NO.
Wall Shield 25259
Fastener Pack 32210
Slip Section 4033-012
3
 Loading...