

HealthRider HATL612051 Owner's Manual
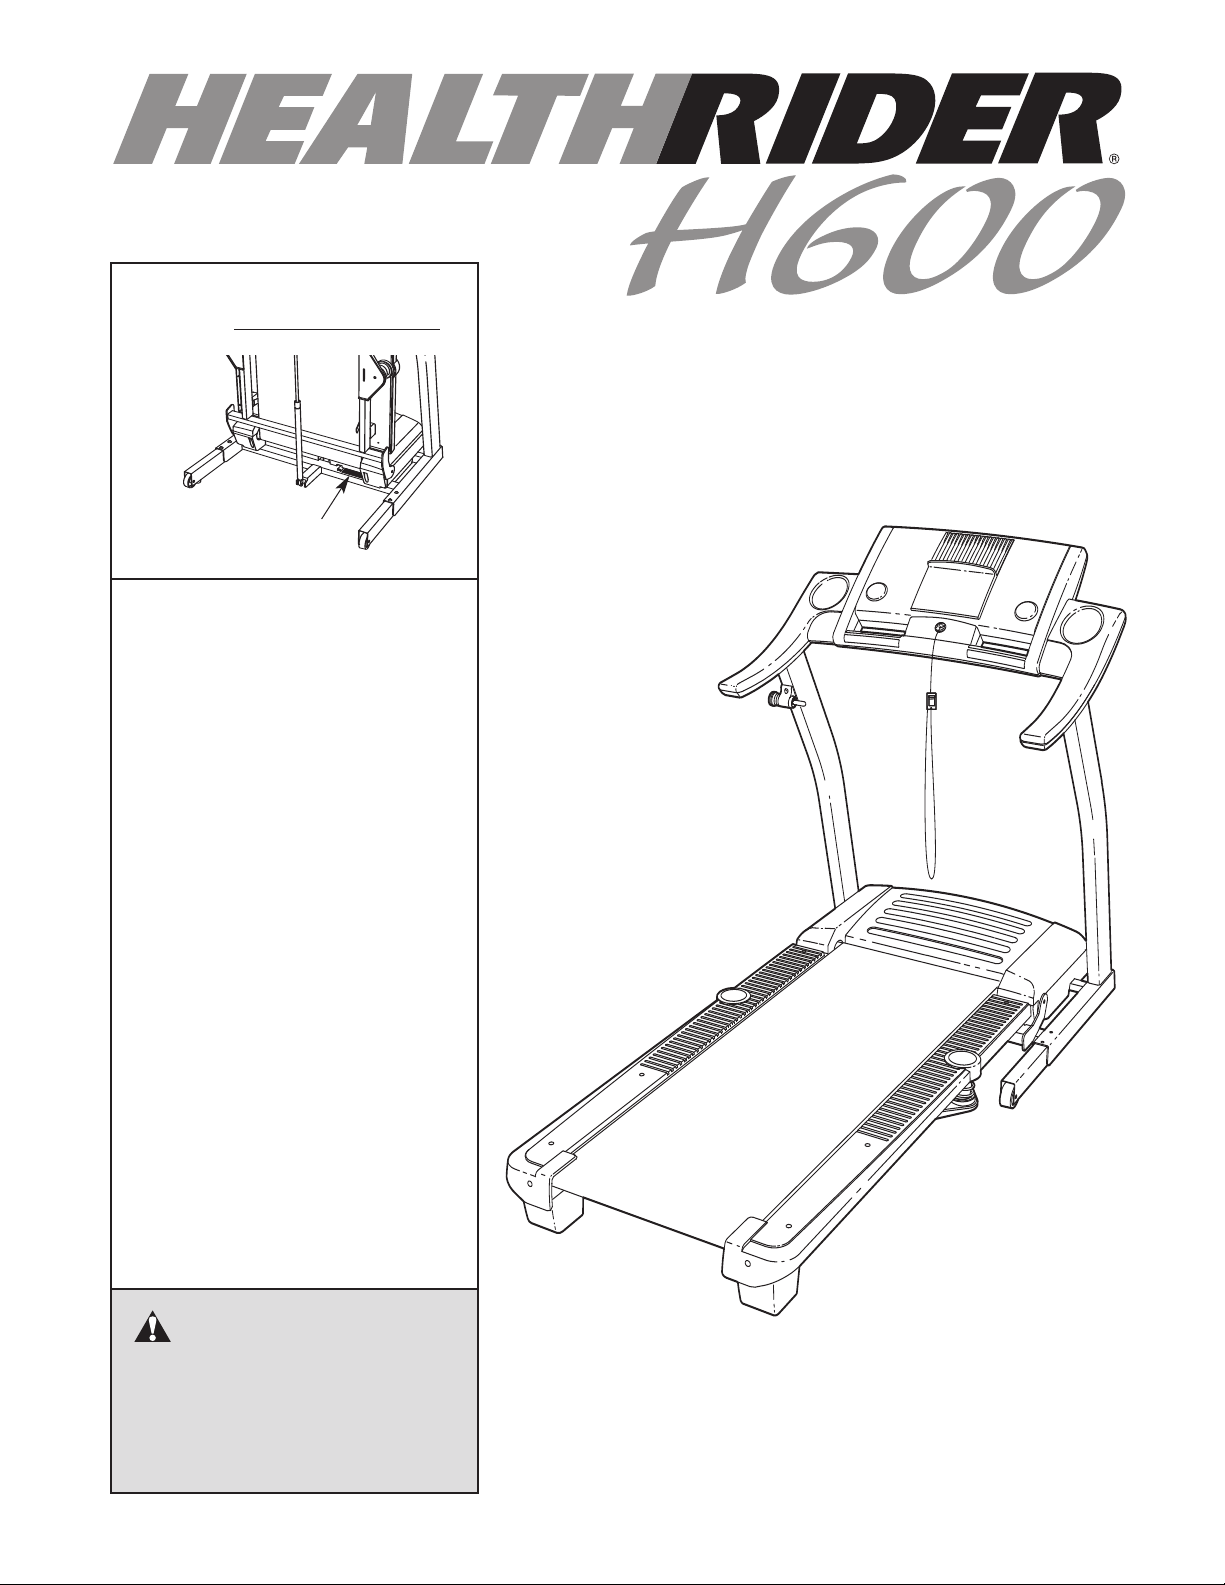
Model No. HATL61205.1
Serial No.
Serial Number Decal
QUESTIONS?
If you have questions, or if there
are missing or damaged parts,
we will guarantee complete satisfaction through direct assistance
from our factory.
TO AVOID DELAYS, PLEASE
CALL DIRECT TO OUR TOLLFREE CUSTOMER HOT LINE.
The trained technicians on our
Customer Hot Line will provide
immediate assistance, free of
charge to you.
USER’S MANUAL
CUSTOMER HOT LINE:
800-820-0915
E-mail:
newlife@vip.163.com
ICON’s Web site:
www.iconfitness.com
CAUTION
Read all precautions and instructions in this manual before using
this equipment. Save this manual
for future reference.
Newlife is an authorized dealer of this treadmill in the territory
of mainland China. This treadmill is designed and manufactured by ICON Health & Fitness, Inc.

TABLE OF CONTENTS
IMPORTANT PRECAUTIONS . . . . . . . . . . . . . . . . . . . . . . . . . . . . . . . . . . . . . . . . . . . . . . . . . . . . . . . . . . . . . . . .3
BEFORE YOU BEGIN . . . . . . . . . . . . . . . . . . . . . . . . . . . . . . . . . . . . . . . . . . . . . . . . . . . . . . . . . . . . . . . . . . . . . .5
ASSEMBLY . . . . . . . . . . . . . . . . . . . . . . . . . . . . . . . . . . . . . . . . . . . . . . . . . . . . . . . . . . . . . . . . . . . . . . . . . . . . . . .6
HOW TO USE THE CHEST PULSE SENSOR . . . . . . . . . . . . . . . . . . . . . . . . . . . . . . . . . . . . . . . . . . . . . . . . . . . .9
OPERATION AND ADJUSTMENT . . . . . . . . . . . . . . . . . . . . . . . . . . . . . . . . . . . . . . . . . . . . . . . . . . . . . . . . . . . .10
HOW TO FOLD AND MOVE THE TREADMILL . . . . . . . . . . . . . . . . . . . . . . . . . . . . . . . . . . . . . . . . . . . . . . . . . .25
TROUBLESHOOTING . . . . . . . . . . . . . . . . . . . . . . . . . . . . . . . . . . . . . . . . . . . . . . . . . . . . . . . . . . . . . . . . . . . . .27
CONDITIONING GUIDELINES . . . . . . . . . . . . . . . . . . . . . . . . . . . . . . . . . . . . . . . . . . . . . . . . . . . . . . . . . . . . . . .30
PART LIST . . . . . . . . . . . . . . . . . . . . . . . . . . . . . . . . . . . . . . . . . . . . . . . . . . . . . . . . . . . . . . . . . . . . . . . . . . . . . .31
ORDERING REPLACEMENT PARTS . . . . . . . . . . . . . . . . . . . . . . . . . . . . . . . . . . . . . . . . . . . . . . . . . .Back Cover
Note: An EXPLODED DRAWING is attached in the centre of this manual.
HealthRider is a registered trademark of ICON IP, Inc.
2

IMPORTANT PRECAUTIONS
WARNING: T
following important precautions and information before operating the treadmill.
1. It is the responsibility of the owner to ensure
that all users of this treadmill are adequately
informed of all warnings and precautions.
2. Use the treadmill only as described.
3. Place the treadmill on a level surface, with at
least 2.5 m (8 ft.) of clearance behind it and
0.5 m (2 ft.) on each side. Do not place the
treadmill on any surface that blocks air openings. To protect the floor or carpet from damage, place a mat under the treadmill.
4. Keep the treadmill indoors, away from moisture and dust. Do not put the treadmill in a
garage or covered patio, or near water.
5. Do not operate the treadmill where aerosol
products are used or where oxygen is being
administered.
6. Keep children under the age of 12 and pets
away from the treadmill at all times.
7. The treadmill should be used only by persons
weighing 135 kg (300 lbs.) or less.
8. Never allow more than one person on the
treadmill at a time.
Wear appropriate exercise clothes when
9.
using the treadmill. Do not wear loose clothes
that could become caught in the treadmill.
Athletic support clothes are recommended for
both men and women.
o reduce the risk of burns, fire, electric shock, or injury to persons, read the
12. Keep the power cord away from heated surfaces.
13. Never move the walking belt whilst the power
is turned off. Do not operate the treadmill if
the power cord or plug is damaged, or if the
treadmill is not working properly. (See TROUBLESHOOTING on page 27 if the treadmill is
not working properly.)
14. Read, understand, and test the emergency
stop procedure before using the treadmill (see
OPERATION AND ADJUSTMENT on page 10).
15. Never start the treadmill whilst you are standing on the walking belt. Always hold the
handrails whilst using the treadmill.
16. The treadmill is capable of high speeds.
Adjust the speed in small increments to avoid
sudden jumps in speed.
17. The pulse sensors are not medical devices.
Various factors, including the user's movement, may affect the accuracy of heart rate
readings. The pulse sensors are intended
only as an exercise aid in determining heart
rate trends in general.
18. Never leave the treadmill unattended whilst it
is running. Always remove the key, unplug
the power cord, and switch the on/off switch
to the off position when the treadmill is not in
use. (See the drawing on page 5 for the loca-
Always wear athletic
tion of the circuit breaker.)
shoes. Never use the treadmill with bare feet,
wearing only stockings, or in sandals.
10. When connecting the power cord (see page
10), plug the power cord into an earthed circuit. No other appliance should be on the
same circuit. When replacing the fuse, an
ASTA approved BS1362 type should be fitted to
the fuse carrier. A 13 amp fuse should be used.
11. If an extension cord is needed, use only a 3conductor, 1mm
longer than 1.5 m (5 ft.).
2
(14-gauge) cord that is no
19. Do not attempt to raise, lower, or move the
treadmill until it is properly assembled. (See
ASSEMBLY on page 6, and HOW TO FOLD
AND MOVE THE TREADMILL on page 25.)
You must be able to safely lift 45 pounds (20
kg) to raise, lower, or move the treadmill.
20. When folding or moving the treadmill, make
sure that the storage latch is fully closed.
Inspect and properly tighten all parts of the
21.
treadmill regularly.
3
2. When using iFIT.com programs, an electronic
2
“chirping” sound will alert you when the
speed and/or incline of the treadmill is about
to change. Always listen for the “chirp” and
be prepared for speed and/or incline changes.
n some instances, the speed and/or incline
I
may change before the personal trainer describes the change.
23. When using iFIT.com programs, you can manually override the speed and incline settings
at any time by pressing the speed and incline
buttons. However, when the next “chirp” is
heard, the speed and/or incline will change to
the next settings of the program.
24. Remove iFIT.com CDs and videos from your
CD player or VCR and disconnect your MP3
layer when you are not using them.
p
25. Never insert any object into any opening.
26. DANGER: Always unplug the power
cord immediately after use, before cleaning the
treadmill, and before performing the maintenance and adjustment procedures described in
this manual. Never remove the motor hood unless instructed to do so by an authorized service representative. Servicing other than the
procedures in this manual should be performed
by an authorized service representative only.
27. This treadmill is intended for in-home use
only. Do not use this treadmill in a commercial, rental, or institutional setting.
WARNING: Before beginning this or any exercise program, consult your physician. This
is especially important for persons over the age of 35 or persons with pre-existing health problems.
Read all instructions before using. ICON assumes no responsibility for personal injury or property
damage sustained by or through the use of this product.
SAVE THESE INSTRUCTIONS
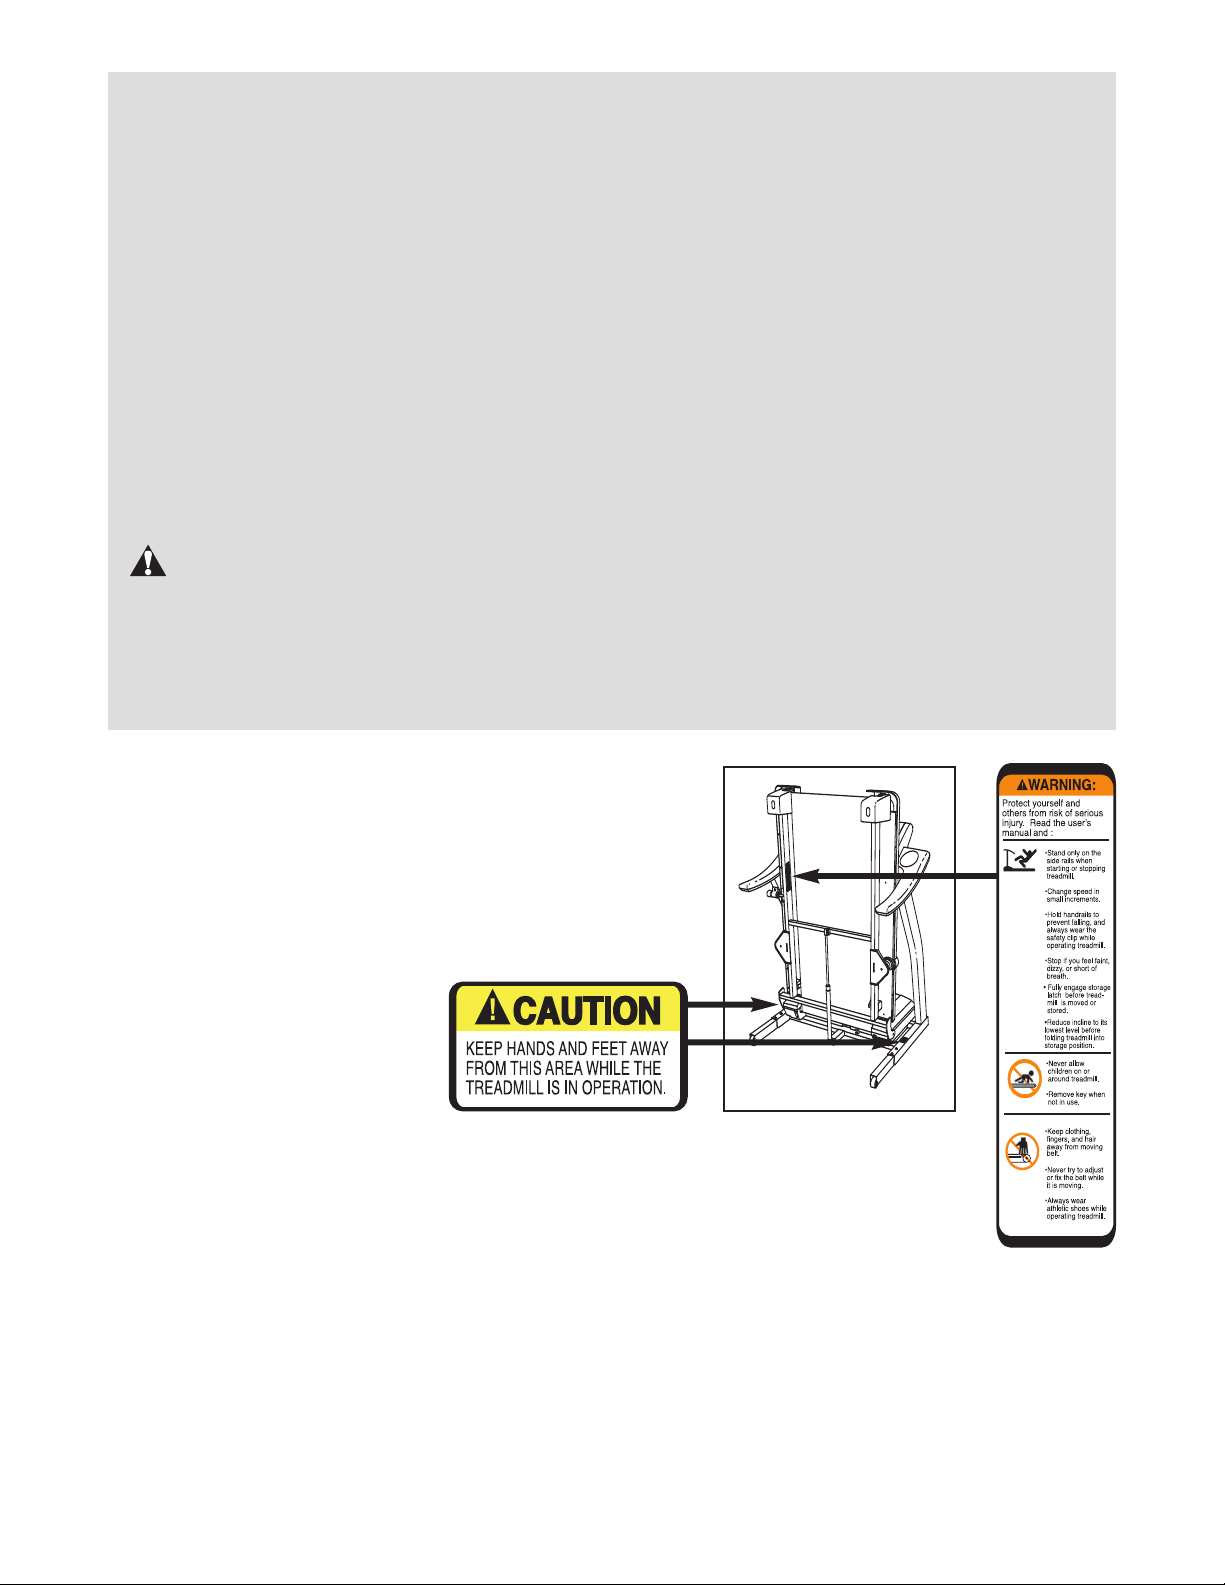
The decals shown at the right have been placed on the
treadmill. If a decal is missing or illegible, call the telephone
number on the front cover of this manual and order a free replacement decal. Apply the decal in the location shown.
4
BEFORE YOU BEGIN
hank you for selecting the revolutionary HealthRider
T
600 treadmill. The H600 treadmill offers an impres-
H
sive array of features to help you achieve your fitness
goals in the convenience and privacy of your home.
And when you’re not exercising, the unique H600
treadmill can be folded up, requiring less than half the
floor space of conventional treadmills.
For your benefit, read this manual carefully before
using the treadmill. If you have questions after read-
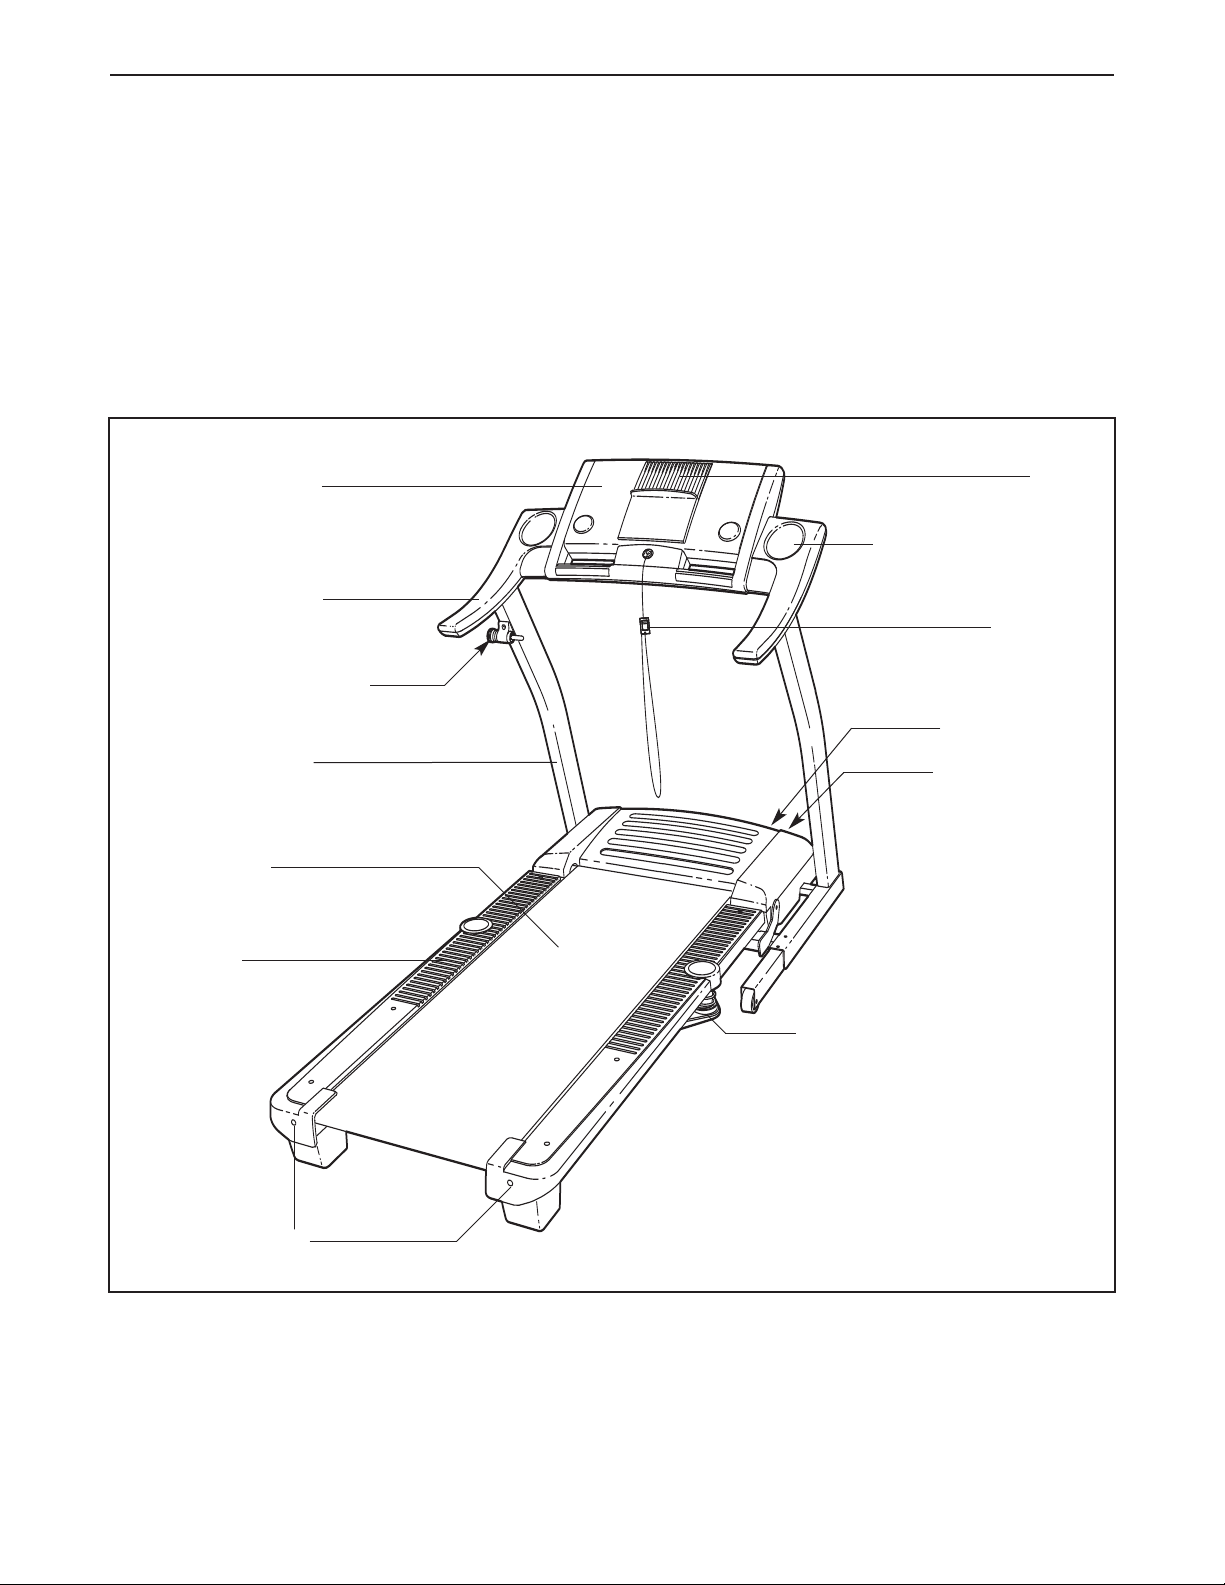
Console
Handrail
Storage Latch
®
ng this manual, see the front cover of this manual. To
i
elp us assist you, please note the product model
h
number and serial number before calling. The model
number of the treadmill is HATL61205.1. The serial
number can be found on a decal attached to the treadmill (see the front cover of this manual for the location).
Before reading further, please familiarise yourself with
the parts that are labelled in the drawing below.
Water Bottle Holder
(no bottle is included)
Key/Clip
On/Off Switch
Fan
Upright
Walking Belt
Foot Rail
BACK
Rear Roller
Adjustment Bolts
Circuit Breaker
Cushioned Walking Platform
for maximum exercise comfort
RIGHT SIDE
5
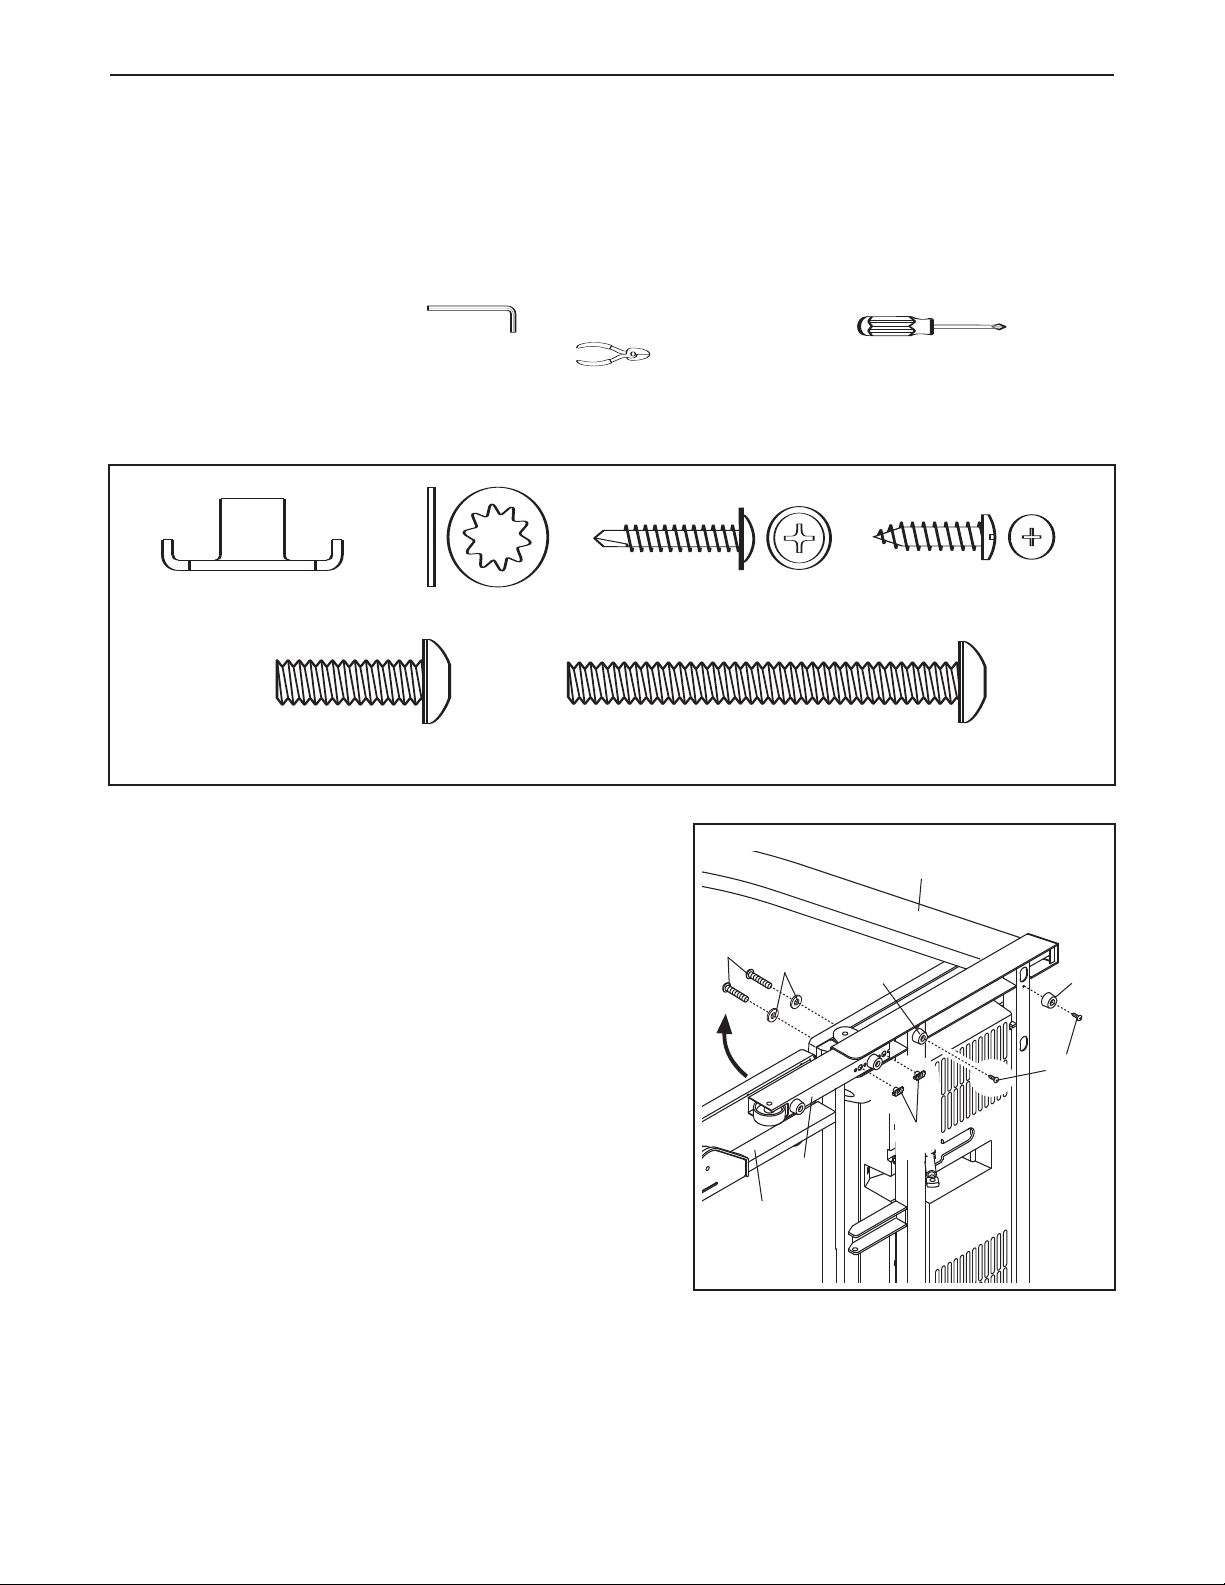
ASSEMBLY
W
heel Nut (13)–2
1” Tek Screw (83)–4
2
Extension Leg Bolt (96)–4
3
Star Washer (8)–8
Console Bolt (64)–4
Extension Leg Nut (67)–4
3/4” Screw (3)–2
Extension Leg Bolt (65)–4
Extension Leg Bolt (96)–4
ssembly requires two persons.Set the treadmill in a cleared area and remove all packing materials. Do not
A
dispose of the packing materials until assembly is completed. Note: The underside of the treadmill walking belt is
coated with high-performance lubricant. During shipping, a small amount of lubricant may be transferred to the
top of the walking belt or the shipping carton. This is a normal condition and does not affect treadmill performance. If there is lubricant on top of the walking belt, simply wipe off the lubricant with a soft cloth and a mild,
non-abrasive cleaner.
Assembly requires the included hex key and your own phillips screwdriver (with a
shaft at least 15 cm [6 in.] long) and wire cutters .
Use the drawings below to identify the hardware used during assembly. Note: If a part is not in the parts bag,
check to see if it has been preattached to one of the parts to be assembled.
1. Make sure that the power cord is unplugged.
With the help of a second person, carefully tip the
treadmill onto its left side as shown. Partially fold the
Frame (58) so the treadmill is more stable. Do not fully
fold the treadmill until it is completely assembled.
Insert an Extension Leg (89) into the base of the Uprights
(84) as shown. Next, hold two Extension Leg Nuts (67) in
the bottom of the Extension Leg. Then, insert two
Extension Leg Bolts (65) with Star Washers (8) into the
top of the Extension Leg, and firmly tighten the Extension
Leg Bolts into the Extension Leg Nuts.
With the help of a second person, carefully tip the treadmill onto its other side. Attach the other Extension Leg
(not shown) as described above.
Attach four Base Pads (82) (only two are shown) to the
base of the Uprights (84) with four 1” Tek Screws (83).
1
65
8
89
58
82
84
82
83
67
6
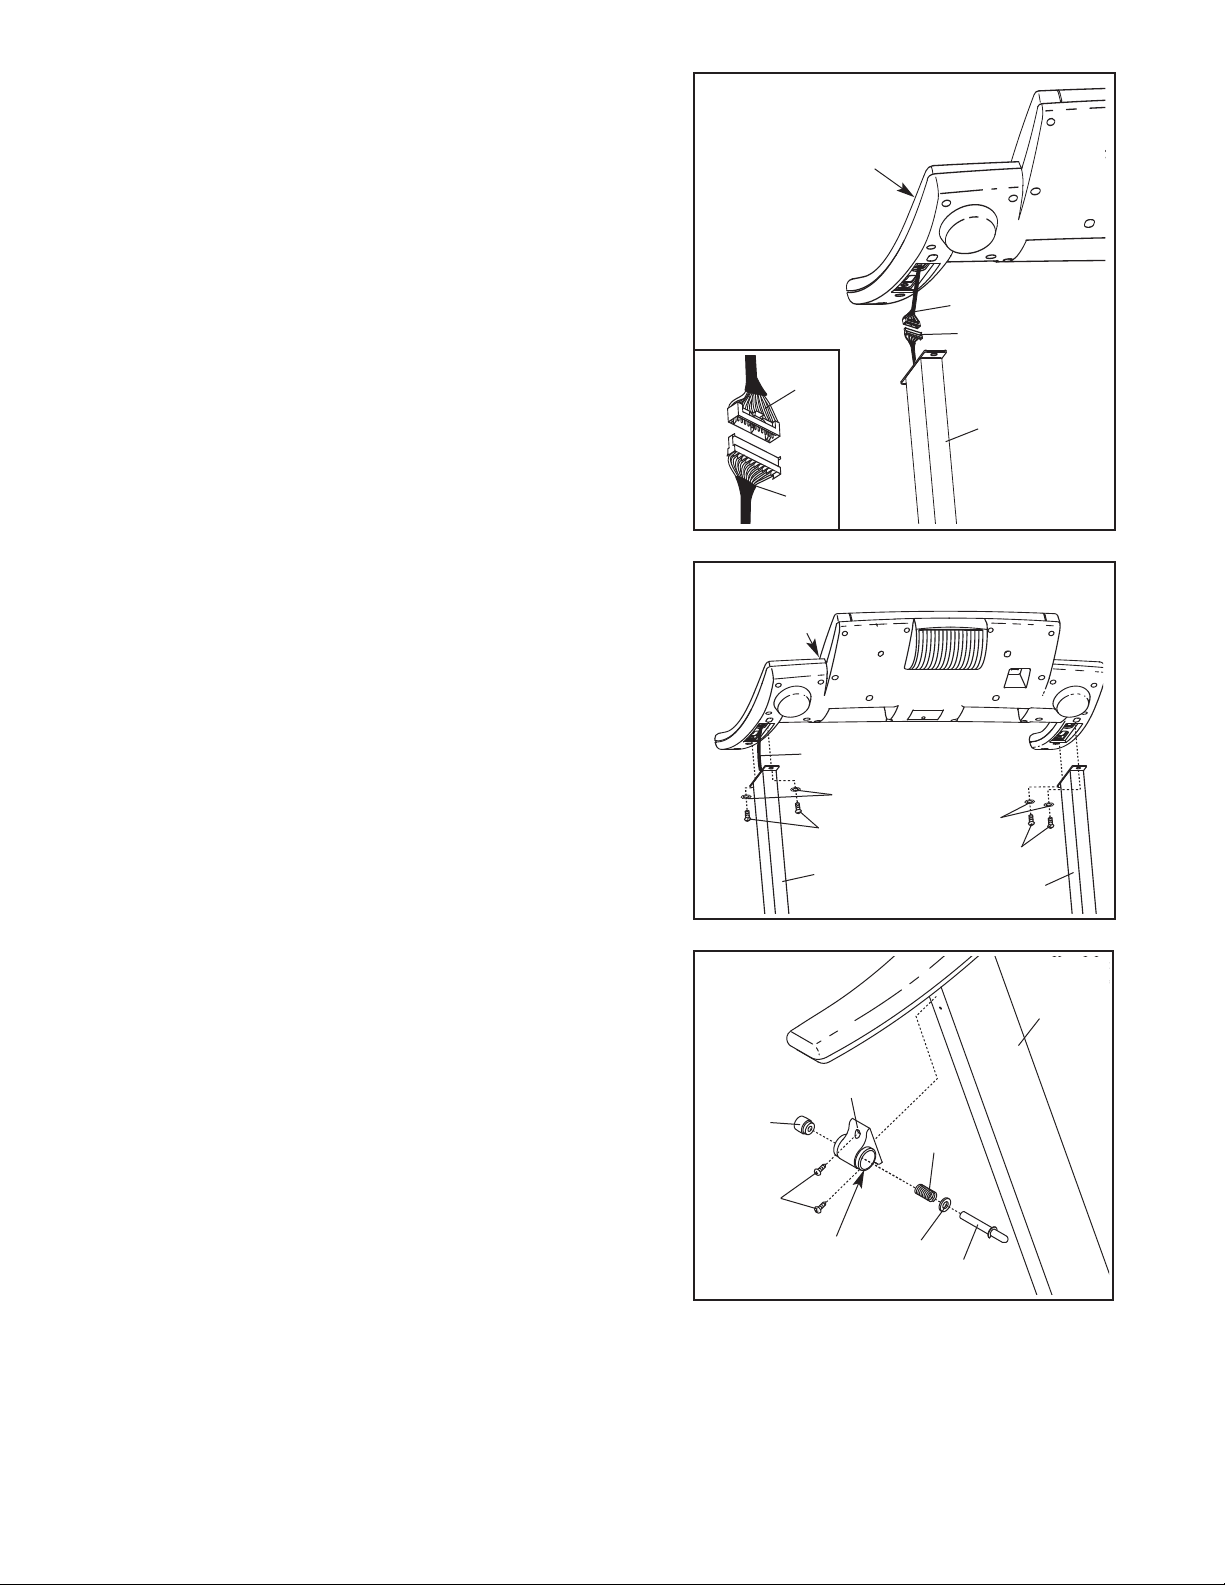
. With the help of a second person, carefully raise the
2
Uprights (84) to a vertical position.
Have the second person hold the console assembly near
the Uprights (84) as shown. Look under the console assembly and locate the Console Wire Harness (78).
Cut the plastic ties securing the Upright Wire Harness
(77) to the right Upright (84). Next, connect the Upright
Wire Harness to the Console Wire Harness (78).
sure to connect the connectors properly (see the
inset drawing). The connectors should slide together
easily and snap into place.
slide together easily and snap into place, turn one connector and then try again. IF THE CONNECTORS ARE
NOT CONNECTED PROPERLY, THE CONSOLE MAY
BE DAMAGED WHEN THE POWER IS TURNED ON.
If the connectors do not
Make
2
Console
Assembly
78
77
78
84
77
3. Insert the Wire Harnesses (77, 78) down into the right
Upright (84).
Set the console assembly on the Uprights (84). Be care-
ful to avoid pinching the Wire Harnesses (77, 78).
Whilst a second person holds the console assembly, attach it with four Console Bolts (64) and four Star Washers
(8) as shown; start all four Console Bolts and then
firmly tighten them.
4. Orient the Latch Housing (73) so the large hole is on the
indicated side. Attach the Latch Housing to the left
Upright (84) with two 3/4” Screws (3);
Screws and then tighten them.
Remove the knob from the pin. Make sure that the collar
and the spring are on the pin. (Note: If there are two collars, place one on each side of the spring.) Next, insert
the pin into the Latch Housing (73). Then, tighten the
knob back onto the pin.
Plug in the power cord as described on page 10, and
turn on the power as described on page 12. Note: The
treadmill may automatically rise to the maximum incline
level and then return to the minimum level.
start both Latch
3
Console
Assembly
4
Knob
3
77, 78
64
84
Large
Hole
8
8
64
84
84
73
Spring
Collar
Pin
7
. Place the treadmill in the storage position (see HOW TO
5
FOLD AND MOVE THE TREADMILL on page 25).
5
103
Next, place the cylinder end of the Shock (108) near the
racket on the base of the Uprights (84).
b
See the two small inset drawings. Using your fingernail
or the end of a screwdriver, press on the end of the
Shock Pin (103) to loosen it from the Shock (108). Next,
rotate the Shock Pin and pull it out of the Shock.
careful to avoid losing the Shock Pin.
See drawing 5a. Press the cylinder end of the Shock
(108) onto the ball on the bracket. Next, insert the end of
the Shock Pin (103) through two of the small holes in the
end of the Shock. Then, rotate the Shock Pin until it clips
onto the Shock.
Raise the Shock (108) to a vertical position. Remove the
6.
Shock Pin (103) from the raised end of the Shock as described in step 5. If necessary, rotate the Shock to align
the end of the Shock with the ball on the bracket on the
Frame (58).
Next, press the Incline increase and decrease buttons
until the ball on the bracket is aligned with end of the
Shock (108). Then, press the end of the Shock onto the
ball. Note: It may be necessary to press the end of the
Shock onto the ball whilst the Frame is moving.
See drawing 6a. Insert the Shock Pin (103) into the two
indicated small holes in the end of the Shock (108).
Then, rotate the Shock Pin until it clips onto the Shock.
Note: Extra Shock Pins are included.
Be
5a
6
6a
108
84
108
103
Holes
103
58
103
Bracket
Bracket
103
Bracket
108
Press the Incline decrease button until the treadmill is at
the lowest incline level. Then, unplug the power cord.
7. Make sure that all parts are properly tightened before you use the treadmill. If there are sheets of clear
plastic on the treadmill decals, remove the plastic. To protect the floor or carpet, place a mat under the treadmill. Note: Extra hardware may be included. Keep the included hex key in a secure place; the large hex key is
used to adjust the walking belt (see page 28).
103
108
8

HOW TO USE THE CHEST PULSE SENSOR
OW TO PUT ON THE CHEST PULSE SENSOR
H
he chest pulse sensor consists of two components:
T
the chest strap and the sensor unit (see the drawing
below). Insert the tab on one end of the chest strap into
the hole in one end of the sensor unit, as shown in the
inset drawing. Press the end of the sensor unit under
the buckle on the chest strap. The tab should be flush
with the front of the sensor unit.
Chest Strap
Tabs
Tab
Sensor Unit
Next, wrap the chest
pulse sensor around
your chest and attach
the other end of the
chest strap to the
sensor unit. Adjust
the length of the
chest strap, if necessary. The chest pulse
sensor should be under your clothes, tight against your
skin, and as high under the pectoral muscles or
breasts as is comfortable. Make sure that the logo on
the sensor unit is facing forward and is right-side-up.
Sensor
Unit
Buckle
Store the chest pulse sensor in a warm, dry place.
•
Do not store the chest pulse sensor in a plastic bag
r other container that may trap moisture.
o
• Do not expose the chest pulse sensor to direct sun-
ight for extended periods of time; do not expose it to
l
temperatures above 50° C (120° F) or below -10° C
(15° F).
• Do not excessively bend or stretch the sensor unit
when using or storing the chest pulse sensor.
• Clean the sensor unit using a damp cloth—never
use alcohol, abrasives, or chemicals. The chest
strap may be hand washed and air dried.
CHEST PULSE SENSOR TROUBLESHOOTING
The instructions on the following pages explain
how the chest pulse sensor is used with the console. If the chest pulse sensor does not function
properly, try the steps below.
• Make sure that you are wearing the chest pulse sensor as described at the left. Note: If the chest pulse
sensor does not function when positioned as described, move it slightly lower or higher on your chest.
• Use saline solution such as saliva or contact lens
solution to wet the two electrode areas on the sensor
unit. If heart rate readings do not appear until you
begin perspiring, rewet the electrode areas.
• As you walk or run on the treadmill, position yourself near the centre of the walking belt. For the con-
sole to display heart rate readings, the user must
be within arm’s length of the console.
Next, pull the sensor unit away from your body a few
inches and locate the two electrode areas on the inner
side (the electrode areas are covered by shallow
ridges). Using saline solution such as saliva or contact
lens solution, wet both electrode areas. Return the
sensor unit to a position against your chest.
CHEST PULSE SENSOR CARE AND MAINTENANCE
• Thoroughly dry the chest pulse sensor after each
use. The chest pulse sensor is activated when the
electrode areas are wetted and the heart rate
monitor is put on; the chest pulse sensor shuts off
when it is removed and the electrode areas are
dried. If the chest pulse sensor is not dried after
each use, it may remain activated longer than necessary, draining the battery prematurely.
The chest pulse sensor is designed to work with
•
people who have normal heart rhythms. Heart rate
reading problems may be caused by medical conditions such as premature ventricular contractions
(pvcs), tachycardia bursts, and arrhythmia.
• The operation of the chest pulse sensor can be affected by magnetic interference caused by high
power lines or other sources. If it is suspected that
this is a problem, try relocating the treadmill.
• The CR2032 battery may need to be replaced (see
page 29).
9
OPERATION AND ADJUSTMENT
THE PRE-LUBRICATED WALKING BELT
Your treadmill features a walking belt coated with high-performance lubricant. IMPORTANT: Never apply silicone spray or other substances to the walking belt or the walking platform. Such substances will deterio-
ate the walking belt and cause excessive wear.
r
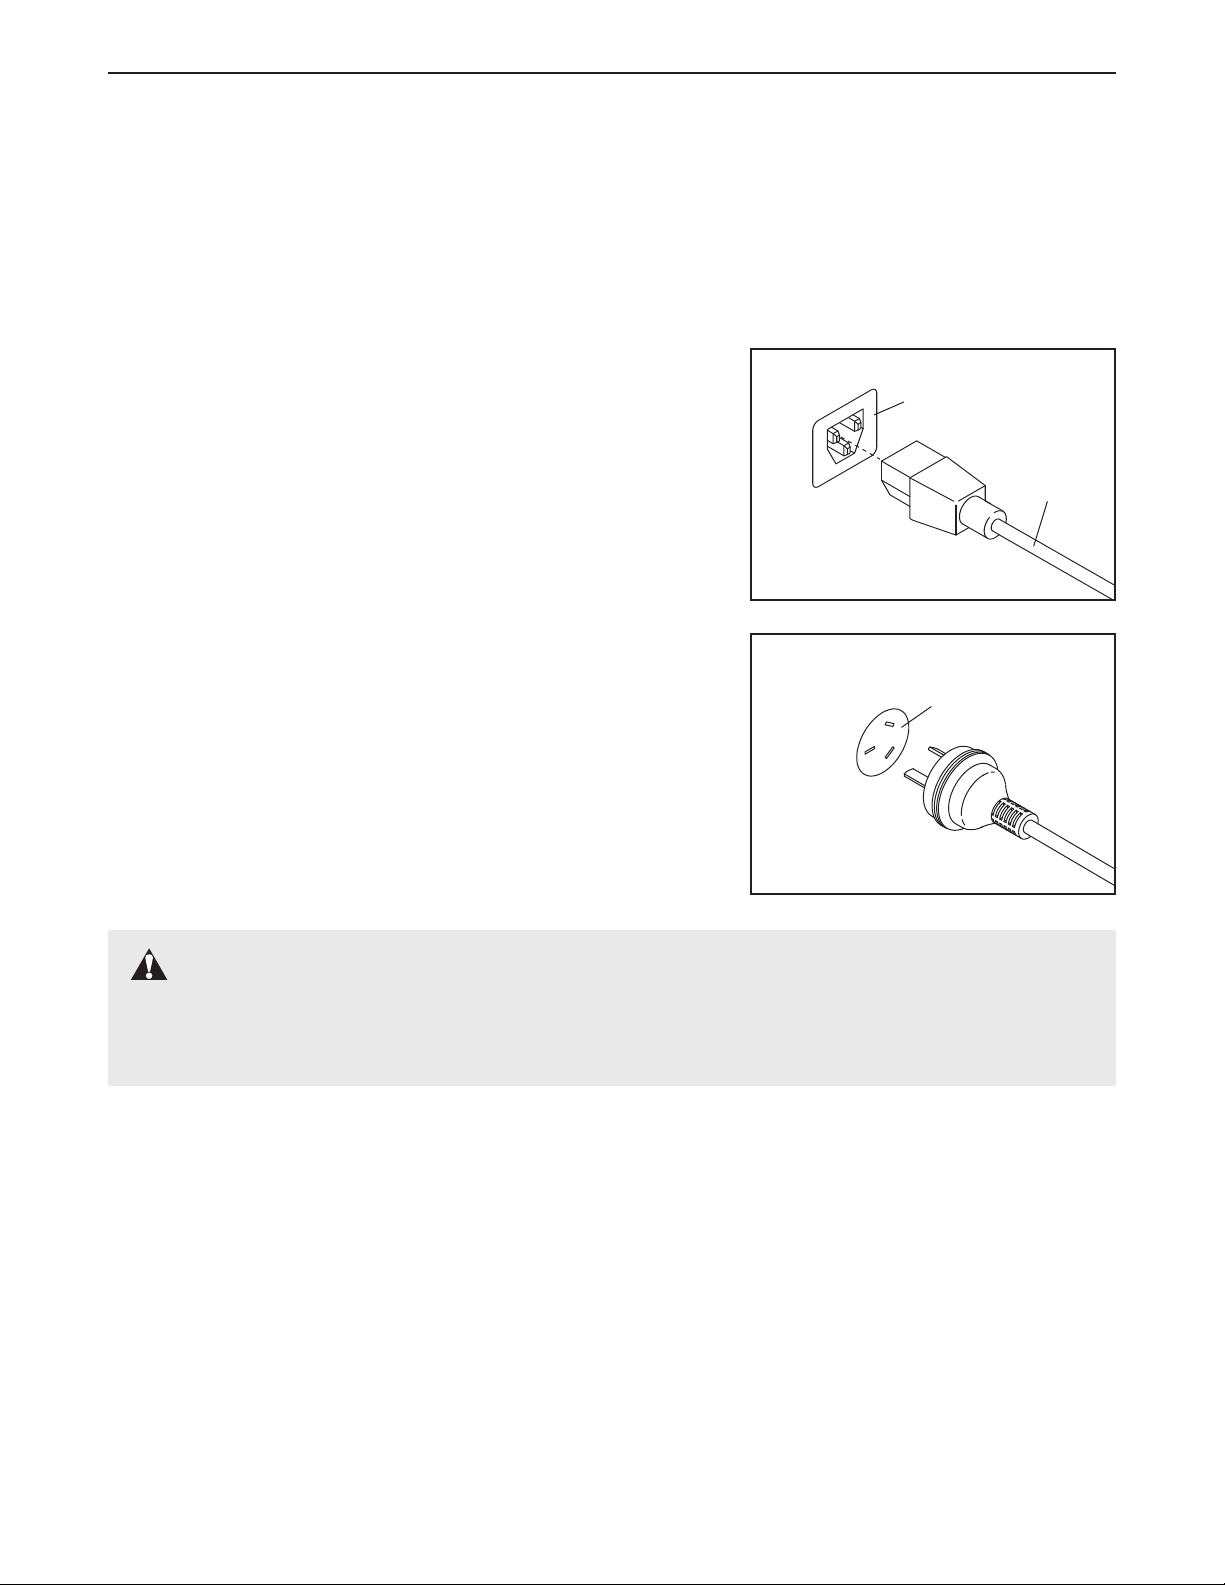
HOW TO PLUG IN THE POWER CORD
This product must be earthed.
down, earthing provides a path of least resistance for electric current to reduce the risk of electric shock. This product is equipped
with a power cord having an equipment-earthing conductor and an
earthing plug.
be replaced with a manufacturer-recommended power cord.
See drawing 1. Plug the indicated end of the power cord into the
socket on the treadmill.
See drawing 2. Plug the power cord into an appropriate outlet that is
properly installed and earthed in accordance with all local codes and
ordinances.
GFCI-equipped outlets.
Important: If the power cord is damaged, it must
Important: The treadmill is not compatible with
If it should malfunction or break
1
Socket on Treadmill
Power
Cord
2
Outlet
DANGER: Improper connection of the equipment-earthing conductor can result in an in-
creased risk of electric shock. Check with a qualified electrician or serviceman if you are in doubt as
to whether the product is properly earthed. Do not modify the plug provided with the product—if it will
not fit the outlet, have a proper outlet installed by a qualified electrician.
10
Key
Clip
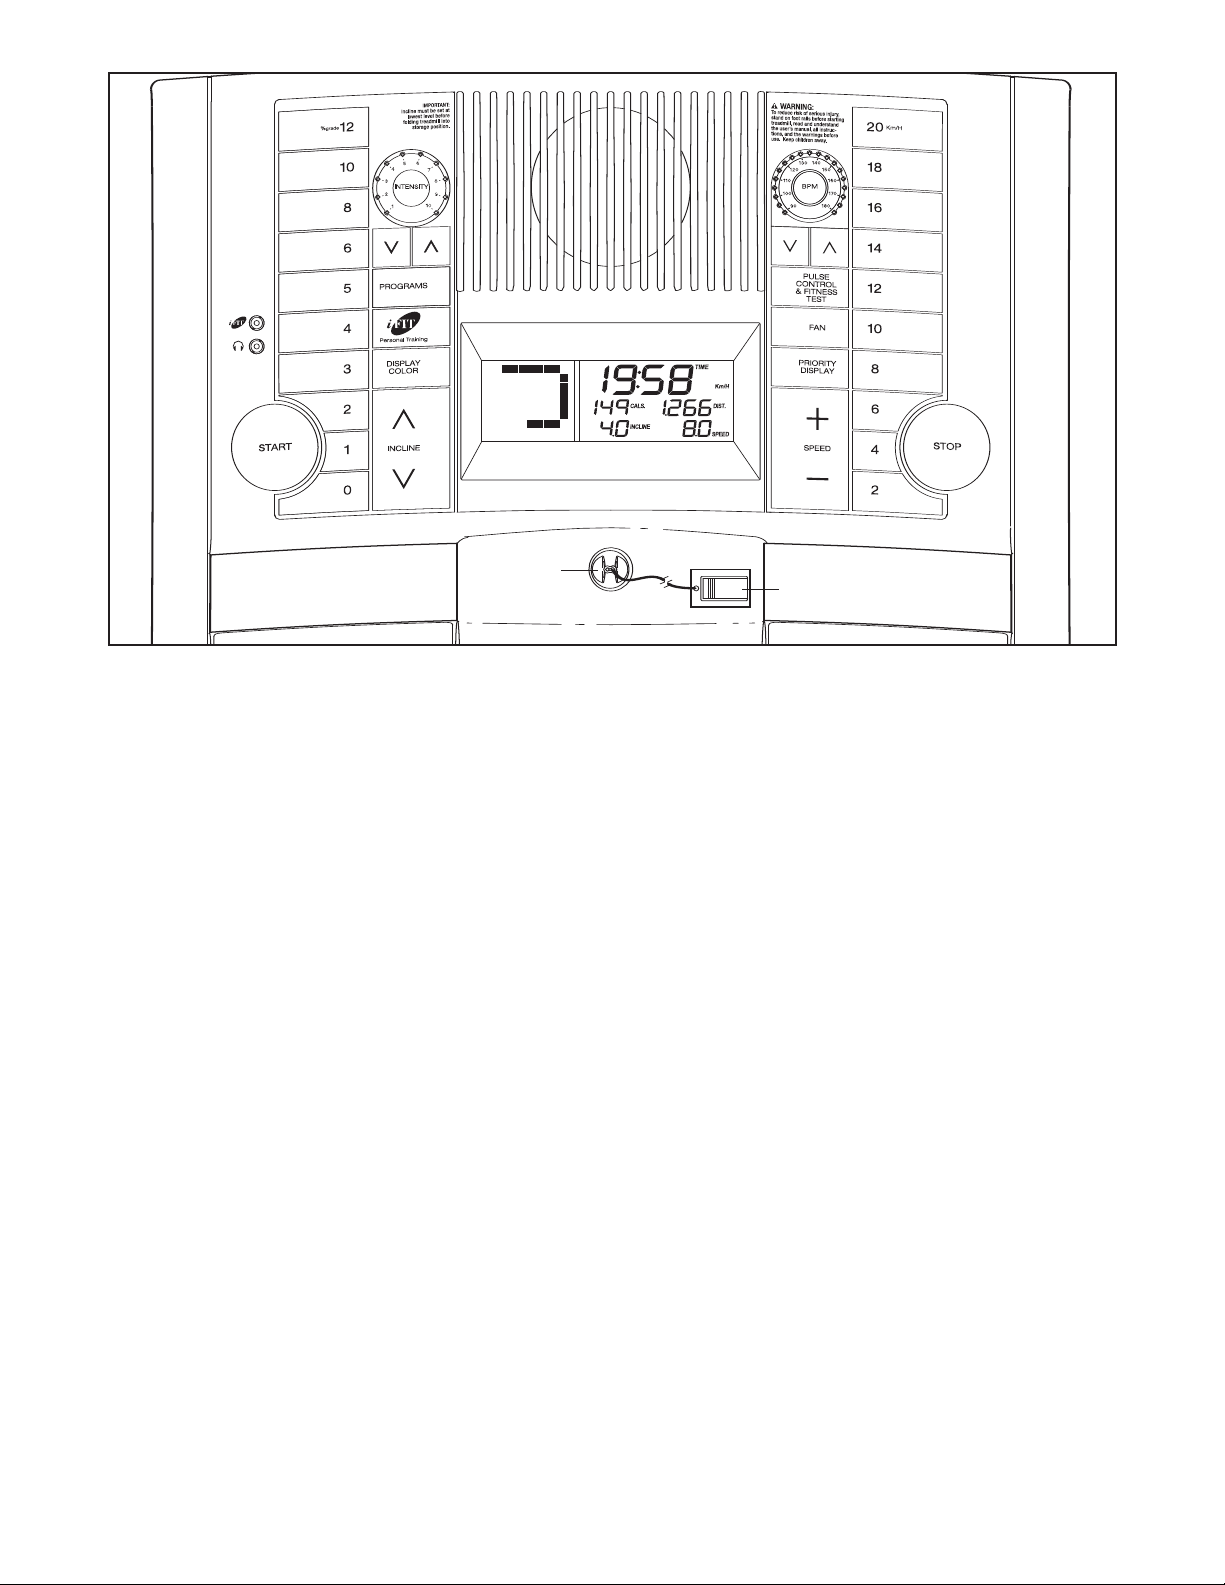
FEATURES OF THE CONSOLE
The treadmill console offers an impressive array of
features designed to make your workouts more effective. When the manual mode of the console is selected, you can change the speed and incline of the
treadmill with the touch of a button. As you exercise,
the console will display continuous exercise feedback.
You can even measure your heart rate using the handgrip pulse sensor or the chest pulse sensor.
In addition, the console features 20 preset programs.
Each preset program automatically controls the speed
and incline of the treadmill as it guides you through an
effective workout. The console also offers four pulse
programs that control the speed and incline of the
treadmill to keep your heart rate near target heart rate
settings during your workouts. In addition, a fitness test
program measures your VO
The console also features iFIT.com interactive technology. Having iFIT.com technology is like having a per
sonal trainer in your home. Using the included audio
cable, you can connect the treadmill to your portable
stereo, home stereo, computer, or VCR and play special iFIT.com MP3, CD, and video programs (iFIT.com
MP3 programs, CDs, and videocassettes are available
max, or aerobic capacity.
2
-
separately). Each iFIT.com program automatically controls the speed and incline of the treadmill as a personal trainer guides you through every step of your
workout; high-energy music provides added motivation.
To download iFIT.com MP3 programs, go to
www.iFIT.com. To purchase iFIT.com CDs or videocassettes, call the telephone number on the front
cover of this manual.
With the treadmill connected to your computer, you
can also go to www.iFIT.com and access iFIT.com
programs directly from our Web site. See
www.iFIT.com for more information.
To use the manual mode of the console, follow the
steps beginning on page 12. To use a preset program, see page 14. To use a pulse program, see
page 16. To use the fitness test program, see page
18. To use an iFIT.com MP3, CD, or video program,
see page 21. To use an iFIT.com program directly
from our Web site, see page 23.
Note: If there is a sheet of clear plastic on the face
of the console, remove the plastic. To prevent damage to the walking platform, always wear clean
shoes whilst using the treadmill.
1
1
 Loading...