

Page 1
PORTROD
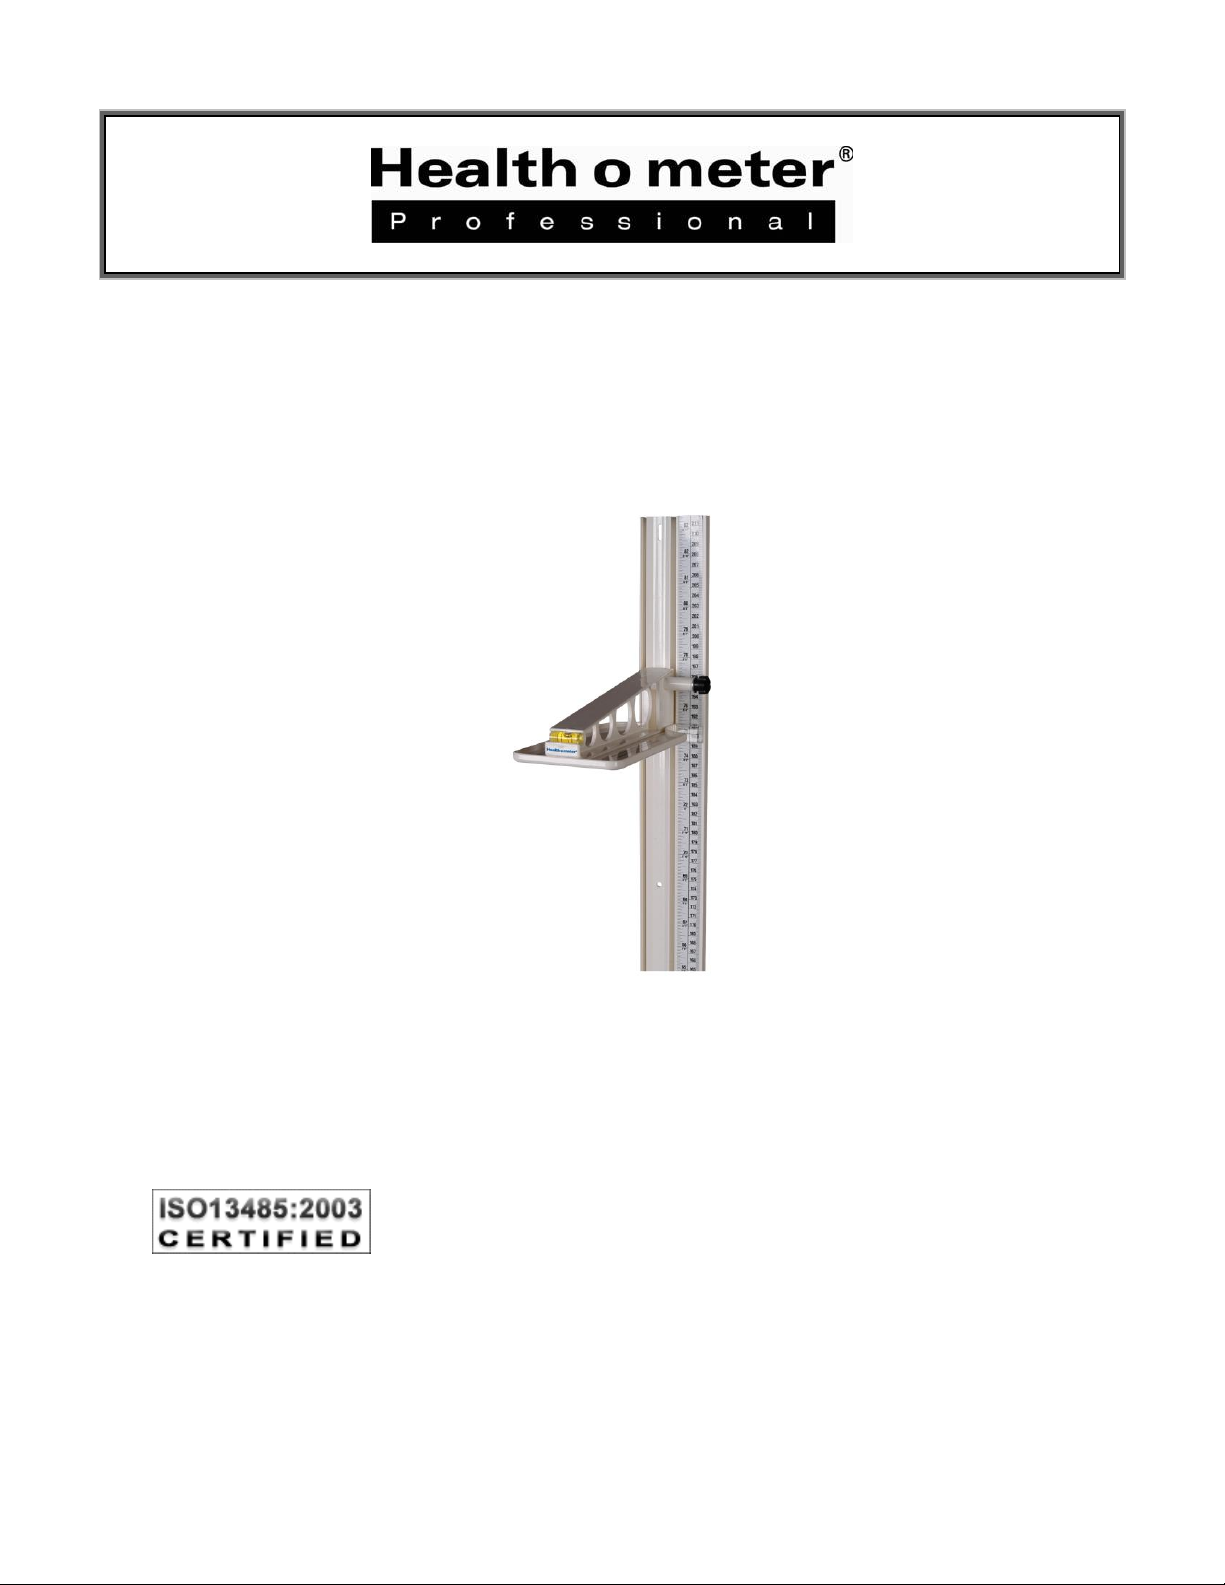
WALL MOUNTED HEIGHT ROD
P/N UMPORTROD Rev20160818
USER INSTRUCTIONS
1
Page 2

PORTROD
Thank you for your purchase of this Health o meter® Professional product. Please read this manual
carefully, and keep it for easy reference or training.
TABLE OF CONTENTS
CAUTIONS AND WARNINGS ............................................................................................. 3
SPECIFICATIONS .............................................................................................................. 3
CERTIFICATIONS / DISPOSAL / SERVICE ....................................................................... 4
WALL MOUNT INSTRUCTIONS ......................................................................................... 5
HEIGHT MEASUREMENT INSTRUCTIONS ....................................................................... 10
MAINTENANCE .................................................................................................................. 11
WARRANTY ........................................................................................................................ 12
Please register your product for warranty coverage at:
www.homscales.com
For User Instructions updates and revisions please go to:
www.homscales.com
2
Page 3

CAUTIONS AND WARNINGS
SPECIFICATIONS
Height Range
PORTROD: Max 213cm (83”) / Min 60cm (23-5/8”)
Environmental
Operating temperatures: 5°C to 40°C (41°F to 104°F)
Storage temperatures: 0°C to 50°C (32°F to 122°F)
Atmospheric Pressure: 500hPa to 1060hPa
Maximum Humidity: 85% RH in use or in storage
Graduation
PORTROD: 1/16” / 1 mm
Physical Dimensions
PORTROD:
Width: 7cm (2.75”)
Depth: 1.3cm (0.50”)
Height: 152.4cm (60.0”)
To prevent injury and damage to your product, please follow these instructions very carefully.
Do not transport the PORTROD while the headpiece is attached.
Be sure the PORTROD is placed on a flat, stable surface when it is being cleaned or being assembled.
For accurate measurement, the PORTROD must be placed on a stable wall surface.
For accurate measurement, verify proper operation according to the procedure described in this manual
before each use.
Do not use in the presence of flammable materials.
When not in use, raise headpiece to a high position, or have it removed and stored.
When wall mounting the PORTROD, ensure that the mounting location is free of electrical lines, gas pipes,
and other safety hazards. Ensure that wall is of construction that can support the PORTROD.
To prevent patient injury, the patient must be attended throughout the entire measuring event.
GENERAL
The PORTROD Wall Mounted Height Rod has a large headpiece and features a clear indicator, which allows
for accurate measurement of a patient’s height. Each PORTROD is designed to provide accurate, reliable, and
repeatable height measurements, and includes features that make the process of measuring a patient’s height
simple, fast, and convenient. Each PORTROD is set up to determine the height of a stationary patient. Height is
displayed in centimeters (cm), inches (in), and feet/inches.
PORTROD SPECIFICATIONS
3
Page 4
CERTIFICATIONS / DISPOSAL / SERVICE
CERTIFICATION DESCRIPTIONS
Pelstar, LLC has been officially certified as a manufacturer of
Health o meter® Professional medical devices to be in
compliance with stringent ISO requirements. The Pelstar, LLC
quality assurance system covers the development,
production, sales and service of medical scales and
measuring systems.
PORTROD DISPOSAL
This Health o meter® Professional product must be disposed of properly. Follow the national,
regional or local regulations which apply to you for disposal of domestic waste.
SERVICE INFORMATION
The PORTROD Wall Mounted Height Rod Kit is shipped disassembled in one carton. Carefully
inspect the carton for shipping damage before unpacking. If damage is found, contact Customer
Service immediately.
For further information or telephone support, please contact a Health o meter® Professional
Customer Service representative at 1-800-815-6615.
4
Page 5

PORTROD WALL MOUNT INSTRUCTIONS
To avoid damaging the PORTROD when unpacking it, do not use a box cutter, knife, scissors or
any sharp object when opening the protective inner packaging. If damage is found, contact your
shipper or a Health o meter® Professional representative immediately. Claims must be filed with the
shipper as soon as possible after receipt of the package. The following information details what you will
find inside the carton as you unpack the parts for assembly. Set the carton aside for storage.
Parts List
Carton
(1) User instructions
(1) PORTROD (height rod channel)
(1) PORTROD headpiece
(2) Drywall anchors (use for drywall mounting only)
(3) Screws and washers (only 2 will be used for assembly)
Tools Required (not included)
Drill, 5mm (3/16") Drill bit (if mounting on drywall), 1.5mm (1/16”) drill bit (if mounting on wood, wood
studs or metal), Tape measure, Level
5
Page 6

PORTROD WALL MOUNT INSTRUCTIONS (CONT.)
1. Measure 23-5/8” (60cm) from the floor and
mark with a pencil.
2. Align the bottom of the height rod channel at
the 23-5/8” (60cm) marked location. While
holding the height rod in place, mark the wall
in the center of the 2nd hole from the top
(round hole).
3. Once the hole is marked, set aside the
height rod.
- If mounting to drywall, use a 5mm (3/16”)
drill bit to drill a lead hole into the marked
location.
- If mounting to wood, wood studs or metal,
use a 1.5mm (1/16”) drill bit to drill a lead
hole into the marked location.
5mm (3/16”) drill bit for
mounting on drywall
1.5mm (1/16”) drill bit
for mounting on wood,
wood studs or metal
PORTROD Preparation
1. Carefully remove the product from the carton, and place on a flat and dry surface.
2. Unfold the PORTROD and ensure that the upper and lower parts align.
Note: Half the measuring strip is attached to the PORTROD. Do NOT attach the remaining half at
this point.
Caution: When wall mounting the PORTROD, ensure that the mounting location is free of
electrical lines, gas pipes, and other safety hazards. Ensure that wall is of construction that
can support the PORTROD.
Wall Mounting Instructions
6
Page 7

PORTROD WALL MOUNT INSTRUCTIONS (CONT.)
4. If mounting to drywall, obtain one of the
included drywall anchors and set the drywall
anchor into the drilled hole in the wall.
If mounting on wood, wood studs or Note:
metal, you do not need to install drywall
anchors and can skip to the next step.
5. Reposition the height rod channel against
the wall, lining up the 2nd round hole with
the inserted drywall anchor or drilled lead
hole. Insert the screw with washer (for wood
mounting) or drywall anchor screw (for
drywall mounting) through the front of the
height rod channel into the drywall anchor
or the drilled lead hole. Tighten the screw
until the height rod channel is held gently
against the wall while still allowing it to
swing freely from side to side.
6. Using a level, make sure the height rod
channel is plumb/straight. Mark the other
round hole (2nd hole from the bottom of the
height rod channel).
7
Page 8

PORTROD WALL MOUNT INSTRUCTIONS (CONT.)
7. Swing the height rod channel to the side to
drill a lead hole into the marked location. If
mounting to drywall, obtain the remaining
drywall anchor and insert the anchor into
the wall.
8. Swing the height rod channel back to its
vertical position. Align the hole with the
inserted drywall anchor or drilled lead hole
and insert the screw. Tighten the top screw
until height rod is held firmly against the
wall.
9. Once the height rod channel is secured to
the wall, peel away the adhesive backing on
the measuring strip and affix to the height
rod channel.
8
Page 9

PORTROD WALL MOUNT INSTRUCTIONS (CONT.)
10. Obtain the headpiece from the carton. Align
the grooves at the back of the headpiece
with the grooves at the top of the height rod.
Gently lower the headpiece onto the height
rod. The tension knob may need to be
loosened to allow the headpiece to slide
onto the height rod channel.
11. Tighten the tension knob to keep the
headpiece in place on the height rod
channel. The height rod is now ready for
use.
12. If the headpiece is not moving smoothly
along the height rod, loosen the black
tension knob. If the headpiece moves too
freely, tighten the tension knob. Warning:
Ensure that the tension knob bolt on the
side of the headpiece is properly engaged.
If the bolt is too loose or over-tightened the
headpiece will not function properly. Do
NOT use tools to tighten the tension knob.
Tension Knob
Tension Knob
Bolt
9
Page 10

HEIGHT MEASUREMENT INSTRUCTIONS
1. Loosen the black knob located on the right
side of the headpiece. Slide the headpiece
above the estimated height of the patient.
2. Position the patient with their back against
the height rod and their heels touching the
wall. Ensure that the patient’s posture is
upright, and that the patient’s head is straight
and level. Slide the headpiece down until it
rests gently on the patient’s head and turn the
black knob to tighten it.
3. Determine the patient’s height by reading the
value on the measuring tape nearest to the
line on the clear indicator. The clear indicator
is located on the right side of the headpiece.
height indicator line
Note: A patient needs to be a minimum of 60cm (23-5/8”) in height for the height to be accurately
measured.
10
Page 11

MAINTENANCE
Part #
Description
PORTRODHP
Portrod Headpiece
PORTRODTAPE
Portrod Measuring Tape
Maintenance
The following page provides instructions for maintenance and cleaning for the PORTROD product.
Maintenance operations, other than those described in this manual, should be performed by
qualified service personnel.
Caution: Before first use, or after long periods of non-use, check the product for proper
operation and function. If the PORTROD does not operate correctly, refer to qualified
service personnel.
1. Check overall appearance of the PORTROD for any obvious damage or wear and tear.
Cleaning
Proper care and cleaning is essential to ensure a long life of accurate and effective operation.
1. Clean all external surfaces with a clean damp cloth or tissue. Mild antimicrobial or antibacterial
soap and water solution may be used. Dry with a clean soft cloth. Do not use abrasive cleaners.
2. Do not use Isopropyl Alcohol or other solutions to clean the surface.
Replacement Parts
Replacement parts are available if the height rod needs to be repaired. Contact Health o meter
Professional Scales Customer Service at 1-800-815-6615 to inquire about the availability of these
replacement parts.
11
Page 12

WARRANTY
Limited Warranty
What does the Warranty Cover?
This Health o meter® Professional product is warranted from date of purchase against defects of materials or in
workmanship for a period of one (1) year. If product fails to function properly, return the product, freight prepaid
and properly packed to Pelstar, LLC (see “To Get Warranty Service”, below, for instructions). If the
manufacturer determines that a defect of material or in workmanship exists, the customer’s sole remedy will be
replacement of the product at no charge. Replacement will be made with a new or remanufactured product or
component. If the product is no longer available, replacement may be made with a similar product of equal or
greater value. All replaced parts are covered only for the original warranty period.
Who is Covered?
The original purchaser of the product must have proof of purchase to receive warranty service. Please save
your invoice or receipt. Pelstar dealers or retail stores selling Pelstar products do not have the right to alter, or
modify or any way change the terms and conditions of this warranty.
What is Excluded?
Your warranty does not cover normal wear of parts or damage resulting from any of the following:
negligent use or misuse of the product, use on improper voltage or current, use contrary to the operating
instructions, abuse including tampering, damage in transit, or unauthorized repair or alternations. Further, the
warranty does not cover natural disasters, such as fire, flood, hurricanes and tornadoes. This warranty gives
you specific legal rights, and you may also have other rights that vary from country to country, state to state,
province to province or jurisdiction to jurisdiction.
To get Warranty Service make sure you keep your sales receipt or document showing proof of
purchase. Call (+1) 800-638-3722 or (+1) 708-377-0600 to receive a return authorization (RA) number, which
must be included on the return label. Attach your proof of purchase to your defective product along with your
name, address, daytime telephone number and description of the problem. Carefully package the product and
send with shipping and insurance prepaid to:
Pelstar, LLC
Attention R/A#_____________
Return Department
9500 W. 55th St.
McCook, IL 60525
PELSTAR, LLC
9500 West 55th Street • McCook, IL 60525 • USA
1-800-638-3722 or 1-708-377-0600
PLEASE REGISTER YOUR PRODUCT FOR WARRANTY COVERAGE AT:
http://www.homscales.com/customers/registration.aspx
Health o meter® is a registered trademark of Sunbeam Products, Inc. used under license.
Health o meter® Professional products are manufactured, designed, and owned by Pelstar, LLC.
We reserve the right to improve, enhance, or modify Health o meter® Professional product features or specifications without
notice.
© Pelstar, LLC 2016
P/N UMPORTROD Rev20160818
12
 Loading...