

Page 1
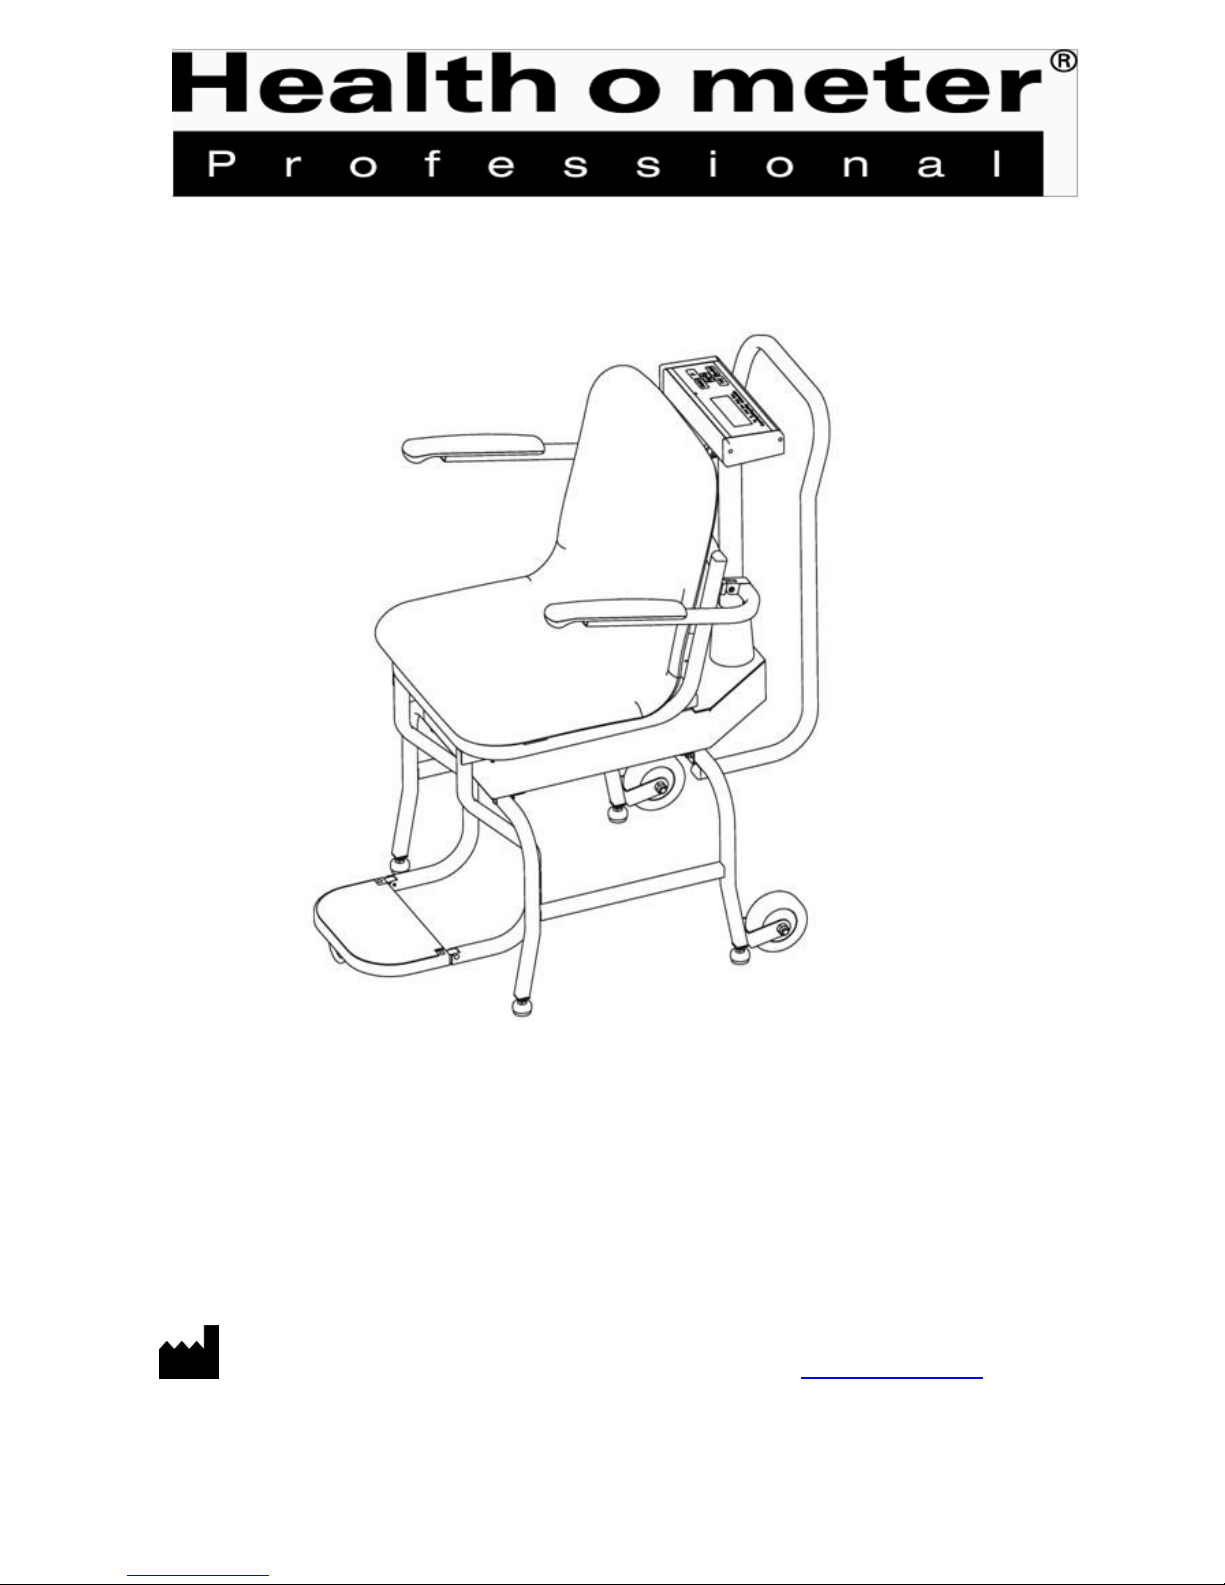
P/N UM594KL Rev: 20160308
ASSEMBLY & OPERATING INSTRUCTIONS
Please register your product at www.homscales.com
PELSTAR, LLC 9500 West 55th St. McCook, IL 60525-7110 USA www.homscales.com
DIGITAL CHAIR SCA
MODEL 594KL
© Pelstar, LLC 2016
LE
Page 2
2
Capacity and resolution
600 lb x 0.2 lb / 270 kg x 0.2 kg
Power Requirements
6 Volt Rechargeable battery, charger and battery included
Environmental
Operating temperatures: 5°C to 40°C (41°F to 104°F)
Storage temperature: -1°C to +52°C (30°F to 125°F)
Humidity: 85% rH
Chair
18 1/4” (w) x 15” (d) x 17 ½” (h)
Scale Dimensions
24 3/8” (w) x 32 ½” (d) x 36 ¾” (h) (Arm Width 20 1/2”)
MODEL: 594KL
Thank you for your purchase of this product. Please read this manual carefully and keep it handy for ready reference.
CAUTION AND WARNING ........................................................ 2
SCALE SPECIFICATIONS ........................................................ 2
SET UP ....................................................................................... 3
OPERATING INSTRUCTIONS .................................................. 3
PRESERVING BATTERY/PROGRAMMING AUTO-OFF
TIME..
3
MAINTENANCE.......................................................................... 3
T
ROUBLESHOOTING................................................................ 4
CALIBRATION PROCEDURE.................................................... 4
LIMITED WARRANTY................................................................ 5
To prevent injury and damage to your scale, please follow these instructions very carefully
Do not transport the scale while the chair is loaded.
For accurate weighing the scale must be placed on a flat, stable surface.
For accurate weighing, verify proper operation according to the procedure described in this manual before each use.
Do not use in the presence of flammable materials.
Operating at other voltages and frequencies than specified could damage the equipment.
Do not leave patient unattended in the chair.
Do not use chair scale in place of a wheelchair to transport patients.
Do not bounce scale down stairs, as doing so may damage internal parts.
Do not use the footrest as a step.
To maximize battery life, do not leave charger plugged into the scale for extended periods.
TABLE OF CONTENTS
GENERAL
Health o meter Professional’s Digital Chair Scale, model 594KL, uses sophisticated microprocessor technology. This precision instrument is
designed to provide accurate, reliable and repeatable weight measurements and features that make the weighing process simple, fast and
convenient. The scale is set up to determine the weight of a stationary patient. The weight can be displayed in pounds or in kilograms. The
unit can be operated using its 6 Volt rechargeable battery.
SCALE SPECIFICATIONS
Page 3
3
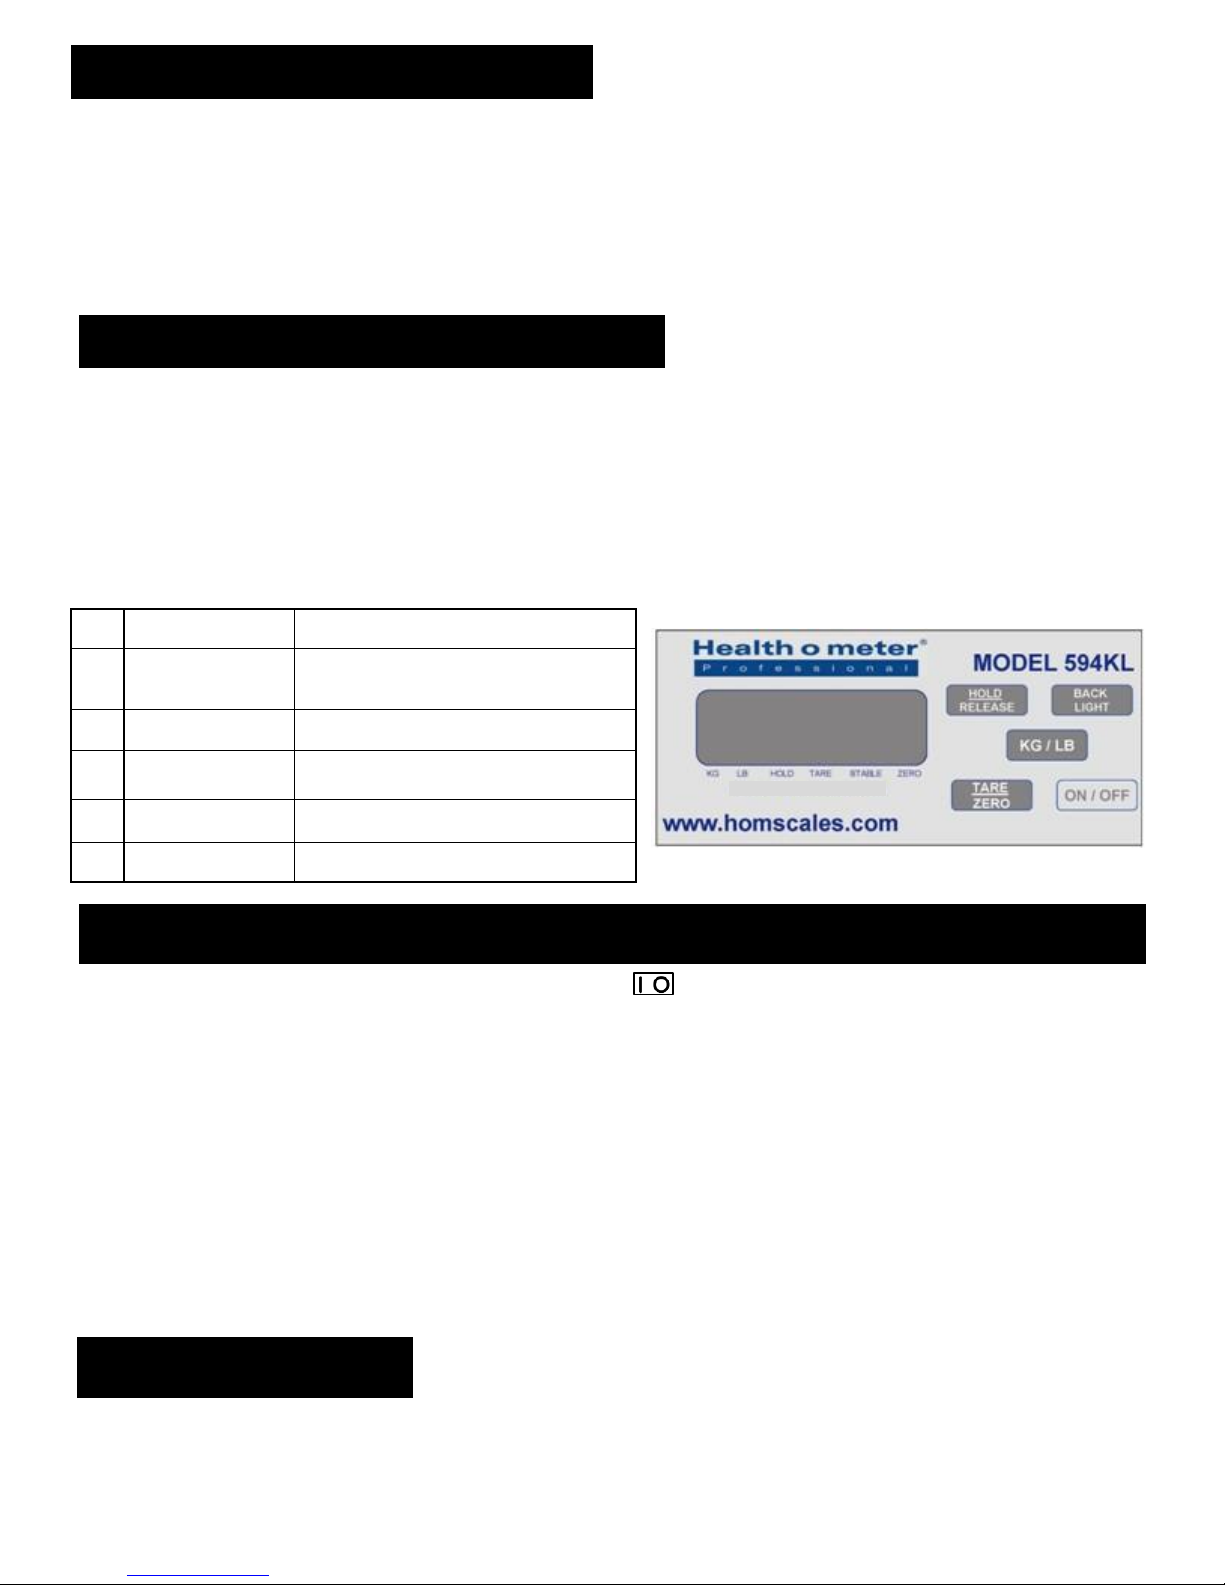
NO.
DESCRIPTION
FUNCTION
1.
HOLD / RELEASE
Holds the value of the weighed object on the
display until the button is pressed again to
2.
BACK LIGHT
Turns display back light on and off
3.
KG / LB
Pressing and holding button for 3 seconds
toggles between kilograms or pounds.
4.
TARE / ZERO
Zeros the scale prior to weighing or sets a tare
value.
5.
ON / OFF
Turns scale ON and OFF
PRESERVING BATTERY/PROGRAMMING AUTO-OFF
MAINTENANCE
Your scale is a precision instrument and should be handled accordingly. The Health o Meter Professional Digital Chair Scale is shipped
completely assembled, so no additional assembly required.
Some protective plastic, cardboard and foam will need to be removed before using.
1. Remove metal bands attached to small skid.
2. Remove cardboard at the front and the back end of the chair.
3. Remove protective foam and plastic cover on the display.
4. Plug the scale’s battery charger into the chair scale display and into a power source to charge the battery. The battery needs to be charged overnight
to gain full power. When charging, be sure the On/Off switch located on the side of the display is in the On “I” position. To maximize battery life, do not
leave charger plugged into the scale for extended periods.
1. Make sure the scale is on a hard, level surface before using.
2. Press the ON / OFF button to turn on the scale.
3. The indicator will start the initialization coun t from 000000 to 999999.
4. Wait until “0.0” and the arrows above ZERO and STABLE appear on the display.
5. The model 594KL model is designed to provide convenient and accurate weighing to the less mobile. The side-arms and footrest are movable for
easy access and patient comfort.
6. Place the patient on the scale. The scale will display the patient weight. (NOTE: the weight will change until the patient is stable). Once the patient
is stable an arrow will appear above STABLE on the display.
7. Press and hold the KG / LB button for 3 seconds to select the weigh mode, either kilograms or pounds.
8. Weight may remain displayed on the scale by pressing the HOLD / RELEASE button. To release, press the HOLD / RELEASE button again.
The 594KL is equipped with a power switch located on the side of the display. When the switch is moved to the On “I” position it is supplying
power to the scale, even when the display head is off. To charge the battery this switch must be in the On “I” position. To preserve power, keep the
the swtich in the Off “O”position.
The 594KL also has an Auto-Off feature that will automatically turn the scale off after a period of inactivity. This battery saving feature is
programmable by the user. The 594KL can be programmed to automatically power off from 0 (disabled) to 21 minutes. The default shut off value set
by the factory is 2 minutes. Once the auto-off time is changed it cannot be changed back to the 2 minute default setting.
1. Press ON / OFF and wait for the display to show “0.0”.
2. At the same time press both the TARE/ZERO and KG/LB buttons. The display will show “t” along with a number representing the current
shut-off setting.
3. Use the KG/LB button to change the shut off setting. The shut-off values are set in 3 minute increments. (“ t 0” = disabled; “t 1” = 3 minutes;
”t 2” = 6 minutes …….. “t 7” = 21 minutes.)
4. Press TARE/ZERO to save the desired turn off value. “CAL” will appear on the display.
5. Press BACK LIGHT to exit. Wait for “0.0” to appear and the scale is now ready for normal operation.
GENERAL
The Maintenance and Troubleshooting sections provide instructions for maintenance, cleaning, troubleshooting and operator replaceable parts for the
Digital Chair Scale. Maintenance operations other than those described in these sections should be performed by qualified service personnel.
Before first-use and after periods of non-use, check the scale for proper operation and function. If the scale does not operate correctly, refer to qualified
service personnel.
1. Check overall appearance of the total scale for any obvious damage, abuse, etc.
2. Inspect condition of battery charger.
Page 4
4
CLEANING
SYMPTOM
POSSIBLE CAUSE
CORRECTIVE ACTION
Scale does not turn on
1. Dead battery
2. Faulty electrical outlet
3. Bad battery charger
1. Attach battery charger to recharge battery.
2. Use a different outlet for the battery charger.
3. Replace battery charger.
Questionable weight or the scale
does not zero
1. External object interfering with the scale.
2. The display did not show
“0.
0” before
weighing
3. Scale is not on a level floor
4. Scale is out of calibration
1. Remove interfering object from the scale.
2. Ask the patient to get off the scale and begin weighing
process again.
3. Place the scale on a level floor and begin weighing process
again.
4. Check weight with known weight value.
The display shows “- 0F- ”
The load on the scale exceeds the maximum
capacity (600 lbs / 270 kg)
Remove the excess weight and use the scale according to its
limits.
ERROR NO.
DEFINITION
CHECK / REPLACE
Err 1
A / D value is lower when CAL
Scale is below minimum calibration weight. Calibration weight
must be more than 44 lbs. The recommended calibration weight
is 600 lbs.
--OF--
The load on the scale exceeds the capacity (600 lb / 270kg).
Remove excess weight and use the scale according to its
limits.
Or-Err
High saturation state (High A / D)
The load cell cable is not connected properly. Check cables
and mechanical connection. If problem persists, contact
Health o meter Professional Customer Service 800-815-
6615.
Or-Err
Low saturation state (Low A / D)
The load cell cable is not connected properly. Check cables
and mechanical connection. If problem persists, contact
Health o meter Professional Customer Service 800-815-
6615.
UF
Battery is low.
Recharge battery. Overnight charge is required to fully charge
battery.
TROUBLESHOOTING
CALIBRATION PROCEDURE
ERROR LIST
Proper care and cleaning is essential to ensure a long life of accurate and effective operation. Disconnect the scale from the battery charger.
1. Clean all external surfaces with a clean damp cloth or tissue. Mild soap and water solution may be used. Dry with a clean soft cloth.
2. Do not immerse the scale into cleaning or other liquid solution.
3. Do not use Isopropyl Alcohol or other solutions to clean the display surface.
Refer to the following instructions to check and correct any failure before contacting service personnel.
This scale has been calibrated at the factory and does not require re-calibration prior to use.
The following procedure should be performed only to correct any error in calibration. For maximum accuracy, calibration should be done using
certified weights. The recommended calibration weight is 600 lbs, however calibration can be performed using any weight no less than 44 lbs and no
more than 600 lbs.
1. Turn the scale on.
2. At the same time press the TARE/ZERO and KG/LB buttons. “t” and the number representing the current automatic shut off value will
appear on the display.
3. Press the TARE/ZERO button. “CAL” and then '600.0' will appear on the display.
4. To change the calibration weight, press the HOLD/RELEASE button to move the flashing indicator to the left. Then press the KG/LB button to set the
value to the desired calibration weight.
5. Press the TARE/ZERO button again. The display will show 'CAL 00'.
6. Press the TARE/ZERO button again. The display will show CAL-SP. Load 600 LB (or altered value) of calibration weight on to the scale and press the
TARE/ZERO button. The display will show "600.0" (or altered value).
7. Remove the weight from the scale. The scale returns to the normal weighing mode.
Page 5
LIMITED WARRANTY
P/N UM594KL Rev: 20160308
What does the Warranty Cover?
This Health o meter® Professional scale is warranted from date of purchase against defects of materials or in
workmanship for a period of two (2) years. If product fails to function properly, return the product, freight prepaid and
properly packed to Pelstar. See “To Get Warranty Service” below for instructions. If manufacturer determines that a
defect of material or in workmanship exists, customers' sole remedy will be replacement of scale at no charge.
Replacement will be made with a new or remanufactured product or component. If the product is no longer available,
replacement may be made with a similar product of equal or greater value. All replaced parts are covered only for the
original warranty period.
Who is Covered?
The original purchaser of the product must have proof of purchase to receive warranty service. Please save your
invoice or receipt. Pelstar dealers or retail stores selling Pelstar products do not have the right to alter, or modify or in
any way change the terms and conditions of this warranty.
What is Excluded?
Your warranty does not cover normal wear of parts or damage resulting from any of the following: negligent use or
misuse of the product, use on improper voltage or current, use contrary to the operating instruction, abuse including
tampering, damage in transit, or unauthorized repair or alternations. Further, the warranty does not cover natural
disasters, such as fire, floods, hurricanes and tornadoes. This warranty gives you specific legal rights, and you may
also have other rights that vary from country to country, state to state, province to province or jurisdiction to jurisdiction.
To get warranty service make sure you keep your sales receipt or document showing proof of purchase. Call 1 (800) 638
-3722 or 1 (708) 377-0600 to receive a return authorization number. Attach proof of purchase to your defective product
along with your name, address, daytime telephone number and description of the problem. Carefully package the
product and send with shipping and insurance prepaid to:
Pelstar LLC
Attention R / A#
Return Department
9500 W. 55th St.
McCook, IL 60525
PELSTAR,
9500 W. 55th St. • McCook, IL 60525 •
1-800-638-3722 or
LLC
1-708-377-0600
USA
PLEASE REGISTER YOUR SCALE FOR WARRANTY COVERAGE AT:
www.homscales.com
Health o meter® is a registered trademark of Sunbeam Products, Inc. used under license
Health o meter® Professional products are manufactured, designed and owned by Pelstar, LLC.
We reserve the right to improve, enhance or modify Health o meter® Professional product features or specifications without notice.
 Loading...