

Page 1
E112697
UL 60601-1
CSA C22.2 No. 601.1-M90
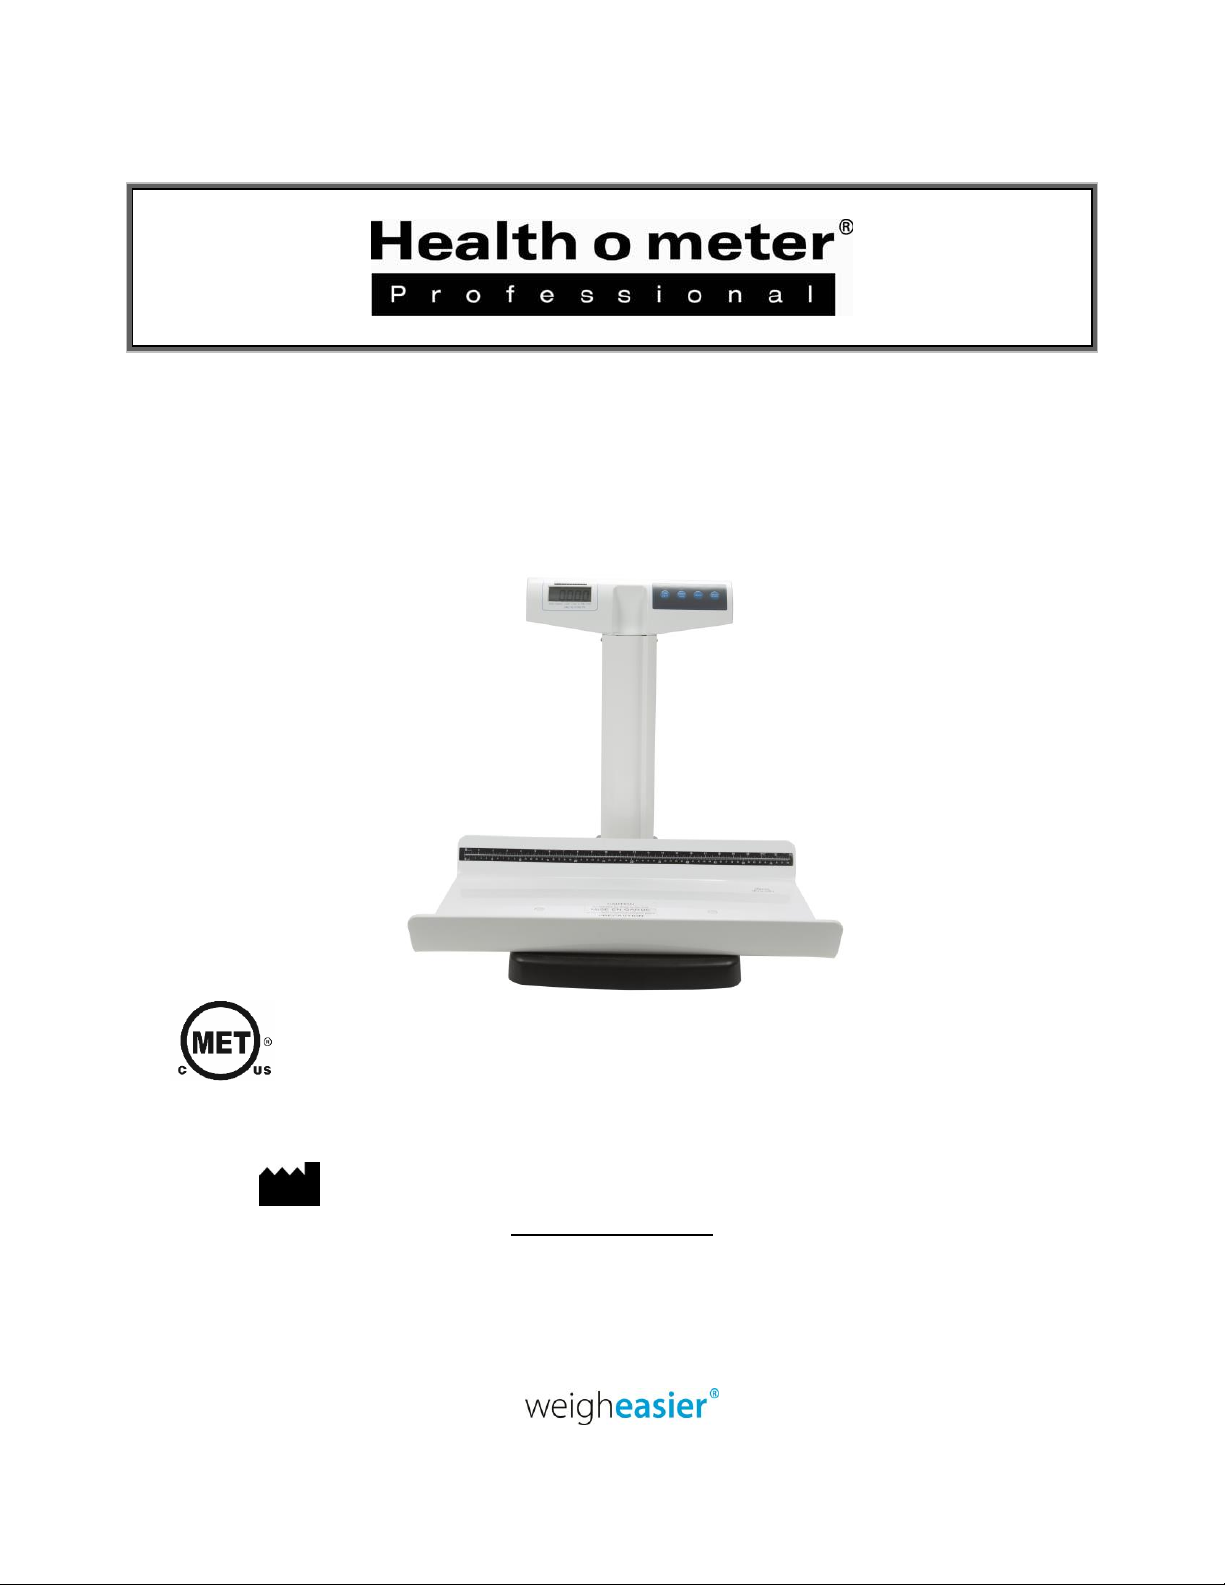
Digital Pediatric Tray Scale
Model 522KL / 522KG
User Instructions
PELSTAR, LLC 9500 West 55th St. McCook, IL 60525-7110 USA
www.homscales.com
Health o meter® Professional 522KL
Health o meter® Professional 522KG
© Pelstar, LLC 2019
P/N UM522KL_522KG Rev20190412 1
Page 2
Health o meter
Health o meter
Thank you for purchasing this Health o meter® Professional product. Please read this manual
carefully, and keep it for easy reference or training.
®
Professional 522KL
®
Professional 522KG
TABLE OF CONTENTS
Cautions and Warnings ............................................................................................. 3
Specifications ............................................................................................................ 4
Certifications / Connectivity / Disposal ...................................................................... 5
Assembly Instructions .............................................................................................. 6
Powering the Scale ................................................................................................... 9
Operating Instructions ............................................................................................... 10
Maintenance and Cleaning ........................................................................................ 12
Calibration ................................................................................................................ 13
Troubleshooting ........................................................................................................ 14
Warranty .................................................................................................................... 15
Note: This scale has been factory calibrated, and does not
require calibration prior to use.
Please register your scale for warranty coverage at:
www.homscales.com/product-support/technical-support/product-warranty-registration
For User Instructions updates and revisions please go to:
www.homscales.com
P/N UM522KL_522KG Rev20190412 2
Page 3

CAUTIONS AND WARNINGS
Intended Use
The Health o meter® Professional 522KL/522KG scale is intended to be used in a professional medical
environment by trained medical staff. This product was designed to weigh infants that are laying or sitting on the
tray. The intended use of the included measuring tape is to measure patient length. Do not modify the product
or use it for anything other than its intended purpose.
To prevent injury and damage to your scale, please follow these instructions very carefully.
Assemble and operate the scale per the enclosed user instructions.
For accurate weighing, this scale must be placed on a flat, stable surface.
For accurate weighing, verify before each use the proper operation according to the procedure
described in this manual.
Do not transport the scale with a patient or object on the tray.
Do not exceed the weight capacity specified for this scale.
Do not use in the presence of flammable or explosive materials.
Ensure that the scale or AC adapter do not come in contact with liquids, excessive temperature, or
excessive humidity.
If the scale becomes damaged, it should not be operated until properly serviced.
Patient/caregiver safety
This scale is designed for static weighing of patients only. No scale should be used for patient
transfer.
To prevent patient injury, the patient must be attended throughout the entire weighing event.
Patient should wear lightweight covering or a paper tray liner should be used during weighing event.
When operating the scale with batteries:
If the “LO” indicator activates, replace the batteries or switch to the AC adapter as soon as possible.
When replacing / inserting batteries, be sure to use all new batteries.
When operating the scale with the (optional) AC adapter:
Operate this scale exclusively with the AC adapter provided by Health o meter Professional. Use of
an unspecified adapter will void the warranty, and can pose a serious safety hazard.
For use with AC adapter model ADPT31 (USA or Canada) or ADPT30 (International) (not included)
Prior to using this scale, inspect the AC adapter cord for cracking / fraying, or for broken / bent plug
prongs.
Prior to using this scale, ensure that the AC adapter is plugged into an outlet with the rated voltage
appropriate for operation.
Ensure that the AC adapter outlet is wired to a circuit breaker or other protected power source.
Unplug the AC adapter, and carefully store both the adapter and adapter cord before moving the
scale.
Operating this scale at voltages and frequencies other than specified can damage the equipment
and will void the warranty.
This equipment has been tested and found to comply with the EMC limits for the Medical Device Directive
93/42/EEC (EN 55011 Class A and EN 60601-1-2). These limits are designed to provide reasonable
protection against harmful interference in a typical medical installation. The equipment generates, uses
and may radiate radio frequency energy and, if not installed and used in accordance with these
instructions, may cause harmful interference to other devices in the vicinity. There is no guarantee that
interference will not occur in a particular installation. If this equipment does cause harmful interference
with other devices, which can be determined by turning the equipment off and on, the user is encouraged
to try to eliminate the interference by one or more of the following measures:
• Reorient or relocate the receiving device.
• Increase the separation between the equipment.
• Connect the equipment into an outlet on a circuit different from that to which the other device(s) is
connected.
• Consult Customer Service or a field service technician for help.
In no event shall Pelstar, LLC be liable for damages or injuries arising out of or connected with the
assembly, use, or misuse of this product.
P/N UM522KL_522KG Rev20190412 3
Page 4
SPECIFICATIONS
Capacity and Resolution
522KL: 50 lb / 23 kg; 0 - 20 lb / 0.2 oz; 20 - 50 lb / 0.5 oz;
0 - 9 kg / 5g; 9 - 23 kg / 10 g
522KG: 23 kg; 0 - 9 kg / 5g; 9 - 23 kg / 10 g
Power Requirements
Adapter Model No. UE15WCP1-090050SPA, Part No.
UE160714HKKK1-P
Health o meter® Professional Model (ADPT30) (Not Included)
Input: 100-240V – 50/60Hz, 500mA
Output: 9.0V - - - 0.5A
Or 6 AA Batteries (included)
Environmental
Operating temperatures: 50°F to 104°F (10°C to 50°C)
Storage temperatures: 30°F to 122°F (0°C to 50°C)
Maximum Humidity: 95% RH
Physical Dimensions
Tray Size:
Length: 14 1/2” (368 mm)
Width: 24 1/8” (613 mm)
Height: 2 5/8” (67 mm)
Product Footprint:
Length: 21” (533 mm)
Width: 24 1/8” (613 mm)
Height: 23 1/8” (587 mm)
Weight: 20 lb (9 kg)
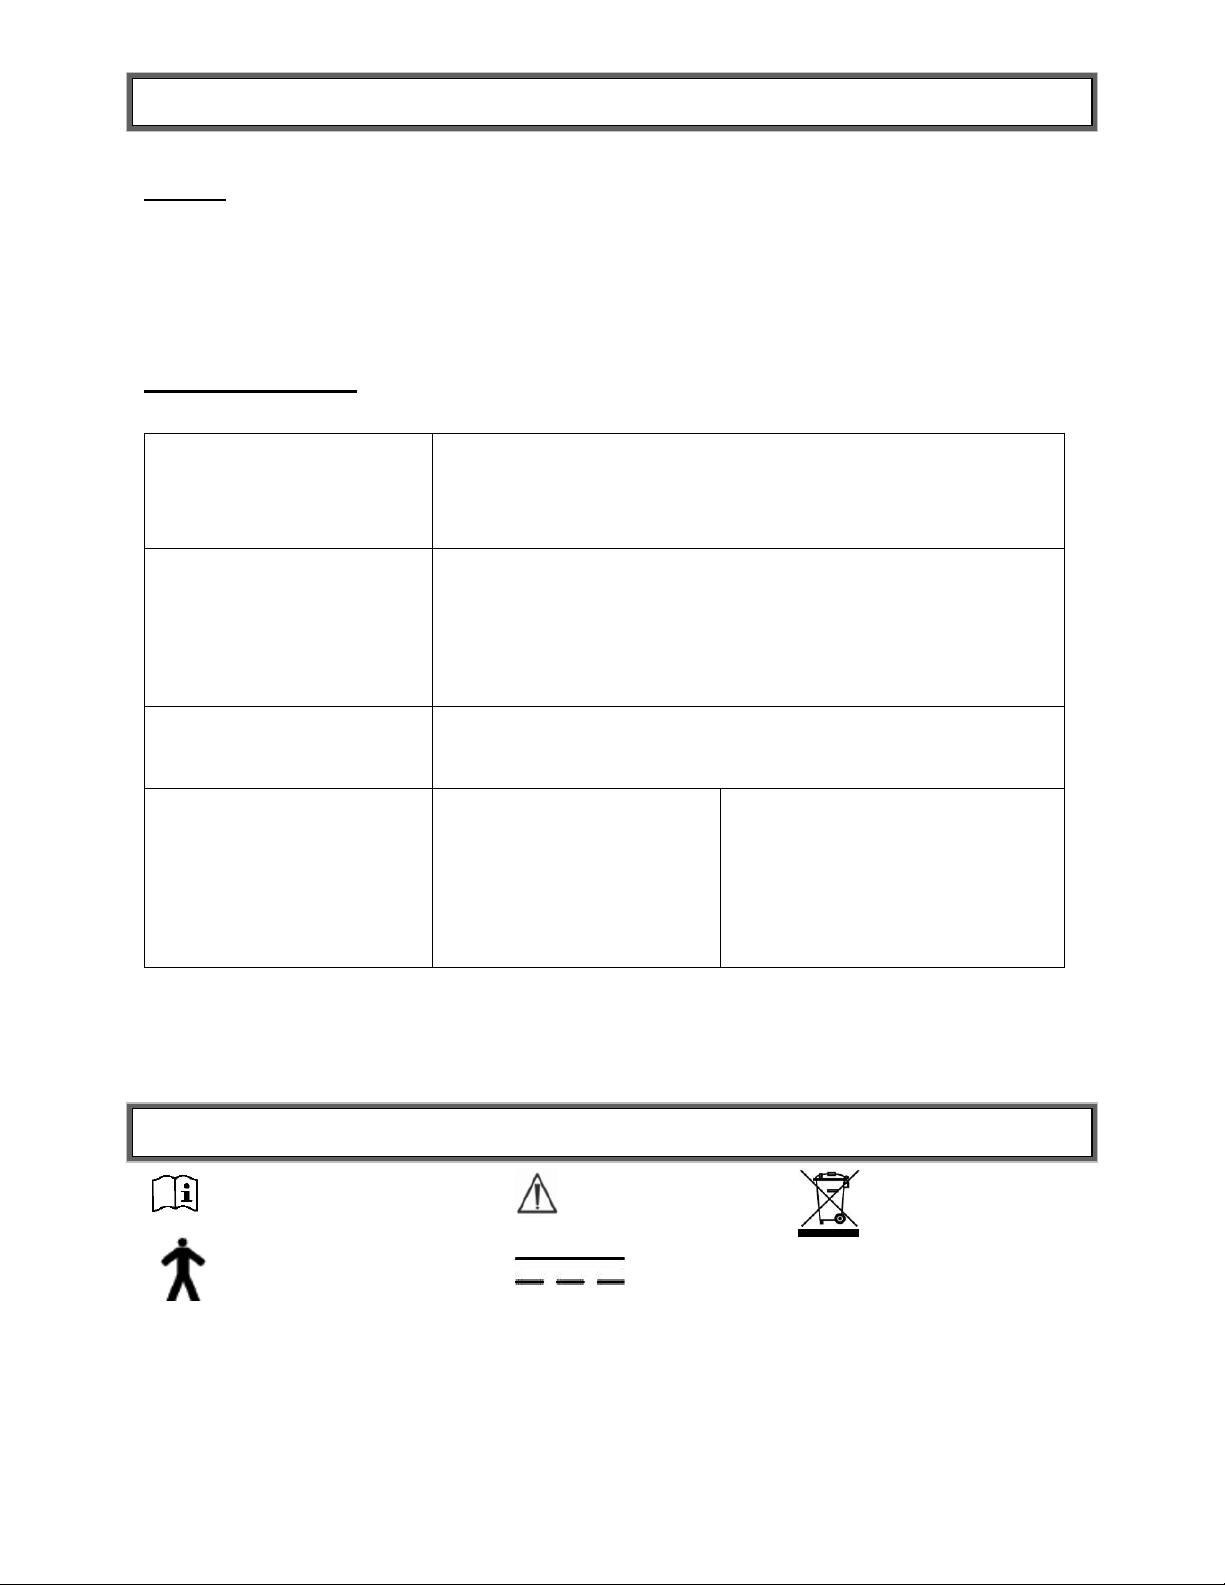
Caution
Attention: Consult Accompanying Documents
Type B Applied Parts
DC Power Supply
Do not dispose of this device in
the domestic waste stream.
General
The Health o meter® Professional 522KL/522KG scale uses highly sophisticated microprocessor
technology. Each precision scale is designed to provide accurate, reliable and repeatable
weight measurements. In addition, each scale is designed to provide the user with features that
make the weighing process simple, fast, and convenient.
Scale Specifications
DEFINITION OF SYMBOLS
Scale surface and provided measuring tape are the Type B applied parts.
P/N UM522KL_522KG Rev20190412 4
Page 5
CERTIFICATIONS / CONNECTIVITY / DISPOSAL
Pelstar, LLC has been officially certified as the manufacturer
of Health o meter® Professional medical devices. The Pelstar,
LLC quality assurance system covers the development,
production, sales and service of medical scales and
measuring systems.
This product is tested to and meets the requirements of:
1. UL60601-1 First Edition: Safety for Medical Electrical
Equipment
2. CSA C22.2 No. 601-1 M90: Medical Electrical Equipment
Certification Descriptions
Scale Connectivity Information
For reliable transmission of weight data, this scale is designed to connect to a computer,
monitor, or other electronic data device via Health o meter® Professional Connectivity Solutions.
This connectivity helps minimize transcription errors when recording patient data. For further
information regarding how to connect this scale to other electronic devices, please contact
Health o meter® Professional Scales Technical Support at 800-638-3722 or visit
www.homscales.com/innovations/connectivity.
Scale Disposal
This Health o meter® Professional scale must be disposed of properly as electronic waste.
Follow the national, regional or local regulations which apply to you for disposal of electronic
waste or batteries. Do not dispose of this device in the domestic waste stream.
P/N UM522KL_522KG Rev20190412 5
Page 6

ASSEMBLY INSTRUCTIONS
Before Assembly
Each 522KL/522KG Digital Pediatric Tray scale is shipped disassembled in one carton.
Carefully inspect the carton for shipping damage before unpacking. If damage is found, contact
your shipper or a Health o meter® Professional representative immediately at 1-800-815-6615.
Claims must be filed with the shipper as soon as possible after receipt of the package. The
following information details what you will find inside the main carton as you unpack the parts for
assembly.
To prevent scratching any components, carefully remove each assembly from the carton and
unwrap the packing materials. Set the carton aside for storage. To avoid damaging the scale
parts when unpacking, do not use a box cutter, knife, scissors, or any sharp object to open the
protective inner packaging.
Parts List
Carton
(6) AA batteries
(4) Column mounting screws (attached to display assembly column)
(2) M6 x 16mm tray mounting screws
(2) Screw covers (to cover tray mounting screws)
(1) Scale platform
(1) Column (w / display assembly)
(1) User instructions
(1) Measuring tape (black)
(1) Weighing tray
(1) Adapter bracket (w/ scale platform)
Tools Required
Phillips head screwdriver (not included)
P/N UM522KL_522KG Rev20190412 6
Page 7
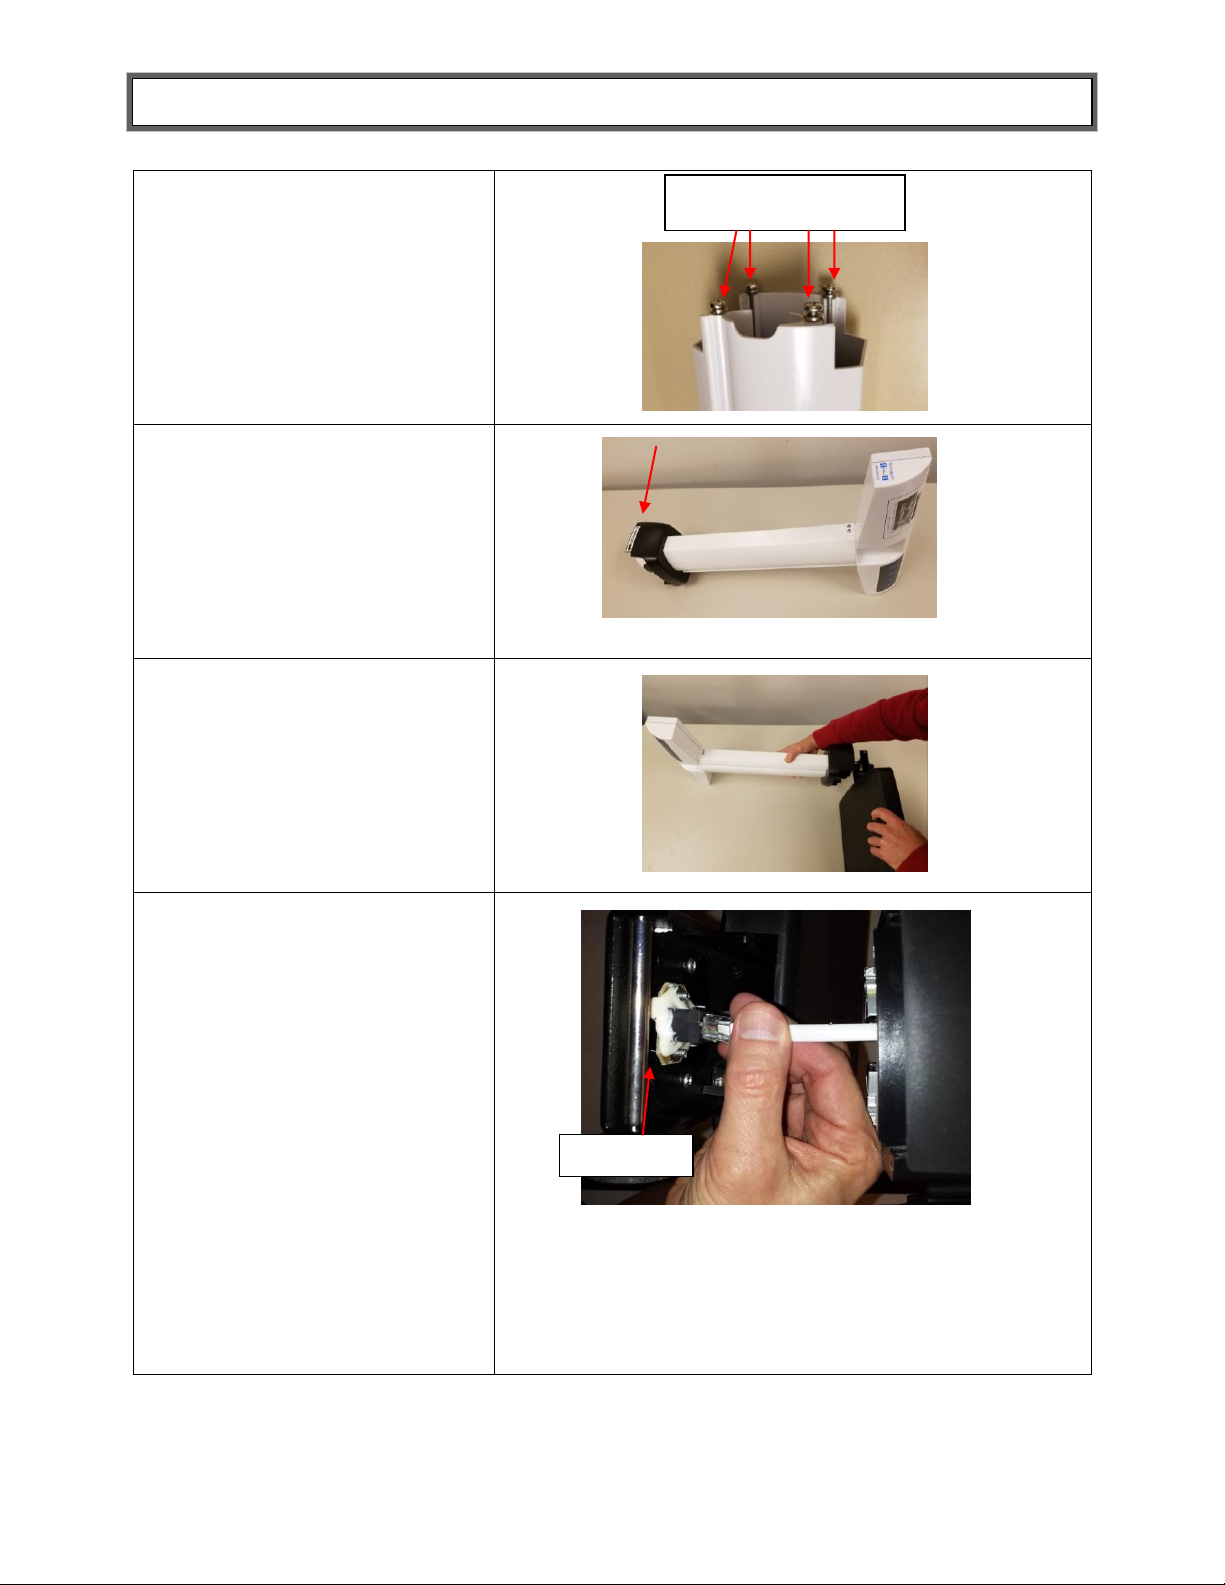
ASSEMBLY INSTRUCTIONS (CONTINUED)
1. Carefully remove the contents
of the carton and place each
part on a flat, level, and dry
surface. Remove the 4 column
mounting screws and washers
from the bottom of column and
set aside for assembly step 5.
2. Remove the black adapter
bracket from scale platform.
Place the bracket on the
bottom of the column with the
adapter jack arrow sticker
pointing towards the front of
the column.
3. Place the scale platform on its
side and place the column on
its side, perpendicular to the
platform. The front of the
display head on the column
should be facing forward and
above the scale platform.
4. Locate the load cell connector
cable inside the column and
pull gently until the plug
reaches the bottom of the
column. Carefully pull the
cable connector from the
bottom of the column and plug
into the RJ jack on the scale
platform. Caution: Once
connected, keep a firm grip
on the columns to ensure
the load cell connector cable
is not pulled out from the RJ
jack.
This cable connects the load
cells to the display head and
must be entirely plugged in
for the scale to function
properly.
Screws and washers
RJ Jack
P/N UM522KL_522KG Rev20190412 7
Page 8
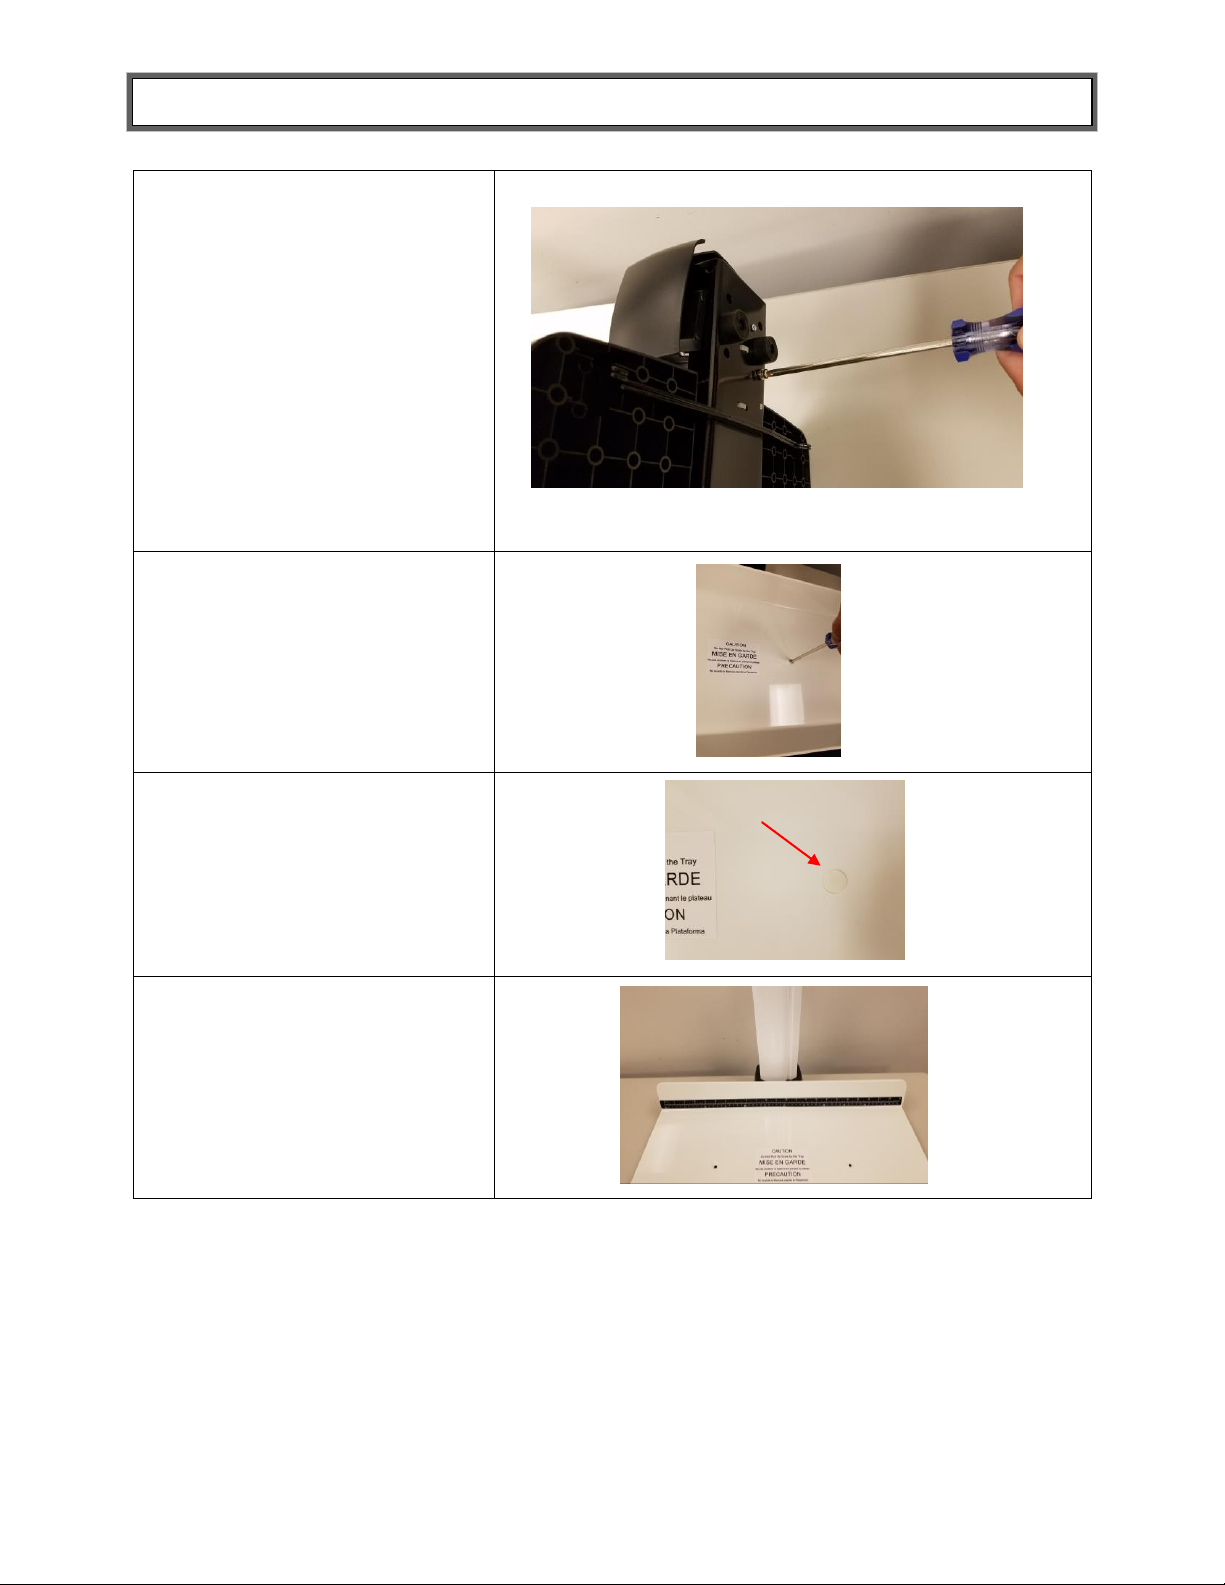
ASSEMBLY INSTRUCTIONS (CONTINUED)
5. Position and secure the
column to the scale platform.
Locate the 4 column mounting
screws previously removed in
step 1. Insert the 4 screws
through the bottom of the
scale platform screw holes and
into the column. Ensure that
washers are located between
the screw heads and the scale
platform screw holes. Using a
Phillips head screwdriver,
tighten the screws to secure
the column to the base of the
platform.
6. Locate the 2 M6 x 16mm
screws included in the clear
plastic bag. Align the 2 holes
in the tray with the mounting
holes on the scale platform.
Insert the screws and tighten
to attach the tray to the scale
platform.
7. Obtain the circular adhesive
screw covers and place onto
the screw cap on the tray.
8. Obtain the measuring tape and
remove the adhesive backing.
Affix the measuring tape to the
bottom or side of tray.
Column B
(top)
Column B
(top)
P/N UM522KL_522KG Rev20190412 8
Page 9
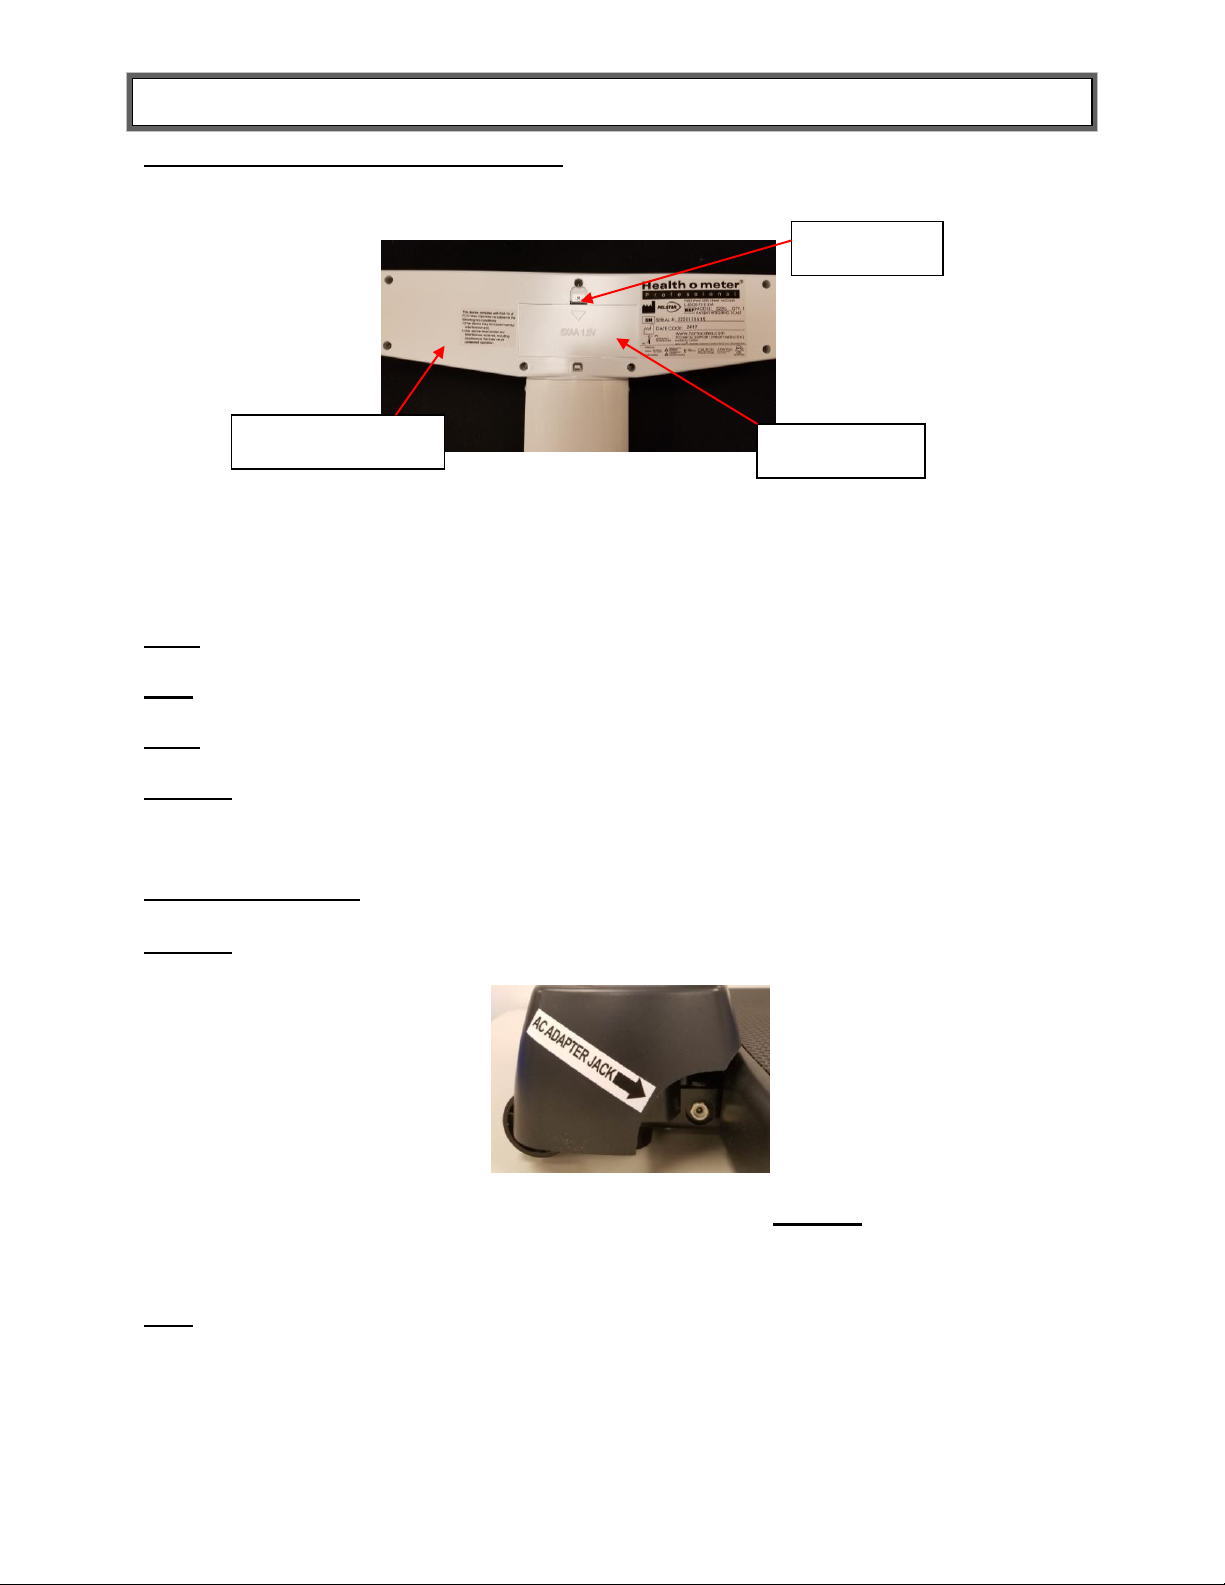
POWERING THE SCALE
Locking tab
Battery cover
Display assembly
Powering the Scale – Inserting Batteries
1. With a Phillips head screwdriver remove the screw from the battery compartment cover
located on the back of the display. Remove the battery cover by pressing downward on the
locking tab.
2. Replace or install 6 new AA batteries. Health o meter® Professional recommends using an
alkaline or lithium battery, rated for 130°F (54°C) operation. Do not use zinc-carbon batteries.
3. Re-attach the battery cover to the display assembly.
4. Ensure all objects are removed from the weighing tray, and then press the ON/OFF button to
turn the scale on. “88:8:8.8” followed by “0:0.0” will appear on the display.
Note: The battery icon on the display does not indicate battery life. The battery icon simply
indicates that batteries are being used as the power source.
Note: If the set up procedure fails, refer to the troubleshooting instructions. If the problem is not
corrected, contact Health o meter Professional Scales Customer Service at 1-800-815-6615.
Note: If “Lo” appears on the display, it indicates that the battery power is low. It does NOT
indicate a problem with the weight measurement.
Warning: If the scale will not be used for some time, remove the batteries to avoid a
safety hazard. Disposal of batteries must be performed in accordance with the prevailing
national, regional or local regulations which apply to you.
Optional AC Adapter
1. Connect the AC adapter (not included) into the adapter jack on the scale platform.
Warning: To avoid a safety hazard, use only a Health o meter® Professional AC adapter.
2. Plug the scale’s AC adapter into the power source/wall outlet. Caution: Always plug the AC
adapter into the scale first, then into the power source/wall outlet.
3. When the AC adapter is disconnected from the scale, the scale will switch to battery power if
batteries are installed.
Note: If the set up procedure fails, refer to the troubleshooting instructions. If the problem is not
corrected, refer to qualified service personnel.
P/N UM522KL_522KG Rev20190412 9
Page 10

OPERATING INSTRUCTIONS
Auto-Off Function
As an energy saving feature, the scale will automatically turn off after 2 minutes of inactivity. By
default, this function is enabled. Note: The Auto-off function is only active when the scale is
being powered by batteries. Note: The scale will not power off if a weight is held on the display.
Disable Auto-Off
1. While the scale is turned off, press and hold the HOLD/RELEASE button.
2. While holding the HOLD/RELEASE button, press the ON/OFF button to turn the scale on.
3. Release both keys and “AOF=0” will be displayed.
4. Auto-off is now disabled and the scale will remain on until the scale is manually turned off.
Enable Auto-Off
1. While the scale is turned off, press and hold the HOLD/RELEASE button.
2. While holding the HOLD/RELEASE button, press the ON/OFF button to turn the scale on.
3. “START” will briefly appear on the display followed by “AOF=1”.
4. Auto-off is now enabled.
Selecting the Weight Measuring Unit (522KL Only):
Note: LB (Pounds) is the default weight measuring unit upon initial set-up/assembly.
1. Press the ON/OFF button to turn the scale on.
2. Wait for “0.0” LB or “0.0” KG to appear on the display.
3. Press the LB/KG button to choose between LB or KG.
Note: The scale will always default to the unit last used even after it has been powered off and
back on again. To lock the scale in a weight measuring unit follow the instructions below.
Locking the Weight Measuring Unit (522KL Only)
The weight measuring unit can be locked to only measure in KG or LB. Follow the procedures
below to lock the weight measuring unit.
KG Lock Instructions (522KL Only)
1. Press the ON/OFF button to turn the scale on. Wait for “0.0” to appear on the display.
2. Press and hold the LB/KG button so that KG icon is displayed and continue holding the
LB/KG button for approximately 10 seconds.
3. When the KG icon flashes, release the LB/KG button. The KG weight measuring unit is now
locked and will remain locked even if the scale is turned off.
LB Lock Instructions (522KL Only)
Note: To lock in LB weight mode, you must follow the instructions above to lock in KG weight
mode first.
1. Once the scale is locked in KG mode, press and hold the LB/KG button for approximately
10 seconds until the LB icon flashes.
2. When the LB icon flashes, release the LB/KG button. The LB weight measuring unit is now
locked and will remain locked even if the scale is turned off.
Unlocking the Weight Measuring Unit (522KL Only)
Note: If your scale is locked in KG mode, you must first follow the instructions above to lock into
LB mode, and then begin the disabling instructions below.
1. Press the ON/OFF button to turn the scale on. Wait for “0.0” to appear on the display.
2. Press and hold the LB/KG button until LB and KG icons both flash. When LB and KG are
flashing, release the LB/KG button. The weight measuring unit is now unlocked; pressing
the LB/KG button will allow user to toggle between LB and KG.
P/N UM522KL_522KG Rev20190412 10
Page 11

OPERATING INSTRUCTIONS (CONTINUED)
Weighing a Patient
1. Make sure there is nothing on the tray.
2. Press the ON/OFF button to turn the display assembly on. “88:8:8.8” followed by “0:0.0” will
appear on the display.
3. Lay the baby on the scale so that its weight is evenly distributed on the tray. The scale will
begin to display weight information and will lock on the patient’s weight when the stable weight
of the patient is determined. Depending on the movement of the patient on the scale, it may
take several seconds for the scale to lock onto the weight. When a stable weight is calculated a
small ring will appear on the display along with the baby’s weight. If the display shows “OVER”
you have exceeded the capacity of the scale.
Caution: To prevent patient injury, the patient must be attended throughout the entire
weighing event.
4. The weight may be held on the display by pressing the HOLD/RELEASE button. To release,
press the HOLD/RELEASE button again.
5. After the weight measurement has been taken and is recorded, remove the baby from the
weighing tray. After weight is removed from the tray the scale will return to zero.
6. Press the ON/OFF button to turn the scale off.
Zero Function
The ZERO/TARE button zeroes the scale prior to a weight measurement. The ZERO/TARE
button is also used in the Tare function as outlined below.
Tare Function
The tare function allows you to place other items on the scale while weighing the baby without
affecting the baby’s weight reading.
1. With all weight off the scale, press the ON/OFF button to turn on the scale.
2. Wait until “0:0.0” appears on the display.
3. Place the object on the scale. The display will show a value for the object’s weight.
4. Press the ZERO/TARE button. The word “TARE” will appear on the display, followed by
“0:0.0”.
5. Keep the object on the platform, and lay the baby on the tray. The scale will display the
baby’s weight.
Note: If the scale does not return to “0:0.0” when you remove the object and baby from the tray,
press the ZERO/TARE button to return the scale to zero.
P/N UM522KL_522KG Rev20190412 11
Page 12
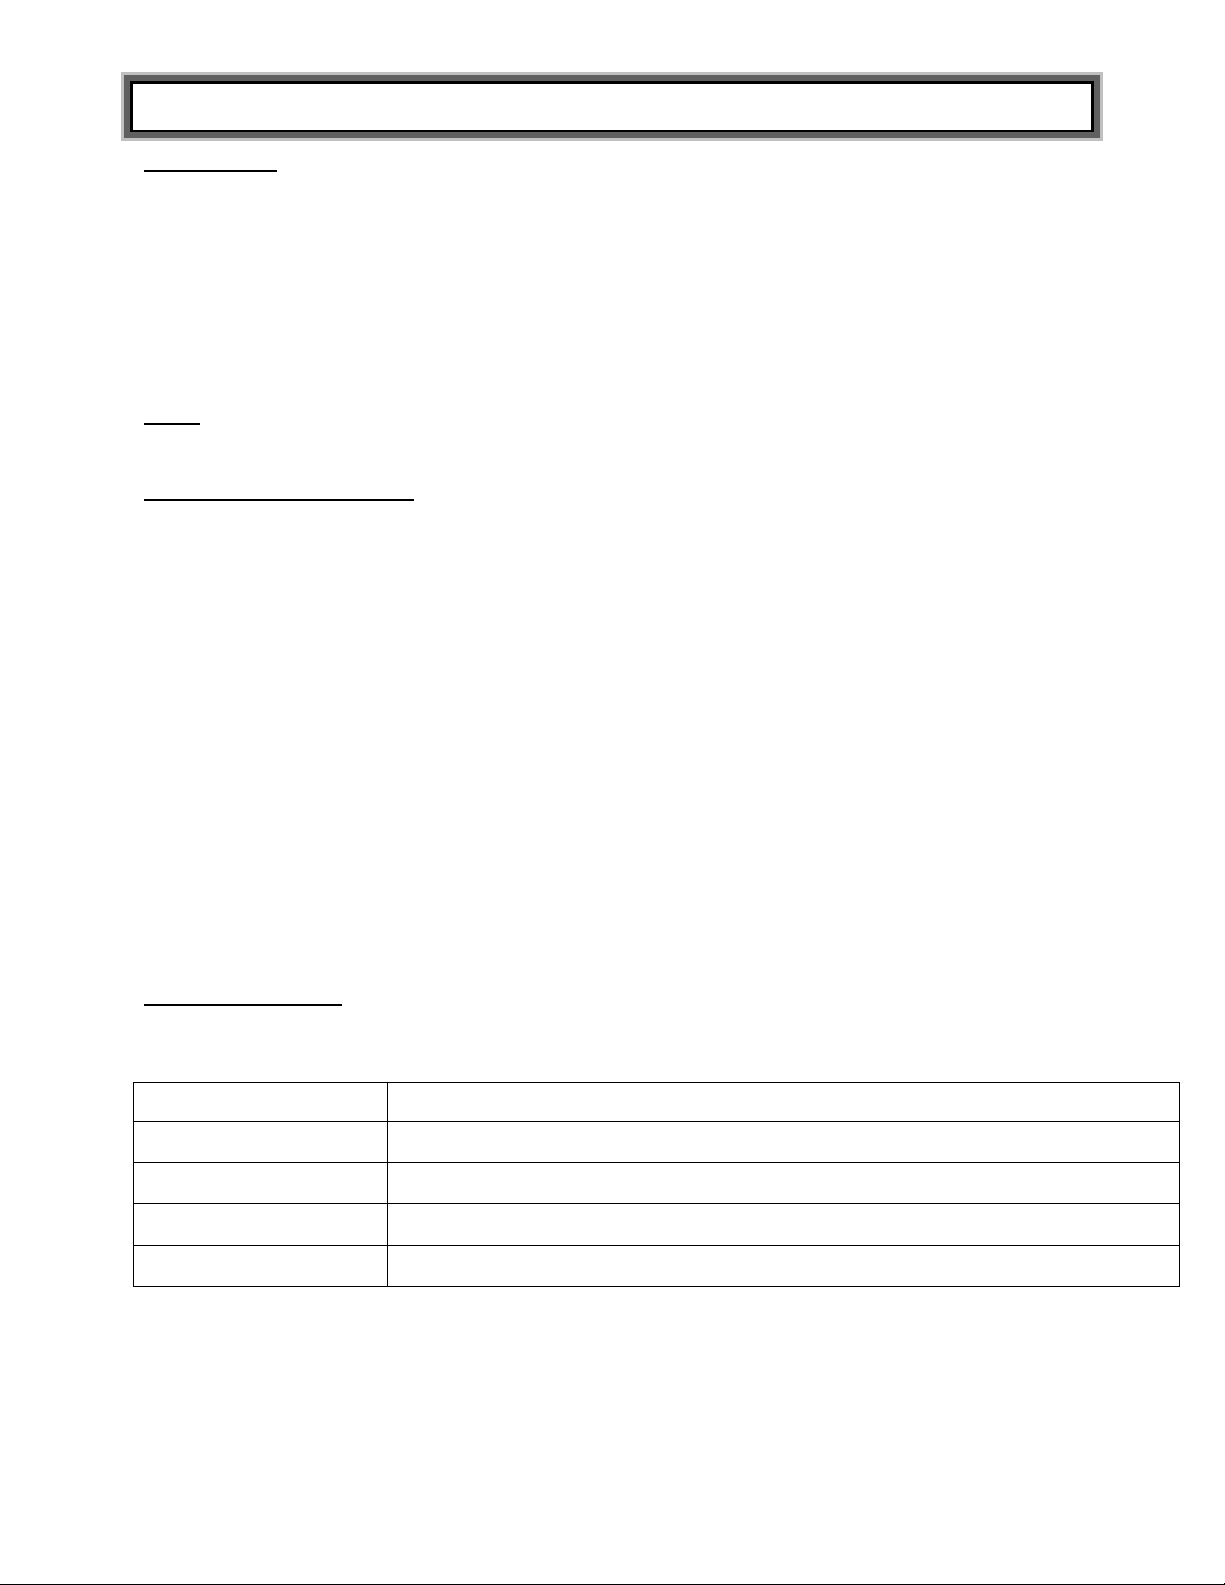
MAINTENANCE AND CLEANING
Part #
Description
522KL/524KLKEYPAD
522KL Keypad
522TRAY
Tray for 522KL/522KG scale
ADPT31
Power adapter (USA and Canada)
ADPT30
Power adapter (International)
Maintenance
The following pages provide instructions for maintenance, cleaning, calibrating, and
troubleshooting of your scale. Maintenance operations other than those described in this
manual should be performed by qualified service personnel.
Caution: Before first use, or after long periods of non-use, check the scale for proper
operation and function. If the scale does not operate correctly, refer to qualified service
personnel.
1. Check overall appearance of the total scale for any obvious damage, wear, and tear.
2. Inspect the AC adapter cord for cracking or fraying, or for broken/bent prongs.
Note: This scale is an extremely sensitive weighing device. If the auto-off function is disabled,
battery power will be consumed.
Cleaning and Disinfecting
Proper care and cleaning is essential to ensure a long life of accurate and effective weighing.
Caution: Disconnect the scale from the AC adapter power source prior to cleaning the
unit.
1. Health o meter® Professional recommends using one of the following solutions on a soft
cloth or disposable wipe:
● mild soap and water solution
● 70% isopropyl alcohol
● solution with 1-5% hydrogen peroxide concentration
After cleaning/disinfecting, wipe with a cloth dampened with water and then with a clean dry
cloth. To avoid residue build-up or damp surfaces, ensure the screen and scale parts are
completely dry after cleaning.
2. Never use rough or abrasive materials to clean the scale, as these will damage the scale’s
finish.
3. Do not submerge the scale in water or any other liquid.
4. Do not pour or spray fluids directly on the scale.
Replacement Parts
Replacement parts may be available if a piece of the scale needs to be replaced. Contact Health o
meter Professional Scales Customer Service at 1-800-815-6615 to inquire about the availability of
these replacement parts.
P/N UM522KL_522KG Rev20190412 12
Page 13
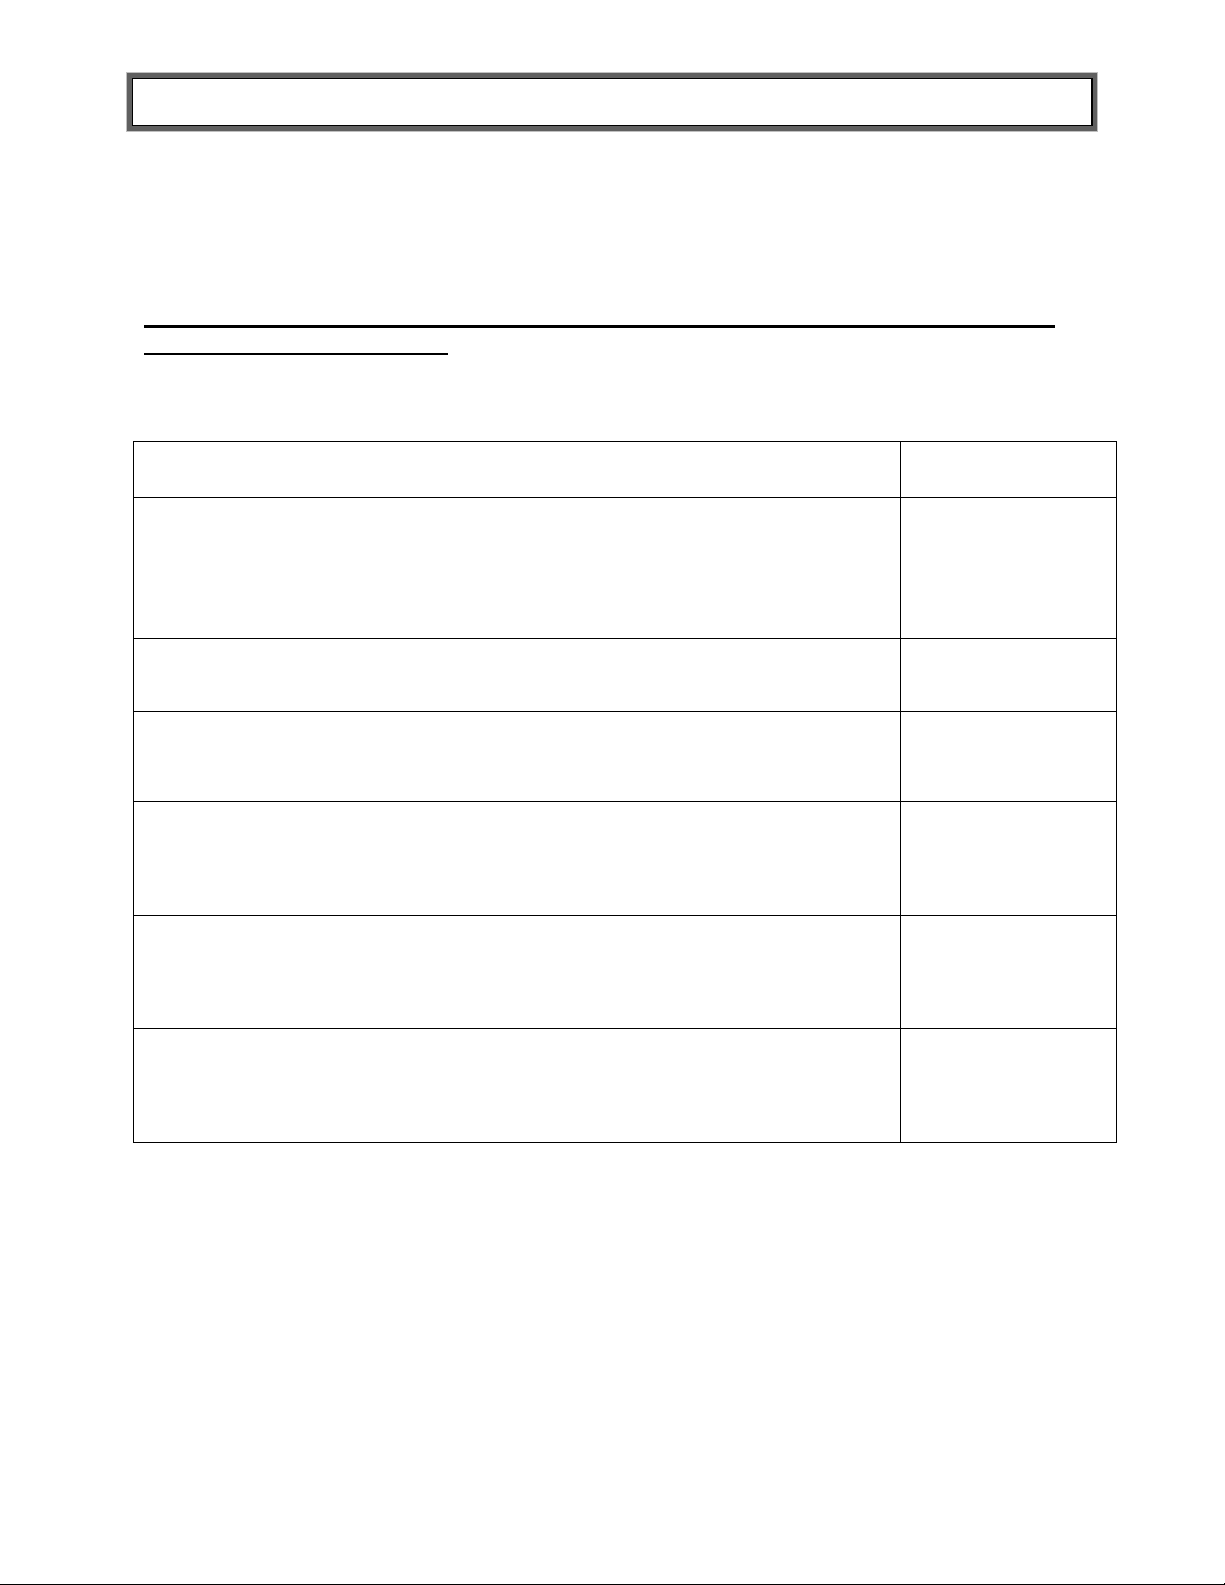
CALIBRATION
ACTION
DISPLAY
SHOWS
With the scale off, press and hold the LB/KG button (522KL) or the
blank blue button (522KG) and ZERO/TARE buttons at the same
time, then press the ON/OFF button to turn on the scale. “CAL” will
briefly appear on the display, followed by four numbers indicating that
you can begin calibration. Release all three buttons.
“CAL” followed by
“XXXX”
Press the ZERO/TARE button. “C-5” will flash on the display,
followed by “0”or “1”.
“C-5” then “0” or
“1”.
Place 5 kg on the scale. Four numbers will appear. When calibration
numbers stabilize, press the ZERO/TARE button. “C-10” will appear
on the display, followed by “0” or “1”.
“XXXX” followed
by “C-10” then “0”
or “1”.
Place an additional 5 kg on the scale, for a total of 10 kg. Four
numbers will appear. When calibration numbers stabilize, press the
ZERO/TARE button. “C-15” will appear on the display, followed by “0”
or “1”.
“XXXX” followed
by “C-15” then “0”
or “1”.
Place an additional 5 kg on the scale, for a total of 15 kg. Four
numbers will appear. When calibration numbers stabilize, press the
ZERO/TARE button. “C-20” will appear on the display, followed by “0”
or “1”.
“XXXX” followed
by “C-20” then “0”
or “1”.
Place an additional 5 kg on the scale, for a total of 20 kg. Four
numbers will appear. When calibration numbers stabilize, press the
ZERO/TARE button. “END” will appear on the display, followed by
“OFF”. The scale will automatically shut off.
“XXXX” followed
by “END” then
“OFF”
This scale has been factory calibrated, and does not require calibration prior to
use. If required, the scale can be calibrated. Calibration of your scale must be
performed using kilograms (KG). 20 kilograms are required for calibration, applied in 5
kg increments.
Note: Only weights certified and traceable to national standards should be used
for calibration procedures.
P/N UM522KL_522KG Rev20190412 13
Page 14
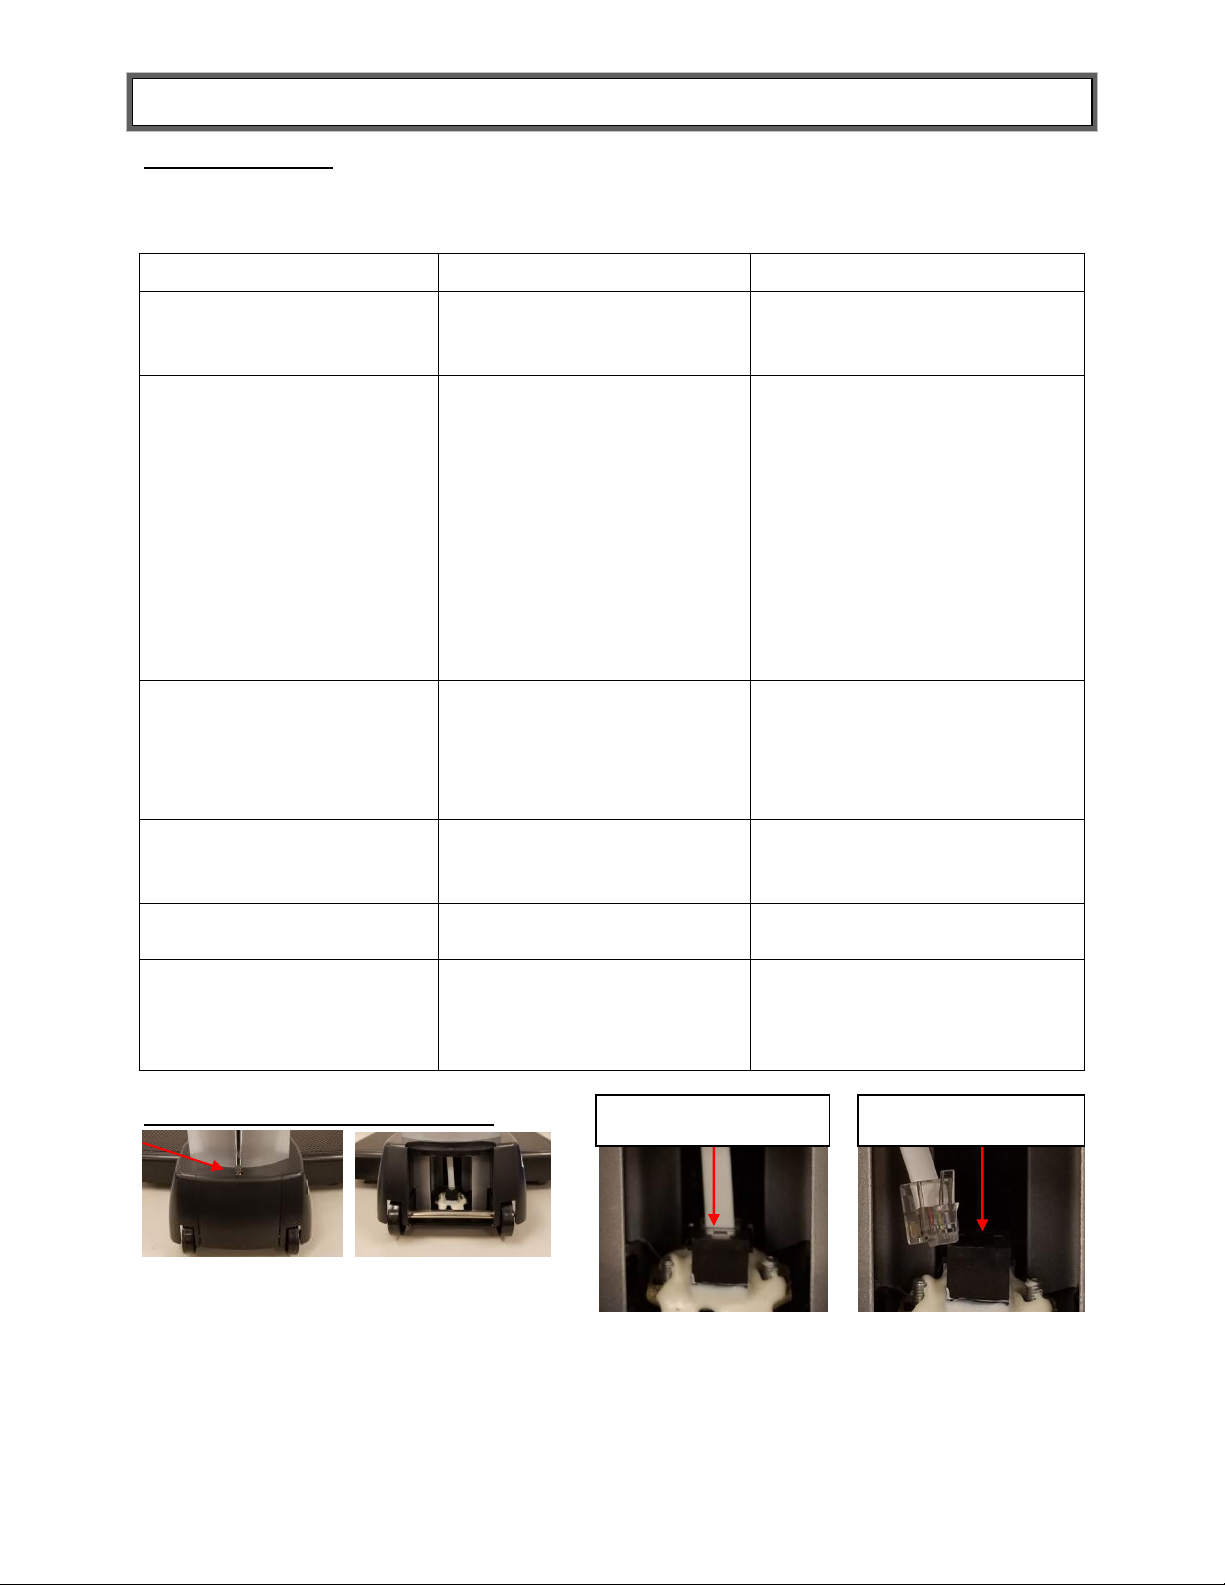
TROUBLESHOOTING
Symptom
Possible Cause
Corrective Action
Scale does not turn on
1. Dead battery
2. Faulty electrical outlet
3. Bad power supply
1. Replace batteries
2. Use a different outlet
3. Replace AC adapter
Questionable weight or
the scale does not zero
1. External object
interfering with the scale
1. Remove interfering object
from the scale
2. The display did not
show “0:0.0” before
weighing
2. Remove the patient from
the weighing tray, zero the
scale and begin weighing
process again
3. Scale is not placed on a
level surface
3. Place the scale on a level
surface and begin weighing
process again
4. Scale is out of
calibration
4. Check weight with known
weight value
Weighing is performed
but the weighing process
takes too long and the
weight does not lock on
the display
The patient is not laying
still
Try to have the patient lay
still
The display shows “Over”
message
The load on the scale
exceeds the capacity
(50 lb / 23 kg)
Remove the excess weight
and use the scale according
to its limits
The display shows
“Lo” message
The batteries are depleted
Replace batteries according
to instructions
Scale turns on but will not
register a weight reading
Load cell connector cable
is not plugged in
Refer to the instructions
below to inspect the load cell
cable.
Load Cell Cable
Connected
Load Cell Cable
Not Connected
1. Using a Phillips screwdriver, remove
the door at the back of the platform
base.
2. Inspect the load cell connector cable to ensure
it is completely plugged into the RJ jack. If cable
was plugged in, unplug and plug in again until it
clicks into place. After checking connection,
replace door at the back of the platform base.
Troubleshooting
Before contacting service personnel, refer to the following instructions to check and to
correct any failures.
Inspecting the Load Cell Cable
P/N UM522KL_522KG Rev20190412 14
Page 15

WARRANTY
Limited Warranty
What does the Warranty Cover?
This Health o meter® Professional scale is warranted from date of purchase against defects of materials or in
workmanship for a period of two (2) years. If product fails to function properly, return the product, freight prepaid and
properly packed to Pelstar, LLC (see “To Get Warranty Service”, below, for instructions). If the manufacturer determines
that a defect of material or in workmanship exists, the customer’s sole remedy will be replacement of the scale at no
charge. Replacement will be made with a new or remanufactured product or component. If the product is no longer
available, replacement may be made with a similar product of equal or greater value. All replaced parts are covered only
for the original warranty period.
Who is Covered?
The original purchaser of the product must have proof of purchase to receive warranty service. Please save your invoice
or receipt. Pelstar dealers or retail stores selling Pelstar products do not have the right to alter, or modify or in any way
change the terms and conditions of this warranty.
What is Excluded?
Your warranty does not cover normal wear of parts or damage resulting from any of the following: negligent use or
misuse of the product, use on improper voltage or current, use contrary to the operating instructions, abuse including
tampering, damage in transit, or unauthorized repair or alternations. Further, the warranty does not cover natural
disasters, such as fire, flood, hurricanes and tornadoes. This warranty gives you specific legal rights, and you may also
have other rights that vary from country to country, state to state, province to province or jurisdiction to jurisdiction.
To get Warranty Service make sure you keep your sales receipt or document showing proof of purchase. Call (+1)
800-638-3722 or (+1) 708-377-0600 to receive a return authorization (RA) number, which must be included on the return
label. Attach your proof of purchase to your defective product along with your name, address, daytime telephone number
and description of the problem. Carefully package the product and send with shipping and insurance prepaid to:
Pelstar, LLC
Attention R/A#_____________
Return Department
9500 West 55th Street
McCook, IL 60525
Extended Warranty Available*
This scale is eligible for Health o meter® Professional ScaleSurance Extended Warranty Program. ScaleSurance
extends the warranty period for an additional two years. This extension to the standard Limited Warranty can be
purchased with new scales or for a facility’s existing scale before its current warranty has expired. To learn more, visit
www.homscales.com/scalesurance/ or contact your medical supply distributor.
*Not available in all countries
PELSTAR, LLC
9500 West 55th St. McCook, IL 60525-7110 USA
1-800-638-3722 or 1-708-377-0600
PLEASE REGISTER YOUR SCALE FOR WARRANTY COVERAGE AT:
www.homscales.com
Health o meter® is a registered trademark of Sunbeam Products, Inc. used under license.
Health o meter® Professional products are manufactured, designed, and owned by Pelstar, LLC.
We reserve the right to improve, enhance, or modify Health o meter® Professional product features or specifications
without notice.
© Pelstar, LLC 2019
P/N UM522KL_522KG Rev20190412 15
 Loading...