

Page 1

Expression Pedal
User Guide
Guía del usuario
Guide d’utilisation
Guida per l’uso
Benutzerhandbuch
Appendix
English (3–6)
Español (7–10)
Français (11–14)
Italiano (15–18)
Deutsch (19–22)
English (23)
Page 2

2
Page 3

User Guide (English)
Box Contents
HeadRush Expression Pedal
6 mm Hex Key
User Guide
Safety & Warranty Manual
Support
For the latest information about this product (documentation, technical specifications, system
requirements, compatibility information, etc.) and product registration, visit headrushfx.com.
For additional product support, visit headrushfx.com/support.
Features
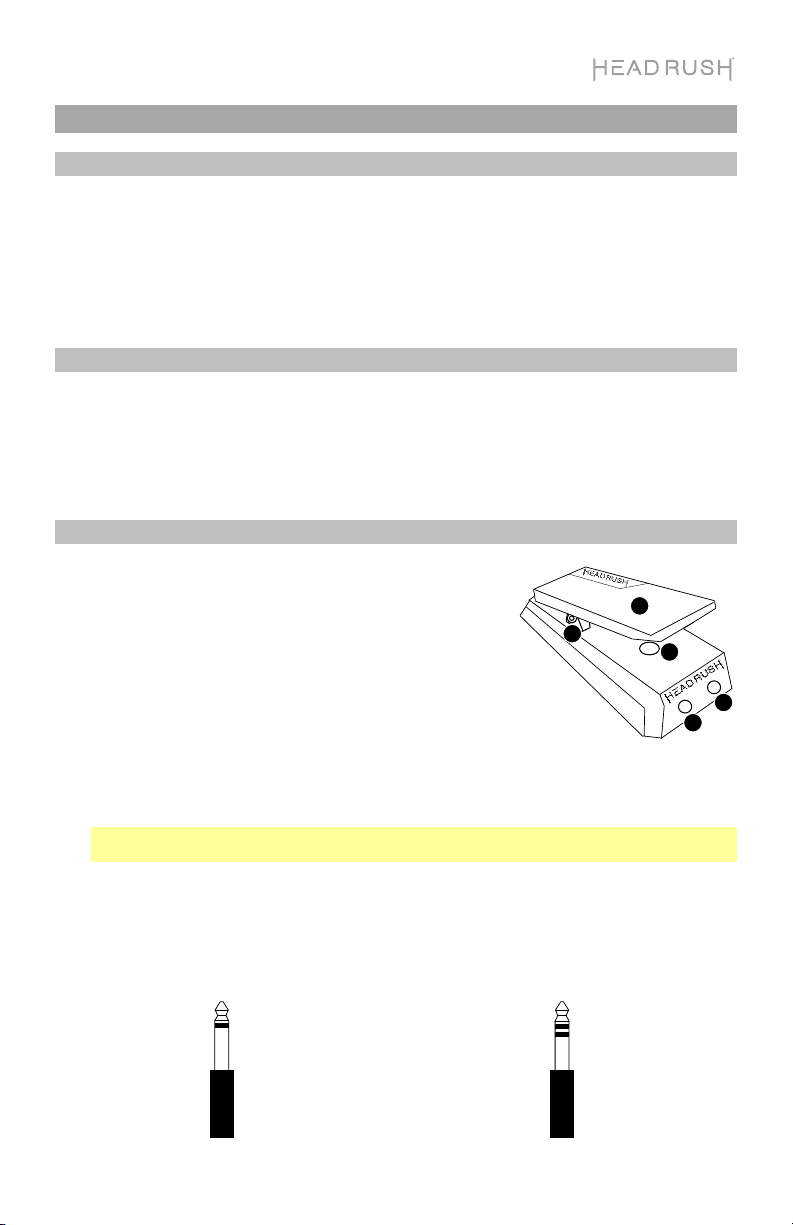
1. Foot Pedal: Place your foot on the foot pedal and move the
pedal from the toe-down to toe-up position (and vice-versa)
to adjust the parameter(s) on your connected device.
2. Toe Switch: Push down on the toe portion of the pedal
when it is in the toe-down position to activate the toe switch
function.
3. Tension Adjustment Screw: This screw enables you to
adjust the “action” of the pedal to suit your style by using
the included 6 mm hex key. If you would like a tighter or
heavier movement of the pedal, turn the screw clockwise. If
you would like a smoother or softer pedal movement, turn
the screw counter-clockwise.
Important: For fine adjustment only. Do not turn the bolt more than a 1/2 revolution in either
direction.
4. Expression Pedal Output: (1/4”/6.35 mm, TRS): Connect this output to the expression pedal
input of your device using a standard 1/4" (6.35 mm) TRS cable. See the diagram below for an
example of a TRS connector.
5. Toe Switch Output: (1/4”/6.35 mm, TS): Connect this output to the toe switch input of your
device using a standard 1/4" (6.35 mm) TS cable. See the diagram below for an example of a
TS connector.
1/4" (6.35 mm)
TS - Toe Switch
1/4" (6.35 mm)
TRS - Expression Pedal
3
1
2
5
4
3
Page 4
Operation
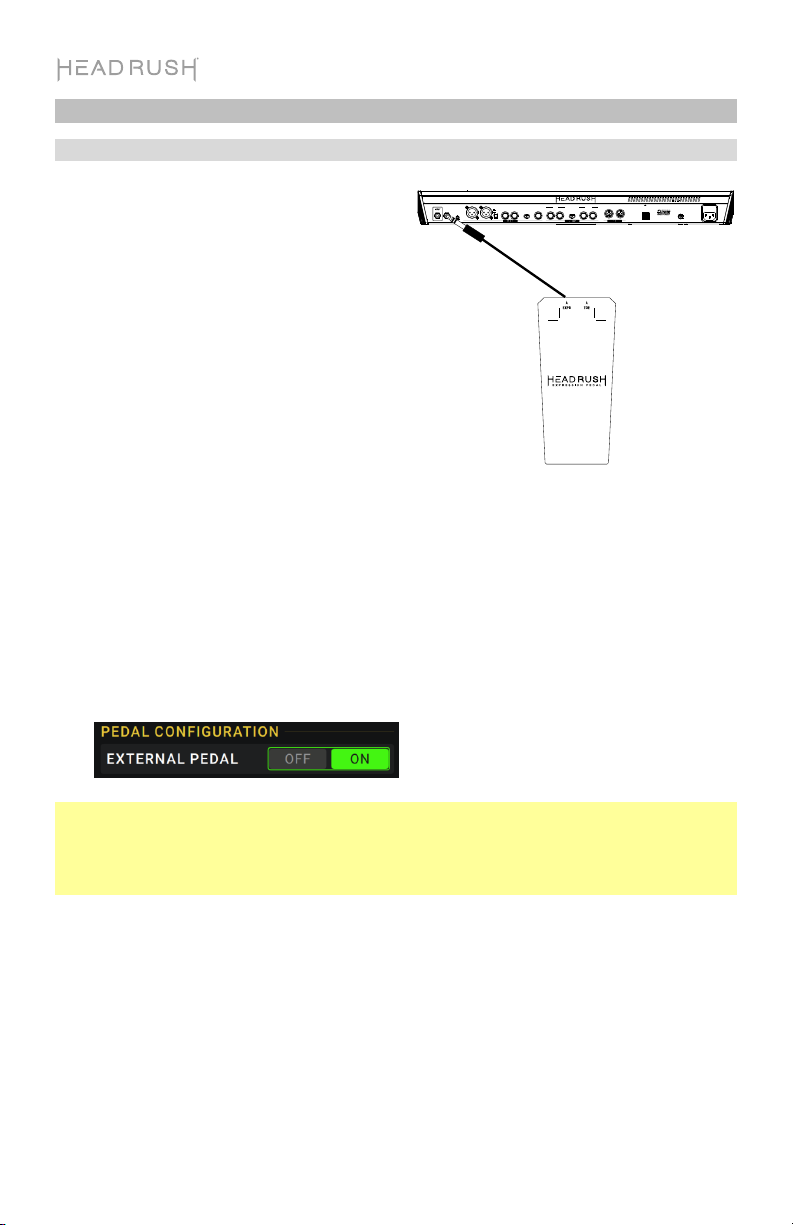
Setup with the HeadRush Pedalboard
When connected to a HeadRush Pedalboard, you
can use the HeadRush Expression Pedal to control
RIGHT LEF T (MON O)
EXPR 2
AUX IN
SEND
GND
LEFT (MONO)
LIFT
AMP LINE
RACK STOMP
the parameter(s) assigned to Bank B of a rig. For
more information on assigning parameters from
your rig to the HeadRush Expression Pedal, please
consult the HeadRush Pedalboard User Guide
available at headrushfx.com.
To set up the HeadRush Expression Pedal with
the HeadRush Pedalboard:
1. Connect the Expression output of the
HeadRush Expression Pedal to the
HeadRush Pedalboard's EXPR 2 input using
a standard 1/4" (6.35 mm) TRS cable.
2. On the HeadRush Pedalboard, tap the ...
icon on the top right of the screen and then
tap Global Settings to enter the Global
Settings menu.
3. In the Global Settings menu go to page 3 by
selecting/tapping the 3 on the bottom of the
Global Settings menu.
4. On Global Settings page 3, turn Pedal
Configuration's External Pedal from Off to
On.
The HeadRush Expression Pedal will now
control the parameter(s) assigned to Bank B
of a rig.
Note: The HeadRush Expression Pedal’s built-in toe-switch feature is not supported by the
HeadRush Pedalboard. If you are using the Classic mode for the expression pedal of a rig, the
HeadRush Pedalboard’s internal pedal toe switch will activate or deactivate parameter(s)
assigned to Bank A only. If you are using the Advanced mode for the expression pedal of the
rig, the HeadRush Pedalboard’s internal pedal toe switch will be disabled entirely.
EXHAUST-DO N OT BL OCK
OUT/THRUINRETURN
RIGHT LEFT (MONO)RIGHTPHONES LEFT (MONO)RIGHT
USB
POWER
PATENT PENDING
4
Page 5

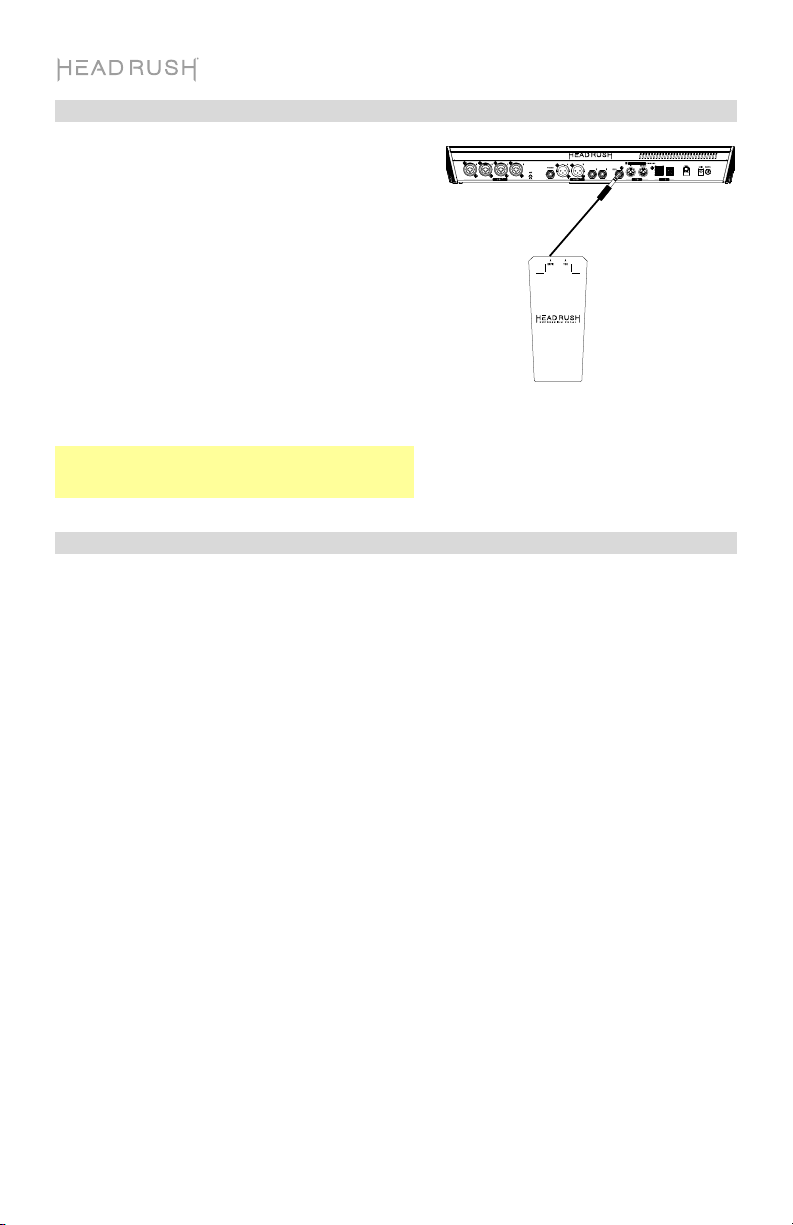
Setup with the HeadRush Gigboard
When connected to a HeadRush Gigboard,
you can use the HeadRush Expression Pedal
to control the parameter(s) assigned to Bank
A and/or Bank B of a rig. You can switch
between controlling Bank A and Bank B on
the Gigboard by using the toe switch feature
on the HeadRush Expression Pedal. For more
information on assigning parameters from
your rig to the HeadRush Expression Pedal,
please consult the HeadRush Gigboard User
Guide available at headrushfx.com.
To set up the HeadRush Expression Pedal
with the HeadRush Gigboard:
1. Connect the Expression output of the
HeadRush Expression Pedal to the
EXPR input using a standard 1/4" (6.35
mm) TRS cable.
2. Connect the Toe output of the
HeadRush Expression Pedal to the Toe
input using a standard 1/4" (6.35 mm)
TS cable.
3. On the HeadRush Pedalboard, tap the
... icon on the top right of the screen
and then tap Global Settings to enter
the Global Settings menu.
4. On the Global Settings page under the
External Pedal/Ext Amp parameters,
set the Toe Switch parameter to be
MOMNT, and Pedal Polarity parameter
to be NORM.
The HeadRush Expression Pedal will
now be able to control the parameter(s)
assigned to Bank A and/or Bank B of a
rig.
Design Development
Artwork Approval
5
Page 6
Setup with the HeadRush Looperboard
When connected to a HeadRush Looperboard, you
can use the HeadRush Expression Pedal to control
up to 4 parameters at a time, including FX Rack
Parameters, Track Volume, and Track Panning. For
more information on assigning parameters from your
rig to the HeadRush Expression Pedal, please
consult the HeadRush Looperboard User Guide
available at headrushfx.com.
To set up the HeadRush Expression Pedal with
the HeadRush Looperboard:
Connect the Expression output of the HeadRush
Expression Pedal to the EXPR input using a
standard 1/4" (6.35 mm) TRS cable. The HeadRush
Expression Pedal will now control any assigned
parameters for a loop.
Note: The HeadRush Expression Pedal’s built-in
toe-switch feature is not supported by the
HeadRush Looperboard.
Setup with other devices
Other devices such as guitar effects processors, vocal effects processors, keyboards, etc. may also
be compatible with the HeadRush Expression Pedal. If you are unsure if your device is compatible
with the HeadRush Expression Pedal, please consult the device's manual or manufacturer to confirm
that the specifications listed in the end of this manual match the device’s requirements.
To set up the HeadRush Expression Pedal with other devices:
1. If your device has an input for an expression pedal, connect the Expression output of the
HeadRush Expression Pedal to this input using a standard 1/4" (6.35 mm) TRS cable.
2. If your device has an input for a toe switch, connect the Toe output of the HeadRush
Expression Pedal to this input using a standard 1/4" (6.35 mm) TS cable.
3. If necessary, change any settings on your device to enable the functionality of the expression
pedal and toe switch.
6
Page 7
Guía del usuario (Español)
Contenido de la caja
HeadRush Expression Pedal
Llave Hexagonal de 6 mm
Guía del usuario
Manual sobre la seguridad y garantía
Soporte
Para obtener la información más reciente acerca de este producto (documentación,
especificaciones técnicas, requisitos de sistema, información de compatibilidad, etc.) y
registrarlo, visite headrushfx.com.
Para obtener soporte adicional del producto, visite headrushfx.com/support.
Características
1. Pedal: Coloque sus pies sobre el pedal y muévalo desde la
posición con los dedos del pie hacia abajo hasta la posición
con los dedos del pie hacia arriba (y viceversa) para ajustar
los parámetros de su dispositivo conectado.
2. Interruptor de dedo del pie: Empuje hacia abajo sobre la
porción del pedal correspondiente a los dedos del pie
cuando el mismo se encuentre en la posición con los dedos
del pie hacia abajo para activar la función del interruptor de
dedo del pie.
3. Tornillo de ajuste de tensión: Este tornillo le permite
ajustar la "acción" del pedal para que se adapte a su estilo
utilizando la llave hexagonal de 6 mm incluida. Si desea un movimiento del pedal más ajustado
o pesado, gire el tornillo en sentido horario. Si desea un movimiento del pedal más suave o
liviano, gírelo en sentido antihorario.
Importante: Realice solamente ajustes finos. No gire el perno más de media vuelta en
cualquiera de las direcciones.
4. Salida para pedal de expresión: (1/4 pulg./6,35 mm, TRS): Conecte esta salida a la entrada
para pedal de expresión de su dispositivo utilizando un cable TRS estándar de 6,35 mm (1/4
pulg.). Consulte en el siguiente diagrama un ejemplo de un conector TRS.
5. Salida para interruptor de dedo del pie: (1/4 pulg./6,35 mm, TS): Conecte esta salida a la
entrada para interruptor de dedo del pie de su dispositivo utilizando un cable TS estándar de
6,35 mm (1/4 pulg.). Consulte en el siguiente diagrama un ejemplo de un conector TRS.
3
1
2
5
4
TS - Interruptor de dedo del pie
TRS - Pedal de expresión
7
Page 8
Funcionamiento
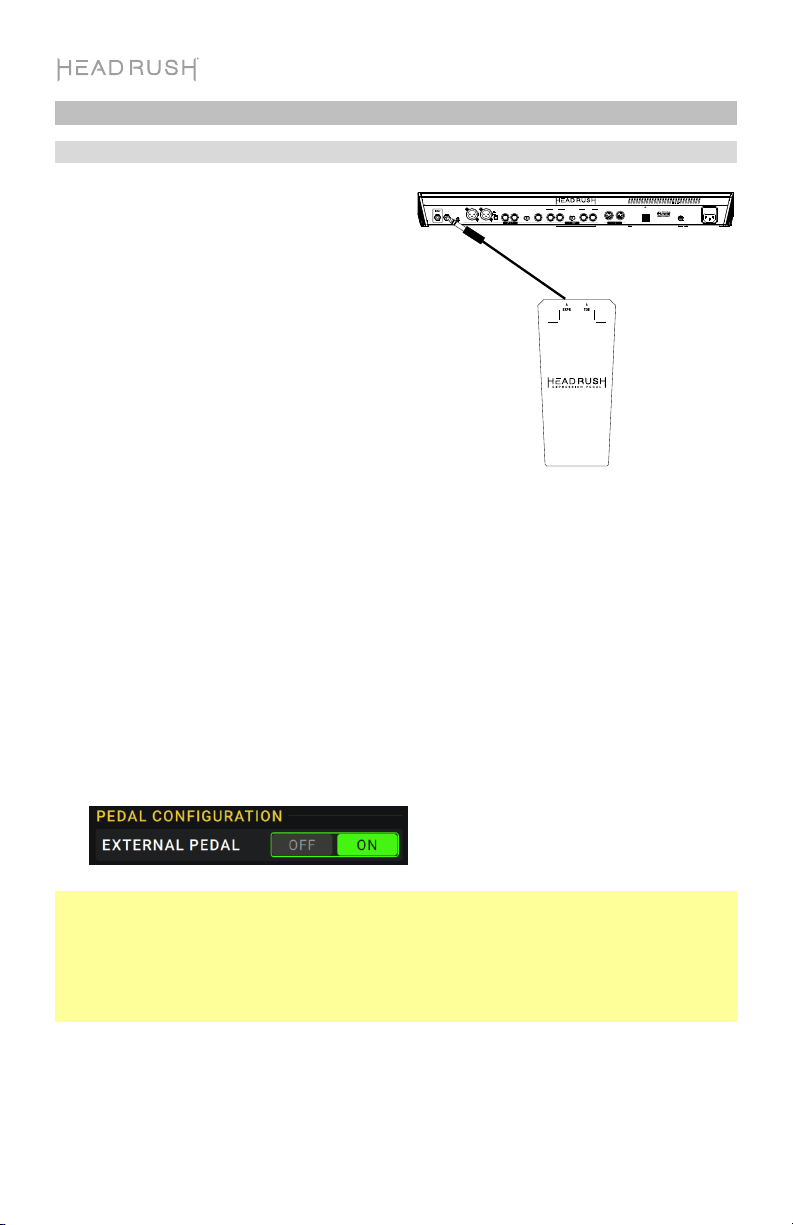
Instalación con HeadRush Pedalboard
Al conectarse con una HeadRush Pedalboard,
puede utilizar el pedal de expresión HeadRush
RIGHT LEF T (MON O)
EXPR 2
AUX IN
SEND
GND
LEFT (MONO)
LIFT
AMP LINE
RACK STOMP
Expression Pedal para controlar los parámetros
asignados al banco B de una configuración. Para
obtener más información sobre cómo asignar
parámetros desde su configuración al pedal de
expresión HeadRush Expression Pedal, consulte la
guía del usuario de HeadRush Pedalboard
disponible en headrushfx.com.
Cómo configurar el pedal de expresión
HeadRush Expression Pedal con la HeadRush
Pedalboard:
1. Conecte la salida de expresión Expression
del pedal de expresión HeadRush Expression
Pedal a la entrada EXPR 2 de la HeadRush
Pedalboard utilizando un cable TRS estándar
de 6,35 mm (1/4 pulg.).
2. En la HeadRush Pedalboard, toque el icono
... en la parte superior derecha de la pantalla
y luego toque Global Settings para entrar al
menú Global Settings (Ajustes globales).
3. En el menú Global Settings, vaya a la página
3 seleccionando/tocando el 3 que se
encuentra en la parte inferior del menú
Global Settings.
4. En la página 3 de Global Settings, cambie la
opción External Pedal de Pedal Configuration
de Off (Desactivado) a On (Activado).
El pedal de expresión HeadRush Expression
Pedal ahora controlará los parámetros
asignados al banco B de una configuración.
Nota: La característica de interruptor de dedo del pie integrado del pedal de expresión
HeadRush Expression Pedal no es compatible con la HeadRush Pedalboard. Si está utilizando
el modo clásico para el pedal de expresión de una configuración, el interruptor de dedo del
pie interno de la HeadRush Pedalboard únicamente activará o desactivará los parámetros
asignados al banco A. Si está utilizando el modo avanzado para el pedal de expresión de la
configuración, el interruptor de dedo del pie interno de la HeadRush Pedalboard estará
completamente desactivado.
EXHAUST-DO N OT BL OCK
OUT/THRUINRETURN
RIGHT LEFT (MONO)RIGHTPHONES LEFT (MONO)RIGHT
USB
POWER
PATENT PENDING
8
Page 9

Instalación con la HeadRush Pedalboard
Una vez conectado a una HeadRush Pedalboard,
puede utilizar el pedal de expresión HeadRush
Expression Pedal para controlar los parámetros
asignados al banco B de una configuración. Puede
alternar entre controlar el banco A y el banco B de la
Gigboard para utilizar la característica del interruptor
de dedo del pie del pedal de expresión HeadRush
Expression Pedal. Para obtener más información
sobre cómo asignar parámetros desde su
configuración al pedal de expresión HeadRush
Expression Pedal, consulte la guía del usuario de
HeadRush Gigboard disponible en headrushfx.com.
Cómo configurar el pedal de expresión HeadRush
Expression Pedal con la HeadRush Gigboard:
1. Conecte la salida de expresión Expression del
pedal de expresión HeadRush Expression Pedal
a la entrada EXPR utilizando un cable TRS
estándar de 6,35 mm (1/4 pulg.).
2. Conecte la salida de Toe del pedal de expresión
HeadRush Expression Pedal a la entrada Toe
utilizando un cable TS estándar de 6,35 mm (1/4
pulg.).
3. En la pedalera HeadRush Pedalboard, toque el
icono ... en la esquina superior derecha de la
pantalla y luego toque Global Settings para
entrar al menú Global Settings (Ajustes globales).
4. En la página Global Settings bajo los parámetros
External Pedal/Ext Amp, ajuste el parámetro
Toe Switch a MOMNT y el parámetro Pedal
Polarity a NORM.
El pedal de expresión HeadRush Expression
Pedal ahora será capaz de controlar los
parámetros asignados al banco A y/o el banco B
de una configuración.
Design Development
Artwork Approval
9
Page 10

Instalación con la HeadRush Pedalboard
Una vez conectado con una HeadRush
Looperboard, puede utilizar el pedal de expresión
HeadRush Expression Pedal para controlar hasta
4 parámetros a la vez, incluyendo los parámetros
del rack de efectos, el volumen de la pista y el
balance (panning) de la pista. Para obtener más
información sobre cómo asignar parámetros
desde su configuración al pedal de expresión
HeadRush Expression Pedal, consulte la guía del
usuario de HeadRush Looperboard disponible en
headrushfx.com.
Cómo configurar el pedal de expresión
HeadRush Expression Pedal con la HeadRush
Looperboard:
Conecte la salida de expresión Expression del
pedal de expresión HeadRush Expression Pedal a
la entrada EXPR utilizando un cable TRS estándar
de 6,35 mm (1/4 pulg.). El pedal de expresión
HeadRush Expression Pedal ahora controlará
cualquier parámetro asignado para un bucle.
Nota: La característica de interruptor de dedo del
pie integrado del pedal de expresión HeadRush
Expression Pedal no es compatible con la
HeadRush Looperboard.
Instalación con otros dispositivos
Es posible que otros dispositivos tales como procesadores de efectos de guitarra, procesadores de
efectos vocales, etc., también sean compatibles con el pedal de expresión HeadRush Expression
Pedal. Si no está seguro si su dispositivo es compatible con el pedal de expresión HeadRush
Expression Pedal, consulte el manual del dispositivo o el fabricante para confirmar que las
especificaciones enumeradas al final de este manual coinciden con los requerimientos del
dispositivo.
Cómo configurar el pedal de expresión HeadRush Expression Pedal con otros dispositivos:
1. Si su dispositivo tiene una entrada para pedal de expresión, conecte la salida Expression del
pedal de expresión HeadRush Expression Pedal a esta entrada utilizando un cable TRS
estándar de 6,35 mm (1/4 pulg.).
2. Si su dispositivo tiene una entrada para interruptor de dedo del pie, conecte la salida Toe del
pedal de expresión HeadRush Expression Pedal a esta entrada utilizando un cable TS estándar
de 6,35 mm (1/4 pulg.).
3. De ser necesario, modifique los ajustes en sus dispositivos para activar la funcionalidad del
pedal de expresión y el interruptor de dedo del pie.
10
Page 11

Guide d’utilisation (Français)
Contenu de la boîte
HeadRush Expression Pedal
Clé Hexagonale de 6 mm
Guide d’utilisation
Consignes de sécurité et informations concernant la garantie
Assistance technique
Pour les toutes dernières informations concernant la documentation, les spécifications
techniques, la configuration requise, la compatibilité et l’enregistrement du produit, veuillez
visiter headrushfx.com.
Pour de l’assistance supplémentaire, veuillez visiter le site headrushfx.com/support.
Caractéristiques
1. Pédale : Placez le pied sur la pédale et appuyez sur la partie
avant (orteils) puis relâchez (et vice-versa) pour régler les
paramètres de l’appareil connecté.
2. Contacteur au pied : Appuyez sur la partie avant (orteils)
lorsque la pédale est déjà abaissée pour activer la fonction
de commutation.
3. Vis de réglage de tension : Cette vis permet de régler le
mouvement de la pédale en fonction du style de jeu. Si vous
souhaitez un mouvement de la pédale plus tendu, utilisez la
clé hexagonale de 6 mm fournie pour tourner la vis dans le
sens des aiguilles d'une montre. Si vous souhaitez un
mouvement de la pédale plus souple, tournez la vis dans le
sens contraire des aiguilles d'une montre.
Important : Réglage de précision seulement. Ne tournez pas la vis de plus d'un demi-tour dans
un sens ou dans l'autre.
4. Sortie pour pédale d’expression : (6,35 mm, TRS) : Cette sortie permet de relier la pédale
d’expression à votre appareil en utilisant un câble TRS 6,35 mm. Veuillez consulter le schéma
ci-dessous pour un exemple de connecteur TRS.
5. Sortie pour contacteur au pied : (6,35 mm, TS) : Cette sortie permet de relier le contacteur au
pied à votre appareil en utilisant un câble TS 6,35 mm. Veuillez consulter le schéma ci-dessous
pour un exemple de connecteur TS.
3
TS - Contacteur au pied
TRS - Pédale d'expression
1
2
5
4
11
Page 12

Fonctionnement
Utilisation avec le HeadRush Pedalboard
Lorsque reliée à un HeadRush Pedalboard, vous
pouvez utiliser la HeadRush Expression Pedal
pour commander les paramètres assignés à la
banque B d’une configuration personnalisée. Pour
en savoir plus sur comment assigner des
paramètres d’une configuration personnalisée à la
HeadRush Expression Pedal, veuillez consulter le
guide d'utilisation du HeadRush Pedalboard
téléchargeable à partir de headrushfx.com.
Pour installer la HeadRush Expression Pedal
avec le HeadRush Pedalboard :
1. Reliez la sortie Expression de la HeadRush
Expression Pedal à l’entrée EXPR 2 du
HeadRush Pedalboard en utilisant un câble
TRS standard de 6,35 mm.
2. Sur le HeadRush Pedalboard, appuyez sur
l'icône ... en haut à droite de l'écran, puis
appuyez sur Global Settings pour accéder
au menu Global Settings.
3. Dans le menu Global Settings, allez à la
page 3 en appuyant sur le 3 dans le bas du
menu Global Settings.
4. Sur la page 3 du menu Global Settings,
activez l’option External Pedal du paramètre
Pedal Configuration.
La HeadRush Expression Pedal commandera
maintenant les paramètres assignés à la
banque B d'une configuration personnalisée.
RIGHT LEFT (MONO)
EXPR 2
AUX IN
SEND
GND
LEFT (MONO)
LIFT
AMP LINE
RACK STOMP
EXHAUST-DO N OT BL OCK
OUT/THRUINRETURN
RIGHT LEFT (MONO)RIGHTPHONES LEFT (MONO)RIGHT
USB
POWER
PATENT PENDING
Remarque : La fonction de contacteur au pied de la HeadRush Expression Pedal n’est pas
prise en charge par le HeadRush Pedalboard. Si vous utilisez le mode classique pour la pédale
d'expression d'une configuration personnalisée, la fonction de contacteur au pied de la pédale
interne du HeadRush Pedalboard permet d’activer et de désactiver les paramètres assignés à
la banque A uniquement. Si vous utilisez le mode avancé pour la pédale d'expression d'une
configuration personnalisée, la fonction de contacteur au pied de la pédale interne du
HeadRush Pedalboard sera désactivée.
12
Page 13

Utilisation avec le HeadRush Gigboard
Lorsque reliée à un HeadRush Gigboard, vous
pouvez utiliser la HeadRush Expression Pedal pour
commander les paramètres assignés à la banque A
et/ou à la banque B d’une configuration
personnalisée. Vous pouvez basculer entre la
commande de la banque A et de la banque B du
Gigboard en utilisant la fonction de contacteur au
pied de la
savoir plus sur comment assigner des paramètres
d’une configuration personnalisée à la HeadRush
Expression Pedal, veuillez consulter le guide
d'utilisation du HeadRush Gigboard téléchargeable
à partir de headrushfx.com.
Pour installer la HeadRush Expression Pedal
avec le HeadRush Gigboard :
1. Reliez la sortie Expression de la HeadRush
2. Reliez la sortie Toe de la HeadRush
3. Sur le HeadRush Gigboard, appuyez sur
4. Sur la page Global Settings, sous les
HeadRush Expression Pedal. Pour en
Expression Pedal à l’entrée EXPR du
HeadRush Gigboard en utilisant un câble TRS
standard de 6,35 mm.
Expression Pedal à l’entrée Toe du HeadRush
Gigboard en utilisant un câble TS standard de
6,35 mm.
l'icône ... en haut à droite de l'écran, puis
appuyez sur Global Settings pour accéder au
menu Global Settings.
paramètres External Pedal/Ext Amp, réglez
Toe Switch sur MOMNT et Pedal Polarity sur
NORM.
La HeadRush Expression Pedal commandera
maintenant les paramètres assignés à la
banque A et/ou à la banque B d'une
configuration personnalisée.
Design Development
ArtworkApproval
13
Page 14

Utilisation avec le HeadRush Looperboard
Lorsque reliée à un HeadRush Gigboard, vous
pouvez utiliser la HeadRush Expression Pedal
pour commander jusqu’à 4 paramètres à la
fois, incluant les paramètres FX Rack et le
volume et le panoramique de la piste. Pour en
savoir plus sur comment assigner des
paramètres d’une configuration personnalisée
à la HeadRush Expression Pedal, veuillez
consulter le guide d'utilisation du HeadRush
Looperboard téléchargeable à partir de
headrushfx.com.
Pour installer la HeadRush Expression
Pedal avec le HeadRush Looperboard :
Reliez la sortie Expression de la HeadRush
Expression Pedal à l’entrée EXPR du
HeadRush Looperboard en utilisant un câble
TRS standard de 6,35 mm La HeadRush
Expression Pedal commandera maintenant les
paramètres assignés à une boucle.
Remarque : La fonction de contacteur au
pied de la HeadRush Expression Pedal n’est
pas prise en charge par le HeadRush
Looperboard.
Installation avec d'autres appareils
D'autres appareils tels que les processeurs d'effets de guitare, les processeurs d'effets vocaux, les
claviers, etc., peuvent également être compatibles avec la HeadRush Expression Pedal. Si vous ne
savez pas si votre appareil est compatible avec la HeadRush Expression Pedal, veuillez consulter le
guide d’utilisation de l’appareil ou le fabricant afin de vous assurer que les spécifications répertoriées
à la fin de ce guide correspondent aux exigences de l’appareil.
Pour installer la HeadRush Expression Pedal avec d’autres appareils :
1. Si votre appareil dispose d’une entrée pour pédale d’expression, reliez la sortie Expression de
la HeadRush Expression Pedal à cette entrée en utilisant un câble TRS standard de 6,35 mm.
2. Si votre appareil dispose d’une entrée pour contacteur au pied, reliez la sortie Toe de la
HeadRush Expression Pedal à cette entrée en utilisant un câble TS standard de 6,35 mm.
3. Si nécessaire, modifiez les paramètres de votre appareil pour activer les fonctionnalités de la
pédale d’expression et du contacteur au pied.
14
Page 15

Guida per l’uso (Italiano)
Contenuti della confezione
HeadRush Expression Pedal
Chiave Esagonale da 6 mm
Guida per l’uso
Istruzioni di sicurezza e garanzia
Assistenza
Per le ultime informazioni in merito a questo prodotto (documentazione, specifiche tecniche,
requisiti di sistema, informazioni sulla compatibilità, ecc.) e per effettuarne la registrazione,
recarsi alla pagina headrushfx.com.
Per ulteriore assistenza sul prodotto, recarsi alla pagina headrushfx.com/support.
Caratteristiche
1. Pedale: Posizionare il piede sul pedale e spostare la punta
del piede da posizione rialzata a posizione abbassata (e
viceversa) per regolare i parametri sul dispositivo collegato.
2. Interruttore a punta: Spingere verso il basso la punta del
pedale quando si trova in posizione abbassata per attivare
la funzione dell’interruttore.
3. Vite di regolazione della tensione: Questa vite consente di
regolare “l’azione” del pedale in base al proprio stile
utilizzando la chiave esagonale da 6 mm inclusa. Se si
desidera un movimento più stretto o pesante del pedale,
girare la vite in senso orario. Se si desidera un movimento
del pedale più morbido o più leggero, ruotare la vite in
senso antiorario.
Importante: Solo per regolazione fine. Non ruotare il bullone più di 1/2 giro in entrambe le
direzioni.
4. Uscita del pedale di espressione: (1/4”/6,35 mm, TRS): Collegare questa uscita all’ingresso
del pedale di espressione del dispositivo utilizzando un cavo TRS standard da 1/4” (6,35 mm).
Fare riferimento allo schema seguente per un esempio di connettore TRS.
5. Uscita dell’interruttore a punta: (1/4”/6,35 mm, TS): Collegare questa uscita all’ingresso
dell’interruttore a punta del dispositivo utilizzando un cavo TS standard da 1/4” (6,35 mm). Fare
riferimento allo schema seguente per un esempio di connettore TS.
1
3
2
5
4
TS – Interruttore a Punta
TRS – Pedale di Espessione
15
Page 16

Funzionamento
Configurazione HeadRush Pedalboard
Quando si è connessi a HeadRush Pedalboard, è
possibile utilizzare HeadRush Expression Pedal
RIGHT LEFT (MONO)
EXPR 2
AUX IN
SEND
GND
LEFT (MONO)
LIFT
AMP LINE
RACK STOMP
per controllare il/i paramentro/i assegnati al Banco
B di un impianto. Per ulteriori informazioni
sull’assegnazione dei parametri dall’impianto al
HeadRush Expression Pedal, si prega di
consultare la Guida per l’utente di HeadRush
Pedalboard disponibile sul sito headrushfx.com.
Per impostare HeadRush Expression Pedal con
HeadRush Pedalboard:
1. Connettere l’uscita Expression di HeadRush
Expression Pedal all’ingresso EXPR 2 di
HeadRush Pedalboard utilizzando un cavo
TRS standard da 1/4” (6,35 mm).
2. Sull’HeadRush Pedalboard, toccare l’icona
... in alto a destra sullo schermo e quindi
toccare Global Settings per accedere al
menu Global Settings.
3. Nel menu Global Settings andare a pagina 3
selezionando il numero 3 nella parte inferiore
del menu Global Settings.
4. A pagina 3 del menu Global Settings, girare
External Pedal della Pedal Configuration da
Off a On.
HeadRush Expression Pedal controllerà ora i
parametri assegnati al Banco B di un
impianto.
Nota bene: La funzione di interruttore a pedale incorporata nel HeadRush Expression Pedal’s
non è supportata dalla HeadRush Pedalboard. Se si utilizza la modalità Classica per il pedale
di espressione di un impianto, l’interruttore a punta interno di HeadRush Pedalboard attiverà o
disattiverà il/i parametro/i assegnati solo al Banco A. Se si utlizza la modalità Avanzata per il
pedale di espressione di un impianto, l’interruttore a punta interno di HeadRush Pedalboard’s
verrà disattivato completamente.
EXHAUST-DO N OT BL OCK
OUT/THRUINRETURN
RIGHT LEFT (MONO)RIGHTPHONES LEFT (MONO)RIGHT
USB
POWER
PATENT PENDING
16
Page 17

Configurazione HeadRush Gigboard
Quando si è connessi a HeadRush Gigboard, è
possibile utilizzare HeadRush Expression Pedal per
controllare i parametri assegnati al Banco A e/o al
Banco B di un impianto. É possibile alternare il
controllo del Banco A e del Banco B su Gigboard
utilizzando la funzione di interruttore a punta su
HeadRush Expression Pedal. Per ulteriori informazioni
sull’assegnazione dei parametri dall’impianto a
HeadRush Expression Pedal, si prega di consultare la
Guida per l’utente di HeadRush Pedalboard disponibile
al sito headrushfx.com.
Per impostare HeadRush Expression Pedal con
HeadRush Gigboard:
1. Connettere l’uscita Expression di HeadRush
Expression Pedal all’ingresso EXPR utilizzando
un cavo TRS standard da 1/4” (6,35 mm).
2. Connettere l’uscita Toe di HeadRush Expression
Pedal all’ingresso Toe utilizzando un cavo TS
standard da 1/4” (6,35 mm).
3. Su HeadRush Pedalboard, toccare l’icona ... in
alto a destra sullo schermo e quindi toccare
Global Settings per accedere al menu Global
Settings.
4. Nella pagina Global Settings sotto i parametri
External Pedal/Ext Amp, impostare il parametro
Toe Switch su MOMNT, e il parametro Pedal
Polarity su NORM.
HeadRush Expression Pedal sarà ora in grado di
controllare il/i parametro/i assegnato al Banco A
e/o al Banco B dell’impianto.
Design Development
ArtworkApprova l
17
Page 18

Configurazione HeadRush Looperboard
Quando si è connessi all’ HeadRush Looperboard, è
possibile utilizzare il HeadRush Expression Pedal per
controllare fino a 4 parametri alla volta, inclusi i
parametri FX Rack, Volume Traccia e Pan Traccia. Per
ulteriori informazioni sull’assegnazione dei parametri
dall’impianto al HeadRush Expression Pedal, si prega
di consultare la Guida per l’utente di HeadRush
Pedalboard disponibile al sito headrushfx.com.
Per impostare HeadRush Expression Pedal con
HeadRush Looperboard:
Connettere l’uscita Expression del HeadRush
Expression Pedal all’ingresso EXPR utilizzando un cavo
TRS standard da 1/4” (6,35 mm). Il HeadRush
Expression Pedal controllerà ora tutti i parametri
assegnati per un loop.
Nota bene: La funzione di interruttore a pedale
incorporata nel HeadRush Expression Pedal’s non è
supportata dalla HeadRush Looperboard.
Configurazione con altri dispositivi
Altri dispositivi come processore di effetti per chitarra, processori di effetti vocali, tastiere, ecc.
potrebbero anche essere compatibili con HeadRush Expression Pedal. Se non si è certi che il
proprio dispositivo sia compatibile con HeadRush Expression Pedal, si prega di consultare il
manuale del dispositivo o il produttore per verificare che le specifiche elencate alla fine di questo
manuale corrispondano ai requisiti del dispositivo.
Per impostare HeadRush Expression Pedal con altri dispositivi:
1. Se il tuo dispositivo ha un ingresso per un pedale di espressione, collegare l’uscita Expression
di HeadRush Expression Pedal a questo ingresso utilizzando un cavo TRS standard da 1/4”
(6,35 mm).
2. Se il dispositivo ha un ingresso per un interruttore a punta, connettere Toe di HeadRush
Expression Pedal a questo ingresso utilizzando un cavo TS standard da 1/4” (6,35 mm).
3. Se necessario, modificare le impostazioni sul dispositivo per abilitare le funzionalità del pedale
di espressione e dell’interruttore a punta.
18
Page 19

Benutzerhandbuch (Deutsch)
Lieferumfang
HeadRush Expression Pedal
6 mm-Inbusschlüssels
Benutzerhandbuch
Sicherheitshinweise und Garantieinformationen
Kundendienst
Für die neuesten Informationen zu diesem Produkt (Dokumentation, technische Daten,
Systemanforderungen, Informationen zur Kompatibilität etc.) und für die Produktregistrierung
besuchen Sie headrushfx.com.
Für zusätzlichen Produkt-Support besuchen Sie headrushfx.com/support.
Funktionen
1. Fußpedal: Platzieren Sie Ihren Fuß auf dem Fußpedal und
bewegen Sie das Pedal von der Zehenposition nach oben
(und umgekehrt), um die Parameter Ihres angeschlossenen
Geräts anzupassen.
2. Zehen-Schalter: Drücken Sie auf den Zehenbereich des
Pedals, wenn es sich in der Zehenposition nach unten
befindet, um die Zehenschalterfunktion zu aktivieren.
3. Spannungseinstellschraube: Mit dieser Schraube können
Sie die „Aktion“ des Pedals mithilfe des mitgelieferten 6
mm-Inbusschlüssels an Ihren Stil anpassen. Wenn Sie eine
schwerere Pedalbewegung bevorzugen, drehen Sie die
Schraube im Uhrzeigersinn. Wenn Sie eine sanftere oder
weichere Pedalbewegung wünschen, drehen Sie die
Schraube gegen den Uhrzeigersinn.
Wichtig: Nur zur Feineinstellung. Drehen Sie die Schraube nicht mehr als eine halbe
Umdrehung in beide Richtungen.
4. Expression Pedal-Ausgang: (1/4"/6,35 mm, TRS): Verbinden Sie diesen Ausgang mit den
Expression-Pedaleingang Ihres Geräts unter Verwendung eines 1/4" (6,35 mm) Standard-TRSKabels. Ein Beispiel finden Sie in der folgenden Abbildung eines TRS-Anschlusses.
5. Zehenschalterausgang: (1/4”/6,35 mm, TS): Verbinden Sie diesen Ausgang mit dem
Zehenschaltereingang Ihres Geräts unter Verwendung eines 1/4" (6,35 mm) Standard-TSKabels. Ein Beispiel finden Sie in der folgenden Abbildung eines TS-Anschlusses.
TS - Zehenschalter
TRS - Expression-Pedal
3
1
2
5
4
19
Page 20

Betrieb
Einrichten des HeadRush Pedalboard
Bei Anschluss an ein HeadRush-Pedalboard
können Sie mit dem HeadRush-Expression-Pedal
RIGHT LEFT (MONO)
EXPR 2
AUX IN
SEND
GND
LEFT (MONO)
LIFT
AMP LINE
die Parameter steuern, die der Bank B eines Rigs
zugewiesen sind. Weitere Informationen zum
Zuweisen von Parametern von Ihrem Rig zum
HeadRush Expression Pedal finden Sie im
HeadRush Pedalboard-Benutzerhandbuch unter
headrushfx.com.
So richten Sie das HeadRush Expression-Pedal
mit dem HeadRush-Pedalboard ein:
1. Verbinden Sie den Expression-Ausgang des
HeadRush Expression-Pedals mit dem EXPR
2-Eingang des HeadRush-Pedalboards über
ein handelsübliches 6,35 mm TRS-Kabel.
2. Tippen Sie im HeadRush-Pedalboard oben
rechts auf das Symbol ... und anschließend
auf Globale Einstellungen, um das Menü
Globale Einstellungen aufzurufen.
3. Gehen Sie im Menü Globale Einstellungen zu
Seite 3, indem Sie die 3 unten im Menü
Globale Einstellungen auswählen bzw. darauf
tippen.
4. Schalten Sie auf Seite 3 unter Globale
Einstellungen die Pedalkonfiguration des
Externe Pedals von "Aus" auf "Ein".
Das HeadRush Expression Pedal steuert nun
die Parameter, die der Bank B eines Rigs
zugewiesen sind.
Hinweis: Die integrierte Zehenschalterfunktion des HeadRush Expression Pedals wird vom
HeadRush Pedalboard nicht unterstützt. Wenn Sie den Classic-Modus für das ExpressionPedal eines Rigs verwenden, aktiviert oder deaktiviert der interne Pedalzehenschalter des
HeadRush-Pedalboards nur die Parameter, die der Bank A zugewiesen sind. Wenn Sie den
Erweiterten Modus für das Expression-Pedal des Rigs verwenden, ist der interne
Pedalzehenschalter des HeadRush-Pedalboards vollständig deaktiviert.
EXHAUST-DO N OT BL OCK
OUT/THRUINRETURN
RIGHT LEFT (MONO)RIGHTPHONES LEFT (MONO)RIGHT
RACK STOMP
USB
POWER
PATENT PENDING
20
Page 21

Einrichten des HeadRush Gigboard
Bei Anschluss an ein HeadRush-Gigboard
können Sie mit dem HeadRush Expression
Pedal die Parameter steuern, die der Bank A
oder B eines Rigs zugewiesen sind. Sie
können zwischen der Steuerung von Bank A
und Bank B auf dem Gigboard wechseln,
indem Sie die Zehenschalterfunktion am
HeadRush Expression-Pedal verwenden.
Weitere Informationen zum Zuweisen von
Parametern von Ihrem Rig zum HeadRush
Expression Pedal finden Sie im GigboardBenutzerhandbuch unter headrushfx.com.
So richten Sie das HeadRush ExpressionPedal mit dem HeadRush-Gigboard ein:
1. Verbinden Sie den ExpressionAusgang des HeadRush ExpressionPedals mit dem EXPR-Eingang über ein
handelsübliches 1/4" (6,35 mm) TRSKabel.
2. Verbinden Sie den Toe-Ausgang des
HeadRush-Expression-Pedals mit dem
Toe-Eingang über ein handelsübliches
1/4" (6,35 mm) TS-Kabel.
3. Tippen Sie im HeadRush-Pedalboard
oben rechts auf das Symbol ... und
anschließend auf Global Settings, um
das Menü Global Settings aufzurufen.
4. Stellen Sie auf der Seite Global Settings
unter den Parametern External
Pedal/Ext Amp den Parameter Toe
Switch auf MOMNT und den Parameter
Pedal Polarity auf NORM.
Das HeadRush Expression Pedal kann
nun den/die Parameter steuern, die der
Bank A oder B eines Rigs zugewiesen
sind.
Design Development
Artwork Approval
21
Page 22

Setup mit dem HeadRush Looperboard
Bei Anschluss an ein HeadRush-Looperboard können
Sie mit dem HeadRush-Expression-Pedal bis zu 4
Parameter gleichzeitig steuern, darunter FX-RackParameter, Track-Lautstärke und Track-Panning.
Weitere Informationen zum Zuweisen von Parametern
von Ihrem Rig zum HeadRush Expression Pedal finden
Sie im HeadRush Looperboard-Benutzerhandbuch
unter headrushfx.com.
So richten Sie das HeadRush Expression-Pedal mit
dem HeadRush-Looperboard ein:
Verbinden Sie den Expression-Ausgang des
HeadRush Expression-Pedals mit dem EXPR-Eingang
über ein handelsübliches 1/4" (6,35 mm) TRS -Kabel.
Das HeadRush-Expression-Pedal steuert nun alle
zugewiesenen Parameter für einen Loop.
Hinweis: Die integrierte Zehenschalterfunktion des
HeadRush Expression Pedals wird nicht vom
HeadRush Looperboard unterstützt.
Einrichten mit anderen Geräten
Andere Geräte wie Gitarreneffektprozessoren, Vokaleffektprozessoren, Keyboards usw. sind
möglicherweise auch mit dem HeadRush Expression-Pedal kompatibel. Wenn Sie sich nicht sicher
sind, ob Ihr Gerät mit dem HeadRush Expression Pedal kompatibel ist, konsultieren Sie das
Handbuch oder den Hersteller des Geräts, um sicherzustellen, dass die am Ende dieses Handbuchs
aufgeführten Spezifikationen den Anforderungen des Geräts entsprechen.
So richten Sie das HeadRush Expression Pedal mit anderen Geräten ein:
1. Wenn Ihr Gerät über einen Eingang für ein Expression-Pedal verfügt, schließen Sie den
Expression-Ausgang des HeadRush Expression-Pedals mit einem handelsüblichen 1/4" (6,35
mm) TRS-Kabel an diesen Eingang an.
2. Wenn Ihr Gerät über einen Eingang für einen Zehenschalter verfügt, schließen Sie den Toe-
Ausgang des HeadRush Expression Pedals mit einem handelsüblichen 6,35 mm (1/4") TSKabel an diesen Eingang an.
3. Ändern Sie gegebenenfalls Einstellungen an Ihrem Gerät, um die Funktion des ExpressionPedals und des Zehenschalters zu aktivieren.
22
Page 23

Appendix (English)
Technical Specifications
Potentiometer
Expression Output
Toe Switch
Toe Switch Output
Dimensions
(width x depth x height)
10 kΩ linear - wiper connected to TRS jack “Tip”
“Tip to Sleeve” resistance at max with pedal in Toe position
1/4” / 6.35 mm TRS output
Momentary style toe switch
1/4” / 6.35 mm TS output
10.3" x 4.9" x 2.6" / 262 x 125 x 67 mm
Weight
Specifications are subject to change without notice.
3.3 lbs / 1.5 kg
Trademarks & Licenses
HeadRush is a trademark of inMusic Brands, Inc., registered in the U.S. and other countries. All other
product names, company names, trademarks, or trade names are those of their respective owners.
23
Page 24

Manual Version 1.2
 Loading...