

Page 1
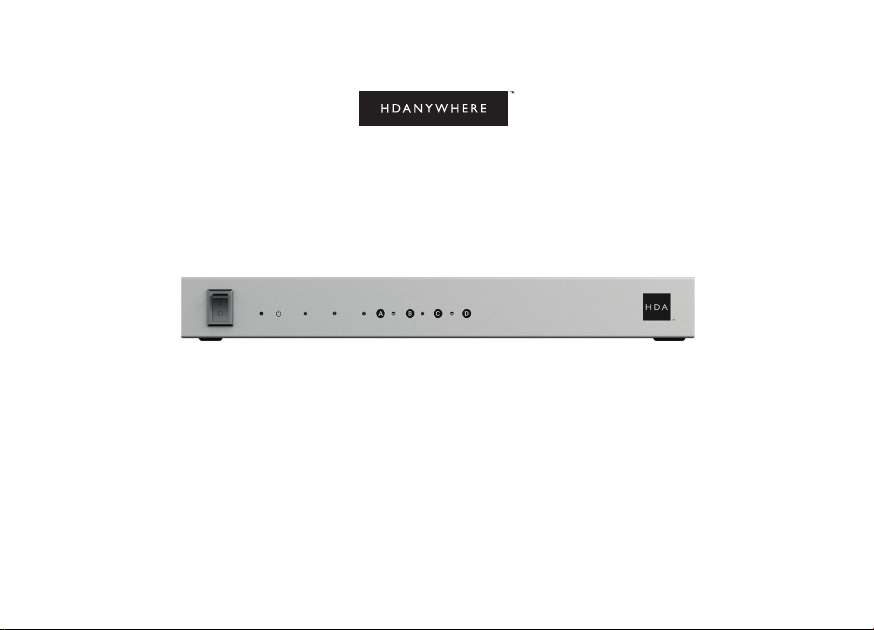
XTND 4K (40) TPC Splitter (1x4+1)
CODE: XTND4K14140TPC
Product Guide (English UK)
Revision 1: 28/08/20
Page 2
Contents
Contents, Glossary of terms 2-3
In the box, Features 4-5
Specications 6-7
XTND 4K (40) TPC Splitter (1x4+1) transmitter description 8-9
XTND 4K (40) TPC Splitter (1x4+1) receiver description 10-11
EDID switch positions & connecting over USB 12-13
IR (Infrared) control, Testing IR works 14-15
Cabling 16-17
Example wiring diagram, Power up sequence 18-19
2 Year Product Guarantee 20-21
Conformity, Hire a HDA Pro 22-23
2
Help is only an email away: [email protected].
Page 3

Glossary of terms
EDID comes from your display and is bundled in with HDMI picture and audio data. EDID tells
Extended Display Identication Data
(EDID)
the HDMI source what resolution the display can handle and what audio format it can play. EDID
is not normally an issue when connecting a source directly to display. However, in distributed
XTND environments, the XTND device can receive different EDID messages from the displays it
is connected to. To x EDID see page 12.
IR RX & IR TX
Tipping Point Compression (TPC)
XTND transmitter
XTND receiver
Infrared (IR) Receiver (RX) and Transmitter (TX). The RX ‘receives’ a signal from another remote
control and the TX ‘transmits’ it. (See page 14)
HDA makes transmission of 18Gbps content possible using TPC. Visually lossless, TPC only
becomes active if the source output threshold is breached, hence the term tipping point.
Part of the XTND pair. The XTND transmitter takes a HDMI signal and converts it into a format
which can be carried over Cat cable. The transmitter is installed at the source end of the setup.
Part of the XTND pair. The XTND receiver takes the signal made by the XTND transmitter and
converts it back to HDMI so that it can be connected to a display.
3
Page 4

In the boxIMPORTANT
For optimum performance and safety, please read these instructions
carefully before connecting, operating or conguring this product.
Please keep this manual for future reference.
Surge protection is recommended
This device contains sensitive electrical components that may
be damaged by electrical spikes, surges, electric shock, lightning
strikes, etc. The usage of surge protection systems is recommended
in order to protect and extend the life of your system.
4
Help is only an email away: [email protected].
Name: XTND 4K (40) TPC Splitter (1x4+1)
Product code: XTND4K14140TPC
x1 XTND 4K (40) TPC Splitter (1x4+1) Transmitter
x4 XTND 4K (40) TPC Splitter (1x4+1) Receiver
x1 Infrared Transmitter cable (1.5m) (IR TX)
x4 Infrared (20-60Khz) Receiver cable (1.5m) (IR RX)
x1 12V 2.5A Power Supply with adapters (UK,EU,US,AU)
x5 Mounting Kits
x1 User Manual
Page 5

Features
Supports 18Gbps bandwidth and video picture formats up to 4K@60Hz (4:4:4) including HDR and Dolby Vision*
Includes local HDMI loop out
4K up to 40m (131ft)
Digital audio support up to and including Dolby Atmos and DTS:X
Audio extraction over coax & stereo (source audio only - no downmix).
Backwards IR
EDID management
Power over Cable
*Only Dolby Vision Low Latency Mode is supported at 60Hz
5
Page 6
Specications
HDMI version HDMI 2.0b
HDCP compliance HDCP 2.2 & HDCP 1.4
Video bandwidth 18Gbps
Video resolution Up to 4K@60Hz (4:4:4)
Colour space RGB, YCbCr 4:4:4, YUV 4:4:4, YCbCr 4:2:2/4:2:0
Colour depth
HDR formats HDR10, HDR10+, Dolby Vision*, HLG
Video & audio I/O
Transmission distance
HDMI audio formats
Coax audio formats PCM 2.0, Dolby Digital / Plus / DTS 2.0 /5.1
Stereo audio formats PCM 2.0
8-bit, 10-bit, 12-bit (1080p@60Hz)
8-bit, 10-bit, 12-bit (4K@60Hz)
8-bit (4K@60Hz 4:4:4)
Input: x1 HDMI
Outputs: x4 Cat, x1 HDMI (Mirror), x1 3.5mm Stereo Jack, x1 Digital Coax
1080p 60m (196ft)
4K 40m (131ft)
PCM 2.0 / 5.1 / 7.1, Dolby Digital / Plus / EX / True HD / Atmos, DTS, DTS-EX, DTS-96 / 24, DTS High
Res, DTS-HD Master Audio, DTS-X
6
Help is only an email away: [email protected].
Page 7

Infrared 20Khz - 60Khz
ESD protection
Power consumption 14W (Maximum)
Power supply 12V 2.5A
Operating temperature 0°C - 40°C / 32°F - 104°F
Storage temperature -20°C - 60°C / -4°F - 140°F
Relative humidity 20 - 90% (Non-condensing)
Housing Steel
Colour Grey (Carbonite)
Dimensions (W/D/H) mm
Weight
Package weight 1900g
*Only Dolby Vision Low Latency Mode is supported at 60Hz.
±8kV (Air-gap discharge)
±4kV (Contact discharge)
Transmitter: 210 x 100 x 25
Receiver: 88 x 61 x 18
Transmitter: 617g
Receiver: 155g
7
Page 8
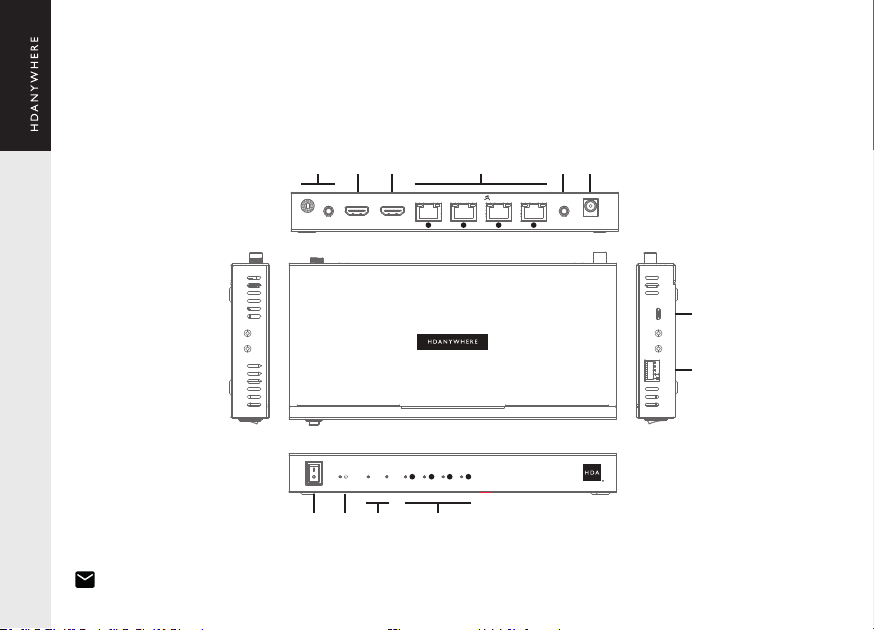
Transmitter Diagram
6 7 10
Video
Source (IN)Coax / Stereo (OUT) HDMI (OUT) IR (OUT) DC12V
A B C D
95 8
11
EDID
12
A B C D
1
2 3 4
8
Help is only an email away: [email protected].
Page 9

Description
1. Power Switch: Turns the XTND on/off.
2. Power: Indicator light. If this light is on and solid then the XTND has power.
3. HDMI Status: The left light indicates an active HDMI source is connected if on. The right light indicates an active display is connected
if on.
4. Video Status (A-D): Indicator light. If this light is on then the XTND Receiver is connected to an active display.
5. Coax / Stereo (OUT): HDMI source audio extraction ports. These ports do not downmix HDMI audio.
6. Source (IN): HDMI video input.
7. HDMI (OUT): HDMI video output.
8. VIDEO TPC: Cat (RJ45) video output port. 18Gbps video will pass through using TPC. The port has two indicator lights. Left light: solid
means connection between XTND transmitter and XTND receiver is good. Off means that there is no connection detected. Right light:
solid means a signal is being transmitted. Off means no signal is detected.
9. IR (OUT): Connect an IR TX to this port to enable remote (IR) control of any AV device local to the XTND transmitter.
10. DC12V: Connect the supplied power supply to this port to provide power to the XTND transmitter and receiver(s).
11. Service: Micro USB port to update XTND rmware and adjust EDID settings for serial (page 13)
12. EDID: Five dip switches which can be used to set EDID operating mode for the XTND (page 12). Each switch has two positions “UP”
or “DOWN”. UP = 1. DOWN = 0.
9
Page 10
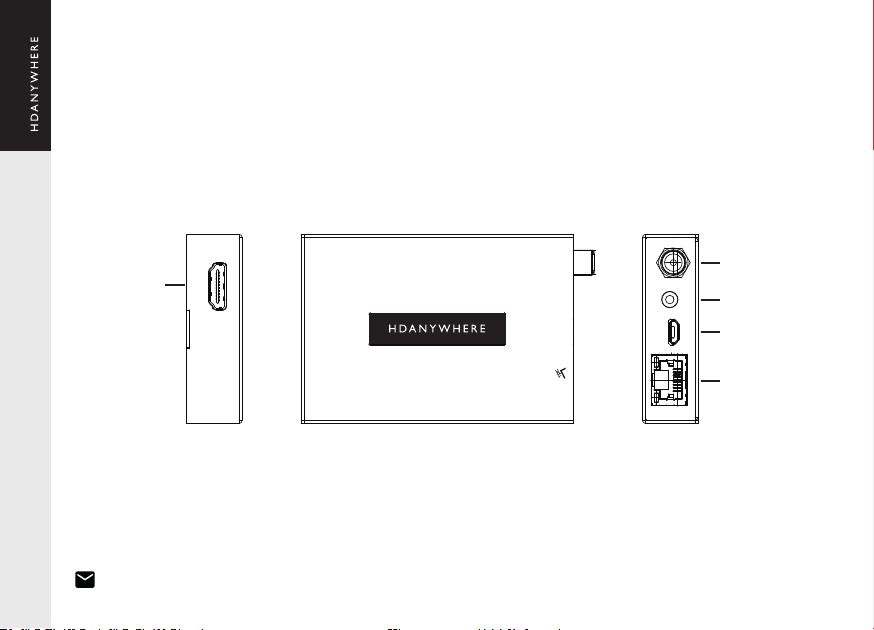
Receiver Diagram
10
HDMI (OUT)
1
Help is only an email away: [email protected].
IR DC12V
Video
2
IN
3
4
5
Page 11

Description
1. HDMI (OUT): HDMI video output. Connect to your display to provide a picture.
2. DC12V: Unused.
3. IR (IN): Connect an IR RX to the “IR IN” port to receive an IR command from a remote control to pass through to the XTND transmitter.
4. Firmware: Micro USB port to update XTND rmware.
5. VIDEO TPC: Video output port (RJ45). 18Gbps video will pass through using TPC. The port has two indicator lights. Left light: solid
means the XTND has power and is on. Right light: solid means that the XTND transmitter and receiver are connected.
11
Page 12
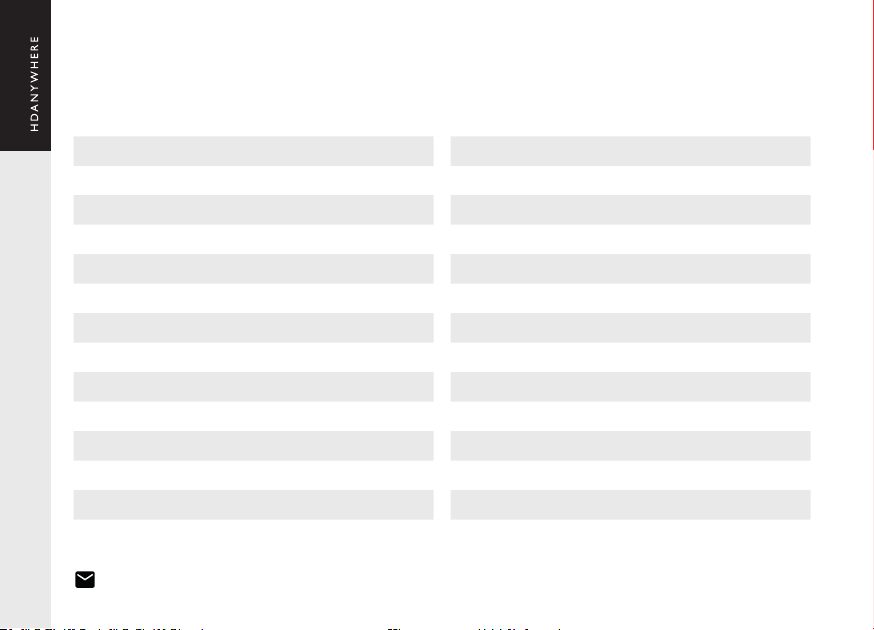
EDID switch positions
11111 1080P, Stereo Audio 2.0
11110 1080P, Dolby/DTS 5.1
11101 1080P, HD Audio 7.1
11100 1080I, Stereo Audio 2.0
11011 1080I, Dolby/DTS 5.1
11010 1080I, HD Audio 7.1
11001 1080P 3D, Stereo Audio 2.0
11000 1080P 3D, Dolby/DTS 5.1
10111 1080P 3D, HD Audio 7.1
10110 4K2K30Hz_444, Stereo Audio 2.0
10101 4K2K30Hz_444, Dolby/DTS 5.1
10100 4K2K30Hz_444, HD Audio 7.1
10011 4K2K60Hz_420, Stereo Audio 2.0
10010 4K2K60Hz_420, Dolby/DTS 5.1
12
Help is only an email away: [email protected].
10001 4K2K60Hz_420, HD Audio 7.1
10000 4K2K60Hz_444, Stereo Audio 2.0
01111 4K2K60Hz_444, Dolby/DTS 5.1
01110 4K2K60Hz_444, HD Audio 7.1
01101 4K2K60Hz_444, Stereo Audio 2.0 HDR
01100 4K2K60Hz_444, Dolby/DTS 5.1 HDR
01011 4K2K60Hz_444, HD Audio 7.1HDR
01010 Copy from HDMI (OUT)
01001 Copy from Output A
01000 Copy from Output B
00111 Copy from Output C
00110 Copy from Output D
00000 Disable dip switch EDID
Page 13

Connecting over USB
This XTND can be controlled directly from a PC or control system by sending ASCII commands via the USB port. Connect a USB cable
to the “Service” port on the side of the XTND and open a serial command tool on your computer.
Baud rate: 115200
Data bits: 8
Stop bit: 1
Check bit: 0
The API is available from our support site or by emailing [email protected]
13
Page 14
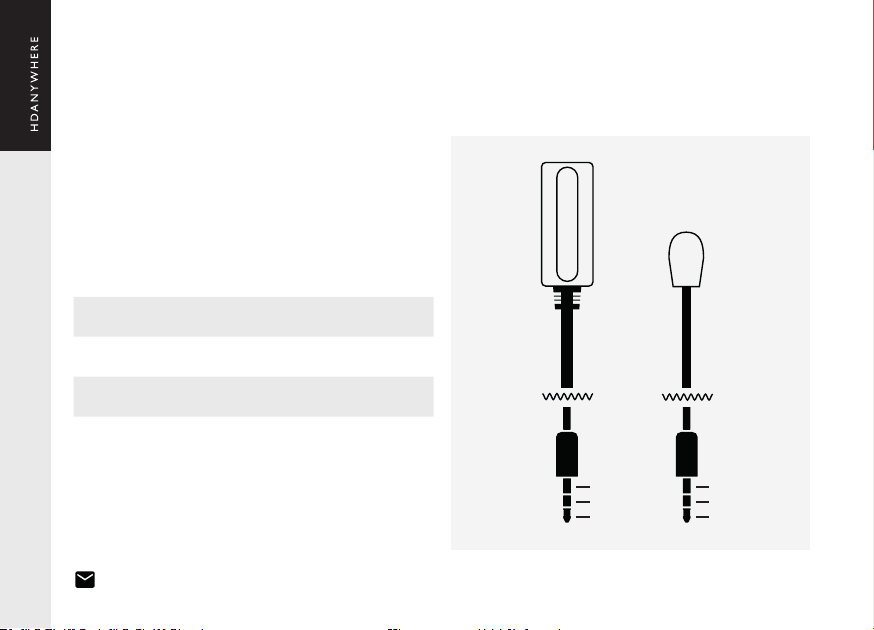
IR (Infrared) control
XTND can send IR signals from the receiver to the transmitter to
control almost any AV device. Using this feature will allow you to use
a remote control at the display end of the XTND setup and pass that
IR command from your display location back to the HDMI source
device that is connected to the XTND transmitter.
Sending IR commands from a display ‘back’ to the XTND transmitter
1. Connect an IR TX to port labelled “IR (OUT)” on the XTND
transmitter.
2. Place the IR TX bud (small tear drop part) in front of the IR
window of the device that you wish to control.
3. Connect an IR RX to port labelled “IR (IN)” on the XTND
receiver.
4. Place IR RX in line-of-sight of the remote control.
IR Receiver (IR RX)
IR Transmitter (IR TX)
1.5m
NCGround
PowerPower
SignalSignal
14
Help is only an email away: [email protected].
Page 15

Testing that IR works
This section aims to verify that your XTND’s IR control system is setup correctly and assumes that all other setup has been followed as per
the instructions laid out in this manual. Please refer to the XTND wiring diagrams in this document to ensure that your setup matches that
before proceeding with the verication below.
Testing operation from a display ‘back’ to the XTND transmitter
Start this test by ensuring that your XTND system is powered on and your source device (connected to your XTND transmitter) is being
correctly displayed on screen. Check that your IR cabling is correctly connected to your XTND system (page 12) and that your remote control
has a clear line-of-sight to the IR RX. Point your remote at the IR RX and test a remote control command for your source device. You should
notice that it responds as if the source device was directly in front of you. If it worked then you have setup IR control correctly.
15
Page 16

Cabling
Currently you can use Cat6, Cat6e, Cat6a, Cat7 or Cat7a with XTND. Cat5e may work, but is not recommended, due to its limited bandwidth
capabilities.
Optimum performance
Whichever network cable type you choose, ensure that the main wiring architecture is ‘solid core’ and not stranded ‘patch’ cabling. Patch
cabling can be used for the last few metres of a run (e.g wallplate) but should be avoided over longer runs as signal transfer over stranded
cores is signicantly impacted. The use of pre-made leads is not recommended unless you can be absolutely sure of their construction
credentials (i.e. solid core 568B). For optimum performance, use a single piece of Cat cable terminated directly at the transmitter and the
receiver ends. Make sure to use the correct connector types (i.e. RJ45 solid core) crimp connectors.
Shielded cables
Shielded FTP cable is not a stipulation. However, if you are using this type of cable ensure compatible shielded accessories are used. Failure
to terminate cable screen at all points can induce interference rather than eliminate it.
Patch panels and wall plates
If patch panels are terminated correctly then there is a minimal loss of distance. The use of wallplates and patch panels has the potential
to cause increased resistance on the cable introducing pinch points for signal transmission and could reduce transmission lengths. TIP:
Instead of using RJ45 wallplates use brush plates.
16
Help is only an email away: [email protected].
Page 17
HDMI cabling
HDANYWHERE recommends using suitably robust and good quality
HDMI cables. It is not advised to use passive HDMI cables over 5
metres in length either on the inputs or the outputs of the XTND
system. Where HDMI cables longer than 5 metres are required, HDA
recommends utilising its own brand of long distance HDMI cables or
a suitable alternative.
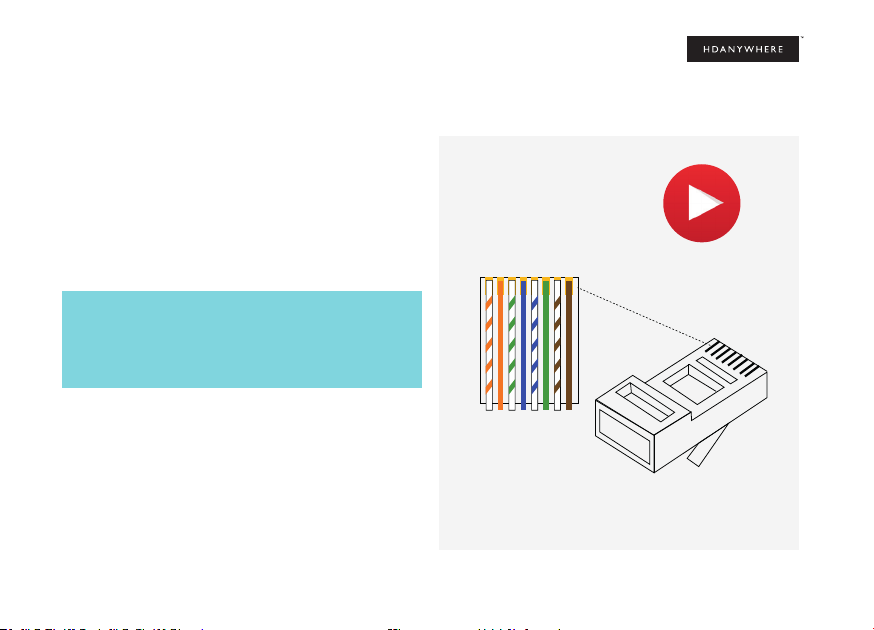
1 2 3 4 5 6 7 8
W
a
?
t
e
c
h
m
i
o
t
n
e
v
a
h
t
n
o
D
l
i
n
e
!
https://youtu.be/EbWAEndiCuU
Note:
DO NOT USE ANY COPPER CLAD ALUMINIUM (CCA) Cat 6/7
CABLE.
1
2
3
Terminate using RJ45 connectors to 568B wiring standard.
4
5
6
7
8
17
Page 18
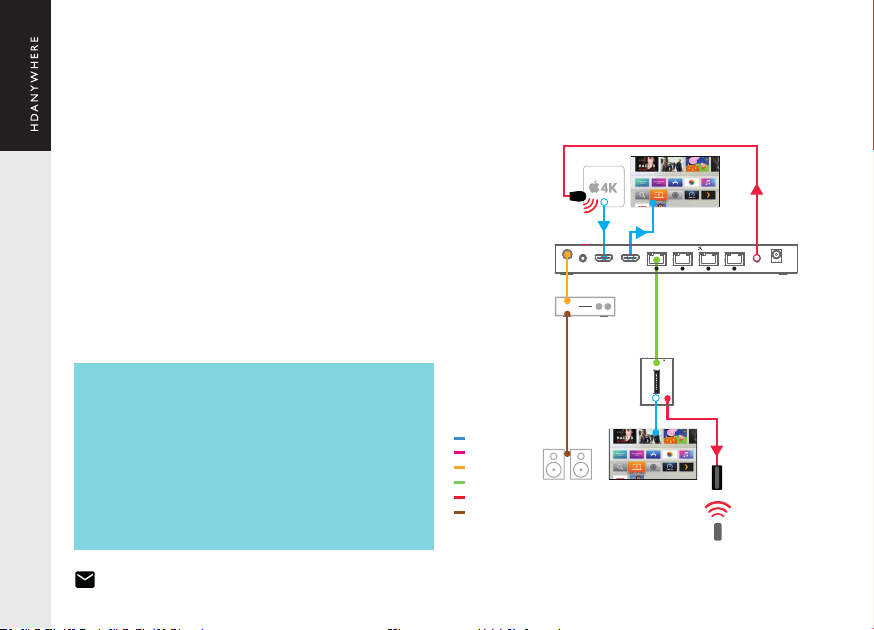
Example wiring diagram
We have detailed a setup to show how the main feature-set of this
XTND system could be used and demonstrated together.
In this diagram, an Apple TV is being extended to a display up to
40m away. The HDMI (Out) on the XTND transmitter is being used to
provide picture to an additional display local to the Apple TV. Audio
from the Apple TV is being extracted and fed to a nearby AVR that
is providing audio amplication in the location of Output A. The
Apple TV is controlled by sending commands from its native remote
control through the XTND system and reproduced at the XTND
transmitter location providing distance remote control of the device.
Note:
This XTND system has been designed so that it can be installed in
multiple ways. The purpose of the diagram is to illustrate a typical/
example setup and assumes that you are already familiar with
the basics of wiring and infrastructure. If you are unsure how you
might install this device in to your property then contact support@
hdanywhere.com or contact a HDA Pro (https://hdanywhere.com/
dealers-and-installers/) for further assistance.
Transmitter
Receiver(s)
HDMI Cable
Ethernet Cable
Coax
Cat Cable
IR RX/TX Cable
Speaker Cable
Source (IN)Coax / Stereo (OUT) HDMI (OUT) IR (OUT) DC12V
AVR
Video
A B C D
IR DC12V
Video
HDMI (OUT)
18
Help is only an email away: [email protected].
Page 19

Power up sequence
1 Ensure that all devices are turned off.
2 Connect HDMI source to “HDMI (IN)” port on the XTND transmitter.
3 Connect the XTND transmitter and receiver together by using Cat 6/7 cable connected to the each end of the “Video TPC” port.
4 Connect a display to the “HDMI (OUT)” port on the XTND receiver.
5 If any devices require IR control, ensure that IR is connected at this stage as well (page 14).
6 Plug in the supplied power lead and switch on the XTND. XTND power indicator LEDs should be lit and solid.
7 Turn on the source device followed by the display(s).
8 Ensure that your display is set to the correct AV input.
9 A picture should now be displayed.
19
Page 20

2 Year Guarantee
WHO WE ARE
1. We are HD CONNECTIVITY LTD trading as HDANYWHERE (“HDA”), a limited company registered under number 06046737 in England and Wales with its registered ofces at The
Hayseld, Malvern, WR14 1GF, United Kingdom.
OUR GUARANTEE TO YOU
2. We, HDANYWHERE warrant to you, the end user of the HDA hardware (the “Products”) that on the date of delivery of the Products to you, and for a period of 2 years from that date of
delivery, the Products shall:
(a) match any description that has been provided to you;
(b) be free from any signicant defects in their design, the materials used to make them, and the way they are made;
(c) be of satisfactory quality (within the meaning of the Consumer Rights Act 2015); and
(d) be t for any purpose held out by us.
This 2 year period, or, if the period has been extended to 3 years in accordance with paragraph 3, will be the “Guarantee Period”. We offer this guarantee to all our customers who are
resident and have an address in Great Britain and Northern Ireland.
EXTENDING YOUR GUARANTEE (NOT APPLICABLE TO ANY XTND)
3. On registering your Products with the HDA Cloud, the guarantee offered in paragraph 2 by us will automatically extend for a period of one year, provided that your registration takes
place within 30 days from the date of delivery. The one year guarantee extension starts automatically from the date that the original 2 year guarantee ends.
HOW TO CLAIM ON YOUR GUARANTEE AND YOUR REMEDIES
4. Subject to paragraphs 5 and 6 of this guarantee, Your sole remedies under Our guarantee to You are as follows:
(i)Up to 30 days: we will repair or replace your Products or provide you with a full refund of the price of the defective Products at your option.
(ii) Up to 6 Months: we will repair or replace your Products. If we are unable to repair or replace your Products we will provide you with a full refund of the price of the defective
Products.
(iii) Up to 2 (3) Years: we will repair or replace your Products. If we are unable to repair or replace your Products we will provide you with a partial refund of the price of the defective
Products based upon the devaluation of the Products since the time of purchase.
5. In order to claim under the guarantee given to you in paragraph 2 you will need to:
(a) give us notice in writing of your intention to claim under the guarantee during the Guarantee Period, and do so within a reasonable time after nding that some or all of the
Products do not comply with the guarantee set out in paragraph 2;
(b) show that the Products that you claim are defective, have been examined by a HDA Pro or other authorised or suitably qualied installer, and that they have[MG3] conrmed in
writing that the suspected defect in the Products stems solely from a fault in the HDA hardware;
(c) give us a reasonable opportunity to examine the Products in question;
(d) provide us with an order number and a dated sales or delivery receipt from an HDA Distributor, HDA Pro or other authorised dealer, reseller or installer of the Products.
(e) obtain from us in advance of returning the Products a return merchandise authorisation and/or case number[MG4] ; and
(f) (if asked to do so by us) return such Products to our place of business at our cost.
CIRCUMSTANCES WHERE YOUR GUARANTEE DOESN’T APPLY
6. We shall not be liable for the Products’ failure to comply with the guarantee set out in paragraph 2 in any of the following events:
20
Help is only an email away: [email protected].
Page 21

(a) If you make any further use of the Products after giving us notice of an issue in accordance with paragraph 5;
(b) the defect arises because you failed to follow our oral or written instructions as to the storage, installation[MG5] , use and maintenance of the Products;
(c) the defect arises as a result of your use of the Products with any other software or hardware that is not compatible with the Products;
(d) the products are used by you for any commercial purpose, including rental or demonstrative purposes;
(e) you alter or repair the Products without the written consent of HDA;
(f) the defect arises as a result of an act of god, fair wear and tear, or your misuse, abuse, unreasonable use, wilful damage, negligence, or abnormal storage of the Products or by any
other causes unrelated to defective hardware or manufacturing;
(g) where the serial number has been altered, defaced or removed;
(h) where the warranty seal on the system has been altered, defaced or removed; or
(i) where the Products differ from their description as a result of changes made to ensure they comply with applicable statutory or regulatory requirements.
TRANSFERRING YOUR GUARANTEE TO SOMEONE ELSE
7. HDA will not accept any liability under such guarantee unless you are the original customer or can produce a letter or chain of letters from the original customer and subsequent
customers (where appropriate) transferring the benet of the guarantee to you.
PRODUCTS THAT ARE NOT COVERED BY THIS GUARANTEE
8. This guarantee does not cover products sold and clearly marked “as is”, “B-grade”, or with faults. This guarantee does not apply to any system software that is preinstalled in the HDA
hardware, or is subsequently provided via update or upgrade releases. Any and all HDA software is licensed to you under the terms of a separate end user licence agreement found here:
https://hdanywhere.com/legals
HOW THIS GUARANTEE WORKS WITH OUR EULA
9. We may void this guarantee if we reasonably believe that the HDA system has been used in a manner that violates terms of our separate End User Licence Agreement (EULA) for the
HDA software. You assume all-risk and liabilities associated with the use of third party products in conjunction with the Products.
YOUR STATUTORY RIGHTS
10. This guarantees is in addition to your statutory rights (including under the Consumer Rights Act) which are not affected by this guarantee
GENERAL TERMS OF THIS GUARANTEE
11. Except as provided in this guarantee, we shall have no liability to you in respect of the Products’ failure to comply with the guarantee set out in paragraph 2.
12. We reserve the right to amend or withdraw this guarantee at any time although for the avoidance of doubt any guarantees that are in existence at such a time will be honoured.
13. These Conditions shall apply to any repaired or replacement Product supplied by us.
GUARANTEE CONTACT INFORMATION
To contact ([email protected]) or call HDANYWHERE Technical Support (call charges will depend on your telephone provider. Please check with your operator for exact
charges).The team is available 9am - 5pm weekdays. To help us handle your query promptly, please have your invoice number and model SKU and serial ready.
21
Page 22

Important information
EU Conformity
Hereby, HDANYWHERE declares that this HDMI connectivity device is in compliance with the essential requirements and other relevant
provisions of the following Directives: 2006/95/EC (LVD Directive); 2004/108/EC (EMC Directive); 1999/5/EC (R&TTE Directive). The full text
of the EU declaration of conformity is available in the compliance section at HDANYWHERE.com/legals
Recycling your device properly
In some areas, the disposal of certain electronic devices is regulated. Make sure you dispose of or recycle your device in accordance with
your local laws and regulations.
22
Help is only an email away: [email protected].
Page 23
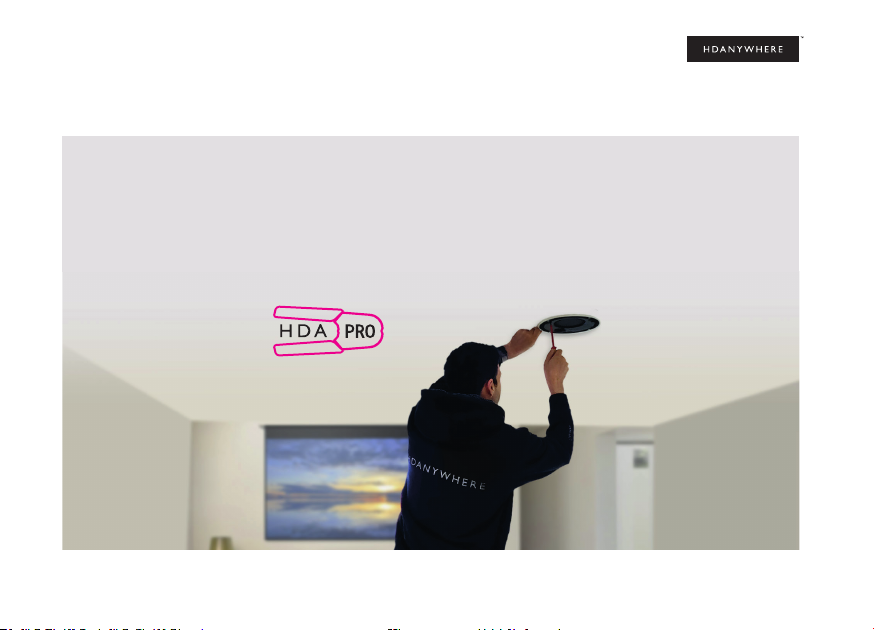
Hire a HDA Pro
If cabling infrastructure, installation and control seem like too much to absorb and learn then why not hire a HDA Pro to do the work
instead for you? Having your XTND system professionally installed should help to guarantee the system’s long-term performance and
ensure that it blends neatly with your decor.
Find a HDA Pro anywhere in the world today https://hdanywhere.com/dealers-and-installers/
23
Page 24

Let us know what you think.
We would love to hear how we could further improve our products and services.
If we can make something better, please let us know!
Copyright © HDANYWHERE.
TM
HDANYWHERE
Registered in England & Wales 06046737 VAT 913222367
HDANYWHERE assumes no responsibility for any inaccuracies that may be contained in this document. In no event
will HDANYWHERE be liable for direct, indirect, special, incidental, or consequential damages resulting from any
defect or omission in this document, even if advised of the possibility of such damages.
is a trading name of HD Connectivity Ltd.
 Loading...