

Page 1

Page 2

IImmppoorrttaanntt SSaaffeettyy IInnssttrruuccttiioonns
s
WWaarrnniinng
RReeaadd tthhiiss eennttiirree OOwwnneerr’’ss GGuuiiddee bbeeffoorree aasssseemmbblliinngg aannd
iinnssttaalllliinngg tthhee PPhhaannttoomm cclleeaanneerr..FFaaiilluurree ttoo ffoollllooww ssaaffeetty
wwaarrnniinnggss aanndd OOwwnneerr’’ss GGuuiiddee iinnssttrruuccttiioonnss ccaann rreessuulltt iin
sseevveerree iinnjjuurryy,,ddeeaatthh oorr pprrooppeerrttyy ddaammaaggee.
FFoorr aaddddiittiioonnaall ffrreeee ccooppiieess ooff tthhee OOwwnneerr’’ss GGuuiiddee yyoouu
ccaann ddoowwnnllooaadd tthheemm ffrroomm wwwwww..hhaayywwaarrddnneett..ccoom
oorr ccaallll ((880000)) 222277--11447777.
WWaarrnniinngg -- RRiisskk ooff EElleeccttrriiccaall SShhoocck
The Hayward Phantom Turbo Automatic Pool Cleaner is
designed to connect to a threaded 1-1/2 inch female pipe
fitting on a dedicated return line that is powered by a 3/4 H.P.
Booster Pump. You should have a licensed electrician install
the cleaner’s booster bump.
iinnssttaalllleedd iinn aaccccoorrddaannccee wwiitthh tthhee NNaattiioonnaall EElleeccttrriiccaall CCoodde
aanndd aallll llooccaall ccooddee rreeqquuiirreemmeennttss..FFaaiilluurree ttoo ddoo ssoo ccaan
rreessuulltt iinn sseerriioouuss iinnjjuurryy oorr ddeeaatthh.
WWaarrnniinngg -- RRiisskk ooff IInnjjuurry
FFaaiilluurree ttoo ffoollllooww tthhee ssaaffeettyy wwaarrnniinnggss bbeellooww mmaayy rreessuulltt iin
sseevveerree iinnjjuurryy,,ddeeaatthh oorr pprrooppeerrttyy ddaammaaggee.
• Always disconnect and remove the cleaner and pressure
hose before entering the pool.
• Disconnect the Safety Rope that separates the pool’s shallow
end from the pool’s deep end,before running the Phantom.
Always reconnect the Safety Rope before entering the pool.
• Always handle with care. Do not let children or pets play with
the cleaner; it is not a toy.
• Always turn the Booster Pump
the cleaner
• Do not operate outside the pool. The Phantom Turbo Cleaner
and hoses contain high-pressure water jets that may
cause injury.
• Disconnect pressure hose from the universal wall fitting
before removing the cleaner from the pool.
NNeevveer
•
hose, pressure gauge or sweep hose at any person or pet.
IImmppoorrttaanntt IInnffoorrmmaattiioon
• Always turn the Filtration Pump on
booster pump on. Running the booster pump dry will
damage the booster pump and is not covered by the
Hayward warranty.
g
.
.
TThhee BBoooosstteerr PPuummpp mmuusstt bbe
.
y
.
OOFFF
F
before handling
.
r
point an
y of the cleaner’
s high-pressure jets,
n
CCaauuttiioonn -- RRiisskk ooff EEqquuiippmmeenntt DDaammaagge
bbeeffoorre
e
turning the
d
y
n
m
k
e
n
pressure
e
• Always disconnect and remove the Phantom cleaner and
hoses from the pool before cleaning or backwashing the
ool filter.
p
• After cleaning or backwashing the pool filter, allow the
filtration system to run for a minimum of five minutes or until
all debris has been flushed from plumbing lines before
reconnecting the Phantom cleaner.
• New plumbing lines must be flushed out before connecting
the Phantom cleaner.
• The Phantom cleaner should not be used to remove plaster
dust or construction debris from new or renovated pools.
• The Phantom cleaner should not be used to remove
excessive sand (dense debris) following wind or sandstorms.
• Always disconnect and remove the Phantom cleaner and
e
n
hoses before chemically shocking the pool.
• Only operate the Phantom cleaner for the period of time
necessary to clean the pool. Excessive use is unnecessary
and will cause cleaner parts to prematurely wear.
• Regularly inspect the cleaner and hoses; do not use if
damaged or if any rough edges are visible on the cleaner;
this can cause damage to the pool.
• Lift the Phantom cleaner by its wing (Part A, page 4), never
by the hose or bag.
DDiissccllaaiimmeer
• Pool plaster is affected by age, water chemistry,etc.
• Pool plaster can deteriorate over time.
The integ
•
vacuum cleaner – automatic or manual – cannot remove
the plaster.
• The integrity of “good” pool plaster is such that the plaster
will cause wear on the cleaner, the cleaner will not wear out
“good” pool plaster.
Vin
•
chemistr
• Vinyl pool liners can become brittle and weak.
• Vinyl pool liners can be affected by the installation and the
pool’s surroundings.
• Patterns on vinyl pool liners vary in quality.
• When installing the Phantom cleaner, you assume
responsibility for the condition of the pool’s surroundings
and chemistry.
r
rity of “good” pool plaster is such that a pool
y age, sunlight, and water
yl pool liners are af
.
y
fected b
Use Only Genuine Hayward Replacement Parts.
1
Page 3

CCoonntteenntts
s
IImmppoorrttaanntt SSaaffeettyy IInnssttrruuccttiioonnss .. .. .. .. .. .. .. .. .. .. .. .. .. .. .. .. .. .. .. .. .. .. .. .. .. .. .. .. .. .. .. .. .. .. .. .. .. .. .. .. .. .. .. ..1
DDiissccllaaiimmeerr .. .. .. .. .. .. .. .. .. .. .. .. .. .. .. .. .. .. .. .. .. .. .. .. .. .. .. .. .. .. .. .. .. .. .. .. .. .. .. .. .. .. .. .. .. .. .. .. .. .. .. .. .. .. .. .. .. .. ..1
IInnttrroodduuccttiioonn .. .. .. .. .. .. .. .. .. .. .. .. .. .. .. .. .. .. .. .. .. .. .. .. .. .. .. .. .. .. .. .. .. .. .. .. .. .. .. .. .. .. .. .. .. .. .. .. .. .. .. .. .. .. .. .. .. ..3
FFoorr YYoouurr RReeccoorrddss .. .. .. .. .. .. .. .. .. .. .. .. .. .. .. .. .. .. .. .. .. .. .. .. .. .. .. .. .. .. .. .. .. .. .. .. .. .. .. .. .. .. .. .. .. .. .. .. .. .. .. .. .. ..3
PPrriinncciippllee PPaarrttss .. .. .. .. .. .. .. .. .. .. .. .. .. .. .. .. .. .. .. .. .. .. .. .. .. .. .. .. .. .. .. .. .. .. .. .. .. .. .. .. .. .. .. .. .. .. .. .. .. .. .. .. .. .. .. ..4
PPrreeppaarriinngg tthhee PPooooll .. .. .. .. .. .. .. .. .. .. .. .. .. .. .. .. .. .. .. .. .. .. .. .. .. .. .. .. .. .. .. .. .. .. .. .. .. .. .. .. .. .. .. .. .. .. .. .. .. .. .. .. ..5
Dedicated Return Line . . . . . . . . . . . . . . . . . . . . . . . . . . . . . . . . . . . . . . . . . . . . . . . . .5
Tools Needed for Installation . . . . . . . . . . . . . . . . . . . . . . . . . . . . . . . . . . . . . . . . . . . . .5
CCoonnnneeccttiinngg PPhhaannttoomm TTuurrbboo CClleeaanneerr ttoo PPooooll .. .. .. .. .. .. .. .. .. .. .. .. .. .. .. .. .. .. .. .. .. .. .. .. .. .. .. .. .. .. .. .. ..6
Installing the Universal Wall Fitting . . . . . . . . . . . . . . . . . . . . . . . . . . . . . . . . . . . . . . . . .6
AAsssseemmbblliinngg aanndd SSiizziinngg tthhee RRiiggiidd PPrreessssuurree HHoossee .. .. .. .. .. .. .. .. .. .. .. .. .. .. .. .. .. .. .. .. .. .. .. .. .. .. .. .. ..7
CCoonnnneeccttiinngg tthhee RRiiggiidd PPrreessssuurree HHoossee .. .. .. .. .. .. .. .. .. .. .. .. .. .. .. .. .. .. .. .. .. .. .. .. .. .. .. .. .. .. .. .. .. .. .. .. .. ..8
Disconnecting a Hose Pipe . . . . . . . . . . . . . . . . . . . . . . . . . . . . . . . . . . . . . . . . . . . . . .8
Connecting Hose to Wall . . . . . . . . . . . . . . . . . . . . . . . . . . . . . . . . . . . . . . . . . . . . . . . .8
OOppeerraattiinngg tthhee PPhhaannttoomm TTuurrbboo CClleeaanneerr .. .. .. .. .. .. .. .. .. .. .. .. .. .. .. .. .. .. .. .. .. .. .. .. .. .. .. .. .. .. .. .. .. .. .. .. ..9
Setting Pressure . . . . . . . . . . . . . . . . . . . . . . . . . . . . . . . . . . . . . . . . . . . . . . . . . . . . .9
LLaarrggee CCaappaacciittyy DDeebbrriiss BBaagg .. .. .. .. .. .. .. .. .. .. .. .. .. .. .. .. .. .. .. .. .. .. .. .. .. .. .. .. .. .. .. .. .. .. .. .. .. .. .. .. .. .. .. .. ..110
Attaching Debris Bag . . . . . . . . . . . . . . . . . . . . . . . . . . . . . . . . . . . . . . . . . . . . . . . . .10
Removing Debris Bag . . . . . . . . . . . . . . . . . . . . . . . . . . . . . . . . . . . . . . . . . . . . . . . . .10
Emptying Debris Bag . . . . . . . . . . . . . . . . . . . . . . . . . . . . . . . . . . . . . . . . . . . . . . . . .10
Sand (Dense Debris) . . . . . . . . . . . . . . . . . . . . . . . . . . . . . . . . . . . . . . . . . . . . . . . . . .10
CCoorrrreeccttllyy OOppeerraattiinngg PPhhaannttoomm TTuurrbboo CClleeaanneerr .. .. .. .. .. .. .. .. .. .. .. .. .. .. .. .. .. .. .. .. .. .. .. .. .. .. .. .. .. .. ..111
Movement . . . . . . . . . . . . . . . . . . . . . . . . . . . . . . . . . . . . . . . . . . . . . . . . . . . . . . . . .11
Spin-Out . . . . . . . . . . . . . . . . . . . . . . . . . . . . . . . . . . . . . . . . . . . . . . . . . . . . . . . . . .11
Sweep Hose . . . . . . . . . . . . . . . . . . . . . . . . . . . . . . . . . . . . . . . . . . . . . . . . . . . . . . .11
Cleaning . . . . . . . . . . . . . . . . . . . . . . . . . . . . . . . . . . . . . . . . . . . . . . . . . . . . . . . . . .11
Fine Debris . . . . . . . . . . . . . . . . . . . . . . . . . . . . . . . . . . . . . . . . . . . . . . . . . . . . . . . .11
Sand (Dense Debris) . . . . . . . . . . . . . . . . . . . . . . . . . . . . . . . . . . . . . . . . . . . . . . . . . .11
Pressure Hose . . . . . . . . . . . . . . . . . . . . . . . . . . . . . . . . . . . . . . . . . . . . . . . . . . . . . .11
PPhhaannttoomm TTuurrbboo CClleeaanneerr AAddjjuussttmmeennttss .. .. .. .. .. .. .. .. .. .. .. .. .. .. .. .. .. .. .. .. .. .. .. .. .. .. .. .. .. .. .. .. .. .. .. .. ..112
Changing Spin-Out Frequency . . . . . . . . . . . . . . . . . . . . . . . . . . . . . . . . . . . . . . . . . .12
Changing Spin-Out Cam . . . . . . . . . . . . . . . . . . . . . . . . . . . . . . . . . . . . . . . . . . . . . . .12
Adjusting Spin-Out Duration . . . . . . . . . . . . . . . . . . . . . . . . . . . . . . . . . . . . . . . . . . . .12
ing Top and Bottom Operation . . . . . . . . . . . . . . . . . . . . . . . . . . . . . . . . . . . . . .13
Chang
Adjusting Sweep Hose Power . . . . . . . . . . . . . . . . . . . . . . . . . . . . . . . . . . . . . . . . . . .13
MMaaiinntteennaannccee .. .. .. .. .. .. .. .. .. .. .. .. .. .. .. .. .. .. .. .. .. .. .. .. .. .. .. .. .. .. .. .. .. .. .. .. .. .. .. .. .. .. .. .. .. .. .. .. .. .. .. .. .. .. .. ..114
Removing Phantom
Emptying Debris Bag . . . . . . . . . . . . . . . . . . . . . . . . . . . . . . . . . . . . . . . . . . . . . . . . .14
Cleaning the In-Line Filter . . . . . . . . . . . . . . . . . . . . . . . . . . . . . . . . . . . . . . . . . . . . . .14
Sweep Hose
SSttoorriinngg tthhee PPhhaannttoomm TTuurrbboo CClleeaanneerr .. .. .. .. .. .. .. .. .. .. .. .. .. .. .. .. .. .. .. .. .. .. .. .. .. .. .. .. .. .. .. .. .. .. .. .. .. ..115
Winterizing . . . . . . . . . . . . . . . . . . . . . . . . . . . . . . . . . . . . . . . . . . . . . . . . . . . . . . . .15
Periodic Freezing Conditions . . . . . . . . . . . . . . . . . . . . . . . . . . . . . . . . . . . . . . . . . . . .15
TTrroouubblleesshhoooottiinngg .. .. .. .. .. .. .. .. .. .. .. .. .. .. .. .. .. .. .. .. .. .. .. .. .. .. .. .. .. .. .. .. .. .. .. .. .. .. .. .. .. .. .. .. .. .. .. .. .. .. .. .. .. ..116
BBoooosstteerr PPuummpp .. .. .. .. .. .. .. .. .. .. .. .. .. .. .. .. .. .. .. .. .. .. .. .. .. .. .. .. .. .. .. .. .. .. .. .. .. .. .. .. .. .. .. .. .. .. .. .. .. .. .. .. .. .. ..117
PPhhaannttoomm TTuurrbboo PPaarrttss DDiiaaggrraamm aanndd RReeppllaacceemmeenntt PPaarrttss LLiisstt .. .. .. .. .. .. .. .. .. .. .. .. .. .. .. .. .. .. ..118
LLiimmiitteedd WWaarrrraannttyy .. .. .. .. .. .. .. .. .. .. .. .. .. .. .. .. .. .. .. .. .. .. .. .. .. .. .. .. .. .. .. .. .. .. .. .. .. .. .. .. .. .. .. .. .. .. .. .. .. .. .. .. ..119
Turbo Cleaner from Pool . . . . . . . . . . . . . . . . . . . . . . . . . . . . . . . .14
. . . . . . . . . . . . . . . . . . . . . . . . . . . . . . . . . . . . . . . . . . . . . . . . . . . . . . .15
1
1
3
3
4
5
6
7
8
9
0
1
2
4
5
6
7
8
9
2
Use Only Genuine Hayward Replacement Parts.
Page 4

IInnttrroodduuccttiioon
n
Congratulations on your purchase of the Hayward Phantom Turbo
Automatic Pool Cleaner. The Hayward Phantom Turbo is the only
otal Pool Cleaner. The Phantom Turbo is designed to not only to
T
clean your pool’s bottom and sides,but also to skim the water’s
surface as well – all automatically!
TThhiiss rreevvoolluuttiioonnaarryy ddeessiiggnn ooffffeerrss tthhee ffoolllloowwiinngg ffeeaattuurreess:
••FFaasstteerr CClleeaanniinng
-Wider Vacuum Nozzle
-Powerful Sweep Hose
••LLaarrggee DDeebbrriiss PPiicckk--uup
-Large Suction Inlet
-Three High Pressure Water Jets
••LLeessss FFrreeqquueenntt BBaagg CClleeaanniinng
-Large Capacity Bag
-Easy to remove, clean and replace debris bag
••CCoommpplleettee PPooooll CCoovveerraagge
-Patented AquaDrive™ water jet propulsion
-Randomized Cleaning & Spin-out
-Sweeps debris off steps while skimming
••CClleeaannss tthhee PPooooll BBoottttoomm,,SSiiddeess aannddSSkkiimmss
tthhee WWaatteerr’’ss SSuurrffaacce
-Automatic Ascent and Descent
-Switch for Bottom & Side Cleaning Only or Surface
Skimming Only
••LLeessss WWeeaarr oonn PPooooll SSuurrffaacce
-Patented AquaDrive water jet propulsion: no powered
wheels wearing pool surfaces
••EEaassyy IInnssttaallllaattiioon
g
p
g
e
e
e
n
:
IImmppoorrttaannt
his Owner’s Guide is for Phantom Turbo owners who want to
T
install their Automatic Pool Cleaner. However, we recommend
that an Authorized Hayward Dealer install the cleaner.
The Hayward 6060 Booster Pump purchased separately or as
part of the Phantom Turbo Automatic Pool Cleaner package offers
optimum cleaner performance. Use of other booster pumps will
provide acceptable performance if they deliver at least 35 Pounds
per Square Inch (PSI) at 12 Gallons Per Minute (GPM) at the
dedicated line pool wall fitting. For electrical and plumbing
installation procedures for the Hayward Booster Pump, refer to the
Owner’s Guide that comes with the Hayward 6060 Booster Pump.
FFoorr YYoouurr RReeccoorrdds
t
s
A limited warranty program protects your Hayward Phantom
o take full advanta
T
urbo cleaner
T
please read, complete and
RReeggiissttrraattiioonn CCaarrdd wwiitthhiinn 1144 ddaayyss ooff ppuurrcchhaassee ddaattee oorr ggo
ttoo wwwwww..hhaayywwaarrddnneett..ccoomm//wwaarrrraannttyy ttoo ccoommpplleettee oonnlliinnee.
our warranty card is included in this Owner’
Y
Use Only Genuine Hayward Replacement Parts.
.
ge of this limited warranty
rreettuurrnn tthhee LLiimmiitteedd WWaarrrraanntty
s Guide.
y
,
o
.
PPuurrcchhaassee DDaatte
SSeerriiaall NNuummbbeerr
(located on back of cleaner)
NNuummbbeerr ooff RRiiggiidd PPiippee AAsssseemmbblliieess UUsseed
PPrreessssuurree GGaauuggee RReeaaddiinng
e
g
d
3
Page 5
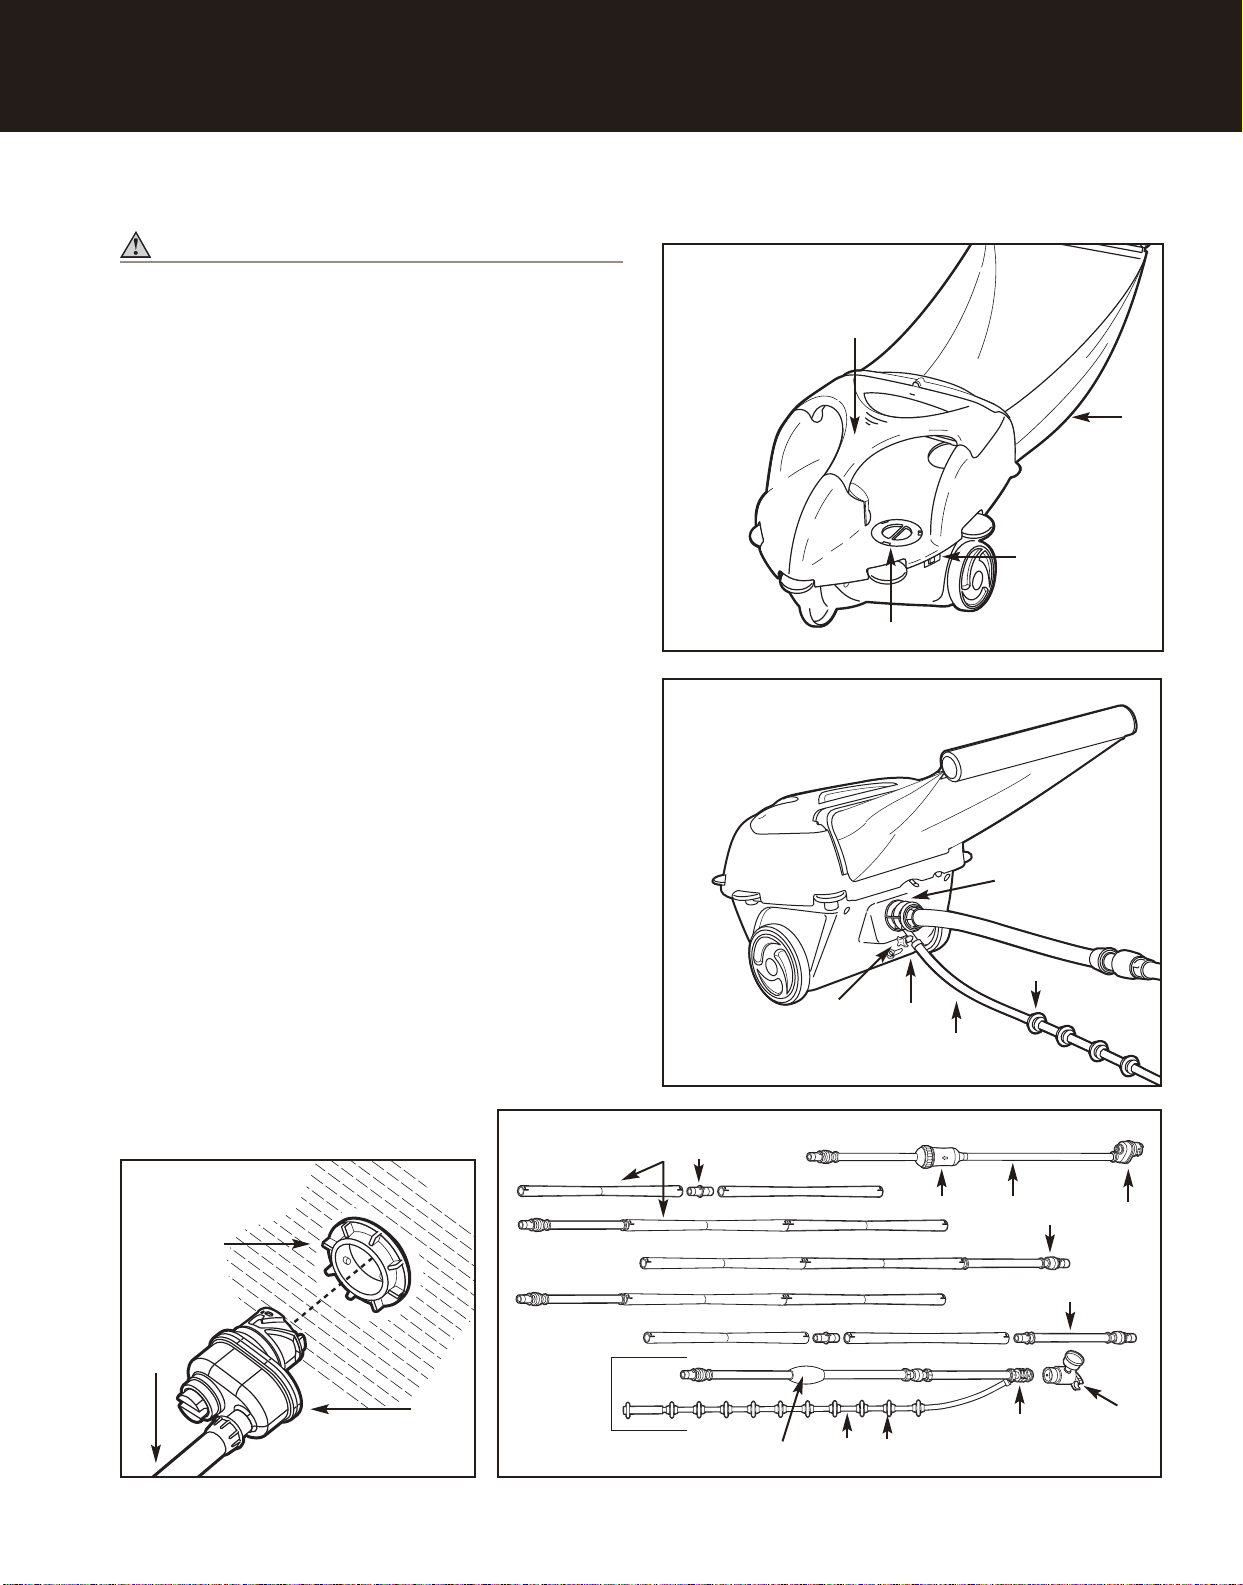
PPrriinncciippllee PPaarrtts
s
CCaauuttiioonn -- RRiisskk ooff EEqquuiippmmeenntt DDaammaagge
ose may be stored folded pipe-to-pipe. Only first 3-foot hose section
H
and sweep hose must be stored straight,
nnoott ccooiilleedd.
e
.
A. Wing
B. Large Capacity Debris Bag with Float Closure
C. Cleaner Connector
D. Sweep Hose Connector
E. Sweep Hose Adjustment Knob
F. Cam Cap
G. Rigid Pressure Hose
H. Hose Float
I. Hose Pipe Coupling
J. Hose Swivel - (See special installation instructions in this manual)
K. Adjustable Wall Quick Connect
L. Sweep Hose
M. Wear Roller
N. Rigid Hose Pipe
O. Universal Wall Fitting
P. Top / Auto / Bottom Switch
Q. In-Line Filter
R. Hose Swivel Assembly
S. Hose Cleaner End Assembly
T. Hose Wall End Assembly
U. Setup Pressure Gauge
FFrroonntt vviieeww PPrroodduucct
RReeaarrvviieeww PPrroodduucct
t
A
B
P
F
t
WWaallll QQuuiicckk CCoonnnneecct
O
G
C
M
E
RRiiggiidd PPrreessssuurree HHoossee PPaarrttss ((GG)
N
t
K
S
)
I
H
L
D
L
Q
M
T
J
C
K
R
U
4 5
Page 6

PPrreeppaarriinngg tthhee PPooool
l
TThhee PPhhaannttoomm TTuurrbboo cclleeaanneerr sshhoouulldd nnoott bbee uusseedd ttoo cclleeaan
tthhee ppooooll ffoorr sspprriinngg ssttaarrtt--uupp uunnttiill tthhee ffoolllloowwiinngg sstteeppss
hhaavvee bbeeeenn ttaakkeenn:
11.
.
Clear the pool of any objects that might interfere with the
cleaner’s operation.
22.
.
Check to see that the water is at the recommended level.
33.
.
Check the water chemistry.The water should be properly
balanced (ph level) and the pool free from algae.
NNoottee:
performance of the cleaner.
44.
.
Clean or backwash the filtration system without the
Phantom cleaner in the pool.
CCaauuttiioonn -- RRiisskk ooff EEqquuiippmmeenntt DDaammaaggee.
Always disconnect the Phantom Turbo Cleaner and hoses from
the Universal Wall Fitting and remove from pool before
backwashing or cleaning the filtration system. Failure to do so
can damage the Booster Pump and Cleaner.
55.
.
Clean the filtration system pump’s strainer basket
NNoottee:
filtration system at regular intervals according to individual
pool conditions.
NNeeww PPooooll CCoonnssttrruuccttiioon
11.
.
Brush newly constructed pool surface and manually
vacuum new surface debris
Phantom.
SSaanndd ((ddeennssee ddeebbrriiss)
AAllwwaayyss eemmppttyy tthhee PPhhaannttoomm bbaagg wwhheenn ssaanndd
((oorr hheeaavvyy ddeebbrriiss)) eeffffeeccttss tthhee cclleeaanneerr’’ss ssttaabbiilliitty
Pools with excessive amounts of sand should be manuall
vacuumed before installing the Phantom.
:
:
Algae can adversely affect the operation and
.
:
After installing the Phantom Turbo cleaner, clean the
n
before
installing the
)
y
y
n
DDeeddiiccaatteedd BBoooosstteerr PPuummpp RReettuurrnn LLiinne
he cleaner is designed to connect to a 1-1/2 inch dedicated
T
return line that is at least 6 inches below the normal water level
with 1-1/2 inch female threads. If the dedicated return line has
3/4 inch female threads, you will need to purchase a 1-1/2 inch
NPTF x 3/4 inch NPTM adapter.
TToooollss NNeeeeddeedd ffoorr IInnssttaallllaattiioon
• Flat blade screwdriver for adjusting the Regulator on the
Wall Quick Connect.
Rigid Pressure Hose Measuring Tape
•
(included in Ba
g #1).
n
e
Use Only Genuine Hayward Replacement Parts.
Page 7
CCoonnnneeccttiinngg tthhee PPhhaannttoomm TTuurrbboo CClleeaanneerr TToo PPooool
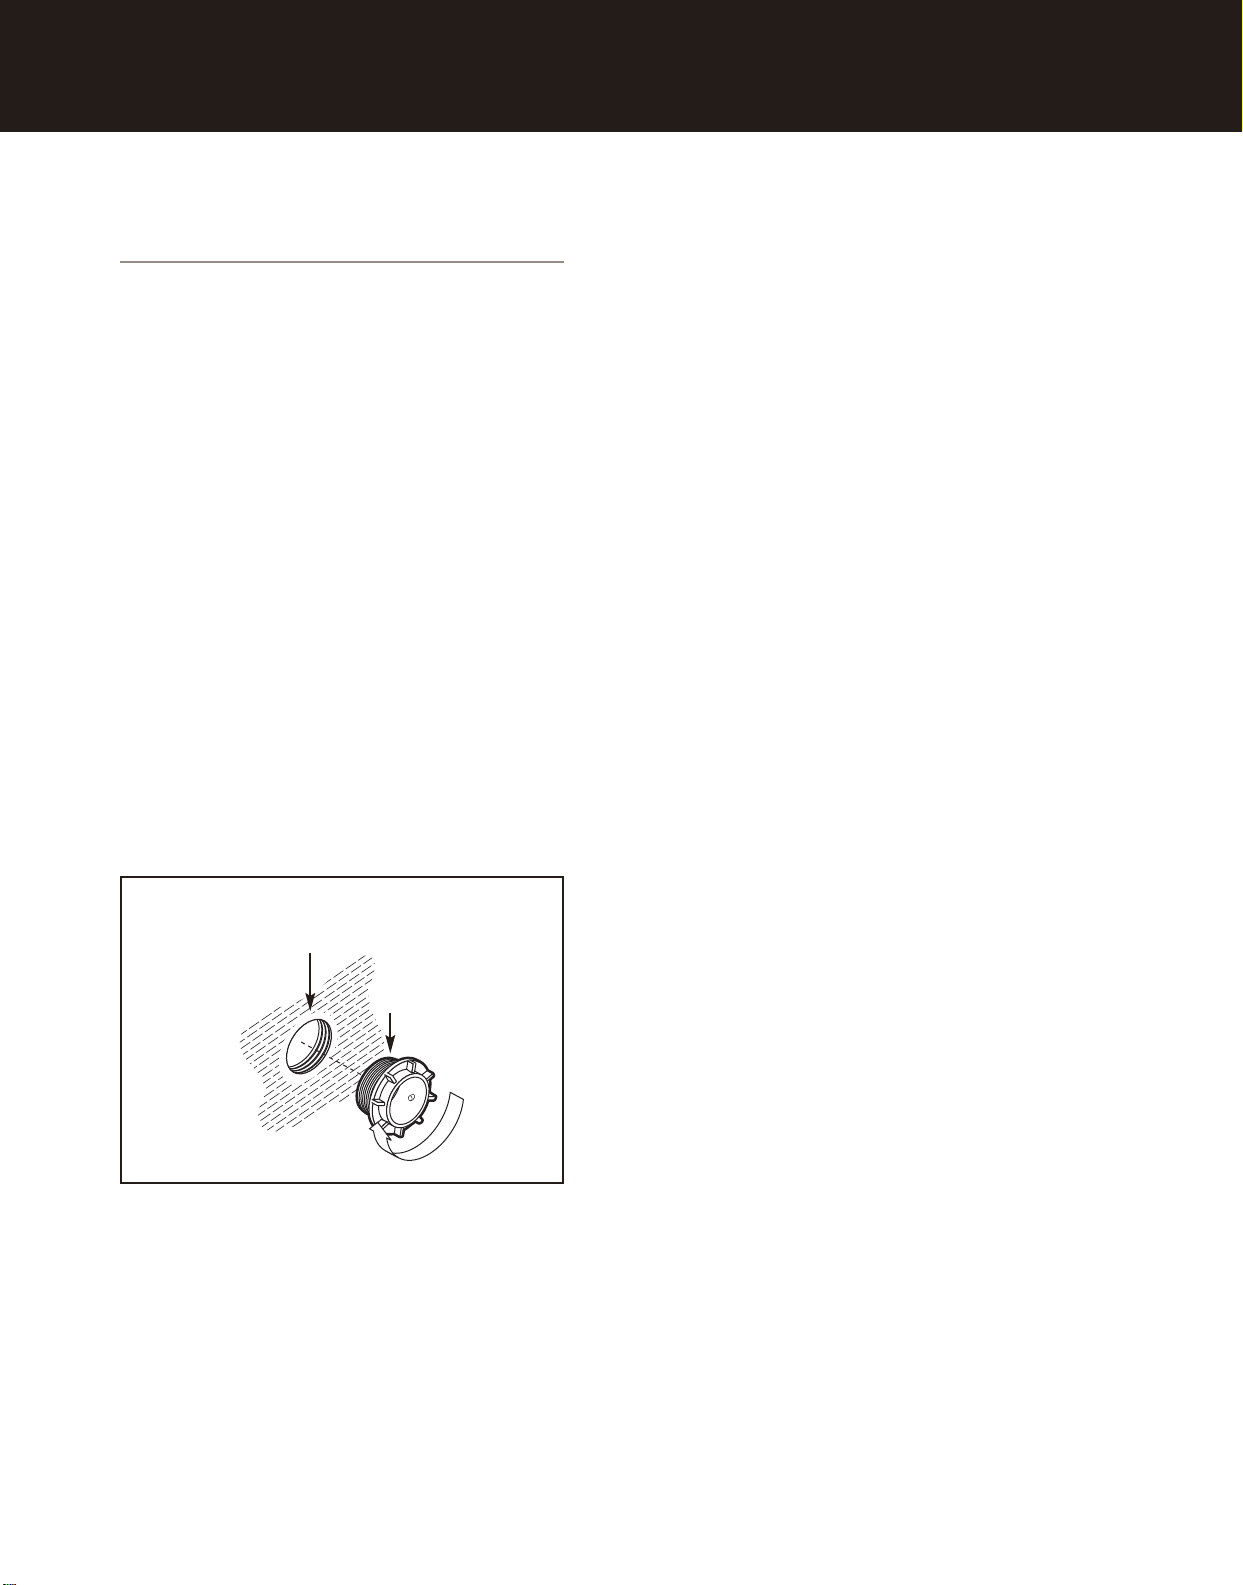
IInnssttaalllliinngg UUnniivveerrssaall WWaallll FFiittttiinngg
BBuuiillddeerrss::
midpoint of the pool’s long wall.
SSppeecciiffiiccaattiioon
DDeepptthh:
SSiizzee:
11.
.
22.
.
33.
.
44.
.
55.
.
66.
.
nstall the Dedicated Return Line at the
I
n
: Dedicated Return Line in Pool Wall.
:
At least 6 inches below water level.
:
1-1/2 inch NPT Female Threaded.
Flush plumbing lines before proceeding.
OOFFF
Turn Booster Pump and Main Filtration Pump
Remove plug or existing Universal Wall Fitting from
previously installed pool cleaner (if any).
Remove the Universal Wall Fitting (part O) and Teflon®tape
from Bag #1.
When installing or re-installing the Universal Wall Fitting
use Teflon®tape on its plastic threads. Leave two starting
threads on the end of the Universal Wall Fitting un-taped.
Screw the Universal Wall Fitting into the Dedicated
Return Line.
IImmppoorrttaanntt:
right to engage starting threads. Be sure both parts are
started properly (not cross threaded) then resume tightening
– hand tighten only.
ssccrreeww aallll tthhee wwaayy iinnttoo tthhee DDeeddiiccaatteedd RReettuurrnn LLiinnee.
DDoo nnoott oovveerr ttiigghhtteenn.
:
Turn the Universal Wall Fitting 1 full turn to the
TThhee UUnniivveerrssaall WWaallll FFiittttiinngg mmaayy nnoot
.
F
.
.
t
l
UUnniivveerrssaall WWaallll FFiittttiinng
Teflon®is a registered trademark of E.I. du Pont de Nemours
and Company.
g
Dedicated Return Line
Universal
all Fitting (O)
W
6
Page 8

AAsssseemmbblliinngg aanndd SSiizziinngg tthhee RRiiggiidd PPrreessssuurree HHoosse
e
AAsssseemmbblliinngg aanndd SSiizziinngg tthhee RRiiggiidd PPrreessssuurree HHoossee
11.
.
pen the plastic bag labeled #1 that contains 10 Rigid Hose
O
Pipes (Part N) and 5 Hose Pipe Couplings (Part I).
22.
.
Lubricate the 5 Hose Pipe Couplings by dunking them in
soapy water.
33.
.
Align the Barbs on the Hose Pipe Coupling with the Tabs on
the Rigid Hose Pipes and snap together.Be sure the black
o-ring does not slip out of the groove on the Hose Pipe
Coupling (if the o-ring is visible through the latch opening
when pipes are snapped together the o-ring has slipped out
of the groove and will leak)
CCoonnnneeccttiinngg HHoossee PPiippees
44.
.
Make 5
SSeetts
Hose Pipe onto each end of the Hose Pipe Couplings.
s
PPiippee AAsssseemmbblliiees
s
of
I N
s
by connecting 1 Rigid
RReeccttaanngguullaarr--SShhaappeedd PPooool
Farthest Point
KKiiddnneeyy--SShhaappeedd PPooool
AAnnggllee--SShhaappeedd PPooool
l
Farthest Point
l
Universal Wall Fitting
(Dedicated Line)
l
Universal Wall Fitting
(Dedicated Line)
Universal Wall Fitting
(Dedicated Line)
RRiiggiidd HHoossee PPiippee AAsssseemmbblly
N
55.
.
Locate the “Measuring Tape” (packed in Bag #1), secure the
y
I
end of the tape marked “Wall Connector End” on the pool
coping immediately above the Universal Wall Fitting.
66.
.
Unroll the Measuring Tape, walk around the pool to the
farthest point along the pool wall from the Universal Wall
Fitting.
At the farthest point from the Universal Wall Fitting hold
the Measuring T
ape at the pool edge/coping and read the
number of Pipe Assemblies specified on the tape.
1 Pipe
Assembly
Farthest Point
MMeeaassuurriinngg TTaappe
NNoottee:
a.
e
:
If the measuring ta
pe specifies more than 5 Pipe
Assemblies, you need to purchase the additional Pipe
sections (P/N
AX6000HE) from your Authorized Hayward
Dealer.
If the measuring tape specifies fewer than 5 Pipe
b.
Assemblies, set the remaining Pipe Assemblies aside these
will not be needed.
Use Only Genuine Hayward Replacement Parts.Use Only Genuine Hayward Replacement Parts.
7
Page 9

CCoonnnneeccttiinngg TThhee RRiiggiidd PPrreessssuurree HHoossee ttoo PPooool
l
77.
.
Lubricate the swivel on the 3 ft. Hose Wall End Assembly (Part T)
in soapy water then snap into one of the Pipe Assemblies.
WWaallll CCoonnnneeccttoorr AAsssseemmbblly
88.
.
Lubricate the swivel on the Hose Cleaner End Assembly (Part S)
in soapy water then snap into a different Pipe Assembly.
HHoossee CClleeaanneerr EEnndd AAsssseemmbblly
y
T QN
y
RRiiggiidd PPrreessssuurree HHoossee AAsssseemmbblly
DDiissccoonnnneeccttiinngg aa HHoossee PPiippe
If it is necessary to shorten, lengthen or replace a component
of the Rigid Pressure Hose, the Snap Fits can be undone with
two small screwdrivers.
CCoonnnneeccttiinngg HHoossee ttoo WWaallll FFiittttiinng
11.
.
With the Booster Pump and Filtration system turned
look down from the pool deck and hold the Wall Quick
Connect so the hose is to the left and the adjustment knob
is to the right. Insert the Wall Quick Connect into the
Universal Wall Fitting and turn it to the left (counter
clockwise) to lock. The hose should be on the bottom below
the adjustment knob.
22.
.
Pull the Wall Quick Connect outward to check that the Wall
Quick Connect is locked into the Universal W
33.
ddiissccoonnnneecct
.
To
Filtration pump
toward the wall, turn it to the right (clockwise) and pull the
all Quick Connect out of the Universal
W
t
the hose, first turn the Booster Pump and
OOFFF
F
y
e
g
all Fitting.
then push the Wall Quick Connect
all Fitting.
W
OOFFF
F
,
S
99.
.
HHoossee SSwwiivveell AAsssseemmbblly
g #2 and lubrica
Open Ba
Assemblies (Part R) in soapy water.Connect the Pipe
Assemblies by snapping the Hose Swivel Assemblies into each
of the Pipe Assemblies.
te both ends of the Hose Swivel
y
RN
8
WWaallll QQuuiicckk CCoonnnneecct
IItt iiss eesssseennttiiaall tthhaatt tthhee HHoossee SSwwiivveell AAsssseemmbblliieess aarre
iinnssttaalllleedd ccoorrrreeccttllyy ttoo eennssuurree ttaannggllee ffrreeee ooppeerraattiioonn ooff tthhe
PPhhaannttoomm TTuurrbboo.
t
e
.
Use Only Genuine Hayward Replacement Parts.
e
Page 10

OOppeerraattiinngg tthhee PPhhaannttoomm TTuurrbboo CClleeaanneer
r
WWaarrnniinngg -- RRiisskk ooff IInnjjuurry
The Filtration and Booster Pumps must be
or disconnecting cleaner hose.
CCaauuttiioonn -- RRiisskk ooff EEqquuiippmmeenntt DDaammaagge
The filter pump must always be run to clear air from the system
before turning the Booster Pump
Pump without the main filter pump
Pump dry will damage the Booster Pump and void the warranty.
OOppeerraattiinngg tthhee PPhhaannttoomm TTuurrbboo CClleeaanneer
11.
.
Be sure all filtration system valves are open and supplying
water to the Booster Pump.
22.
.
Be sure valves to and from the Booster Pump and dedicated
return line are fully opened.
33.
.
The Phantom Turbo Cleaner and its Booster Pump can only
operate when the pool’s filter pump is operating.
CCaauuttiioonn -- RRiisskk ooff EEqquuiippmmeenntt DDaammaagge
Failure to open valves fully and/or failure to have the filtration
system operating will damage the Booster Pump. This damage
voids the Booster Pump’s warranty.
y
OOFFF
F
OONN..NNeevveerr rruun
OON
N
. Running the Booster
n
when connecting
e
the Booster
r
e
pressure is still below 20 PSI, check for clogged Filter, Pump
Strainer Basket, Main Drain, Skimmer Basket, etc., to
determine why there is insufficient water pressure at the
dedicated line. If more pressure is still required have an
Authorized Hayward Pool Dealer or Service person check
the Booster Pump, Filtration System and Plumbing to
determine if they are functioning correctly.
33.
.
Turn the Booster Pump and Filtration Pump
44..RReemmoovvee tthhee SSeettuupp PPrreessssuurree GGaauugge
Connector. Store the Setup Pressure Gauge with the
Owner’s Guide in a safe place.
55.
.
Attach the Cleaner Connector to Cleaner. The Sweep Hose
should be directly below the Pressure Hose.
66.
.
Place the cleaner in the pool, turn the Filtration system
OON
then turn the Booster Pump
SSeettuupp PPrreessssuurree GGaauuggee && WWaallll CCoonnnneecct
N
.
K
C
OOFFF
F
e
from the Cleaner
t
.
OON
N
,
SSeettttiinngg PPrreessssuurre
IImmppoorrttaanntt:
is not properly set. Too little pressure will prevent proper
movement and cleaning. Too much pressure will cause poor
cleaning and premature wear of Cleaner parts.
:
WWaarrnniinngg -- RRiisskk ooff IInnjjuurry
Be careful to hold the Cleaner Connector (Part C) with the Setup
Pressure Gauge (Part U) a
sprayed by the hole in the Setup Pressure Gauge or by the
Sweep Hose.
Clip the Setup Pressure Gauge to the hose near the Wall Quick
Connect.
11.
.
Turn the filtration system pump
OON
N
. Read the pressure on the Setup Pressure Gauge
connected to the Cleaner Connector
screwdriver to adjust the Wall Quick Connect Knob
(see figure 2) until the pressure reads 25 PSI (
NNoottee:
:
The Wall Quick Connect can be adjusted from “0”
(fully closed) to “5” (fully open). Do
adjustment knob be
22.
.
Wall Connector is on Position “5” (fully open) and the
If the
e
The cleaner will not operate properly if the pressure
y
ttached under wa
NNeevveer
r
point a jet or hose at people or pets.
or
“0”
yond
ter and not to be
OON
N
then the Booster Pump
lat blade
Use a f
.
+
/- 5 PSI).
NNOOT
T
force the
“5”.
U
AAddjjuussttiinngg PPrreessssuurree aatt WWaallll CCoonnnneeccttoor
CCoonnnneeccttiinngg PPrreessssuurree HHoossee ttoo CClleeaanneer
Figure 1
r
Figure 2
r
C
Use Only Genuine Hayward Replacement Parts.
Figure 3
9
Page 11

LLaarrggee CCaappaacciittyy DDeebbrriiss BBaag
g
AAttttaacchhiinngg DDeebbrriiss BBaagg ((sseeee ffiigguurree 11)
11.
.
Place the frame of the Debris Bag against the back
of the Cleaner as shown.
22.
.
Press down on the top corners of the frame.
33.
.
Press down on the top-center of the frame to lock
the Debris Bag in place.
RReemmoovviinngg DDeebbrriiss BBaagg ((sseeee ffiigguurree 22)
11.
.
Pull the top of the Debris Bag frame back (1) and then up (2).
NNoottee::
If you allow the bag to dry, the debris will be easier to remove.
EEmmppttyyiinngg DDeebbrriiss BBaagg ((sseeee ffiigguurree 33)
11.
.
Hold Bag over trash can or wherever debris is to be placed.
22.
.
Slide Float Closure off of bag.
33.
.
Hold open edges apart and shake debris from bag.
44.
.
Slide Float Closure onto bag.
SSaanndd ((ddeennssee ddeebbrriiss)
If too much sand or heavy debris is collected in the Debris Bag,
the bag will “droop” over the hose while on the bottom and the
Cleaner may not be able to ascend to the surface properly. If you
observe the bag drooping over the hose turn the booster pump off
and empty the Debris Bag.
NNoottee:
:
Pools with excessive amounts of sand should be manually
vacuumed before installing the Phantom Turbo.
)
)
)
)
AAttttaacchhiinngg DDeebbrriiss BBaag
RReemmoovviinngg DDeebbrriiss BBaagg ((DDeettaaiill)
EEmmppttyyiinngg DDeebbrriiss BBaag
g
g
B
Figure 1
)
Figure 2
Float Closure
10
Figure 3
Use Only Genuine Hayward Replacement Parts.
Page 12

CCoorrrreeccttllyy OOppeerraattiinngg CClleeaanneer
r
MMoovveemmeennt
When the Phantom cleaner is operating properly it will randomly
travel around the bottom, sides and surface of the pool in “AUTO”
mode. The cleaner will clean the bottom and walls 2/3 of its
cycle and skim the surface 1/3 of the cycle. In “TOP” or “BOT”
(Bottom) mode, the cleaner will stay in the Skimming or Bottom
& Wall mode (respectively) until the switch is changed to a
different mode.
SSppiinn--OOuut
The cleaner will periodically stop and rotate clockwise in order
to provide better pool coverage and to escape from corners and
other obstacles. If the cleaner is momentarily stopped in a corner
or at an obstacle, it will Spin-Out to free itself and continue
moving randoml
the frequency of the Spin-Outs. The cleaner comes equipped with
3 Spin-Out Cams; every 75, 50 (factory installed) or 30 seconds
(75 second and 30 second Cams are in the Accessory bag). To
change Spin-Out Frequency see “Changing Spin-Out Cam”.
SSwweeeepp HHoosse
The Sweep Hose should move in a slow, undulating (snake-like)
motion. It moves debris out of tight corners so the cleaner can
vacuum the debris at a more accessible spot in the pool.
The Sweep Hose also stirs fine debris into suspension for
removal by the pool’s filtration system.
aarree wweeaarr ppaarrtts
(Wear Line) replace the Wear Rollers (P/N AX5006A) a bag of
extra Wear Rollers is included.If a hole forms in the Sweep Hose,
it must be replaced with a genuine Hayward Phantom Sweep
Hose (P/N AX5000RSHA).
t
t
y about the pool. The Spin-Out Cam determines
e
TThhee SSwweeeepp HHoossee RRoolllleerrs
s
. When the rollers wear-down to the outer groove
s
SSaanndd ((DDeennssee DDeebbrriiss)
If too much sand or heavy debris is collected in the Debris Bag,
the bag will “droop” over the hose while on the bottom and may
not be able to ascend to the surface. If you observe the bag
drooping over the hose turn the booster pump off and empty
the Debris Bag.
PPoooollss wwiitthh eexxcceessssiivvee aammoouunnttss ooff ssaanndd sshhoouulldd bbee mmaannuuaalllly
vvaaccuuuummeedd bbeeffoorree iinnssttaalllliinngg tthhee PPhhaannttoomm.
The Phantom is designed to operate with 1/2-cup of sand and
the remainder of its bag filled with leaves, acorns, grasses,etc.
PPrreessssuurree HHoosse
This hose has been designed to minimize the forming of loops
and knotting. Most of the pressure hose should remain below the
surface of the water the majority of the time. If the hose forms a
loop the cleaner will eventually work it out. In the rare event the
hose becomes knotted or tangled, it will limit the range of
the cleaner. To get optimal coverage, remove knots or bad
tangles if found.
SSppiinn--OOuutt CCaamms
75-Second
s
)
y
.
e
Sun Logo
50-Second 30-Second
CClleeaanniinng
When the cleaner is on the bottom or walls debris is vacuumed
from below the cleaner and passed through the vacuum tube
into the Debris Bag. When the cleaner is skimming the surface
water jets push the debris into the Debris Bag where it is held
until the user empties the Ba
debris on the first pass, but your pool should be clean in 3-hours
or less (depending on pool size, shape and the amount of debris
in the pool).
OObbsseerrvvee tthhee PPhhaannttoomm’’ss ooppeerraattiioonn aatt rreegguullaarr iinntteerrvvaallss aanndd eemmpptty
tthhee bbaagg aass nneecceessssaarryy.
necessary to clean the pool. Excessive use is unnecessary and
will cause premature cleaner wear.
FFiinnee DDeebbrriis
The Large Capacity Debris Bag, as with other pressure-side
cleaners, does not hold very fine sand or other powder-like
debris. Powder will be blown through the bag and into
suspension so it can be filtered b
Use Only Genuine Hayward Replacement Parts.
g
The cleaner may not pick-up all
g.
.
Only operate the Phantom for the time
s
tion system.
y the pool’
s filtra
SSwweeeepp HHoosse
y
WWeeaarr RRoolllleer
e
Wear Rollers (M)
r
ear Line
W
(outer groove)
11
Page 13

PPhhaannttoomm TTuurrbboo CClleeaanneerr AAddjjuussttmmeenntts
s
WWaarrnniinngg –– RRiisskk ooff IInnjjuurry
TTuurrnn tthhee BBoooosstteerr PPuummpp aanndd FFiillttrraattiioonn PPuummpp OOFFFF bbeeffoorre
mmaakkiinngg aaddjjuussttmmeennttss ttoo tthhee cclleeaanneerr..AAllwwaayyss mmaakke
aaddjjuussttmmeennttss oouuttssiiddee ooff tthhee ppooooll..FFaaiilluurree ttoo ddoo ssoo mmaay
ccaauussee iinnjjuurryy.
.
CChhaannggiinngg SSppiinn--OOuutt FFrreeqquueennccy
• In most pools it will not be necessary to change the Spin-Out
frequency.
• The cleaner comes with a 3-prong Spin-Out cam installed,
which makes the Phantom cleaner Spin-Out once every
50-seconds. This is appropriate for most pools.
• Pools that are small or have many sharp corners or other
obstacles may benefit from more frequent Spin-Outs. For
such pools, open the Cam Cap and replace the 3-prong cam
with the 5-prong 30 second cam.
• Pools that are very large and/or have very few obstacles may
benefit from less frequent Spin-Outs. For such pools, open
the Cam Cap and replace the 3-prong cam with the 2-prong
75-second cam.
• The goal is to maximize cleaning time and minimize the
amount of time spinning out.
• If the cleaner is spending too much time at an obstacle
waiting for a Spin-Out, use a cam with more prongs for more
frequent Spin-Outs.
• If the cleaner rarely needs to Spin-Out near an obstacle then
a cam with fewer prongs and less frequent Spin-Outs will
increase effective cleaning time.
• If the cleaner has a tendency to stay in the deep end (not
cleaning the shallow end sufficiently), in pools with a
particularly steep or long slopes between the deep and
shallow ends, we recommend using a cam with fewer
it will promote longer straight runs.
prongs,
y
e
e
y
y
AAddjjuussttiinngg SSppiinn--OOuutt DDuurraattiioon
ach Cam has a “Summer” side and a “Winter” side (see Sun &
E
Snowflake logos on each Cam). The Summer side is usually
preferred. If the pool water is cold (below 60 degrees F), the
Pressure Hose becomes stiffer and may prevent the Cleaner
from Spinning-Out enough to escape from obstacles. The
“Winter” Cam side will provide longer Spin-Outs so the Cleaner
operates better in cold water.
11.
.
Turn the Cam Cap to open
22.
.
Remove the Cam, turn it over and replace the Cam so the
desired (Sun or Snowflake) side is face-up.
•
•
If the cleaner is making more than three attempts to escape
from an obstacle, use the “Winter” side.
•
•
If the cleaner regularly spins-out more than three-quarters
of a turn, use the “Summer” side.
CCaamm CCaapp oonn DDeecck
CCaamm CCaapp OOppeen
Spin-Out Cam
k
n
n
Cam Cap (F)
p (F)
Cam Ca
CChhaannggiinngg SSppiinn--OOuutt CCaam
11.
.
urn the Cam Ca
T
22.
.
Remove the Spin-Out Cam.
33.
.
Place the desired Cam in place over the stem.
44.
.
Place unused Cams in Accessor
place with the Owner’s Guide.
55.
.
Close the Cam Ca
m
p counter clockwise to open.
p.
12
g and store in a safe
y Ba
SSppiinn--OOuutt CCaamms
75-Second
s
50-Second 30-Second
Use Only Genuine Hayward Replacement Parts.
Sun Logo
Page 14

CChhaannggiinngg TToopp aanndd BBoottttoomm OOppeerraattiioon
The Top/Bottom Switch (Part P, page 4) is set to “AUTO” at the
factory.The Phantom Cleaner will vacuum the pool bottom and
sides 2/3 of its cycle and skim the surface 1/3 of its cycle
automatically.
The cleaner can be easily adjusted to concentrate on the areas
of the pool with the most debris.
•• TToo OONNLLYY cclleeaann tthhee bboottttoomm aanndd ssiiddeess ooff tthhee ppooooll,
mmoovvee tthhee sswwiittcchh ttoo tthhee rriigghhtt ““BBOOTT””.
•• TToo OONNLLYY sskkiimm tthhee ppooooll ssuurrffaaccee,,mmoovvee tthhee sswwiittcchh
ttoo tthhee lleefftt ““TTOOPP””.
TToopp//AAuuttoo//BBoott SSwwiittcch
.
h
n
,
.
AAddjjuussttiinngg SSwweeeepp HHoossee PPoowweer
In most pools it will not be necessary to adjust the
•
Sweep Hose power.
• Observe the Phantom cleaner operating in the pool.
The Sweep Hose should move in a slow, undulating
(snake-like) motion.
SSwweeeepp HHoossee NNoott MMoovviinngg:
•
move side-to-side and just drags behind the cleaner, check
the Sweep Hose for holes. Check for debris behind the
adjustment knob or in the jet-end of the Sweep Hose.
SSwweeeepp HHoossee MMoovveess SSlloowwllyy OOrr NNoott AAtt AAllll:: TTuurrnn tthhe
•
aaddjjuussttmmeenntt kknnoobb ccoouunntteerr--cclloocckkwwiisse
Hose power.
SSwweeeepp HHoossee FFrreeqquueennttllyy SSpprraayyss OOuutt OOff TThhee PPooooll:
•
TTuurrnn tthhee aaddjjuussttmmeenntt kknnoobb cclloocckkwwiisse
Hose power.
NNoottee:
This can cause the hose to tangle or knot.
NNOOT
:
T
Do
turn the Sweep Hose completely off.
r
:
If the Sweep Hose does not
e
to increase Sweep
e
to reduce Sweep
e
:
AAddjjuussttiinngg SSwweeeepp HHoossee PPoowweer
r
Use Only Genuine Hayward Replacement Parts.
13
Page 15

MMaaiinntteennaanncce
e
RReemmoovviinngg tthhee PPhhaannttoomm TTuurrbboo CClleeaanneerr FFrroomm tthhee PPooool
WWaarrnniinngg –– RRiisskk ooff IInnjjuurry
The Booster Pump and Filtration Pump must be
connecting or disconnecting cleaner or hose.
11..TTuurrnn tthhee BBoooosstteerr PPuummpp aanndd FFiillttrraattiioonn PPuummpp OOFFFF.
you will not be replacing the cleaner before the next Booster
Pump timer cycle, turn the Booster Pump Timer
run the Booster Pump without the cleaner connected.
FFaaiilluurree ttoo ddoo ssoo ccaann ccaauussee sseerriioouuss iinnjjuurryy.
CCaauuttiioonn -- RRiisskk ooff EEqquuiippmmeenntt DDaammaagge
NNeevveer
r
run the Booster Pump without the Cleaner connected.
Doing so will damage the pump’s motor and void the Booster
Pump’s warranty.
22.
.
From the pool deck looking down push the Wall Quick
Connect into the Universal Wall Fitting and turn it to the right
(clockwise).
33.
.
Pull the Wall Quick Connect out of the Universal Wall Fitting.
44.
.
Grab the cleaner by the wing, and remove from the pool.
55.
.
Disconnect the Cleaner Connector from the Phantom
Cleaner.
66.
.
Lay the Cleaner End of the Pressure Hose and the Sweep
Hose flat and straight.
IImmppoorrttaanntt::
and the Sweep Hose straight,
operate properly with these hoses bent.
Always store the Cleaner End of the Pressure Hose
EEmmppttyyiinngg tthhee DDeebbrriiss BBaag
• Empty the Debris Bag regularly. Do not continue to operate
the Phantom when the bag is full.
11.
.
Hold Bag over trashcan or wherever debris is to be placed.
22.
.
Slide Float Closure off of bag.
33.
.
Hold open edges apart and shake debris from bag.
44.
.
Slide Float Closure onto ba
SSaanndd ((ddeennssee ddeebbrriiss)):: AAllwwaayyss eemmppttyy tthhee PPhhaannttoom
•
DDeebbrriiss BBaagg wwhheenn tthheerree iiss ttoooo mmuucchh ssaanndd ((oorr hheeaavvy
ddeebbrriiss)).
.
If the Cleaner cannot climb to the surface in TOP
AUTO mode OR the Bag “droops” over the hose
or
BBoooosstteerr PPuummpp OOFFFF aanndd eemmppttyy tthhee DDeebbrriiss BBaagg.
• When the bag is full of leaves or other debris, the debris may
trap air in the bag while skimming the surface. If the trapped
air prevents the cleaner from descending to the pool bottom,
empty the Debris Bag.
DDOO NNOOTT ooppeerraattee tthhee PPhhaannttoomm iiff iitt rruunnss oonn iittss ssiiddee oor
uuppssiiddee--ddoowwnn.
.
y
nnoott ccooiilleed
g
g.
OOFFF
F
when
OOFFFF..NNeevveer
.
e
d
. The cleaner may not
m
ttuurrnn tthhe
.
.
If
y
e
r
Screen
s
ter hose with inlet
IImmppoorrttaanntt:
IImmppoorrttaanntt:
e
:
Make
:
If
.
l
r
CClleeaanniinngg tthhee IInn--LLiinnee FFiilltteerrs
11.
.
he Hose In-Line filter (Part Q) is located by the Wall Quick
T
Connect (Part K).
22.
.
To remove the screen inside the In-Line Filter, unscrew
the cap of the In-Line Filter and remove the screen.
33.
.
Remove the debris from the screen and rinse.
the screen frequently becomes plugged, the filtration
system is not performing properly or there is another
plumbing problem.
44.
.
Place the open end of the screen into the outlet end of the
In-Line Filter and screw the cap back on.
sure the O-Ring is in place and properly seated.
IInn--LLiinnee FFiilltteer
IInn--LLiinnee FFiilltteer
r
r
CCaauuttiioonn -- RRiisskk ooff EEqquuiippmmeenntt DDaammaagge
NNeevveerr ooppeerraattee tthhee cclleeaanneerr wwiitthhoouutt tthhee ssccrreeeenn iinn ppllaaccee.
Operating the cleaner without the screen will damage the
cleaner’s internal mechanism.
55.
.
Inlet Manifold filter screen stays in manifold inlet when hose
is removed f
66.
.
If there is debris in the filter it can be removed for cleaning
b
y grasping the bar and gently pulling while twisting.
77.
.
Rinse to ensure that all debris and sand is removed from
the inlet filter screen.
88.
.
Before replacing the manifold, check that there is no debris
visible inside of manifold inlet. If sand or debris can be seen,
gently rinse out manifold using a wa
pointed down.
MMaanniiffoolldd FFiilltteer
or storage.
r
14
Use Only Genuine Hayward Replacement Parts.
Page 16

SSttoorriinngg tthhee PPhhaannttoommTTuurrbboo CClleeaanneer
r
SSwweeeepp HHoosse
• Sweep Hose Wear Rollers will experience wear when
operating in a plastered or concrete pool.
• When the Wear Rollers wear-down to the outer groove
(Wear Line) replace the Wear Rollers (P/N AX5006A).
• Check the Sweep Hose for holes
(Replace if necessary with P/N: AX5000RSHA).
WWeeaarr RRoolllleer
Some parts will wear with normal use. To ensure the high quality
performance, insist on
((uussiinngg nnoonn--HHaayywwaarrdd rreeppllaacceemmeenntt ppaarrttss wwiillll VVooiidd tthhe
PPhhaannttoomm TTuurrbboo CClleeaanneerr’’ss WWaarrrraannttyy)).
user replaceable and subject to normal wear and tear.
11..SSwweeeepp HHoossee:
be replaced. Unscrew the metal mender nut from the hose
and pull the Sweep Hose (Sweep Hose Replacement Part
Number: AX5000RSHA) off the Cleaner Connector. Attach a
new Sweep Hose to the Cleaner Connector.
22..LLaarrggee CCaappaacciittyy DDeebbrriiss BBaagg wwiitthh FFllooaatt:
should be replaced if it is torn (Replacement Part Number:
AX6000BA).
33..SSwwiivveellss:
the cleaner is running, it should be replaced.
e
r
GGeennuuiinnee HHaayywwaarrdd rreeppllaacceemmeenntt ppaarrtts
.
The following parts are
:
If a hole forms in the Sweep Hose, it should
:
:
If a swivel ceases to turn easil
y or leaks while
Wear Line
roove)
(outer g
e
The Debris Bag
SSttoorriinngg tthhee PPhhaannttoomm CClleeaanneer
11..TTuurrnn tthhee BBoooosstteerr PPuummpp OOFFF
Booster Pump will not turn on while the Phantom cleaner is
NNeevveer
out of the pool (
the cleaner connected).
22.
.
Disconnect Wall Quick Connect from the Universal Wall
Fitting. The Universal Wall Fitting may be left in place.
33.
.
The cleaner is constructed of the finest materials available,
however we recommend that when the Phantom cleaner is
removed from the pool, it should be stored flat on its wheels
in a shaded area to protect the unit form excessive exposure
to sunlight.
44.
.
Store the Sweep Hose and the Hose Cleaner End Assembly
(Part S) straight and flat,
Sections may be folded on one another,so that the short
hoses in-between are bent. If possible, store the hoses in
the shade.
r
operate the Booster Pump without
WWiinntteerriizziinngg tthhee CClleeaanneer
When closing your pool for the winter completely drain the water
s
from the Phantom Cleaner (by slowing rotating it in all directions)
and Hoses. Store the Phantom Cleaner indoors to prevent
freezing of the inner mechanisms.
PPeerriiooddiicc FFrreeeezziinngg CCoonnddiittiioonns
If you are in an area subject to periodic freezing conditions, but
pool equipment is kept in operation, it is very important that the
filtration system and Phantom cleaner be in operation during
times when hard freezing occurs (normally between 3 AM and
7AM). Running the Phantom cleaner at this time will ensure
against damaging the Cleaner and may prevent freezing the
.
ter
pool wa
r
F
and set the timer so the
nnoott ccooiilleed
d
. The Rigid Hose Pipe
r
s
Use Only Genuine Hayward Replacement Parts.
15
Page 17

TTrroouubblleesshhoooottiinng
g
FFoorr TTeecchhnniiccaall AAssssiissttaannccee CCaallll:
1-800-429-9273
:
16
Use Only Genuine Hayward Replacement Parts.
Page 18

BBoooosstteerr PPuummp
p
BBoooosstteerr PPuummpp TTyyppiiccaall IInnssttaallllaattiioon
rom Pool
F
Filtration Pump Pool Filter Heater To Spa
n
Phantom Turbo
Booster Pump
(sold separately)
Plumbing
Options
Solar System
Chlorinator
To Pool
RReeff..NNoo..PPaarrtt NNoo.
1
2 AX6060A Pump Volute
3
4 AX6060C Impeller Assembly
5 AX6060S Seal Plate O-Ring
6
7 AX6060E Seal Plate Assembly (incl. Drain Plug w.O-Ring)
8 SPX4000FG Drain Plug w/O-Ring
9
10 SPX3200Z5 Motor Belt
11
Use Only Genuine Hayward Replacement Parts.
.
DDeessccrriippttiioon
AX6060Z1 Screw,
AX6060UNPAK
SPX2700SA
AX6060G Motor Support
SPX2707Z1B
6060HKIT Hose Kit (incl. Hose, 2 Hose Fittings,and 4 Hose Clamps)
Union Connector Kit (incl. 2 ea. Union Hose Connector,
Union Pipe Connector,Union Nut, and Union O-Ring)
Shaft Seal
Motor,
1
ype b x 1-
T
⁄4”
Assembly
3
Square Flange
,
⁄4 HP
n
1
(Set of 10)
⁄4”
17
Page 19

PPhhaannttoomm TTuurrbboo PPaarrttss DDiiaaggrraam
m
Ref. No. Part No. Description
1 AX6000TA Deck (with Wing & Cam Cap)
2 AX6001F Cam Cap
3 AX5003M Cams (3-pack)
4 AX6000GA Gearbox (with Cams, Hoses & Ties)
5 AX5010D4 Screws (5-pack)
6 AX6009BF Front Wheel (with Retainer & Bearing)
7 AX6000D Soft Rollers (7-pack with Bearing)
*8 AX6000MA3 Turbo Manifold Assembly (with Hoses & Ties)
9 AX5000B Vac Tube
10 AX5000A2 Bottom Housing
*11 AX5009E1 Rear Axle Split (2 Pack)
12 AX6009B Rear Wheels (with Bearings, Axle, Nuts & Hubcaps)
13 AX6000HA Rigid Pressure Hose (complete)
14 AX6000HCA Pressure Hose Cleaner End Assembly
(Without Sweep Hose)
15 AX6000HWA2 Pressure Hose and Top of In-Line Filter Assembly
Hose Swivel Assembl
16 AX6000HF
17 AX6000HE Rigid Hose Pipe Section (2 Rigid Pipes & 1 Coupling)
18 AX6000HWA1 Wall Quick Connect, Hose, Bottom In-Line Filter
19 AX6009S In-Line Filter Screen
AX6000PTA
20
21 AX5000RSHA Sweep Hose (with Rollers & Mender Nut)
22 AX6000BA Large Capacity Debris Bag (with Float)
23 AX6000FC Float Closure
AX5004L1
24
25 AX5006A Wear Rollers (10-pack)
26 AX5500EF Floats (Left & Right)
AX6000SW
27
*28 AX6000TNKA Nose Jet Tank
AX6008M Front Spin-Out Jet (with Hose & Tie)
29
30 AX5010G10 Wall Quick Connect O-Ring
31 AX5010G18 Cleaner Connector O-Ring
32 AX5010G19 In-Line Filter O-Ring
AX5010G20
33
*34 AX6004R1 Inlet Filter Screen
*Denotes New Part Numbers.
A
y
Assembl
Set-up Pressure Gauge
W
Universal
A Top / Auto / Bot Switch
Pipe Connector O-Ring (3-pack)
y
all Fitting
18
Use Only Genuine Hayward Replacement Parts.
Page 20

IImmppoorrttaanntt!
RReettaaiinn YYoouurr BBiillll ooff SSaallee FFoorr PPrrooooff ooff WWaarrrraannttyy EElliiggiibbiilliitty
To the Original Retail Consumer / Purchaser (the “PURCHASER”)
of the Hayward Phantom Turbo Automatic Pool Cleaner (the
“CLEANER”).
Hayward Pool Products, Inc. (“HAYWARD”) warrants the parts for
One (1) year form the date of original purchase (excluding the
bag and sweep hose which are normal replacement parts).
TThhee HHaayywwaarrdd BBoooosstteerr PPuummpp iiss eexxcclluuddeedd iinn tthhiiss wwaarrrraanntty
aanndd ccaarrrriieess iittss oowwnn sseeppaarraattee wwaarrrraannttyy.
SHOULD THE CLEANER FAIL TO BE IN GOOD WORKING ORDER
IN ACCORDANCE WITH THE ABOVE SCHEDULE, HAYWARD WILL
T ITS OPTION REPAIR OR REPLACE THE CLEANER OR ANY
A
DEFECTIVE PARTS AT NO ADDITIONAL CHARGE EXCEPT
AS SET FORTH BELOW. REPAIR PARTS AND REPLACEMENT
PRODUCTS WILL BE FURNISHED ON AN EXCHANGE BASIS AND
WILL BE NEW OR FUNCTIONALLY EQUIVALENT. ALL PARTS
REMOVED AS A RESULT OF REPLACEMENT SHALL BECOME
THE PROPERTY OF HAYWARD. LIABILITY OF HAYWARD AND THE
SOLE REMEDY OF THE PURCHASER WHETHER IN CONTRACT
UNDER ANY WARRANTY, IN TORT (INCLUDING NEGLIGENCE), IN
STRICT LIABILITY OR OTHERWISE, SHALL BE LIMITED TO THE
REPAIR OR REPLACEMENT OF DEFECTIVE PARTS ONLY AND
SHALL IN NO EVENT EXCEED THE RETURN OF THE AMOUNT OF
THE PURCHASE PRICE PAID BY THE PURCHASER.
TTHHIISS LLIIMMIITTEEDD WWAARRRRAANNTTYY IISS SSUUBBJJEECCTT TTOO TTHHE
FFOOLLLLOOWWIINNGG TTEERRMMSS AANNDD CCOONNDDIITTIIOONNSS:
11.
.
22.
.
!
y
.
E
:
This Limited Warranty shall not apply to damage caused by
failure to perform normal maintenance on the CLEANER
(e.g. monitoring pressure/flow and replacing a worn bag
and sweep hose).
This Limited Warranty shall be void if the CLEANER is
modified in any respect, including, but not limited to the use
of any parts other than Genuine Hayward Parts.
LLiimmiitteedd WWaarrrraanntty
LLiimmiitteedd WWaarrrraanntty
33.
.
This Limited Warranty shall not apply to any injury, loss,
damage, defect or malfunction of the CLEANER or failure of
the CLEANER to function resulting form any failure to
operate or maintain the CLEANER in accordance with the
directions contained in the Owner’s Guide provided by
HAYWARD or any injury, loss, damage, defect, malfunction
or failure to function resulting from any misuse,
unreasonable use, tampering, abuse,accident, act of God,
alterations in the CLEANER by anyone other than HAYWARD
including but not limited to such damages or injuries to
y
parts resulting from running pump dry (e.g. interruption in or
inadequate supply of water to the Booster Pump, or
obstruction in lines, or otherwise); or damage, defects, or
malfunctions resulting from defects in, failure or malfunction
of, or negligence, abuse, or misuse with respect to
equipment other than the CLEANER.
44.
.
This Limited Warranty shall not apply to the malfunction of,
damage to, materials failure in, or changes in the
appearance of the CLEANER resulting from exposure to
sunlight or chemicals or chemical reactions to substances
with which any part of the CLEANER may come in contact or
parts if worn, do not affect performance of the CLEANER.
55.
.
This Limited Warranty does not apply to cleaners used for
commercial purposes.
66.
.
The CLEANER is designed to function in a properly
designed, constructed and maintained pool. The Limited
Warranty does not apply in the circumstances where the
pool’s design, construction or maintenance is defective,
substandard or inappropriate for the CLEANER’S operation.
77.
.
Deterioration, discoloration or brittleness of pool plaster and
vinyl liners can be caused over time separa
combination with, algae and an imbalance in pool water
chemistry, improper installation, and other factors.
tely by, or in
y
y
Use Only Genuine Hayward Replacement Parts.
19
Page 21

LLiimmiitteedd WWaarrrraanntty
y
LLiimmiitteedd WWaarrrraanntty
AYWARD hereby disclaims any and all claims, and PURCHASER
H
releases HAYWARD from any and all claims for damages to any
pool plaster or vinyl liner in PURCHASER’S pool by reason of the
use and/or operation of the CLEANER
88.
.
This Limited Warranty is valid and enforceable only on
CLEANERS assembled, manufactured, or purchased and
installed in the United States of America and Canada.
99.
.
This Limited Warranty shall apply to PURCHASER as original
purchaser of the CLEANER from an authorized HAYWARD
dealer and shall not apply to any subsequent purchaser,
assignee or other recipient of the CLEANER from the
PURCHASER.
1100..TThhiiss LLiimmiitteedd WWaarrrraannttyy ddooeess nnoott aappppllyy uunnlleessss tthhe
aaccccoommppaannyyiinngg RReeggiissttrraattiioonn CCaarrdd iiss ssiiggnneedd,,ccoommpplleetteed
aanndd rreettuurrnneedd wwiitthhiinn ffoouurrtteeeenn ((1144)) ddaayyss ffrroomm tthhee ddaatte
ooff ppuurrcchhaassee oorr aann eeqquuiivvaalleenntt wwaarrrraannttyy ffoorrmm iis
ccoommpplleettee oonnlliinnee aatt wwwwww..hhaayywwaarrddnneett..ccoomm//wwaarrrraannttyy.
Hayward reserves the right to dispose of any Registration
Card once it is received. PURCHASER must retain written
proof of purchase.
1111.
.
The foregoing Limited Warranty gives the PURCHASER
specific legal rights, which may vary from state to state, and
accordingly,some of the listed conditions, and exclusions
may not apply to PURCHASERS living in certain states.
1122.
.
Neither party will be liable to the other for any failure or
delay in performance due in whole or in part to any cause
beyond such party’s reasonable control, including due to the
elements, acts of God, acts of the other party, acts of civil or
military authority, war, riots, or concerted labor action.
1133.
.
The PURCHASER has no right to sell,
interest it has in this a
consent of HAYWARD. HAYWARD may, without notice,
assign its interest in this agreement or any payment or other
sum due hereunder without notice to or prior consent of the
PURCHASER. If Hayward makes any such assignment, the
assignee will have all of HAYWARD’s rights, obligations,
powers, privileges and remedies. Modification of this
Agreement may only be made in writing signed by an
authorized agent of HAYWARD.
Should a defect in workmanship and /or materials in the
CLEANER become evident during the term of the Limited
Warranty, PURCHASER must ship the item freight prepaid to any
authorized Factory Service Center as soon as possible after the
discovery of the defect,
including date of purchase and serial number of the item claimed
to be defective, the name and address of the PURCHASER and a
brief description of the problems/defects encountered.
Call (800) 227-1477 for the name and address of the nearest
y
reement without the prior written
g
together with a cop
e
e
s
.
transfer or assign
y of the Bill of Sale
Factory Service Center (outside the continental U.S. call
(909) 594-1600).
AYWARD will at its option, repair or replace the defective
H
CLEANER parts covered by this Limited Warranty at its own cost
and expense and return the same to the PURCHASER freight
prepaid. HAYWARD is not responsible for any cost and expense
of handling, packing, shipping or transporting the CLEANER or
any parts to or from the Factory Service Center, unless expressly
provided to the contrary by state law. No dealer, distributor or
other similar person has any authority to make any warranties or
representations concerning HAYWARD beyond the express terms
contained herein. HAYWARD assumes no responsibility for any
warranties beyond the express terms contained in this Limited
Warranty. This Limited Warranty is in lieu of any other warranties
expressed or implied, and is valid and enforceable only in the
d
United States of America and Canada.The PURCHASER must
provide written proof of the original date of purchase of the
CLEANER in form reasonably acceptable to HAYWARD.
The exclusive forum for any dispute between the PURCHASER
and HAYWARD will be binding arbitration, conducted in Union
County, New Jersey under the rules of the American Arbitration
Association, and the prevailing party will be entitled to an award
of attorney’s fees and costs.
THE FOREGOING WARRANTY AND REMEDIES ARE EXCLUSIVE
AND ARE MADE EXPRESSLY IN LIEU OF ALL OTHER
WARRANTIES, EXPRESSED OR IMPLIED,WHETHER IN FACT OR
BY OPERATION OF LAW,STATUTORY OR OTHERWISE,
INCLUDING WARRANTIES OF MERCHANTABILITY AND FITNESS
FOR USE OR A PARTICULAR PURPOSE. HAYWARD NEITHER
ASSUMES NOR AUTHORIZES ANY OTHER PERSON TO ASSUME
ANY OTHER LIABILITY IN CONNECTION WITH THE SALE,
FOR IT
INSTALLATION OR USE OF THE CLEANER AND HAYWARD
MAKES NO WARRANTY WHATSOEVER FOR EQUIPMENT NOT
SUPPLIED BY HAYWARD. THE FOREGOING WARRANTY DOES
NOT COVER DAMAGE
ACCIDENT, MISUSE, ABUSE, OR NON-HAYWARD
MODIFICATIONS OF THE CLEANER. HAYWARD SHALL NOT BE
LIABLE FOR DAMAGES DUE TO DELAYS IN DELIVERY OR USE. IN
NO EVENT WILL HAYWARD BE LIABLE TO THE PURCHASER FOR
ANY DAMAGES INCLUDING,
SPECIAL, INCIDENTAL OR CONSEQUENTIAL DAMAGES ARISING
OUT OF OR RELATING TO THE SALE, INSTALLATION, OR USE OF
OR INABILITY
POOL OR FOR ANY OTHER CLAIM BY ANY OTHER PARTY.
TO USE
TO THE CLEANER RESULTING FROM
ANY DIRECT,
BUT NOT LIMITED
THE CLEANER,
PURCHASER’S SWIMMING
TO,
20
Use Only Genuine Hayward Replacement Parts.
Page 22

 Loading...