

Page 1

ABOVE GROUND SERIES
Suction Pool Cleaner
Owner’s Manual
ISM926 Rev. A
Hayward Pool Products
620 Division Street, Elizabeth, NJ 07201 USA
908.351.5400 • www.hayward.com
Page 2
TURBINE SUCTION CLEANER SAFETY WARNINGS
Owner’s Manual
Congratulations on the purchase of your Hayward automatic suction pool
cleaning system. Your cleaner is the smart, ecient way to clean your aboveground pool.
Hayward turbine cleaners are powered by your pool’s filter system and are
designed to work well with most systems. The performance of the cleaner in your
pool will be relative to its power source. Because the operation and performance
of the cleaner are system reliant, there is a remote possibility that a service call
may be necessary to complete the proper installation of your cleaner. This call
will be at the consumer’s expense.
Lastly, one or more of the accessories designed for the cleaner, including
additional hose sections, might be applicable to your installation. Consult
your Hayward dealer for prices and availability.
DO NOT use to remove large debris in new pools.
REMOVE cleaner and hose before adding ANY chemicals to your pool.
DO NOT swim with cleaner.
Store the cleaner in a shaded, safe area.
Hoses must be stored straight. DO NOT coil the hose.
KEEP AWAY from children and pets.
REMOVE cleaner when performing backwash.
REMEMBER safety first.
For complete warnings and safety information visit www.hayward.com.
FOR YOUR RECORDS
Purchase Date:
Serial Number:
KEY
Tip
Attention
Pressure Adjustment
Pump
32
Page 3

CARTON CONTENTS PREPARING THE POOL
Pool Cleaner
Connector
x9
x1
Leader
Regulator
Valve
Connector/Leader Hoses Accessory Kit
Cone
Adapter
x1
Flow
Gauge
Please complete the following steps
to prepare your pool for installation:
DEBRIS
Remove any large objects and
excessive debris from the pool.
WATER LEVEL
Confirm that water level is at the
recommended level.
WATER CHEMISTRY
Make sure water is properly
pH: 7.2 - 7.8
Chlorine: 1.0-3.0 PPM
Total Alkalinity: 80 - 120 PPM
balanced and that the pool is free
from algae.
FILTER
Clean or backwash the filter.
Clean the skimmer and pump
baskets prior to installing the cleaner.
54
Page 4
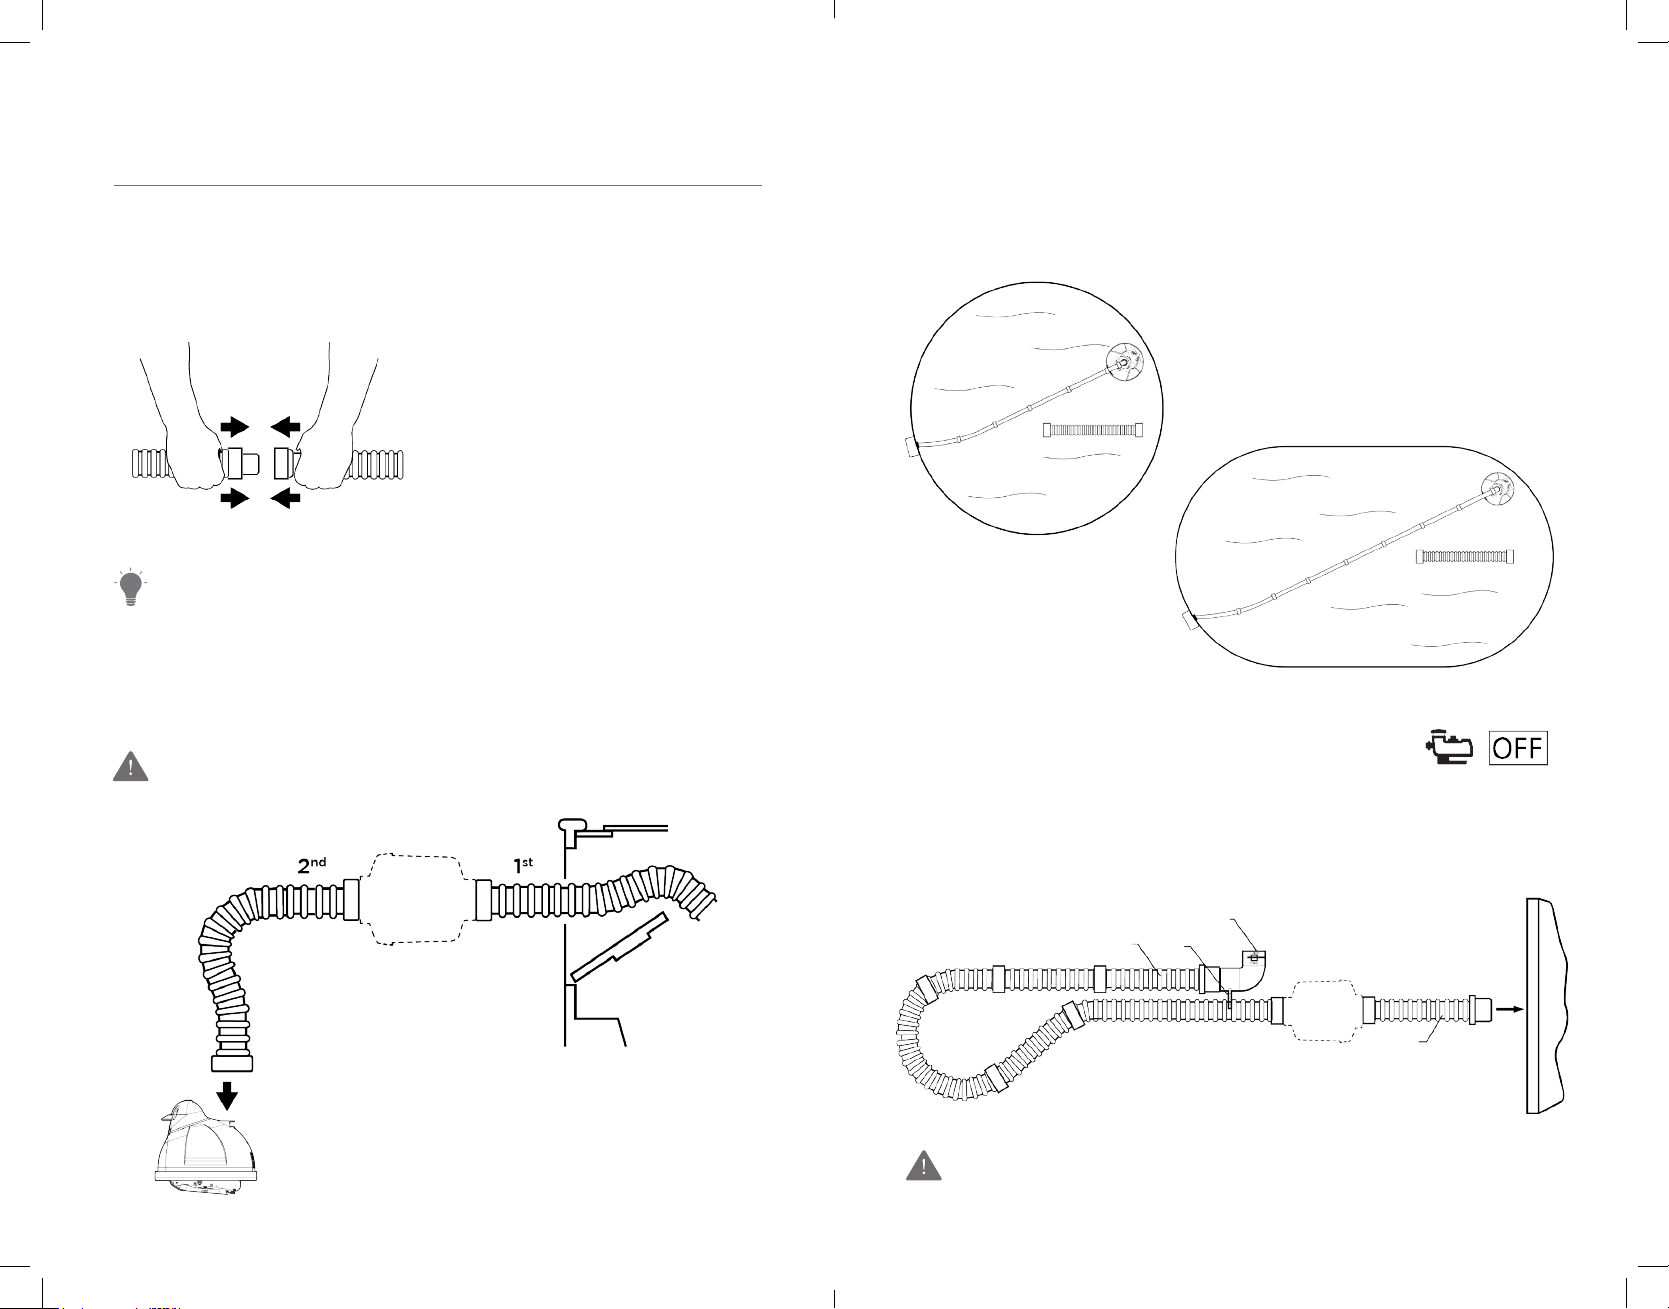
INSTALLATION
Step 2
Sizing Suction Hose
Step 1
Connect hose sections.
Note: Make sure all connections
are tight to prevent air leaks.
TIP: Wetting the hose ends will
make it easier to connect the
hose sections.
If optional leaf canister is purchased, install between 1st and 2nd
hose sections starting from the wall connector or skimmer.
Pull hose to farthest location in the pool opposite the wall connector or
skimmer + 2 extra hose sections.
+2
+2
Step 3
Fill hose completely with water.
Insert flow gauge onto the leader
hose. Attach the C-clip of the
gauge onto the 1st hose section.
FLOW GAUGE
C-CLIPLEADER HOSE
Make sure the flow gauge is under water.
FIRST HOSE
SECTION
TO SKIMMER
OR VAC-LOCK
76
Page 5
INSTALLATION
Step 4
Connecting to skimmer:
Connect the skimmer cone adapter to
tapered male end of the first hose section.
Note: Hose end goes into cone adapter.
FIRST HOSE SECTION
CONE
ADAPTER
Reading Too High?
If the black disk is outside of the box on the “MAX” side and you
have connected your hose to the skimmer, reduce the vacuum/
water flow by using one of the following:
• Suction valve(s) in the filter system (if equipped with)
• Hayward regulator valve
To install the Hayward regulator valve:
1. Remove the hose from the skimmer cone adapter.
2. Close the regulator valve by rotating the blue collar clockwise
until tight.
3. Insert the regulator valve onto the skimmer cone adapter and the
hose end into the regulator valve.
4. Turn the filter system on and allow it to evacuate any air in
the system.
5. Turn the blue collar clockwise until black disk appears between
“MIN” and “MAX” markings.
Step 5
Check the water flow reading on
the flow gauge.
The black disk should be between
the “MIN” and “MAX” markings.
If the disk is in the proper location,
move on to step 6.
TO MAIN DRAIN
(if applicable)
REGULATOR
VALVE
CONE ADAPTER
TO PUMP
98
Page 6

INSTALLATION
Reading Too Low?
An initial vacuum reading that is TOO low to meet the water flow
setting necessary to operate the cleaner is indicative of a system
problem, and not a problem with the cleaner.
The regulator valve cannot be used to INCREASE the initial
vacuum reading.
View our YouTube video at
www.youtube.com/watch?v=aqyrv_9nJZI
or contact your authorized Hayward Dealer for assistance.
Step 6
Submerge the cleaner into the water to remove all air.
Step 7
Step 8
Turn pump on and observe cleaner.
1110
Page 7

IMPORTANT TIPS
Periodically check the water flow/vacuum to be sure that your
cleaner is operating as eciently as possible.
Remember, too much vacuum is just as bad as too little.
Periodically check to make sure that the cleaner hose is securely
attached to its suction source (i.e. skimmer, wall connector, etc.).
Disconnect the cleaner hose from the skimmer/regulator valve
prior to “backwashing”, so to not restrict water flow.
DO NOT COIL HOSE
When storing your cleaner, the hose sections must be stored
straight. A coiled hose will create a memory in the hose that will
impede the cleaner’s ability to move properly.
Coiled hoses are not covered under the Hayward warranty.
When the cleaner is out of the pool, always disconnect the leader
hose from the cleaner.
Adjust the water return toward the center of the pool so
water circulation does not interfere with the cleaner’s pool
coverage capability.
Use only original Hayward spare parts and hoses to ensure
proper operation.
1312
Page 8

MAINTENANCE TIPS
Check the condition of the “shoes, wings, and flaps” periodically.
WEAR MARK
GOOD SHOE
WORN SHOE
Shoe Replacement:
Step 1
Step 2
WEAR LINE
Hayward is not responsible for damage caused by misuse of the
cleaner or damage caused by worn or broken parts.
1514
Page 9

MAINTENANCE TIPS
Wing Replacement:
Step 1
Step 3
Step 2
Step 4
1716
Page 10

TROUBLESHOOTING
FOR TECHNICAL ASSISTANCE, CALL: 908.355.7995
PROBLEM CAUSES SOLUTION
Slow/no forward movement
Cleaner head “floats”
Lack of/improper water
flow through cleaner
Blockage of the cleaner
throat
Worn shoes
Worn wings
Improper cleaner model
for application
Air trapped in the head
The cleaner head is actually
being pulled or lifted o the
bottom of the pool by the,
or return line flow –either at
the surface or at the bottom
of the pool –or both.
Check water flow with flow
gauge and adjust as per
Step 5.
Clear blockage
Replace shoes
Replace wings
See your pool dealer or
servicer.
Remove all air from cleaner
head. Stop all air from
entering the pool through
the return lines. If cleaner
head and hose are covered
with fine bubbles, give the
hose a good tug. This will
release the air bubbles and
allow the cleaner head to
settle to the bottom of
the pool until the hose is
covered with bubbles again.
Readjust return outlets
to prevent water flow
interfering with cleaner
head and/or hose.
PROBLEM CAUSES SOLUTION
Check water flow with flow
gauge and adjust as per
Step 5.
Install additional hose
sections per installation
instructions.
screen, if necessary
2. Check to see that cone
gear is free of debris and
rotates smoothly in
both directions
3. Check steering program
and troubleshoot –then:
a. clean, repair or replace
gearbox
b. check pod/A-
frame connection
and REPLACE IF
NECESSARY. DO
NOT ATTEMPT TO
RETIGHTEN LOOSE
PODS.
c. check medium turbine
and spindle gear
assemblies
Cleaner sticks at ladder,
corners, etc.
Improper water flow
Worn shoes Replace shoes
Worn wings Replace wings
Hose too short
Steering failure 1. Check and clean rear
1918
Page 11

WARRANTY
A limited warranty program protects your HAYWARD ABOVE GROUND SERIES
cleaner. To take full advantage of the limited warranty, please read, complete and
return registration card within 10 days of the purchase date. Your warranty card is
packed in the owner’s guide and accessory pack.
HAYWARD POOL PRODUCTS LIMITED WARRANTY
To original purchasers of this equipment, Hayward Pool Products warrants these
cleaners to be free from defects in materials and workmanship for a period of
TWO (2) years from the date of purchase, when used in single family
residential applications.
The limited warranty excludes damage from freezing, negligence, improper
installation, improper use or care or any Acts of God. Parts that fail from a defect
or become defective during the warranty period shall be repaired or replaced, at
our option, within 90 days of the receipt of defective product, barring unforeseen
delays, without charge.
Proof of purchase is required for warranty service. In the event proof of
purchase is not available, the manufacturing date of the product will be the sole
determination of the purchase date.
To obtain warranty service, please contact the place of purchase or the nearest
Hayward Authorized Service Center. For assistance on your nearest Hayward
Authorized Service Center, please visit us at www.hayward.com.
Hayward shall not be responsible for cartage, removal, repair or installation labor
or any other such costs incurred in obtaining warranty replacements or repair.
The Hayward Pool Products warranty does not apply to components
manufactured by others. For such products, the warranty established by the
respective manufacturer will apply.
The express limited warranty above constitutes the entire warranty of Hayward
Pool Products with respect to its pool products and is in lieu of all other
warranties expressed or implied, including warranties of merchantability or
fitness for a particular purpose. In no event shall Hayward Pool Products be
responsible for any consequential, special or incidental damages of any nature.
Some states do not allow a limitation on how long an implied warranty lasts, or
the exclusion of incidental or consequential damages, so the above limitation
may not apply to you. This warranty gives you specific legal rights, and you may
also have other rights, which vary from state to state.
REGISTRATION CARD
DETACH HERE: Fill out bottom portion completely and mail within 10 days of purchase/installation or register online.
WARRANTY REGISTRATION CARD
Register online at www.hayward.com
Please Print Clearly:
First Name _______________________________
Last Name _______________________________
Address _________________________________
________________________________________
________________________________________
Country _________________________________
Phone Number ___________________________
Purchase Date ________________
E-Mail Address ____________________________
Serial Number _____________________________
Model Number ____________________________
Pool Capacity _________________ (U.S. Gallons)
Please include me on all e-mail communications
regarding Hayward® Equipment or promotions.
Mail to:
Hayward Pool Products
620 Division Street
Elizabeth, NJ 07201 USA
Attn: Warranty Dept
or REGISTER YOUR WARRANTY
ON-LINE AT WWW.HAYWARD.COM
Years Pool has been in service
< 1 yr 2-3 4-5 6-10 11-15 >15
Purchased from:
Builder Retailer Pool Service
Internet/Catalog
Company Name ________________________
Address _______________________________
______________________________________
______________________________________
Country _______________________________
Phone ________________________________
Type of Pool:
Concrete/Gunite Vinyl Fiberglass
Other _________________
New Installation Replacement
Installation for:
In Ground Above Ground Spa
Thank you for your purchase
2120
Page 12

Page 13

Hayward Pool Products
620 Division Street, Elizabeth, NJ 07201 USA
908.351.5400 • www.hayward.com
Page 14

2
IS101HET Rev. A
1
3
Page 15

ABOVE GROUND SUCTION CLEANER
Penguin Model
 Loading...