

Page 1
IS925E - Rev B - 06
USER’S GUIDE
GUIDE DE L’UTILISATEUR
GUÍA DEL USUARIO
GEBRAUCHSANWEISUNG
GUIDA DELL’UTENTE
HANDLEIDING VOOR DE GEBRUIKER
GUIA DO UTILIZADOR
Please read all instructions before operating the NAVIGATOR cleaner.
Lire attentivement la notice avant de mettre en route le nettoyeur NAVIGATOR.
Leer atentamente antes de poner en marcha el Limpiafondos NAVIGATOR.
Bitte, lesen Sie das Handbuch aumerksam durch, bevor Sie den Reiniger NAVIGATOR inbetriebsetzen.
Leggere attentamente le istruzioni prima di mettere in servizio il pulitore NAVIGATOR.
Lees de handleiding aandachtig alvorens de NAVIGATOR bodemzuiger in te Schakelen.
Antes pôr o aspirador NAVIGATOR a funcionar, ler o manual com atençao.
HAYWARD POOL EUROPE - Parc Industriel de la Plaine de l’Ain - Allée des Chênes - 01150 Saint-Vulbas - France - http://www.hayward.fr
Page 2
2
FIGURE 1 FIGURE 4
FIGURE 2
FIGURE 3
FIGURE 5
FIGURE 6
Page 3
3
FIGURE 7 FIGURE 9
FIGURE 8 FIGURE 10
FIGURE 11
Page 4
4
GB
CONGRATULATIONS !
You have just become the owner of the latest and
most sophisticated automatic pool cleaners.
The Navigator cleaner is powered by your pool's filtration system and is designed to operate with most
existing systems. Its performance will therefore
depend on how powerful your pump is.
INSTALLING
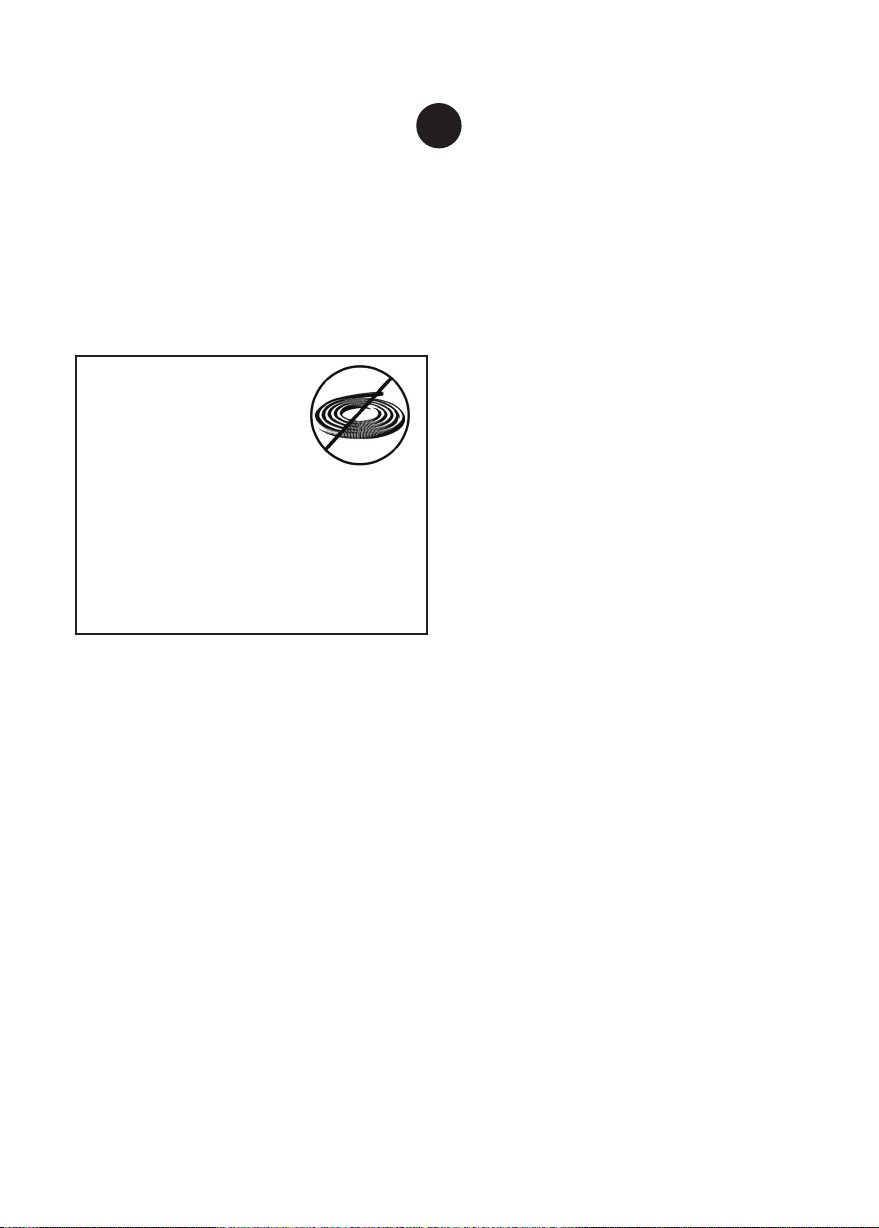
Coiling the hose may impair
the operation of the Navigator
cleaner. The warranty does
not cover problems caused by
coiled hoses. Always stow the
lengths straight.
Remark: The Navigator should not be used for
the pool's first Spring-cleaning; unless the conditions stated in steps 1 and 2 we met. Whenever
your pool is clogged with an unusually large
amount of debris, take the necessary steps to
restore its 'pre-installation' appearance.
Always carry the Navigator by its handle. Never
by the hose.
THE NAVIGATOR CLEANER
Step 1. Clean or back-wash your filter and clean
your pre-filter basket before installing the Navigator.
Clean your system regularly as the characteristics
of your installation dictate.
Step 2. Check the chemical properties of your
water. Make sure that the chemical balance is correct and that the pool is free of algae. Check the
pool and remove anything that might plug the suction port of your Navigator, in particular large clumps
of leaves.
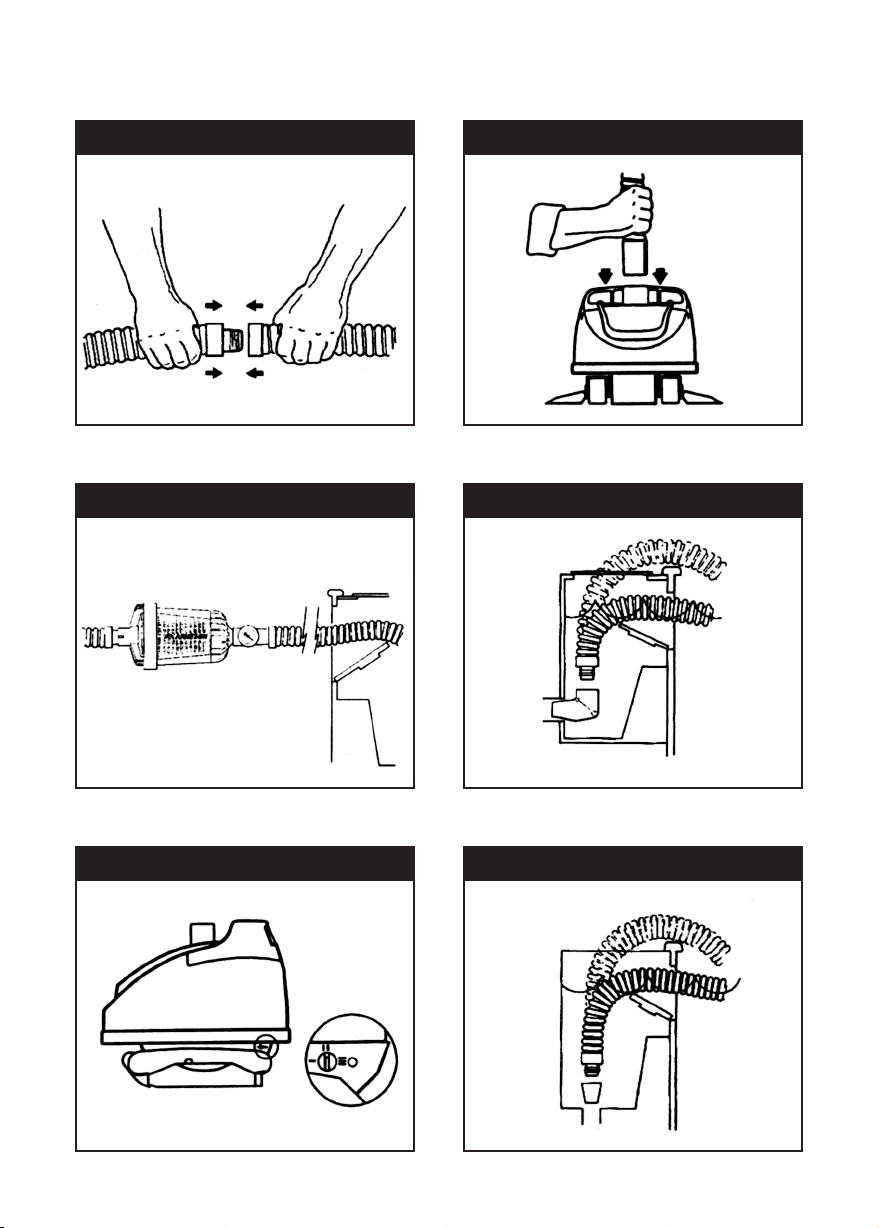
Step 3. There are nine (9) 1,2 m connecting hoses
and a 1,2 m main hose with a grey end. Connect
the Navigator hose sections together. Insert the
male end of one hose firmly into the female end of
another hose and turn (see.figure 1). Depending on
the shape and size of your pool, you may not need
all the hoses. But you must always connect the
main hose, or the Navigator will not work properly.
The hose lengths need not be forced home. but
must be tight enough to prevent air leaks. Wetting
the ends of the hoses will make it easier to join
them.
Step 4. From the skimmer. the complete hose
should reach the farthest part of the pool, with two
sections to spare for depth. This extra length is
essential to the proper operation of the Navigator. If
your complete hose is not long enough, you will
have to buy extra lengths from your dealer. After
connecting the correct length of hose. insert the leaf
trap and the AEV096 vacuum gauge between the
length of hose connected to the skimmer and the
next length. The vacuum gauge is used to measure
the water flow when the Navigator is started up (see
figure 2).
Step 5. Check that the rear flap adjustment knob is
in fact set to II, the intermediate position (see figure
3). Immerse the Navigator in the water to drive out
all trapped air. When al air has been eliminated, the
main hose can be connected. The main hose has a
grey end and a red sticker that must be removed.
Connect the grey end to the Navigator (as shown in
figure 4) and immerse the hose to drive out the air
as for a manual cleaning.
Do not use the return line/inlet water to "sink" the
Navigator hose, as this will force air into the cleaner
head, and possibly cause performance problems.
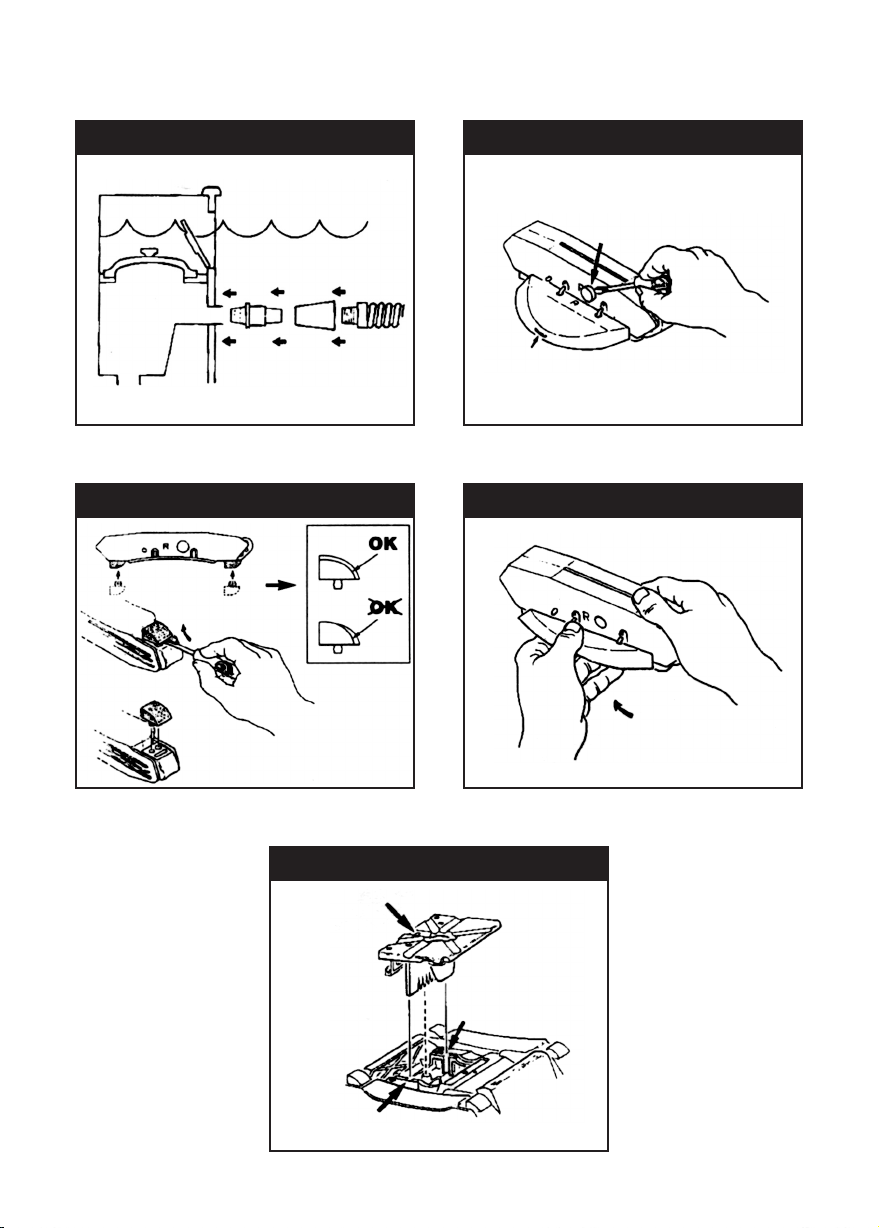
Step 6. With the filtration system off, connect the
hose to the skimmer as shown in figures 5, 6. and
7. Figure 5 shows the connection of the hose to a
skimmer with a bottom suction port, using the
AEXV093BP adapter cone. Figure 6 shows the
connection to a port on the side or back, for which
the AEXV151 adapter cone, available from your
dealer, must be used. The hose may be connected
through either the slit or the cover of the skimmer.
Figure 7 shows the connection of the hose to a
skimmer with a direct suction port in the pool. The
AEXV093BP adapter cone is connected to the
connector supplied with your skimmer for the
manual cleaner. The prefilter cover supplied with
the skimmer must also be used for the Navigator to
work property. If the cover does not close tight, get
in touch with your dealer to see if another accessory is needed.
Step 7. Start up the filtration system. Check the
level on the AEV096 vacuum gauge (see figure 2
for its installation). It measures the water flow created by your pool's filtration system and should indicate a vacuum of at least 100 mm (4").The vacuum
should be about 25 mm (1") per length of hose
used. For example, if you use ten (10) lengths of
hose, you will adjust the water flow in the Navigator
so that the vacuum gauge indicates a vacuum of
250 mm (10"), with a tolerance of plus or minus 25
mm (1"). This is a rough value, and a slightly higher
or lower reading is perfectly acceptable. Remove
Page 5

5
the vacuum gauge from the hose and keep it within
easy reach. You will need it from time to time to
check the operation of the Navigator.
Important: Remove the AEV096 vacuum gauge
after adjusting the Navigator. It is not designed to
be left in the water and is not covered by the
Navigator warranty.
Step 8. Observe the Navigator in operation. The
discharge of water into the pool may affect the cleaner, either at the hose on the surface or with the
Navigator itself at the bottom of the pool. If the
pool's discharge can swivel, turn it so the flow of
water does not interfere with the movements of the
Navigator. Otherwise, ask your dealer to help find a
solution.
Step 9. Check that the Navigator moves without
stopping too long at steps and other obstacles (vertical walls, ladders). If it seems to you that the
Navigator is stuck, set therear flap adjustment knob
to I (see figure 3).
Step 10. The Navigator climbs the vertical walls of
cement and fiberglass pools provided that they join
the pool bottom in a smooth curve (radius at least
30 cm). When the Navigator climbs a wall, It may
stop short of the top. If the Navigator seems not to
grip the wall, set the rear flap adjustment knob to III
(see figure 3).
If the Navigator reaches the water surface and
takes in air, set the rear flap adjustment knob to I
(see figure 3). If the cleaner still climbs too high,
reduce the suction power by 25 mm (1") until operation becomes normal.
About 80% of pool residues are on the bottom, the
remaining 20 % on the walls, so the Navigator
spends more time cleaning the bottom than the
walls.
Because of the shape of most sunken liner pools
(corners too sharp), the Navigator is confined to the
bottom (whatever the depth) and sloping walls. The
Navigator does not climb vertical liner walls.
Now that your Navigator cleaner is installed and
working properly, enjoys your pool.
IMPORTANT RECOMMENDATIONS
1. Check regularly that the hose of the Navigator
is properly connected to the skimmer suction
port.
2. Disconnect the hose of the Navigator beforeback-washing the filter. This is to ensure the
flow of water needed for effective backwashing.
3. Never coil the hose of the cleaner. The warranty does not cover problems caused by coiled
hoses.
4. Warning: If massive chlorination is applied, it is
essential to remove the Navigator and its hose
from the pool until the chlorine level returns to
normal.
5. Always disconnect the main hoses from the
Navigator head when the latter is not in the
pool.
6. Always carry and lift the Navigator by its handle, never by the hose.
7. Remove the Navigator and its hose from the
pool before using the pool.
8. Check the vacuum regularly using the vacuum
gauge. Too much or too little suction is harmful.
9. Keep the back grate clean and free of debris by
regular brushing.
Remark: Bear these points in mind when installing your Navigator.
MAINTENANCE TIPS
The Navigator has a "removable bottom". The purpose of this feature is readier access to the turbine/suction chamber unit for servicing or cleaning.
Should the Navigator stop or slow down too much
because of the build-up of residues in the neck or
inside the device, you can reach the turbine/suction
chamber unit (see figure 11).
DISCLAIMER
1. Ageing, sunlight, and chemical treatments
damage the liner.
2. The liner may be weakened and become brittle.
3. The pool's installation and environment may
also affect the liner.
4. When you install your Navigator, you take complete responsibility for the condition of your pool
and its environment.
Page 6

6
LIST OF POSSIBLE PROBLEMS
PROBLEM CAUSE SOLUTION
The cleaner is slow or doesn't move. Not enough flow through the cleaner. Clean the leaf trap. the prefilter and the filtration
Partial blockage of the suction opening of the
Navigator.
Pads worm. Replace the pads (figure 8).
Wings worn Replace the wings (figures 9 and 10).
The cleaner stops at walls, steps, the ladder,
etc.
The cleaner tails to climb the vertical walls of
a cement or gunite pool.
The cleaner reaches the surface and takes
in air
Suction too weak. Check the vacuum with the vacuum gauge.
Pads or wings worn. Replace the pads (figure 8) or wings (fig 9. 10).
Hose too short. Addlengthsas explainedIn the directionsfor use.
Failure of steering system. Check and clean the back grate. Check that
Not enough flow through the cleaner. Clean the leaf trap, the prefilter, and the filtra-
Partial blockage of the suction opening of the
Navigator
Pads worn. Replace the pads (figure 8).
Wings worn. Replace the wings (figures 9 and 10).
Hose too short. Addlengthsas explainedIn the directionsfor use.
Wrong rear flap tension. Setthe rearflapadjustment knob to III (figure 3).
Too much flow through the cleaner. Clean the leaf trap, the prefilter, and the filtra-
Wrong rear flap tension. Set the rear flap adjustment knob to I (figure 3).
Failure of steering system. Check and clean the back grate. Check that
system. Check the vacuum with the vacuum
auge.
g
Clear the blocked opening.
the cone transmission mechanism turns
freely in both directions. Check and necessary replace the guidance system.
tion system. Check the vacuum with the
vacuum gauge.
Clear the blocked opening.
tion system. Check the vacuum with the
vacuum gauge.
the cone transmission mechanism turns freely
in both directions. Check and if necessary
replace the guidance system.
WARRANTY CONDITIONS
The NAVIGATOR is warranted to be free from detects in material and workmanship for (5) five years from
the date of purchase. All warranty claims would be including the proof of purchase indicating the date. We
invite you to keep your receipt.
Hayward warranty is limited to the replacement or repair, at our option, of defective products that have been
used in normal conditions and accordingly to the instruction leaflet, with no change in the product and that
have been working only with genuine Hayward parts. Frost and chemical reaction damages are excluded
of the warranty.
Hayward will not be responsible for all other costs (removal, labour reinstallation...), neither direct nor indirect damages caused by malfunction of the defective product.
The limited warranty excludes the following motion devices: hoses, shoes, wings, flaps,A. frame and pads.
To initiate a warranty claim and ask for repair or replacement of a product, please contact your dealer. No
shipment to our factory will be accepted without our preliminary written acceptance.
Page 7

7
F
FÉLICITATIONS !
Vous venez d'acquérir le dernier né et le plus
sophistiqué des nettoyeurs automatiques de piscines.
Le nettoyeur Navigator est mû par le système de filtration de votre piscine et est conçu pour fonctionner avec la plupart des systèmes existants.
La performance de votre Navigator sera donc fonction de la puissance de votre pompe.
L'enroulement du tuyau
compromet le bon fonctionnement du nettoyeur Navigator.
La garantie ne couvre pas les
problèmes liés à des tuyaux
enroulés. Toujours stocker les
sections droites.
Remarque : Le Navigator ne doit pas être utilisé
lors du nettoyage au redémarrage de la piscine
au printemps, hormis si les conditions décrites
dans les étapes 1 et 2 sont respectées. Chaque
fois que votre piscine sera encombrée d'une
quantité anormalement élevée de débris, il faudra effectuer les étapes nécessaires pour lui
rendre son aspect de "pré-installation".
Toujours porter le Navigator à l'aide de sa poignée. Ne jamais le porter par le tuyau.
INSTALLATION DU NETTOYEUR NAVIGATOR
Étape 1. Nettoyer ou contre-laver votre filtre, net-
toyer votre panier de préfiltre avant d'installer le
Navigator. Nettoyer votre système régulièrement en
fonction des caractéristiques de votre installation.
Étape 2. Vérifier les caractéristiques chimiques de
votre eau. S'assurer que l'équilibre chimique est
respecté et qu'il n'y a pas d'algue dans la piscine.
Vérifier la piscine et enlever tous les objets qui pourraient boucher l'aspiration de votre nettoyeur
Navigator, en particulier de gros amas de feuilles.
Étape 3. Il y a neuf (9) tuyaux de connexion de 1,2
m et un tuyau principal de 1,2 m avec embout gris.
Connecter les sections de tuyau du Navigator les
unes aux autres. Pour ce faire, il faut introduire fortement et tourner l'extrémité mâle de chaque tuyau
dans l'extrémité femelle d'un autre tube (cf. figure
1). En fonction de la taille et de la forme de votre
piscine, il n'est pas toujours nécessaire d'utiliser la
totalité des tuyaux. En revanche, il faut toujours
connecter le tuyau principal sinon le Navigator ne
fonctionnerait pas correctement. Il n'est pas nécessaire de connecter à fond les tuyaux, mais ils doivent être suffisamment serrés pour éviter toute fuite
d'air. En humidifiant l'extrémité des tuyaux, il sera
plus facile de les connecter.
Étape 4. Le tuyau complet doit, en partant du skimmer, atteindre le point le plus éloigné de la piscine,
auquel il faudra rajouter 2 sections supplémentaires
pour la profondeur. Cette longueur complémentaire
est indispensable au bon fonctionnement du
Navigator. Si la longueur totale de votre tuyau n'est
pas suffisante, il faudra acheter des sections complémentaires auprès de votre revendeur habituel.
Après avoir raccordé la longueur correcte de tuyau,
introduisez le piège à feuilles et le dépressiomètre
AEV096 entre la section de tuyau qui est connectée
au skimmer et la section de tuyau suivante. Le
dépressiomètre sert à mesurer le débit d'eau lors du
démarrage du Navigator (voir figure 2).
Étape 5. Vérifier que le bouton de réglage du volet
arrière est bien sur la position Il, le réglage intermédiaire (voir figure 3). Immerger le Navigator dans
l'eau pour en évacuer tout l'air emprisonné. Quand
tout l'air s'est échappé, on peut connecter le tuyau
principal. Le tuyau principal possède un embout
gris et un autocollant rouge qu'il faut enlever.
Connecter l'embout gris au nettoyeur Navigator
(comme indiqué figure 4) et immerger le tuyau pour
évacuer l'air, comme on procède pour un nettoyage
manuel.
Ne pas utiliser l'eau en provenance du refoulement
pour remplir le tuyau du Navigator. Ceci risque d'introduire de l'air dans la tête du nettoyeur et de créer
des problèmes de performances.
Étape 6. Le système de filtration arrêté, connecter
le tuyau au skimmer, comme indiqué sur les figures
5, 6 et 7. La figure 5 indique le système de
connexion du tuyau au skimmer équipé d'une aspiration basse, à l'aide du cône d'adaptation
AEXV093BP. La figure 6 indique le mode de
connexion dans le cas d'une aspiration latérale ou
arrière dans cette configuration, il faut utiliser le
cône d'adaptation à angle droit AEXV151, disponible auprès de votre revendeur habituel. Le tuyau
peut être connecté indifféremment en passant à travers la meurtrière ou le couvercle du skimmer. La
figure 7 indique le moyen de connecter le tuyau
dans le cas où le skimmer possède une aspiration
directe dans la piscine. Le cône d'adaptation
AEXV093BP se branche sur le connecteur livré
avec votre skimmer pour l'utilisation de nettoyeur
manuel. Il est également nécessaire d'utiliser le
couvercle du préfiltre livré avec le skimmer pour un
fonctionnement correct du Navigator. Si le couvercle ne ferme pas hermétiquement, contacter
votre revendeur pour vérifier si un accessoire complémentaire est nécessaire.
Étape 7. Mettre en route le système de filtration.
Vérifier le niveau du dépressiomètre AEV096 (voir
la figure 2 pour son installation). Il sert à mesurer le
débit d'eau généré par le système de filtration de
votre piscine et doit indiquer une dépression d'au
Page 8
8
moins100 mm(4 pouces). La dépression devrait se
situer à 25 mm (1 pouce) par section de tuyau utilisée. Par exemple, si vous utilisez dix (10) sections
de tuyau, vous réglerez le débit d'eau dans le
Navigator de façon à ce que le dépressiomètre
indique une dépression de 250 mm (10 pouces)
avec une tolérance de plus ou moins 25 mm (± 1
pouce). Cette mesure est indicative et un niveau
légèrement plus haut ou plus bas est tout à fait
acceptable. Retirer le dépressiomètre du tuyau et
gardez-le à portée de main. Vous en aurez besoin
de temps en temps pour vérifier le fonctionnement
du Navigator.
Important : Après avoir réglé le Navigator retirer
le dépressiomètre AEV096. Il n'est pas prévu
pour rester dans l'eau et n'est pas couvert par la
garantie Navigator.
Étape 8. Observer le Navigator en marche. Le
refoulement de l'eau vers la piscine peut affecter le
bon fonctionnement du nettoyeur soit au niveau du
tuyau à la surface, soit avec le Navigator lui-même
au fond de la piscine. Si la piscine est équipée d'un
refoulement avec une rotule orientable, il faut diriger
le flux d'eau de manière à ne pas gêner les mouvements du Navigator. Dans le cas contraire, consulter
votre revendeur pour une solution adaptée.
Étape 9. Vérifier que le Navigator se déplace sans
s'arrêter trop longtemps contre les marches ou
autres obstacles (parois verticales, échelles ...). S'il
vous semble que le Navigator tend à s'immobiliser,
mettez le bouton de réglage du volet arrière en
position I (voir figure 3).
Étape 10. Le Navigator gravit les parois verticales
des piscines en ciment et en fibre de verre à condition qu'elles forment un angle arrondi d'au moins 30
cm de rayon avec le sol de la piscine. Lorsque le
Navigator gravit une paroi, il ne la gravit pas nécessairement jusqu'en haut. Si le Navigator ne semble
pas accrocher à la paroi, tourner le bouton de réglage du volet arrière en position III (voir figure 3). Si le
Navigator atteint la surface de l'eau et aspire del'air,
tournez le bouton de réglage du volet arrière en
position I (voir figure 3). Si le nettoyeur persiste à
gravir la paroi trop haut, réduisez la puissance d'aspiration de 25 mm (1 pouce) jusqu'à ce que le fonctionnement redevienne normal.
Environ 80% des résidus d'une piscine se trouvent
sur le fond de la piscine. Environ 20 % des résidus
se trouvent sur les parois. Le Navigator passe donc
plus de temps à nettoyer le fond que les parois. A
cause de la forme (angles trop aigus) de la plupart
des piscines enterrées liner, le Navigator est
confiné au fond de la piscine (quelle que soit la profondeur) et aux parois inclinées. Le Navigator ne
gravit pas les parois verticales liner.
Maintenant que votre nettoyeur Navigator est installé et fonctionne sans problème, profitez des joies
de votre piscine.
CONSEILS IMPORTANTS
1. Contrôler régulièrement que le tuyau du nettoyeur Navigator est correctement connecté à
l'aspiration du skimmer.
2. Déconnecter le tuyau du Navigator avant
d'opérer un contre-lavage du filtre. Ceci doit
garantir le flux d'eau nécessaire à un contrelavage efficace.
3. Ne jamais enrouler le tuyau du nettoyeur. La
garantie ne couvre pas les problèmes dus à
des tuyaux enroulés.
4. Attention. En cas de chloration choc, il est
impératif de retirer le nettoyeur Navigatoret son
tuyau de la piscine jusqu'à ce que le chlore soit
revenu à son niveau normal.
5. Toujours déconnecter le tuyau principal de la
tête du Navigator lorsque celui-ci est hors de la
piscine.
6. Toujours porter et soulever le Navigator à l'aide
de la poignée. Ne jamais le porter par le tuyau.
7. Si vous vous baignez, il faut retirer le Navigator
et son tuyau de piscine.
8. Vérifier régulièrement le niveau de dépression
avec le dépressiomètre. Une aspiration excessive ou insuffisante est néfaste.
9. Maintenir la grille arrière propre et sans débris
en la brossant régulièrement.
Remarque : L'installation du Navigator est
déconseillée tant que ces conditions persistent.
CONSEILS D'ENTRETIEN
Le Navigator est doté d'un "fond amovible". Le but
d'une telle conception à accès rapide est de faciliter
l'accès au bloc turbine/chambre de succion pour
tout entretien ou nettoyage. Au cas où le Navigator
s'arrêterait de fonctionner ou ralentirait de façon
anormale à cause de la concentration de résidus
dans le col ou à l'intérieur de l'appareil, vous pouvez
accéder au bloc turbine/chambre de succion (voir
figure 11).
DECHARGE DE RESPONSABILITÉ
1. Le vieillissement, le soleil et les traitements chimiques abîment le liner.
2. Le liner peut devenir cassant et faible.
3. L'installation et l'environnement de la piscine
peuvent également affecter le liner.
4. Lors de l'installation de votre Navigator, vous
assumez toute responsabilité relative à l'état de
votre piscine et son environnement.
Page 9

9
LISTE DES PROBLEMES POSSIBLES
PROBLÈMES CAUSES SOLUTIONS
e nettoyeur est lent ou n'avance pas.
L
Le nettoyeur se bloque contre les murs. les
marches. l'échelle...
Le nettoyeur ne parvient pas à gravir les
parois verticales d'une piscine en
ciment/gunite.
Le nettoyeur atteint la surface et aspire l'air. Insuffisance ou Inadéquation du débit à travers
nsuffisance ou inadéquation du débit à tra-
I
vers le nettoyeur.
Obstruction partielle de la bouche d'aspiration du Navigator.
Patins usés. Remplacer les Patins (figure 8).
Ailes usées. Remplacer les ailes (figure 9 et 10)
Aspiration inadéquate Vérifier la pression avec le dépressiomètre
Patins ou ailes usés Remplacer lespatins(figure8)oulesailes (fig.9,10).
Tuyau trop court. Ajouterdessections supplémentaires.
Défaillance du système de direction. Vérifier et nettoyerla grille arrièreVérifier que le
Insuffisance ou inadéquation du débit à travers le nettoyeur.
Obstruction partielle de la bouche d'aspiration du Navigator.
Patins usés. Remplacer les patins (figure 8).
Ailes usées. Remplacer les ailes (figure 9et 10).
Tuyau trop court. Installezdessegments de tuyau supplémentaires.
Tension incorrecte du volet arrière. Mettez le bouton de réglage du volet arrière en
le nettoyeur.
Tension incorrecte du volet arrière. Mettez le bouton de réglage du volet arrière en
Défaillance du système de de direction. Vérifier et nettoyer la grille amère. Vérifier que
ettoyer le piège à feuilles, le préfiltre et le
N
système de filtration. Vérifier la pressionavec le
dépressiomètre.
Dégager l'ouverture obstruée.
mécanisme de transmission du cône tourne
librement dans les deux directions. Vérifier et
changer le système de pilotage si nécessaire.
Nettoyer le piège à feuilles, le préfiltre et le
système de filtration. Verifier la pression avec
le dépressiomètre.
Dégager l'ouverture obstruée.
position III (figure 3)
Nettoyer le piège à feuilles, le préfiltre et le
système de filtration.
Vérifier la pression avec le dépressiomètre
position I (figure 3).
le mécanisme de transmission du cône tourne
librement dans les deux directions. Vérifier et
changer le système de pilotage si nécessaire.
CONDITIONS DE GARANTIE
Le NAVIGATOR est garanti contre tous vices de fabrication ou de matière pendant une période de cinq
années à compter de la date d'achat. Toute demande de garantie devra être accompagnée d'une preuve d'achat justifiant sa date. Nous vous incitons donc à conserver votre facture.
La garantie Hayward est limitée a la réparation ou au remplacement, au choix d'Hayward, des produits
défectueux pour autant qu'ils aient subi un emploi normal, en accord avec les prescriptions mentionnées dans leur manuel d'utilisation, que le produit n'ait été modifié d'aucune sorte et utilisé uniquement avec des composants et des pièces Hayward. Les dommages dus au gel ou aux attaques
d'agents chimiques ne sont pas garantis.
Tous les autres frais (transport, main d'oeuvre...) sont exclus de la garantie. HAYWARD ne pourra être
tenu pour responsable d'aucun dommage direct ou indirect provenant du fonctionnement incorrect d'un
produit.
La garantie ne s'applique pas aux pièces d'usure suivantes: tuyaux, pieds, ailerons, volets, roulements,
patins.
Pour faire jouer une garantie et demander la réparation ou le remplacement d'un article, adressez vous
à votre revendeur. Aucun retour de matériel a notre usine ne sera accepté sans notre accord écrit préalable.
Page 10

10
E
! FELICIDADES !
Acaba de adquirir el último y más sofisticado limpiafondos automático de piscinas.
El limpiafondos Navigator es el sistema de filtración
de piscinas concebido para trabajar con la mayoría
de los sistemas de filtración disponibles en el mercado. El funcionamiento de su Navigator dependerá de la potencia de la bomba que tenga instalada.
Enrollar las mangueras
afecta al funcionamiento del
Navigator. La garantía no
cubre los problemas originados por las mangueras enrolladas.
Nota: el Navigator no deberá utilizarse para la
limpieza de la piscina al inicio de la temporada,
sin que se sigan los pasos 1 y 2 descritos más
abajo. Cuando la piscina esté sometida a cantidades anormales de suciedad, deberán de
seguirse los pasos necesarios para llevar a la
piscina a condiciones "previas a la Instalación".
Levantar siempre el Navigator por el asa. No
coger nunca por las mangueras.
INSTALACIÓN
DEL LIMPIAFONDOS NAVIGATOR
Paso 1. Realice un ciclo de contra-lavado a su fil-
tro, y Limpie el cesto del prefiltro antes de instalar el
Navigator. Limpie el sistema regularmente en función de las características de su instalación.
Paso 2. Verifique las características químicas del
agua. Asegúrese de que el agua esté adecuadamente equilibrada, y la piscina libre de algas.
Revise la piscina y retire cualquier objeto grande
que pueda interferir en el funcionamiento del limpiafondos Navigator, en particular hojas grandes.
Paso 3. Hay nueve (9) mangueras conectores de
1,2, y una más de igual longitud con un cono de
adaptación de color gris. Conecte los tramos necesarios de manguera unos con otros, introduciendo
y girando firmemente el extremo cónico macho de
cada manguera en el extremo hembra del tramo
siguiente (ver fig. 1). La manguera principal, con el
cono de adaptación de color gris, deberá siempre
utilizarse, conectándose directamente al Navigator,
o el limpiafondos no podrá funcionar correctamente. Para conocer el número de tramos que debe
unir lea el paso 4. No es necesario apretar las
conexiones de las mangueras hasta el fondo, pero
deben estar lo suficientemente apretadas para prevenir cualquier filtración de aire. Si los extremos de
las mangueras se mojan es más fácil unir los tramos.
Paso 4. El número de secciones a utilizar será tal
que, partiendo del skimmer o la toma del limpiafondos, se alcance el punto mas alejado de la piscina,
añadiéndole otros dos tramos extra debido a la profundidad. Esta longitud adicional es indispensable
para el buen funcionamiento del Navigator. Si el
número de tramos de manguera suministrados no
es suficiente, seránecesarioadquirir secciones adicionales a su distribuidor habitual. Cuando haya
ensamblado los tramos para obtener la longitud
correcta de manguera, inserte el cesto recogehojas
y el depresiómetro AEV096 entre la sección de la
manguera que estáconectada al skimmer o la toma
de limpiafondos y la siguiente. El depresiómetro
sirve para ajustar el caudal de agua en el momento de la puesta en marcha del Navigator (ver fig. 2),
pero debe ser retirado durante el funcionamiento
habitual para evitar su deterioro.
Paso 5. Verifique que el botón de reglaje en la solapa posterior izquierda está enla posición II, el reglaje intermedio (ver fig. 3). Sumerja el Navigator en el
agua para eliminarel aire desu interior. Cuandotermine el burbujeo, conecte la manguera principal (la
manguera principal posee un cono de adaptación
de color gris y un adhesivo rojo para marcarla que
hay que quitar). Conecte el cono de adaptación gris
al limpiafondos (ver fig. 4) y sumerja todos los tramos de manguera para evacuar el aire, tal y como
se procede para una limpieza manual.
No utilizar el agua procedente de la impulsión para
llenar el tubo del Navigator. Puede entrar aire en el
cabezal del limpiafondos y generar problemas de
prestaciones.
Paso 6. Con el sistema de filtración parado, conecte el último tramo de manguera al skimmer o a la
toma de limpiafondos, tal y como se indican en las
figuras 5, 6, y 7. La figura 5 indica el sistema de
conexión de la manguera a un skimmer equipado
con toma de aspiración baja, con el cono de adaptación AEXV093BP. La figura 6 indica el modo de
conexión en elcaso de una aspiración lateral o posterior; en esta configuración hay que utilizar un
cono de adaptación en ángulo recto AEXV151, disponible en su distribuidor habitual. La manguera
puede estar conectada pasando a través de la
abertura o de la tapa del Skimmer. La figura 7 indica la forma de conectar la manguera en el caso en
que el skimmer tenga una aspiración directa en la
piscina. El cono de adaptación AEXV093BP se
conecta sobre la toma de aspiración directa suministrada con su skimmer para la limpieza manual.
Es necesario utilizar la tapa del prefiltro del
Skimmer para un correcto funcionamiento del
Navigator. Si la tapa no cierra herméticamente,
contacte con su distribuidor para comprobar si es
necesario un accesorio adicional.
Page 11

11
Paso 7. Ponga en marcha el sistema de filtración
Verifique la medida del depresiómetro AEV096 (ver
fig.2 para su instalación), que mide el caudal de
agua generado por el sistema de filtración de su
piscina, y debe indicar una depresión como mínimo
de 100 mm (4 pulgadas). La depresión debe ser de
25 mm (1 pulgada) por sección de manguera utilizada, con un margen del 10%. Por ejemplo, si utiliza 10 secciones de manguera, debe ajustar el caudal de agua que absorbe el Navigator, de manera
que el depresiómetro indique una depresión de 25
x 10 = 250 mm (10 pulgadas), con un margen de ±
25 mm (± 1 pulgada de vacío). Esta medida es
orientativa y un nivel ligeramente mas alto o mas
bajo es aceptable. Retire el depresiómetro de la
manguera y guárdelo; úselo para verificar, de vez
en cuando, el funcionamiento del Navigator.
Paso 8. Observe el Navigator en funcionamiento.
Importante: Después de ajustar el caudal de su
Navigator, retire el depresiómetro AEV096 de la
manguera. No está diseñado para permanecer
en el agua ni esta cubierto por la garantía del
Navigator.
Los impulsores del agua de la piscina pueden afectar al buen funcionamiento del limpiafondos, bien
afectando a la manguera en la superficie del agua,
o al propio Navigator en el fondo de la piscina. Si la
piscina está equipada con boquillas direccionales,
dirija el flujo del agua de manera que no interfiera el
movimiento del Navigator. Si no posee boquillas
direccionales, consulte a su distribuidor.
Paso 9. Compruebe que su Navigator se desplaza
sin detenerse, durante mucho tiempo, en escalones u otros obstáculos (paredes verticales, escaleras, etc.). Si parece que el Navigator tiene tendencia a inmovilizarse, coloque el botón de ajuste
de la solapa posterior en la posición I (ver fig. 3).
Paso 10. Su Navigator ascenderá por las paredes
verticales de las piscinas gunitadas o de fibra de
vidrio, si existe al menos un radio de 30 cm en la
unión de la pared y el fondo. Dependiendo del
momento de llegada a la pared, el Navigator podrá
iniciar o no el ascenso por la misma. Si su piscina
tiene radios mayores o iguales a 30 cm y su
Navigator no asciende por la pared, coloque el
botón de ajuste de la solapa posterior en la posición
III (ver fig. 3). Si el limpiafondos asciende por encima de la superficie del agua y aspira aire, coloque
el botón de ajuste de la solapa posterior en la posición I (ver fig. 3). Si continúa este comportamiento
reduzca el vacío que se tiene en la manguera en
incrementos de 25 mm (1 pulgada) hasta que logre
un funcionamiento adecuado.
El 80% de la suciedad que se encuentra en una
piscina está en el fondo, y tan sólo el 20% en las
paredes. Por este motivo, el Navigator se ha
diseñado para que está en esta proporción en cada
parte.
Debido a la forma (ángulos abruptos) de la mayoría
de las piscinas de liner enterradas, la limpieza del
Navigator se realizará en el fondo y las paredes
inclinadas, no ascendiendo las paredes verticales
de las piscinas liner.
Cuando su limpiafondos Navigator esté instalado y
funcione correctamente, disfrutará como nunca
antes de su piscina.
CONSEJOS IMPORTANTES
1. Compruebe regularmente que las mangueras
del limpiafondos el Navigator estén correctamente conectadas a la aspiración del Skimmer.
2. Desconecte la manguera del Navigator antes
de realizar un ciclo de contra-lavado del filtro.
Esto garantiza un caudal suficiente para un
contra-lavado eficaz.
3. No enrolle jamás la manguera del limpiafondos. La garantía no cubre los problemas debidos a mangueras enrolladas.
4. Atención: En caso de realizar un tratamiento de
choque con cloro a la piscina, es absolutamente necesario retirar el limpiafondos Navigator y
las mangueras de la piscina, hasta que el nivel
de cloro alcance su valor normal.
5. Desconecte siempre la manguera principal de
la cabeza del Navigator cuando esté fuera de la
piscina.
6. Transporte siempre el Navigator por el asa. No
lo coja nunca por las mangueras.
7. Retire de la piscina el Navigator y las mangueras antes de bañarse.
8. Verifique regularmente el nivel de presión en
las mangueras con el depresiómetro. Una aspiración excesiva o insuficiente impedirá que su
Navigator funcione correctamente.
9. Mantenga la rejilla trasera del Navigator limpia,
cepillándola regularmente para eliminar los
residuos.
CONSEJOS DE MANTENIMIENTO
El Navigator está dotado de una base de apertura
Nota: la instalación del Navigator no está aconsejada si persisten estas condiciones.
fácil. El propósito de esta base de apertura fácil es
el permitir el rápido acceso a la cámara de la turbina de succión para facilitar su limpieza. En caso de
que el Navigator deje de funcionar o se vuelva
lento, a causa de la acumulación de residuos dentro del aparato, podrá acceder a la cámara de la turbina de succión ( ver fig. 11 ).
DESCARGO DE RESPONSABILIDADES
1. La antigüedad, la luz solar y los productos químicos pueden afectar al vinilo y a la macilla de
la piscina.
2. El vinilo se puede volver quebradizo y débil.
3. El vinilo también se puede ver afectado por la
instalación y el entorno de la piscina.
4. Después de instalar el Navigator, debe asumir
toda responsabilidad derivada de las condiciones de la piscina y el entorno de ésta.
Page 12

12
GUIA DE SOLUCIÓN DE PROBLEMAS
PROBLEMA CAUSA SOLUCION
l limpiafondos es lento o no avanza.
E
El limpiafondos se bloquea en las paredes,
escalones, etc.
El limpiafondos no asciende las paredes verticales en piscinas gunitadas.
El Limpafondos asciende hasta la superficie
del agua y aspira aire.
arencia o flujo incorrecto de agua a través
C
del limpiafondos.
Obstrucción pardal en la boca de aspiracion
del Navigator.
Zapatas desgastadas. Reemplazar las zapatas (fig. 8).
Aletas desgastadas Reemplazar las aletas (ver fig. 9 y 10)
Aspiración inadecuada Verificar la presión con el depresiometro.
Zapatas o aletas desgastadas. Reemplazarlas zapatas(fig.8)olas aletas(fig.9y 10).
Manguera demasiado corta. Añadir 2 secciones complementarias como se
Fallo en el sistema de dirección. Verificar y limpiar la rejilla posterior. Verificar
Carencia o flujo incorrecto de agua a través
del limpiafondos.
Obstrucción parcial en la boca de aspiración
del Navigator.
Zapatas desgastadas. Reemplazar las zapatas (fig. 8)
Aletas desgastadas. Reemplazar las aletas(ver fig. 9 y 10)
Manguera demasiado corta. Añadir 2 secciones complementarias como se
Tensión incorrecta en solapa trasera Moverel ajuste de lasolapapostenora posición
Carencia oflujoincorrectode agua a través del
limpiafondos.
Tensión incorrecta en solapa trasera. Mover el ajuste de la solapa posterior a posi-
Fallo en el sistema de dirección. Verificar y limpiar la rejilla posterior. Verificar
impiar el cesto recogehojas, elprefiltro yel sis-
L
tema de filtración.
erificar la presión con el depresiometro.
V
Limpiar la obstrucción.
indica en el manual.
que el engranaje cónico este libre y gira libremente en las dos direcciones. Verificar o cambiar el programa maestro si es necesario.
Limpiar el cesto recogehojas, el prefiltro y el
sistema de filtración.
Verificar la presión con el depresiometro.
Limpiar la obstrucción.
indica en el manual.
III (ver fig 3).
Limpiar el cesto recogehojas, el prefiltro y el
sistema de filtración.
Verificar la presión con el depresiometro.
ción I (ver fig. 3).
que el engranaje cónico esté libre y gira libremente en las dos direcciones. Verificar o cambiar el programa maestro si es necesario.
CONDICTIONES DE GARANTIA
El NAVIGATOR está garantizado contra todo vicio de fabricación o de material durante un periodo de
5 años a partir de la fecha de expedición Toda petición de garantía deberá acompañarse con la prueba de compra justificando la fecha de la misma Aconsejamos conservar siempre su factura
La garantía HAYWARD queda limitada al reemplazo o la reparación, sin cargo, de las piezas defectuosas, con la condición que los productos empleados hayan sido los correctos. De acuerdo con las
instrucciones mencionadas en el manual de utilización. El producto no debe ser modificado y deberá
utilizarse únicamente piezas HAYWARD Los perjuicios ocasionados por las condiciones climatológicas
o las producidas por agentes químicos están exentas de garantía
Todo gasto de transporte. Mano de obra están excluidos de la garantía HAYWARD no será responsable bajo ningún concepto de prejuicios directos e indirectos causados por el funcionamiento incorrecto de un producto
La garantía no es aplicable a las piezas de desgaste normal mangueras. Zapatitos. Aletas. Patines etc.
Para poder cubrir una garantía y pedir la reparación o la sustitución de un articulo. Ponerse en contacto con su vendedor habitual No se podrá enviar ningún material a nuestros almacenes sin previo acuerdo por escrito.
Page 13

13
D
HERZLICHEN GLÜCKWUNSCH !
Sie haben gerade das letzte und anspruchsvollste
Modell der automatischen Schwimmbad-Reiniger
erworben.
Der Reiniger Navigator wird vom Filtersystem Ihres
Schwimmbads betrieben und wurde entwickelt, um
mit den meisten der bestehenden Systeme zu funktionieren. Die Leistung Ihres Navigator ist demnach
von der Leistung Ihrer Pumpe abhängig.
Das Aufwickeln des
Schlauchs behindert den ein-
wandfreien Betrieb des
Reinigers Navigator.
Probleme in Zusammenhang
mit aufgewickelten
Schläuchen sind nicht von der
Garantie gedeckt. Die
Abschnitte immer gerade lagern.
Anmerkung: Der Navigator darf nicht bei der
Reinigung beim erneuten Inbetriebsetzen des
Schwimmbads im Frühjahr verwendet werden,
außer wenn die unter Etappen 1 und 2 beschriebenen Voraussetzungen erfüllt sind. Jedes Mal,
wenn Ihr Schwimmbad eine anormal große
Menge von Abfallen enthält, müssen die Etappen
durchlaufen werden, die U. die
Wiederherstellung seines "ursprünglichen"
Aspekts erforderlich sind.
Den Navigator immer an seinem Griff und nicht
am Schlauch tragen.
INSTALLATION DES REINIGERS NAVIGATOR
Etappe 1. Ihr Filter reinigen oder gegenspulen,
Ihren Vorfilterkorb reinigen, bevor Sie den
Navigator installieren. Ihr System regelmäßig
entsprechend den Merkmalen Ihrer Anlage reinigen.
Etappe 2. Die chemischen Merkmale Ihres
Wassers prüfen. Sich vergewissern, dass das
chemische Gleichgewicht eingehalten wird und
dass sich keine Algen im Schwimmbad befinden.
Das Schwimmbad prüfen und alle Gegenstande
entfernen, die die Ansaugung Ihres Reinigers
Navigator verstopfen konnten, insbesondere
große Blätteranhäufungen.
Etappe 3. Es gibt neun (9) 1,2 m langeAnschluss
schlauche und einen 1,2 m langen Hauptschlauch
mit grauem Stutzen. Die Schlauchabschnitte des
Navigator miteinander verbinden. Dazu muss
man das Ende mit Aussengewinde eines jeden
Schlauchs in des Ende mit Innengewinde eines
anderen Schlauchs stecken und festdrehen
(siehe Abb. 1). Je nach Größe und Form Ihres
Schwimmbads brauchen nicht immer alle
Schläuche verwendet zu werden. Der
Hauptschlauch muss jedoch immer angeschlossen werden, weil der Navigator sonst nicht einwandfrei funktionieren wurde. Die Schläuche
brauchen nicht bis zum Anschlag festgedreht zu
werden, müssen jedoch fest genug sein, um
Luftentweichungen zu vermeiden. Durch
Befeuchten der Schlauchenden können sie leichter angeschlossen werden.
Etappe 4.Ab dem Skimmer muss der Schlauch den
entferntesten Punkt des Schwimmbads erreichen,
wobei ihm dann 2 zusätzliche Abschnitte für die Tiefe
hinzugefügt werden müssen. Diese zusätzliche
Länge ist für den einwandfreien Betrieb des
Navigator unerlässlich. Wenn die Gesamtlänge Ihres
Schlauchs nicht ausreichend ist, müssen Sie bei
Ihrem üblichen Händler zusätzliche Abschnitte kaufen. Nach Anschluss der korrekten Schlauchlänge,
die Blätterfangvorrichtung und den Unterdruckprüfer
AEV096 zwischen dem am Skimmer angeschlossenen Schlauchabschnitt und dem folgenden
Schlauchabschnitt einsetzen. Der Unterdruckprüfer
dient zur Messung des Wasserdurchflusses beim
Anlauf des Navigator (siehe Abb. 2).
Etappe 5. Sich vergewissern, dass der
Einstellknopf der hinteren Klappe auf Position II,
d.h. der Zwischeneinstellung, steht (siehe Abb. 3).
Den Navigator in das Wasser tauchen, um die in
ihm enthaltene Luft entweichen zu lassen. Wenn
die ganze Luft entwichen ist, kann der
Hauptschlauch angeschlossen werden. Der
Hauptschlauch weist einen grauen Stutzen auf,
sowie einen roten Aufkleber, der entfernt werden
muss. Den grauen Stutzen an den Reiniger
Navigator anschließen (wie auf Abb. 4 ersichtlich), und den Schlauch zum Entweichenlassen
der Luft eintauchen, in gleicher Weise wie bei
einer manuellen Reinigung.
Schließen Sie den Navigator auf keinen Fall am
Wassereinlauf an. Dies könnte Luft in den
Reiniger bringen und seine Funktion nachhaltig
beeinträchtigen.
Etappe 6. Den Schlauch bei abgeschaltetem
Filtersystem am Skimmer anschließen, wie auf
Abb. 5, 6 und 7 ersichtlich. Die Abb. 5 zeigt das
Anschlussystem des Schlauchs am mit einer
unteren Ansaugung ausgerüsteten Skimmer
anhand des AdapterkegelsAEXV093BP. Die Abb.
6 zeigt die Anschlussweise im Fall einer seitlichen
oder hinteren Ansaugung: bei dieser
Konfiguration ist der rechtwinklige Adapterkegel
AEXV151 zu verwenden, der bei Ihrem üblichen
Händler erhältlich ist. Der Schlauch kann entweder durch die Scharte oder den Deckel des
Skimmers angeschlossen werden. Die Abb. 7
zeigt die Anschlussweise des Schlauchs für den
Fall, dass der Skimmer eine direkte Ansaugung
im Schwimmbad besitzt. Der Adapterkegel
AEXV093BP wird am mit Ihrem Skimmer für die
Verwendung eines manuellen Reinigers mitgelieferten Verbinder angeschlossen. Für einen einwandfreien Betrieb des Navigator ist es ebenfalls
erforderlich, den mit dem Skimmer mitgelieferten
Deckel des Vorfilters zu verwenden. Wenn sich
der Deckel nicht hermetisch schließt, rufen Sie
bitte Ihren Händler an, um zu prüfen, ob ein weiteres Zubehörteil erforderlich ist.
Etappe 7 Das Filtersystem einschalten. Das
Page 14

14
Niveau des Unterdruckprüfers AEV096 prüfen
(siehe Abb. 2 für seine Installation). Er dient zur
Messung des vom Filtersystem Ihres
Schwimmbads erzeugten Wasserdurchlaufs und
muss einen Unterdruck von mindestens 100 mm
(4 Zoll) anzeigen. Der Unterdruck sollte pro verwendeten Schlauchabschnitt 25 mm (1 Zoll)
betragen. Wenn Sie beispielsweise zehn (10)
Schlauchabschnitte verwenden, dann den
Wasserdurchlauf im Navigator so einstellen, dass
der Unterdruckprüfer einen Unterdruck von 250 m
(10 Zoll) mit einer Toleranz von mehr oder weniger 25 mm (± 1 Zoll) anzeigt. Hierbei handelt es
sich um einen Richtwert, und ein etwas höheres
oder niedrigeres Niveau ist ohne weiteres akzeptierbar. Den Unterdruckprüfer vom Schlauch nehmen und in Griffnahe aufbewahren. Sie werden
ihn von Zeit zu Zeit brauchen, um die
Betriebsweise des Navigator zu prüfen.
Etappe 8 Den Navigator wahrend des Betriebs
Wichtig: Nach Einstellung des Navigator, den
Unterdruckprüfer AEV096 entfernen. Er ist nicht
vorgesehen, um im Wasser zu bleiben, und ist
nicht von der Garantie Navigator gedeckt.
beobachten. Die Ruckförderung des Wassers in
das Schwimmbad kann den einwandfreien
Betrieb des Reinigers entweder am Schlauch an
der Oberfläche oder mit dem Navigator selbst am
Boden des Schwimmbads beeinträchtigen. Wenn
das Schwimmbad mit einer Rückförderung mit
orientier barem Kugelgelenk ausgerüstet ist, so
muss der Wasserfluss so gelenkt werden, dass er
die Bewegungen des Navigator nicht behindert.
Im gegenteiligen Fall Ihren Händler anrufen, um
eine geeignete Lösung zu finden.
Etappe 9 Sich vergewissern, dass sich der
Navigator ohne längere Haltezeiten an Stufen
oder anderen Hindernissen (senkrechte Wände,
Leitern,...) fortbewegt. Wenn Sie den Eindruck
haben, dass der Navigator zur Immobilisierung
neigt, den Einstellknopf der hinteren Klappe auf
Position I stellen (siehe Abb. 3).
Etappe 10 Der Navigator erklimmt die senkrechten Wände von Schwimmbadern aus Zement
oder Glasfasern, vorausgesetzt dass sie einen
abgerundeten Winkel mit einem Radius von mindestens 30 cm in Bezug auf den
Schwimmbadboden aufweisen. Wenn der
Navigator eine Wand erklimmt, versetzt er sich
nicht unbedingt bis nach oben. Wenn der
Navigator nicht an der Wand zu haften scheint,
den Einstellknopf der hinteren Klappe auf Position
III stellen (siehe Abb. 3).
Wenn der Navigator die Wasseroberfläche
erreicht und Luft ansaugt, den Einstellknopf der
hinteren Platte auf Position I drehen (siehe Abb.
3). Wenn der Reiniger die Wand zu hoch erklimmt, die Ansaugleistung um 25 mm (1 Zoll)
reduzieren, bis der Betrieb wieder normal wird.
Etwa 80 % der Rückstände eines Schwimmbads
befinden sich auf seinem Boden und etwa 20 %
an den Wänden. Daher verbringt der Navigator
längere Zeit mit dem Reinigen des Bodens als mit
dem der Wände.
Aufgrund der Form (zu spitze Winkel) der meisten
eingegrabenen Liner-Schwimmbäder, bleibt der
Navigator auf dem Schwimmbadboden (bei jeder
beliebigen Tiefe) und an den schrägen Wänden.
Der Navigator erklimmt keine senkrechten LinerWände.
Nachdem Ihr Reiniger Navigator jetzt installiert ist
und problemlos funktioniert, können Sie sich Ihres
Schwimmbads erfreuen.
WICHTIGE EMPFEHLUNGEN
1. Regelmäßig kontrollieren, dass der Schlauch des
Reinigers Navigator ordnungsgemäß an der
Ansaugung des Skimmers angeschlossen ist.
2. Vor Gegenwaschen des Filters den Schlauch
des Navigator abziehen. Dies soll den für ein
wirksames Gegenwaschen erforderlichen
Wasserfluss garantieren.
3. Den Schlauch des Reinigers nicht aufwickeln.
Probleme aufgrund von aufgewickelten
Schläuchen sind nicht von der Garantie gedeckt.
4. Achtung. Bei einer Schock-Chlorierung muss
der Reiniger Navigator und sein Schlauch
unbedingt aus dem Schwimmbad genommen
werden, bis das Chlor wieder sein normales
Niveau erreicht hat.
5. Den Hauptschlauch immer vom Kopf des
Navigator abziehen, wenn er sich außerhalb
des Schwimmbads befindet.
6. Den Navigator immer am Griff und nicht am
Schlauch tragen und anheben.
7. Wenn Sie baden, den Navigator und seinen
Schlauch aus dem Schwimmbad nehmen.
8. Regelmäßig den Unterdruck mit dem
Unterdruckprüfer kontrollieren. Eine zu starke
oder zu schwache Ansaugung ist schädlich.
9. Das rückseitige Gitter durch Bürsten sauber
halten und von Abfällen befreien.
WARTUNGSEMPFEHLUNGEN
Anmerkung: Für die Installation des Navigator
wird empfohlen, die vorstehenden
Voraussetzungen zu beachten.
Der Navigator ist mit einem "abnehmbaren
Boden" ausgerüstet. Eine derartige Konzeption
mit schnellem Zugriff soll den Zugriff zum Block
Turbine/Saugkammer für Wartungs- und
Reinigungszwecke erleichtern.
Sollte der Navigator aufgrund der
Restbestandskonzentration im Hals oder innerhalb des Geräts nicht mehr weiterlaufen oder
sich anormal verlangsamen, können Sie auf den
Block Turbine/Saugkammer zugreifen (siehe Abb.
11).
HAFTUNGSENTLASTUNG
1. Alterung, Sonne und chemische
Behandlungen beschädigen den Liner.
2. Der Liner kann brüchig und schwach werden.
3. Die Installation und die Umgebung des
Schwimmbads konnen den Liner ebenfalls
beeinflussen.
4. Bei der Installation Ihres Navigator übernehmen Sie die gesamte Haftung was den
Zustand Ihres Schwimmbads und seine
Umgebung anbetrifft.
Page 15

15
LISTE DER MÖGLICHEN PROBLEME
PROBLEME URSACHEN LÖSUNGEN
Der Reiniger ist langsam oder bewegt sich
nicht fort
Der Peiniger blockiert sich gegen Mauern,
Stufen, Leiter...
Der Reiniger kann die senkrechten Wände
eines Schwimmbads aus Zement/Gunit nicht
erklimmen.
Der Reiniger erreicht die Oberflache und
saugt Luft an.
Unzureichender oder ungeeigneter
Durchfluss durch den Reiniger
Teilweise Verstopfung der Ansaugöffnung
des Navigator.
Verschlissene Gleitschuhe. Die Gleitschuhe auswechseln (Abb. 8).
Verschlissene Flügel. Die Flügel auswechseln (Abb. 9 und 10).
Ungeeignete Ansaugung. Den Druck mit dem Unterdruckprüfer kon-
Verschlissene Gleitschuhe oder Flügel. Die Gleitschuhe (Abb. 8) oder die Flügel (Abb.9 und
Zu kurzer Schlauch. ZusätzlicheAbschnittehinzufügen, wiein derNotiz
Ausfall des Lenksystems. Das rückseitige Rost kontrollieren und reinigen.
Unzureichender oder ungeeigneter
Duchfluss durch den Reiniger.
Teilweise Verstopfung der Ansaugöffnung
des Navigator.
Verschlissene Glutschuhe. Die Gleitschuhe auswechseln (Abb. 8).
Verschlissene Flügel. DieFlügel auswechseln (Abb. 9 und 10)
Zu kurzer Schlauch. Zusätzliche Schlauchabschnitte nach
Falsche Spannung der hinteren Klappe. Den Einstellknopf der hinteren Klappe auf
Unzureichender oder ungeeigneter Duchfluss
durch den Reiniger.
Falsche Spannung der hinteren Klappe. Den Einstellknopf der hinteren Klappe auf
Ausfall des Lenksystems. Das rückseitige Rost kontrollieren und reinigen.
Die Blatterfangvorrichtung, den Vorfilter und
das Filtersystem reinigen. Den Druck mit dem
nterdruckprüfer kontrollieren.
U
Die verstopfte Öffnung reinigen.
trollieren.
10) auswechseln.
angegeben.
Prüfen, ob sich der Transmissionsmechanismus
des Kegels in beiden Richtungen frei dreht. Das
Lenksystem prüfen und bei Bedarf auswechseln.
Die Blätterfangvorrichtung, den Vorfilter und
das Filtersystem prüfen. Den Druck mit dem
Unterdruckprüfer kontrollieren.
Die verstopfte Öffnung reinigen.
Installationsanweisunghinzufügen.
Position III stellen (Abb. 3).
Die Blätterfangvorrichtung, den Vorfilter und
das Filtersystem prüfen. Den Druck mit dem
Unterdruckprüfer kontrollieren.
Position I stellen (Abb. 3).
Prüfen, ob sich der Transmissionsmechanismus
des Kegels in beiden Richtungen frei dreht. Das
Lenksystemprüfen undbeiBedarf auswechseln.
GARANTIE BEDINGUNGEN
Der NAVIGATOR unterliegt einer Garantie auf Material und Verarbeitungsfehler von fünf Jahren,
gerechnet ab dem Versanddatum. Wir bitten Sie daher Ihre Rechnung aufzubewahren.
Unsere Garantie beschrankt sich auf den kostenlosen Austausch oder der Reparatur des in Frage kommenden Produktes. Die Entscheidung hierüber obliegt uns, und berücksichtigt u.a. einen normalen
Gebrauch des Produktes, gemäß den Gebrauchshinweissen. Es darf keine Teil des NAVIGATOR ausgetauscht werden und zum Betrieb dürfen ausschließlich Teile von Hayward verwendet werden.
Frostschaden und Schäden durch chemische Produkte sind von der Garantie ausgeschlossen
Darüber hinaus übernimmt Hayward keine Kosten die direkt oder indirekt durch den eventuellen Fehler
des NAVIGATOR aufgetreten sind (Ausbau. Transport, u.s.w...)
Die eingeschränkte Garantie bezieht sich nicht auf die folgenden Teile: Schlauche, Schuhe, Flügel,
Klappen, Kogellager, und Fußteil.
Um eine Garantie anzumelden wenden Sie sich bitte an den Händler von dem Sie Ihren NAVIGATOR
bezogen haben. Aus Organisatorischen Grüden können wir ein unerlaubt an uns geschicktes Teil nicht
bearbeiten.
Page 16

16
I
CONGRATULAZIONI !
Avete appena acquistato l'ultimo nato ed il più
sofisticato del pulitori automatici per piscine.
Il pulitore Navigator è azionato dal dispositivo di
filtrazione della vostra piscina ed è studiato per
funzionare con la maggior parte dei dispositivi
esistentl. La prestazione del Navigator sarà perciô in funzione della potenza della vostra pompa.
L'avvolgimento del tubo
compromette il buon funzionamento del pulitore Navigator.
La garanzia non copre i problemi connessi a dei tubi
avvolti. Immagazzinare
sempre le sezioni ben diritte.
Osservazione : Il Navigator non deve essere utilizzato in primavera al momento della pulizia perla
rimessa in funzione della piscina, salvo se sono
rispettate le condizioni descritte nelle fasi 1 e 2.
Ogni volta che la piscina sarà ingombrata di una
quantità anormalmente elevata di residui, si
dovranno effettuare le fasi necessarie per rendergli nuovamente l'aspetto di “pre-installazione”.
Il Navigator deve essere sempre impugnato.
Non portarlo mai per il tubo.
INSTALLAZIONE DEL PULITORE NAVIGATOR
Fase 1 : Pulire o lavare il filtro a controcorrente,
pulire il cesto del prefiltro prima d'installare il
Navigator. Pulire regolarmente il dispositivo in
funzione delle caratteristiche della vostra installazione.
Fase 2 : Controllare le caratteristiche chimiche
dell'acqua. Assicurarsi che s'a rispettato l'equilibrio chimico e che non ci saino alghe nella piscina. Controllare la piscina e togliere tutti gli oggetti che potrebbero ostacolare l'aspirazione del pulitore Navigator, in particolare i grandi cumuli di
foglie.
Fase 3 : Vi sono 9 (nove) tubi di collegamento da
m 1,2 ed un tubo principale da m 1,2 con un'imboccatura grigia. Collegare una con I'altra le
sezioni del tubo del Navigator. Per far ció, si deve
introdurre con forza e girare l'estremità maschia
di ciascun tubo nell'estremità femmina dell'altro
tubo (ved. figura 1). In funzione della misura e
della forma della vostra piscina, non è sempre
necessario utilizzare tutti i tubi. II tubo principale,
invece, deve essere sempre collegato, altrimenti il
Navigator non pub funzionare correttamente. Non
occorre collegare a fondo i tubi, ma essi devono
essere sufficientemente stretti per evitare una
perdita d'aria. Sarà più facile collegare i tub se
verra inumidita la loro estremità.
Fase 4 : Il tubo completo, partendo dallo schiumatore, deve raggiungere il punto più lontano
della piscina e gli si dovranno poi aggiungere 2
sezioni supplementari per la profondità. Questa
lunghezza complementare è indispensabile per il
buon funzionamento del Navigator. Se la
Iunghezza complessiva del tubo non è sufficiente,
si dovranno acquistare altre sezioni complementarl presso il rivenditore abituale. Dopo aver collegato la lunghezza giusta del tubo, introducete l'arrestafoglie ed il depressiometro AEV096 tra la
sezione del tubo che è collegata allo schiumatore
e la sezione del tubo successiva. II depressiometro serve a misurare il flusso d'acqua al momento
della messa in funzione del Navigator (ved. figura
2).
Fase 5 : Controllare che la manopola di regolazione posteriore si trovi bene sulla posizione Il
che è la regolazione media (ved. figura 3).
Immergere il Navigator nell'acqua per evacuarne
tutta l'aria imprigionata. Dopo che tutta l'aria è
stata evacuata si pub collegare il tubo principale.
Quest'ultimo ha un'imboccatura grigia e un autoadesivo rosso che deve essere tolto. Collegare
I'imboccatura grigia al pulitore Navigator (come
indicato alla figura 4) ed immergere il tubo per
evacuare l'aria nello stesso modo che per la pulizia manuale.
Per riempire il tubo galleggiante di aspirazione del
Navigator sconsigliamo l'utilizzo dell'acqua che
esce dalle bocchette di mandata. Tale operazione
richia di immettere dell'acqua nel corro del robot
creando dei problemi di funzionamento.
Fase 6 : Mentre il dispositivo di filtrazione e
fermo, collegare il tubo alto schiumatore, come
indicato alle figure 5, 6 e 7. La figura 5 indica il
dispositivo di collegamento del tubo ail() schiumatore munito di un'aspirazione bassa con l'auto
del cono d'adattamento AEXV093BP. La figura 6
indica come effettuare il collegamento nel caso di
un'aspirazione laterale o posteriore; in questa
configurazione si deve impiegare il cono d'adattamento ad angolo retto AEXV151 disponibile presso il vostro rivenditore abituale. II tubo pub essere collegato indifferentemente passando attraverso la feritoia o attraverso il coperchio dello schiumatore. La figura 7 indica il modo di collegare il
tubo nel caso in cui lo schiumatore possiede
un'aspirazione diretta nella piscina. Il cono d'adattamento AEXV093BP si collega al connettore fornito col vostro schiumatore per essere utilizzato
come pulitore manuale. Inoltre, per un buon funzionamento del Navigator e necessario utilizzare
il coperchio del prefiltro fornito con lo schiumatore. Se il coperchio non chiude ermeticamente,
contattare il vostro rivenditore per Controllare se
occorre un accessorio complementare.
Page 17

17
Fase 7 : Azionare il dispositivo di filtrazione.
Controllare il livello del depressiometro V096 (per
l'installazione, ved. la figura 2). Esso serve a
misurare il flusso d'acqua generato dal dispositivo
di filtrazione della piscina e deve indicare una
depressone di almeno 100 mm (4 pollici). La
depressione dovrebbe trovarsi a 25 mm (1 pollice) per ogni sezione di tubo impiegata. Per esempio, se utilizzate 10 (dieci) sezioni di tubo, dovrete regolare il flusso d'acqua nel Navigator in modo
che il depressiometro indichi una depressione di
250 mm (10 pollici) con una tolleranza più o meno
di 25 mm (± 1 pollice). Tale misura è indicativa ed
un livello leggermente più alto o più basso è del
tutto accettabile. Togliere il depressiometro dal
tubo e tenetelo a portata di mano. Ne avrete bisogno ogni tanto per controllare il funzionamento del
Navigator.
Importante: Dopo aver regolato il Navigator,
togliere il depressiometro AEV096 in quanto
esso non e previsto per restare in acqua e non è
coperto dalla garanzia Navigator.
Fase 8 : Osservare il Navigator mentre è in funzione. II rinvio dell'acqua verso la piscina può
influire sul buon funzionamento del pulitore, sia a
livello del tubo alla superficie sia con lo stesso
Navigator in fondo alla piscina. Se la piscina e
dotata di un rinvio con una rotula orientabile, si
deve dirigere il flusso dell'acqua in modo da non
ostacolare i movimenti del Navigator. In caso
contrario, consultare il vostro rivenditore per una
soluzione adeguata.
Fase 9 : Controllare che il Navigator si sposti
senza che si fermi per molto tempo davanti agli
scalini o ad altri ostacoli (pareti verticali, scale,
ecc.). Se vi sembra che il Navigator tenda ad
immobilizzarsi, posizionate la manopola di regolazione dello sportello posteriore sulla posizione I
(ved. figura 3).
Fase 10 : II Navigator sale lungo le pareti verticali delle piscine in cemento ed in fibra di vetro purché esse formino un angolo arrotondato di almeno 30 cm di raggio col suolo della piscina.
Quando il Navigator sale lungo una parete, non la
sale necessariamente fino in alto. Se il Navigator
non sembra aggrapparsi alla parete, girare la
manopola di regolazione dello sportello posteriore sulla posizione III (ved. figura 3).
Se il Navigator raggiunge la superficie dell'acqua
ed aspira dell'aria, girate la manopola di regolazione dello sportello posteriore sulla posizione I
(ved. figura 3). Se il pulitore persiste a salire troppo in alto, diminuite la potenza d'aspirazione di 25
mm (1 pollice) fino a che il funzionamento non
ridiventa normale.
Circa l’80% dei residui di una piscina si trovano
sul fondo della piscina stessa. Circa il 20% dei
residui si trovano sulle pareti. II Navigator passa
perciò più tempo a pulire il fondo che le pareti.
A causa della forma (angoli troppo vivi) della maggior parte delle piscine interrate, il Navigator è
confinato sul fondo della piscina (qualunque sia la
profondità) e sulle pareti inclinate. II Navigator non
sale sull'intonaco delle pareti verticali.
Ora che il pulitore Navigator è installato e funziona senza problemi, godetevi le gioie della vostra
piscina.
AVVERTIMENTI IMPORTANTI
1. Controllare regolarmente che il tubo del pulitore Navigator sia ben collegato all'aspirazione dello schiumatore.
2. Scollegare il tubo del Navigator prima di effettuare il lavaggio a controcorrente del filtro. Ciò
deve garantire il flusso d'acqua necessario ad
un efficace lavaggio a controcorrente.
3. Non avvolgere mai il tubo del pulitore. La
garanzia non copre i problemi dovuti a tubi
arrotolati.
4. Importante. In caso di clorazione d'urto, è
obbligatorio togliere il pulitore Navigator ed il
suo tubo dalla piscina fino a che il cloro non
sia tornato al suo livello normale.
5. Scollegare sempre il tubo principale dalla
testa del Navigator quando quest'ultimo si
trova fuori della piscina.
6. Portare e sollevare sempre il Navigator con la
mano. Non tirarlo mai col tubo.
7. Se fate il bagno, si deve togliere dalla piscina
il Navigator ed il suo tubo.
8. Controllare regolarmente il livello di depressione con il depressiometro. Un'aspirazione
eccessiva o insufficiente è deleteria.
9. Spazzolare regolamente la griglia posteriore
permantenerla pulita e senza residui
CONSIGLI PER LA MANUTENZIONE
Osservazione: Per I' installazione del Navigator,
si sconsiglia di osservare le avvertenze sopra
indicate.
II Navigator è munito di un "fondo amovibile". Lo
scopo di avere un accesso rapido è di facilitare
l'accesso al blocco turbina/camera di aspirazione
per qualsiasi manutenzione o pulitura.
Nel caso in cui il Navigator si arrestasse di funzionare o che rallentasse in modo anormale a
causa della concentrazione dei residui nel collo o
all'interno dell'apparecchio, voi potete accedere al
blocco turbina/camera di aspirazione (verd figura
11).
DECLINAZIONE DI RESPONSABILITÀ
1. L'invecchiamento, il sole ed i trattamenti chimici rovinano l'intonaco
2. L'intonaco può diventare frangibile e debole.
3. L'impianto e l'ambiente della pisana possono
influire sull'intonaco.
4. Al momento dell'installazione del vostro
Navigator, voi vi assumete ogni responsabilità
relativa allo stato della vostra piscina e del
suo ambiente.
Page 18

18
ELENCO DEGLI EVENTUALI PROBLEMI
PROBLEMI CAUSE SOLUZIONI
l pulitore e lento o non avanza.
I
Il pulitore si blocca contro i mun. gli scalini, la
scala, ecc...
Il pulitore non riesce a salire sulle paretivertical' di una piscina in cemento/gunite.
Il pulitore raggiunge la superficie e aspira
l'aria
nsufficienza o inadeguatezza del flusso
I
attraverso il pulitore.
Ostruzione parziale della bocca d'aspirazione del Navigator.
Pattini usati. Sostituire i pattini (figura 8).
Ali usate. Sostituire le ali (figure 9 e 10)
A splrazione inadeguata. Controllare la pressione col depressrometro.
Pattini ci ali usati. Sostituire i pattini (figura 8) o le ali (figure9 e 10).
Tubo troppo corto. Aggiungere delle sezioni supplementari
Guasto nel dispositivo di sterzo. Controllare e pulire la griglia posteriore.
Insufficienza o inadeguatezza del flusso
attraverso il pulitore.
Ostruzione parziale dells bocca d'aspirazione del Navigator.
Pattini usati. Sostituirei pattini (figura 8).
Ali usate. Sostituire le ali (figure 9 e 10).
Tubo troppo corto. Montare dei segmenti supplementari di tubo
Tensione errata dello sportello posteriore. Mettete la manopola di regolazione dello spor-
Insufficienza o inadeguatezza del flusso attraverso il pulitore.
Tensione errata dello sportello posteriore.
Guasto nel dispositivo di sterzo.
Guasto nel dispositivo di sterzo. Controllare che il meccanismo di trasmissio-
ulire il bloccafoglie, il prefiltro ed il dispositivo
P
di filtrazione. Controllare la pressione con il
depressiometro.
Liberare l'apertura ostruita.
come indicato nelle istruzioni.
Controllare che il meccanismo di trasmis
none del cono ruoti liberamente nelle due
direzioni. Controllare e cambiare il dispositivo di pilotaggio, se occorre.
Pulire il bloccafoglie, il prefiltro ed il dispositivo
di filtrazione. Controllare la pressione col
depressiometro.
Liberare l'apertura ostruita.
secondole istruzionid'installazione
tello posteriore sulla posizione III (figura 3).
Pulire il bloccafoglie, il prefiltro ed il dispositivo di filtrazione. Controllare la pressione col
depressiometro.
Mettere la manopola di regolazione dello sportello posteriore sulla posizione I(figura 3).
Controllare e pulire la griglia posteriore.
ne del cono ruoti liberamente nelle due direzioni. Controllare e sostituire il dispositivo di
pilotaggio, se occorre.
CONDIZIONI DI GARANZIA
Il NAVIGATOR è garantito contro qualsiasi vizio di fabbricazione o di materiale per un periodo di cinque
anni a decorrere dalla data d'acquisto. Le domande di garanzia debbono essere corredate da un giustificativo d'acquisto recante la data dello stesso. Vi invitiamo pertanto a conservare la fattura.
La garanzia Hayward si limita alla riparazione o sostituzione, a discrezione della ditta Hayward, dei prodotti difettosi nella misura in cui le normali condizioni d'uso siano state rispettate, conformemente alle
prescrizioni fornite nel manuale per l'uso, e il prodotto non sia stato modificato in alcun modo e sia stato
utilizzato solo con componenti e pezzi di marca Hayward. I danni conseguenti al gelo o ad aggressioni chimiche non sono garantiti.
Tutte le altre spese (trasporto, manodopera, ecc.) sono escluse dalla garanzia. La ditta Hayward non
e responsabile dei danni diretti o indiretti provenienti dal disservizio di un prodotto.
La garanzia non si applica ai seguenti pezzi soggetti ad usura : tubi, piedi, alette, farfalle, cuscinetti,
pattini.
Per fruire della garanzia e richiedere la riparazione o sostituzione di un articolo, rivolgersi al proprio
rivenditore. Nessun materiale rispedito alla fabbrica sarä accettato senza previo accordo scritto da
parte nostra.
Page 19

19
NL
GEFELICITEERD!
U hebt zopas de nieuwste en meest geavanceerde automatische zwembadreiniger gekocht.
De Navigator reiniger wordt voortbewogen door
het filtersysteem van het zwembad en werkt met
de meeste bestaande systemen. De prestaties
van de Navigator zullen dus afhangen van het
vermogen van de pomp.
Het oprollen van de slang
kan de goede werking van de
Navigator reiniger in het
gedrang brengen.
Beschadigingen die te wijten
zijn aan het oprollen van de
slangen, worden niet door
onze waarborg gedekt. Berg
de elementen altijd recht op.
Opmerking: Gebruik de Navigator niet voor het
schoonmaken van het zwembad bij de eerste
ingebruikneming na de winter, behalve indien de
voorwaarden zoals omschreven in de etappes 1
en 2 vervuld zijn. Wanneer er abnormaal veel vuil
op de zwembadbodem ligt, moet het zwembadwater eerst de verschillende etappes van de
voorbehandeling ondergaan.
Neem de Navigator altijd vast met het handvat.
Verplaats het toestel nooit door aan de slang te
trekken.
INSTALLATIE VAN DE NAVIGATOR REINIGER
Etappe 1. Maak de filter schoon of voer een back-
wash-cyclus uit, reinig de voorfilterkorf alvorens
de Navigator te installeren. Maak het toestel
regelmatig schoon, afhankelijk van de kenmerken
van uw installatie.
Etappe 2. Controleer de chemische eigenschappen van het zwembadwater. Zorg ervoor dat het
chemische evenwicht in acht wordt genomen en
dat het water geen wieren bevat. Controleer het
zwembad en verwijder alle voorwerpen die de
aanzuigopening van de Navigator reiniger zouden
kunnen verstoppen, vooral grote hoeveelheden
bladeren.
Etappe 3. De installatie telt negen (9) verbindingsslangen van 1,2 m en een hoofdslang van 1,2 m,
voorzien van een grijs mondstuk. Steek de verschillende slangelementen van de Navigator als
volgt in elkaar: steek een smal uiteinde krachtig en
met een draaibeweging in een breed uiteinde van
een ander element (zie fig. 1). Afhankelijk van de
afmetingen en de vorm van het zwembad, is het
niet altijd noodzakelijk, alle elementen te gebruiken. Wel moet in ieder geval de hoofdslang worden aangesloten, anders zou de Navigator niet
behoorlijk werken. Forceer de elementen niet: ze
moeten alleen voldoende stevig in elkaar zitten
om het ontsnappen van lucht te vermijden. Door
het uiteinde van de slangen nat te maken, kunnen
ze gemakkelijker in elkaar worden geschoven.
Etappe 4. De totale lengte van de slang moet
gelijk zijn aan de afstand tussen de skimmer en
het verste punt van het zwembad, plus 2 extraelementen voor de diepte. Deze extra-elementen
zijn absoluut noodzakelijk om een goede werking
van de Navigator te verzekeren. Vormt het basispakket een slang die niet lang genoeg is voor uw
zwembad, bestel dan extra-elementen bij uw dealer. Na het monteren van een slang die voldoende lang is, de bladvanger en de onderdrukmeter
V096 aanbrengen tussen het element dat op de
skimmer is aangesloten en het volgende element.
De onderdrukmeter dient om het waterdebiet te
meten bij het inschakelen van de Navigator (zie
fig. 2).
Etappe 5. Controleer of de afstelknop aan de
achterkant wel degelijk op de stand II, d.w z. de
tussenstand, staat (zie fig. 3). Dompel de
Navigator onder in het zwembadwater om de
lucht die de reiniger bevat, te verwijderen. Zodra
er geen lucht meer ontsnapt, kan de hoofdslang
worden aangesloten. De hoofdslang is voorzien
van een grijs mondstuk en een rode, te verwijderen sticker. Sluit het grijs mondstuk aan op de
Navigator reiniger (zie fig. 4) en dompel de slang
onder om de lucht te laten ontsnappen, net zoals
bij een manueel reinigingssysteem.
In geen geval het water dat mit de terugbuis komt
gebruiken, on de darm van de Navigator te vullen.
Wanneer men di wel doet, loopt men het risiko,
dat er lucht in de kop van de reiniger komt, waardeer men de perkektie vermindert.
Etappe 6. Schakel het filtersysteem van het zwembad uit, sluit de slang op de skimmer aan (zie fig.
5, 6 en 7). Fig. 5 geeft aan hoe de slang moet worden aangesloten op de skimmer met aanzuiging
onderaan, met behulp van een verloopstuk
AEXV093BP. Op fig. 6 wordt aangegeven hoe de
verbinding tot stand moet worden gebracht wanneer de aanzuiging via de zij- of achterkant gebeurt
; in dat geval moet een knievormig verloopstuk
(AEXV151) worden gebruikt, dat u bij uw dealer
kunt bestellen. De slang mag zonder onderscheid
door het kijkgat of het deksel van de skimmer worden aangesloten. Op fig. 7 wordt aangegeven hoe
de slang moet worden aangesloten wanneer de
skimmer voorzien is van een directe aanzuiging in
het zwembad. Het verloopstuk AEXV093BP wordt
aangesloten op het aansluitingsstuk dat bij de
skimmer geleverd wordt voor het gebruik van een
manueel reinigingssysteem. Om de goede werking
van de Navigator te verzekeren is het verder noodzakelijk het deksel van de voorfilter te gebruiken
die bij de skimmer geleverd wordt. Is het deksel
niet hermetisch gesloten, neem dan contact op met
uw dealer om na te gaan of een extra-accessoire
noodzakelijk is.
Page 20

20
Etappe 7 Schakel het filtersysteem in. Controleer
het peil van de onderdrukmeter V096 (voor de
Installatie ervan: zie fig. 2). De onderdrukmeter
dient om het waterdebiet te meten dat door het filtersysteem van uw zwembad wordt opgewekt en
moet een onderdruk van ten minste 100 mm (4
duim) aangeven. Normaal gesproken dient de
onderdruk per ingezet slangelement 25 mm (1
duim) te bedragen. Voorbeeld: gebruikt u tien (10)
slangelementen, dan zult u het waterdebiet van
de Navigator zo afstellen dat de onderdrukmeter
een onderdruk van 250 mm (10 duim) aangeeft,
met een speling van ± 25 mm (± 1 duim). Dit is
een gemiddelde waarde; een waarde die iets
hoger of iets lager ligt, is best aanvaardbaar. Haal
de onderdrukmeter van de slang en hou hem binnen handbereik. U zult hem af en toe moeten
gebruiken om de goede werking van de Navigator
te controleren.
Belangrijk: Verwijder de onderdrukmeter na het
afstellen van de Navigator. De onderdrukmeter is
immers niet voorzien om ondergedompeld te blijven
en wordt niet door de Navigator garantie gedekt.
Etappe 8 Bekijk de Navigator terwijl hij werkt. De
terugstuwing van het water in het zwembad kan
de goede werking van de reiniger in het gedrang
brengen ter hoogte van de slang aan de oppervlakte of wat betreft de Navigator zelf die zich op
de bodem van het zwembad bevindt. Is het
zwembad uitgerust met een terugstuwingssysteem voorzien van een oriënteerbare ronde plaat,
dan moet de waterstroom zo gericht worden dat
de bewegingen van de Navigator niet gehinderd
worden. In het andere geval uw dealer raadplegen om een passende oplossing te vinden.
Etappe 9 Controleer of de Navigator niet al te
lang blijft stilstaan tegen traptreden of andere
obstakels (verticale wanden, ladders, enz...).
Vindt u dat de Navigator vaak tot stilstand dreigt
te komen, dram de afstelknop aan de achterkant
op stand I (zie fig. 3).
Etappe 10 De Navigator beklimt verticale zwembadwanden van cement of glasvezel, op voorwaarde dat de hoek op de bodem een afgeronde
hoek vormt met een straal van ten minste 30 cm.
Bij het beklimmen van een wand gaat de
Navigator niet noodzakelijk door tot de bovenrand
ervan. Hebt u de indruk dat de Navigator zich niet
aan de wand vasthecht, draai de afstelknop aan
de achterkant op stand III (zie fig. 3).
Bereikt de Navigator het wateroppervlak en zuigt
hij lucht op, draai de afstelknop aan de achterkant
op stand I (zie fig. 3). Blijft de reiniger de wand te
ver beklimmen, verminder dan het aanzuigvermogen met 25 mm (1 duim) totdat de reiniger
opnieuw normaal werkt.
Ongeveer 80 % van het vuil in een zwembad
bevindt zich op de bodem. Ongeveer 20 % hecht
zich vast aan de wanden. De Navigator doet er
dus langer over om de bodem te reinigen.
Vanwege de vorm (nl. de te scherpe hoeken) van
de meeste ingegraven liner zwembaden, kan de
Navigator alleen gebruikt worden voor het schoon-
maken van de bodem van het zwembad (ongeacht
de diepte) en van hellende wanden. De Navigator
beklimt de verticale liner wanden niet.
Nu de Navigator reiniger geïnstalleerd is en probleemloos werkt, kunt u volop van uw zwembad
genieten
BELANGRIJKE WENKEN
1. Controleer regelmatig of de slang van de
Navigator reiniger goed is aangesloten op de
aanzuigopening van de skimmer.
2. Maak de slang van de Navigator los alvorens
een backwash-cyclus van de filter uit te voeren.
Zo bent u er zeker van dat de waterstroom voldoende is voor een efficiënte backwash.
3. Rol de slang van de reiniger in geen geval op.
Problemen die te wijten zijn aan het oprollen
van slangen, worden niet door de waarborg
gedekt.
4. Let op. Wordt het water drastisch gechloord,
dan moet de Navigator reiniger (inclusief de
slang) uit het zwembad worden gehaald totdat het chloorgehalte weer normaal is.
5. Maak de hoofdslang en de kop van de
Navigator altijd los wanneer de reiniger zich
niet in het zwembad bevindt.
6. Gebruik het handvat om de Navigator te verplaatsen of op te tillen. Trek nooit aan de slang.
7. Tijdens het zwemmen, moet de Navigator(inclusief de slang) uit het zwembad worden gehaald.
8. Controleer de onderdruk regelmatig met de
onderdrukmeter. Een overdreven of onvoldoende aanzuiging veroorzaakt schade.
9. Borstel de rooster aan de achterkant regelmatig schoon zodat er geen afval vast blijft zitten.
Opmerking: Het verdient aanbeveling de Navigator
niet te installeren zolang deze verschijnselen onveranderd blijven.
TIPS VOOR HET ONDERHOUD
De Navigator is voorzien van een "losse bodem".
Dit concept is bedoeld om de toegang tot de eenheid turbine/aanzuigkamer voor het onderhoud of
schoonmaken, te vergemakkelijken.
Valt de Navigator stil of beweegt de reiniger zich
abnormaal traag voort omdat er te veel vuil tegen
de kraag of aan de binnenkant van het toestel blijft zitten, dan kunt u de eenheid turbine/aanzuigkamer gemakkelijk bereiken (zie fig.
11).
AFWIJZING VAN DE AANSPRAKELIJKHEID
1. Door veroudering en onderinvloedvan de zon en
chemische producten worden liner aangetast.
2. De liner kan broos en zwak worden.
3. De Installatie en de omgeving van het zwembad kunnen eveneens een negatieve invloed
hebben op de kwaliteit van liner.
4. Bij de installatie van de Navigator draagt u de
volledige verantwoordelijkheid wat betreft de
staat van uw zwembad en de omgeving
ervan.
Page 21

21
LIJST VAN DE MOGELIJKE PROBLEMEN
PROBLEEM OORZAKEN OPLOSSINGEN
De bodenzuiger zich langzaam of helemaal
iet voort.
n
De reiniger loopt vast tegen de wanden, de
treden. de ladder, enz…
De reiniger slaagt er niet in, de verticale
wanden van een de verticale
cement/spuitbeton te beklimmen.
De reiniger bereikt het wateroppervlak en
zuigt Lucht op.
Het debiet van de waterstroom in de reiniger
s ontoereikend of inadequaat.
i
e aanzuigopening van de Navigator is
D
gedeeltelijk verstopt.
De glijders zijn versleten. Vervang de glijders (fig. 8)
De vleugels zijn versleten. Vervang de vleugels (fig. 9 en 10)
Inadequate aanzuiging Controleer de druk met de onderdrukmeter
De glijders of de vleugels zijn versleten. Vervang de glijders (fig. 8) of de vleugels (fig.
De slang is te kort. Voeg de nodige extra-elementen toe (zie
De stuurinrichting werkt niet goed. Controleer de rooster aan de achterkant en
Het debiet in de reiniger is ontoereikend of
inadequaat.
De aanzuigopening van de Navigator is
gedeeltelijk verstopt.
De glijders zijn versleten. Vervang de glijders (fig. 8).
De vleugels zijn versleten. Vervang de vleugels (fig. 9 en 10).
De slang is te kort. Voeg de nodige extra-elementen toe (zie
Verkeerde spanning aan de achterkant Stelde afstelknop aan deachterkantat op stand
Het debiet in de reiniger is ontoereikend of
inadequaat.
Verkeerde spanning aan de achterkant Stel de afstelknop aan de achterkant af op
De stuurinrichting werkt niet goed. Controleer de rooster aan de achterkant en
Maak de bladvanger, de voorfilter en het filter-
ysteem schoon. Controleer de druk met de
s
onderdrukmeter.
aak de verstopte opening vrij.
M
9 en 10)
handleiding).
maak hem schoon. Controleer of het overbrengingsmechanisme vande kegel inbeide richtingen vrij kan bewegen. Controleer de stuurinrichting en vervang dit onderdeel indien nodig.
Maak de bladvanger. de voorfilter en het filtersysteem schoon. Controleer de druk met de
onderdrukmeter.
Maak de verstopte opening vrij.
handleiding).
III (fig.3).
Maak de bladvanger, de voorfilter en het filtersysteem schoon. Controleer de druk met
de onderdrukmeter.
stand I (fig. 3).
maak hem schoon. Controleer of het overbrengingsmechanisme van de kegel in beide
richtingen vrij kan bewegen. Controleer de
stuurinrichting en vervang dit onderdeel
indien nodig.
GARANTIEVOORWAARDEN
De NAVIGATOR geniet van een waarborg van vijf jaar, te rekenen vanaf de aankoopdatum, tegen alle
fabrieksfouten of gebrekkige materialen. Elk verzoek om toepassing van deze waarborg dient te worden vergezeld van een aankoopbewijs dat deze datum aantoont. Wij raden u derhalve aan, uw factuur
te bewaren.
De Hayward garantie is beperkt tot de reparatie of de vervanging, naar de keuze van Hayward, van de
gebrekkige producten, op voorwaarde dat deze normaal werden gebruikt volgens de gebruiksaanwijzingen, dat het product geen enkele wijziging heeft ondergaan en dat het uitsluitend met Hayward
onderdelen werd gebruikt. Schade die te wijten is aan vorst of aantasting door chemische producten
wordt niet door deze garantie gedekt.
Alle overige kosten (transport, arbeidskosten, enz...) worden evenmin door de garantie gedekt.
Hayward kan in geen geval aansprakelijk worden gesteld voor rechtstreekse of onrechtstreekse schade veroorzaakt door een abnormale werking van een product. De garantie geldt niet voor de volgende
onderdelen die aan slijtage zijn blootgesteld slangen, voeten, vleugels, luiken, lagers, glijders. Om de
garantie in te roepen en de reparatie of de vervanging van een artikel aan te vragen, gelieve een
beroep te doen op uw dealer. De terugzending van producten aan onze fabriek wordt uitsluitend aanvaard mits onze voorafgaande schriftelijke instemming.
Page 22

22
P
FELICITAÇOES !
Acaba de comprar o mais recente e o mais sofisticado dos limpadores automáticos de piscinas.
O limpador Navigator é movido pelo sistema de
filtração da sua piscina e esta concebido para
funcionar com a maioria dos sistemas existentes.
O desempenho do seu Navigator dependerá portanto da potência do sua bomba.
O enrolamento do tubo compromete o funcionamento correcto do limpador Navigator. A
garantia não cobre os problemas ligados aos tubos enrolados. Conservar sempre as
secções direitas.
Observaçõo : O Navigator não deve ser utilizado durante a limpeza no arranque da piscina na
Primavera, excepto se as condições descritas
nas etapas 1 e 2 forem respeitadas. Sempre que
a sua piscina estiver atulhada com uma grande
quantidade de detritos, sera preciso efectuar as
etapas necessárias para que fique com o aspecto de “pré-instalação”.
Transportar sempre o Navigator por meio da sua
pega. Nunca transportá-lo pelo tubo.
INSTALAÇÃO DO LIMPADOR NAVIGATOR
Etapa 1. Limpar ou contra-lavar o seu filtro, limpar
o seu cesto de pré-filtro antes de instalar o
Navigator. Limpar o seu sistema regularmente em
função das caracteristicas da sua instalação.
Etapa 2. Verificar as características químicas da
sua água. Verificar se o equilibrio químico é
respeitado e se não há algas na piscina. Verificar
a piscina e remover todos os objectos que poderiam entupir a aspiração do seu limpador
Navigator, nomeadamente os montes de folhas.
Etapa 3. Há nove (9) tubos de ligação de 1,2 m e
um tubo principal de 1,2 m com ponteira cinzenta. Ligar as secções de tubo do Navigator umas
às outras. Para tal, é preciso introduzir fortemente e girar a extremidade macho de cada tubo na
extremidade flmea do outro tubo (vide figura 1).
Em função do tamanho e da forma da sua piscina, nem sempre é necessário utilizar todos os
tubos. Em contrapartida, é sempre necessário
ligar o tubo principal, porqué senão o Navigator
não funciona correctamente. Não é necessário
ligar a fundo os tubos, mas eles devem ser suficientemente apertados para evitar qualquer fuga
de ar. Se humedecer a extremidade dos tubos,
será mais fácil ligá-los.
Etapa 4. O tubo completo deve alcançar, a partir
do escumador, o ponto mais afastado da piscina,
ao qual será preciso acrescentar 2 secções
suplementares para a profundidade. Este comprimento complementaré indispensável para o funcionamento correcto do Navigator. Se o comprimento total do seu tubo não for suficiente, será
preciso comprar secções complementares no seu
revendedor habitual. Depois de ter ligado o comprimento correcto de tubo, introduza a armadilha
de folhas e o depressómetro AEV096 entre a
secção de tubo que está ligada ao escumador e
a secção do tubo seguinte. O depressómetro
serve para medir o caudal de água durante o
arranque do Navigator (ver figura 2).
Etapa 5. Verificar se o botão de regulação da borboleta traseira está realmente na posição II, a
regulação intermédia (ver figura 3). Imergir o
Navigator na água para evacuar todo o ar aprisionado. Quando todo o ar se tiver escapado,
pode-se ligar o tubo principal. O tubo principal
possui uma ponteira cinzenta e um autocolante
vermelho que é preciso retirar. Ligar a ponteira
cinzenta ao limpador Navigator (como indicado
na figura 4) e imergir o tubo para evacuar o ar,
como se procede para uma limpeza manual.
Näo utilizar a agua que ven du sobrante para
encher o tubo du Navigator. Pois pode entrar
agua na cabeça du limpiador de fundos trazendo
consigo problemas de eficacia.
Etapa 6. Com o sistema de filtração parado, ligar
o tubo ao escumador como indicado nas figuras
5, 6 e 7. A figura 5 indica o sistema de ligação do
tubo ao escumador equipado com uma aspiração
baixa, por meio do cone de adaptação
AEXV093BP. A figura 6 indica o modo de ligação
no caso de uma aspiração lateral ou traseira;
nesta configuração, é preciso utilizar o cone de
adaptação de ângulo recto AEXV151, disponível
no seu revendedor habitual. O tubo pode ser ligado indiferentemente passando através da abertura ou da tampa do escumador. A figura 7 indica o
meio de ligar o tubo se o escumador possuir uma
aspiração directa na piscina. O cone de adaptação AEXV093BP liga-se ao conector fornecido
com o seu escumador para a utilização de limpador manual. E também necessário utilizar a
tampa do pré-filtro fornecido com o escumador
para o funcionamento correcto do Navigator. Se a
tampa não fechar hermeticamente, contactar o
seu revendedor para verificar se é necessário um
acessório complementar.
Etapa 7 Pôr o sistema de filtração a trabalhar.
Verificar o nível do depressómetro AEV096 (ver
figura 2 para a sua instalação). Ele serve para
medir a água gerada pelo sistema de filtração da
sua piscina e deve indicar uma depressão de
pelo menos 100 mm (4 polegadas). A depressão
deveria situar-se a 25 mm (1 polegada) por
secção de tubo utilizada. Por exemplo, se utilizar
dez (10) secções de tubo, deve regular o caudal
de água no Navigator de forma que o depressó-
Page 23

23
metro indique uma depressão de 250 mm (10
polegadas) com uma tolerância de mais ou
menos 25 mm (± 1 polegada). Esta medição é
indicativa e um nível ligeiramente mais alto ou
mais baixo é completamente aceitável. Retirar o
depressómetro do tubo e conserve-o ao alcance
da mão. Terá necessidade dele de vez em quando para verificar o funcionamento do Navigator.
Importante : Depois de ter regulado o Navigator,
retirar o depressómetro AEV096. Ele não está
previsto para permanecer na água e não está
coberto pela garantia Navigator.
Etapa 8 Observar o Navigator em funcionamento.
A descarga da água para a piscina pode afectar o
funcionamento correcto do limpador quer ao nivel
do tubo à superfície, quer com o próprio
Navigator no fundo da piscina. Se a piscina estiver equipada com uma descarga com uma rótula
orientável, é preciso dirigir o fluxo de água de
forma a não prejudicar os movimentos do
Navigator. Caso contrário, consultar o seu revendedor para uma solução adaptada.
Etapa 9 Verificar se o Navigator se move sem
parar muito tempo contra os degraus ou outros
obstáculos (paredes verticais, escadas...). Se lhe
parecer que o Navigator tem tendência a imobilizar-se, ponha o botão de regulação da borboleta
traseira na posição 1 (ver figura 3).
Etapa 10 O Navigator sobe as paredes verticais
das piscinas em cimento e em fibra de vidro com
a condição que elas formem um ângulo arredondado de pelo menos 30 cm de raio com o solo da
piscina. Quando o Navigator sobe uma parede,
ele não sobe necessariamente até ao cimo. Se o
Navigator parecer que não se agarra ã parede,
girar o botão de regulação da borboleta traseira
para a posição III (ver figura 3).
Se o Navigator alcançar a superfície da água e
aspirar ar, gire o botão de regulação da borboleta
traseira para a posição I (ver figura 3). Se o limpador continuar a subir a parede demasiado alto,
reduza a potIncia de aspiração de 25 mm (1 polegada) até que o funcionamento se torne normal.
Cerca de 80% dos resíduos de uma piscina
encontram-se no fundo da piscina. Cerca de 20%
dos residuos encontram-se nas paredes. O
Navigator passa portanto mais tempo a limpar o
fundo que as paredes.
Por causa da forma (ângulos muito agudos) da
maioria das piscinas enterradas liner, o Navigator
mantém-se rio fundo da piscina (qualquer que
seja a profundidade) e nas paredes inclinadas. O
Navigator não sobe as paredes verticais revestimento.
Agora que o seu limpador Navigator está instalado e funciona sem problema, aproveite os prazeres da sua piscina.
CONSELHOS IMPORTANTE
1. Verificar regularmente se o tubo do limpador
Navigator está correctamente ligado à aspiração do escumador.
2. Desligar o tubo do Navigator antes de operar
uma contra-lavagem do filtro. Isto deve
garantir o fluxo de água necessária a uma
contra-lavagem eficaz.
3. Nunca enrolar o tubo do limpador. A garantia
não cobre os problemas devidos aos tubos
enrolados.
4. Atenção. No caso de cloração com grande
quantidade de cloro, é imperativo retirar o limpador Navigator e o seu tubo da piscina até
que o cloro volte ao seu nível normal.
5. Desligar sempre o tubo principal da cabeça
do Navigator quando este estiver fora da piscina.
6. Transportar e levantar sempre o Navigator
por meio da pega. Nunca transportar pelo
tubo.
7. Se tomar banho, é preciso retirar o Navigator
e o seu tubo da piscina.
8. Verificar regularmente o nível de depressão
com o depressómetro. Uma aspiração excessiva ou insuficiente é nefasta.
Observação : É importante seguir estes conselhos para a instalação do Navigator.
9. Conservar a grelha limpa e sem detritos
escovando-a regularmente.
CONSELHOS DE MANUTENÇÃO
O Navigator possui um «fundo amovível». O
objectivo desta concepção de acesso rápido é
facilitar o acesso ao bloco turbina / câmara de
sucção para qualquer manutenção ou limpeza.
Se o Navigator deixar de funcionar ou se se tornar lento de maneira anormal por causa da
concentração de resíduos no pescoço ou no
interior do aparelho, pode aceder ao bloco turbina/câmara de sucção (ver figura 1).
ISENÇÃO DE RESPONSABILIDADE
1. O envelhecimento, o sol e os tratamentos
químicos estragam o revestimento.
2. O revestimento pode tornar-se quebradiço e
fraco.
3. A instalação e o ambiente da piscina podem
afectar também o revestimento.
4. No momento da instalação do seu Navigator,
você assume toda a responsabilidade relativa
ao estado da sua piscina e do seu ambiente.
Page 24

24
LISTA DOS PROBLEMAS POSSÕVEIS
PROBLEMAS CAUSAS SOLUTIONES
O limpador é lento ou não avança Insuficiência ou inadequação do caudal
O limpador fica bloqueado contra as
paredes, os degraus, a escada...
O limpador não consegue subir as paredes
verticais de uma piscina em cimento/gunite
O limpador atinge a superficie e aspira ar Insuficiência ouinadequação do caudalatravés
través do limpador
a
Obstrução parcial da boca de aspiração do
avigator
N
Patins gastos Substituir os patins (figura 8)
Asas gastas Substituir as asas (figura 9 e 10)
Aspiração inadequada Verificar a pressão com o depressõmetro
Patins ou asas gastos Substituir os patins (figura 8) ou as asas
Tubo demasiado curto Acrescentar secções suplementares como
Falha do sistema de direcção Verificar e limpar a grelha traseira Verificar se
Insuficiência ou inadequação do caudal
através do limpador
Obstruçao parcial da boca de aspiração do
Navigator
Patin gastos Substituir os patins (figura 8).
Asas gastas Substituir as asas (figura 9 e 10)
Tubo demasiado curto Instalar segmentos suplementares de tubo
Tensão incorrecta da borboleta traseira Pôr o botão de regulação da borboleta traseira
do limpador
Tensäo incorrecta da borboleta traseira Pôr o botão de regulação da borboleta traseira
Falha do sistema de direcçao Verificar e limpar a grelha traseira. Verificar
Limpar aarmadilha de folhas, opré-filtro eo sis-
ema de filtração. Verificar a pressão com o
t
depressõmetro
Libertar a abertura obstruida
(figura 9 e 10)
indicado nas instruções
o mecanismo de transmissão do cone gira
livremente em ambos os sentidos Verificar e
mudar o sistema de pilotagem se necessario.
Limpar a armadilha de folhas, o pré-filtro e o
sistema de filtração. Verificar a pressão com o
depressõmetro.
Libertar a abertura obstruida.
de acordo com as instruções de instalação.
na posição Ill (figura 3).
Limpar a armadilha de folhas, o pré-filtro e o
sistema de filtração. Verificar a pressão com
o depressõmetro.
na posição I (figura 3).
se o mecanismo de transmissão do cone
gira livremente em ambas as direcções
Verificar e substituir o sistema de pilotagem
se necessario.
CONDIÇÕES DE GARANTIA
O NAVIGATOR é garantido contra todos os vicios de fabrico ou de matéria durante um periodo de cinco
anos a contar da data de compra. Qualquer pedido de garantia devera ser acompanhado por uma
prova de compra justificativa da data. É aconselhavel conservar a factura.
A garantia Hayward limita-se à reparação ou a substituição, a critério de Hayward, dos produtos defeituosos, com a condição que tenham sido utilizados normalmente, segundo as recomendações indicadas no manual de utilização, que o produto não tenha sido modificado de modo algum e tenha sido utilizado unicamente com componentes e peças Hayward. Os danos devidos ao gelo ou aos ataques de
agentes quimicos não são garantidos.
Todas as outras despesas (transporte, mão-de-obra...) ficam excluidas da garantia. Hayward não
podera ser considerado como responsavel de nenhum dano directo ou indirecto decorrente do funcionamento incorrecto de um produto.
A garantia não se aplica às seguintes peças de desgaste: tubos, pés, pás, placas, rolamentos, patins.
Para solicitar uma garantia e pedir a reparação ou a substituição de um artigo, dirija-se ao seu vende-
dor. Não sera aceite nenhum envio de material para a nossa fabrica sem o nosso acordo previo escrito.
 Loading...