

Hayward TriStar VS 900 Omni, Super Pump VS 700 Omni, HL32900VSP, HL2350020VSP, HL2670020VSP Operation Manual
...Page 1

\
USE ONLY HAYWARD GENUINE REPLACEMENT PARTS
Hayward Pool Products
620 Division Street, Elizabeth NJ 07207
Phone (908)-355-7995
www.hayward.com
Operation Manual
092693 RevC
Contents
Introduction............................................2
Favorites................................................17
Themes.................................................22
Cong...................................................24
Upgrade................................................27
Simple Mode........................................30
Web Enabled Control..............................33
Warranty................................................34
VS Omni
Pool Automation Control
HL32950VSP HL32900VSP
HL2350020VSP HL2670020VSP
Page 2

USE ONLY HAYWARD GENUINE REPLACEMENT PARTS
1
IMPORTANT SAFETY INSTRUCTIONS
When using this electrical equipment, basic safety precautions should always be followed, including the following:
• READ AND FOLLOW ALL INSTRUCTIONS
• WARNING: Disconnect all AC power during installation.
• WARNING: Water in excess of 100 degrees Fahrenheit may be hazardous to your health.
• WARNING: To reduce the risk of injury, do not permit children to use this product unless they
are closely supervised at all times.
• WARNING: Do not use the VS Omni to control fire pits or related equipment.
• A green colored terminal marked “Grounding” is located inside the wiring compartment. To
reduce the risk of electric shock, this terminal must be connected to the grounding means
provided in the electric supply service panel with a continuous copper wire equivalent in size
to the circuit conductors supplying the equipment.
• One bonding lug for US models (two for Canadian models) is provided on the external
surface. To reduce the risk of electric shock, connect the local common bonding grid in the
area of the swimming pool, spa, or hot tub to these terminals with an insulated or bare copper
conductor not smaller than 8 AWG US / 6 AWG Canada.
• All field installed metal components such as rails, ladders, drains, or other similar hardware
within 3 meters of the pool, spa or hot tub shall be bonded to the equipment grounding bus
with copper conductors not smaller than 8 AWG US / 6 AWG Canada.
SAVE THESE INSTRUCTIONS
Page 3
USE ONLY HAYWARD GENUINE REPLACEMENT PARTS
2
Introduction
This manual assumes that the VS Omni has been installed and configured according to the Installation Manual. The VS Omni can now be programmed with user desired settings such as schedules,
themes, and favorites. This manual will also explain how to manually turn pool equipment on/off,
program settings for specific equipment, view pool equipment status and conditions, and more.
Now that the initial configuration has been completed, the VS Omni will automatically go to the
Home Screen or Idle Screen. All settings and operation functions can be accessed from the Home
Screen. Note that if the VS Omni Control Pad is not touched for more than two minutes, the Idle
Screen will be displayed.
Using the Control Pad
The VS Omni uses the Control Pad touchscreen as the main interface with the device. Once
configured, the VS Omni can be controlled remotely by internet enabled devices such as computers, tablets, and phones. The Control Pad must be used to access the Configuration Wizard. The
Configuration Wizard is used for initial configuration (completed during the installation process) and
for any changes to existing configuration.
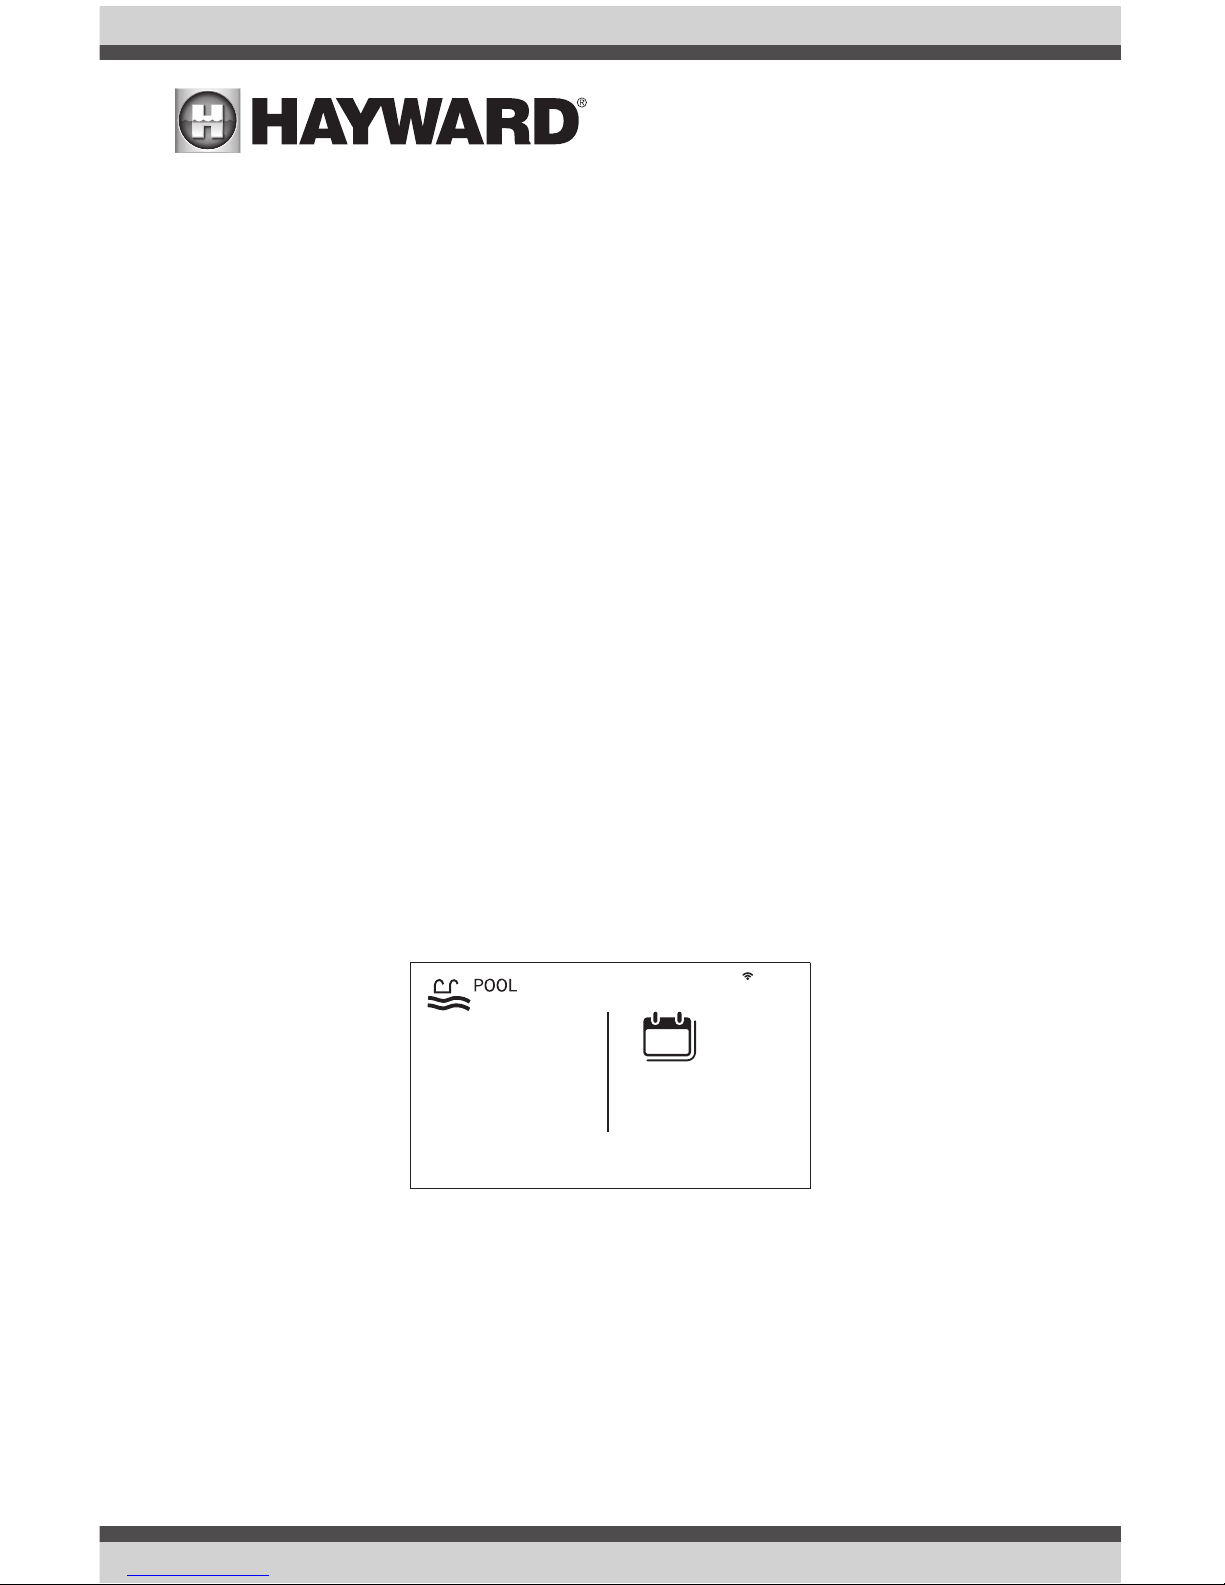
Idle Screen
The Control Pad will display the idle screen after two minutes of user inactivity. When the filter
pump is on, the Idle Screen will display the current temperature of the pool on the left side of the
screen. On the right side of the screen, the time will be displayed and the air temperature will
toggle with the date as well as other information.
º
F
82
9:13 PM
FRIDAY
jul 13
13
Page 4
USE ONLY HAYWARD GENUINE REPLACEMENT PARTS
3
Home Screen
When the Idle Screen is touched, the VS Omni will display the Home Screen. This screen will give
the user access to all functions, settings, and configuration options.
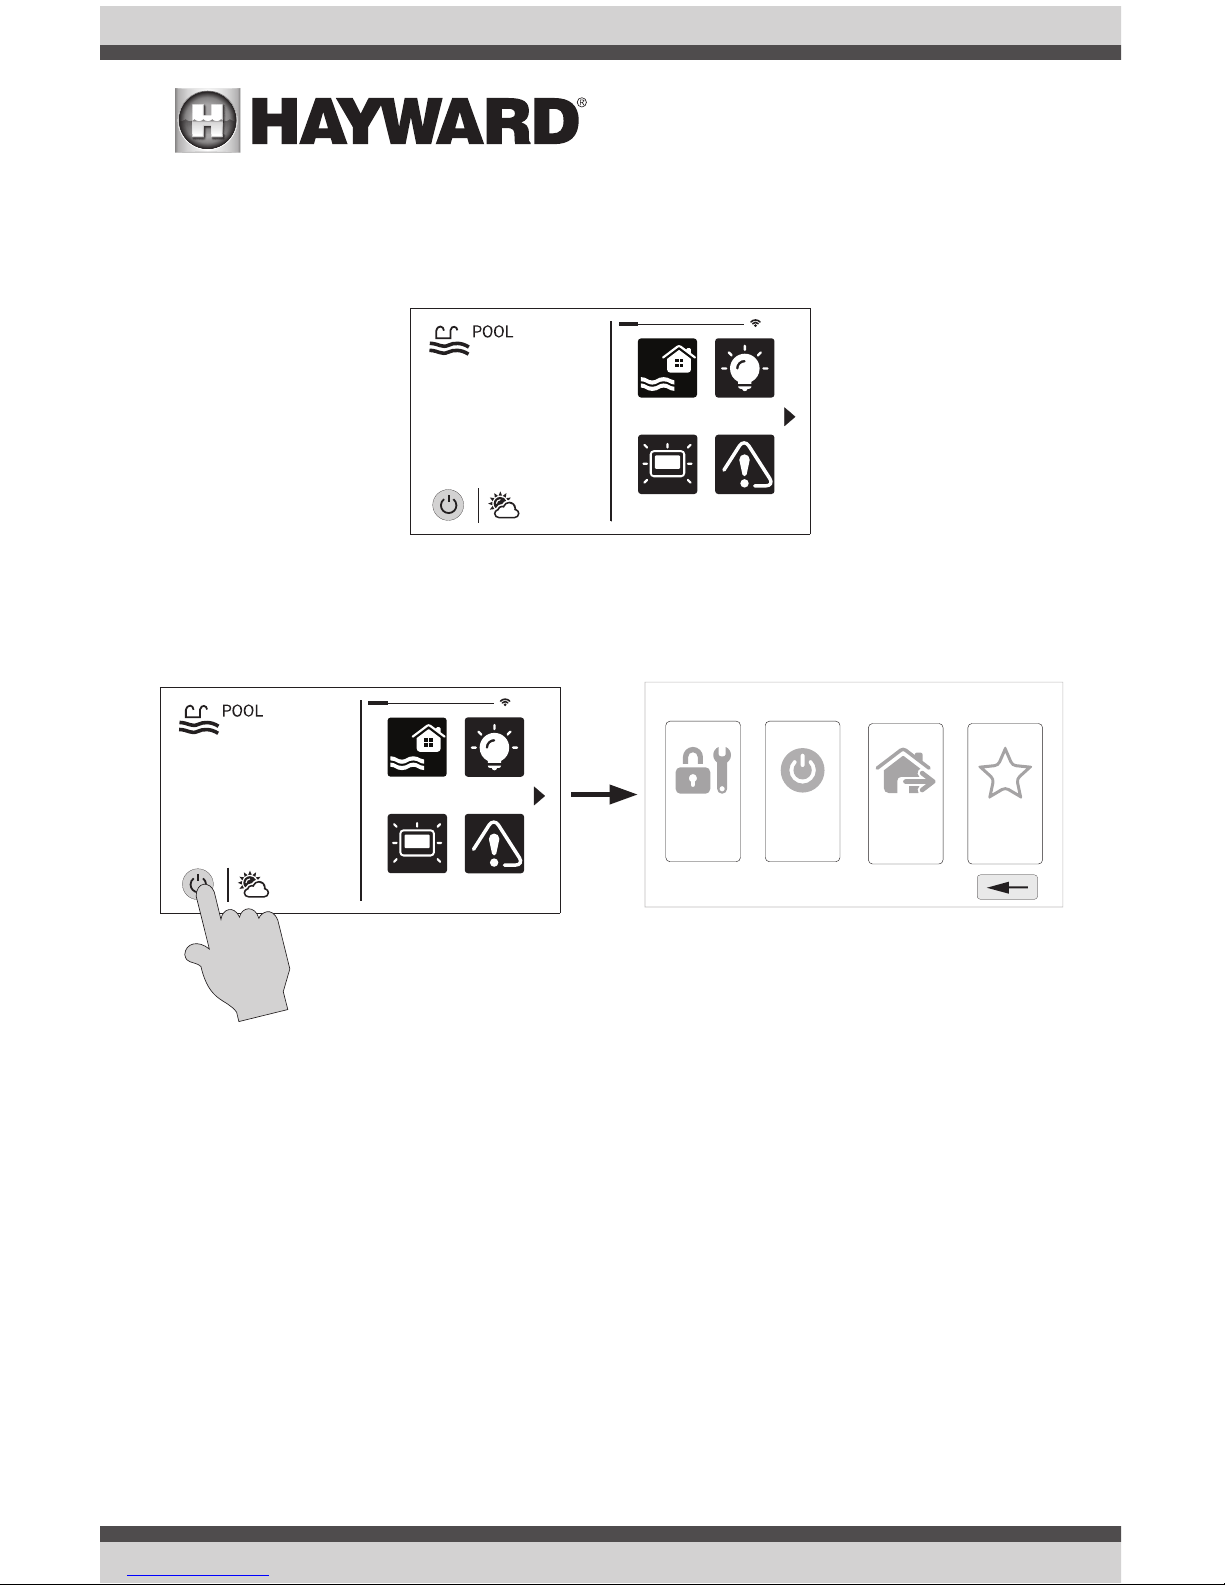
Power Button
The power button is displayed at all times when the VS Omni is not idle. When touched, it offers
the following 4 functions:
Shut Down - When Shut Down is selected, the VS Omni will turn off all pool equipment and report
when it is safe to remove power. When this message is displayed, you can either power off the unit
or restart the VS Omni by touching the large power button displayed on the left side of the screen.
Service Mode - Service Mode will turn off all pool equipment and disable all networked devices.
Service Mode is useful to prevent scheduled operation and disable remote operation while servicing the pool. After selecting Service Mode, there are two options:
Service Mode (Standard): The VS Omni will remain in Service Mode until you manually exit.
To exit Service Mode, touch the power button and select the Service Mode button again.
Service Mode Timed: Before entering Service Mode, you will select a Service Mode timeout.
This is the amount of time that the VS Omni will stay in Service Mode before automatically
exiting. The timeout can be set between 1-96 hours. There is no need to exit Service Mode
manually.
daylight
features
lights
º
F
air
71º F
82
alarm
daylight
features
lights
º
F
air
71º F
82
alarm
shut down
service
mode
simple
mode
features
o
Page 5
USE ONLY HAYWARD GENUINE REPLACEMENT PARTS
4
Features Off - Features Off offers a quick way to turn off all equipment (except the filter pump and
ColorLogic lights if running because of a schedule) with a single touch of a button.
Simple Mode - Simple Mode is a customizable screen that can be set up for quick access to your
Favorites (page 17). You can set up only the Favorites that you want shown while in Simple Mode.
Because it’s customizable, Simple Mode can provide a convenient way to access the most common
functions for owners as well as a handy solution to limit access to other users. For information on
how to create and delete Simple Mode functions, refer to the “Favorites” section in this manual.
The MSP ID number (page 27) is needed when entering and exiting Simple Mode.
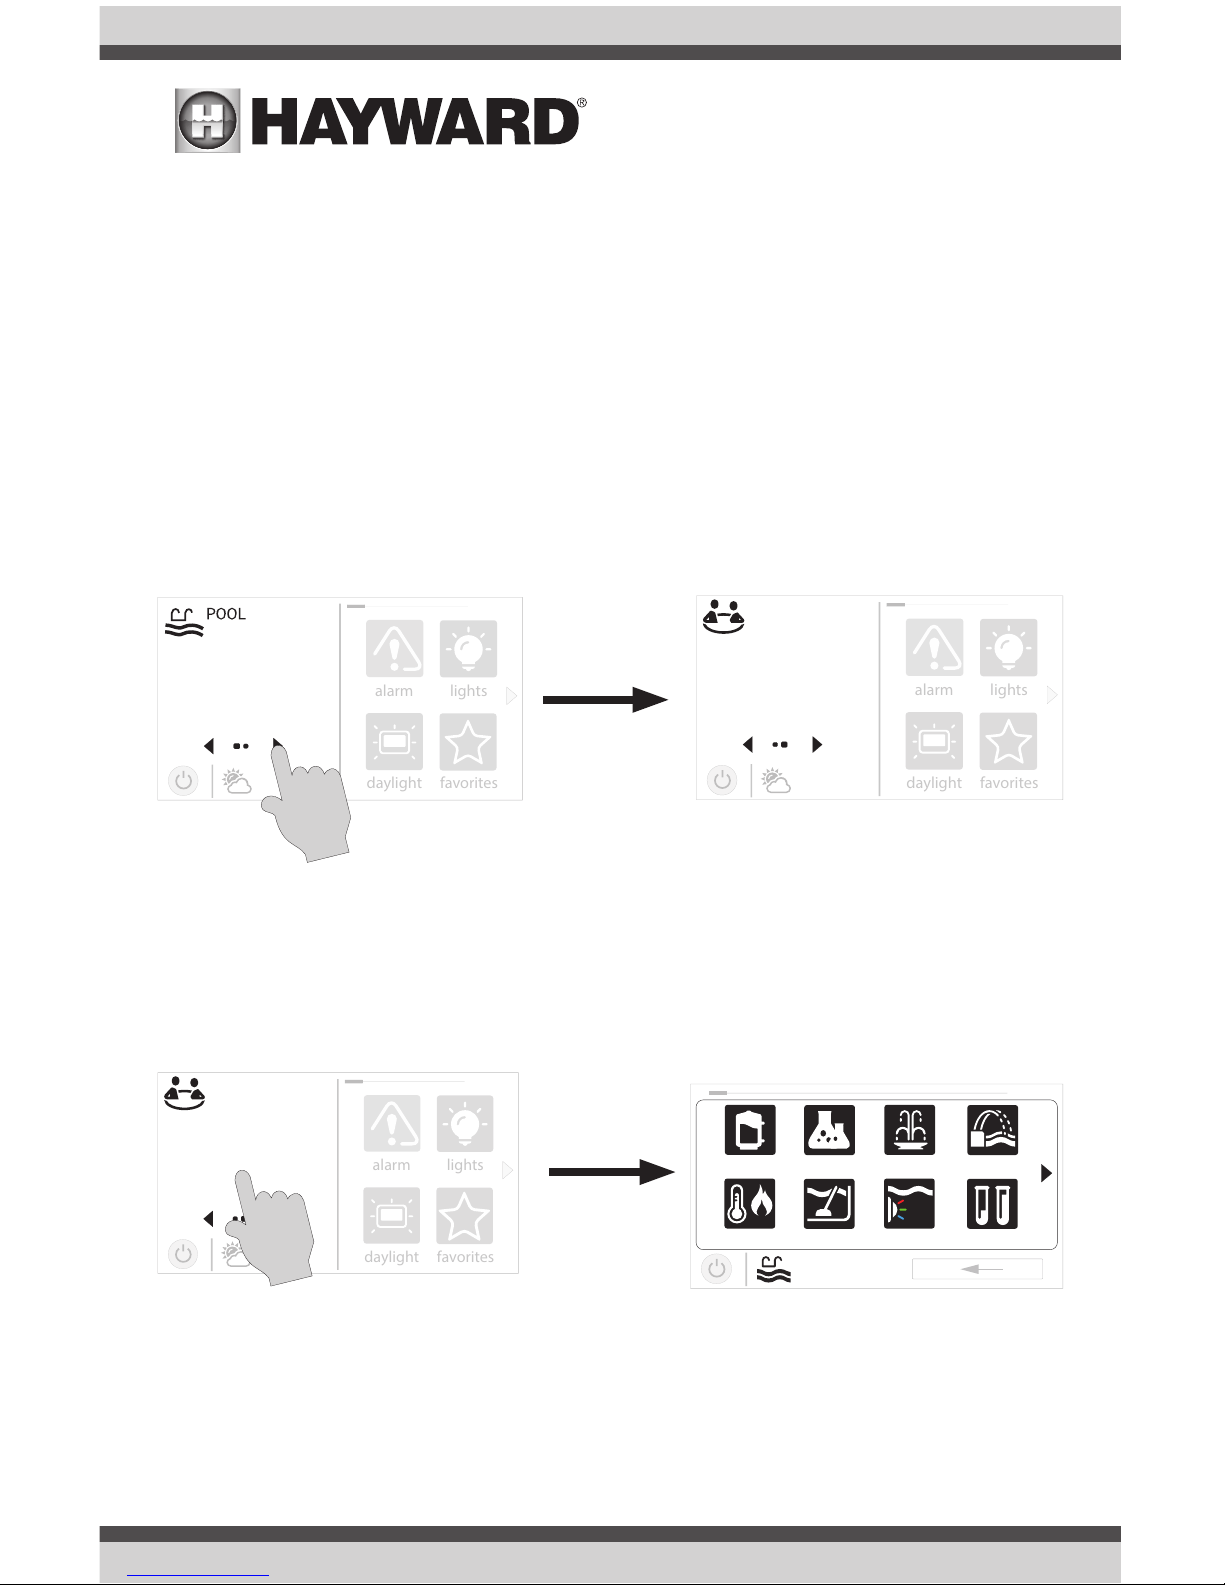
Selecting a Body of Water - Left Side of Home Screen
The left side of the Home Screen allows you to select and control a Body of Water. If more than one
Body of Water is used (typically a pool and a spa), pressing the left and right arrows shown below
toggle between the Bodies of Water. If just a pool is configured, there will be no arrows shown.
Controlling a Body of Water
When the desired Body of Water is displayed, touch the left side of the screen to advance to the Body
of Water Features Screens. The items shown on the Features Screen relate to that Body of Water
ONLY. To control a different Body of Water, select the desired Body of Water at the Home Screen first,
then go to the Features Screens.
daylight
favorites
alarm
lights
º
F
air
71º F
82
Use arrow buttons on left side of screen to change Body of Water.
daylight
favorites
alarm
lights
º
F
air
71º F
SPA
102
daylight
favorites
alarm
lights
º
F
air
71º F
SPA
102
uclights chlorinator
alarm light hung
1 / 2
vsp pH
heater cleaner
POOL
features
When the desired Body of Water is displayed, touch left side of screen
to enter Control Screens.
Page 6
USE ONLY HAYWARD GENUINE REPLACEMENT PARTS
5
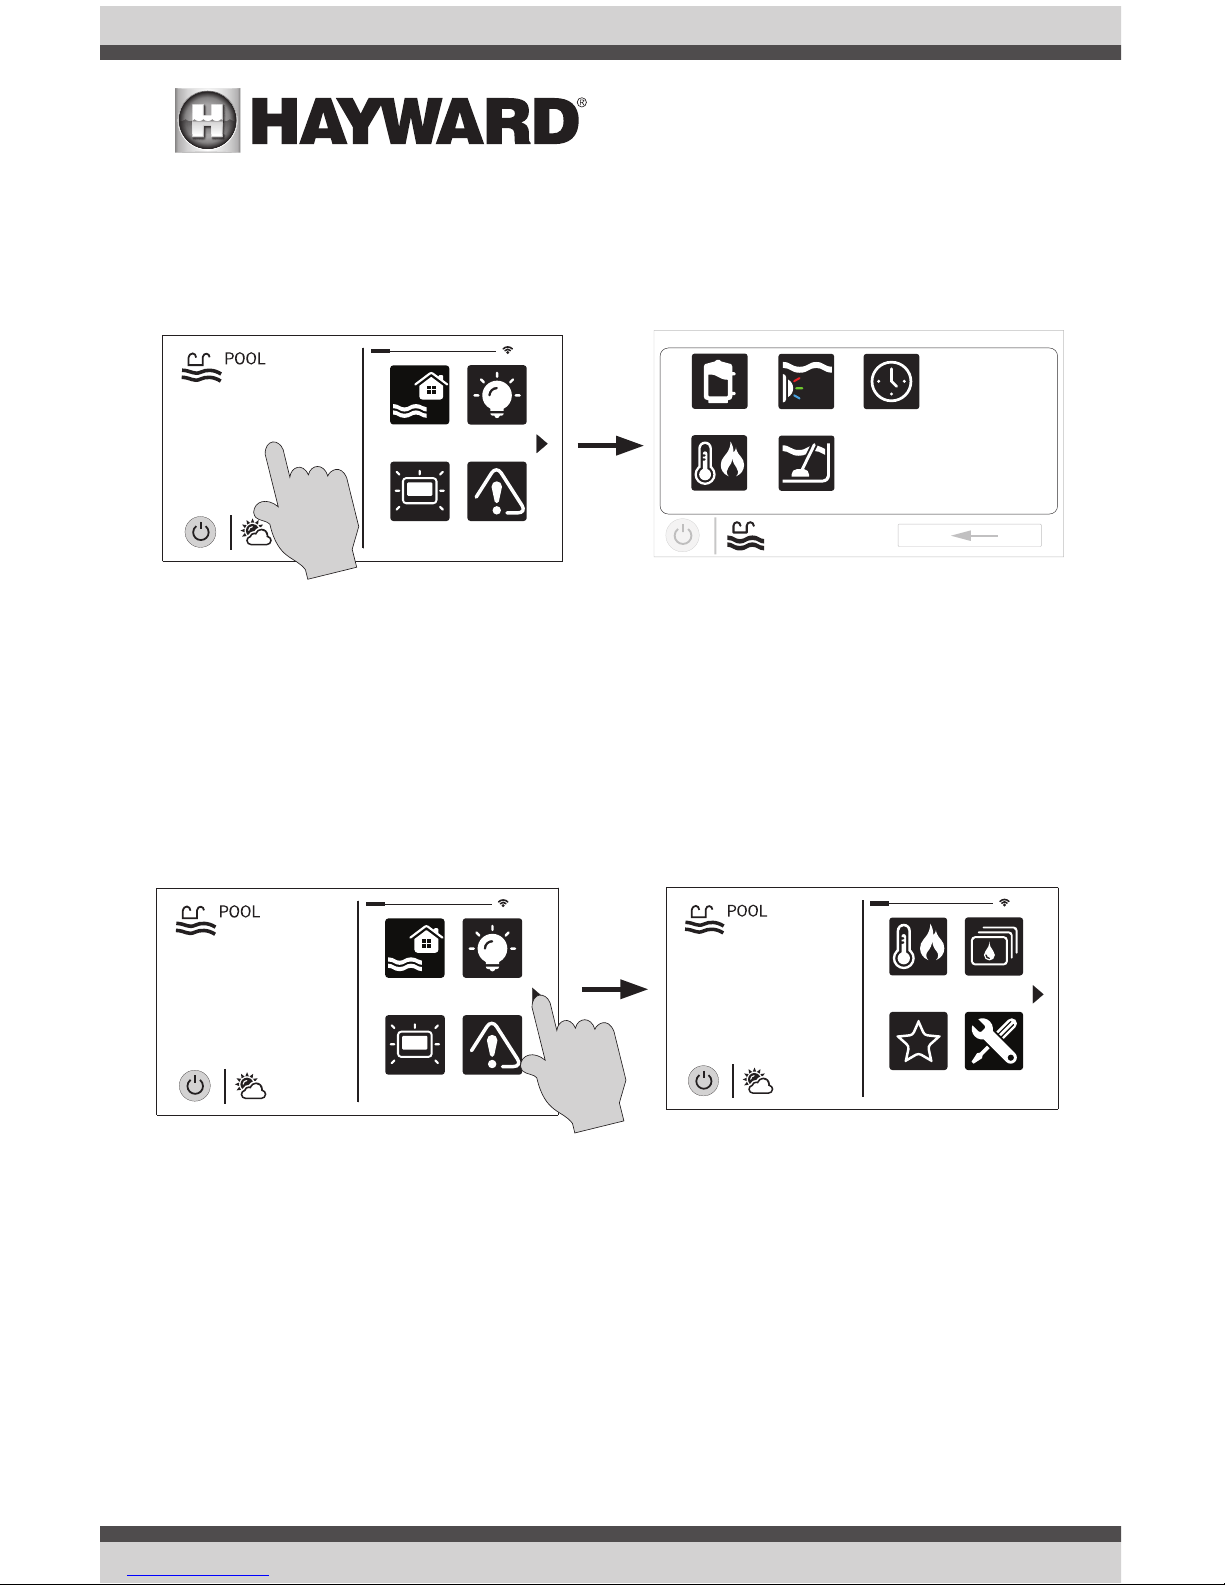
Features (left side of the Home Screen)
After selecting the desired Body of Water (if applicable), touch the left side of the screen to advance
to the Features Screen. The various buttons shown in the Features Screen are related to initial
configuration. For example, if you configured a heat pump to heat the pool, then the heater settings for the heat pump will be displayed.
Favorites - Right Side of Home Screen
The right side of the Home Screen is Favorites. These buttons offer universal control for all Bodies
of Water and Backyard equipment. Up to four Favorite buttons will be shown on the Home screen.
To access more Favorites, touch the arrows on the left or right of the Favorite buttons.
Note that some default buttons will appear on the Favorites Screen. These buttons are related
to your initial configuration settings and are automatically created. In addition, custom “Favorite”
buttons can also be added. The VS Omni supports up to 50 Favorites for quick, easy access to
commonly used functions.
Navigation
The VS Omni has been designed to be intuitive, allowing most users the ability to navigate with
little instruction. Following is a list of commonly used buttons. As you navigate through the various
screens, these buttons will likely be displayed. Some sections of this manual may refer to buttons
that are specific to certain types of pool equipment. You’ll find more information about those buttons under their corresponding section. If your installation does not include that particular equipment, those sections can be skipped.
daylight
features
lights
º
F
air
71º F
82
alarm
uclights
vsp
heater cleaner
POOL
features
schedule
daylight
features
lights
º
F
air
71º F
82
alarm
favorites
heating
themes
º
F
air
71º F
82
cong
Page 7
USE ONLY HAYWARD GENUINE REPLACEMENT PARTS
6
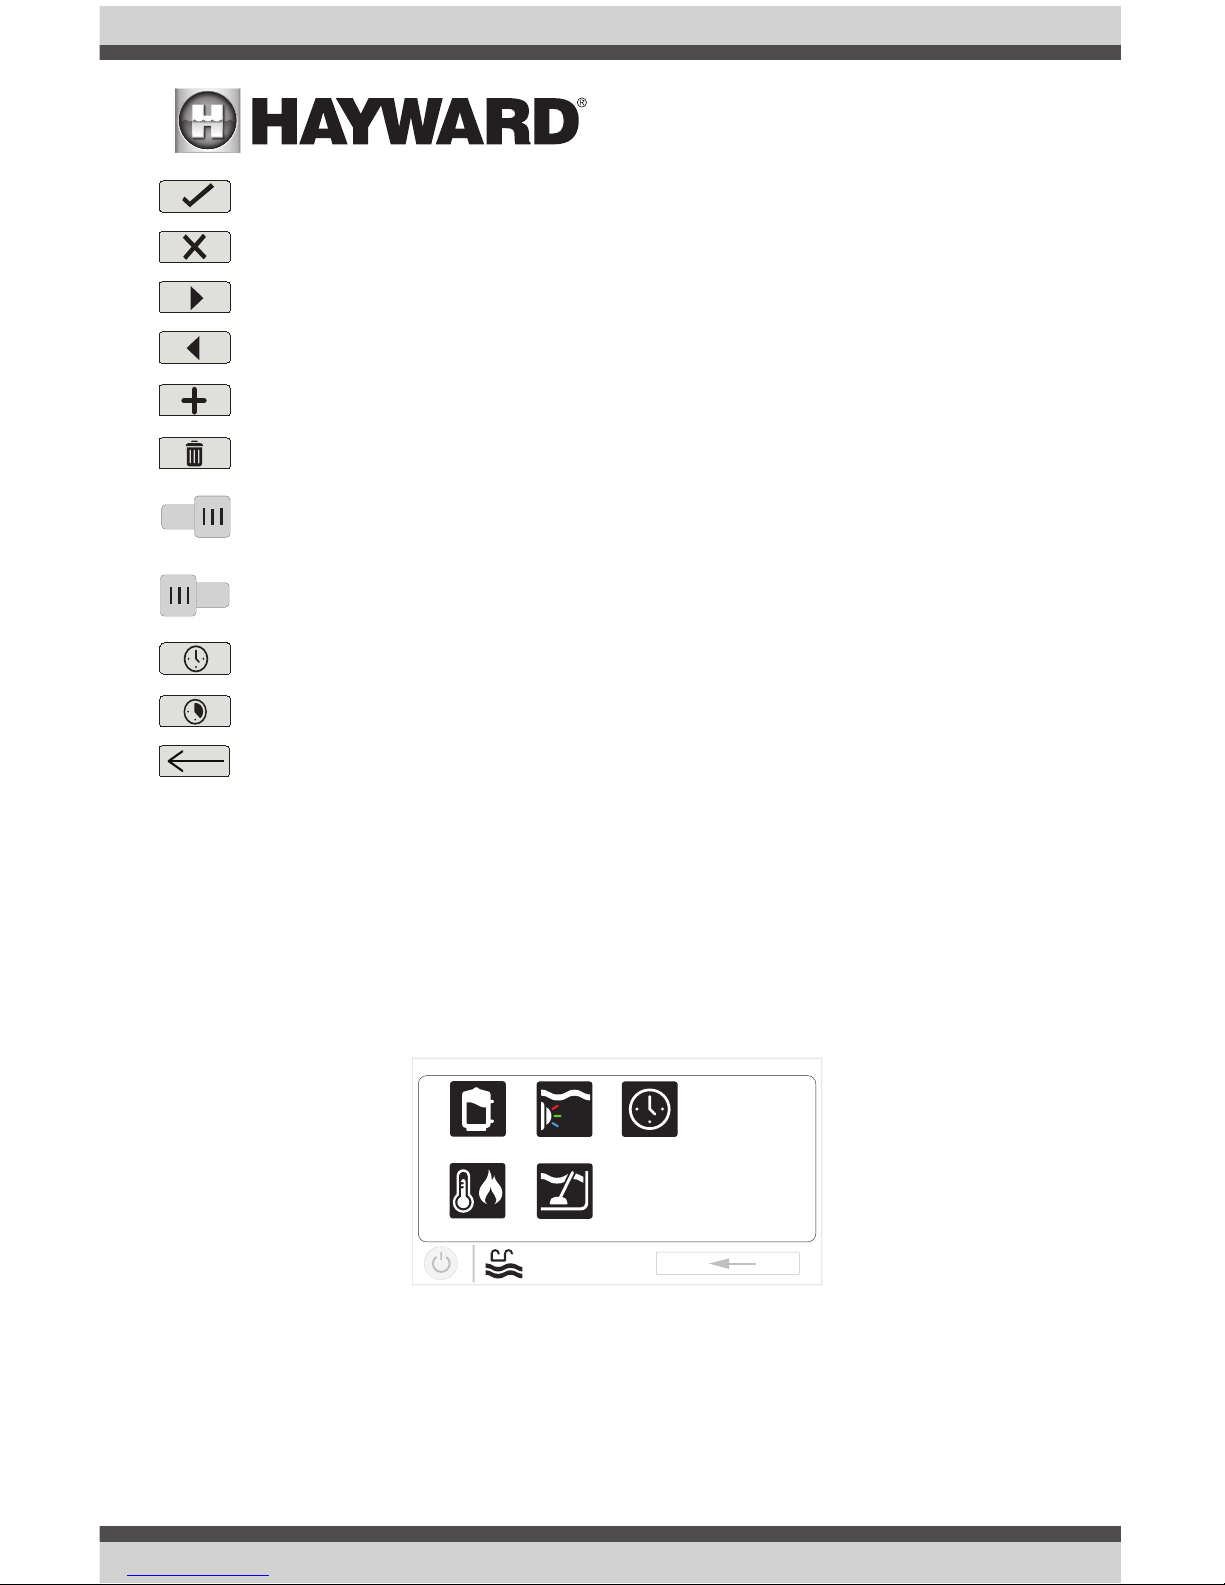
Save - Touch this button to save your selection.
Cancel - Touch this button to cancel your selection.
Advance - Touch this button to advance to the next screen.
Back - Touch this button to return to the previous screen.
Add - Touch this button to add an item.
Delete - Touch this button to delete a highlighted item.
Turn On or Enable - This button will either manually turn on pool equipment or enable a
function.
Turn Off or Disable - This button will either manually turn off pool equipment or disable
a function.
Schedule - Touch this button to schedule a function.
Countdown Timer - Touch this button to set a countdown timer.
Back - Touch this button to return to a previous screen.
Features and Control Screens
As previously stated, the Features Screen allows you to control functions and equipment. The
contents of the Features Screen is a result of how the VS Omni was configured using the Configuration Wizard. If equipment is missing or does not belong in the Features Screen, you may have to
go back to the Configuration Wizard and correct the configuration of that equipment.
An example of a Features Screen is shown below. In this example, we are looking at the Pool
(shown in the lower left of the screen) configured with a pump, a heater, a cleaner, and UCL lights.
Depending on the equipment in your system, your screens will likely be different. The purpose of
this section is to explain how Features and Control Screens work as well as show some common
equipment examples which will help familiarize you with the interface. Even though some of your
equipment may be different, you should see similarities in the following examples that will help you
create and change settings for all the equipment in your Features Screens.
ON
OFF
uclights
vsp
heater cleaner
POOL
features
schedule
Page 8

USE ONLY HAYWARD GENUINE REPLACEMENT PARTS
7
Note that the following examples will be shown for the Pool only. All of the equipment shown in
the Features Screens will have been initially configured in the Configuration Wizard to operate with
a Pool body of water. You may have configured the VS Omni to share equipment with the Spa in
which case the equipment will be shown in the Features Screen for both the Pool and Spa.
Control Screens
After an item has been selected in the Features Screen, you’ll be brought to a control screen.
Control Screens are used to make changes to the pool’s equipment settings. To change a setting,
you’ll first touch the left side of the Home Screen to enter the Features Screen, then select the
equipment you’d like to set.
Filter Pump
In the example below, a variable speed pump which was named “vsp” has been configured to be
used with the Pool in the Configuration Wizard. Touching the “vsp” button in the Features Screen
will bring you to a pump Control Screen which will let you manually turn on/off the pump, view
the status, set a schedule, set a speed, start a countdown timer, or view the pump’s diagnostics.
Single speed and two speed pumps will have a similar Control Screen.
ON
POOL
vsp pump
ON
MED HIGH CUSTOMLOW
Change Speed - Manually
select the desired speed. This
will not be shown for single
speed pumps. Low, Med, and
High are fixed speeds. The
Custom button will bring you
to a screen that allows you to
select a speed based on percentage or RPM (determined
during configuration).
Turn On / Turn Off - Slide
this switch manually to turn
on/off the pump. This will
override any schedules or timer
settings.
Status of Equipment - This is an indicator
only. When lit up and in motion (shown below), the equipment is active. When grayed
out and stationary, the equipment is off.
Set Schedule - Touch
this button to add/delete a
schedule for the filter pump
or to enable/disable an
existing schedule.
Countdown Timer - Touch
this button to set a countdown timer for the filter
pump.
Diagnostics - Touch this
button to view the filter
pump’s diagnostics. This
option only appears for variable speed pumps.
uclights
vsp
heater cleaner
POOL
features
schedule
ON
POOL
vsp pump
ON
MED HIGH CUSTOMLOW
Pool Features Screen Pump Control Screen
Page 9

USE ONLY HAYWARD GENUINE REPLACEMENT PARTS
8
Add a Schedule
If the “Set Schedule” button is touched, you’ll be brought to the pump schedule screen below.
Here you can add, delete, edit, enable, and disable schedules. Because there have been no schedules set up, the screen is blank. Touch the Add button (+) to add a schedule for the pool pump.
Set Schedule Time
Refer to the screen below to set the start and end times. When finished, touch “repeat”.
Set Schedule Frequency
Refer to the screen below to select how often you’d like the schedule to run. If “custom” is
selected, you’ll be asked which day(s) of the week you would like the pump to run. Touch “speed”
when finished.
POOL
vsp pump
Please press + button to add schedule items.
ON/OFF
end 7:00 pm
POOL
vsp pump
start 10:00 am
10
start / end
repeat
speed
am
pm
00
:
end 7:00 pm
POOL
vsp pump
start 10:00 am
10
start / end
repeat
speed
am
pm
00
:
Set Start Time - Select this
button to edit the start time.
The pump will start at the time
shown.
Edit Time - Select the Hours,
Minutes, or AM/PM fields to
change the desired time.
Set End Time - Select this button to edit the
end time. The pump cycle will end at the
time shown.
Set Schedule Frequency Select how often you’d like the
schedule to run (weekdays,
weekends, all week, custom).
Set Pump Speed - Select this
button to change the pump
speed for the schedule. This
option only appears for variable
speed and two speed pumps.
POOL
vsp pump
start / end
repeat
speed
weekdays all weekweekends
custom
Page 10
USE ONLY HAYWARD GENUINE REPLACEMENT PARTS
9
Set Pump Speed
Refer to the screen below to select the pump speed during the schedule. If custom is selected,
you’ll be asked to set the % pump speed or RPM depending on the setting. When finished, touch
the Save button to save the schedule. NOTE: the speed setting only appears if the pump is a variable speed or a two speed pump.
NOTE: if you intend to run the pump at different speeds throughout the day, create additional
schedules. You can start a new schedule on the same minute that the previous one ends. If
schedules overlap, the newest schedule’s start time will take priority by ending the previous schedule early. You can create up to 100 total schedules on the system.
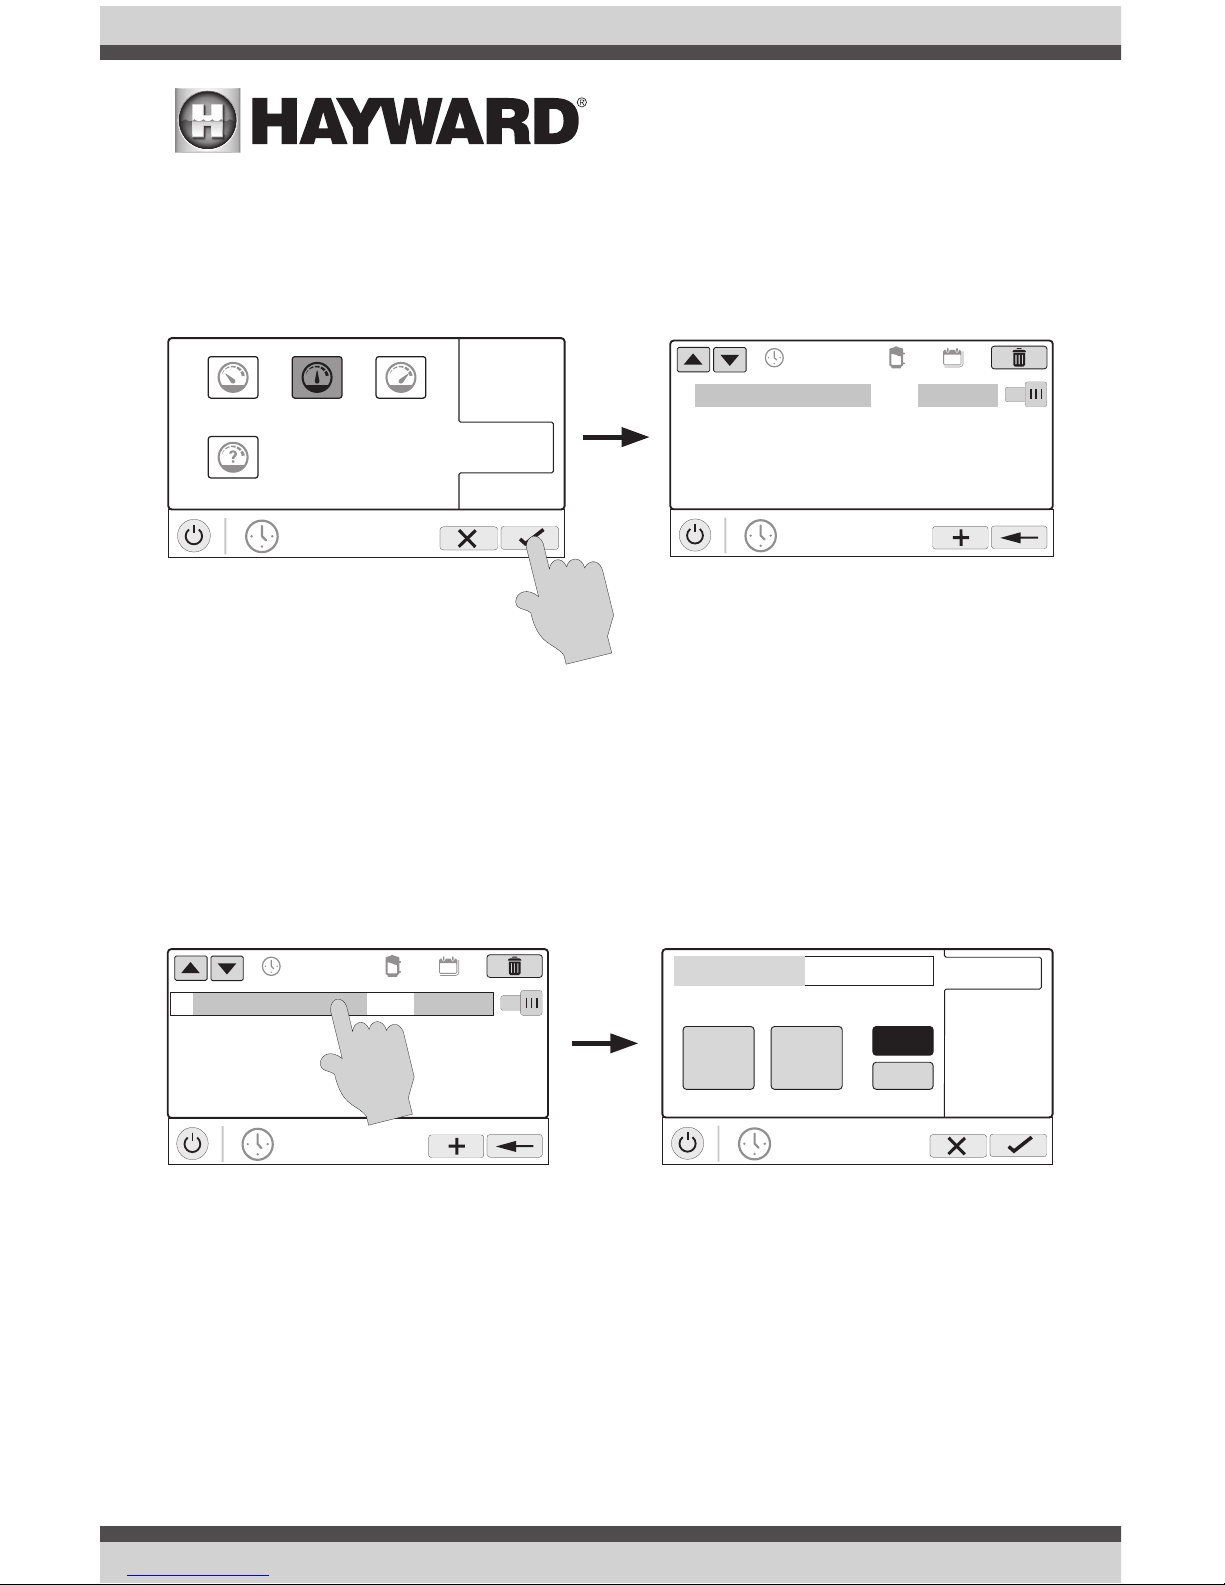
Edit a Schedule
To edit a schedule, touch the schedule as shown below. You’ll be brought back to the screen which
will allow you to set times, speed and frequency.
POOL
vsp pump
start / end
repeat
speed
low highmed
custom
POOL
vsp pump
01
10:00 am / 7:00 pm
med
all week
ON
POOL
vsp pump
01
10:00 am / 7:00 pm
med
all week
ON
end 7:00 pm
POOL
vsp pump
start 10:00 am
10
start / end
repeat
speed
am
pm
00
:
Page 11
USE ONLY HAYWARD GENUINE REPLACEMENT PARTS
10
Turning a Schedule Off
There may be circumstances when you will want to turn off a schedule temporarily. To do this,
slide the On/Off button to “Off”. The schedule will remain off until you go back to this screen and
turn it off.
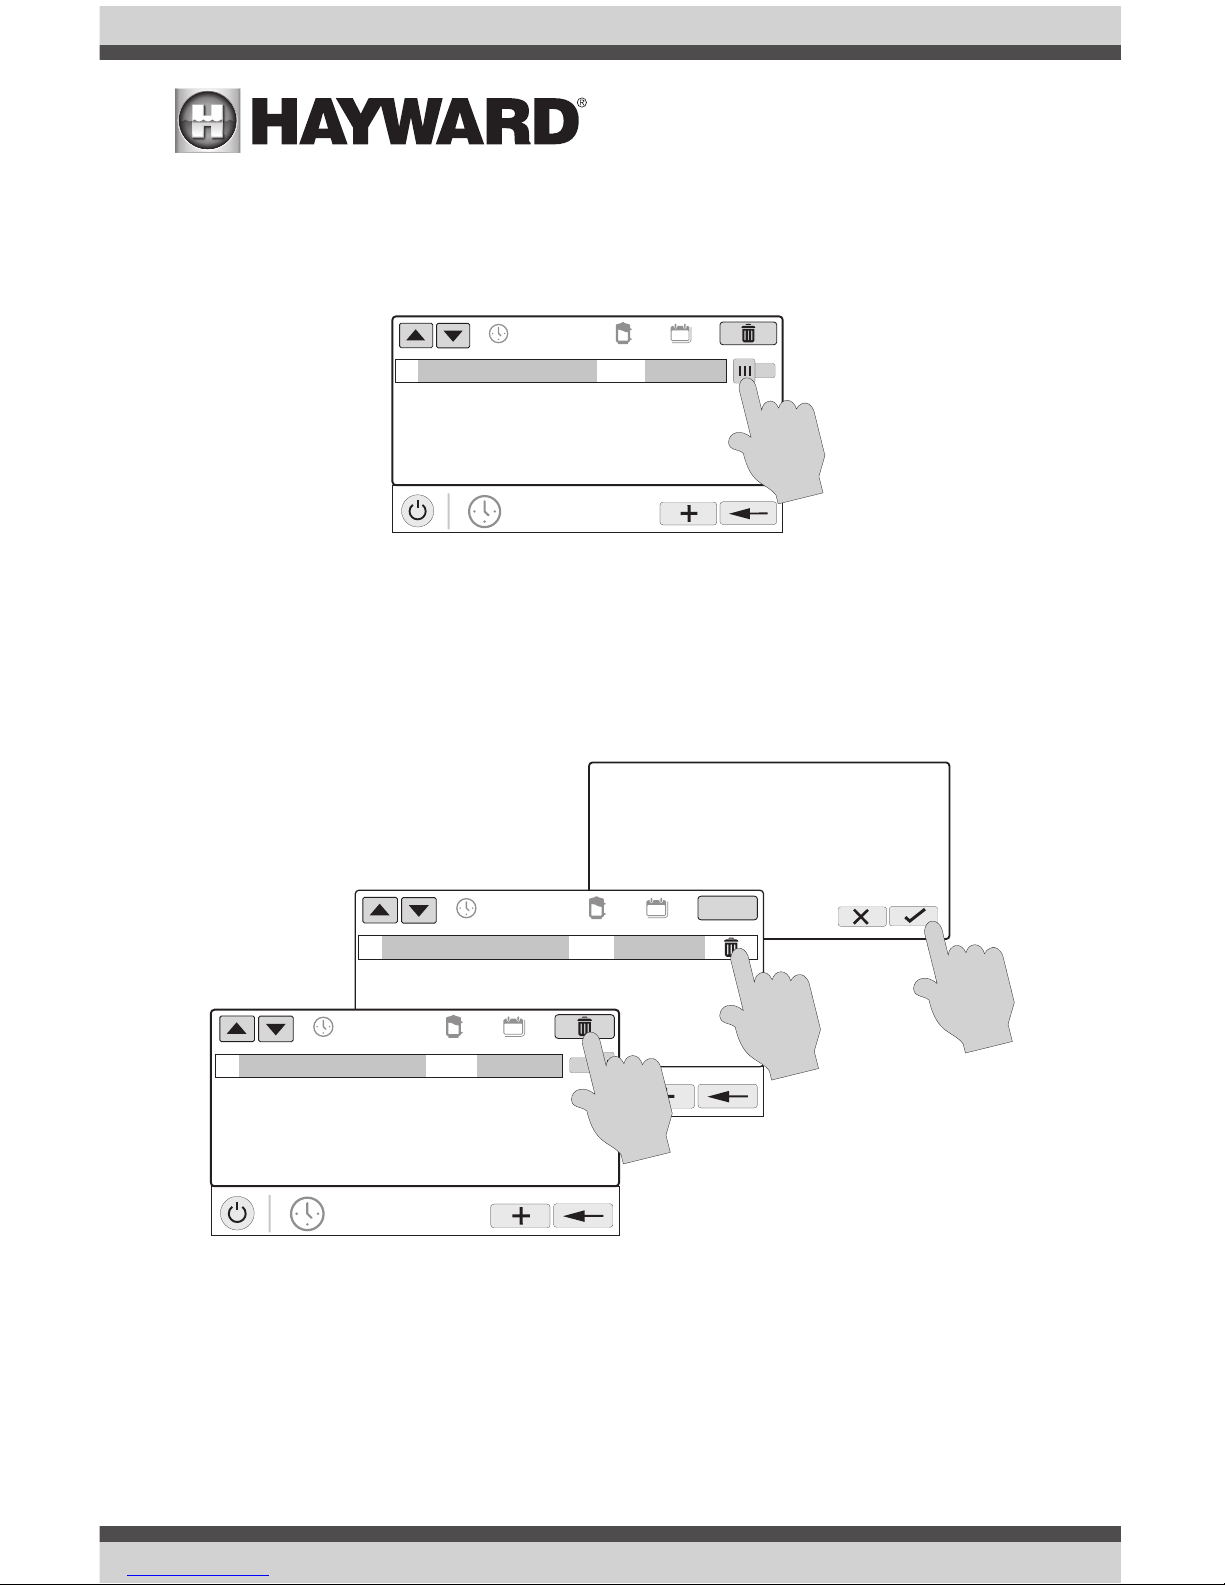
Deleting a Schedule
Schedules can be deleted when they are no longer necessary. To delete a schedule, select the
schedule and touch Delete as shown below. A Delete button should appear on the side of the
schedule. Touch this Delete button to remove the schedule.
POOL
vsp pump
01
10:00 am / 7:00 pm
med
all week
OFF
Are you sure you want to delete
the schedule?
POOL
vsp pump
ON/OFF
01
10:00 am / 7:00 pm
med
all week
POOL
vsp pump
01
10:00 am / 7:00 pm
med
all week
ON
Page 12

USE ONLY HAYWARD GENUINE REPLACEMENT PARTS
11
Countdown Timer
A countdown timer runs or enables equipment for the amount of time specified. You can initiate
the countdown timer at the equipment’s control screen. At the countdown screen, set the desired
countdown time. In this case, the timer will run the pump for the specified countdown time. If
the equipment is already running due to a schedule, the countdown timer setting will override the
schedule and turn off at the end of the countdown interval. If the equipment is off, the countdown
timer will turn it on for the duration/speed that has been set.
Heater
The VS Omni has one output for a gas heater or heat pump. It can also provide solar heating using
the actuator output to divert water through installed solar equipment. Touching the Heater button
in the Features Screen will let you enable or disable the heater, set priority, set temperature, set
a schedule and view the status of the heater. An example of the heater Control Screen is shown
below:
uclights
vsp
heater cleaner
POOL
features
schedule
ON
set temperature
65 F
POOL
heater
85 F
actual
POOL
vsp pump
time
speed
low highmed
custom
POOL
vsp pump
time
speed
0000
:
hours minutes
countdown duration
ON
POOL
vsp pump
ON
MED HIGH CUSTOMLOW
Page 13

USE ONLY HAYWARD GENUINE REPLACEMENT PARTS
12
Setting and Changing Priority if using Solar Heating
If a solar heater is added, the Set Priority button will appear in the Heater Control Screen. If the
priority heater cannot meet the demand for heat, the next heater will be allowed to operate. Use
priorities to maximize efficiency by allowing the most cost effective heater to run first.
The example on the following page shows how to change priority to run the solar heater first, then,
if it can’t meet the demand for heat, the heat pump will be allowed to operate. Note that the time
interval used for heater priority can only be changed in the Configuration Wizard. A time interval
setting of “0” will eliminate priority and always run both heaters at the same time.
ON
set temperature
65 F
POOL
heater
85 F
actual
Set Schedule -
Touch this button to
set a schedule for
the heater.
Set Priority - If
Solar heating is
used in addition
to a conventional
heater, use this
button to set priority and enable/
disable heaters.
Save Setting - the
settings is not saved
until this button is
pushed.
Status of Equipment - When
grayed out and stationary, equipment is currently idle. When in
motion, the heater is actively
heating.
Enable / Disable -
Slide this switch to
enable and disable
the heater. The
setting will not take
effect until the Save
button is touched.
To turn on the
heater, adjust the
setpoint higher than
the actual water
temperature and
then save.
Change Setting - This slider
will raise and lower the heater
setpoint setting.
Page 14

USE ONLY HAYWARD GENUINE REPLACEMENT PARTS
13
ColorLogic Lights
2
POOL
heater
Select Source
Prioritize
1
1
POOL
heater
Select Source
Prioritize
2
solar
POOL
heater
Select Source
Prioritize
heat pump
solar
POOL
heater
Select Source
Prioritize
heat pump
ON
set temperature
65 F
POOL
heater
85 F
actual
Enable and Disable Heaters - When
“Select Source” is highlighted, touching a heater button will enable and
disable that heater. A grayed out
heater is disabled.
uclights
vsp
heater cleaner
POOL
features
schedule
ON
UCL
color shows
1 / 2
Mardi Gras
USA
VoodooLoungeTranquility
Twilight Gemstone
Page 15

USE ONLY HAYWARD GENUINE REPLACEMENT PARTS
14
You can set schedules for the ColorLogic lights as well as countdown timers. This procedure has
been previously shown. Note that after the countdown interval, the lights will go off regardless of
their previous state.
Light Show/Color - From the ColorLogic Control Screen, select the desired show or color. Use the
Advance button to show all of the available selections. Use the Light Show/Color button to switch
between all light shows and all solid colors.
Synchronize - Because changing colors and shows requires interrupting power to the ColorLogic
lights, there is a chance that the lights could lose synchronization due to timing issues. If you find
that the color or show does not correspond with the selection that you’ve made, the lights may be
out of sync. Touch the Synchronize button to re-sync the ColorLogic lights.
Other Lights
You can turn other lights on/off, set schedules, and set a countdown timer at the Other Lights
Control Screen shown below. These functions have been illustrated previously in this manual.
ON
UCL
color shows
1 / 2
Mardi Gras
USA
VoodooLoungeTranquility
Twilight Gemstone
Turn on / Turn off - Slide this switch to
manually turn on/off the ColorLogic lights.
This will override schedules or timer settings.
Set Schedule -
Touch this button
to set a schedule
for the ColorLogic
Lights.
Countdown Timer -
Touch this button to
set a countdown timer
for the lights.
Light Show/Color -
This button will change
the selection between
light shows and solid
colors.
Synchronize - Touch this button to synchronize the ColorLogic lights. The lights
will then default to Voodoo Lounge.
Selections - Select
the desired light show
or solid color.
uclights
vsp
heater deck lights
POOL
features
schedule
ON
POOL
deck lights
ON
Page 16

USE ONLY HAYWARD GENUINE REPLACEMENT PARTS
15
Cleaners
You can turn the cleaner on/off, set schedules, and set countdown timers at the Cleaner Control
Screen shown below. You can also set pump speed if a two speed or variable speed pump has
been configured to be used with the cleaner.
Water Features
You can turn the water feature on/off, set schedules, and set countdown timers at the Water Features Control Screen shown below. You can also set pump speed if a two speed or variable speed
pump has been configured to be used with the water feature.
Accessories
You can turn the accessories on/off, set schedules, and set countdown timers at the Accessories
Control Screen shown below. You can also set pump speed if a two speed or variable speed pump
has been configured to be used with the accessory.
uclights
vsp
heater jets
POOL
features
schedule
ON
POOL
jets
ON
uclights
vsp
heater cleaner
POOL
features
schedule
ON
POOL
cleaner
ON
uclightsvsp
heater fountain
POOL
features
schedule
ON
POOL
fountain
ON
Page 17

USE ONLY HAYWARD GENUINE REPLACEMENT PARTS
16
Schedule
The Schedule button appears on the Features Screen regardless of what equipment has been
configured in the Configuration Wizard. It offers a convenient way to create and edit schedules.
Any equipment that has been configured and has an option for schedules, will be shown in the
Schedule Control Screen. Equipment that has been assigned a schedule will show a clock symbol
in the upper right side of the button. Touching any of these buttons will bring you to the schedule
screen for that equipment. Create and edit schedules as shown on page 8.
Spillover
If spillover is configured, you can turn spillover on/off, set schedules, and set a countdown timer at
the Spillover Control Screen. These functions have been illustrated previously in this manual.
Freeze Protect Override
If freeze protect is enabled AND the air temperature falls below the freeze threshold, the VS Omni
will turn on the filter pump to circulate the water. Freeze protection can be overridden for 60 minutes by touching the Freeze Prot. button found on the Features Screen. IMPORTANT: Ensure that
equipment is protected from a freeze condition before overriding this feature. To resume normal
freeze protection, simply touch the Freeze Prot. button again.
uclights
vsp
heater cleaner
POOL
features
schedule
POOL
schedule
vsp
uclights
heater cleaner
uclights
vsp
heater cleaner
POOL
features
schedule
Overriding Freeze Protect could cause
damage to your system. Are you sure?
60 min
120 min 180 min
ON
POOL
vsp pump
ON
MED HIGH CUSTOMLOW
POOL
features
2 / 2
music schedule
spillover
Page 18

USE ONLY HAYWARD GENUINE REPLACEMENT PARTS
17
Favorites
Favorites can be found on the right side of the Home Screen and offer control for equipment. Favorites are also used to control equipment that has been configured for the “Backyard”. Favorites
offer quick easy access to frequently used functions and most Favorites can be added to Simple
Mode (page 30).
The VS Omni will automatically create some Favorites based on your system’s configuration. You
can also create your own Favorites. Once Favorites have been created, you can change the location in which they appear on the Home Screen. In addition, if you no longer require a Favorite, it
can be deleted. The VS Omni supports up to a total of 50 Favorites.
In most cases, touching a Favorite button on the Home Screen will bring you to the same screens
that have been covered in the Control Screens section of this manual. Refer to these screens if
necessary.
Alarms
ALARM
alarm list
Alarm
No Water Flow FlowSensor
AUTO
daylight
features
lights
º
F
air
71º F
82
alarm
An alarm condition will change the mood color of the entire touchscreen (if enabled)
and display an “!” symbol in the upper right side of the associated button as shown
below.
For more detail, use the Alarm button found in Favorites. Alarms are automatically
generated when the VS Omni detects a condition outside of the normal operating
parameters. The Alarm button found in Favorites will bring you to a screen that displays any active
alarms (shown below). Some alarms can be manually deleted; others will remain until the alarm
condition is corrected.
Daylight
Daylight is another button that will appear in Favorites by default. This button is used to change
the screen contrast for better viewing in bright sunshine. Touching this button will toggle Daylight
viewing on and off.
Features/Lights/Heaters/Backyard
These four buttons function similarly. If any water feature, light, heater, or backyard accessory has
been configured in the Configuration Wizard, a Features, Lights, Heaters, and/or Backyard button
will appear in Favorites. These buttons give you quick access to the control screens for all related
pool equipment. These are the same control screens that you’ve used in the Pool Features and
Control Screens section of this manual.
Page 19

USE ONLY HAYWARD GENUINE REPLACEMENT PARTS
18
Edit Features/Lights/Heaters
When a feature, light, or backyard accessory is selected, you’ll advance to the related Control
Screen.
Favorites Screen
All of the buttons on the right side of the Home Screen are referred to as “Favorites” but there is
also a Favorites button. Using this button, you can create and manage all of your favorites.
ON
POOL
jets
ON
FEATURES
select
jets
FEATURES
all bodies pool
select
daylight
features
lights
º
F
air
71º F
82
alarm
favorites
heating
themes
º
F
air
71º F
82
cong
MANAGE
favorites
deck lights
vsp jets
S
S
SS
Page 20

USE ONLY HAYWARD GENUINE REPLACEMENT PARTS
19
Creating Favorites
Follow the procedure below for adding Favorites. This example shows how to create a Favorite for
a heater. To find “heater” in our Add Favorites screen, we have to select “Pool” when prompted.
The next screen will show all equipment configured for the Pool; in this case, just heater. Selecting
heater and saving will add the heater to the Favorites screen. We can now move the heater button
if desired.
Add to Simple Mode - Touch this
button to add a favorite to Simple
Mode.
MANAGE
favorites
deck lights
vsp jets
S
S
SS
Add Favorite - Touch this
button to add a favorite.
Current Favorites -
These are favorites
that have already
been added. You can
change the location of
where they appear on
the Home Screen.
MANAGE
favorites
deck lights
vsp jets
S
heater
MANAGE
favorites
heater
MANAGE
favorites
pool backyard
MANAGE
favorites
deck lights
vsp jets
S
Page 21

USE ONLY HAYWARD GENUINE REPLACEMENT PARTS
20
Moving Favorites
Favorites will be displayed on the Home Screen in the order that they are shown on the Favorites
Screen, from left to right. The default Favorites cannot be moved. To move Favorites, follow the
procedure below.
Deleting Favorites
To delete Favorites, follow the procedure below. Default Favorites cannot be deleted.
MANAGE
favorites
deck lights
vsp jets
S
heater
MANAGE
favorites
deck lights
vsp jets
S
heater
MANAGE
favorites
deck lights
vsp jets
S
heater
MANAGE
favorites
deck lights
vsp jets
S
heater
MANAGE
favorites
deck lights
vsp jets
S
MANAGE
favorites
MANAGE
favorites
uclights chlorinator
heater
music
Are you sure you want to delete
this favorite?
MANAGE
favorites
deck lights
vsp jets
S
heater
MANAGE
favorites
deck lights
vsp jets
S
heater
Page 22

USE ONLY HAYWARD GENUINE REPLACEMENT PARTS
21
Adding Favorites to Simple Mode
For more information on Simple Mode, refer to page 30. Note that most Favorites can be added
to Simple Mode but not all. Follow the procedure below. Note: If the Favorite has been added
to Simple Mode, moving the button location on the Favorites screen will affect its position on the
Simple Mode screen.
Deleting Favorites from Simple Mode
Deleting Favorites from Simple Mode is similar to adding Favorites to Simple Mode.
MANAGE
favorites
deck lights
vsp jets
S
heater
S
MANAGE
favorites
deck lights
vsp jets
S
heater
S
MANAGE
favorites
deck lights
vsp jets
S
heater
MANAGE
favorites
deck lights
vsp jets
S
heater
Indicates that item has been
added to Simple Mode.
MANAGE
favorites
deck lights
vsp jets
S
heater
MANAGE
favorites
deck lights
vsp jets
S
heater
MANAGE
favorites
deck lights
vsp jets
S
heater
S
S
Page 23

USE ONLY HAYWARD GENUINE REPLACEMENT PARTS
22
Themes
Themes allow you to execute many pool functions with just one button. This can be handy for
functions that require interaction with various pool equipment. For example, spending an evening
in the spa might require you to turn on the spa jets, set the heater to 104ºF, and turn on the spa
lighting. Rather than manually performing these functions, they can be saved as a Theme and executed with just one button. To create a Theme, put all of the equipment into the desired state. In
the example above, you would set all the equipment as described. When creating Themes, the VS
Omni takes a “snapshot” of the system state/settings. This snapshot is saved as a Theme. Refer
to the following diagrams and information for creating and running Themes.
Create a Theme
To create a Theme, put all of the equipment into the desired state and refer to the diagram on the
top of the next page.
favorites
heating
themes
º
F
air
71º F
82
cong
MANAGE
themes
OFF
pool party
MANAGE
themes
OFF
pool party
Edit Theme - After selecting
a Theme, touch this button
to edit the Theme. You can
rename, change icon and set
as favorite.
Start Theme - After selecting a Theme, touch this
button to start the Theme.
End Theme - After selecting a Theme,
touch this button to end the Theme.
Create a Theme - Touch
this button to create a
Theme. Before creating,
make sure all pool/spa/
backyard equipment is in
the desired state.
Select Theme - Touch
this button to select
the desired Theme. You
can now turn it on/off,
edit, set a schedule, set
a countdown timer, or
delete the selection using
the buttons above.
Page 24

USE ONLY HAYWARD GENUINE REPLACEMENT PARTS
23
Starting a Theme
If a Favorite was created for the Theme, run the Theme just as you would any other Favorite. To
start a Theme within the “Manage Themes” screen, follow the procedure below. Note that only one
Theme can run at a time.
MANAGE
themes
OFF
pool party
MANAGE
themes
OFF
pool party
favorites
heating
themes
º
F
air
71º F
82
cong
SETTING
theme
name
icon
favorite yes
pool party
Please ensure all the equipment for
this theme is currently ON.
MANAGE
themes
OFF
Name the Theme - Touching this button
will bring you to a keyboard where you can
enter a name for the theme. Saving the
name will bring you back to this screen.
Select an Icon - Touching this button will bring
you to an icon selection screen. Touch the advance
button to access more icons. Selecting and saving
the icon will bring you back to this screen.
Add the Theme to Favorites - Touching this
button will toggle the selection from Yes to
No. Select whether you want the new Theme
to be added to Favorites. If so, a new button
will be generated and added to Favorites.
You’ll be able to turn the Theme on/off with
the new Favorite button.
Page 25

USE ONLY HAYWARD GENUINE REPLACEMENT PARTS
24
Stopping a Theme
If a Favorite was created for the Theme, stop the Theme just as you would any other Favorite. To
stop a Theme within the “Manage Themes” screen, follow the procedure below. Note that when
stopping a Theme, all functions will turn off and the filter pump will return to any schedules that
have been previously set.
Config
The Config button offers many options related to the configuration and operation of the VS Omni.
You can view log files, backup configuration settings, restore configuration settings, modify display
settings and more.
Using a USB Thumb Drive
Some options require the use of a USB thumb drive (removable media) that will be inserted in the
VS Omni. If logging is desired (page 26), the thumb drive should be left in the VS Omni during
normal operation. This connection is not waterproof so care must be taken to protect the Control
MANAGE
themes
OFF
pool party
MANAGE
themes
OFF
pool party
favorites
heating
themes
º
F
air
71º F
82
cong
favorites
heating
themes
º
F
air
71º F
82
cong
SYSTEM
conguration
1 / 2
cong wizard
system info
backup cong
restore cong
display
network
date/time
language
Page 26

USE ONLY HAYWARD GENUINE REPLACEMENT PARTS
25
Pad while logging. The location of the USB port is shown in the Installation Manual.
Config Wizard
The Configuration Wizard is used to add, remove, and configure pool equipment that is controlled
by the VS Omni. Configuration should have already been completed at installation and should not
be necessary unless a change has been made to the system. If a new configuration is saved, it will
overwrite the old configuration and may require you to change previous equipment settings.
If pool equipment is added or removed from your system you may edit the existing Configuration.
Quick Edit allows you to go directly to the equipment that you’d like to add/remove/configure.
Refer to the Quick Edit Guide section in the Installation manual for more information.
System Info
System Info will show the Hayward Unique Address (HUA) and version for all smart components
(components that communicate with the VS Omni). This may be needed by Hayward Technical
Service when troubleshooting or diagnosing system issues.
This screen will also display the MSP ID, which is used as a password for entering the Configuration Wizard as well as entering Simple Mode.
Backup Config
You can back up your configuration settings, schedules, setpoints, etc. to the VS Omni’s internal
memory or to a USB thumb drive.
Restore Config
You can overwrite the existing configuration with a backup that is stored internally or on a USB
thumb drive. After selecting Restore Config, the following options will appear:
Restore Last - this is the last backup that was saved to internal memory.
Restore Prev - this is the second to last backup that was saved to internal memory.
[DATE] - this is the oldest backup that was saved to internal memory. The date will be shown on
the selection.
Restore from USB - you can browse the USB drive and find available backups. Backup files
will begin with “MSPCONFIGxxyyzz” where xx=month, yy=day, and zz=year (the date the file was
created). The VS Omni will automatically create a backup file when a new configuration is saved.
These files end with “.xml”. Backup files that are created manually end with “.bak”. Both types
can be restored.
To restore a backup, make your selection from above and then touch Save.
Page 27

USE ONLY HAYWARD GENUINE REPLACEMENT PARTS
26
Display
The Display Settings screen offers options to customize the way the VS Omni displays information.
Network
You can view the VS Omni ip address at this screen. This is the address that the router will use to
connect the VS Omni to the home network. You can also turn the connection to the router on and
off using the On/Off toggle.
Date/Time
Set the date and time on this screen.
Language
Select a language. If a desired language is not shown, it may be available from Hayward through
their website at www.hayward.com/firmware. Refer to page 29 for information on installing new
languages.
Data Log (requires a thumb drive, page 24)
Use this feature if instructed by Hayward Technical Service. The data log shows a log of daily
operations and can help Hayward Technical Service diagnose or troubleshoot problems. The data
log options are:
Clear Log File - this will delete all data in the log file.
Show Log File - this will display the log file.
SYSTEM
conguration
1 / 2
cong wizard
system info
backup cong
restore cong
display
network
date/time
language
DISPLAY
settings
100%
12h
F
º
vs%
DISPLAY
settings
100%
12h
F
º
vs%
12/24 hour format - Toggles between
12 hour and 24 hour time display.
Audio - Toggles between audio on and
off.
oF/o
C - Toggles
between oF and oC.
VSP Speed Display - Display VSP
pump speed in %
or RPM.
Display Settings
- Set display idle
duration and default
on settings.
Display Brightness -
Set display brightness.
Page 28

USE ONLY HAYWARD GENUINE REPLACEMENT PARTS
27
Restore Defaults - this will return the data log settings to the factory default.
Set Level - you can change the amount of detail that is shown in the log file with this button.
You can also enable or disable data logging using the On/Off toggle.
Upgrade
Additional functions, features, and languages may be available for your VS Omni.
Determine if Firmware Upgrade is Available
The VS Omni’s firmware is the basic operating system that runs the unit. The VS Omni was
shipped with the version of firmware that was available at the time of release. There may be a
newer version available and if so, we encourage you to upgrade. Also, if you have experienced
problems, Hayward Technical Service may advise you to upgrade you VS Omni firmware. If this is
the case, follow the instructions on the following page.
1. Determine your current MSP firmware version.
2. Using an ordinary web browser, go to www.hayward.com/firmware and compare the latest
available version on the web to the current firmware version. If the firmware version on the
web is greater (number is larger) than your current version, upgrade your VS Omni. If not,
periodically check the website and upgrade as newer firmware is released.
favorites
heating
themes
º
F
air
71º F
82
cong
SYSTEM
conguration
1 / 2
cong wizard
system info
backup cong
restore cong
display
network
date/time
language
SYSTEM INFO
msp id: 31721
component HUA version
MSP
Variable Speed...
Variable Speed...
Smart Relay
Smart Relay
00-01-02-03-04
10-01-10-59-9c
10-01-10-00-01
90-31-03-42-41
90-31-03-42-3b
X.26.22.1-b0
R0.2.15
R0.2.10
X1.0.9
X1.0.9
Current Firmware Version
MSP ID Number
Page 29

USE ONLY HAYWARD GENUINE REPLACEMENT PARTS
28
Upgrading Firmware (must be in Service Mode, page 3)
1. Insert your USB thumb drive into your computer.
2. Go to www.hayward.com/firmware.
3. Click on the link to download the latest firmware and save to the USB thumb drive.
4. Remove the USB thumb drive from the computer.
5. Locate the port on the underside of the VS Omni Control Pad and insert the thumb drive.
6. Apply power to the VS Omni (if not already powered) and allow the VS Omni to fully start.
7. Enter Service Mode (page 3)
8. Touch the Upgrade button
9. Select “MSP” and touch the Save button.
SERVICE MODE
main screen
daylight
sysinfo
upgrade
cong
factory reset remove DDT
alarm
calibrate
select device
component HUA current version
MSP 05--- R1.3.0
Smart Relay 90-31-03-42-35 X1.0.12
COMPONENT
selection
Smart IO Board a0-41-03-41-28 X1.0.6
select device
component HUA current version
MSP 05--- R.1.3.0
COMPONENT
selection
Smart Relay 90-31-03-42-35 X1.0.12
Smart IO Board a0-41-03-41-28 X1.0.6
select device
component HUA current version
MSP 05--- R.1.3.0
COMPONENT
selection
Smart Relay 90-31-03-42-35 X1.0.12
Smart IO Board a0-41-03-41-28 X1.0.6
select le
USB/
MSP_AR_BO140017
FILE
selection
...\
select le
USB/
MSP_AR_BO140017
FILE
selection
...\
10. The VS Omni will now look at your USB thumb drive. Select the firmware
file that was saved from the website and then touch the Save button.
Page 30

USE ONLY HAYWARD GENUINE REPLACEMENT PARTS
29
SERVICE MODE
main screen
daylight
sysinfo
upgrade
cong
factory reset remove DDT
alarm
calibrate
select device
component HUA current version
MSP 05--- R1.3.0
Smart Relay 90-31-03-42-35 X1.0.12
COMPONENT
selection
Smart IO Board a0-41-03-41-28 X1.0.6
ready to upgrade
component rmware le
MSP MSP_AR_BO140017
UPGRADE
rmware
0%
success ready to restart
component rmware le
MSP MSP_AR_BO140017
UPGRADE
rmware
100%
select device
component HUA current version
MSP 05--- R.1.3.0
COMPONENT
selection
Smart Relay 90-31-03-42-35 X1.0.12
Smart IO Board a0-41-03-41-28 X1.0.6
select device
component HUA current version
MSP 05--- R.1.3.0
COMPONENT
selection
Smart Relay 90-31-03-42-35 X1.0.12
Smart IO Board a0-41-03-41-28 X1.0.6
11. Touch Save to begin the upgrade. After the upgrade is finished, touch Save to restart.
12. After the VS Omni has restarted, exit Service Mode and resume operation.
Installing a New Language (must be in Service Mode, page 3)
1. Insert your USB thumb drive into your computer.
2. Go to www.hayward.com/firmware.
3. Click on the link to download the desired language and save to the USB thumb drive.
4. Remove the USB thumb drive from the computer
5. Locate the port on the underside of the VS Omni Wiring Hub and insert the thumb drive.
6. Apply power to the VS Omni (if not already powered) and allow the VS Omni to fully start.
7. Enter Service Mode (page 3).
8. Touch the Upgrade button.
9. Select “MSP” and touch the Save button.
Page 31

USE ONLY HAYWARD GENUINE REPLACEMENT PARTS
30
10. The VS Omni will now look at your USB thumb drive. Select the language file that was saved
from the website and then touch the Save button.
11. Touch Save to begin upgrade. After the upgrade is finished, touch Save.
12. After VS Omni has restarted, exit Service Mode and resume operation.
Simple Mode
Up to this point, you’ve been shown how to view the Home Screen and access all of the pool’s
functions by using the features screens (left side of Home Screen) and favorites (right side of
Home Screen). This method of access is called “Standard Mode” and offers the most information and control. An alternative to Standard Mode is “Simple Mode”. Simple Mode eliminates
the Home Screen and allows you to view and control only the Favorites that you specify. Simple
Mode is customizable and may be preferred to Standard Mode depending on your needs. Simple
Mode can provide a convenient way to access the most common functions for owners as well as a
handy solution to limit access to other users. Up to 24 Favorites can be displayed in Simple Mode.
Depending on the pool equipment that has been configured, some default Favorites may appear in
Simple Mode. These default Favorites cannot be removed from Simple Mode. For information on
how to add and delete Simple Mode Favorites, refer to page 21.
select le
USB/
MSP_RS_R1.4.0-FR
FILE
selection
...\
select le
USB/
MSP_RS_R1.4.0-FR
FILE
selection
...\
ready to upgrade
component rmware le
MSP MSP_RS_R1.4.0-FR
UPGRADE
rmware
0%
success ready to restart
component rmware le
MSP MSP_RS_R1.4.0-FR
UPGRADE
rmware
100%
Page 32

USE ONLY HAYWARD GENUINE REPLACEMENT PARTS
31
Simple Mode Screen
Enter Simple Mode
To enter Simple Mode, go to the Home Screen and follow the procedure below. Entering and exiting Simple Mode will require your VS Omni’s MSP ID number. This number is used as a password.
To find your unit’s MSP ID, refer to page 27.
ENTER
password
1 2 3
4 5 6
7 8 9
0
.
****
shut down
service
mode
features
o
simple
mode
daylight
features
lights
º
F
air
71º F
82
alarm
vsp
heating
cleanerdaylight
air
71º F
Schedule Indicator -
Favorites that have been
configured to operate on
a schedule will display
this indicator.
Home Screen Information - The
same information that is displayed
on the Home Screen is also displayed on the Simple Mode screen.
Status - Items that
are highlighted are
active or “On”. In this
example, the VSP pump
and heater are both
On. Touching buttons
in Simple Mode will turn
the items On or Off.
Page 33

USE ONLY HAYWARD GENUINE REPLACEMENT PARTS
32
Exit Simple Mode
To exit Simple Mode, follow the procedure below.
ENTER
password
1 2 3
4 5 6
7 8 9
0
.
****
shut down
service
mode
features
o
standard
mode
vsp
heating
cleanerdaylight
air
71º F
Page 34

USE ONLY HAYWARD GENUINE REPLACEMENT PARTS
33
SYSTEM INFO
msp id: 31721
component HUA version
MSP
Variable Speed...
Variable Speed...
Smart Relay
Smart Relay
00-01-02-03-04
10-01-10-59-9c
10-01-10-00-01
90-31-03-42-41
90-31-03-42-3b
X.26.22.1-b0
R0.2.15
R0.2.10
X1.0.9
X1.0.9
SYSTEM
conguration
1 / 2
cong wizard
system info
backup cong
restore cong
display
network
date/time
language
favorites
heating
themes
º
F
air
71º F
82
cong
daylight
features
lights
º
F
air
71º F
82
alarm
MSP ID
Web Enabled Control
The VS Omni should have already been configured for use with the home’s router to allow for
remote control through the web. This procedure is covered in the Configuration Wizard information
found in the Installation manual. After configuration, an account must be created to allow access
to the VS Omni from web enabled devices. If this has not already been done by the installer, follow
the procedure below.
1. Using an ordinary web browser, go to www.haywardomnilogic.com. If you don’t already have
an account, select “Register New User” and set up a new account.
2. Log in to you account.
3. Register your VS Omni. Registering will require you to answer a series of questions about
your VS Omni. When asked for your Time Zone, be sure to enter the same time zone as the
physical location of the installed VS Omni, otherwise schedules will be inaccurate. You’ll also
be asked for an MSP System ID. This number can be found directly from the VS Omni. To
find your unit’s MSP ID, follow the procedure below.
After the MSP is accepted, the VS Omni will be linked to your account. You’ll be able to access the
VS Omni at any time from your browser by logging into your account at haywardomnilogic.com.
For mobile devices, download the “OmniLogic” app from your device’s app store. Login to your
account through the app and you should see the VS Omni.
Page 35

USE ONLY HAYWARD GENUINE REPLACEMENT PARTS
34
Hayward
®
TriStar VS 950 Omni Limited Warranty
To Buyer, as original purchaser of this equipment, Hayward Pool Products, Inc. warrants this product to be free from defects
in materials and workmanship for a period of FOUR (4) years from the date of purchase.
Parts which fail or become defective during the warranty period, except as a result of freezing, negligence, improper installation, use, or care, shall be repaired or replaced, at our option without charge, within 90 days of the receipt of defective
product, barring unforeseen delays.
To obtain warranty replacements or repair, defective components or parts should be returned, transportation paid, to the
place of purchase, or to the nearest authorized Hayward service center. For further Hayward dealer or service center information, contact Hayward customer service department or visit us at www.hayward.com. No returns may be made directly
to the factory without the express written authorization of Hayward Pool Products.
Proof of purchase is required for warranty service. In the event proof of purchase is not available, the manufacturing date
of the product will be the sole determination of the purchase date.
Hayward shall not be responsible for cartage, removal, repair or installation labor or any other such costs incurred in obtaining warranty replacements or repair.
The Hayward Pool products warranty does not apply to components manufactured by others. For such products, the warranty established by the respective manufacturer will apply.
The express limited warranty above constitutes the entire warranty of Hayward Pool Products with respect to its’ pool
products and is in lieu of all other warranties expressed or implied, including warranties of merchantability or fitness for
a particular purpose. In no event shall Hayward Pool products be responsible for any consequential, special or incidental
damages of any nature.
Some states do not allow a limitation on how long an implied warranty lasts, or the exclusion of incidental or consequential
damages, so the above limitation may not apply to you. This warranty gives you specific legal rights, and you may also
have other rights, which vary from state to state.
Hayward
®
TriStar VS 900 Omni, Super Pump VS 700 Omni,
MaxFlo VS 500 Omni Limited Warranty
To Buyer, as original purchaser of this equipment, Hayward Pool Products, Inc. warrants this product to be free from defects
in materials and workmanship for a period of THREE (3) years from the date of purchase.
Parts which fail or become defective during the warranty period, except as a result of freezing, negligence, improper installation, use, or care, shall be repaired or replaced, at our option without charge, within 90 days of the receipt of defective
product, barring unforeseen delays.
To obtain warranty replacements or repair, defective components or parts should be returned, transportation paid, to the
place of purchase, or to the nearest authorized Hayward service center. For further Hayward dealer or service center information, contact Hayward customer service department or visit us at www.hayward.com. No returns may be made directly
to the factory without the express written authorization of Hayward Pool Products.
Proof of purchase is required for warranty service. In the event proof of purchase is not available, the manufacturing date
of the product will be the sole determination of the purchase date.
Hayward shall not be responsible for cartage, removal, repair or installation labor or any other such costs incurred in obtaining warranty replacements or repair.
The Hayward Pool products warranty does not apply to components manufactured by others. For such products, the warranty established by the respective manufacturer will apply.
The express limited warranty above constitutes the entire warranty of Hayward Pool Products with respect to its’ pool
products and is in lieu of all other warranties expressed or implied, including warranties of merchantability or fitness for
a particular purpose. In no event shall Hayward Pool products be responsible for any consequential, special or incidental
damages of any nature.
Some states do not allow a limitation on how long an implied warranty lasts, or the exclusion of incidental or consequential
damages, so the above limitation may not apply to you. This warranty gives you specific legal rights, and you may also
have other rights, which vary from state to state.
Page 36

USE ONLY HAYWARD GENUINE REPLACEMENT PARTS
Hayward is a registered trademark and Pro Logic
is a trademark of Hayward Industries, Inc. © 2018 Hayward Industries, Inc.
All other trademarks not owned by Hayward are the property of their respective owners.
Hayward is not in any way affiliated with or endorsed by those third parties.
For further information or consumer
technical support, visit our website at
www.hayward.com
US: 908-355-7995
Pour de plus amples informations ou un soutien
technique au consommateur, visitez notre site Web à
www.hayward-pool.ca
Canada: 888-238-POOL
 Loading...