

Page 1
ISEC50C90
Rev. A
____________________________________________________________________________________
OWNER’S MANUAL
INSTALLATION, OPERATION, & PARTS
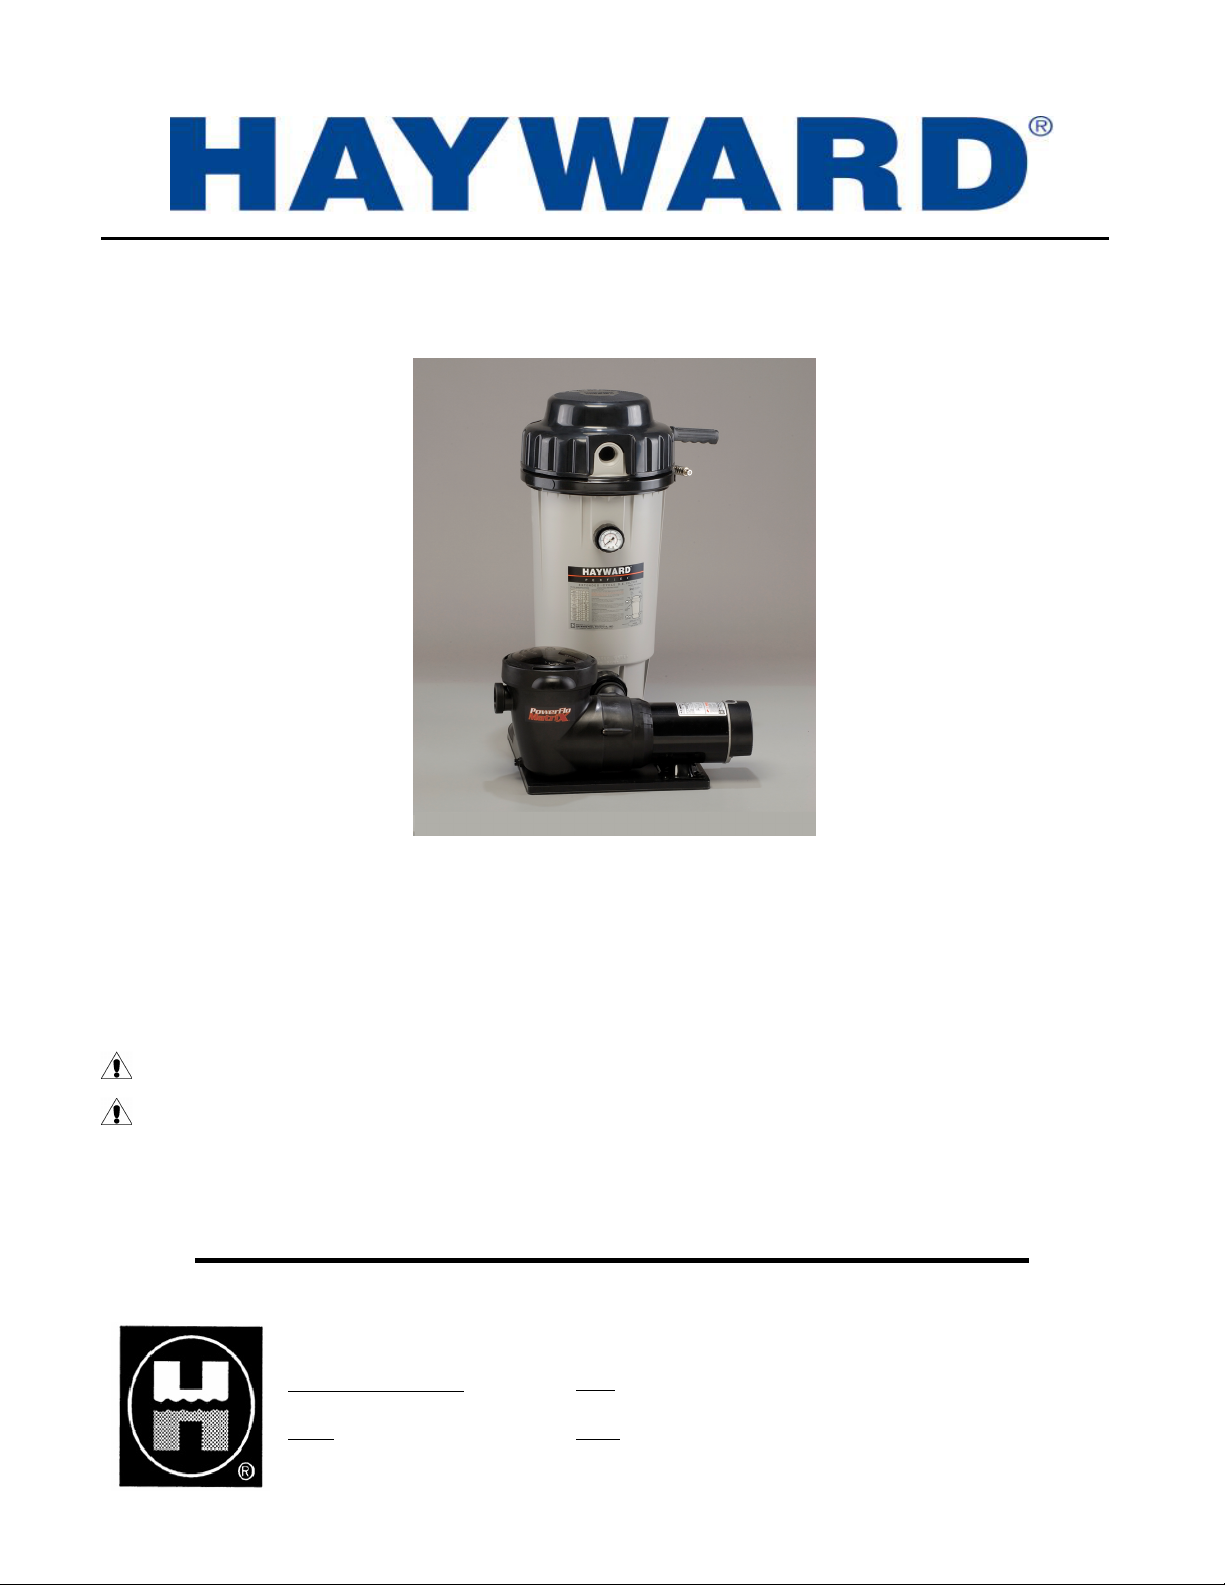
Perflex Extended Cycle Filtration System
EC50C90 Series
The Hayward
swimming pools. The advanced design reduces maintenance requirements while providing superior performance.
To prevent potential injury and to avoid unnecessary service calls, read this manual carefully and completely.
CAUTION – We highly recommend a qualified professional install and service this product.
WARNING – This manual contains important safety information that must be furnished to the end
user of this product. FAILURE TO READ AND FOLLOW ALL INSTRUCTIONS COULD RESULT IN
SERIOUS INJURY.
®
Perflex™ Filtration System is specifically designed for the demanding requirements of today’s above-ground
SAVE THIS INSTRUCTION MANUAL
HAYWARD POOL PRODUCTS, INC.
Corporate Headquarters: U.S.A:
620 Division Street 1 Hayward Industrial Drive 2935 Sidco Drive 2875 Pomona Blvd.
Elizabeth, NJ 07207 Clemmons, NC 27012 Nashville, TN 37204 Pomona, CA 91768
Canada:
Europe:
2880 Plymouth Drive Parc Industriel de la plaine de l'Ain
Oakville, Ontario L6H 5R4 Allêe des Chênes
01150 Saint Vulbas
France
Page 2
Perflex™ Extended Cycle Filtration System__________ ________
(
)
PRODUCT REGISTRATION
DATE OF INSTALLATION ____________________
INITIAL PRESSURE GAUGE READING (CLEAN FILTER) _______________________
PUMP MODEL ________________ HORSEPOWER _______________________
FILTER MODEL ________________ SERIAL NUMBER _______________________
Retain For Your Records
IMPORTANT SAFETY INSTRUCTIONS
When installing and using this electrical equipment, basic safety precautions should always be
followed, including the following: Failure to follow instructions may result in injury.
READ AND FOLLOW ALL INSTRUCTIONS
IN THIS OWNER’S MANUAL AND ON
EQUIPMENT.
KEEP SAFETY LABELS IN GOOD CONDITION AND
REPLACE IF MISSING OR DAMAGED.
WARNING – To reduce risk of injury, do not permit children to use or climb on this
product. The ANSI/NSPI 4 Standard (above-ground and on-ground pools) advises that
components such as the filtration system, pumps, and heaters be positioned to prevent their being
used as a means of access to the pool by young children. Closely supervise children at all times.
CAUTION – The Perflex™ Filtration System is intended for use on permanently installed
above-ground swimming pools and may also be used with hot tubs and spas if so marked. Do
NOT use with storable pools. A permanently installed pool is constructed in or on the ground or
in a building such that it cannot be readily disassembled for storage. A storable pool is
constructed so that it is capable of being readily disassembled for storage and reassembled to its
original integrity.
Though this product is designed for outdoor use, it is strongly advised to protect the electrical
components from the weather. Select a well-drained area, one that will not flood when it rains. It
requires free circulation of air for cooling. Do not install in a damp or non-ventilated location.
Bond motor to pool structure. Use a solid copper conductor, size or larger. Run wire from
external bonding lug to reinforcing rod or mesh. Connect a No. 8 AWG (8.4 mm²) solid copper
bonding wire to the pressure wire connector provided on the motor housing and to all metal parts
of swimming pool, spa, or hot tub, and to all electrical equipment, metal piping or conduit within
5 ft. (1.5 m) of inside walls of swimming pool, spa, or hot tub. (In Canada use No. 6 AWG
bonding wire.)
Page 3
Perflex™ Extended Cycle Filtration System__________ _________________________
NOTE: The National Electrical Code (NEC) permits use of a cord with a maximum 3 ft.
(1 m) length. If your pump is equipped with a cord complying with the NEC, the following three
(3) items apply.
WARNING – Risk of Electric Shock. Connect only to a grounding
type receptacle protected by a Ground Fault Circuit Interrupter (GFCI). Contact a
qualified electrician if you cannot verify that the receptacle is protected by a
GFCI.
WARNING – To reduce the risk of electric shock replace damaged cord
immediately. Do NOT bury cord. Locate cord to minimize abuse from lawn
mowers, hedge trimmers and other equipment.
WARNING – To reduce the risk of electric shock, do NOT use an extension cord to
connect unit to electric supply. Provide a properly located outlet. Qualified personnel MUST do
all electrical wiring.
CAUTION – All suction and discharge valves MUST be OPEN when
starting the filter system. Failure to do so could result in severe personal injury
and/or property damage. All drains and suction covers MUST have properly
installed covers securely attached with the screws supplied with the covers. If
screws are lost, order replacement parts from your supplier.
DANGER – Suction Entrapment Hazard. Never use the pool or
spa if a drain cover is damaged, cracked, missing, or not securely attached. Suction in drains and
suction outlets can cause drowning, disembowelment, hair or body entrapment, severe injury, and
death. Disembowelment, entrapment, or drowning is possible when body parts or hair come in
contact with damaged, broken, cracked, missing, or unsecured drain covers and suction outlets.
Suction from pumps with only one drain or suction outlet can cause disembowelment,
entrapment, or drowning. Pumps for pools and spas require two (2) functioning suction outlets at
least three (3) feet apart, on two (2) walls or on the floor and one (1) wall of the pool or spa.
Installation of pump and suction outlets must be in compliance with all applicable local building
codes. Replace damaged, broken, cracked, missing, or unsecured drain covers and suction outlets
immediately.
WARNING – Hazardous Pressure. Pumps, filters, and other
equipment/components of a swimming pool filtration system operate under pressure. Incorrectly
installed and/or improperly tested filtration equipment and/or components may fail resulting in
injury and/or property damage. A qualified pool professional MUST conduct all pressure tests.
This product is intended for above-ground/on-ground swimming pool applications only. Do NOT
connect to a high-pressure system such as a municipal water main. To prevent explosion caused
by entrapped air in the filtration system use provided air relief valve to bleed air from the system.
Confirm that ALL filtration system component clamps, bolts, and covers have been tightened to
the manufacturer’s recommendations.
WARNING – Never operate or test the filtration system at more than 30 PSI.
SAVE THESE INSTRUCTIONS
Page 4

Perflex™ Extended Cycle Filtration System _____________________________________
General Information
Introduction
This manual contains information for the proper installation and operation of the Hayward® Perflex™ Filtration
System. All Perflex™ Filtration models are high performance, above-ground swimming pool filters. Instructions in
this manual MUST be followed precisely.
The Hayward Perflex System is a high performance swimming pool filter system having an output rating of 3,000
gallons (11 KL) per hour. Manufactured from durable, corrosion-proof materials, the filter and pump are combined
on a strong, molded mounting base. The system is designed for continuous operation and for installation below the
pool water line. It may be used on fresh or salt-water swimming pools.
The Perflex Filter System uses diatomite filter powder (commonly called D.E.). D.E. is the most efficient dirt
remover known for swimming pool filtration. It is normally fed into the system through the skimmer when the filter is
initially started; then drained from the filter when it can no longer efficiently remove dirt from the water.
The Hayward Perflex D.E. filter provides the deepest, most comprehensive clean, removing microscopic dust and
pollen as small as one micron - 100 times smaller than a grain of salt. It takes care of debris the first time through, so
you can run it fewer hours per day.
Patented Flex-Tubes™ make the Hayward Perflex D.E. filter unique. D.E. filter powder coats the tubes and traps dirt
and impurities as they pass through the filter. When the accumulated dirt builds up pressure and decreases the flow,
conventional filters require backwashing. But with the Hayward Perflex D.E. filter, simply move the unique "Bump"
handle up and down a few times to automatically activate the Flex-Tubes, repositioning the dirt and D.E. within the
filter and extending the filter cycle. When the filter powder is totally used, the "Bump" action makes it possible to
drain the used diatomite without backwashing or dismantling the filter.
The Power-Flo Matrix™ Pump Series has been engineered as a uniquely superior above-ground pool pump. With the
single push of a button, this truly versatile pump changes from a vertical to a horizontal discharge and back again. It's
large profile and integrated styling makes the Power-Flo Matrix a swimming pool pump like no other. It is driven by
a heavy duty motor, which is electronically isolated and insulated from the pool water. Output pressure and flow are
tuned to the filter, resulting in a perfectly balanced, non-corrosive system.
Product Features
Designed for large above-ground pools
Combines large cleaning capacity with a polished stainless steel clamp for easy access to filter components
Power-Flo Matrix™ Series high-performance pump
Quick-connect union
Modular platform base
Perflex™
Model No. EC30 EC40C EC50C
Effective Filtration Area 15 FT² 20 FT² 25 FT²
Design Flow Rate 30 GPM 40 GPM 50 GPM
Turnover
Filtration Performance Data
8 hours 14,400 GAL 19,200 GAL 24,000 GAL
12 hours 21,600 GAL 28,800 GAL 36,000 GAL
Page 5

Perflex™ Extended Cycle Filtration System _________________________
Installation Instructions
System Location
For best pump performance, the system MUST be located below the
pool water line (See Figure to the right).
Install the system on a firm, level base or pad to meet all local and
national codes. The field supplied base or pad must be level and
vibration-free. Keep the filter bump handle, drain outlet, and
pressure gauge accessible for convenient operation. There is an
alternate bump handle location on the other side of the filter outlet.
Instructions for changing the handle position are covered later.
Though the pump is designed for outdoor use, it is strongly advised
to protect the electrical components from the weather. Select a welldrained area, one that will not flood when it rains. Pump motors
require free circulation of air for cooling. Do not install pump in a damp or non-ventilated location.
Plumbing & Installation
1. To facilitate servicing of the filter system and to allow for indoor storage during the winter months, installing
union connections at the suction and outlet ports is recommended.
2. Use 1-1/4" or 1-1/2" I.D. flexible plastic pipe, or hose, joined with insert fittings and stainless steel clamps.
3. All plumbing connections on the system are 1 ½” N.P.T. When making connections, use plastic male-end
adapters. Apply three (3) turns of Teflon tape or plastic pipe sealant to the male threads. Screw the fitting into
the thread hand-tight; then using a wrench, tighten one more full turn, if necessary. (NOTE: Adapters have
varying tolerances and over-tightening with a wrench may only cause damage to the filter.) Ball type valves are
recommended where needed.
4. Use Teflon tape to seal threaded connections on molded plastic components. All plastic fittings must be new or
thoroughly cleaned before use. NOTE: Do NOT use Plumber’s Pipe Dope as it may cause cracking of the
plastic components. When applying Teflon tape to plastic threads, wrap the entire threaded portion of the male
fitting with one to two layers of tape. Wind the tape clockwise as you face the open end of the fitting, beginning
at the end of the fitting.
5. Tighten pump base mounting bolts, if loose.
6. Securely hand tighten the union nut between the filter and pump.
7. Connect the pool suction plumbing between the skimmer, pool outlet, and the pump. Connect the pool return
(inlet) plumbing.
8. If pressure gauge is not installed, apply Teflon tape to the gauge threads, and carefully screw the gauge into the
threaded hole in the side of the filter body.
9. A filter drain plug, with gasket, is furnished with each filter and is all that is needed for complete filter draining.
If desired however, drain piping may be extended from the filter by using the optional Drain Valve Kit (Model
SP0723) and an appropriate length of 1-1/2" pipe. Piping must slope away from the filter so the tank can drain by
gravity. DO NOT use roll-flat type hose for drain piping.
10. All electrical connections should be made in accordance with applicable electrical codes.
11. Check for joint leaks before operating system.
12. Refer to pump instruction booklet for pump information.
Page 6

Perflex™ Extended Cycle Filtration System _____________________________________
Prior to Start-Up
Important Safety Instructions - Read and follow all instructions
When installing and using this equipment, basic safety precautions MUST always be followed.
WARNING – Pump and Filter System Operates Under High Pressure. Failure to follow
instructions may result in serious injury.
1. Make sure clamp is located and centered properly over the filter flange.
2. Both sides of the clamp must be tightened firmly and evenly until spring coils touch each other (see illustration
below).
3. Final space between both clamp halves should be equal.
The following sleeve nut assembly, which includes a spring, two (2) washers (small and large hole) and a sleeve nut,
provides a visual means of ensuring that the clamp is tight.
Before Starting the Filter System
1. Obtain a supply of operating chemicals, D.E., and a pool test kit. Use only the swimming pool grades of D.E.,
such as:
CELATOM (Eagle-Picher Industries, Inc.)
AQUA-CEL (Johns-Manville Products Corporation)
DICALITE 4200 (Grefco, Inc.)
WITCO (Witco Corporation)
2. Superchlorinate the pool water by adding unstabilized granular or liquid chlorine. Stabilized forms of chlorine
are recommended for normal daily use after the initial clean up of the water. Follow chemical manufacturer's
recommendations for superchlorination and daily use.
Start-Up & Operation
Starting the Filter
Close the filter drain and the vent valve.
CAUTION – All suction and outlet valves MUST be OPEN before operating the filter system.
Failure to do so could cause severe personal injury and/or property damage.
1. Prime and start the pump following the manufacturer’s instructions.
2. Air trapped in the system will automatically vent to the pool. Once air has escaped the filter and a steady
stream of water is returning to the pool, the filter is ready for pre-coating. DO NOT operate the filter for
more than one (1) minute without the pre-coat charge.
Page 7

Perflex™ Extended Cycle Filtration System _____________________________________
Start-Up & Operation (cont.)
Pre-Coating
Scoop 5 lbs. (2.3 kgs.) of diatomite (D.E.) into the system through the skimmer as fast as the plumbing will take it.
Note and record the pressure gauge reading after the diatomite (D.E.) has been added. This is the "Pre-Coat Pressure".
Filtering
Filtration starts as soon as the filter has been pre-coated. As the filter removes dirt from the pool water, the
accumulated dirt causes a resistance to flow. As a result, the gauge pressure will rise and the flow will decrease.
When the pressure rises 7-10 psi (.49-.70 Bar) above the pre-coat pressure, regenerate the filter.
Regeneration (Extending the Cycle)
Stop the pump. Move the bump handle down slowly, then up briskly. Repeat 3 times. Restart the pump and filtration
will resume at near the original flow and pressure.
After each regeneration, and until the filter is cleaned, there may be a slight increase in the starting pressure. This is
the result of dirt accumulating within the filter and is completely normal.
Cleaning
Cleaning is recommended when the pressure gauge rises more than 10 psi (.70 Bar) in less than a 24 hour period or
when cloudy water returns to the pool for more than 30 seconds after regeneration. To clean, first stop the pump; then
move the bump handle down slowly, then up briskly. Repeat 8 times. Open the vent valve (under bump cover), open
the filter drain plug (Note: If the filter is installed below the pool water line, close the suction and outlet valves) and
allow water and dirt to empty completely.
After the filter has drained, and with the drain still open, run the pump for a few seconds to flush out any dirt
remaining in the bottom of the filter. (Note: If the filter is installed below the pool water line, opening the suction
valve for a few seconds with the pump off will adequately flush the unit.)
Close the filter drain plug and the vent valve. Open the suction and outlet valves (when used). Start the pump and let
the filter fill with water and repeat the "Cleaning" procedure. This completes the cleaning phase. The filter is now
ready for re-charging. Proceed as in "Starting the Filter" and "Pre-Coating".
Vacuuming
Vacuuming can be performed directly into the filter whenever needed. For fastest results, regenerate the filter before
and after each vacuuming operation.
To Change Bump Handle Position
1. Remove the bump handle grip. Push in tab at base of handle. Carefully pry the bump cover from the retaining
groove and slide the cover off the handle.
2. Using a drift (or 10 penny nail), tap the pivot pin out of the filter head anchor point, freeing the end of the handle.
3. Rotate the bump handle to the alternate position and align the handle and the head anchor holes. Tap the pivot
pin in place.
4. Reinstall the bump cover and grip.
Page 8

Perflex™ Extended Cycle Filtration System _____________________________________
Start-Up & Operation (cont.)
Gauge/Inspection Port Adapter
The gauge/inspection port adapter provides an easy way to look into the filter at the "top" area of the tube nest
assembly. It gives a quick inspection capability to check the tube nest condition (algae, calcium or D.E. build-up,
etc.), without requiring removal of the filter head. It also allows you to wash off trapped debris and excess D.E. from
between the Flex-Tubes and from under the tube sheet by spraying with a garden hose.
To remove adapter - Shut off pump and valves, and drain water in filter to below port. Unscrew adapter, with gauge,
counterclockwise.
To re-install - Thread adapter, with O-ring in place, securely into filter housing.
Preventative Maintenance
While Perflex filters are basically resistant to the difficulties often encountered as a result of chemical build-up in
swimming pools, it is important to keep in mind that the mineral content in a pool increases every day as a result of
the chemicals and the normal water evaporation process. If the concentration of minerals is allowed to get too high,
the minerals will form deposits on the Flex-Tubes inside the filter, and will eventually result in shortened filter cycles.
To guard against this, a yearly chemical cleaning (soaking) of the Flex-Tube assembly is suggested. Use
commercially available 20% muriatic acid added to water in 1 to 1 ratio; OR use other commercial filter element
cleaner mixed in accordance to the package instructions.
WARNING – Use a plastic container and take extreme care – harmful to eyes, skin, and
clothing. Always wear rubber gloves and eye protection.
WARNING – Do NOT add water to acid.
WARNING – Do NOT mix chlorine and acid.
After cleaning, thoroughly flush all affected parts with cold water.
Winterization
In areas where sub-freezing temperatures can be expected, the filter should be drained and removed from its operating
location and stored indoors. Prior to removal, cycle the filter as described under "Cleaning".
Service & Repairs
Consult your local authorized Hayward-Perflex dealer or service center. No returns may be made directly to the
factory without the expressed written authorization of Hayward Pool Products, Inc.
Pool Chemistry Guidelines
Suggested Pool Chemistry Levels
pH 7.2 to 7.6 Add Soda Ash Add Muriatic Acid or Sodium Bisulphate
Total Alkalinity 100 to 130 ppm Add Sodium Bicarbonate Add Muriatic Acid
Chlorine (Unstabilized) 0.3 to 1.0 ppm Add Chlorine Chemical No action - Chlorine will naturally dissipate
Chlorine (Stabilized) 1.0 to 3.0 ppm Add Chlorine Chemical No action - Chlorine will naturally dissipate
Chlorine Stabilizer 40 to 70 ppm
(Cyanuric Acid)
Add Stabilizer Dilution - partially drain & refill pool with water that
To Raise To Lower
Action Required to Correct Pool Chemistry
has not been treated with Cyanuric Acid.
Page 9

Perflex™ Extended Cycle Filtration System _____________________________________
Troubleshooting
Problem Probable Cause Remedy
Running at high pressures.
Drop off of return flow.
D.E. coated with normal accumulation of
pool dirt, algae, etc.
Overcharge of D.E. Bump-Drain-Recharge.
Restriction in return line caused by small
eyeball fitting.
Partially closed valve on return line. Open valve.
D.E. coated with normal accumulation of
pool dirt, algae, etc.
Pump strainer basket clogged. Clean.
Skimmer basket clogged. Clean.
Pump impeller vanes clogged. Cleaning with a stiff wire brush through
Air leak on suction side of pump. Check cover gasket, hand knobs, hose,
Bump
Change to larger size fitting.
Bump.
the pump strainer opening will usually
work. Alternate method would be to disassemble and clean.
clamps, etc. Replace or tighten as
necessary.
Short cycles.
Electric motor running less than maximum
R.P.M. (underspeed).
D.E. loaded to capacity with pool dirt, algae,
etc.
Bumping incorrectly. Slow down stroke - brisk up stroke.
Bump handle bent. Check and straighten or replace.
Pump output exceeds design flow rate of
filter.
Presence of algae. Super-chlorinate; Bump-Drain-Recharge
Consult pump and motor troubleshooting
guide.
Note: Most motor problems are due to:
1. Undersized or improper wiring.
2. Power cut-backs.
3. Combination of both 1 & 2.
Bump-Drain-Recharge.
Repeat 6 times.
Check GPM/LPM output. Regulate
pump GPM/LPM output to max. filter
GPM/LPM rating.
as needed.
Page 10

Perflex™ Extended Cycle Filtration System _____________________________________
Troubleshooting (cont.)
Problem Probable Cause Remedy
Short cycles - even after proper
Bump-Drain-Recharge.
D.E. leaking to pool via the return lines.
Contaminated (clogged) Flex-Tube
braids caused by:
1. Natural accumulation of chemical
deposits (accelerated if chemicals are
fed through skimmer).
2. Running D.E. charge too long with
excessive amount of live algae present
in pool.
3. Operating filter without D.E.
4. Operating too long without D.E. after
starting pump. D.E. must be added as
soon as filter is full of water and pump
is putting out a steady stream.
IMPORTANT - Testing a new pool
plumbing system without adding D.E.
will cause this type of clogging.
Opening or tear in one or more FlexTubes.
Rip or hole in diaphragm gasket. Replace gasket.
Worn or loose fitting diaphragm gasket
(chemicals fed through suction lines
may shorten life of this part.)
Clean tube nest (2 methods)
1. Detergent Cleaning: Remove tube
nest and hose down with forceful stream
of clean water. Soak tube nest in strong
solution of laundry detergent (such as
Cheer) and warm water. Hose down
again.
2. Chemical Cleaning: This requires use
of water and muriatic acid solution (or
filter cleaner-type preparations) to
chemically dissolve contaminates.
Consult your pool dealer for chemical
cleaning instructions.
Replace Flex-Tube.
Replace gasket.
Hard bumping.
D.E. leaking back to pool via skimmer
or main drain.
Very short cycles when vacuuming.
Loose bolts on tube nest plates. Tighten bolts.
Caking of D.E. under tube sheet.
Sometimes caused by accumulation of
sun tan oils, hair, or floating particles
that bind together in a clay-like form.
Overloaded with D.E. Sometimes
happens when last charge of dirty D.E.
was not properly drained.
Filter runs too long between bumping. Bump more frequently.
Filter check valve worn or stuck open. Clean and/or replace.
Very dirty water. Bump-Drain-Recharge more often.
Presence of live, vigorously growing
algae.
Presence of alum or flocking agents
which will clog filter.
Bump-Drain-Recharge more often and
reduce the use of oils.
Bump-Drain-Recharge with proper
amount of D.E.
Add enough chlorine to control this
growth - then vacuum.
Vacuum so as to bypass filter. Avoid
using flocking agents.
Page 11

Perflex™ Extended Cycle Filtration System _____________________________________
Replacement Parts
Parts Listing Parts Diagram
Ref.
No. Part No. Description No. Req’d
1 ECX5000D Bump Mechanism Cover 1
2 ECX1322A Vent Valve with O-Ring 1
3 ECX5000BP Filter Head with Vent Valve 1
4 ECX5000C Clamp Assembly with Spring 1
5 ECX100Z9 Pivot Pin (long) 1
6 ECX4236 Shoulder Screw 1
7 ECX1040 Bump Handle
8 ECX1037B Bump Handle Grip-Noryl
9 DEX360JN Nickel Plated Sleeve Nut, 5/16" 1
10 ECX4249 Locknut 1
11 ECX5000F Bump Shaft 1
12 SPX1500N1 Tube Sheet Screw 12
13 ECX1004 Tube Sheet, Top 1
14 ECX5000G Diaphragm Gasket 1
15 ECX1004 Tube Sheet, Bottom 1
16 ECX1500Y1 Tube Sheet, Nut 12
17 ECX96112-46 O-Ring 2
18 ECX1014 Retainer 2
19 ECX1011 Thrust Washer 2
20 ECX1032 Flex-Tube
21 ECX5000AP Filter Body with Flow Diffuser 1
22 ECX27091 Pressure Gauge (back mount) 1
23 ECX1286-6 Gauge/Inspection Port Adapter 1
24 ECX1287 O-Ring for Gauge Adapter 1
25 ECX5029 Decal - Operation 1
26 ECX1055 Flow Controller 1
27 ECX4077B1 Check Valve 1
28 ECX1256 Flow Diffuser with Check Valve 1
29 SP1022C Drain Plug with Gasket 1
30 ECX1161 Platform Base 1
31 SP1480 1 ½" Male Union 1
32 SPX1425Z6 O-Ring 1
33 --- Power-Flo Matrix Pump 1
34a SPX1250WA 6 ft. Cord Set 1
34b SPX1550WA1 3 ft. Twist Lock Cord Set 1
35 ECX1108 Pump Mounting Screw 4
36 ECX1109 Washer 4
37a DEX2400J4 Washer with Small Hole 2
37b DEX2400JS Spring 2
37c DEX2400J3 Washer with Large Hole 2
37d DEX360JN Nickel Plated Sleeve Nut 2
™
Assembly 72
®
1
1
Page 12

Perflex™ Extended Cycle Filtration System________________________________________________
HAYWARD® LIMITED WARRANTY
This filter system was inspected before shipment from our plant. To original purchasers of this filter system,
Hayward Pool Products, Inc., 620 Division Street, Elizabeth, New Jersey, warrants its products free from defects in
materials and workmanship for a period of ONE (1) year from the date of purchase.
Parts which fail or become defective during the warranty period, except as a result of freezing, negligence, improper
installation, use, or care, shall be repaired or replaced, at our option, without charge, within 90 days of the receipt of
defective product, barring unforeseen delays.
To obtain warranty replacements or repair, defective components or parts should be returned, transportation paid, to
the place of purchase, or to the nearest authorized Hayward service center. For further Hayward dealer or service
center information, contact Hayward customer service department. No returns may be made directly to the factory
without the express written authorization of Hayward Pool Products, Inc.
All other conditions and terms of the standard warranty apply.
Hayward shall not be responsible for cartage, removal and/or reinstallation labor or any other such costs incurred in
obtaining warranty replacements.
The Hayward Pool Products warranty does not apply to components manufactured by others. For such products, the
warranty established by the respective manufacturer will apply.
Some states do not allow a limitation on how long an implied warranty lasts, or the exclusion or limitation of
incidental or consequential damages, so the above limitation or exclusion may not apply to you.
This warranty gives you specific legal rights, and you may also have other rights, which vary from state to state.
Hayward Pool Products, Inc.
620 Division Street
*Supersedes all previous publications. Elizabeth, NJ 07207
▲Retain this Warranty Certificate (upper portion) in a safe and convenient location for your records.
▼DETACH HERE: Fill out bottom portion completely and mail within 10 days of purchase/installation.
------------------------------------------------------------------------------------------------------------
Mail to: Hayward Pool Products, Inc., 620 Division Street, Elizabeth, NJ 07207, Attn: Warranty Dept.
Warranty Registration Card
Name__________________________________________________ Years pool has been in service □ less than 1 □ 1-3 □ 3-5 □ 5-10
Address________________________________________________ Purchased from:
Company name________________________________________________
City______________________State_________ Zip ____________
Address_______________________________________________________
E-mail Address:_________________________________________
City___________________________State____________Zip_____________
Product Purchased_______________________________________
Product Serial No.________________________________________
Please send me more information on these other
□ New Installation □ Replacement products from Hayward:
Type of Pool:
□ In-ground □ Vinyl □ Fiberglass □ Gunite □ Above-ground □ Light □ Chlorinator □ Skimmer
Size of Pool______________________________________
□ Pump □ Filter □ Automatic Pool Cleaner
□ Heater
 Loading...