

Hayward AQR100 Owner's Manual
092735 RevB
AQR100
Chlorine Generator for Inground
Swimming Pools up to 30,000 gallons
Owner’s Manual
\
Contents
Introduction................................2
Installation..................................3
Pool Chemistry............................9
Operation..................................12
Troubleshooting.........................15
Mounting Hole Template............18
Warranty....................................18
USE ONLY HAYWARD GENUINE REPLACEMENT PARTS
AQR100
Hayward Pool Products
620 Division Street, Elizabeth NJ 07207
Phone (908)-355-7995
www.hayward.com
IMPORTANT SAFETY INSTRUCTIONS
When installing and using this electrical equipment, basic safety precautions should always be followed, including the following:
• READ AND FOLLOW ALL INSTRUCTIONS
• TO REDUCE THE RISK OF DROWNING FROM HAIR AND BODY ENTRAPMENT, INSTALL A SUITABLY
RATED SUCTION GUARD TO MATCH THE MAXIMUM FLOW RATE MARKED. ATTENTION : LES
PRISES DASPIRATION DOIVENT ETRE EQUIPEES DE GRILLES CONVENANT AU DEBIT MAXIMAL
INDIQUE.
• WARNING: To reduce the risk of injury, do not permit children to use this product unless they
are closely supervised at all times.
• Do not bury cord. Locate cord to minimize abuse from lawn mowers, hedge trimmers, and other
equipment.
• WARNING: To reduce the risk of electric shock, replace damaged cord immediately.
• CAUTION: To reduce the risk of electric shock, install at least 10 feet (3 meters) horizontally from
the inside walls of a pool or spa/hot tub. Do not use an extension cord. ATTENTION : MAINTENIR
UNE DISTANCE MINIMALE D’UN METRE, MESUREE DANS UN PLAN HORIZONTAL, ENTRE LE
BASSIN ET LES APPAREILS ET COMMANDES.
• For Canadian Units: At least two lugs marked “BONDING LUGS” are provided on the external
surface or on the inside of the supply terminal box or compartment. To reduce the risk, connect the local common bonding grid in the area of the hot tub or spa to these terminals with an
insulated or bare copper conductor not smaller than No. 6 AWG.
SAVE THESE INSTRUCTIONS
1
USE ONLY HAYWARD GENUINE REPLACEMENT PARTS

Introduction
The AQR100 is an automatic chlorine generation system for pool sanitization. It is designed for
inground swimming pools up to 30,000 gallons only. The AQR100 is NOT to be used with
above ground pools or with inground pools greater than 30,000 gallons.
The AQR100 requires a low concentration of salt (sodium chloride) in the pool water. It automatically
sanitizes your pool by converting the salt into free chlorine which kills bacteria and algae in the water.
Chlorine will revert back to sodium chloride after killing bacteria. These reactions will continuously
recycle virtually eliminating the need to add sanitizing chemicals to your pool.
The AQR100 can handle the purification needs of most residential swimming pools up to 30,000
gallons (113,000 liters). This unique low cost chlorine generator uses a replaceable electrolytic Cell
that is designed to last for one pool season.
NOTE: The actual amount of chlorination required to properly sanitize a pool varies due to bather
load, rainfall, temperature, and the pool’s cleanliness.
NOTE: Before installing this product as part of a saline water purification system in a pool or spa
using natural stone for coping or for immediately adjacent patios/decking, a qualified stone installation specialist should be consulted regarding the appropriate type, installation, sealant (if any) and
maintenance of stone used around a saline pool with electronic chlorine generator in your particular
location and circumstances.
NOTE: The use of dry acid (sodium bisulfate) to adjust pool pH is discouraged especially in arid regions
where pool water is subject to excessive evaporation and is not commonly diluted with fresh water.
Dry acid can cause a buildup of by-products that can damage your chlorinator Cell.
USE ONLY HAYWARD GENUINE REPLACEMENT PARTS
2
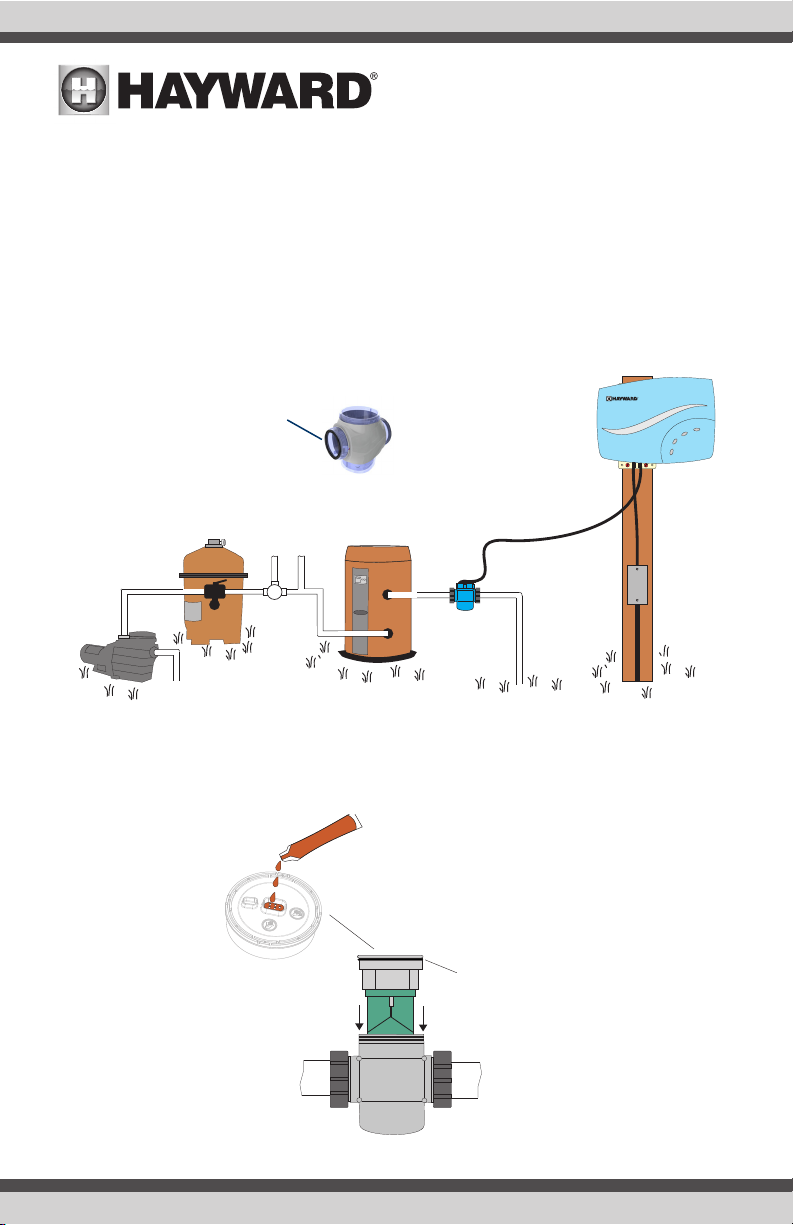
Installation
FROM
POOL
TO
POOL
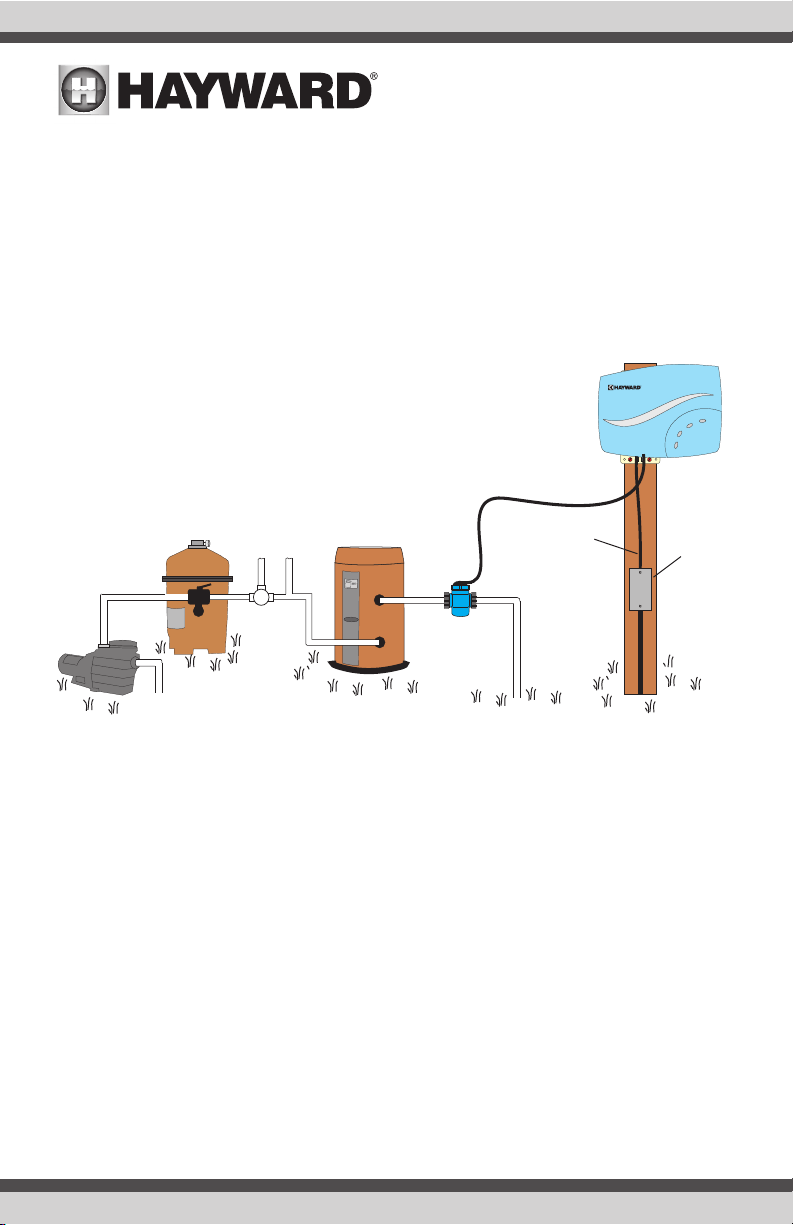
Remove power to the pool filter pump before starting this installation. Installation must be performed
in accordance with Local and NEC codes. The AQR100 can be powered by either 120 VAC or 240
VAC from the same circuit as the pool pump. Its 6 ft. power cord must be connected to power within
a junction box. The Control Box must be mounted a minimum of 10 ft. horizontal distance (or more, if
local codes require) from the pool and within 15 ft. from where the Cell will be installed. Take care to
protect the Cell Cap connector pins while handling the AQR100 unit during installation. If the supply
cord is damaged, it must be replaced by the manufacturer, its service agent or similarly qualified
persons in order to avoid a hazard.
15' CELL CABLE
UL LISTED
JUNCTION
BOX
FILTER
PUMP
FILTER
SOLAR
HEATER
POWER
CORD
CELL
VESSEL
Preparing Pool Water
To prepare the pool water for AQR100 operation, the pool’s chemistry must be balanced and salt
must be added. This must be done BEFORE activating the AQR100. Some adjustments to your pool
chemistry may take several hours, so start the procedure well before you intend to operate the AQR100.
To properly prepare your pool water for use with the AQR100, refer to the “Pool Chemistry” section
on page 9 of this manual.
Adding Salt: Add salt several hours or, if possible, 1 day prior to operating the AQR100. Take care
not to exceed the recommended salt level. Measure salt 6-8 hours after adding to the pool.
NOTE: If the pool does not have new water, add 1 quart (1 liter) of metal remover and 1 quart (1 liter)
of non-copper based algaecide to the pool, per manufacturer’s instructions. This ensures a quick,
troublefree transfer to the AQR100 system.
3
USE ONLY HAYWARD GENUINE REPLACEMENT PARTS
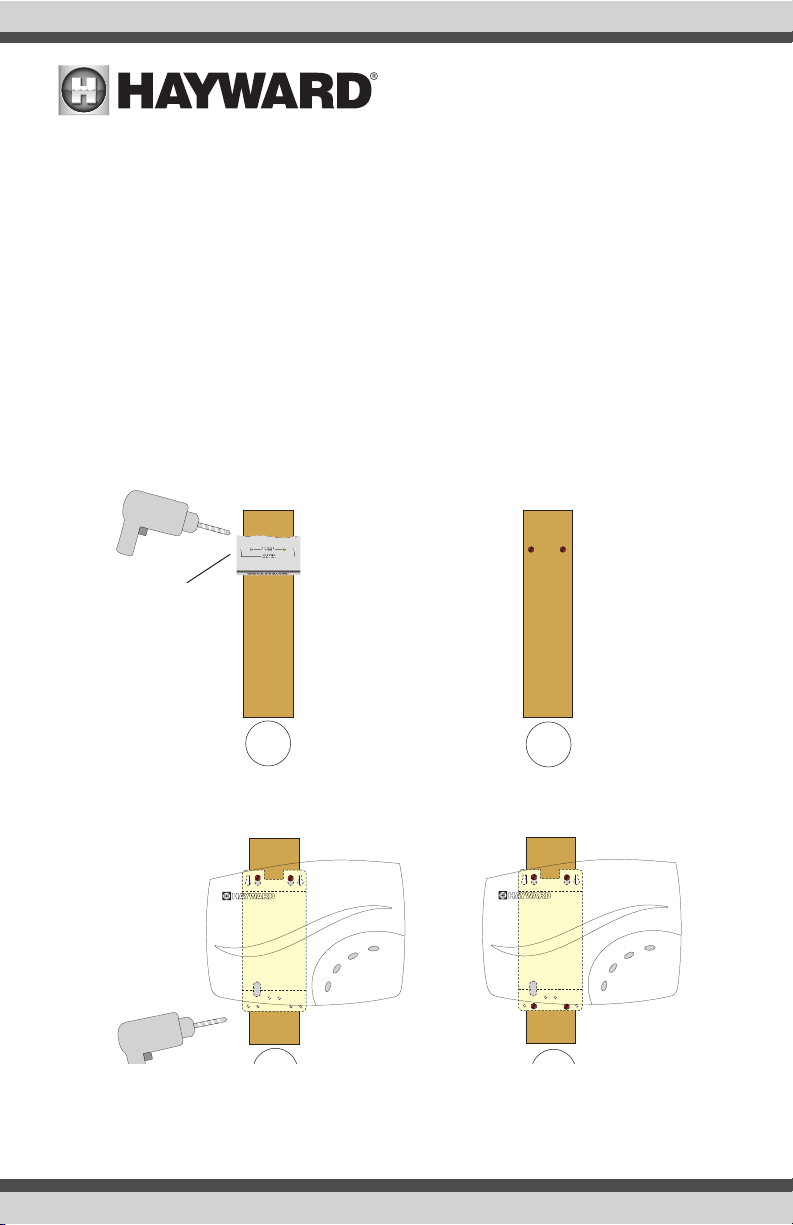
Mounting the AQR100 Control Box
Screw in top
fasteners leaving
1/8” space between
screw head and surface
Attach top mounting hole
guide to desired location and
drill mounting holes.
Hang Control Box
on fasteners and drill
bottom holes.
Screw in bottom
fasteners securely.
1
2
The AQR100 is contained in a raintight enclosure that is suitable for outdoor mounting. The Control
Box must be mounted a minimum of 10 ft. (4 meters) horizontal distance (or more, if local codes
require) from the pool and within 15 ft. from where the Cell is installed.
The Control Box is designed to mount vertically on a flat surface with the cables facing downward.
Because the enclosure also acts as a heat sink (disperses heat from inside the box), it is important
not to block the four sides of the Control Box. Do not mount the Control Box inside a panel or tightly
enclosed area.
Before securing the Control Box to the intended location, make sure that the Cell cable will reach the
location where the Cell Vessel will be installed. For mounting information, refer to the diagram below.
Select appropriate fasteners for your mounting surface that are suitable for a 20lb load. The mounting
template shown in Step 1 can be found on page 18.
Located in
back of Manual
USE ONLY HAYWARD GENUINE REPLACEMENT PARTS
4
Plumbing
O-Ring
Grease
The Cell Vessel is designed to install in 2” (51mm) PVC pool plumbing. For pools using 1½” (38 mm)
polypipe, you must use a 2” adapter. The Cell Vessel must be installed on approximately 10” run of
straight pipe at the end of the return piping just before the water returns to the pool. All pool equipment should be upstream from the Cell Vessel as shown in the diagram below. It must be located
within 15 feet of where the Control Box is mounted. Also, position the Vessel in a manner where the
Cell can be easily inserted and removed.
With power removed to the pump and water drained from the pool plumbing, cut the plumbing in the
desired location and glue the unions to the pipe. Install the included rubber gaskets on the Cell Vessel
then install the Cell Vessel into the plumbing by handtightening the unions.
Install gaskets on Cell
Vessel before installation
When choosing an
installation location, allow
enough cord to easily
insert/remove the cell
FROM
POOL
TO
POOL
Remove the foam protector from the Cell. Verify that the O-Ring is attached before inserting the Cell
into the Cell Vessel. Fully cover Cell pins with supplied grease as shown.
5
USE ONLY HAYWARD GENUINE REPLACEMENT PARTS
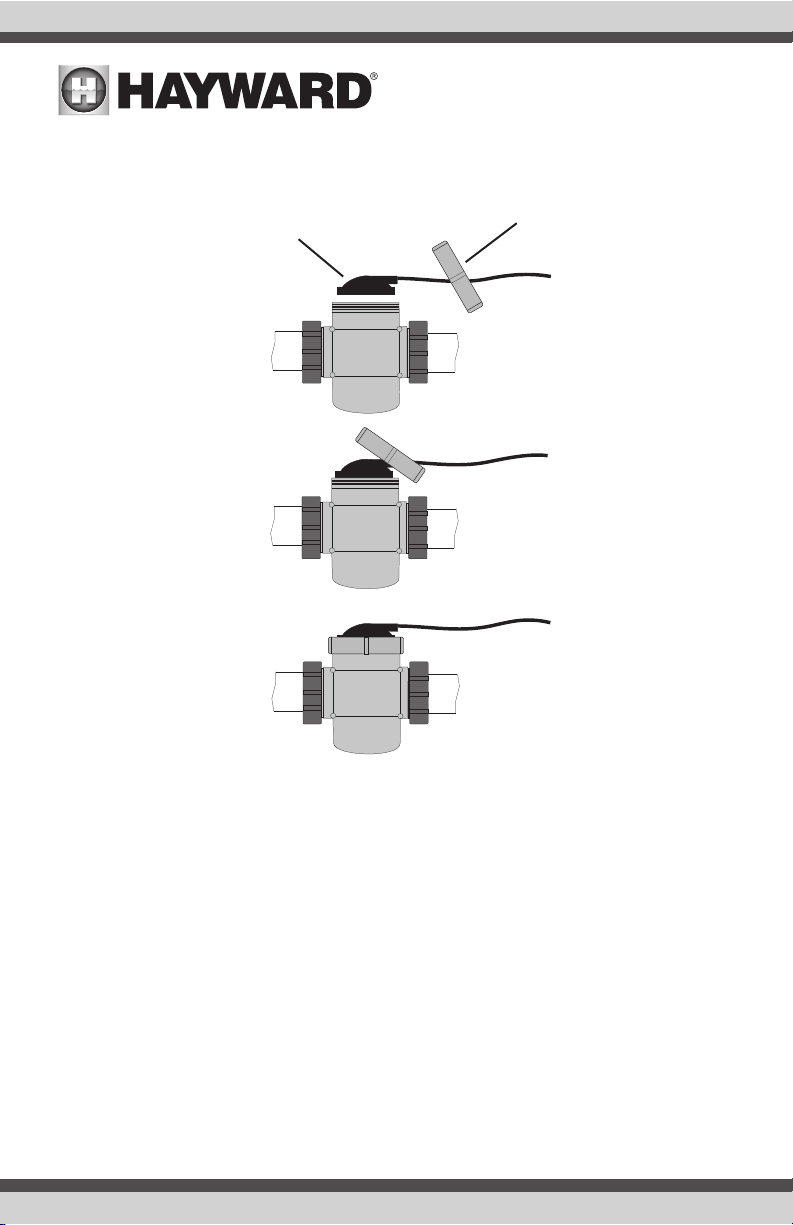
Connect and Fasten Cell Cap
Slip the Cell Cap through the Retaining Nut as shown below. Plug the Cell Cap into the Cell and
secure with the Retaining Nut.
Cell Cap
Retaining Nut
Wiring
Power must be shut off at the circuit breaker before performing any wiring. Be sure to follow Local
and NEC electrical codes. To provide safe operation, the AQR100 should be installed by a qualified
service professional and must be properly grounded and bonded.
The AQR100 can be powered by either 120 VAC or 240 VAC and must be wired in a manner that
the AQR100 turns on and off with the pool pump. If the pump is connected to a timeclock or switch,
wire the AQR100 in parallel.
Locate the 6 ft. long five conductor cable coming from the Control Box. These five colored wires are
used to select voltage and apply power to the AQR100. Refer to the wiring label on the AQR100 as
well as the diagrams on the following page to determine correct wiring connections for either 120
VAC or 240 VAC. Cut the cable and conductors to length and ensure that all connections are made
within a UL Listed junction box. Attach the junction box cover when wiring is complete.
6
USE ONLY HAYWARD GENUINE REPLACEMENT PARTS
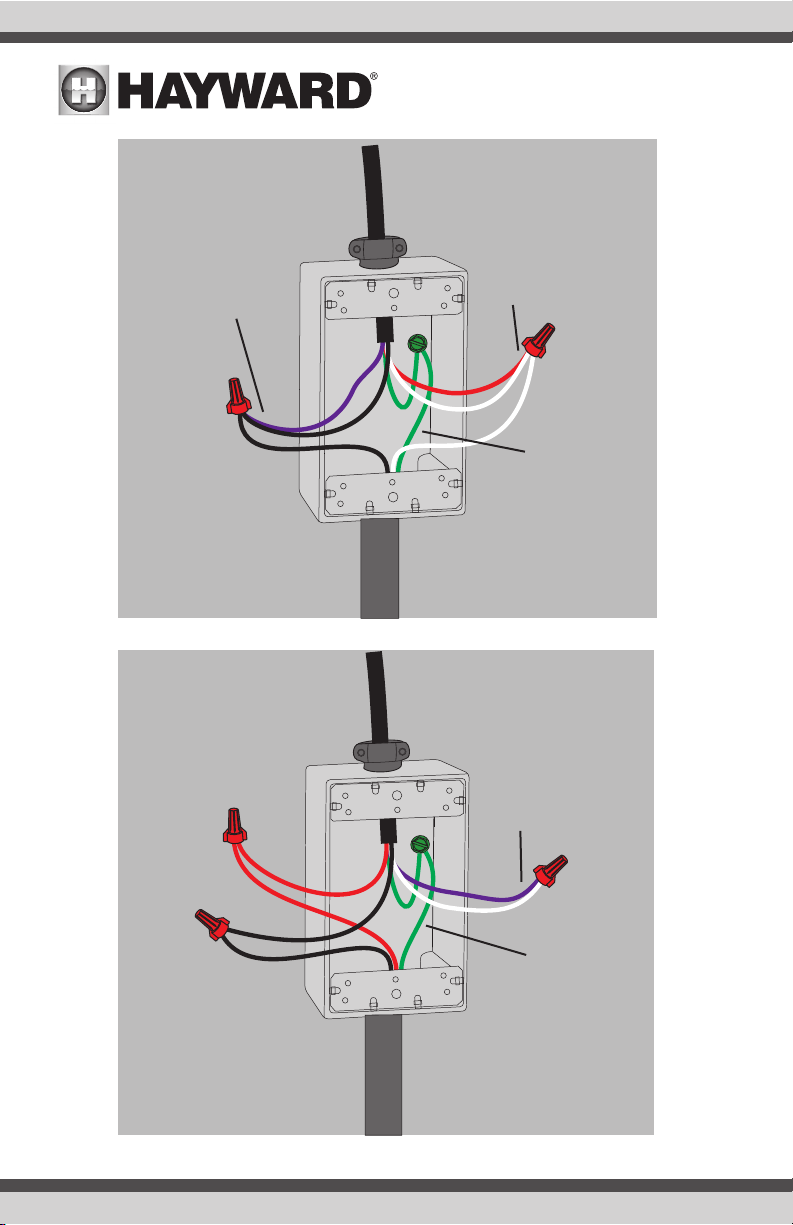
120 VAC
Power Cord from AQR100
black
&
violet
240 VAC
L2
L1
red
&
white
Neutral
Ground
UL Listed
Junction Box
Power Cord from AQR100
white
&
violet
red
black
L1
UL Listed
Junction Box
7
USE ONLY HAYWARD GENUINE REPLACEMENT PARTS
Ground
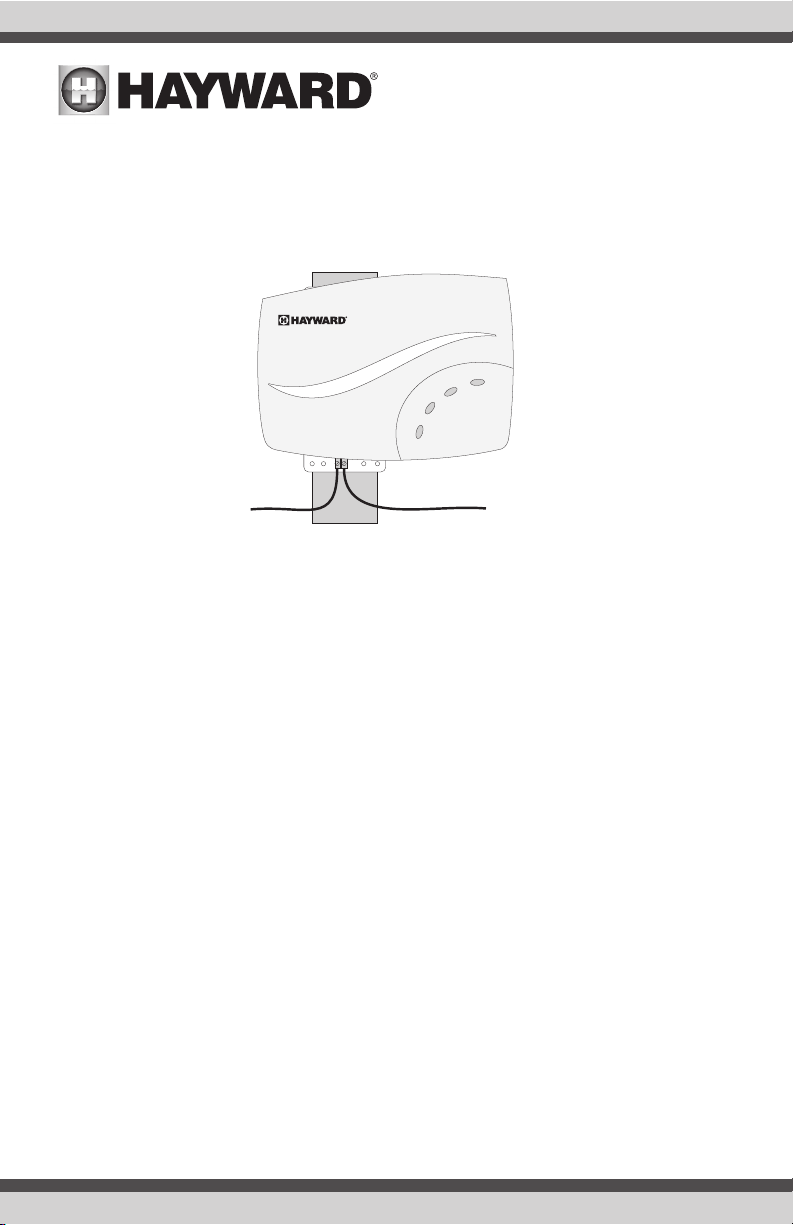
Bonding
Pool bonding or “equipotential bonding” ensures that all pool components around the pool are at the
same electrical potential. If bonding is required at your location (see Local and NEC codes), bonding
lugs are is provided at the bottom of the AQR100 enclosure. Run an 8 AWG solid copper wire (6 AWG
Canada) from the bonding lug to your pool’s existing bonding loop.
To Pool Bonding loop
IMPORTANT: Before going any further, the pool water must be balanced and salt must be added to
your pool. If this has not already been done, refer to the “Pool Chemistry” section on page 9 of this
manual for information on how to prepare your pool water for AQR100 operation.
USE ONLY HAYWARD GENUINE REPLACEMENT PARTS
8
Pool Chemistry
The table below summarizes the levels that are recommended by The Association of Pool and Spa
Professionals (APSP). It is important to maintain these levels in order to prevent corrosion or scaling
and to ensure maximum performance from your AQR100 chlorine generator. Your authorized AQR100
dealer or most pool stores can provide you with the chemicals and procedures to adjust the water
chemistry as well.
Note that pool water emanating from wells and municipal water supplies, along with the introduction
of environmental contaminants, can contain chemistries that are deleterious to the life expectancy
of the Cell.
CHEMICAL IDEAL LEVELS
Salt 1500 to 4500 ppm (3200 ideal)
Free Chlorine 1.0 to 3.0 ppm
pH 7.2 to 7.8
Cyanuric Acid
(Stabilizer)
Total Alkalinity 80 to 120 ppm
Calcium Hardness 200 to 400 ppm
Metals 0 ppm
Saturation Index -.2 to .2 (0 best)
Saturation index
The saturation index (Si) relates to the calcium and alkalinity in the water and is an indicator of the
pool water “balance”. Your water is properly balanced if the Si is 0 ± 0.2. If the Si is below -0.2,
the water is corrosive and plaster pool walls will be dissolved into the water. If the Si is above +0.2,
scaling and staining will occur. Use the chart below to determine the saturation index.
Outdoor Pools 30-50 ppm
Indoor Pools - 0 ppm
Si = pH + Ti + Ci + Ai - TDS
°C °F Ti Ci Ai TDS
12
53
16
60
19
66
24
76
29
84
34
94
39
102
Use: Measure the pH of the pool water, the temperature, water hardness, total alkalinity,
and total dissolved solids. Use the table above to determine Ti, Ci, Ai, and TDS in the
formula shown above. If the Si is equal to 0.2 or more, stains may appear. If the Si is
equal to -0.2 or less, corrosion or deterioration may occur.
Hardness
Calcium
75
0.3
100
0.4
125
150
0.5
200
0.6
250
300
0.7
400
0.8
600
800
0.9
Corrosion Stain
Total
alkalinity
75
1.5
100
1.6
125
1.7
150
1.8
200
1.9
250
2.0
300
2.1
400
2.2
600
2.4
800
2.5
-0.2 0.2
Ok
1.9
2.0
2.1
2.2
2.3
2.4
2.5
2.6
2.8
2.9
Total Dissolved
Solids
0-1000
1001-2000
2001-3000
3001-4000
4001-5000
12.10
12.29
12.35
12.41
12.44
9
USE ONLY HAYWARD GENUINE REPLACEMENT PARTS
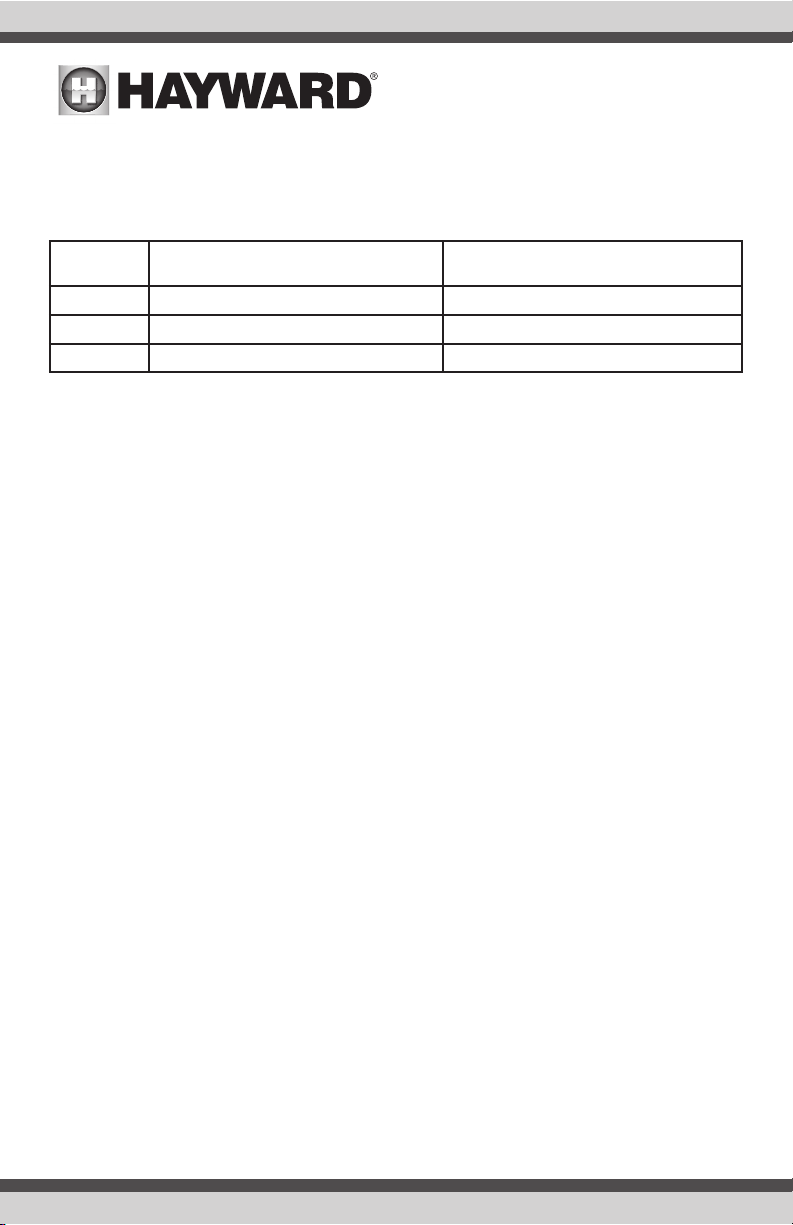
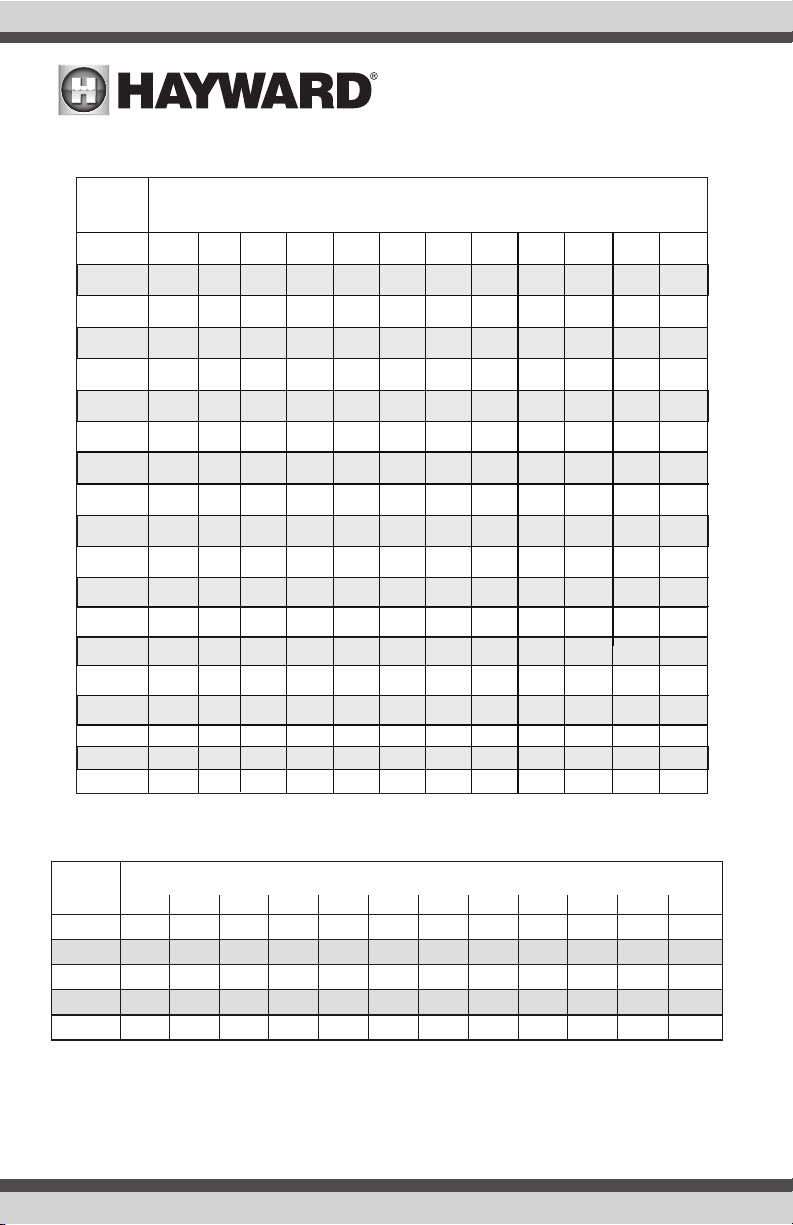
Salt Level
Determining the optimal salt concentration for your pool should be based on your desired pump run
time and the size of your pool. Use the chart on page 11 to determine how much salt in pounds or
(Kgs) need to be added to reach the recommended levels. Use the equations below (measurements
are in feet/gallons and meters/liters) if pool size is unknown.
Gallons
(pool size in feet)
Rectangular Length x Width x Average Depth x 7.5 Length x Width x Average Depth x 1000
Round Diameter x Diameter x Average Depth x 5.9 Diameter x Diameter x Average Depth x 785
Oval Length x Width x Average Depth x 6.7 Length x Width x Average Depth x 893
The AQR100 is designed to operate with a salt level between 1500-4500 ppm (parts per million),
with 3200 ppm being ideal. This broad operating range offers the flexibility to use a salt level that
best suits your pool application. Note that lower salt levels will reduce the efficiency of the AQR100
and result in lower chlorine production. This lower chlorine production may require longer run times
to effectively sanitize the pool. If the pool is too large or the salt level too low, you may not produce
enough chlorine to meet your pool’s demand. In general,
• For pools up to 15,000 gallons, lower salt levels (1500 - 2700 ppm) may be used. Higher levels
can also be used and will require less operating time.
• For pools larger than 15,000 gallons and up to 30,0000 gallons, salt concentration should be
higher than 2800 ppm. Note that a high salt level can begin to give a salty taste to your pool
and can even cause the AQR100 to shut down. Generally, salt will begin to be tasted at a level
of about 3500-4000+ ppm.
The salt in your pool is constantly recycled and the loss of salt throughout the swimming season should
be small. This loss is due primarily to the addition of water because of splashing, backwashing, or
draining (because of rain). Salt is not lost due to evaporation.
Liters
(pool size in meters)
Type of Salt to Use
It is important to use only sodium chloride (NaCl) salt that is greater than 99% pure. This is common
food quality or water softener salt and is usually available in 40-80 lb. bags labeled “Coarse Solar
Salt” or “Pool Salt”. It is also acceptable to use water conditioning salt pellets, however, it will take
longer for them to dissolve. Do not use rock salt, salt with yellow prussiate of soda, salt with anticaking additives, or iodized salt.
How to Add or Remove Salt
For new plaster pools, wait 10-30 days (check with you local pool professional) before adding salt to
allow the plaster to cure. Turn the circulating pump on and add salt directly into the pool. Brush the
salt around to speed up the dissolving process--do not allow salt to pile up on the bottom of the pool.
Run the filter pump for 24 hours with the suction coming from the main drain (use pool vac if there
is no main drain) to allow the salt to evenly disperse throughout the pool.
The only way to lower the salt concentration is to partially drain the pool and refill with fresh water.
Always check stabilizer (cyanuric acid), when checking salt. These levels will most likely decline
together. Use the chart on the following page to determine how much stabilizer must be added to
raise the level to 40 ppm.
10
USE ONLY HAYWARD GENUINE REPLACEMENT PARTS
Current salt
level
ppm
0
200
400
600
800
1000
1200
1400
1600
1800
2000
2200
2400
2600
2800
3000
3200
3400
3600+
8,000
(30,000)
213
(97)
200
(91)
187
(85)
173
(79)
160
(73)
147
(67)
133
(61)
120
(55)
107
(48)
93
(42)
80
(36)
67
(30)
53
(24)
40
(18)
27
(12)
13
(6)
Ideal
Dilute
POUNDS and (Kg) of SALT NEEDED FOR 3200PPM
Gallons and (Liters) of Pool Water
10,000
12,000 14,000 16,000 18,000 20,000 22,000 24,000 26,000
(37,500)
(45000) (52,500) (60,000) (67,500) (75,000) (82,500) (90,000) (98,400)
267
320
373
427
(121)
(145)
250
300
(114)
(136)
233
280
(106)
(127)
217
260
(98)
(118)
200
240
(91)
(109)
183
220
(83)
(100)
167
200
(76)
(91)
150
180
(68)
(82)
133
160
(61)
(73)
117
140
(53)
(64)
100
120
(45)
(55)
83
100
(38)
(45)
80
67
(30)
(36)
60
50
(23)
(27)
33
40
(15)
(18)
17
20
(8)
(9)
Ideal
Ideal Ideal Ideal Ideal Ideal Ideal Ideal Ideal
(170)
350
(159)
327
(148)
303
(138)
280
(127)
257
(117)
233
(106)
210
(95)
187
(85)
163
(74)
140
(64)
117
(53)
93
(42)
70
(32)
47
(21)
23
(11)
(194)
400
(182)
373
(170)
347
(158)
320
(145)
293
(133)
267
(121)
240
(109)
213
(97)
187
(85)
160
(73)
133
(61)
107
(48)
80
(36)
53
(24)
27
(12)
OKOKOKOKOK OK OK OK OK OK
Dilute
Dilute Dilute Dilute Dilute Dilute Dilute Dilute Dilute
480
(218)
450
(205)
420
(191)
390
(177)
360
(164)
330
(150)
300
(136)
270
(123)
240
(109)
210
(95)
180
(82)
150
(68)
120
(55)
90
(41)
60
(27)
30
(14)
533
(242)
500
(227)
467
(212)
433
(197)
400
(182)
367
(167)
333
(152)
300
(136)
267
(121)
233
(106)
200
(91)
167
(76)
133
(61)
100
(45)
67
(30)
33
(15)
587
(267)
550
(250)
513
(233)
477
(217)
440
(200)
403
(183)
367
(167)
330
(150)
293
(133)
257
(117)
220
(100)
183
(83)
147
(67)
110
(50)
73
(33)
37
(17)
640
(291)
600
(273)
560
(255)
520
(236)
480
(218)
440
(200)
400
(182)
360
(164)
320
(145)
280
(127)
240
(109)
200
(91)
160
(73)
120
(55)
80
(36)
40
(18)
693
(315)
650
(296)
607
(277)
563
(256)
520
(236)
477
(217)
433
(197)
390
(178)
347
(157)
303
(137)
260
(118)
217
(99)
173
(79)
130
(60)
87
(39)
43
(19)
28,000 30,000
(106,000)
(113,500)
746
(339)
(363)
700
(342)
(319)
654
(299)
(326)
606
(276)
(296)
560
600
(254)
(272)
514
(234)
(251)
466
499
(212)
(227)
420
450
(192)
(206)
374
401
(169)
(181)
326
349
(147)
(157)
280
(127)
(136)
251
234
(107)
(114)
186
199
(85)
140
150
(65)
94
(42)
46
(20)
Ideal Ideal
OK OK
Dilute Dilute
799
750
701
609
551
300
(91)
(70)
101
(45)
49
(21)
Current
Stabilizer
level
(ppm)
0 ppm
10 ppm
20 ppm
30 ppm
40 ppm
11
POUNDS and (Kg) OF STABILIZER (CYANURIC ACID) NEEDED FOR 40 PPM
Gallons and (Liters) of Pool Water
8,000
(30000)
2.7
(1.2)
2.0
(.9)
1.3
(.59)
0.7
(.31)
10,000
(37500)
3.4
(1.5)
2.5
(1.1)
1.7
(.77)
0.8
(.36)
14,000
12,000
(52500)
(45000)
4.0
4.7
(1.8)
(2.2)
3.0
3.5
(1.6)
(1.4)
2.3
2.0
(1.1)
(.90)
1.0
1.2
(.45)
(.54)
0.00.0 0.00.0 0.0
16,000
(60000)
5.4
(2.5)
4.0
(1.8)
2.7
(1.3)
1.4
(.64)
18,000
(67500)
6.0
(2.7)
4.5
(2.0)
3.0
(1.3)
1.5
(.68)
0.0
20,000
(75000)
6.7
(3.0)
5.0
(2.3)
3.3
(1.5)
1.7
(.77)
0.0
22,000
(82500)
7.4
(3.4)
5.5
(2.5)
3.7
(1.6)
1.8
(.82)
0.0
24,000
(90000)
USE ONLY HAYWARD GENUINE REPLACEMENT PARTS
8.0
(3.6)
6.0
(2.7)
4.0
(1.8)
2.0
(.91)
0.0
20,000
(97500)
8.7
(4.0)
6.5
(3.0)
4.3
(2.0)
2.2
(.97)
0.0
28,000
(105000)
9.4
(4.3)
7.0
(3.2)
4.6
(2.1)
2.4
(1.1)
0.0
30,000
(112500)
10.0
(4.5)
7.5
(3.4)
4.9
(2.2)
2.6
(1.2)
0.0
 Loading...