

Hayward AQL-SS-6B, AQL-SS-D Owner's Manual
USE ONLY HAYWARD GENUINE REPLACEMENT PARTS
.....
Spaside Remote Control
Owner’s Manual
AQL-SS-6B
AQL-SS-D
Contents
Compatibility.........................1
Installation............................1
Operation..............................7
Troubleshooting....................9
Warranty..............................14
092081C RevE
for Aqua Logic and Pro Logic
Hayward Pool Products
620 Division Street, Elizabeth NJ 07207
Phone: (908) 355-7995
www.hayward.com

1
USE ONLY HAYWARD GENUINE REPLACEMENT PARTS
Compatibility
Pro Logic
The AQL-SS-6B-x is compatible with all Pro Logic P-4 and PS versions. The AQL-SS-6B can
control 6 separate functions. The remote is configurable, allowing the user to assign buttons to
specific functions within the Configuration Menu.
The AQL-SS-D is compatible with all Pro Logic PS versions only. The AQL-SS-D can control 8
functions and provides spa and air temperature via the backlit LCD display. In addition to viewing
temperatures, you can also set the spa heater temperature with the AQL-SS-D remote control.
Aqua Logic
The AQL-SS-6B-x and AQL-SS-D-x (where the x denotes the color; W=white, G=gray, B=black)
are compatible with all PS Aqua Logic controls that use software version 2.40 or later (refer to the
Aqua Logic manual to determine software version). The AQL-SS-6B is also configurable when
used with the Aqua Logic P-4 running software version 2.40 or later. The AQL-SS-6B is compatible with PS and P4 models prior to version 2.40, but is not configurable (the buttons are fixed to
operate specific functions).
For PS systems with software version 2.40 or later:
Both units allow the user to assign buttons to specific functions. The AQL-SS-6B can control 6
separate functions. The AQL-SS-D can control 8 functions and provides spa and air temperature
via the backlit LCD display. In addition to viewing temperatures, you can also set the spa heater
temperature with the AQL-SS-D remote control. Both models are configured through the configuration menu in the Aqua Logic.
For P4 systems with software version 2.40 or later:
The AQL-SS-6B can control 6 separate functions. The remote is configurable, allowing the user
to assign buttons to specific functions within the Configuration Menu. The AQL-SS-D is not compatible with these systems.
For PS and P4 systems with software prior to version 2.40:
Only the AQL-SS-6B can be used with these systems and is preconfigured to operate specific
functions. The buttons can not be assigned. The diagram below shows the button functions and
locations for the AQL-SS-6B when used with Aqua Logic models running software prior to version
2.40. The AQL-SS-D is not compatible with these systems.
Installation
The AQL-SS-6B and AQL-SS-D are double insulated, waterproof devices that are designed for
installation at the water’s edge. The remote controls are typically installed at the tile-line of the
spa wall, or in the deck, within arm’s reach of a spa occupant. Before the pool/spa construction
is complete, run electrical conduit from the desired remote location back to the Pro Logic or Aqua
Logic. The installation of the remote should be AFTER the pool/spa construction is complete. For
new tile and concrete applications, optional Mud Boxes (Goldline part AQL-SS-6B-BOX and AQL-
USE ONLY HAYWARD GENUINE REPLACEMENT PARTS
2
SS-D-BOX) are available for both remotes to aid in installation. For mud box installation, refer to
the instructions included with the boxes. For all other installations, refer to the information on the
following pages.
Surface Mount Installation (without Mud Box)
1. The AQL-SS-6B/D’s unique design allows you to use 1½”, 1¼”, or 1” diameter Schedule 40
PVC for installation. Install a 6” (minimum) piece of PVC pipe in the pool/spa wall at a location above the high water mark. There must be at least 2” of clearance from coping stones
or other raised objects to the Schedule 40 pipe. It is advisable that this pipe be plumbed as
level as possible although the O-ring is designed to compensate for small variations from
perpendicular if necessary.
2. The pipe should protrude beyond the finished surface of the spa, as it will be cut back after
surface finishing is completed. Reduce the pipe to ½” or ¾” electrical conduit and run back
to the Pro Logic/Aqua Logic, using sweep elbows for any turns in the run.
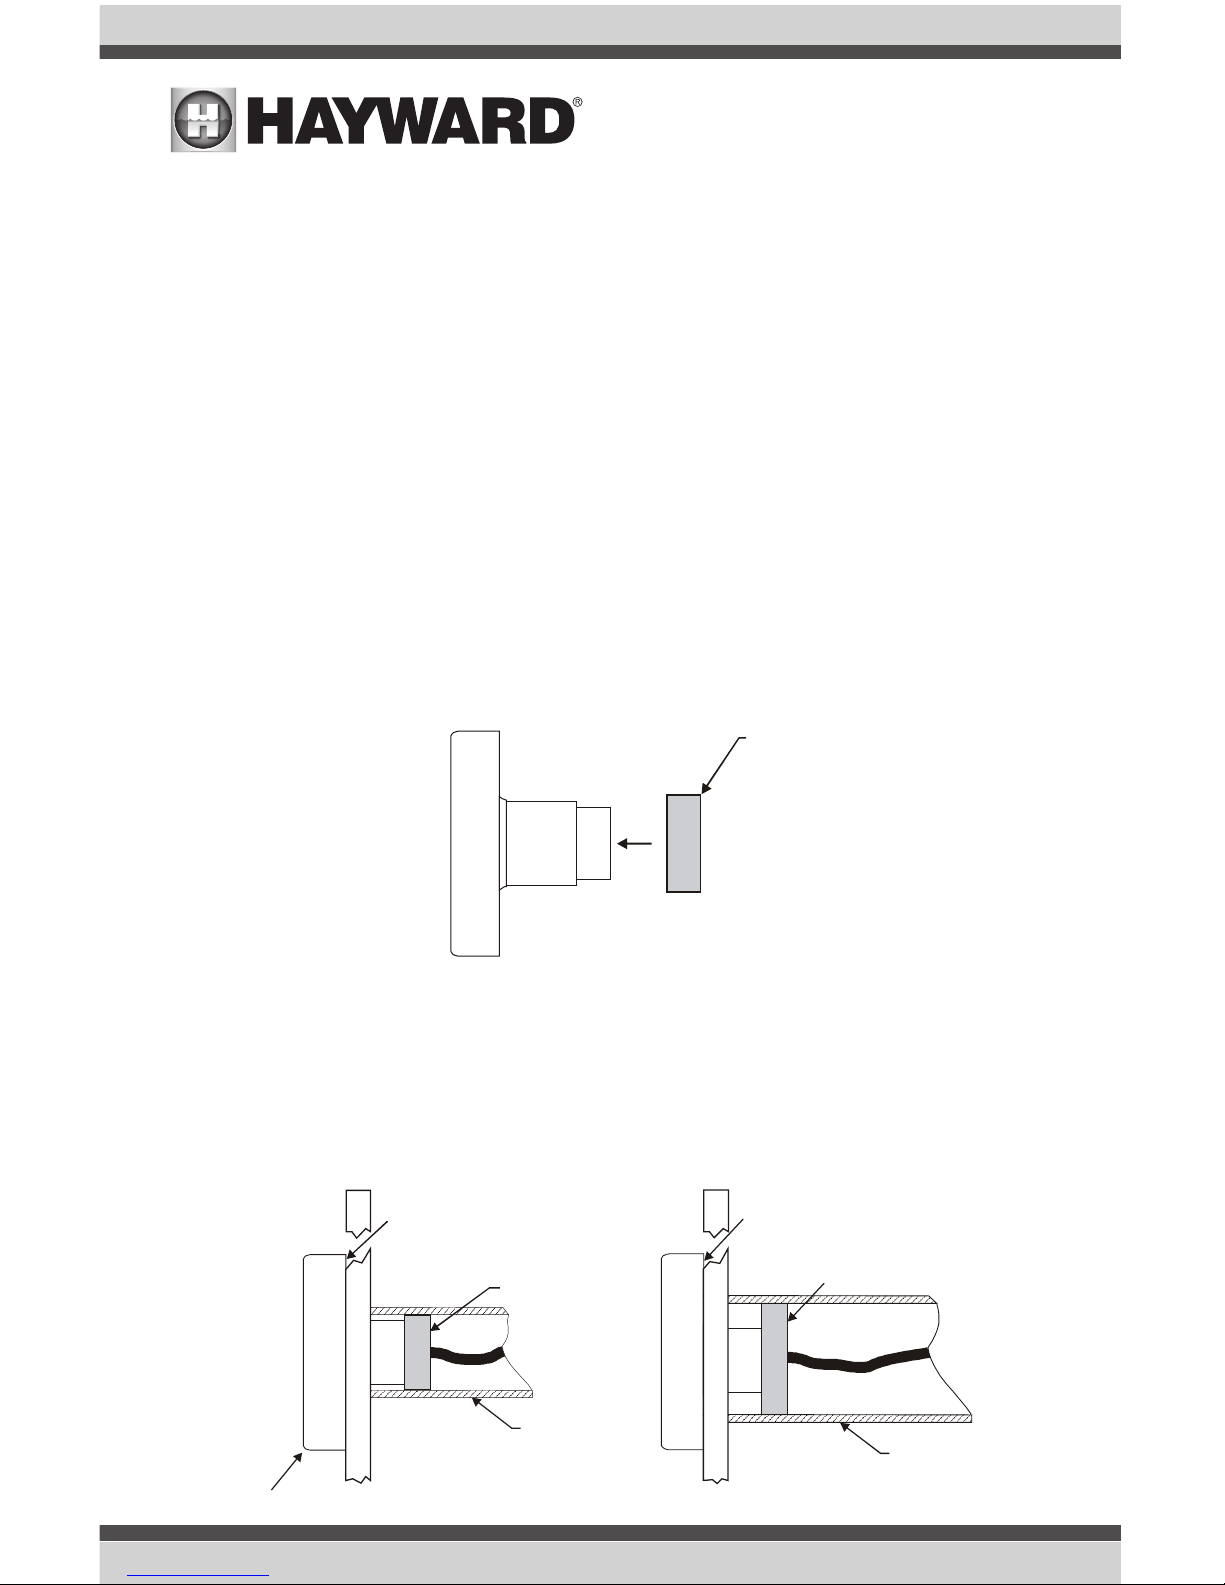
3. Depending on the PVC pipe size used, mount the appropriate size O-ring on the back of the
remote control as shown below and cut the other two off of the cable.
4. When the spa construction is completed, cut back the PVC conduit receptacle flush with the
spa wall or surface of the deck. Run the cable from the AQL-SS-6B/D through the conduit to
the Pro Logic or Aqua Logic.
5. Run a small bead of silicone sealant along outside edge of the remote control. Attach remote
to the mounting surface by sliding the O-ring into pipe and pushing against the surface.
NOTE: Do NOT apply sealant to compression O-ring or PVC pipe. See below.
1”, 1¼”, 1½” Compression
O-Ring
1 in. PVC
Conduit
1½ in. PVC
Conduit
Remote
1” Compression
O-Ring
1½” Compression
O-Ring
cabl e
cabl e
Apply Silcone Sealant
along outside edge only
Apply Silcone Sealant
along outside edge only
3
USE ONLY HAYWARD GENUINE REPLACEMENT PARTS
Flush Mount Installation (without optional Mud Box)
Flush mounting the AQL-SS-6B/D is similar to surface mounting except that the flush mount
frame is used and a cutout is made to accommodate the body. The remote (with frame) is
inserted into the cutout and the O-ring is inserted into the PVC pipe. Refer to the diagram below
and follow the following steps:
1. Find the desired location for the installation of the AQL-SS-6B/D and cut out the hole using
one of the included templates (page 10). The remote should be mounted in a location above
the high water mark.
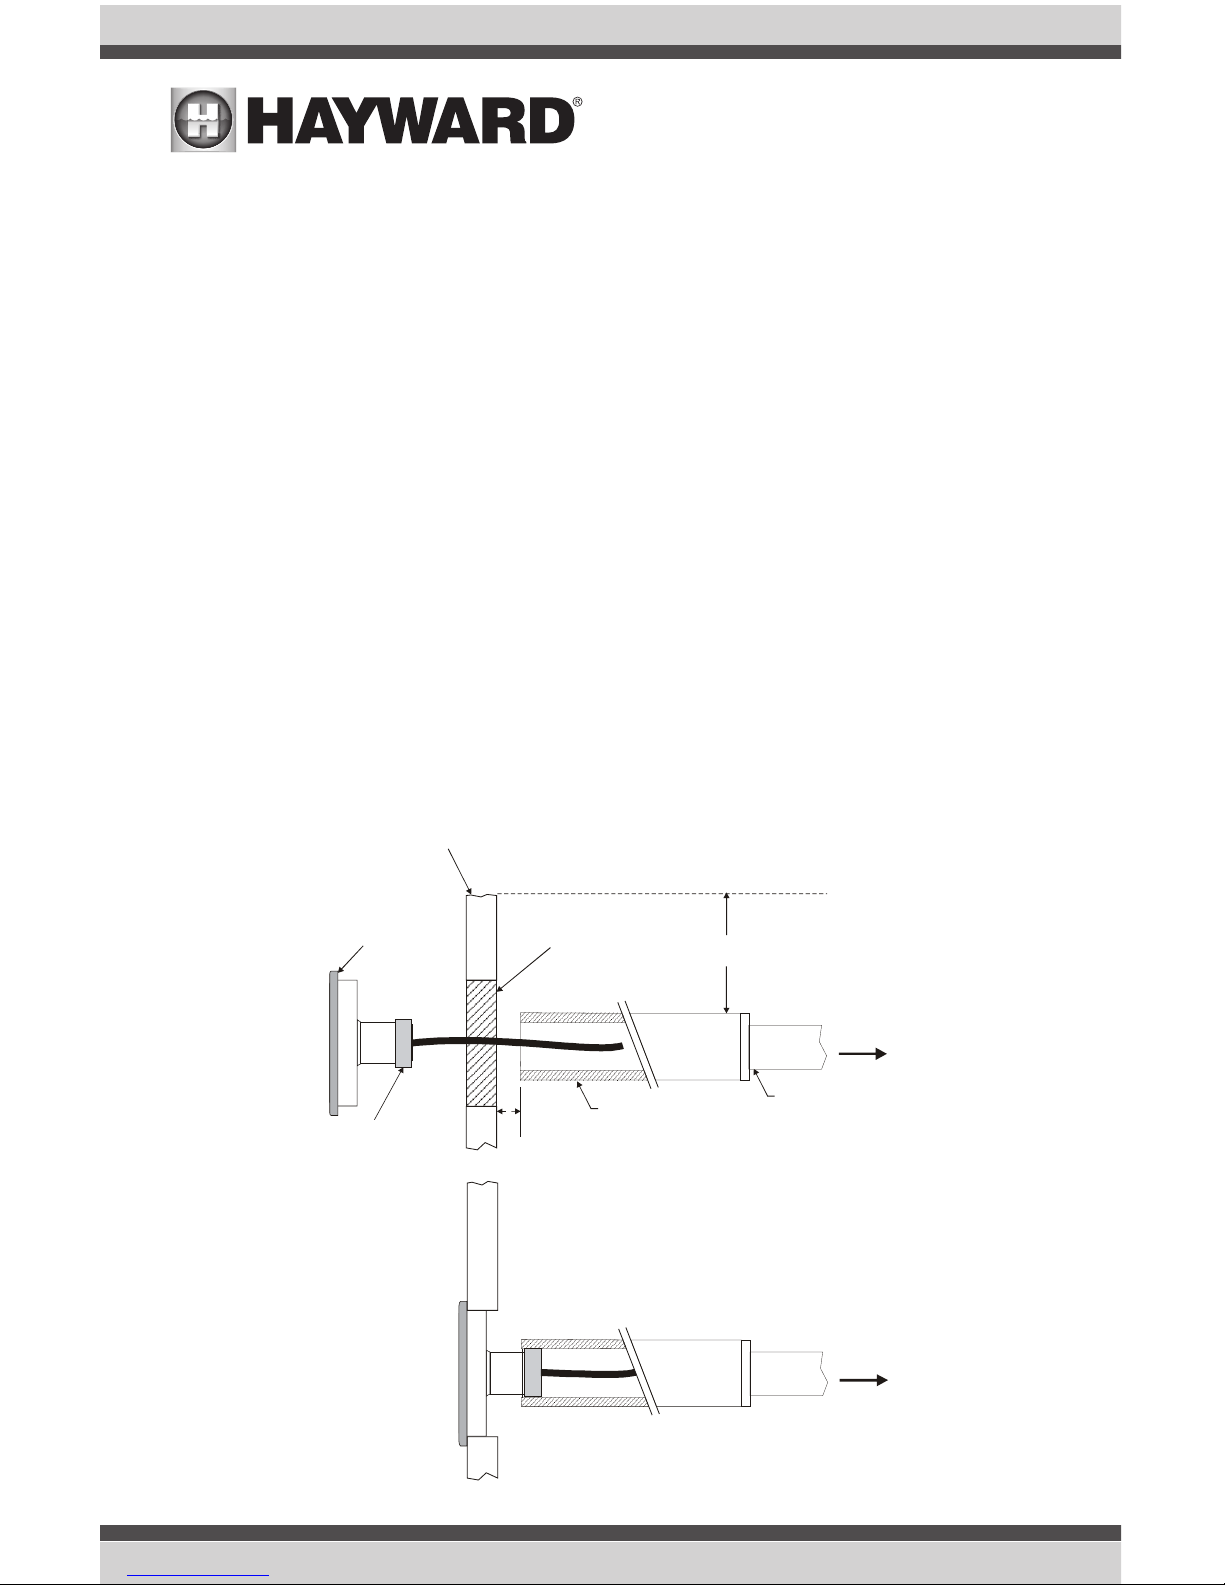
2. Install a 6” (minimum) piece of 1”, 1¼”, or 1½” PVC pipe to be used as a receptacle for
the AQL-SS-6B/D. The pipe will be installed in the pool/spa wall, centered on the cutout
with the pipe end located ¾” behind the cutout surface. The other end should be attached
to ½” or ¾” electrical conduit and run back to the Pro Logic/Aqua Logic. See below. It is
advisable that this pipe be plumbed as level as possible although the O-ring is designed to
compensate for small variations from perpendicular if necessary.
3. Run the cable from the AQL-SS-6B/D through the conduit to the Pro Logic/Aqua Logic.
4. Run a small bead of silicone sealant along the outside edge of the frame. Attach the remote
to the mounting surface by sliding the O-ring into the pipe and pushing the frame against
the surface. NOTE: Do NOT apply sealant to the compression O-ring or PVC pipe.
1, 1¼, or 1½ in. PVC
Conduit
½ or ¾ in. PVC
Conduit
1, 1¼, or
1½ in. O-ring
Apply Silcone Sealant
along outside edge only
Cutout for flush mounting
Mounting surface
¾”
To Aqua Logic
To Aqua Logic
2”
minimum
Coping line
USE ONLY HAYWARD GENUINE REPLACEMENT PARTS
4
Flush Mount Installation using optional Mud Box
Refer to instructions that are included with the AQL-SS-6B-BOX or AQL-SS-D-BOX Mud Box.
Cutout templates are provided on page 10.
Wiring
The AQL-SS-6B/D comes with 150 ft. of 5-conductor 24 AWG outdoor rated cable. In most applications, the cable will need to be shortened. Follow the wiring instructions below:
1. Turn off AC power to the Pro Logic or Aqua Logic
2. Run the cable through the conduit from the remote mounting location to the Pro Logic/Aqua
Logic.
3. Route the cable through one of the knockouts on the left side of the Pro Logic/Aqua Logic. If
the cable needs to be shortened, cut the cable to length.
4. Strip back the gray jacket and strip each of the 5 conductors to expose 1/8” bare wire.
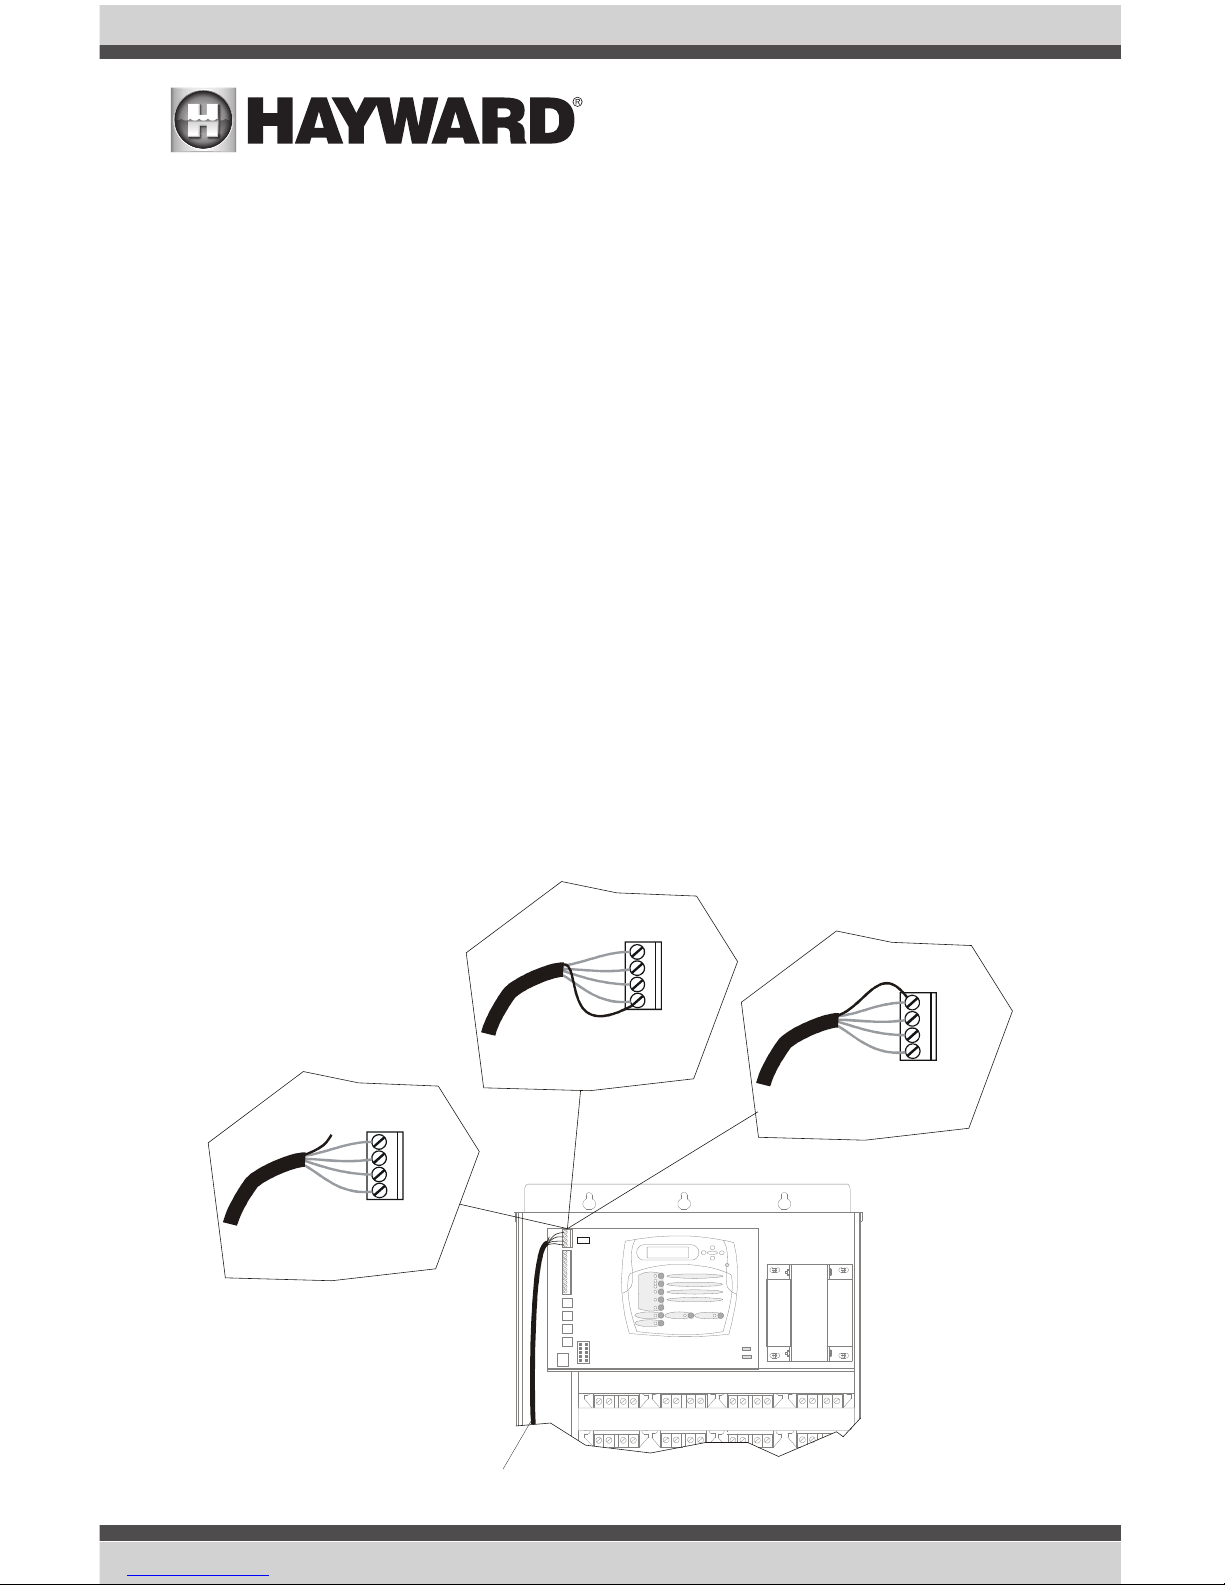
5. Connect wires to the 4 position terminal block located on the upper left corner of the printed
circuit board. Refer to the “Wiring Configurations” section and follow the wiring diagram
below. Note that the White wire is connected to the screw terminal labeled “Yellow”.
6. Turn on power to the Pro Logic/Aqua Logic.
To Spaside Remote
Black
Red
Yel lo w
Green
Configuration A
Black
Black
Red
Red
Yel lo w
Yel lo w
Green
Green
Configuration B
Configuration C
green
green
green
white
white
white
black
black
black
red
red
red
brown
brown
brown
(not used)
 Loading...