


R48 Recycling Mower
Code 445E, 446E, 447E |
|
|
Serial No. 280R00001, 280S00001,or 280T00001 and |
Manual Part No. 111-2087 Rev B |
|
Up |
||
|
Introduction
Read this information carefully to learn how to operate and maintain your product properly and to avoid injury and product damage. You are responsible for operating the product properly and safely.
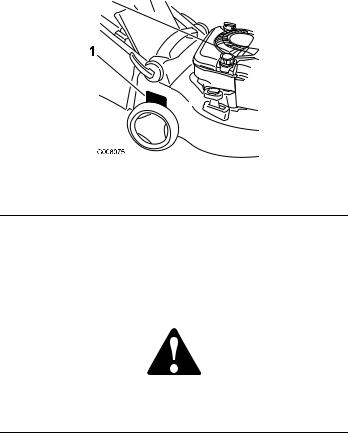
Whenever you need service, genuine parts, or additional information, contact an Authorized Service Dealer and have the model and serial numbers of your product ready. Figure 1 identifies the location of the model and serial numbers on the product.
Figure 1
1.Model and serial number plate
This manual identifies potential hazards and has safety messages identified by the safety alert symbol (Figure 2), which signals a hazard that may cause serious injury or death if you do not follow the recommended precautions.
Figure 2
1.Safety alert symbol
This manual uses 2 words to highlight information. Important calls attention to special mechanical information and Note emphasizes general information worthy of special attention.
Contents |
|
Introduction................................................................. |
2 |
Safety........................................................................... |
3 |
GeneralLawnMowerSafety................................. |
3 |
Sound Pressure..................................................... |
4 |
Sound Power........................................................ |
4 |
Vibration, Hand/arm........................................... |
4 |
SafetyandInstructionalDecals............................. |
5 |
Setup............................................................................ |
6 |
Unfolding the Handle........................................... |
6 |
FillingtheEnginewithOil.................................... |
6 |
InstallingtheFuse(Model447EOnly).................. |
7 |
ChargingtheBattery(Model447EOnly)............... |
7 |
Product Overview........................................................ |
8 |
Operation..................................................................... |
8 |
Filling the Fuel Tank............................................. |
8 |
CheckingtheEngineOilLevel.............................. |
8 |
AdjustingtheCuttingHeight................................ |
9 |
Starting the Engine............................................... |
9 |
Using the Self-propel Drive (Models 446E and |
|
447E Only) .................................................... |
10 |
Stopping the Engine........................................... |
10 |
RecyclingtheClippings....................................... |
10 |
BaggingtheClippings......................................... |
10 |
Rear-dischargingtheClippings............................ |
11 |
Operating Tips................................................... |
11 |
Maintenance............................................................... |
13 |
RecommendedMaintenanceSchedule(s) ................ |
13 |
PremaintenanceProcedures.................................... |
13 |
PreparingforMaintenance ................................. |
13 |
Lubrication............................................................. |
14 |
LubricatingtheWheelGears............................... |
14 |
Engine Maintenance............................................... |
14 |
ReplacingtheAirFilter....................................... |
14 |
ChangingtheEngineOil .................................... |
14 |
ElectricalSystemMaintenance................................ |
15 |
Charging the Battery (Model 447E |
|
Only).............................................................. |
15 |
ReplacingtheFuse(Model447EOnly) ............... |
15 |
DriveSystemMaintenance ..................................... |
16 |
AdjustingtheSelf-propelDrive........................... |
16 |
Blade Maintenance................................................. |
17 |
Replacing the Blade............................................ |
17 |
Cleaning................................................................. |
18 |
Cleaning the Mower............................................ |
18 |
Storage....................................................................... |
18 |
PreparingtheMowerforStorage ........................ |
18 |
RemovingtheMowerfromStorage..................... |
18 |
© 2008—Hayter Limited |
|
Printed in the USA. |
2 |
All Rights Reserved |
|

Safety
Improperly using or maintaining this mower can result in injury. To reduce the potential for injury, comply with these safety instructions.
This mower was designed and tested for reasonably safe service; however, failure to comply with the following instructions may result in personal injury.
To ensure maximum safety, best performance, and to gain knowledge of the product, it is essential that you and any other operator of the mower read and understand the contents of this manual before the engine is ever started. Pay particular attention to the safety alert symbol (Figure 2) which means Caution, Warning, or Danger—“personal safety instruction.” Read and understand the instruction because it has to do with safety. Failure to comply with the instruction may result in personal injury.
General Lawn Mower Safety
The following instructions have been adapted from the ISO 5395.
This cutting machine is capable of amputating hands and feet and throwing objects. Failure to observe the following safety instructions could result in serious injury or death.
Training
•Read the instructions carefully. Be familiar with the controls and the proper use of the equipment.
•Never allow children or people unfamiliar with these instructions to use the mower. Local regulations can restrict the age of the operator.
•Keep in mind that the operator or user is responsible for accidents or hazards occurring to other people or their property.
•Understand explanations for all pictograms used on the mower or in the instructions.
Petrol
WARNING-Petrol is highly flammable. Take the following precautions.
•Store fuel in containers specifically designed for this purpose.
•Refuel outdoors only and do not smoke while refueling.
•Add fuel before starting the engine. Never remove the cap of the fuel tank or add petrol while the engine is running or when the engine is hot.
•If petrol is spilled, do not attempt to start the engine but move the mower away from the area of spillage and avoid creating any source of ignition until petrol vapors have dissipated.
•Replace all fuel tank and container caps securely.
Preparation
•While mowing, always wear substantial footwear and long trousers. Do not operate the equipment when barefoot or wearing open sandals.
•Thoroughly inspect the area where the equipment is to be used and remove all stones, sticks, wires, bones and other foreign objects.
•Before using, always visually inspect to see that guards, and safety devices, such as deflectors and/or grass bags, are in place and working correctly.
•Before using, always visually inspect to see that the blades, blade bolts and cutter assembly are not worn or damaged. Replace worn or damaged blades and bolts in sets to preserve balance.
Starting
•Disengage all blade and drive clutches and shift into neutral before starting the engine.
•Do not tilt mower when starting the engine or switching on the motor, unless the mower has to be tilted for starting. In this case, do not tilt it more than absolutely necessary and lift only the part, which is away from the operator.
•Start the engine or switch on the motor carefully according to instructions and with feet well away from the blade(s) and not in front of the discharge chute.
Operation
•Never mow while people, especially children, or pets are nearby.
•Mow only in daylight or in good artificial light.
•Stay alert for holes in the terrain and other hidden hazards.
•Do not put hands or feet near or under rotating parts. Keep clear of the discharge opening at all times.
•Never pick up or carry a lawn mower while the engine is running.
•Use extreme caution when reversing or pulling a pedestrian controlled lawn mower towards you.
•Walk, never run.
•Slopes:
3

–Do not mow excessively steep slopes.
–Exercise extreme caution when on slopes.
–Mow across the face of slopes, never up and down and exercise extreme caution when changing direction on slopes.
–Always be sure of your footing on slopes.
•Use low throttle settings when engaging the traction-clutch, especially in high gears. Reduce speed on slopes and in sharp turns to prevent overturning or loss of control.
•Stop the blade if the lawn mower has to be tilted for transportation when crossing surfaces other than grass and when transporting the lawn mower to and from the area to be mowed.
•Do not operate the engine in a confined space where dangerous carbon monoxide fumes can collect.
•Stop the engine
–whenever you leave the lawn mower.
–before refueling.
–before removing the grass bag.
–before making height adjustment unless adjustment can be made from the operator’s position.
•Stop the engine and disconnect the spark-plug lead.
–before clearing blockages or unclogging chute.
–before checking, cleaning or working on the lawn mower.
–after striking a foreign object, inspect the lawn mower for damage and make repairs before restarting and operating the lawn mower.
–if lawn mower starts to vibrate abnormally (check immediately).
•Watch out for traffic when crossing or near roadways.
Maintenance and Storage
•Keep all nuts, bolts and screws tight to be sure the equipment is in safe working condition.
•Do not use pressure cleaning equipment on machine.
•Never store the equipment with petrol in the tank and inside a building where fumes can reach an open flame or spark.
•Allow the engine to cool before storing in any enclosure.
•To reduce the fire hazard, keep the engine, silencer, battery compartment and petrol storage area free of grass, leaves, or excessive grease.
•Check grass bag components and the discharge guard frequently and replace with manufacturer’s recommended parts, when necessary.
•Replace worn or damaged parts for safety.
•Replace faulty silencers.
•If the fuel tank has to be drained, do this outdoors.
•Do not change the engine governor settings or overspeed the engine. Operating an engine at excessive speed can increase the hazard of personal injury.
•On multibladed lawn mowers, take care as rotating one blade may cause others to rotate.
•Be careful during adjustment of the lawn mower to prevent entrapment of the fingers between moving blades and fixed parts of the lawn mower.
•To ensure the best performance and safety, purchase only genuine replacement parts and accessories. Do not use will fit parts and accessories; they may cause a safety hazard.
Sound Pressure
This unit has an equivalent continuous A-weighted sound pressure level at the operator ear of 85 dBA, based on measurements of identical machines per EN ISO 11201 and EN 836.
Sound Power
This unit has an equivalent continuous A-weighted sound power level of 96 dBA, based on measurements of identical machines per ISO 11094.
Vibration, Hand/arm
This unit does not exceed a hand/arm vibration level of 4.9 m/s2, based on measurements of identical machines per EN 1033 and EN 836.
4
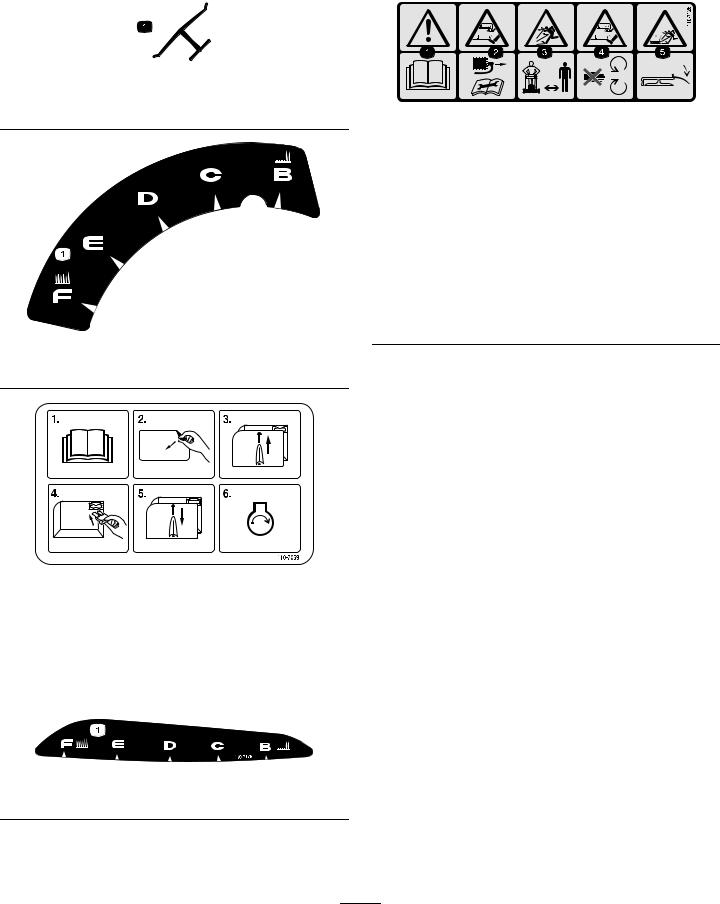
Safety and Instructional Decals
Important: Safety and instruction decals are located near areas of potential danger. Replace damaged decals.
Manufacturer’s Mark
1.Indicates the blade is identified as a part from the original machine manufacturer.
110-7058
1.Height of cut
110-7059
Model 447E only
1. |
Read the Operator’s |
4. |
Install the fuse. |
|
Manual. |
|
|
2. |
Remove the fuse box |
5. |
Replace the fuse box |
|
decal. |
|
cover. |
3. |
Remove the fuse box |
6. |
Start the engine. |
|
cover. |
|
|
|
|
|
|
110-7126
1. |
Warning—read the |
4. |
Cutting, dismemberment |
|
Operator’s Manual. |
|
hazard of hand or |
|
|
|
foot—stay away from |
|
|
|
moving parts. |
2. |
Cutting, dismemberment |
5. |
Thrown object |
|
hazard of hand or |
|
hazard—keep deflector in |
|
foot—remove the |
|
place. |
|
spark plug lead |
|
|
|
before performing any |
|
|
maintenance on the machine.
3.Thrown object hazard—keep bystanders a safe distance from the machine.
110-7178
1.Height of cut
5

Setup
Unfolding the Handle
1. Unlock the handle locks, move the handle sections into the operating position, and lock the handle locks (Figure 3).
Figure 5
Figure 3
2.Unlock the upper handle locks and rotate the upper handle upward and lock it into a position that is comfortable to you (Figure 4).
|
|
Figure 4 |
1. |
Highest position |
3. Lowest position |
2. |
Middle position |
|
Note: You can set the upper handle to 1 of 3 handle positions. Line up the mark to one of the 3 marks on the inner side of the upper handle locks (Figure 4).
Note: If a handle lever is loose, open the lever, rotate it clockwise 1 or 2 turns to tighten it, then close the lever (Figure 5).
Filling the Engine with Oil
Your mower does not come with oil in the engine.
1. Remove the dipstick (Figure 6).
Figure 6
2.Slowly pour oil into the oil fill tube until the oil level reaches the Full line on the dipstick (Figure 6). Do not overfill. (Max. fill: 0.59 l, type: SAE 30W detergent oil with an API service classification of SF, SG, SH, SJ, SL, or higher.)
3.Install the dipstick securely.
Important: Change the engine oil after the first 5 operating hours; change it yearly thereafter. Refer to Changing the Engine Oil.
6
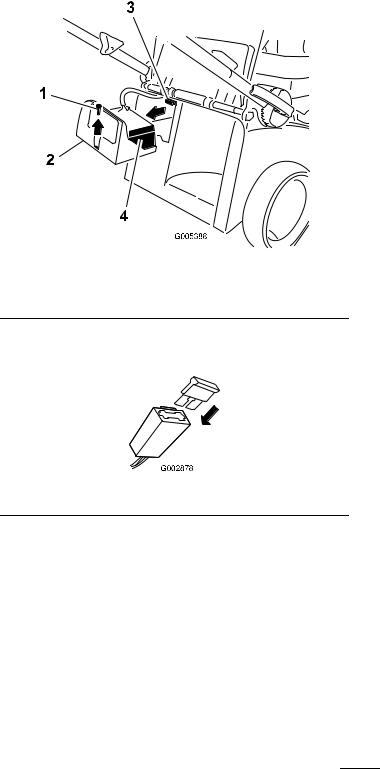
Installing the Fuse (Model
447E Only)
Your mower comes with a 40-amp fuse that protects the electric starter.
Important: You cannot start the mower with the electric starter or charge the battery unless you install the fuse.
1.Remove the battery cover and the battery and locate the fuse holder (Figure 7).
Charging the Battery (Model
447E Only)
Refer to Charging the Battery in the Maintenance section.
|
|
Figure 7 |
|
1. |
Screw |
3. |
Fuse holder |
2. |
Battery cover |
4. |
Battery |
2.Insert the fuse (from the loose parts bag) into the fuse holder (Figure 8).
Figure 8
Note: Your mower comes with a fuse in the owner’s packet and another fuse in the battery box.
3. Install the battery and the battery cover.
7
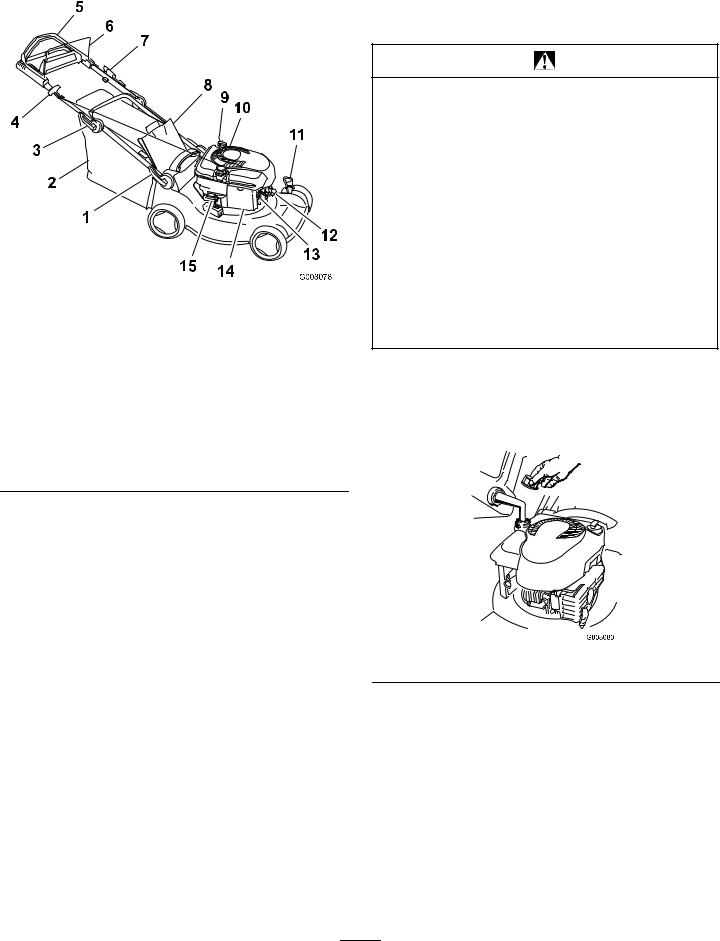
Product Overview |
Operation |
|
Filling the Fuel Tank |
|
|
|
|
Figure 9
Model 447E shown
1. |
Lower handle lock |
9. |
Oil fill/Dipstick (not shown) |
2. |
Grass bag |
10. |
Fuel tank cap |
3. |
Upper handle lock |
11. |
Cutting height lever (2) |
4. |
Recoil start handle |
12. |
Spark plug |
5. |
Upper handle (Models |
13. |
Primer |
|
446E and 447E only) |
|
|
6. |
Blade control bar |
14. |
Air filter |
7.Electric start (model 447E 15. Recycling/bagging lever only)
8.Rear door
Petrol is extremely flammable and explosive. A fire or explosion from petrol can burn you and others.
•To prevent a static charge from igniting the petrol, place the container and/or mower directly on the ground before filling, not in a vehicle or on an object.
•Fill the tank outdoors when the engine is cold. Wipe up spills.
•Do not handle petrol when smoking or around an open flame or sparks.
•Store petrol in an approved fuel container, out of the reach of children.
Fill the fuel tank with fresh unleaded petrol (Figure 10).
Important: To reduce starting problems, add fuel stabilizer to the fuel all season, mixing it with petrol less than 30 days old.
Figure 10
Checking the Engine Oil Level
Service Interval: Before each use or daily—Check the engine oil level.
1.Remove the dipstick, wipe it clean, and fully install the dipstick (Figure 6).
2.Remove the dipstick and check the oil level (Figure 6). If the oil level is below the Add mark on the dipstick, slowly pour oil into the oil fill tube to raise the oil level to the Full mark on the dipstick. Do not overfill. (Max. fill: 0.59 l, type: SAE 30W
8
 Loading...