

Page 1

V
INSTALLATION, OPERATION
&
MAINTENANCE INSTRUCTIONS
1455 Kleppe Lane Sparks, NV 89431-6467 (775) 359-4712 Fax (775) 359-7424
E-mail: haws@hawsco.com
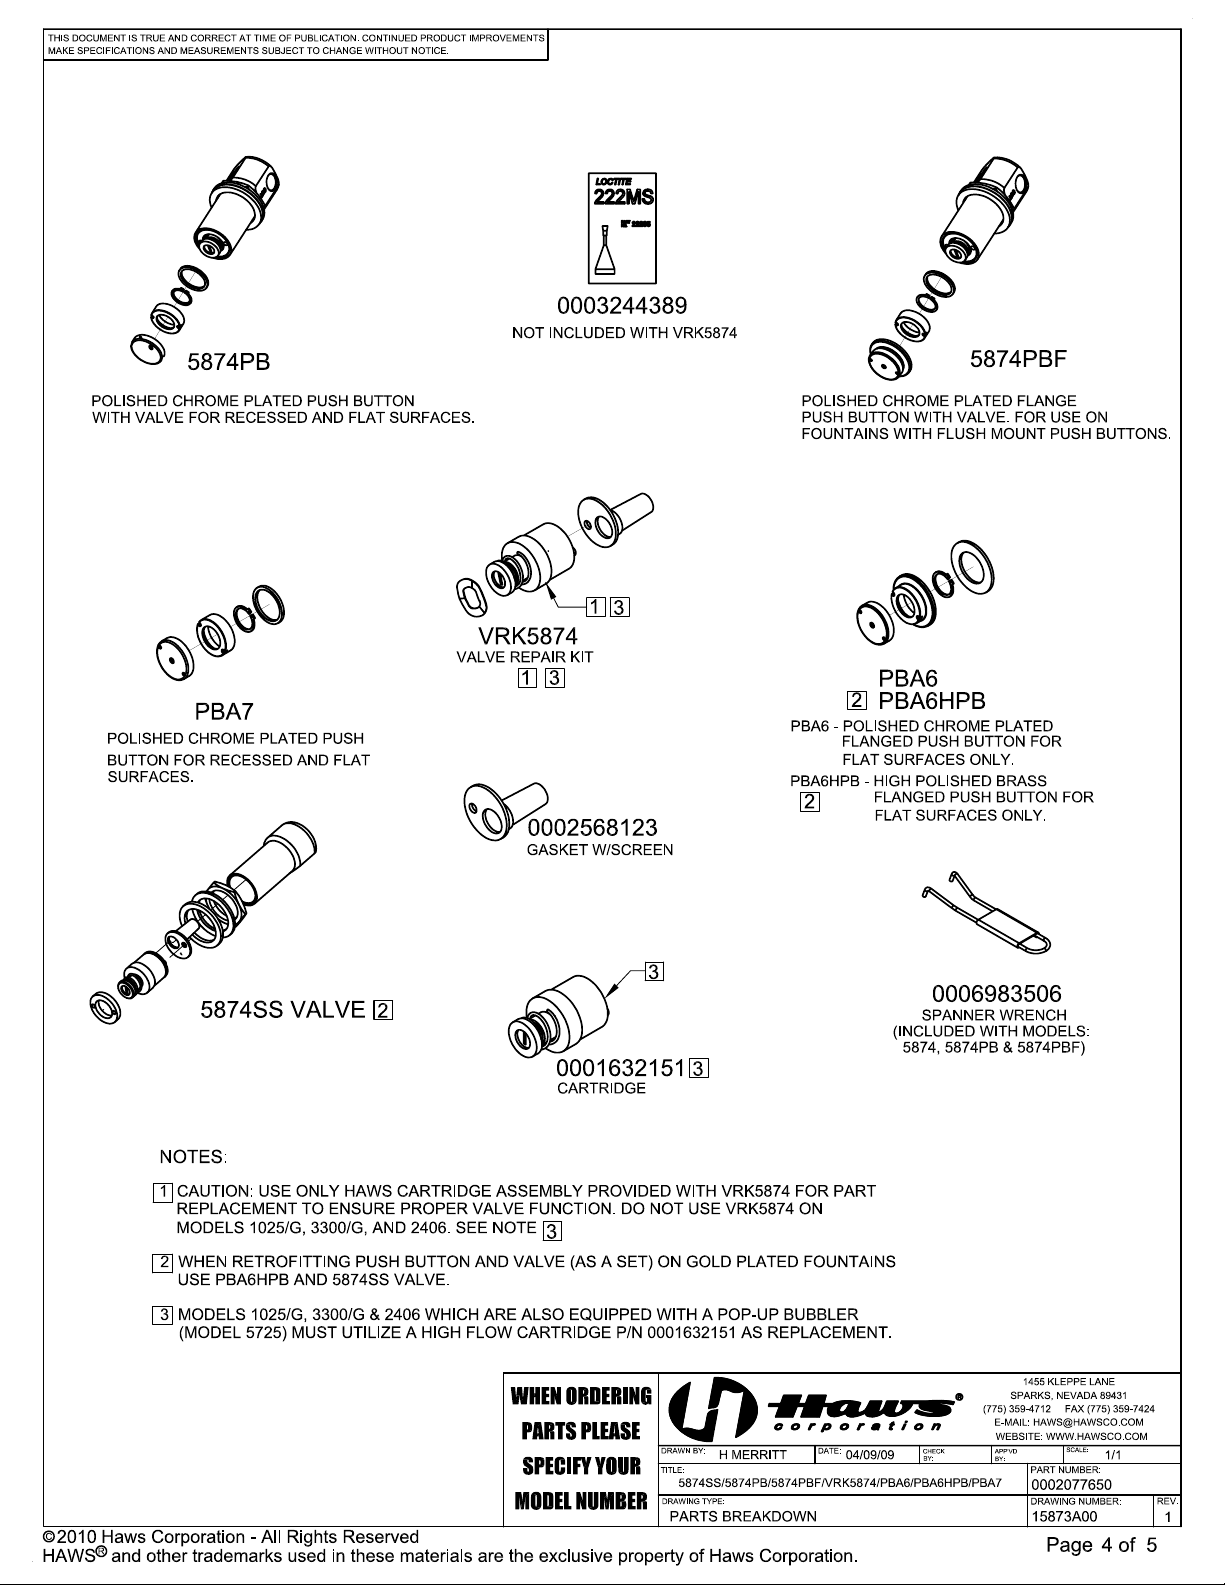
5874SS/5874PB/5874PBF/VRK5874/PBA6/
NOTE TO INSTALLER: Please leave this information with the Maintenance Department.
HAWS® warrants that all of its products are guaranteed against defective material
or poor workmanship for a period of one year from date of shipment. HAWS
liability under this warranty shall be discharged by furnishing without charge F.O.B.
HAWS Factory any goods, or part thereof, which shall appear to the Company
upon inspection to be of defective material or not of first class workmanship,
provided that claim is made in writing to company within a reasonable period after
receipt of the product. Where claims for defects are made, the defective part or
parts shall be delivered to the Company, prepaid, for inspection. HAWS will not be
liable for the cost of repairs, alterations or replacements, or for any expense
connected therewith made by the owner or his agents, except upon written
authority from HAWS, Sparks, Nevada. HAWS will not be liable for any damages
caused by defective materials or poor workmanship, except for replacements, as
provided above. Buyer agrees that Haws has made no other warranties either
expressed or implied in addition to those above stated, except that of title with
respect to any of the products or equipment sold hereunder and that HAWS shall
not be liable for general, special, or consequential damages claimed to arise under
the contract of sale. The drinking fountain manufactured by HAWS is warranted to
function if installation and maintenance instructions provided are adhered to. The
units also must be used for the purpose for which they were intended.
NO OTHER WARRANTIES EXPRESSED OR IMPLIED ARE AUTHORIZED, PROVIDED
SHOULD YOU EXPERIENCE DIFFICULTY WITH THE INSTALLATION OF THIS MODEL,
PLEASE CALL:
FOR PARTS CALL:
PBA6HPB/PBA7
LIMITED WARRANTY
1-800-766-5612
1-800-758-9378
(U.S.A. AND CANADA ONLY) MONDAY-THURSDAY: 6:00 A.M. – 4:00 P.M. PST
FRIDAY: 6:00 A.M – 1:00 P.M. PST
website: www.hawsco.com
No. 2077650(1)
alve/Push Button
02/10
Model 5874SS/5874PB/5874PBF/VRK5874/PBA6/PBA6HPB/PBA7 Page 1 of 5
Page 2

Note:
1. Before removing valve, strainer or cartridge assembly, shut off water
supply line.
2. This valve is pressure compensating. Be sure to remove any existing flow
control devices.
3. When retrofitting an existing fountain with a 5874SS series assembly:
a) Remove any in-line strainer that may be present in the supply line,
b) Reconnect tubing to new valve using supplied or existing fittings.
4. Valve is directional. Verify flow direction indicated on valve when installing.
Caution: Valve must be protected by the 60-mesh strainer LOCATED INSIDE
VALVE BODY.
Warranty void
if 60-mesh strainer IS REMOVED FROM VALVE BODY.
OPERATION & MAINTENANCE OF FRONT ACCESS FEATURES
FLOW ADJUSTMENT: A 3/16” hole in the center of this button is provided for front access to
the adjustment screw found on the cartridge assembly. While pushing the button in and using a
slotted narrow blade screwdriver, the flow may be adjusted by inserting it into the hole and
turning clockwise for increased flow, and counterclockwise for decreased flow.
STRAINER CLEANING: Periodically clean the strainer located inside valve body. Remove
front push-button and retaining nut with the universal spanner wrench provided. Pull cartridge
assembly out. Gently remove strainer off of cartridge. Thoroughly flush away any debris from
strainer. While keeping bottom of cartridge clean of debris, re-attach strainer by aligning larger
hole opening on gasket over the larger water inlet opening on the cartridge. Insert cartridge
assembly back into valve body, by aligning screen into large opening inside bottom of valve
body. Ensure cartridge has bottomed out, by slightly turning into place. Retighten retaining nut
and check for leaks.
CARTRIDGE ASSEMBLY REPLACEMENT: Remove front push-button and retaining nut with
the universal spanner wrench provided. Pull cartridge assembly out. Gently remove strainer off
of old cartridge and reassemble on new cartridge (see strainer reattachment instructions
above). Insert cartridge assembly into valve body by aligning screen into large opening inside
bottom of valve body. Ensure cartridge has bottomed out, by turning slightly into place.
Retighten retaining nut and check for leaks.
CAUTION: When replacing strainer or cartridge assembly, damage can occur if
not properly re-installed. Read instructions carefully.
PUSH BUTTON ASSEMBLY/REASSEMBLY
Must apply 1 Dot of Loctite 222MS Threadlocker on female threads of pushbutton. See page 5 of 5 for proper application procedure.
02/10 Model 5874SS/5874PB/5874PBF/VRK5874/PBA6/PBA6HPB/PBA7 Page 2 of 5
Page 3

TROUBLESHOOTING
PROBLEM
1. Insufficient bubbler flow. 1a. Check that the inlet screwdriver stop is in wide open
b. Adjust bubbler stream height. See Flow Adjustment
c. Verify flow direction indicated on valve.
d. Shut off screwdriver stop, clean the fine mesh strainer
e. Verify minimum 30 psi flowing supply pressure.
f. Shut off screwdriver stop and replace cartridge assembly.
2. Bubbler flow too high. 2a. See step 1 b above.
REPAIR CHECKLIST
position.
instructions in Front Access Feature Box.
found inside the 5874SS series valve. See Strainer
Cleaning instructions in Front Access Feature Box.
See Cartridge Assembly Replacement instructions in
Front Access Feature Box.
3. Valve won’t shut off
completely
3a. Cycle the cartridge assembly by pushing the push-button
5 times to clear any foreign matter (if any is present) from
the valve seat.
3b. Shut off screwdriver stop replace cartridge assembly.
See Cartridge Assembly Replacement instructions in
Front Access Feature Box.
4. No flow out of valve. 4a. Check that the inlet screwdriver stop is in wide open
position.
b. Verify flow direction indicated on valve.
c. Check strainer for possible clogging (see 1 d above).
5. Inconsistent bubbler
5a. See 1 d above
stream height.
6. Button is loose 6a. Refer to Installation Drawing (page 5 of 5) for proper
application of Threadlocker 222MS and assembly
procedure.
7. Water is leaking out of
push button assembly.
7a. Remove push button with spanner wrench (P/N
0006983506) and tighten retaining nut using same
spanner wrench.
b. If leak persist, shut off screwdriver stop and replace
cartridge assembly. See Cartridge Assembly
Replacement instructions in Front Access Feature Box.
For more information about Haws products, see our website: www.hawsco.com
© 2010 Haws
HAWS
02/10
®
®
Corporation – All Rights Reserved
and other trademarks used in these materials are the exclusive property of Haws Corporation.
Model 5874SS/5874PB/5874PBF/VRK5874/PBA6/PBA6HPB/PBA7 Page 3 of 5
Page 4
Page 5

 Loading...