

Page 1
Page 2
␊ Copyright ¤ˇ1998-2003, HAURI Inc. All rights reserved.
This software and documentation is the sole property of HAURI and protected by
copyright laws. This documentation and software cannot, wholly or partially, be copied,
duplicated, translated, reverse engineered, or converted into electronic media or any
machine readable form without HAURI’ s prior written consent.
The Second Edition August 2003
All rights reserved worldwide. No part of this publication or software may be reproduced,
transmitted, transcribed, stored in an archival system or translated into any languages,
human or machine, in any form or by any means, electronic, mechanical, magnetic,
chemical, manual, or otherwise, without the express written permission of HAURI, Inc.,
8th Fl., Yuhan Yanghang Bldg., 49-6, Daebang-dong, Dongjak-gu, Seoul, Korea, Tel: +82
2 828 0820 (Rep.) Fax: +82 2 828 0840
Page 3
␊ Technical Support/Customer Support
USA: Global HAURI Inc.
Homepage : http://www.globalhauri.com
E-mail : support@globalhauri.com, sales@globalhauri.com
Tel : +1 408 232 5463 (1-866-GO HAURI)ừ Fax : +1 408 232 5464
Singapore : HAURI ASIA Pte. Ltd
Homepage : http://www.hauriasia.com
E-mail : support@hauriasia.com, sales@hauriasia.com
Tel : +65 6243 7913/24 (Sales), +65 6243 7914/15 (Technical support)ừ Fax : +65 6442 0223
Japan : HAURI JAPAN Inc.
Homepage : http://www.haurijapan.com ừ E-mail : japan@hauri.net
Tel : +81 3 5444 7916 ừ Fax : +81 3 5444 7980
China : China Blue Star Hauri Technology
Homepage : http://www.cbht.com.cn
E-mail : support@cbht.com.cn
Tel : +86 10 6444 5900(Rep.), +86 10 6444 5911(Technical support) ừ Fax : +86 10 6444 5922
Korea : HAURI Inc.
Homepage : http://www.hauri.co.kr/
E-mail : support@hauri.net, sales@hauri.net
Tel : +82 2 828 0820 (Rep.) ừ Fax : +82 2 828 0840
Page 4

For the Readers
This Manual is for Hauri customers who have purchased ViRobot Advanced Server. It is
strongly recommended that the user reads this manual before using ViRobot Advanced Server
to ensure effective use of ViRobot Advanced Server.
This ViRobot Advanced Server Manual may be slightly different from your program due to an
ongoing functional improvement.
␊ Manual Overview
This Manual is divided into four chapters and a reference. Chapter 1 provides helpful tips
and customer support solutions. Chapter 2 explains how to install and uninstall ViRobot
Advanced Server. Chapter 3 contains instructions for Getting Started. Chapter 4 explains
Advanced Features. The Reference will help you learn more about your system, virus
operation, information, etc.
␊ Conventions
In this manual, the term ‘V iRobot’ will indicate ViRobot Advanced Server.
Page 5
Registering Your Copy Of ViRobot¡¡¡¡¡¡¡¡¡¡¡¡¡¡¡¡¡¡¡¡¡¡¡¡¡¡¡¡¡¡¡¡¡¡¡¡¡¡¡¡¡¡¡¡¡¡¡¡¡¡¡¡¡¡ 10
How To Contact Us ¡¡¡¡¡¡¡¡¡¡¡¡¡¡¡¡¡¡¡¡¡¡¡¡¡¡¡¡¡¡¡¡¡¡¡¡¡¡¡¡¡¡¡¡¡¡¡¡¡¡¡¡¡¡¡¡¡¡¡¡¡¡¡¡¡¡¡¡ 12
How To Update Your Copy Of ViRobot ¡¡¡¡¡¡¡¡¡¡¡¡¡¡¡¡¡¡¡¡¡¡¡¡¡¡¡¡¡¡¡¡¡¡¡¡¡¡¡¡¡¡¡¡¡¡¡¡¡ 14
What To Do When A New Virus Is Discovered¡¡¡¡¡¡¡¡¡¡¡¡¡¡¡¡¡¡¡¡¡¡¡¡¡¡¡¡¡¡¡¡¡¡¡¡¡¡¡¡¡¡¡ 15
What ViRobot Can Do¡¡¡¡¡¡¡¡¡¡¡¡¡¡¡¡¡¡¡¡¡¡¡¡¡¡¡¡¡¡¡¡¡¡¡¡¡¡¡¡¡¡¡¡¡¡¡¡¡¡¡¡¡¡¡¡¡¡¡¡¡¡¡¡¡¡ 20
Installing Your ViRobot ¡¡¡¡¡¡¡¡¡¡¡¡¡¡¡¡¡¡¡¡¡¡¡¡¡¡¡¡¡¡¡¡¡¡¡¡¡¡¡¡¡¡¡¡¡¡¡¡¡¡¡¡¡¡¡¡¡¡¡¡¡¡¡¡ 24
Uninstalling Your ViRobot¡¡¡¡¡¡¡¡¡¡¡¡¡¡¡¡¡¡¡¡¡¡¡¡¡¡¡¡¡¡¡¡¡¡¡¡¡¡¡¡¡¡¡¡¡¡¡¡¡¡¡¡¡¡¡¡¡¡¡¡¡¡ 30
Starting Your ViRobot¡¡¡¡¡¡¡¡¡¡¡¡¡¡¡¡¡¡¡¡¡¡¡¡¡¡¡¡¡¡¡¡¡¡¡¡¡¡¡¡¡¡¡¡¡¡¡¡¡¡¡¡¡¡¡¡¡¡¡¡¡¡¡¡¡¡ 34
Basic Screen Configuration ¡¡¡¡¡¡¡¡¡¡¡¡¡¡¡¡¡¡¡¡¡¡¡¡¡¡¡¡¡¡¡¡¡¡¡¡¡¡¡¡¡¡¡¡¡¡¡¡¡¡¡¡¡¡¡¡¡¡¡¡¡ 35
How To Detect And Remove Virus In Your Computer ¡¡¡¡¡¡¡¡¡¡¡¡¡¡¡¡¡¡¡¡¡¡¡¡¡¡¡¡¡¡¡¡¡¡¡¡ 40
How To Disinfect Virus In Your Mailbox ¡¡¡¡¡¡¡¡¡¡¡¡¡¡¡¡¡¡¡¡¡¡¡¡¡¡¡¡¡¡¡¡¡¡¡¡¡¡¡¡¡¡¡¡¡¡¡¡ 48
Configuration ¡¡¡¡¡¡¡¡¡¡¡¡¡¡¡¡¡¡¡¡¡¡¡¡¡¡¡¡¡¡¡¡¡¡¡¡¡¡¡¡¡¡¡¡¡¡¡¡¡¡¡¡¡¡¡¡¡¡¡¡¡¡¡¡¡¡¡¡¡¡¡¡¡¡ 52
Chapter 1. Before You Begin
Chapter 2. Getting Started With ViRobot
Table of Contents
Chapter 3. ViRobot Advanced Server At A Glance
Page 6
Monitoring ¡¡¡¡¡¡¡¡¡¡¡¡¡¡¡¡¡¡¡¡¡¡¡¡¡¡¡¡¡¡¡¡¡¡¡¡¡¡¡¡¡¡¡¡¡¡¡¡¡¡¡¡¡¡¡¡¡¡¡¡¡¡¡¡¡¡¡¡¡¡¡¡¡¡¡¡ 59
MacRobot ¡¡¡¡¡¡¡¡¡¡¡¡¡¡¡¡¡¡¡¡¡¡¡¡¡¡¡¡¡¡¡¡¡¡¡¡¡¡¡¡¡¡¡¡¡¡¡¡¡¡¡¡¡¡¡¡¡¡¡¡¡¡¡¡¡¡¡¡¡¡¡¡¡¡¡¡¡ 60
Updating Your ViRobot ¡¡¡¡¡¡¡¡¡¡¡¡¡¡¡¡¡¡¡¡¡¡¡¡¡¡¡¡¡¡¡¡¡¡¡¡¡¡¡¡¡¡¡¡¡¡¡¡¡¡¡¡¡¡¡¡¡¡¡¡¡¡¡¡ 62
Scheduler¡¡¡¡¡¡¡¡¡¡¡¡¡¡¡¡¡¡¡¡¡¡¡¡¡¡¡¡¡¡¡¡¡¡¡¡¡¡¡¡¡¡¡¡¡¡¡¡¡¡¡¡¡¡¡¡¡¡¡¡¡¡¡¡¡¡¡¡¡¡¡¡¡¡¡¡¡¡ 70
Client Management¡¡¡¡¡¡¡¡¡¡¡¡¡¡¡¡¡¡¡¡¡¡¡¡¡¡¡¡¡¡¡¡¡¡¡¡¡¡¡¡¡¡¡¡¡¡¡¡¡¡¡¡¡¡¡¡¡¡¡¡¡¡¡¡¡¡¡¡¡ 78
System Information¡¡¡¡¡¡¡¡¡¡¡¡¡¡¡¡¡¡¡¡¡¡¡¡¡¡¡¡¡¡¡¡¡¡¡¡¡¡¡¡¡¡¡¡¡¡¡¡¡¡¡¡¡¡¡¡¡¡¡¡¡¡¡¡¡¡¡¡¡ 79
Quick Scan Bar ¡¡¡¡¡¡¡¡¡¡¡¡¡¡¡¡¡¡¡¡¡¡¡¡¡¡¡¡¡¡¡¡¡¡¡¡¡¡¡¡¡¡¡¡¡¡¡¡¡¡¡¡¡¡¡¡¡¡¡¡¡¡¡¡¡¡¡¡¡¡¡¡ 80
Backup Bin ¡¡¡¡¡¡¡¡¡¡¡¡¡¡¡¡¡¡¡¡¡¡¡¡¡¡¡¡¡¡¡¡¡¡¡¡¡¡¡¡¡¡¡¡¡¡¡¡¡¡¡¡¡¡¡¡¡¡¡¡¡¡¡¡¡¡¡¡¡¡¡¡¡¡¡¡ 81
Virus Library ¡¡¡¡¡¡¡¡¡¡¡¡¡¡¡¡¡¡¡¡¡¡¡¡¡¡¡¡¡¡¡¡¡¡¡¡¡¡¡¡¡¡¡¡¡¡¡¡¡¡¡¡¡¡¡¡¡¡¡¡¡¡¡¡¡¡¡¡¡¡¡¡¡¡ 85
Virus Calendar ¡¡¡¡¡¡¡¡¡¡¡¡¡¡¡¡¡¡¡¡¡¡¡¡¡¡¡¡¡¡¡¡¡¡¡¡¡¡¡¡¡¡¡¡¡¡¡¡¡¡¡¡¡¡¡¡¡¡¡¡¡¡¡¡¡¡¡¡¡¡¡¡¡ 88
Activity Log ¡¡¡¡¡¡¡¡¡¡¡¡¡¡¡¡¡¡¡¡¡¡¡¡¡¡¡¡¡¡¡¡¡¡¡¡¡¡¡¡¡¡¡¡¡¡¡¡¡¡¡¡¡¡¡¡¡¡¡¡¡¡¡¡¡¡¡¡¡¡¡¡¡¡¡ 90
Update Info ¡¡¡¡¡¡¡¡¡¡¡¡¡¡¡¡¡¡¡¡¡¡¡¡¡¡¡¡¡¡¡¡¡¡¡¡¡¡¡¡¡¡¡¡¡¡¡¡¡¡¡¡¡¡¡¡¡¡¡¡¡¡¡¡¡¡¡¡¡¡¡¡¡¡¡¡ 92
Selecting Language¡¡¡¡¡¡¡¡¡¡¡¡¡¡¡¡¡¡¡¡¡¡¡¡¡¡¡¡¡¡¡¡¡¡¡¡¡¡¡¡¡¡¡¡¡¡¡¡¡¡¡¡¡¡¡¡¡¡¡¡¡¡¡¡¡¡¡¡¡ 93
Chapter 4. Using ViRobot Advanced Server
Page 7
Real-time Monitoring Service ¡¡¡¡¡¡¡¡¡¡¡¡¡¡¡¡¡¡¡¡¡¡¡¡¡¡¡¡¡¡¡¡¡¡¡¡¡¡¡¡¡¡¡¡¡¡¡¡¡¡¡¡¡¡¡¡¡¡¡ 96
Update Service¡¡¡¡¡¡¡¡¡¡¡¡¡¡¡¡¡¡¡¡¡¡¡¡¡¡¡¡¡¡¡¡¡¡¡¡¡¡¡¡¡¡¡¡¡¡¡¡¡¡¡¡¡¡¡¡¡¡¡¡¡¡¡¡¡¡¡¡¡¡¡¡¡ 97
Setting Update Using NT Server¡¡¡¡¡¡¡¡¡¡¡¡¡¡¡¡¡¡¡¡¡¡¡¡¡¡¡¡¡¡¡¡¡¡¡¡¡¡¡¡¡¡¡¡¡¡¡¡¡¡¡¡¡¡¡¡¡ 98
Symbols And Terminology ¡¡¡¡¡¡¡¡¡¡¡¡¡¡¡¡¡¡¡¡¡¡¡¡¡¡¡¡¡¡¡¡¡¡¡¡¡¡¡¡¡¡¡¡¡¡¡¡¡¡¡¡¡¡¡¡¡¡¡¡ 104
Definitions And Types Of Virus¡¡¡¡¡¡¡¡¡¡¡¡¡¡¡¡¡¡¡¡¡¡¡¡¡¡¡¡¡¡¡¡¡¡¡¡¡¡¡¡¡¡¡¡¡¡¡¡¡¡¡¡¡¡¡¡ 106
How To Protect Your System Against Viruses¡¡¡¡¡¡¡¡¡¡¡¡¡¡¡¡¡¡¡¡¡¡¡¡¡¡¡¡¡¡¡¡¡¡¡¡¡¡¡¡¡¡¡ 109
References
Page 8

Page 9

Chapter 1.
Before You Begin
Registering Your Copy Of ViRobot
How To Contact Us
How To Update Your Copy Of ViRobot
What To Do When A New Virus Is Discovered
Page 10

ViRobot Advanced Server
10
CHAPTER 1. BEFORE YOU BEGIN
Registering Your Copy Of ViRobot
HAURI offers technical support, customer service support, update, security information and
virus protection tips to registered customers via e-mail. HAURI provides one year of free virus
definition and scanning engine updates with the purchase of V iRobot Advanced Server. Annual
subscriptions are available for subsequent updates.
␊␊
Be sure to register your software and get benefits we offer.
We highly recommend all our ViRobot for Windows Advanced Server customers to register.
Your information will be maintained for one year, and you can view and change your registered
information anytime.
␊␊
The customer service period expires one year after your registration and/or
installation.
The customer service period for ViRobot series expires one year after customer registration and/or
installation. All services provided by us will be discontinued after one year of registration.
␊␊
The registered customer will have a lot of benefits such as
⍥Weekly engine udates.
⍥Customer help service via Internet/e-mail/telephone/online service.
⍥Free upgrade for the same product during registration period.
⍥Access to web BBS for registered customers.
⍥Update on demand when a new virus is found.
Page 11

ViRobot Advanced Server
11
CHAPTER 1. BEFORE YOU BEGIN
␊␊
To register your ViRobot
You have various ways to register your ViRobot series software. Choose the most convenient one
for you. However, registration by telephone or e-mail is not available.
Visit our websites at www.hauri.net and use the on-line registration menu.
We highly recommend you to renew your registration when your customer support period expires.
Due to the characteristics of anti-virus program, you need to update the engine regularly to detect
and remove new viruses. We offer ViRobot software series upgrade for the customers who renew
registrations at much lower price than the initial purchase.
For more information, visit our homepage or contact our sales representative.
Page 12

ViRobot Advanced Server
12
CHAPTER 1. BEFORE YOU BEGIN
How to Contact Us
Most of the information you will need, for the operation of ViRobot Advanced Server can be
found here. However, if you require further assistance, please contact us via:
␊␊
USA : Global HAURI Inc.
Address : 3003 North First Street #234 San Jose, CA 95134
Homepage : http://www.globalhauri.com
Email : support@globalhauri.com, sales@globalhauri.com
Tel : +1 408 232 5463
Fax : +1 408 232 5464
␊␊
Singapore : HAURI ASIA Pte. Ltd
Address : Block 750C, Chai Chee Road, #02-12 Technopark @ Chai Chee, Singapore 469003
Homepage : http://www.hauriasia.com
Email : support@hauriasia.com, sales@hauriasia.com
Tel : +65 6243 7913/24 (Sales), +65 6243 7914/7915 (Technical support)
Fax : +65 6442 0223
␊␊
Japan : HAURI JAPAN Inc.
Address : 4th Fl., MS Bldg., #11-5, Shiba 4-Chome, Minato-ku, Tokyo 108-0014, Japan
Homepage : http://www.haurijapan.com
Email : japan@hauri.net
Tel : +81 3 5444 7916
Fax : +81 3 5444 7980
Page 13

ViRobot Advanced Server
13
CHAPTER 1. BEFORE YOU BEGIN
␊␊
China : China Blue Star Hauri Technology
Address : 15th Fl., Blue Star Bldg., No.17 Bei San Huan East Street, Chao Yang District, Beijing
100029, P.R.C.
Email : support@cbht.com.cn
Tel : +86 10 6444 5900(Rep.), +86 10 6444 5911(Technical support)
Fax : +86 10 6444 5922
␊␊
Korea : HAURI Inc.
Address : 8th Fl., Yuhan Yanghang Bldg., 49-6, Daebang-dong, Dongjak-gu, Seoul, Korea, 156754
Homepage : http://www.hauri.co.kr
Email : support@hauri.net, sales@hauri.net
Tel : +82 2 828 0820 (Rep.)
Fax : +82 2 828 0840
Page 14

ViRobot Advanced Server
14
CHAPTER 1. BEFORE YOU BEGIN
How To Update Your Copy Of ViRobot
There are various convenient ways to update your ViRobot. Please choose one from the
followings:
␊␊
Using Update Wizard
You can use Update Wizard in ViRobot to update. For more information, see Updating ViRobot.
␊␊
Downloading Update File from Our Homepage
⍥Use your web browser to access http://www.hauri.net
⍥Select Download.
⍥Select Update Wizard
⍥Follow directions in each page.
⍥After downloading the latest ViRobot engine, find and double click the file you have just
downloaded in Windows Explorer.
⍥Start ViRobot and check whether the engine is updated successfully.
Page 15

ViRobot Advanced Server
15
CHAPTER 1. BEFORE YOU BEGIN
What To Do When A New Virus Is Discovered
If you notice a virus alert, please send it to us and we will complete the analysis within 24
hours. We will always put our best effort to minimize any loss and damage. We provide
technical support for any virus problems detected by other programs.
␊␊
Symptoms of a Virus Infection
When your system is infected by
⍥Typical viruses,
ῇ It gets stuck frequently.
Ὲ The sizes of execution files increase.
Έ Execution speed of system file slows down especially if your memory resident program is
infected.
Ὴ Unidentifiable error occurs when you run files.
Ή Your system logo may change.
⍥Macro viruses,
ῇ The documents do not open normally or are password protected by unknown reason.
Ὲ Unrecognizable characters or funny texts appears in your document.
Έ You cannot run Macro menu in Tools menu.
Ὴ Error occurs when you use VB editor to see macrocodes.
Ή Illegible message appears while you work on the document.
ῌ VB editor starts in debug mode while you work with Excel or Word.
Page 16

ViRobot Advanced Server
16
CHAPTER 1. BEFORE YOU BEGIN
␊␊
To send a new virus to us
⍥By File or Macro virus
Please send the infected file itself because the file itself has become the virus. Send the
executable file in case of file virus, or office document file in case of macro virus. If the file
infected by
Macro virus is sensitive document, you may do the followings before you send it to us.
ῇ Open the file infected by macro virus.
Ὲ Select New in the File menu to open a new document.
Έ Enter any message you want and save the document.
Ὴ Now you have a new document.
⍥Send the Files to Us
Internet : Our homepage at http://www.hauri.net
E-mail : Technical Support at support@hauri.net.
Page 17

Page 18

Page 19
Chapter 2.
Getting Started With ViRobot
What ViRobot Can Do
Installing Your ViRobot
Uninstalling Your ViRobot
Page 20

ViRobot Advanced Server
20
CHAPTER 2. GETTING STARTED WITH VIROBOT
What ViRobot Can Do
ViRobot Advanced Server is an anti-virus program designed by HAURI. Incorporated with
our unique technology, ViRobot employs a specialized scan scheme to offer high-speed
scanning and excellent protection performance against viruses. Currently, ViRobot can detect
and remove over 17,000 viruses from all over the world.
␊␊
More Powerful ViRobot Engine
ViRobot is equipped with powerful ViRobot engines to offer reliable detections and repairs. With
advance functions that detect unknown viruses in all platforms (DOS, Windows, Macro, Java
Applets etc.), ViRobot enables you to catch up with any new viruses created. The unique scanning
engines available in this copy of ViRobot Advanced Server is a proven technology that is also used
in other HAURI products such as ViRobot Advanced Server and ViRobot Management Server
(VMS) Solution.
␊␊
Server Protection
Your ViRobot blocks computer viruses before it gets into your network server so that it protects
your network environment. You can also use ViRobot client products (such as ViRobot for
Windows 9x or ViRobot Professional) in your client PCs to protect your whole network
environment from virus infection. Especially for Windows NT, you can prevent any server
overload due to large-scale network virus detection by using optimised ViRobot engine.
Page 21

ViRobot Advanced Server
21
CHAPTER 2. GETTING STARTED WITH VIROBOT
␊␊
Virus Blocking by Real-time Monitoring
Your ViRobot offers real-time computer virus monitoring function in Microsoft Windows NT file
server environment to protect not only the server itself but also client PCs from virus infection.
␊␊
ViRobot Client PC Management
If you use ViRobot client products (such as ViRobot Professional and ViRobot Expert) in your
client PCs, it provides engine and service pack data of the client PC to server. The server refers to
this data to guarantee the client PC operates with the up-to-date engine.
␊␊
Support Various Operating System and Multi Language Selection for User
Convenience
ViRobot Advanced Server supports Windows NT/2000 Server/2000 Advanced Server platforms.
Also, ViRobot recognizes English and Korean automatically. By using optional multi-language
library, you can customize your ViRobot Advanced Server to use any language version of
Windows.
You do not need to reinstall your ViRobot Advanced Server since you can select the language you
want after installation.
␊␊
Enhanced Update Function
Due to the characteristics of anti-virus program, it is essential for you to update your engine
regularly. ViRobot Advanced Server supports FTP and HTTP protocols so that you can update
your engine even if you use firewall or proxy functions. It also supports access through leased
Internet line, such as LAN, or modem for you to update your engine in any environment. ViRobot
Advanced Server offers automatic update notice function that analyzes your recent update patterns,
as well as update scheduling function for you to update your engine regularly.
Page 22

ViRobot Advanced Server
22
CHAPTER 2. GETTING STARTED WITH VIROBOT
␊␊
Virus Transmission and On-line Customer Support Service
Your ViRobot Advanced Server detects unknown computer virus and moves them to a virtual
directory in Windows NT/2000 Server/2000 Advanced Server so that the viruses cannot be
executed. If you choose, the files stored in this directory will be automatically sent to ‘HAURI
Virus Report Center’ so that ‘HAURI Customer Support Team’ can report the analysis back to you
within 24 hours. All files sent to HAURI through virus transmission function are all encrypted for
security reasons. You can also check to see if your files are transmitted correctly.
␊␊
Mailbox Check-up
Since some viruses are spreading via e-mail transmission, ViRobot Advanced Server scans your
mailbox and checks attached files.
␊␊
MacRobot for Office 2000/IE 5
The MacRobot engine, which is exclusive macro virus monitoring module, has been greatly
improved to operate as a plug-in for Microsoft Office Family. It automatically detects and removes
any macro virus when you open an Office document in Microsoft Office 2000 or Internet Explorer
5.0. In this way, your ViRobot can block any macro virus coming from Internet and other sources.
␊␊
Support for Various File Compression
Your ViRobot Advanced Server supports various compressed file formats such as ZIP, ARJ(JAR),
LHA, RAR, CAB, ACE, and ZOO. It will detect and remove any virus in the multi-compressed file
by its compression level. Also, since it supports UUENCODE and MIME used in e-mail, it can
block any virus infected e-mail message that comes with compressed file in your e-mail.
Page 23

ViRobot Advanced Server
23
CHAPTER 2. GETTING STARTED WITH VIROBOT
␊␊
Providing Various Virus Information
Registered customers will get not only information about all virus that can be detected and removed
by ViRobot, but also Virus Calendar that contains information about viruses and its active dates.
This will help you prepare for malignant virus that acts on a certain date.
␊␊
Easy-to-Use User Interface
ViRobot Advanced Server has been improved and adopted user-requested functions as much as
possible to provide more friendly and easy-to-use interface. Also, the My Folder is added for you to
specify a folder or a file for search in advance. By using this My Folder function for shared folder in
the computer on the network, you can protect your valuable data with ease.
Page 24

ViRobot Advanced Server
24
CHAPTER 2. GETTING STARTED WITH VIROBOT
Installing Your ViRobot
␊␊
Operating Environment
ViRobot Advanced Server is an anti-virus program for Windows NT/2000 Server/2000 Advanced
Server. Your system requirements for ViRobot Advanced Server are:
⍥Platform : Microsoft Windows NT / 2000 Server / 2000 Advanced Server
⍥System : Intel Pentium processor running 150MHz or faster
⍥Memory : 32MB or more of RAM
⍥HDD :10 MB or more of hard disk space
⍥Others : CD-ROM
␊␊
In Your CD-ROM
If you have misplaced your ViRobot Advanced Server Manual, please find the Help in your
ViRobot Advanced Server.
⍥ViRobot Advanced Server CD
⍥Manual
Page 25
ViRobot Advanced Server
25
CHAPTER 2. GETTING STARTED WITH VIROBOT
␊␊
How To Install Your ViRobot
Insert the ViRobot Advanced Server CD-ROM in the CD-ROM drive of your computer.
You will see the ViRobot Installation screen. If you do not see this screen, follow the steps below.
Click Start button on the taskbar in Windows NT/2000 Server/2000 Advanced Server and select
Run.
Enter the CD-ROM drive letter and installation program name and click OK button.
(If CD-ROM drive letter is D, enter ‘D:\Setup.exe’)
␊␊
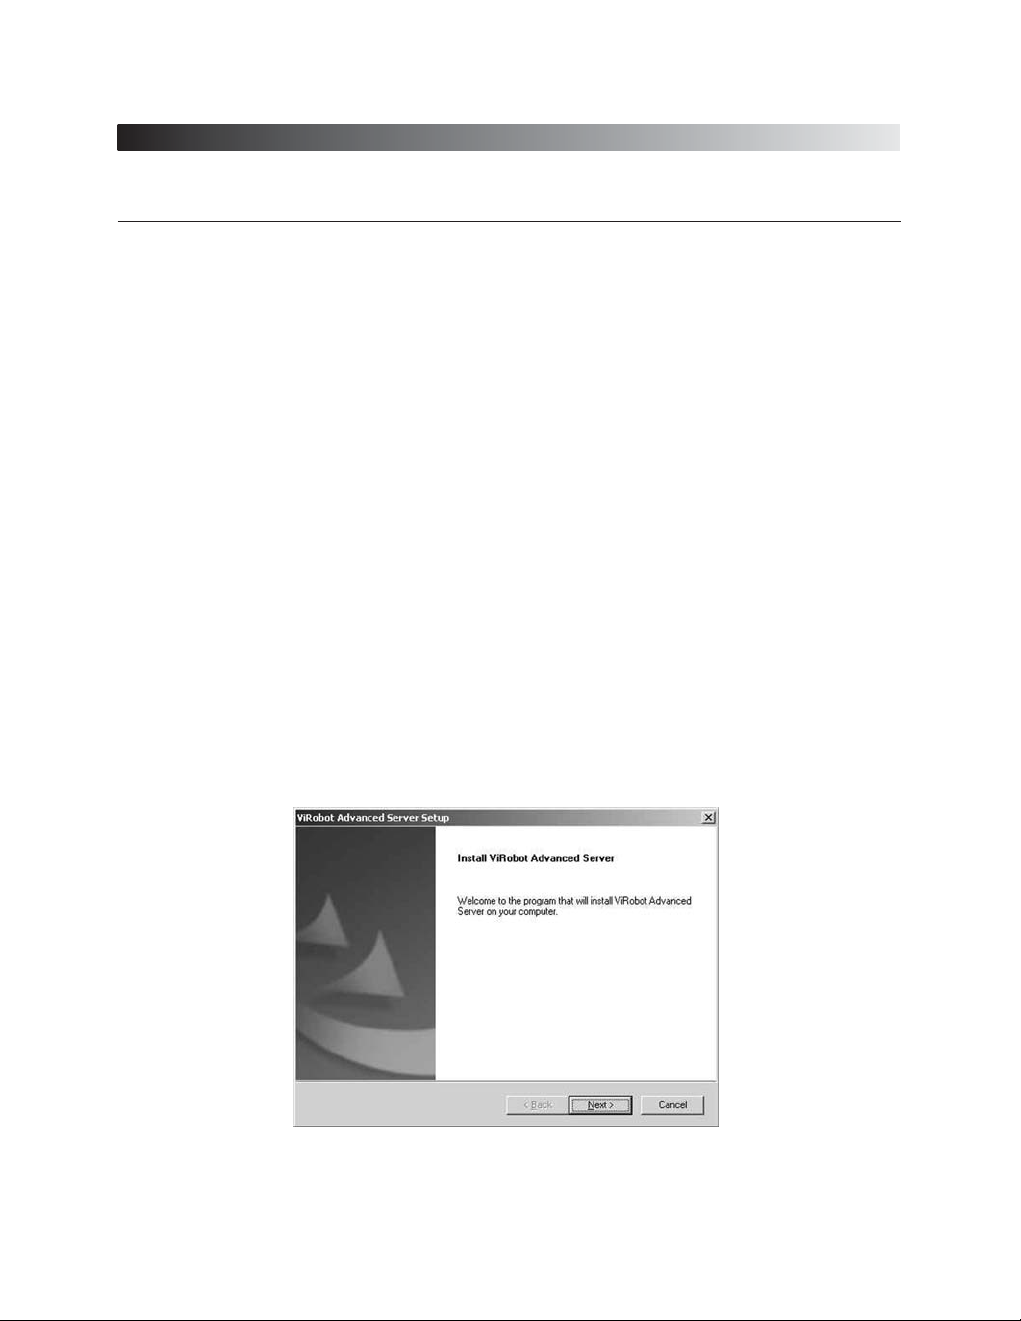
Continue Installing ViRobot Advanced Server
1. You can continue installing ViRobot Advanced Server when the initial installation dialog box
appears. You should close all other Windows programs before you start installation. If everything
is OK, click Next.
[ Figure 2-1 Welcome ViRobot ]
Page 26
ViRobot Advanced Server
26
CHAPTER 2. GETTING STARTED WITH VIROBOT
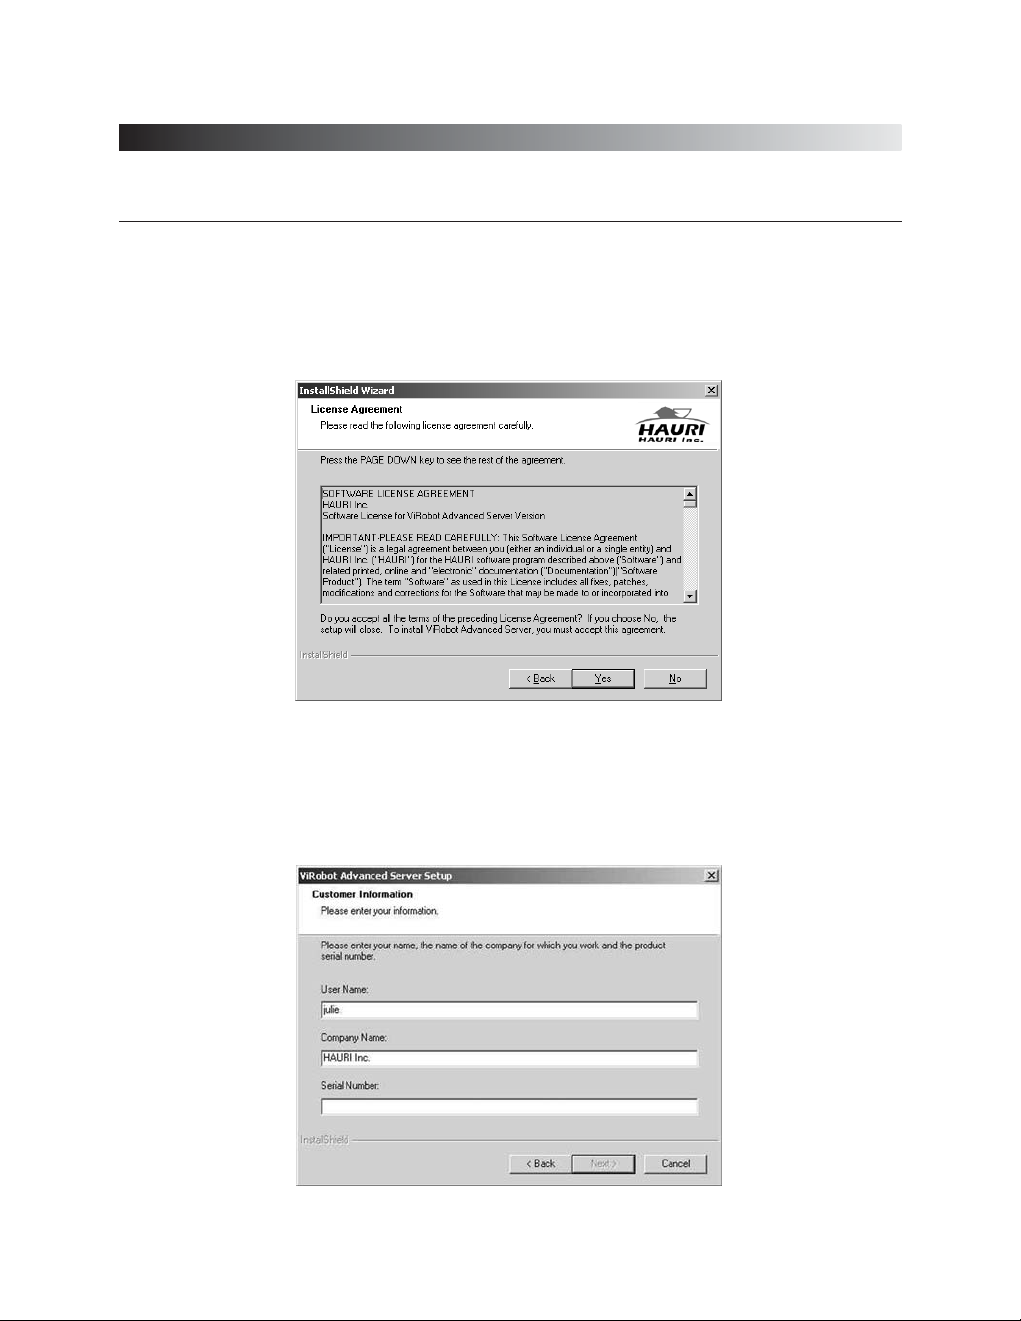
2. The License Agreement of ViRobot Advanced Server appears. If you agree with it, click Yes.
3. Enter your customer information. Type user name, company or organization, and serial number.
The serial number is on the sticker in your Manual. Click Next after completion.
[ Figure 2-2 License Agreements ]
[ Figure 2-3 Customer Information ]
Page 27
ViRobot Advanced Server
27
CHAPTER 2. GETTING STARTED WITH VIROBOT
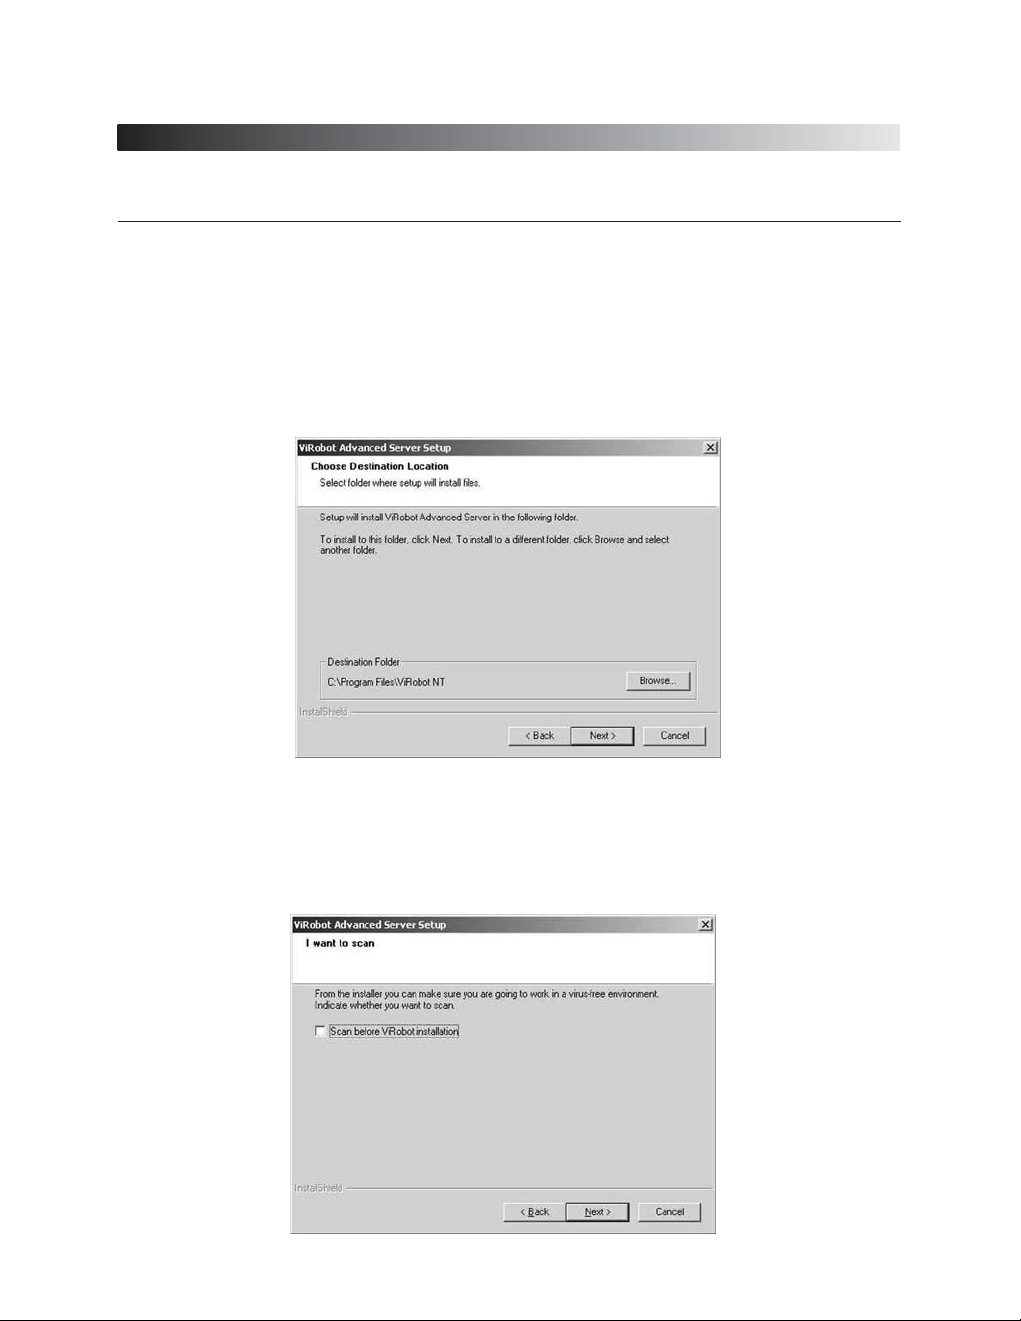
4. Select the destination folder to install ViRobot Advanced Server. The default destination folder
for ViRobot Advanced Server is ‘C:\Program Files\ViRobot. NT’. To change the folder, click
Search button to select the folder you want. Click Next.
5. The installation program automatically checks the system for virus infection before installation.
Select an option you want and click Next. After completion, the scan window will close.
[ Figure 2-4 Choose Destination ]
[ Figure 2-5 Scan before Installation ]
Page 28
ViRobot Advanced Server
28
CHAPTER 2. GETTING STARTED WITH VIROBOT
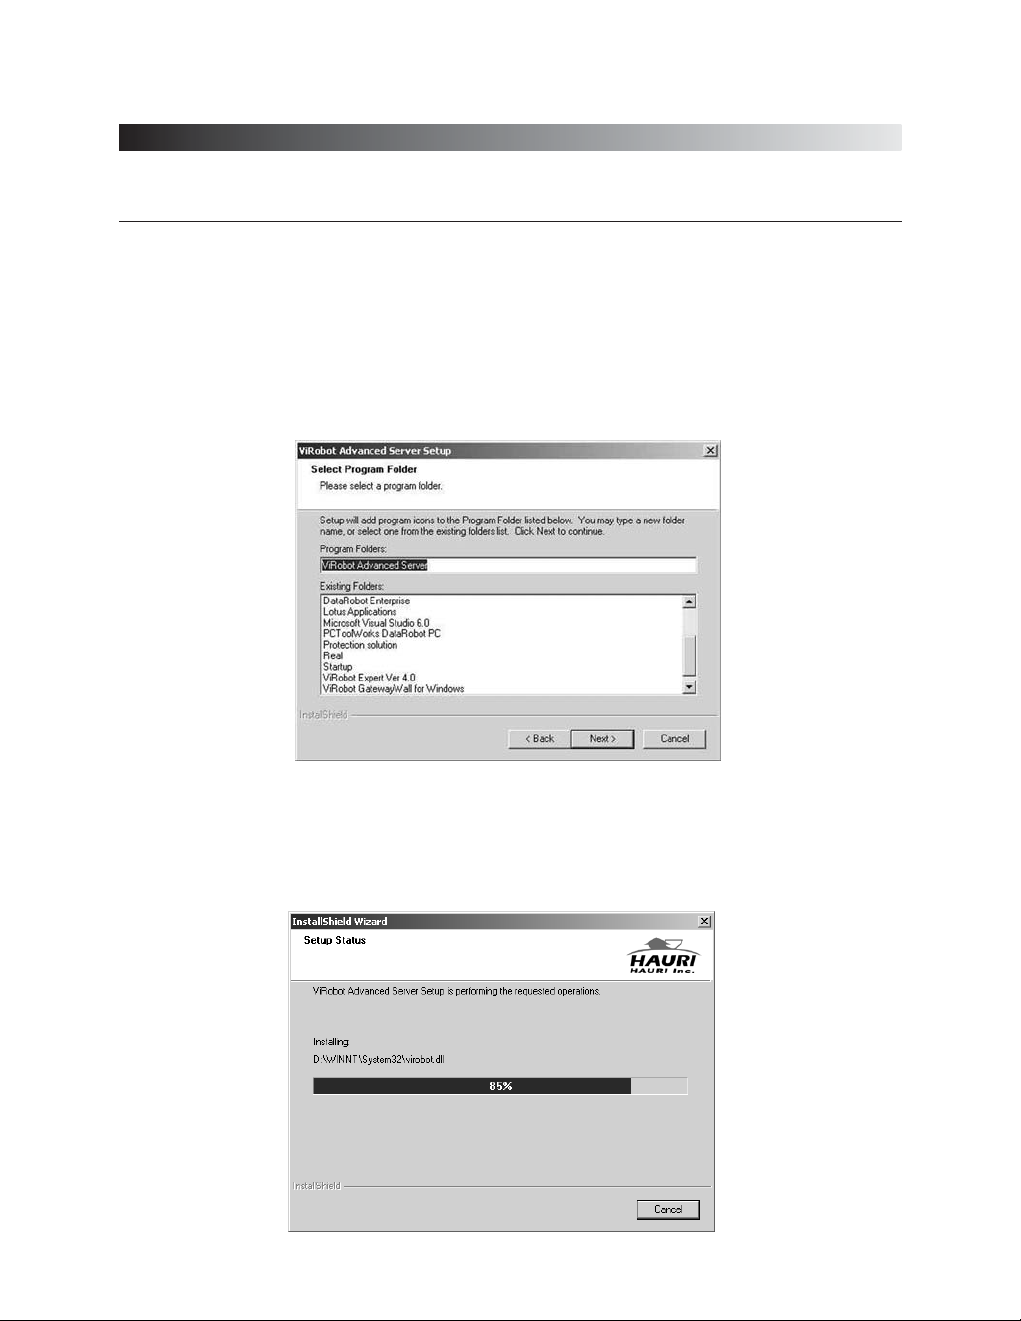
6. Select the program folder in the Program list of the Start menu. The default program folder name
is ViRobot Advanced Server. Type a new folder name or select one from existing folders, and
click Next.
7. Check to make sure that you have selected everything correctly so far. To correct any of current
setting, click Back. Otherwise, click Next to continue installation.
[ Figure 2-6 Choose Program Folder ]
[ Figure 2-7 Copying Files ]
Page 29
ViRobot Advanced Server
29
CHAPTER 2. GETTING STARTED WITH VIROBOT
8. The ViRobot Advanced Server installation is finished. Get the latest viruses definitions.
9. The ViRobot Advanced Server is now installed in your computer.
[ Figure 2-8 Installation is Completed ]
Page 30
ViRobot Advanced Server
30
CHAPTER 2. GETTING STARTED WITH VIROBOT
Uninstalling Your ViRobot
Use ViRobot Advanced Server uninstallation utility to remove ViRobot Advanced Server
from your computer .
1. Select ViRobot Advanced Server in Add/Remove Programs of Control Panel and click
Change/Remove button. Then the following screen will be shown. Click OK to remove
ViRobot.
[ Figure 2-9 Remove ViRobot ]
Page 31

ViRobot Advanced Server
31
CHAPTER 2. GETTING STARTED WITH VIROBOT
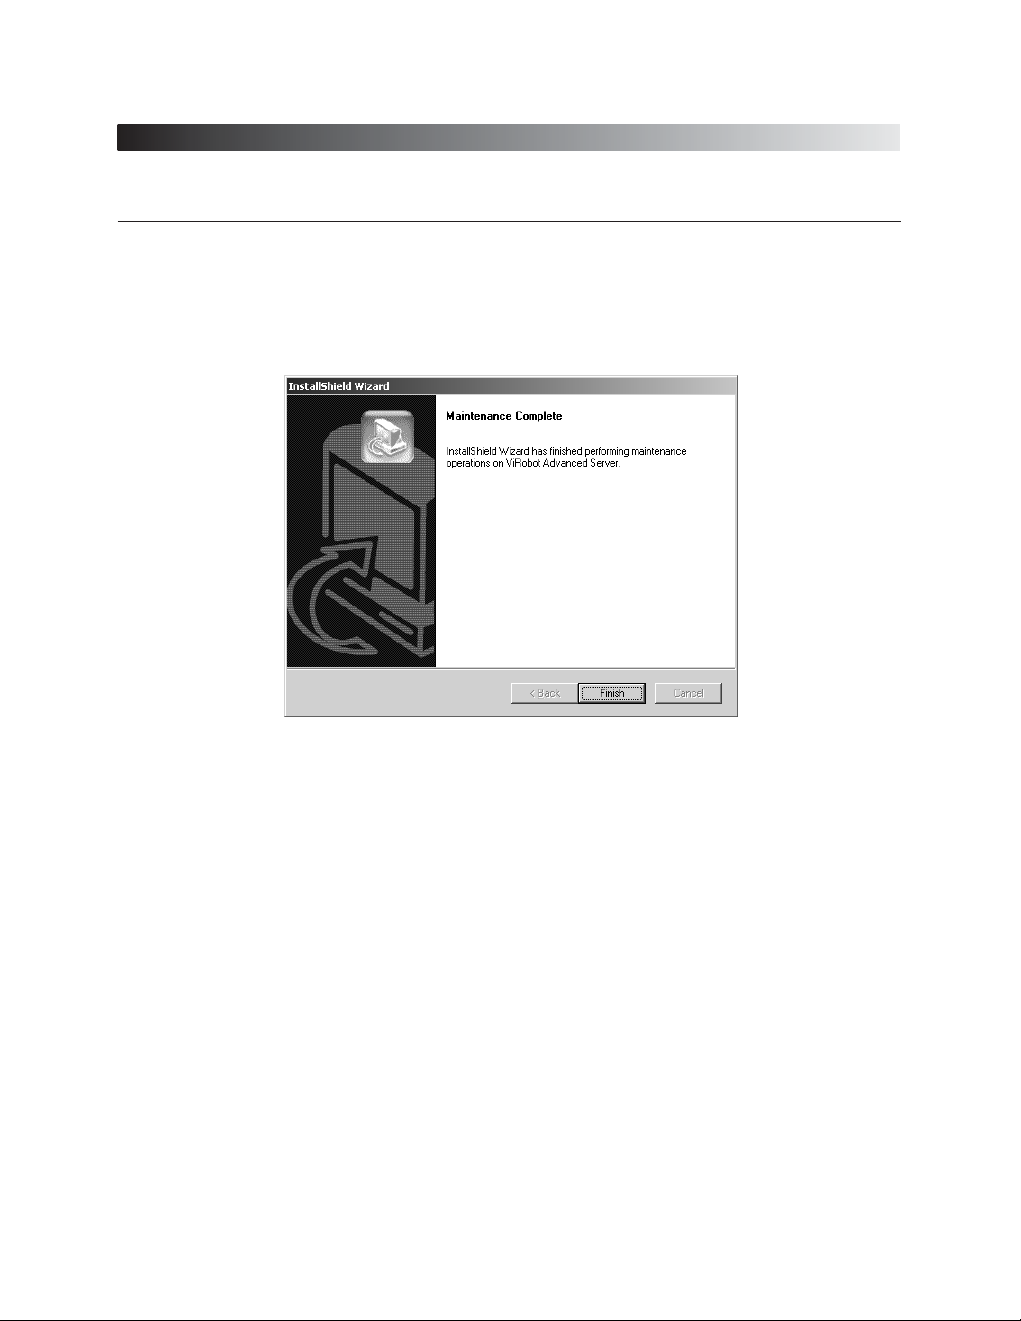
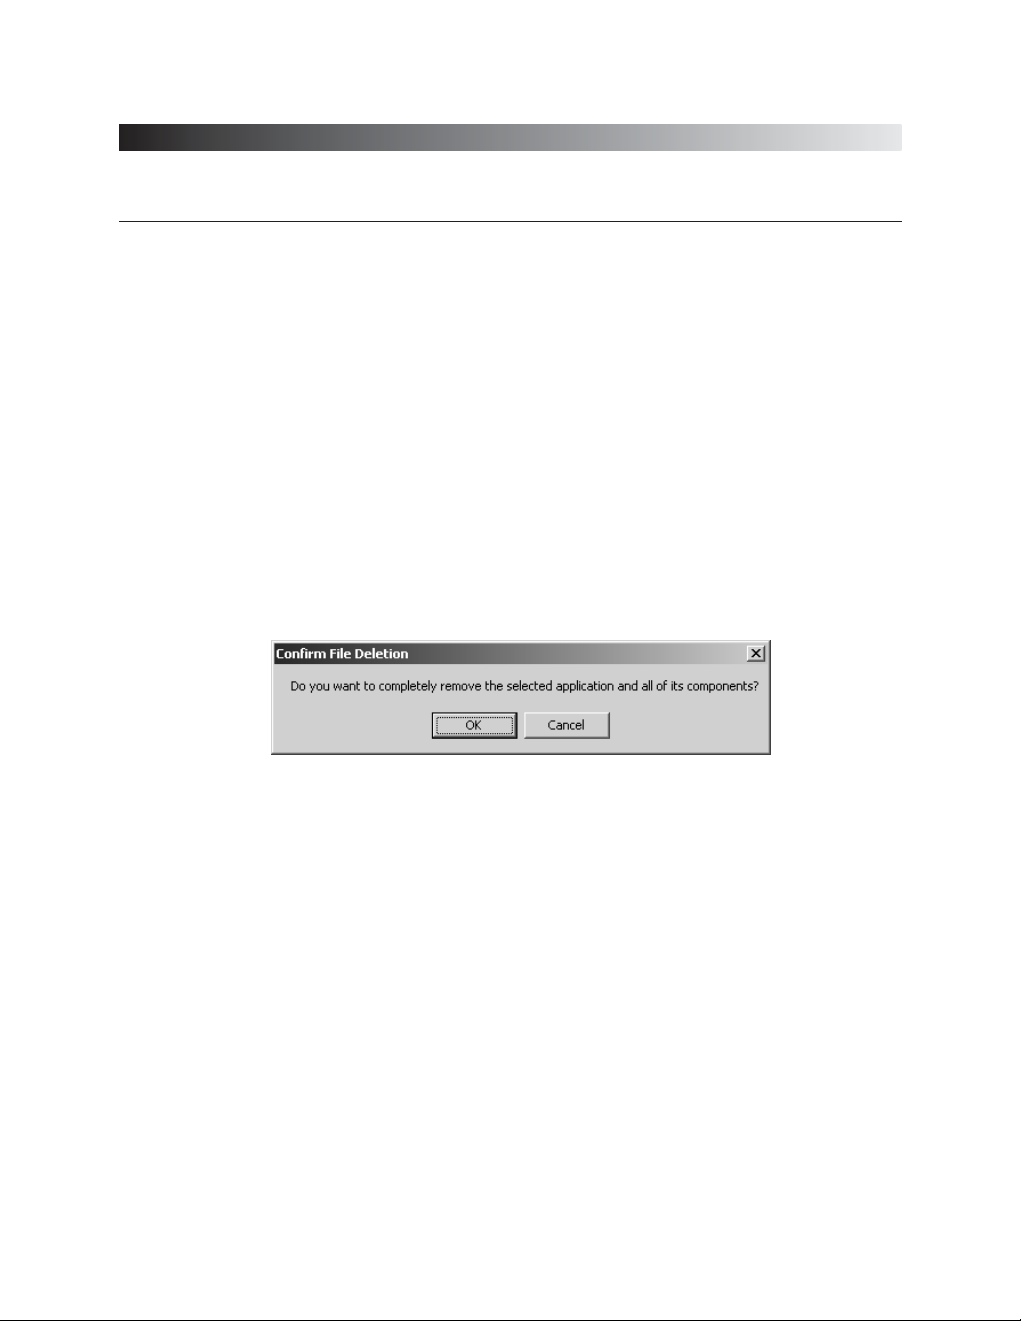
2. You will see the screen shown below when all of ViRobot Advanced Server components
are removed. Select one of the options. Click Finish button.
[ Figure 2-10 Uninstallation is Completed ]
Page 32

Page 33

Chapter 3.
ViRobot Advanced Server
At A Glance
Starting Your ViRobot
Basic Screen Configuration
How To Detect And Remove Virus In Your Computer
How To Disinfect Virus In Your Mailbox
Configuration
Monitoring
MacRobot
Updating Your ViRobot
Scheduler
Page 34

ViRobot Advanced Server
34
CHAPTER 3. VIROBOT ADVANCED SERVER AT A GLANCE
Starting Your ViRobot
To run V iRobot Advanced Server after installation, follow the steps described below.
1. Click Start button on the taskbar.
2. Move the mouse pointer on Programsand hold for a second. You will see program groups.
3. Select the folder named ViRobot Advanced Server and then click ViRobot Advanced
Server.
[ Figure 3-1 Start ViRobot ]
Note : You can also double click ViRobot Advanced Server icon on your
desktop, or select Start and click ViRobot Advanced Server on the taskbar.
Page 35

ViRobot Advanced Server
35
CHAPTER 3. VIROBOT ADVANCED SERVER AT A GLANCE
Basic Screen Configuration
When you start the ViRobot Advanced Server starts, you will see the logo screen. Click the
logo screen to display ViRobot Advanced Server initial screen. After five seconds without
clicking, it will automatically disappear .
The basic V iRobot Advanced Server basically has the components such as Menu bar, Toolbar,
Shortcut bar, Folder Frame, Function Frame, and Select All/Repair button, Scan Frame, and
Repair Frame.
[ Figure 3-2 ViRobot Frames ]
Menubar
Folder Frame
Shortcut bar
Toolbar
Scan Frame
Repair Frame
Function Frame
Select All/Repair Button
Engine Version
Page 36

ViRobot Advanced Server
36
CHAPTER 3. VIROBOT ADVANCED SERVER AT A GLANCE
⍥⍥
Menu bar
Menu bar holds every ViRobot Advanced Server functions.
⍥⍥
Toolbar
This GUI component shows you the most frequent actions of ViRobot Advanced Server.
⍥⍥
Shortcut bar
Check the hard drive or folder you want to check without selecting menu.
⍥⍥
Folder Frame
Use this frame to select a drive or folder you want to check.
⍥⍥
Function Frame
Issue a command to the drive or folder selected from Folder Frame.
⍥⍥
Select All/Repair Button
Use this button to repair any viruses found by virus scan.
⍥⍥
Scan Frame
When you select a drive or folders and click Start Search button, this frame shows current file
and scan related information.
⍥⍥
Repair Frame
Show any virus information found during scan.
⍥⍥
Engine Version
Show the current version of ViRobot Advanced Server.
Page 37

ViRobot Advanced Server
37
CHAPTER 3. VIROBOT ADVANCED SERVER AT A GLANCE
␊␊
Menu bar
Select basic commands of ViRobot Advanced Server from this menu bar.
⍥⍥
Scan
ῇ My Computer : Select this menu to go to My Computer toolbar.
Ὲ Mailbox : Select this menu to go to Mailbox toolbar.
Έ Scan Now : Select this menu to scan selected directory or file.
Ὴ Select All : Select this to select all virus-infected list after scanning.
Ή Repair Selected Files : Select this menu to repair the files you selected from virus infected list.
ῌ My Folder : Select this to specify folders or files that you want to scan frequently in the scan
list.
῍ Refresh My Computer : Select this menu to reload the list on My Computer.
῎ Refresh Mailbox : Select this menu to reload the list into the Mailbox frame.
῏ Exit : Select this menu to exit from ViRobot Advanced Server.
⍥⍥
Utilities
ῇ Configuration : Click this menu to set or modify ViRobot Advanced Server’s configuration.
Ὲ Backup Bin : Use this menu to store the virus in the backup folder or send it to us.
Έ Update Wizard : This Update Wizard will guide you to update your engine for the latest
definitions.
Ὴ Schedule Wizard : Use this wizard to schedule virus scan and update regularly.
Ή Select Language : Select this menu when you want to select other interface language.
Page 38

ViRobot Advanced Server
38
CHAPTER 3. VIROBOT ADVANCED SERVER AT A GLANCE
⍥⍥
View
ῇ MacRobot : Select this menu to go to MacRobot window.
Ὲ Virus Library : Select this menu to see virus library that ViRobot Advanced Server can detect
and remove.
Έ ViRobot Calendar : Select this menu to bring up a window that shows viruses and their
active dates in calendar.
Ὴ Activity Log : This menu shows previous virus scans and its results.
Ή Update Info : Select this menu to view updated information and virus list.
⍥⍥
Manager
ῇ Real-time Monitoring : This menu provides real-time computer virus monitoring.
Ὲ Client Management : This menu shows information about the PC engines and service pack
when you use ViRobot client products (such as ViRobot Professional and ViRobot Expert)
on your client PCs.
Έ System Info : This menu shows system components and their information.
⍥⍥
Help
ῇ About ViRobot : Select this menu to see customer information and product version.
Ὲ ViRobot Help : Use this menu to view the online help for using ViRobot Advanced Server.
Page 39

ViRobot Advanced Server
39
CHAPTER 3. VIROBOT ADVANCED SERVER AT A GLANCE
⍥⍥
Toolbar
ῇ My Computer : Use this button to detect and remove viruses in your computer.
Ὲ Mailbox : Use this button to detect and remove viruses in your Mailbox.
Έ Configuration : Use this button to set or modify ViRobot Advanced Server configuration.
Ὴ Monitoring : This button to provide real-time computer virus monitoring function.
Ή MacRobot : Use this button to detect and remove macro viruses when you open a document
file from Office 2000 (Word, Excel, or PowerPoint), Internet Explorer 5 or above.
ῌ Update : Use this button to update your ViRobot engine.
῍ Schedule : Use this wizard to schedule virus check and update regularly.
῎ Help: Use this button to go to ViRobot Advanced Server Help Menu.
Note : ViRobot Self-test When you start ViRobot, it detects and removes
any virus in the currently running process, memory, boot sector, and the
ViRobot itself. Thus safe virus scan is available after this ViRobot self-test
is completed.
Page 40

ViRobot Advanced Server
40
CHAPTER 3. VIROBOT ADVANCED SERVER AT A GLANCE
How To Detect And Remove Virus In Your
Computer
The initial start screen of ViRobot Advanced Server is My Computer window. Detect viruses
and repair files in your system here. You can get to this window to detect and remove virus by
clicking My Computer () icon, while you are working on other tasks of V iRobot window.
␊␊
Scanning Viruses
[ Figure 3-3 Scanning Viruses ]
Page 41

ViRobot Advanced Server
41
CHAPTER 3. VIROBOT ADVANCED SERVER AT A GLANCE
1. Select folders or drives you want to scan in Folder Frame.
ῡ To do this, click the box ( ) next to the drive or folder that you want to scan.
You will see the box of the selected drive or folder changes to checked box shape ( ).
ῢ To select any subfolders, click ( ) of the drive or folder to display the subfolders.
Repeat ῡ to select a folder you want.
ΰ To select all drives and their folders, click Select Drives and Folders button( ).
2. Click Scan Now ( ) button in the Function Frame to start virus scan.
ῡ When the scanning begins, you will see the file name in progress, number of checked files,
and number of infected files in the Scan Frame.
ῢ To stop the current scan in progress, click Stop ( ) button in the Function Frame.
3. The Result of Scan window appears when the scan is completed.
You will see various information about the search in this window. .
[ Figure 3-4 Scanning Result ]
You can see various information about
the search in this window.
Page 42

ViRobot Advanced Server
42
CHAPTER 3. VIROBOT ADVANCED SERVER AT A GLANCE
␊␊
Repairing Infected Files
If any virus is detected in virus scan, you will see the number and the list of infected files in Repair
Frame.
1. Select the files that you want to repair from the infected file list in the Repair Frame.
ῡ Click the checkbox ( ) on the row that you want to repair.
You will see the box change to a checked box ( ).
ῢ To select all items in the list, click Select All ( ) button.
2. Click Repair ( ) button after you select all items you want from the list.
[ Figure 3-5 Infected List ]
Page 43

ViRobot Advanced Server
43
CHAPTER 3. VIROBOT ADVANCED SERVER AT A GLANCE
3. When you see a dialog box that asks you for repair options, select the proper option you want.
4. Check to see if the file is repaired in repair window when the repair process is completed.
[ Figure 3-6 Repair a virus ]
[ Figure 3-7 Repair Result ]
Repair this file.
Repair all files
without asking.
Do not repair this file. Cancel all repair process.
Page 44

ViRobot Advanced Server
44
CHAPTER 3. VIROBOT ADVANCED SERVER AT A GLANCE
␊␊
My Folder
The My Folder ( ) at the right of the Function Frame allows you to specify folders
and drives for virus scan. It will reduce scan time because you can narrow your scan to necessary
area depending on your particular system environment.
1. Click My Folder in Function Frame.
2. On the wizard window, enter the name for the list and click Next button.
[ Figure 3-8 My Folder Scan Wizard ]
Enter the
scan name.
Page 45

ViRobot Advanced Server
45
CHAPTER 3. VIROBOT ADVANCED SERVER AT A GLANCE
3. Select folders or files to specify and click OK button.
4. You will see the folders and files you have selected are added to the Folder Frame.
[ Figure 3-9 Select Folders and Files ]
[ Figure 3-10 My Folder ]
You will see all
selection is
added in the
Folder Frame.
Check if the list has
been created as
you selected.
Add files
to the list.
Click OK outton if
everything is correct.
Add folders
to the list.
Page 46

ViRobot Advanced Server
46
CHAPTER 3. VIROBOT ADVANCED SERVER AT A GLANCE
Note :
Messages on the Repair Frame after repair has been completed.
Repaired : The infected files are safely repaired.
Fail to Repair : Repair has failed. Please send the files to HAURI
Customer Center.
Deleted : The file has been deleted because they were infected by overwriting type or backdoor type virus. These files are created by viruses and
have nothing to do with your system.
Overlapped : In ViRobot Advanced Server, the file that is infected by
several viruses should be repaired for several times. You will see this
message when you stop the repair in the middle of the process. It indicates
that the file is not completely recovered from viruses. Select these files to
repair them again.
Access denied: In case of viruses exclusively for Windows, the file is often
not accessible. When you see this message, use clean booting disk and
run ViRobot for DOS for repair.
Page 47

ViRobot Advanced Server
47
CHAPTER 3. VIROBOT ADVANCED SERVER AT A GLANCE
Repair after decompression : You see this message when a
compressed file can be diagnosed but not be repaired. Decompress the file
into a temporary folder and use ViRobot Advanced Server to detect and
repair the file again.
Repair after decryption : Sometimes the macro virus documents are
locked with a password. The ViRobot Advanced Server cannot repair these
files. Please unlock the document and try again.
New Virus : You will see this message when any new virus is found.
Please send the file to HAURI Customer Center so that we can send the
repair pattern back to you.
Suspected : You will see this message when ViRobot Advanced Server
detects the virus by using unknown virus detection functions. Please send
the file to HAURI. We will send the result back to you.
Page 48

ViRobot Advanced Server
48
CHAPTER 3. VIROBOT ADVANCED SERVER AT A GLANCE
How To Disinfect Virus In Your Mailbox
Select Mailbox ( ) in the ViRobot Advanced Server toolbar to detect and repair the
attachments to the mails that are already received. The check and repair method is almost the
same as the method you use in My Computer window.
␊␊
Scanning Viruses in the Mailbox
1. Select the mailbox you want to scan in Folder Frame.
ῡ If you cannot see the mail folder, click Refresh ( ).
ῢ To select the whole mailbox, click Select Mail Folder ( ) in the Folder Frame.
Only Inbox is supported in Outlook Express.
[ Figure 3-11 Mailbox Scan ]
Page 49

ViRobot Advanced Server
49
CHAPTER 3. VIROBOT ADVANCED SERVER AT A GLANCE
2. Click Scan Now ( ) button in the Function Frame to start a scan.
ῡ When the scan begins, you will see the file name in progress, number of checked files, and
number of infected files in the Scan Frame.
ῡ To stop current scan in progress, click Stop ( ) button in the Function Frame.
3. The Result of Scan window appears when the scan is completed. You will see various
information about the scan in this window.
␊␊
Repairing Infected Files
If any virus is detected in virus search, you will see the number and the list of infected files in Result
of Scan window. You cannot directly remove the virus within the mailbox. Check any infected
mail in the list, and save the attached file with another name and disinfect the virus using ViRobot
Advanced Server again.
[ Figure 3-12 Mailbox Scan Result ]
You can see various
information
about the search in
Scan Frame.
Page 50

ViRobot Advanced Server
50
CHAPTER 3. VIROBOT ADVANCED SERVER AT A GLANCE
In this Manual, we assume you are using Microsoft Outlook Express 5. The same method for
saving the attached files is used for Microsoft Outlook 97 or Microsoft Outlook 2000.
1. Check if you have any virus-infected file in ViRobot Advanced Server Repair Frame.
2. Find the mail with the virus infected file attachment in Microsoft Outlook Express.
[ Figure 3-13 Infected E-Mails ]
[ Figure 3-14 E-mail containing Virus ]
Check if you have any virus
infected file in the list.
Mail containing virus.
Page 51

ViRobot Advanced Server
51
CHAPTER 3. VIROBOT ADVANCED SERVER AT A GLANCE
3. Double click the mail with the file attachment when the mail window appears. Click the file
attachment using right button of the mouse and select Save Asᴎ
4. Save the file attachment in the temporary folder that you have created in advance. Use ViRobot
Advanced Server to detect and repair the temporary folder again.
[ Figure 3-15 Save the Attachments ]
Save As
Note 1 :
In Microsoft Outlook Express, only Inbox appears in the Folder Frame.
However, all the folders will appear as for Microsoft Outlook 97 or Microsoft
Outlook 2000.
Note 2 :
You cannot use mailbox scan function when you use other e-mail software
such as Netscape Messenger and Eudora.
Page 52

ViRobot Advanced Server
52
CHAPTER 3. VIROBOT ADVANCED SERVER AT A GLANCE
Configuration
Select Configuration ( ) on ViRobot Advanced Server toolbar to set-up its operating
environment. The configuration of ViRobot Advanced Server consists of Scanner, Startup,
Mail, Excluded Zone, and Options.
␊␊
Scanner
You can set up operating environment for virus detect and repair. Any configuration you set here
will be applied when you scan virus in My Computer and Mailbox.
␊␊
When virus is found
⍥Repair automatically : The ViRobot Advanced Server will remove the virus found without
asking.
⍥Create Activity Log : Check this option to save the list on the Repair Frame to a file.
See Activity Log section of the manual.
[ Figure 3-16 Configuration-Scanner ]
Page 53

ViRobot Advanced Server
53
CHAPTER 3. VIROBOT ADVANCED SERVER AT A GLANCE
⍥Enable Sound: Check this to sound when a virus is found.
␊␊
If incurable file :
⍥Delete File : To delete the file if it is an incurable over-writing type virus.
␊␊
Advanced Scan
⍥Include Subfolder: Include subfolders for virus scan.
⍥Backup the infected: Check this box to save repaired file in Backup Bin.
Refer to Backup Bin in this manual for instructions to recover, delete, or transmit the saved files.
⍥Compressed Files : Check this box to specify if you want to check the inside of a compressed
file.
The number below indicates how many levels should be decompressed for scanning if the
compressed file has several compression levels.
[ Figure 3-17 Advanced Scan ]
Specify how many
levels you want to scan
in a compression file.
Page 54

ViRobot Advanced Server
54
CHAPTER 3. VIROBOT ADVANCED SERVER AT A GLANCE
␊␊
Search Coverage
⍥
All Files : Scan all files.
⍥
Executables : Scan only executable files (.exe, .com, or .dll).
⍥
MS-Office Files : Scan only document files (.xls, .doc, or .ppt).
⍥
User’s Extensions : Scan only user-defined files. To set user-defined fields and files.
1. Click Extensions button.
2. Type the file extension and click Add button.
3. Check that your input has been added in the User Defined Extensions window.
[ Figure 3-18 Scan Coverage ]
Click here.
[ Figure 3-19 User's Extension ]
Click here.
Page 55

ViRobot Advanced Server
55
CHAPTER 3. VIROBOT ADVANCED SERVER AT A GLANCE
␊␊
Mail
Set options related to search on mailbox. The option you set here is applied to your mailbox.
⍥I want to scan
ῇ All email attachments : To scan the attachments of all the mails in the mailbox.
Ὲ Only unread email attachments : To scan the attachments of the mails, which are not read
yet. You can check this option to reduce scanning time.
[ Figure 3-20 Configuration - Mail ]
Page 56

ViRobot Advanced Server
56
CHAPTER 3. VIROBOT ADVANCED SERVER AT A GLANCE
␊␊
Excluded Zone
Specify items that will not be included for virus detection.
1. Select files or folders to be excluded from scan.
2. Check if those items you selected have been included in List of Excluded.
3. To remove a particular item, select the item and click Delete button.
[ Figure 3-21 Configuration - Excluded zone ]
Excude from the
detection list items to be
excluded from detection.
Select files to be
excluded from scan.
Select folders to be
excluded from scan.
Page 57

ViRobot Advanced Server
57
CHAPTER 3. VIROBOT ADVANCED SERVER AT A GLANCE
␊␊
Options
Set the options of ViRobot Advanced Server. You can set right mouse button scan and options for
MacRobot.
⍥
R-Mouse : Check this box to enable the scan function of the right button of your mouse.
⍥
MacRobot : Check this box to enable MacRobot functions.
⍥
Messenger Service : Check this box to receive a warning message when real-time monitor
detects and repairs any virus.
⍥
IP Tracking : Check this box to display IP Address when real-time monitor detects or repairs
any virus.
[ Figure 3-22 Configuration-Options ]
Page 58

ViRobot Advanced Server
58
CHAPTER 3. VIROBOT ADVANCED SERVER AT A GLANCE
␊␊
Resident Scan
⍥
Files that you want to scan : Check off real-time scanning options includes All Files,
Executables, MS-Office Files, and User’s Extensions.
⍥
Folders in this list will not be scanned for virus : Click ‘Add Folder’ button to select a folder to
be excluded from real-time scanning.
[ Figure 3-23 Configuration-Resident Scan ]
Page 59

ViRobot Advanced Server
59
CHAPTER 3. VIROBOT ADVANCED SERVER AT A GLANCE
Monitoring
The real-time monitoring function of ViRobot Advanced Server on all files provides 100%
detection and repair of computer virus, thus the efficient and safe management of Windows
NT/2000 Advanced server .
The upper frame shows the information about files currently in use and their status (scanning,
infected, repaired, deleted, backup and engine version).
The lower frame shows the detect/repair status of infected files.
[ Figure 3-24 Monitoring ]
Page 60

ViRobot Advanced Server
60
CHAPTER 3. VIROBOT ADVANCED SERVER AT A GLANCE
MacRobot
Select MacRobot () from V iRobot Advanced Server toolbar to use MacRobotfunctions.
MacRobot detects and removes macro viruses when you open a document file (Word, Excel,
or PowerPoint) in Office 2000, Microsoft Internet Explorer 5 or above.
␊␊
Microsoft Office 2000
⍥This program checks for any virus infection when you open a document file (Word, Excel, or
PowerPoint) in Microsoft Office 2000.
⍥When the infected file is found, you will be asked if you want to repair it.
⍥Select Yes to repair the document and open it.
[ Figure 3-25 MacRobot ]
Make sure if this
box is checked.
The result list of
the MacRobot
virus scan is
displayed here.
Page 61

ViRobot Advanced Server
61
CHAPTER 3. VIROBOT ADVANCED SERVER AT A GLANCE
␊␊
Internet Explorer 5.0 or above
The program checks for virus when you open a document in Internet Explorer 5. You will see a
window as shown below when you try to open virus-infected document. Save it in a temporary
folder and use ViRobot Advanced Server to repair it.
Page 62

ViRobot Advanced Server
62
CHAPTER 3. VIROBOT ADVANCED SERVER AT A GLANCE
Updating Your ViRobot
Select Update ( ) on toolbar to update your ViRobot Advanced Server.
ViRobot Advanced Server supports FTP and HTTP protocol so that the users using firewall or
proxy function can upgrade perfectly. Also, it supports every type of Internet access including
leased line such as LAN.
␊␊
LAN users
1. Select Internet in Update Type and click Next button.
[ Figure 3-26 Select Path ]
Select Internet.
Page 63

ViRobot Advanced Server
63
CHAPTER 3. VIROBOT ADVANCED SERVER AT A GLANCE
2. Select the server name and click Next button.
⍥Update ViRobot Advanced Server and Clients: Select this option when you have installed
ViRobot client product in client PCs and the PCs are connected to NT server to provide
ViRobot engine and service pack.
⍥Update only ViRobot Advanced Server: Select this option when you update only ViRobot
Advanced Server.
[ Figure 3-27 Select the Server ]
Select one from
HAURI A,HAURI B,
HAURI C, HAURI D,
or other server for the
server name.
Page 64

ViRobot Advanced Server
64
CHAPTER 3. VIROBOT ADVANCED SERVER AT A GLANCE
3. Select the protocol and click Next button.
[ Figure 3-28 Select Path ]
Note 1 :
The file you will receive for update is the same from FTP or HTTP.
Note 2 :
Check Proxy only if you are using proxy server or firewall.
Contact your administrator for server and port number.
Select HTTP if you are
an individual user.
Page 65

ViRobot Advanced Server
65
CHAPTER 3. VIROBOT ADVANCED SERVER AT A GLANCE
4. Wait until the transmission is completed. It may take some time depending on the network
bandwidth.
5. Click Finish button when the transmission is finished.
6. After you finish update, start ViRobot Advanced Server and check if the engine is updated
properly.
[ Figure 3-29 Getting Files ]
[ Figure 3-30 Update is Finished ]
You can see the
update progress.
You can see the
update information
Page 66

ViRobot Advanced Server
66
CHAPTER 3. VIROBOT ADVANCED SERVER AT A GLANCE
␊␊
Update by Using Floppy Disk
If you have no way to connect with external systems
but you have other systems that have LAN connection, you can update your engine using Floppy
Disk function.
1. After the update is finished in the Internet accessible system, click Floppy Disk.
2. Insert a diskette in the system and click Start. To finish the progress, click OK after the copying
[ Figure 3-31 Select Floppy Disk ]
[ Figure 3-32 Creating Update Disk ]
Click here.
Select
Floppy Disk.
Page 67

ViRobot Advanced Server
67
CHAPTER 3. VIROBOT ADVANCED SERVER AT A GLANCE
to diskette is completed.
3. Run ViRobot on the system you want to update and select Floppy Disk from Update Path and
click Next button.
4. Insert the 3.5 floppy diskette you made above in the Drive A.
5. Click Finish button after copying update file is completed.
6. Start ViRobot Advanced Server and check if the engine is updated properly.
[ Figure 3-33 Select Floppy Disk ]
Select
Floppy Disk.
Page 68

ViRobot Advanced Server
68
CHAPTER 3. VIROBOT ADVANCED SERVER AT A GLANCE
␊␊
PC Update
When the access to external network is not available, use PC Update to download the up-to-date
engine. First, you should have a system that has access to an external network and is already
updated to the latest version.
1. Make Update folder under ViRobot directory shared in the updated PC.
2. Select PC Share in Update path and click Nextbutton.
3. Click the folder icon ( ) to find the update file in internal network.
[ Figure 3-34 Select PC Sharek ]
[ Figure 3-35 Find Update Files ]
Select
PC Share.
Page 69

ViRobot Advanced Server
69
CHAPTER 3. VIROBOT ADVANCED SERVER AT A GLANCE
4. Find the user name that shares the file from user list and expand its tree. Select the Update folder
from shared folders of Updated PC and click OK button.
5. Click Finish button after copy of update file is completed.
6. Start ViRobot Advanced Server and check if the engine is updated properly.
[ Figure 3-36 Find Shared Folder ]
Note : Update Using Start with previous settings
If you have updated ViRobot at least one time, use the previous settings for
later update. In this way, you don't have to set up your update configuration
each time when you update the engine.
Find and click the shared ViRobot
Adranced Server Update folder.
Page 70

ViRobot Advanced Server
70
CHAPTER 3. VIROBOT ADVANCED SERVER AT A GLANCE
Scheduler
Select Schedule ( ) on ViRobot Advanced Server toolbar to set time for update and virus
scanning. You will see a window as shown below when you start Schedule Wizard for the first
time. T o add a schedule, click Add button. or, to click Deletebutton.
[ Figure 3-37 Schedule Wizard ]
Note :
S ( ) indicates the search and U ( ) indicates the update in the list.
Added items will
be shown here.
You can schedule for
virus scans and update.
Select an item and press
this button to delete it
Page 71

ViRobot Advanced Server
71
CHAPTER 3. VIROBOT ADVANCED SERVER AT A GLANCE
␊␊
Scheduled Virus Scan
Scheduled Virus Scan function is to scan for viruses in your computer at the date and time you set.
Set the schedule at a time when the system is not busy so that you can scan for viruses without
impacting system load.
1. Select Add button in the initial screen and select Scheduled Virus Scan.
2. Set date and time.
[ Figure 3-38 Scheduled Virus Scan ]
[ Figure 3-39 Time Setting ]
Select Scheduled
Virus Scan.
Page 72

ViRobot Advanced Server
72
CHAPTER 3. VIROBOT ADVANCED SERVER AT A GLANCE
Daily : Set the time to scan viruses daily. We recommend that you set the time when the
system is not busy.
Weekly : Set the date to scan viruses weekly. We recommend that you set the date for virus
scan at least once a week.
Monthly : Set the date to scan viruses monthly. We recommend that you set this option
several times to scan viruses at least once a week. You may set a certain date.
Screen Saver : The program will start virus scanning when screen saver is activated on your
system. This facilitates more stable virus scans since it runs when you do not use the system.
3. Select drives and folders you want to check and click Done button.
4. Check the initial frame if the change you have made is applied.
[ Figure 3-40 Select Drives and Folders ]
Select drives and
folders to be scanned.
Page 73

ViRobot Advanced Server
73
CHAPTER 3. VIROBOT ADVANCED SERVER AT A GLANCE
␊␊
Scheduled Update
The Scheduled Update allows you to update your engine automatically by connecting to the
predefined server at the date and time you set. We update virus definition weekly, so set your
schedule accordingly.
1. Select Add button in the initial screen and select Scheduled Update.
2. Set date and time.
[ Figure 3-41 Scheduled Update ]
[ Figure 3-42 Time Setting ]
Select Scheduled
Update.
Page 74

ViRobot Advanced Server
74
CHAPTER 3. VIROBOT ADVANCED SERVER AT A GLANCE
3. Set access server and network configuration.
ῡ Access Server : Select one of HAURI A, HAURI B, HAURI C, HAURI D or Others for
access server unless you have to set otherwise.
ῢ Protocol : Choose either FTP or HTTP. HTTP is for an individual user.
ΰ Proxy : Set this option if you use proxy server. Contact your administrator for server and port
number.
4. Check the initial frame if the change you have made is applied.
[ Figure 3-43 Set the Server ]
Page 75

Page 76

Page 77

Chapter 4.
Using ViRobot Advanced Server
Client Management
System Information
Quick Scan Bar
Backup Bin
Virus Library
Virus Calendar
Activity Log
Update Info
Selecting Language
Page 78

ViRobot Advanced Server
78
CHAPTER 4. USING VIROBOT ADVANCED SERVER
Client Management
This screen shows engines and versions of service packs of ViRobot client products (such as
ViRobot Professional and ViRobot Expert) logged on the ViRobot Advanced Server so that
you can manage client PCs efficiently. To get to Client Management window, select Client
Management Option from Manager in the Menu bar .
[ Figure 4-1 Client Managemen ]
Page 79

ViRobot Advanced Server
79
CHAPTER 4. USING VIROBOT ADVANCED SERVER
System Information
This screen shows hardware, system configuration and information of your Windows
NT/Advanced server . To get to System Information window, select System Information option
from Manager in the Menu bar.
[ Figure 4-2 System Information ]
Page 80

ViRobot Advanced Server
80
CHAPTER 4. USING VIROBOT ADVANCED SERVER
Quick Scan Bar
Check the folder you want to scan in Quick Scan Bar in ViRobot Advanced Server without
using the mouse to check the folder .
␊␊
How to Use: [Drive Name] [Path] [File Name] [/Option]
␊␊
Option
⍥/A : Scan all files
⍥/S : Include subfolders for virus scan.
⍥/U : Remove viruses found without asking the user.
⍥/R : Print the report without repairing the infected file.
⍥/? : Show Help page for Quick Scan Bar.
␊␊
Examples
⍥To scan drive C only : C:
⍥To scan the folder C:\Windows: C:\WINDOWS
⍥To scan C:\WINDOWS\WIN.COM file: C:\WINDOWS\WIN.COM
⍥To scan C:\WINDOWS and its subfolders: C:\WINDOWS /S
⍥To scan all files in drive C: C: /A :
⍥To scan network share folder: \\John Doe\DOWN
[ Figure 4-3 SiteServer Settings ]
Enter the drive or
folder to check.
Page 81

ViRobot Advanced Server
81
CHAPTER 4. USING VIROBOT ADVANCED SERVER
Backup Bin
ViRobot Advanced Server backs up the file when it repairs the file. You can recover , delete, or
transmit the file in the Backup Bin. Activate backup option in Configuration ( ) and check
the backup checkbox to backup the files.
[ Figure 4-4 Backup Bin ]
Check this box to
make backup.
Note : The document files will be always backed up when they are
repaired regardless of Configuration setup.
Page 82

ViRobot Advanced Server
82
CHAPTER 4. USING VIROBOT ADVANCED SERVER
␊␊
Running Backup Bin
Select Utility, then, Backup Bin in ViRobot Advanced Server menu bar. When the Backup Bin runs
regularly, you will see a screen as shown below. The current backup files are also shown in this
window.
The Backup Bin contains Send, Empty, and Restore function.
⍥Send : Select this function to send files in the Backup Bin to us.
You will receive a report for the files from our Customer Support Team in 24 hours.
⍥Restore : Select this function to recover the file to its original folder.
If the repaired file is in the same folder, it will be overwritten.
⍥Empty : Select this function to remove the file from your system permanently.
You cannot recover the file deleted by this function.
[Figure 4-5 Backup Bin ]
Currently stored file list.
Page 83

ViRobot Advanced Server
83
CHAPTER 4. USING VIROBOT ADVANCED SERVER
␊␊
Sending a File to Us
If the file is damaged after you repair it, send the previous file in the Backup Bin to us and we will
send the analysis back to you.
1. Choose the file to send and click Send to HAURI ( ).
2. Select Yes when you see a dialog box that asks if you want to send.
[Figure 4-6 Select a File ]
[Figure 4-7 Send File to HAURI ]
Drag your
mouse to
select files.
Choose the file and
click Send to HAURI.
Select Yes to send the file
you have selected.
Page 84

ViRobot Advanced Server
84
CHAPTER 4. USING VIROBOT ADVANCED SERVER
3. Check if the file is sent successfully after transmission.
[ Figure 4-8 Check the Transmission ]
You will see the icon
changed to ( ) after
it is sent successfuly.
Page 85

ViRobot Advanced Server
85
CHAPTER 4. USING VIROBOT ADVANCED SERVER
Virus Library
Select Virus Library function to see information about all viruses that ViRobot Advanced
Server can detect and remove.
␊␊
Running Virus Library
Select View, then, Virus Library in ViRobot Advanced Server menu bar.
␊␊
Viewing Virus Library
You will see the Virus Library display window. Click the virus name you want to see in the virus
library frame.
[ Figure 4-9 Virus Library ]
Page 86

ViRobot Advanced Server
86
CHAPTER 4. USING VIROBOT ADVANCED SERVER
␊␊
Virus type
All Viruses : Select this option to see all viruses.
Boot Viruses : Select this option to boot viruses.
File Viruses : Select this option to file viruses.
Boot/File Viruses : Select this option to see viruses that damage boot and files at the same time.
Macro Viruses : Select this option to see macro viruses.
Windows Viruses : Select this option to see all viruses that are exclusively for Windows.
␊␊
Characteristics of Viruses
⍥⍥
Infected Area
N
COM/Macro : The viruses in the file virus list infect the files with .com extension, while those
in the macro virus list infect macro files.
N
EXE : This virus infects the files with .exe extension.
Master Boot : These viruses infect main boot sector.
DOS Boot : These viruses infect the DOS boot sector.
⍥⍥
Infected Type
Parasitic : It infects files at the beginning or end of the file.
Overwriting : Since these viruses overwrite the file, the file size does not change but you cannot
run the file normally.
Trojan Horse : It cannot duplicate itself but does harm to the system.
Linking : These viruses do not infect the file directly, but they change the beginning location of
a directory area.
Spawning : These viruses do not infect files directly. However, they use the execution order of
extension to create the virus with the same name as the .exe file but with .com extension.
Page 87

ViRobot Advanced Server
87
CHAPTER 4. USING VIROBOT ADVANCED SERVER
Memory : These viruses infect the memory.
Stealth : These viruses show the information of before infection to hide the infection when the
user requests for the information.
Encryption : These viruses encrypt themselves to make it difficult to detect them in anti-virus
programs.
Polymorphic : These viruses change their forms every time they infect files.
␊␊
Search by Virus Name
ViRobot Advanced Server offers you a function to find the information you want from the list
instantly. Enter the name of the virus in search input box.
[ Figure 4-10 Searching a Virus ]
Enter the virus
name directly.
Page 88

ViRobot Advanced Server
88
CHAPTER 4. USING VIROBOT ADVANCED SERVER
Virus Calendar
You can see activating date of virus and its information in the Virus Calendar. It is highly
likely that the virus operating in a certain date is very malicious. Be sure to check the
timetable frequently and scan your system before these kinds of virus wake up.
␊␊
Running Virus Calendar
Select View, then, Virus Calendar in ViRobot Advanced Server menu bar.
␊␊
Virus Calendar
You can easily see the virus and its operating date since the ViRobot Virus Calendar shows the
virus on its activating date. Click the date to see information about viruses that operate on that date.
[ Figure 4-11 Virus Calendar ]
Virus Information
Virus name
Active Date
Safe Date
Previous Month Today Next Month
Page 89

ViRobot Advanced Server
89
CHAPTER 4. USING VIROBOT ADVANCED SERVER
Virus Name : Click the virus operating date to see the virus name. If there are several viruses on
the date, each name will be displayed on the list. Click the virus name you want and you will see the
virus library at the right bottom frame.
Page 90

ViRobot Advanced Server
90
CHAPTER 4. USING VIROBOT ADVANCED SERVER
Activity Log
You can see the information that has been displayed in the Repair Frame after you have run
ViRobot Advanced Server. You can save the list with other name or print it in Activity Log.
Check Create Activity Log check box in Configuration( ) to maintain the information.
␊␊
Running Activity Calendar
Select View, then, Activity Log in ViRobot Advanced Server menu bar.
[ Figure 4-12 Create Activity Log ]
Check Activity
Log checkbox to
see activity.
Page 91

ViRobot Advanced Server
91
CHAPTER 4. USING VIROBOT ADVANCED SERVER
␊␊
Activity Log
If you have created the log file, you can see the information including infected files, item, and repair
status after you have scanned the files. You may also print or save the list with other name, if
necessary.
[ Figure 4-13 Create Activity Log ]
Delete the log file.
Reload the log file.
Page 92

ViRobot Advanced Server
92
CHAPTER 4. USING VIROBOT ADVANCED SERVER
Update Info
The Update Info. records the information of updated ViRobot Advanced Server engine. You
can check when you have updated your engine.
␊␊
Running Update Info
Select View, then, Update Info. in ViRobot Advanced Server menu bar.
␊␊
Update Information
If you have updated your engine at least once, check it in Update Info.
[ Figure 4-14 Update Info ]
Update file list.
Page 93

ViRobot Advanced Server
93
CHAPTER 4. USING VIROBOT ADVANCED SERVER
Selecting Language
Your ViRobot Advanced Server supports not only English but also other languages. We
support all languages with language packs.
␊␊
Running Select Language
Select Utility, then, select Language in ViRobot Advanced Server menu bar.
␊␊
Select Language
You can see the language is changed when you select another language and run ViRobot Advanced
Server again.
[ Figure 4-15 Update Info ]
Page 94

Page 95

References
Real-time Monitoring Service
Update Service
Setting Update Using NT Server
Symbols And Terminology
Definitions And Types Of Virus
How To Protect Your System Against Viruses
Page 96

ViRobot Advanced Server
96
REFERENCES
Real-time Monitoring Service
␊␊
Starting Manually
Click Start, and then click Setting. And select Service in Control Panel.
␊␊
Stopping Manually
Select ViRobot for WinNT(TM) Monitoring and click Stop button in the service screen to stop realtime monitoring service.
[ Figure 5-1 Start Real-Time Monitoring ]
Page 97

ViRobot Advanced Server
97
REFERENCES
Update Service
ViRobot Advanced server provides update service that you can update your client PC engine.
␊␊
Starting Manually
Click Start, and then click Setting. And select Service in Control Panel.
Select ViRobot for WinNT(TM) Update and click Start button to start update service.
␊␊
Stopping Manually
Select ViRobot for WinNT(TM) Update and click Stop button in the service screen to stop update
service.
Page 98

ViRobot Advanced Server
98
REFERENCES
Setting Update Using NT Server
If you manage client PCs by using Windows NT Server with single domain, you can only use
IP address and port number of the server to make it update server for all client PCs. However,
if your network is configured with multiple main domains with several Windows NT Servers,
you can set one system to share received information with other servers rather than connecting
all NT servers with external network. You can use this configuration in environments such as
followings:
␊␊
It is time consuming to connect all servers and client PCs to external
network for update due to slow network bandwidth.
␊␊
You want all of your uses to get fast update in closed network environment
or in the environment physically separated from external network.
␊␊
You need to update among NT servers in network environment with multiple
main domains.
Page 99

ViRobot Advanced Server
99
REFERENCES
␊␊
Setting up NT Server to provide update service
You do not need to setup FTP site for update in the network environment with single main domain.
The purpose of this function is to enable the system that cannot use Microsoft Network to access the
network to get updates. Set new FTP site with UPDATE folder under ViRobot with permission to
read. (Requires Windows NT 4.0 with Option Pack 4.0 or higher)
1. Select Start, and then click Internet Service Manager in Administrative Tools of Programs menu.
[ Figure 5-2 Internet Service Manager ]
Page 100

ViRobot Advanced Server
100
REFERENCES
2. Select Default FTP Site when you see Internet Information Services.
3. Click right mouse button and select Site from New menu. New FTP Site Wizard will start.
[ Figure 5-3 Click Default FTP ]
[ Figure 5-4 FTP Wizard ]
 Loading...