

Page 1

Princess Dear Diary...
The keepsake organizer!
Contents
Opening your Princess Dear Diary p.2
A Quick Look at Princess Dear Diary Icons p.3
How to Change the Batteries Without
Losing Your Stuff p.4-6
The Functions You Will Use p.7-8
Features:
Clock/Alarm p.9-10
Things to Remember p.11
Calculator p.12-13
Things to Do p.14-15
Friends & Family p.16-17
Password p.18-19
Stuff p.20
Troubleshooting p.21
Cautions p.22
Warranty p.23
1
Page 2
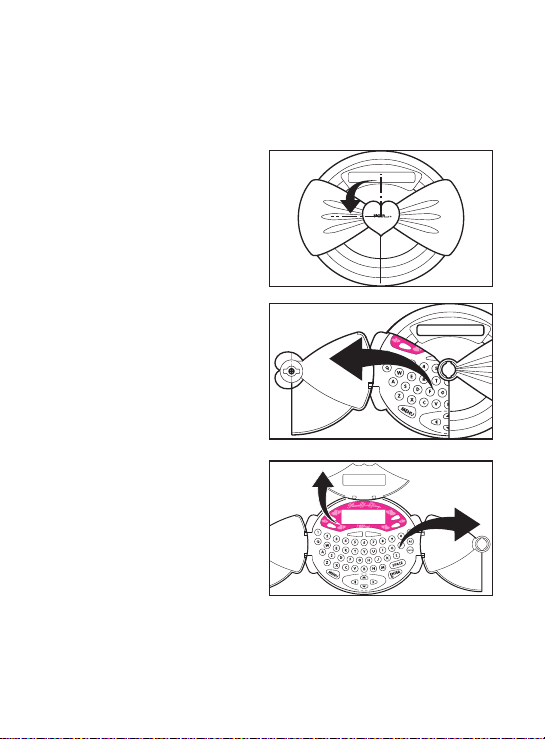
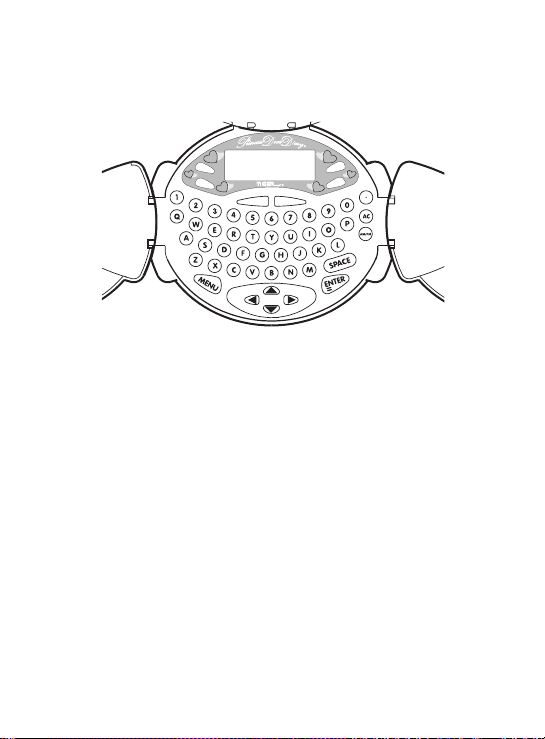
Opening Your
Princess Dear Diary
To open your
Princess Dear Diary, turn
the heart-shaped latch a
quarter turn to the left
and lift.
Open the left-hand locket
cover, then the right-hand
locket cover and finally,
the top locket cover. This
will display all the buttons
you will need to use your
Princess Dear Diary.
Close the covers in the
reverse order. To lock your
Princess Dear Diary, turn
the heart-shaped latch a
quarter turn to the right.
ON OFF
NOTE: The locket covers are designed to snap off the
base. This is to help prevent breakage. If any of the
covers snap off, just align the hinges and snap it back
on.
2
ON OFF
Page 3

A Quick Look at
Princess Dear Diary Icons
THINGS TO REMEMBER
You can save dated messages of fifteen
characters each.
CALCULATOR
You use this for basic math functions.
THINGS TO DO
You can save messages for an exact time
and date.
FRIENDS & FAMILY
You can save the names, phone numbers
and birthdays of special people.
PASSWORD
You can create a four character password
to protect your files from nosey people.
STUFF
You can save one list that holds up to fifty
characters.
CLOCK/ALARM
You can set and change the clock and the
alarm can remind you of an important
appointment.
3
Page 4
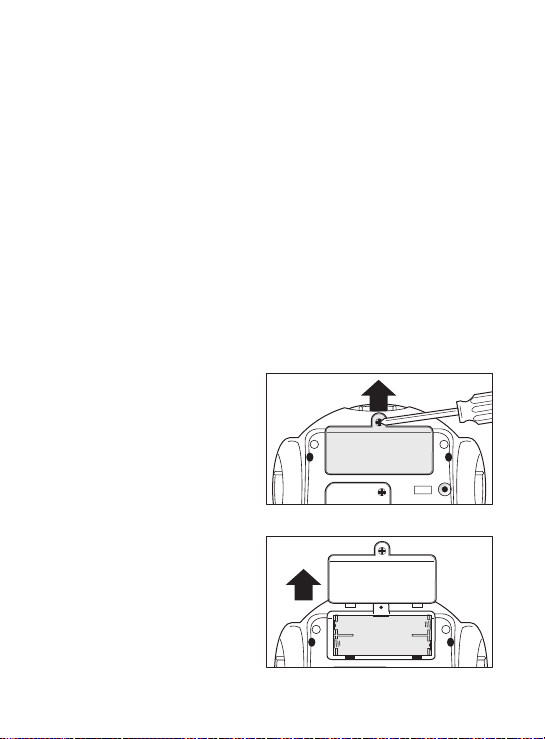
How to Change the Batteries
Without Losing Your Stuff
The Princess Dear Diary has main batteries and a
backup battery. The main batteries are two AAA
batteries that must be installed before you can use
Princess Dear Diary. The backup battery is a CR2032
“button cell” battery about the size of a nickel. It
provides power to hold your information if the AAA
batteries discharge completely.
Never remove all of the batteries at the same time or all
of your information will be erased!
Replacing the Main Batteries
Remove the screw from
the battery compartment
door using a phillips
screwdriver.
Lift and remove the
battery compartment
door.
®
4
Page 5
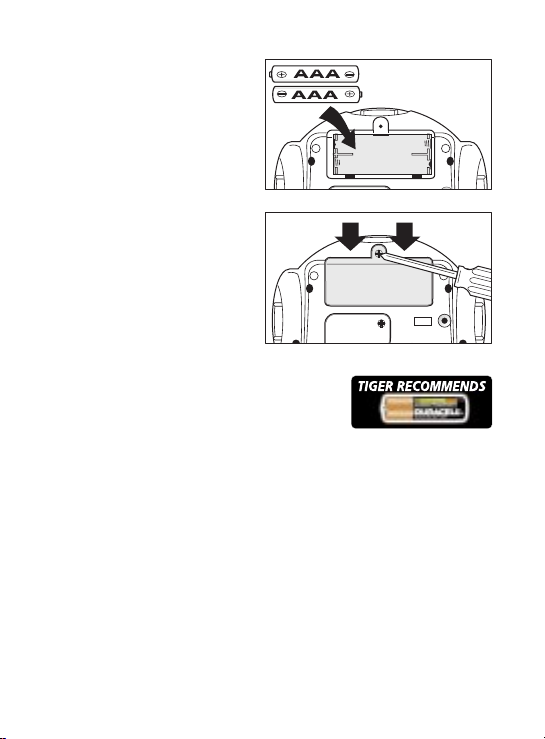
Insert the batteries,
making sure to align the
“+” and “-” signs.
Replace the battery
compartment door and
screw.
TO ENSURE PROPER FUNCTION :
– DO NOT MIX OLD AND NEW BATTERIES
– DO NOT MIX ALKALINE, STANDARD OR
RECHARGEABLE BATTERIES
– BATTERY INSTALLATION SHOULD BE DONE BY AN ADULT
– NON-RECHARGEABLE BATTERIES ARE NOT TO BE RECHARGED
– RECHARGEABLE BATTERIES ARE TO BE REMOVED FROM THE TOY
BEFORE BEING CHARGED (IF REMOVABLE)
– RECHARGEABLE BATTERIES ARE ONLY TO BE CHARGED UNDER ADULT
SUPERVISION
– ONLY BATTERIES OF THE SAME OR EQUIVALENT TYPE AS RECOM
MENDED ARE TO BE USED
– BATTERIES ARE TO BE INSERTED WITH THE CORRECT POLARITY
– EXHAUSTED BATTERIES ARE TO BE REMOVED FROM THE TOY
– THE SUPPLY TERMINALS ARE NOT TO BE SHORT-CIRCUITED
5
Page 6
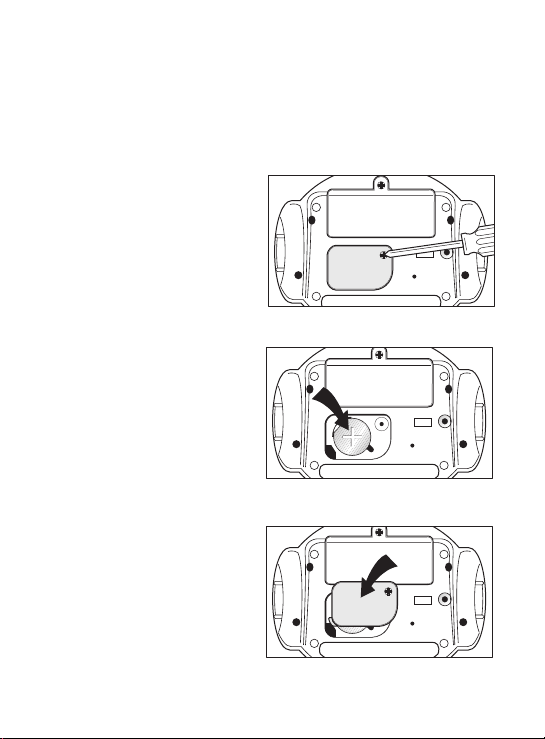
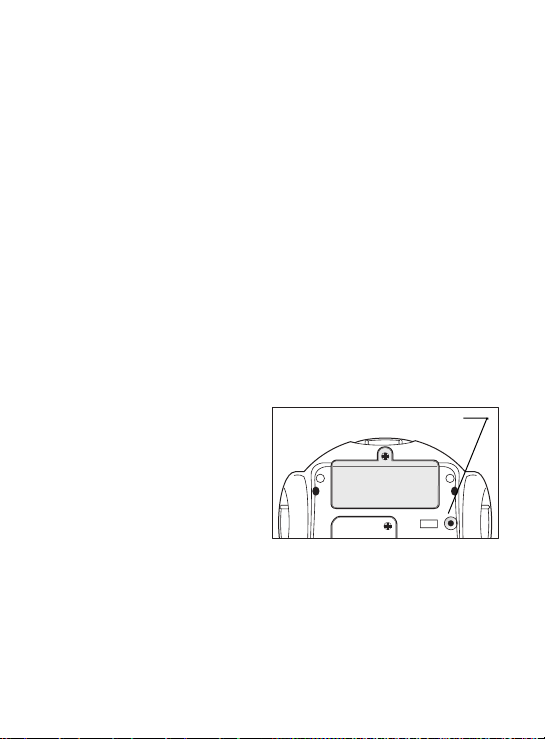
Replacing the Backup Battery
Note: This battery was installed at the factory and, with
normal use, should not need changing for 24 months
after you begin using your Princess Dear Diary.
Using a Phillips
®
screwdriver, remove the
screw on the small battery
compartment door. Lift
and remove the battery
compartment door.
Remove the CR2032
button cell battery and
replace it with one of
the same type. The “+”
should be facing you.
Replace the battery
compartment door and
screw.
6
Page 7
The Functions You Will Use
ON OFF
÷
x
–
+
Press the ON button and a clock face appears on the
screen. NOTE: The diary will NOT operate unless the
ON button is pressed.
Press EDIT when you want to change information that
is in your Princess Dear Diary and is showing on the
display. You can add or remove information using the
keyboard.
Press DELETE when you want to erase a character at
the underline cursor or erase an item from your
THINGS TO DO, THINGS TO REMEMBER, FRIENDS
& FAMILY or STUFF lists.
Press SEARCH when you have a list in Princess Dear
Diary and you want to look through it. If you press a
letter, followed by SEARCH, you will see the first
word that begins with that letter. (Very useful for
finding Zack’s number in the telephone directory.) If
you press SEARCH in the THINGS TO REMEMBER
mode, you will see your list in date order.
7
Page 8
Press QUIT to stop editing or reading the current list
and backup one level closer to the main menu.
Press MENU to jump right to the main menu.
Press the UP, DOWN, LEFT and RIGHT ARROWS to
make the calculator divide, add, multiply and subtract.
The ARROW keys are marked with the associated
calculator function.
Press AC or SPACE to clear the display and memory in
the calculator.
Press ENTER to make a selection when Princess Dear
Diary asks you to. In the CALCULATOR mode, use
ENTER for the equal sign.
Press ON to access the CLOCK/ALARM mode. Press
ENTER and the entire menu is shown.
Press OFF to turn off menu icons.
Note: The clock, day and date will be on the screen for
quick reference when you are not in a function mode.
Reset Operation :
RESET BUTTON
- By pressing the reset
button on the bottom of
the unit, you can delete
all the data previously
input. A message on the
screen will ask you,
CLEARALL?Y/N. By
pressing Y(yes) all data
will be deleted, N(no)
will return you to the
clock display screen.
- Be sure to press reset button and clear all data
before you use PRINCESS DEAR DIARY for the
first time.
8
Page 9

Clock/Alarm
Press MENU to see the
icon.
Use the LEFT or RIGHT
ARROW followed by
ENTER to select the clock
icon. You will know when
you are on that icon
because it will be flashing.
Press EDIT, the screen
will show CLOCK/ALARM
Press "C" for clock.
Enter the date using keys
0-9. Use two digits for the
month, two digits for the
day and the last two digits
of the year. Press ENTER
when date is correct.
Enter the time using keys
0-9. Use two digits for the
hour and two digits for the
minute. Press AM/PM to
activate AM or PM mode.
Press ENTER when time
is correct.
9
Page 10

To access the ALARM
function, go back to the
screen that shows
CLOCK/ALARM and press
“A” for alarm. Enter the
alarm time using keys 0-9.
Press ENTER when alarm
is correct. Press AM/PM to
activate AM or PM mode.
To activate the alarm,
select ON/OFF using the
ARROW keys.
Press ENTER to save the
alarm.
Note: When the alarm rings, press any key to turn it
off.
10
Page 11

Things to Remember
Press MENU to see the
icon.
Use the LEFT or RIGHT
ARROW followed by
ENTER to select the
THINGS TO REMEMBER
icon.
Enter the date to
remember using keys 0-9.
Press ENTER when date is
correct.
Type your message. Press
ENTER when you are
finished with the message.
To add more message,
repeat these steps as many
times as needed to enter
all your messages.
To look at your list, press
SEARCH or the DOWN
ARROW. The first date
and message appears.
Press the DOWN ARROW
to scroll through your list.
The list will sort
automatically placing the
earliest date first.
Press QUIT or MENU to return to the Main Screen.
11
Page 12

Calculator
ON OFF
Press MENU to see the
icons.
Use the LEFT or RIGHT
ARROW followed by
ENTER to select the
CALCULATOR icon.
Use the number keys and calculator function (ARROW)
keys to enter your problem.
NUMBER
KEYS
÷
x
–
+
CALCULATOR FUNCTION KEYS
12
Page 13

Use ENTER as the equal sign.
Use SPACE or AC to clear memory.
For example :
600 ÷ ( ) 25 = (ENTER)
÷
Display shows : 24
Next example : clear memory (AC or SPACE)
13 + ( ) 11 = (ENTER)
+
Display shows : 24
continuing the example with the last result:
x
x ( ) 25 = (ENTER)
Display shows : 600
Press QUIT or MENU to return to the Main Screen.
_
13
Page 14

Things to Do
Press MENU to see the
icons.
Use the LEFT or RIGHT
ARROW followed by
ENTER to select the
THINGS TO DO icon.
Enter the date to
remember using keys 0-9.
Press ENTER when the
date is correct.
Enter the time to
remember. Press ENTER
when the time is correct.
Press AM/PM to activate
AM or PM mode.
Type your message. Press
ENTER when you are
finished. To continue
entering items to list,
repeat these steps as often
as needed.
To look at your list, press
SEARCH or the DOWN
ARROW. The first date and
time appears.
14
Page 15

Press the DOWN ARROW
as many times as needed to
see your messages.
Press DELETE to erase
the message showing on
the display.
Press QUIT or MENU to return to the Main Screen.
15
Page 16

Friends & Family
Press MENU to see the
icons.
Use the LEFT or RIGHT
ARROW followed by
ENTER to select the
FRIENDS & FAMILY icon.
Type the name of the first
person on your list. Press
ENTER. Each name can be
up to 12 charactors long,
including spaces.
Enter the the person’s
telephone number using
keys 0-9, “ - ” and space.
Press ENTER.
Enter the person’s
birthday using keys 0-9.
Press ENTER.
To add more FRIENDS &
FAMILY repeat these steps
as often as needed.
16
Page 17

To review your list, press
SEARCH or the DOWN
ARROW. Press the DOWN
ARROW to scroll through
your list. The person’s
name and phone number
will appear first, then the
person’s name and
birthday.
Princess Dear Diary will
put your FRIENDS &
FAMILY in alphabetical
order based on the first
name typed. EXAMPLE: If
you enter Amy Jones and
Susie Bobbitt, Amy Jones
will appear first.
A faster way to find a
person is to press the first
letter (or letters) in the
name, then press SEARCH.
Press QUIT or MENU to return to the Main Screen.
17
Page 18

Password
Press MENU to see the
icons.
Use the LEFT or RIGHT
ARROW followed by
ENTER to select the
PASSWORD icon.
Enter any four characters
that you want to be your
password. Press ENTER.
Princess Dear Diary will
ask you to enter your
password again to make
sure it has the correct one.
Retype your password and
press ENTER.
(Your actual password will
not appear on the screen.
This is so that it stays a
secret.)
18
Page 19

Decide if you want your
password on or off, or if
you want to edit (change)
it. If you want it ON, press
ENTER. If you want it
OFF, use the RIGHT
ARROW to move the
cursor to OFF and press
ENTER.
If you want to EDIT it, use
the RIGHT ARROW to
move the cursor to EDIT
and press ENTER.
Princess Dear Diary will
display CHANGE TO.
Type your new password. then press ENTER. As
before, Princess Dear Diary will ask you to retype your
password to make sure it is correct. Type your
password again and press ENTER when you are
finished.
Your password will protect your privacy, preventing
other people from scrolling through your Princess Dear
Diary.
NOTE: DON'T FORGET YOUR PASSWORD. IF YOU
DO, YOU WILL NOT BE ABLE TO ACCESS ANY OF
YOUR FILES (YOU MAY WANT TO WRITE IT
DOWN IN A SPECIAL PLACE).
Press QUIT or MENU to return to the Main Screen.
19
Page 20

Stuff
Press MENU to see the
icons.
Use the LEFT or RIGHT
ARROW followed by
ENTER to select the
STUFF icon.
This file has room for fifty (50) characters in one
continuous line. To type as much stuff as you can in
fifty characters, use abbreviations. Press ENTER when
you are finished.
To see your STUFF list,
press the DOWN ARROW.
Press the RIGHT ARROW
to scroll through the line.
Press the LEFT ARROW to
scroll back.
Press QUIT or MENU to return to the Main Screen.
20
Page 21

Troubleshooting
SYMPTOM
Unit will not function
after initial battry
insertion.
Unit freezes or will not
turn off.
The screen becomes dim,
cursor movement slows or
functions do not work
consistently.
SOLUTION
RESET button on the back of
the unit MUST be pressed
before using for the first
time.
Press the RESET button on
the back of the unit.
“AAA” batteries require
replacement. Under normal
use, “AAA” batteries may
need replacement every 2-3
weeks. The backup button
cell battery should last at
least 2 years.
21
Page 22

Cautions
ON OFF
RESET
ON OFF
High temperature will destroy the
unit. Do not leave unit in direct
sunlight.
Do not press the liquid crystal
display and avoid heavy shock or the
display may fail.
Do not use a pencil or pin to press
the RESET button. Use a ball-point
pen.
Clean only with a piece of soft dry
cloth.
22
Page 23

90-DAY LIMITED WARRANTY
Tiger Electronics, Ltd. (Tiger) warrants to the original consumer purchaser of this product
that the product will be free from defects in materials or workmanship for 90 days from
the date of original purchase. This warranty does not cover damages resulting from
accident, negligence, improper service or use or other causes not arising out of defects
in materials or workmanship.
During this 90-day warranty period, the product will either be repaired or replaced (at
Tiger’s option) without charge to the purchaser, when returned with proof of the date of
purchase to either the dealer or to Tiger.
Product returned to Tiger without proof of the date of purchase or after the 90-day
warranty period has expired, but prior to one year from the original date of purchase,
will be repaired or replaced (at Tiger’s option) for a service fee of U.S.$10.00. Payments
must be by check or money order payable to Tiger Electronics, Ltd.
The foregoing states the purchaser’s sole and exclusive remedy for any breach of
warranty with respect to the product.
All product returned must be shipped prepaid and insured for loss or damage to:
The product should be carefully packed in the original box or other packing materials
sufficient to avoid damage during shipment. Include a complete written description of
the defect, a check if product is beyond the 90-day warranty period, and your printed
name, address and telephone number.
THIS WARRANTY IS IN LIEU OF ALL OTHER WARRANTIES AND NO OTHER REPRESENTATIONS OR CLAIMS OF ANY NATURE SHALL BE BINDING ON OR OBLIGATE TIGER IN
ANY WAY. ANY IMPLIED WARRANTIES APPLICABLE TO THIS PRODUCT, INCLUDING
WARRANTIES OF MERCHANTABILITY AND FITNESS FOR A PARTICULAR PURPOSE, ARE
LIMITED TO THE NINETY (90) DAY PERIOD DESCRIBED ABOVE. IN NO EVENT WILL
TIGER BE LIABLE FOR ANY SPECIAL, INCIDENTAL, OR CONSEQUENTIAL DAMAGES
RESULTING FROM POSSESSION, USE, OR MALFUNCTION OF THIS TIGER PRODUCT.
Some states do not allow limitations as to how long an implied warranty lasts and/or
exclusions or limitations of incidental or consequential damages, so the above
limitations and/or exclusions of liability may not apply to you. This warranty gives you
specific rights, and you may also have other rights which vary from state to state.
For more information about Tiger Electronics, our products and special promotions,
please visit our Web Site at: www.tigertoys.com
Tiger Repair Department
1000 N. Butterfield Road, Unit 1023
Vernon Hills, IL 6006l, U.S.A.
23
Page 24

INSTRUCTIONS
Model: 71-554
24
®
Page 25

®, TM & © 1999 Tiger Electronics, Ltd.
980 Woodlands Parkway, Vernon Hills, Illinois 60061, U.S.A.
www.tigertoys.com
PRINTED IN CHINA 715540001WTI-03
25
 Loading...